Table of Contents
- Navigating to the Account Management View Screen
- Account Management View Breakdown
- Main Account Header
- Overview
- Billing
Account Management View: Overview
 Updated
by Mitchell Paul-Soumis
Updated
by Mitchell Paul-Soumis
- Navigating to the Account Management View Screen
- Account Management View Breakdown
- Main Account Header
- Overview
- Billing
Read Time: 37 mins

The account view screen within Sonar houses current and historical information about the account, and also allows you to perform a variety of actions against an account. The screen is separated into a main header, which contains key details of the account (such as account type, status, name, etc.), and a side panel of tabs that you can cycle through (such as Billing, Network & Inventory, Correspondence, etc.). When within one of the side panel tabs, there may be additional tabs that you can cycle through at the top of that section as well. Each tab contains different sets of information regarding the account as well as different actions that you can take.
Navigating to the Account Management View Screen
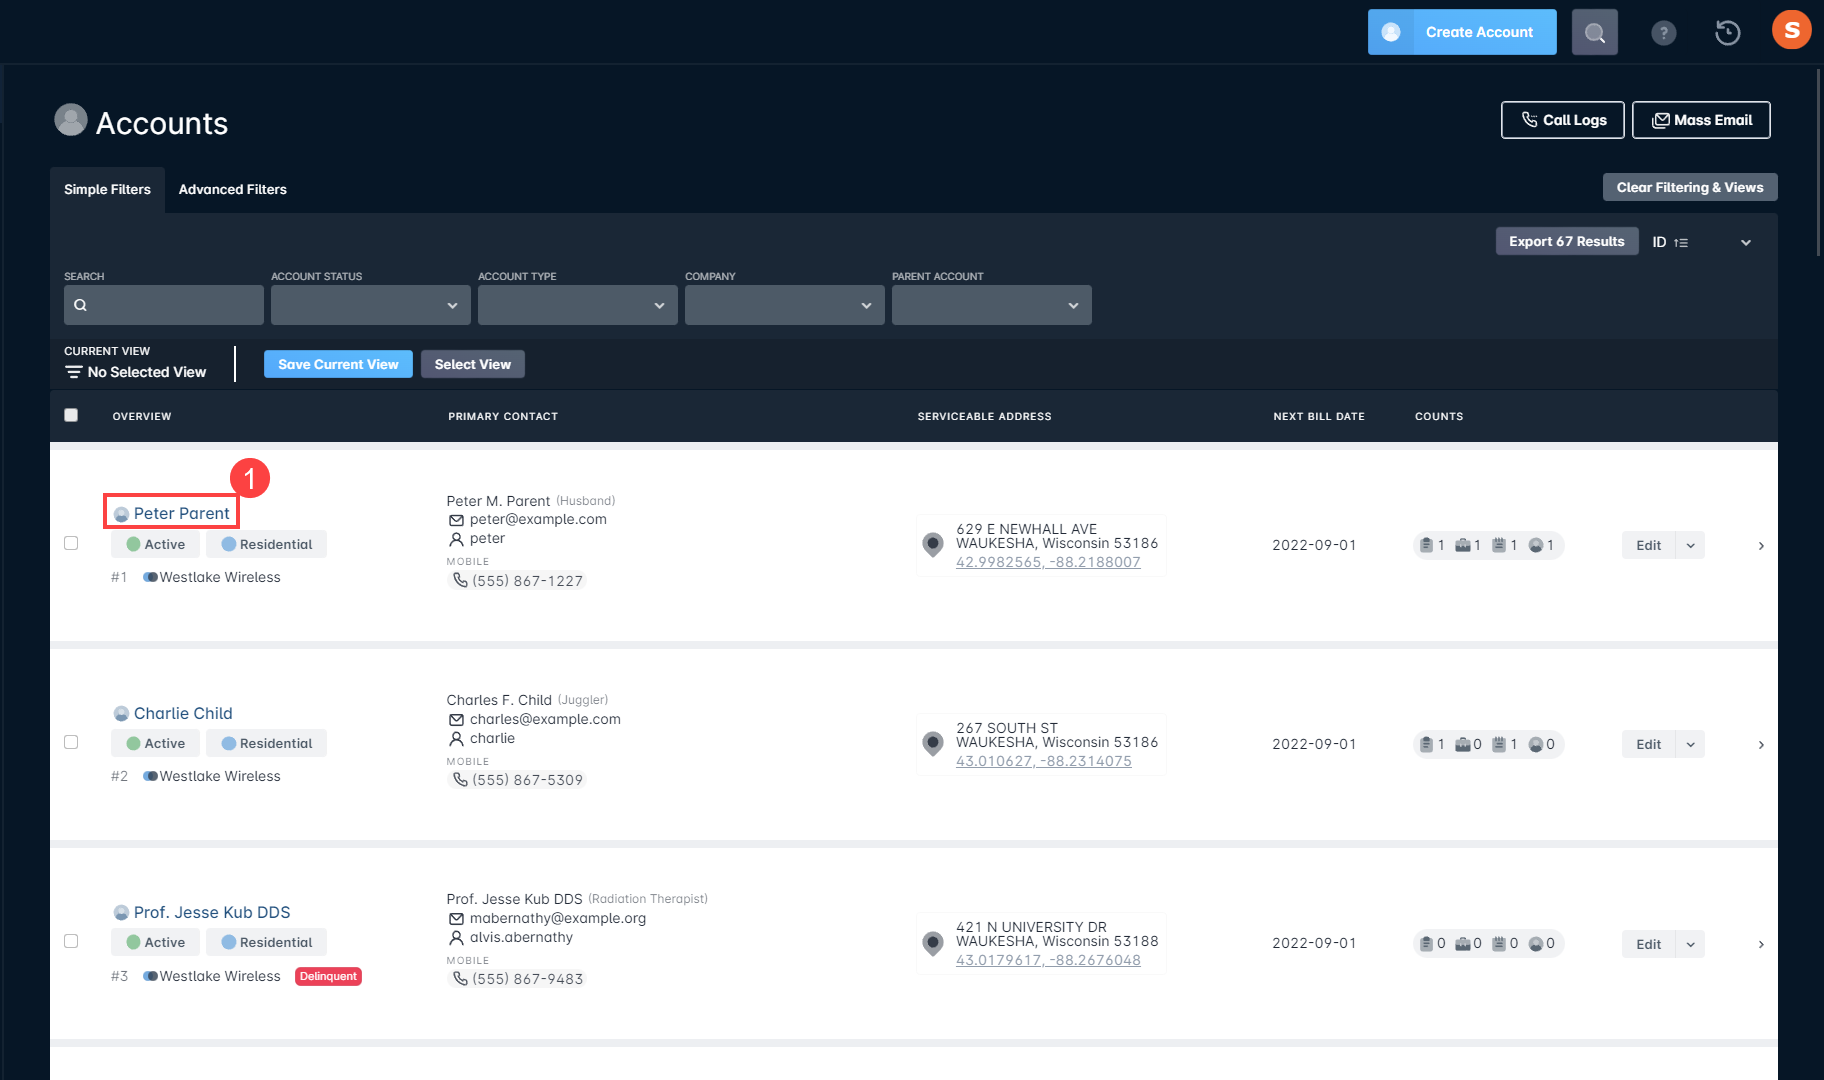
There are three main ways to navigate to an individual account's management view:
- From the main Accounts screen, click the name of the account, which will open the management view
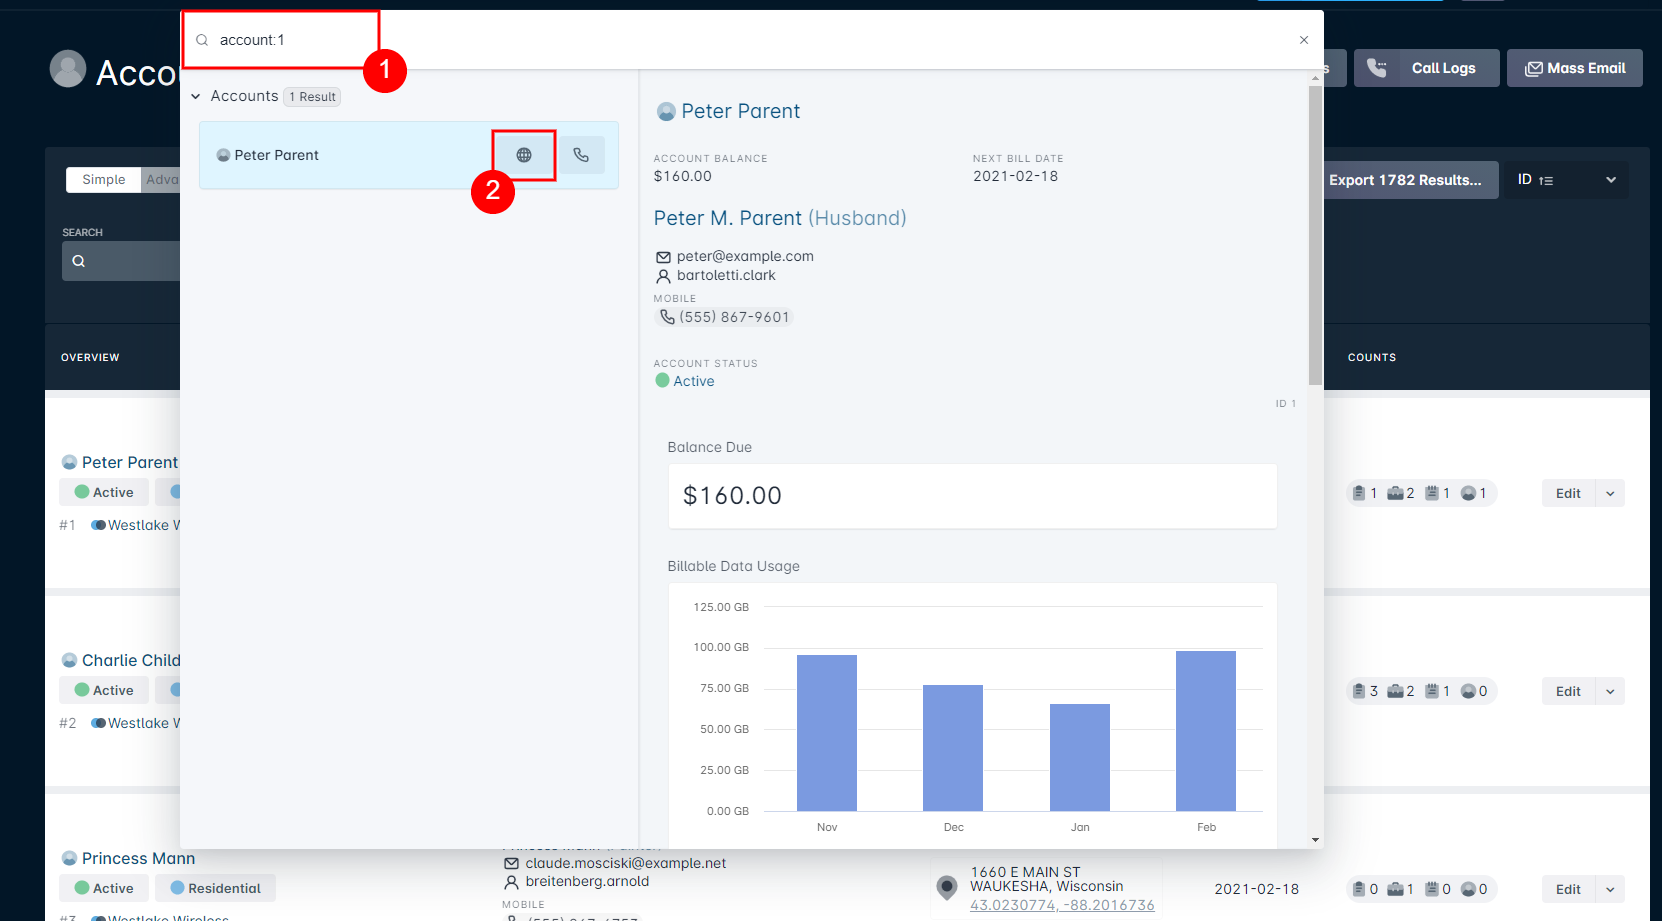
- Perform a global search for the account you are looking for, and from the results list that appears, click on the globe icon for that account
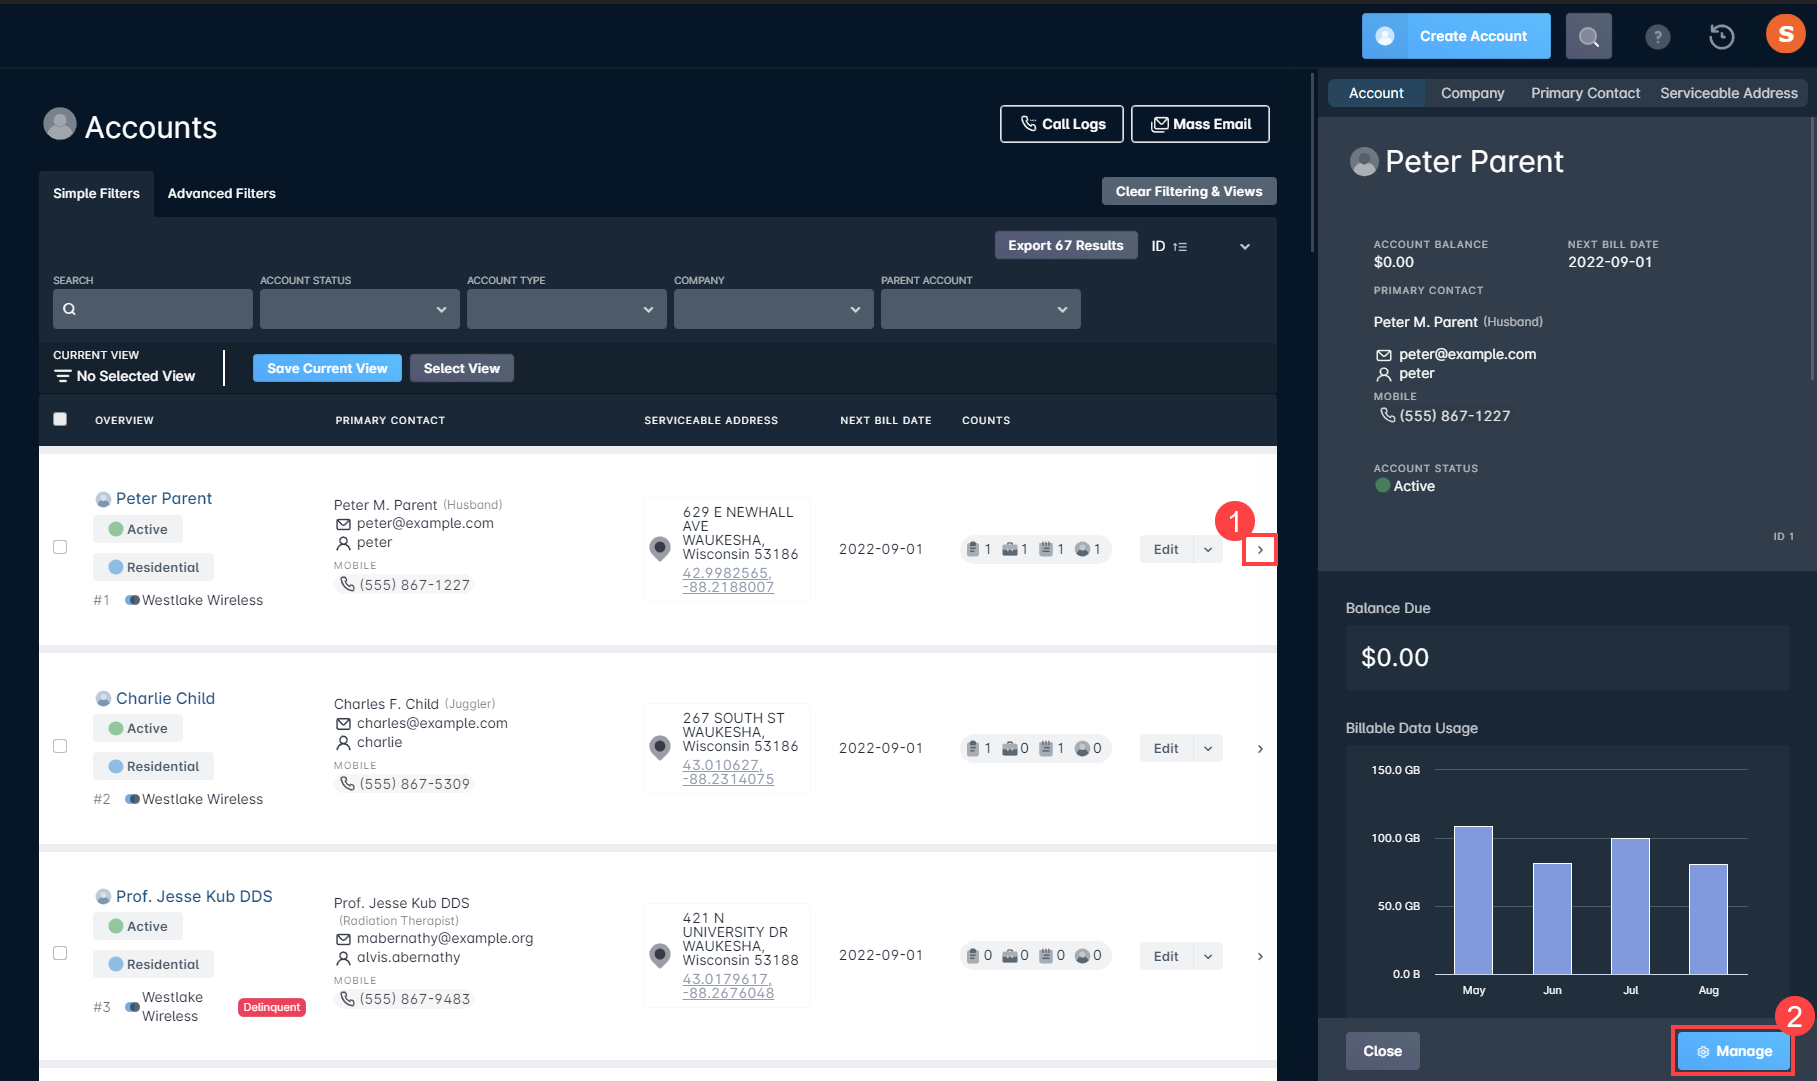
- Expand the side panel, and from the “Account” tab, click “Manage”
Account Management View Breakdown
Below you will find information for each section, tab and sub-tab of the account management view screen.
Main Account Header
The top panel of the account view screen will remain visible regardless of which account tab you navigate to. A breakdown of the information contained here is provided below.

- Account Name: This is the name of the account, which is usually the name of the account holder.
- Account Status: The current status of the account – clicking the status will open the Edit Account menu.
- Account Type: The type of the account – clicking the type will open the Edit Account menu.
- Account Group(s): Any groups that the account belongs to will be displayed here. If the account is not part of any groups, "[No Groups]" will be displayed instead.
- Account ID: The ID of the account – this is different from the ID of the account's primary contact.
- Location: The serviceable address associated with the account.
- Email: The email address of the account's primary contact.
- Child Account: If the account is a parent to one or more child accounts, the total number of associated child accounts will be displayed here.
Clicking on the number of accounts will open the sidebar panel that shows the names and account numbers of all linked accounts. Clicking on the account name from this sidebar will redirect you to the selected account.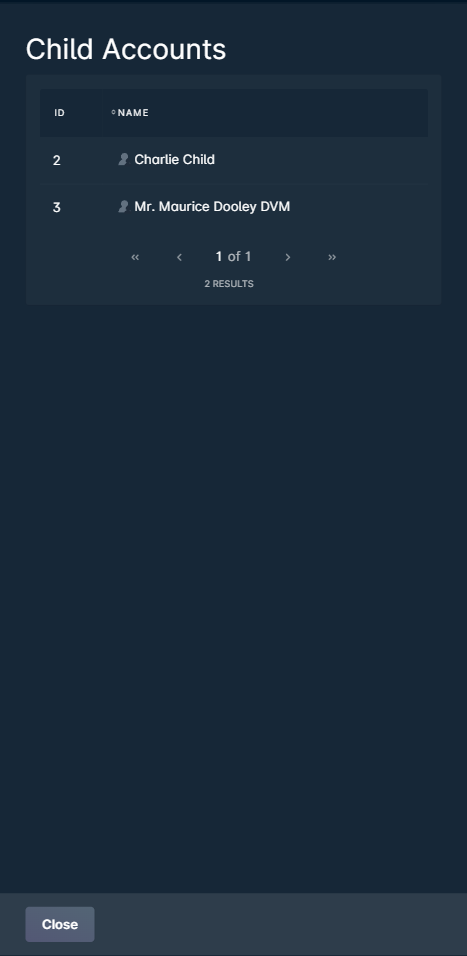 If you are viewing a child account (an account that has a parent account linked to it), the parent account will be displayed; clicking on the parent account name will open a sidebar panel containing further details for that account.
- Edit Menu: Clicking "Edit" will display the Edit Account window; clicking the arrow on the menu will display additional options, such as adding a call log, moving an IP assignment, linking/unlinking a parent account, and disconnecting the account.
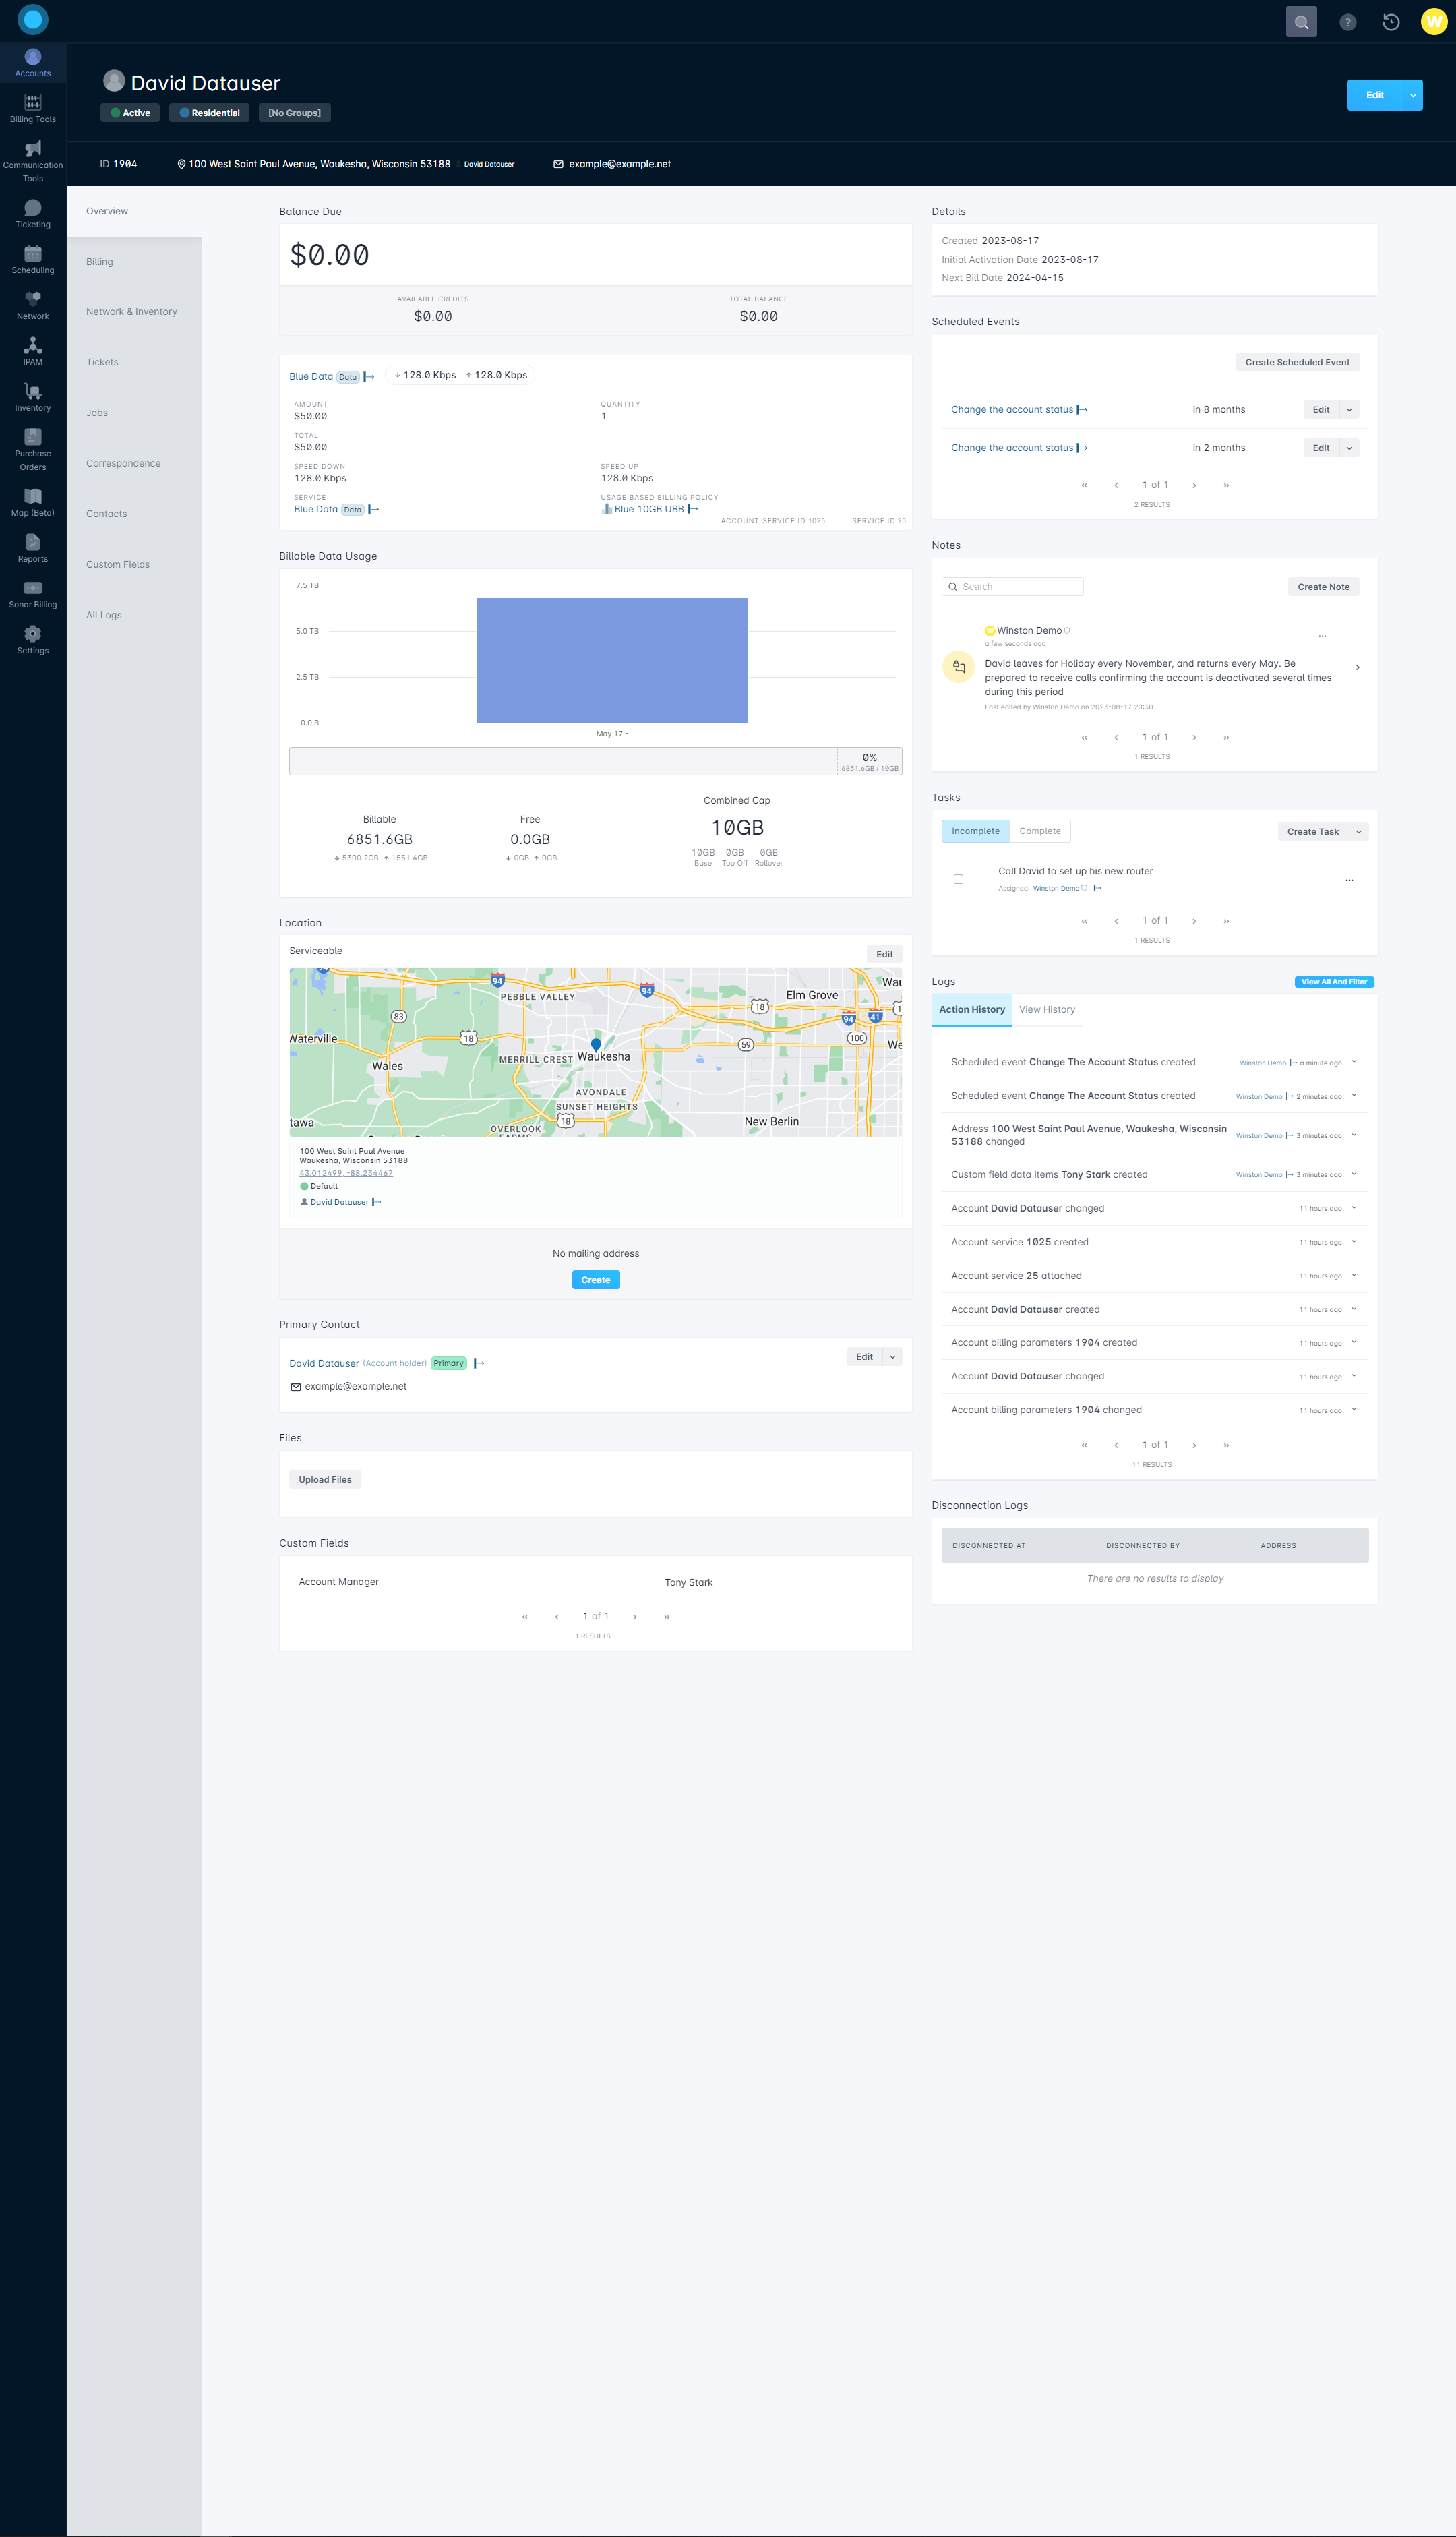
Overview
The Overview tab provides a quick glance of numerous important details of an account, from scheduled events to the total balance due, and is the tab that is displayed by default when you first navigate into an account.
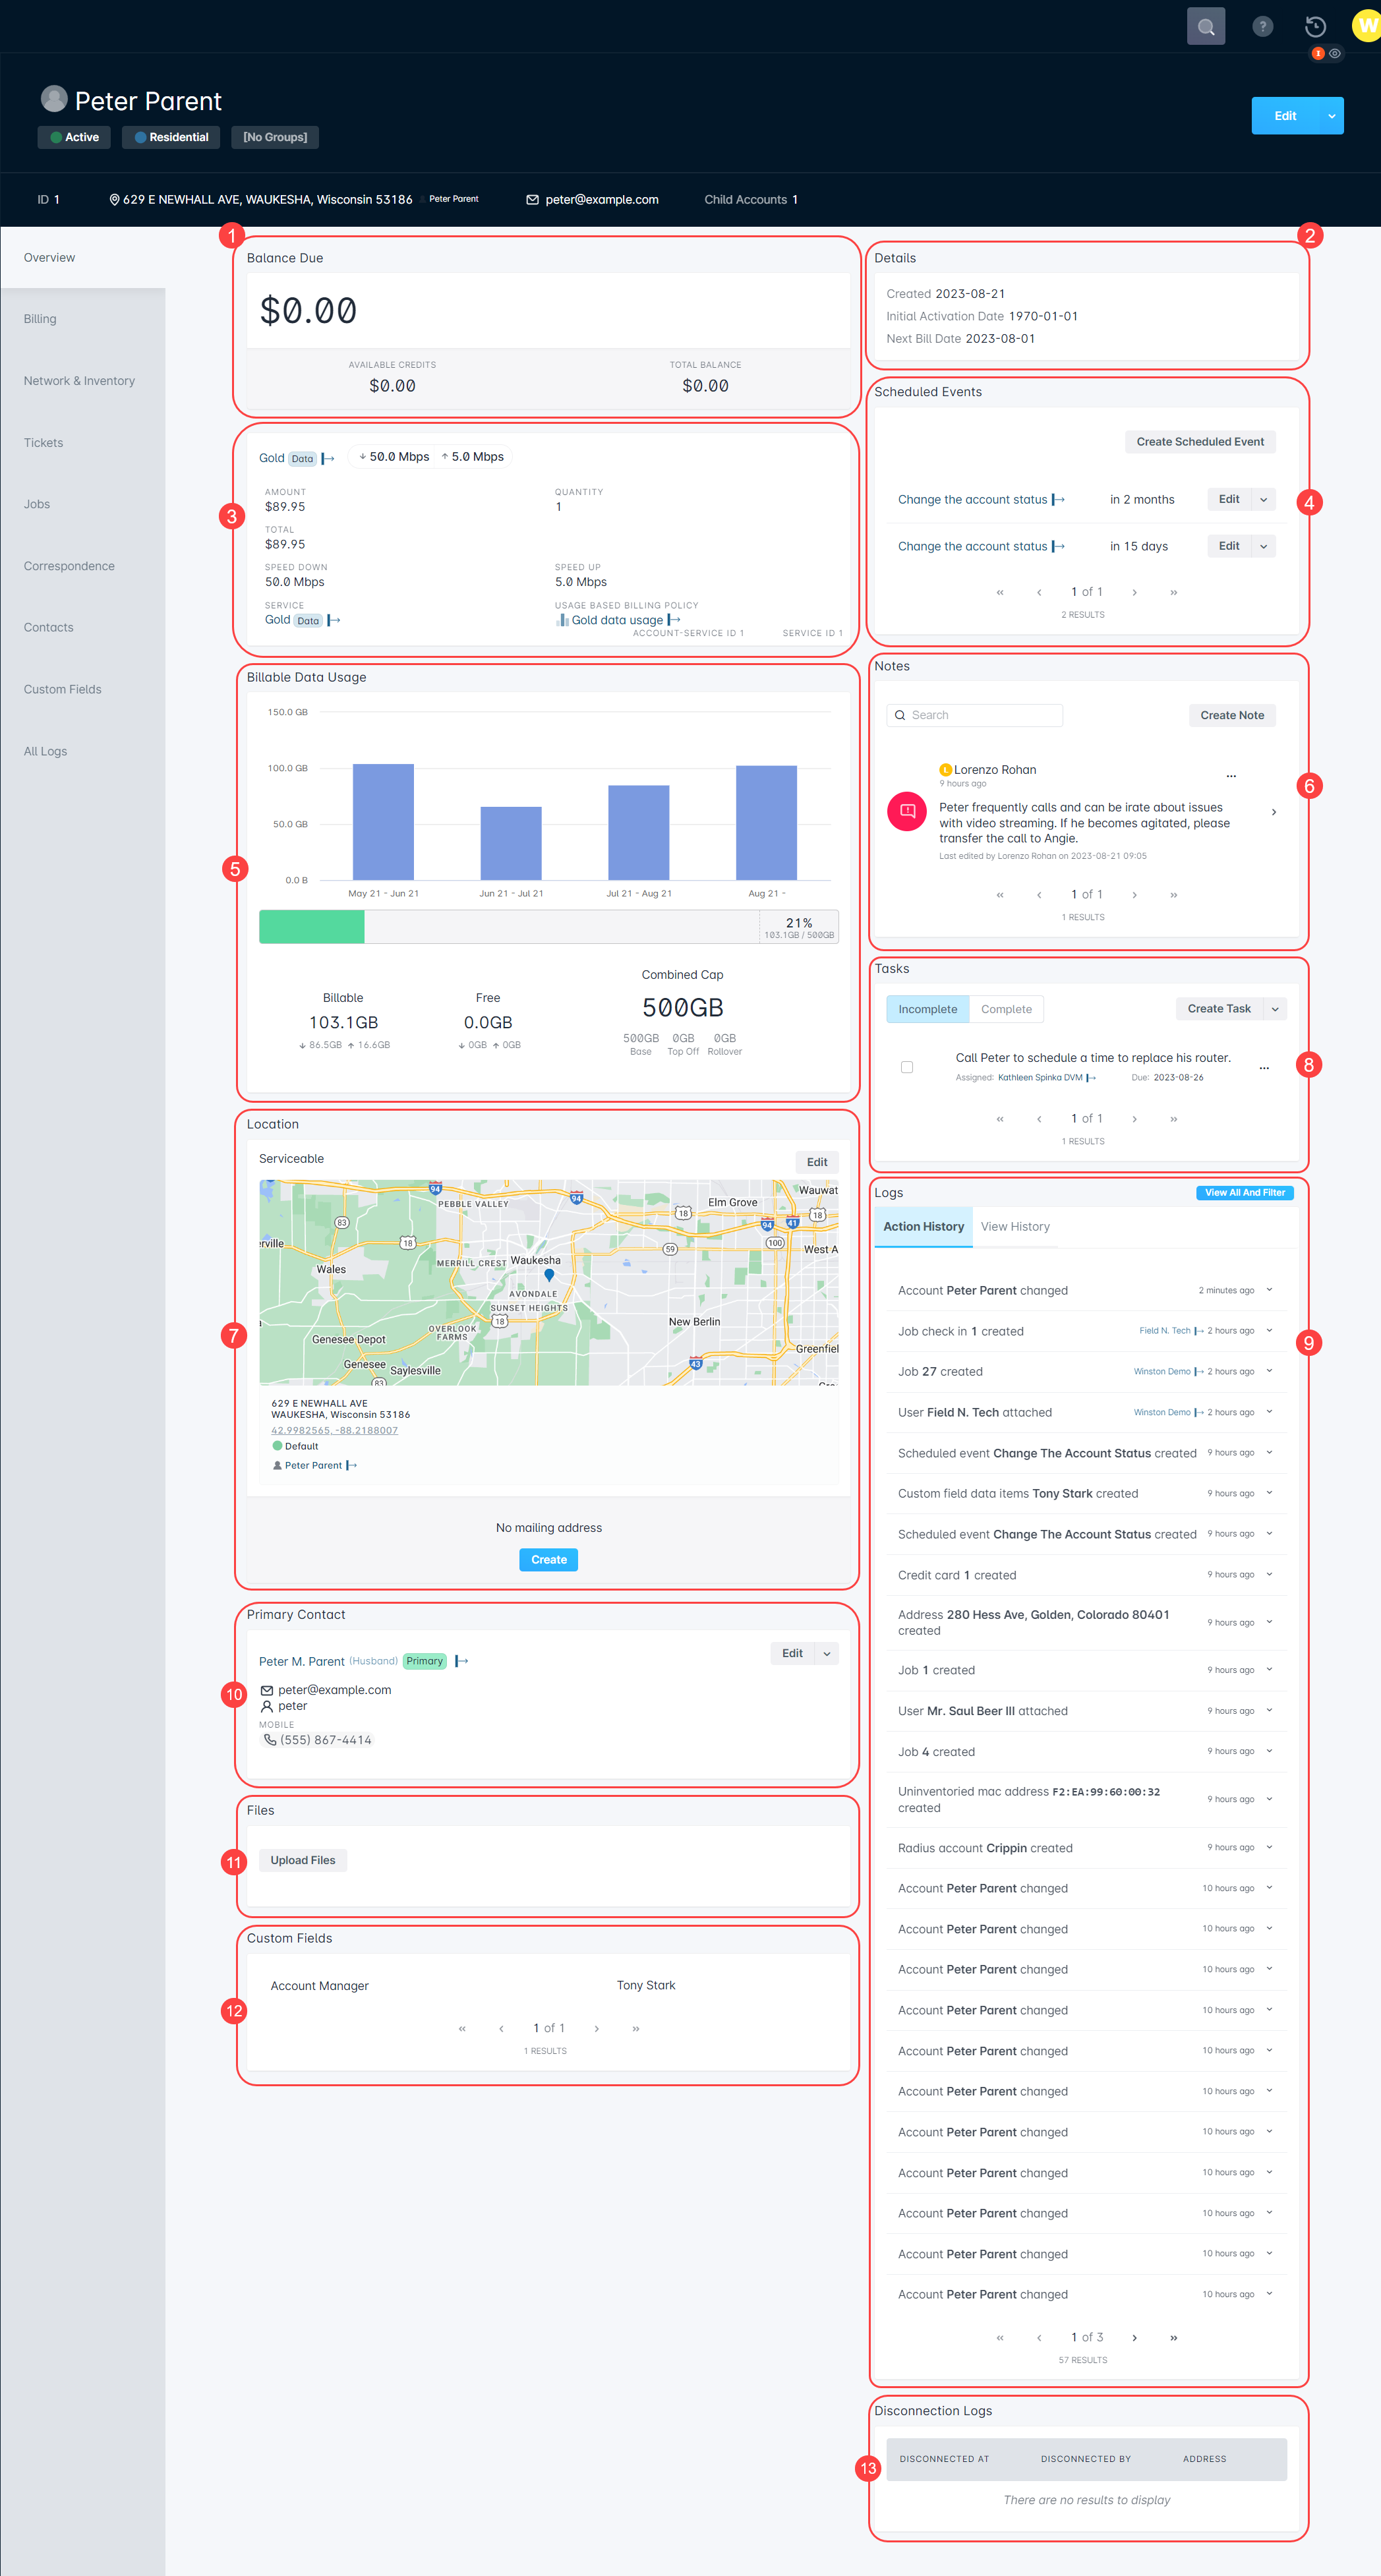
- Due Now: The account's currently due total is displayed here, along with the total balance on the account and any available credits that could be applied to the account.
- Details: Key details for the account, such as the date the account was created, when it was initially activated, and the next billing date, are displayed here to provide a quick reference to the viewer.
- Data Service: If there is a data service on the account, the details for that service will be displayed here, such as the service name, upload/download speeds, service price, quantity, and any associated usage based billing policy. Additional details can be viewed through a side panel, which can be opened by clicking on the service or usage based billing policy fields.
- Scheduled Events: Any existing scheduled events on the account will appear here, and this is also where you can set up a new scheduled event for the account, or edit/delete an existing one. To view the details for a scheduled event, click on the scheduled event name; the event's details will be displayed in the side panel.For more information on setting up scheduled events, check out the Scheduled Events: Overview and Use Cases article.
- Billable Data Usage: This area lets you view the amount of data that has been utilized by the account, if you are using Sonar in a way that allows it to collect data usage from the network. From here, you can view a breakdown of the current billable usage, free usage (if the account has a usage based billing policy with free periods defined), and a breakdown of the current data usage cap on the account (if one exists.) Through the "Top Off" button, you can add additional data to the account, so long as the account has a data service that is associated with a usage based billing policy and that policy allows for additional data to be added during the billing cycle.Hovering over the bars on the Billable Data Usage graph will display the total amount of data used for that specific month.
- Notes: Any notes created on this account will be displayed here; this is also where you can edit/delete an existing note, or create a new one.For more information on account notes, check out the Notes and Tasks: Best Practices and Use Cases article.
- Location: This is where both the account's serviceable address and mailing address, if present, are displayed. The serviceable address will be highlighted on the map that shows here.
- Tasks: This is where you can create tasks for an account, which can also be assigned to a specific user within Sonar, and view existing tasks. Toggling between the "Incomplete" and "Complete" buttons will display tasks that have not yet been tackled, as well as ones that have been taken care of already.For more information on tasks, check out the Notes and Tasks: Best Practices and Use Cases article.
- Logs: All account activity is preserved here in the form of logs, which are broken down into Action History and View History.
The Action History tab displays details for actions taken against the account, such as removing a service or uploading a file. The action that occurred will be displayed, along with the icon of the user who performed the action and how long ago the action took place. Clicking on a specific log entry will display further details about that particular action.
The View History tab is used to log the date, time, and name of any user that views this account.Hovering over the area that says how long ago the log item occurred will display the exact date and time that the log item took place.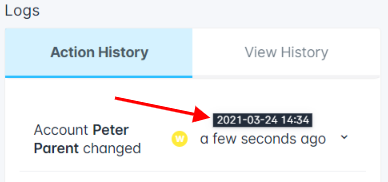
The
 button will redirect you to the "All Logs" tab, where a full list of all Action and View History logs can be browsed, filtered, and exported.
- Primary Contact: The primary contact for the account will be displayed here - this includes the name, with the label Primary next to it, the contact's email address, and mobile phone number, if present. Clicking the "Edit" button will open the Edit Contact window which is where you can update information for this particular contact, including their customer portal username and password, their role within Sonar, and the email categories they are set up to receive. Clicking the arrow next to "Edit" will provide you with the additional options of deleting the contact or editing the phone numbers associated with the contact.
- Files: This is where you can store and review any files that are relevant to the account, and any file format is accepted. Once uploaded, it will appear as a tile within the Files area – if it is an image, a small preview of it will be visible; otherwise, it will remain gray. Clicking this section will open a side panel where additional details of the file can be viewed, including file name, size, type, the user who uploaded it, and also a “Download” button which will download the file to your device. Through the 3 dot menu (located in the top-right corner of the tile) you can edit the file or delete it entirely.Files that can be uploaded to an account must not exceed 500 MB.
- Custom Fields: Any custom fields that are set up for this account will be displayed here, as well as under the “Custom Fields” tab on the left panel. These are strictly here for display purposes – to edit the custom fields, you can click the “Edit” option within the main account header, near the top of the page.To learn more about custom fields, check out the Custom Fields Overview and Use Cases article.
- Disconnection Logs: The history of any disconnections for the account will be available here, including the time and date the account was disconnected, the user who performed the disconnection, and the serviceable address that the account was disconnected from. Clicking on the user or the serviceable address will open a side panel where further details for the entity can be viewed.
Billing
The Billing tab has several available tabs along the top that you can cycle through for different sets of billing information for the account. The contents of each tab are discussed further below.

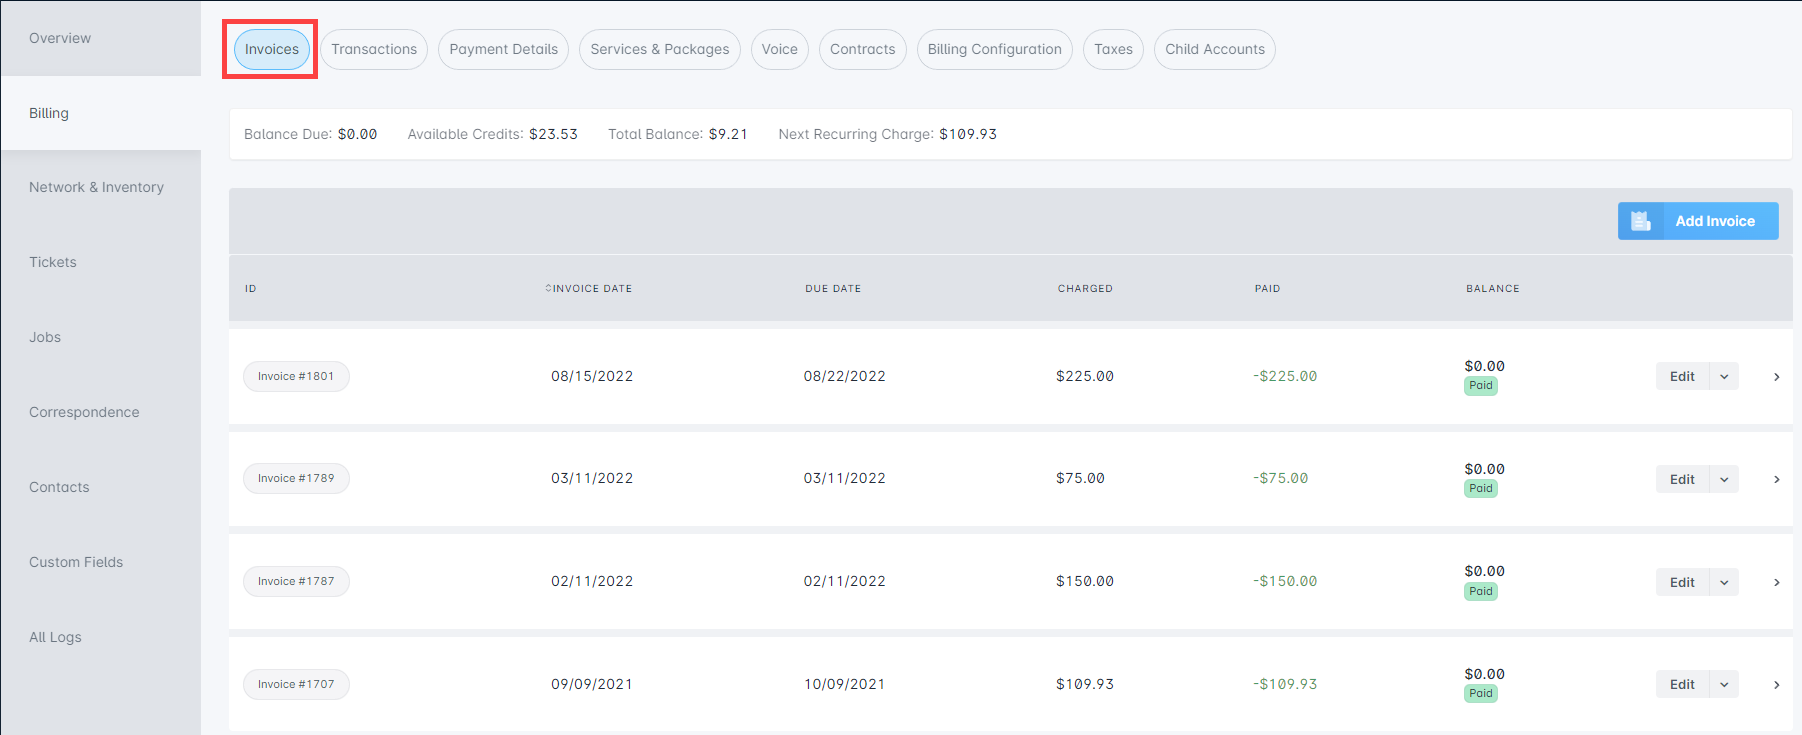
Invoices
Within the Invoices tab, there is a banner at the top that displays the following:
- Balance Due: The amount shown here reflects the total amount of all invoiced transactions.
- Available Credits: The amount here is a total of any credits available on the account that haven't been applied to an invoice.
- Total Balance: The amount shown here reflects the total sum of all due invoices, as well as any uninvoiced debits.
- Next Recurring Charge: The amount shown here is the total sum of any recurring services or packages on the account along with their corresponding taxes.
Every invoice that has been generated for the account will also be listed below this banner. You have the options to create a new invoice, view details of existing invoices, and perform a variety of actions on any invoices listed here. Clicking "Edit" will provide you with the options to either freeze the invoice or edit the message that is printed on the invoice.
Clicking the downward arrow (adjacent to the "Edit" menu) will provide further actions that can be taken, which are listed below:
- Download Invoice: This will download a PDF version of the bill in invoice mode.
- Download Statement: This will download the bill in statement mode (containing any prior balances) in a PDF format.
- Email Invoice: This allows you to email a copy of the bill to the customer – the bill will appear in the bill mode specified for the account.
- Link Invoice: If the account is a parent account, the option to manually link a child account's invoice will be available. Selecting this option will provide you with a dropdown in a pop-up window, where you can select which child invoice you wish to link the parent invoice to.The linking of invoices is generally done automatically by the billing process and should therefore not be performed manually, unless attempting to rectify an error.
- Unlink Invoice: If the account is a parent account, the option to manually unlink a child account's invoice will be available. Selecting this option will provide you with a dropdown in a pop-up window, where you can select which child invoice you wish to unlink from the parent invoice.If you are viewing a child account, this option will be replaced with "Unlink Parent Invoice"; selecting it will open a pop-up window where both the child and parent invoices will be displayed, and you will need to confirm your action.
The linking of invoices is generally done automatically by the billing process and should therefore not be performed manually, unless attempting to rectify an error. - Void: Voiding an invoice will remove all credits applied by payments and discounts, and reverse all debits on the invoice. The discounts created from the debit reversals will be used to zero the invoice. The invoice will then be locked and marked as void.
- Apply Credits: When selecting "Apply Credits" from the menu, a pop-up window will appear and provide you with the total amount available in credits to apply to the account, the invoice balance, and a spot to specify the amount of available credit you wish to apply to the invoice.
- Delete: You can only delete manually created invoices where the invoice date is greater than the accounting period close date.
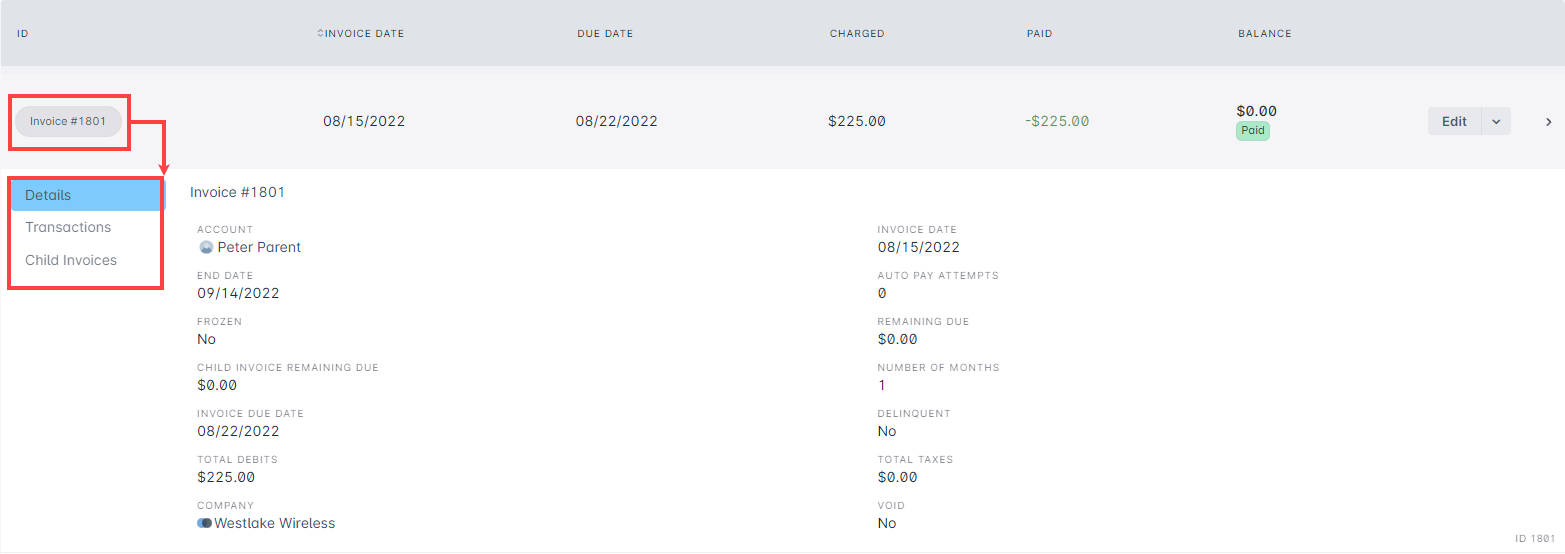
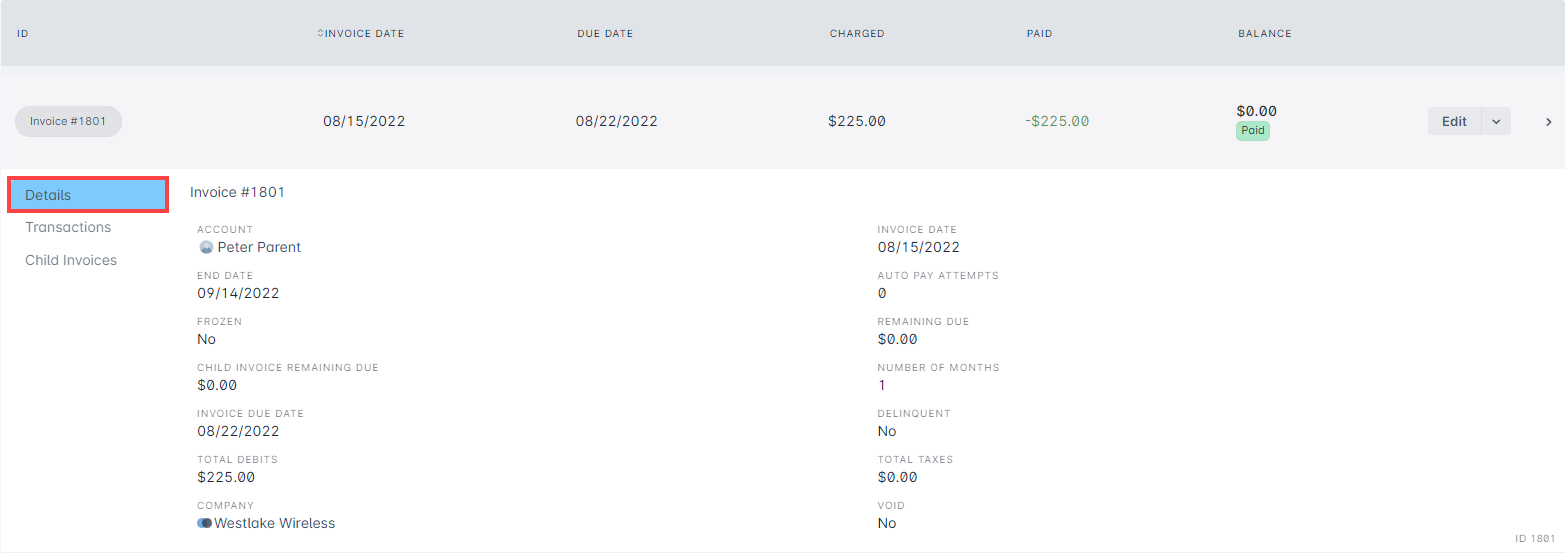
Details
Although some key details are displayed in the main invoice list along the top, such as the date it was created, the due date, the amount charged, the amount paid (if any), and the total balance, further details about the invoice are provided by clicking the "Details" tab. Within this tab, you can view additional information about an invoice, including the remaining amount due on any child invoices, if the account is linked to any child account(s), the dates the invoices covers, the number of months it is for, and whether the invoice is frozen, delinquent, or void. There are also additional pieces of information that upon clicking will open a sidebar menu with further details for that particular item - this includes the invoice number listed beside the Details tab, the account listed, and also the company.
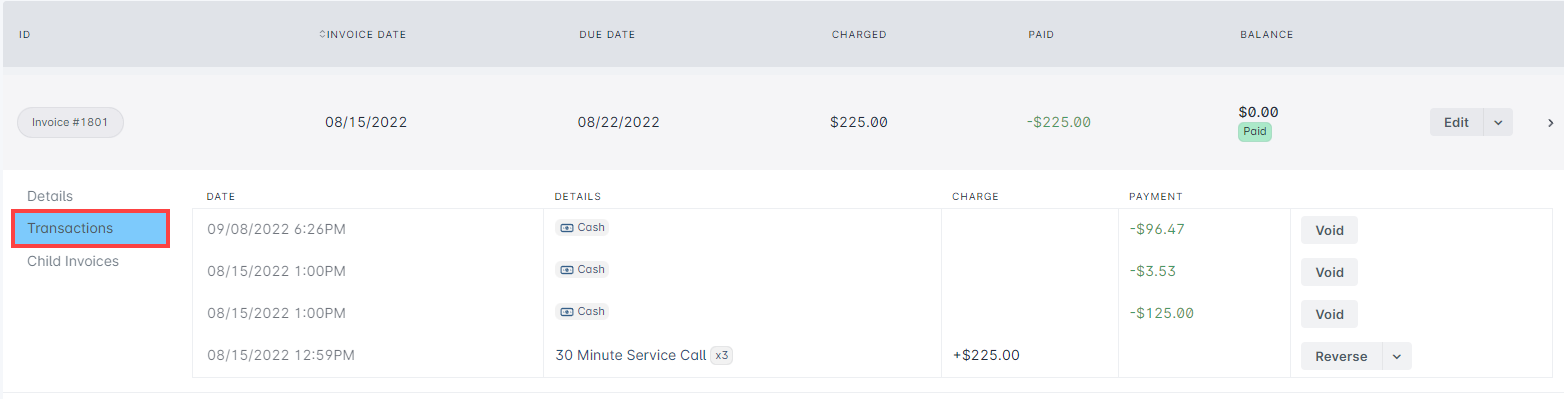
Transactions
The transactions tab will list any transactions that are included on that particular invoice. The items under the Details column of the transactions tab will open a sidebar menu with further information, when clicked. Debit transactions that are listed will have the option "Reverse" available on the right-hand side, just as credit transactions will have the option "Void". Clicking the arrow adjacent to "Reverse" will provide you an "Edit" option where you're able to adjust the debit transaction description. Additional prompts will appear if either "Void" or "Reverse" are selected, to fill out any required information and confirm the action.
Child Invoices
If an account is the parent of any child account(s), the invoices for the child accounts will appear within the Child Invoices tab. A few details about the child invoice will be listed, including the date of the invoice, the invoice number, the child account it is associated with, and the remaining amount due. The invoice number listed under the Invoice # column is clickable, as well as the child account listed under the Account column – clicking the invoice number will open a sidebar providing details about the invoice, while clicking the child account will redirect to that account's management page.

Transactions
At the top of the transactions tab, you will see a banner that displays the following:
- Balance Due: The amount shown here reflects the total amount of all invoiced transactions.
- Available Credits: The amount here is a total of any credits available on the account that have not yet been applied to an invoice.
- Total Balance: The amount shown here reflects the total sum of all due invoices as well as any uninvoiced debits.
- Next Recurring Charge: The amount shown here is the total sum of any recurring services or packages on the account along with their corresponding taxes.
Listed below are all the financial transactions on the account – this includes debits (charges associated with a specific service), discounts (a credit applied by a service), and payments (a credit applied by a payment method).
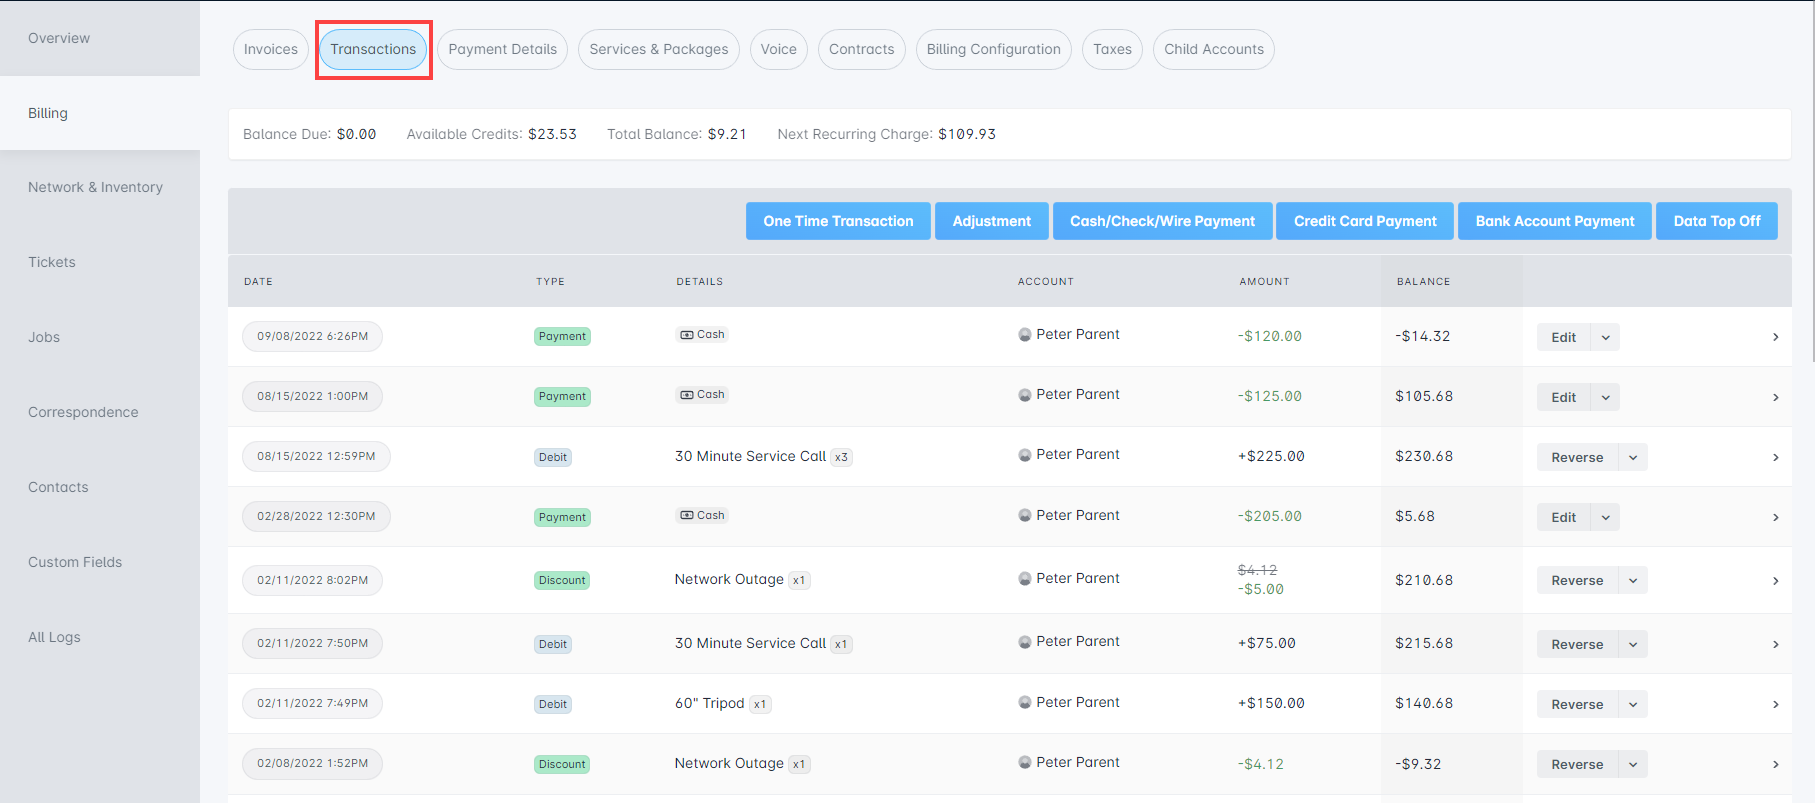
Expand this section for a more detailed look at the Transactions tab for an account
1. One Time Transaction: allows you to add a one time service, data service, voice service, or recurring service as a one time transaction to the account.
2. Adjustment: allows an adjustment service to be added to the account.
3. Cash/Check/Wire Payment: used to apply a payment to the customer's account, in the form of cash, check, or wire.
4. Credit Card Payment: used to make a credit card payment on the account, if the account has a credit card attached to it.
5. Bank Account Payment: used to make a bank account payment on the account, if the account has a bank account associated with it.
6. Data Top Off: used to purchase additional data during a customer's billing period; this will only be available if the account is attached to a usage based billing policy that allows for the purchase of additional data during the billing period.
7. Date: the date and time the transaction occurred; clicking here will provide additional sub-tabs that you can cycle through to obtain further information for a particular transaction.
8. Type: the type of transaction, such as debit, credit, discount, or payment.
9. Details: provides information regarding the transaction and clicking on the text here will open a side panel containing further details; for example, if the transaction was a service, the service name and quantity would appear, whereas if it was a payment, the payment type would be displayed (such as Check or Cash).
10. Account: the account the transaction was applied to; clicking here opens a side panel where further details for the account can be viewed.
11. Amount: the amount of the transaction will be displayed here; if there is an associated tax, the tax amount will appear in smaller text directly underneath, and hovering over it will display a "Taxes" label.
12. Balance: the running balance for the account; this will update based on the transactions that occur.
13. Additional Actions: the additional actions available here, such as reversing a transaction and downloading a receipt, will depend on the transaction type, as well as whether the accounting period is open or closed. When reversing a payment, there will be an option in the Reverse Payment window that will also refund the same amount via the payment provider, if your payment processor allows for this.
The inner tabs that appear here will depend on the transaction type. For example, with a debit transaction, you will be able to see inner tabs for Details and Tax Transactions; for a payment transaction, you will be able to cycle through Details, Reversals, Refunds, and Credits.
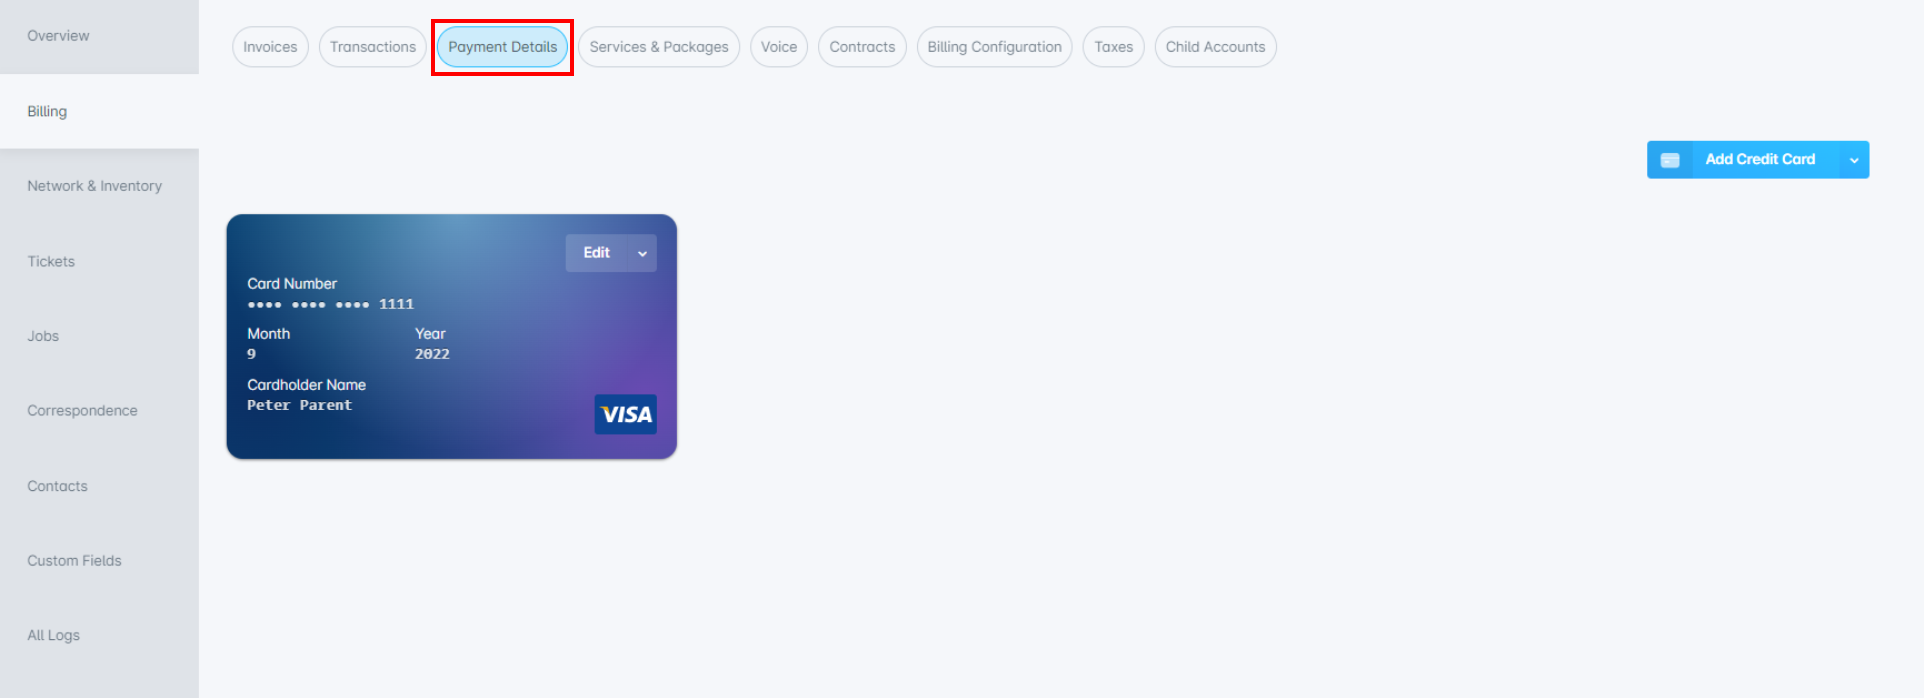
Payment Details
The Payment Details section displays any credit card(s) and bank account(s) that have been saved to this account for future payment.
To add a new payment method to the account, you can click "Add Credit Card" or click the adjacent arrow to select the "Add Bank Account" option. Both of these selections will result in an additional window being displayed where you will enter the relevant payment information.
If the Auto Payment option is enabled, the payment method will automatically be charged for the entire account due balance on the date you have set up for auto pay to run, within the Billing Configuration tab.
Once a credit card or bank account has been added as a payment method, they will appear within this sub-tab for the account; deleting or editing the payment method options are available through their respective "Edit" buttons, or by clicking the adjacent downward arrow.
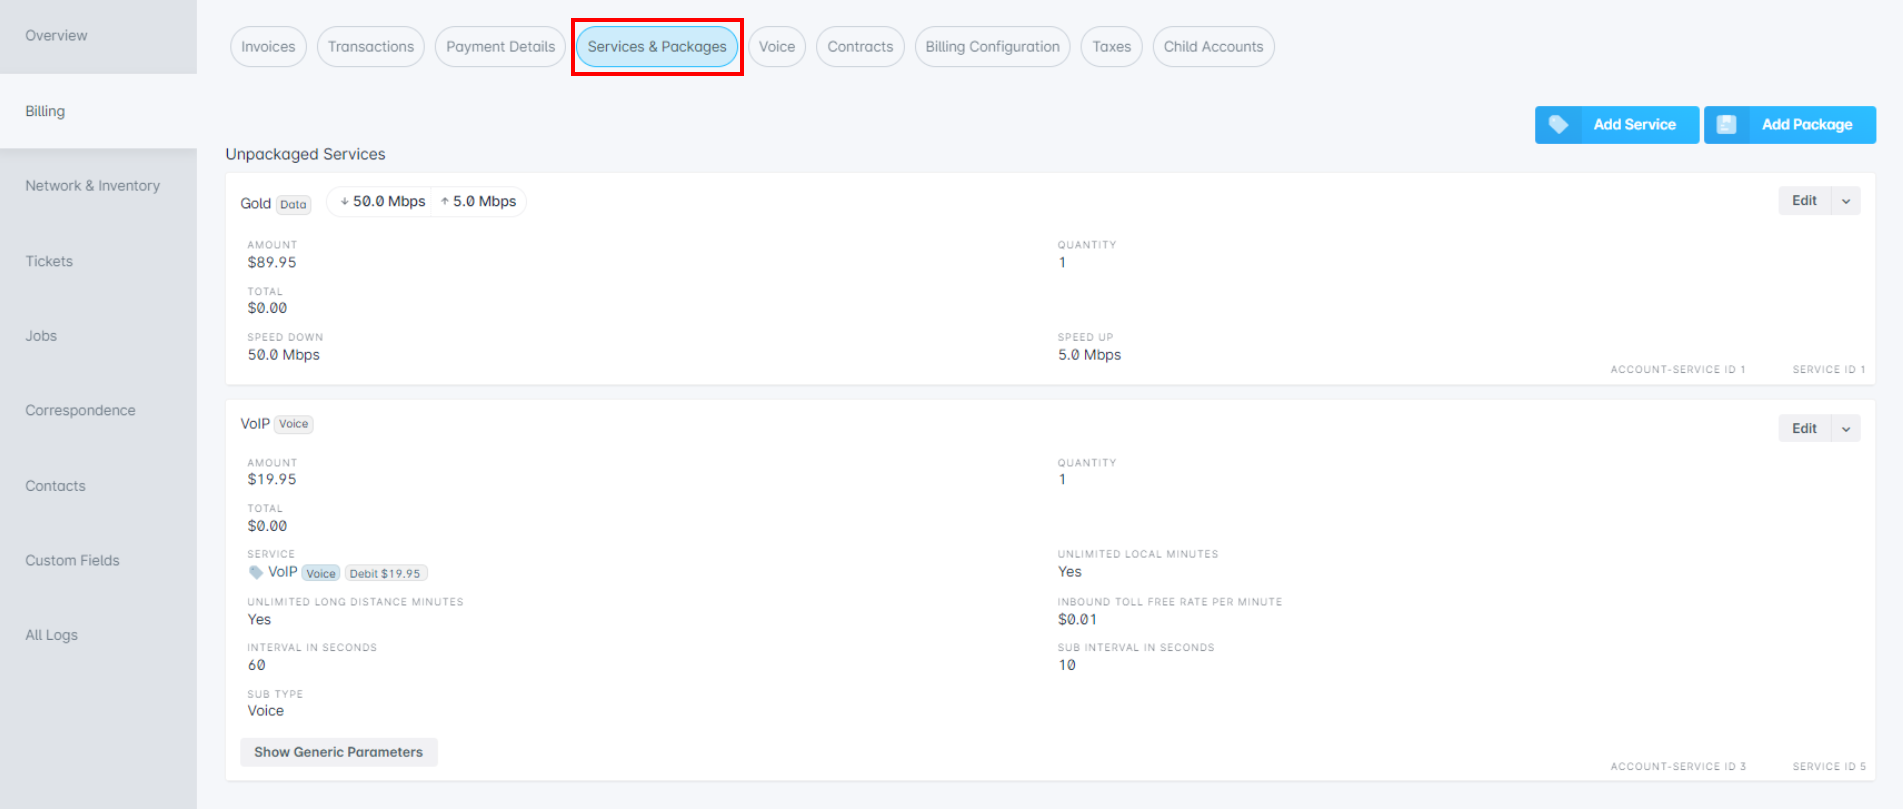
Services & Packages
This is where you can view all existing services and packages on an account, as well as add new services and packages. The name of the service, along with a defining label will be displayed (i.e., Recurring if it is a recurring service, Data if it is a data service, in which case the upload and download speeds of the data service will be displayed as well), in addition to the amount being charged for the service, and the quantity. Any price overrides will also be reflected here, and if the service uses proration then the Addition Prorate Date will be displayed as well. The "Edit" menu on the right-hand side of each service also provides the options to edit the service details or delete it entirely.
Voice
The Voice sub-tab allows you to view and change details related to the account's voice service. This page is broken down into two sections
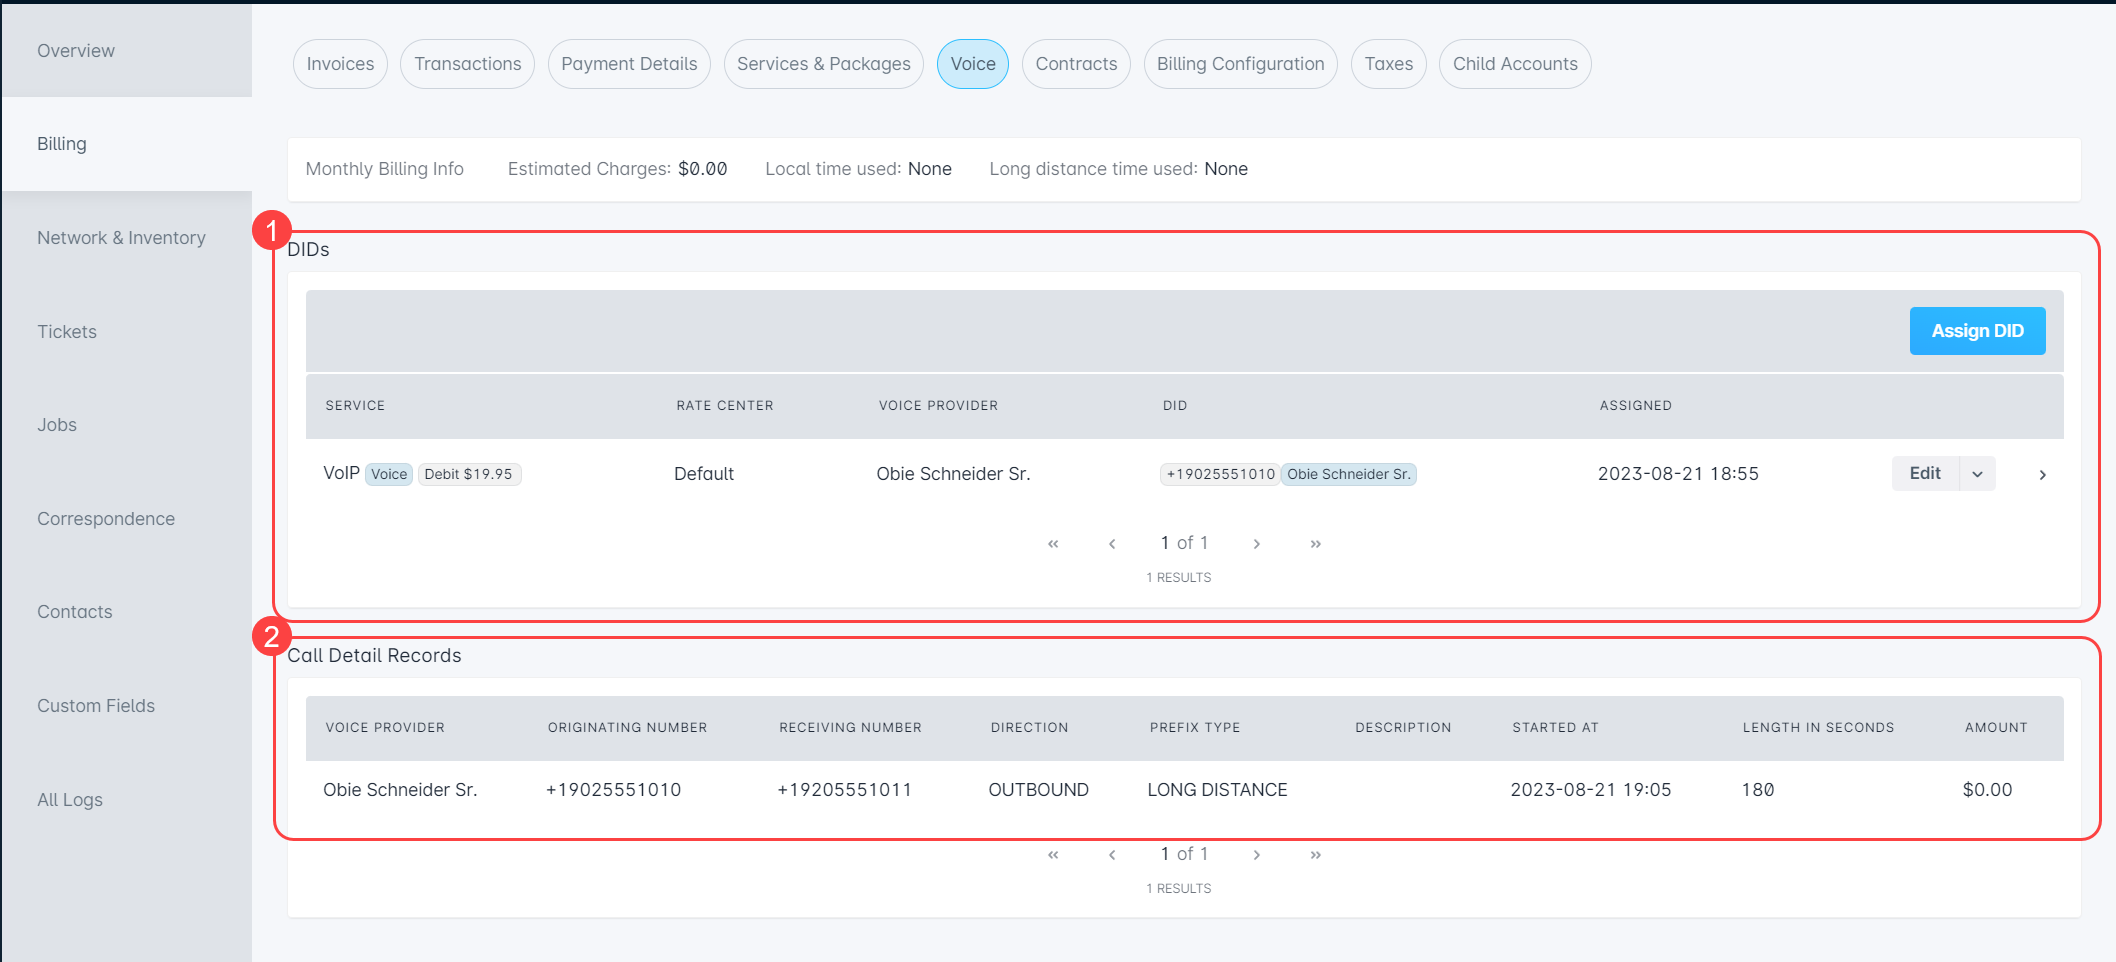
- DIDs
- This table shows you all information related to the subscriber's DID, and allows you to add additional DIDs using the "Assign DID" button. The DID must be added to your instance first, and have a corresponding Voice service before assigning it to the customer.
- Call Detail Records (CDRs)
- This table shows you all information related to reported Call Detail Records, whenever they're imported into your Sonar instance. All outgoing or inbound calls to the subscribed DID will be reported and tracked here.
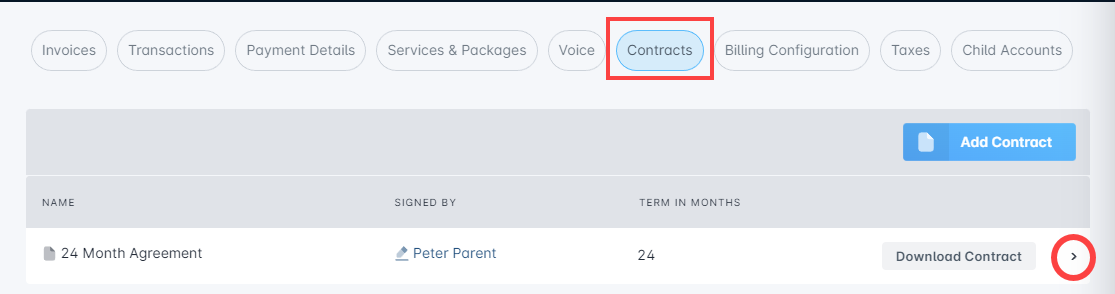
Contracts
This tab displays any existing contract templates that have been assigned to the account and is also where you can add a new contract to the account, via the "Add Contract" button. Each contract listed here will display the name of the contract and who it was signed by - if the contract has not yet been signed, a value of Unsigned will be present in the Signed By column instead.
Each unsigned contract listed can be edited, deleted, or signed through the "Edit" menu. Clicking on the arrow at the end of the row will open a sidebar menu with additional details about that particular contract, including an image of the signature used to sign the contract once the customer has signed it. Once a contract has been signed by the customer, the only action that will be available to you will be to download a copy.
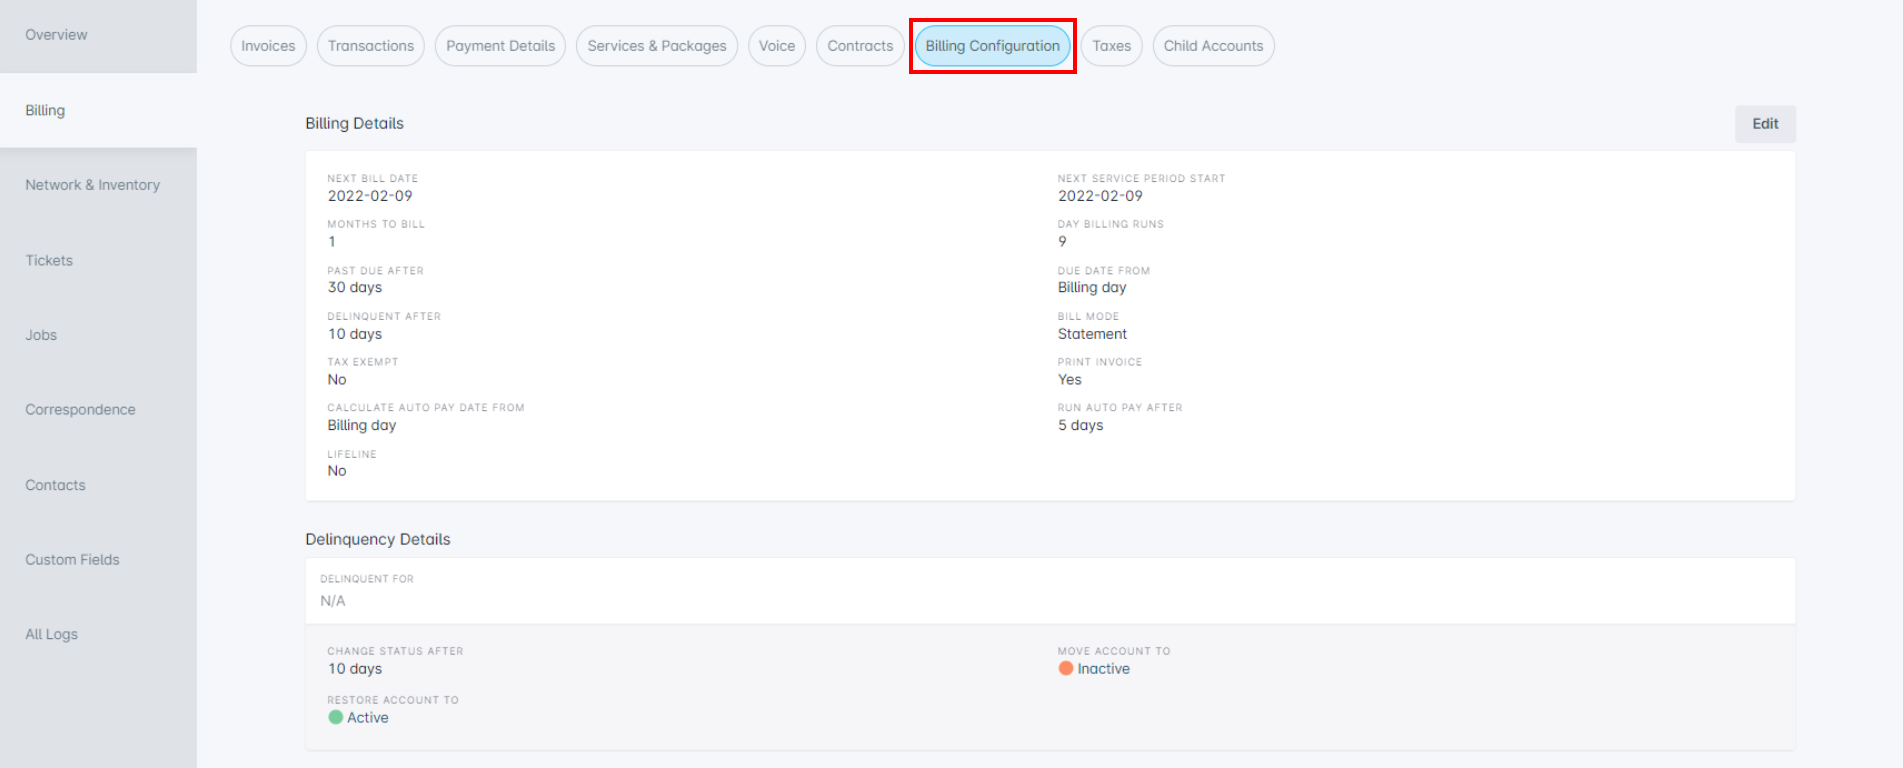
Billing Configuration
The billing parameters are generally inherited from your system settings; however, they can be overridden for an account here. The settings defined here will determine how this account gets billed. For more information on what each parameter means and does, refer to the Billing Parameters Detailed Breakdown document.
This is also where you can define billing settings that are individual to the account, such as:
- Whether the account should be tax exempt (i.e. for an account that has special circumstances)
- If the account should be enabled for a printed invoice (i.e. if you are using printed invoice batches to mail invoices to customers)
- The mode that the customer wishes to receive their bill in (i.e. Invoice mode or Statement mode)
To update any of these specific settings, or to update the account's billing configuration in general, click the "Edit" button in the top-right corner of the Billing Details section.
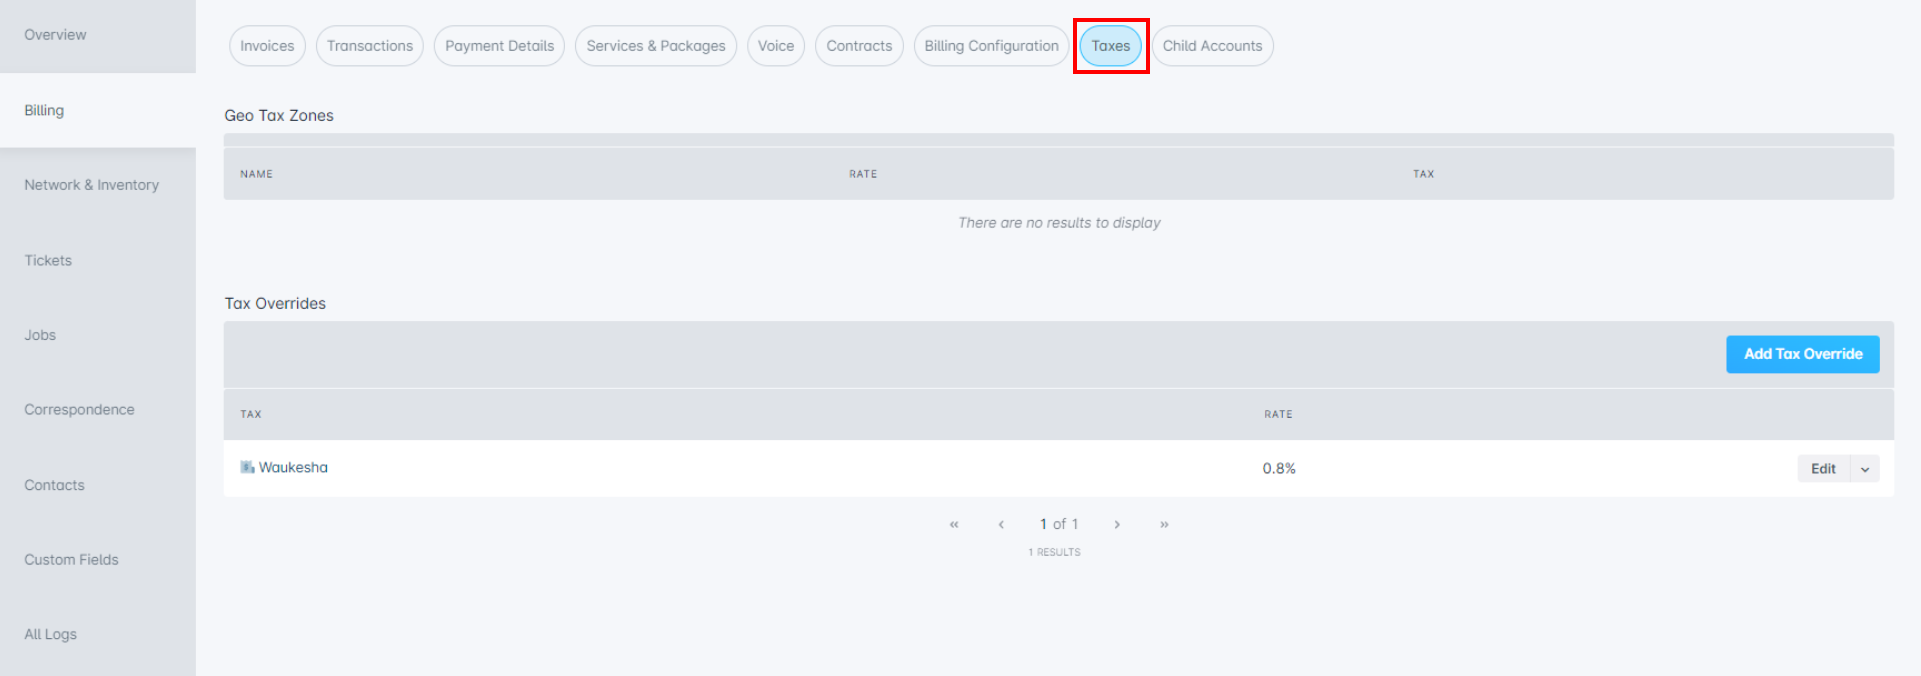
Taxes
If the account is calculated to fall within the boundaries of any geo tax zones, the name of the geo tax, the rate, and the name of the tax type will be displayed under the Geo Tax Zone heading. Clicking the text under both the Tax and Name columns will open a sidebar window with further details for each. You will not see anything listed here if you have not configured any geographical tax zones or if the account does not fit into any geographical zones that are created.
The Tax Override section provides you with the option to add a tax override to the account, and also view, edit or delete any existing tax overrides.
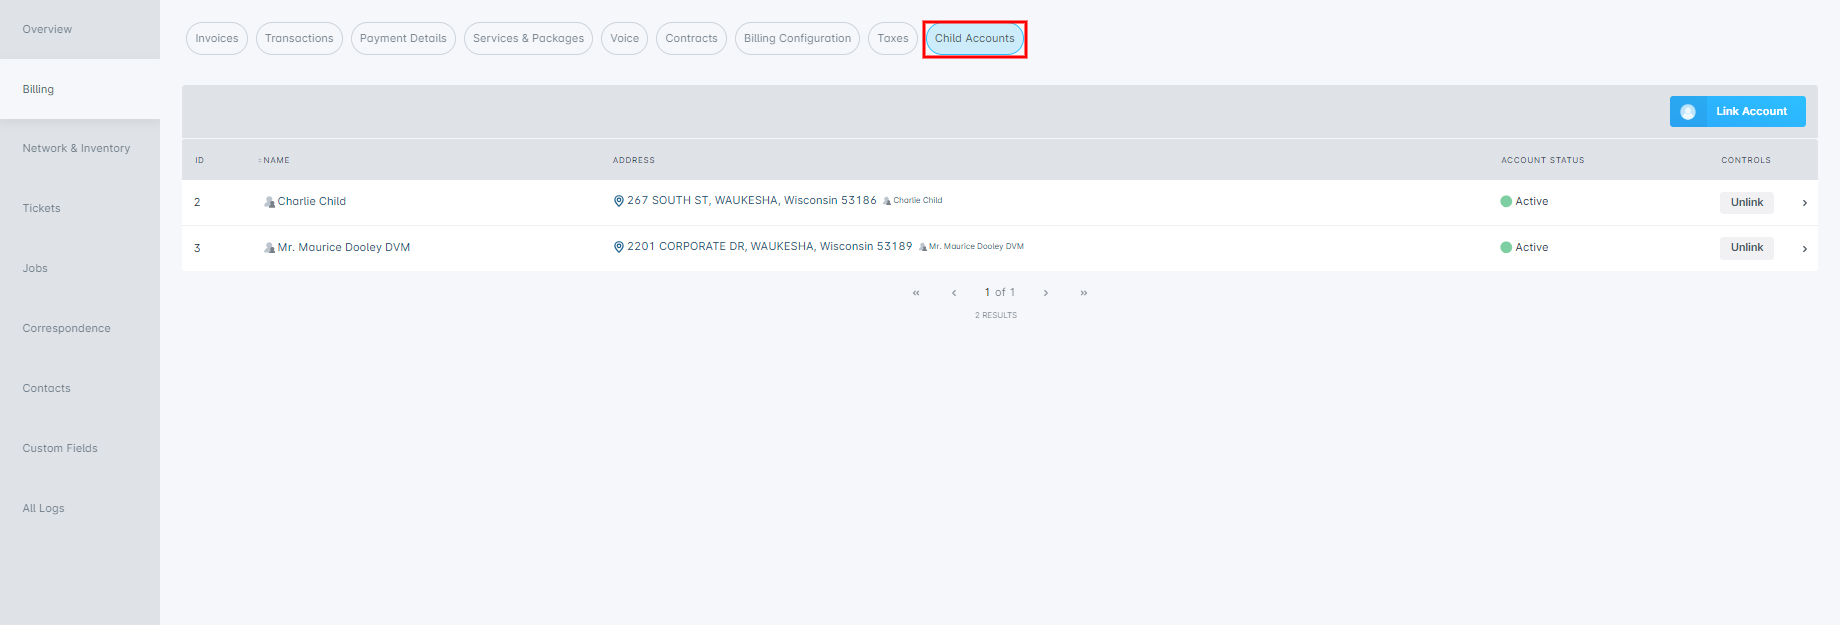
Child Accounts
Adding a child account is a way of connecting one or more accounts together within Sonar, and this results in the parent account becoming responsible for all future recurring invoices generated on any of the associated child account(s).
Adding a child account to the main parent account can be done here, through the use of "Link Account". Any existing child accounts associated with the account you are viewing will also be listed here; the ID and name of the child account will be displayed, with the option to "Unlink" the existing child account.
Network & Inventory
The Network & Inventory tab is where you can view and add inventory to an account, as well as control provisioning on the account and the assignment of network resources. Within this tab, there are also several additional tabs that you can cycle through, displayed at the top - these are discussed further below.
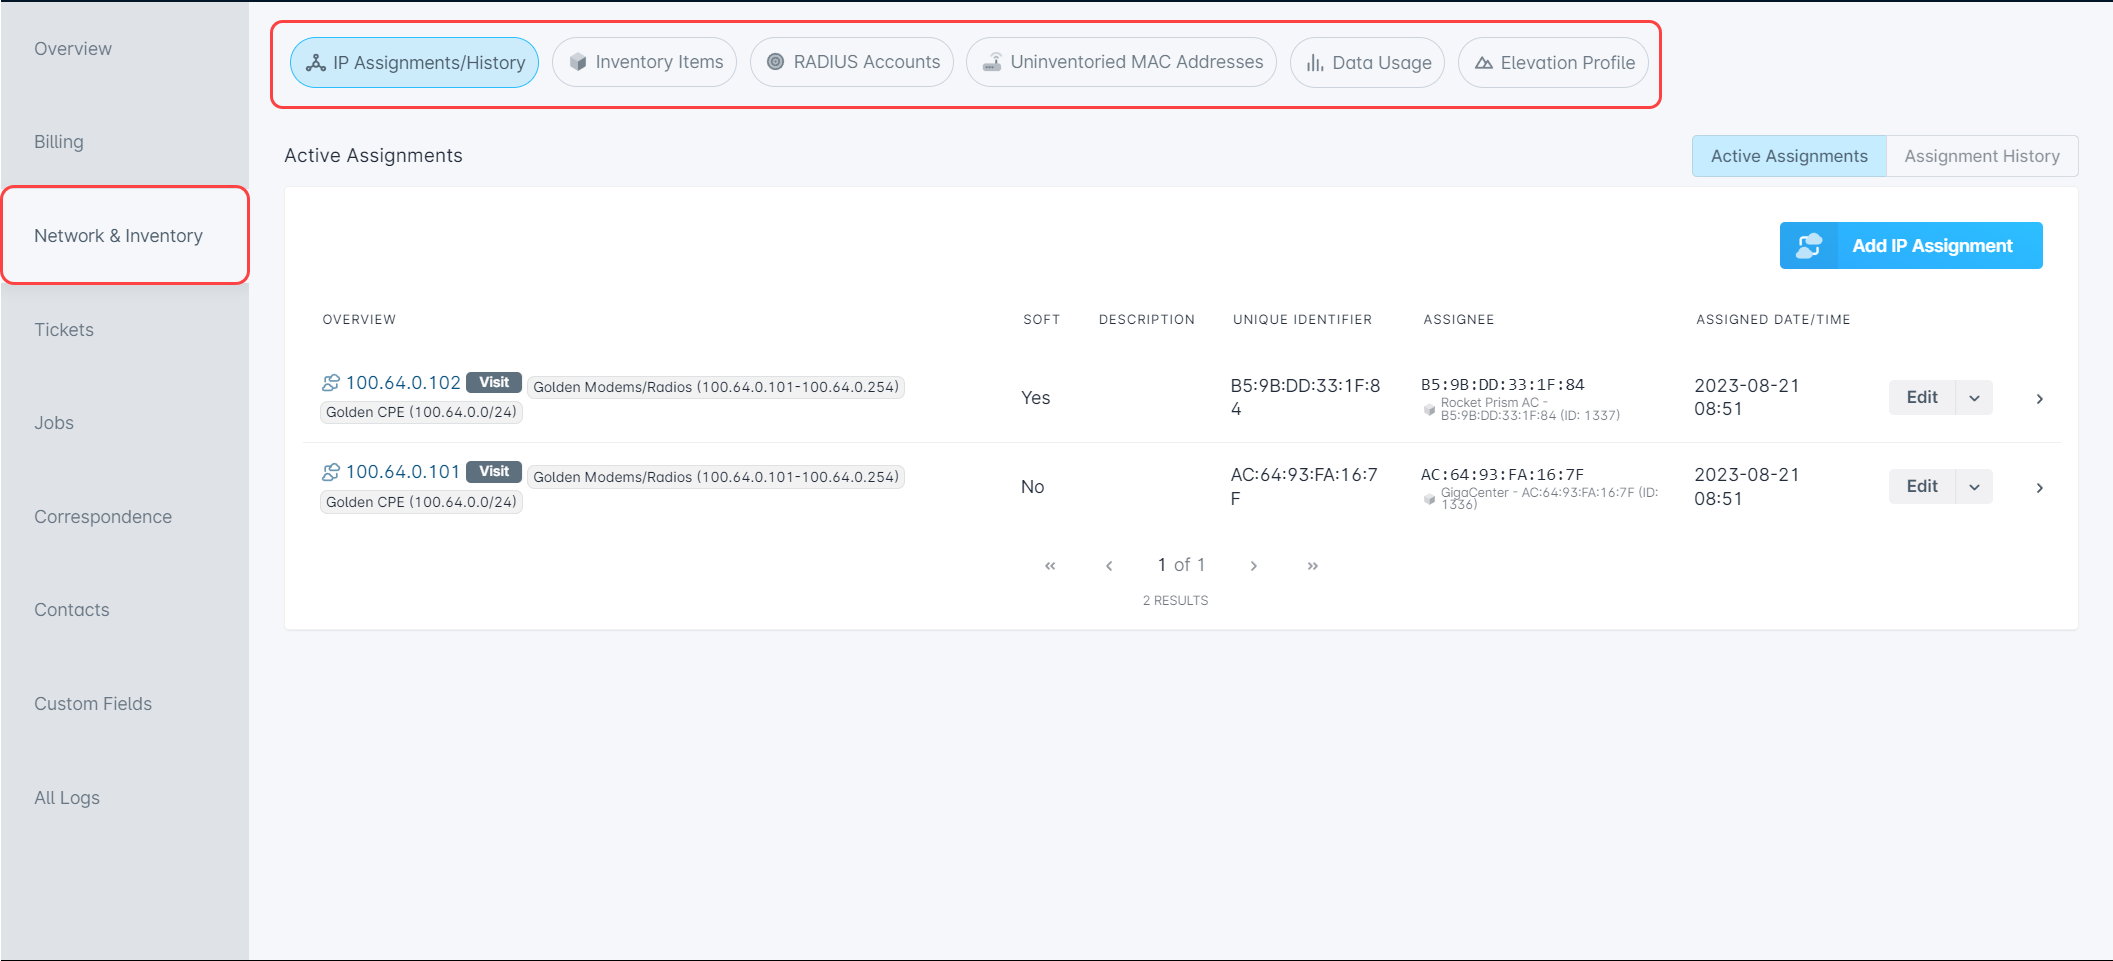
IP Assignments/History
This tab controls all IP assignments on the account, allowing you to view active IP assignments as well as IP assignment history. Through the use of the toggle on the right-hand side, you can switch between the Active Assignments tab and the Assignment History tab. The Assignment History tab displays every IP that has ever been assigned to the account, as well as some other key details – such as whether it was a soft assignment or not, the date it was assigned and also when it was removed. The Active Assignments tab contains all IPs currently assigned to the account, including information about whether it is a soft assignment or not, the assignee, and any available controls.
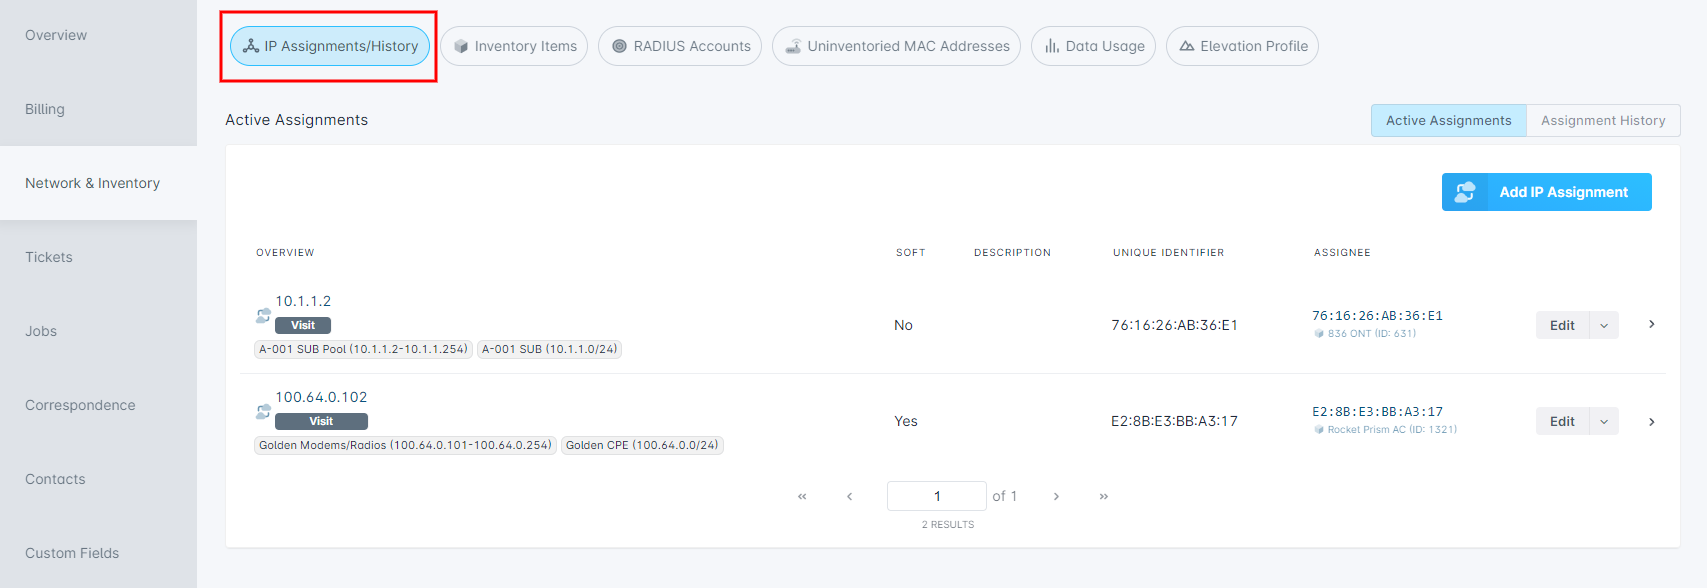
There are 3 other entities, apart from accounts, that you can assign an IP address to: Inventory Items, RADIUS Accounts, and Uninventoried MAC Addresses. Each of these are discussed in further detail below, under the similarly titled headings.
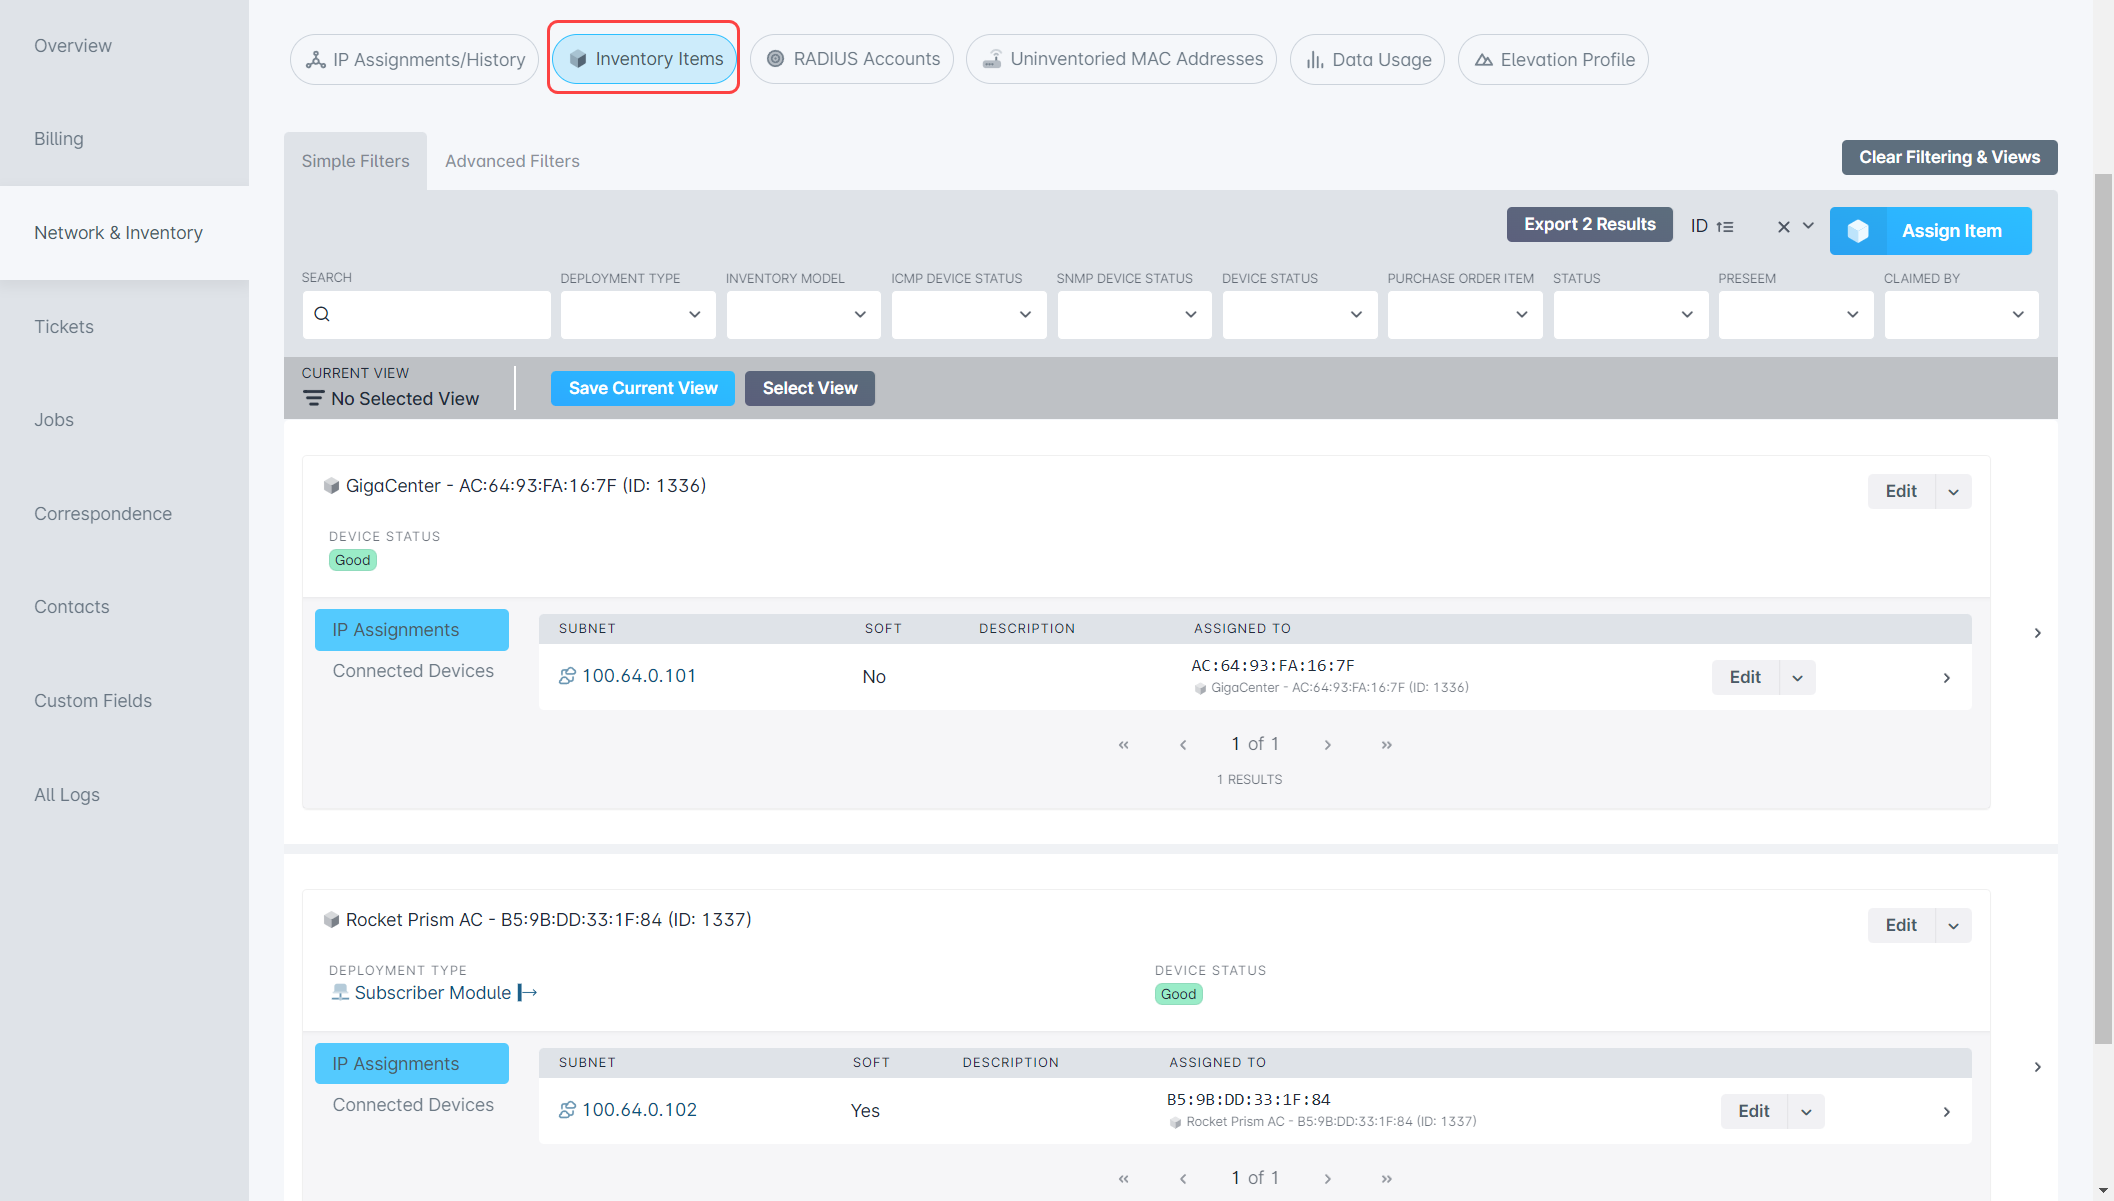
Inventory Items
The Inventory tab shows all inventory that is currently assigned to the account, as well as provides the functionality to assign inventory to the account through the "Assign Item" button. Each inventory item listed will display further details about it, including the MAC address of the item it is assigned to, under the IP Assignments tab, and also displays any connected devices under the Connected Devices tab. The "Edit" menu provides additional options for each inventory item, including the ability to change the assignee, edit field values, link it to a ticket, or assign an IP address to it.
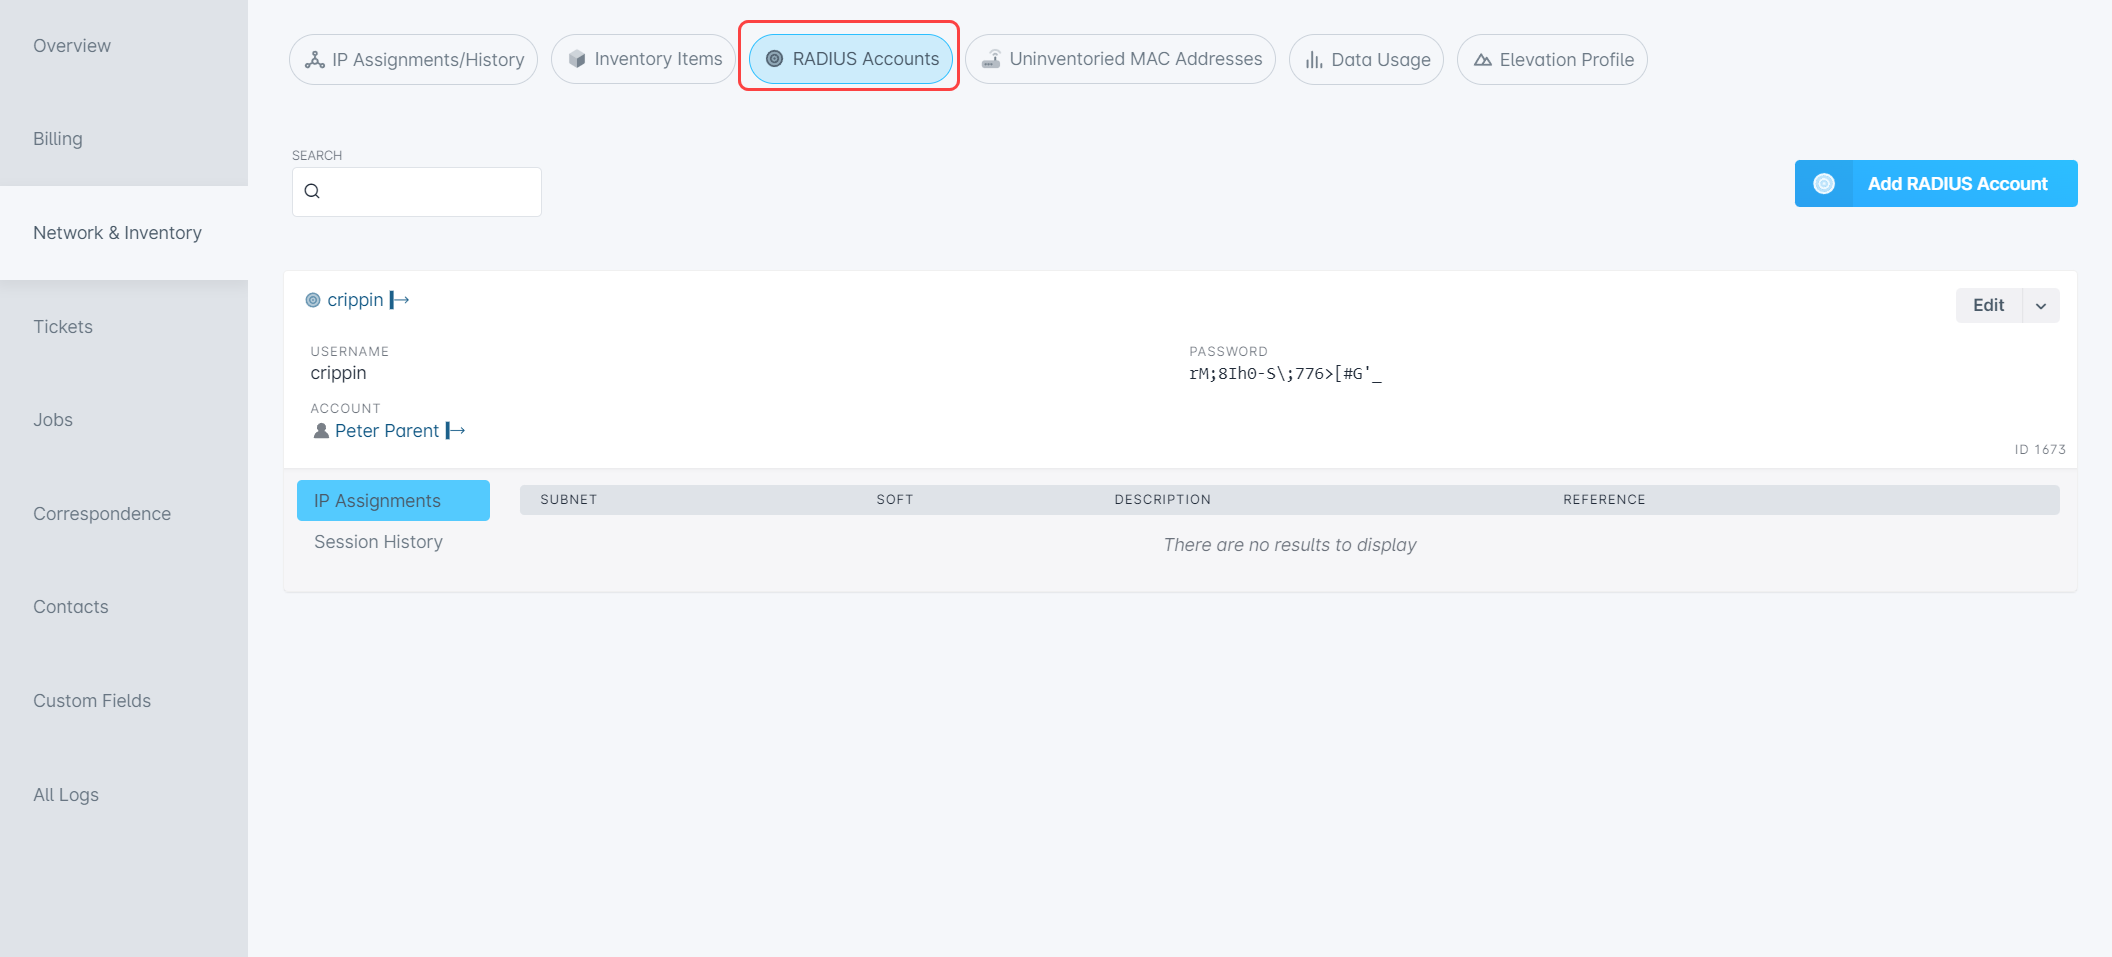
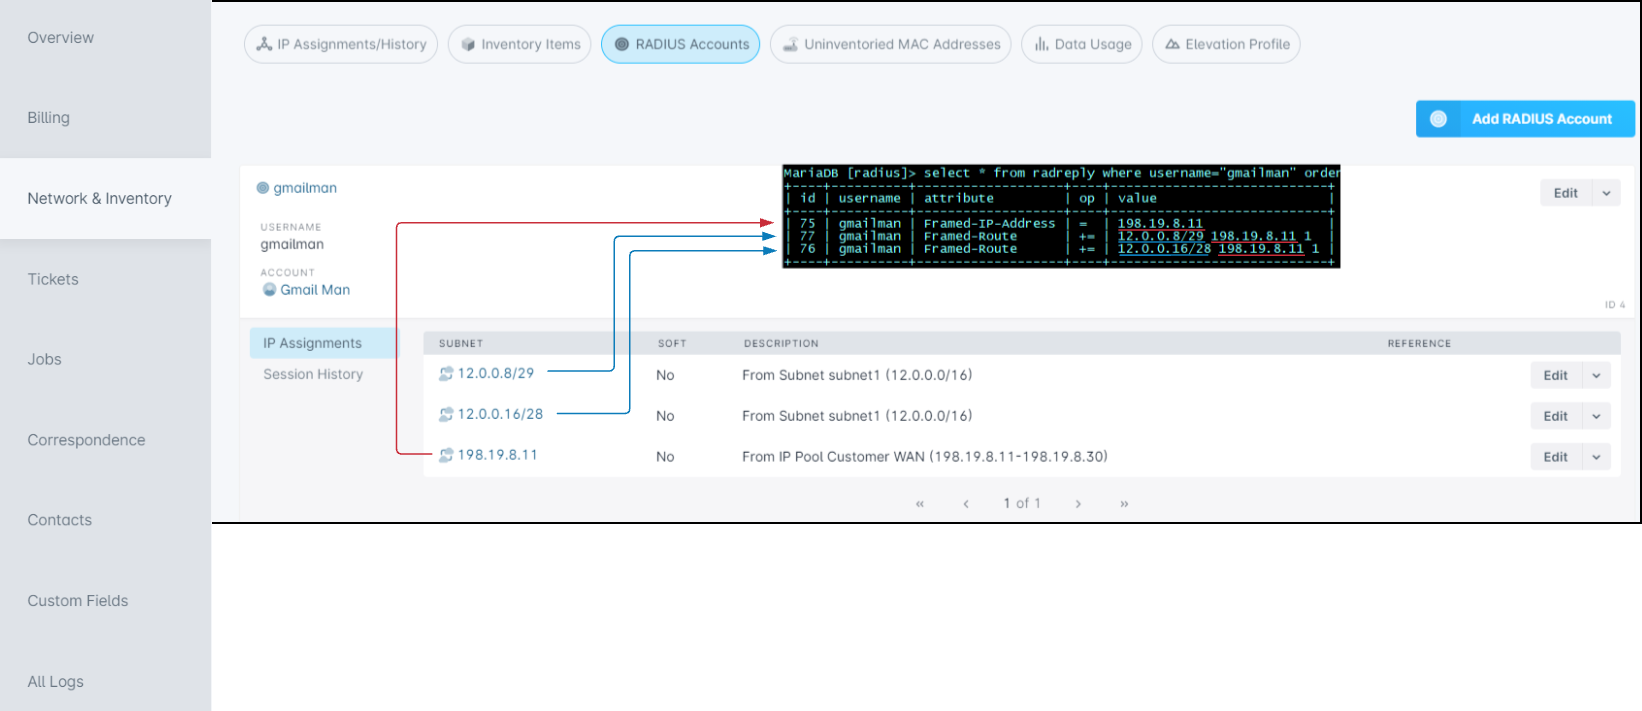
RADIUS Accounts
The RADIUS Accounts tab allows you to manage RADIUS accounts, if you have an active RADIUS server in Sonar. All RADIUS accounts that are currently associated with the customer account will be displayed here, and you can use the "Add RADIUS Account" button to add a new one. Each RADIUS account listed will also have a menu next to it, which allows you to edit the account details, delete it, or add an IP assignment.
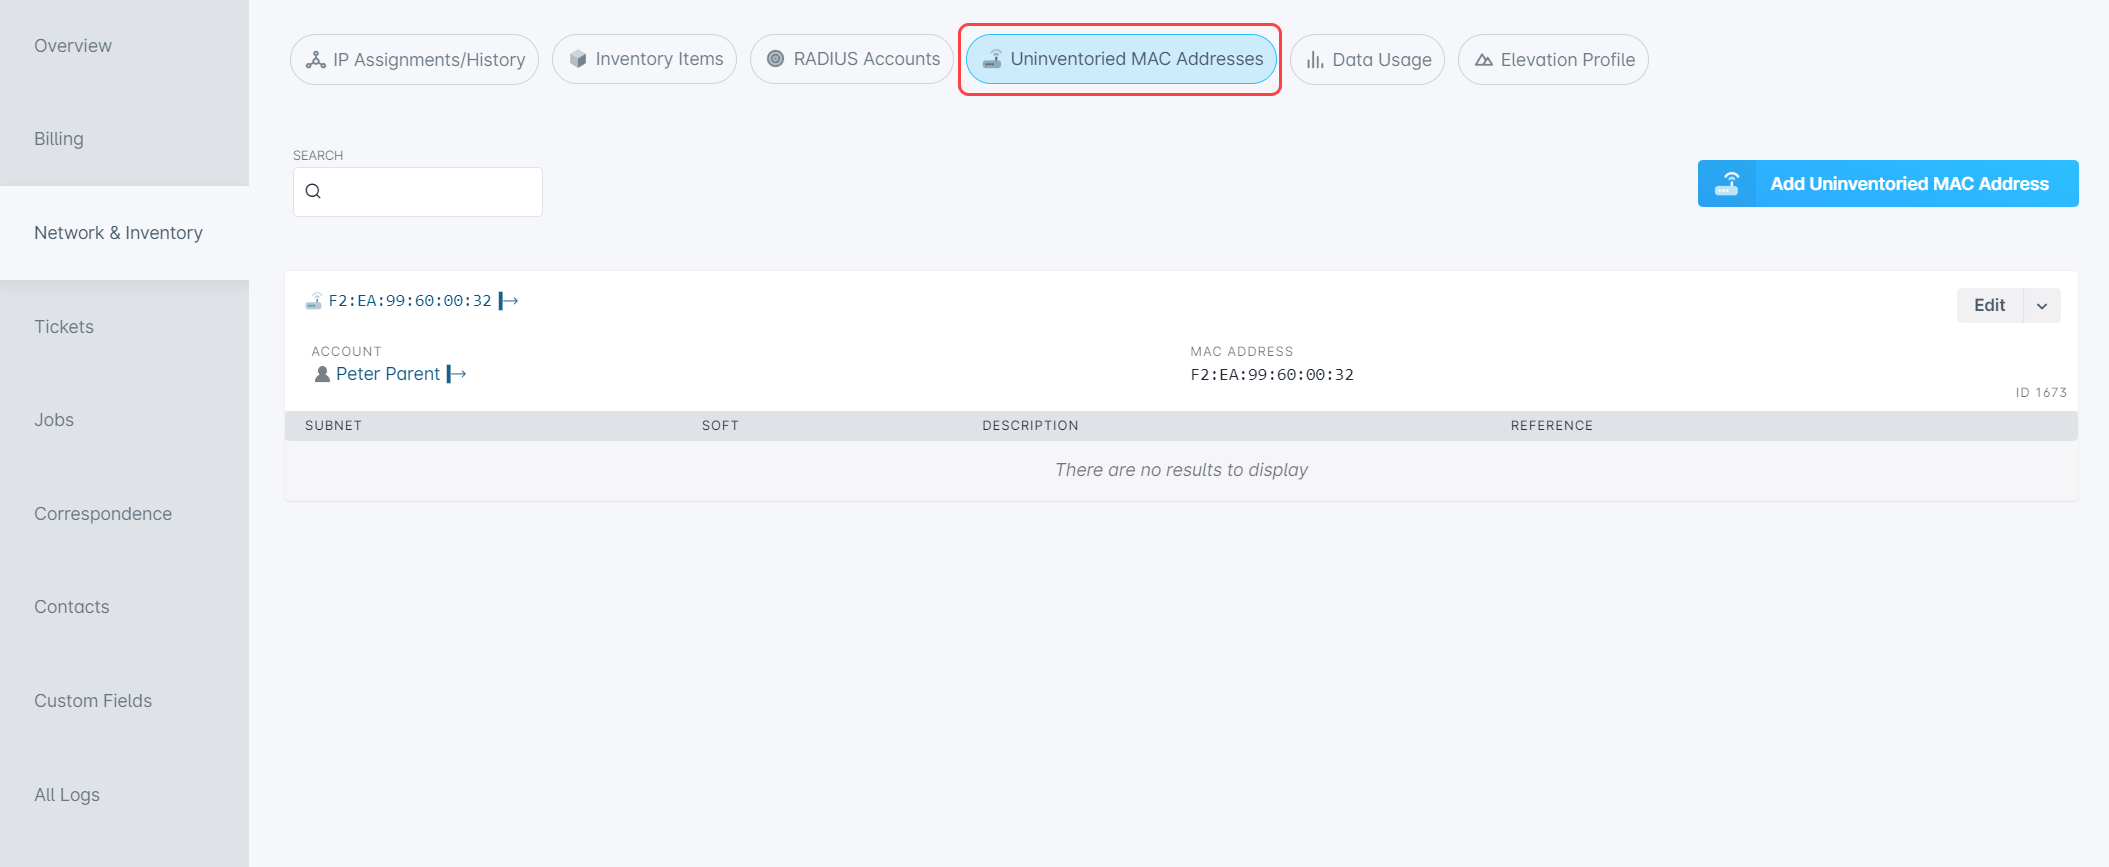
Uninventoried MAC Addresses
Within this tab, you can see any uninventoried MAC addresses associated with the account and have the ability to add an uninventoried MAC address from here as well. Each one listed will display the MAC address, the associated account and also provide an “Edit” menu with additional options, including adding and moving an IP assignment and also deleting the item.
Data Usage
The Data Usage tab allows you to view information regarding the data usage on the account – this tab will only function if you are using Sonar in a way that allows for the collection of data usage from the network. In the top-left corner, details of the data service and any associated usage-based billing policy can be viewed (located directly beneath the data service details); to the right, a graph of billable data usage is displayed; directly beneath, you can select a date range to view a graphical representation of the data throughput, and at the very bottom of this tab, a detailed table of the usage history can be found. Each of these sections is explained further below.
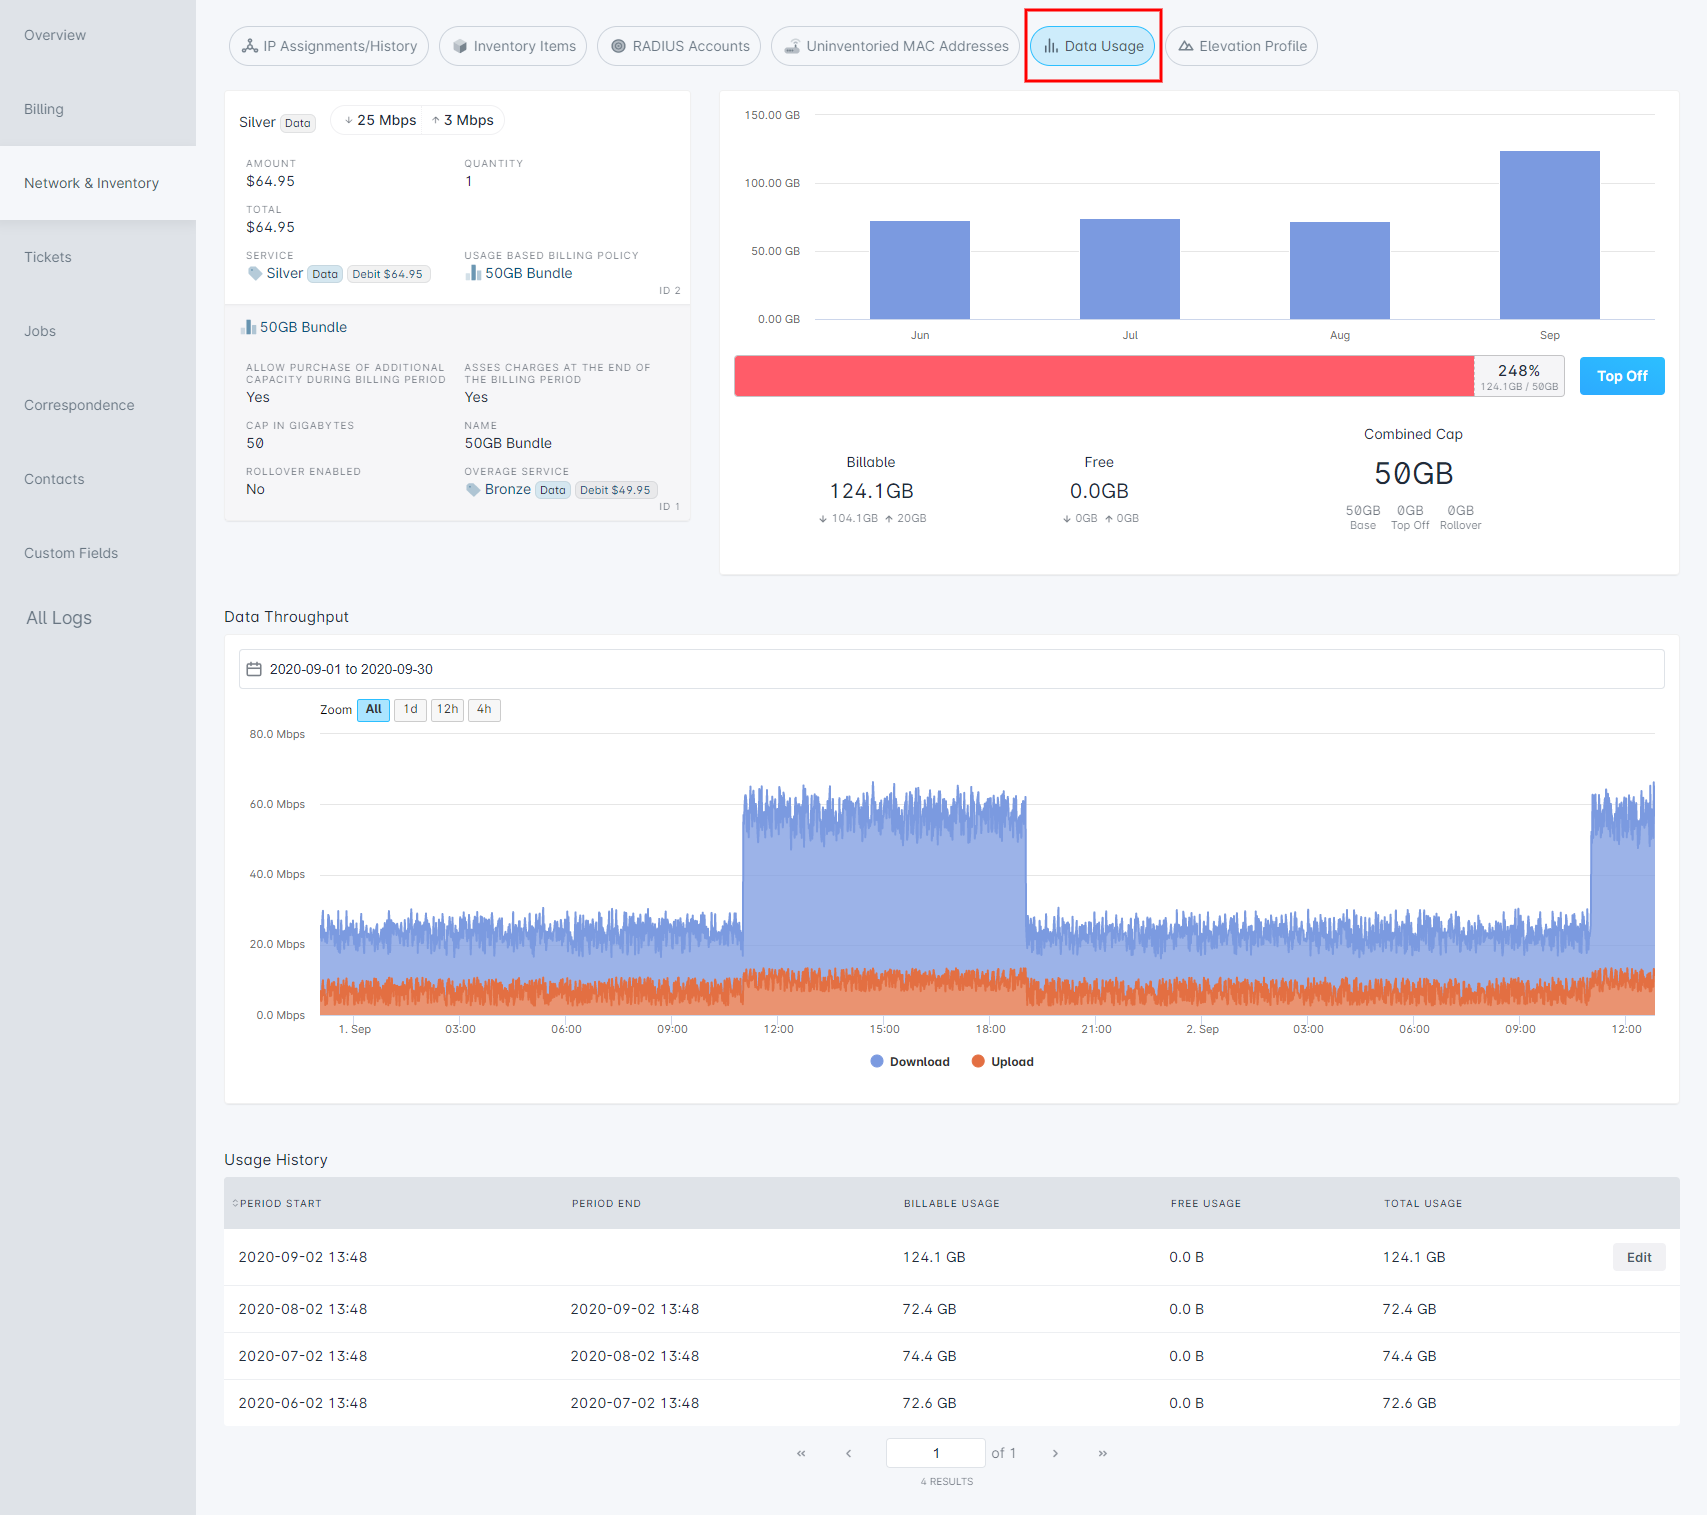
Data Service
The details for the service will be displayed here, such as the service name, upload/download speeds, service price, quantity, and any associated usage based billing policy. Additional details can be viewed through a side panel, which can be opened by clicking on the service or usage based billing policy fields.
Usage Based Billing Policy
If there is an associated usage based billing policy, key details of the policy will be viewable here (directly below the details of the data service). From a glance, you can see if this policy allows top-offs during the billing period, the name of the overage service associated with top-offs (if allowed), whether charges will be assessed at the end of the billing period, if rollover is enabled, and the data usage cap in gigabytes of the policy.
Billable Data Usage Graph
This area lets you view the amount of data that has been utilized by the account. From here, you can view a breakdown of the current billable usage, free usage (if the account has a usage based billing policy with free periods defined), and a breakdown of the current data usage cap on the account (if one exists.) Through the "Top Off" button, you can add additional data to the account, so long as the account has a data service that is associated with a usage based billing policy and that policy allows for additional data to be added during the billing cycle.
Data Throughput
Using the date selector, you can select a single date or date range to view the data throughput for. This graph will display both the upload and download speeds and can be further narrowed down by using the Zoom toggles, allowing you to view the usage for an entire date range or just the last 4 hours.
Usage History
Within this table, both the usage history period start and end date and times are displayed, along with the total billable usage, the free usage (if any), and the overall total data usage on the account. An "Edit" button will be available next to the current usage period, allowing you to manually change details such as the amount of billable inbound and outbound data, as well as the amount of free inbound and outbound data for the account. The usage history period begins at the start of the customer's billing cycle and ends on the following billing day.
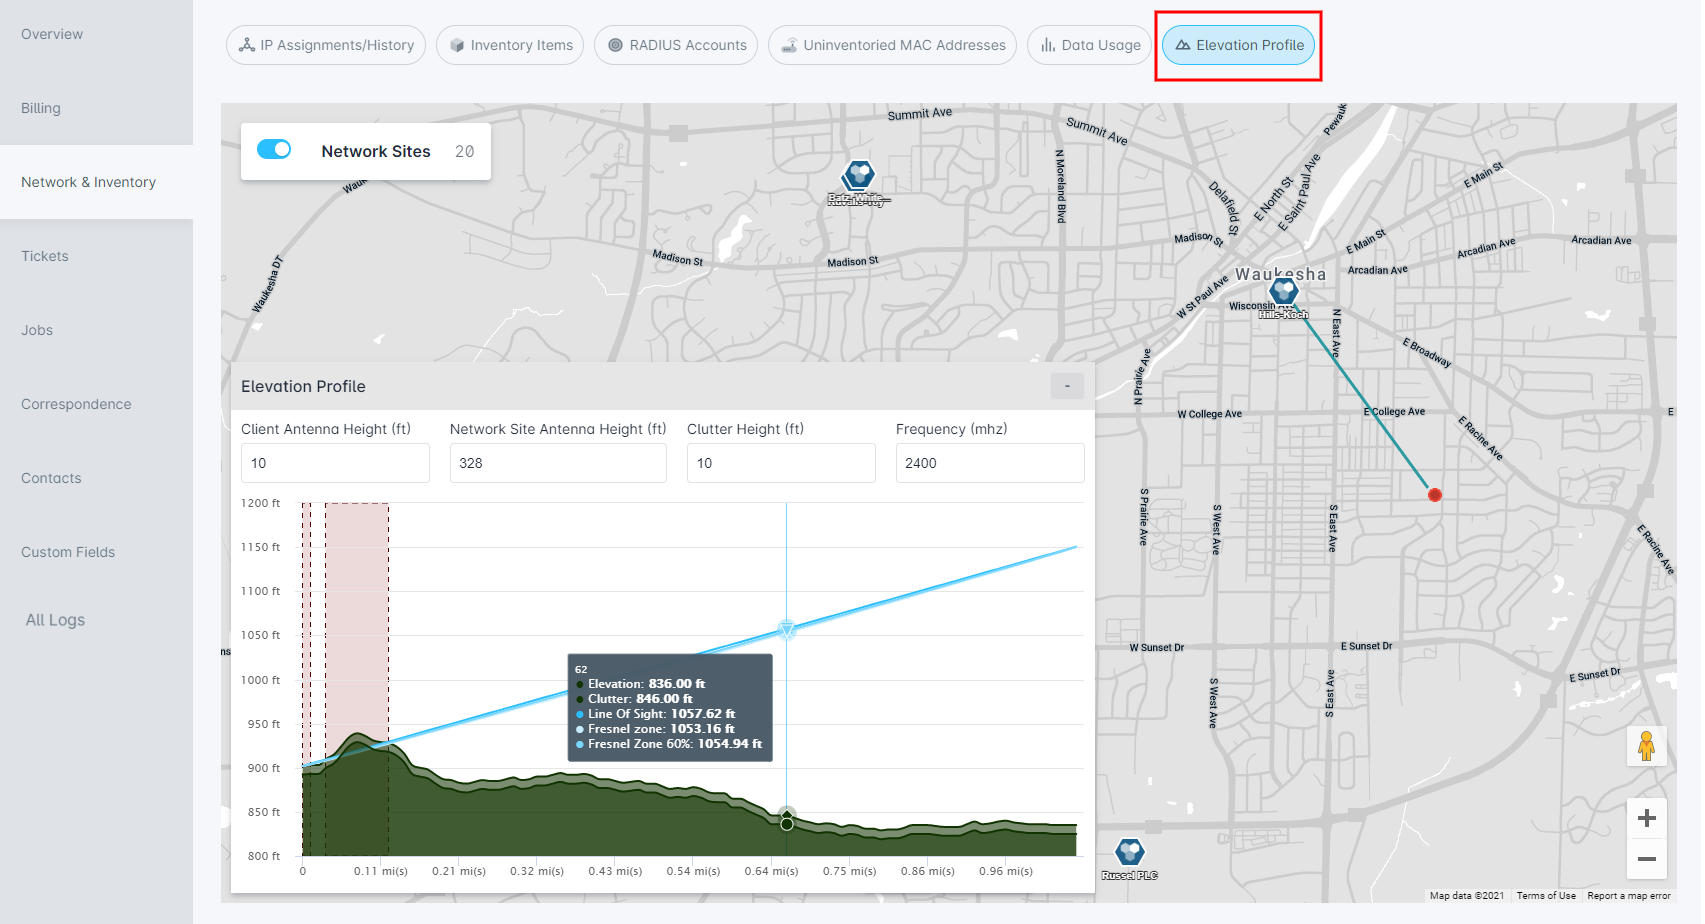
Elevation Profile
From within this tab, you can view the elevation profile between the account's serviceable address and your network sites. This provides a visual representation of the line of sight between the physical address and any network site selected so that you can easily see if there are any obstructions between these two points that might cause issues when getting the customer set up.
The account's serviceable address will appear as a red dot on the map, and your network sites can be toggled to appear on the map through the "Network Sites" button in the top-left corner. Clicking on one of the network sites from the map will open the Elevation Profile sub-window (pictured below), where you can view the line of sight between the serviceable address and the selected network site; hovering your cursor over the blue lines within the elevation profile sub-window will display details for the elevation, clutter, line of sight, and Fresnel zone for any point between those two locations.
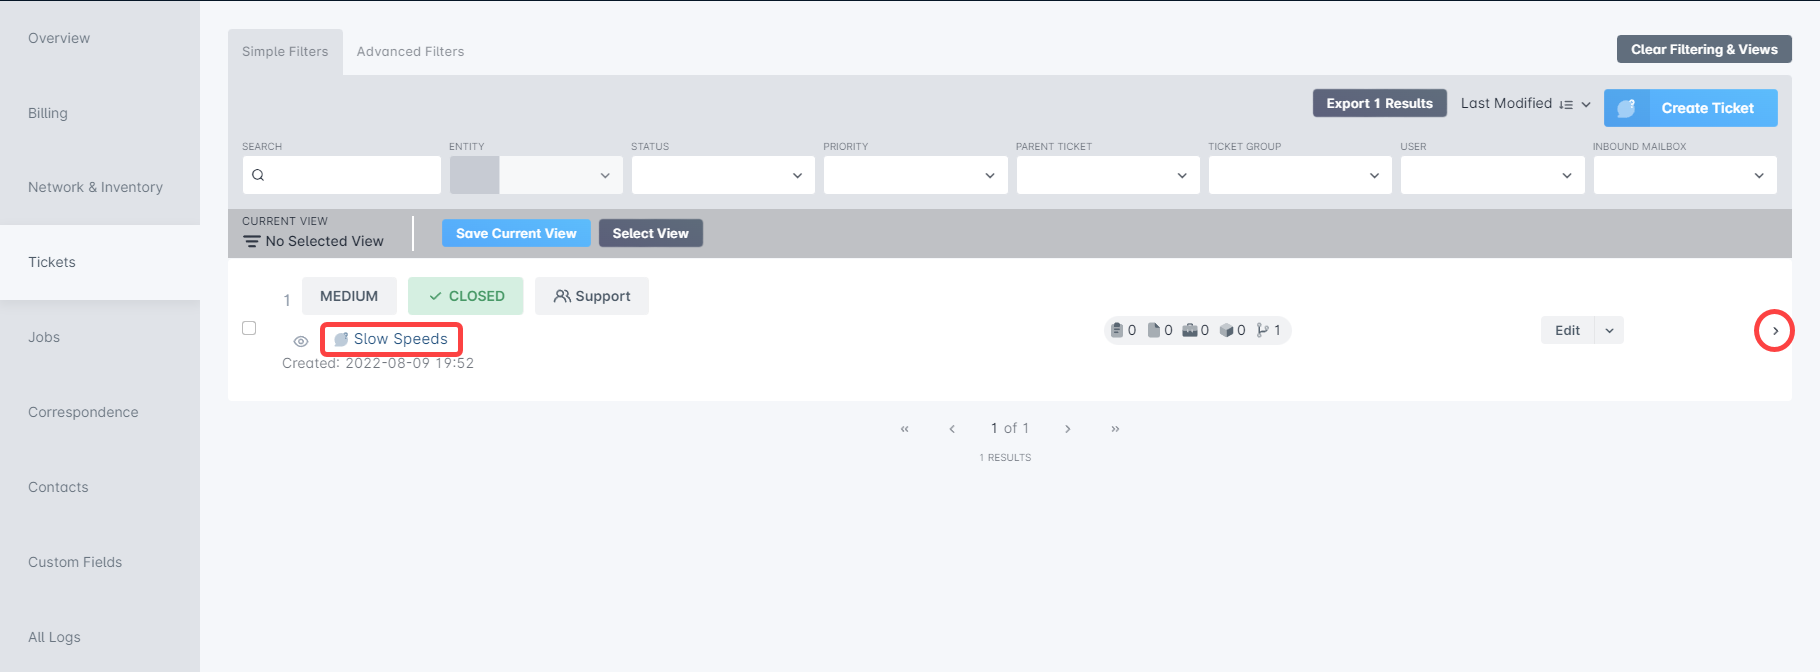
Tickets
All of an account's tickets will be available from within this tab, and new tickets for the account can be created from here as well (and will have the Assignee field prepopulated). Key details for each ticket will be visible, such as the ticket status, priority, group, visibility, creation date and time, and clicking on the name of the ticket will navigate into the management view for that particular ticket, while using the arrow at the end of the row will open a sidebar panel which provides further details.
To the right, the set of icons provide a visual representation of different items that can be associated with a ticket; from left to right these icons represent: tasks, files, jobs, inventory items, and child tickets.
At the far right, the "Edit" button can be used to modify certain ticket details, and further actions are available through the adjacent downward arrow menu - including assigning the ticket, merging it with another, editing the recipients, and creating a job from the ticket.
Jobs
This is where you can view all existing jobs associated with the account and also create a new job for the account. At the very top of the tab we have our filters panel, where you can toggle between using simple or advanced filters to search through the jobs in the list; directly to the right is the "Export # Results..." button, which can be used to export the data from the jobs table, and the “Create Job” button which can be used to create a new job for the account.
Under the Job column, each job type is displayed, as well as the amount of time it is scheduled to take, and the date and time the job is scheduled for if it has been scheduled already. Clicking the job type will navigate to the specific page for the job, while clicking the arrow at the end of the row will open a sidebar menu where you can view further details for that particular job.
If the job is linked to an existing ticket, it will be displayed and clickable under the Ticket menu; clicking the ticket name will navigate into the management view for that particular ticket. The “Attachments” column displays whether there are tasks, notes, or files associated with the job, and the Status column will display the current status for the job (Not Scheduled, Failed, Completed, etc.).
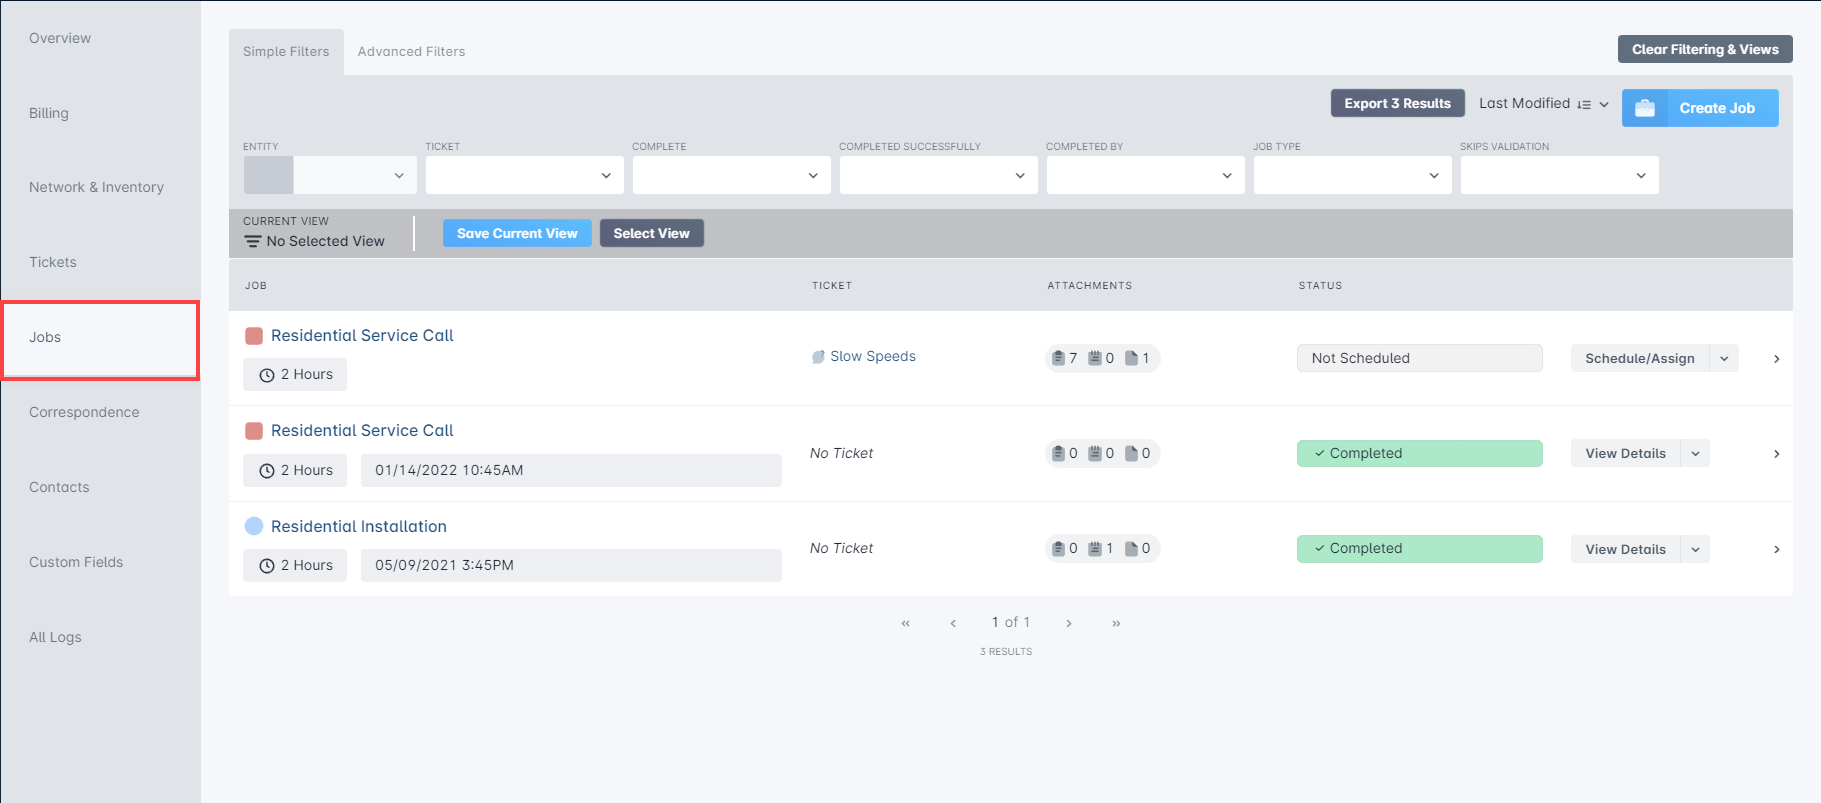
The actions menu for each job (available from the far-right side), will contain different actions depending on the status of the job. For example, if the job has been completed already, you will only be able to view the details, whereas if the job has not been scheduled yet, you will see options such as "Schedule/Assign", "Edit", or "Delete".
Correspondence
The Correspondence tab is where you will find communications with contacts on an account, in the form of call logs and emails.
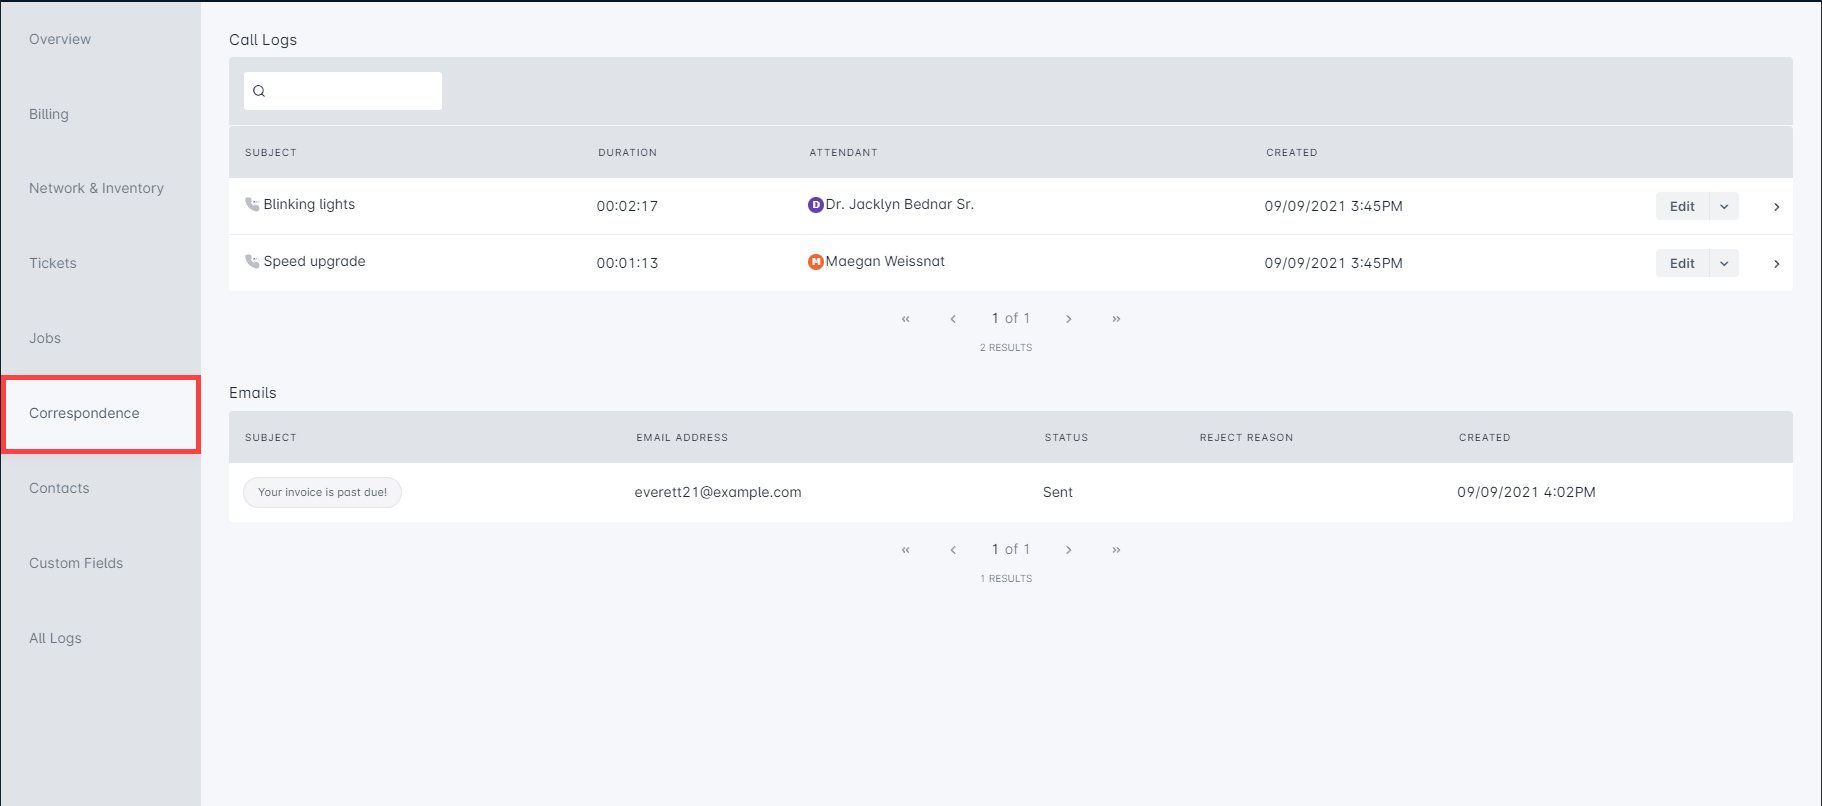
Call Logs
The Call Logs section of the Correspondence tab is where you can find all existing call logs for an account. Each call log will display the subject, duration of the call, the attendant (user) that started the call log, and the date it was created. Clicking the arrow at the end of the row will open a sidebar menu with further details about that particular log. Through the "Edit" menu, you can edit the call log, delete it, or create either an internal or public ticket based off of it. If you select either "Create Internal Ticket" or "Create Public Ticket" the information from the call log will be used to populate the Assignee, Account, Subject, and Description fields for the ticket automatically.
Emails
The Emails section of the Correspondence tab contains a list of emails sent to contacts on the account, and clicking on the email subject (under the SUBJECT column) will display the content of the email that was sent. Each email has the subject, the email address it was sent to, the status of the email, a reject reason if applicable, and the date it was sent. The status of the email can be one of the following:
- Queued: This means the email has not yet been sent out and is waiting to do so.
- Sent: Indicates that the email was sent successfully.
- Rejected: Means that the email was rejected by the recipient's mail server - in this case, the response from the recipient's mail server will be displayed under the Reject Reason column. Emails that are rejected for temporary reasons will be retried; emails that were rejected for permanent reasons, such as the mailbox does not exist, will not be retried.
- Invalid: This means that the email was determined to be invalid - for example, the email address it was sent out to was not a valid email address.
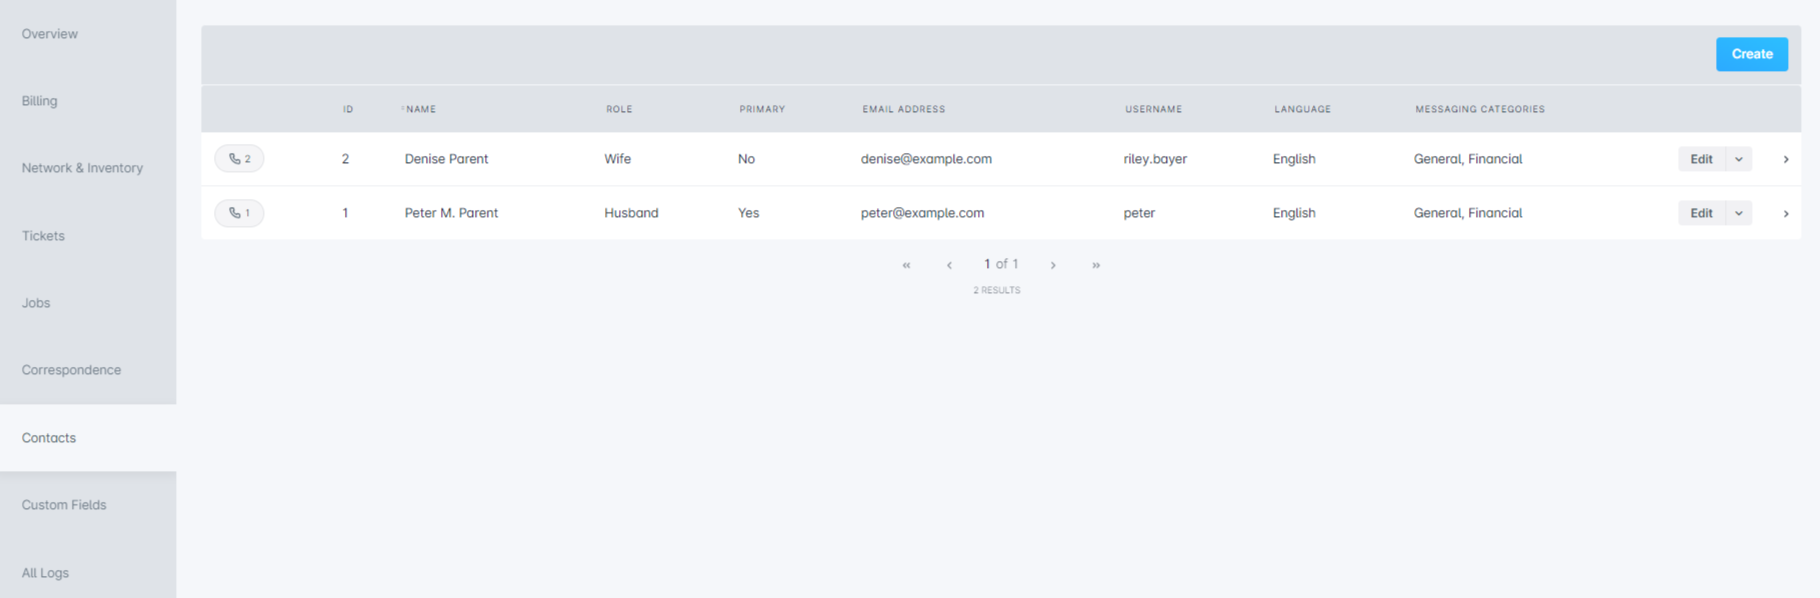
Contacts
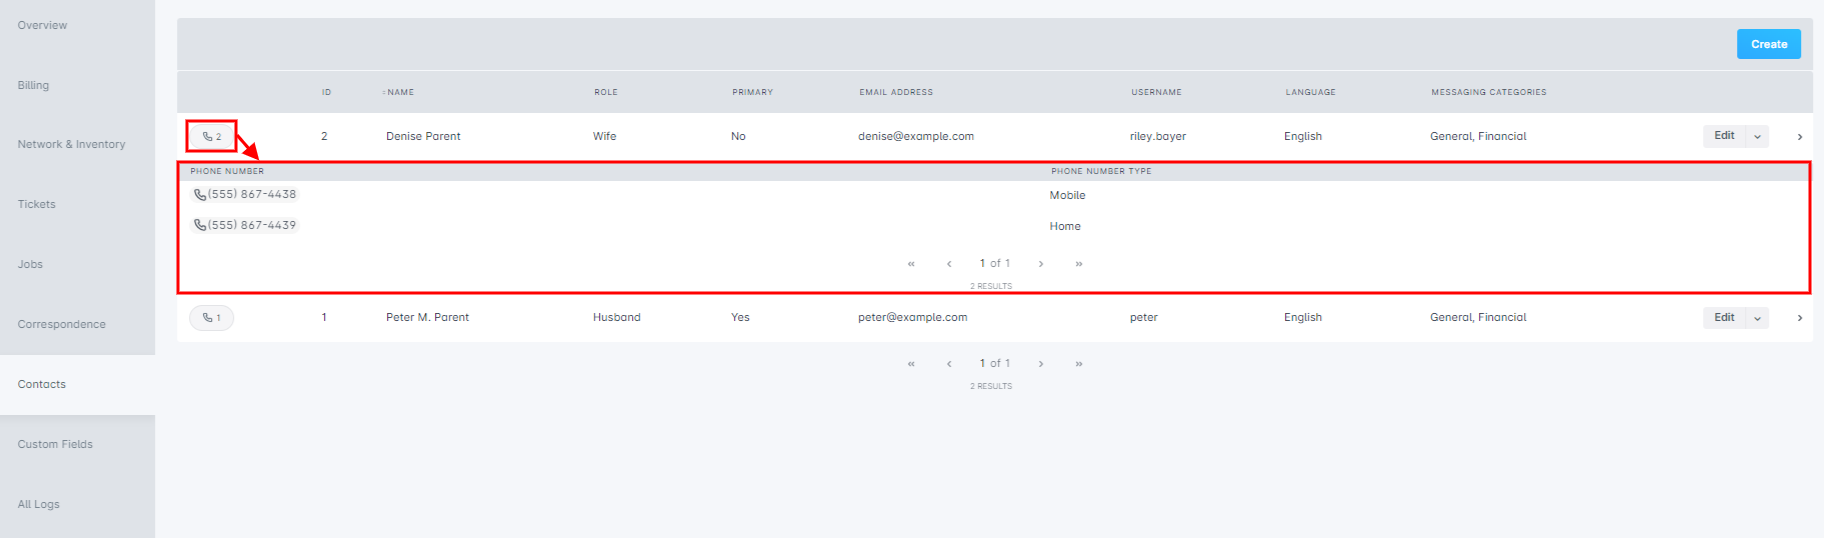
All contacts associated with the account will be displayed in the Contacts tab, and new account contacts can be added from here. The primary contact for the account will have “Yes” under the Primary column displayed next to their name, and their email address will be the one that is displayed within the main account header. Clicking on the arrow at the end of the row will open a sidebar window with further details.
Through the “Edit” menu, you can edit the contact's details, including replacing the primary contact (through the Become Primary checkbox), editing the phone numbers for a contact, which types of messages the contact should receive (through the Messaging Categories field), and their username and password for the customer portal. Clicking on the downward arrow (adjacent to “Edit”), you have the additional option of deleting the contact entirely.
Creating a New Account Contact
Clicking "Create" will open the Create Contact window. This is where you will input the contact's information such as their name, role, email address, language, etc. The username and password fields are utilized for access to the customer portal if enabled. This is also where you can define which email categories the contact should be set up to receive in Sonar by using the "Message Categories" dropdown menu - if you have any email categories that are set up to be default, they will appear here automatically but can be removed, if needed.
There is also the checkbox "Become Primary", which will appear when editing or creating a contact for an account which already has a primary contact designated; checking this box will effectively remove the primary contact designation from the previous user, making the new user the account's new primary contact. Once the primary contact has been set or updated, that contact's information will be displayed under the Primary Contact section of the account's Overview tab, and the contact's email address will be displayed in the main account header.

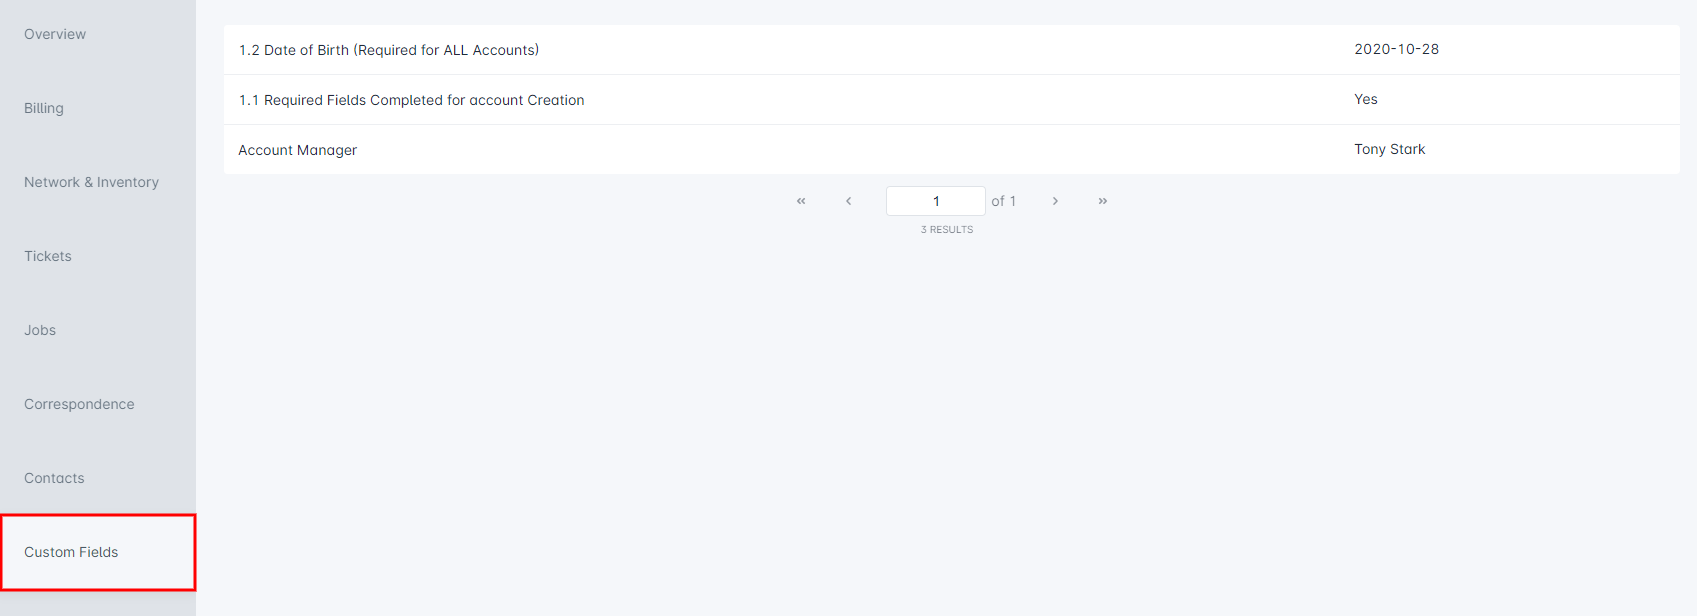
Custom Fields
The Custom Fields tab contains all the custom fields defined for the account. If there are no custom fields defined for the account, nothing will be displayed. Otherwise, the name of the custom field along with the value defined on the account for that field will be displayed.
The custom fields are only displayed here and cannot be edited from within this tab. To edit custom fields for the account, click on the "Edit" menu from within the main account header; the custom fields will be available to edit through the Edit Account window.
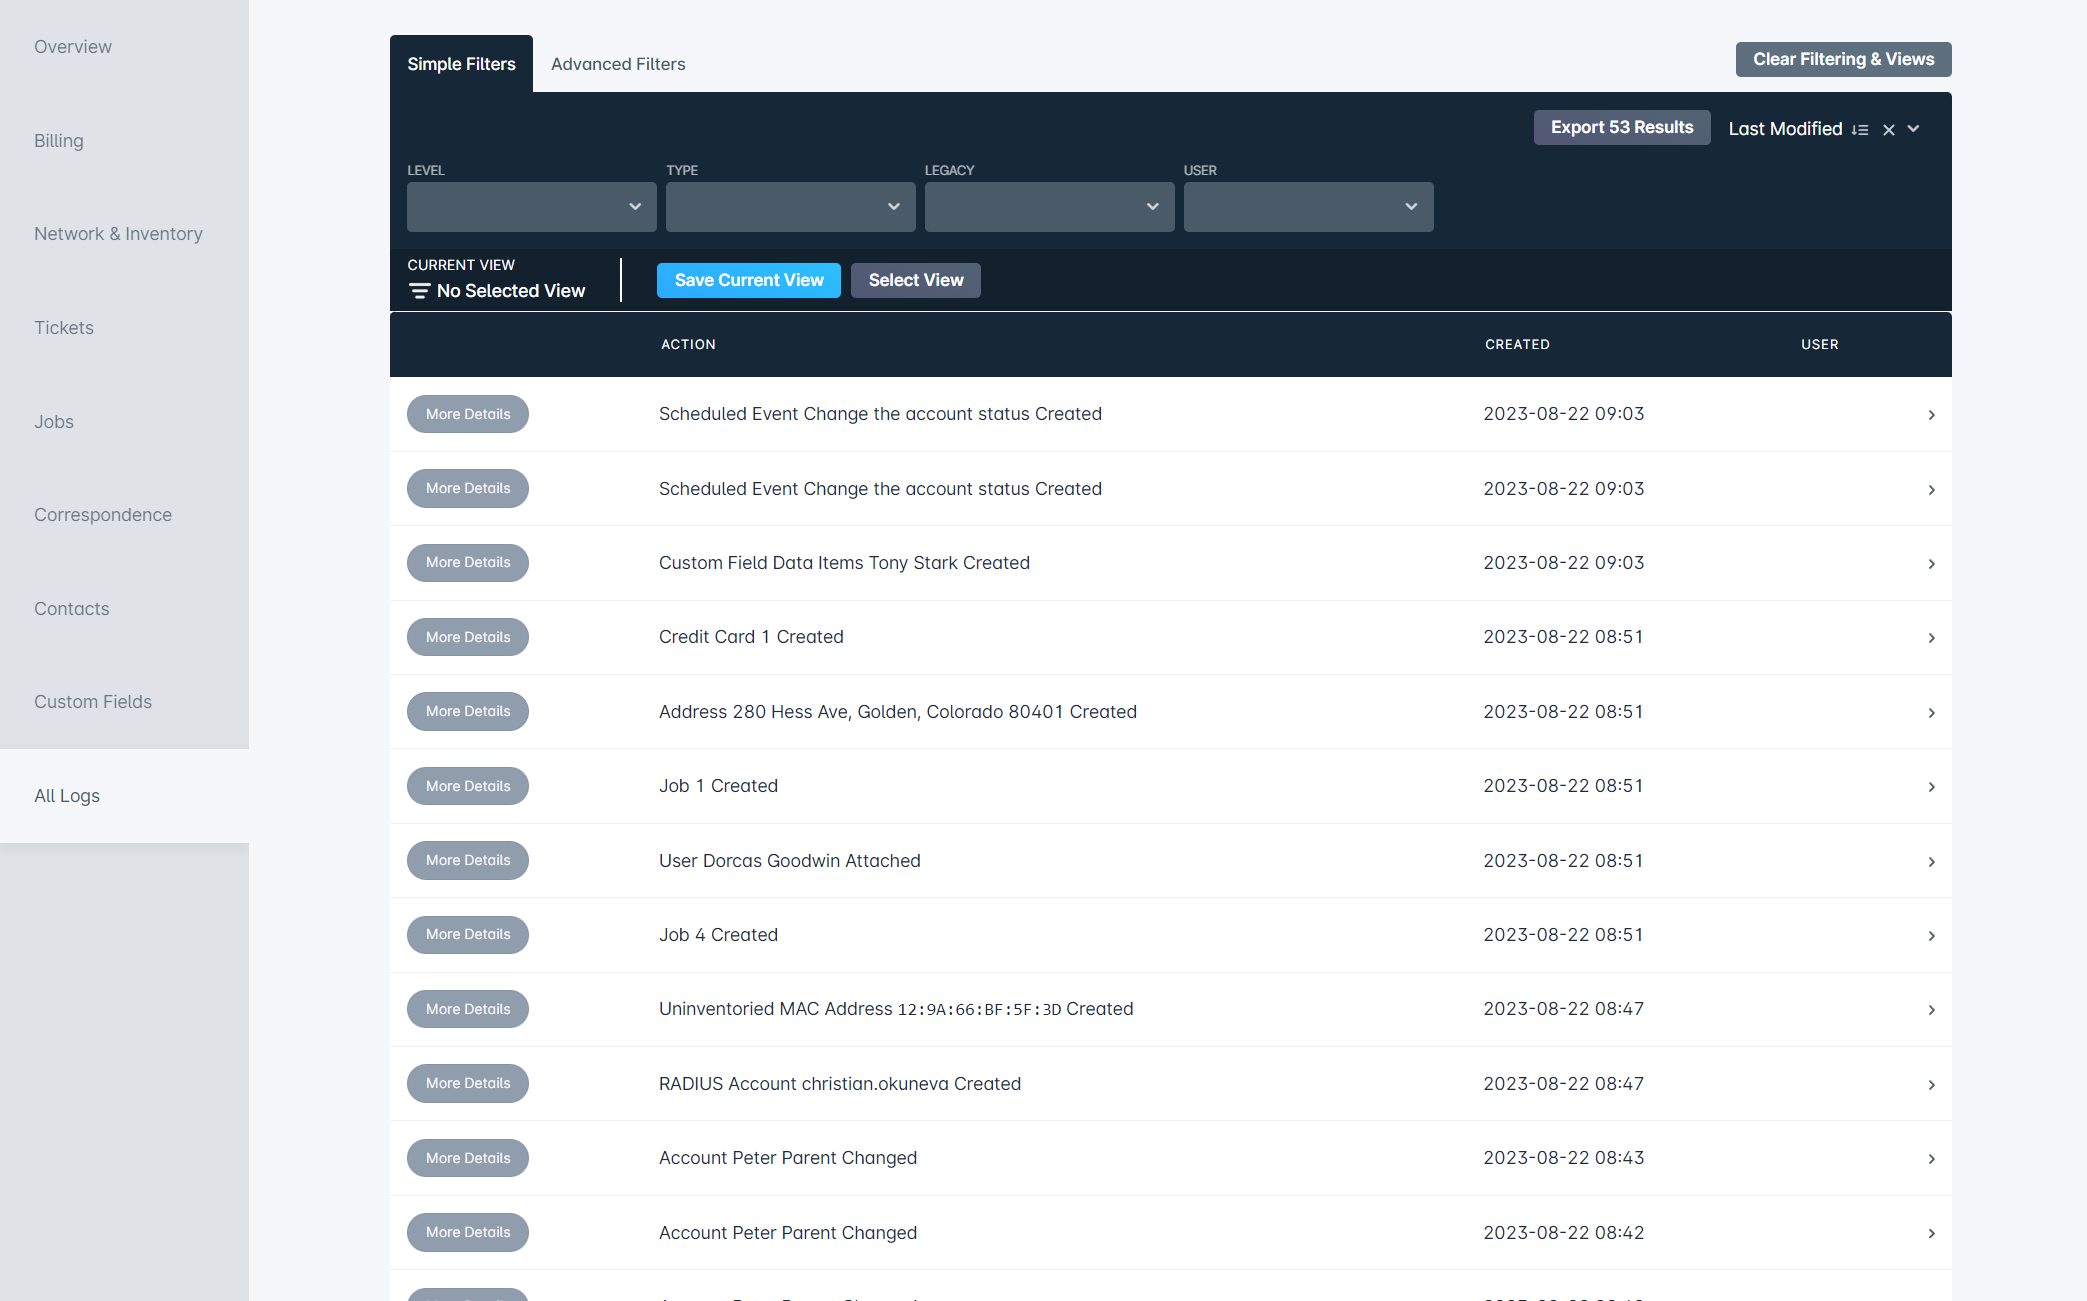
All Logs
The All Logs tab contains a record of all action activity recorded for the account. By default, this page simply lists all actions taken on the account. However, filters can be applied to refine the log results, and each log contains a button to view detailed information.