Table of Contents
IPAM: Overview
Read Time: 7 mins
The IP Address Management Dashboard provides a single convenient module to review, monitor, and modify the IP assignments given to your customers, network sites, and infrastructure. While individual accounts and network sites also record their assigned IP, the IPAM module is the only place where new Supernets, Subnets, and Pools can be created.
IPAM Dashboard View
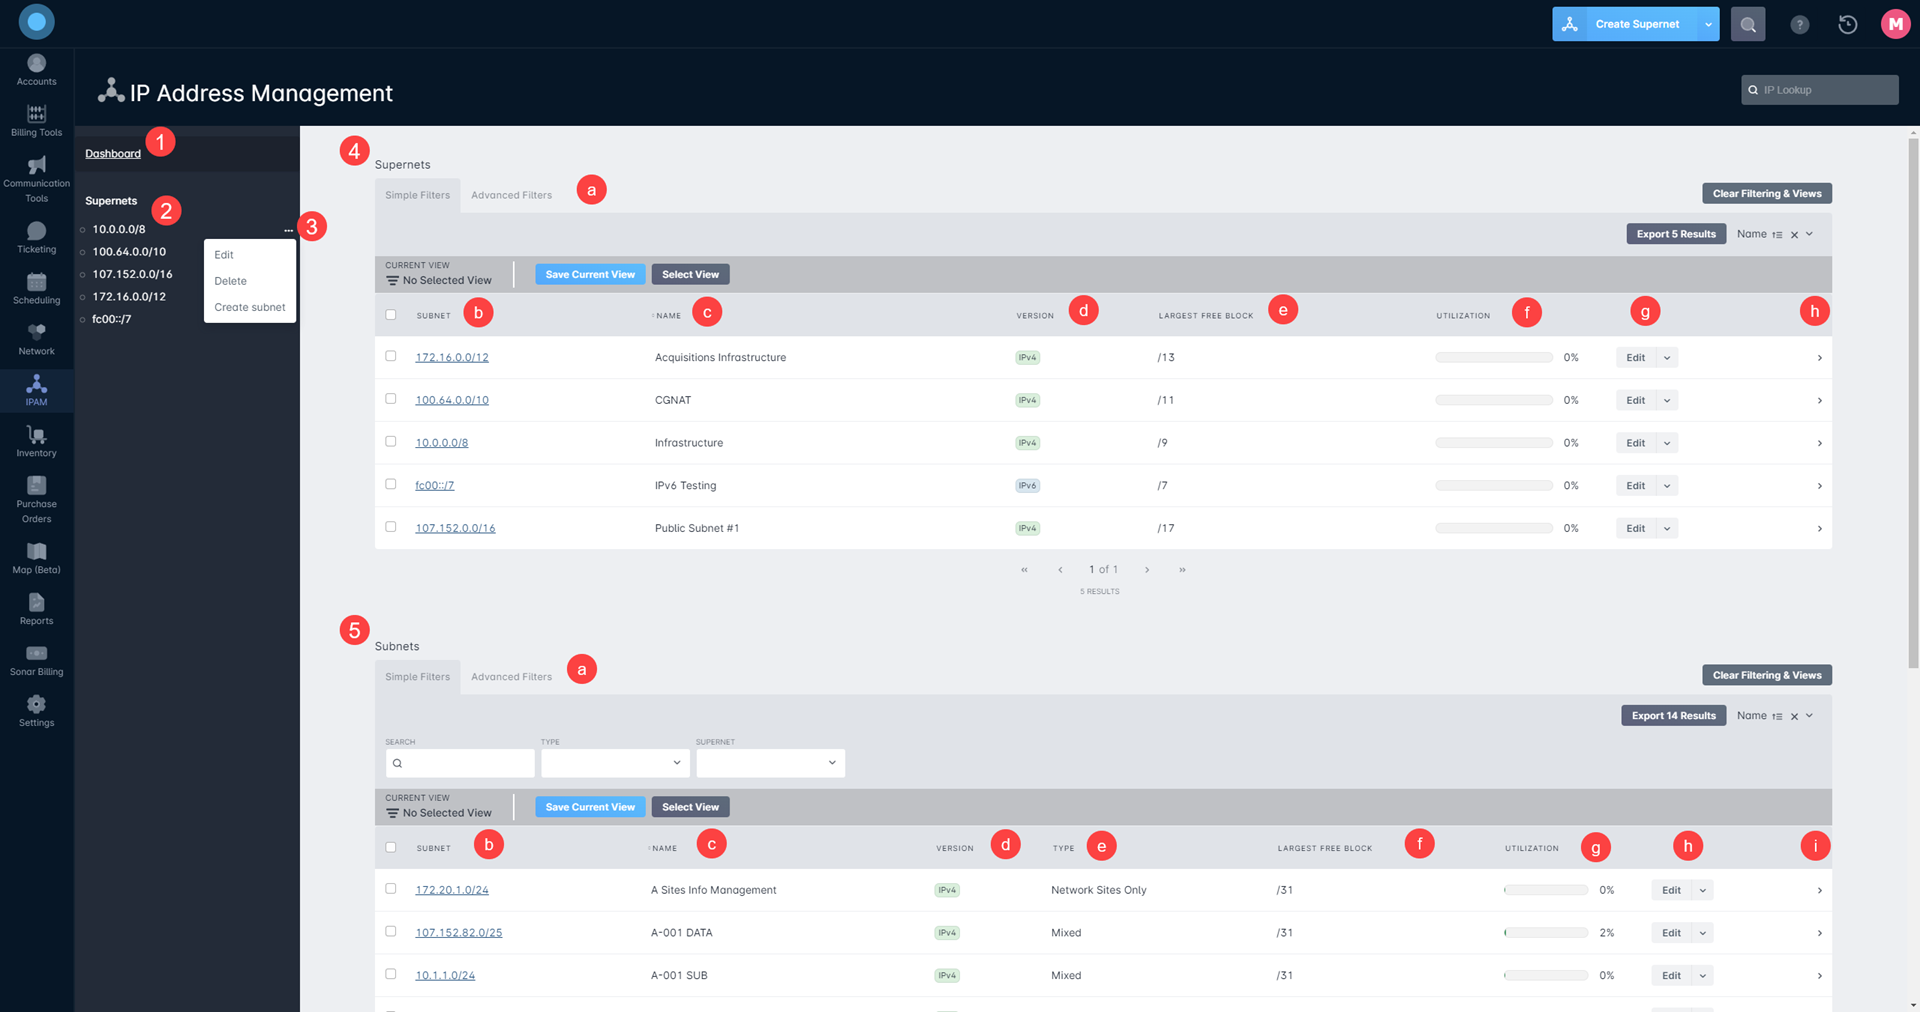
- Dashboard: Clicking here will always bring you to the top level of the supernets view.
- Supernet Explorer: Clicking on any of the available supernets will immediately redirect you into the Supernet view.
- Supernet Management: Clicking on the 3 dots next to any Supernet will open an additional menu, providing the following options:
- Edit
- Delete
- Create subnet
- Supernet table: The Supernet table contains details related to the Supernets you create in your instance.
- Through the Simple/Advanced toggle, you can perform a simple or advanced search. And through Saved Views, you can select from prepopulated filter configurations to be automatically enabled; along with prepopulated views, this section also holds any private saved views you've created, and any public saved views in your instance. For more information on using filters, take a look at our Filtering: Simple vs Advanced article.
- The Subnet column provides the IP addressing and IP range information for the supernet.
- The Name column shows the name provided to the supernet when it was created.
- The Version column shows the IP version information of the supernet, either IPv4 or IPv6.
- The Largest Free Block column will provide the largest IP block available for each supernet.
- The Utilization column provides a progress bar and numerical value for displaying the current usage of the supernet.
- The Edit column allows you to modify the Supernet, and by clicking on the dropdown arrow, you can delete the Supernet or create a Subnet from it.
- The sideways arrow (
>) opens your Supernet side panel, providing additional details, and a link to the management page for the Supernet.
- Subnet table: The subnet table provides information related to the subnets created in your instance.
- Through the Simple/Advanced toggle, you can perform a simple or advanced search. And through Saved Views, you can select from prepopulated filter configurations to be automatically enabled; along with prepopulated views, this section also holds any private saved views you've created, and any public saved views in your instance. For more information on using filters, take a look at our Filtering: Simple vs Advanced article.
- The Subnet column provides the IP addressing and range information for the Subnet.
- The Name column shows the name provided to the subnet when it was created.
- The Version column lists the IP version of the added subnet, either IPv4 or IPv6.
- The Type column provides information on the usage type that the Subnet is assigned to, between:
- Accounts Only
- Excluded
- Mixed
- Network Sites Only
- The Largest Free Block column will provide you with the largest free block of IP addresses that can be used to create an IP Pool.
- The Utilization column will provide a visual and numerical representation of the relative IP address assignment usage within the subnet.
- The Edit column allows you to modify the Subnet, and by clicking on the dropdown arrow, you can:
- Delete the Subnet
- Split the Subnet
- Merge two Subnets from the same Supernet
- Create a new IP Pool from addresses within the Subnet
- The sideways arrow (
>) opens your Subnet side panel, providing additional details, and a link to the management page for the Subnet.
Supernet View
- Supernet: This is the current Supernet you are viewing the details of.
- Current Usage: The percentage of your Supernet that presently has subnets assigned to it.
- Assigned Addresses: The number of IP addresses within the Supernet that are currently assigned to accounts and network sites.
- Unassigned Addresses: The number of IP addresses within the Supernet that are not currently assigned.
- Edit Menu: Clicking “Edit” will allow you to modify certain details of the Supernet while clicking the adjacent downward arrow will provide the options to delete the Supernet or create a new subnet.
- Subnets Table: This is a simplified subnet view showing all the Subnets within this Supernet. This table contains the same information as the Subnet table in the dashboard.
- IP Lookup: Here you can search a specific IP address to bring up its current and historical assignments.
- Create Subnet: Through this button, you can create a new subnet within this Supernet.
Subnet View
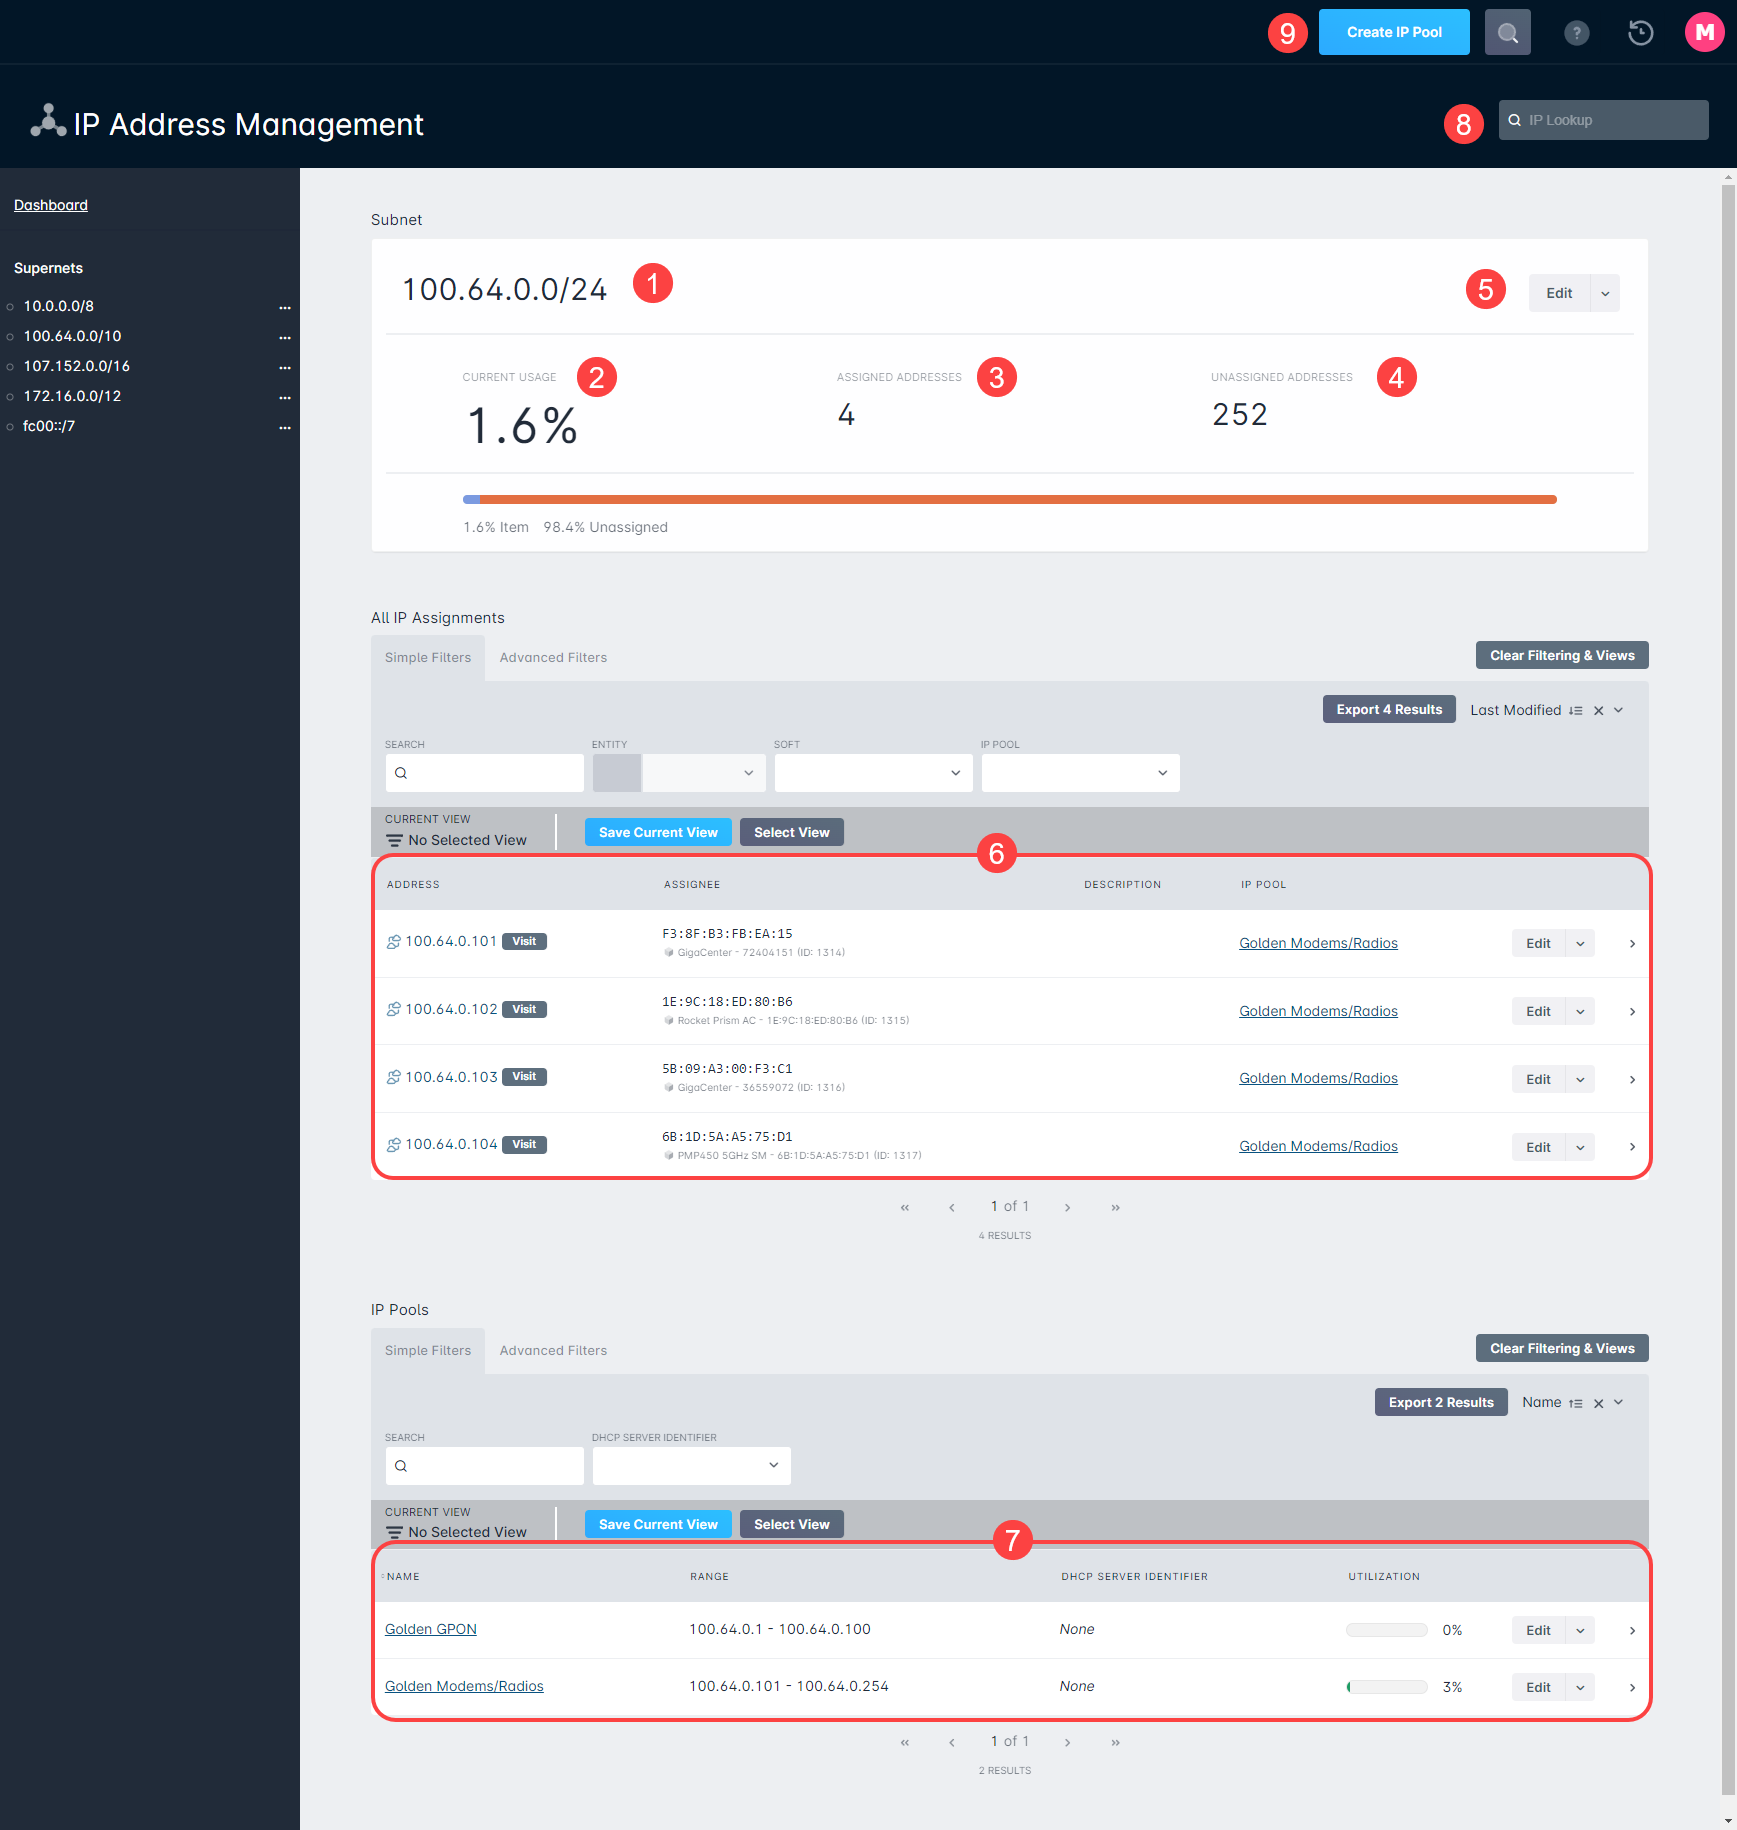
- Subnet: This is the current subnet you are viewing the details of.
- Current Usage: The percentage of IP addresses within the subnet that are currently assigned to accounts and network sites.
- Assigned Addresses: The number of IP addresses within the subnet that are currently assigned to accounts and network sites.
- Unassigned Addresses: The number of IP addresses within the subnet that are not currently assigned.
- Edit Menu: Clicking "Edit" will allow you to modify certain details of the subnet, while clicking the adjacent downward arrow will provide a menu with additional options, such as deleting, splitting, or merging the subnet, and creating an IP pool.
- All IP Assignments Table: Here you can view the details of all IP assignments made from within this subnet.
- IP Pools Table: This is a simplified IP pool view showing all the pools within this subnet.
- IP Lookup: Here you can search a specific IP address to bring up its current and historical assignments.
- Create IP Pool: Clicking this button will open a new window where you can create an IP Pool from within this subnet.
Pool View

- IP Pool Details
- Name: The name of the IP Pool
- Subnet: The subnet that the pool belongs to
- IP Range: The range of available IPs within the pool
- IPs Available: The remaining IPs within a pool that are available to be assigned
- DHCP Servers Table: This table provides the details for the DHCP server that the pool is assigned to; through the "Edit DHCP Servers" button you can edit a DHCP server that the pool is currently assigned to, or assign an existing DHCP server.
Review the article here for more information on setting up a Sonar controlled DHCP server.
- LTE EPCs Table: This table provides the details for the LTE EPCs that the pool is assigned to; through the "Edit LTE EPCs" button you can edit an LTE EPC that the pool is currently assigned to, or assign an existing LTE EPC.
- IP Assignments Table: This table will display any IP assignments that have been made within this pool.
- IP Lookup: Here you can search for a specific IP address to bring up its current and historical assignments.
IP Lookup View
Using the IP lookup will present you with a view that shows you where an IP address is assigned, as well as all historical assignments that have ever existed for this IP address. A common use case for this tool would be to look up the assignment history to properly link a time and IP address presented in a DMCA offense notice to the proper offending account.
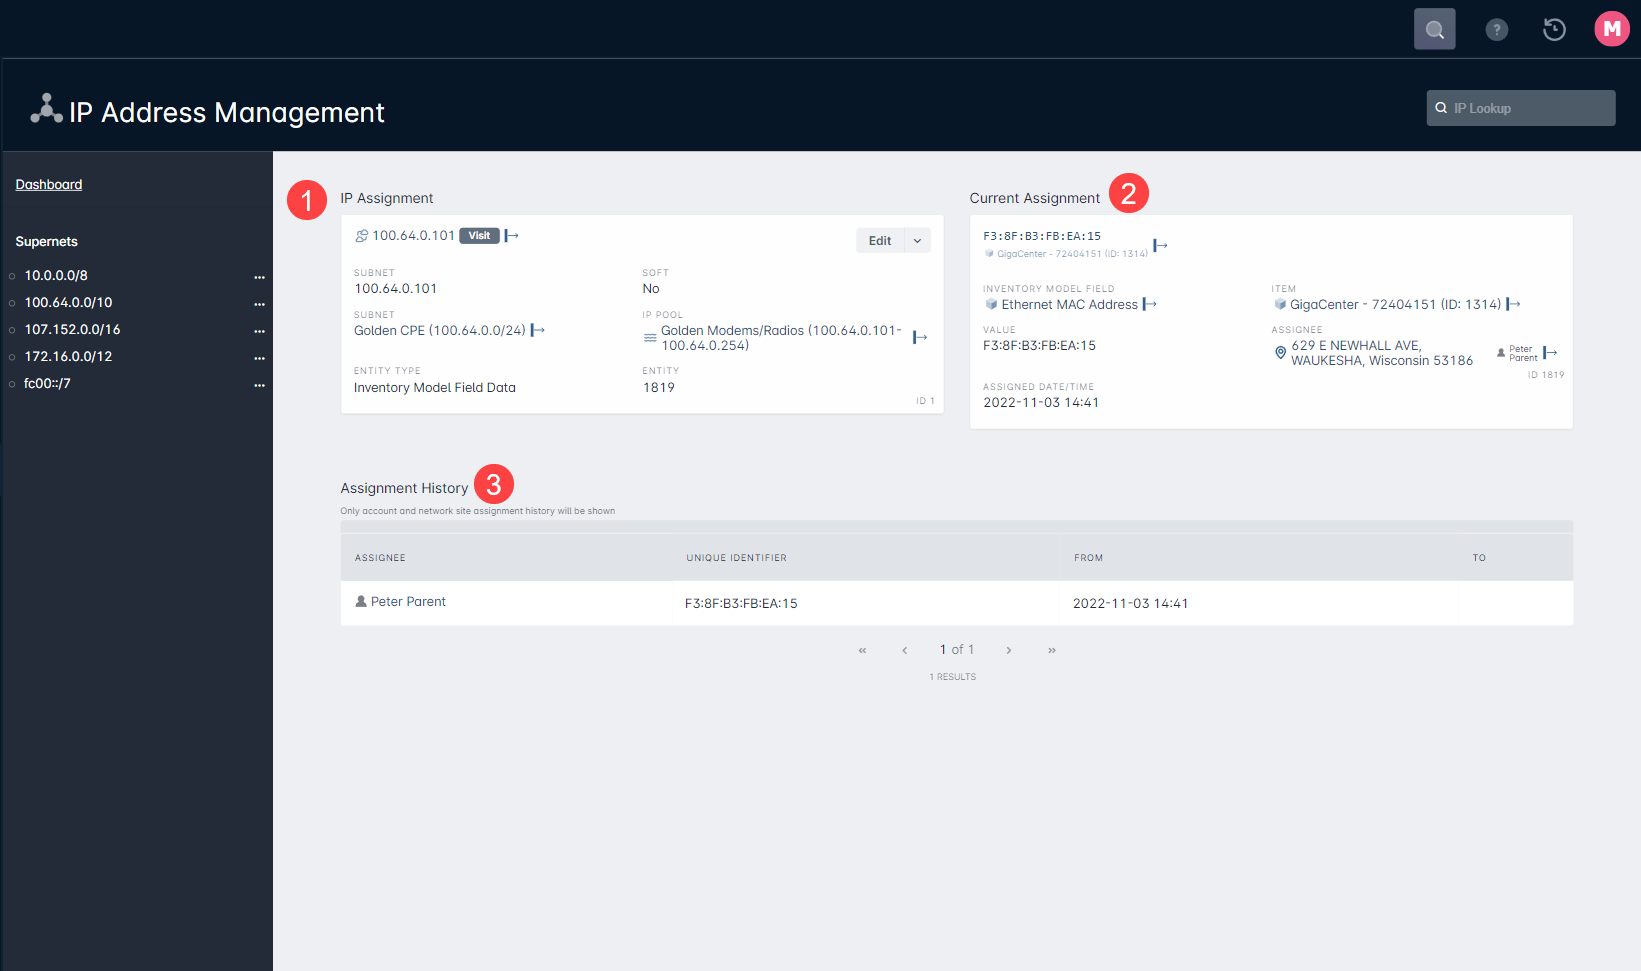
- IP Assignment:
- Subnet: The individual IP you are looking up
- Subnet: The subnet this individual IP is a member of
- Entity: This displays the type of entity that the IP is assigned to
- Soft: If this IP address was soft assigned, it will display "Yes"
- IP Pool: The name of the IP pool that the assignment is a member of
- Entity ID: The specific ID that the IP assignment is made to, for example: an inventory model field ID or RADIUS user ID
- Current Assignment: This area will display the details for the entity that the IP is assigned to, such as
- The Inventory Model Field
- The Inventory Item (Model and ID)
- The Inventory Model Field Value
- The Assignee information, which you can click on to receive information on the account or network site in question
- IP Assignment History Table: If the IP assignment has ever existed on another account or network site, a record of that history will be shown here.