Table of Contents
Tower Coverage Integration: Overview
 Updated
by Mitchell Paul-Soumis
Updated
by Mitchell Paul-Soumis
Read Time: 11 mins
What is Tower Coverage?
Tower Coverage is a third-party service designed from the ground up for Wireless Internet Service Providers, built to create a dynamic coverage map based on Network Site and Network Footprint information you provide.
Tower Coverage simplifies the customer signup process by embedding a signup sheet on a webpage of your choice. This sheet captures the customer's location information, checks it against your coverage map, and provides you with a corresponding lead in your Sonar instance, alongside the nearest tower information. As a result of implementing Tower Coverage and using it effectively, you'll be able to partially automate the lead generation process, the customer intake process, and the address qualification process within Sonar.
Creating a Role to Manage Tower Coverage
In order to manage and make use of the Tower Coverage integration, new role permissions have been added to every Sonar instance. Please take a moment to review these new permissions, and ensure a role is created to allow the management of this integration.
By navigating to Settings → Security → Roles and either editing an existing Role or creating a new Role, you'll be able to see permissions specific for managing Tower Coverage:
The Tower Coverage Configuration permissions have to do entirely with the management of the integration – if the role you're modifying or creating won't be modifying the integration parameters, these permissions can be left unselected.

The Tower Coverage Submission permissions have to do with the management of customer information sent to your Sonar instance by the Tower Coverage integration, which we'll review in more detail later. If you plan to allow this role to view and manage submissions from Tower Coverage, this permission needs to be enabled.

Using Tower Coverage with Sonar
To start using Tower Coverage in your Sonar instance, you'll need to have an account created with them already. While we integrate with their tool, there is no direct link between the applications and no way to sign up within Sonar.
Once an account is created, follow the below steps to begin the process of integrating Tower Coverage with your Sonar workflow:
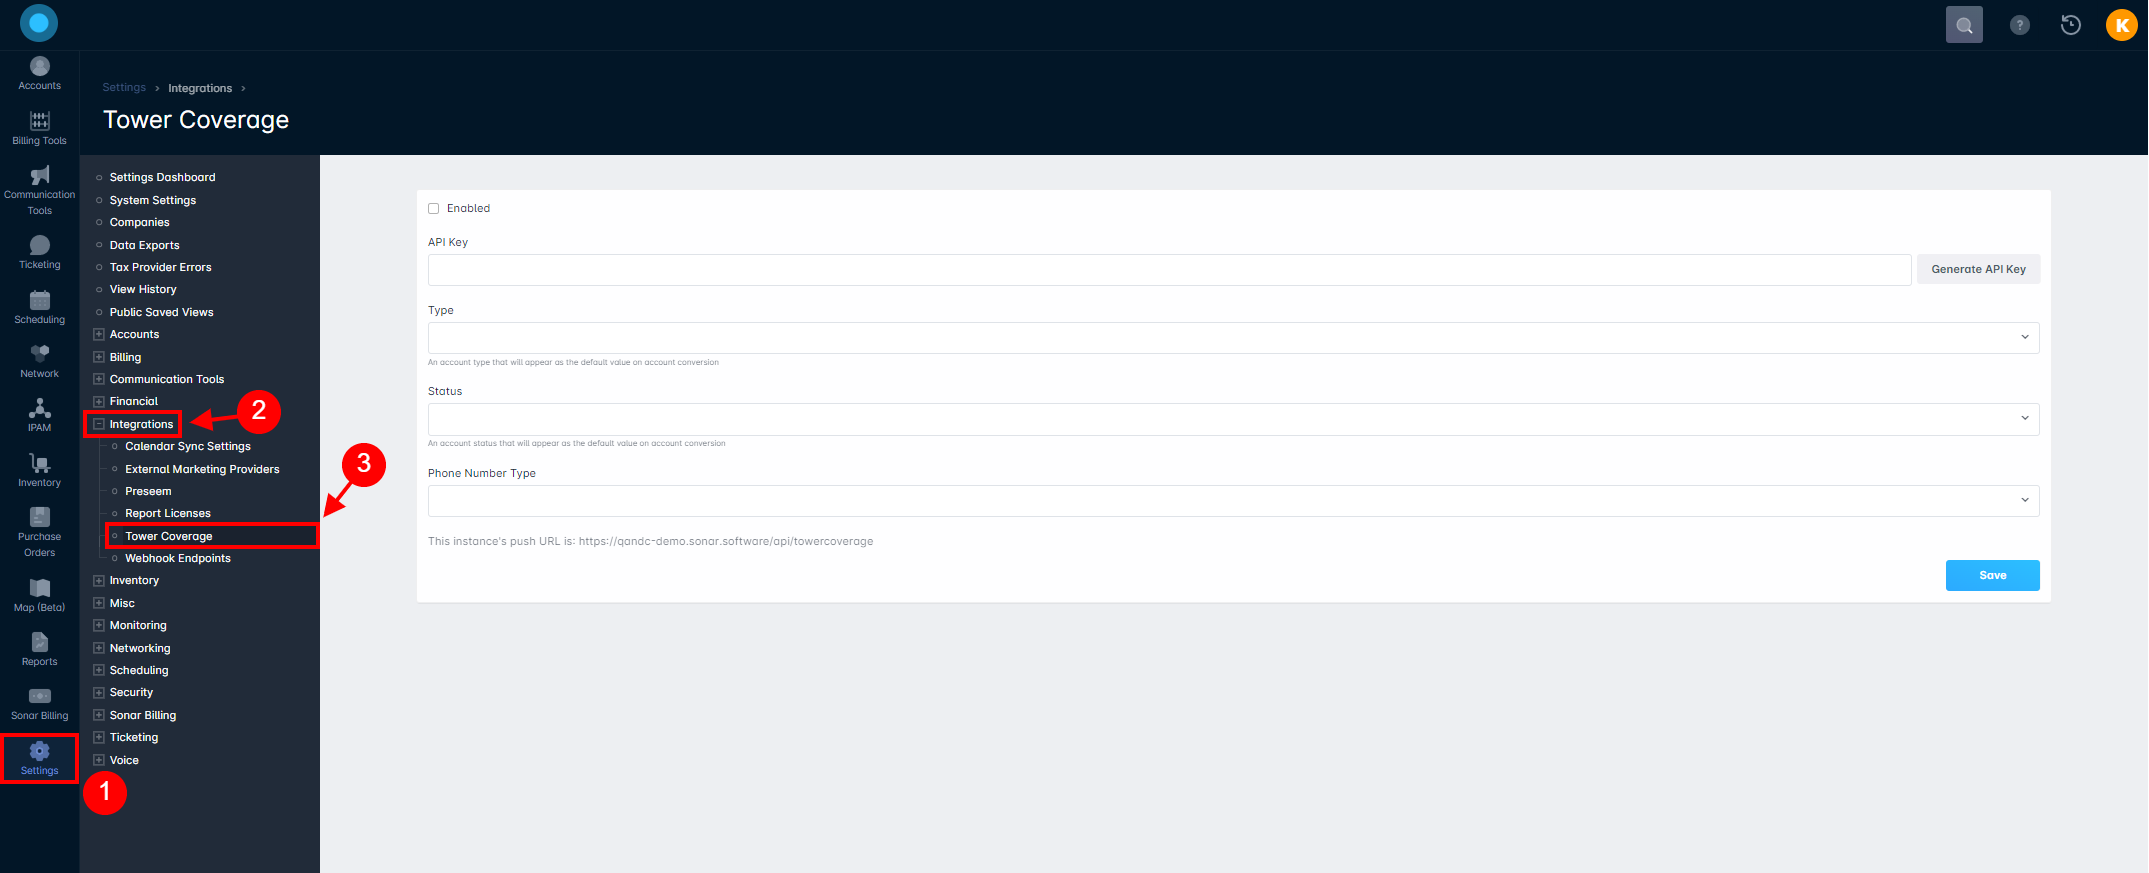
- Click on Settings.
- Expand the Integrations section.
- Click on Tower Coverage.
Setting up the Integration in Sonar
The first step in setting up the integration is filling out the fields on the Integrations page in Sonar:

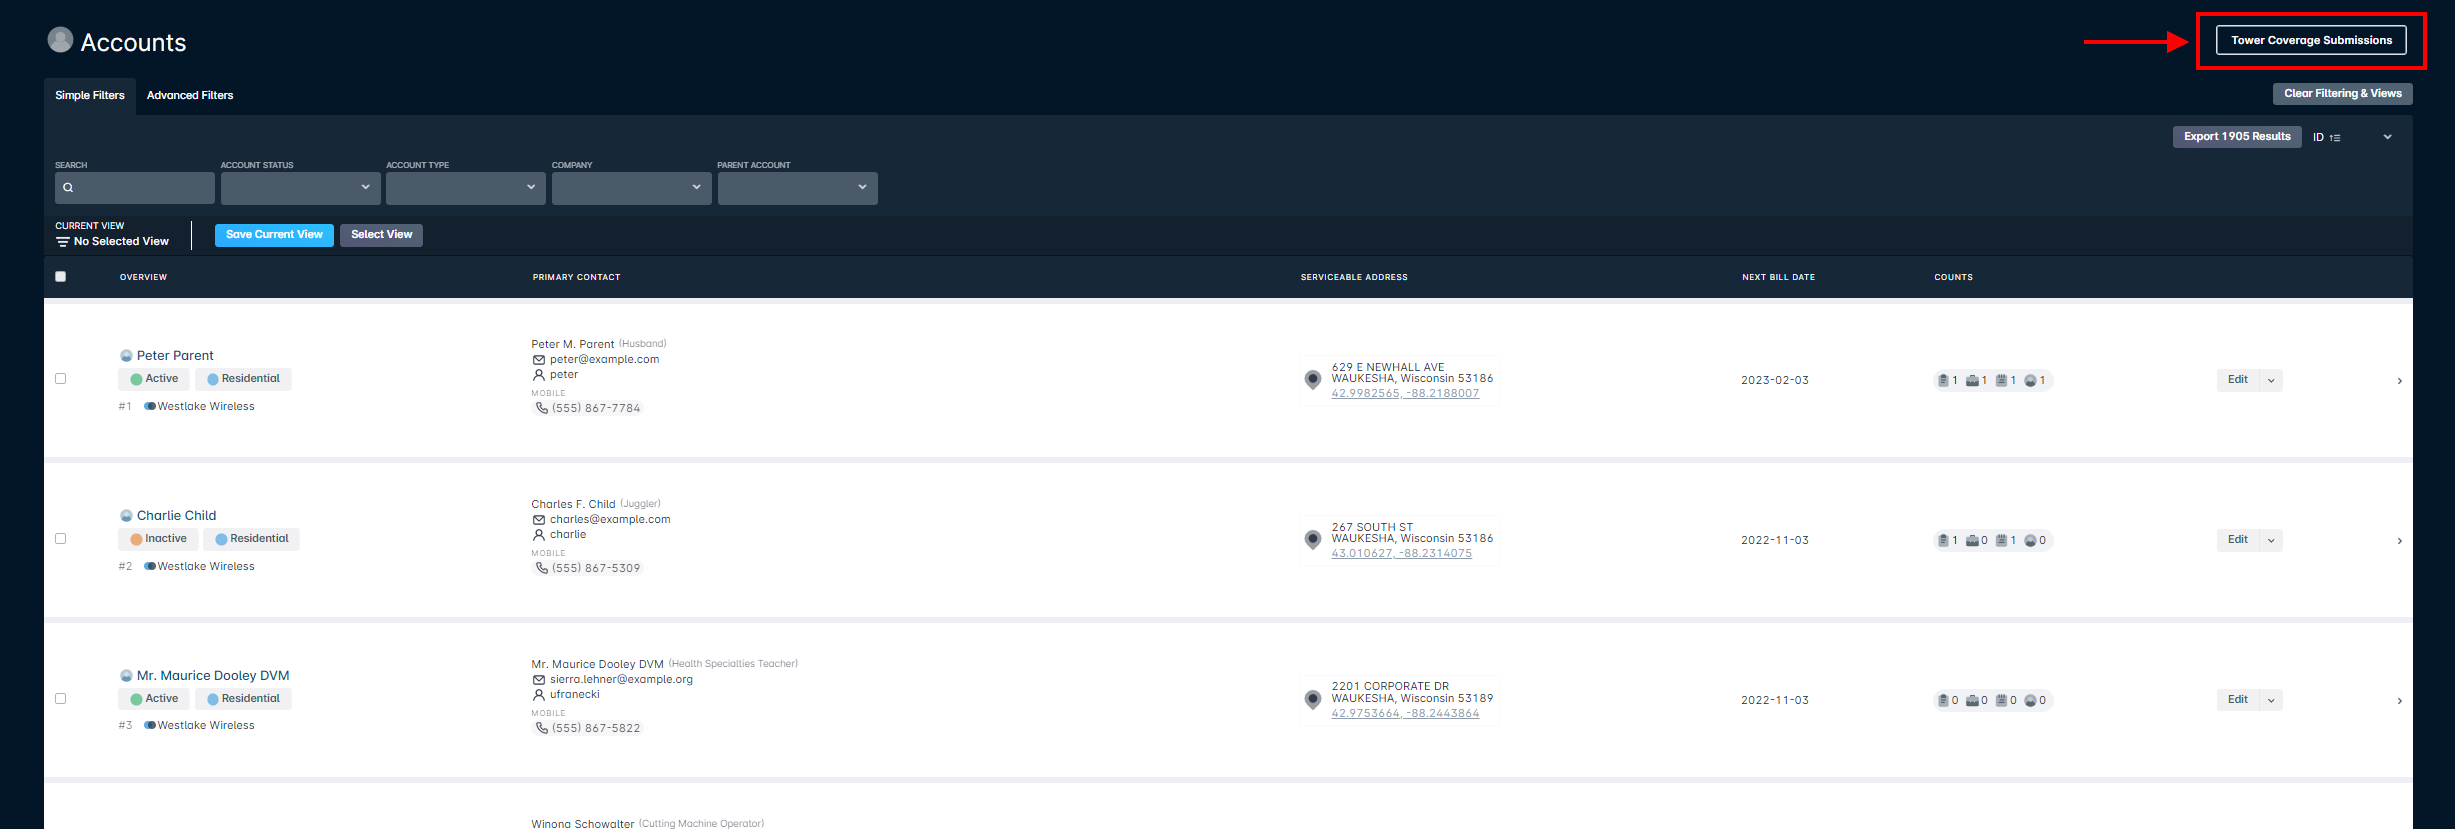
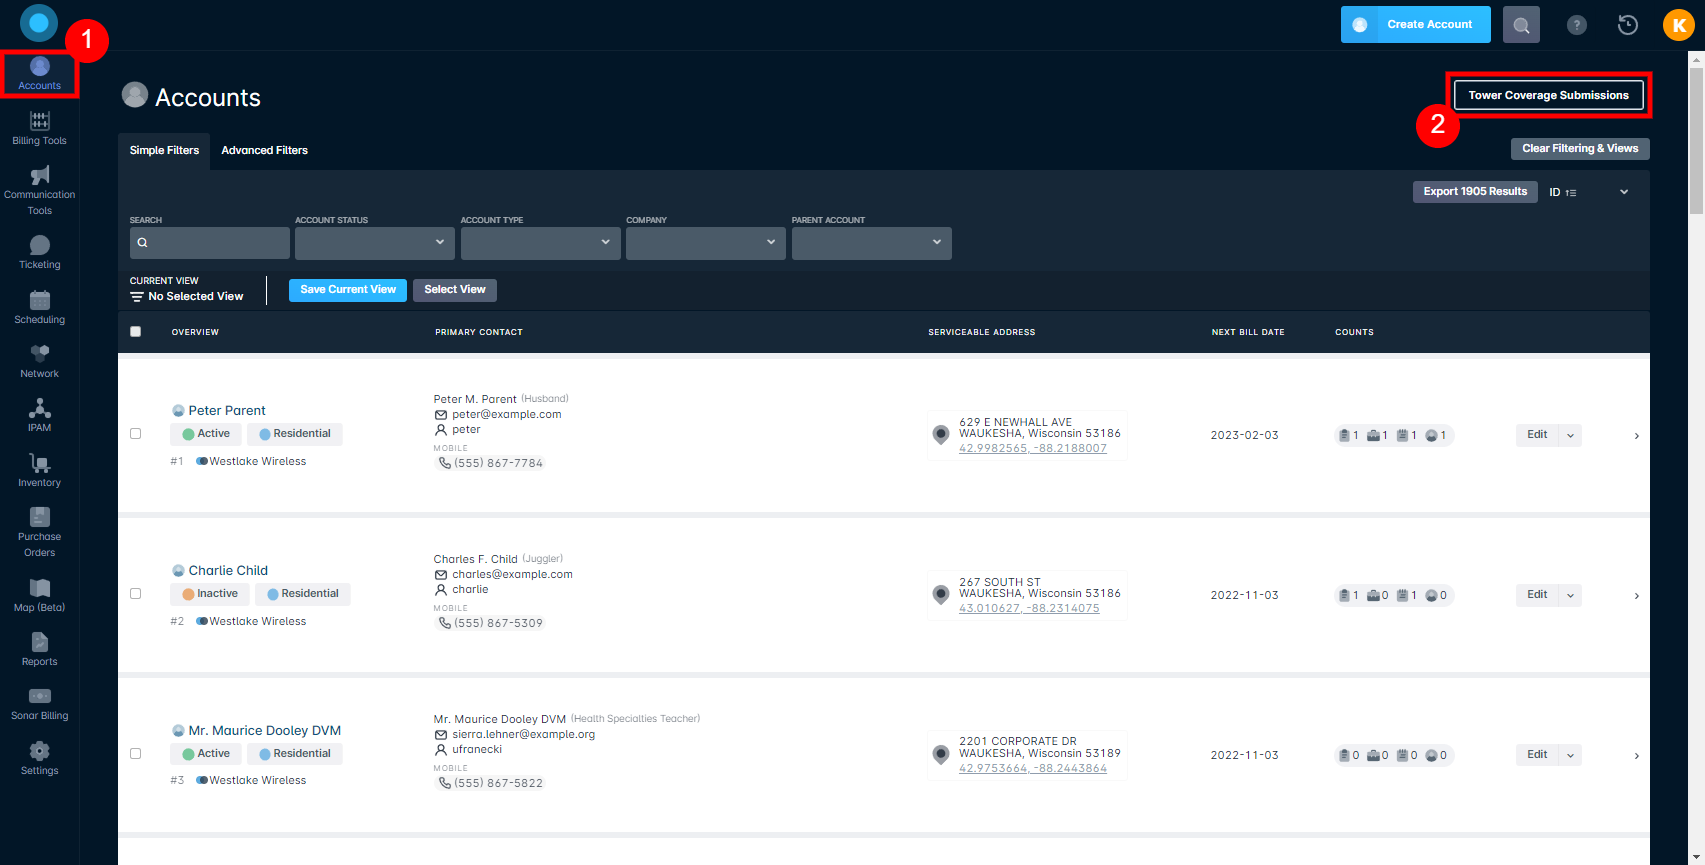
- The Enabled checkbox allows you to control whether this integration is enabled. When the Tower Coverage integration is enabled, a “Tower Coverage Submissions” button will appear on the Accounts List View.
- The API Key acts as a sort of password for communication between Tower Coverage and your Sonar instance.
- The Type selector allows you to define a default account type for all customers forwarded to your instance. This will apply to all potential customers forwarded by Tower Coverage, but can be changed on an individual basis as required.
- The Status selector will define the default account status for all customers forwarded to your instance by Tower Coverage. The account status can also be changed on an individual basis, but most commonly will change along with their progress through your onboarding stages.
- The Phone Number type allows you to select how the customer's contact number is stored. This can be modified on a case-by-case basis.
- The instance's push URL will vary based on your actual instance name and will need to be provided to Tower Coverage to complete the setup.
Once this information is filled out, click “Save” to complete the first step of the integration.
Linking your Tower Coverage Account with Sonar
The next step on the path to implementing Tower Coverage effectively is taking the API key you generated, and the instance's Push URL, and linking them within your Tower Coverage account, which you can do by following these steps:
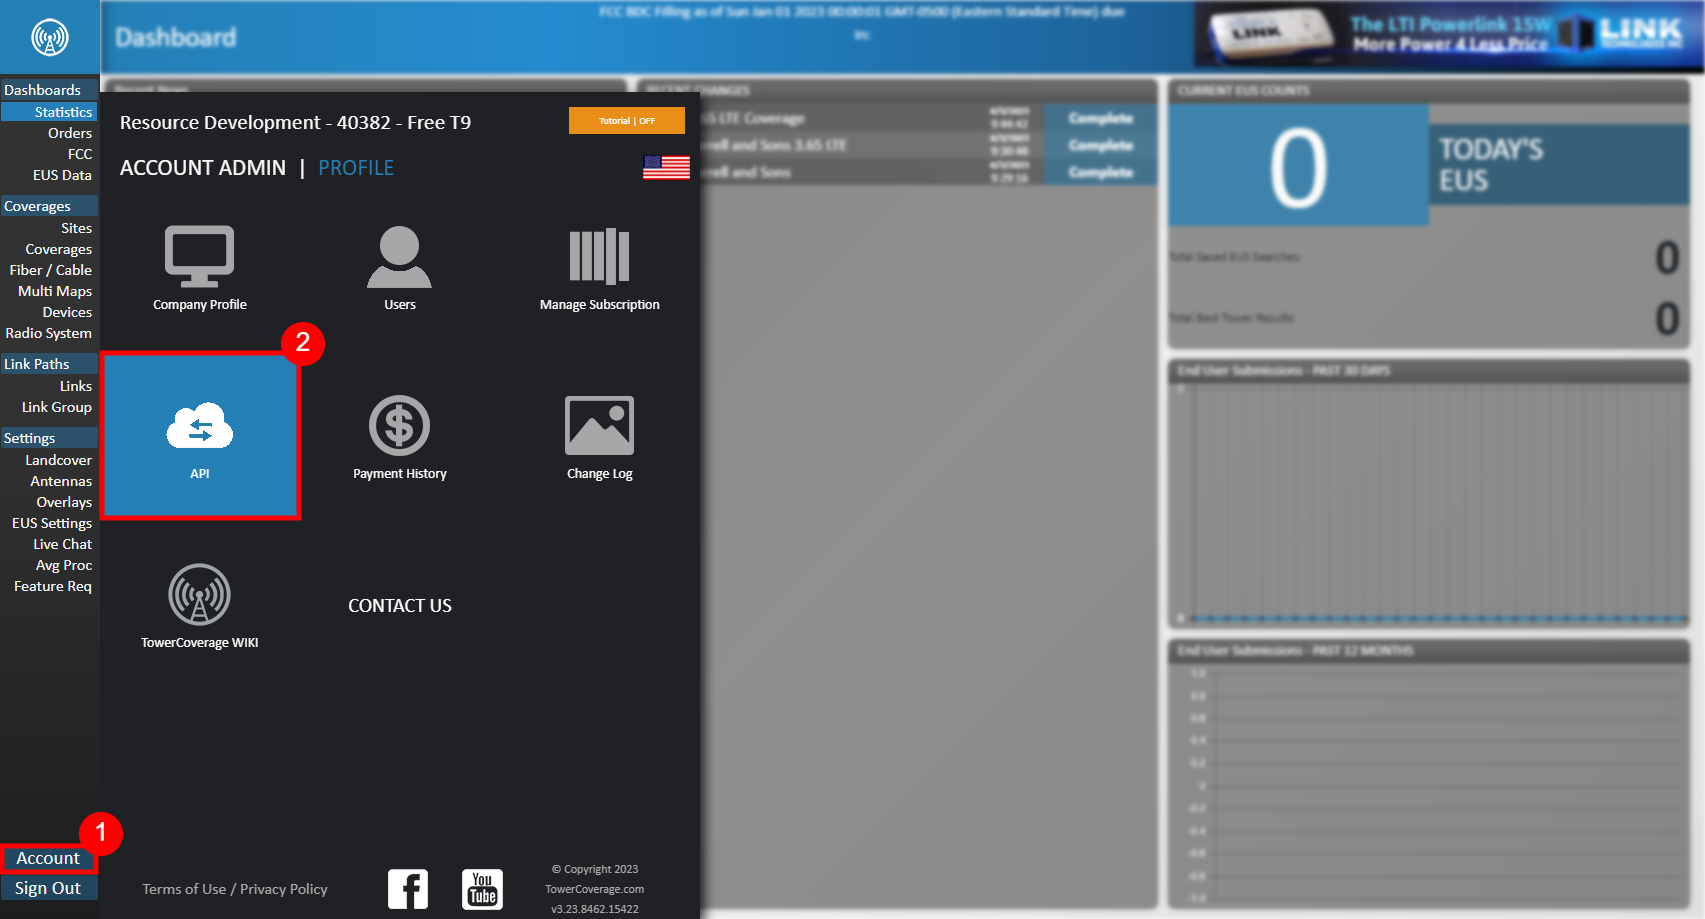
- Log in to your Tower Coverage account.
- Navigate to Account → API:
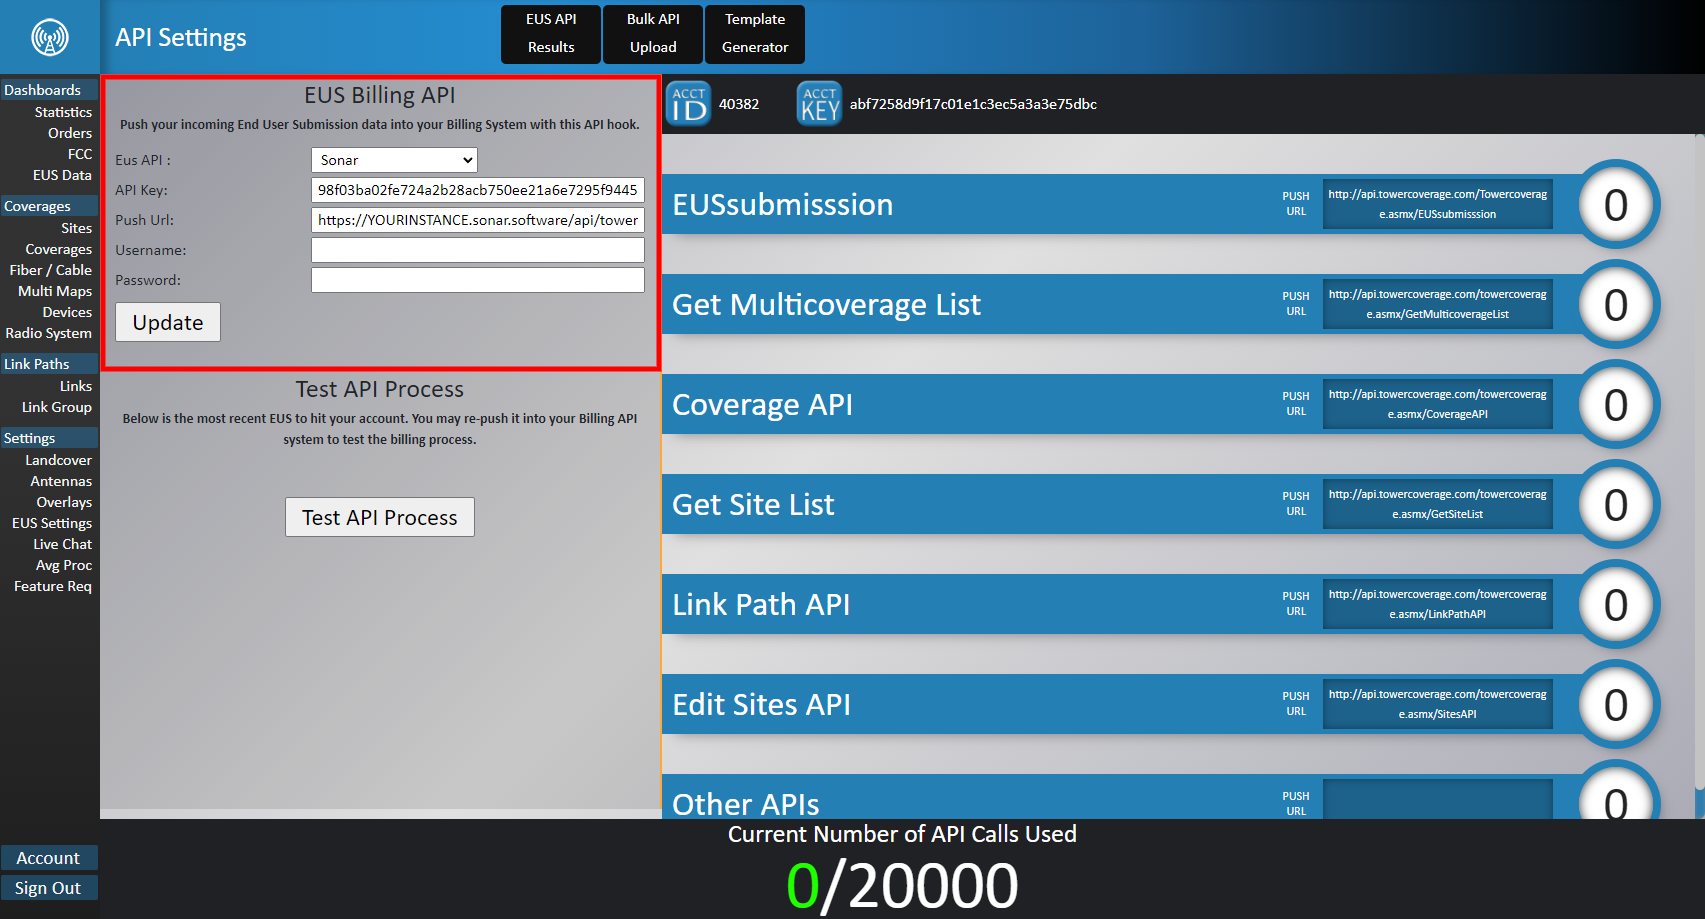
- On the “API Settings” page, select “Sonar” from the EUS Billing API dropdown, then enter the API Key, Push URL, and Tower Coverage user credentials that were all generated in previous sections:
Ensuring Valid Coverage Information
Before you start receiving customer data with Tower Coverage for migration into Sonar, you'll need to ensure you have both Sites and Coverages configured within your Tower Coverage account. Without valid sites and coverage, the information Tower Coverage delivers to you based on customer submissions may be incorrect or incomplete.
Adding a New Site
To add a new Site to your Tower Coverage account:
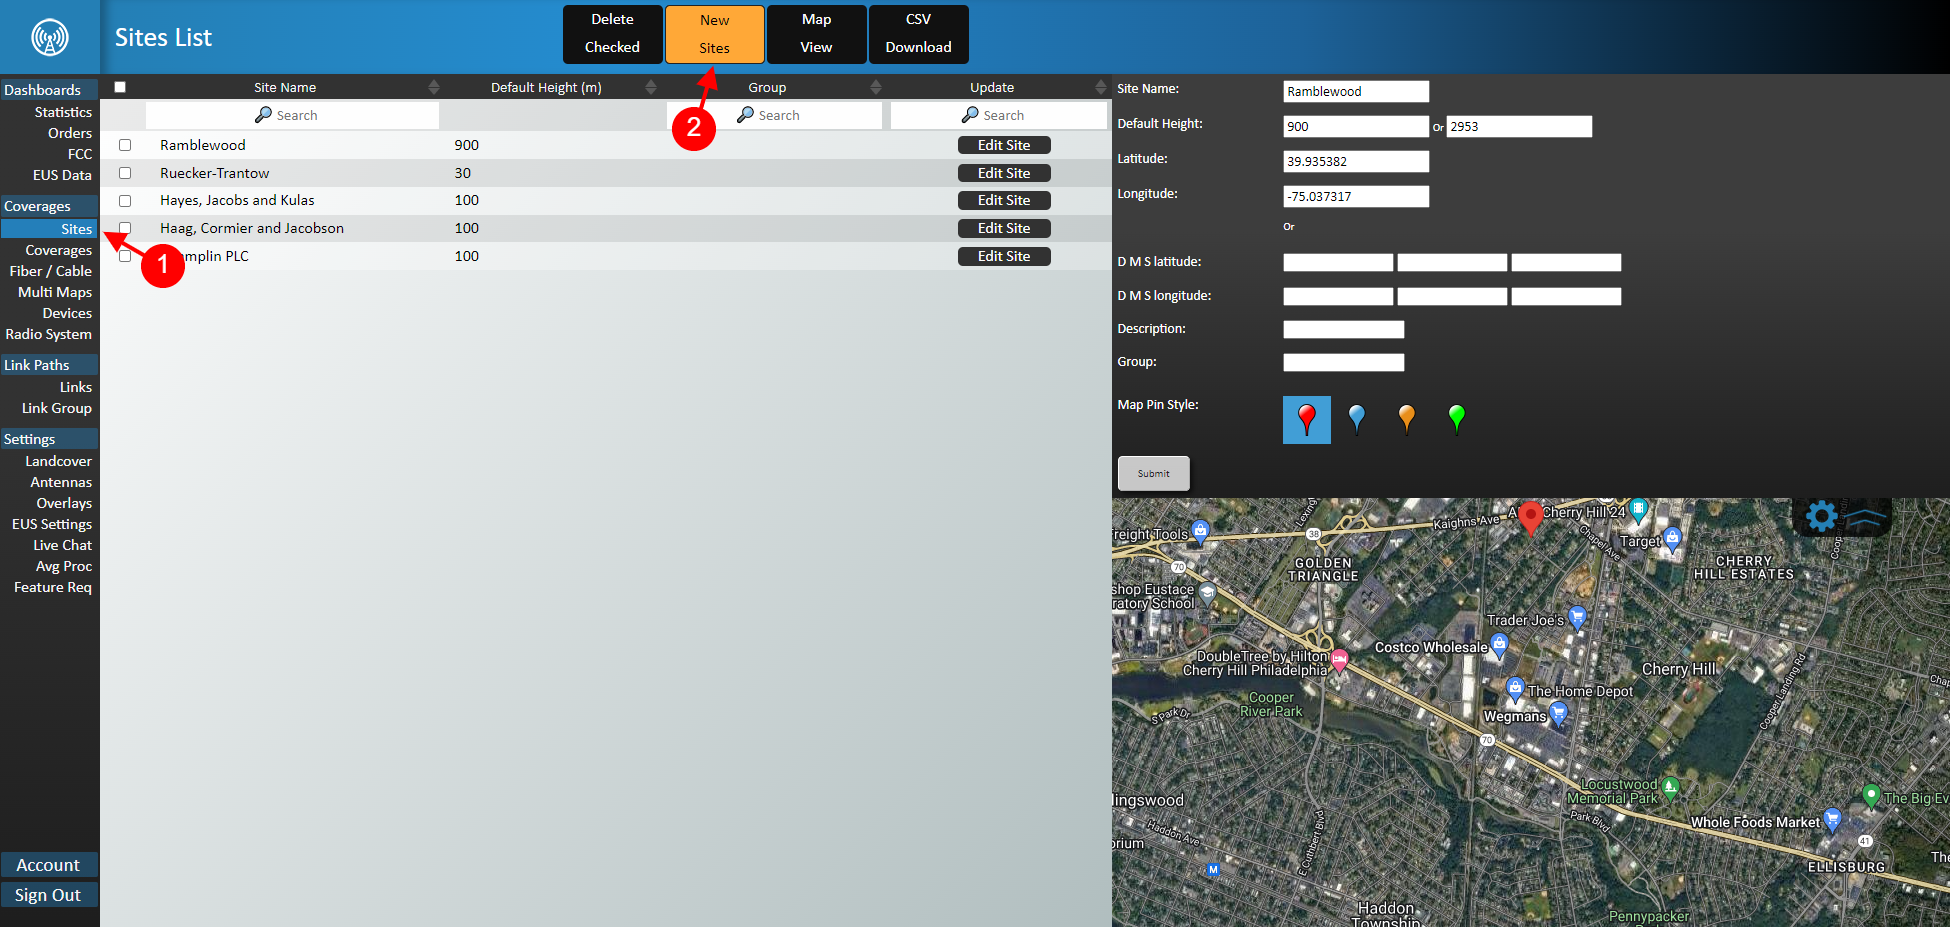
- Underneath the Coverages section, click on "Sites", and then select "New Sites".
- On the new page that populates, give your Site a name, and then provide the Latitude, Longitude, and average antenna height on the tower within the New Site modal:
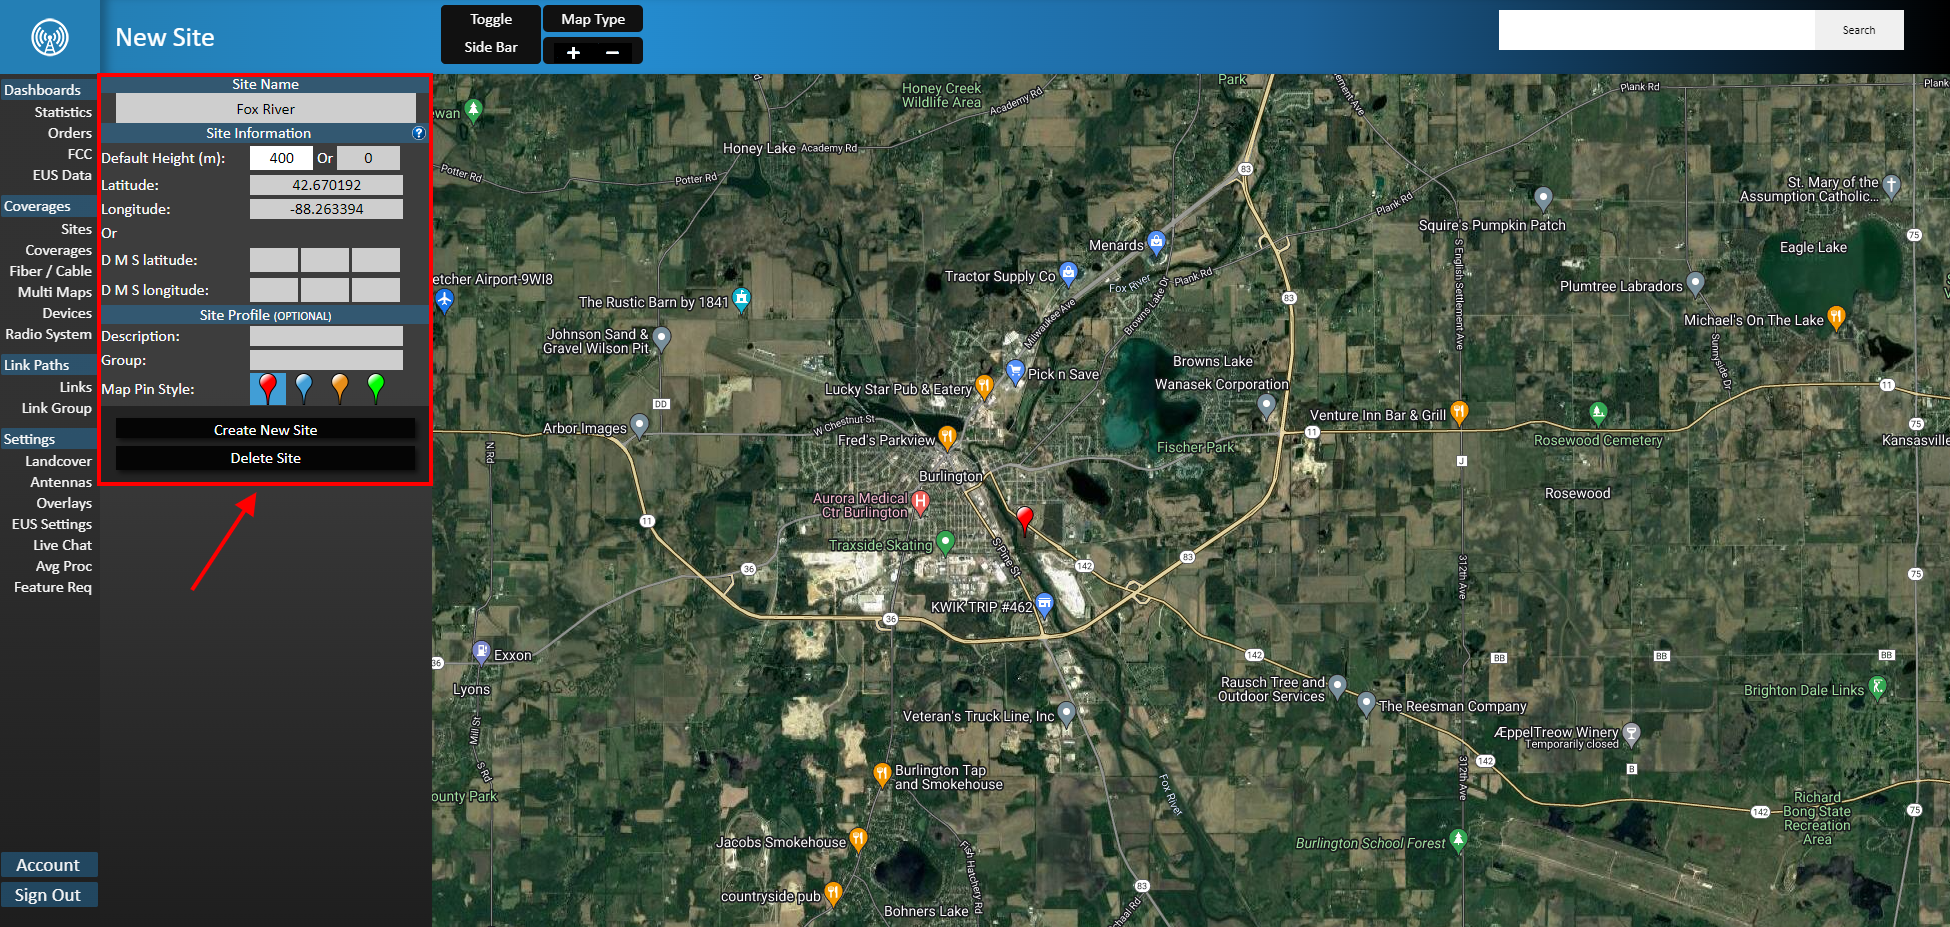
- Click the "Create New Site" button. The map will reload, and your Site will now be in place within Tower Coverage.You can also import a CSV file containing your Site information based on a template that Tower Coverage provides | Siteimporttemplate.csv
Adding a New Coverage
With your Site added, the next step is adding the antennas and coverage area to the tower. To do that, follow the steps below:
- Click on the "Coverages" option found in the menu to the left of the screen, and then select "New Coverages".

- Fill in the Coverage information based on the antenna and band spec of your actual hardware. The information that needs to be entered here will vary greatly, but it is important for it to be accurate to your network. You can see an example below:

- With the Coverage added, click on "Create Coverage" and Tower Coverage will start processing the new coverage information within your system.The processing can take some time, depending on the complexity of your coverage information.
Adding a Multi Map
To establish a zone of coverage, you also need to configure a Multi Map. This is a collection of Coverage areas that represent a serviceable area on your network.
- Click on the "Multi Map" button from the navigation sidebar, and then select "New Multi Map".
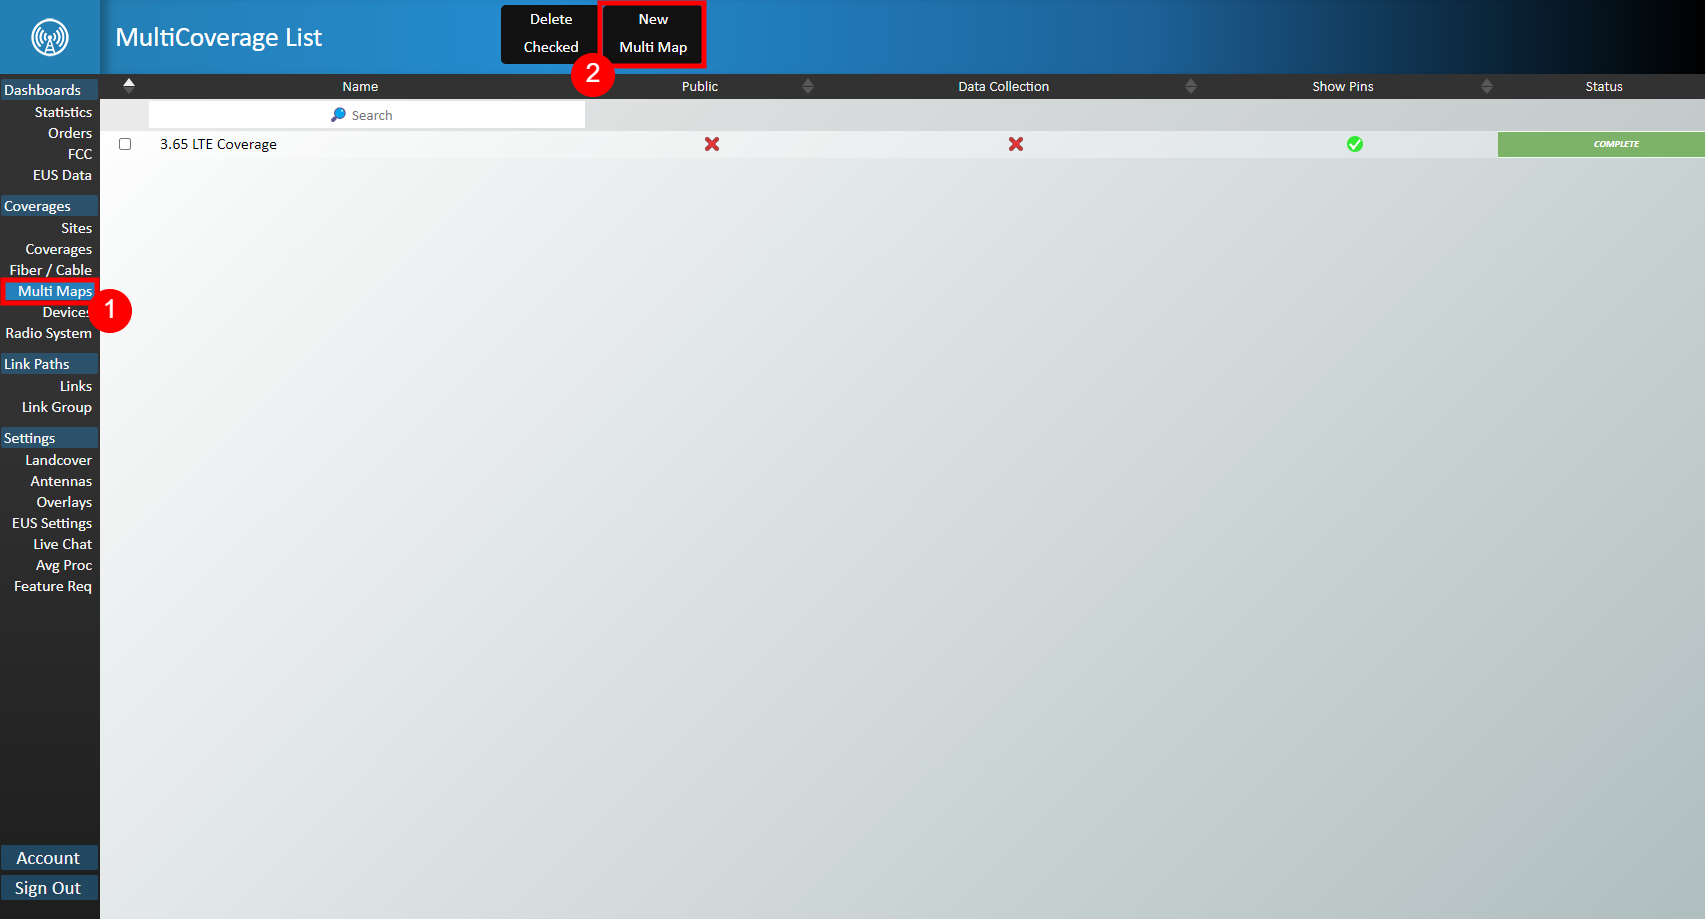
- On the next page, select all the coverages that will comprise this Multi Map, click "Add Selected" and give the Multi Map a name before clicking on "Create Map".
Testing the Integration with a Sample Submission
Before launching the integration, you may wish to test that it is working as expected. To do so, follow the steps below:
- Log in to your Tower Coverage account.
- Within the Coverages section, click on "Multi Maps".
- Click on an existing Multi Map.
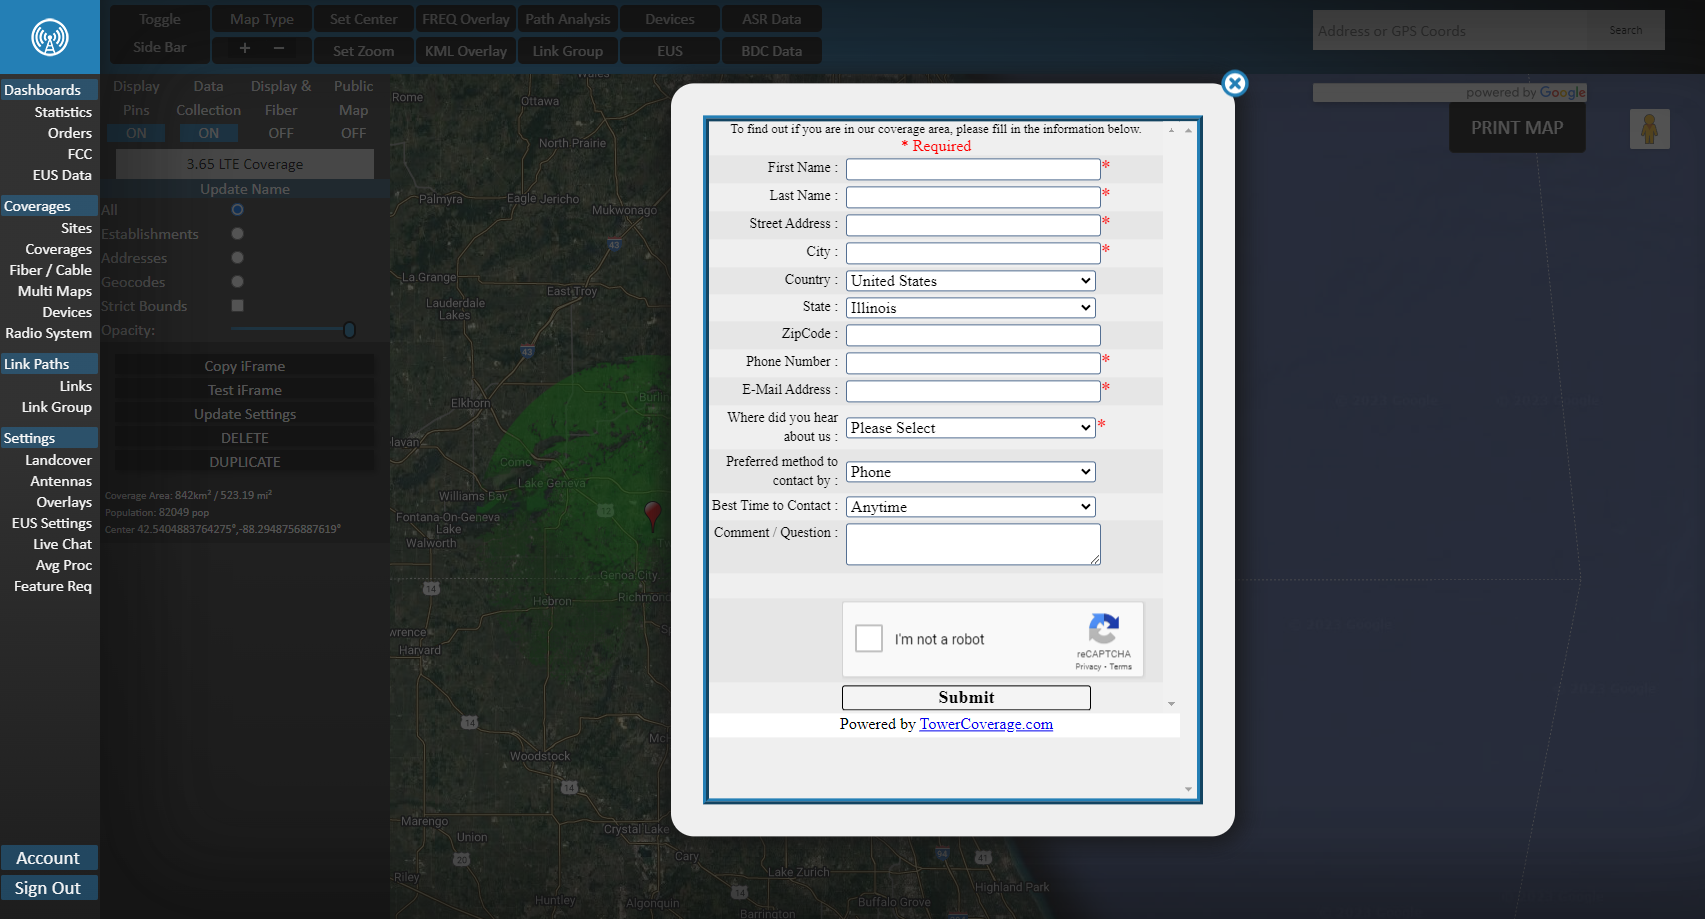
- Ensure "Data Collection" is turned ON and then select "Test iFrame".

- In the newly populated modal, input customer information such as a name and address, and then add a checkmark alongside “I'm not a robot” before clicking on Submit.
- Once the modal closes, navigate to Account → API and click on “Test API Process”.
- Following this, you can return to your Sonar instance, and you should see the inputted values present within Tower Coverage Submissions.
How Tower Coverage Works in Sonar
Once you've configured the integration and pointed your Tower Coverage instance towards your Sonar instance, you can begin using Tower Coverage to store leads and receive coverage information.
When a customer fills out the contact form provided by Tower Coverage and hosted on your website, the process flow occurs as below:
- Tower Coverage gathers the customer data and stores it initially on their end.
- Using your provided Network Coverage information, Tower Coverage calculates the 3 Network Sites with the best coverage.These Network Sites aren't always the closest ones, and that's perfectly normal! Tower Coverage uses a variety of methods to determine the Network Sites that result in the best signal.
- The information from Tower Coverage (including Name, Address, and Coverage details) is sent to your Sonar instance via API, which was configured in the previous section.
Once you receive a customer lead from Tower Coverage, you can access it by going to Accounts → Tower Coverage Submissions.
Managing Your Received Leads
Once you receive a lead from Tower Coverage and locate it within your Tower Coverage Submissions, you can then move on to managing them. When you receive a lead, it appears in the following table:
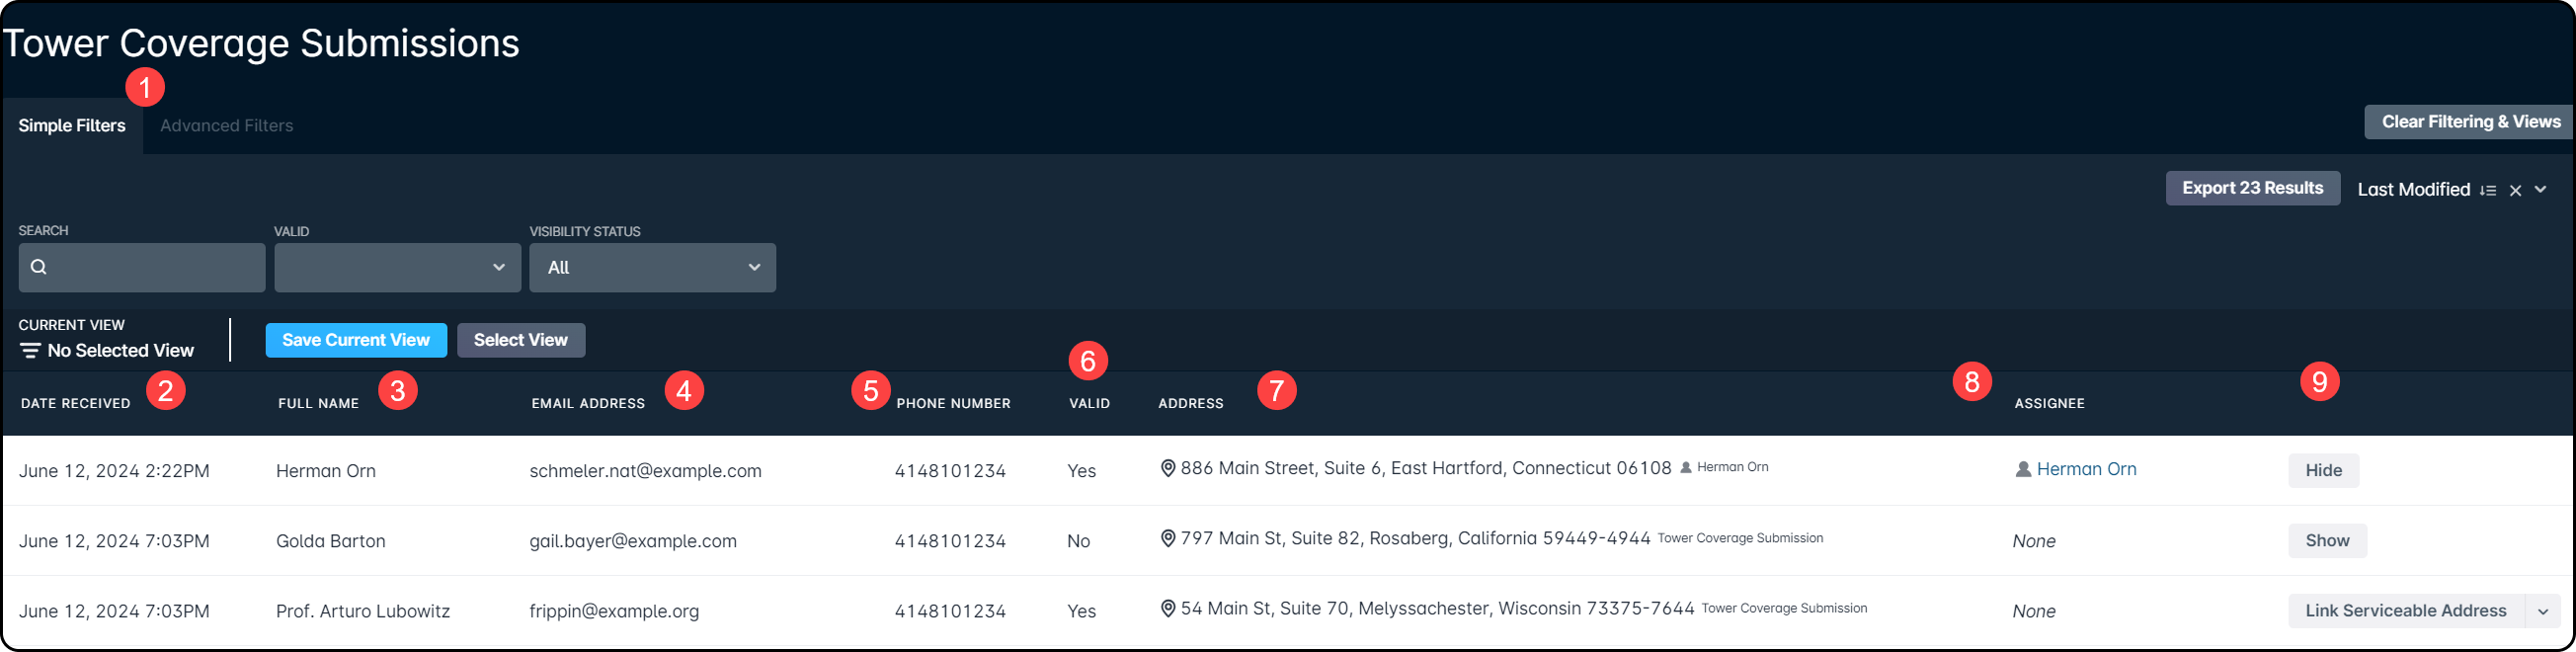
- The Simple /Advanced filter toggle allows you to switch between the Simple filtering, which is pictured, and the more robust Advanced filtering.For more information, you can review the Filtering: Simple vs Advanced article.
- The Date Received column shows the exact date and time each Tower Coverage submission was received in Sonar.
- The Full Name column displays the first and last name provided by the customer during the submission process.
- The Email Address column displays the email address provided by the customer during the submission process.
- The Phone Number column displays the phone number provided by the customer during the submission process.
- The Valid column shows whether the submission contained all required information.An invalid submission can still be converted into an account, but may require manual information entry.
- The Address column displays the serviceable address submitted by the customer during the submission process.
- The Assignee column will display the account name once the serviceable address has been linked, and the lead has been converted to an account.
- The action column allows you to:
- Link Serviceable Addresses and convert the Tower Coverage Leads into accounts
- Hide, and Show, Tower Coverage submissions, providing finer control over leads imported into Sonar.
Link Serviceable Address
The Link Serviceable address button allows you to create a new Serviceable Address in your Sonar instance to serve this potential lead. Once you click the button, a new modal will open, which allows you to provide an address and geocoding information, while also providing you the opportunity to correct any incorrect information the customer may have entered.
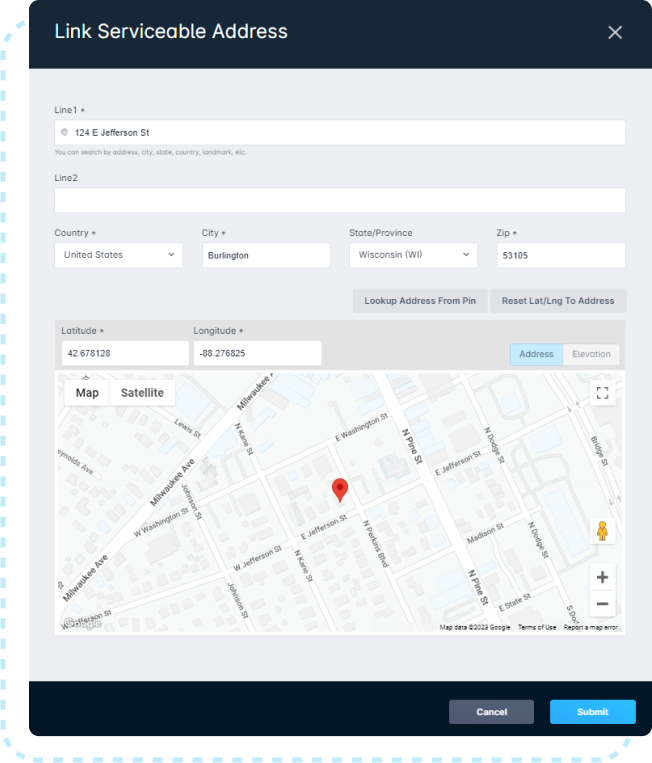
Linking a serviceable address is a necessary step, as until the link is made, you'll be unable to convert the lead into an account, and you'll be unable to see coverage information attached to the address by the Tower Coverage integration.
Exploring the Coverage Information
When Tower Coverage sends a lead into Sonar, you can view network coverage and signal strength for the customer's location by clicking on their Serviceable Address once it's been linked. Doing so will populate the address management page, and from there you can view any of the images to examine them in more detail, and access the detailed report for that network site provided by Tower Coverage.
These images and details will remain attached to the serviceable address even after an account has been created for this customer and can be reviewed by clicking on the serviceable address from within the account management interface.
Creating the Account
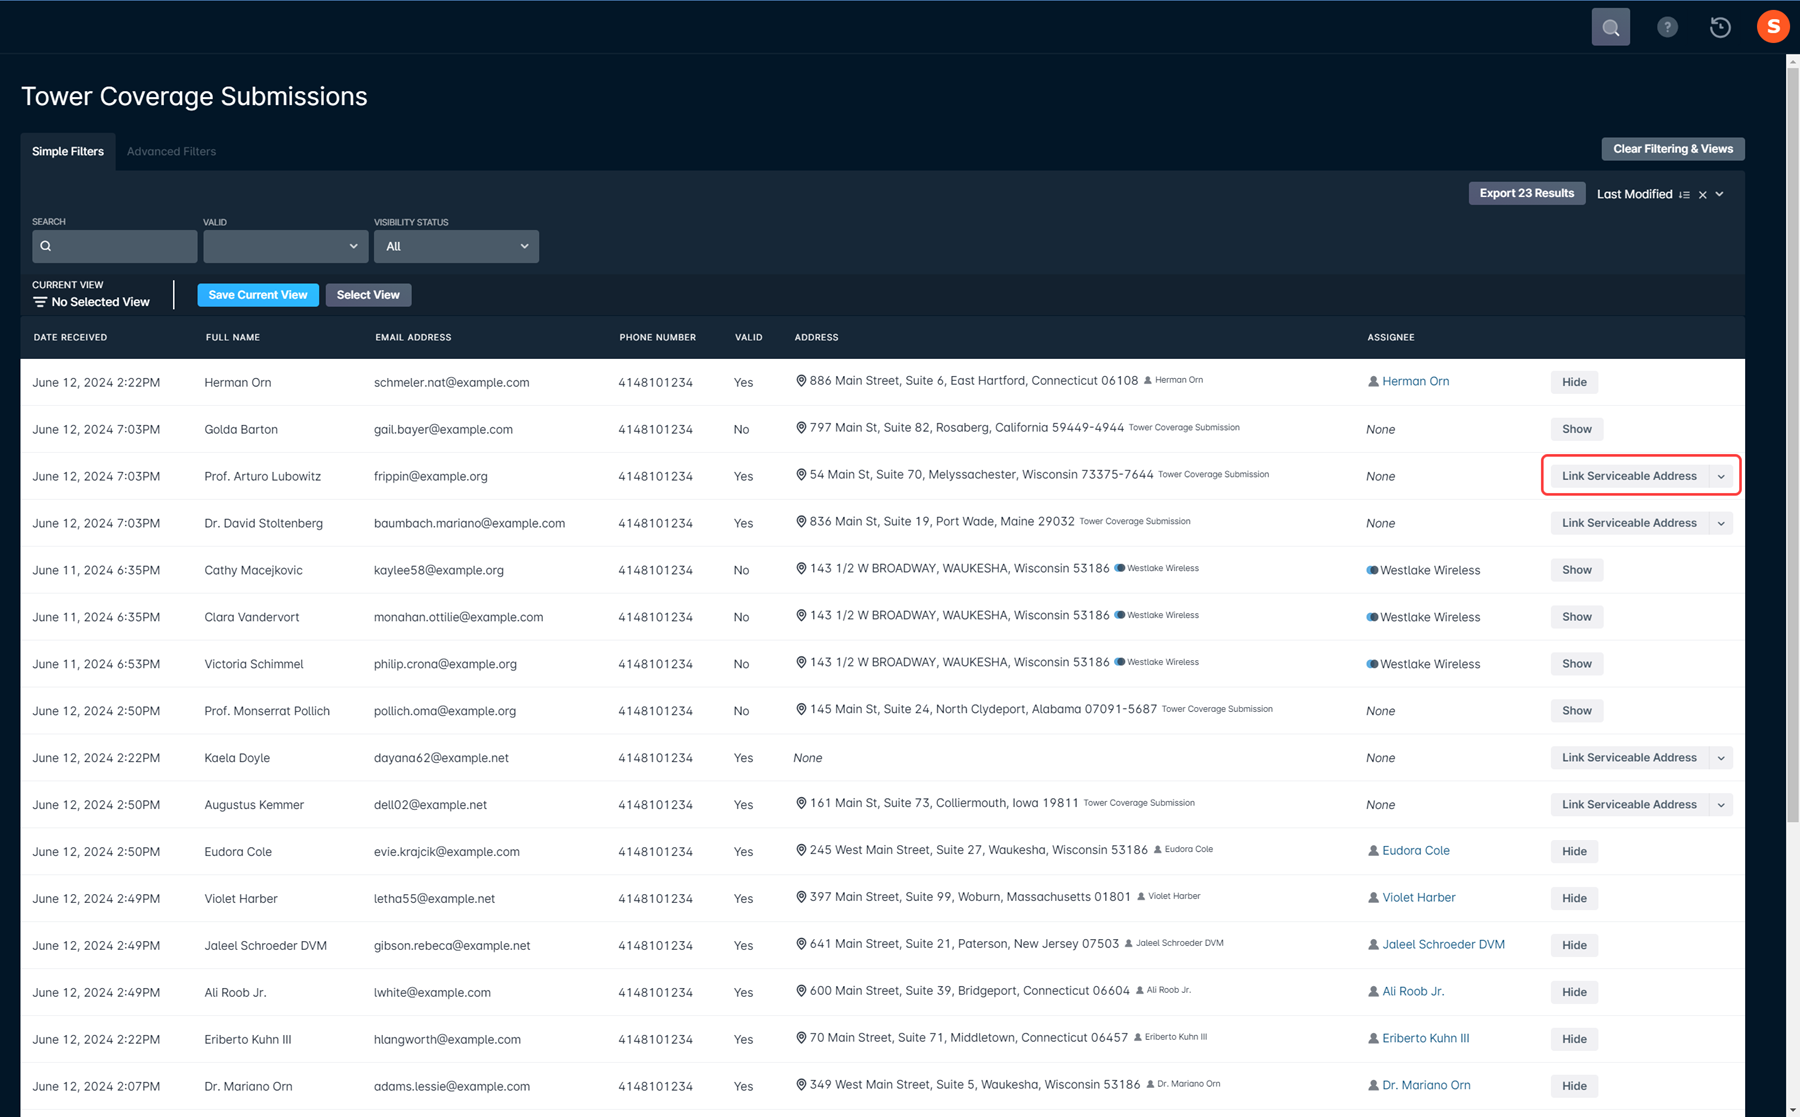
Once you've verified the coverage information and confirmed that the customer's address is serviceable, the next step is to convert the Tower Coverage submitted lead to an account within your instance. After linking the serviceable address, which was done earlier, you'll note the column button has now changed to "Convert to Account".

Clicking this new button will open the account creation modal, where you can fill in all the required fields to create a new customer account.
Once the account is created, you're able to proceed with your usual new customer workflow.
Hiding and Showing Leads
Because Leads added to your Sonar instance through TowerCoverage cannot be deleted, an option is available to Hide them from the list. This reduces visual clutter, while still allowing you to return to the leads at a later date. Additionally, a Visibility Status filter is available that allows you to toggle between:
- All Leads
- Only Hidden Leads
- Only Visible Leads
Every Lead in your instance can be hidden, whether associated to an Account, still waiting to be Linked, or added as a Serviceable Address. Hiding an account is done through the “Hide” action button, which will either be displayed as the sole action on a Linked Lead, or as an action in the dropdown menu for Leads with other actions available.
By clicking on “Hide”, the Lead will no longer show up in the “Visible” filter, and the “Hide” action will switch to “Show”.
