Table of Contents
RADIUS: Build-Out & Integration with Sonar
 Updated
by Mitchell Ivany
Updated
by Mitchell Ivany
Read Time: 13 mins
We strongly recommend that all users transition to the latest supported version of FreeRADIUS.
Building the RADIUS Server
Installation
This installer is designed to be run on Ubuntu 16.04 64 bit. Download and install Ubuntu on the server you wish to run FreeRADIUS on. If you want to host it online, Digital Ocean is a great place to get started with cloud-based hosting. For this article, we will build on Ubuntu 16.04 64 bit.
- Once Ubuntu is installed, SSH in and run the following commands to prepare installation:
sudo apt-get update
sudo apt-get upgrade
sudo apt-get install php-cli php-mbstring php-mysql unzip
- Once these commands are complete, you should install MariaDB (a replacement for MySQL) and the FreeRADIUS server. Run the following commands to complete this step:
sudo apt-get install mariadb-server mariadb-client
sudo apt-get install freeradius freeradius-common freeradius-utils freeradius-mysql
- Once these commands are complete, you can download FreeRADIUS Genie by executing
wget https://github.com/SonarSoftware/freeradius_genie/archive/master.zip
and then
unzip master.zip
Once unzipped, enter the directory by typing
cd freeradius_genie-v2-master
- Now that all the necessary software to run your FreeRADIUS server is installed, you will need to configure your SQL database.
To do this, run the following command:
sudo /usr/bin/mysql_secure_installation
and answer the questions using the following:
Enter current password for root (enter for none): - Press enter
Set root password? [Y/n] - Press 'y'
New password: - Enter a strong password and write it down - we will need this password shortly!
Remove anonymous users? [Y/n] - Press 'y'
Disallow root login remotely? [Y/n] - Press 'y'
Remove test database and access to it? [Y/n] - Press 'y'
Reload privilege tables now? [Y/n] - Press 'y'
Once this is done, we have a very basic server setup - FreeRADIUS and the MySQL database are installed we're ready to move onto the initial configuration.
Configuration
Genie is a command-line tool we built to help automate the setup and configuration of your FreeRADIUS server. We're going to step through each initial setup item to get our initial configuration out of the way.
This is the tool you'll use to do all of your configuration - no need to jump into configuration files or the MySQL database!
Providing the RADIUS Genie Access to the SQL Database
- In order to allow the Sonar Genie tool to setup everything else for you, you need to enter the MySQL root password you setup during step 4 into an .env file.
Type the following
cp .env.example .env
nano .env
You'll see a line that says MYSQL_PASSWORD=changeme. Use the backspace key to delete "changeme" and replace it with the MySQL root password you setup in step 4. Press CTRL+X to exit, and save your changes. Make sure you record this root password somewhere, as you will still need it in the future!
First Steps
- Run the following command:
sudo php genie
You should see a screen like this:

Highlight the Initial Configuration option, press SPACE to select it, and then press ENTER. You'll see an option titled Setup initial database structure - press SPACE to select it, press ENTER, and your database will be configured.
Next, select Perform initial FreeRADIUS configuration by using SPACE to select it, and then pressing ENTER. This will configure your FreeRADIUS server to use the SQL server as a backend, and restart it.
Managing your NAS
NAS stands for Network Access Server - this is the device that you will be connecting to your RADIUS server to manage your clients. Typically, in an ISP network where the NAS is used to manage individual clients, the NAS will be something like a PPPoE concentrator. Let's step through adding a new NAS to the FreeRADIUS server using Genie, and then configuring our NAS (a MikroTik router) to use the FreeRADIUS server.
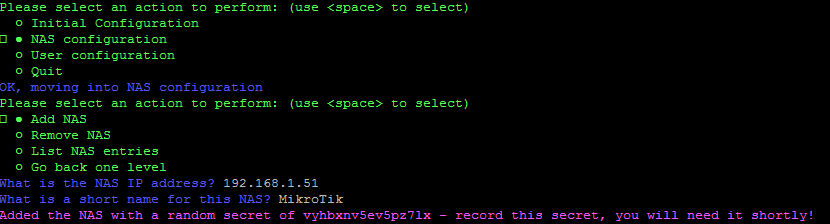
- In Genie, press SPACE on Go back one level and press ENTER to return the top level, and then select NAS Configuration followed by Add NAS. You will be asked for the IP address of the client, and to enter a short name for it.
- We can now add this RADIUS server to our MikroTik to manage our PPPoE sessions. This step will differ depending on your NAS manufacturer - refer to the manual if you're unsure. Jump into your MikroTik using WinBox.
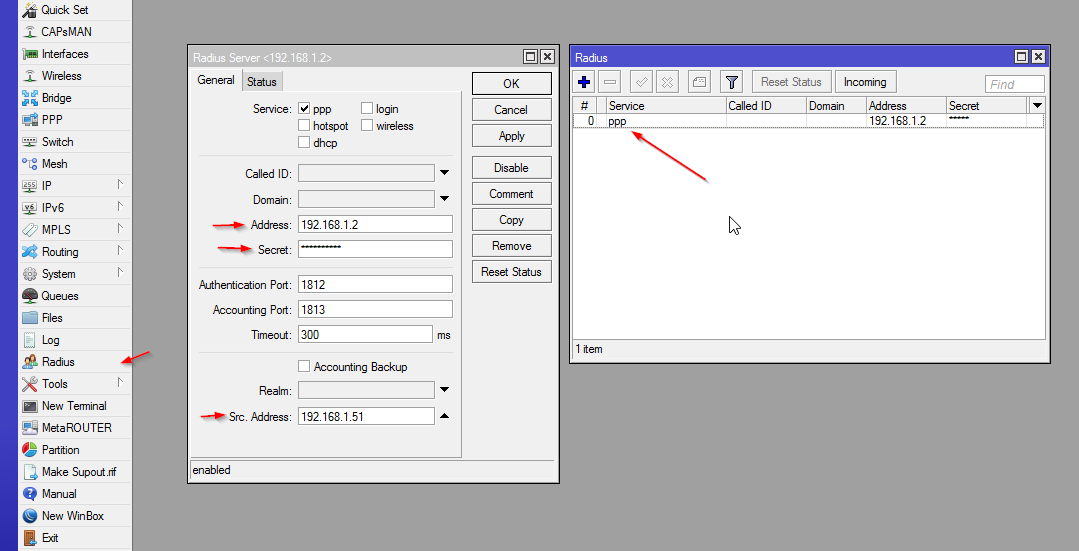
- Click RADIUS on the left, click the + button in the window that appears, and then fill in the following fields:
- Check the PPP checkbox.
- Enter the IP address of your RADIUS server in the Address field.
- Enter the random secret Genie provided you within the Secret field.
- Under Src. Address, enter the IP that you entered into Genie when you created the NAS.
OK, your MikroTik is now set up to use RADIUS for PPP! We'll get into some deeper configuration later on.
You can also view all the NAS you have set up on your RADIUS server by selecting the List NAS Entries in Genie, and you can remove a NAS by using the Remove NAS option.
Configuring MySQL for remote access
We also need to configure the MySQL server to allow remote access from Sonar, so that Sonar can write and read records for the RADIUS server. Let's do that now.
- Navigate into the MySQL remote access configuration menu, and select Enable remote access.
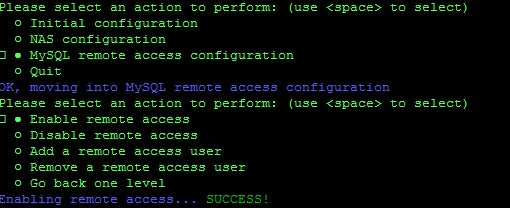
This makes the MySQL server listen for connections on all interfaces on the server, rather than just to localhost (127.0.0.1). Now we need to set up a remote user account so that your Sonar instance can access the database.
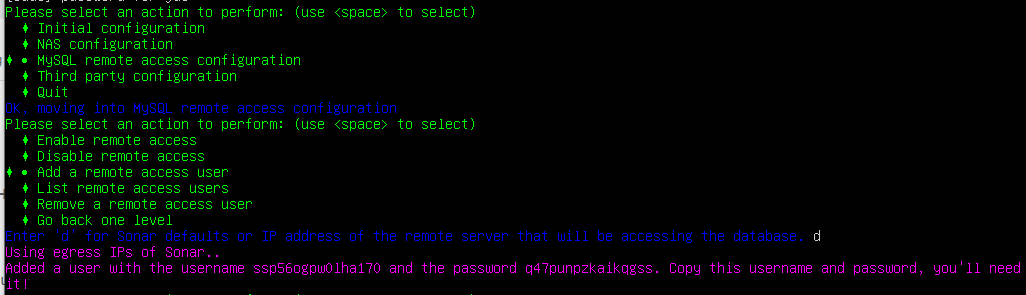
- To do this, select Add a remote access user in the same menu. Genie will ask you for the IP address of the remote server, or to press “
d” to use the default settings. In Sonar's case, the IP Address will vary based on a few factors, so it's always best to refer to the up-to-date list available in the Sonar IP Addressing article and to use the Defaults provided by the RADIUS Genie.As the Origin IP can differ from connection to connection, it's recommended that you whitelist all mentioned IP Addresses to ensure communication can occur continuously.
Once you add the remote access user, Genie will give you back a random username and password. Copy this down - we'll need it in a minute!
If you ever need to add a new user, view the existing users, or remove a user, you can also do that in this menu.
Linking your FreeRADIUS server to Sonar
Once this configuration is done, we need to add the RADIUS server into Sonar.
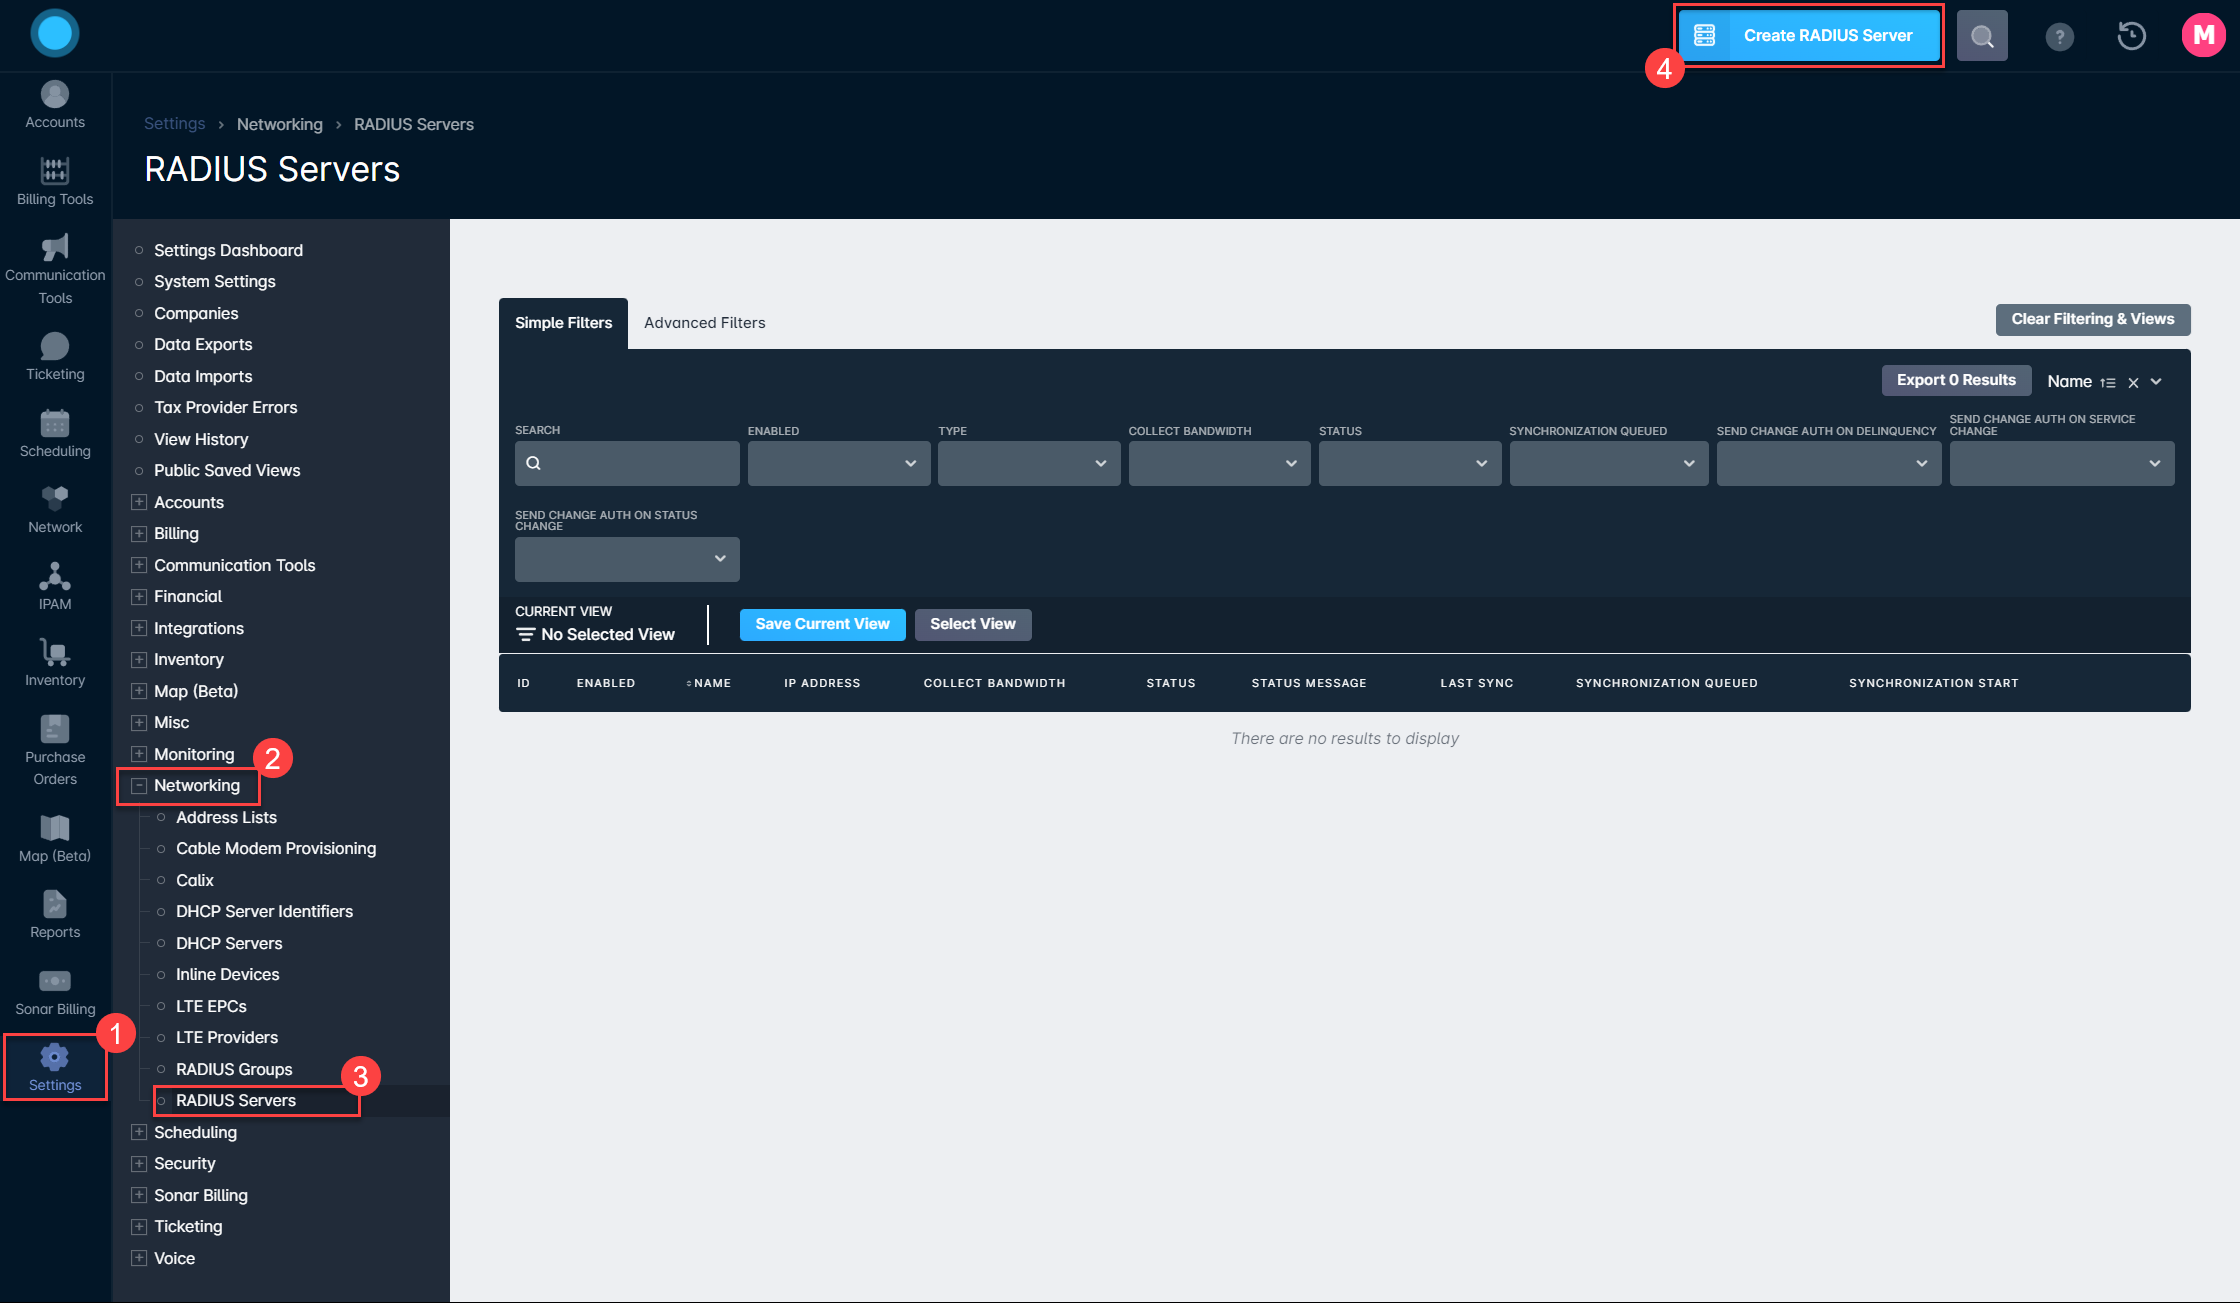
- Inside your Sonar instance, navigate to Settings → Networking → RADIUS Servers and click the blue “Create RADIUS Server” button in the top right.
- Fill in the Create RADIUS Server modal that appears with the information generated by the FreeRADIUS Genie in step 10
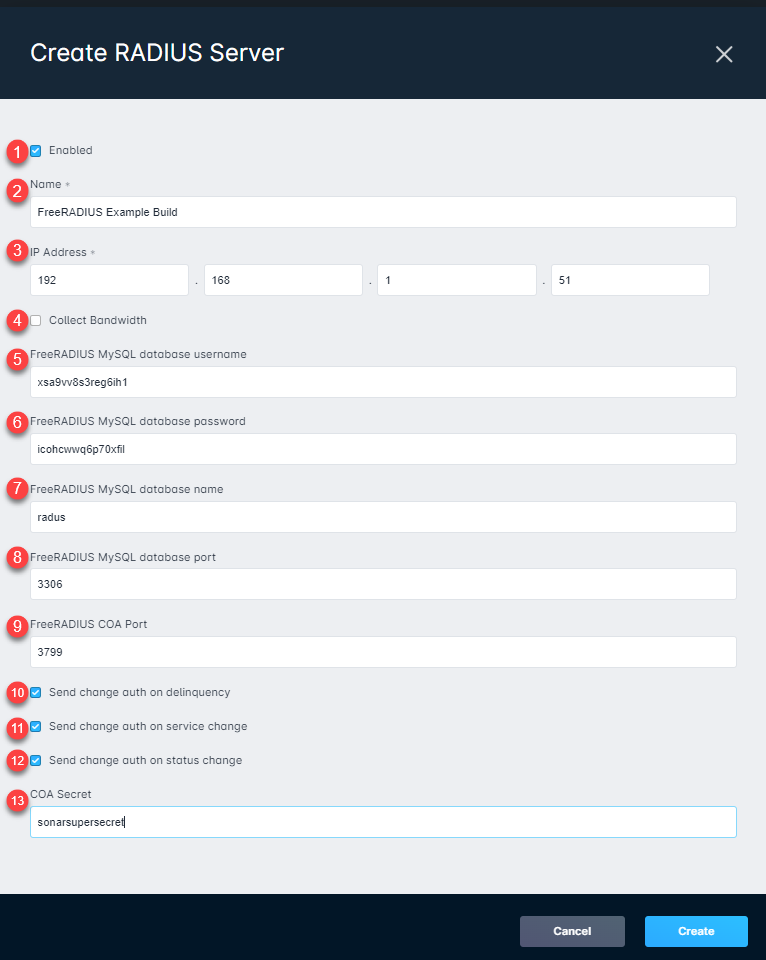
RADIUS Server creation field details
1. The Enabled checkbox will determine if this RADIUS Server will be used by Sonar for network and connection management. If the server is not enabled, Sonar won't send any request to it.
2. The Name field allows you to add an identifiable name to the server within your Sonar instance.
3. The IP Address field is required in order for your Sonar instance to know where to send requests.
4. Collect Bandwidth should be enabled if you want accounting data from sessions to be reported into Sonar as data usage. The usage from RADIUS will be forwarded to the account where that RADIUS username is stored.
5. The FreeRADIUS MySQL database username field is where the username provided in step 10 will be entered.
6. The FreeRADIUS MySQL database password field is where the password provided in step 10 will be entered.
7. The FreeRADIUS MySQL database name field is where you provide the defined database name to Sonar. In this example, the database name is "radius".
8. The FreeRADIUS MySQL database port is the configured network port that allows remote access to your MySQL database. In this example, the database port is "3306".
9. The FreeRADIUS CoA port is the configured network port that allows communication with the RADIUS server when Change of Authorization changes occur.
10. The "Send change auth on delinquency" toggle will enable or disable sending a request to your CoA proxy when an account enters a delinquent state.
11. The "Send change auth on service change" toggle will enable or disable sending a request to your CoA proxy when an account experiences a change of service.
12. The "Send change auth on status change" toggle will enable or disable sending a request to your CoA proxy when an account changes status.
13. The COA secret allows Sonar to connect to your CoA Proxy to effect auth changes. For more information on setting up COA Proxy, check out our article HERE!
Basic PPPoE configuration
Once this is done, you'll have a basic setup in place to enable PPPoE. Here's a quick tutorial on setting up a simple PPPoE configuration on a MikroTik router.
First, we need to set up our IP pools. These should correspond to IP pools you have created in your Sonar IPAM - refer to IPAM: Setup, Policy, & Best Practices for details on this! To configure pools, navigate to IP > Pool in your MikroTik. You can create as many IP pools here as you need, and chain them together so that if one pool is full, the next one is used. You can statically assign IPs to users from within Sonar by associating an IP with their RADIUS account. If you don't do this, then an IP will be selected from an available pool when the client connects, and Sonar will dynamically learn that IP and enter it as a soft assignment inside Sonar.
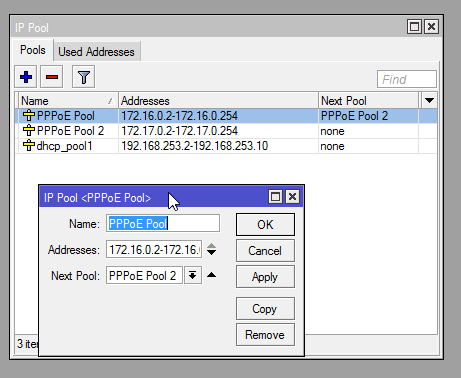
The pool configuration is pretty simple - a start IP, an end IP, and the next pool to use if this one is full.
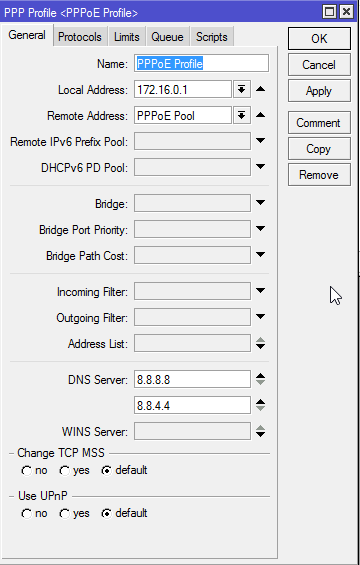
Once you've configured your pools, click PPP in the menu on the left and then click the Profiles tab. Click the + button to create a new profile.
We're going to configure a very basic profile. Enter a name, select a local address to use for the profile (in this example, I used the first IP in the subnet for my pool - note that this IP is not included in my pool range!) and for remote address, select your first pool. Enter some DNS servers to assign to users, and under the Limits tab, set a session timeout. This will disconnect users after a certain period of time, and they will have to reconnect. If you want to allow infinite sessions, don't set a timeout. Something like 24 hours is a reasonable setting if you would like to have a timeout value.
Once your profile is configured, click the Secrets tab, and click the PPP Authentication&Accounting button.
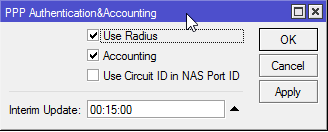
Make sure Use Radius is checked, and that Accounting is checked. Make sure Interim Update is set to a reasonable value in minutes, as this is how frequently this MikroTik will send accounting data to your RADIUS server.
How Interim Updates work with Sonar
While the connection will be established and service will be delivered to the customer, you won't be able to hit the Disconnect button until the first interim update. If a disconnect is attempted on a session that hasn't completed an Interim Interval, the following error will occur:

If you make this too short, and you have a lot of clients, your server may become overloaded, while setting it too high will result in data being sent infrequently. The shorter the time, the more often accounting data will be sent to the RADIUS server, and the more frequently you'll see updates as to users' data usage in Sonar. If you have a very small network (a few hundred users) you can probably set this to a low value (1-5 minutes) without much impact. For larger networks, set this to at least 15 minutes - you may need to increase it even more for very large networks!
Now click the PPPoE Servers tab, and click the + button to create a server.
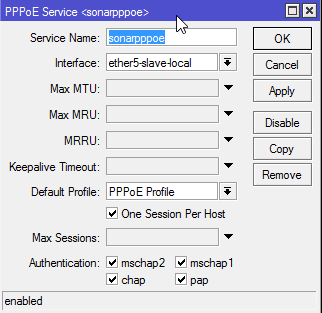
Enter a name for the server, select the interface that your clients will be connecting on, and select the profile we created earlier. If you only want to allow one PPPoE session per host (which you probably do!) check One Session Per Host. Make sure all the authentication options at the bottom are checked.
You now have a very basic, functioning PPPoE server. Login to your Sonar instance, navigate to a user account, and access the Network tab, and then the RADIUS tab. Create a new RADIUS account and note the username and password.
Now, back in the MikroTik, Click the Active Connections tab and try connecting using a PPPoE client, authenticating using the credentials you just created in Sonar. You should be assigned an IP from the pool, and the connection will show up in the list! To assign a static IP, navigate back into Sonar, go to the Network tab on an account, and then IP Assignments. Assign an IP to the RADIUS account, and then disconnect and reconnect your PPPoE client. You will be assigned the static IP you selected.
Troubleshooting Your RADIUS Integration
Before you start troubleshooting your RADIUS Network with Sonar's support team, please ensure the issues have occurred within the last 60 days. Session history for RADIUS Servers is only stored for up to 60 days. Afterward, it can be very challenging to track down specific issues.
Best Practice for Accurate Session Reporting
To configure your FreeRADIUS server to use Coordinated Universal Time (UTC), ensuring consistent and accurate session reporting within Sonar, complete the following steps:
- Set FreeRadius to Use UTC: Ensure your FreeRadius server is configured to use Coordinated Universal Time (UTC) as the system time. This guarantees that session timestamps will be correctly recognized and reported within Sonar.Avoid Local Time Settings: If the server uses local time, timestamps will lack timezone information, causing discrepancies in Sonar's session reports.
- Verify Configuration: After updating the server time to UTC, verify the changes by checking session logs in Sonar to confirm timestamps align accurately.