Table of Contents
Filtering: Simple vs Advanced
Read Time: 9 mins
In various areas within Sonar, you will see two methods by which you can filter: simple and advanced.
Simple filters allow you to view one particular subset of items, as each filter is additional – meaning the search results will only display items that meet all the filters applied. Therefore, the more simple filters you apply, the further you narrow down that one subset you are viewing.
Advanced filters allow you to perform simple filter searches, but with multiple subsets through the use of groups. With groups, you can view results that meet some or all of the criteria based on the filters you have applied, depending on how you have set up the groups for your search. An overview of how to use each of these methods is provided below.
Using Simple Filters
After ensuring the filter toggle is set to 'Simple', you can begin using simple filters by entering text into the search bar or selecting an option from the dropdown lists available for the entity fields. Each selection will further narrow down the subset of items you are viewing.

Example
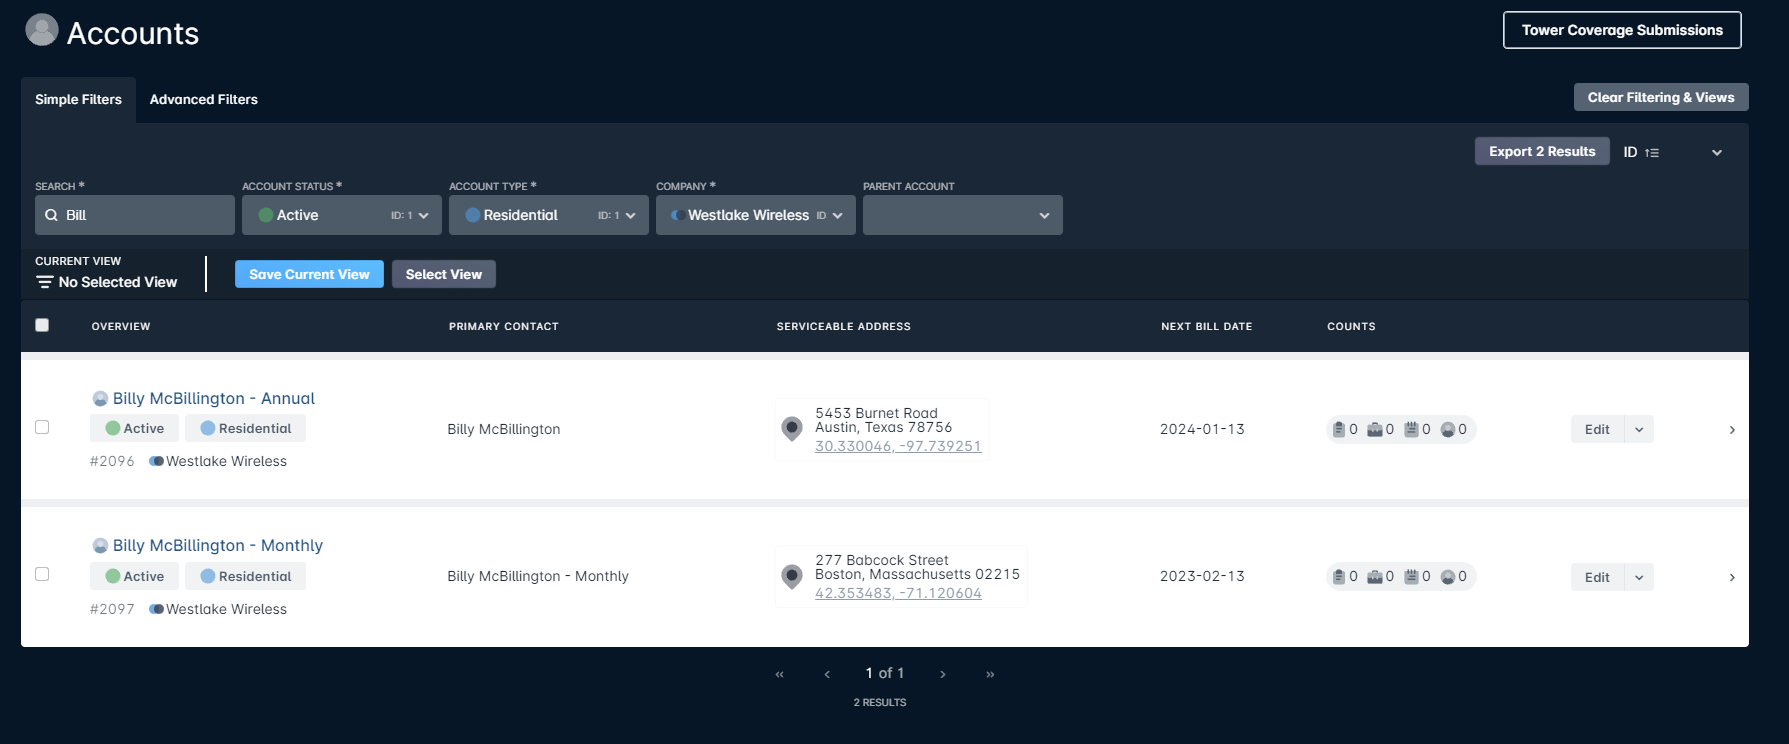
Let's say we need to look up a particular account, and we cannot remember the full name or ID of the account, but we do remember that the name the account is under contains "Bill". We also know that this was an active residential account, and part of the Westlake Wireless company. Using the information we do have, we can use simple filters to help us find the account we are looking for.
By typing "Bill" into the search bar, selecting "Active" as the Account Status, "Residential" as the Account Type, and "Westlake Wireless" as the Company, we have now narrowed down our results to 2 accounts.
Using Advanced Filters
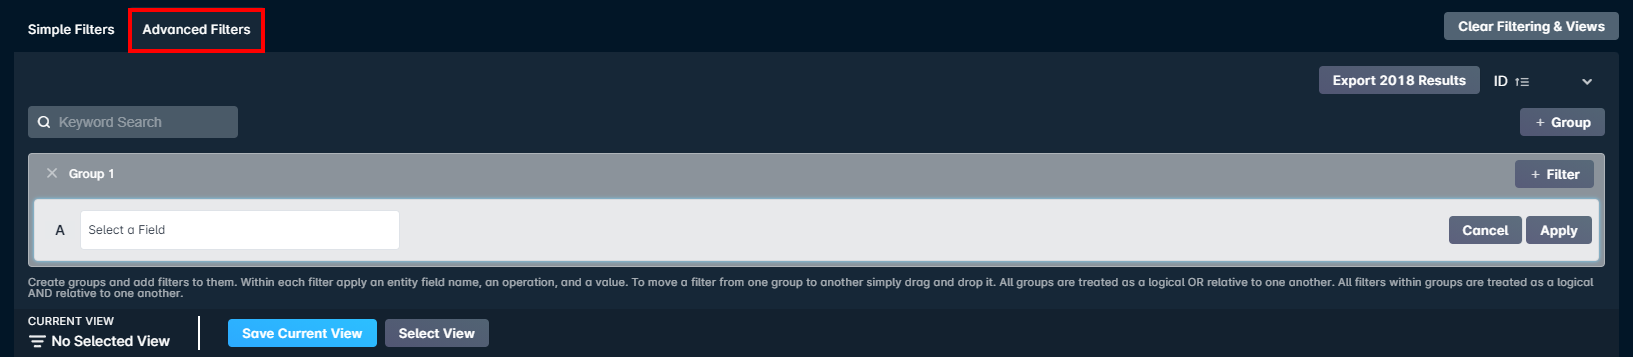
To begin using advanced filters, you first need to make sure that the filter toggle is set to "Advanced". Filters are set up within a group and you have the ability to create multiple groups in order to expand your search. Any filters that are within the same group will be treated in the same way as a simple filter search - they are additional and will only result in items that meet all of the filters applied. When using multiple groups, you can broaden your search by looking at more than one subset of items.
Using Filters
Until the issue is resolved, you can use the IP Assignment Histories field as a workaround.
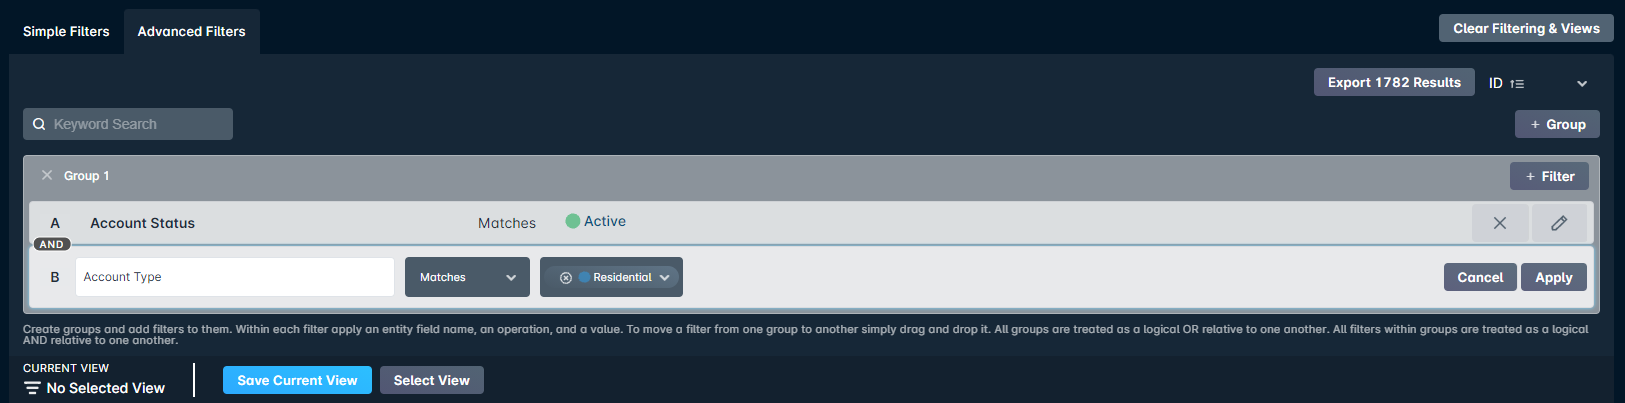
To begin adding filters to a group, you can start by making your first selection with the entity field name dropdown that is already presented to you (it will have an "A" beside it to indicate the first filter in the group). Once you select an entity field from the list, another field will appear where you can select the operation you wish to use - based on this selection, the appropriate field will appear where you can specify the particular value you are looking for. Additional filters can be added within the same group by clicking the "+ Filter" button within the group panel.
Once you have added filters to a group, you will have the options to "Cancel" or "Apply", as can be seen in the top row of the group below. To remove a filter, click "Cancel" and then click the "X" for that filter row. To apply the filter, simply click "Apply" - once you have clicked this, the filter will appear like the bottom row in the group below and your search results will be updated. If you need to edit the filter, you can do so by clicking on the filter's associated pencil icon.
Example
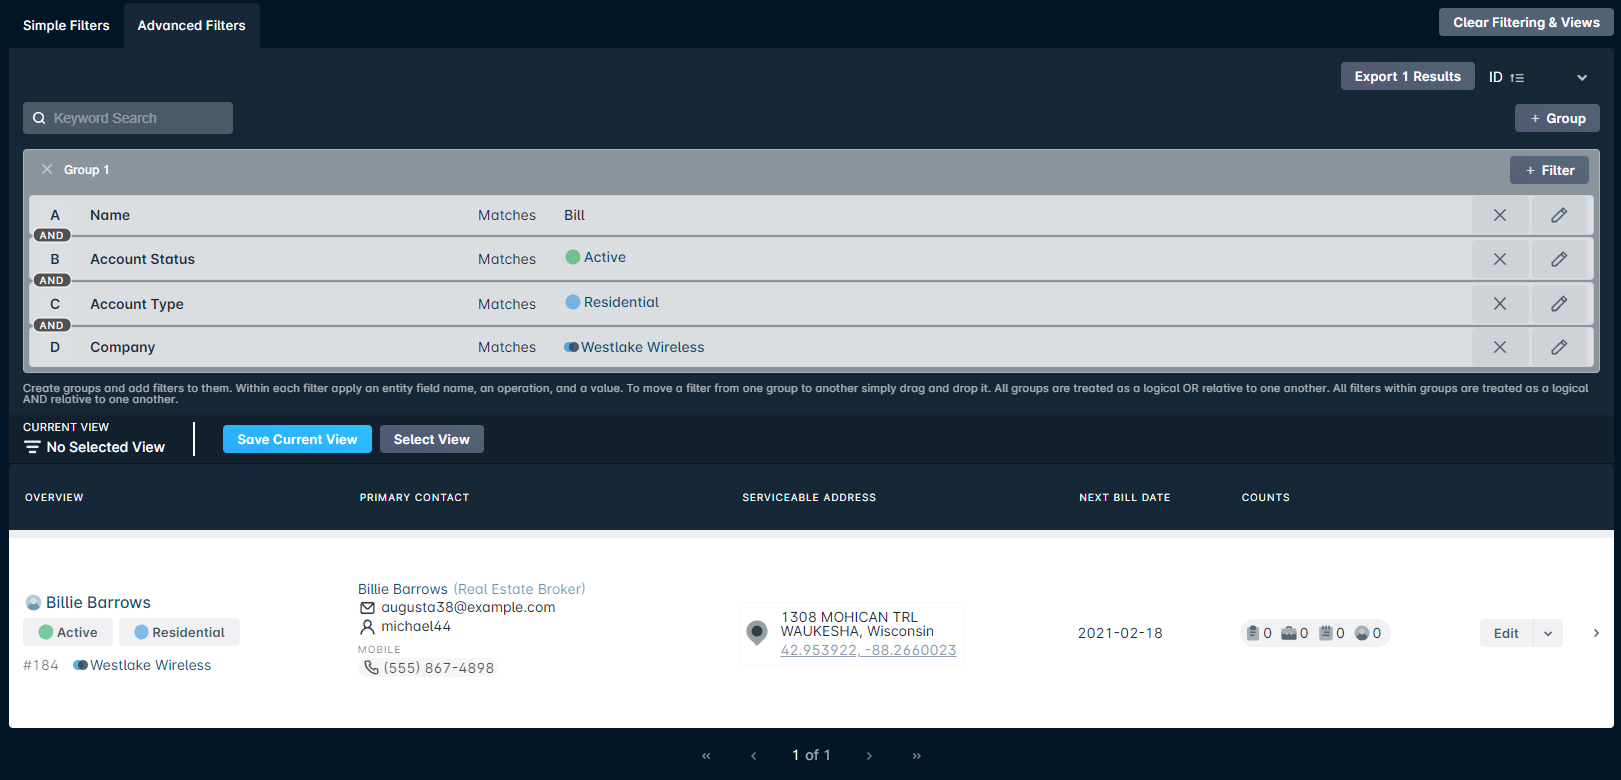
We will use the same example as the one from the simple filters section above, where we are looking for an account that contains the name "Bill", is active status, residential type, and part of the company Westlake Wireless.
To start, we create our first filter for the name "Bill", and then add each additional filter using the "+ Filter" button inside of the group.
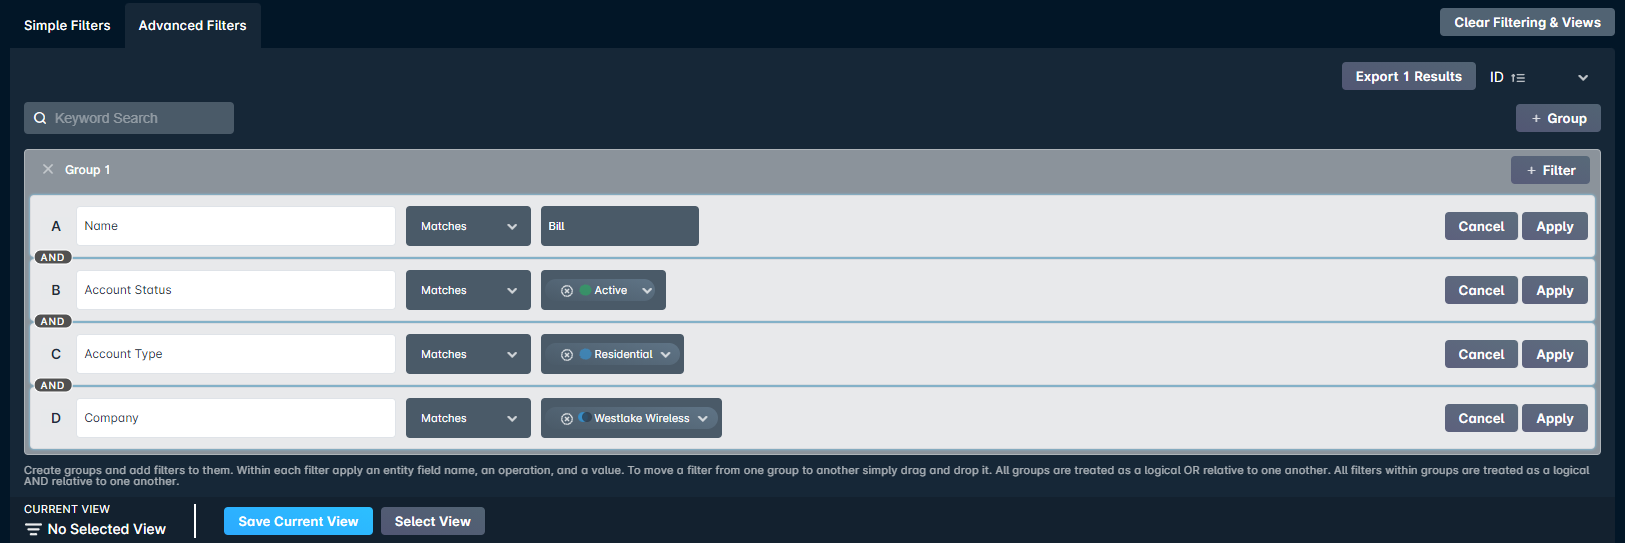
Once we click "Apply" for each of the filters we just set up, our search results will update to only show accounts that meet all the criteria we just defined.
Using Groups
With groups, you can search for items that meet some or all of the criteria that you specify and can therefore perform a broader search. You can add a new group by clicking the "+ Group" button, and can add as many groups as needed. To remove a group, you must first remove all filters within the group, and can then click the "X" at the top left corner of the group to delete it.

Example
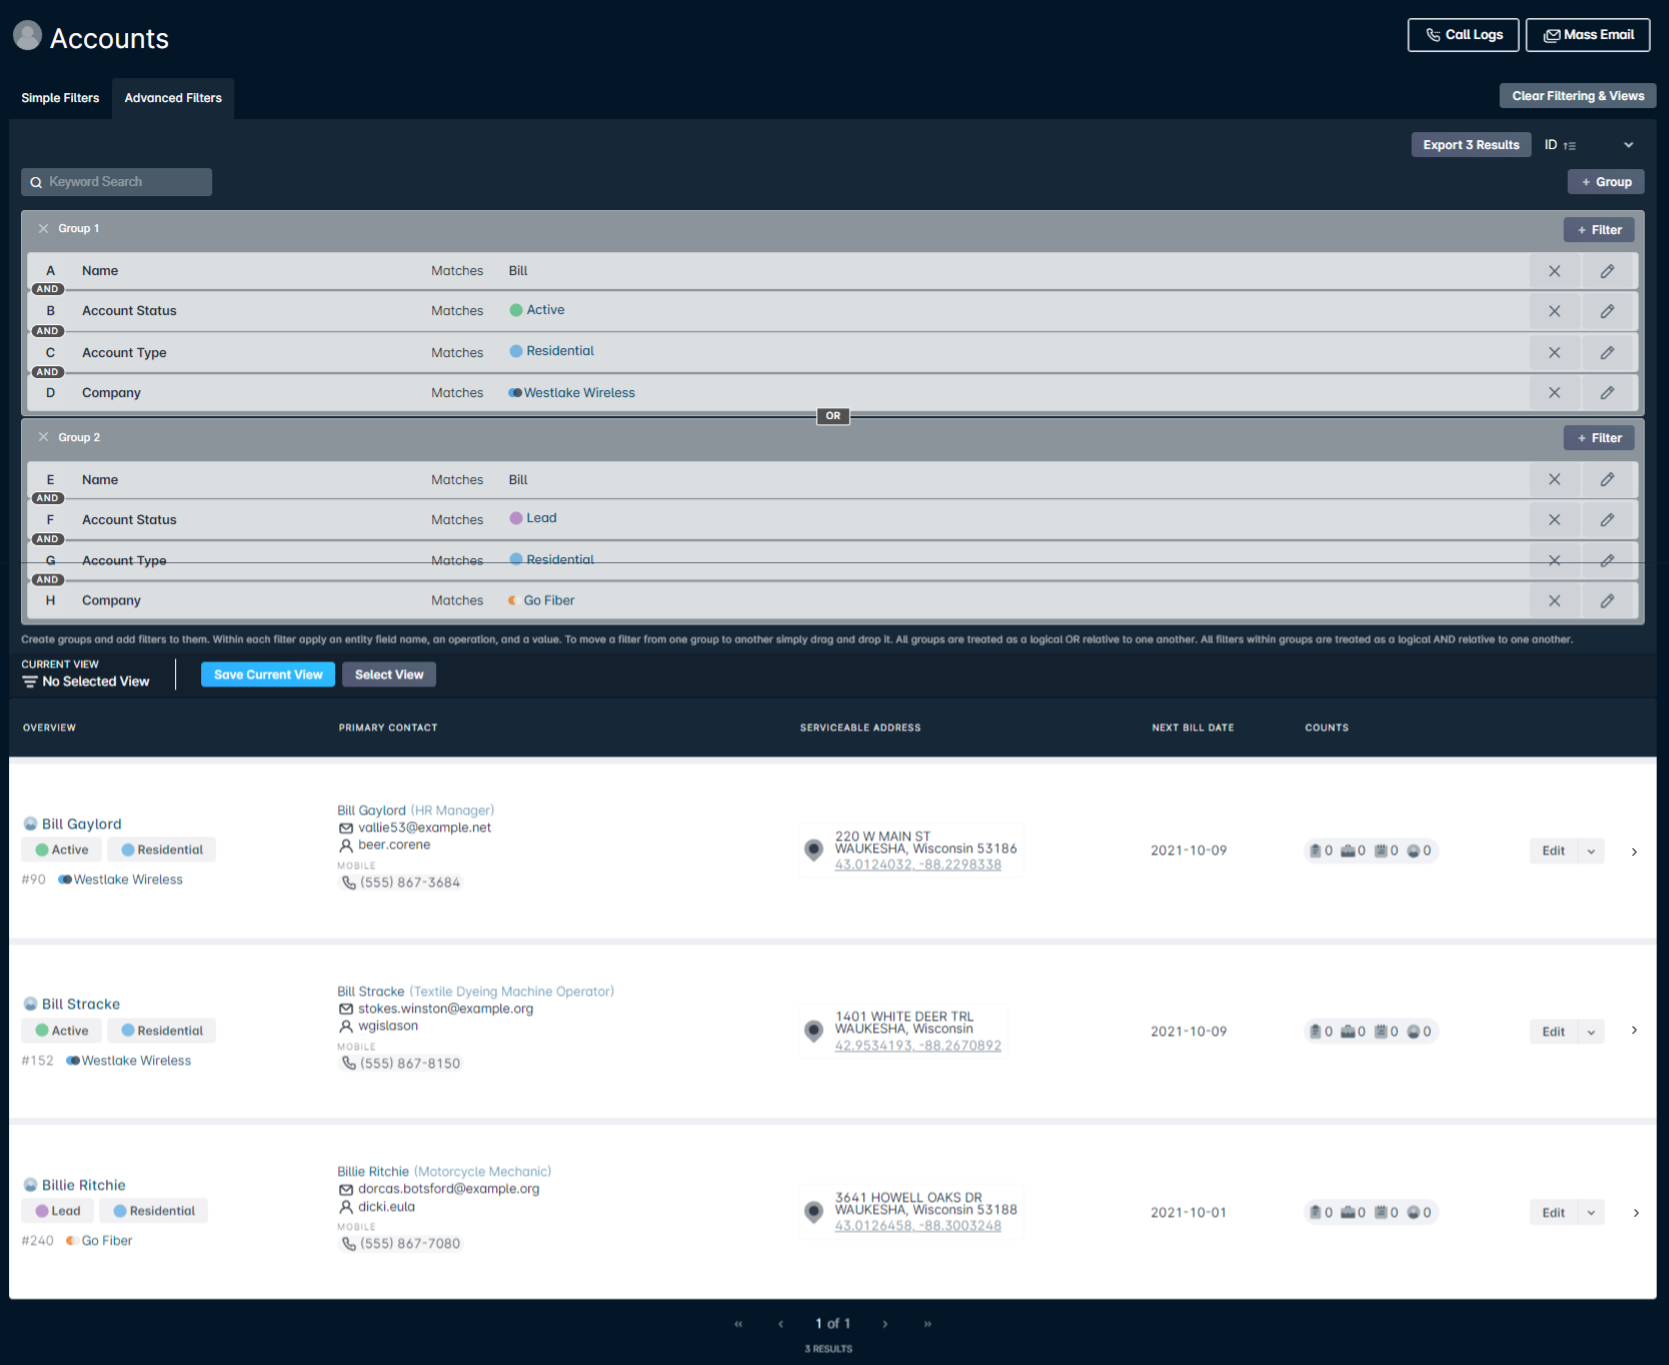
Continuing from our last 2 examples, we will set up our filters in our first group to look for accounts that contain the name "Bill", are active status, residential type, and associated with the Westlake Wireless company. However, let's say that at the same time, we also want to view all accounts that meet the same criteria but are lead status and part of the Go Fiber company instead.
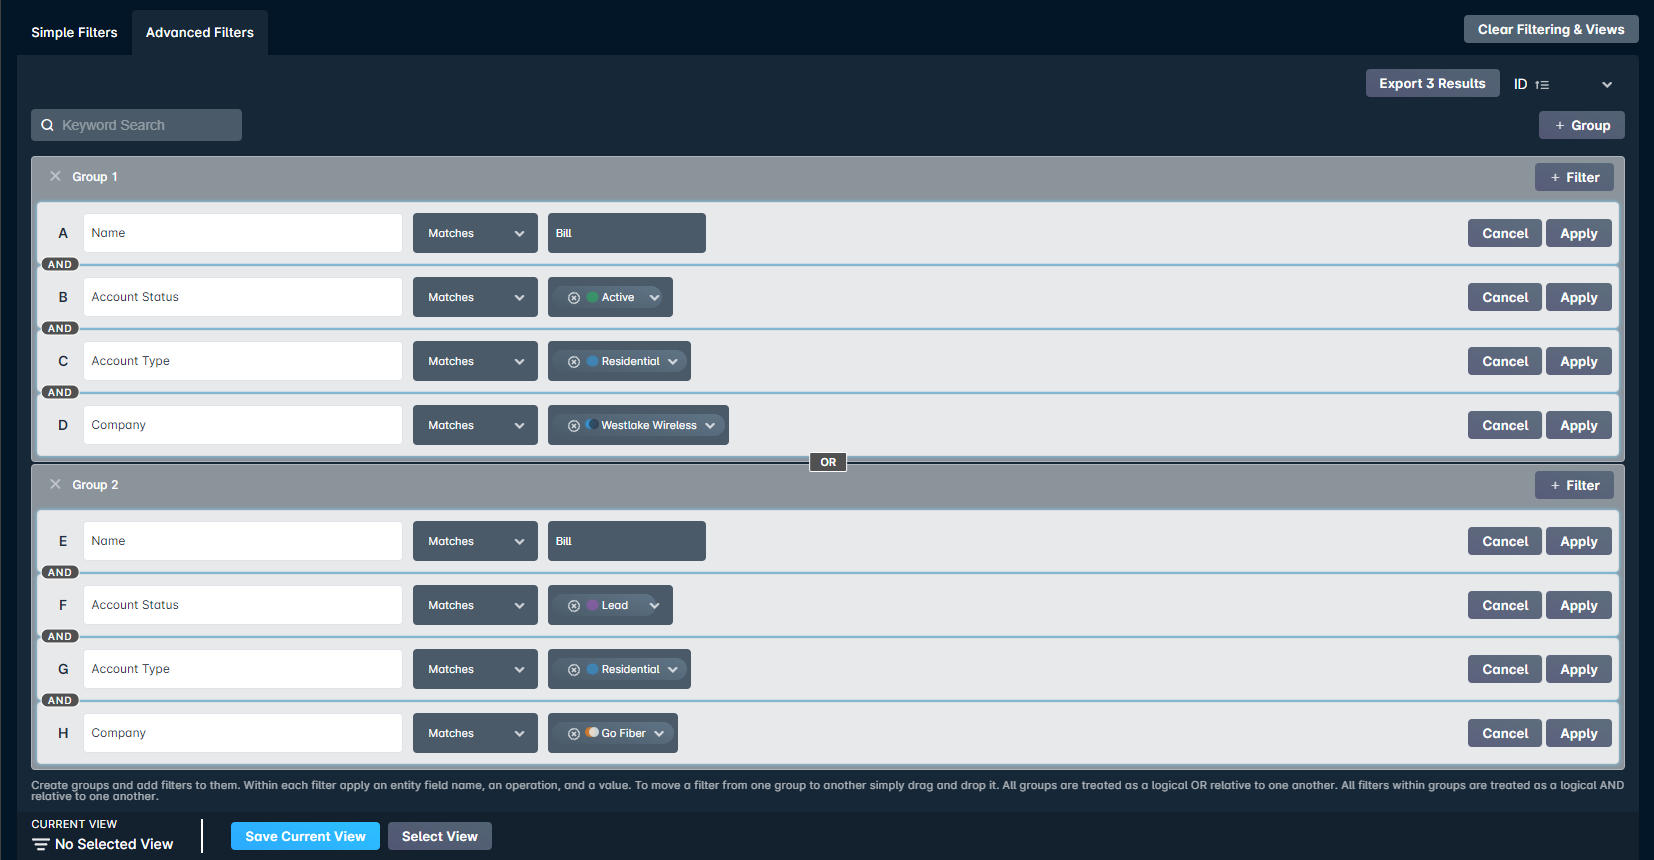
Once we apply our filters in both groups, we can now view all results that meet the criteria specified in either group 1 or group 2.
Saving Views
The Saving Views feature is comprised of a few separate sections. The main component is the ability to automatically return to where you left off, as your prior filter selections are saved locally; these selections are kept until you either move to another machine, log out or manually clear the filtering and views.
Wherever you see the options for Simple and Advanced Filters within your instance, you will have access to the Saving Filters feature. Below, we'll detail the various options available.

- The Current View field reflects the title of the selected filter view.
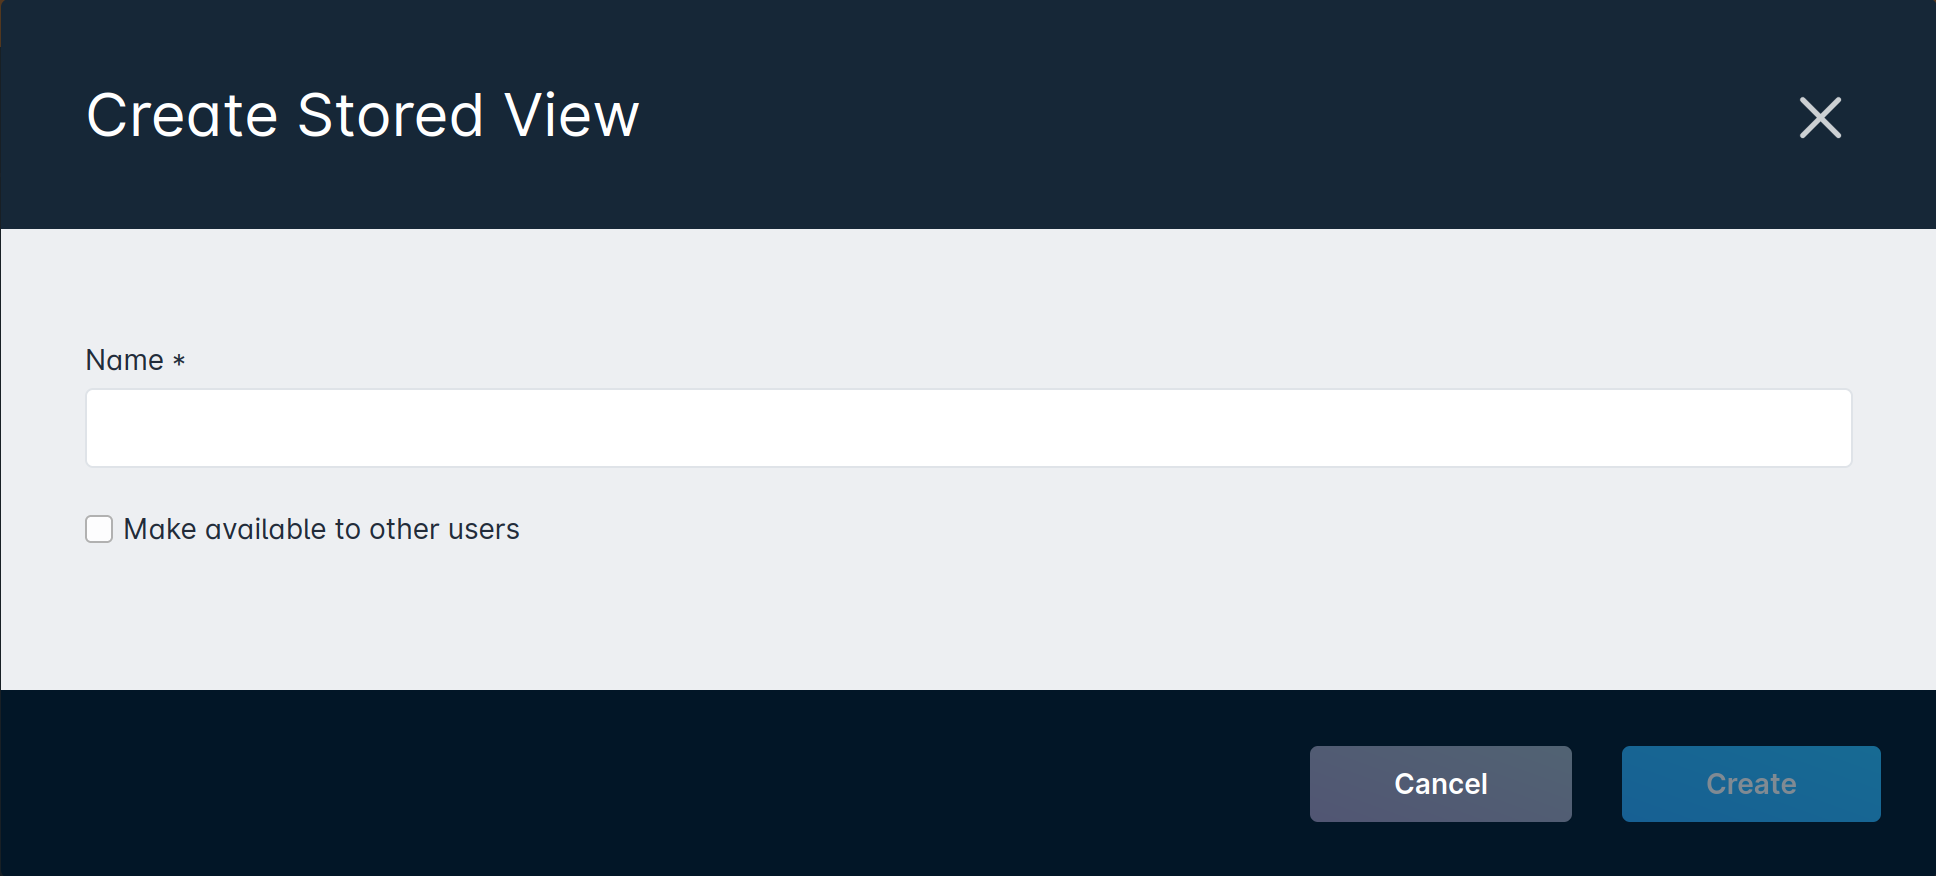
- Save Current View allows you to save both the filtering and sorting selections actively in use. When selected, a new modal is populated where you will add a name for the new stored view. From here, you are also able to share the view by checking off "Make available to other users", but only if you have the applicable role permissions (see further below for information on permissions).
- Select View provides access to all existing saved views available to you; this would include both user only and public views. As you navigate through your instance, you'll notice the saved views change; for example, views created for Accounts will not show if you are on the Tickets interface and vice versa. By default, each instance is pre-loaded with several Public Saved Views.

- Clicking on Clear Filtering & Views prompts a reset of all filters and sorting in use, so if a saved view was in use, it will be de-selected. If the configuration you were using had not been saved, then you would need to rebuild those parameters to get the same view back.
Permissions
Most features of Saving Filters work without any additional permissions given to a user. However, without permissions given, users will be unable to create new, edit existing or delete any public views. All users are able to create new user-only views, and edit any of their own views too.
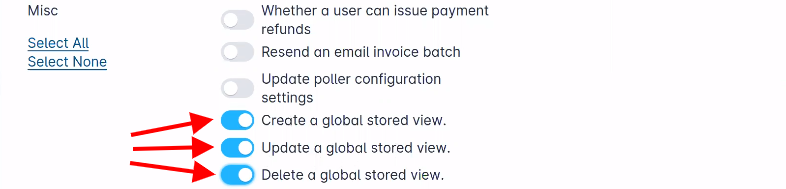
To adjust these permissions, navigate to Settings > Security > Roles and then select the role you need to make changes to. With the new menu populated, scroll down to the Misc section and enable the applicable permissions.
Public Saved Views
To view a complete list of all public views in your instance, navigate to Settings > Public Saved Views. From here, you will be able to see the name of the view, along with the page it is tied to and whether the configuration is for Simple or Advanced filters.
If the 'Update a global stored view' permission is enabled, you are able to rename any public view by clicking on "Edit". Any further changes required must be done from the page it is tied to, as shown in the 2nd column.
If the 'Delete a global stored view' permission is enabled, you can remove a view from your instance by clicking on the dropdown alongside "Edit" and selecting "Delete". Any users who may have been actively utilizing it will continue to use the same filtering and sorting selections until they either clear their filters or log out.
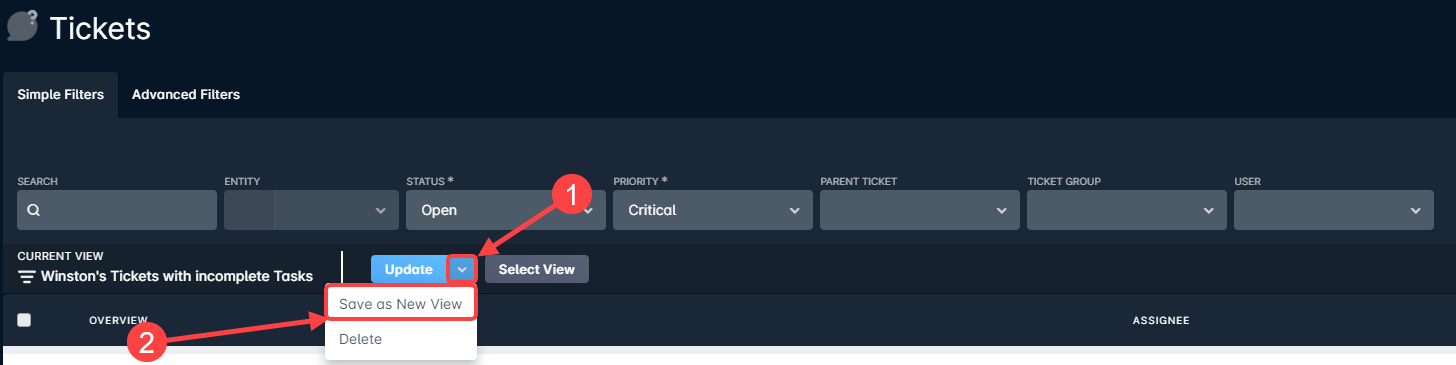
Updating a Saved View
In the event you need to make changes to an already existing view, you would first need to click "Select View" and choose the view from the populated menu. Then, you can make the relevant adjustments to the filters and/or sorting, and select "Update".

In the new modal, you will be advised that you are about to override the existing view. From here, you will have the option of renaming the view before saving the changes.

Saving as a New View
You may come across an existing view that needs one or two changes to provide the data you're looking for. Rather than starting from scratch, you can simply click on "Save as New View" using the dropdown alongside "Update". The modal that appears is the same as if you were saving a view built from scratch.
Deleting a Saved View
There are two ways to delete a public saved view:
- The first method is to navigate to the page the view is tied to, and then select it. From here, you can use the dropdown alongside "Update" to click on "Delete". Following this, the view will be removed from the instance. However, the chosen filters and sorting of the view will persist locally until you select "Clear Filtering & Views" or log out. This process works for both public and user-only views.
- As mentioned under the Public Saved Views section above, you can delete a view from here by clicking on the arrow beside Edit and clicking on "Delete". The view will be removed from your instance and any users who may have been actively utilizing it will continue to use the same filtering and sorting selections until they either clear their filters or log out.