Customer payment methods are usually saved in Sonar and set to auto-pay, so payments run automatically by credit card or bank account with no manual work needed. If you also accept checks, cash, or wire transfers, you’ll need to enter and track those payments manually—but Sonar’s Batch Payment Entry and Deposit Slips tools make this faster and easier to manage.
Using Batch Payment Entry
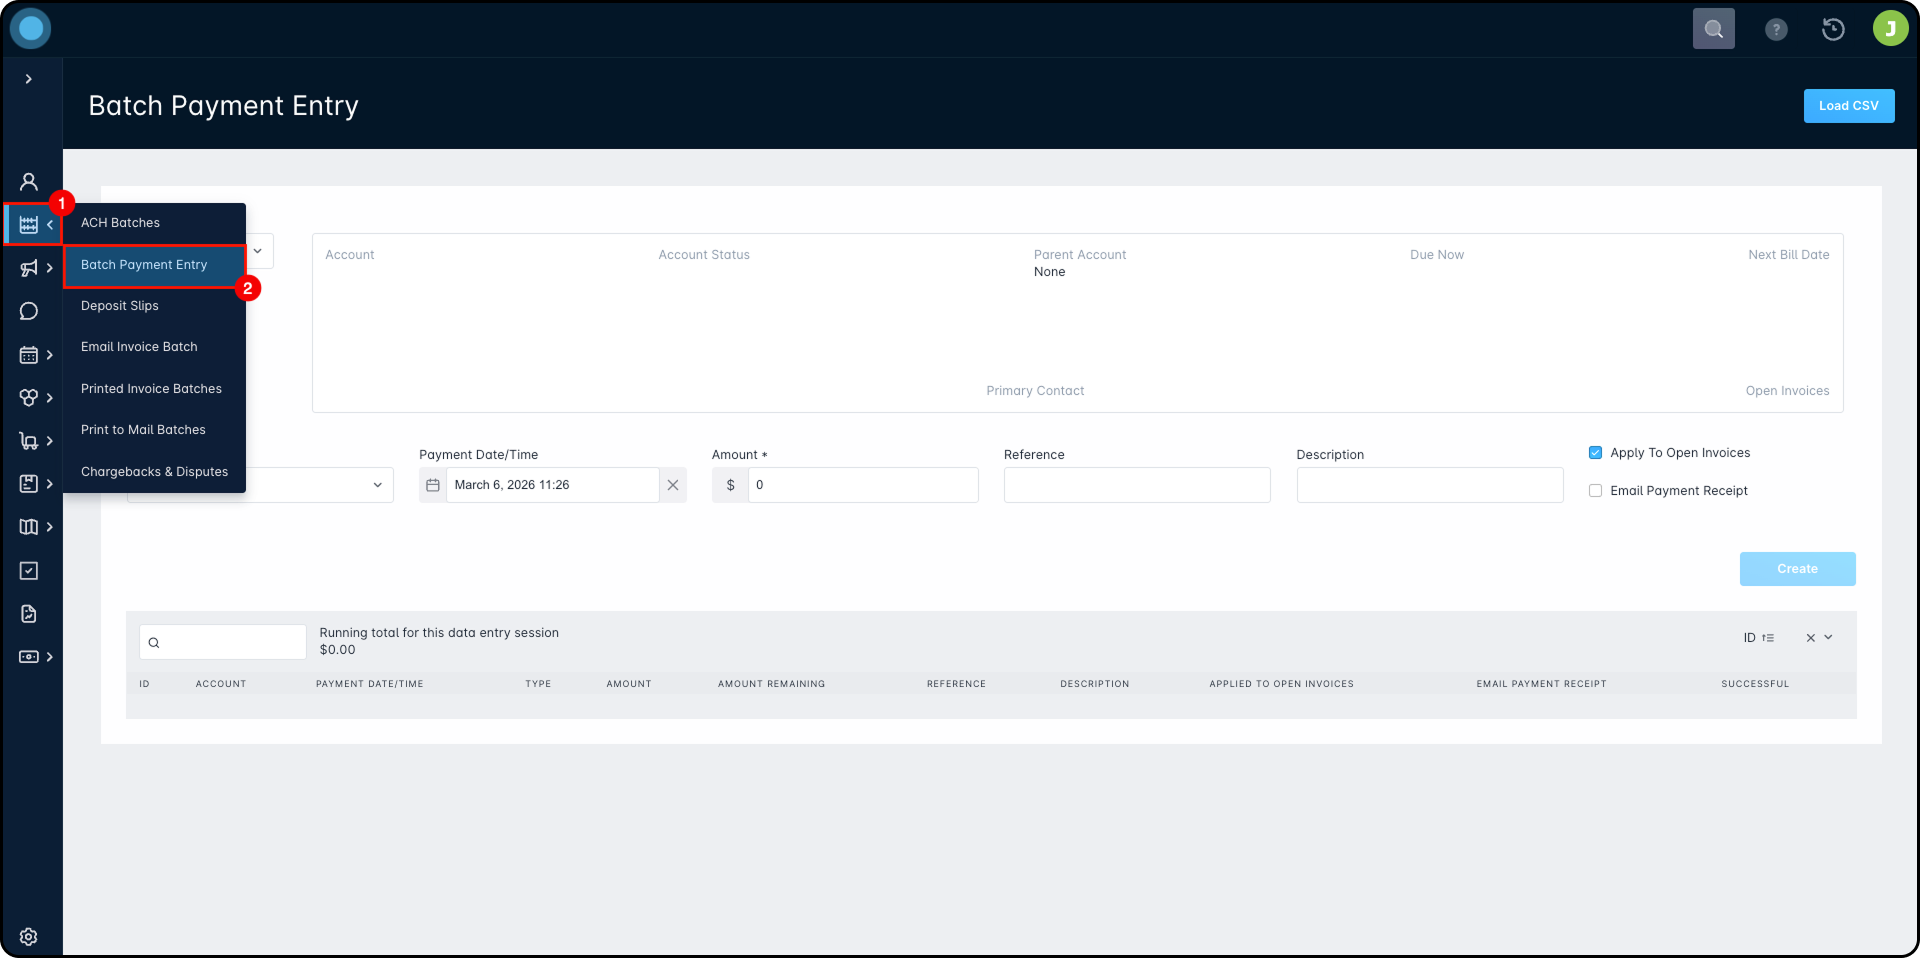
The Batch Payment Entry tool can be accessed by clicking Billing Tools > Batch Payment Entry.
Once you've navigated into the Batch Payment Entry tool, you can follow the steps outlined below to enter a payment for the batch:
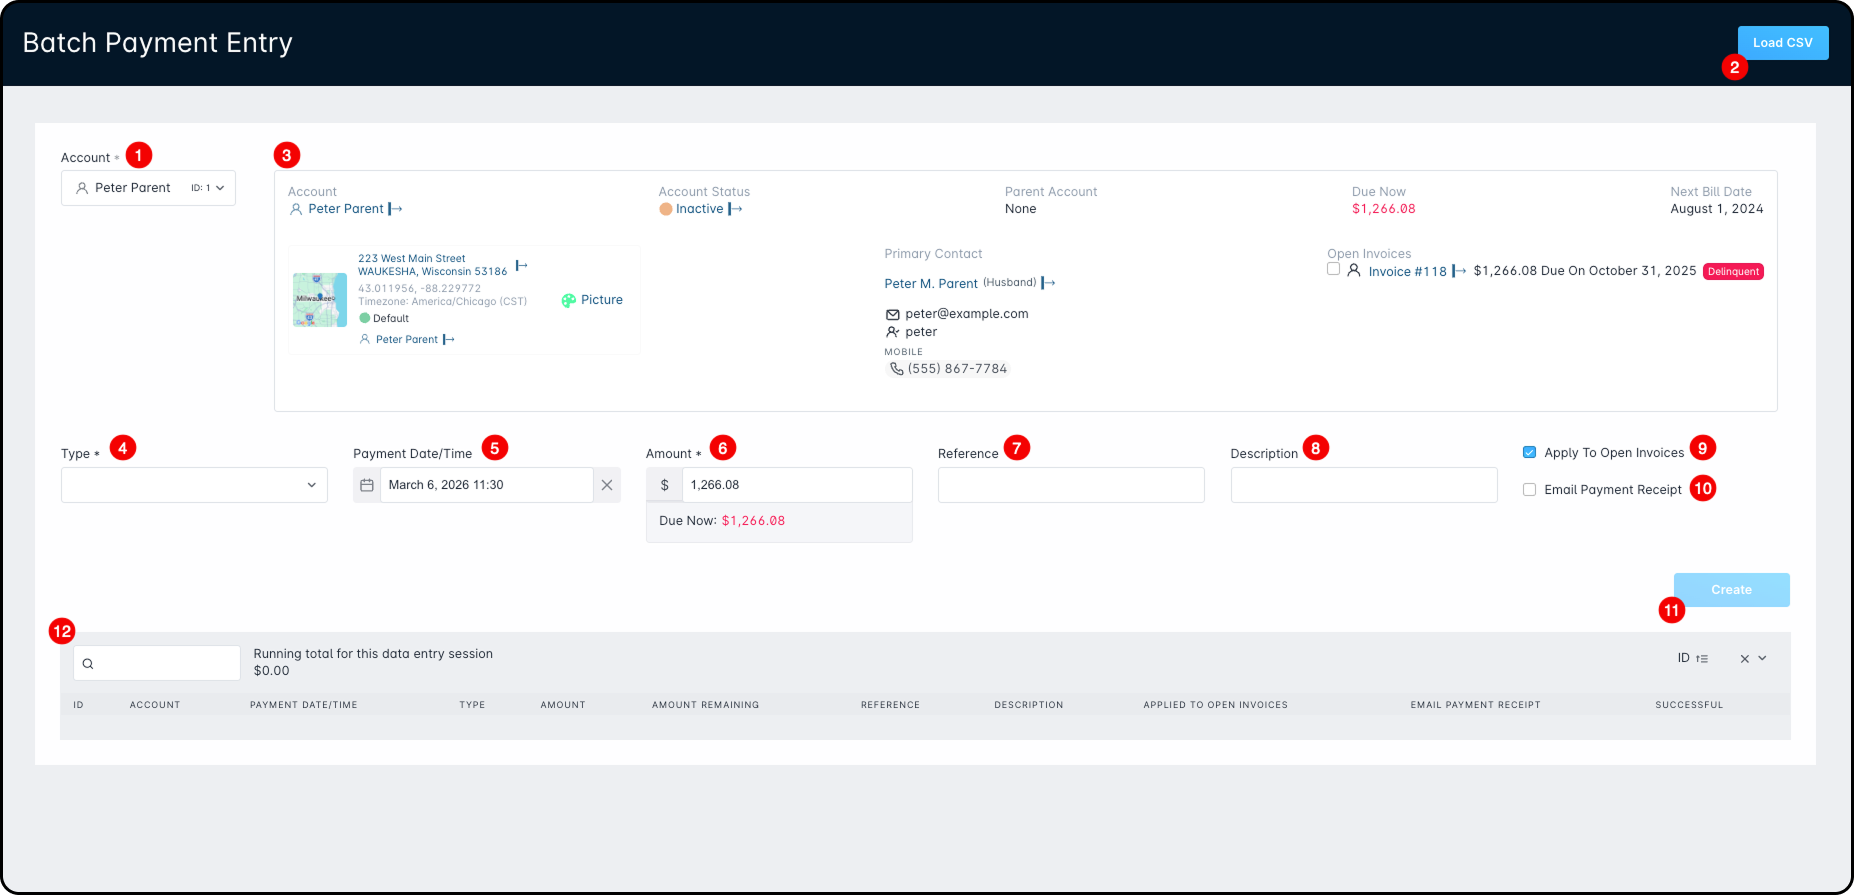
Find the account. Before adding a payment to the batch, select the account the payment belongs to. You can do this in two ways:
Account Selector: Click the Account field to open a list of accounts. Choose an account or use the search bar to find it. The account details will display below.
Account ID: If you know the account ID, type it into the Account field and press Enter. The account will be selected and its details will display below.
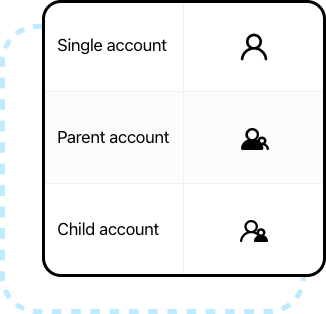
Each account also shows an icon that indicates its Parent/Child account status, with three possible states:
Add your payment CSV (optional). You can upload a CSV to populate the payment batch automatically, which lets you import many payments across multiple accounts at once. This uses a custom importer, which is explained later in the article.
Review account information. This section shows a snapshot of the selected account, including:
Account status
Parent account details
Amount Due now
Next bill date
Address and Primary contact information
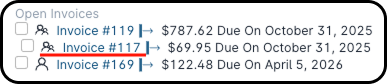
Open Invoices
Open Invoices includes all invoices on the account, including child account invoices.
Child invoices appear indented.
Invoices are listed by due date, with the soonest due dates at the top. From the Open Invoices list, you can:
Select invoices to automatically fill the payment Amount and apply the payment to those invoice(s).
If you select specific invoices, the payment applies only to those invoices. Any extra amount becomes an account credit instead of paying other invoices.
Click an invoice to open the sidebar and view invoice details.
Any text or section in Sonar with this icon () can be clicked to open the sidebar.
Select the payment type. In the Type dropdown, choose the payment method the customer used:
Cash
Check
Other
PayPal
Wire
Enter the payment date and time. Sonar automatically fills in the current date and time, but you can change it by clicking the field and selecting a new date and time.
Payments can only be entered for now or a past date/time—you can’t enter a payment for a future date. If you need a future payment, schedule it on the account using a scheduled event.
Enter the payment amount. Type the amount the customer paid. If the amount doesn’t match the amount due, Sonar will display a message below this field.
Add reference details (optional). Use this field to enter extra information, such as a reference number.
If you select PayPal as the payment type, this field is replaced with Payment Transaction ID.
Add a description (optional). Use the Description field to include extra details about the payment, such as what it’s for (for example, “Re: Install”).
If PayPal is selected as the payment type, this field won’t appear.
Apply to Open Invoices (check/uncheck).
Checked: The payment is applied to open invoices, starting with the oldest invoice.
Unchecked: The payment is added to the account as Available Credits.
Email Payment Receipt (check/uncheck).
Checked: Sonar emails a receipt to the account’s financial contact for the payment.
Click Create. Each payment is added to the table below the account details as you enter it.
Batch Payments table contains:
The batch session running total.
An option to export all payments from the current batch session.
Filters and search tools to help you organize and find payments.
The payment’s unique transaction ID.
The account name.
Click the account name to open the sidebar with a quick account overview and a link to the account management page.
The payment date and time.
The payment type.
The payment amount.
The amount remaining.
The Amount Remaining column shows any balance left after the payment is applied to open invoices on the account. This is usually $0, unless the customer pays more than what’s due. For example, if a customer pays $85 toward an $84.95 bill, the remaining $0.05 is recorded as an overpayment and added to the account as Available Credits.
You’ll also see an amount remaining if no invoices are selected or if Apply to open invoices is unchecked.
Any payment reference entered.
If PayPal is selected, this field is replaced with Payment Transaction ID.
Any payment description entered.
If PayPal is selected, this field won’t appear.
Which invoice(s) the payment was applied to.
Whether an email receipt is being sent to the customer
Whether the payment was successful (batch payments are manual entries of already-confirmed payments, so they will show as successful)
The Edit option, which lets you update the payment reference and also:
Delete the transaction.
You can only delete a transaction in an open accounting period. If the period is closed, you must reverse the transaction instead.
Download the payment receipt.
A caret icon () you can click to open a sidebar with payment and account details.
Considerations for Using the Batch Payment Importer
Click Load CSV to open the import window. By default, it includes two options: upload your CSV or download a template.
The Download Template button provides a sample spreadsheet with example data you can use to build your own import file.Your uploaded spreadsheet must include a header row first, followed by the payment data. The template also shows that some columns are optional, while others are required. To upload successfully, the column headers must match exactly, including capitalization. The importer uses the fields below:
Fields marked with an asterisk (*) are required for every record.
account_id*: The numeric ID of an existing account.
Use numbers only (no quotes or special characters).
payment_type*: The payment type to create (see Payment Type in step #4).
Required—blank values won’t import.
Case-sensitive—must be ALL CAPS (mixed/lowercase will fail).
payment_datetime: The payment date and time.
Payments can only be entered for now or a past date/time—you can’t enter a payment for a future date. If you need a future payment, schedule it on the account using a scheduled event.
Must be ISO 8601 format (for example, 2023-07-24T11:53:46-05:00 or 2023-12-31 18:45).
If an Accounting Period Close Date is set in /settings/billing/billing-settings, the payment date must be after that close date or the import will fail.
If blank, it defaults to the submission date/time.
amount*: The payment amount to credit to the account (see Amount in step #6).
Enter in cents, not dollars (no decimals or commas).
reference: Optional payment reference (see step #7).
description: Optional payment description (see step #8).
transaction_id: PayPal transaction ID.
Only use this when payment_type is PAYPAL.
apply_to_open_invoices: Whether to apply the payment to open invoices (see step #9).
Uses true/false (any capitalization is accepted).
If invoice_ids is provided, this value is ignored.
invoice_ids: The invoice IDs to apply the payment to.
If you include a child invoice, you must also include the parent invoice first.
Put IDs in quotes, comma-separated, no spaces (for example, "7,13,27").
email_payment_receipt: Whether to email a receipt (see step #10).
Even if set to true and emails send, the session table may still display “No.”
Uses true/false (any capitalization is accepted).
Now that your payments are entered and the batch is created, you can use Sonar’s Deposit Slips tool to generate a deposit slip for the bank.
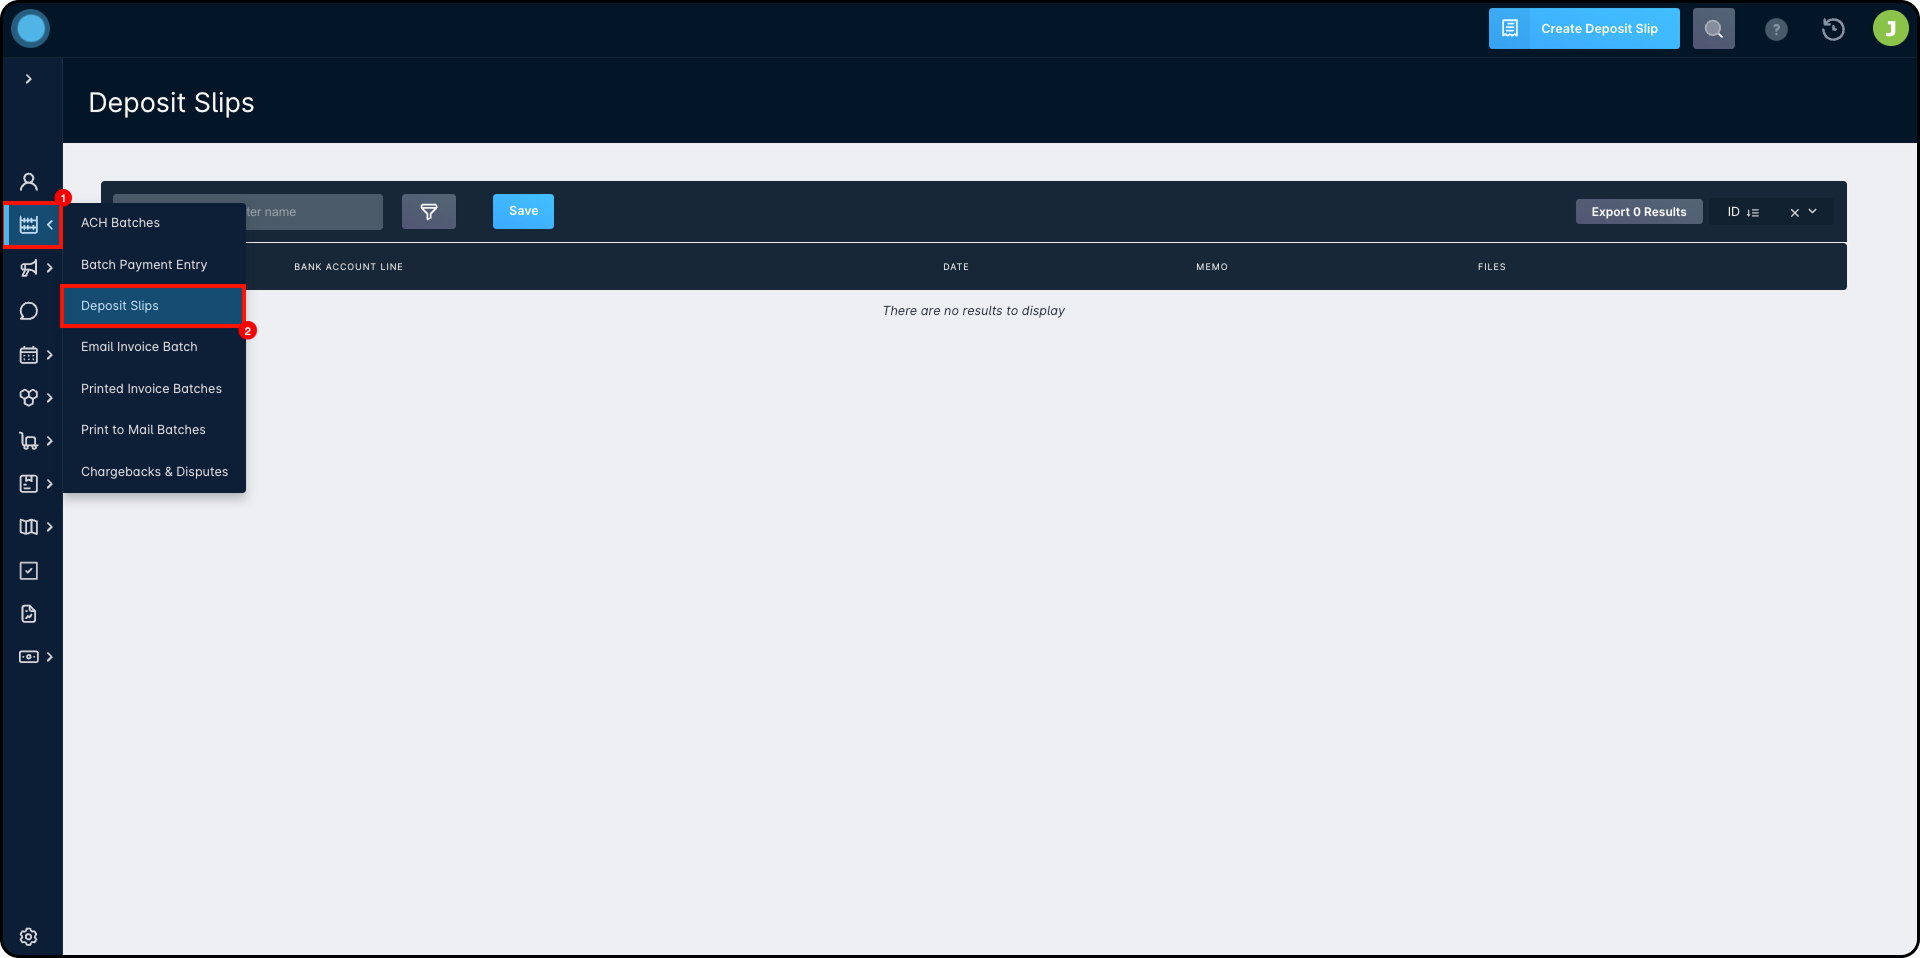
Using Deposit Slips
The Deposit Slips tool can be accessed by clicking into the Billing Tools > Deposit Slips.
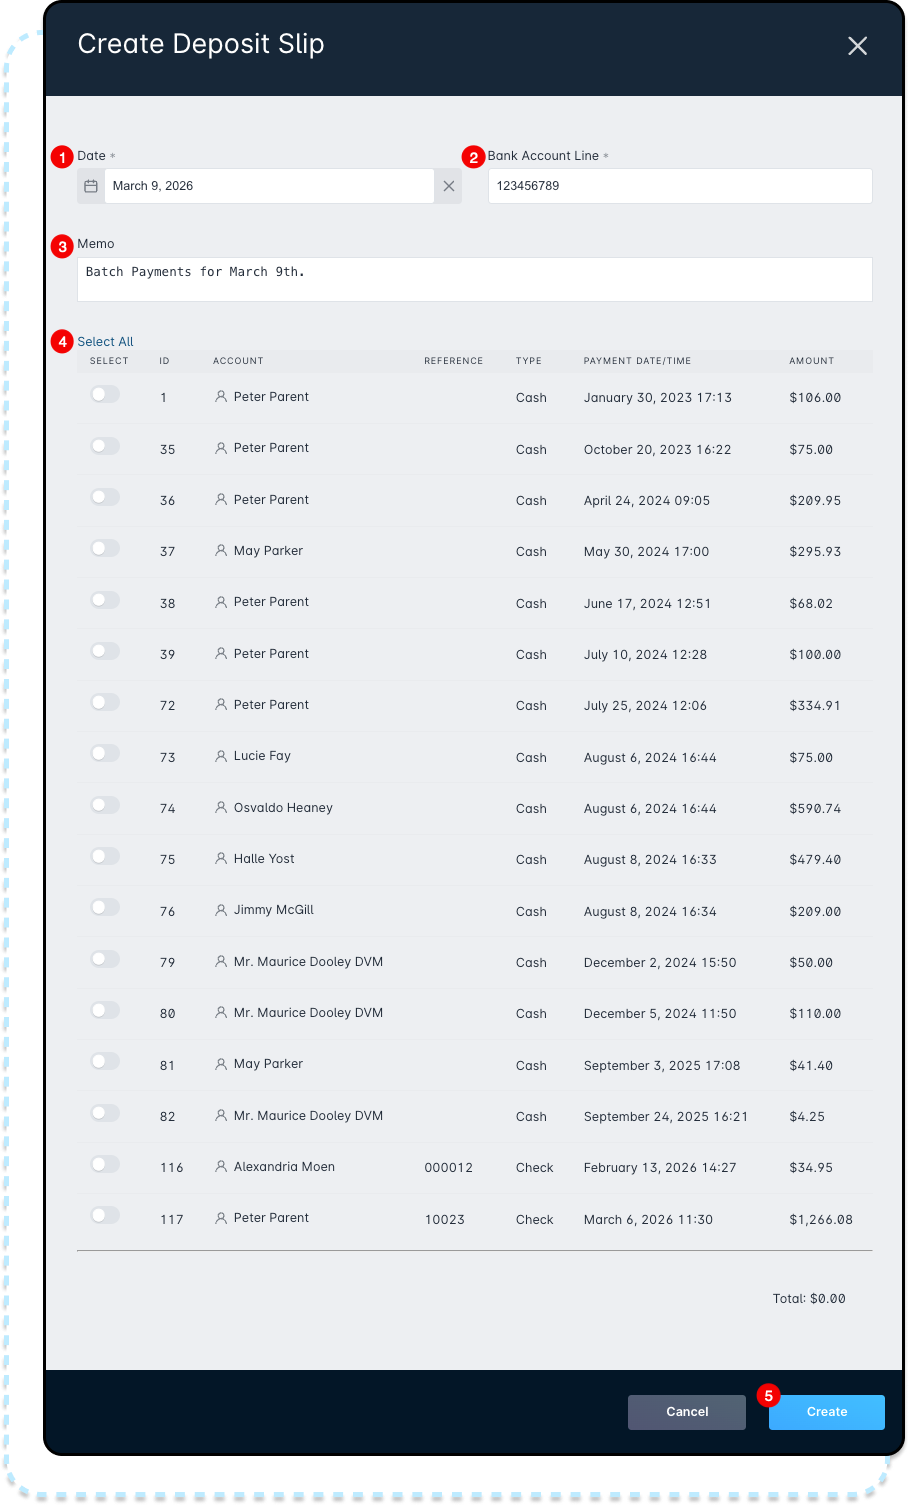
From the Deposit Slips screen, click Create Deposit Slip in the top-right corner. In the Create Deposit Slip window, follow these steps:
Select the date: Use the date picker to choose the day you plan to make the deposit.
Enter the bank account: Add the account number where the payments will be deposited.
Add a memo (optional): Include any notes or extra details about the deposit.
Select the payments to include: Choose from batched payments that haven’t been added to a deposit slip yet. You can click Select All or use the toggle next to each payment to select items individually.
A best practice is to select payments one at a time as you gather each check or cash payment and place it in the deposit envelope. This helps ensure everything selected is physically included—and makes it easy to spot anything missing.
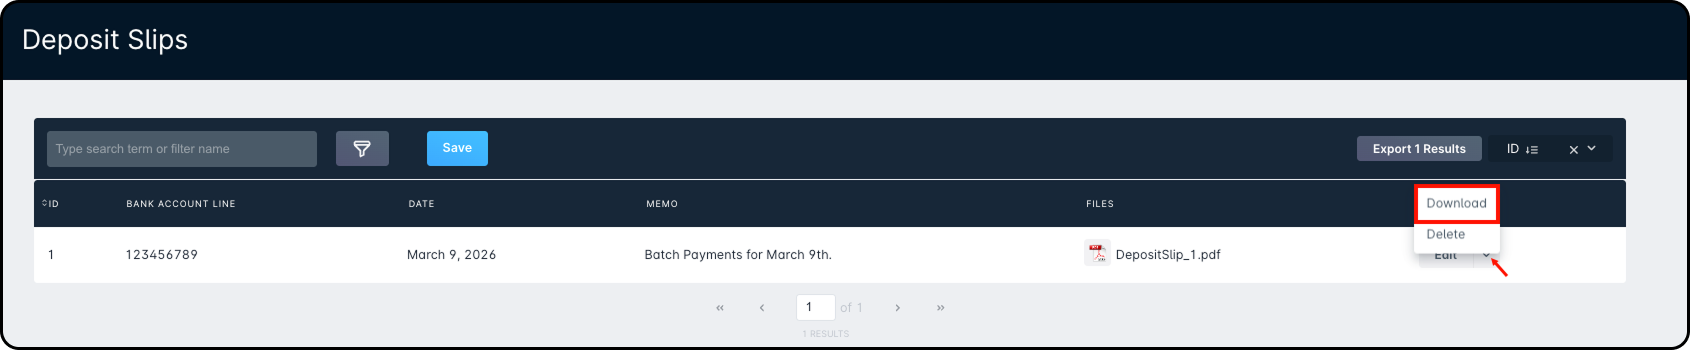
Click Create: The deposit slip is created and will appear on the Deposit Slips screen, where you can download or delete it.
If you delete a deposit slip, all payments on that slip become available again to include in a new deposit slip.
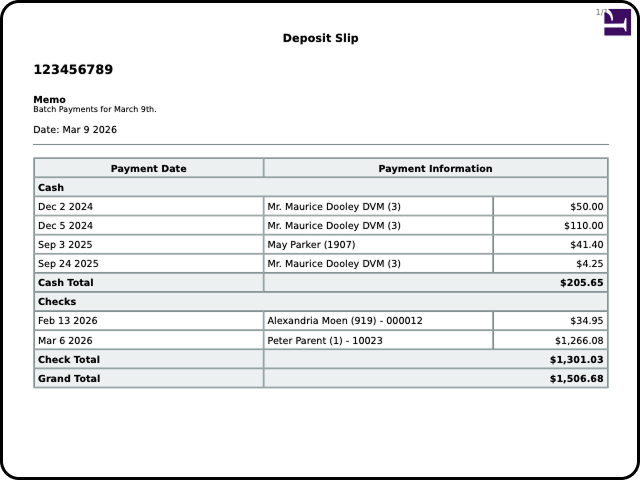
Preview and download the deposit slip: Click the PDF file name in the Files column to preview the deposit slip. To download it, click the drop-down arrow next to Edit and select Download. The PDF includes the details you need for the bank deposit, such as the account number, memo, cash and check totals, and the grand total.
Considerations When Using Deposit Slips
Deposit slips help you process cash and check payments with your financial institution, but they can’t be edited once created.
After a deposit slip is generated, you must delete and recreate it to correct any mistakes—and you can only do that if it hasn’t been submitted to your financial institution yet.
If a payment is entered incorrectly (for example, applied to the wrong account), here’s what to expect:
If the deposit slip hasn’t been created yet: If the deposit slip hasn’t been created yet, you can reverse the incorrect payment (see Manual Transactions) so the deposit slip reflects the correct account—as long as the accounting period is still open. If the period is closed, the corrected transaction won’t match the original date and time, but the deposit slip will still show the right customer name and account.
If the deposit slip is created right away: If a payment was applied and a deposit slip was created right away, any later corrections won’t show on that slip. If the slip hasn’t been submitted to your financial institution, you can delete it and create a new one with only the correct transactions. If the accounting period is closed, the corrected transaction will have a different date and time, since updates can’t be recorded in a closed period.
If you have questions about deposit slips for your business, reach out to your Client Relations Manager (CRM) or the Support team.
 Updated
by Mitchell Ivany
Updated
by Mitchell Ivany

 Any text or section in Sonar with this icon (
 ) can be clicked to open the sidebar.


 ) you can click to open a sidebar with payment and account details.
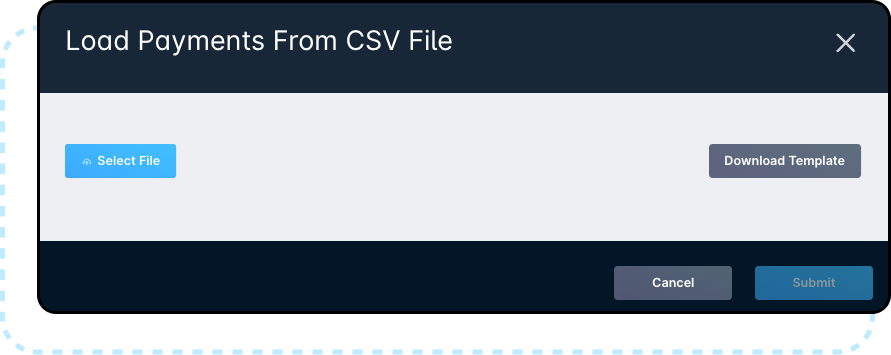

 If you delete a deposit slip, all payments on that slip become available again to include in a new deposit slip.