Our Products & Services
Getting Started
First Time Setup
Getting Started With Jobs
Getting Started with Accounts
Getting Started with Inventory
Getting Started with Ticketing
Setting Sonar up for Billing
Baseline Configuration
How To: Using Sonar's Customer Portal
User Specific Resources
Accounts
Account Groups: Overview & Example Use Cases
Account List View: Overview
Account Management View: Overview
Account Overview Customization
Account Statuses: Overview & Example Use Cases
Account Types: Overview & Example Use Cases
Anchor & Linked Serviceable Addresses: Overview and Best Practices
Archiving an Account: Overview
CPUC Fixed Broadband Deployment by Address
Child Accounts: Best Practices & How Tos
Creating a New Account
Direct Messages: Overview
Disconnecting an Account
Disconnection Reason Management: Overview
Exploring Task Groups
FCC Broadband Data Collection (BDC) Filings: How Sonar Can Help
FCC Data Exports: General Overview and Usage
Future Serviceable Addresses: Overview
Lead Intake Form Processing
Notes: Best Practices & Use Cases
Scheduled Events: Overview & Use Cases
Serviceable Addresses: Overview and Usage
Specify Account ID upon Creation
Tasks & Task Templates: Overview
Using Sonar's FCC Broadband Label Generation Tool
Billing
ACH Batching: Overview
Accounts in Vacation Mode
Avalara: Overview & Setup
Batch Payments & Deposit Slips: Overview
Billing Calculator
Billing Defaults
Billing Settings
Building Packages
Building a Data Service
Canadian ACH tool
Changing Service Pricing in Sonar: Best Practices
Considerations When Using Avalara with Voice Services
Creating Discounts for Services and Packages
Delinquency Billing Best Practices
Delinquency Exclusions: Overview and Use Cases
Dual Data Services: Overview
Email Invoice Batch: Overview
General Ledger Codes: Overview
General Transactions: Best Practices
How Sonar Prorates Billing
How to Take Bank Account Payments
How to: Adding a Service to an Account
Invoice Templates: Overview
Leveraging PayPal as a Payment Method in Sonar
Manual Transactions
Multi-Month Billing & Multi-Month Services
Print to Mail
Printed Invoice Batches: Overview
Services: Overview
Setting Up Payment Methods and Taking Payments
Setting up Bank Account & Credit Card Processors
Taxes Setup
Usage Based Billing Policies: Overview and Usage
Usage Based Billing Policy Free Periods: Overview and Usage
Using Tax Exemptions - How To
Communication
Communications: Call Logs Overview & Best Practices
Communications: Messages Overview
Email Variables & Conditions
Message Categories: Overview & Use Cases
Phone Number Types: Overview and Use Cases
Saved Messages: Overview
Setting up an Outbound Email Domain
Trigger Explanations
Triggered Messages: Setup
Using Outbound SMS
Using the Mass Message Tool
Companies
How to: Setting Up a Company in Sonar
Managing Multiple Companies in Sonar: Best Practices
Rebranding your Sonar Instance
Financial
Contract Templates
Invoice Attachment Use Cases & PDF Examples
Invoice Messages: Overview & Use Cases
Invoices in Sonar: Examples, Creation & Contents
Integrations
Atlas Digital CORE Integration
Calix Cloud Data Field Mappings
Calix SMx Integration: Overview
CrowdFiber Integration
External Marketing Providers
GPS Tracking Providers: Overview
GoCardless Integration: Overview & Setup
How to Connect Cambium to your Sonar Instance
How to Connect Preseem to your Sonar System
How to: Using Webhooks in Sonar
Integrating with Calix Cloud
RemoteWinBox - Integration with Sonar
Sonar Retain: AI-Powered Customer Retention & Quality Intelligence
The Sonar Field Tech App
Tower Coverage Integration: Overview
VETRO FiberMap V2 Integration: Overview
VETRO FiberMap V3 Integration: Overview
Webhooks in Sonar: Basic PHP Example
iCalendar Integration
Inventory
Inventory List View: Overview
Inventory Model Management: General Overview
Network Inventory: How-to & Usage Guide
Segmentable Inventory: How-to & Usage Guide
Setup of Inventory: Manufacturers, Categories, and Assignees
Tracking and Using Consumable Inventory
Jobs
Applying Task Templates to Jobs
Edit Job Options
Example Jobs & Templates
Geofences: Overview
Job Types: Best Practices
Jobs and Scheduling: Overview
Scheduling Dispatcher View: Overview
Scheduling How-to: Creating and Booking a Job
Scheduling Table View: Overview
Scheduling Week View: Overview
Setting Up Schedules General Overview
Mapping
Misc.
Combining Custom Fields & Task Templates for Information Storage
Custom Fields Overview & Use Cases
Custom Links: Overview
Task Templates Overview & Use Cases
Monitoring
Building Alerting Rotations
Building a Monitoring Template
Poller Troubleshooting
Pollers: General Overview, Deployment Strategy, Build Out & Setup
Networking
Adtran Mosaic Cloud Platform Integration: Overview
Assigning RADIUS Addresses
Assigning an IP Address Using Sonar's IPAM: How to
Automating IP Assignments, Data Rates, and Network Access in Sonar
Building Address Lists
Building RADIUS Groups
Building a Device Mapper
Cable Modem Provisioning
Controlling Customer Speeds with Sonar: General Overview
DHCP Delivery
Data Usage Available Methods
Finding your OIDs
FreeRADIUS 3: Build-Out & Integration
How Sonar Communicates - Egress IPs Explained
IP Assignments & Sonar
IPAM: Basic Setup
IPAM: Overview
LTE Integration
MikroTik as an Inline Device: Integration With Sonar
MikroTik: Controlling Access
MikroTik: Controlling Speeds
MikroTik: Setting Up a Sonar Controlled DHCP Server
Netflow On-Premise Integration: Setup and Overview
Network Dashboard: Overview
Network Sites: Management View Overview
PacketLogic: Integration With Sonar
Pulse, Polling, and PHP
RADIUS: Build-Out & Integration with Sonar
RADIUS: Building Reply Attributes
Setting Up CoA Proxy
Sonar Flow
Sonar IP Addressing
Using Multiple Network Devices in Sonar
Purchase Orders
Release Notes
Reporting
Enhanced Business Intelligence - Tips & Tricks for Advanced Users
How To Enhance Your Reporting With Custom Field Data
Report Licenses
Sonar's Business Intelligence: Overview
Understanding Sonar Reports
Using Sonar DataConnect to Connect BI Applications with Your Sonar Instance
Security
Application Firewall: General Overview and Best Practices
Auth0: Overview
Multi-Factor Authentication: Overview
Password Policy In Depth
Removing a Terminated Employee In Sonar
Role Creation using GraphiQL
User Role Creation & Best Practices
Users: Overview
Sonar Billing
sonarPay
sonarPay Canada Disbursements: Overview
sonarPay Chargebacks & Disputes: Overview
sonarPay Disbursements: Overview
sonarPay Monthly Statement: Overview
sonarPay Overview
sonarPay Reversals, Voids, & Refunds: Overview
sonarPay: Token Migration Process
System
A Deeper Dive into the New Sonar API
API Calls Using Third Party Applications: Personal Access Tokens
Browser Compatibility and Minimum Hardware Requirements for Sonar
Consuming the Sonar API
Controlling Your Landing Page: Personal Preferences
Customizing Your Customer Portal
Date/Time Picker: Overview
Dynamic Time Zones in Sonar
Filtering: Overview
Frequently Used Terms
Getting Your Data into Sonar
GraphQL Rate Limiting Overview
How To Use GraphiQL to Understand the Sonar API
How Your Data is Backed Up
How to Best Use Global Search
Interacting with Files via the API
Introducing the New Sidebar
Main Menu: Overview
Mutations in the Sonar API
Notification Preferences
REST API Wrappers for V1 Compatibility
SMS Notifications
Sonar's Rich Text Editor
System Settings: Overview
The New Sonar API
Troubleshooting the Customer Portal
Upgrading your Ubuntu OS - Customer Portal Upgrades
User Profile: Your Personal User Settings
Ticketing
Advanced Ticketing Features
Canned Replies Examples & Templates
Canned Reply Categories
Exploring Ticket Groups
How Sonar Manages Spam Tickets
How to Integrate Inbound Mailboxes with Slack
Inbound Mailboxes Example Build
Ticket Category Families & Ticket Categories: Overview
Ticket Resolution Reasons: Overview
Ticketing: Overview
Using Parent Tickets
Voice
API Changes for Voice Billing
Best Practices to Remain CPNI Compliant
Billing Voice Services in Sonar
Deploying Voice Services in Sonar
Working With the Sonar Team & Additional Resources
Sonar's Security Practices & Certifications
Sonar and General Data Protection Regulation (GDPR)
Sonar's Security Strategies
Technical Security Overview
Best Practices for Fast Tracking a Support Request
Feedback Portal / Suggest a Feature
Learning with Sonar: Tools and Resources
New Client Training Overview
Sonar Casts Table of Contents
Submitting Bugs vs. Feature Requests
The Sonar Community Forum
The Sonar Status Page
Third Party Customer Support Referrals
Table of Contents
- All Categories
- Communication
- Communications: Call Logs Overview & Best Practices
Communications: Call Logs Overview & Best Practices
 Updated
by Jennifer Trower
Read Time: 4 mins
Call Logs allow users to record and collect data while on the phone with a customer. This ensures important details are documented and linked directly to the relevant account. Users can also convert call logs into tickets to track issues and follow up effectively.
Permissions
Before getting started with the Call Logs feature, your user roles will need to be adjusted to account for the permissions required to access and manage Call Logs.

Permission Details
1. View all call logs: Required to access the “Call Logs” tab and call logs in the Correspondence tab of an account.
2. Create a call log: Allows creation of new logs.
3. Update a call log: Enables editing of existing logs.
4. Delete a call log: Grants the ability to delete logs.
Using Call Logs
How to Start a Call Log
There are three places that you can start a call log from, each of which is outlined below:
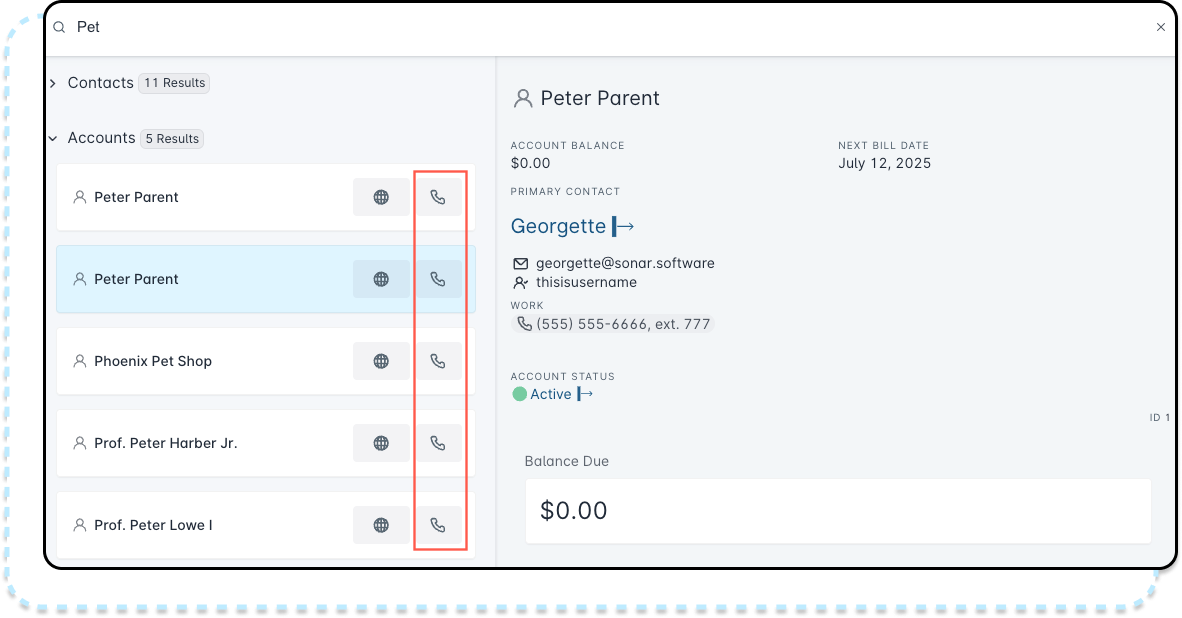
- Global Search: Double-tap the SHIFT key to open the global search bar. After finding an account, click the phone icon next to it to begin logging the call.

- Account Management Page: Click the dropdown arrow next to the Edit menu and select “Add Call Log.”

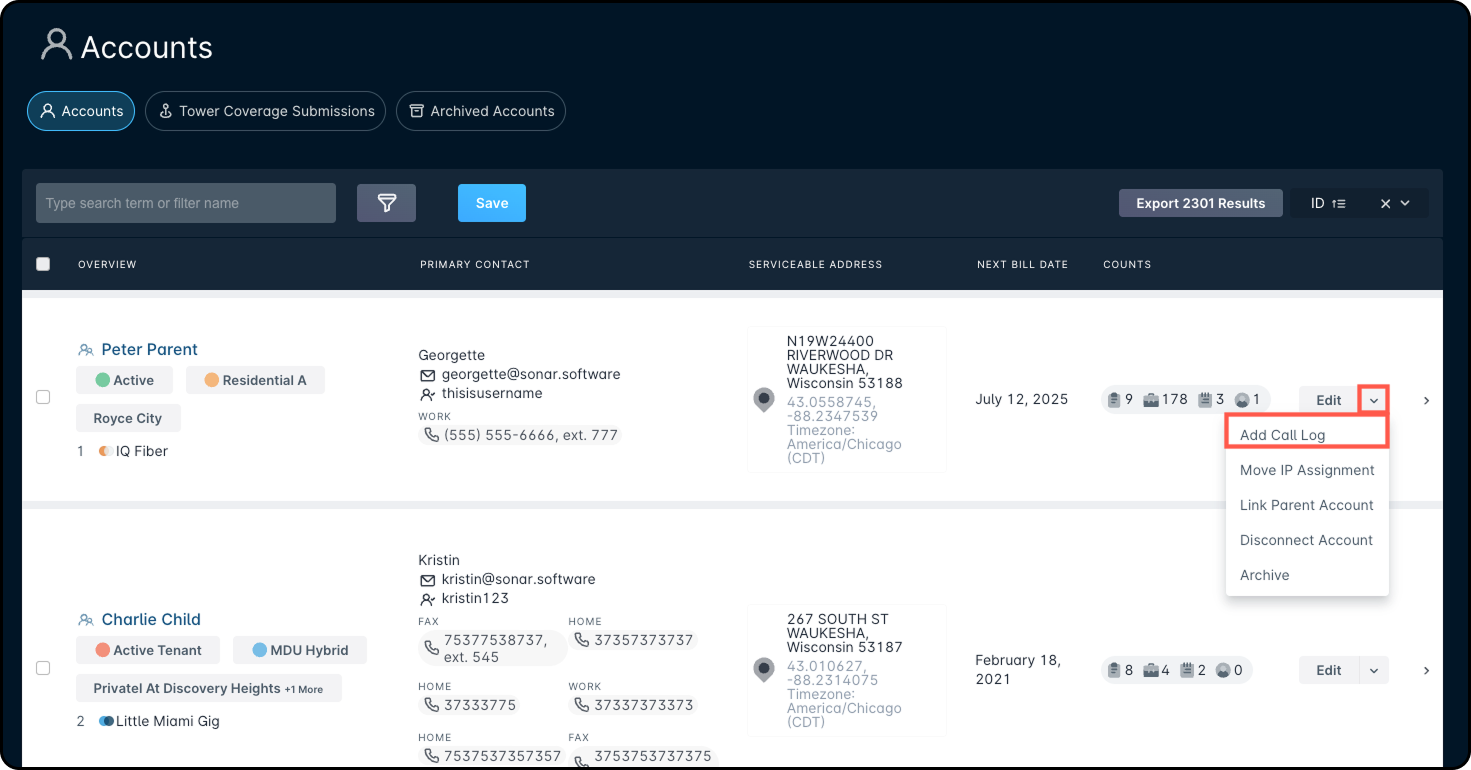
- Account List Screen: From the main list, click the dropdown arrow next to an account and choose “Add Call Log.”

Call Log Window
The Call Log window stays open even if you navigate elsewhere within your instance. Click the green header to minimize it and continue taking notes or looking up information during the call.

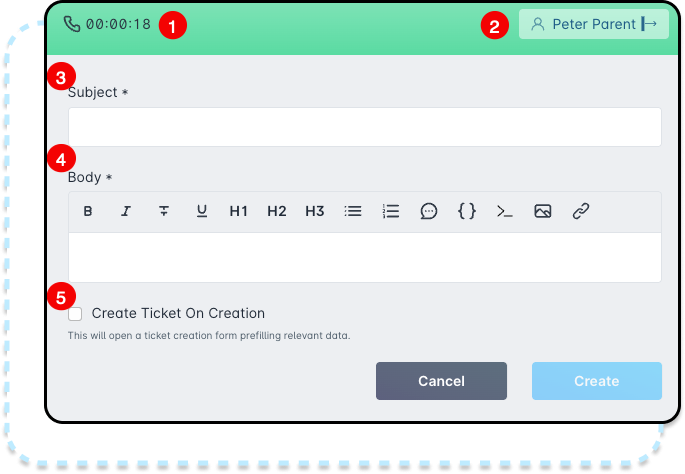
Call Log Window Features
- Timer: Starts automatically when the log begins and continues until saved.
- Linked Entity: Shows which account or item the log is associated with; clicking it opens more details.
- Subject: Describes the reason for the call.
- Body: Used for documenting call content, including notes and troubleshooting.
- Create Public Ticket: If checked, a public ticket is automatically generated upon saving.
Locating Saved Call Logs
There are two different ways for you to locate a saved call log for a customer within your instance. The following outlines these options.
Using Communications in the Main Menu
Navigate to Communications → Call Logs. The Call Logs page provides an overview of all recorded calls in your Sonar instance. It also allows users to convert these logs into tickets and perform administrative actions based on role permissions.

- Filtering Call Logs: Use filters to narrow down call logs by details like account or usernames.For more information on Filtering, click here.
- Account: Shows the account linked to the call log. Click the name to open the account.
- Subject: Displays the call’s subject, entered by the user.
- Duration: Indicates how long the call lasted—from start to creation.
- User: Shows who started the call log.
- Created: Time and date when the log was recorded.
- Edit: Modify call log details. (Available based on user permissions.)
- Create Internal Ticket: Opens a modal to generate an internal ticket using call log details.
- Create Public Ticket: Opens a modal for creating a public-facing ticket.
- Delete: Permanently removes the call log. (Visible based on user permissions.)
Account Management Page
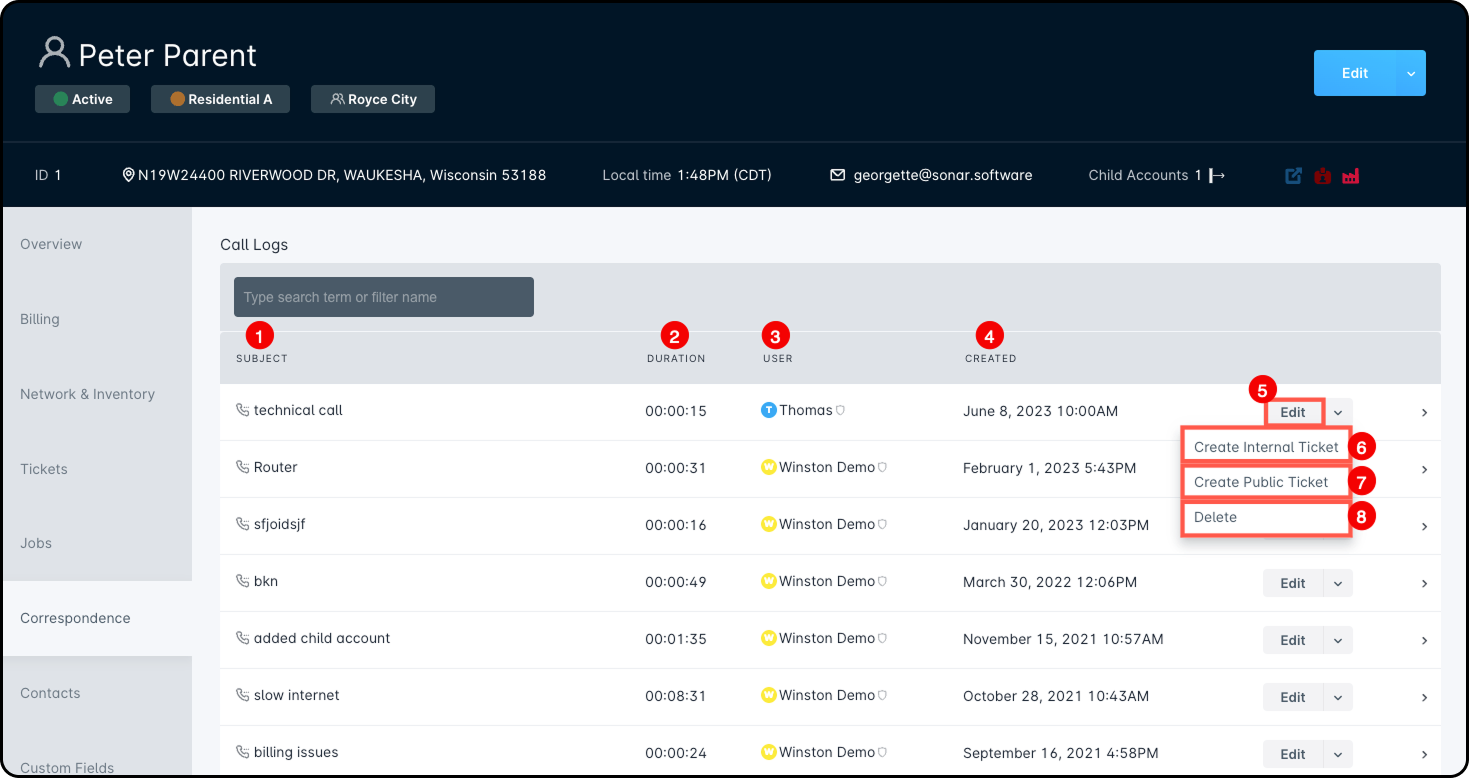
While viewing the account management page, you will navigate to the Correspondence tab. This section reflects all call logs taken within your instance per this individual account, and includes options to action them into tickets.

- Subject: Displays the call’s subject, entered by the user.
- Duration: Indicates how long the call lasted—from start to creation.
- User: Shows who started the call log.
- Created: Time and date when the log was recorded.
- Edit: Modify call log details. (Available based on user permissions.)
- Create Internal Ticket: Opens a modal to generate an internal ticket using call log details.
- Create Public Ticket: Opens a modal for creating a public-facing ticket.
- Delete: Permanently removes the call log. (Visible based on user permissions.)
Best Practices & Tips for Using Call Logs
In this section, we have included some best practices for making the most out of your call logs, and tips on how to use them in the most efficient manner.
Call Logs Should Include:
- Informative Subjects: Include caller name and topic (for example, “Tom re: Billing Questions”).
- Caller Information: Note full names and departments for clarity.
- Customer Issue: Document issue details, troubleshooting steps, and background info.
- Issue Status: Clearly state resolution or next steps.
- Contact Information: Add preferred contact methods for follow-ups.
- Additional Comments: Include context such as customer demeanor or access issues.

