Table of Contents
Creating a New Account
 Updated
by Mitchell Ivany
Updated
by Mitchell Ivany
Read Time: 11 mins

To provide service to your customers within Sonar, an account needs to be created for them. This account allows for the assignment of a serviceable address, the assignment of network inventory, and the assignment of services. In this article, we'll be going over the process of creating a new account, the fields you can fill out, and the basics of delivering a service to this new account.
Account Creation Overview
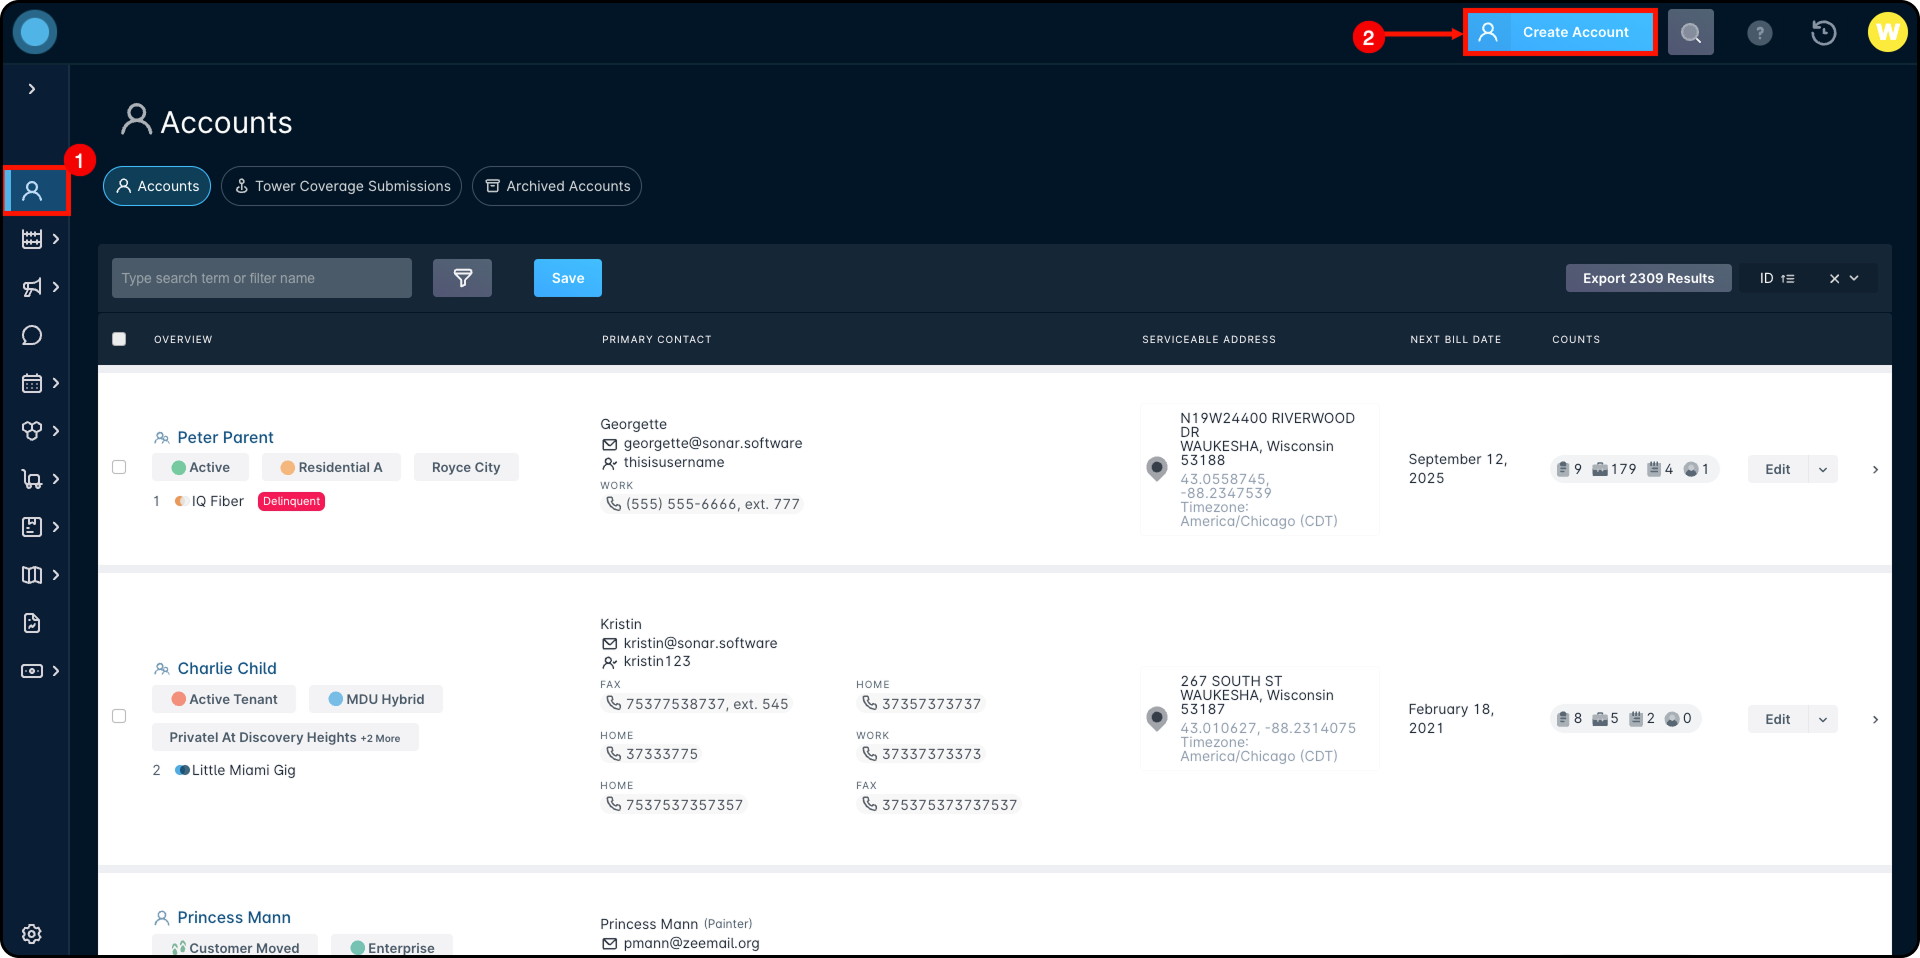
While the primary function of the Accounts List View page is explored in its overview article, you also can create a new account by clicking on the “Create Account” button located in the upper-right corner:
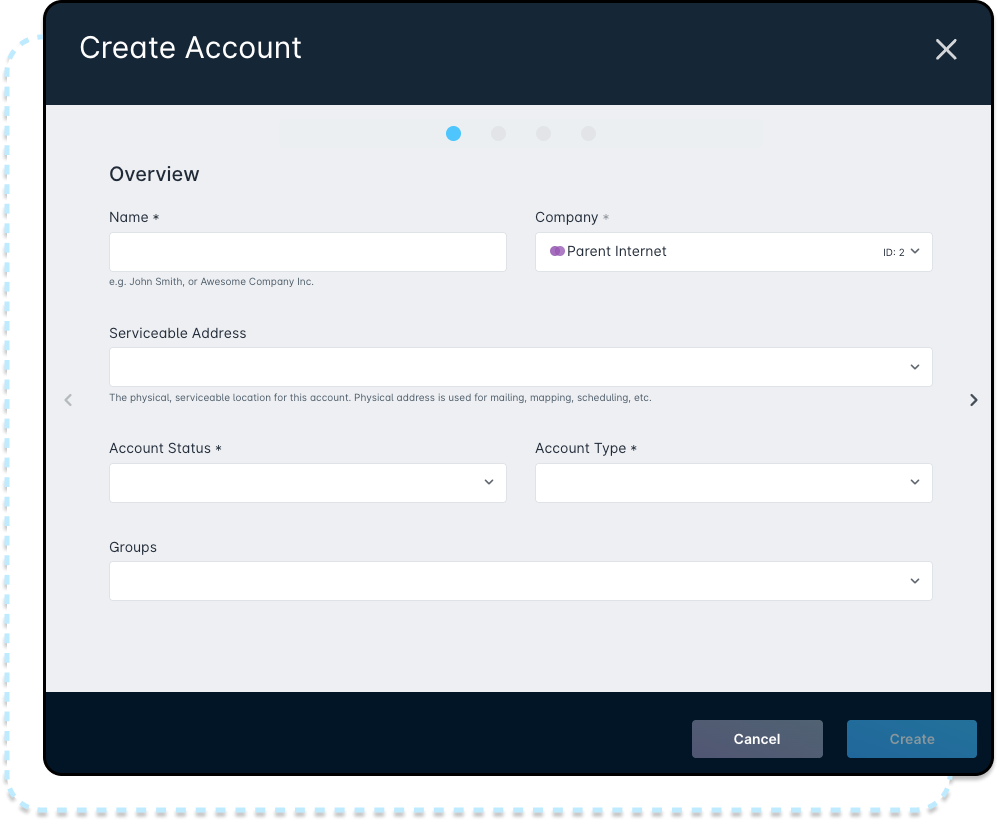
Account creation is divided into 4 pages that can be filled out:
- The first page prompts you to select a name for the account, the company in your instance it'll be tied to, the serviceable address, the initial account status and type for the account, and any account groups you'd like the account assigned to.
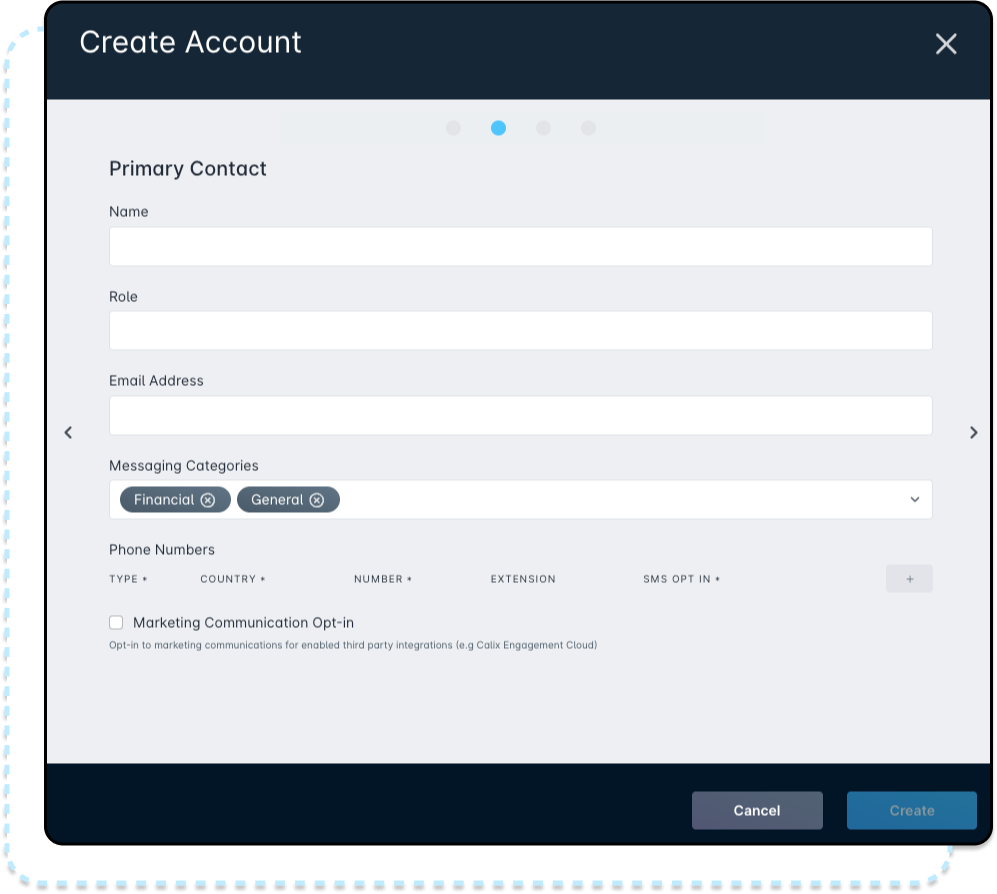
- The second page prompts you to fill in information for the primary contact, such as their name, contact information, and what messaging categories they should belong in.
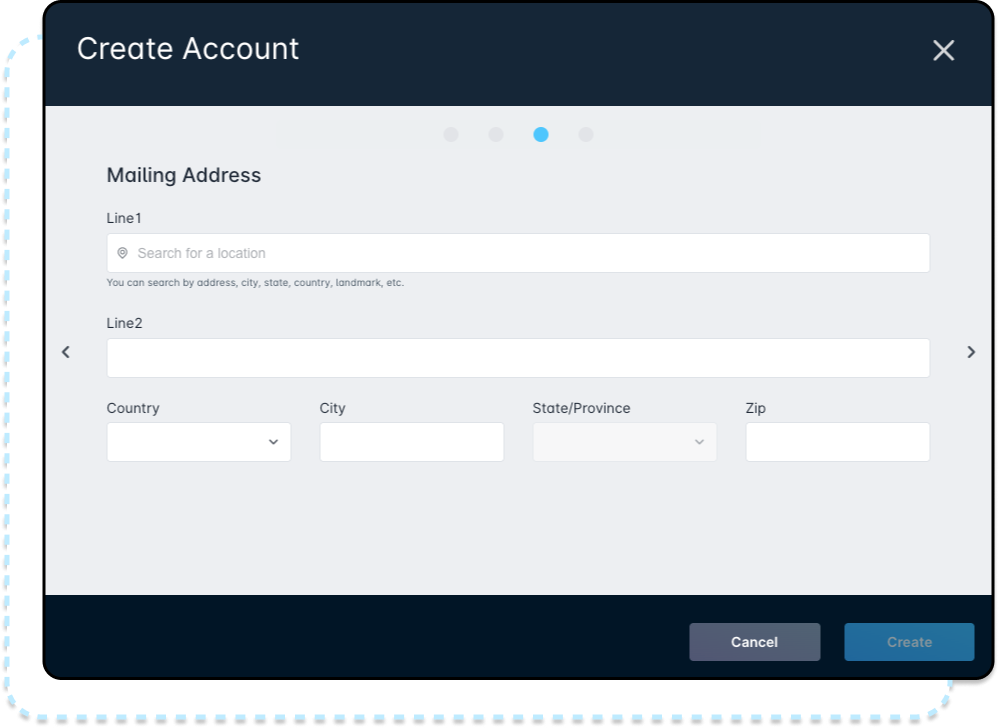
- The third page provides the ability to add a mailing address that can be utilized in the event it's different from the serviceable address.
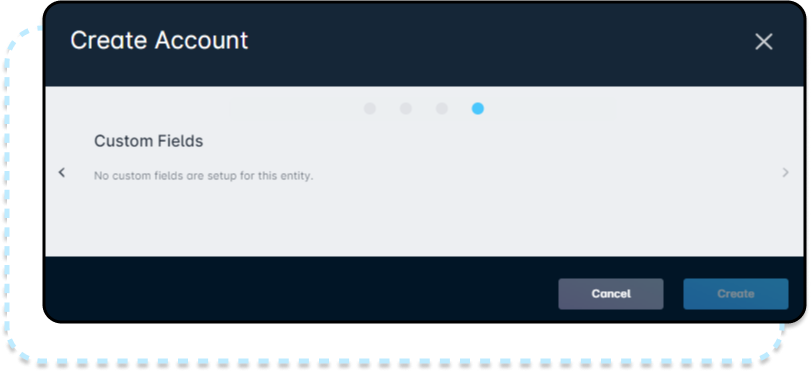
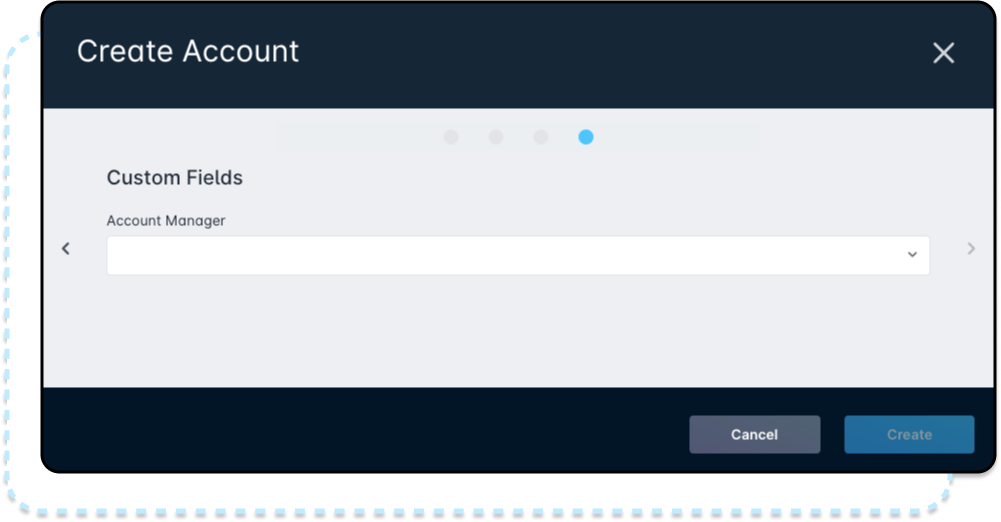
- The fourth page of the account creation modal prompts you to fill in Custom Fields, if applicable.
- If you don't have any custom fields created, you'll see this:
- If you do have some fields configured, you'll see any account-level custom fields instead:
- If you don't have any custom fields created, you'll see this:
Over the following sections, we'll review each page of the account creation modal and discuss the requirements for each field as it relates to account creation.
Account Name and Basic Details
The first page of the Account Creation modal is fairly straightforward - provide a name for the account, select a serviceable address, and assign the account type and group information.
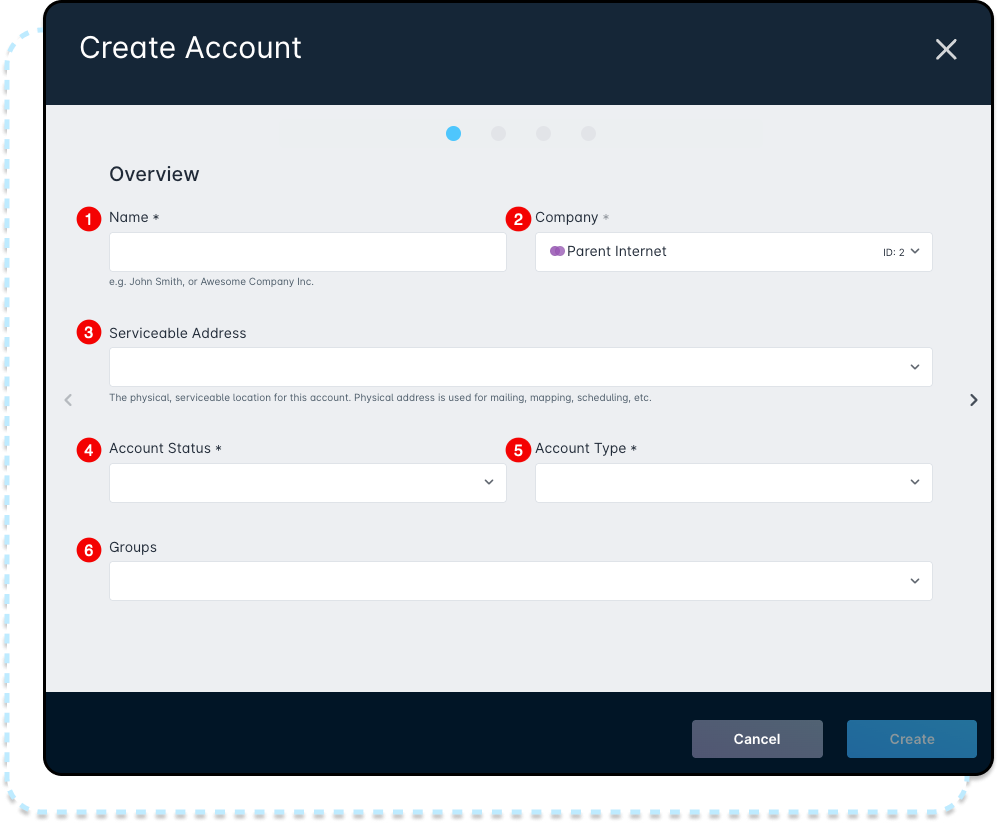
- The Name field sets the name of the account, visible in the account list and on reports.While easy to confuse with the name of the contact, that's set on the next page of account creation and the account name can be entirely unrelated.
- The Company dropdown allows you to set the desired company for the account to belong to. If you have only one company or have a company set as default in your instance, this field will autofill with that company's information.
- The Serviceable Address field allows you to select a serviceable address for the account, or create a new one. Serviceable Addresses will be detailed further in the next section.
- The Account Status dropdown allows you to set what status this account will start with. You can find more details over at the Account Statuses: Overview & Example Use Cases article.
- The Account Type dropdown is similar to the Account Status dropdown, allowing you to assign a type to the account. More information on Account Types can be found in the Account Types: Overview & Example Use Cases article.
- The Groups dropdown allows you to select which account group(s) this account should belong to once it gets created. For more information on account groups, have a look at the Account Groups: Overview & Example Use Cases article.
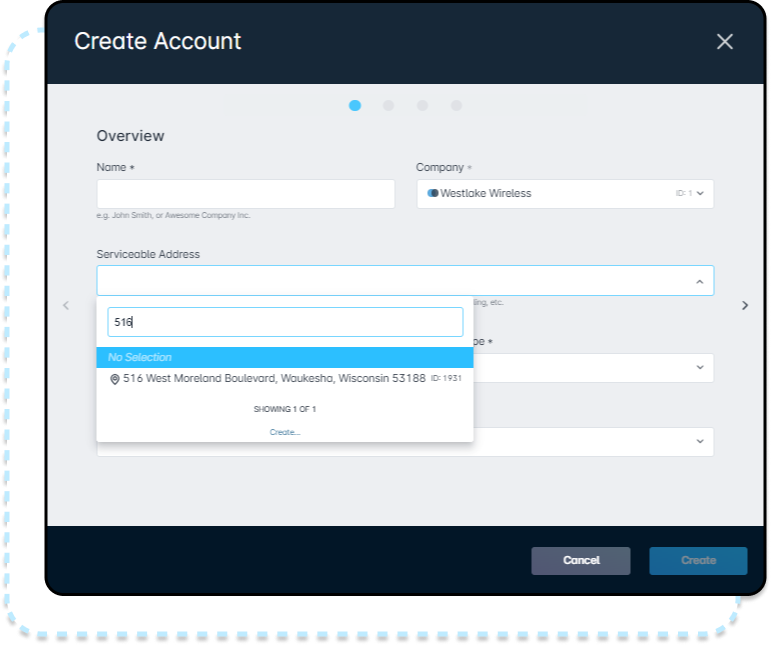
Selecting a Serviceable Address
When selecting a serviceable address for your new account, you'll be provided with a list of currently unassigned serviceable addresses. If there are no serviceable addresses available, then you can also create one directly within the “Serviceable Addresses” dropdown.
Details
Clicking on “Create” from within the dropdown will send you to a new page where you can enter the Serviceable Address's location information.
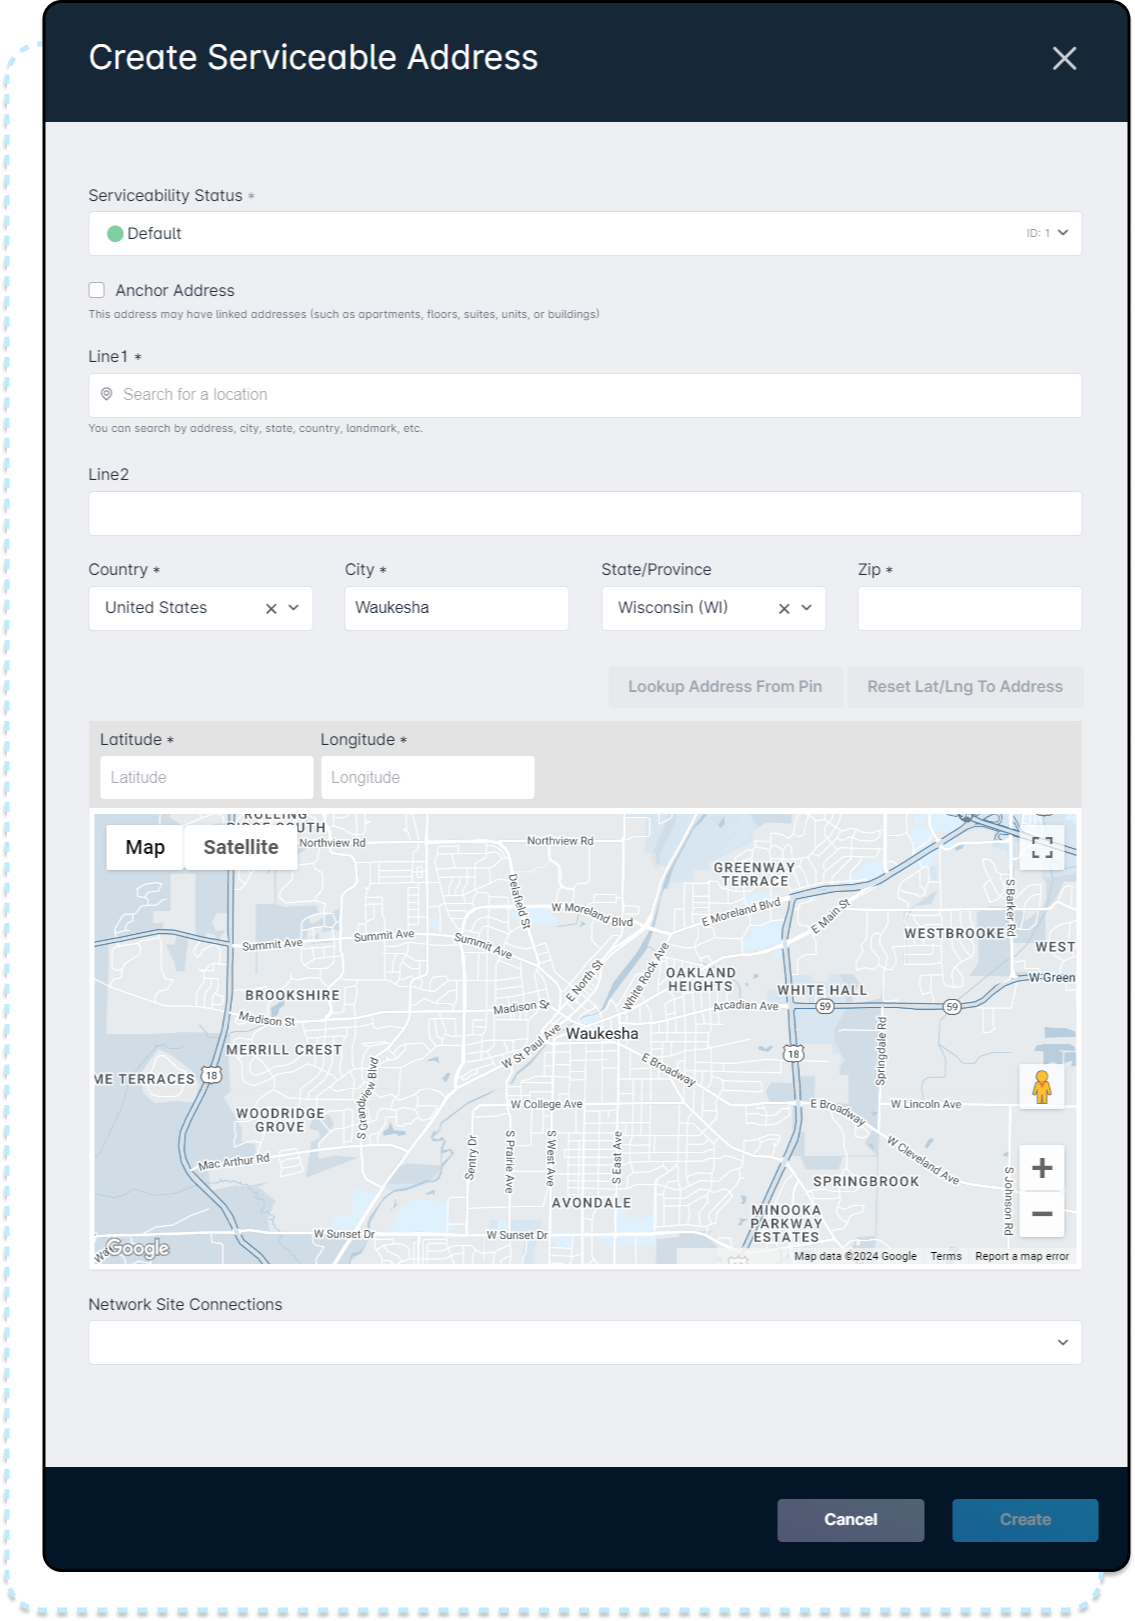
For a Serviceable Address belonging to an account, the marked mandatory fields all need to be filled out. Address information will be dynamically populated using Google Maps, and the precise location can be modified by moving the pin on the map, or by modifying the latitude and longitude. The Elevation tool can be accessed by clicking on the Elevation toggle, highlighted in the image.
If you attempt to add an address that is an exact duplicate of another, you'll receive an error stating “This address is a duplicate of an existing serviceable address". If you need to add another serviceable address at the same location, we recommend adding a Line 2, however, you could also modify the latitude and longitude.
Clicking on “Create” once the address information is filled out will return you to the account creation modal, where you can continue from where you left off.
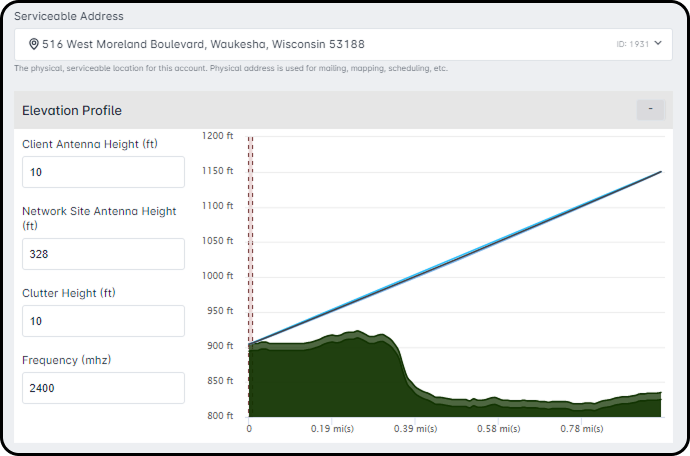
Once you select a Serviceable Address, a map will appear, as pictured here:
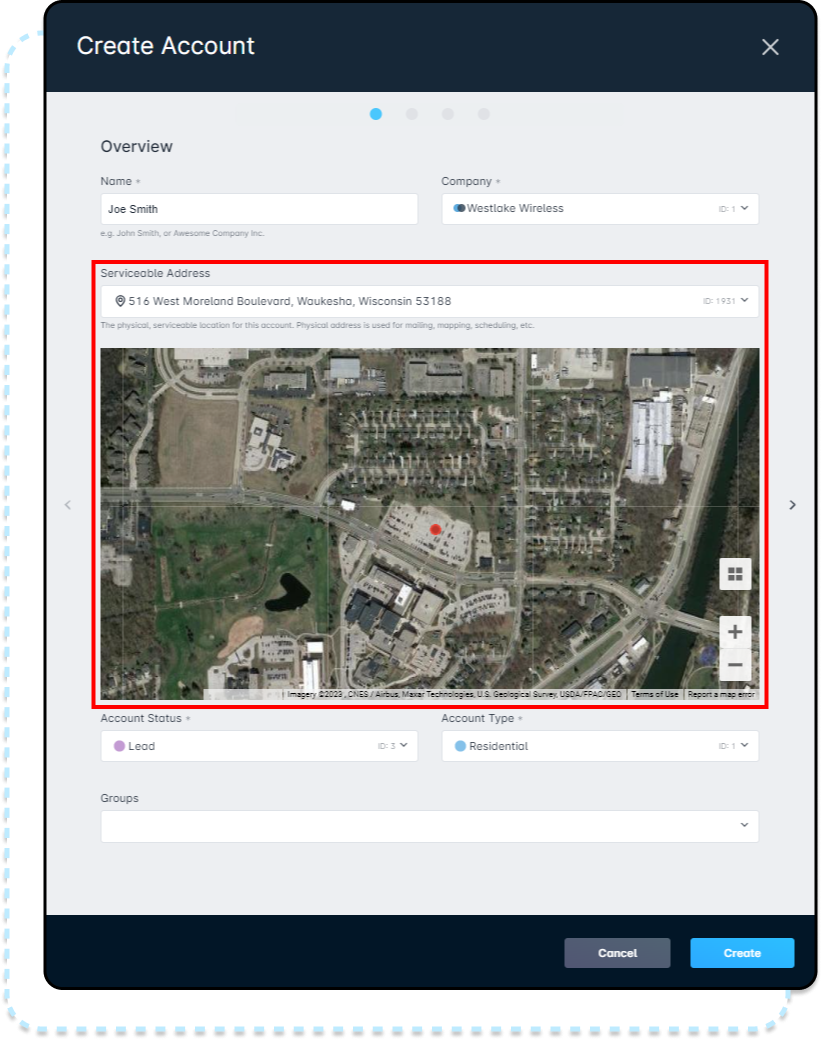
With this map, you can navigate to the nearest Network Site and make use of the Elevation tool to gain information on the line of sight distance and topographical features of the Serviceable Address in relation to the Network Site.
Primary Contact
After completing the basic account information, we can proceed to the second page, which has you define the Primary Contact for this account.
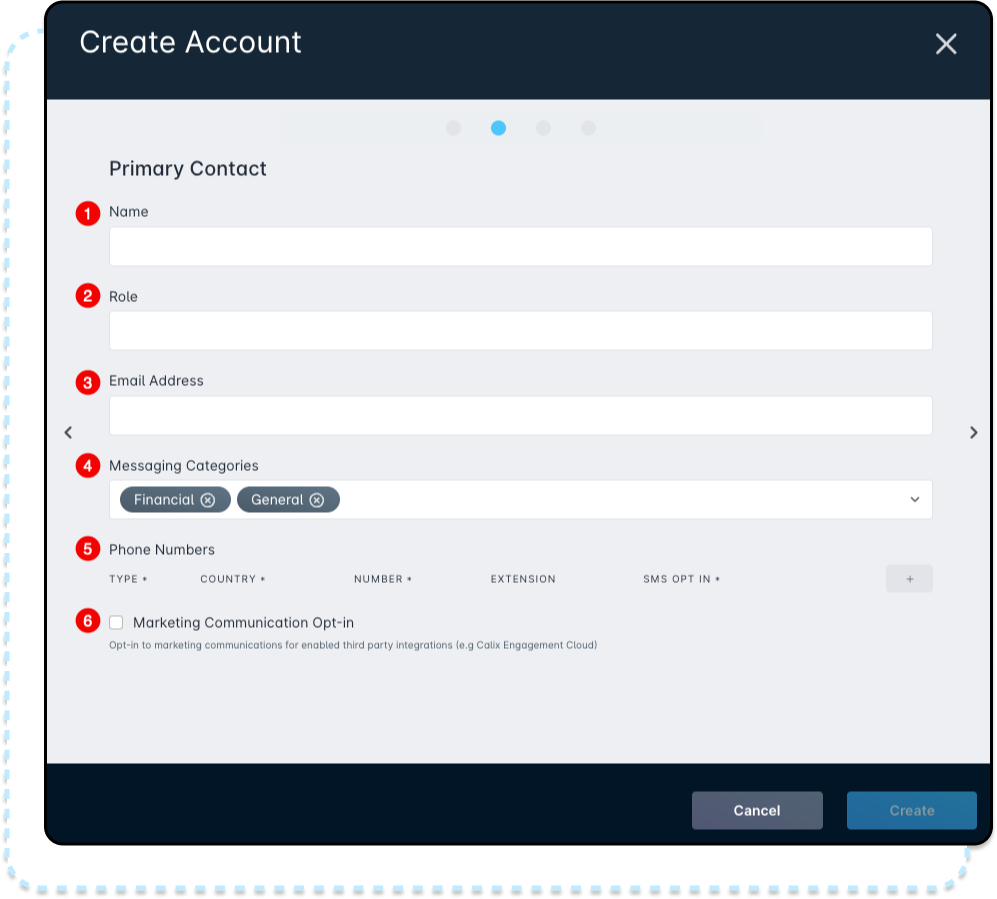
- The Name of the primary contact. This will pre-fill to match the account name but can be modified as needed.
- The Role is used to define the position within the account. For a Residential account, this is typically unused, but a Commercial account might see a Role such as "IT Contact".
- The Email Address field allows you to set the email address for the contact, which will be used for things like service notifications and invoices.
- The Messages Categories dropdown allows you to select as many or as few messaging categories for the primary contact as you'd like, as long as these categories currently exist in your instance. You can read more about message categories in the Message Categories: Overview & Use Cases article.
- The Phone Numbers section allows you to add phone numbers based on the Phone Number Types you configured in your instance settings.
- Marketing Communication Opt-in checkbox allows you to opt-in to marketing communications for enabled third party integrations.
Mailing Address
The mailing address tab offers similar fields to the process of adding a serviceable address, with the exception of seeing the location on a map.

Custom Fields
The final step in account creation is filling out the Custom Fields. These fields are set in your instance settings, and mandatory fields are configured per instance.

If no Custom Fields are created, this page will display a message indicating that there are no custom fields for the entity:

Next Steps
Once you've filled in all the required information and created the account, you'll automatically be redirected to the account's management page. This is where you can modify custom fields, add services, and manage payment methods. For a complete overview of the Account Management Page, you can review the article for it here | Account Management View: Overview.
In the following sections, we'll be reviewing the basics of continuing the setup of a new account, including assigning services, scheduling the installation job, and adding a payment method. These three activities can be done in any order; however, they should all be done before leaving the account's management page for the first time.
Assigning Services
In the example below, the account status is set to “Lead.” This is often done for various reasons, such as preparing to add a service to the account. However, no charges will be generated until the account is moved out of the “Lead” status and into an active account status.
To add a recurring service, go to the Billing tab and then click on the Services & Packages sub-tab.
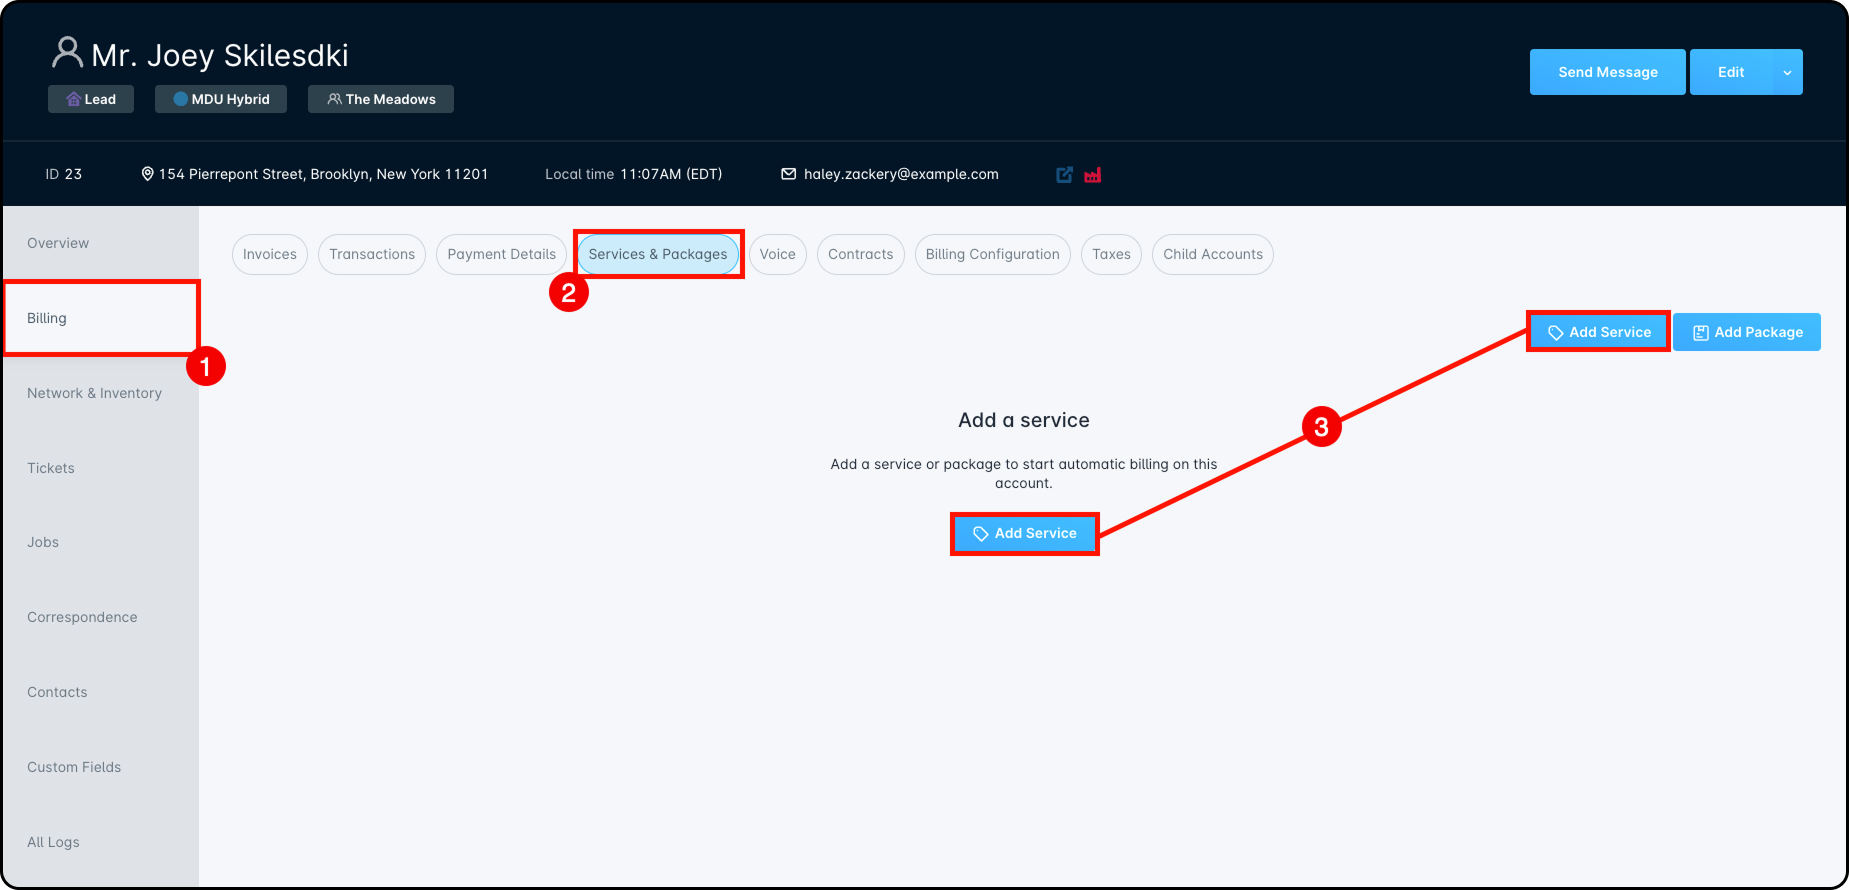
By clicking on the Add Service button, which is present in both the highlighted area and at the center of the page - as long as no services are currently added to the account - you'll be presented with the “Create Account Service” modal. This modal will prompt you to select a service from a list of all services created on your instance, and allocated to the company this account is attached to.
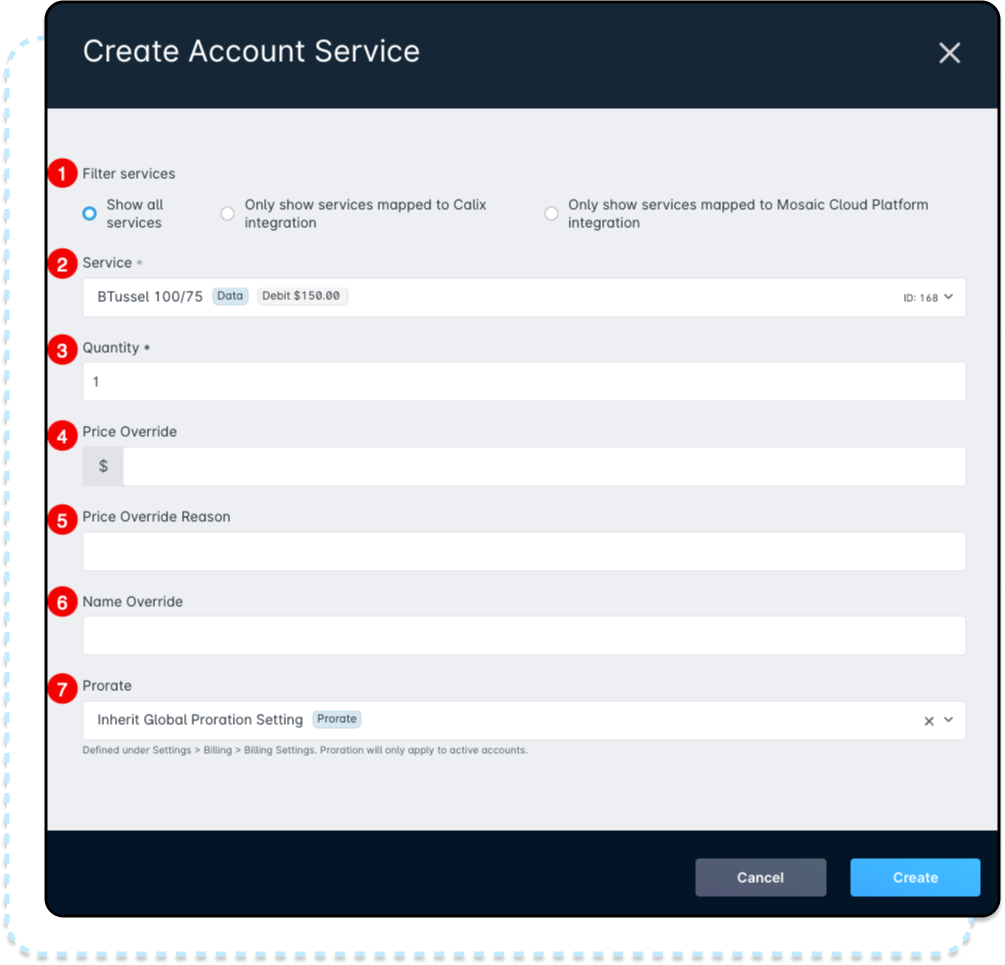
- The Filter Services dropdown allows you to control which services are visible within your instance. You can choose to show all services, only those mapped to the Calix integration, or only those associated with the Mosaic Cloud Platform integration.
- The Service dropdown lets you select the type of service you'd like to add to the account. You can choose from Recurring, Expiring, or Data services, depending on the customer's needs.
- The Quantity field allows you to specify how many times the selected service should be billed. For example, if a customer needs to renew two domains, you would add the Domain Renewal service once and set the quantity to 2, rather than adding the same service twice.
- Using the Price Override field, you can define a custom price for the service. This custom price will remain in effect until it is manually updated or removed.
- The Price Override Reason field provides a space to explain why the price was changed, giving context for future reference or review.
- The Name Override option allows you to rename the service as it appears on the account. This is useful when adding a service with a generic name, such as an “Adjustment” or “Expiring” service, and you want to provide a more specific description for clarity.
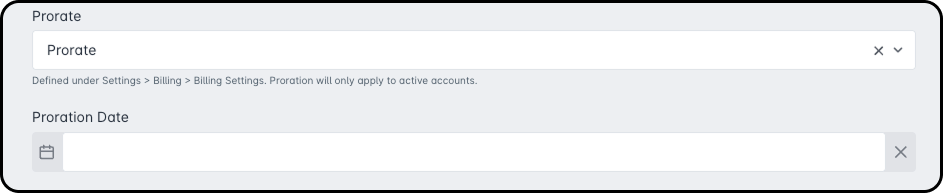
- Lastly, the Prorate dropdown defaults to “Inherit Global Proration Setting” as configured in your Billing Settings. However, if you change this to “Prorate,” a new field will appear, allowing you to select a specific date to apply the proration.
You can also add a One-Time transaction to an account in Lead status. To do this, go to the Billing tab, open the Transactions sub-tab, and click the dropdown next to the One-Time Transaction button.
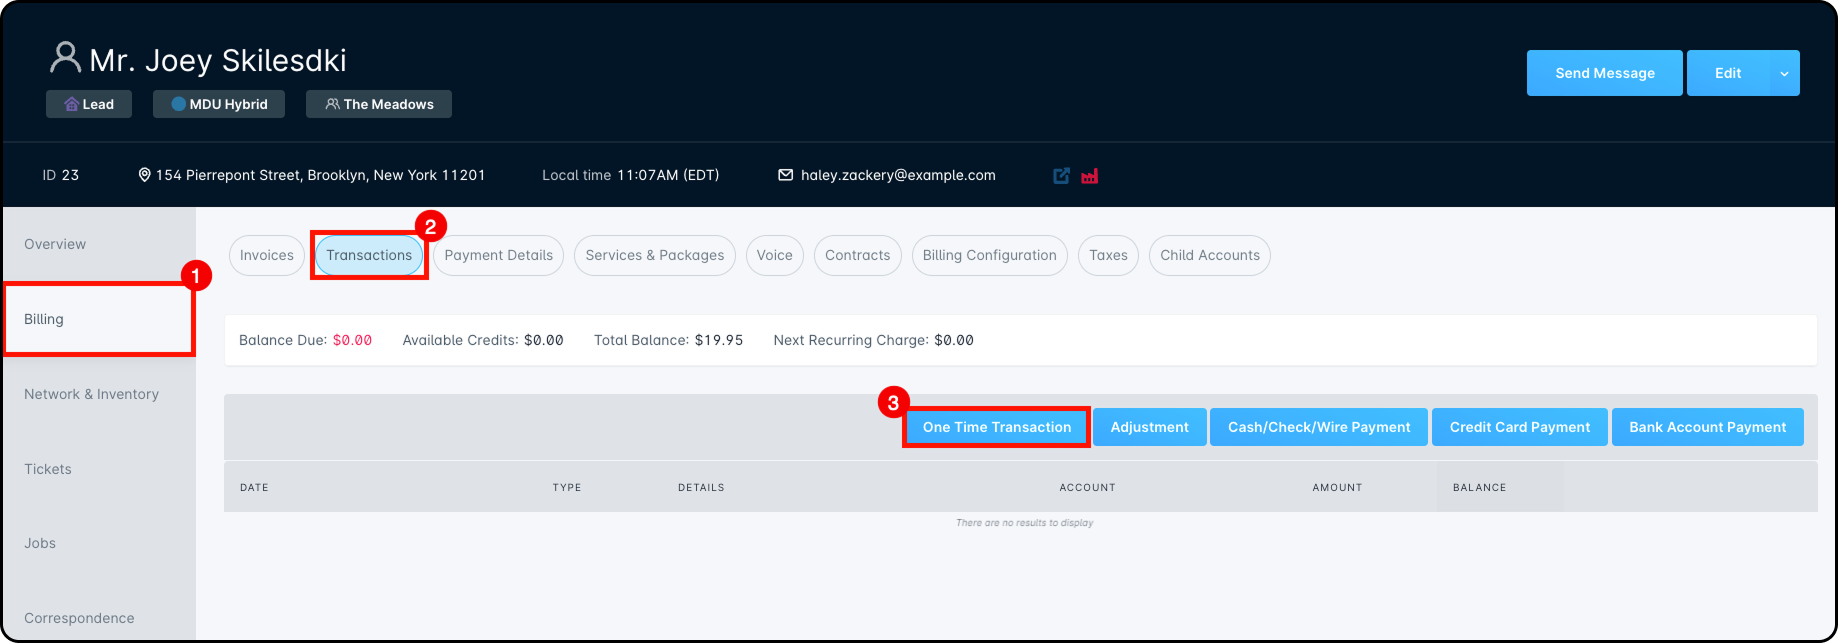
One-Time transactions are similar to recurring services but only apply a charge once. The debit is added to the account right away but won’t be invoiced until the account becomes active.
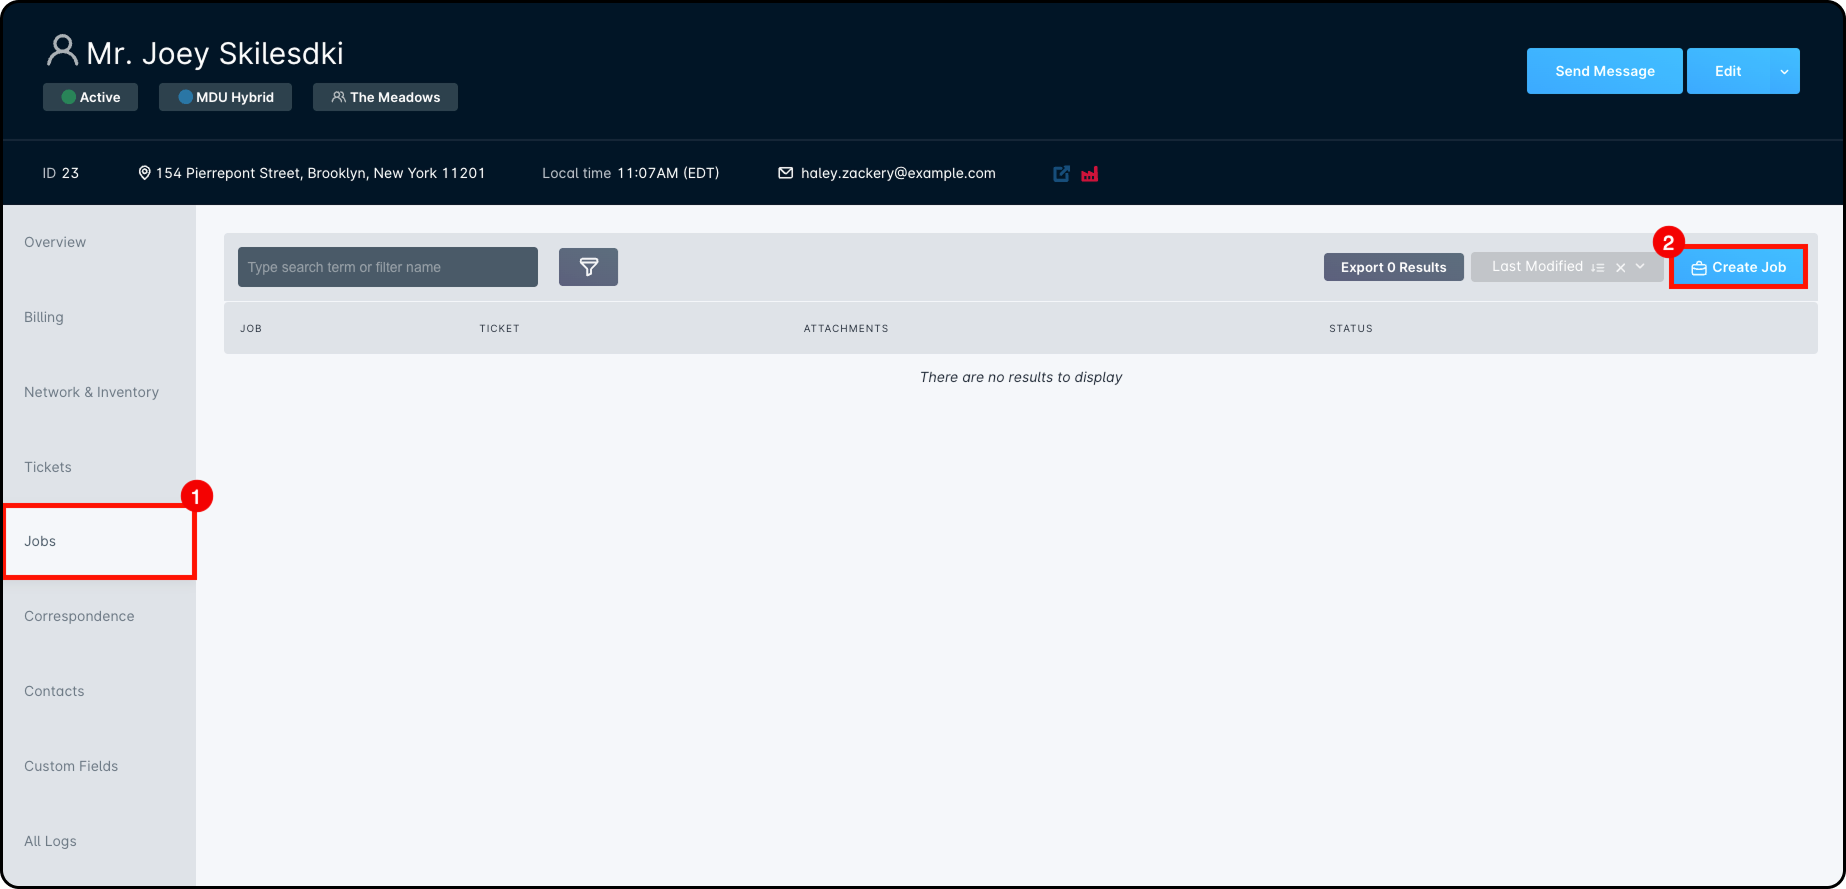
Scheduling a Job
When an account is in Lead status, you’ll often need to schedule an installation to activate the service. Whether it’s a simple router setup or a full equipment install, a job is usually required to complete the process.
To schedule a job, go to the Jobs tab and click Create Job. This opens a window where you can select and schedule the job type, such as an installation.
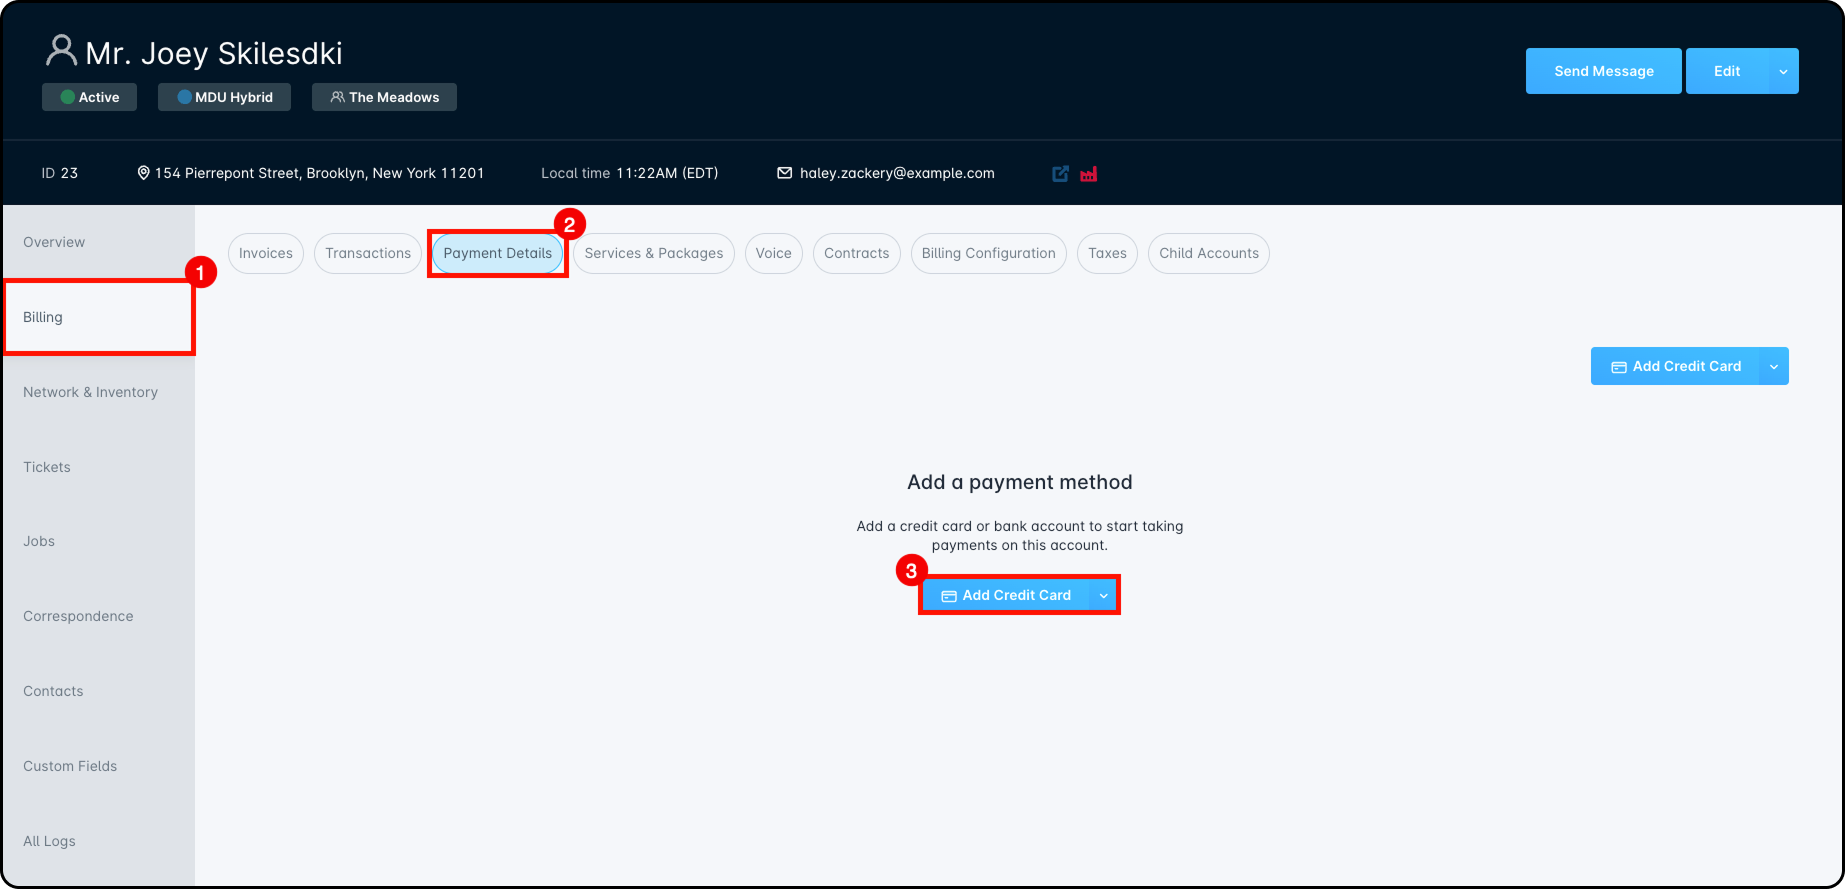
Adding a Payment Method
The final step in setting up an account is adding a payment method so you can charge the customer for their services.
To add a payment method, go to the Billing tab, open the Payment Details sub-tab, and click Add Credit Card.
After clicking Add Credit Card, a form will appear where you can enter the payment details.
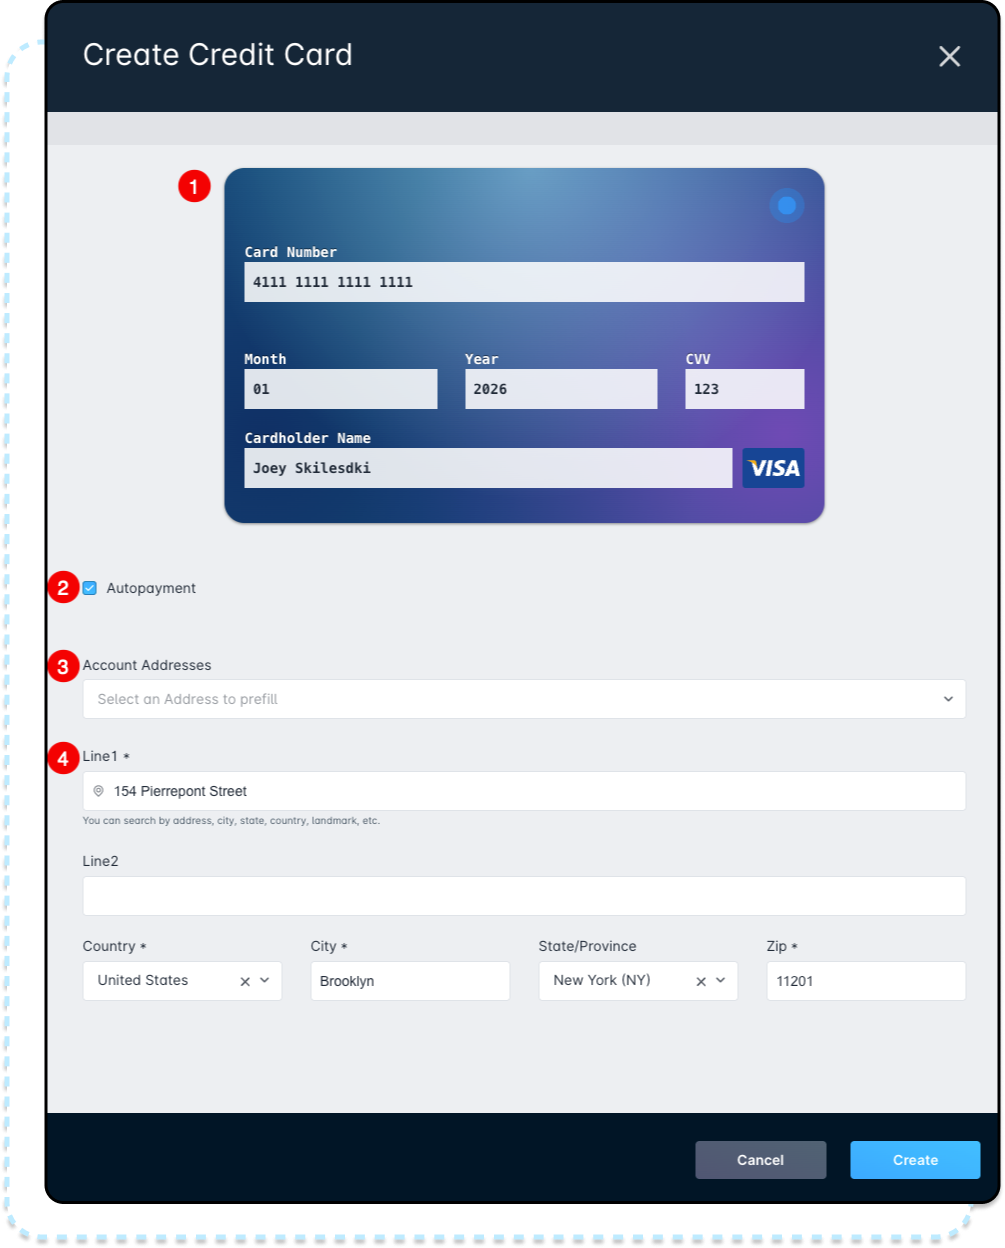
- When entering Payment Card details, you'll need to provide the card number, expiration date, CVV/CVC, and the cardholder’s name.
- You can turn on the Auto Payment toggle to use this card for automatic payments. If auto-pay is off or no payment method is selected, payments must be made manually.
- Use the Autofill Address dropdown to quickly fill in address fields using the account’s mailing or serviceable address.
- The Billing Address must be entered manually, even if it matches other addresses on the account.
After adding the card, it will appear as a saved payment method. If autopay is turned on, a tag will show on the card. To update the autopay setting, billing address, expiration date, or cardholder name, click the Edit button.
