Table of Contents
Manual Transactions
 Updated
by Mitchell Ivany
Updated
by Mitchell Ivany
Read Time: 10 mins
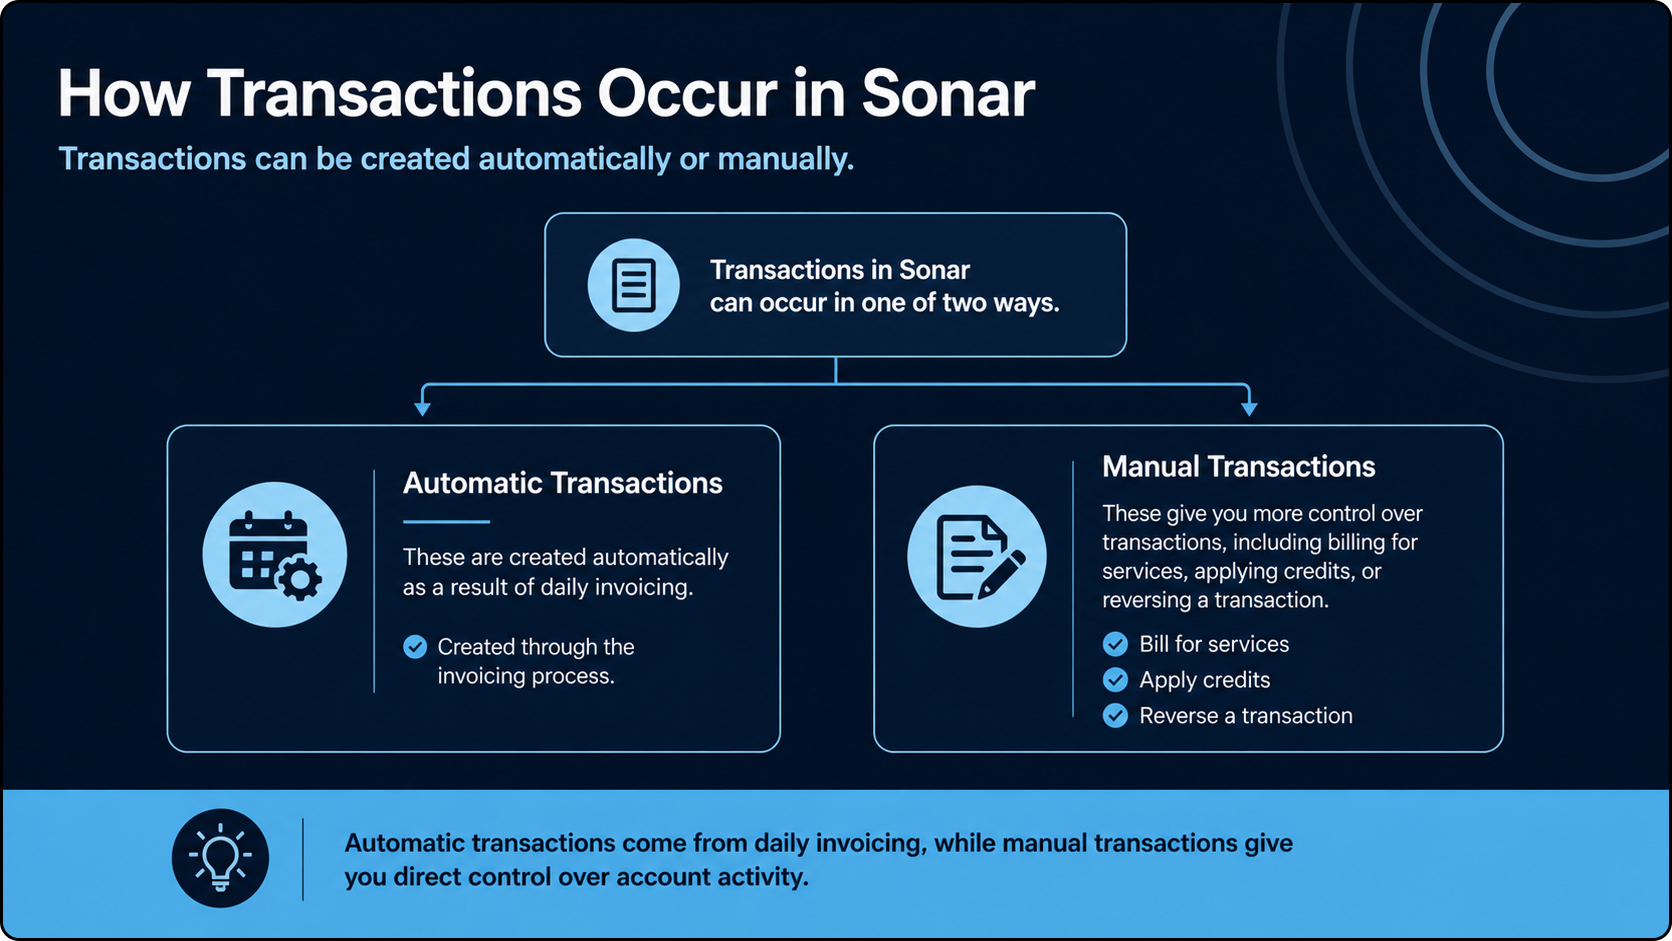
In this article, we’ll cover how to create manual transactions, refund payments, reverse transactions, and manually create or void invoices. Since manual transactions are started from an account, open the customer account you want to work with before following the steps.
full dollar format. For example, enter fifteen cents as $0.15, not $.15. Using the wrong format can create an incorrect transaction amount.Adjustments
The first manual transaction type is an Adjustment. Adjustments use an existing Adjustment service to add a debit or credit to an account. They are commonly used for small invoice changes, such as crediting a customer for service downtime caused by an outage or other service issue.
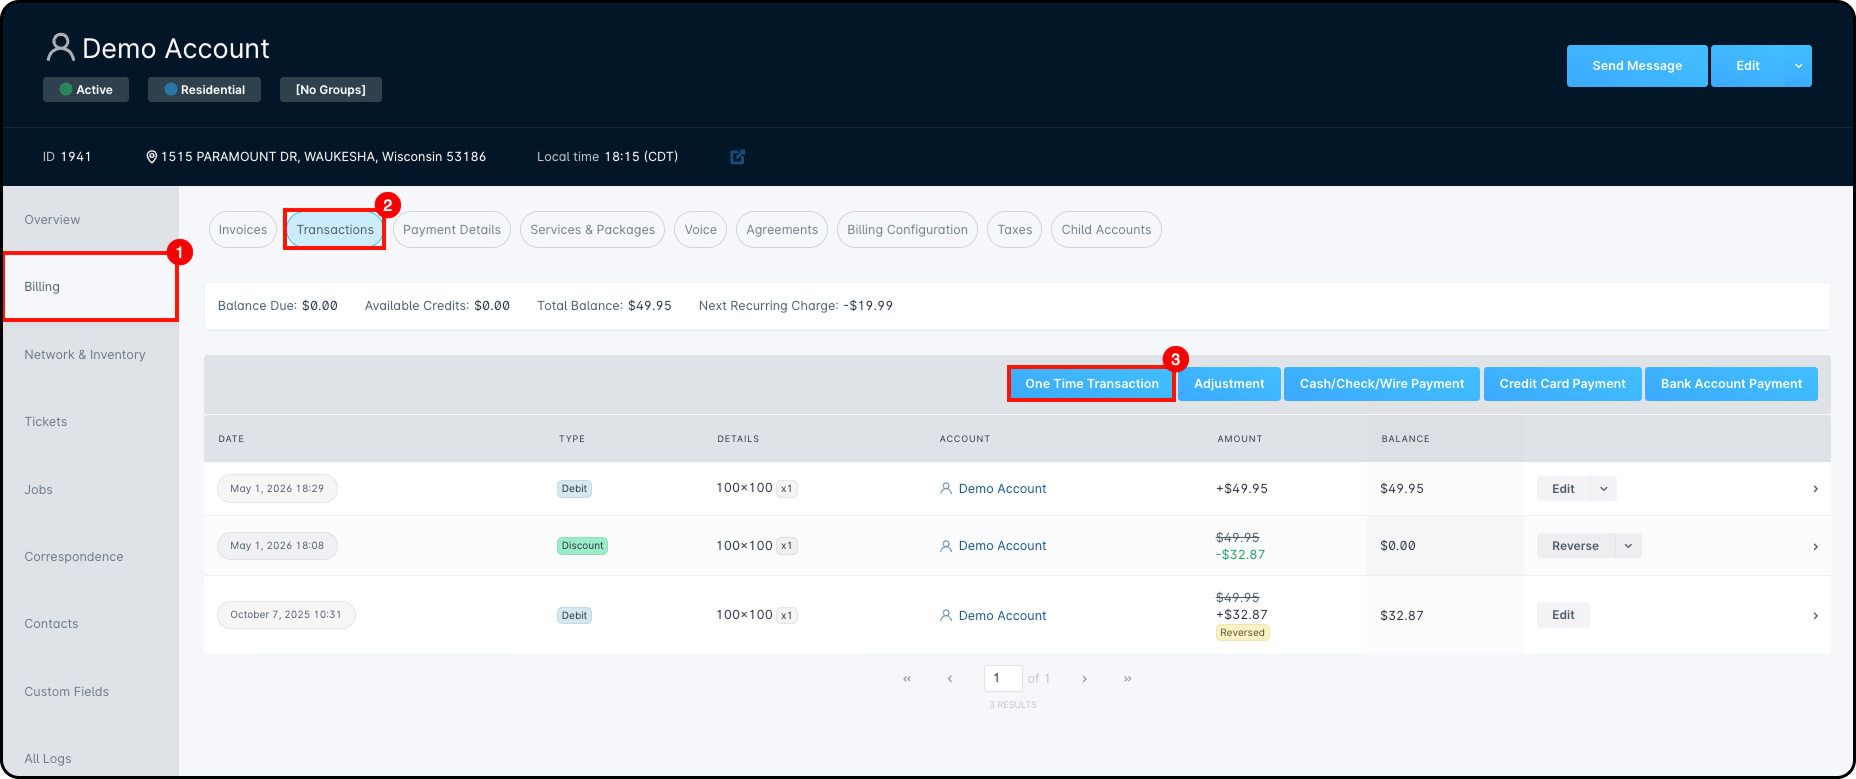
To apply an adjustment from an account, go to Billing > Transactions.
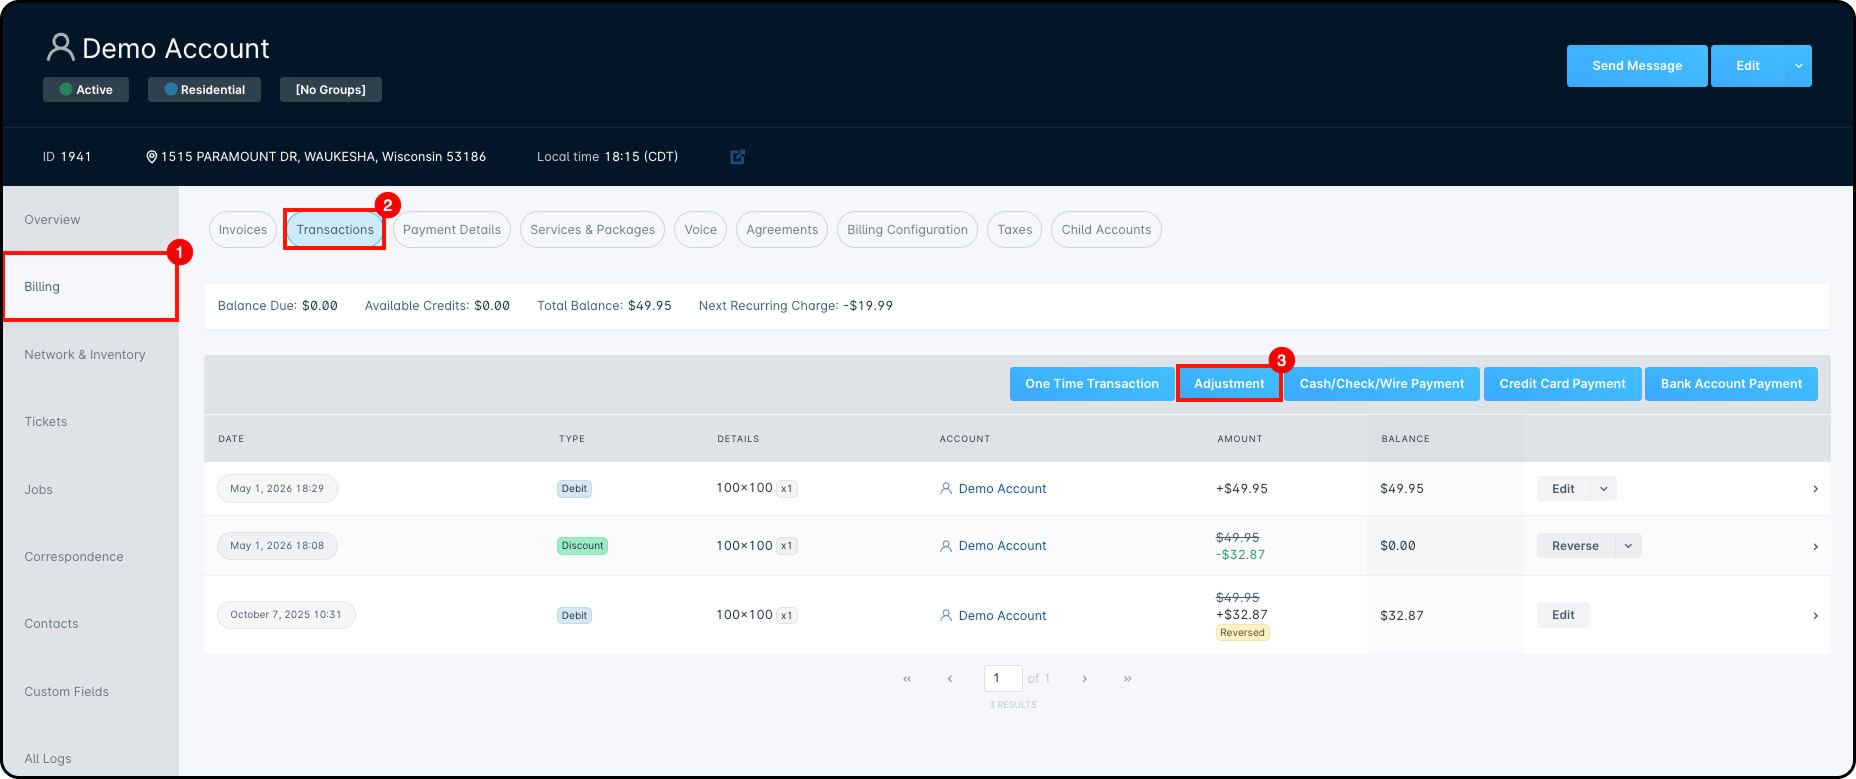
Once you’re on the Transaction History sub-tab, click Adjustments to open the Create Adjustment window.
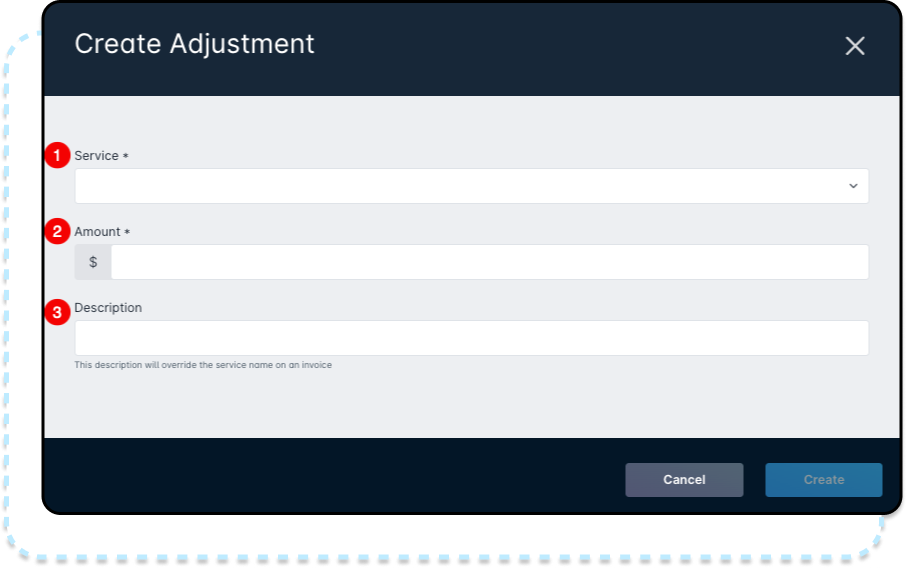
- Service: Choose an Adjustment Service from the dropdown. This list only shows Adjustment Services assigned to the same company as the account. If a service has a restricted amount, the remaining amount will be shown next to it.
- Amount: Enter the amount you want to add as either a debit or a credit.
- Description: Enter the reason for the adjustment. This description will replace the service name in the Transaction History sub-tab and on the invoice.
One Time Transactions
One Time Transactions work similarly to Adjustments, but with more flexibility. Unlike Adjustments, they are not limited to Adjustment services—you can select from Data, One Time, Recurring, or Voice services. They can also be added through a scheduled event.
To create a One Time Transaction, go to Billing > Transactions, then click One Time Transaction.
Once you click One Time Transaction, the Create One Time Transaction window will open.
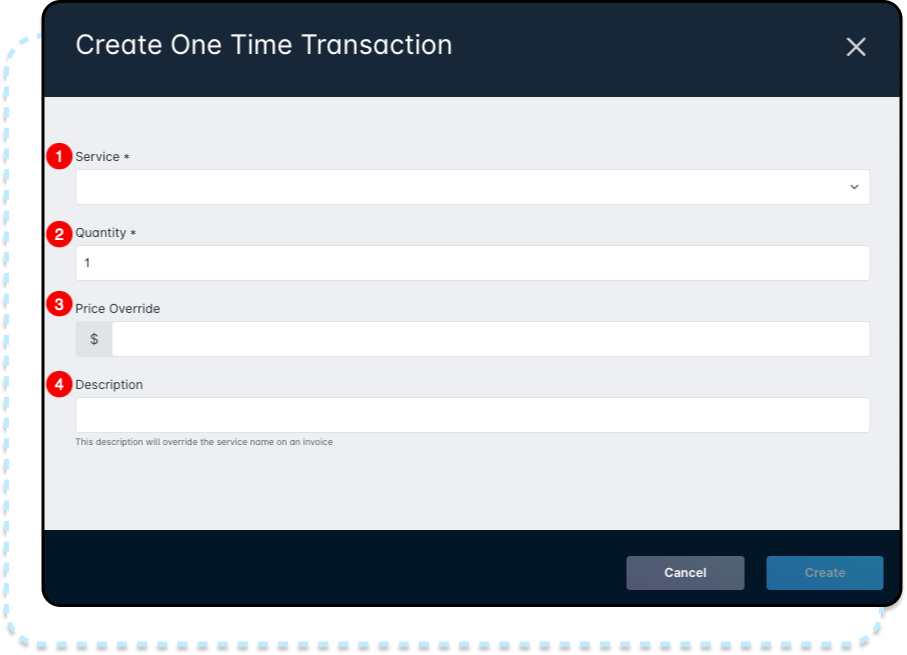
- Service: Select the service you want to charge one time. You can choose from Data, One Time, Recurring, or Voice services.
- Quantity: Enter how many times the service should be charged. For example, if a 30-minute service call lasted 2 hours, enter 4.
- Price Override: Use this field if you aim to change the service price for this transaction only.
- Description: Enter the reason for the one-time charge. This description will replace the service name in Transaction History and on the invoice.
Manual Payments
Now that we’ve covered manual transactions, let’s look at how to take payments in Sonar. Payments can be made manually from an account, even if payment methods are also used for automatic payments.
You can always add payments by Cash, Check, or Wire. Credit Card and Bank Account payments require a configured payment processor.
To add a payment, go to Billing > Transactions.
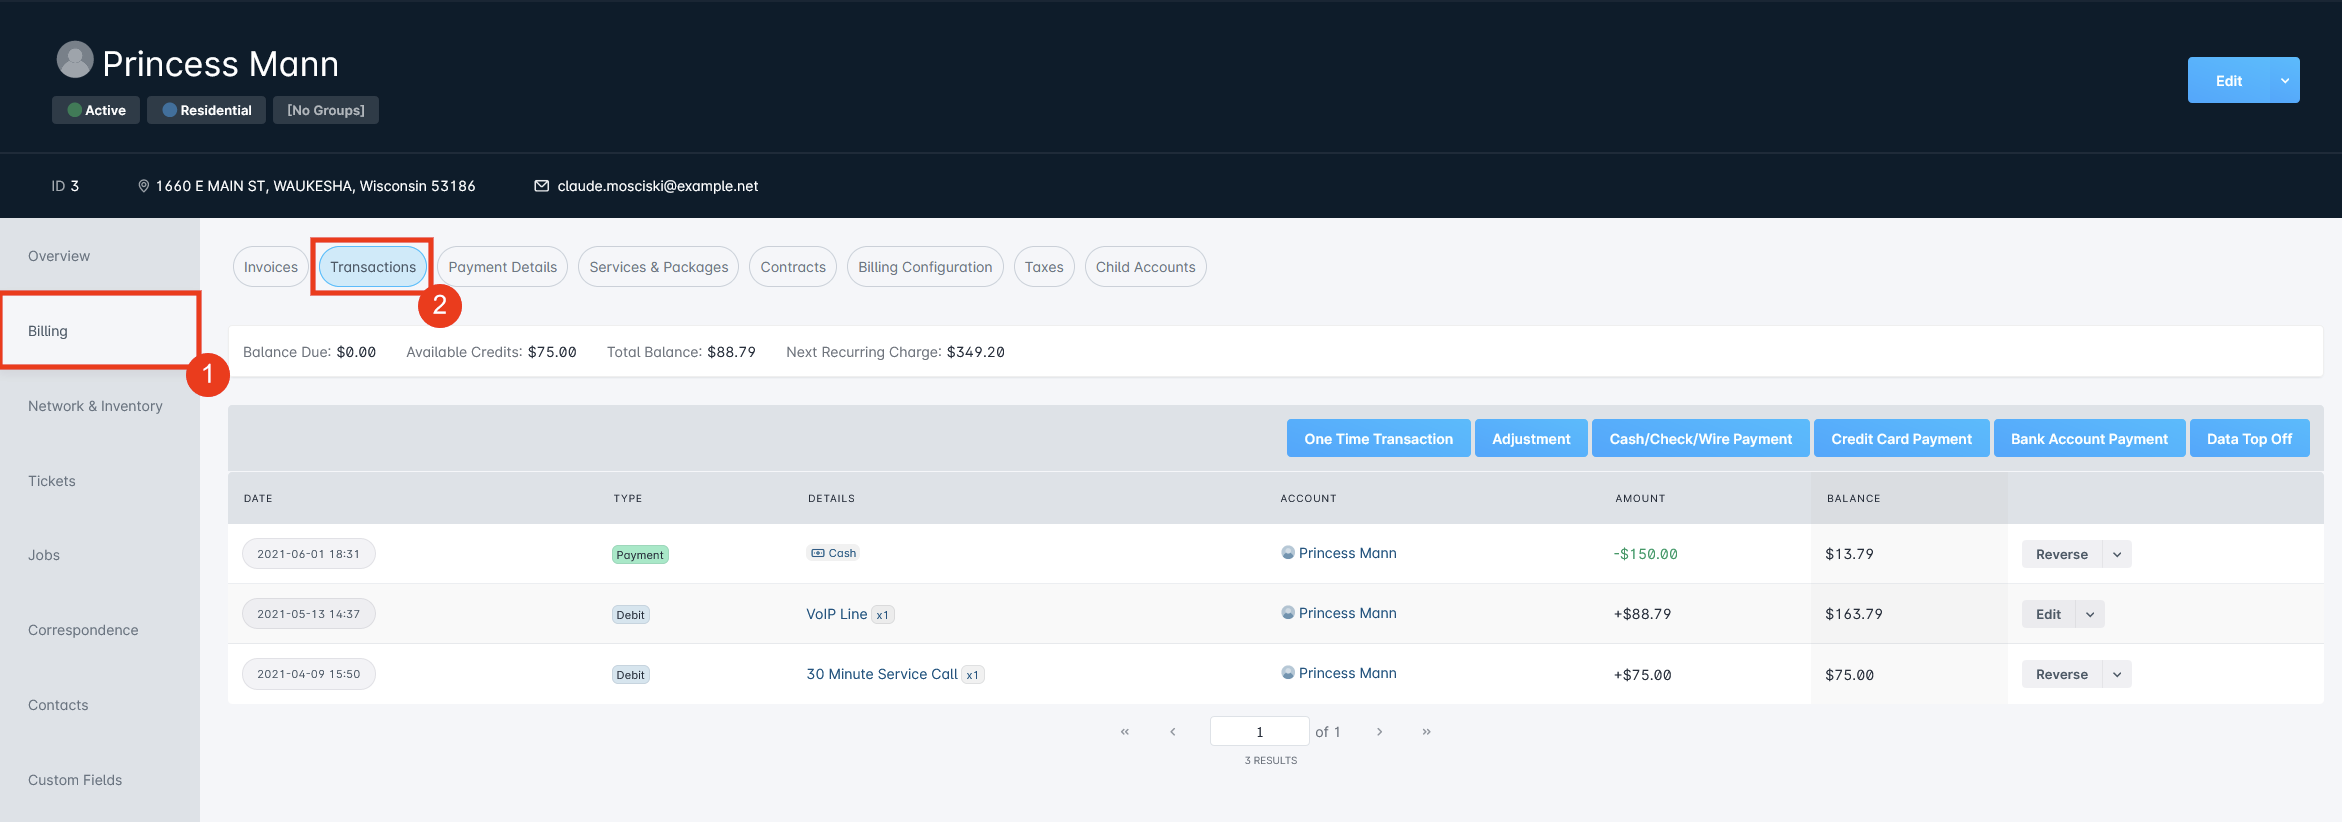
From the Transactions page, you can receive manual payments by selecting the button that matches the customer’s payment type.
The available payment options appear in the top-left corner of the transactions table:
- Cash, Check, and Wire payments open in the same payment window.
- Bank Account and Credit Card payments each have their own payment window.
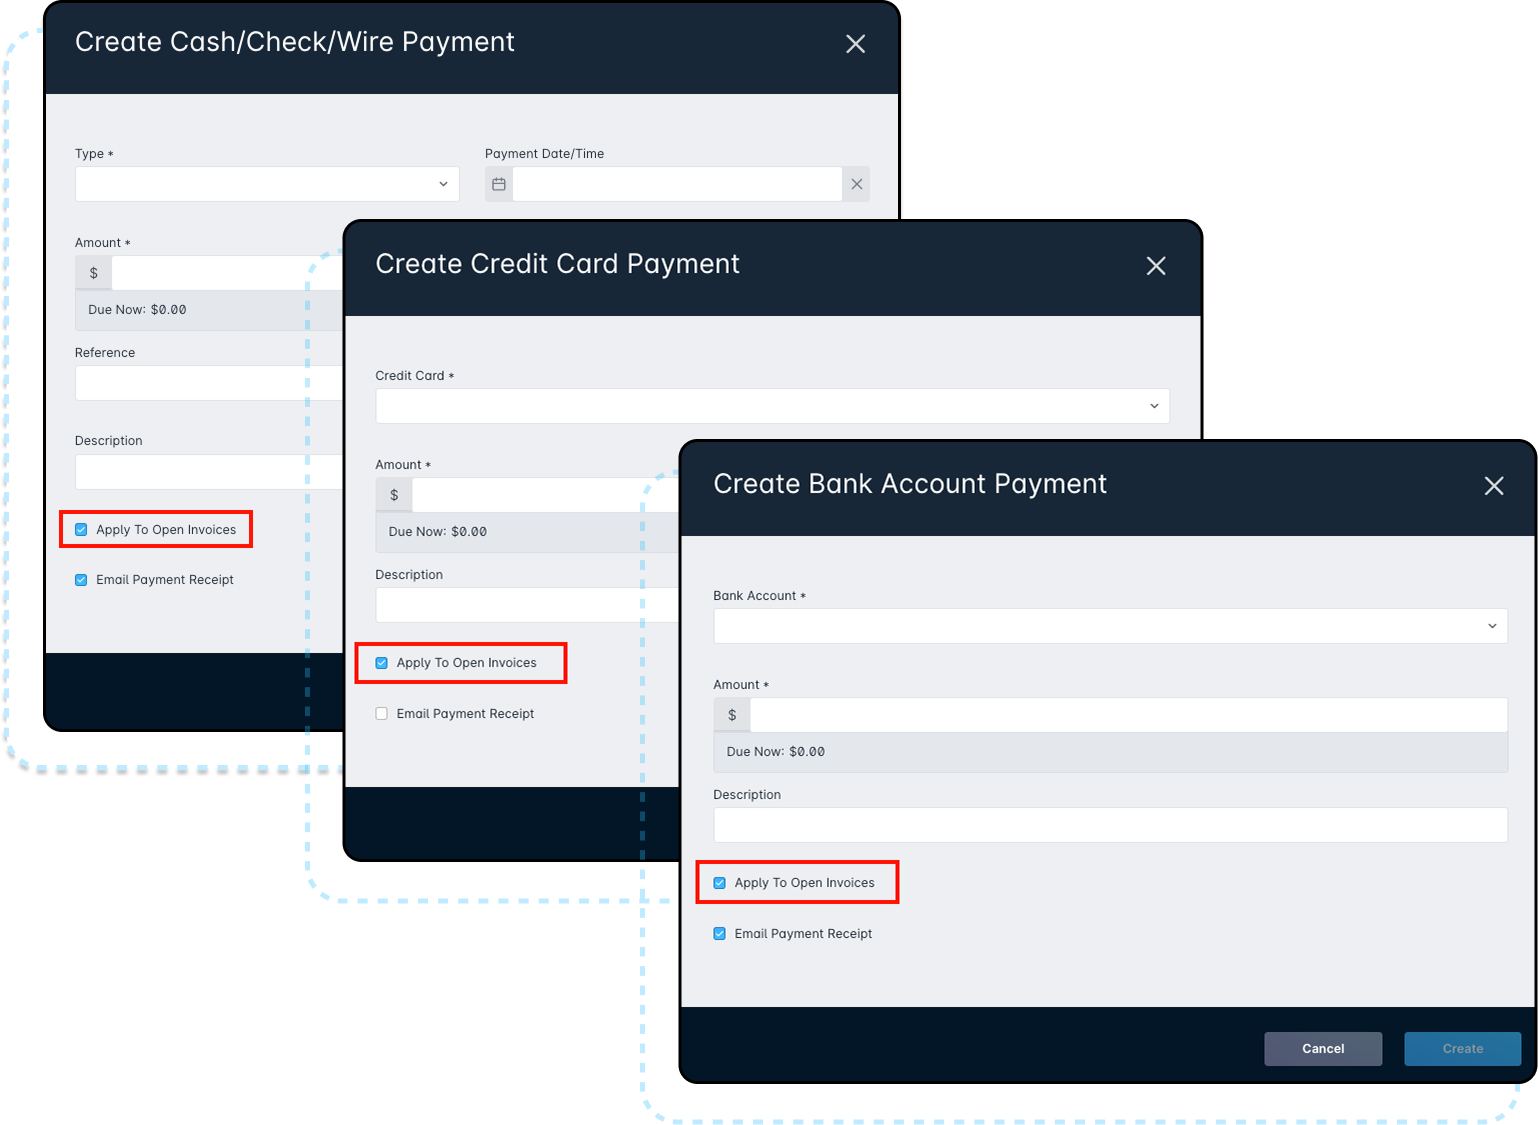
Creating a Cash, Check, or Wire Payment
Once you select Cash/Check/Wire, the Create Cash/Check/Wire Payment window will open.
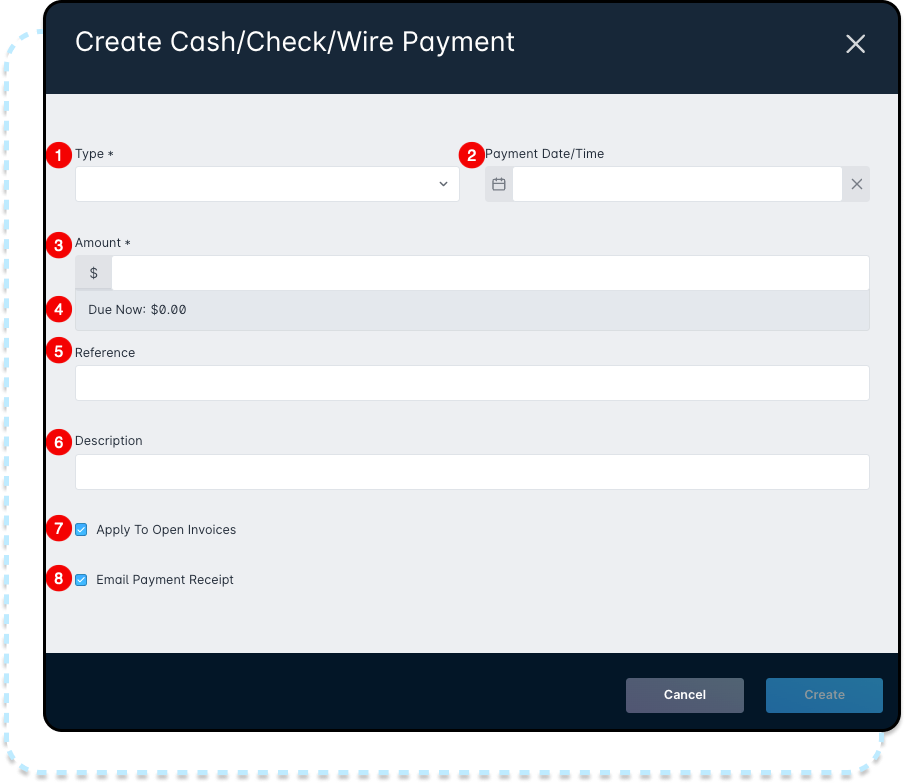
- Type: Select the payment type you want to add. Available options are Cash, Check, Other, and Wire.
- Payment Date/Time: Choose the date and time of the payment. In most cases, this should be when the customer made the payment, but you can also choose a past or future date.
- Amount: Enter the amount the customer is paying. This area also shows the amount currently due.
- Due Now: Displays the amount currently due on the account or invoice.
- Reference: Enter a reference for the payment, such as the financial institution or other identifying details.
- Description: Add any extra details about the payment or the reason it was entered manually.
- Apply To Open Invoices: If checked, the payment will be applied to any unpaid invoices. If unchecked, or if there are no open invoices, the payment will be added as an Available Credit on the account.
- Email Payment Receipt: If checked, a payment receipt will be emailed to the financial contact on the account.
Credit Card/Bank Account Payments
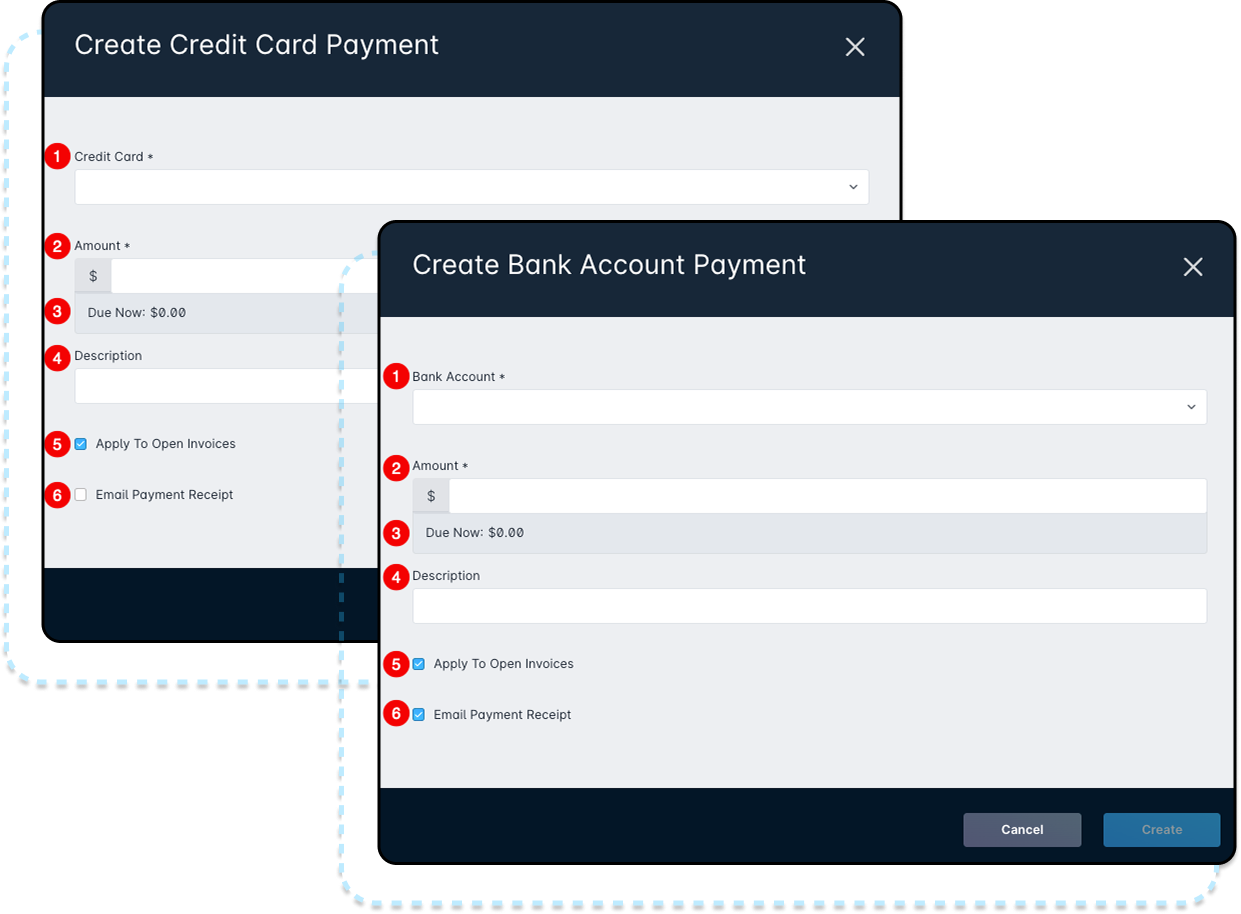
The Credit Card Payment and Bank Account Payment windows are nearly the same. The main difference is that the Bank Account Payment window will show a Bank Account dropdown instead of a Credit Card dropdown.
- Credit Card / Bank Account: Select the payment method you want to use from the list of saved payment methods on the account.In the Credit Card Payment window, this field is labeled Credit Card. In the Bank Account Payment window, it is labeled Bank Account.
- Amount: Enter the amount of the payment being made on the account.
- Due Now: Displays the amount currently due on the account or invoice.
- Description: Add any extra details about the transaction.
- Apply To Open Invoices: If checked, the payment will be applied to any unpaid invoices. If unchecked, or if there are no open invoices, the payment will be added as an Available Credit on the account.
- Email Payment Receipt: If checked, a payment receipt will be emailed to the financial contact on the account.

Reversing Payments
In Sonar, a reversal is used to undo or correct a transaction on an account, such as a debit, credit, payment, or discount. Reversals help keep the account history accurate by showing both the original transaction and the correction.
A refund is different: it is used when money needs to be returned to the customer, usually after a payment has already been received. In simple terms, use a reversal to correct the account balance, and use a refund when funds need to be sent back to the customer.
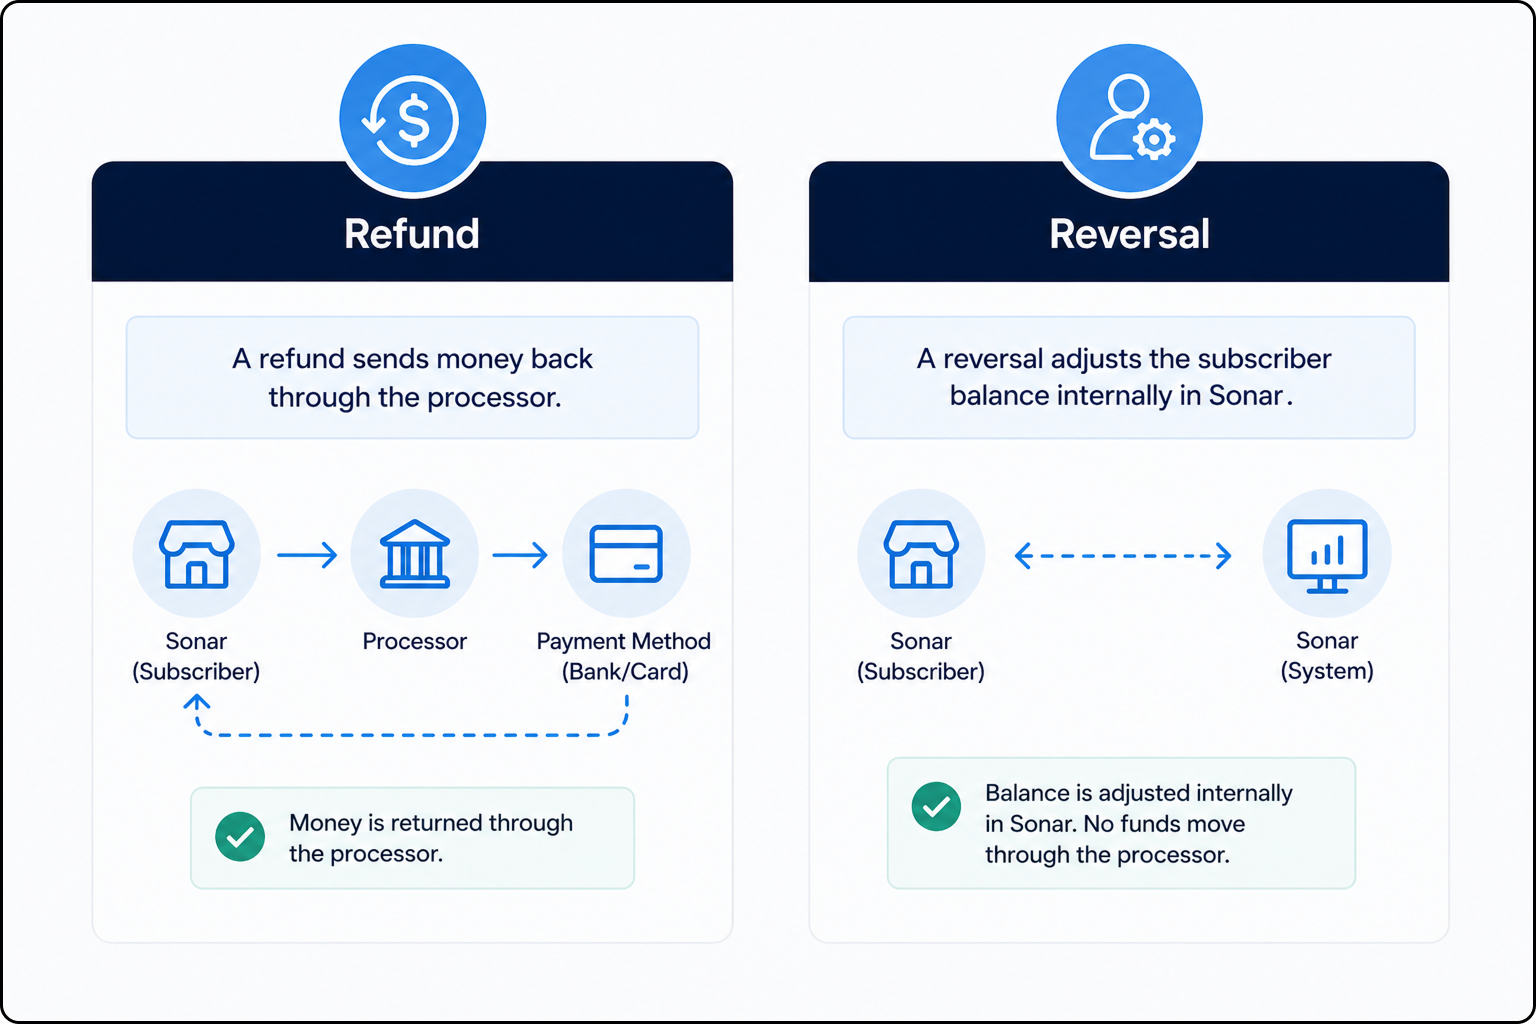
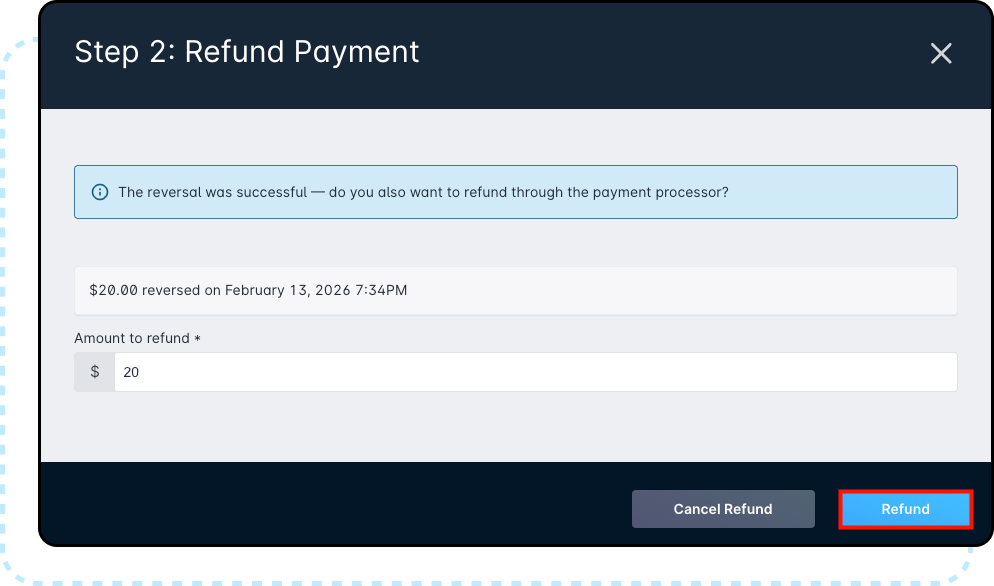
In Sonar, reversals and refunds are handled as a two-step process. First, you reverse or correct the transaction on the customer’s account so the account balance and history are accurate. Then, if money must be returned to the customer, you issue a refund.
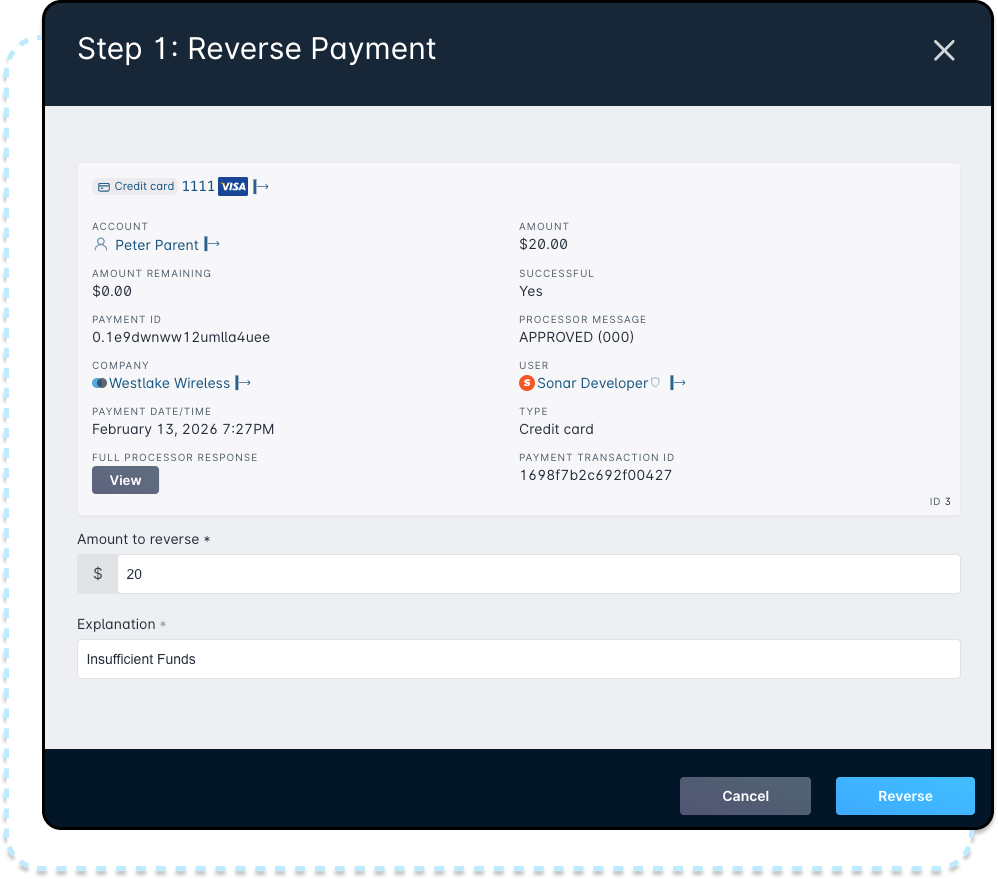
In Step 1: Reverse Payment, confirm the Amount to reverse, enter an Explanation (so it’s clear why the change was made), and then select Reverse to complete the reversal.
After that, Sonar opens Step 2: Refund Payment in a second window. The Amount to refund is automatically filled in to match what you reversed.
If you don’t need to send money back, select Cancel.
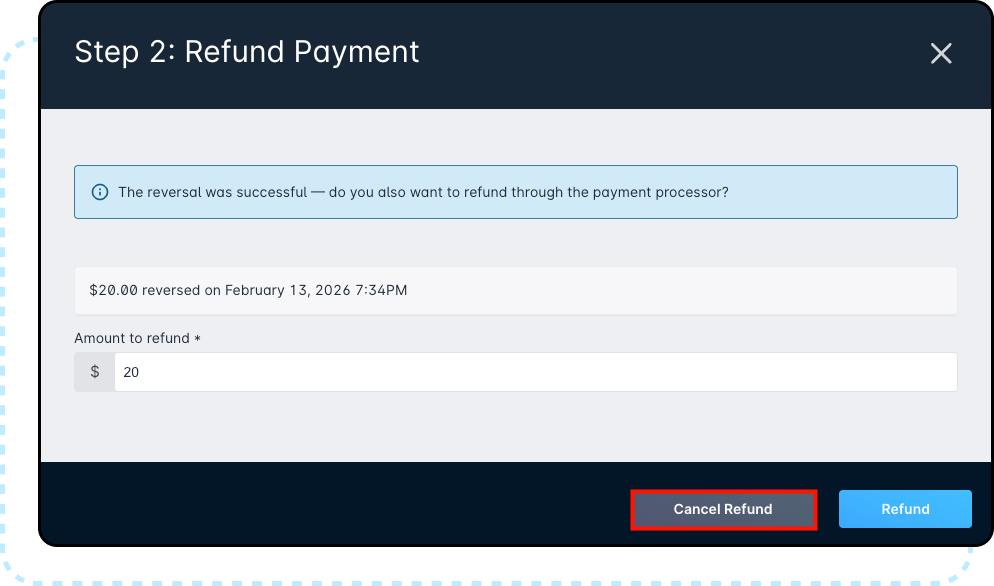
If you do need to return funds, select Refund to start the refund through your payment processor.
Creating a Manual Invoice
After transactions are added to the account, they need to be invoiced before the customer can pay them. To create a manual invoice, go to Billing > Invoices.
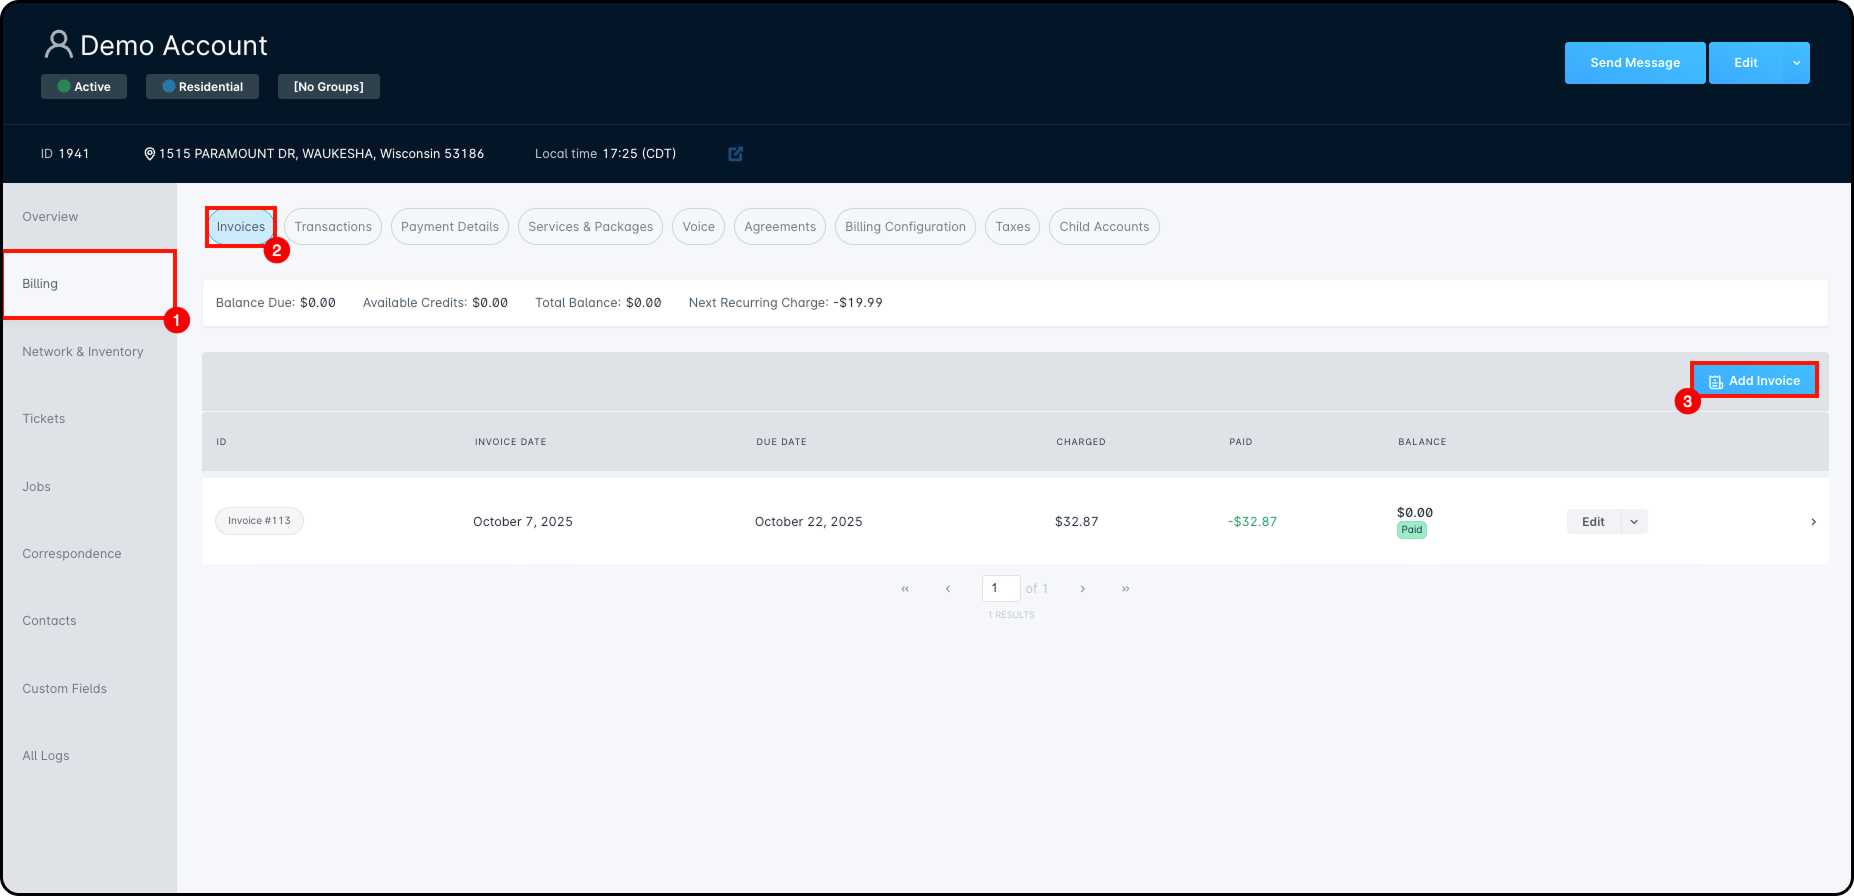
The Invoices tab shows all invoices created for the account. From this tab, click Add Invoices to get started.
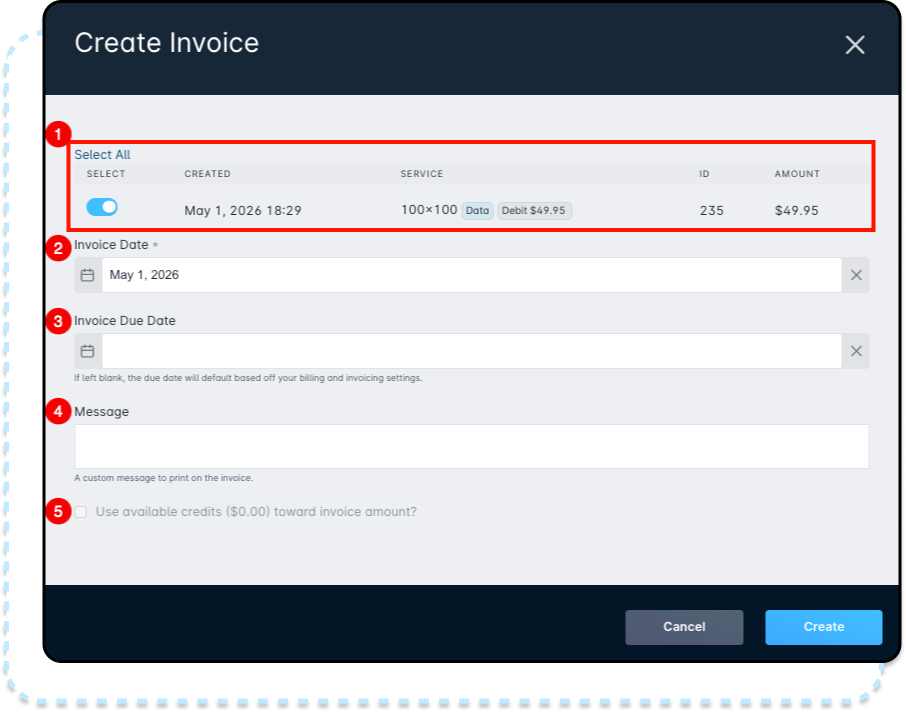
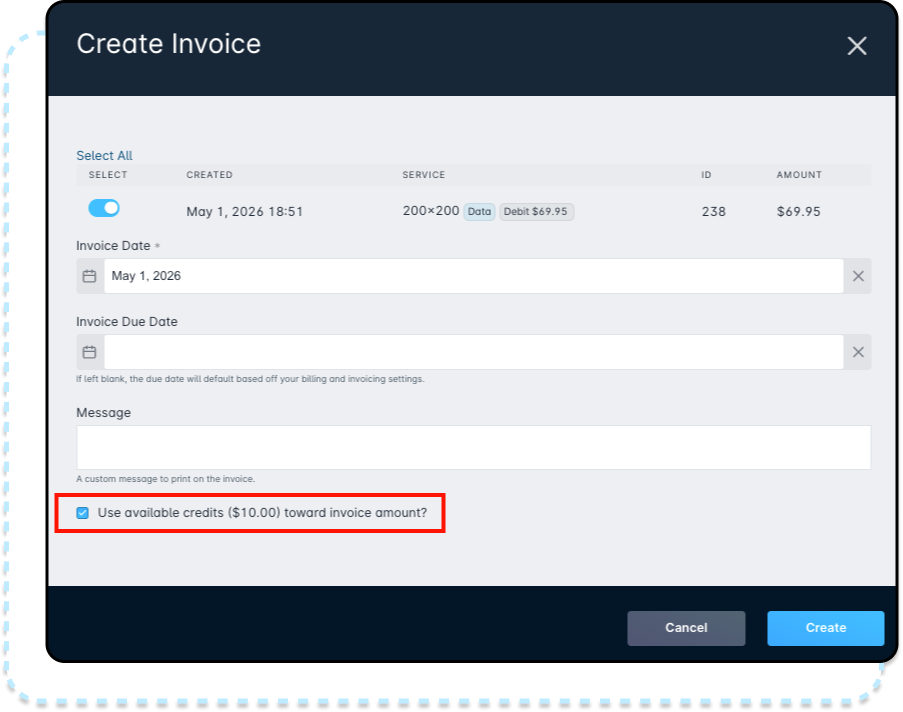
Once you click Add Invoices, the Create Invoice window will open.
- Uninvoiced Debits: Select the debits you want to include on the invoice. These are transactions that have been added to the account but have not been invoiced yet.
- Invoice Date: Choose the date the invoice should be generated and sent to the customer.
- Invoice Due Date: Choose when payment is due. If this is left blank, the due date will be based on the account’s billing and invoicing settings.
- Message: Add a custom message to print on the invoice. This message appears at the bottom of the invoice.
- Use Available Credits: If the account has available credits, such as manual payments or credit services, use this option to apply them to the invoice.

Invoice Management
Invoices in Sonar can be managed in two ways: deleted or voided.
- Deleting an invoice removes the invoice while the accounting period is still open. Any invoiced debits become uninvoiced again, and any applied credits are returned to the account as available credits.
- Voiding an invoice is used after the accounting period is closed. Voiding removes credits applied by payments or discounts and reverses the debits on the invoice. The reversal credits are then used to bring the invoice balance to zero, and the invoice is locked and marked as void.
To manage invoices, go to Billing > Invoices.

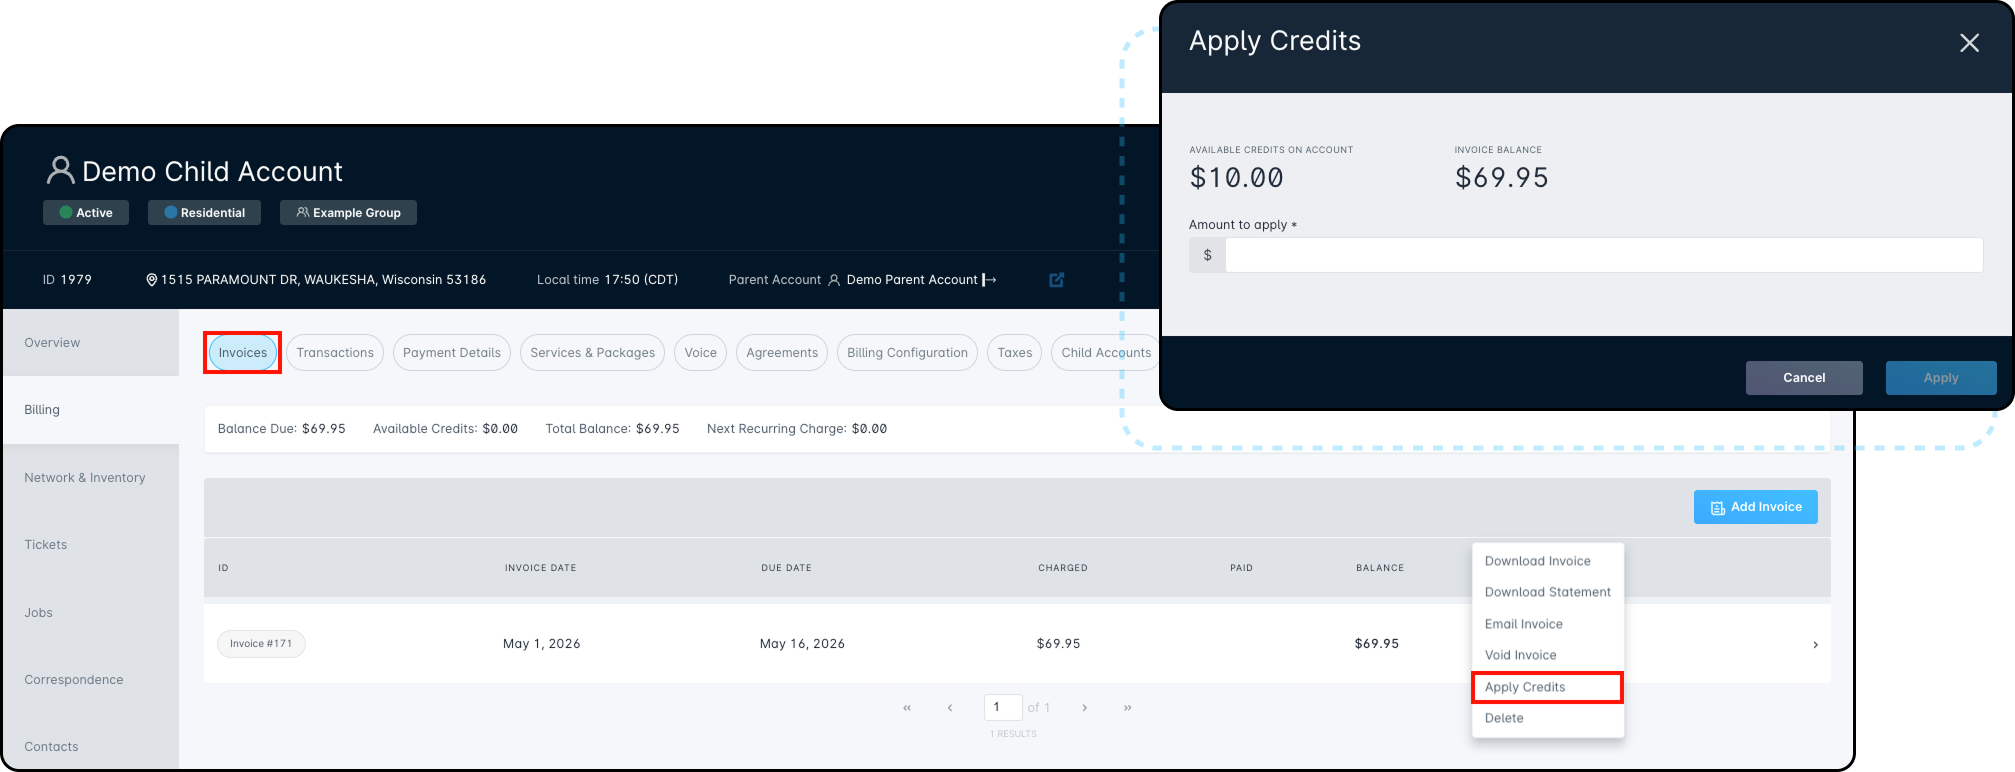
From the Invoices tab, click the dropdown next to Edit to view the available invoice actions.
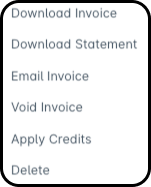
Edit Menu Action Details
2. Download Statement: Downloads a statement version of the invoice/account balance.
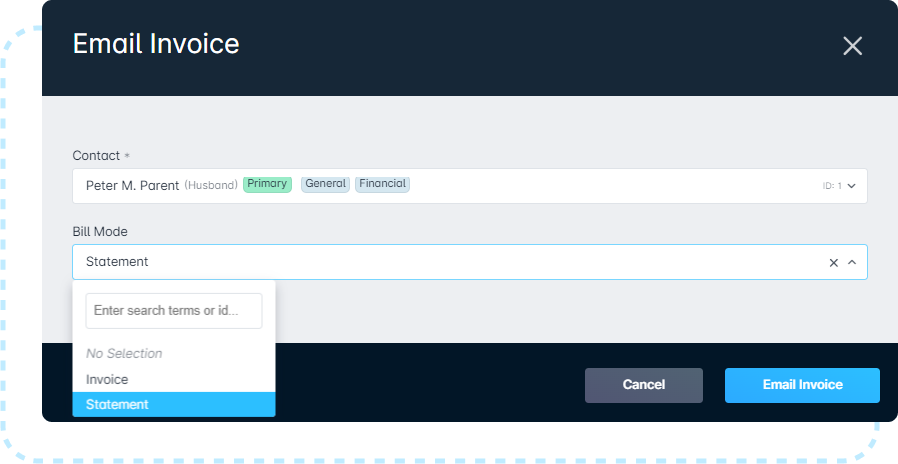
3. Email Invoice: Opens a popup where you can choose which account contact should receive the bill. You can also choose the bill mode: Invoice or Statement.
4. Void Invoice: Voids the invoice when voiding is allowed.
5. Apply Credits: Applies available account credits to the invoice.
6. Delete: Deletes the invoice when the accounting period is still open.
This context menu includes both Delete and Void actions. Each option opens its own confirmation window.
- Delete: Removes the invoice when deletion is allowed. A message is required because deleting an invoice does not create matching credits to balance reporting.
- Void: Voids the invoice when voiding is allowed. This keeps invoice history while reversing the invoice activity.
Selecting the Email Invoice: Opens a popup where you can pick which account contact should receive the bill. You can also pick the bill mode: Invoice or Statement.
This context menu contains both the Delete and Void actions, which will open their respective modals. Deletion will require a message to be submitted, as invoice deletion will not create corresponding credits to balance reporting.
Applying Credits
Credits are amounts available on an account that can be applied to invoices.
Credits can be added in a few ways:
- Credit services: Add a credit using a credit service through a recurring transaction, one-time transaction, or adjustment.
- Voiding an invoice: Voiding reverses the invoice transactions and automatically creates credits to balance the invoice.
- Payments: Manual payments also add credits to the account for the payment amount.
This section focuses on manually applying available credits to invoices.
If an account has available credits and an open invoice, you can apply the credit to the invoice in a few ways:
- From an open invoice: Apply available credits directly to the invoice.
- When creating an invoice: Apply available credits during invoice creation.
- When adding a new credit or manual payment: Apply the credit or payment directly to an open invoice.