A Purchase Order (PO) allows you to submit documentation to a specific vendor and request-specific amounts of inventory items from the vendor. A typical purchase order will include the vendor's information, a “ship to” address, and payment terms along with details of the requested items.
Why Use Purchase Orders?
Purchase orders provide several advantages when incorporated into your traditional inventory request flow. Below are some reasons implementing purchase orders will simplify your day-to-day operations:
Purchase orders provide a detailed paper trail. Most vendors will acknowledge the receipt of a purchase order and also follow up the PO by sending an invoice once the order is completed. Certain vendors will even provide an additional sales order to confirm the items, prior to the order being filled.
Many vendors prefer receiving purchase orders over a phone or online order, as it clearly establishes the request and leaves very little room for human error.
Purchase orders will make your life easier during an audit, allowing auditors to easily cross-reference invoices, packing slips, and purchase requests. Without purchase orders, you could potentially spend hours going over receipts and emails from vendors.
Easily add inventory to Sonar via the PO receiving workflow. Rather than manually adding the items, the receiving workflow walks you through this process, associating the created items to the PO, and indicating what quantity you should be receiving based on the order details. If you were accidentally shorted on an item, this workflow will make sure that the error is caught, and tracked until the remaining items arrive.
How to Use Purchase Orders in Sonar
Before using Purchase Orders in Sonar, you'll need to ensure that the correct permissions are enabled for your user role.
If you're a super-admin, the permissions will be applied to your role automatically.
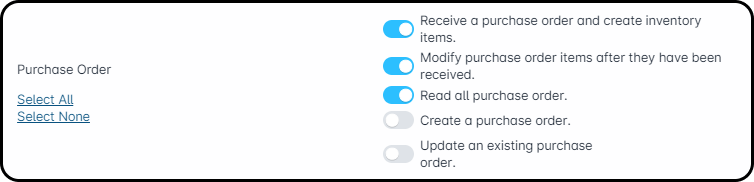
The permissions that need to be applied to the role can be found under Settings → Security → Roles and are part of the “Purchase Order” section of the permissions list:
Additionally, you'll need to ensure a Role has the Purchase Group section configured:
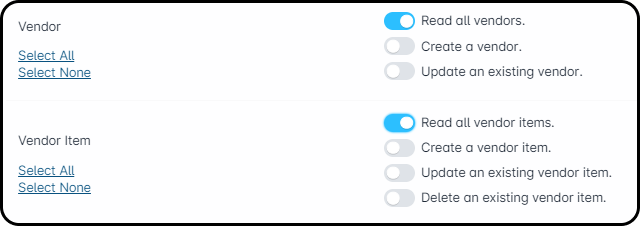
You'll also need the Vendor and Vendor Item sections of the role:
Due to the interconnected nature of Purchase Orders, this role also needs the ability to view Account Types:
The permissions enabled on this role are the bare minimum that can be enabled while retaining PO functionality. Your use case may require additional permissions depending on what they'll be doing with the purchase order system.
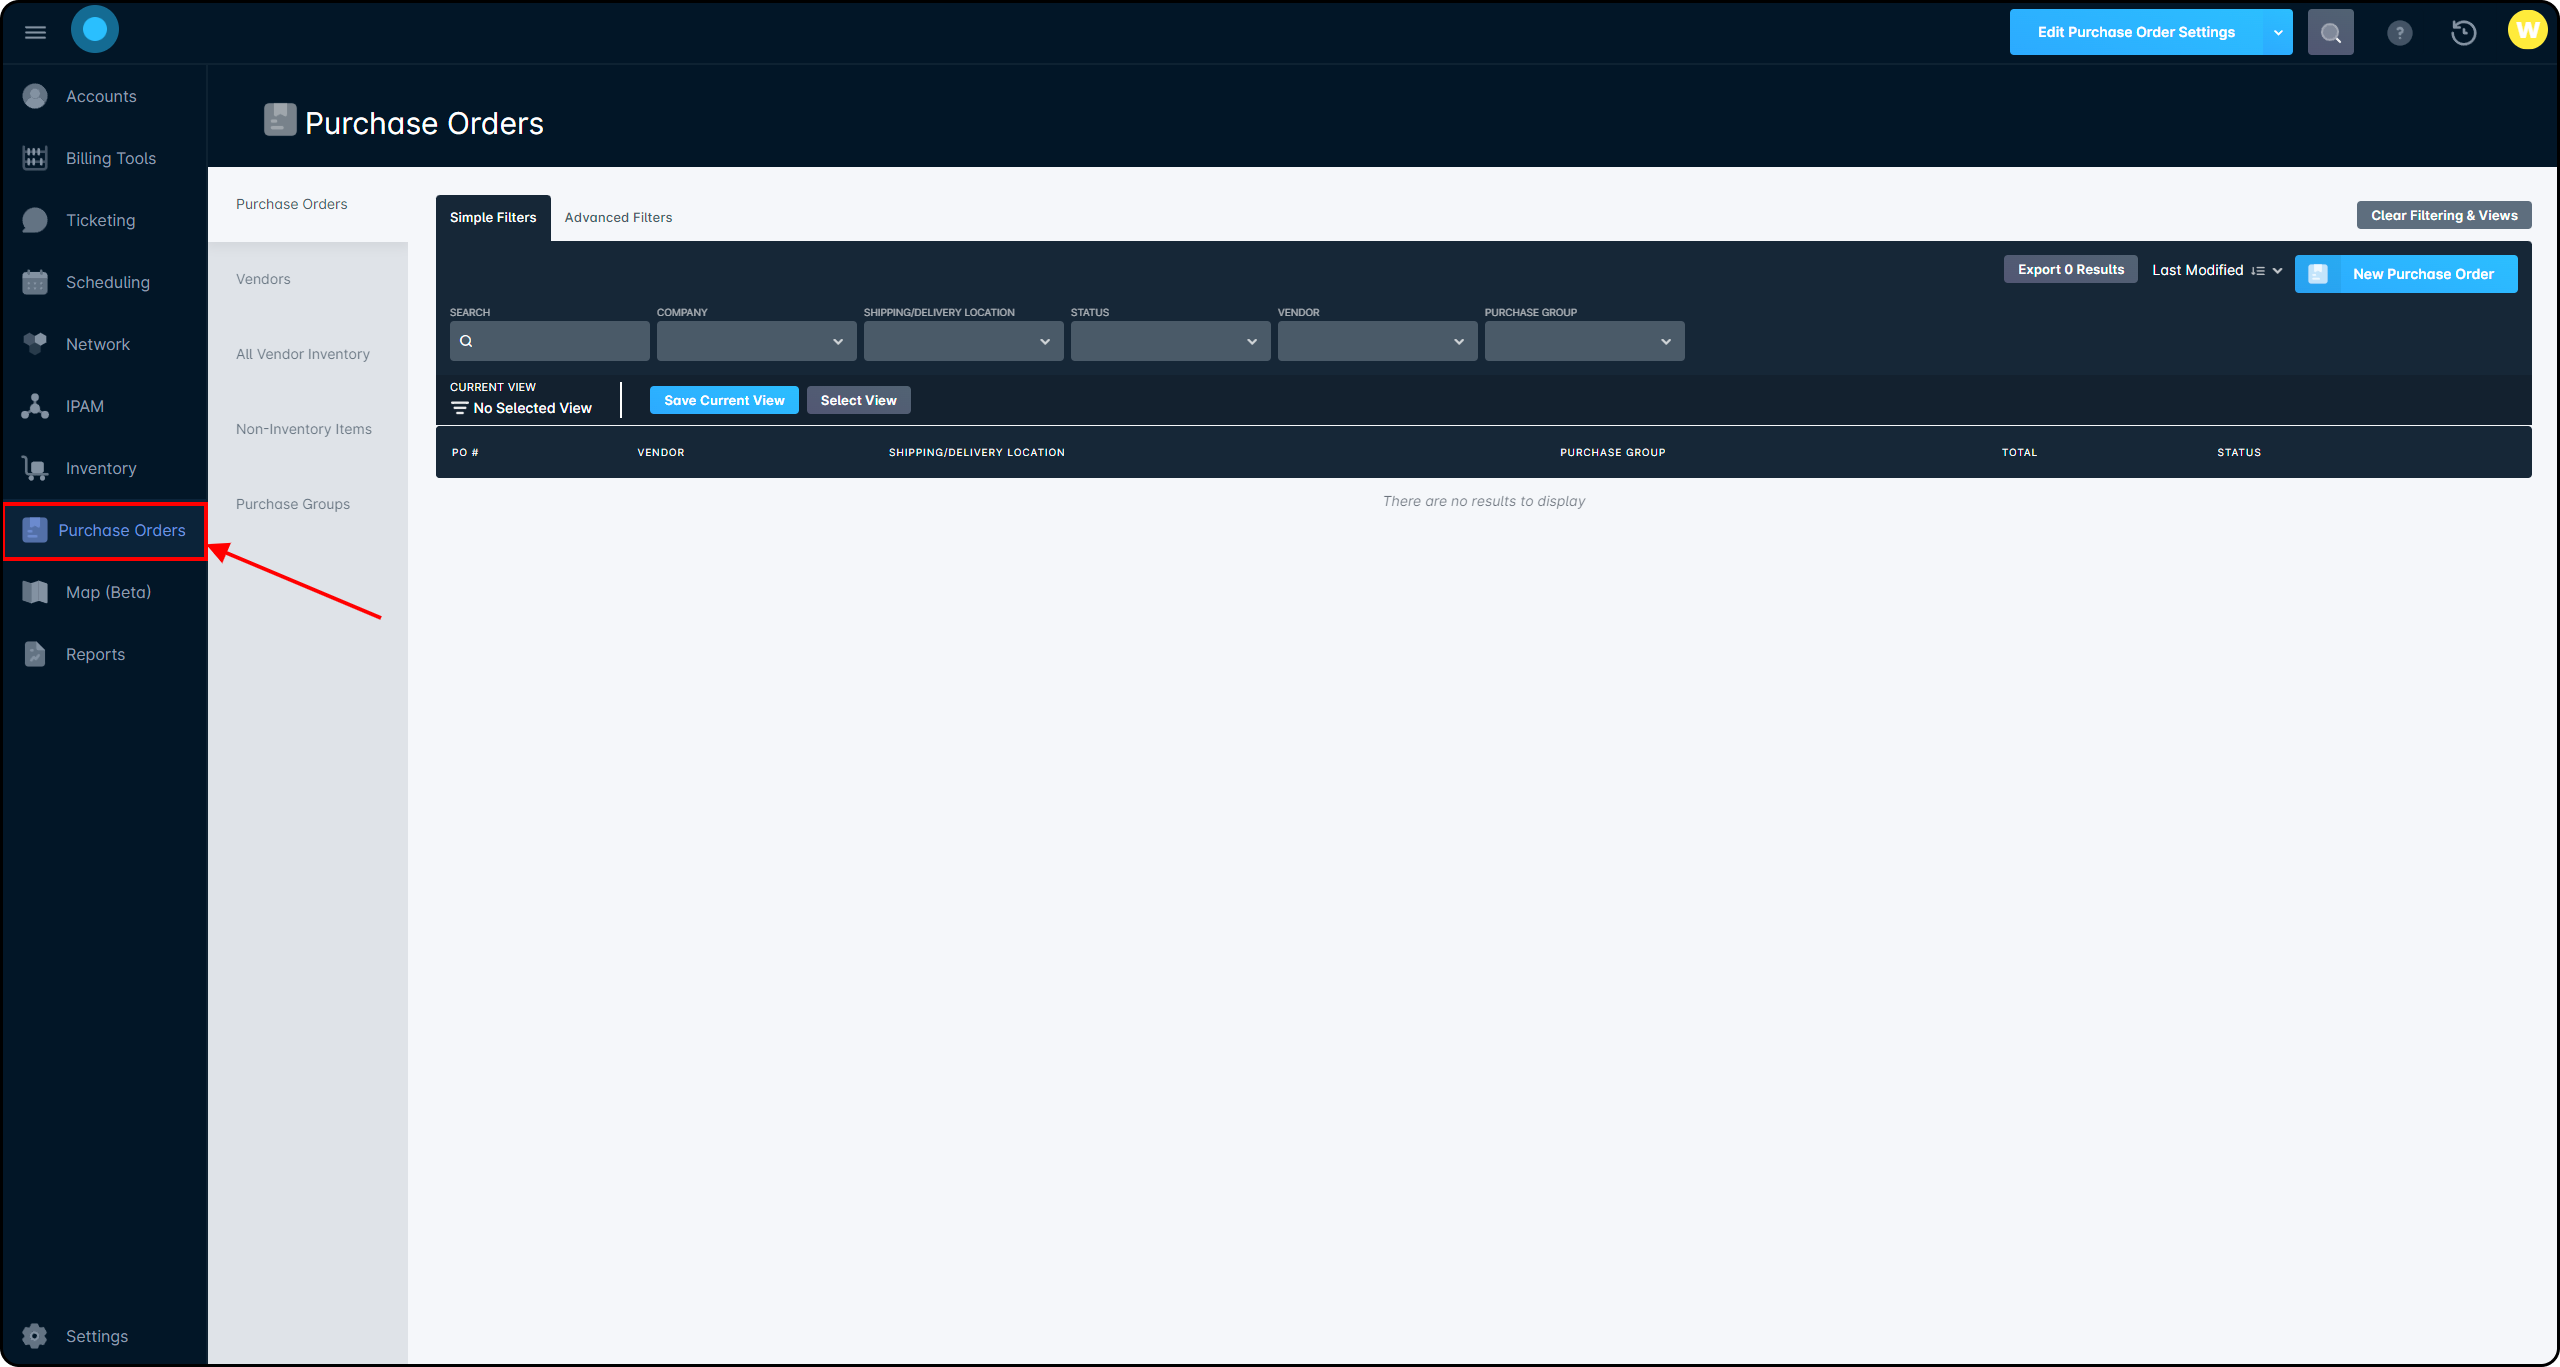
Once the role has the appropriate permissions enabled, you can access the Purchase Orders section of your Sonar Interface by clicking on the “Purchase Orders” button on the sidebar.
If the role isn't enabled for the user, the Purchase Orders menu won't be visible on the sidebar.
Configuring Purchase Orders in Sonar
Before you and your users can start creating Purchase Orders, the various settings and options need to be configured. In this section, each step will be covered to ensure your purchase orders are being set up and sent correctly.
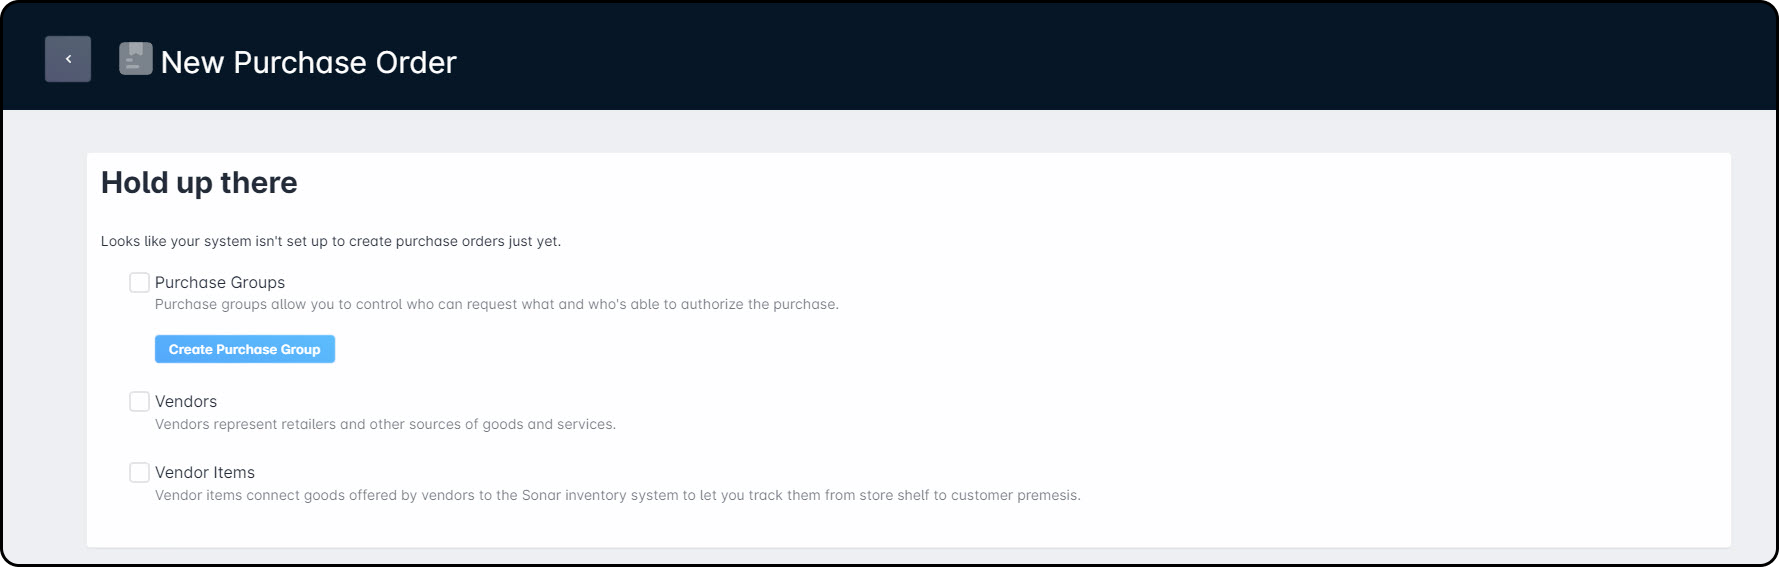
Hold up there
If you try to use Purchase Orders before you've completed the configuration, you'll be met with this screen: Because of the dependencies in the Purchase Order module, there are several prerequisites. This page will set you up with the basics, although the following sections do go into greater detail of each step.
Purchase Order Settings
If you've previously used a Purchase Order system outside of Sonar, modifying the Purchase order settings should be the first step you take to ensure both systems align. You can modify the Purchase Order settings through the “Edit Purchase Order Settings” button, pictured below:
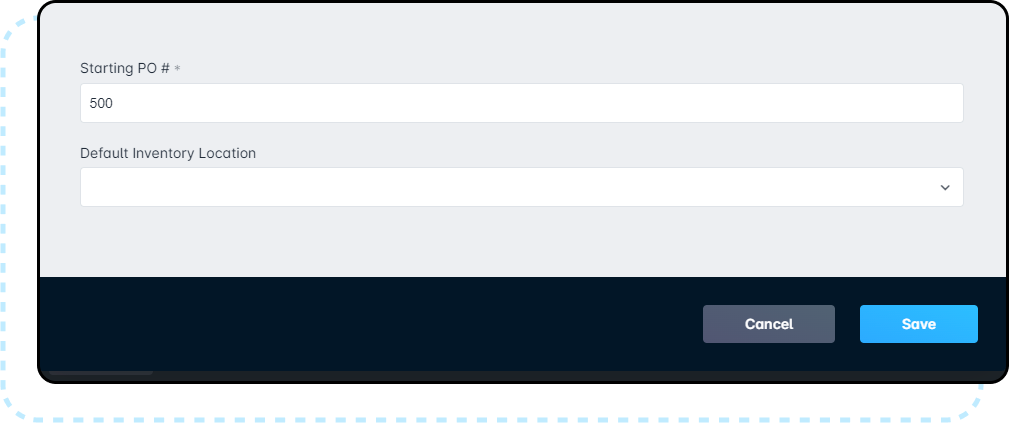
This will open the modification modal, which will let you change your next PO number and set a default inventory location for ordered items:
Once the PO number is set and a Purchase Order is created, you aren't able to go lower than the first number in Sonar's PO module. Please ensure the Starting PO # is correct before creating a new order.
Managing Purchase Groups and Approval Limits
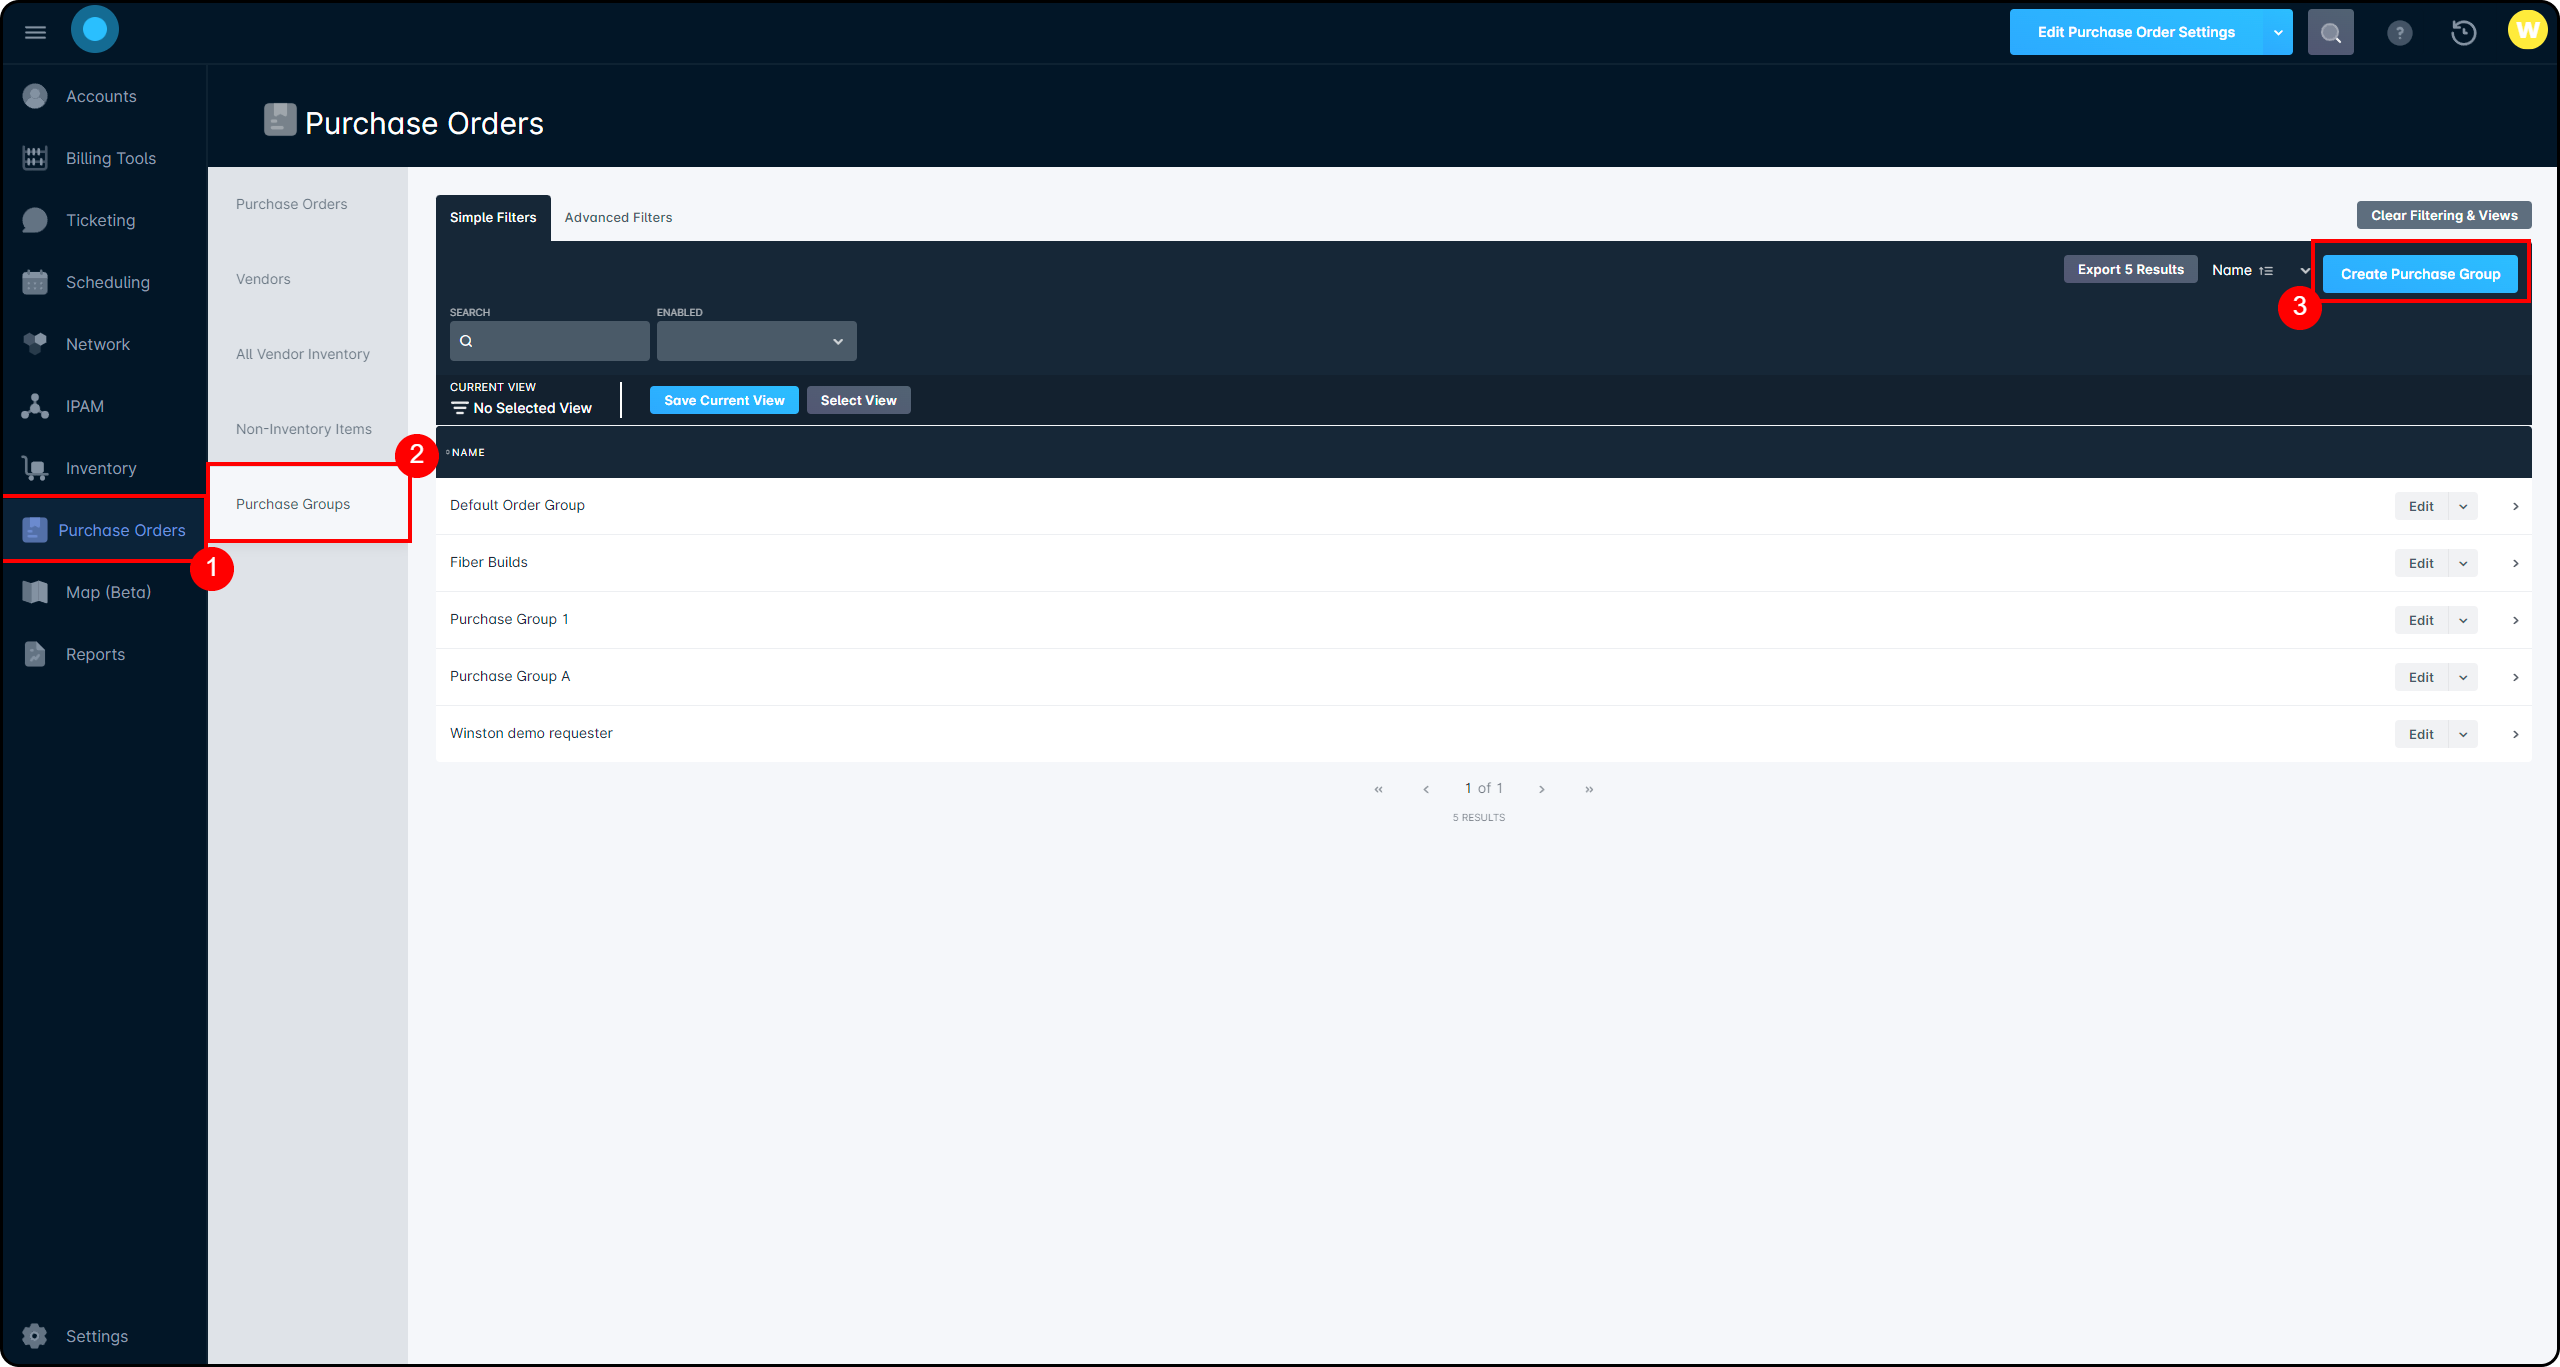
To create Purchase Orders, Purchase Groups need to be added to your instance. Purchase Groups are a collection of users, categorized as “requesters” and as “approvers”. Each Purchase Group can also have an automatic approval limit added to simplify the requisition process, with manual approval required beyond that value.
To create a Purchase Group, select the tab from the Purchase Orders page, then click the “Create Purchase Group” button:
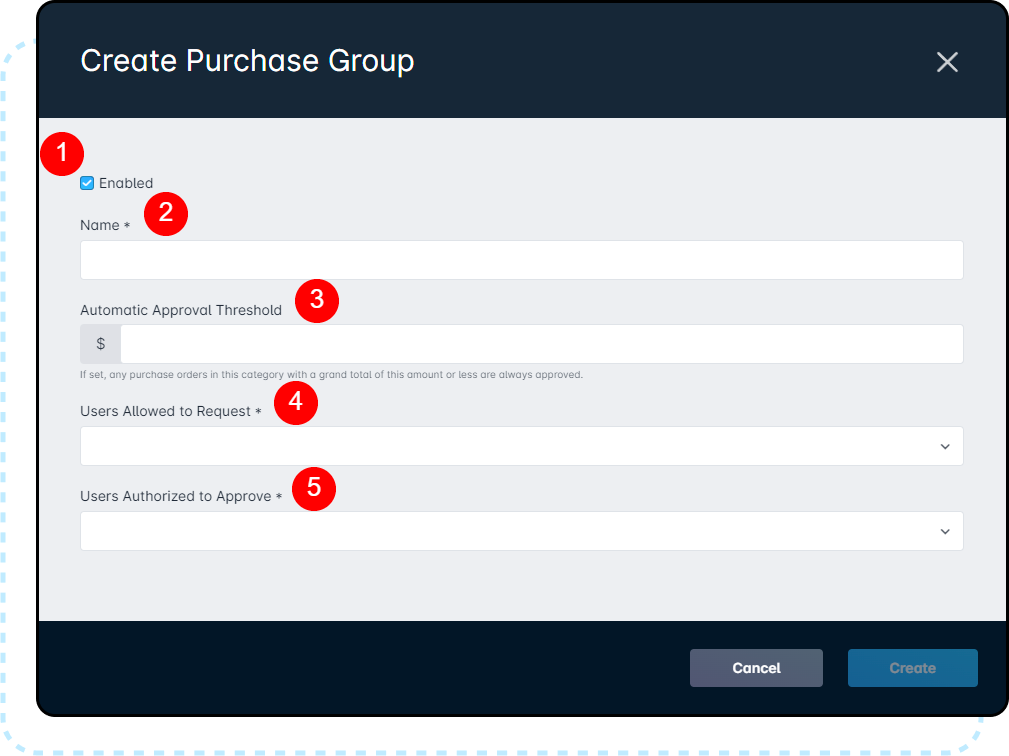
The creation modal that opens will allow you to completely customize your Purchase Group:
The Enabled checkbox determines whether the Purchase Group you're creating will be active for requesting purchase orders.
The Name field is where you set the name of the group, which will be reflected in requests and historical purchase order details.
The Automatic Approval Threshold allows you to set a dollar amount that allows purchase orders with a grand total equal to or below this amount to be automatically approved. This value will only apply if the vendor uses the same currency as your Sonar instance.
The Users Allowed to Request field determines which users will be part of this Purchase Group to make requests.
The Users Authorized to Approve field allows you to set one or multiple users who can approve Purchase Orders requested under this Purchase Group.
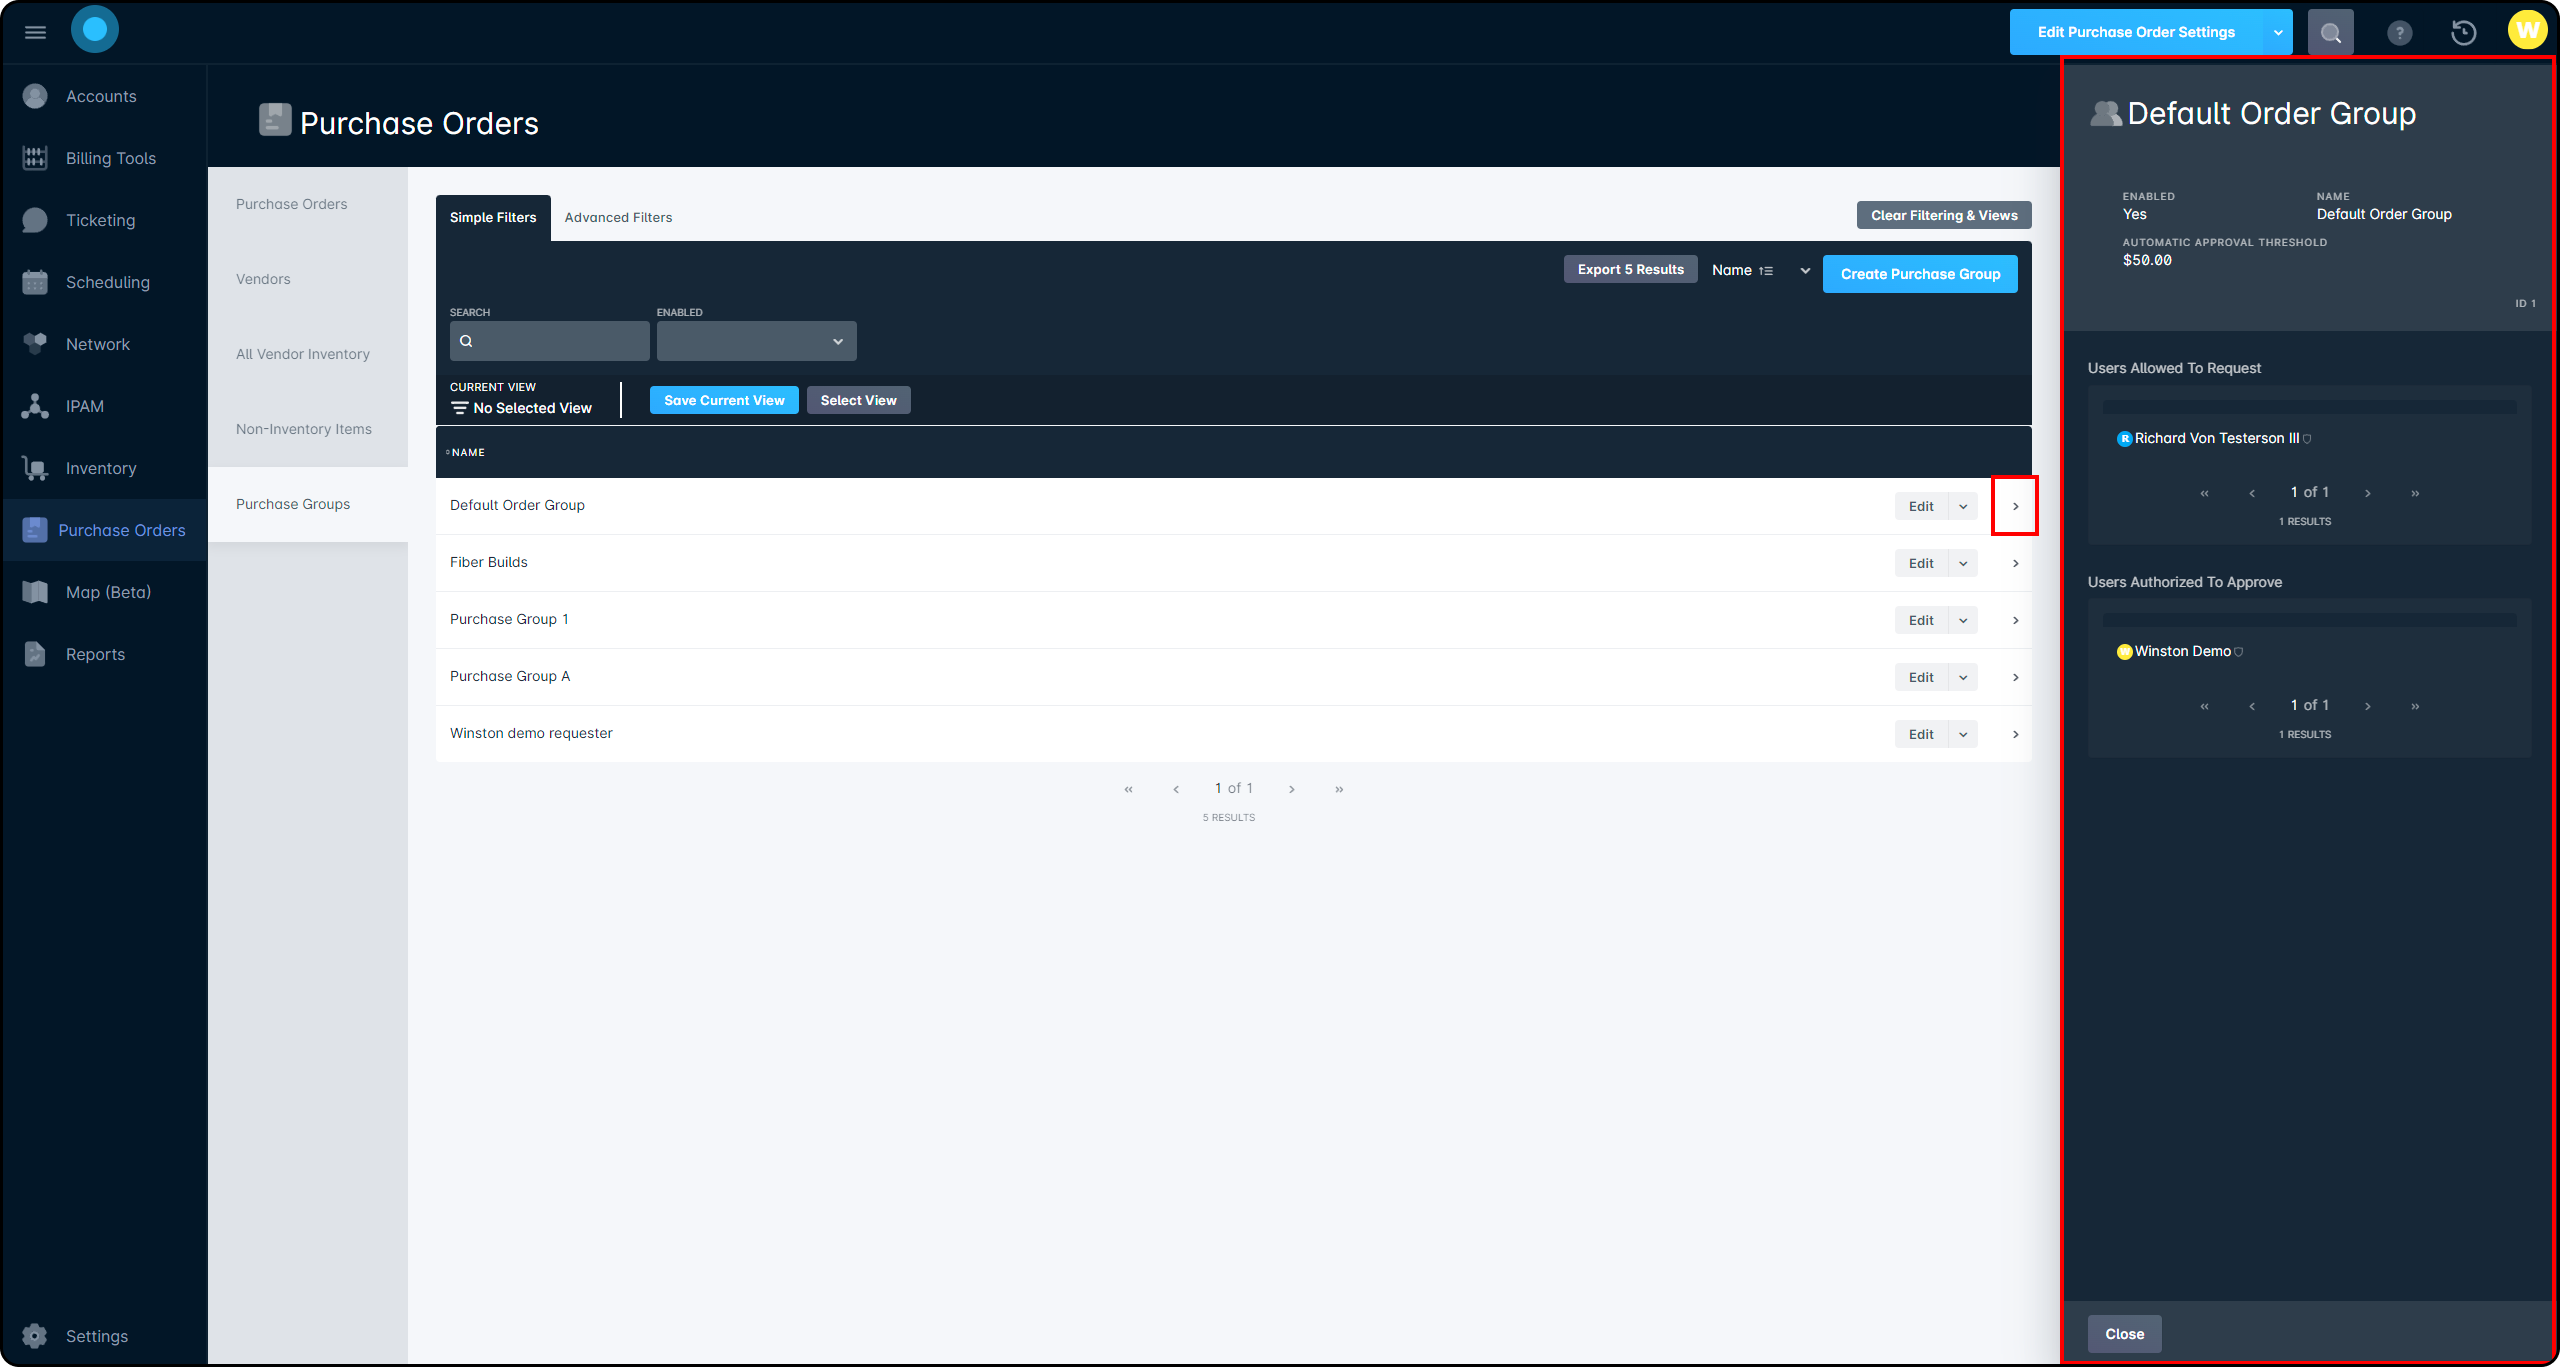
Once the Purchase Group is created, you can review the authorized users through the sidebar, accessed by clicking the arrow in line with the group name:
Creating Vendors
Creating vendors is an essential part of the purchase order process. The vendors you add in Sonar will be the only ones that you can request new inventory from using the PO feature.
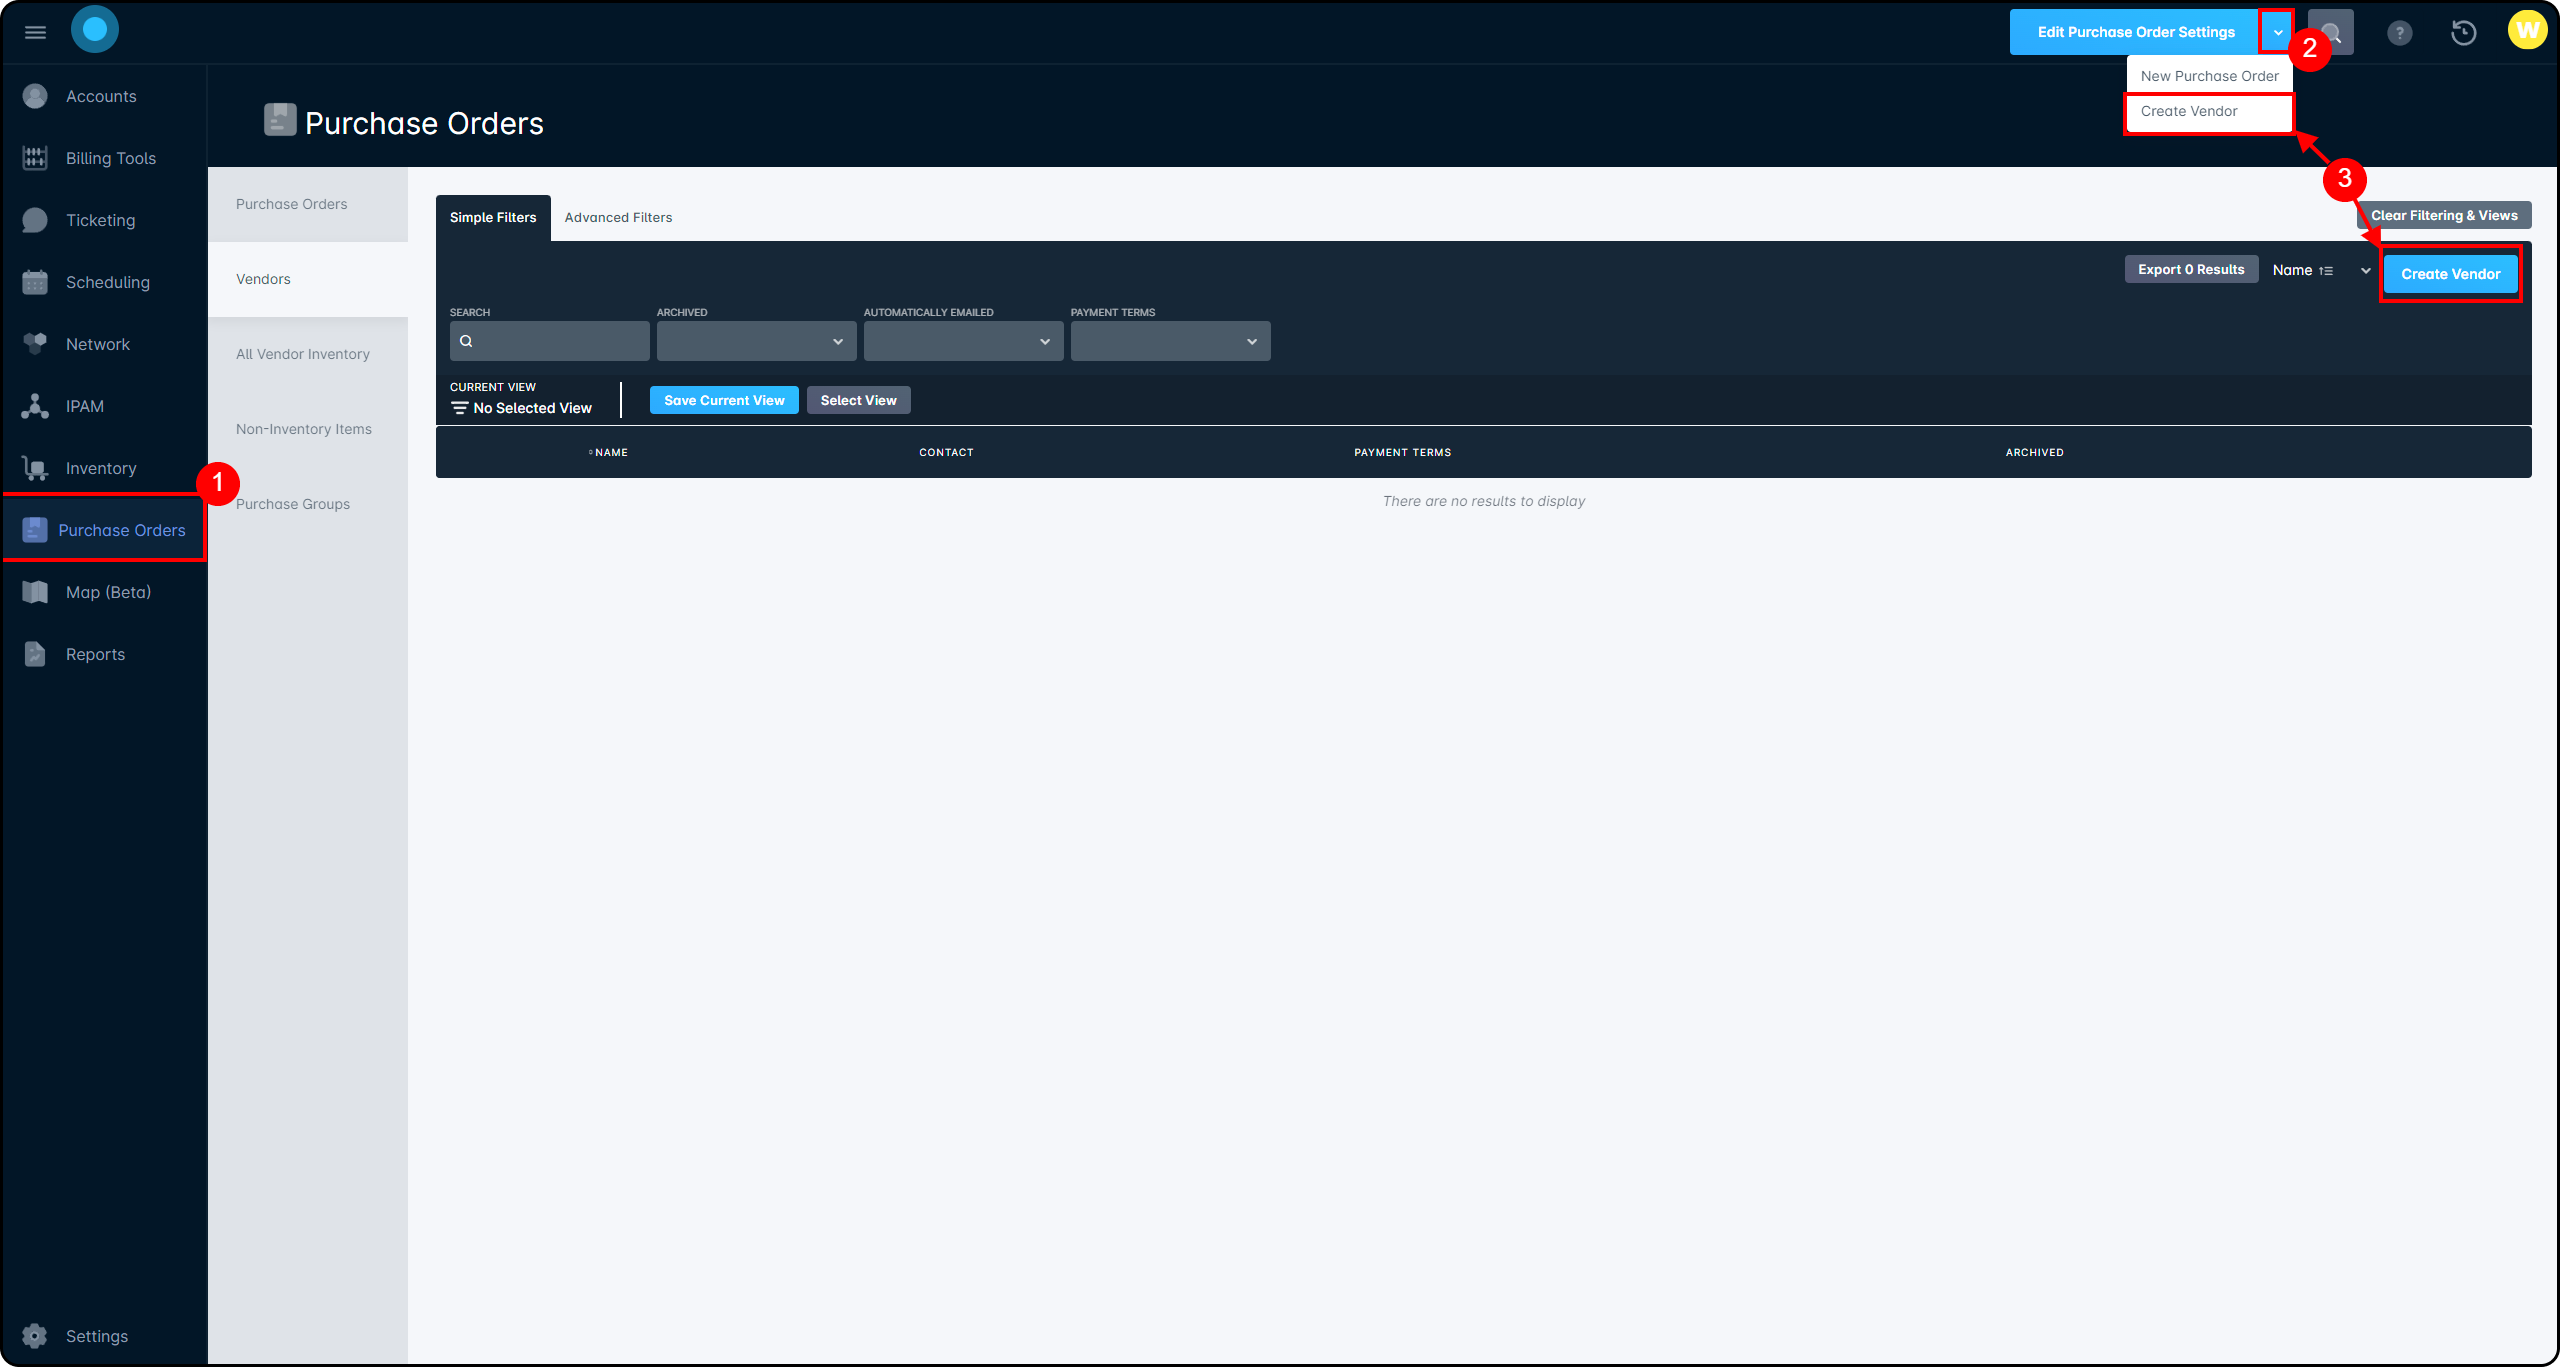
From the dropdown next to the “Edit Purchase Orders” button, selecting “Create Vendor” (or by clicking the “Create Vendor” button on the Vendor tab) will open the creation modal, which is divided into 3 sections.
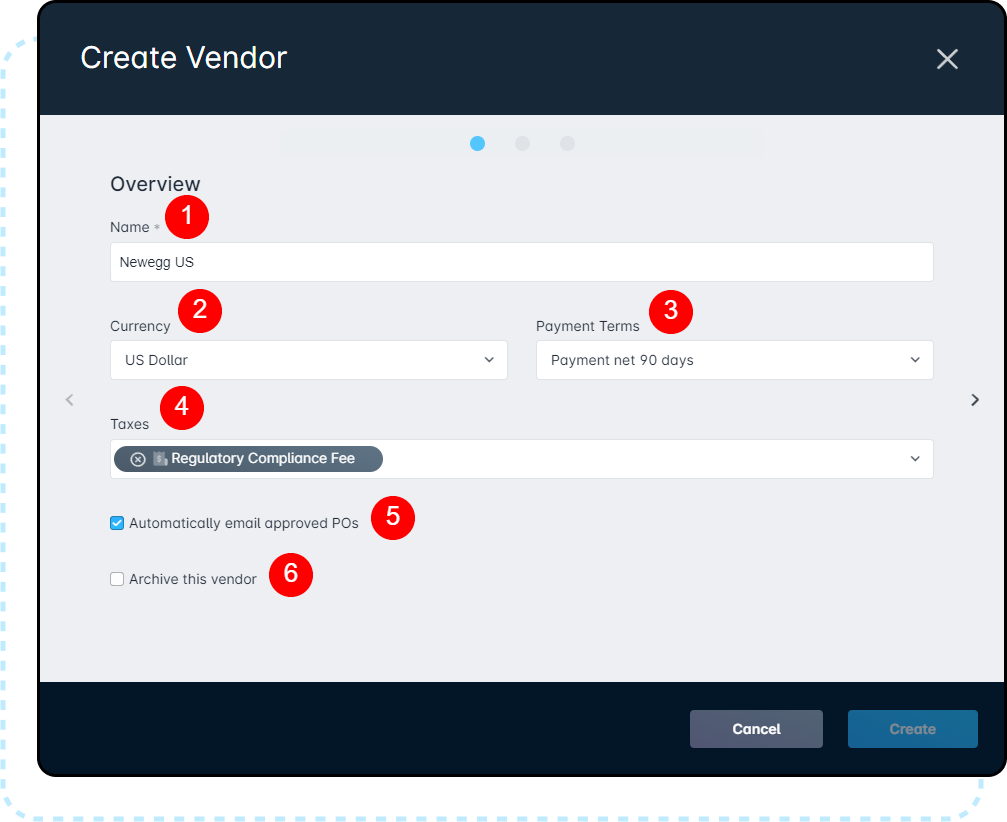
The first page of the vendor creation modal focuses on the basic payee information of the vendor.
The name entered here will be reflected both in the user interface and on the Purchase Order generated by the system and sent to the vendor.
The Currency field allows you to set the currency this vendor uses.
This field is primarily used for record-keeping, as no currency conversion is performed within Sonar. However, if the vendor uses a different currency than your Sonar instance, auto-approval functionality won't work.
The Payment Terms field is used to set what payment terms are included on the PO sent to the vendor. The terms available in this dropdown can't be modified, and are only used for record-keeping purposes.
The Taxes field allows you to select one or more Global taxes created in your instance and have them be automatically applied to items in a PO for the created vendor.
Vendors and the Purchase Order module don't allow you to add any geographically restricted taxes.
The Automatically email approved POs checkbox will send all POs that are approved directly to the vendor, rather than requiring a manual initiation of the email.
The Archive this vendor checkbox allows you to deactivate a vendor and prevent it from being used in future purchase orders.
Archiving is in place because vendors can't be deleted once they've been added, to maintain perpetual historical accuracy.
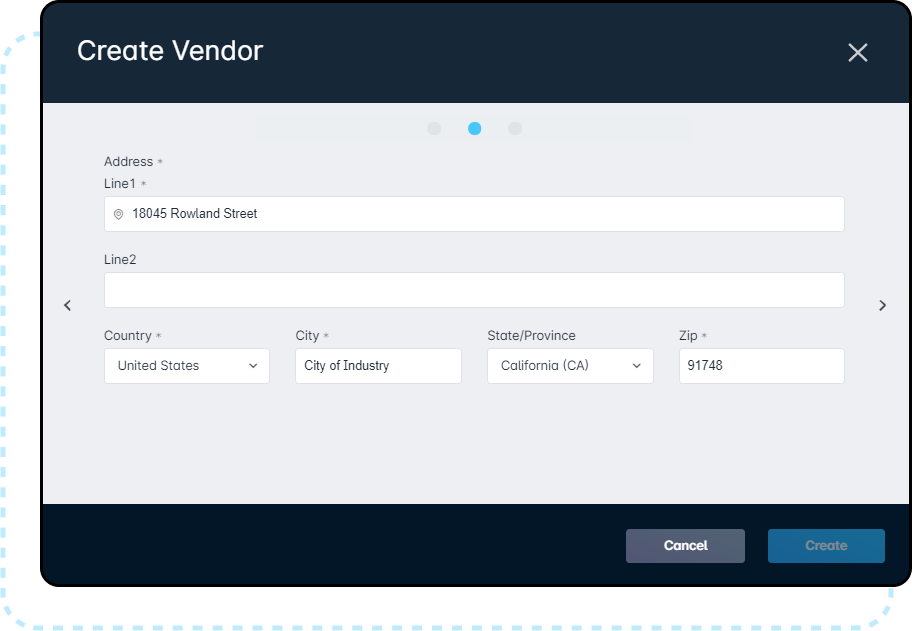
The second page has you configure the address for the vendor:
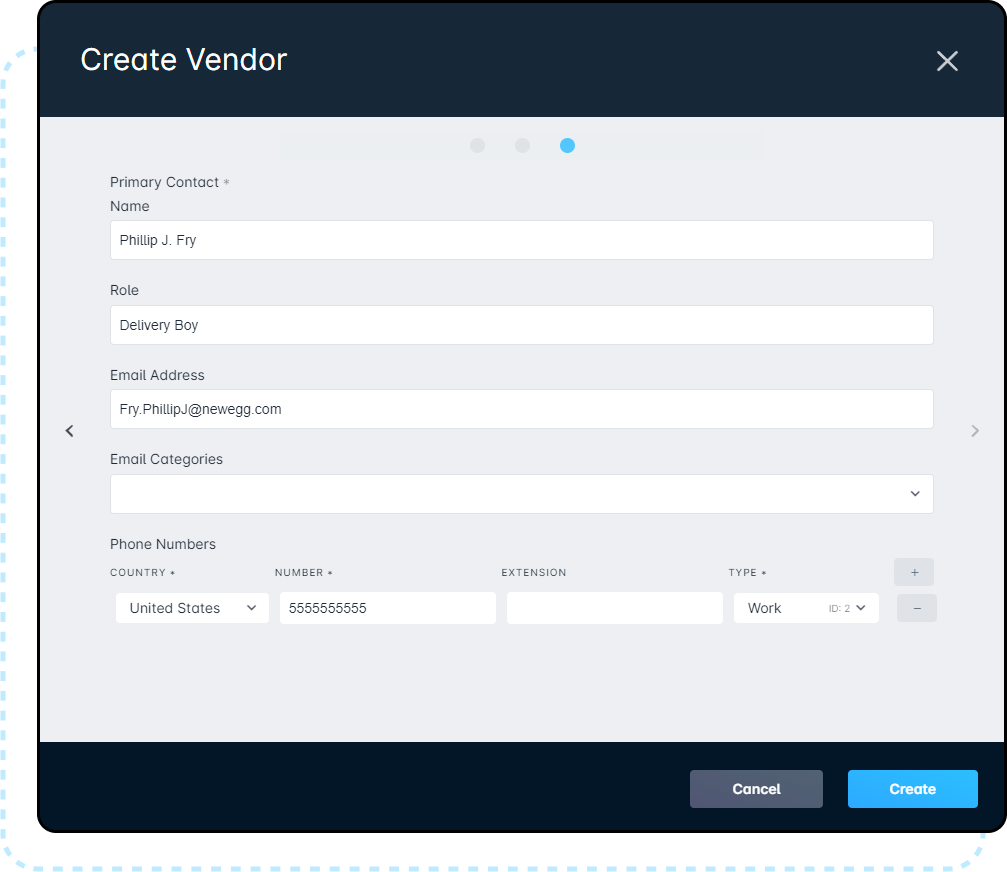
The final page of the Vendor creation modal allows you to set a contact within the vendor, using the same fields as contact creation within Sonar:
Currently, both the Email Categories and the Phone Numbers fields are unused for Vendor contacts, even if they're entered.
Vendor Screen Overview
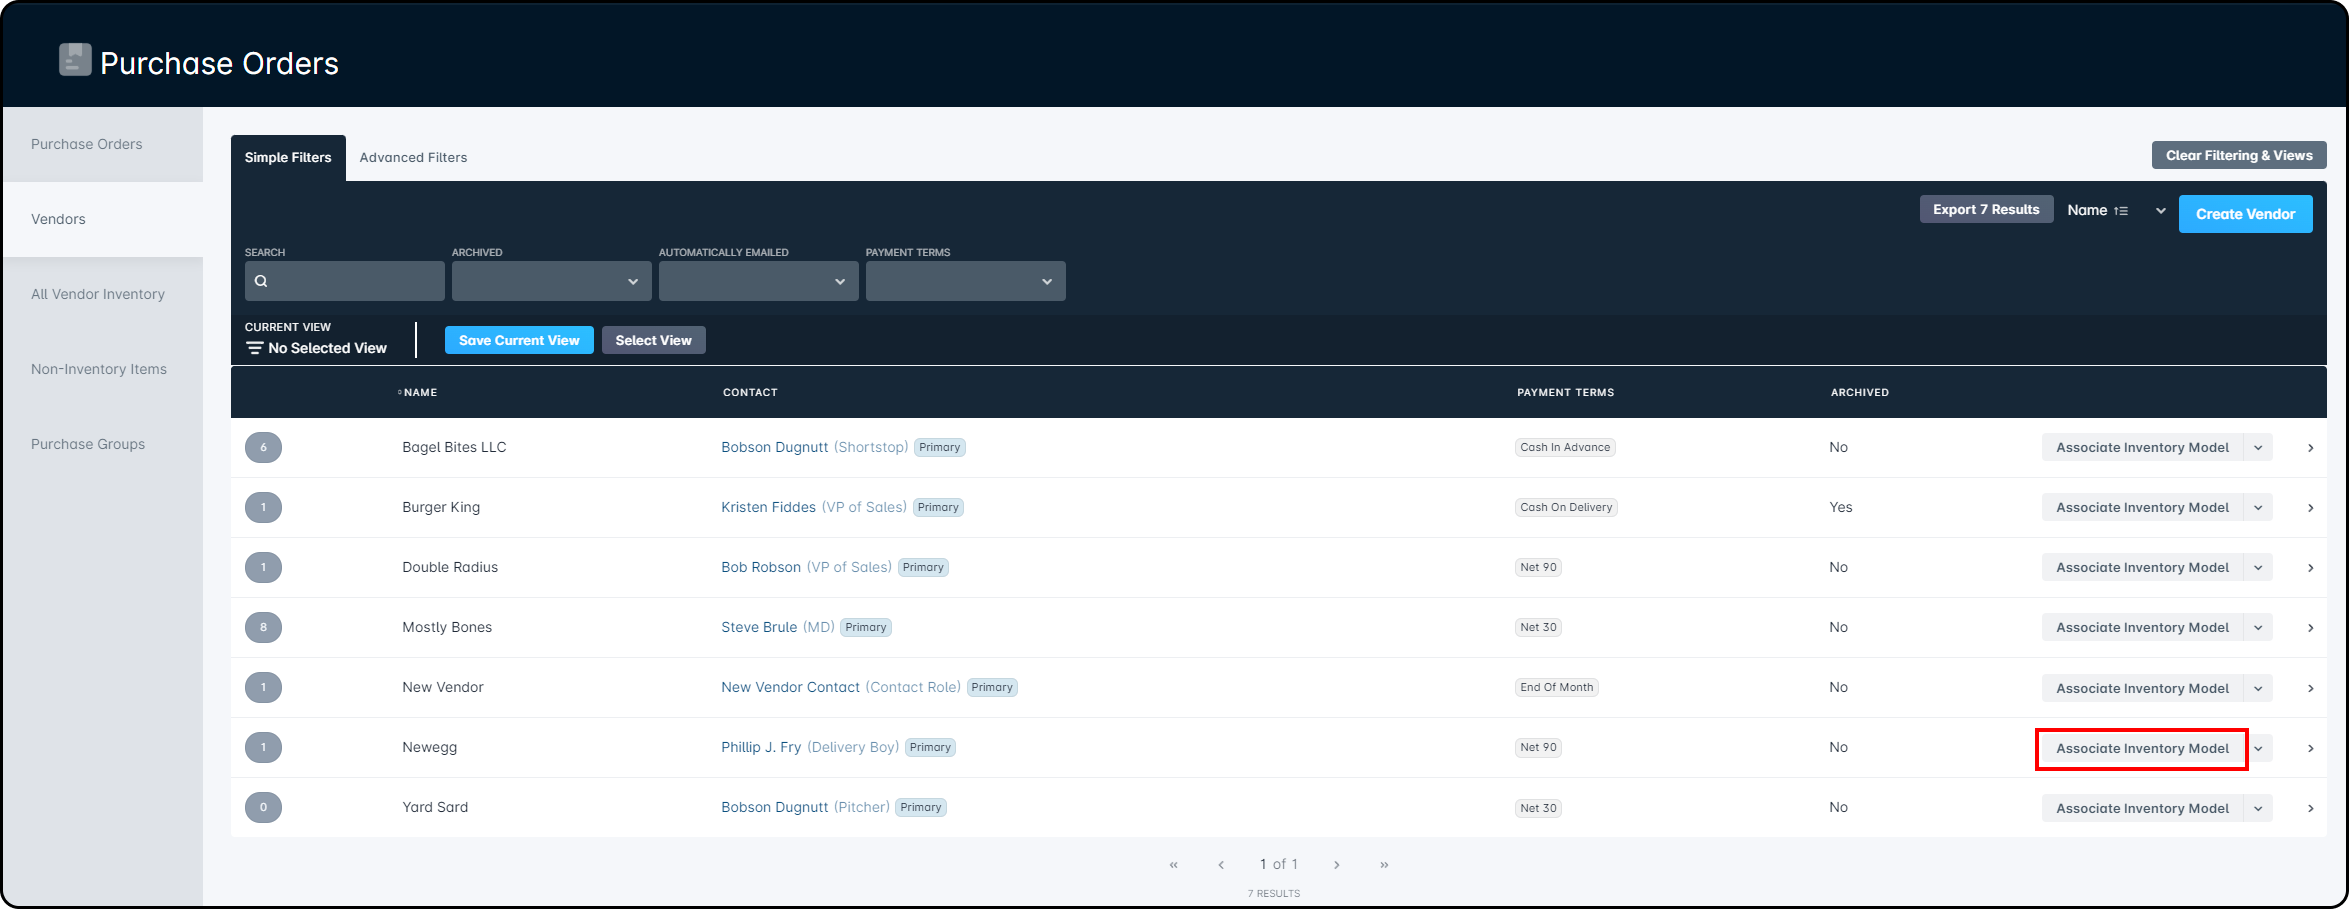
The list of all vendors added to your instance is available by clicking on Purchase Orders → Vendors tab, and contains information about all the vendors currently added to your instance:
The Simple/Advanced toggle allows you to switch between the simple filtering, which is pictured, or the advanced filtering. You can read more about the difference here.
The Name column lists the name of the vendor, provided when it was added.
The Contact column lists the contact name and their role.
The Payment Terms column lists the provided payment terms for the vendor.
The Archived column will display whether or not the vendor is currently Archived, based on the checkbox in the vendor settings.
The final column allows you to associate Inventory Items to the vendor, or by expanding the dropdown:
Associate non-inventory items
Add a new contact
Archive the vendor
Edit the Vendor details
The number here lists the number of associated inventory items, and clicking on it will open a sub-table with more information on the models.
The Name column in the sub-table instead shows the name of the inventory model, rather than the vendor.
The Price column represents the per-unit pricing for the item at the associated vendor. This is set while associating inventory models to a vendor.
The Part Number column lists the provided part number for each inventory model in the sub-table.
The Receiving Quantity column displays the number of each item that will be received each time an order is made. This is separate from item quantity during an order and allows for individual or multi-pack items to be received.
The Retail Item column will indicate whether or not you've marked the item as a retail sale item.
The Archived column indicates whether or not the inventory item associated with the vendor has been archived.
The Edit button allows you to edit the Inventory Item model details that you have linked to the vendor.
Managing Vendors
Each vendor you add has an associated management overview screen, which allows you to review key details about the vendor on a single screen. This overview screen provides meaningful information on the vendor at a single glance. You can access the vendor management screen by clicking the PO # or on the arrow in line with the vendor to expand the sidebar, then clicking on the "Manage" button.
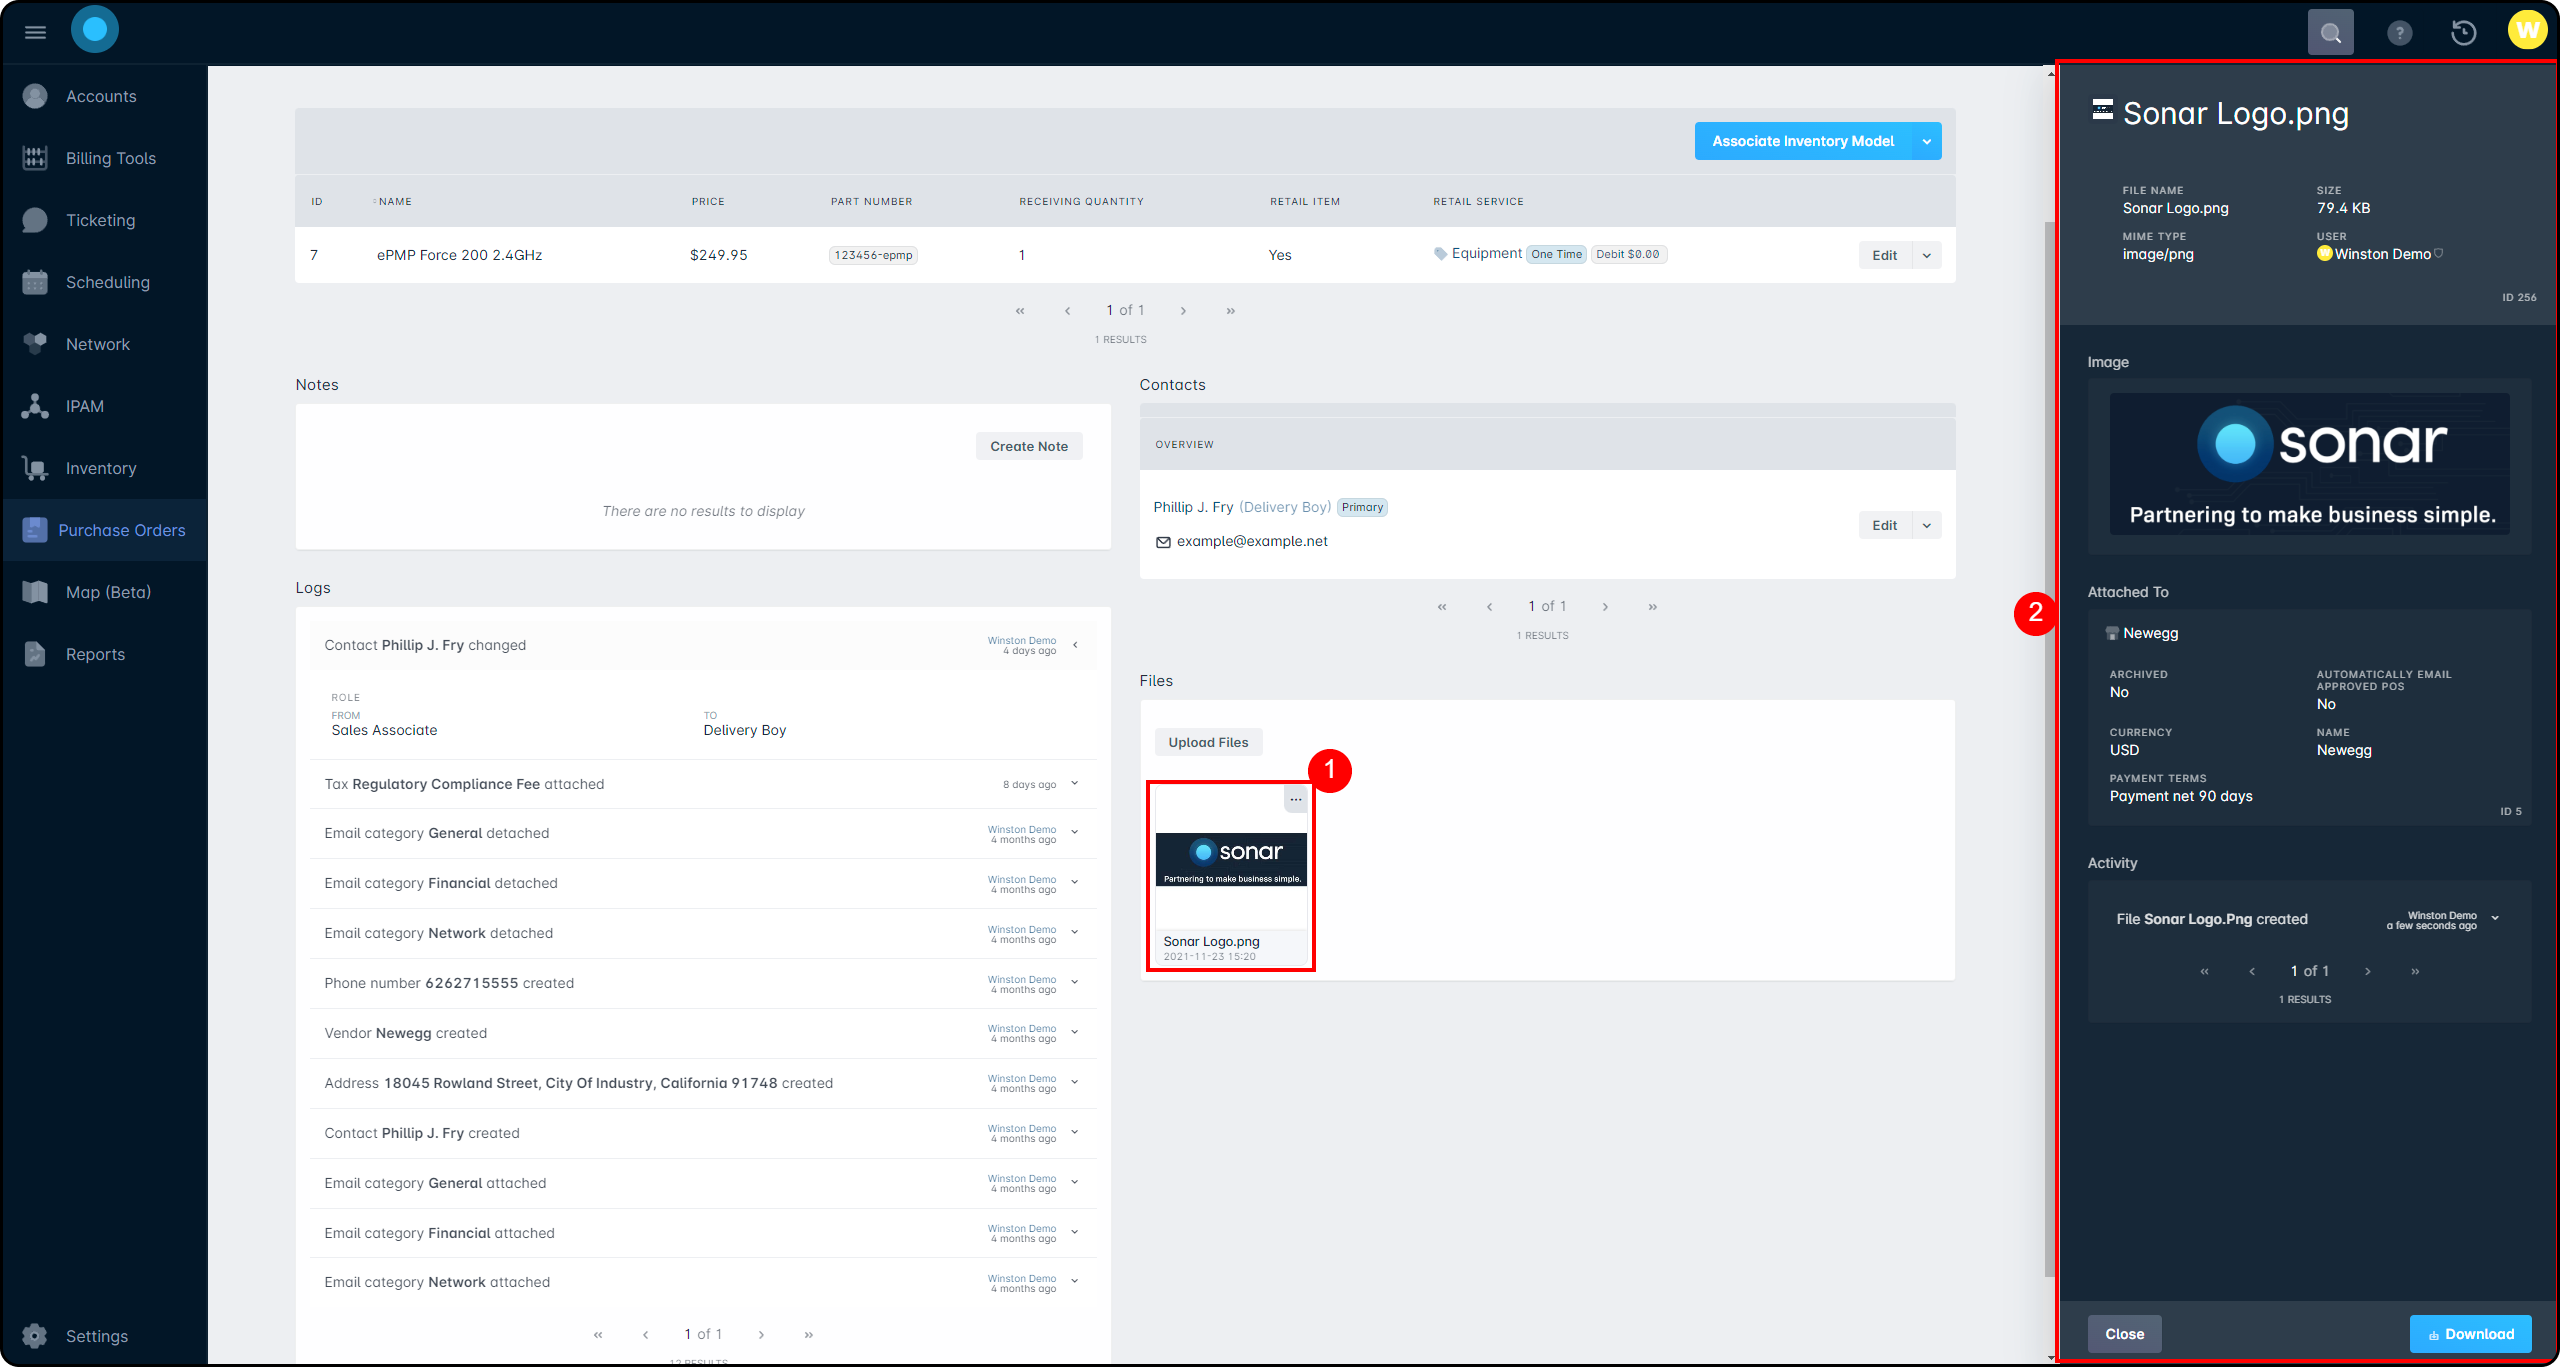
With the management modal open, you'll be able to see a detailed view of your vendor, organized into distinct sections on the page:
This area will show the name of the vendor you're managing.
The Archived indicator shows whether or not the vendor has been archived and can no longer be used for purchase order requests.
The Currency section will display the currency (such as USD, in this example) that was selected when creating the vendor.
The Payment Terms section will display the set payment terms, configured when creating the vendor.
The last section of the header will display the address that was inputted while configuring the vendor.
The Add Contact button will open the contact creation modal, and expanding the dropdown will allow you to archive the vendor, or edit the vendor's details.
If the vendor is currently in an archived state, the option will instead be to enable the vendor.
This table displays information on the associated inventory models and non-inventory items, and the "Associate Inventory Item" button can be expanded to show "Associate Non-Inventory Items".
This ID column will show the ID of the associated Inventory Model.
This ID is based on the order the models were associated with vendors, not when the models were added to your instance.
The Name column shows what the associated inventory or non-inventory item was named.
The Price column shows the price of the item as it was set when associated with the vendor.
The Part Number column reflects what was set for each item. If no part number is provided, the column will be blank.
The Receiving Quantity column reflects the value as it was set during model association.
The Retail Item column will show which of the associated models are sold directly as retail items.
If an associated inventory model is sold as a retail item, this column will show the one-time service associated with the retail purchase.
The Notes section will show any information or notes added to the vendor. This uses the same Notes functionality as the other modules in Sonar
The Contacts section will show the name and position of all contacts added to the vendor, as well as show which contact is the primary contact.
The Logs section will show you historical actions taken on this vendor, and expanding a record will provide more information on what action was taken.
The Files section allows you to attach images or files to the vendor. These files can be viewed or downloaded from the sidebar, accessible by clicking on the item:
Associating Vendor Items
To begin associating a new inventory item with a particular vendor, click on “Associate Inventory Model” from the right-most column on the vendor you'd like to add a new model to:
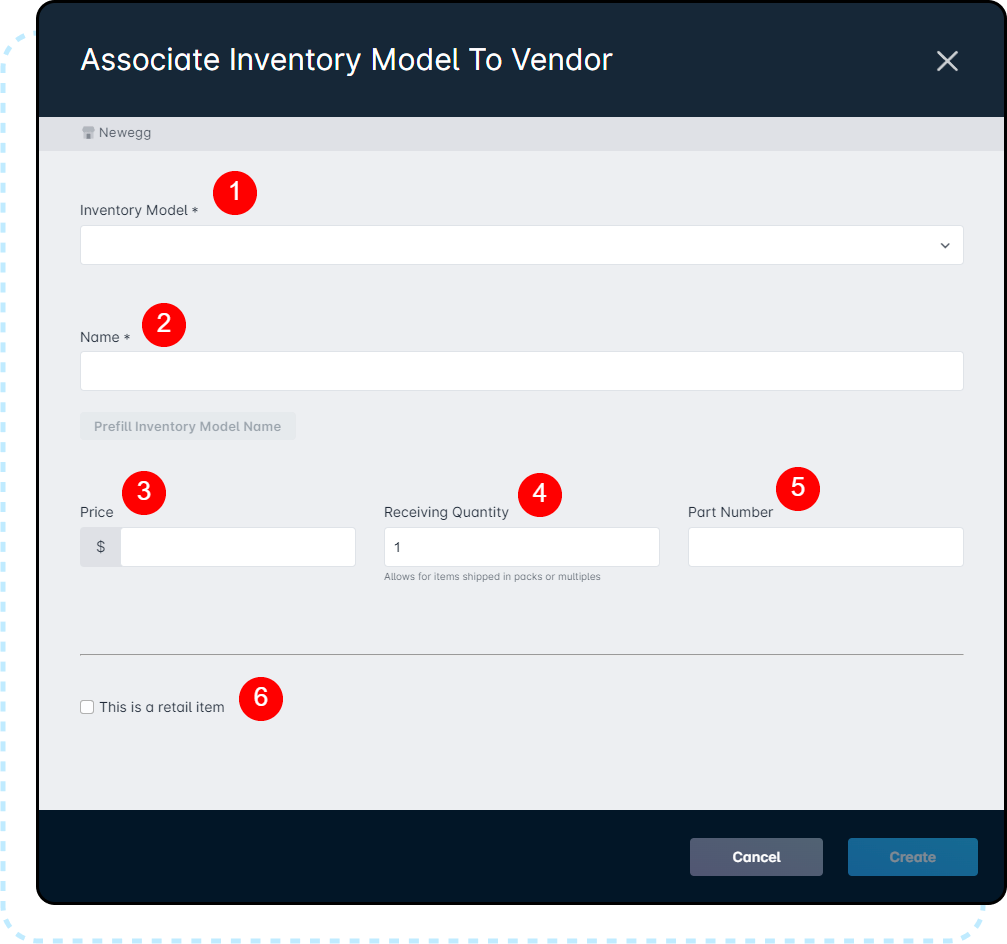
This will open the “Associate Inventory Model To Vendor” modal, where you'll be prompted to provide information in a series of fields:
The Inventory Model dropdown allows you to select an inventory model to associate with the vendor based on the models that have been added to your instance previously. For more information on adding new inventory models, refer to this article.
The Name field allows you to modify the name of the inventory model for purchase orders. This will not affect the name of the inventory model in your instance's inventory management interface.
The Price field allows you to set the default per-unit pricing of the inventory model with this vendor.
The price can be overridden during PO creation, if the vendor has a sale, for example.
The Receiving Quantity field allows you to set the number of individual items received per order. For example, if the model is sold in a two-pack, the receiving quantity would be set to “2”. This facilitates inventory reconciliation when a purchase order is made.
The Part Number allows you to add an identification number directly from the vendor to simplify the PO process when the vendor receives the order.
The “This is a retail item” check box will open a new dropdown and allow you to associate the inventory model with a specific one-time service in your instance.In the future, functionality will be available to allow items to be billed to customer accounts using the selected service.
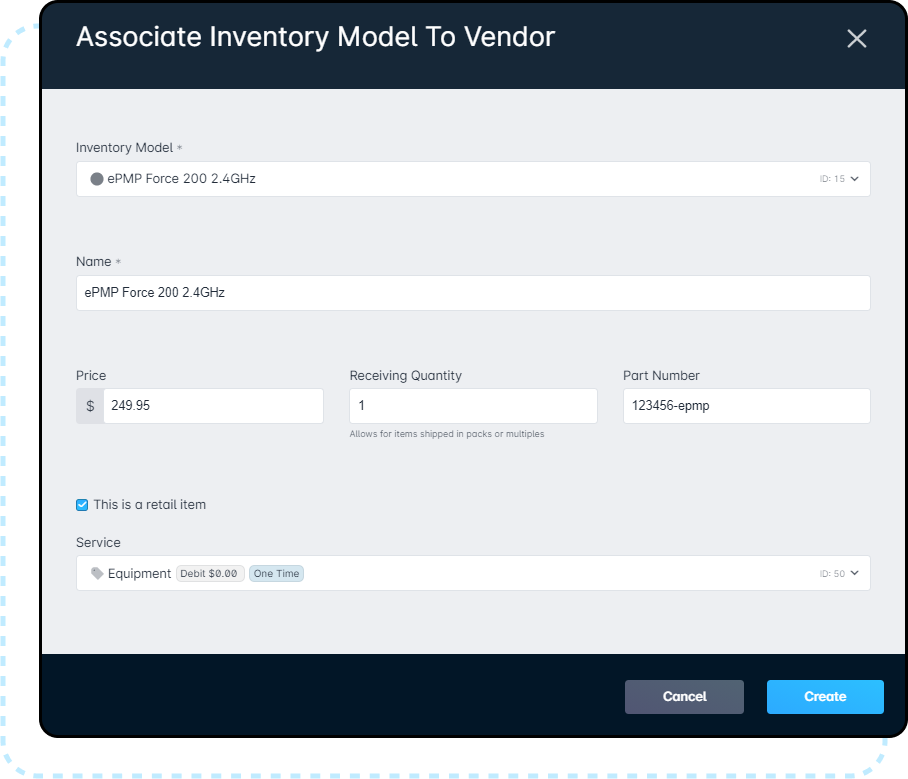
A completed Inventory Model association might look like this:
Managing Associated Inventory
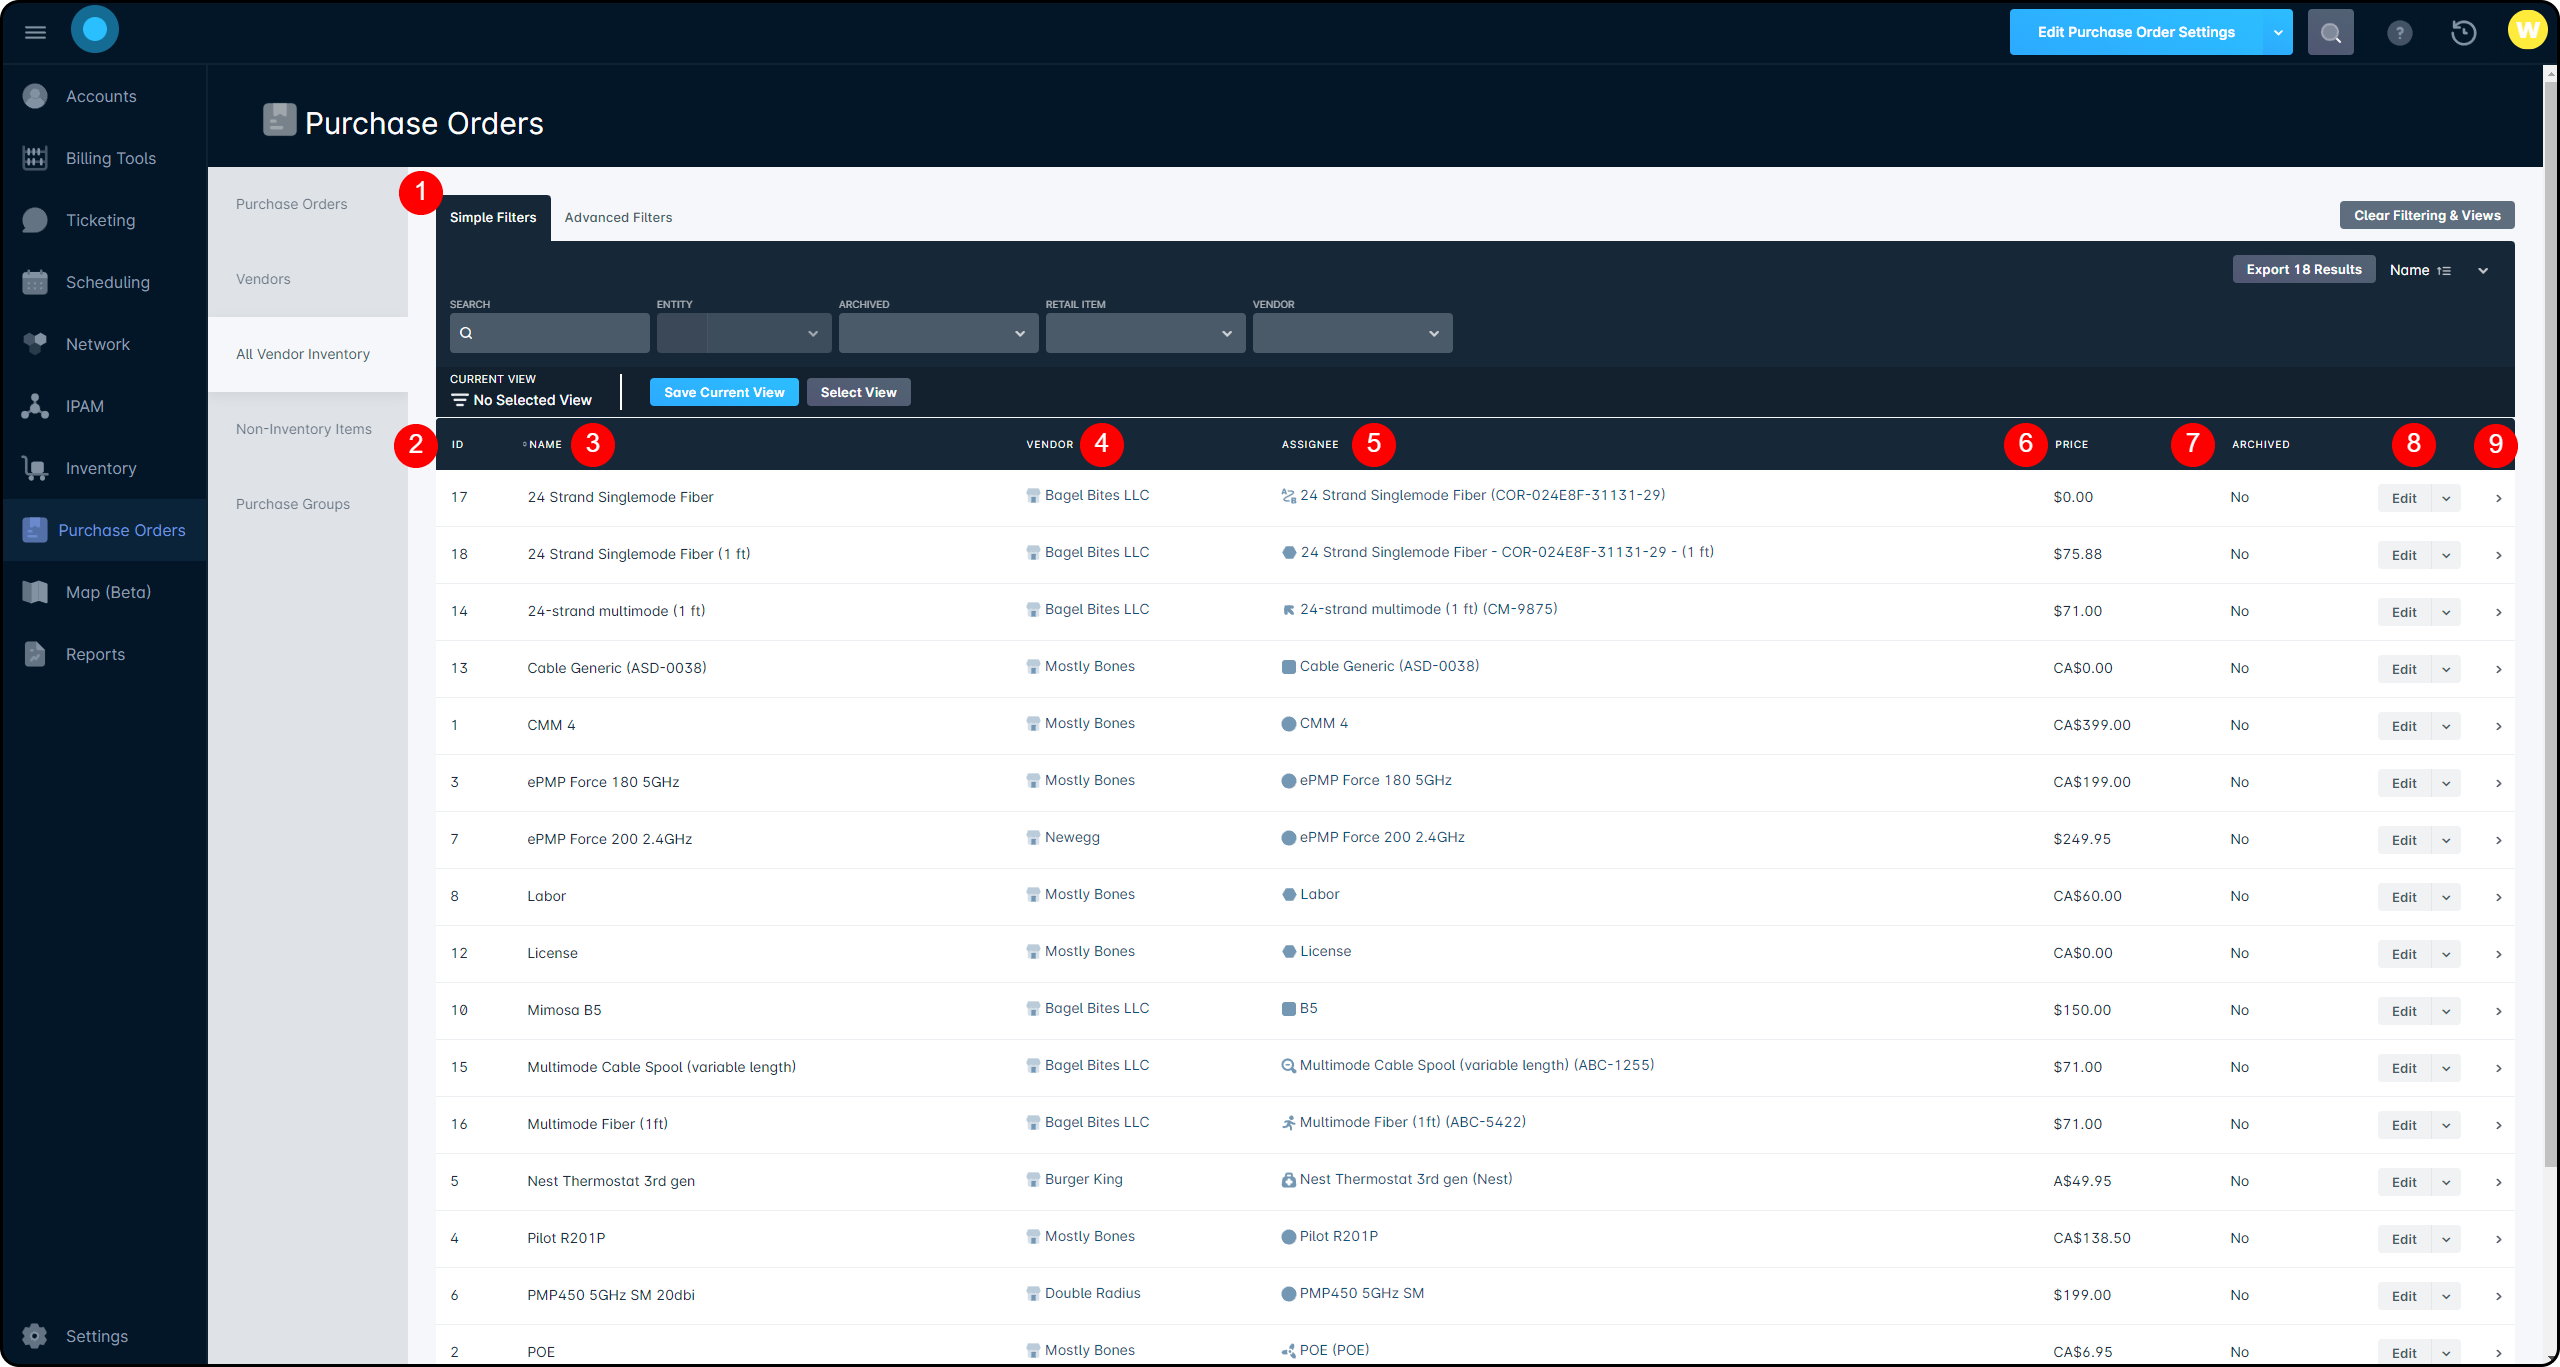
Once inventory models are associated with vendors in the purchase order module, you're able to manage them in two ways. The first is through the vendor management page, which was detailed in the previous section of this article. The other is through the “All Vendor Inventory” tab, accessible from the main Purchase Order page:
The Simple/Advanced toggle allows you to switch between the simple filtering, which is pictured, or the advanced filtering. You can read more about the difference here.
The ID column allows you to view or sort by the ID of the associated inventory model, based on what order the models were added to vendors.
The Name column will show the name of the item as it was added to a vendor, regardless of its name in your inventory module.
The Vendor column displays the vendor from your purchase order module that each inventory model is associated with.
The Assignee column shows which inventory model you've linked the vendor model to within your inventory module.
The Price column shows the price of the item as it was set when associated with the vendor.
The Archived column displays whether the item is still active and can be ordered.
The Edit button allows you to modify the details of the associated model and expanding the dropdown allows you to archive or delete the item.
Opening the sidebar using the arrow in this column allows you to review the item details and see any activity surrounding the associated inventory.
Adding and Managing Non-Inventory items
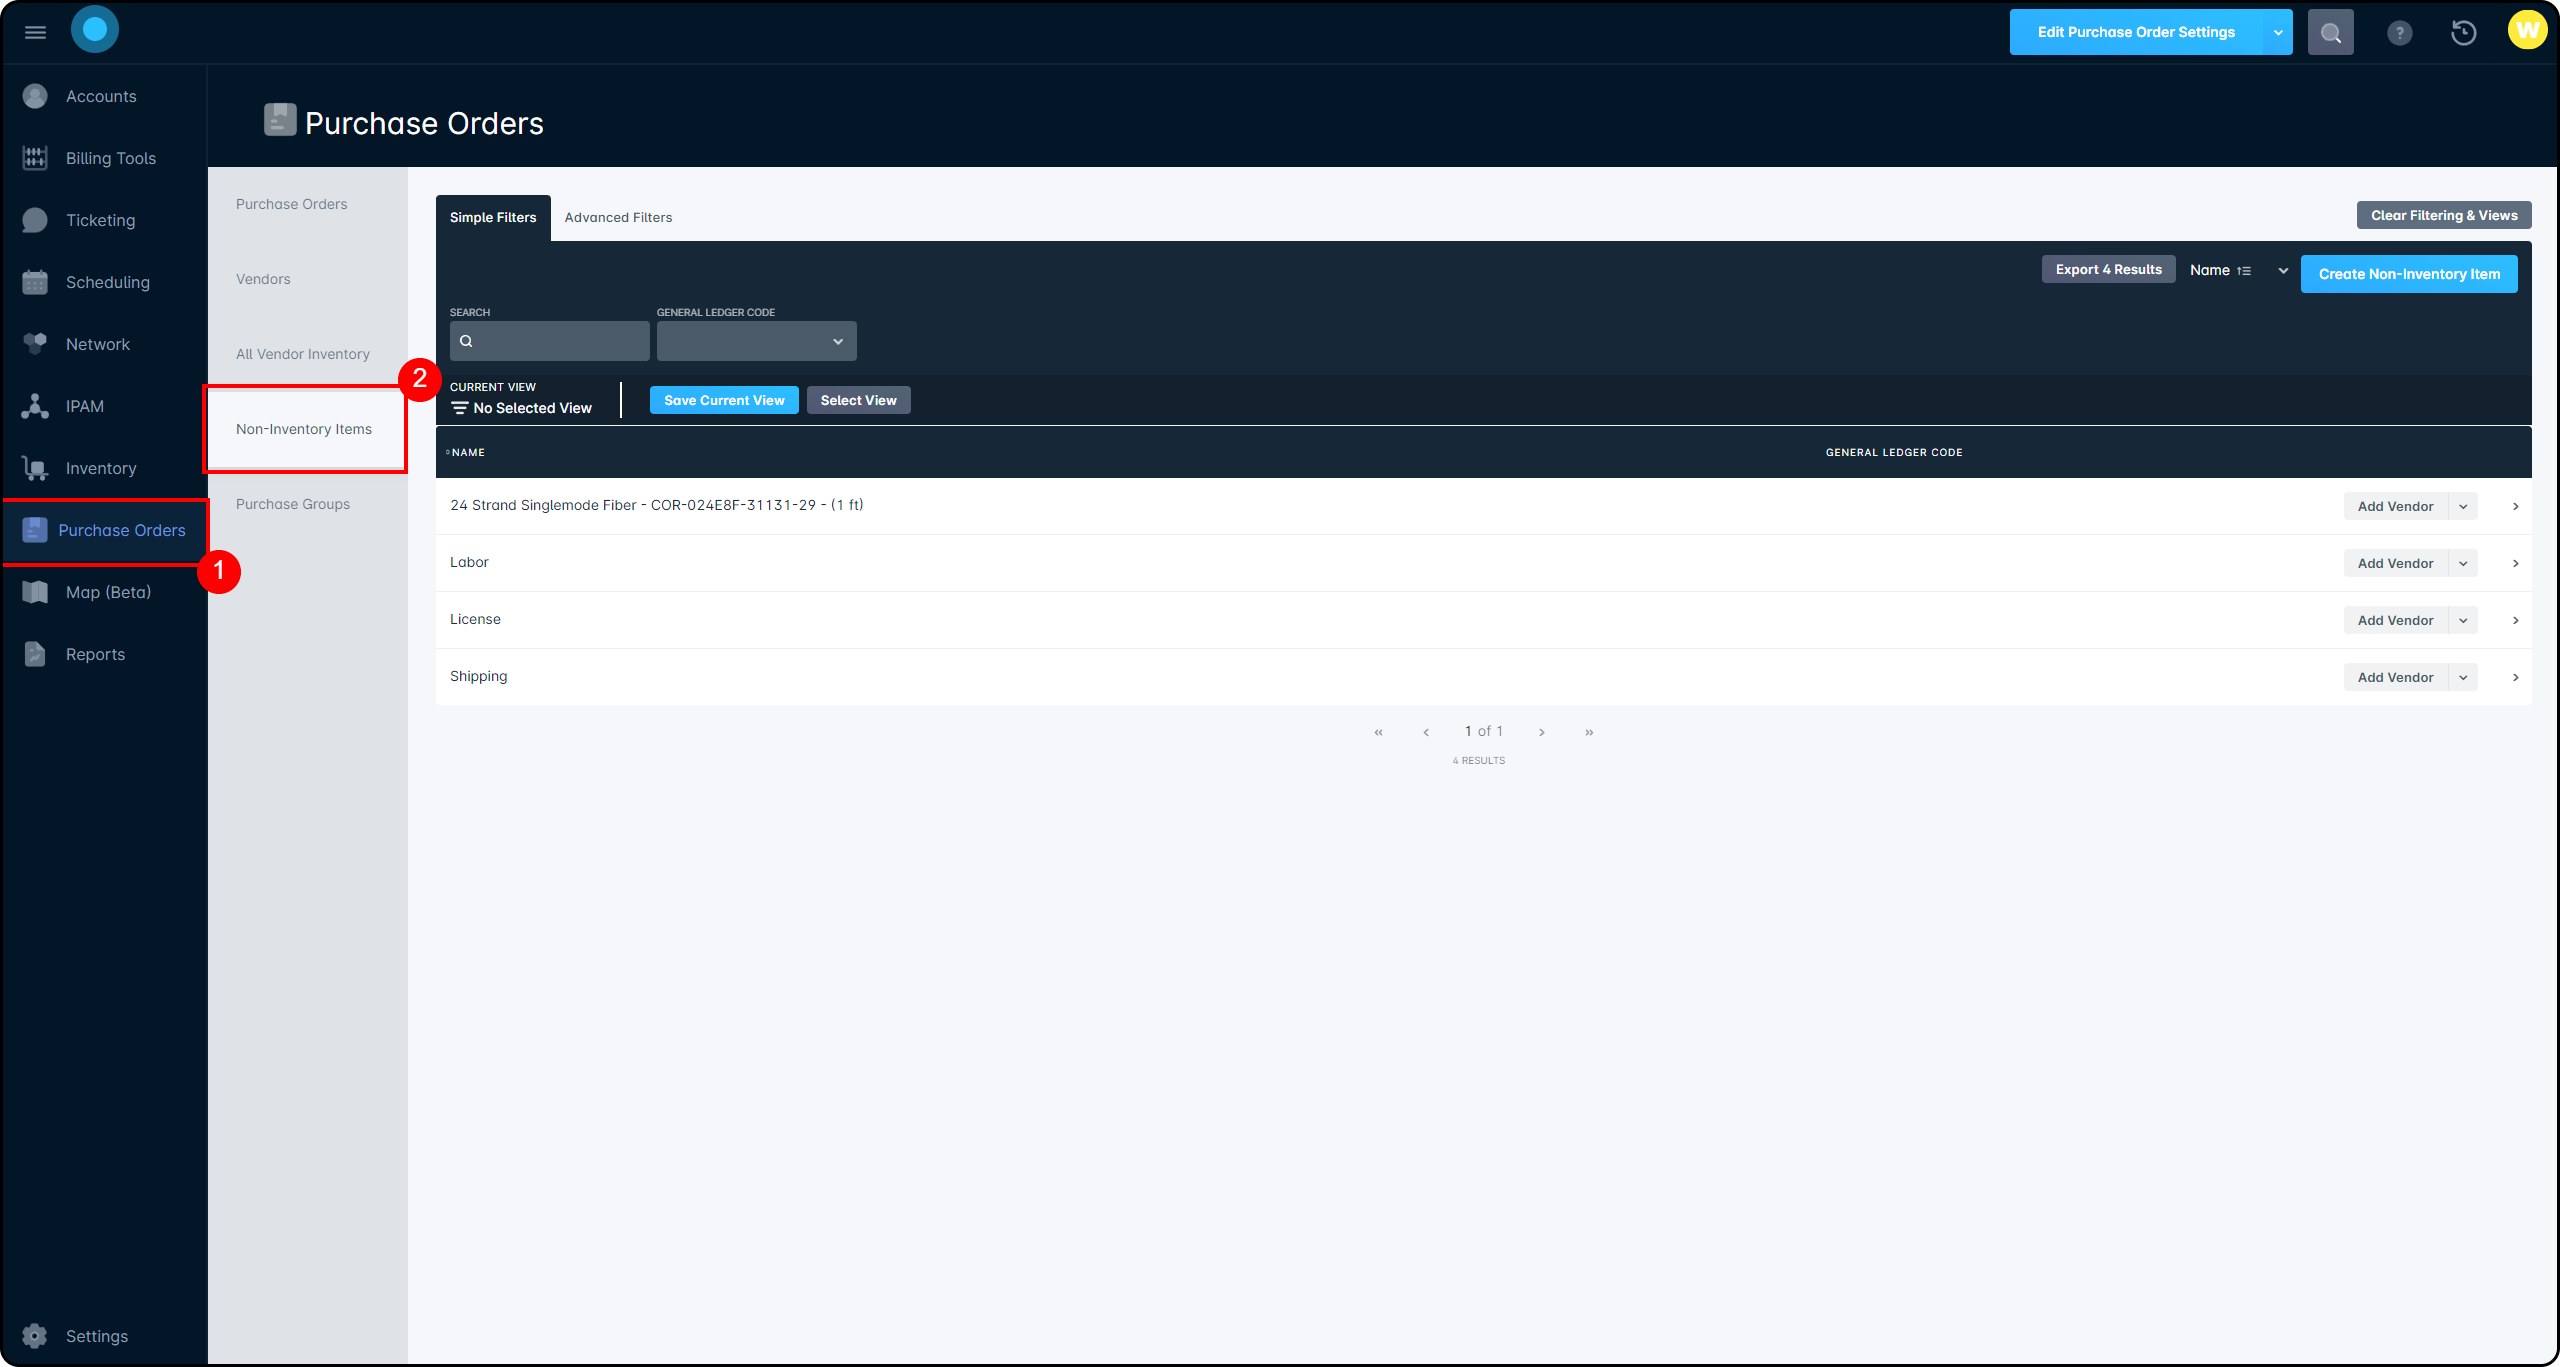
An additional feature that the Purchase Order module allows you to manage is the use of Non-Inventory Items. This section of the module allows you to add chargeable line items that represent something immaterial, like shipping or freight fees. You can access this panel through Purchase Orders → Non-Inventory Items
From this page, you can create a new Non-Inventory Item, or associate an existing one with your vendor(s). Clicking the “Create Non-Inventory Item” button will open the creation modal:
Providing a name for your Non-Inventory item is mandatory, and serves to identify the item in the UI and on the Purchase Order.
You can optionally add a General Ledger Code, which allows your instance to more accurately report on this item and purchase.
Unlike Vendor Items, which have their GL code defined at the Inventory Category level, Non-Inventory items need a GL Code assigned manually for accurate reporting.
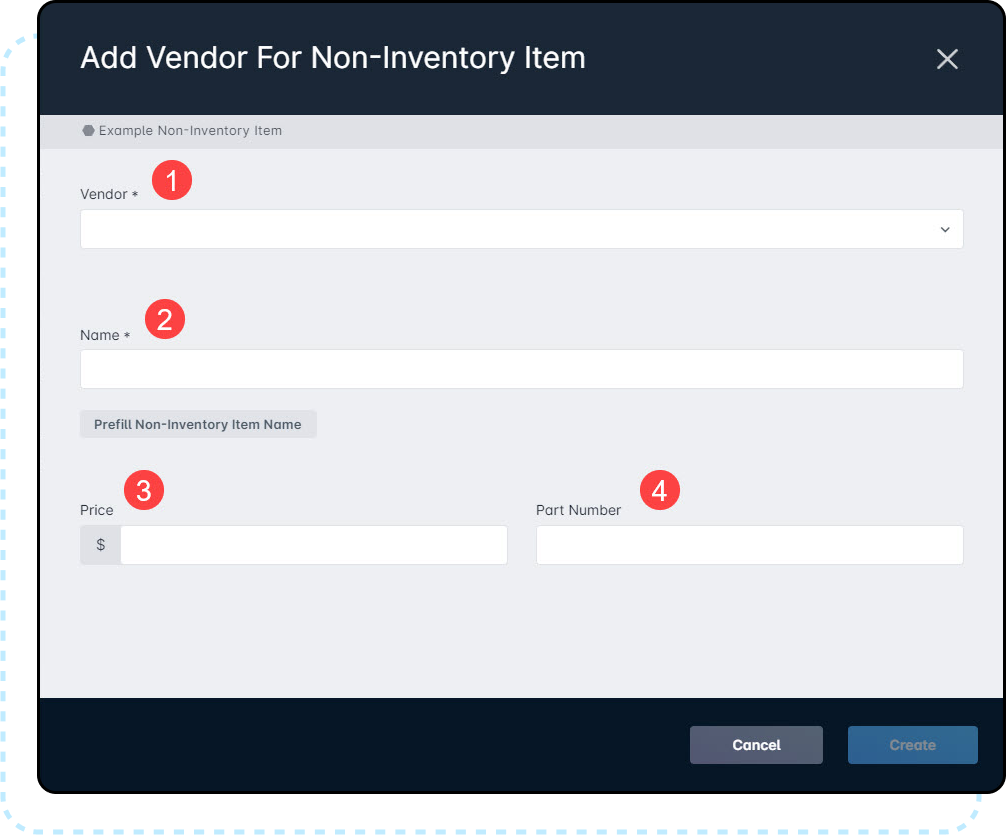
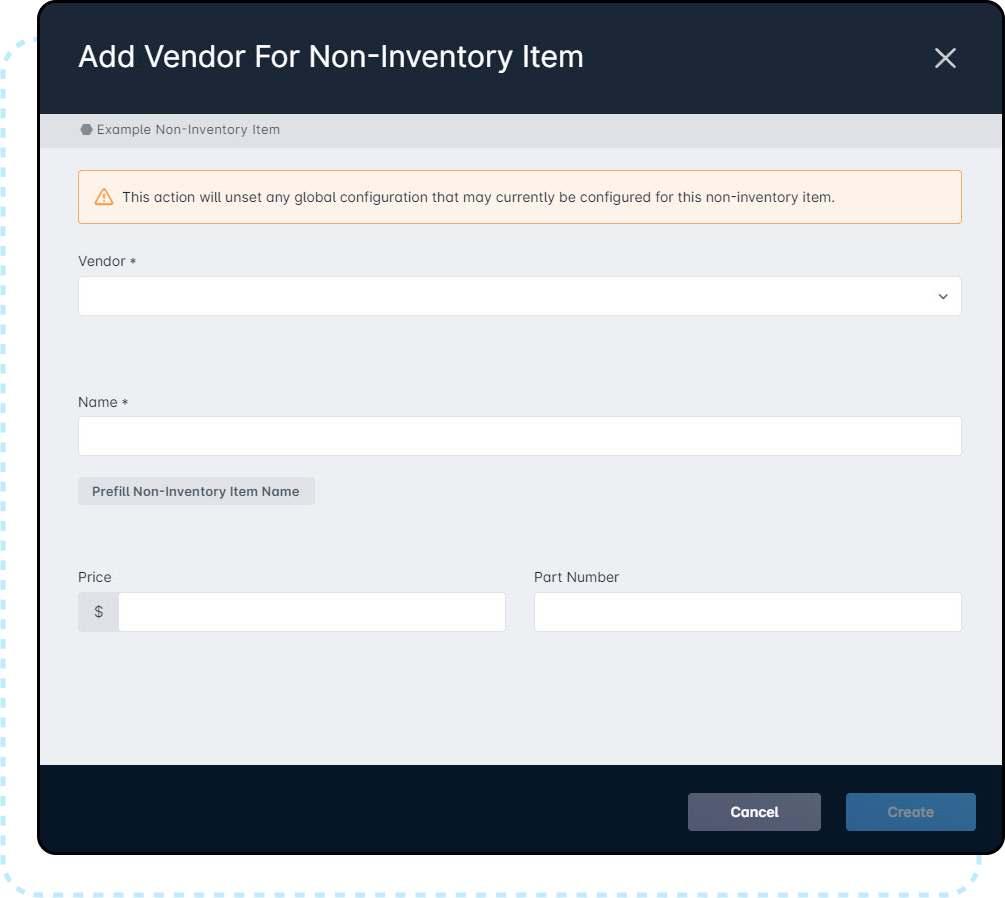
Associating a Non-Inventory item is fairly straightforward – by clicking on the “Assign” button inline with any of the items, the vendor assignment modal will open:
The Vendor selector is where you pick which of your created vendors this item will be associated with. The same non-inventory item can be associated with multiple vendors, but only one can be added per modal.
The Name field allows you to modify the name of the Non-Inventory item when applied to a vendor.
Changing the name here won't change the name of the item in the Non-Inventory Items section, it will only apply to the specific vendor.
The Price field allows you to set a default price for the non-inventory item. This can be modified when the item is added to a Purchase Order.
The Part Number allows you to differentiate between similarly named items from a vendor, and can optionally be applied to Non-Inventory items.
Once associated, non-inventory items can be viewed on the vendor page.
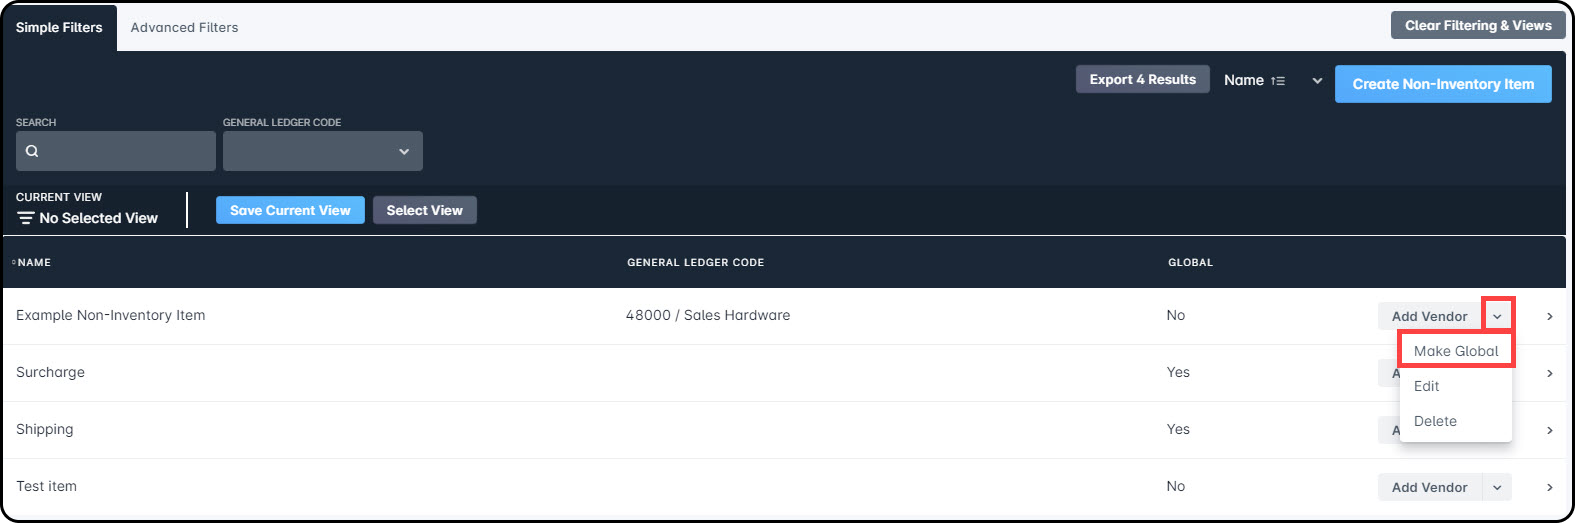
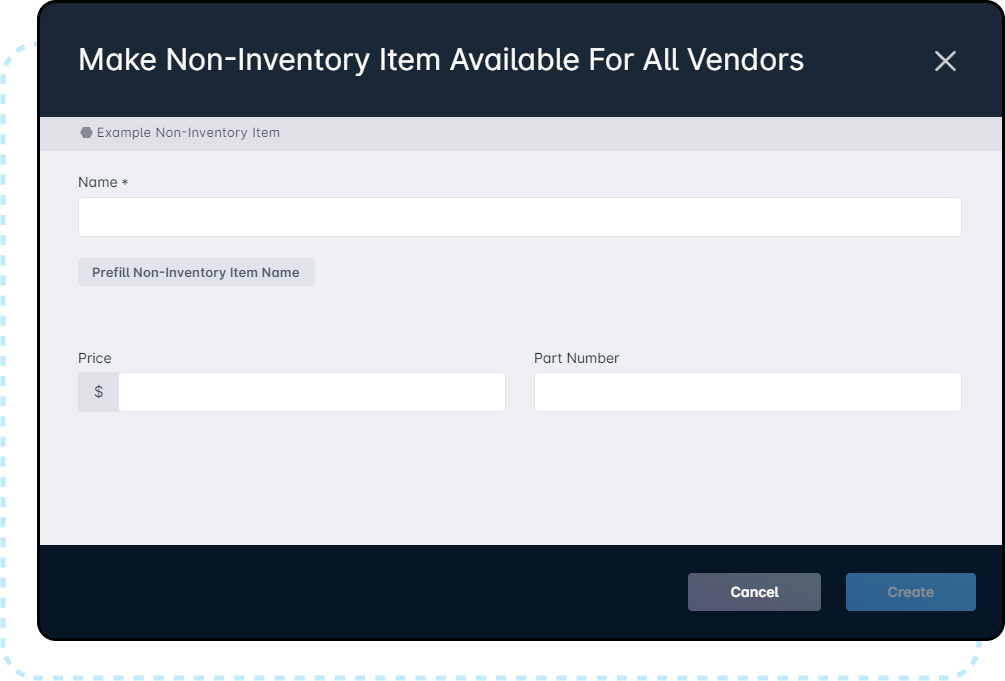
Making Non-Inventory Items global
Another option for non-inventory items is to make them Global – this option will associate the item with every vendor added to your instance. This option is available from the “Assign” sub-menu, pictured here.
This opens a modal that's nearly identical to the normal assignment modal. However, the Vendor selector will not be present.
Attempting to assign a Global NVI to a single vendor will remove the item as globally available, with a warning message displayed to confirm this.
Creating a Purchase Order
Before proceeding, it is worth noting that Purchase Orders cannot be deleted once they're created in your instance. Unhandled or unsubmitted POs will persist indefinitely.
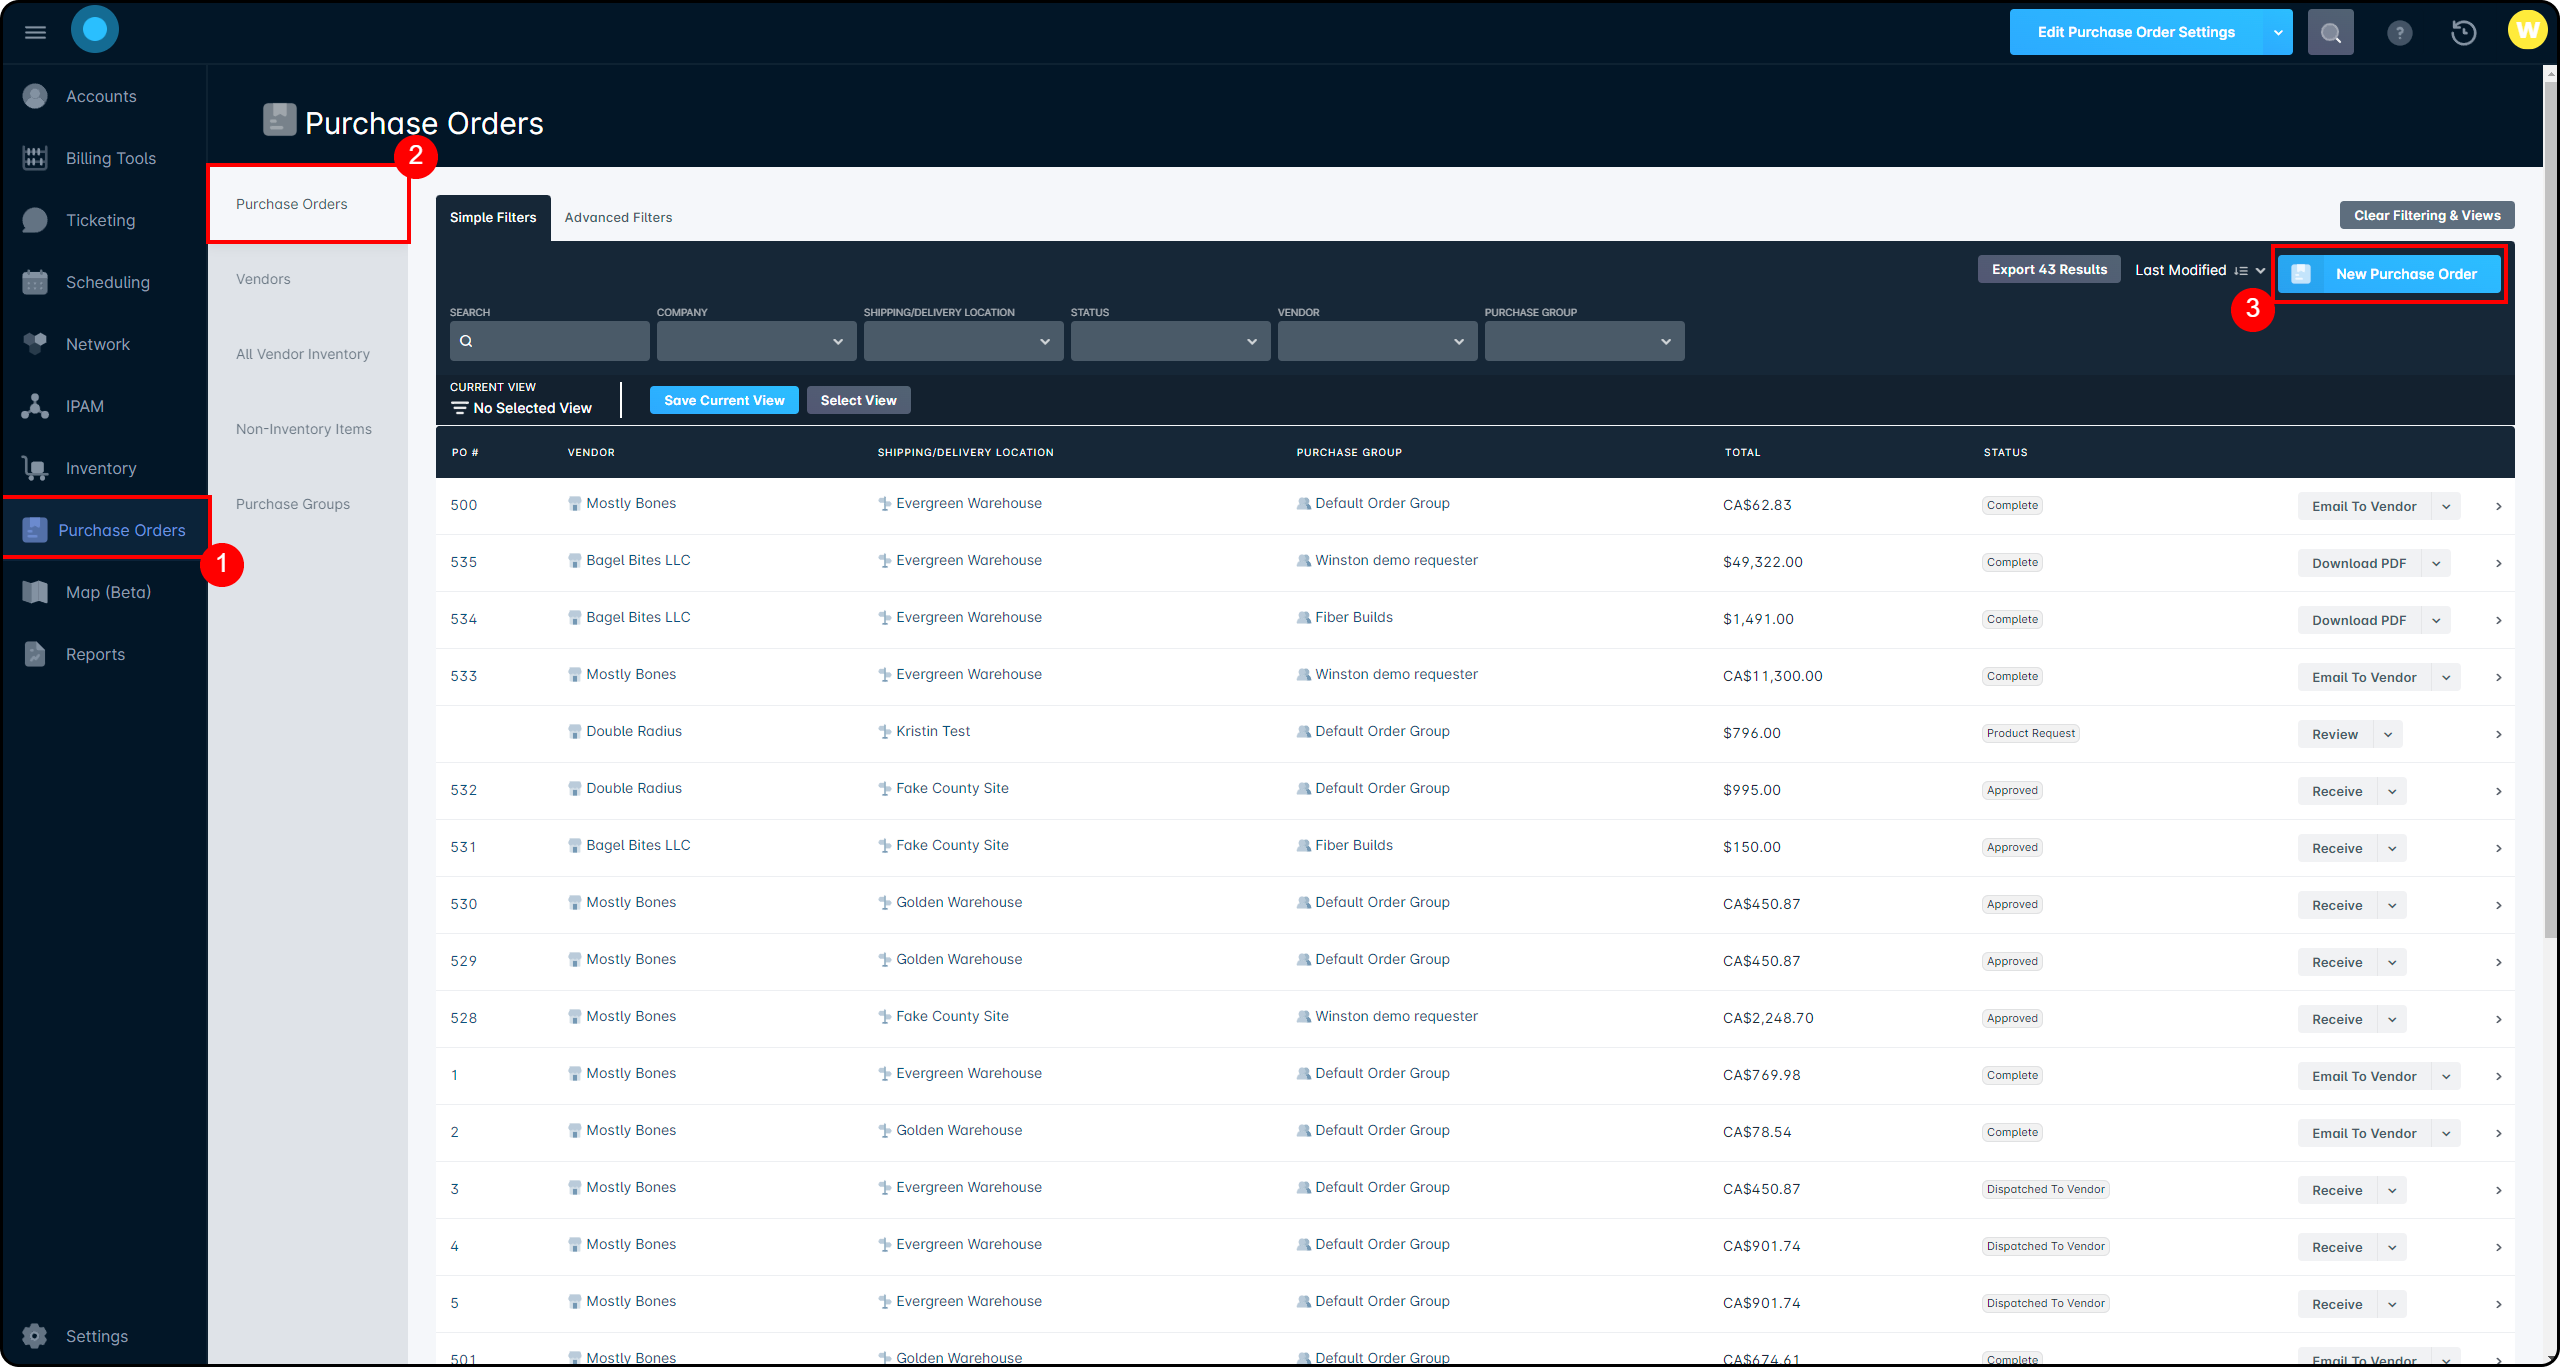
Creating a Purchase Order is a relatively straightforward process once the initial configuration is completed. From the “Purchase Orders” tab, click on the “New Purchase Order” button:
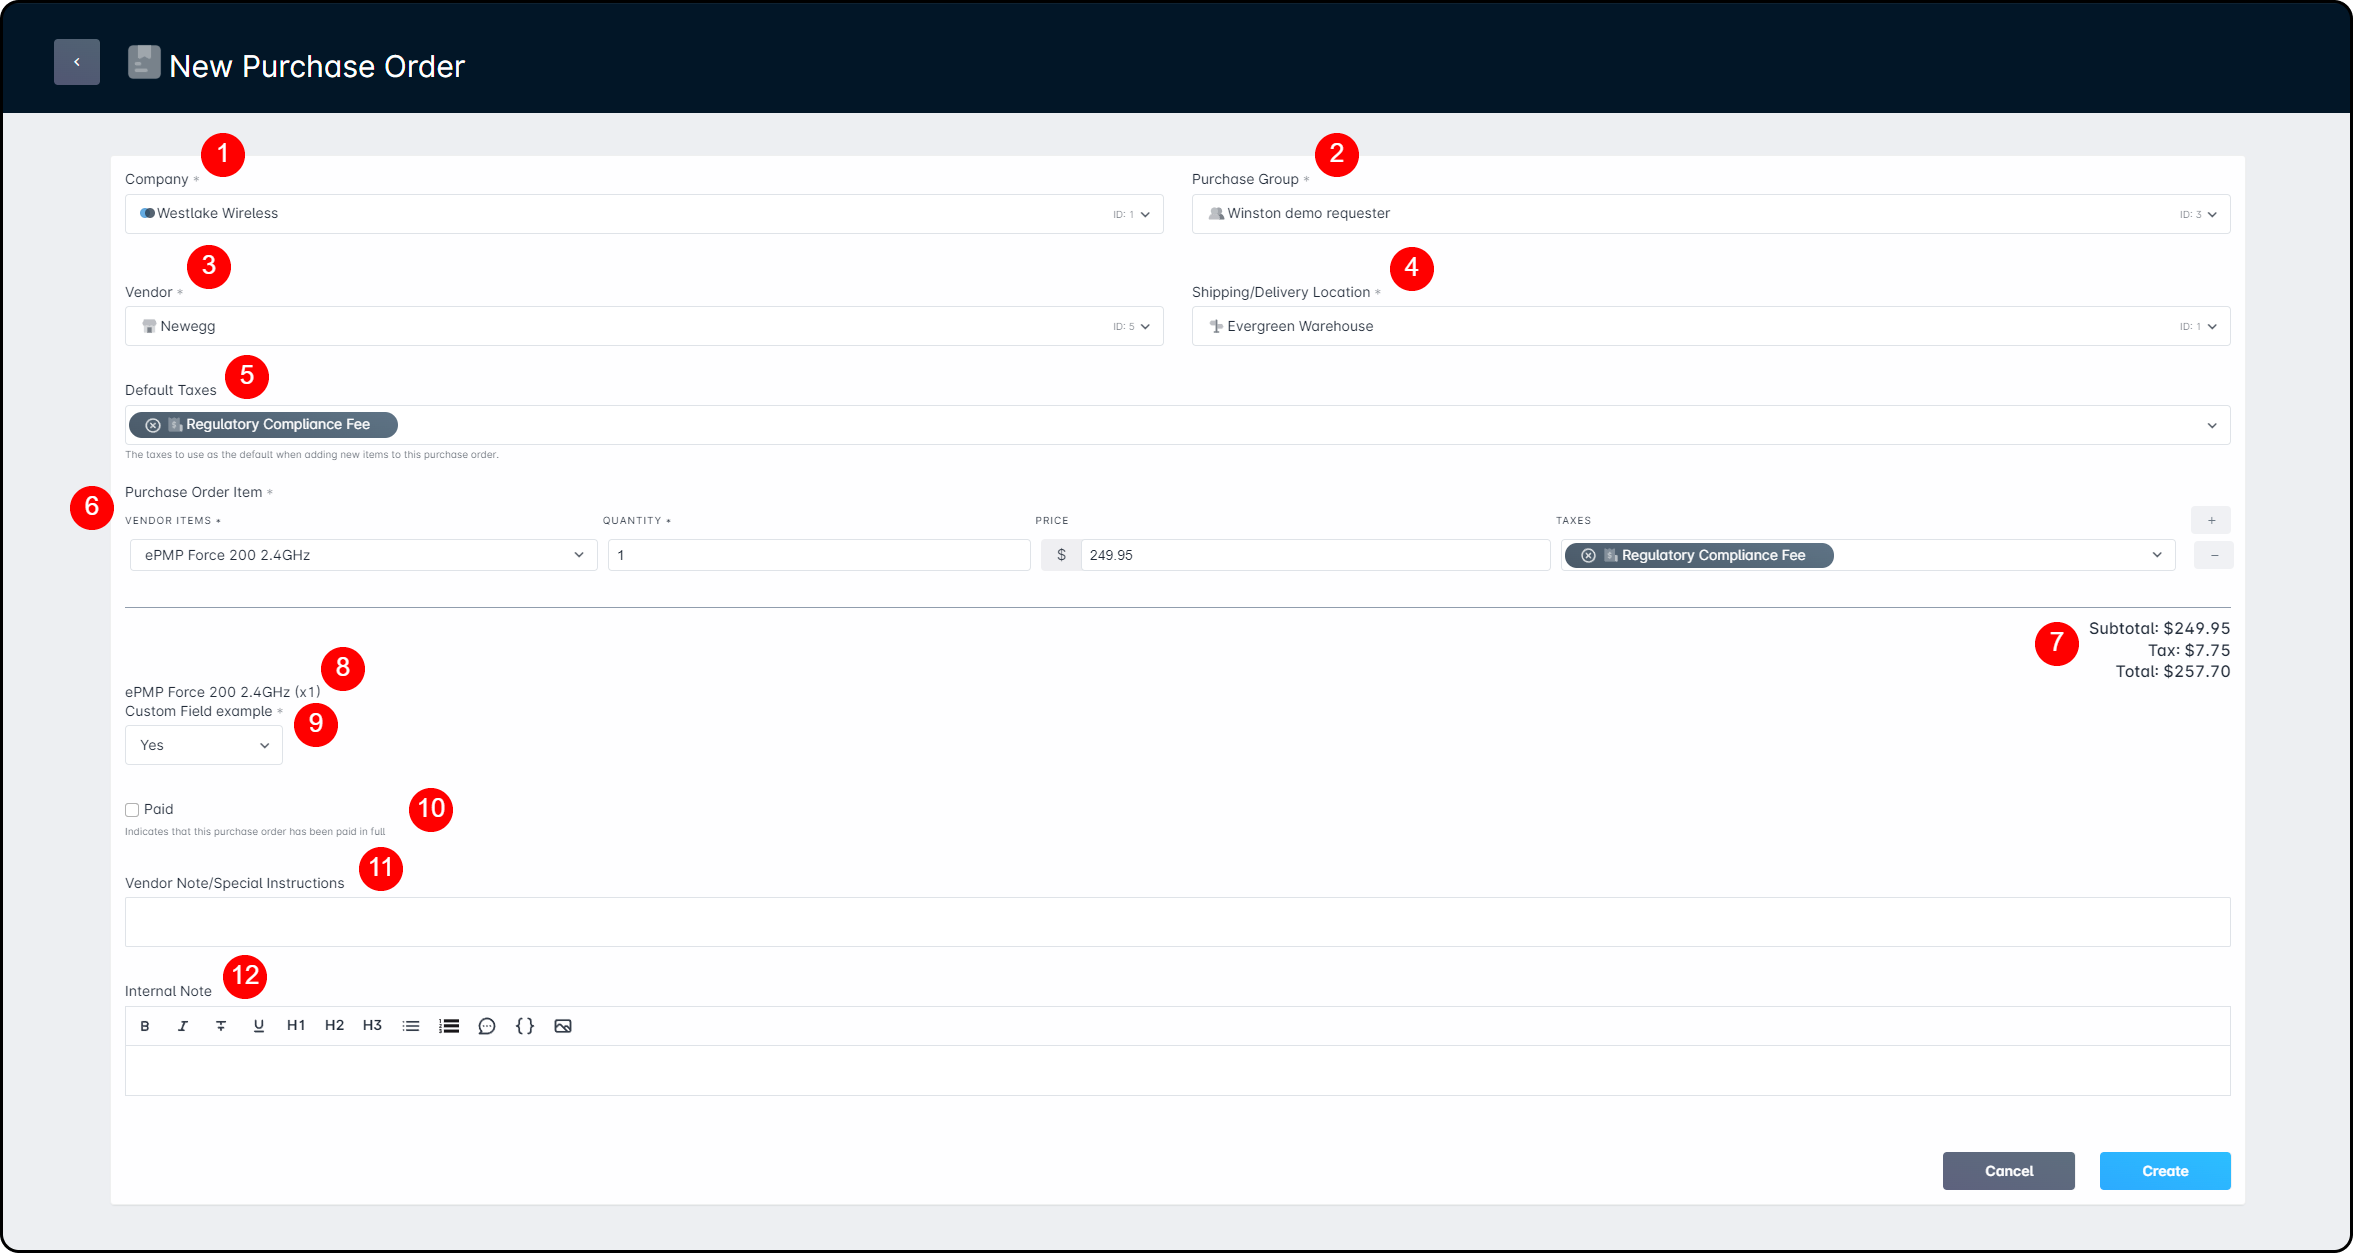
This will take you to the “New Purchase Order” page, where you'll begin filling out fields to submit a new PO:
The Company dropdown allows you to select which company the Purchase Order should be processed to, and the list will show every company in your instance.
The Purchase Group field allows you to specify which purchase group this order will pass through in the event you belong to multiple groups.
The Vendor dropdown will list the vendors you've added to your instance, and allow you to select from any of them. The selected vendor will influence the items that appear in #6.
The Shipping/Delivery Location dropdown will list all inventory locations in your instance, and will automatically set the shipping address to the address of the Inventory Location you've selected.
The Default Taxes field will allow you to select a tax in your instance that will be automatically applied to all items added into the Purchase Order. This field will autofill with the tax applied to the vendor during creation if one was selected.
The Purchase Order Item section is where you select the items and quantities you'll be placing an order for. To add a new item, you need to click the “+” on the right-hand side. By default, there are no item fields to select, so you need to click the “+” to start.
Configuring the Min/Max fields on your Inventory Models can help inform your Purchase Order Item selections. You can use the “Reorder Report” to determine which items you have low inventory of (at or below the configured “min” values), and use the stored “max” values to inform the quantity of items to be ordered.
Once an item is added, you can remove the row by clicking on the "-" button that appears. Rows can only be removed from last to first.
Reordering your items list
When you add multiple items to an order, you're able to change how they appear in the list by dragging each item around, as shown in this gif:
This shows the subtotal, taxes (based on the taxes that were set while creating the vendor), and the adjusted total amount. The total here is based only on the items you submitted, and will not adjust for any volume discounts or other discounts the vendor may have.
All items added to the purchase order will be displayed here for review, including the quantity being ordered, along with their custom fields. If multiple items are ordered, each one will have its section.
Items will appear here even if no custom fields are defined in your instance settings.
The Custom Field section is where details get added to the custom fields you've defined for purchase orders. This is done through Settings → Misc. → Custom Fields and allows you to add additional details to an order.
Custom Fields aren't viewable on the purchase order received by the vendor, but can be viewed on the Purchase Order Management page.
The Paid checkbox allows you to edit the Purchase Order and mark it paid for reporting purposes. This is especially useful when payment terms on large orders can extend up to 90 days.
The VendorNotes/Special Instructions section allows you to add a note to your PO when it's sent to the vendor.
The Internal Comments field allows you to add details about the Purchase Order that only other internal users can see. This field uses Sonar's Rich Text Editor, which you can see more about in the linked article.
Internal comments are a great way to pass information from a requester to an approver, such as details around the quantity or specific item rationale.
Once the fields are all filled out, click on create, and the Purchase Order will be moved to the main list to be approved, or emailed to the vendor.
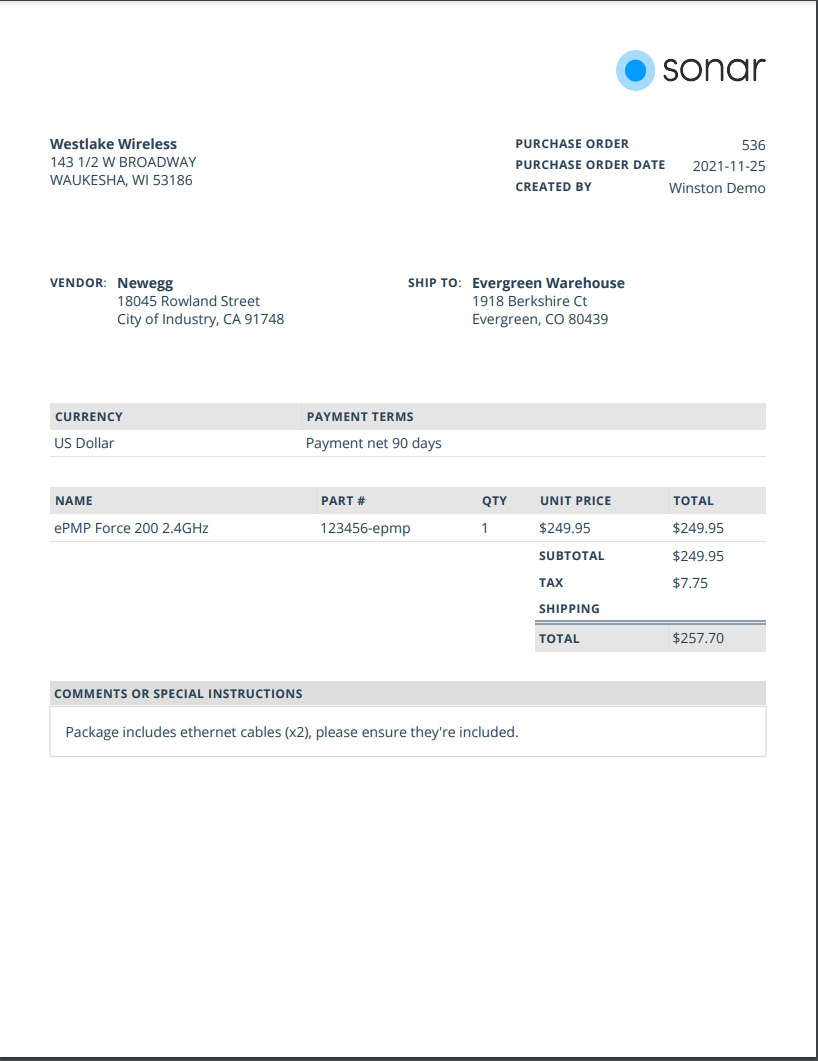
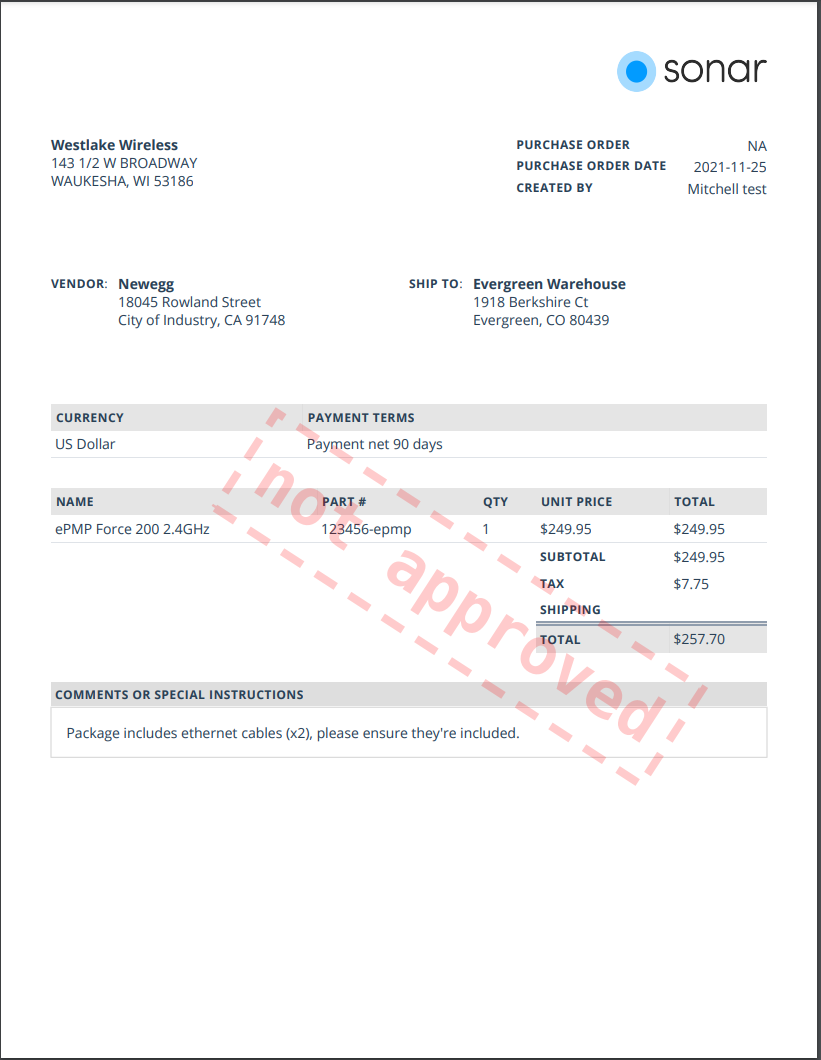
Purchase Order PDF Example
Purchase orders are emailed to vendors directly, however, you can download the purchase order to view a copy of what was sent. The PO sent to the vendor looks like this: You can also download POs that aren't approved, and those will have a unique stamp indicating their status: You'll note that the "Not Approved" Purchase Order doesn't have a PO#. Those are only generated once the PO is approved and ready to send to the vendor.
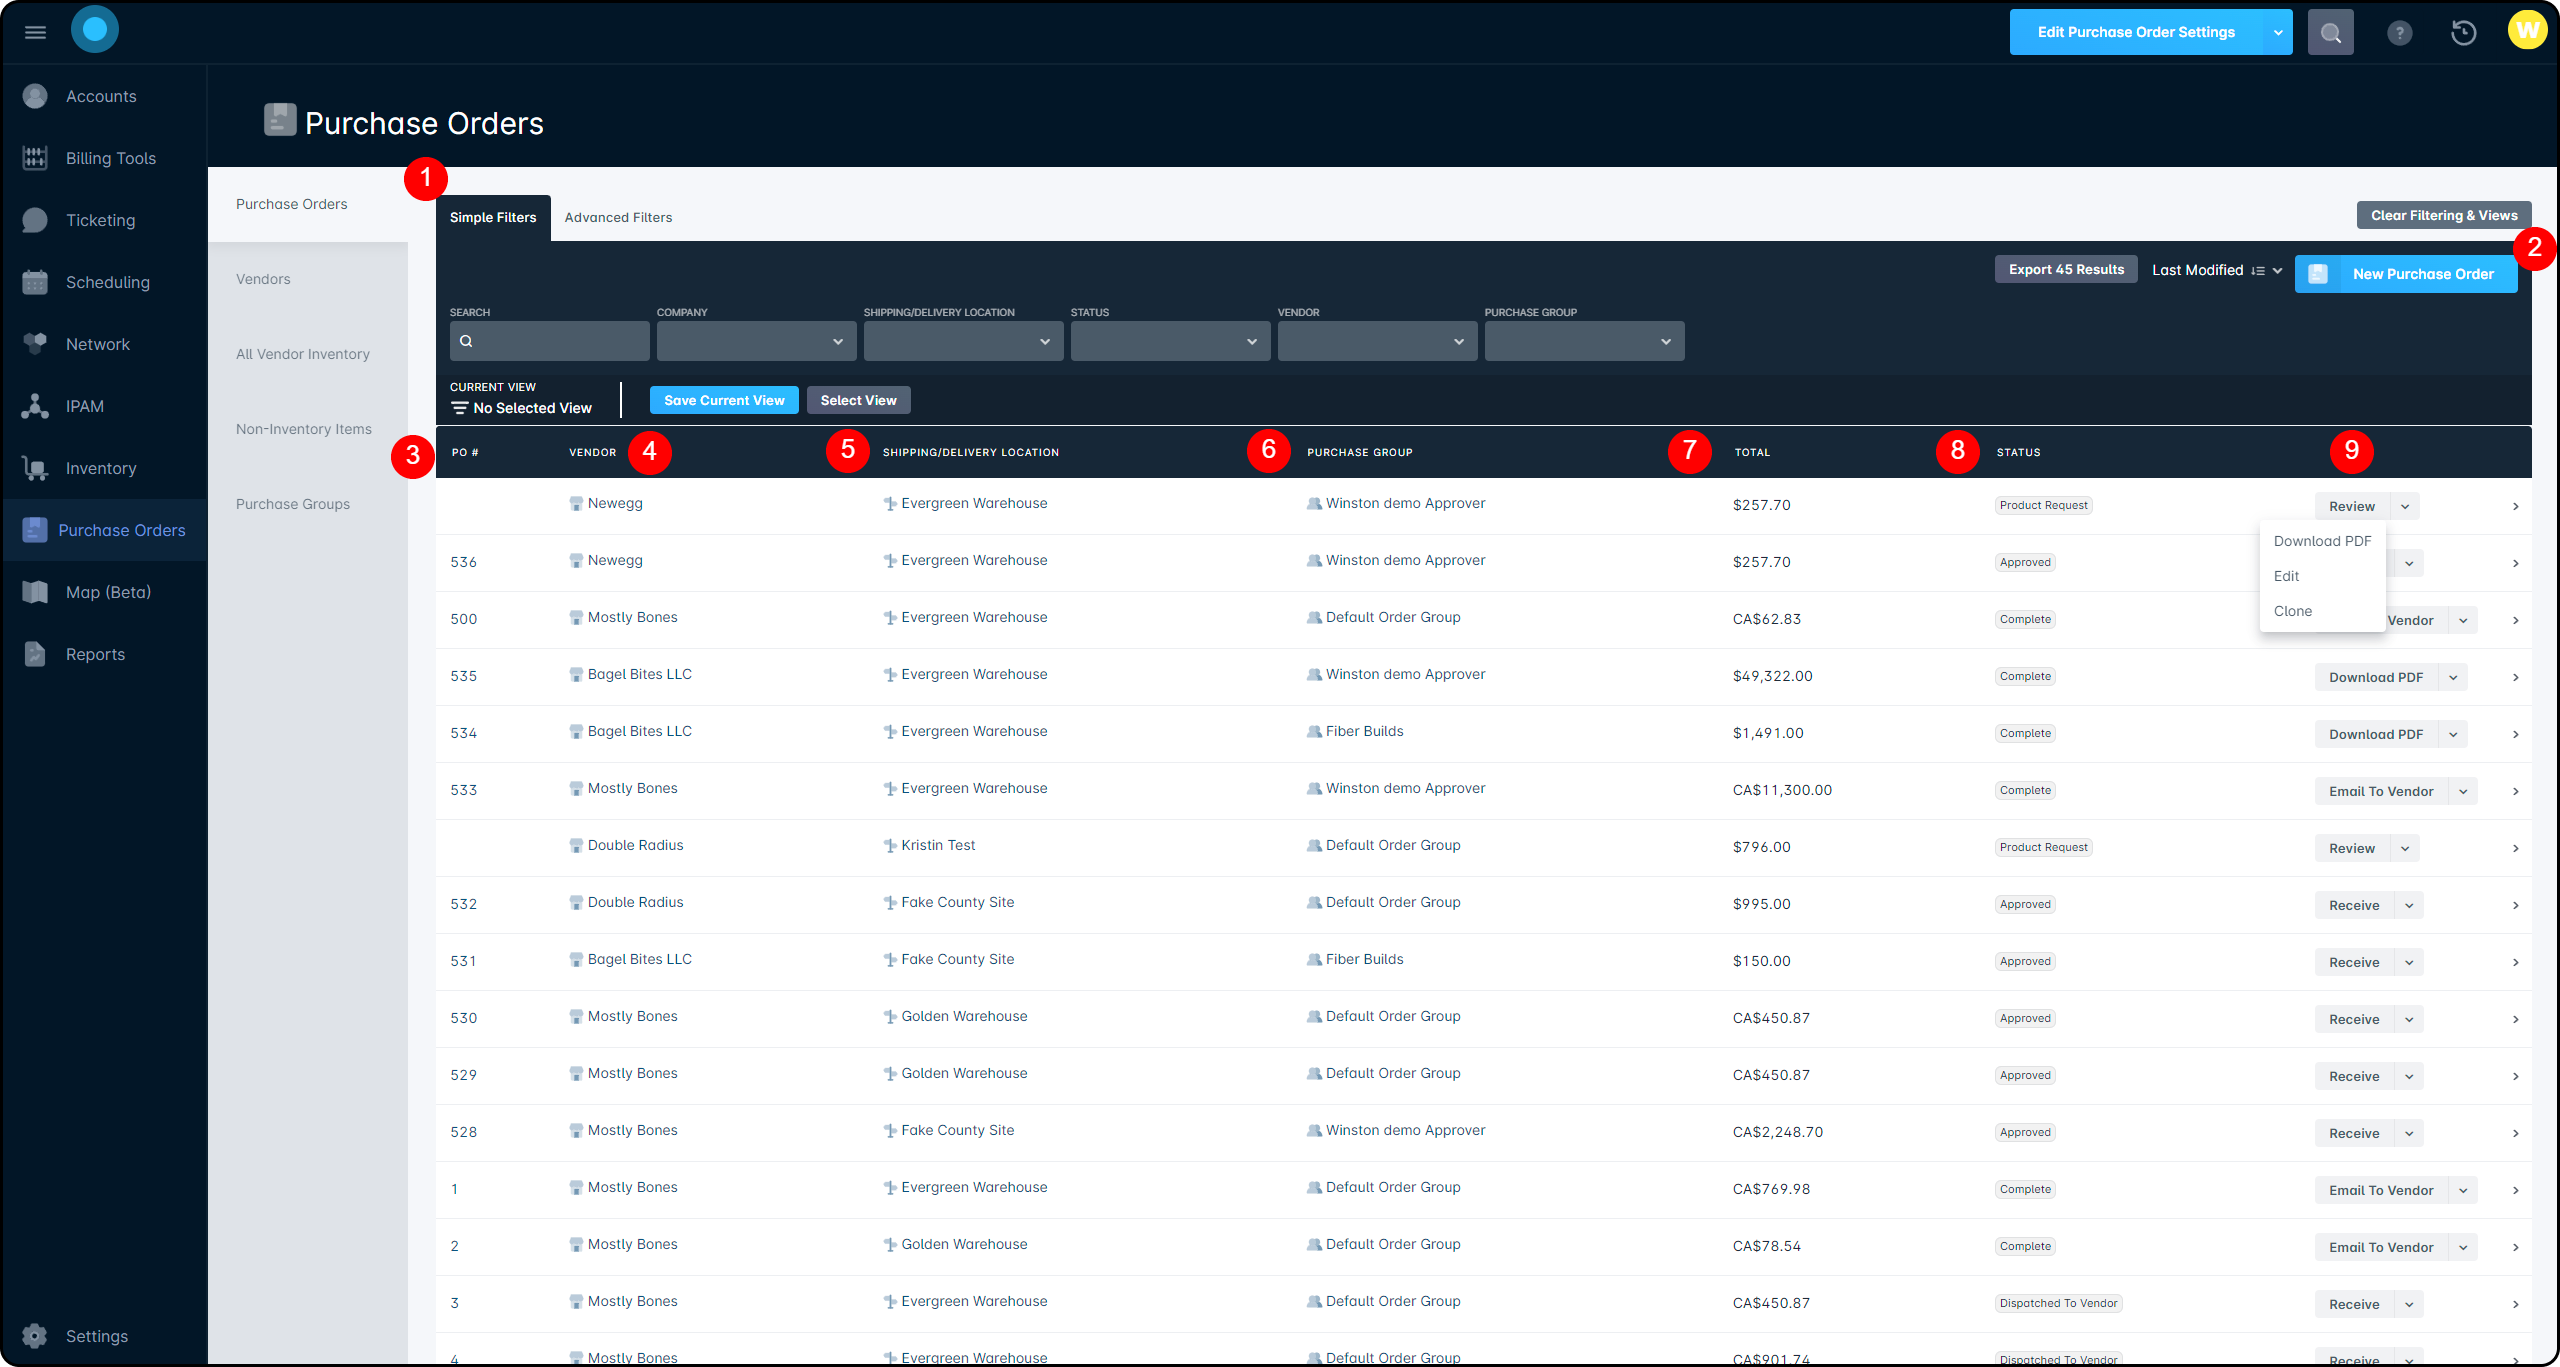
Purchase Orders Tab Overview
The Simple/Advanced toggle allows you to switch between the simple filtering, which is pictured, or the advanced filtering. You can read more about the difference here.
The New Purchase Order button will take you to the Purchase Order creation page, shown in the previous section. You can also access this function through the dropdown next to the “Edit Purchase Order Settings” button.
The PO# column will show the Purchase Order number as shown on the PO itself. If the purchase order has been submitted but not approved, the PO# will be blank.
The Vendor column will display the vendor each PO has been submitted to.
The Shipping/Delivery Location column will display the Inventory Location selected during PO creation. Clicking on the location name will open a sidebar, providing further information on the inventory location.
The Purchase Group column will display the Purchase group the requester belongs to. Detailed information on requester and approver is available from the Purchase Order Management page.
The Total column will list the total value of all items requested in the Purchase Order, based on the information entered into the “Price” and “Quantity” sections of the purchase order creation
The Status column displays the current PO status, and can be the following:
Approved, indicating a purchase order that was made and approved, but hasn't been dispatched to the vendor.
Canceled, indicating a PO that has been canceled in your instance.
Complete, indicating a PO where all items were received. Purchase Orders will never automatically move into the “Complete” status, and must be manually set.
Dispatched to Vendor, indicating a purchase order that was approved and emailed to the vendor.
Failed to dispatch, indicating a PO that was not successfully sent to the vendor.
Incomplete, indicating a PO that has partially received the ordered items.
Product Request, indicating a PO pending approval.
Receiving, indicating a PO that has received a shipment and has begun adding those items to inventory.
Rejected, indicating a PO that was cancelled by the vendor after dispatch.
The final column allows you to manage your requests. The displayed button will vary based on the status of the purchase order, however, expanding the dropdown next to the button will typically show the same options:
Email To Vendor
Download PDF
Edit
Clone
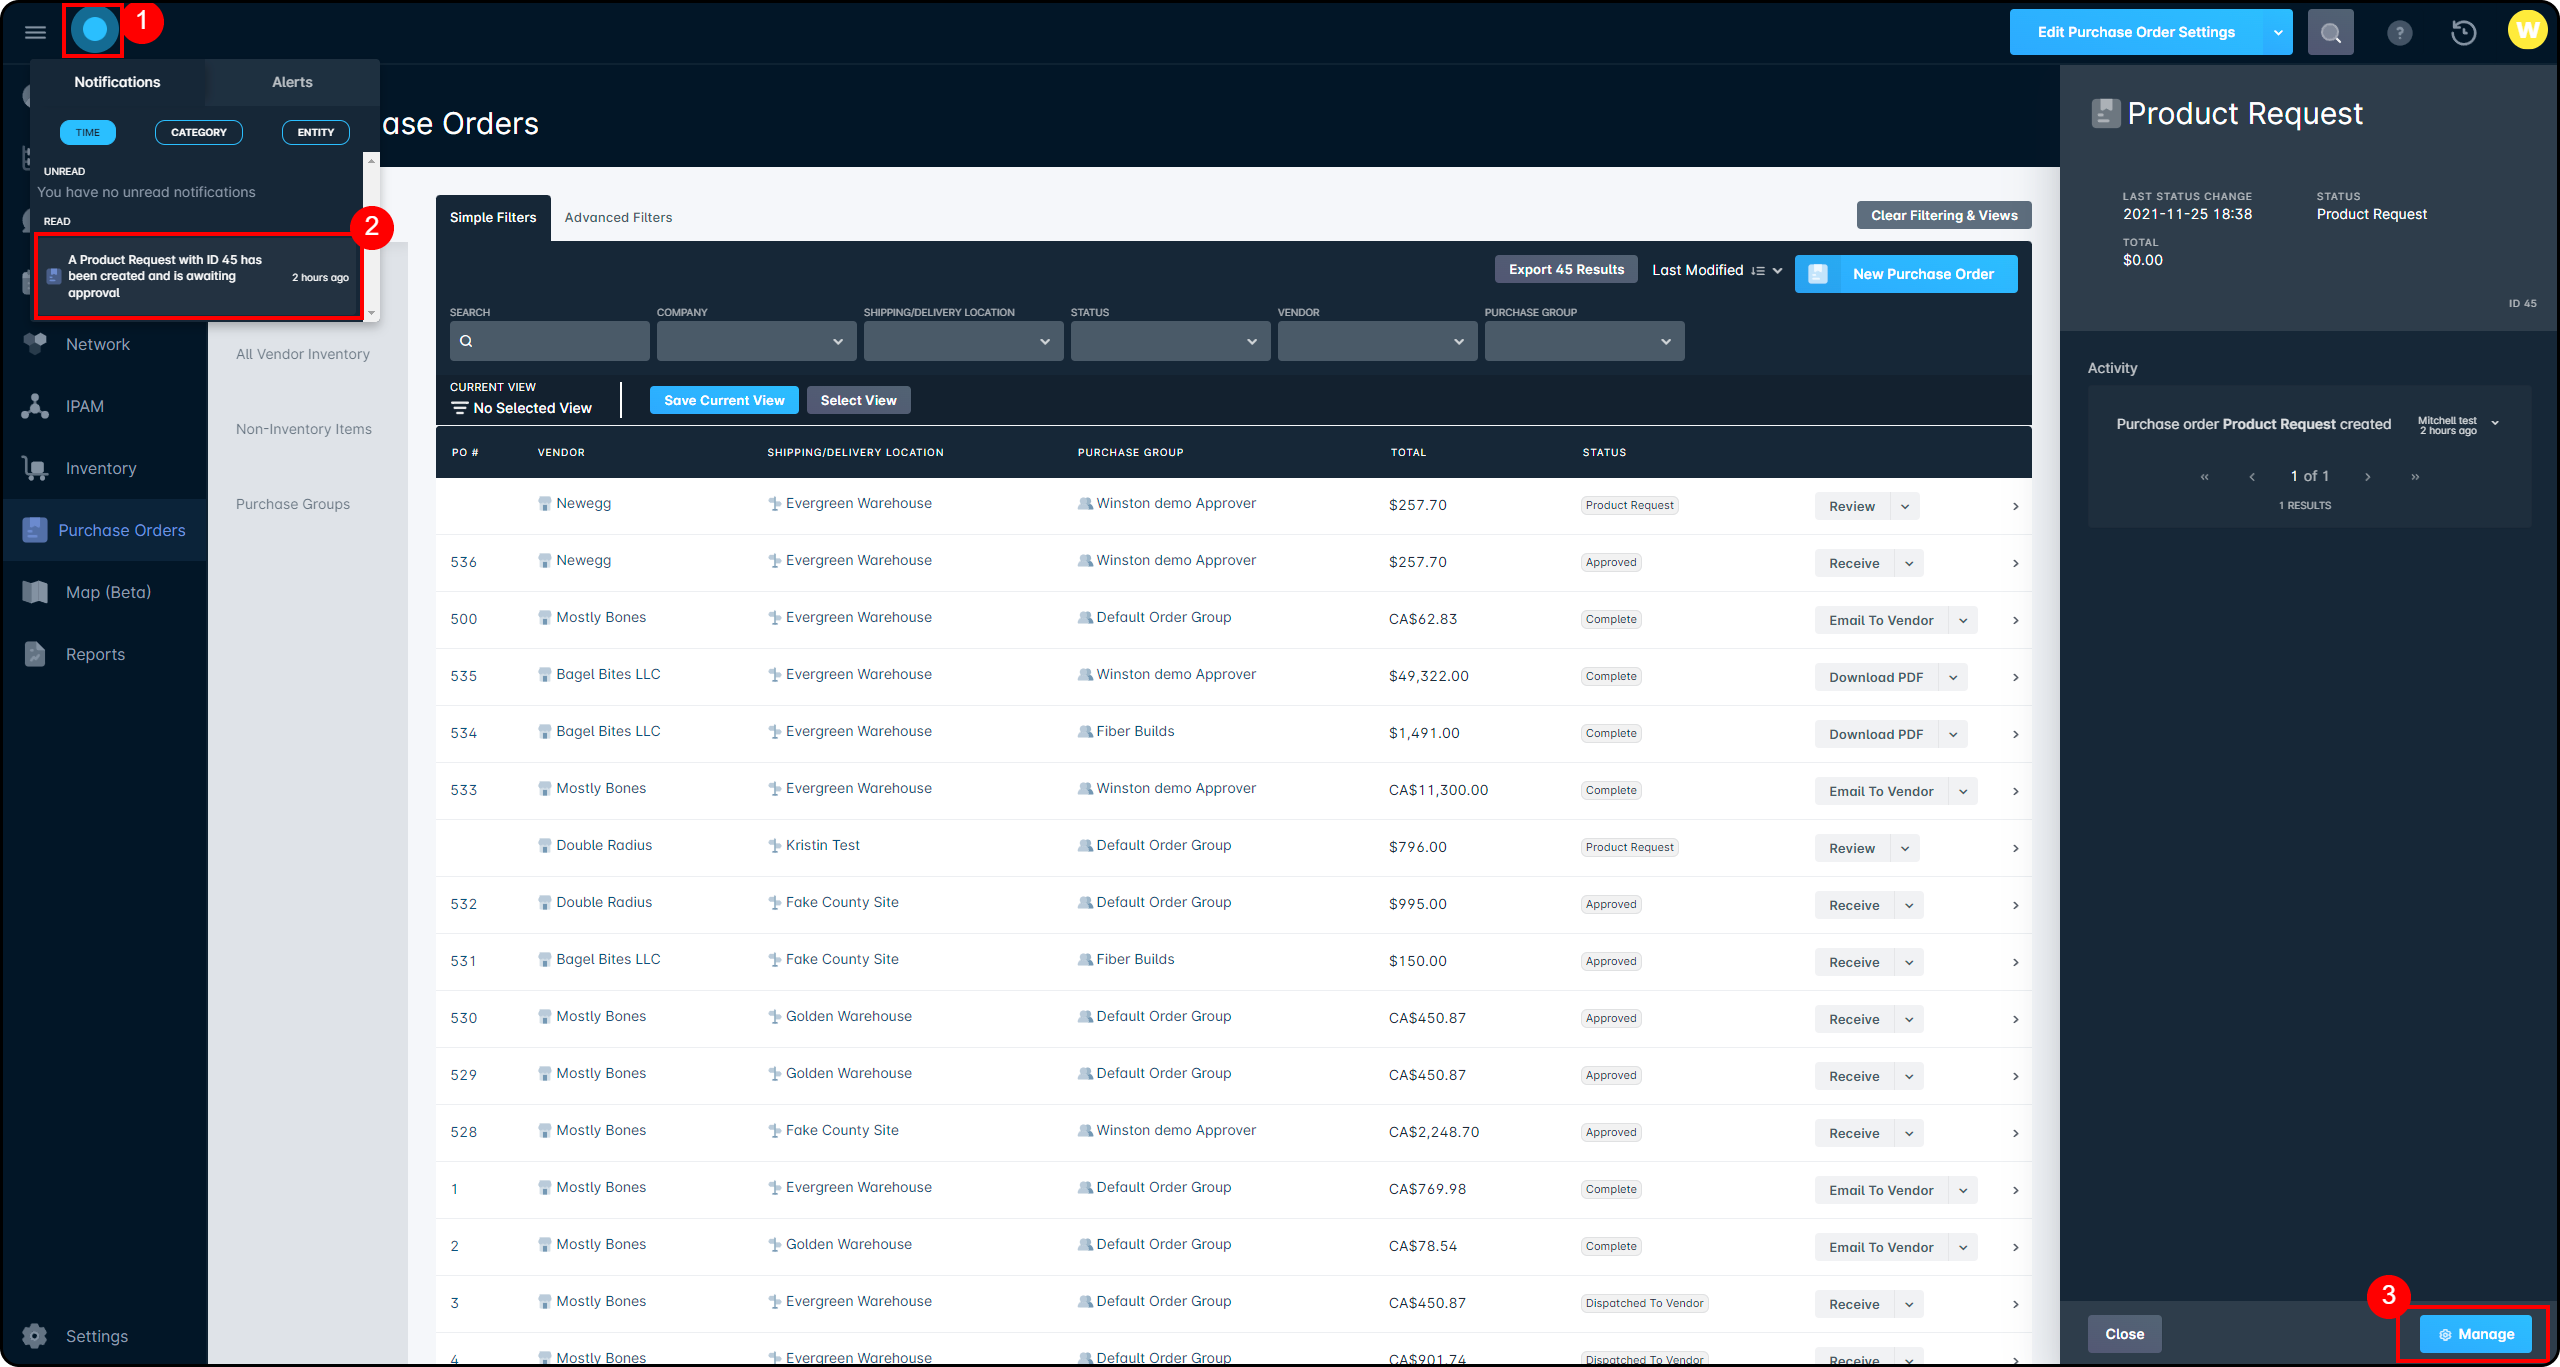
Reviewing Pending Requests and Managing Purchase Orders
Monitoring Purchase Orders and determining overall inventory levels can be done using the Inventory Purchasing and Inventory Reorder reports. While not integrated directly with the Purchase Order module, these two reports simplify PO management.
Whether you're approving a pending request or reviewing the details of a Purchase Order, the management view will allow you to see the request information, ordered parts, custom fields, and internal notes.
If you do have a purchase order request to approve, a notification will be displayed by the Sonar logo, and clicking on the notification will open the sidebar for that purchase order directly.
Reviewing Pending Requests
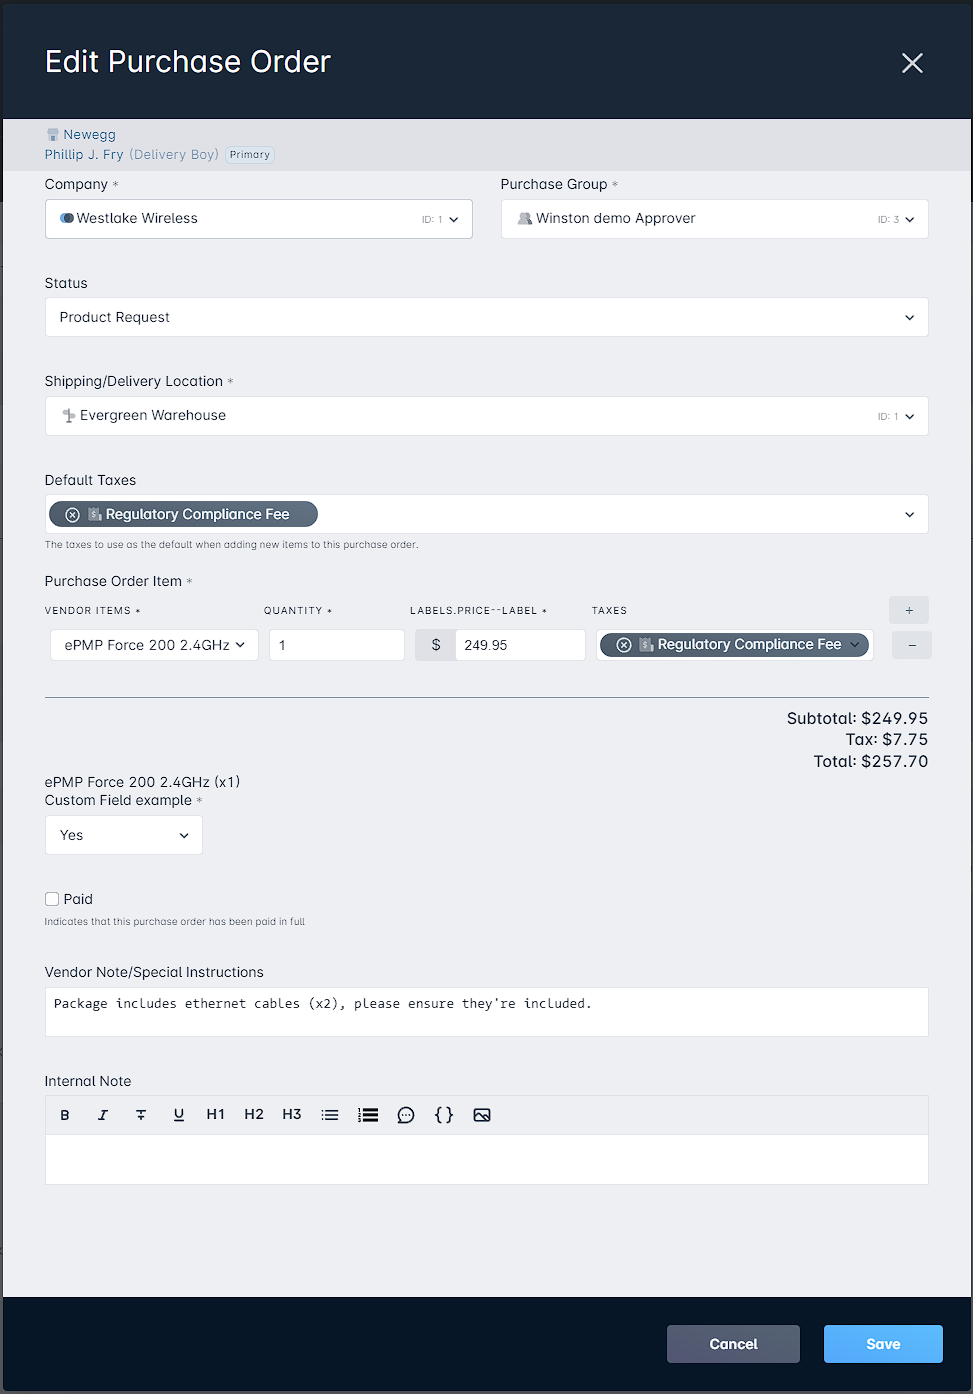
Any pending request in the Purchase Order module will have a "Review" button next to it, either from the Purchase Order list view or from the Purchase Order management view. Clicking it will open the "Edit Purchase Order" modal, where the approver can review and modify any of the details on the purchase order, including the vendor notes: In order to mark the Purchase Order as Approved, the status must be changed from "Product Request" (as pictured above) to "Approved". Additionally, a new Internal Note can be left by the approver. Clicking on "Save" will commit the changes and approve the Purchase Order.
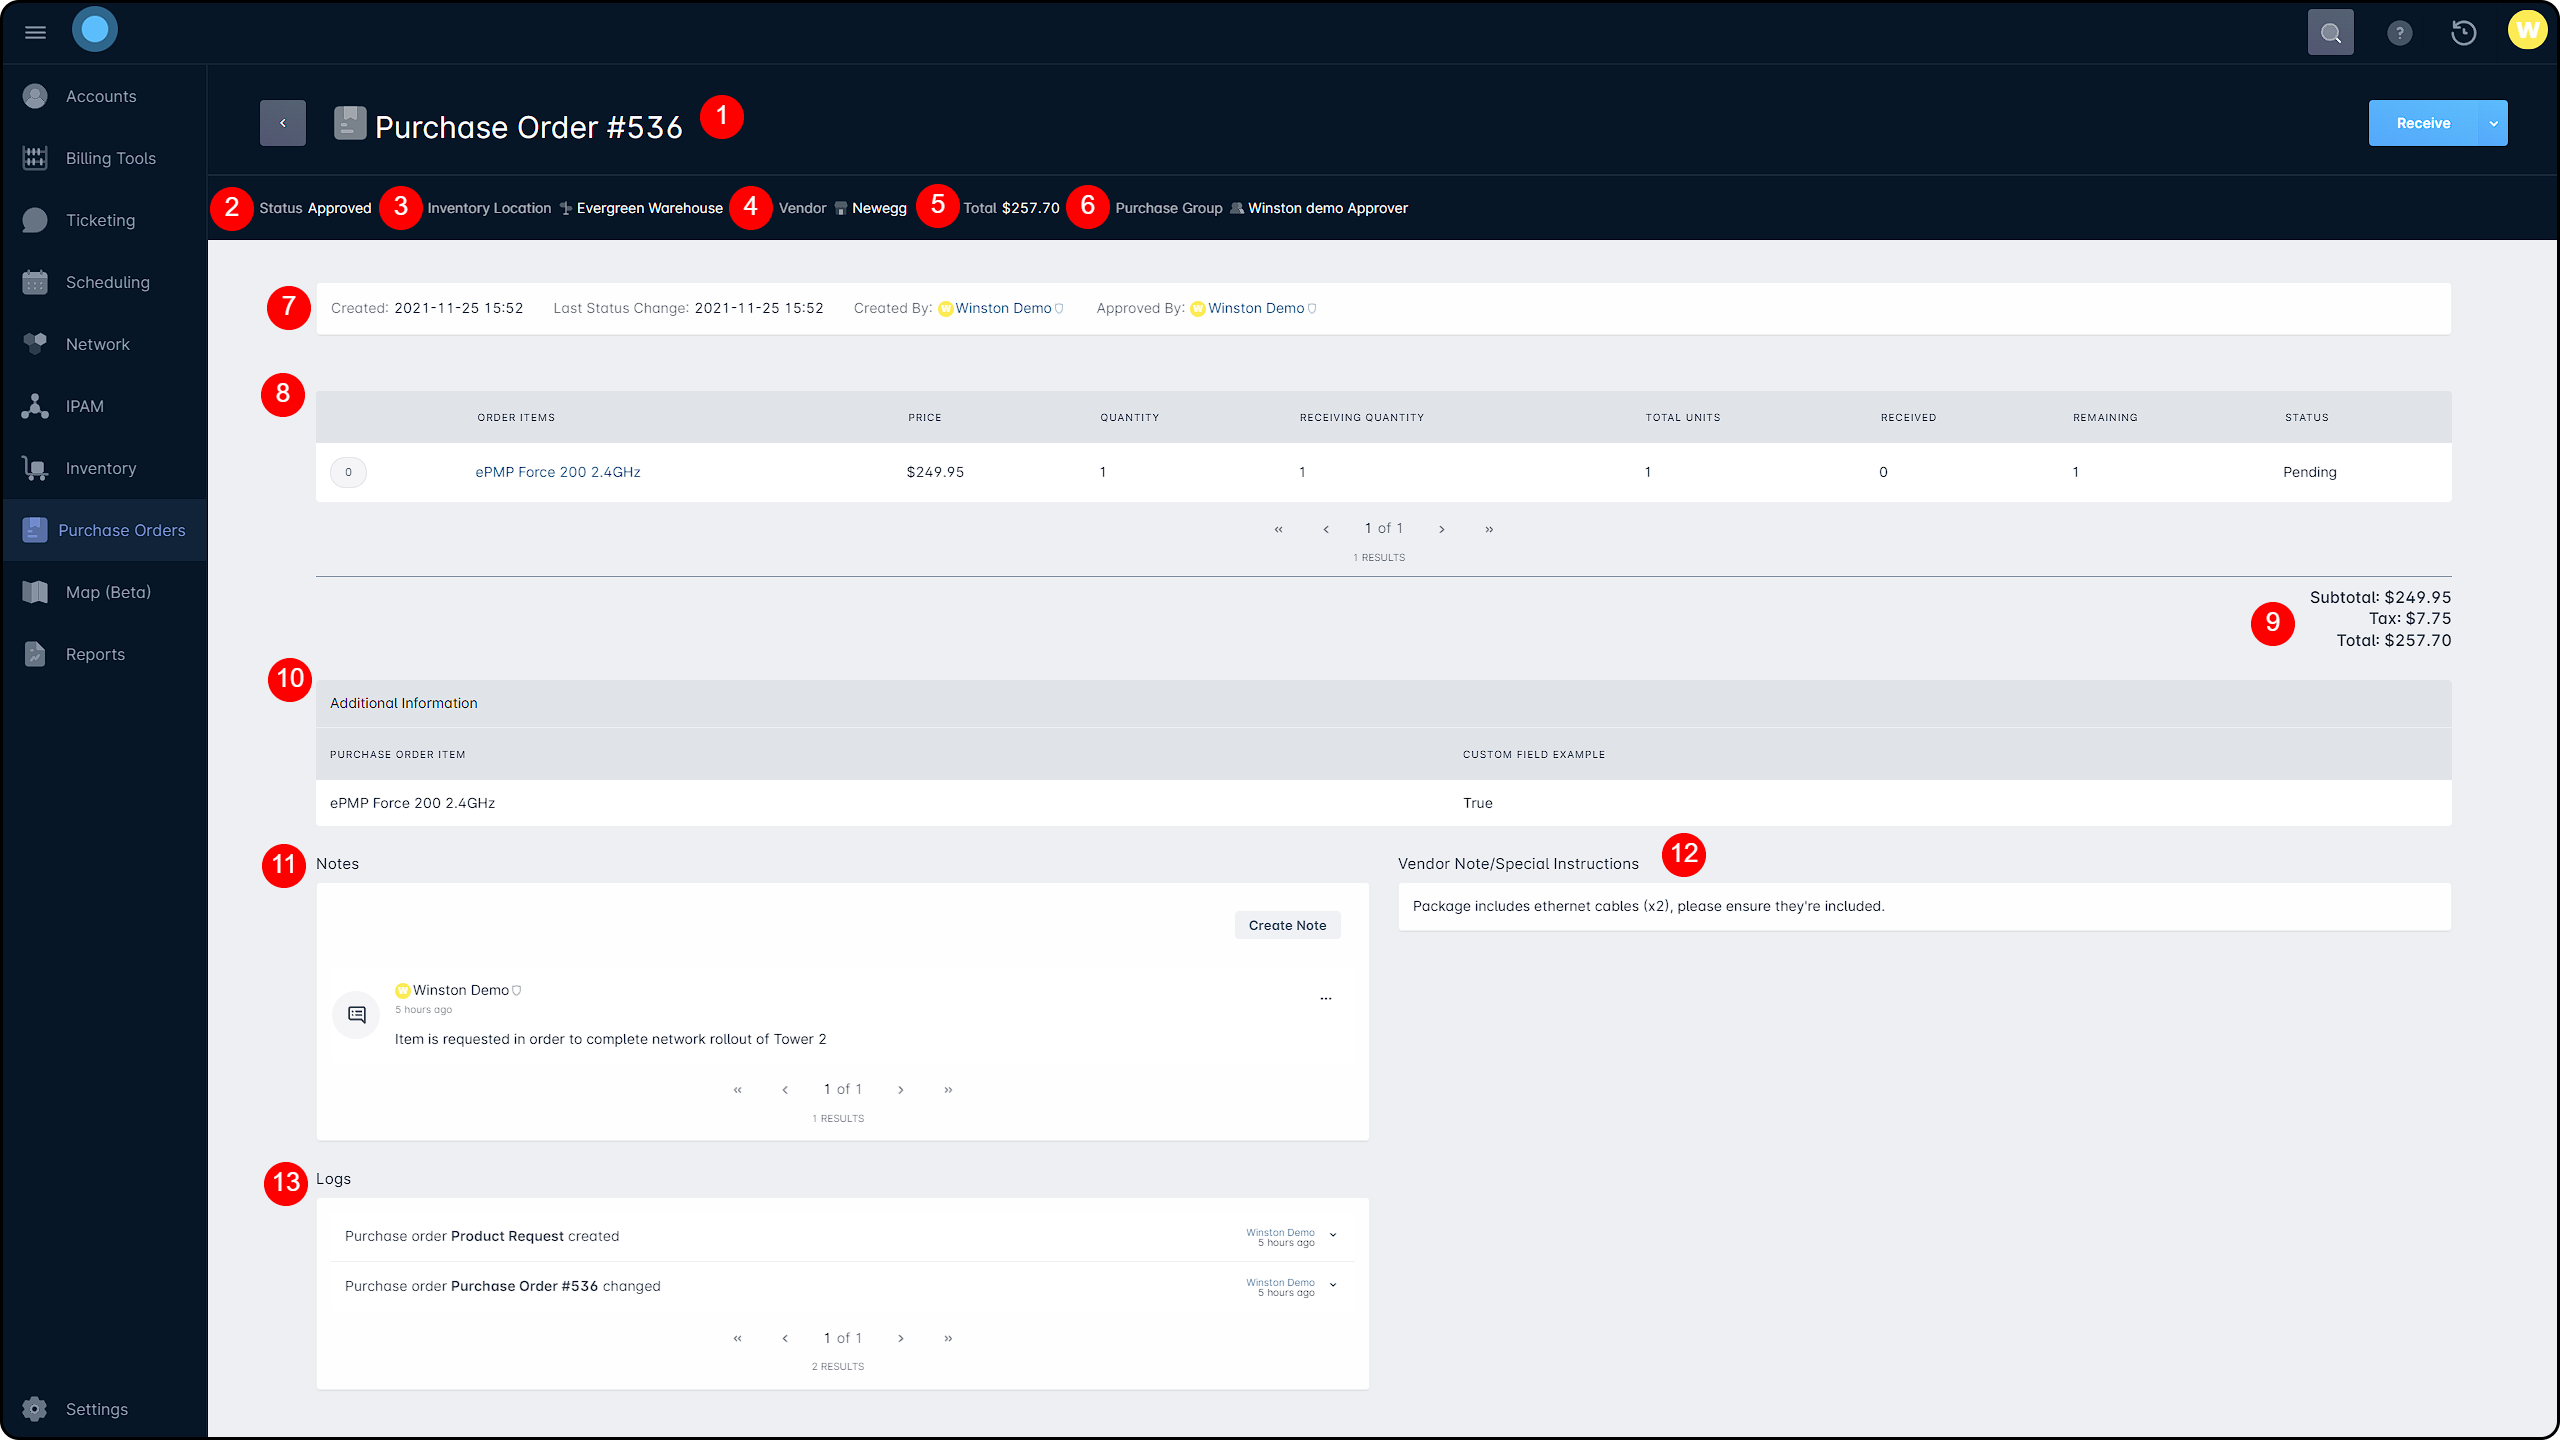
The first part of the header displays the Purchase Order number. If a request hasn't been approved yet, it will show “Product Request” in this section, rather than a Purchase Order number.
The Status section will show the purchase order status.
Then Inventory Location section will show where the Purchase Order was originally shipped to. This field's value won't change, even if the items are received and moved to another location.
The Vendor section will display the vendor that the order was sent to.
The Total section will display the part total, including any applicable taxes.
The Purchase Group section will show you the purchase group that the order was requested through.
The information field here will provide more specific information about the PO creation, including the date and time the request was made, who requested it, and who approved it.
The item information field will display information on all vendor items and non-inventory items included in the purchase order. This section will provide the item name, the quantity ordered, the pack quantity, and the total units received.
The Total section will break down the order total and provide details on the order subtotal, any applicable taxes, and the grand total.
The Additional Information section will show you the custom field details for all items added to the Purchase Order.
The Notes field is where any added internal Notes/Comments left on the Purchase Order can be viewed.
The Vendor Notes/Special Instructions field allows you to view the vendor notes sent with the purchase order.
The Logs field will retain detailed historical information for the purchase order. To get more details about any particular record, you can expand the item in the list.
Editing Purchase Orders
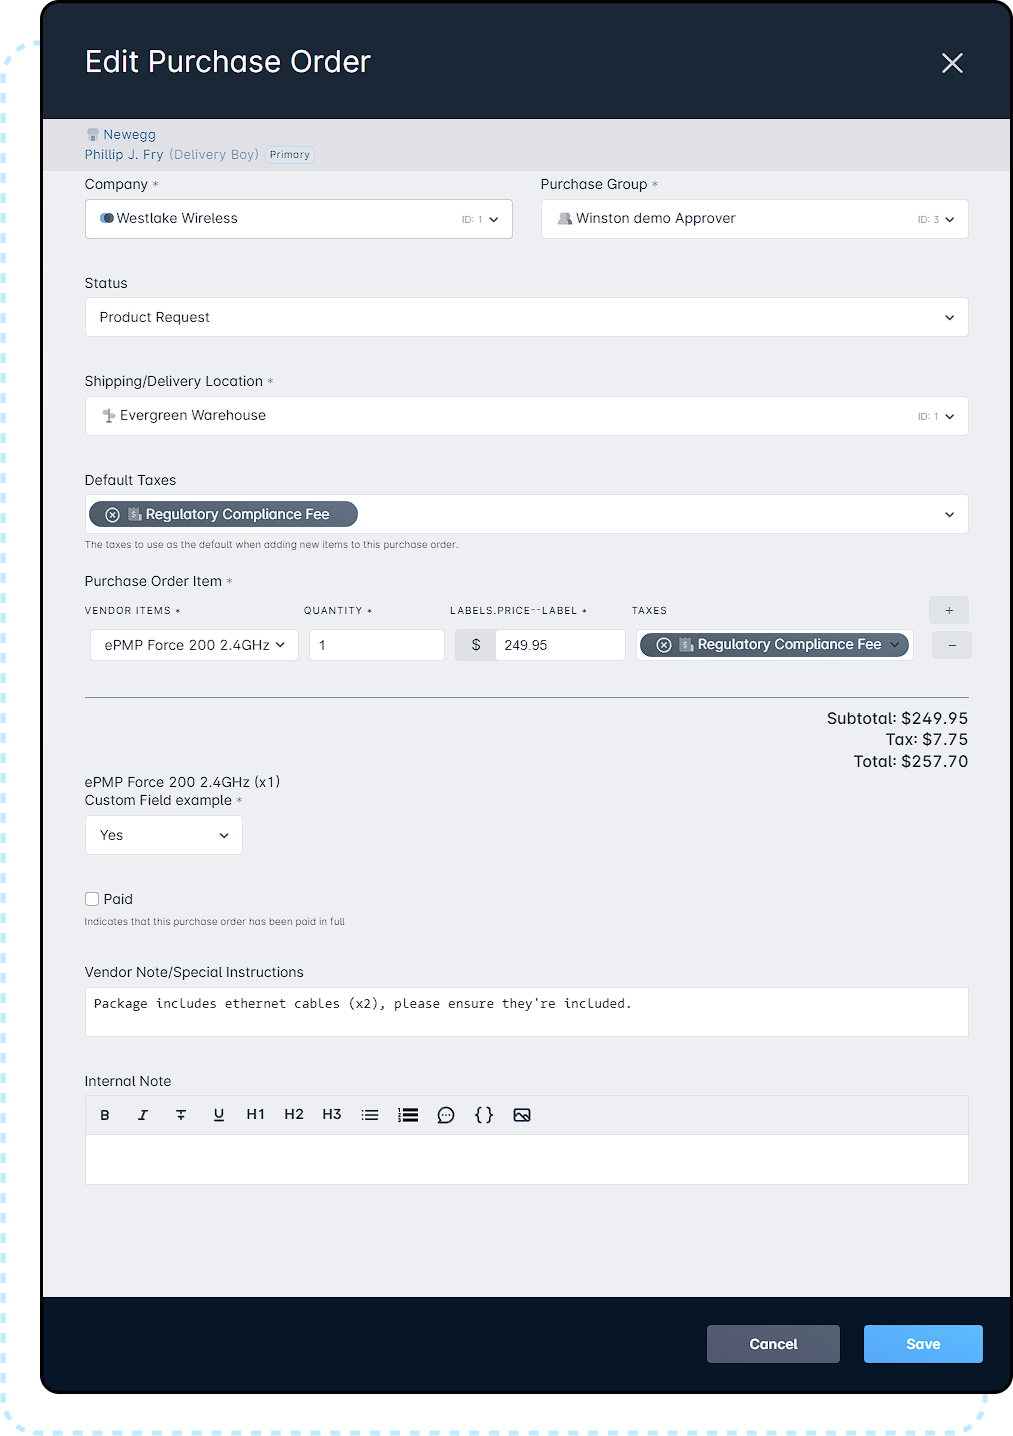
Purchase Orders that are pending approval or have been marked as approved can be edited to modify the item list, or any order details. This process opens the same “Edit Purchase Order” modal as the approval process, and each section can be modified as needed:
If a PO requestor edits a Purchase Order that needed manual approval, such as one exceeding the Purchase Group's auto-approval limit, and makes a change to any field that contributes to a higher total, the changes can't be saved until they change the PO status back to Purchase Request. This is to ensure any additional changes receive the same approval process as the original order.
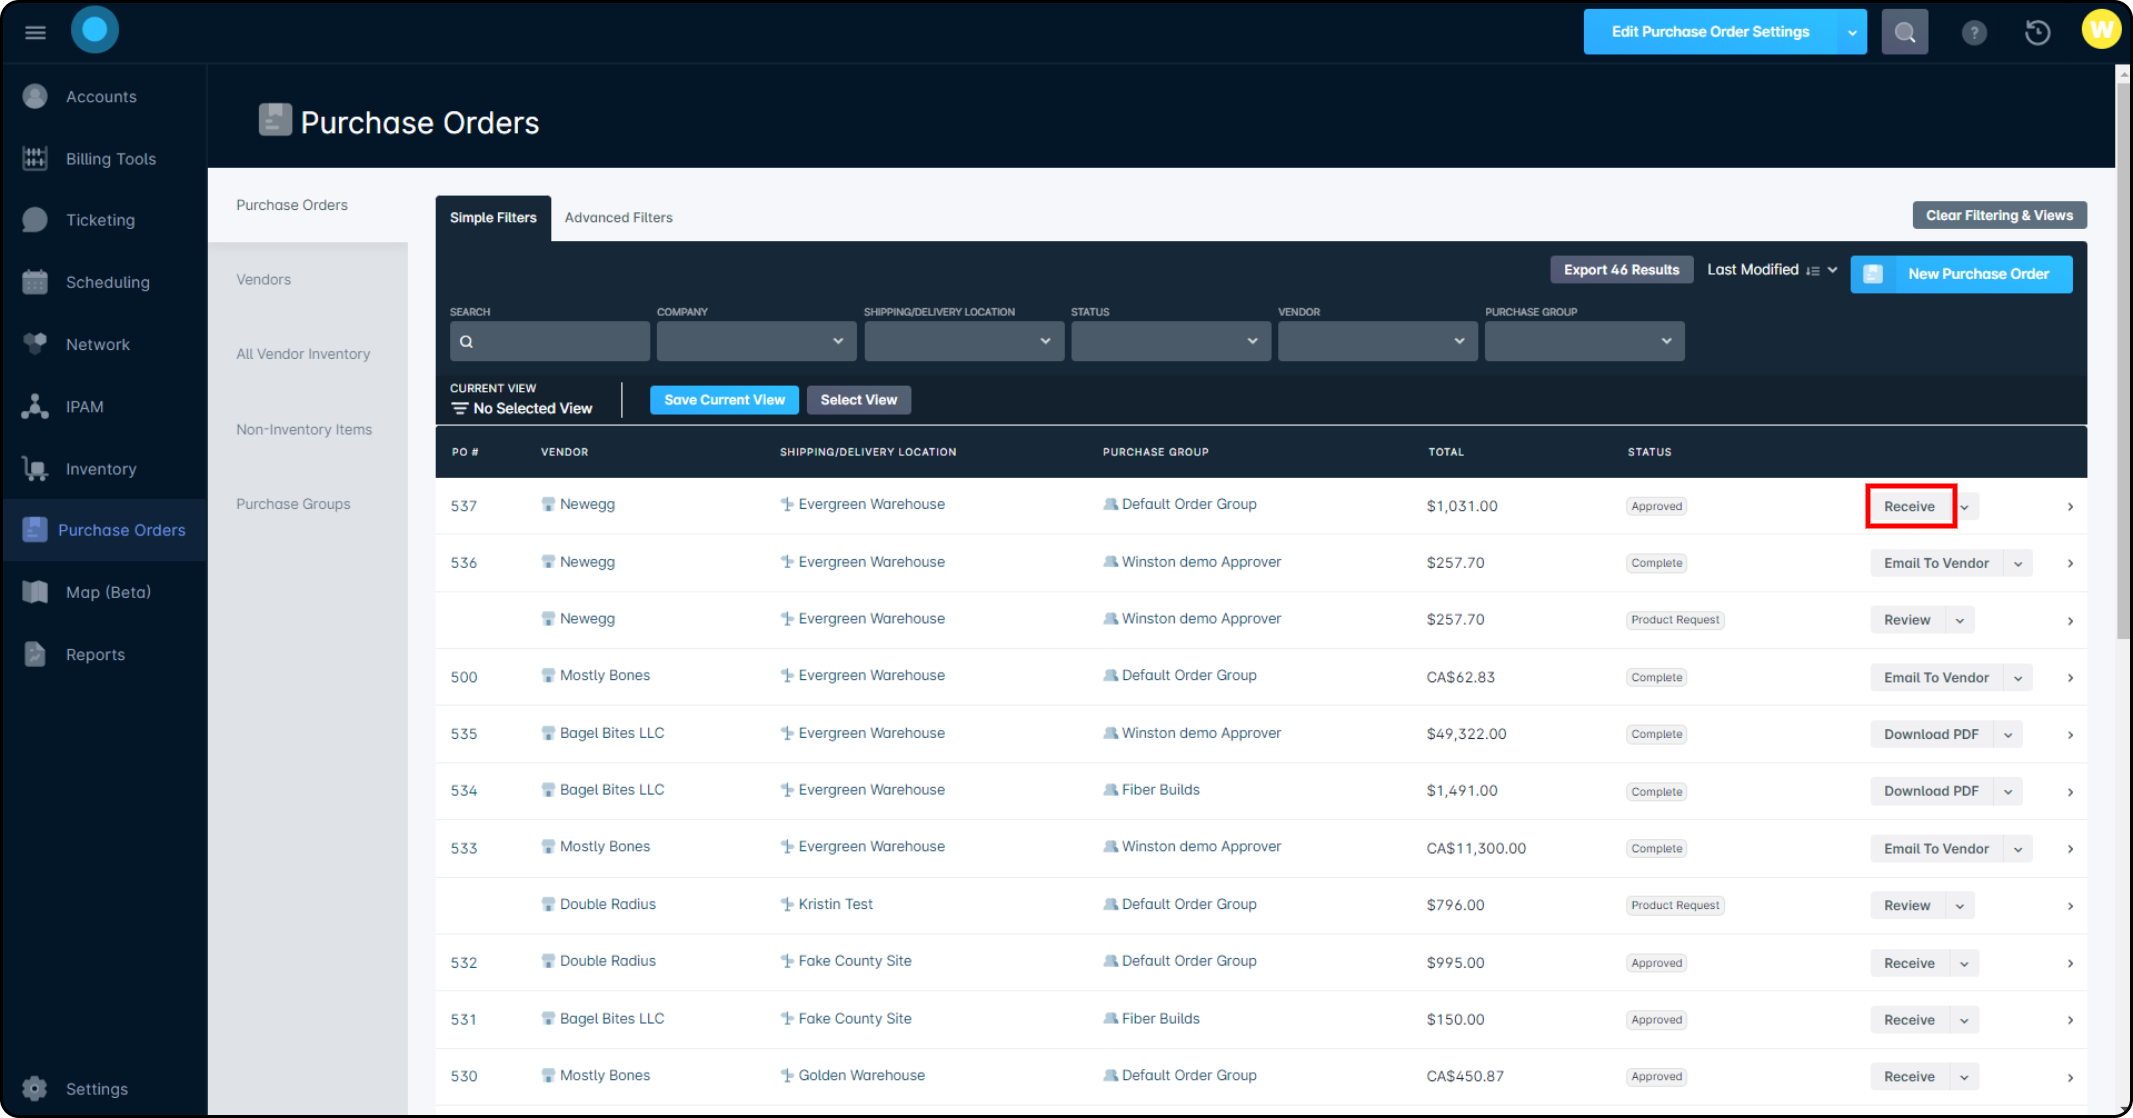
Receiving Ordered Items
Once a purchase order has been submitted to the vendor, the next step in the module is to mark the items as received. To do this, click on the “Receive” button from the Purchase Orders list view:
This will open the “Receiving” page and allow you to review the list of ordered items and mark them as received individually:
Non-Inventory items included in a Purchase Order will be automatically marked as received, given that there is no physical item being added to inventory.
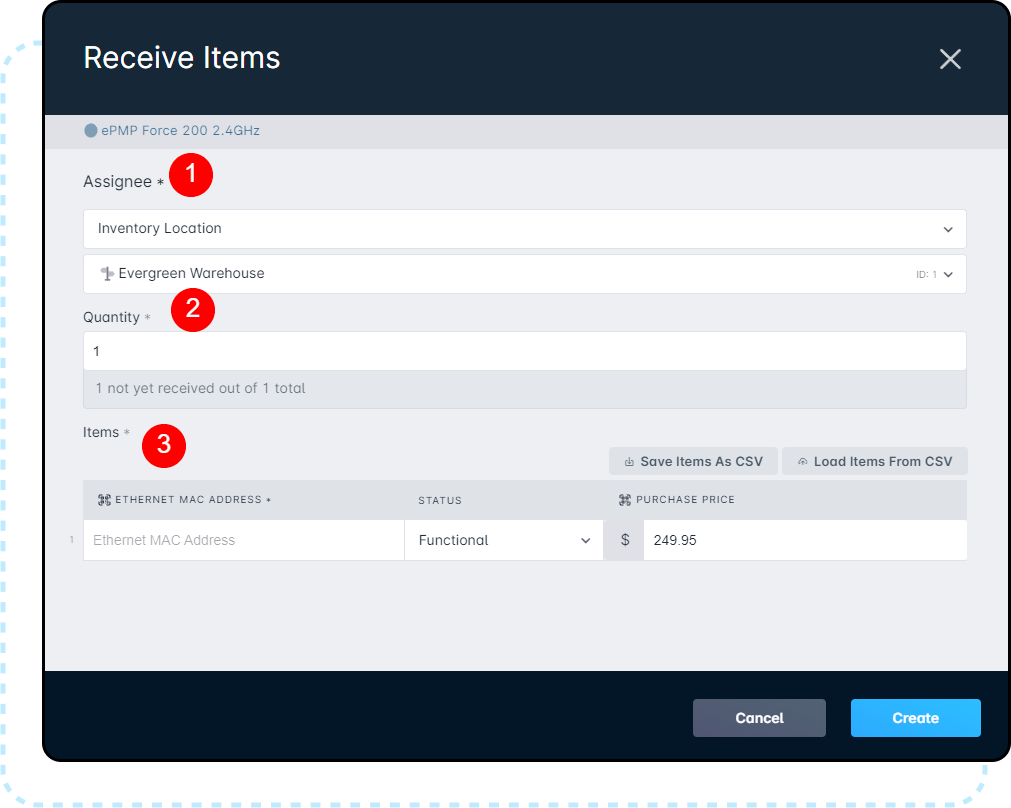
Once you click the receive button here, the item reception modal will open, allowing you to provide further details on the inventory item before adding it to your instance.
The Assignee field allows you to assign the item to a new location, address, or account as it's being received.
The Quantity field allows you to adjust the number of received units.
If you receive fewer units than you ordered, adjusting the quantity allows you to add only the units you did receive while leaving the PO incomplete in your instance.
The Items field is where you add defining information to the item, based on the item fields defined in the Inventory Model.
Using Purchase Orders for bulk item reception has some limitations, primarily when the number of ordered items exceeds 1000. In these situations, you'll need to divide the reception into batches by repeating the multipack reception steps with fewer items than your received total. This can be 1000 single items, or 100 multipacks with a "10" receiving quantity, for example.
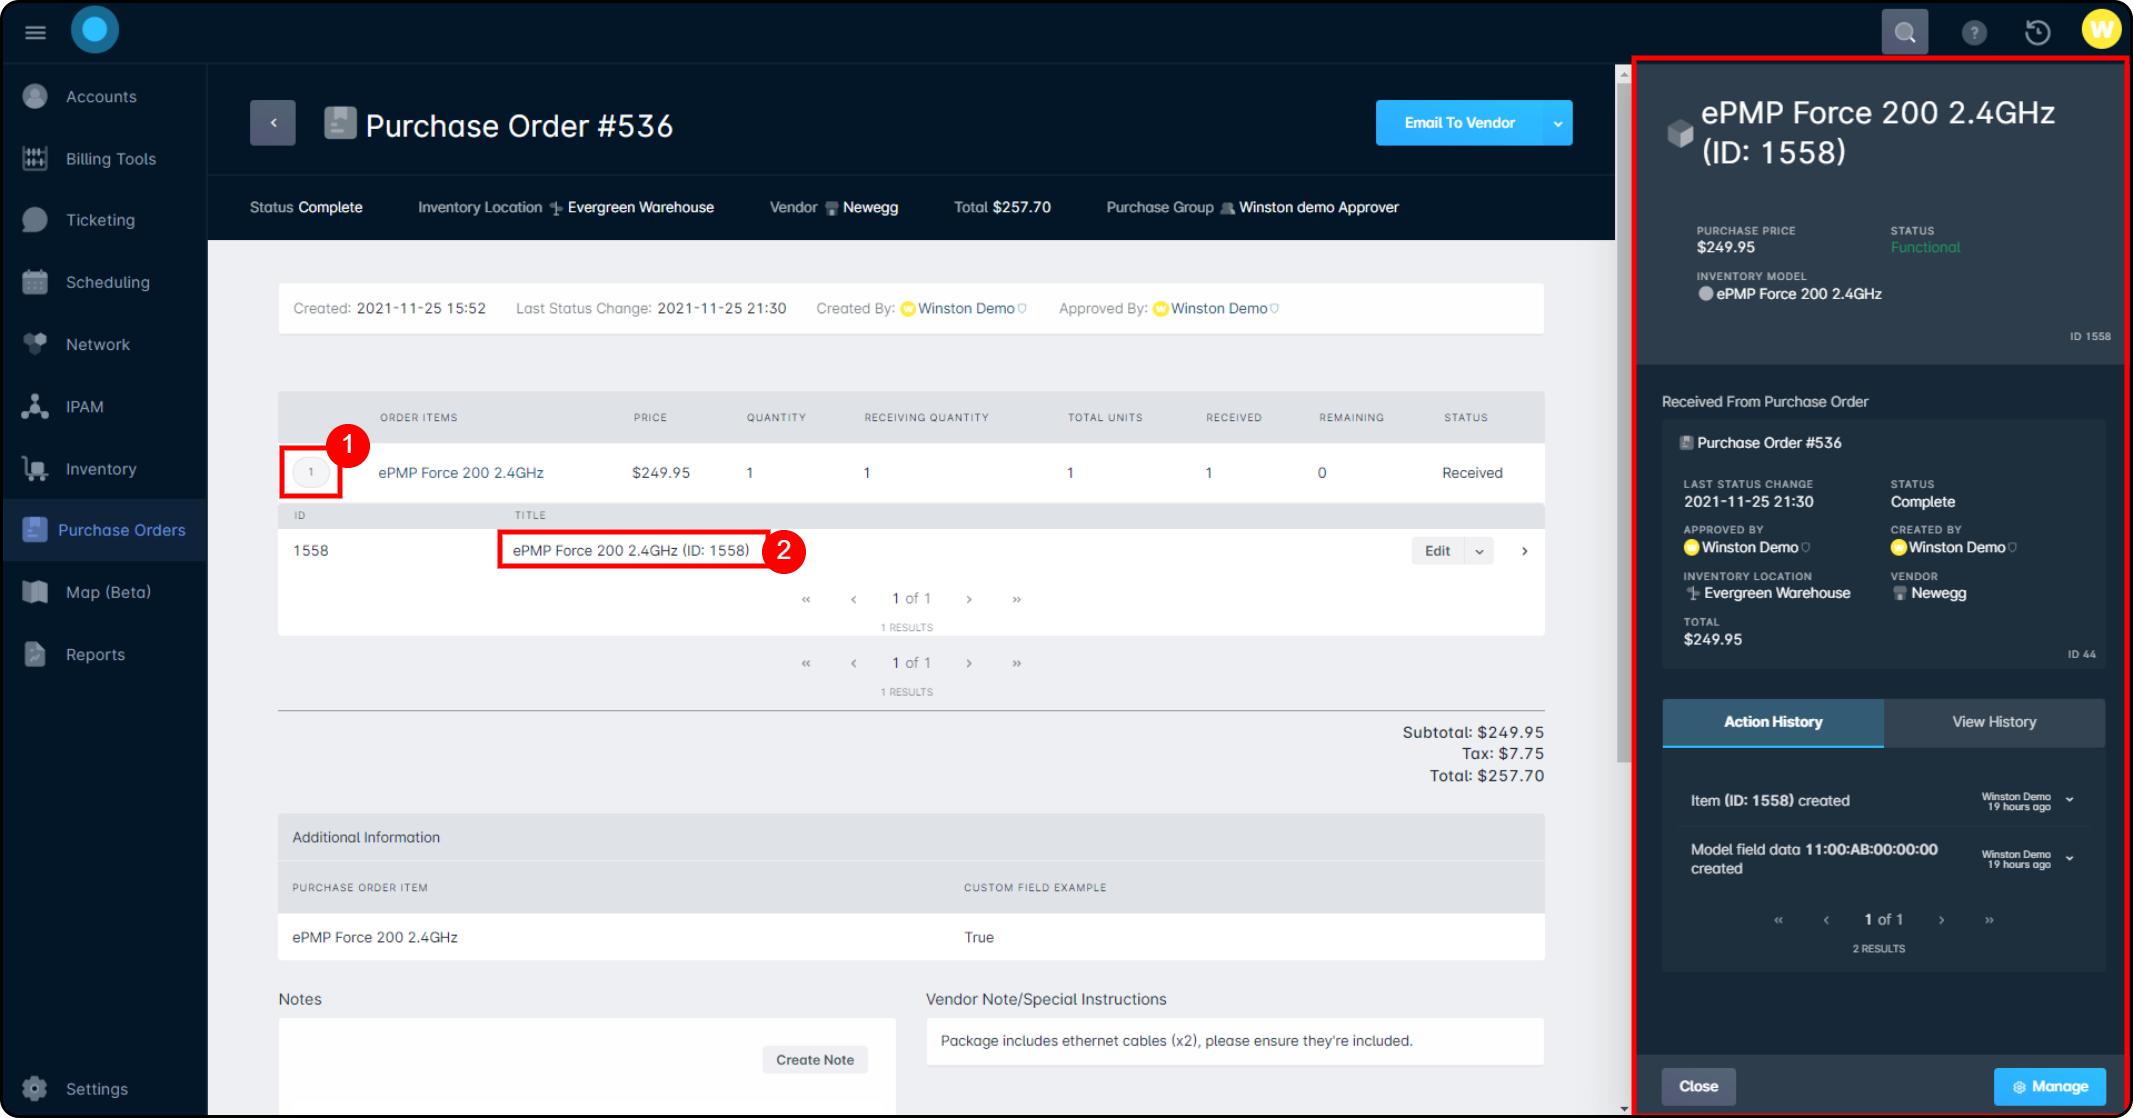
Once received, linked hardware information can be seen by expanding the item information and clicking on the model name to open the sidebar:
Receiving Multipacks
Receiving an item that was ordered with a “Receiving Quantity” greater than 1 follows a nearly identical process as the reception of a single item. The main difference is in the event of a shipping mismatch and in how the Sonar system handles the pricing.
In this example, an item was ordered with a “Receiving Quantity” of 5, and a price of $995- this is what happens when the item is received:
Because Sonar was told that the pack contained 5 individual items, and was a total of $995, it will automatically adjust the purchase price for each item to meet the combined total. This helps to ensure accurate accounting when purchasing multiple items.
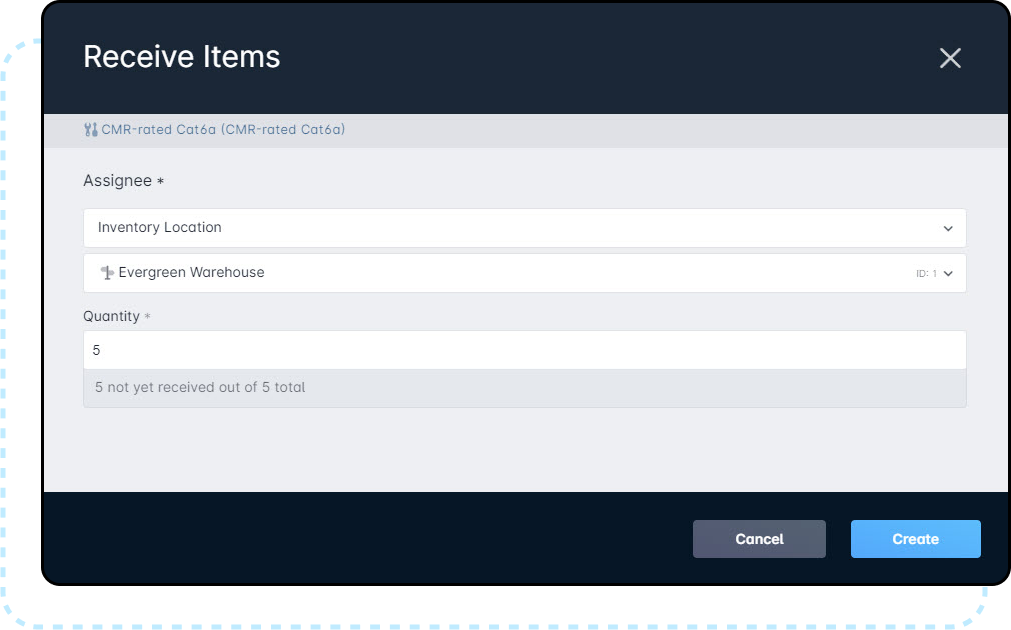
Receiving Generic Items
Receiving Generic Items uses the same item reception modal as individual items and multipacks, but the item field section is removed.
When you receive Generic Items, you only need to set their Assignee in Sonar, and how many you're receiving.
 Updated
by Mitchell Ivany
Updated
by Mitchell Ivany


 Currently, both the Email Categories and the Phone Numbers fields are unused for Vendor contacts, even if they're entered.
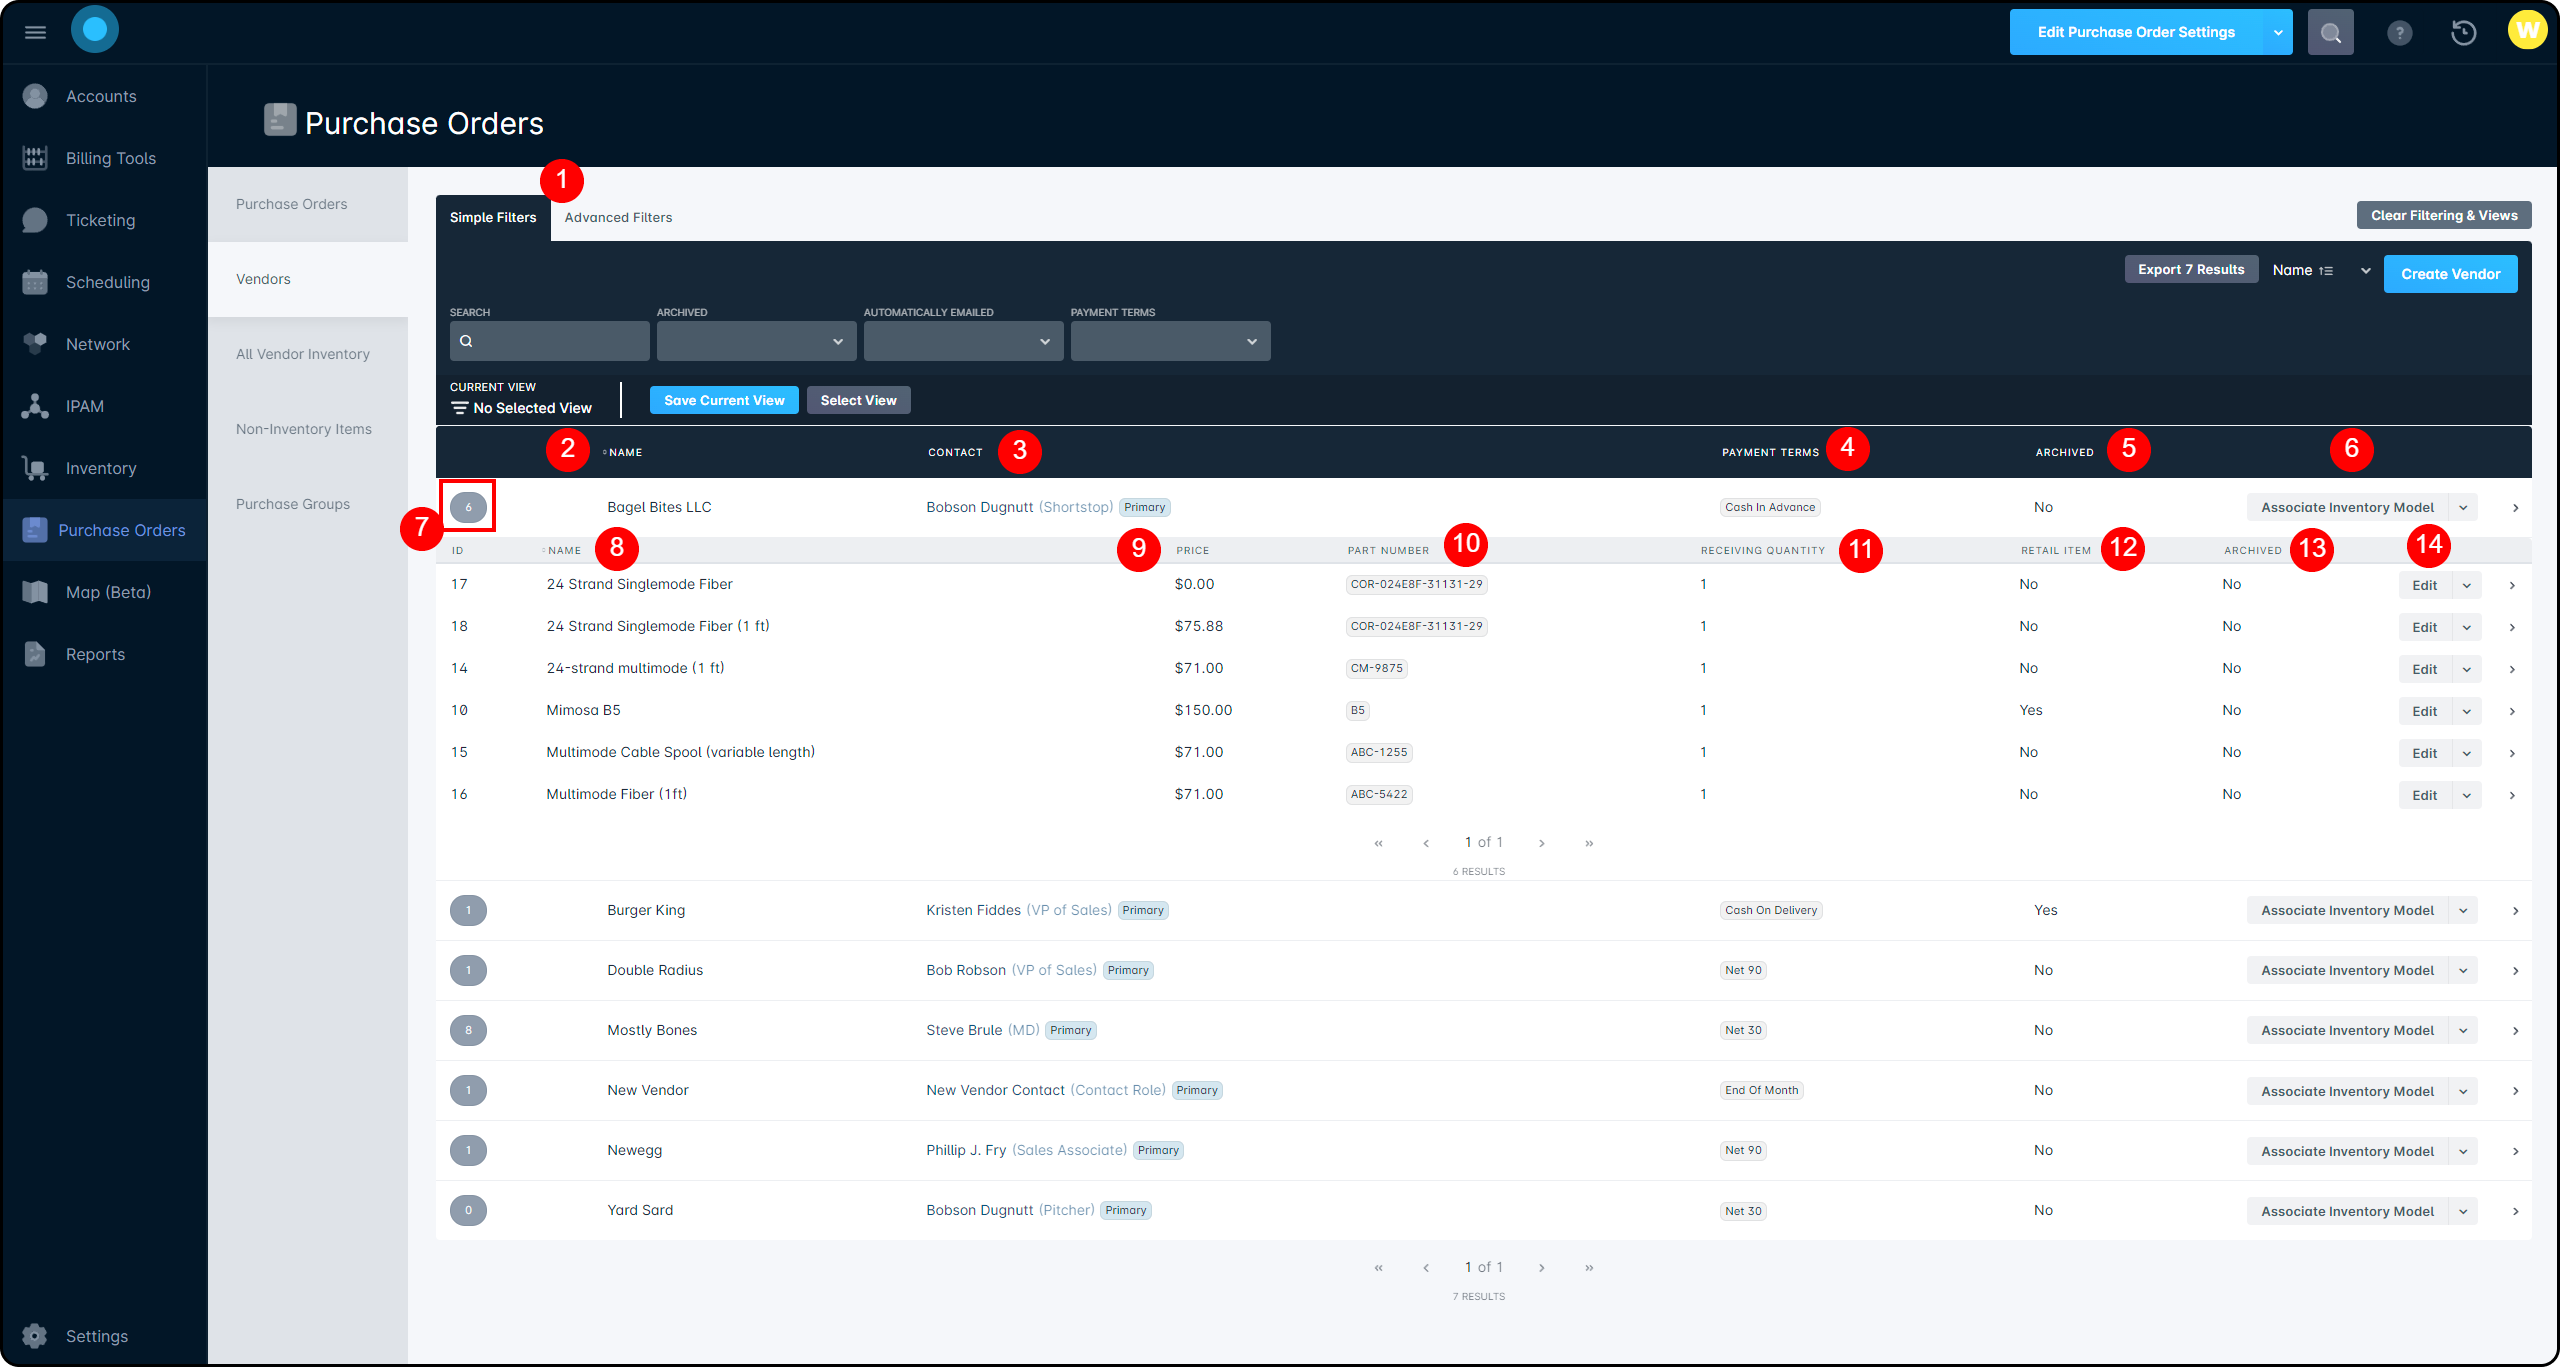


 Once an item is added, you can remove the row by clicking on the "-" button that appears. Rows can only be removed from last to first.