Table of Contents
- Prerequisites
- Permissions
- How Sonar and MikroTik DHCP Work Together
- How Sonar Routes Reservations to the Right DHCP Server
- Step 1: Add IP Addresses and Pools to MikroTik
- Step 2: Create a Sonar User in MikroTik
- Step 3: Create the SSL Certificate
- Step 4: Enable the api-ssl Service
- Step 5: Add the MikroTik to the Sonar Application Firewall
- Step 6: Add the MikroTik as a DHCP Server in Sonar
- How DHCP Synchronization Works
- Using DHCP Server Identifiers
- Add a DHCP Server Identifier
MikroTik: Setting Up a Sonar Controlled DHCP Server
 Updated
by Kristen Fiddes
Updated
by Kristen Fiddes
- Prerequisites
- Permissions
- How Sonar and MikroTik DHCP Work Together
- How Sonar Routes Reservations to the Right DHCP Server
- Step 1: Add IP Addresses and Pools to MikroTik
- Step 2: Create a Sonar User in MikroTik
- Step 3: Create the SSL Certificate
- Step 4: Enable the api-ssl Service
- Step 5: Add the MikroTik to the Sonar Application Firewall
- Step 6: Add the MikroTik as a DHCP Server in Sonar
- How DHCP Synchronization Works
- Using DHCP Server Identifiers
- Add a DHCP Server Identifier
Read Time: 8 mins
If you are running a non-long-term release and run into issues, roll back to the current long-term release before opening a support case. The current release trees are listed at mikrotik.com/download/changelogs.
A Sonar-controlled DHCP server allows Sonar to manage static DHCP reservations on a MikroTik router. Once configured, Sonar pushes DHCP reservations from IPAM to MikroTik and keeps them synchronized automatically or through a manual sync.
Sonar uses the MikroTik api-ssl service to connect securely to the router. Sonar also checks connectivity with the device every 5 minutes, which may appear in the MikroTik logs.
Prerequisites
Before setting up a Sonar-controlled DHCP server, make sure you have:
- A MikroTik router running RouterOS from the long-term release tree.
- Winbox access to the MikroTik router.
- IPAM configured in Sonar.If you haven't done this yet, start with IPAM: Basic Setup.
- The current Sonar inbound and outbound IP addresses from Sonar IP Addressing.
- Access to the MikroTik router’s WAN IP address.
- Access to Sonar settings for DHCP server configuration.
Permissions
Before getting started with the setup, your user roles will need to be adjusted to account for the permissions required to use the DHCP Server feature.

Permission Details
2. Update a DHCP server: Allows the user to edit existing DHCP server settings. This may include updating the server name, IP address, port, credentials, selected IP pools, and related configuration options.
3. Create a DHCP server: Allows the user to add a new DHCP server in Sonar. This permission is required to create the MikroTik DHCP server record and enter the connection details needed for Sonar to communicate with the device.
4. Delete a DHCP server: Allows the user to remove an existing DHCP server from Sonar. This should be limited to users who are responsible for managing network settings, because deleting a DHCP server can affect DHCP synchronization and reservation management.
How Sonar and MikroTik DHCP Work Together
Sonar maintains the list of static DHCP reservations based on IP assignments for Inventory Items, Uninventoried MAC Addresses, and IMSIs. When a synchronization occurs, Sonar pushes those reservations to the MikroTik and compares them against what's already there. A match requires the IP address, MAC address, and Sonar's internal DHCP server tag to all align.
For each reservation, one of three things happens:
- The IP exists in MikroTik but the MAC doesn't match Sonar — the MikroTik entry is deleted.
- The reservation exists in Sonar but not in MikroTik — it is created in MikroTik.
- The reservation matches in both systems — no action taken.
For more on Sonar's DHCP architecture and the optional lease script that enables dynamic lease tracking, see DHCP Delivery.
How Sonar Routes Reservations to the Right DHCP Server
When you have more than one DHCP server connected to Sonar, three things determine which server a reservation gets written to:
- The IP assignment — the specific IP being reserved for an inventory item, MAC address, or IMSI.
- The IP pool that IP belongs to — every reservation inherits the pool of its IP assignment.
- The DHCP Server Identifier (if used) — an optional grouping that binds one or more pools to a specific DHCP server.
If a pool is part of a DHCP Server Identifier, Sonar writes reservations from that pool only to the matching DHCP server. If a pool isn't tied to an identifier, Sonar falls back to the DHCP server's default behavior — which, for MikroTik, is to write the reservation to all connected DHCP servers.
This matters most in setups where you have:
- Multiple MikroTiks managing different parts of your network (for example, per region, per POP, or per VLAN)
- A single MikroTik with multiple DHCP servers defined for different interfaces or VLANs
- Separated pools for different service types (residential vs. commercial, IPv4 vs. dual-stack, etc.)
For single-server deployments, this is usually invisible — pools all go to the one server you've configured. For multi-server deployments, configure DHCP Server Identifiers (covered later in this article) to control exactly where each pool's reservations land.
Step 1: Add IP Addresses and Pools to MikroTik
If your production network already has the required subnets configured, skip to Step 2.
- In Winbox, go to IP > Addresses.
- Add each subnet that exists in Sonar IPAM.
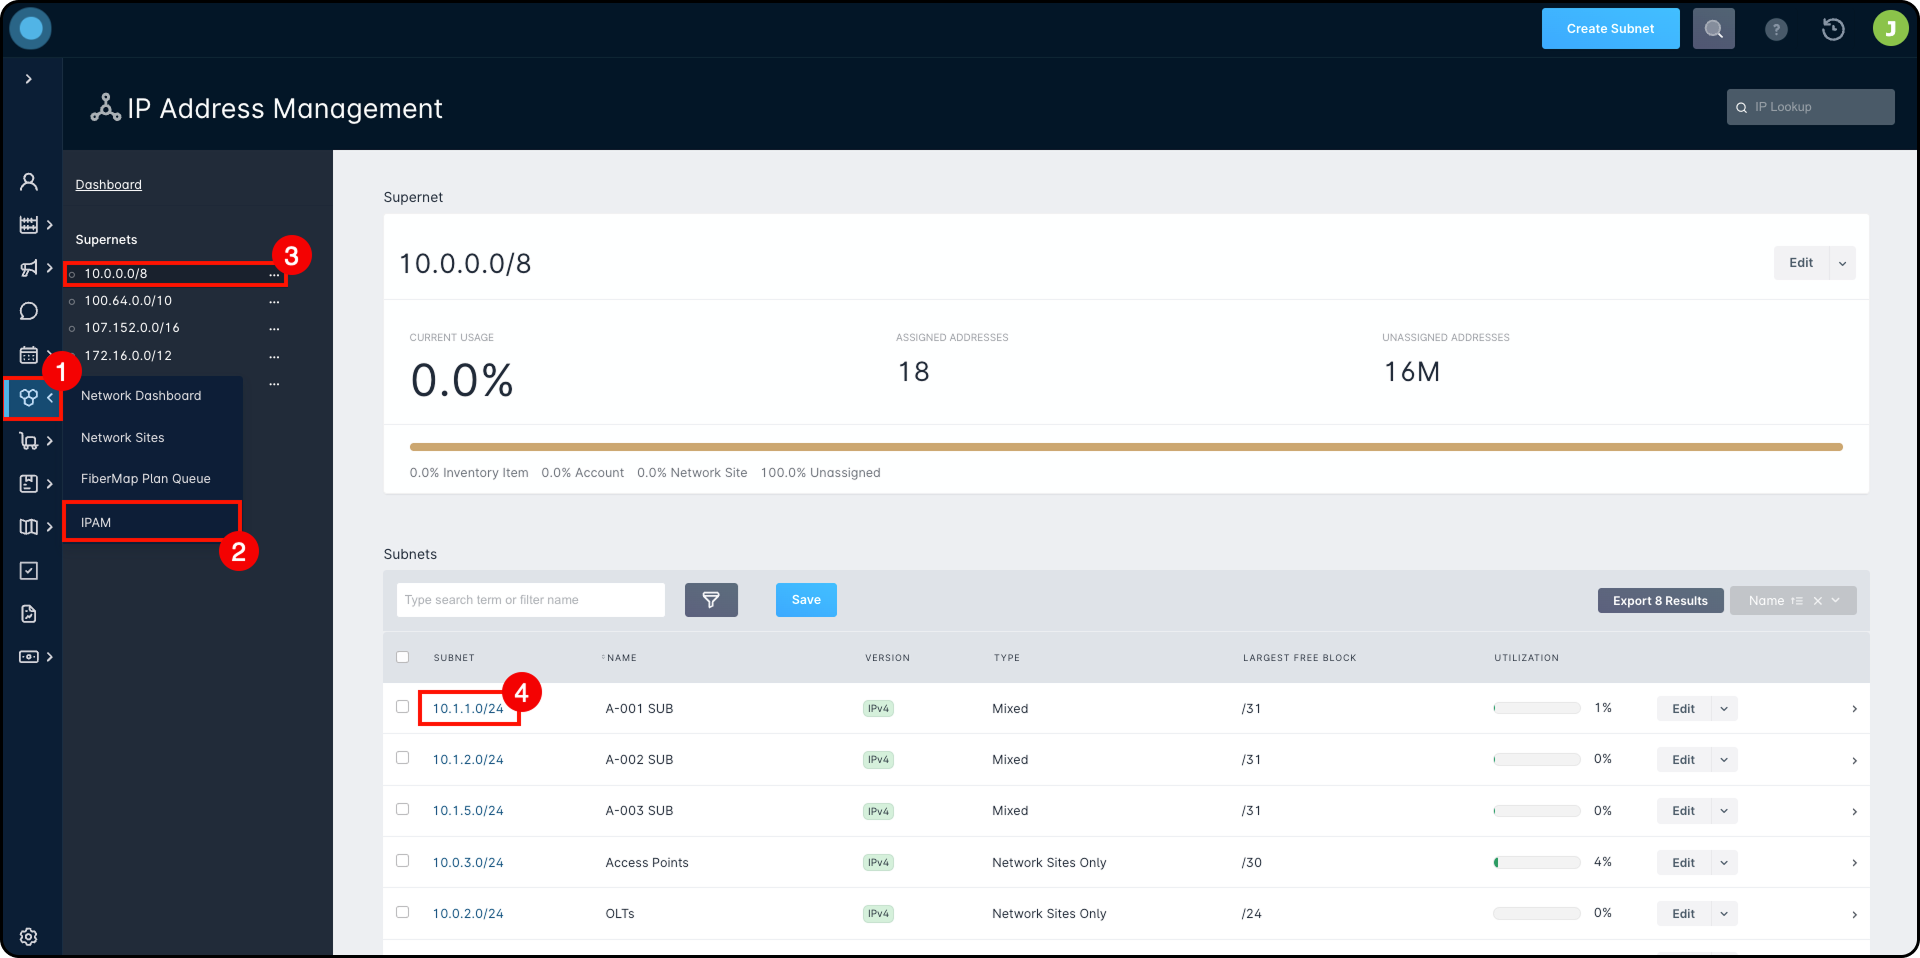
- Assign each subnet to the correct outgoing interface.
- Add a comment using the subnet name.
- Add each subnet that exists in Sonar IPAM.
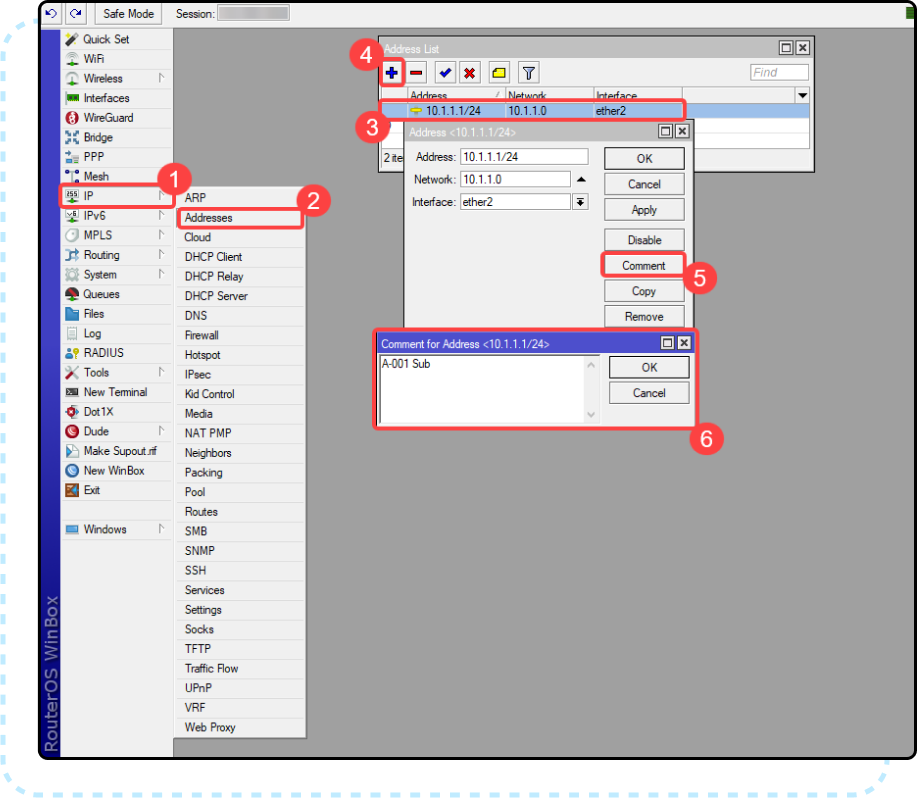
- Go to IP > DHCP Server > Networks.
- Add the same subnets.
- Set your internal DNS servers.
- Add a comment using the subnet name.
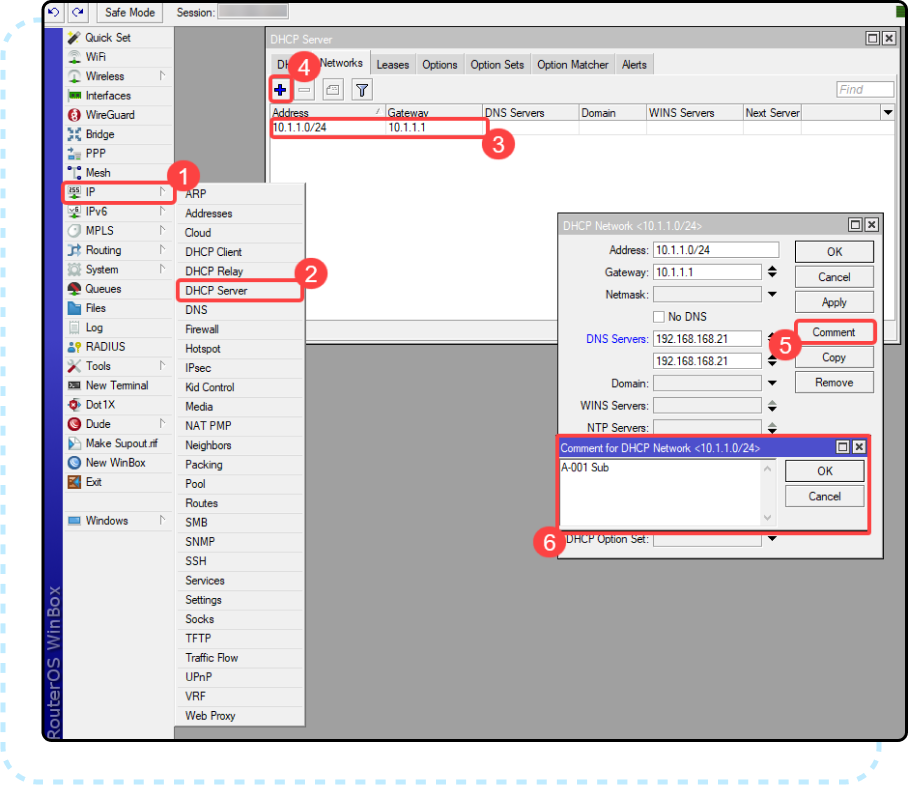
- Go to IP > DHCP Server > DHCP.
- Add the IP pools from Sonar IPAM.
- Set Address Pool to static-only.
- Use the same interfaces configured for the subnet addresses.
- Add the IP pools from Sonar IPAM.
Setting the address pool to static-only ensures MikroTik only hands out IPs that exist as assignments in Sonar.
Step 2: Create a Sonar User in MikroTik
Sonar needs a dedicated MikroTik user to authenticate with the router.
- In Winbox, go to System > Users.
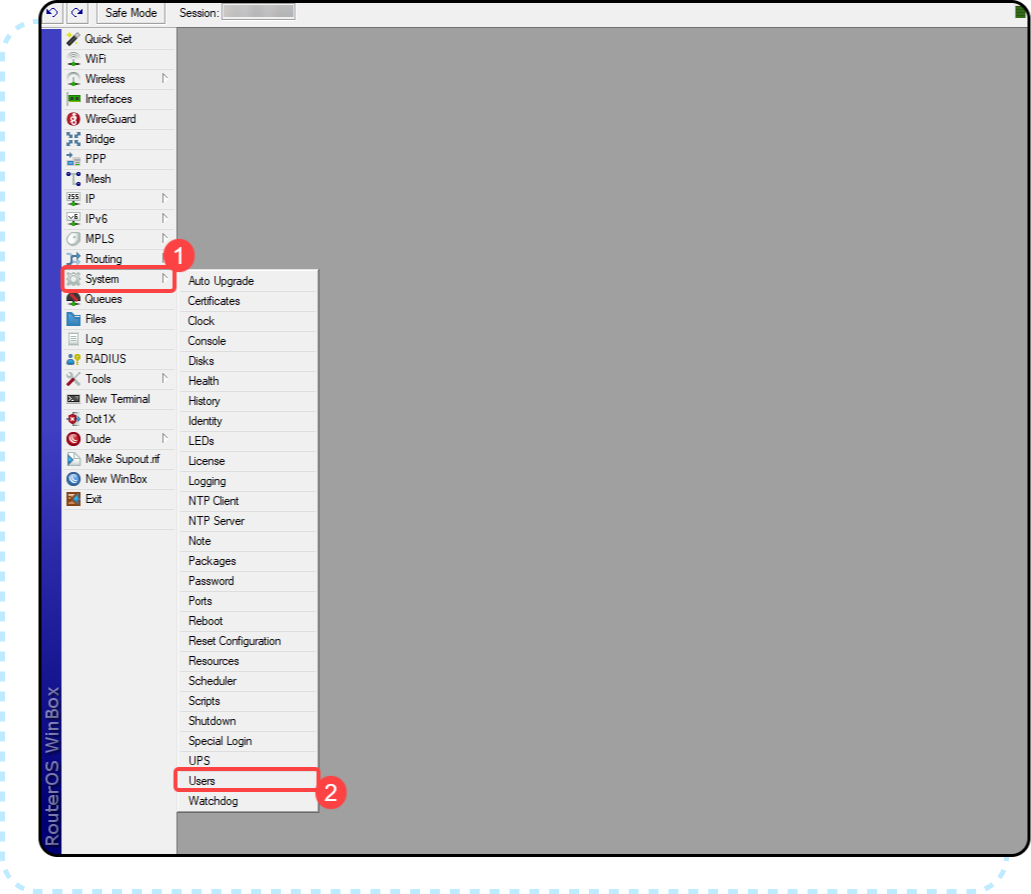
- Click the blue + icon.
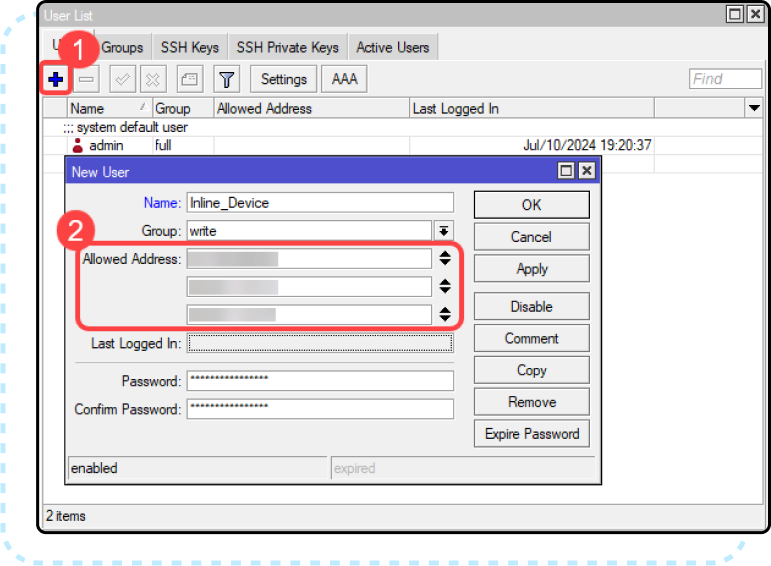
- Enter a username and password.
- Save the username and password for later use in Sonar.
- Set Group to
write. - Set Allowed Address to the current Sonar outbound (egress) IP address or addresses.
Step 3: Create the SSL Certificate
The integration requires the MikroTik api-ssl service. You can use a self-signed certificate generated on the MikroTik.
- In WinBox, open a new terminal.
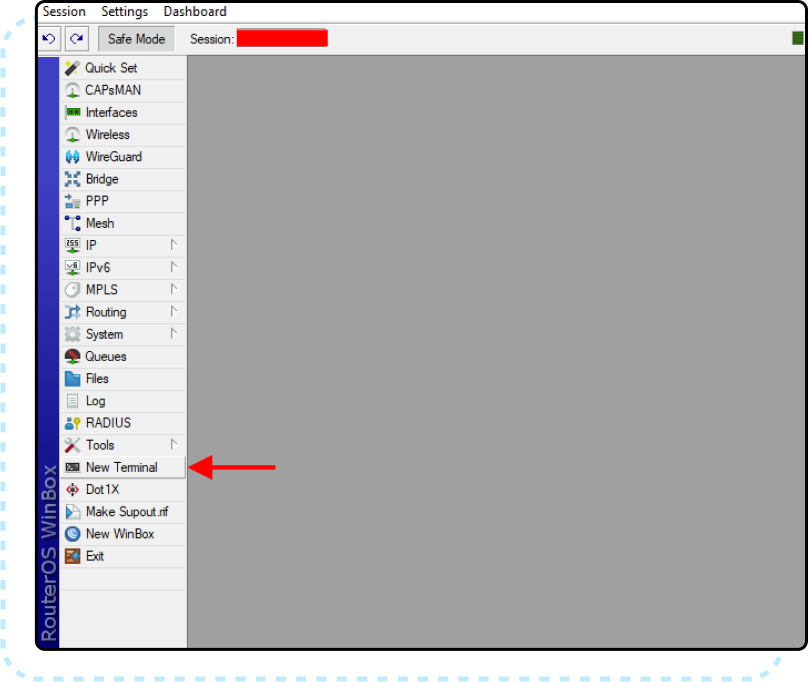
- Create the certificate template:
/certificate

add name=ca-template common-name=myCa key-usage=key-cert-sign,crl-sign - Sign the certificate. Replace
{sonar_ip_address}with the current Sonar IP address:sign ca-template ca-crl-host={sonar_ip_address} name=myCa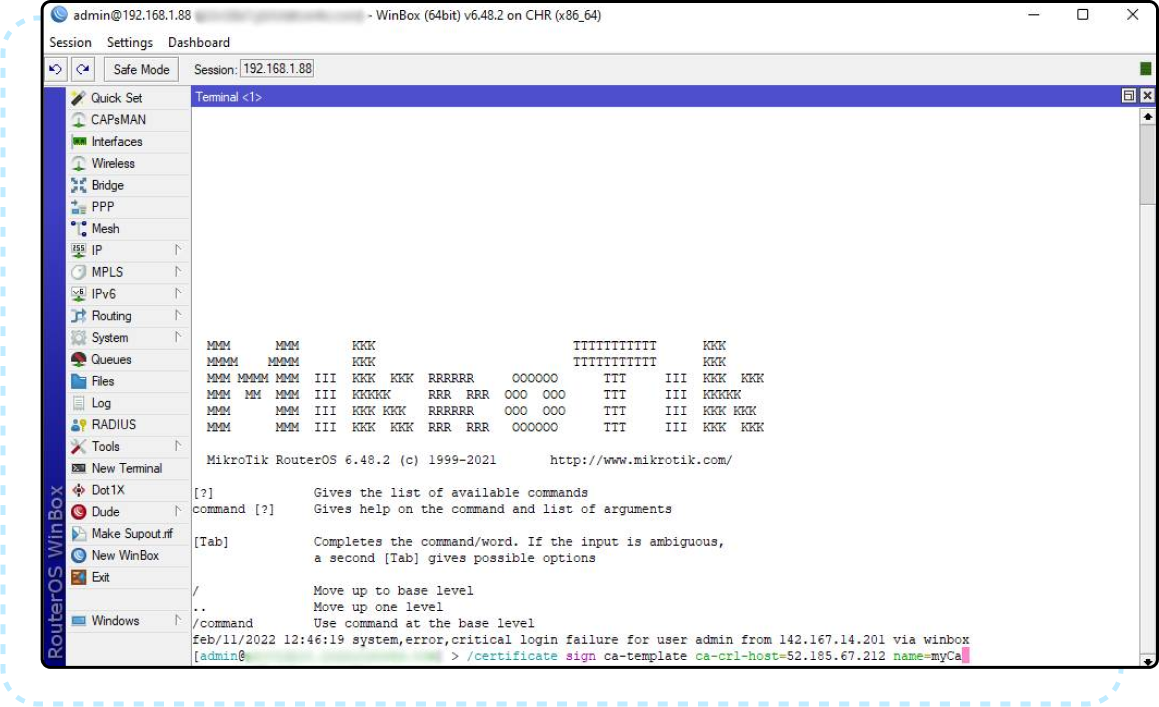
- If the certificate does not show a trusted flag, mark it as trusted:
set myCa trusted=yes
mipsbe-CPU devices, such as RB7xx, RB2011, and RB9xx models, signing can take longer, especially with larger key sizes.Step 4: Enable the api-ssl Service
Sonar communicates with MikroTik through the api-ssl service. The plain api service on port 8728 will not work for this integration.
- In Winbox, go to IP > Services.
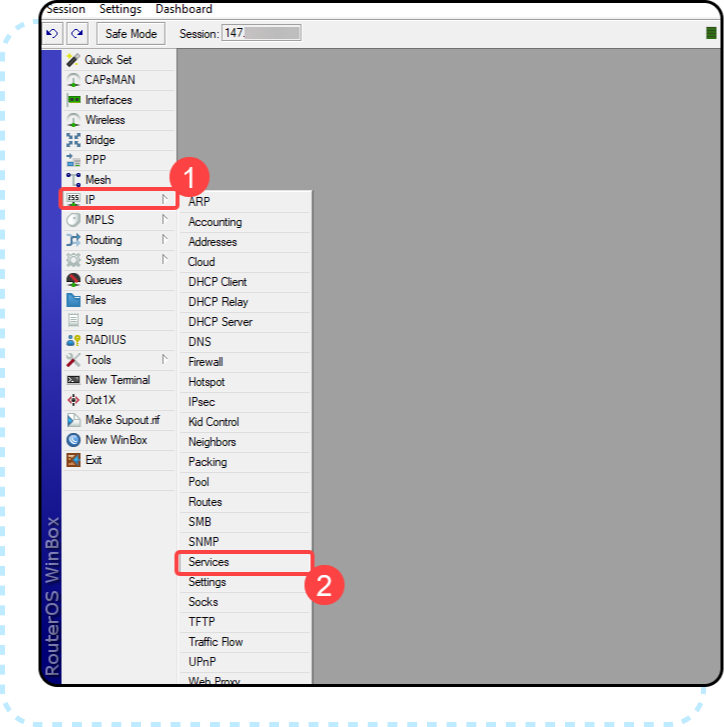
- Select
api-ssl.- Click the blue checkmark to enable it.
- Double-click
api-sslto edit it.- Set Port to
8729, unless you use a custom port. - Set Available From to the current Sonar outbound (egress) IP address or addresses.
- Select the certificate created in Step 3.
- Set Port to
- Click OK.
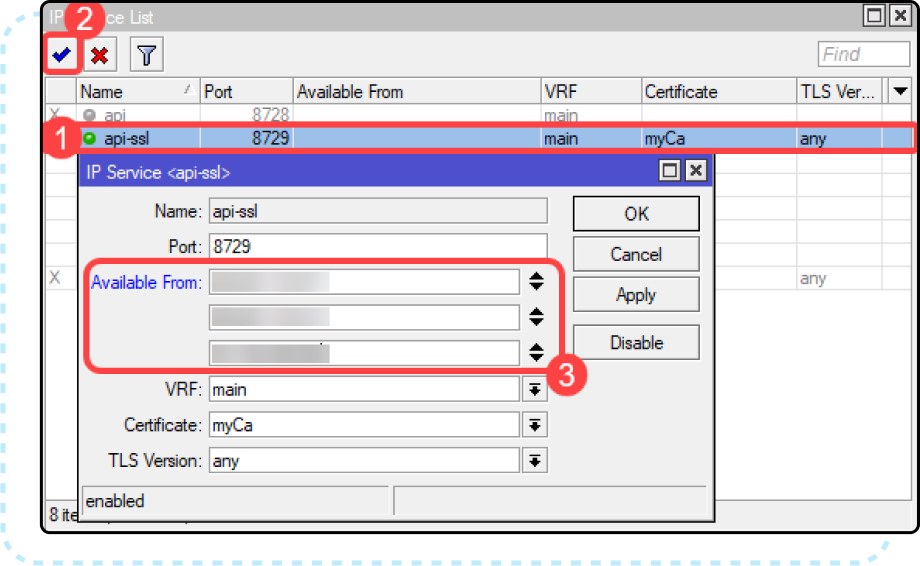
api service on port 8728 is disabled unless it is needed for another purpose.Step 5: Add the MikroTik to the Sonar Application Firewall
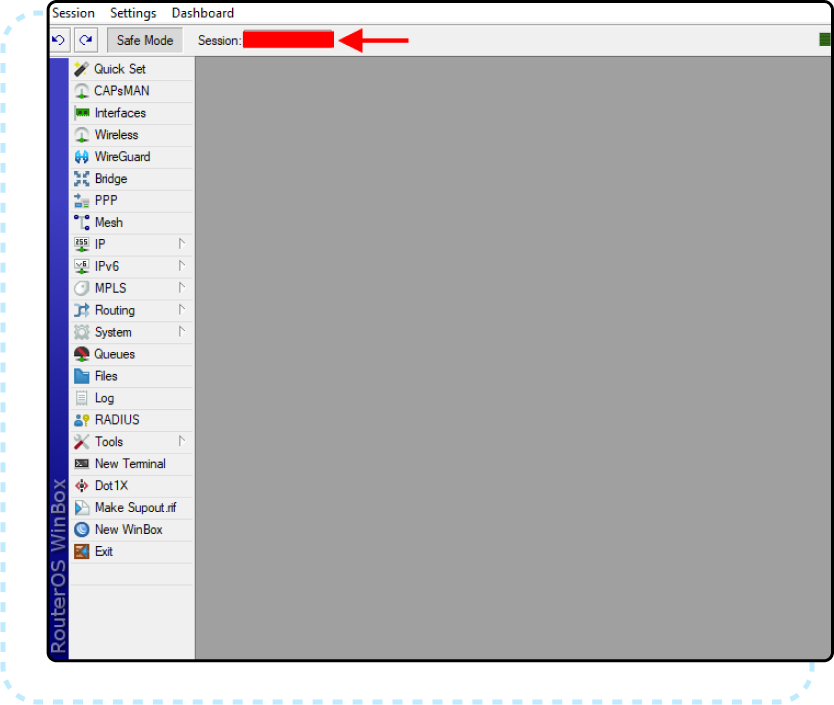
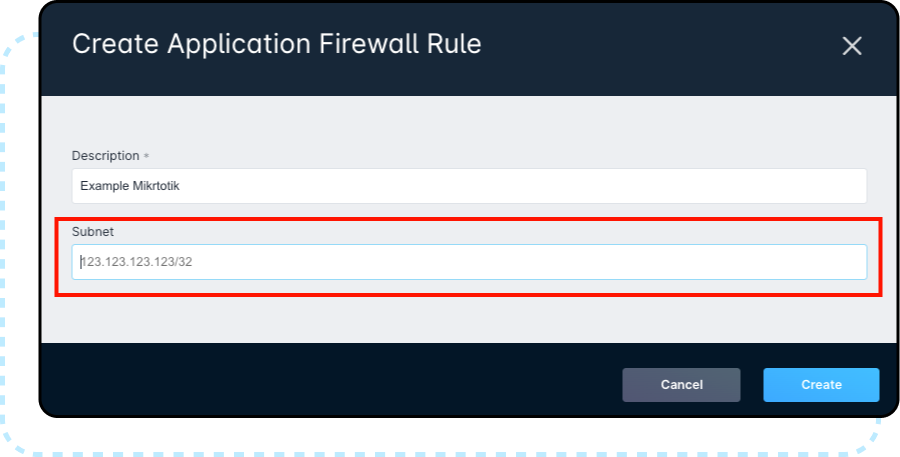
- Identify the MikroTik router’s WAN IP address.
- In Sonar, go to Settings > Security > Application Firewall Rules.
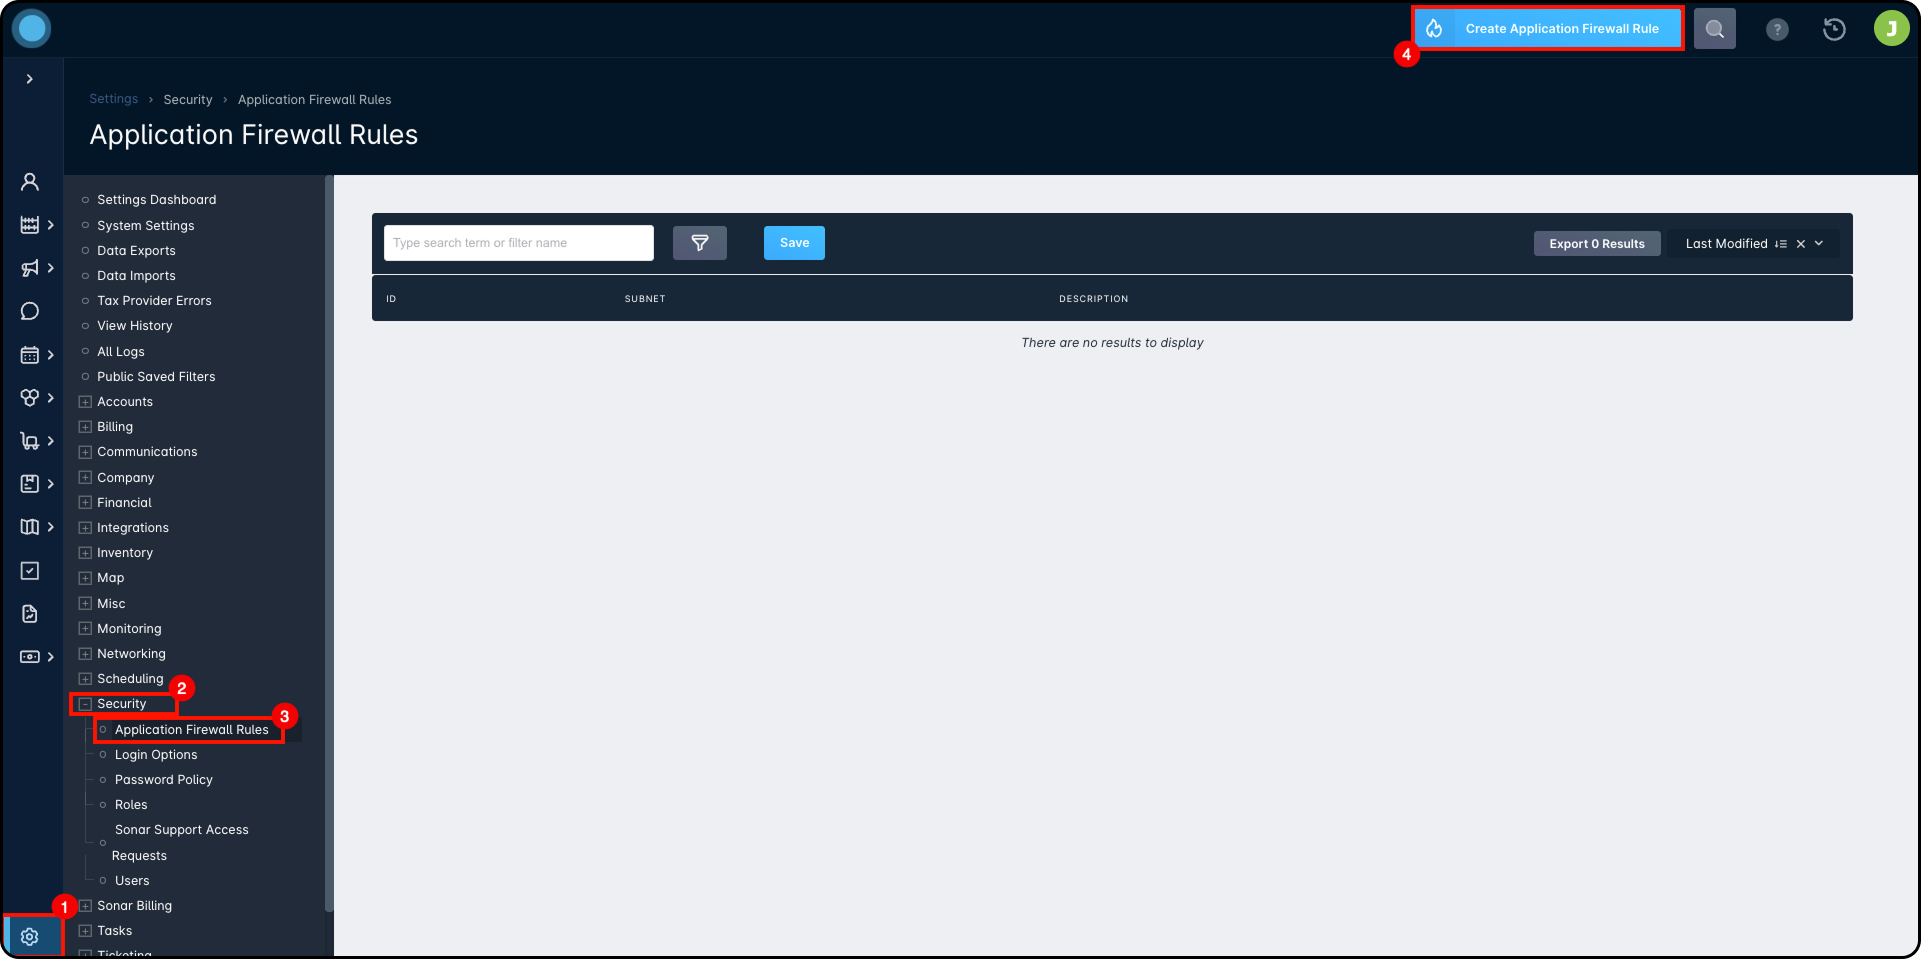
- Click Create.
- Add the MikroTik WAN IP address under Subnet.
- Use the MikroTik device name as the Description.
- Save the rule.
Step 6: Add the MikroTik as a DHCP Server in Sonar
- In Sonar, go to Settings > Networking > DHCP Servers.
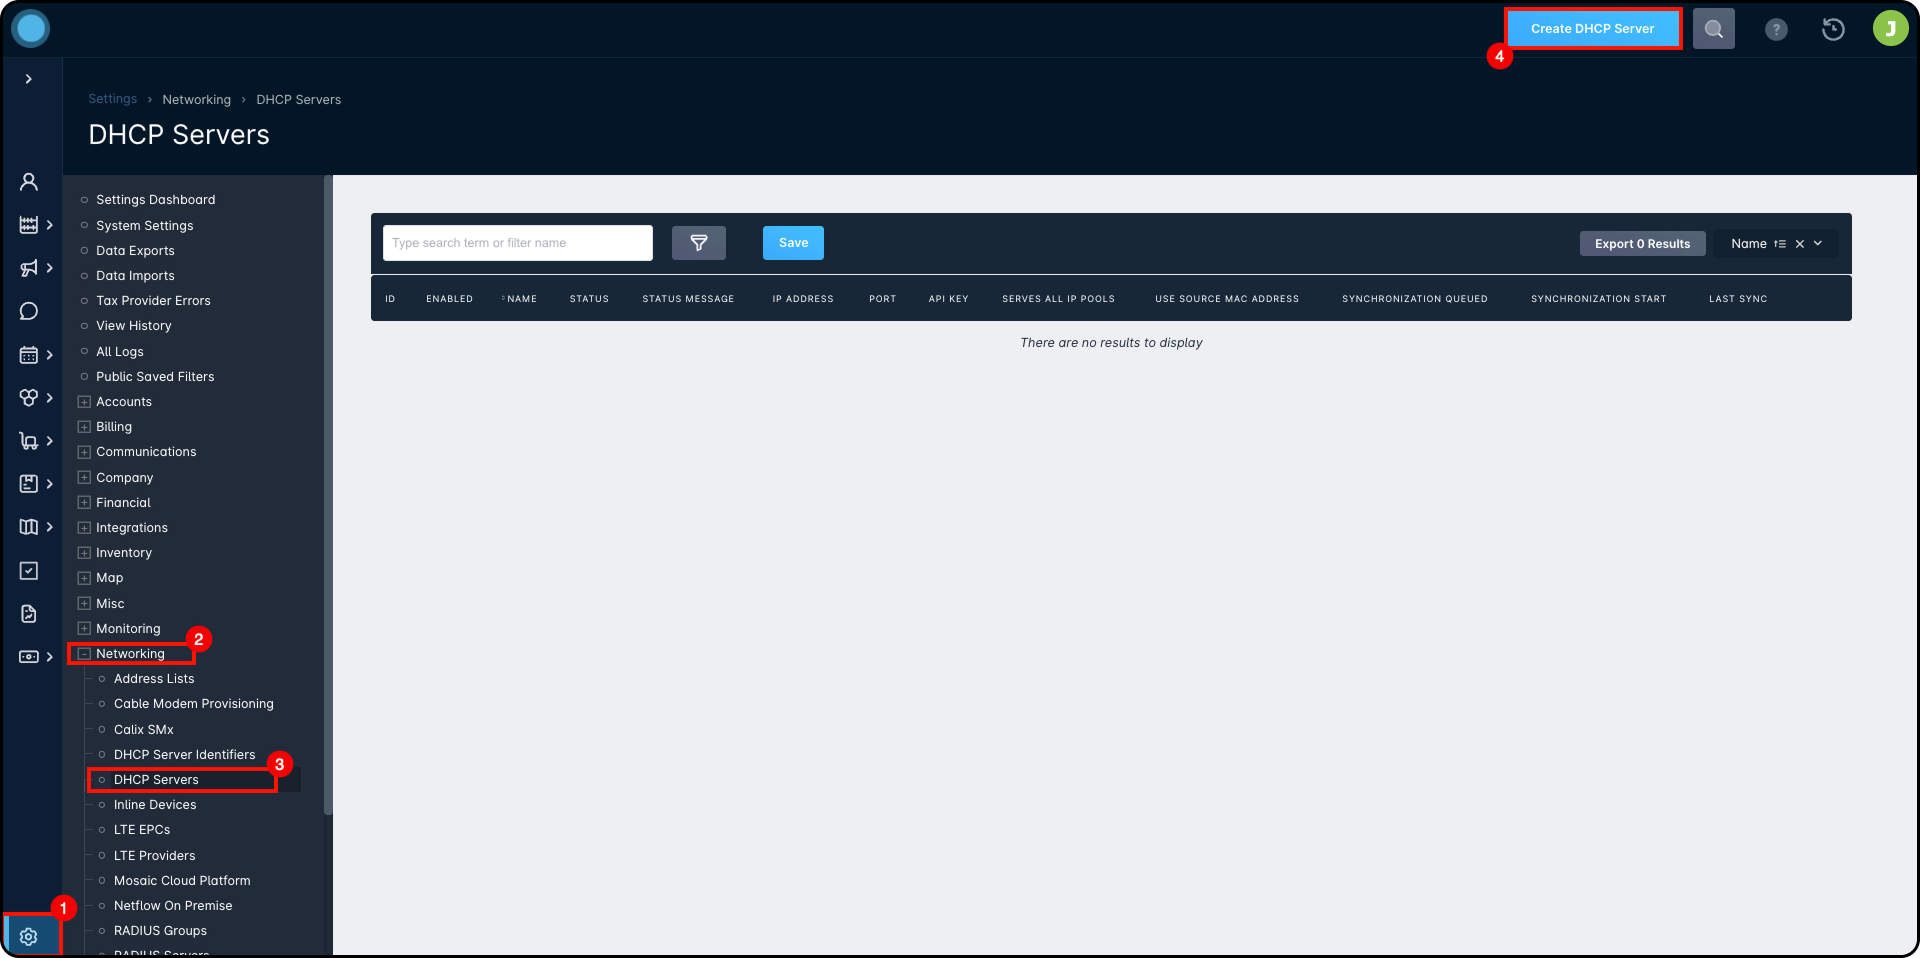
- Click Create.
- Enter a Name. As a best practice, match the MikroTik name shown under System > Identity.
- Enter the IP Address used to reach the MikroTik in Winbox, unless you are using a port forward.
- Enter the Port used by
api-ssl. The default is8729. - Enter the MikroTik Username and Password created earlier.
- Select the IP Pools managed by this DHCP server.
- Enable Use Source MAC Addresses only if you want MikroTik to use the MAC address of a DHCP relay instead of the requesting device.
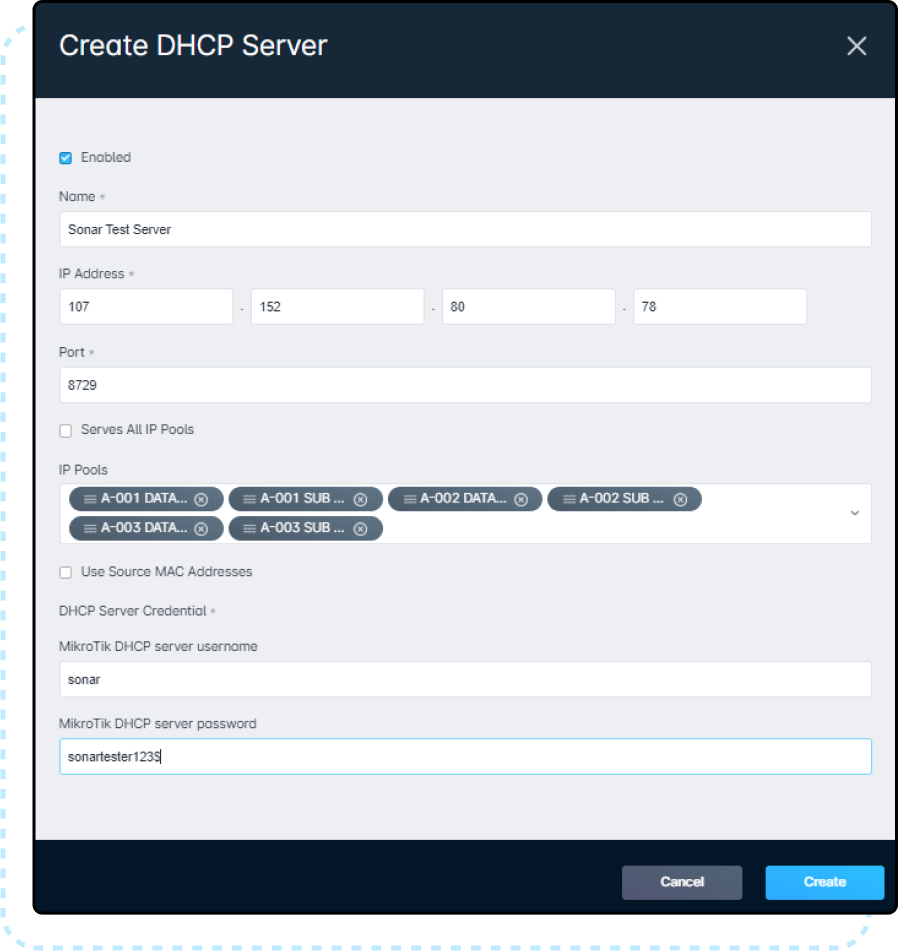
- Click Validate Credentials.


- After validation succeeds, open the dropdown next to the DHCP server and click Synchronize.

How DHCP Synchronization Works
DHCP synchronization runs automatically when an IP assignment in a managed pool is created, updated, or deleted in Sonar.
You can also run synchronization manually from the dropdown next to the DHCP server in Sonar.

Using DHCP Server Identifiers
A DHCP Server Identifier groups one or more IP pools and connects them to a specific DHCP server on the MikroTik.
For MikroTik, the identifier name in Sonar must exactly match the DHCP Server name under IP > DHCP Server > DHCP in MikroTik.
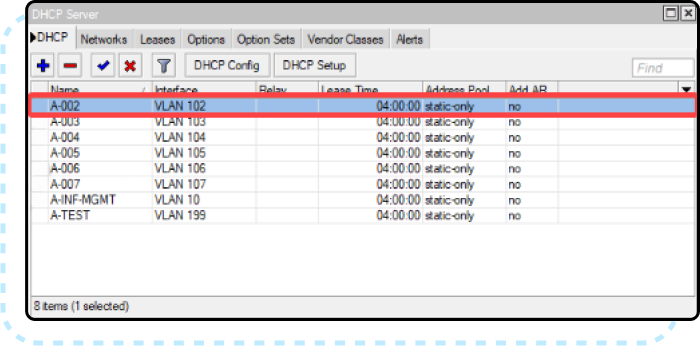
If a pool does not have an identifier in Sonar, MikroTik uses its default behavior and writes the lease to all DHCP servers.
Add a DHCP Server Identifier
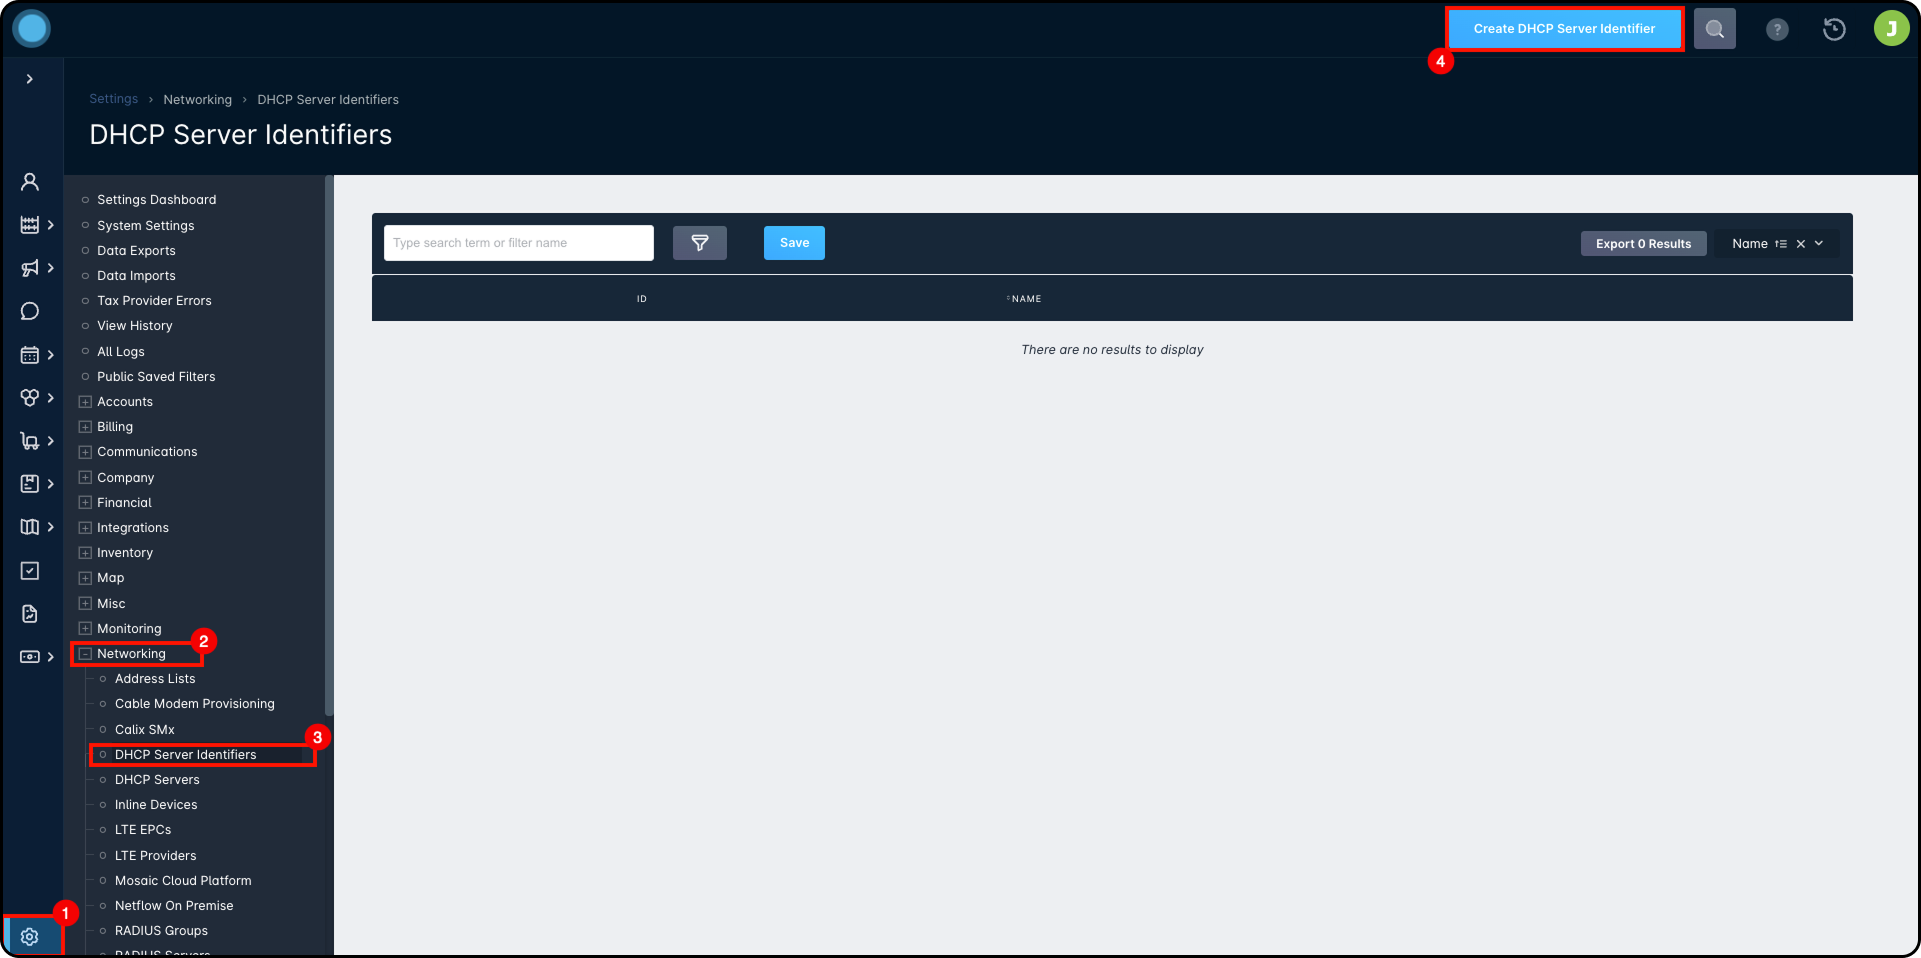
- In Sonar, go to Settings > Networking > DHCP Server Identifiers.
- Click Create DHCP Server Identifier.
- Enter a name that exactly matches the MikroTik DHCP Server name.
- Select the IP pool or pools the identifier should contain.
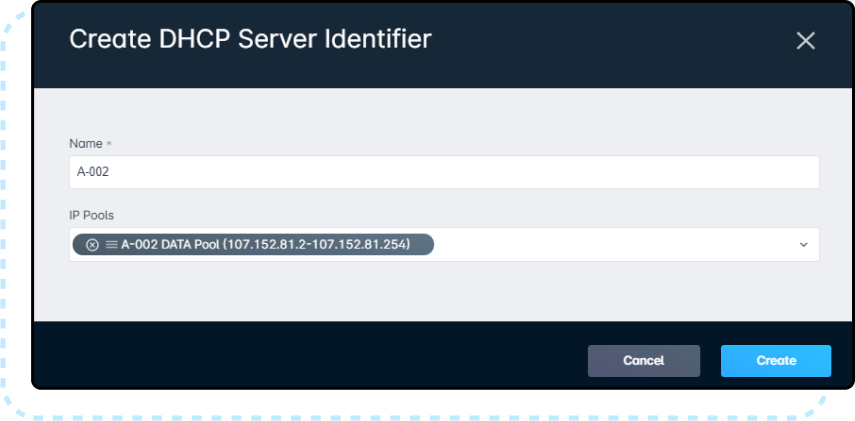
- Select the IP pool or pools the identifier should contain.
- Click Create.
Changes apply in real time to the applicable DHCP servers.