Table of Contents
GPS Tracking Providers: Overview
 Updated
by Kristen Fiddes
Updated
by Kristen Fiddes
Read Time: 10 mins
Integrating a GPS Tracking Provider
Integrating a GPS Tracking Provider within your Sonar instance allows you to view technicians' whereabouts via the Map and Scheduling pages; this feature allows you to either perpetually track the vehicle, or specify days and times only. In this article, we'll cover the process of integrating your provider and how to link vehicles, as well as how the feature is used once the setup is complete.
At this time, Sonar supports the integration of the following GPS Tracking Providers:
- Geotab
- Linxup
- Samsara
- Track Your Truck
- Verizon ConnectThis integration is only compatible with the Verizon Networkfleet brand.
- Zubie
Permissions
To integrate GPS Tracking Providers or make any adjustments to an existing integration, the corresponding role permissions must be enabled. Please take a moment to review these new permissions and ensure that the relevant roles have them added before proceeding with any walkthrough steps.
Navigate to Settings → Security → Roles and either choose to edit an existing Role or create a new Role. With the next page populated, locate the permissions reflected in the screenshots below and enable whichever ones are applicable to that Role.

All users who access The Map Interface or the Dispatcher View of the calendar will be able to see the GPS tracking in action, but without the permissions reflected above, they'll be unable to modify the integration settings.
GPS Tracking Provider Settings
The GPS Tracking Provider page can be accessed by navigating to Settings → Integrations → GPS Tracking Providers. This page will display all existing providers within your instance, with a range of abilities to manage them.
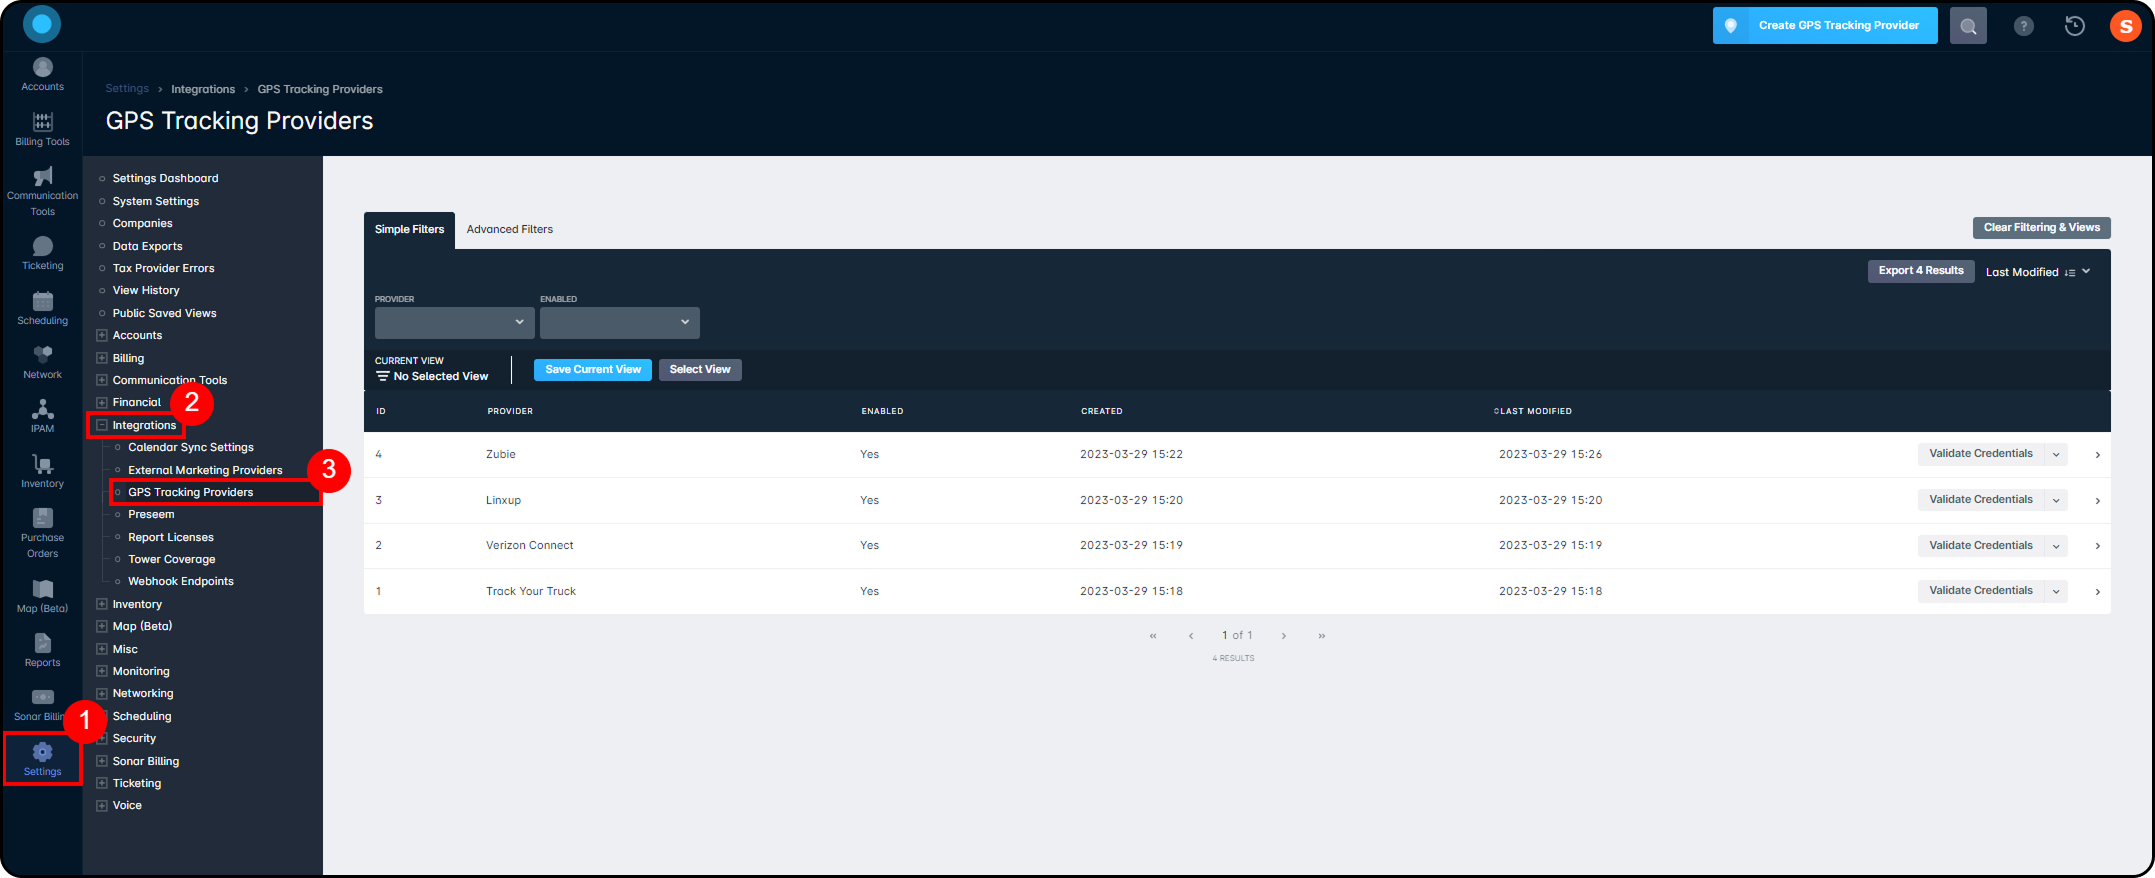
Below, we'll break down the table portion of the page:

- The Provider column reflects the name of the GPS Tracking Provider.You can have multiple providers added to an instance, which may be necessary if you're dealing with multiple companies in one instance.
- The Enabled column offers a quick way to identify which providers are enabled or disabled presently. If disabled, the credentials remain present in the instance, and can be validated, but any vehicles associated with that provider will not update within the mapping GUIs.
- The Created column displays the date the provider was added to the instance.
- The date and time below Last Modified is updated as the provider is edited or enabled/disabled.
- The Validate Credentials button will use the credentials input in the creation or edit modal to validate with the provider.
- The downward-facing arrow reveals the following options:
- Edit – clicking on this will populate the edit modal, which can be used to update the credentials.
- Enable/Disable - this option will change depending on whether the provider is currently enabled or disabled.
- Delete - clicking on this will clear the provider from the instance.This can only be done once any associated vehicles are separated from the provider you're trying to delete, we'll cover this process underneath Managing Vehicles.
- Clicking the arrow at the far right of the line item will populate a sidebar menu that details information such as the activity history of the integration, whether it's enabled, and if OAuth was required for the authentication.
How to Add a GPS Tracking Provider
While on the GPS Tracking Provider page, click on Create GPS Tracking Provider in the upper-right corner and a new modal will populate:
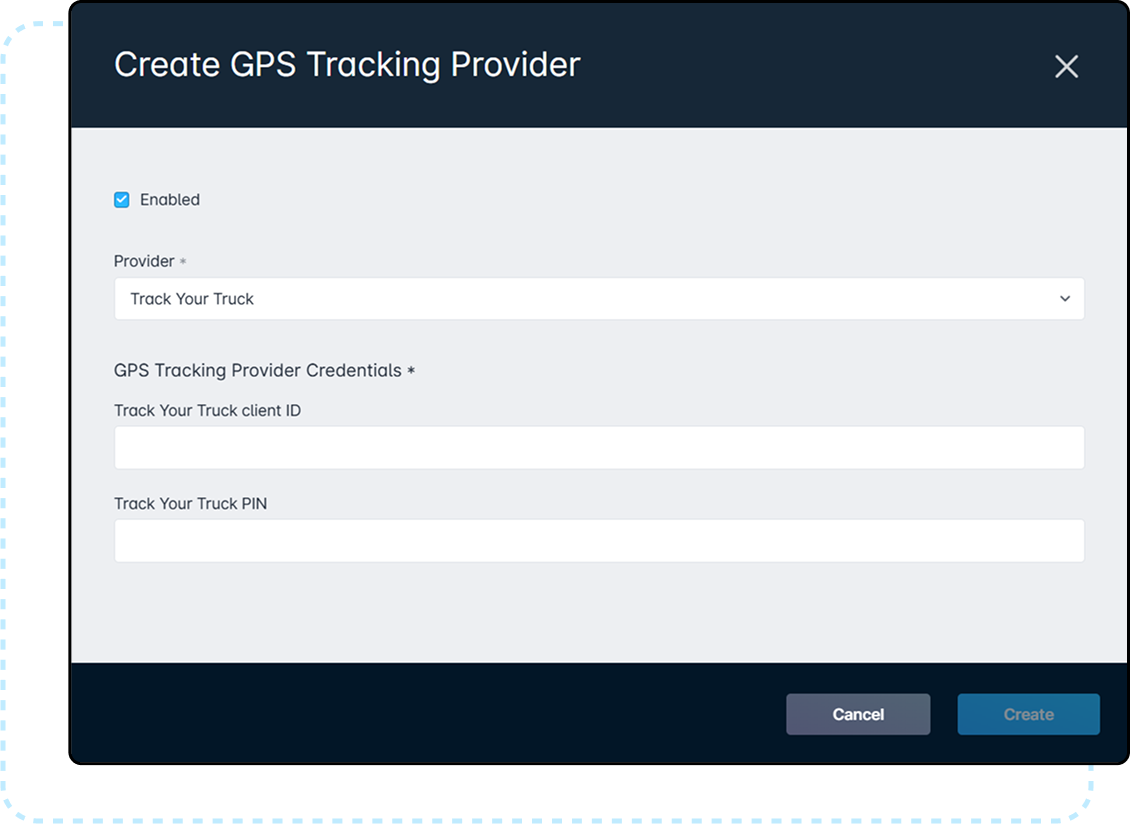
The dropdown underneath Provider allows you to select from the available providers outlined at the start of this article. Once selected, the related credential fields will populate where you will input your client ID and client secret/password. From this modal, you can also choose to enable the provider immediately, or leave it disabled until a later time.
The folds below include steps to locate your client information for each provider:
Steps for Geotab
It also requires your Geotab Database information, which is your unique instance name from Geotab. For example,
https://my.geotab.com/xxyyzz. The xxyyzz is your Database name.Steps for Linxup
It also requires the Linxup API Access URL. If no value is set, the integration will default to
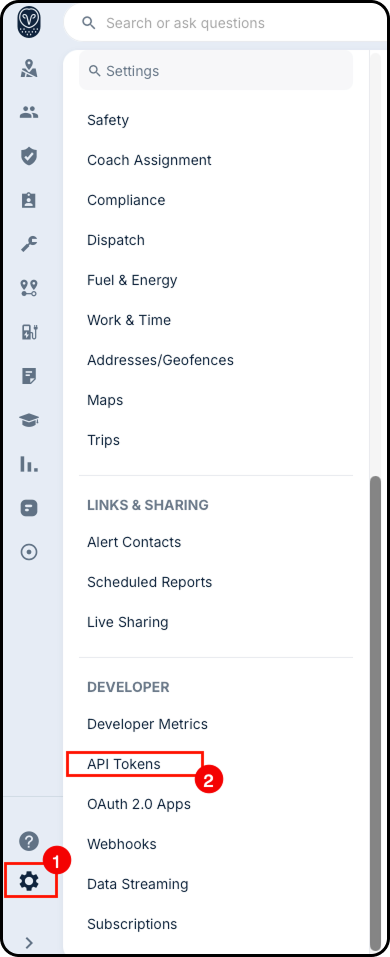
www.linxup.com. To confirm which API Access URL should be used for your integration, contact Linxup support.Steps for Samsara
2. Go to Organization Settings.
3. In the left navigation, under Developer, select API Tokens.
4. Click + Add an API Token (upper-right corner).

5. In the Add API Token window, enter:
a. Name:
Sonar Integrationb. Tag Access: Leave as
Entire Organization (unless you need to restrict access to specific tags)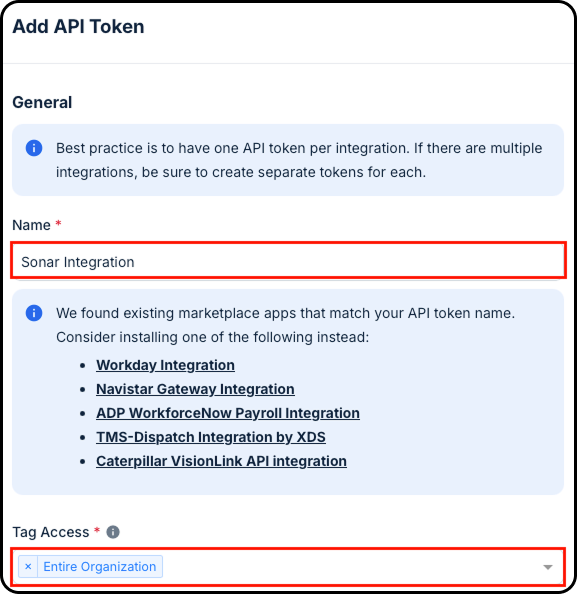
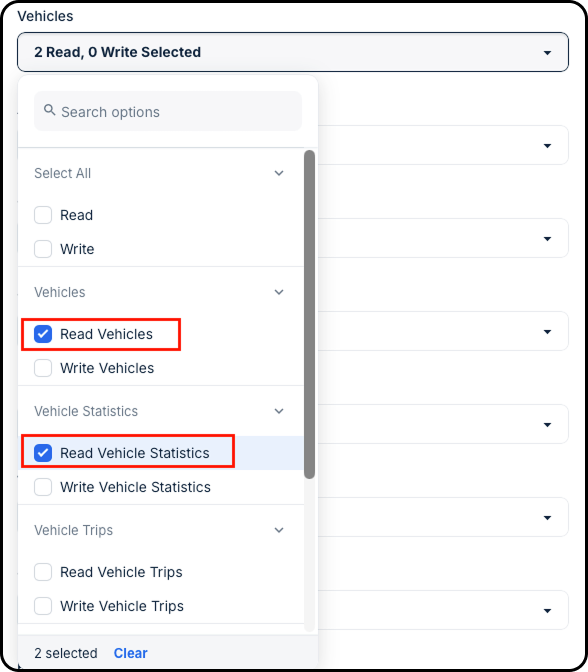
c. Scopes: Keep only the following and remove all others:
i. Vehicles → Read Vehicles
ii. Vehicles → Read Vehicle Statistics
6. Click Save.
7. Copy and securely store the API key that’s generated.
This is the only time the full token will be shown. If it’s lost, you’ll need to regenerate it.
Steps for Track Your Truck
Steps for Verizon Connect
1. Navigate to the Verizon Connect login page.
2. Log in as the admin user.
3. Navigate to Getting Started → Client Key Management.
4. Select Register New Client to prompt the creation of a Client ID and Secret.
Steps for Zubie
2. Locate the Add an App section of the interface.
3. Underneath App Name, input "Sonar" or something along those lines; this is used to identify which apps have access so we recommend keeping it simple.
4. Underneath Callback URL, add the following URL with the respective portion updated to match your instance:
https://YOURINSTANCEHERE.sonar.software/oauth/gpstracking/zubiecar
5. Click on Save.
6. Once saved, a new line item will populate below Your Apps within Zubie and from here, you can retrieve the Client ID and Client Secret needed to add Zubie to Sonar.
Once created, the new provider will be reflected in the GPS Tracking Provider table. However, before you're able to utilize the integration further, you must first click Validate Credentials. If successful, a green confirmation message will appear in the upper-left corner. In the event the credentials cannot be validated, you need to confirm the credentials for your GPS Tracking Provider and update them in your instance by clicking on the downward-facing arrow alongside Validate Credentials and selecting Edit. This will populate a modal similar to the creation window, and from there you can update the information before attempting to validate once again.
Managing Vehicles
The next step of integrating a GPS Tracking Provider is associating the necessary vehicles and deciding when to track them. Before you can follow the steps within your Sonar instance, you must first ensure the vehicles are set up within your GPS tracking provider's system. When ready to proceed, navigate to Settings → Inventory → Vehicles.
From the table, locate the vehicle you wish to track and click on Edit.
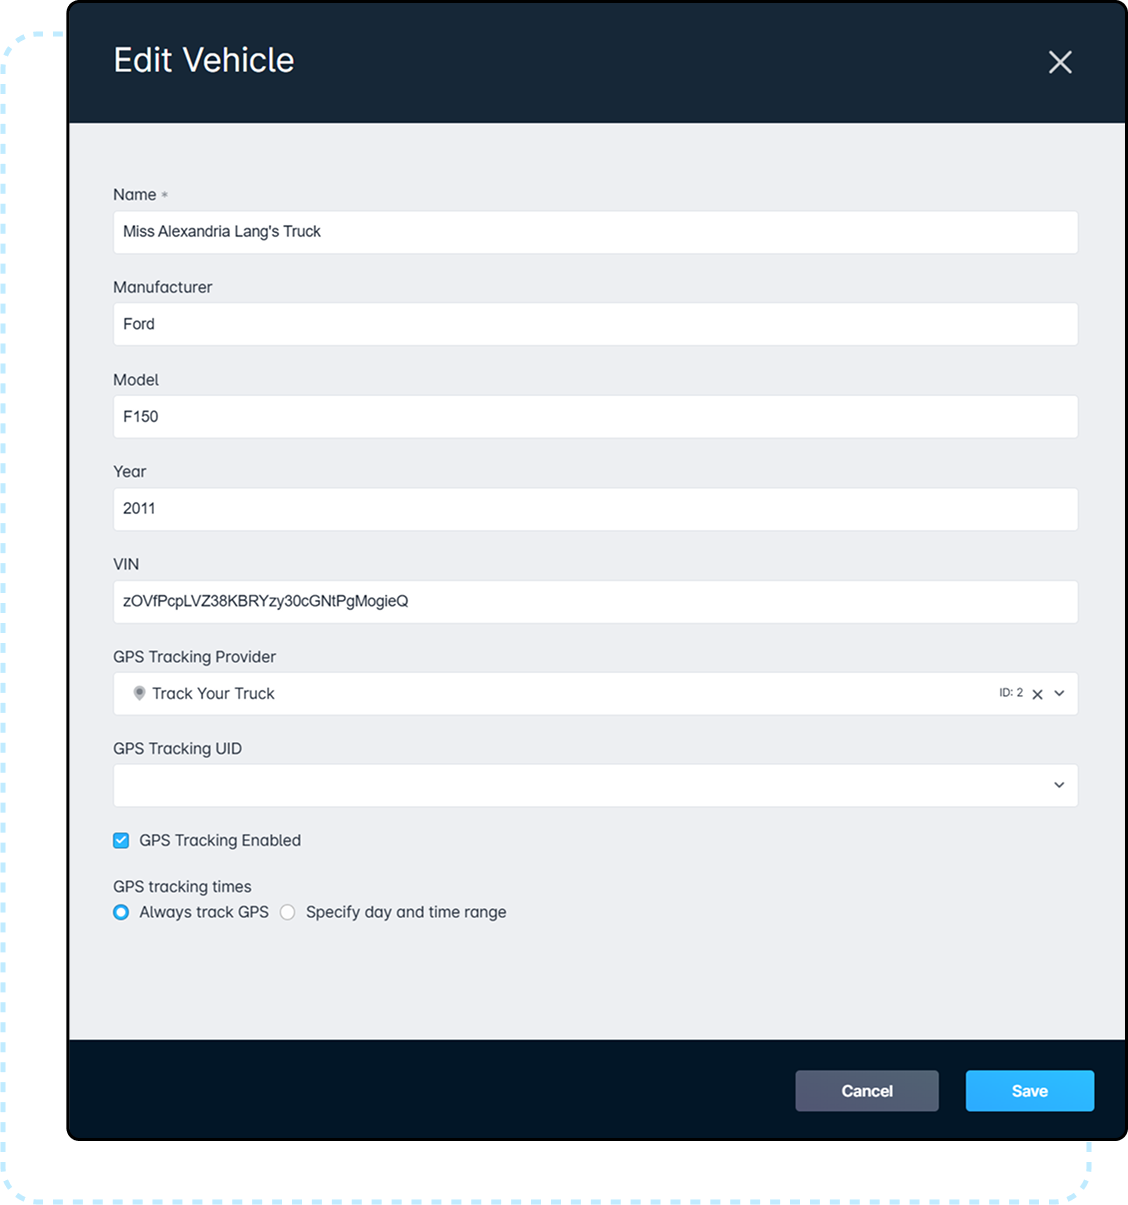
- Use the dropdown below GPS Tracking Provider to select the appropriate provider; the only providers that show here are the ones you've already integrated.
- Underneath GPS Tracking UID, locate the correct UID that is associated with the vehicle you're updating.
- To enable tracking, add a checkmark alongside GPS Tracking Enabled. When enabled, the following option will display.
- The options beneath GPS tracking time are as follows:
- Always track GPS - selecting this will mean that the vehicle is always tracked.
- Specify day and time range - selecting this will display new fields that allow you to select which days of the week, the timezone, and the timeframe that you wish to track the vehicle.If this option is chosen, the vehicle will still appear on the map outside the times specified, however, it will only reflect the last recorded location. The status will only update within the days and times outlined.
How to Disable GPS Tracking With a Vehicle
The steps outlined below are to be used in the event you need to temporarily disable tracking of a vehicle, while maintaining the associated GPS Tracking UID.
- Navigate to Settings → Inventory → Vehicles.
- Identify which vehicle you want to change and then click on Edit alongside it.
- In the newly populated modal, uncheck GPS Tracking Enabled and then click on Save.
How to Delete GPS Tracking From a Vehicle
In the event you intend to remove a GPS Tracking Provider from your Sonar instance, the vehicles must first have the tracking deleted entirely. The process to do so requires only a few steps:
- Navigate to Settings → Inventory → Vehicles.
- Identify which vehicle you want to modify, then click on Edit alongside it.
- In the newly populated modal, uncheck GPS Tracking Enabled and use the dropdown below GPS Tracking Provider to select No Selection.
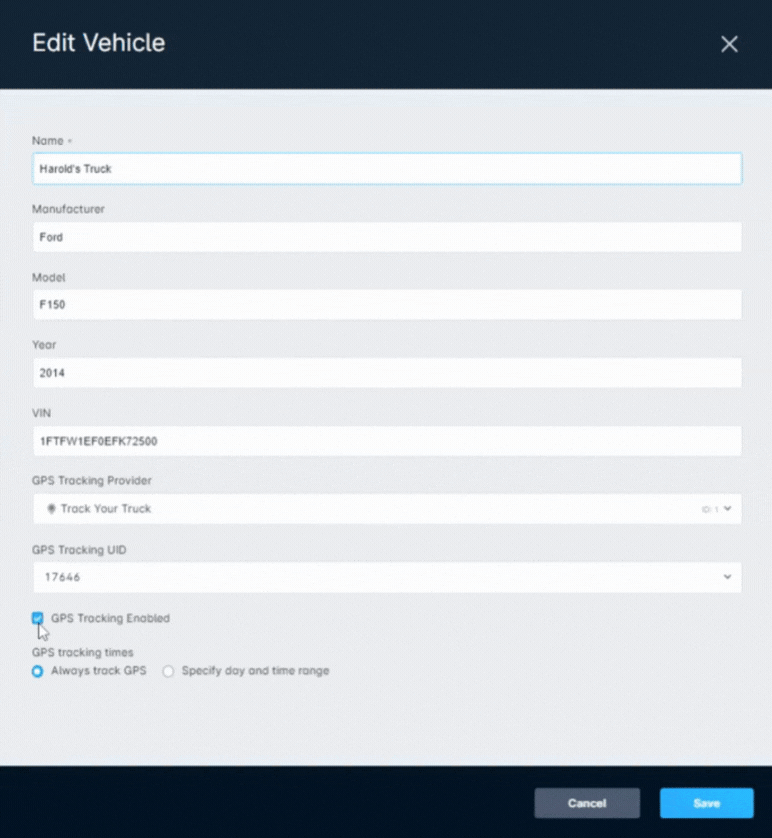
- Click on Save.
GPS Tracking In Use
Once a provider has been integrated, and the respective vehicles have been associated, you can then view the vehicles by navigating to Maps or Scheduling within your instance:
Maps
Within Maps, you'll be able to see vehicle icons throughout your service area. Hovering over a vehicle icon will populate a mini-menu overlaying the map that reflects the vehicle information and the status; some tracking providers may show additional information, such as the speed the vehicle is traveling. Clicking on a vehicle icon will prompt a sidebar menu to appear which provides similar information to the mini-menu, and additionally includes activity history along with easy access to the vehicle inventory page by selecting Manage.
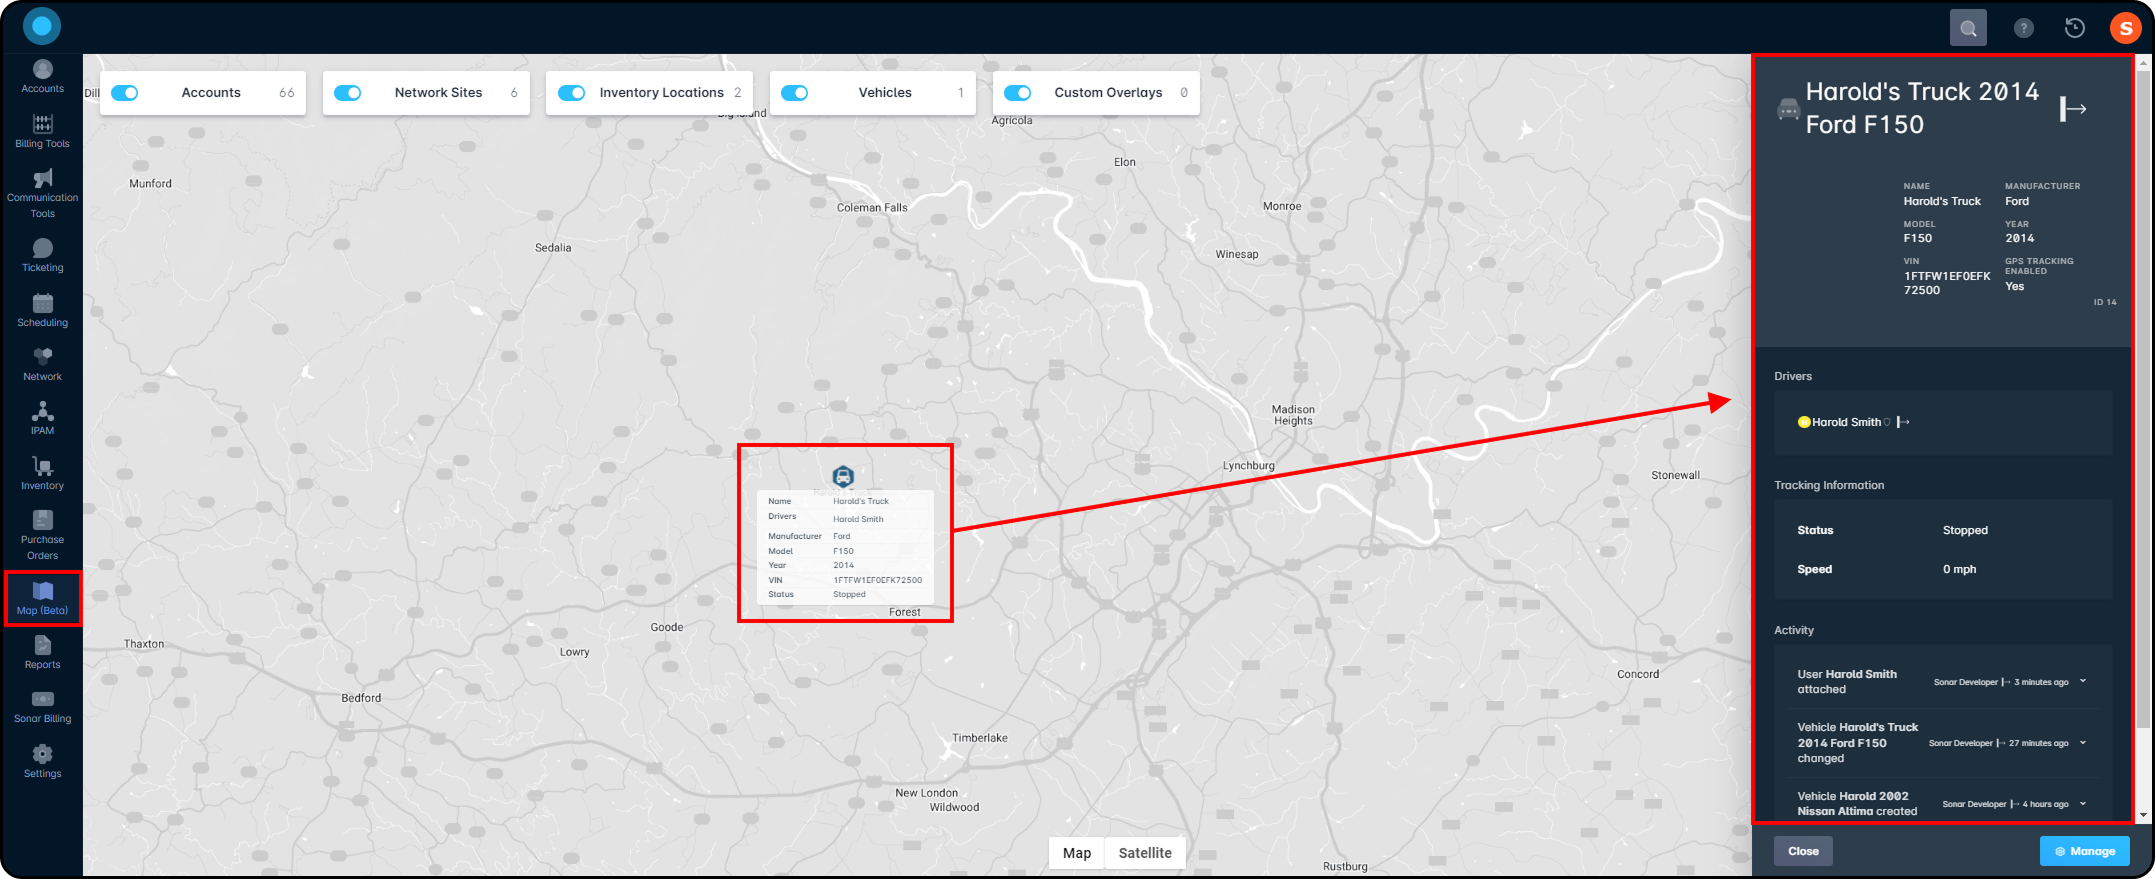
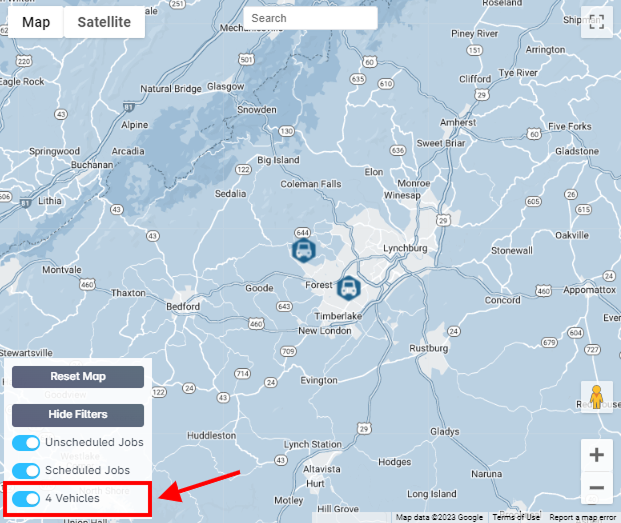
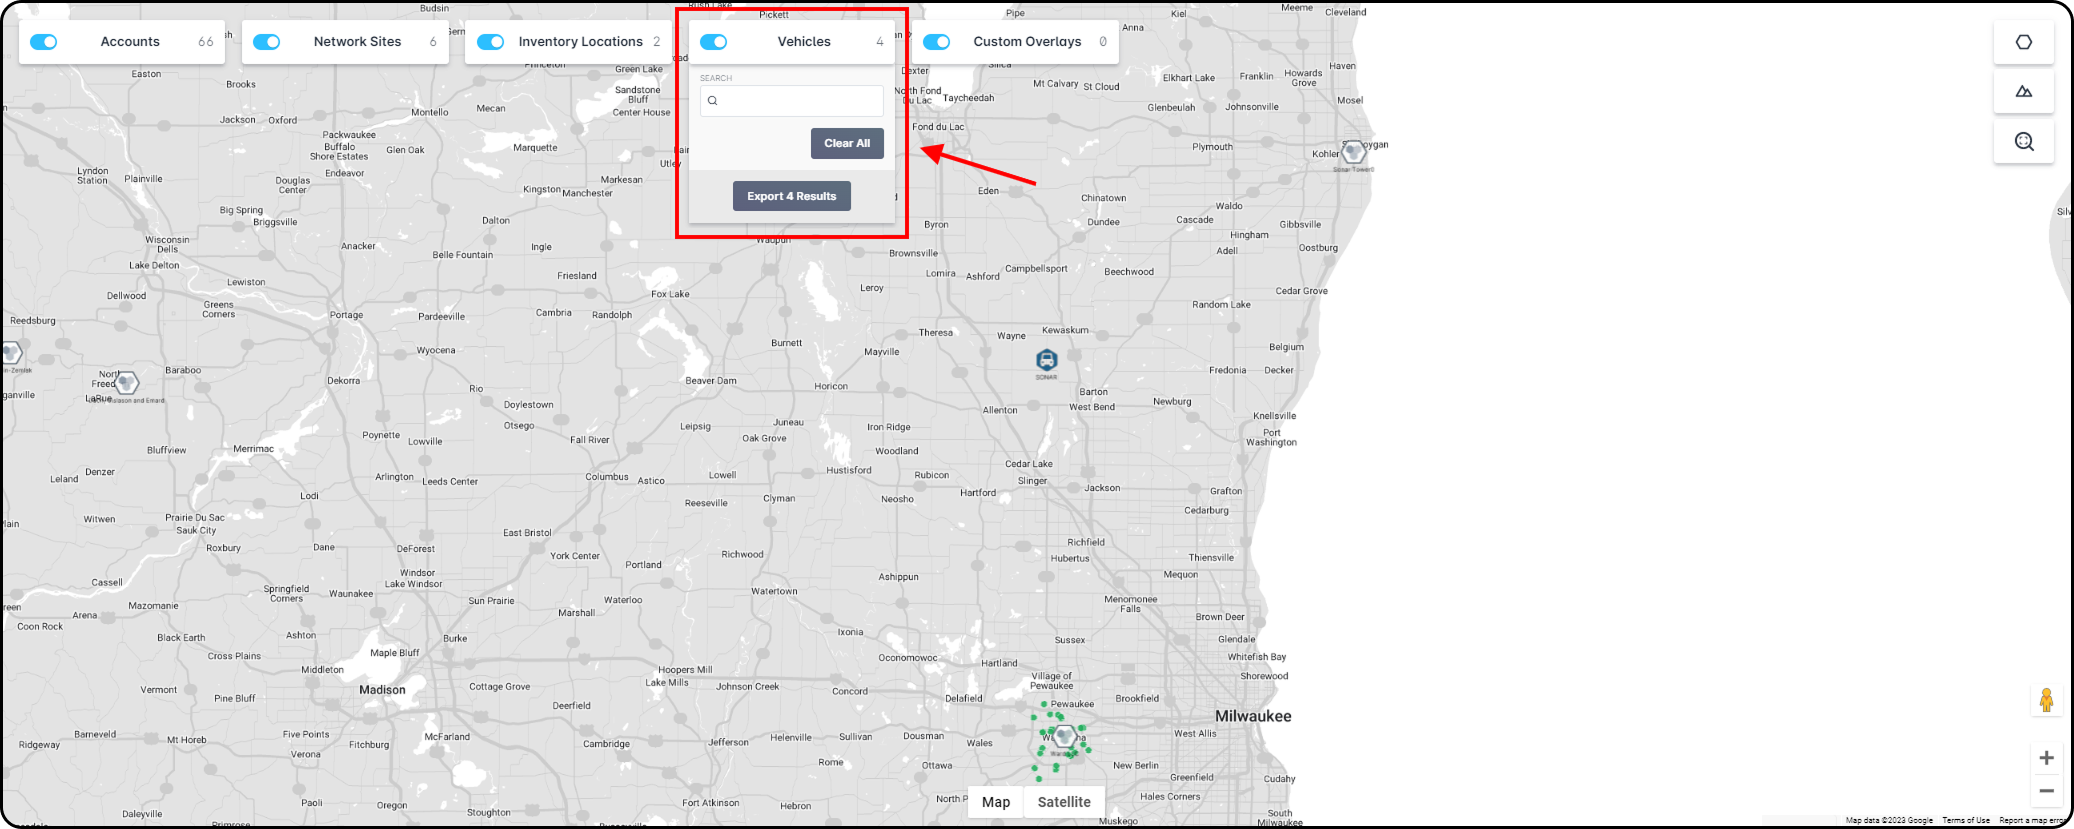
The Vehicles filter at the top of the map allows you to quickly remove all tracked vehicles from your map, or efficiently locate one by expanding the filter and utilizing the search feature.
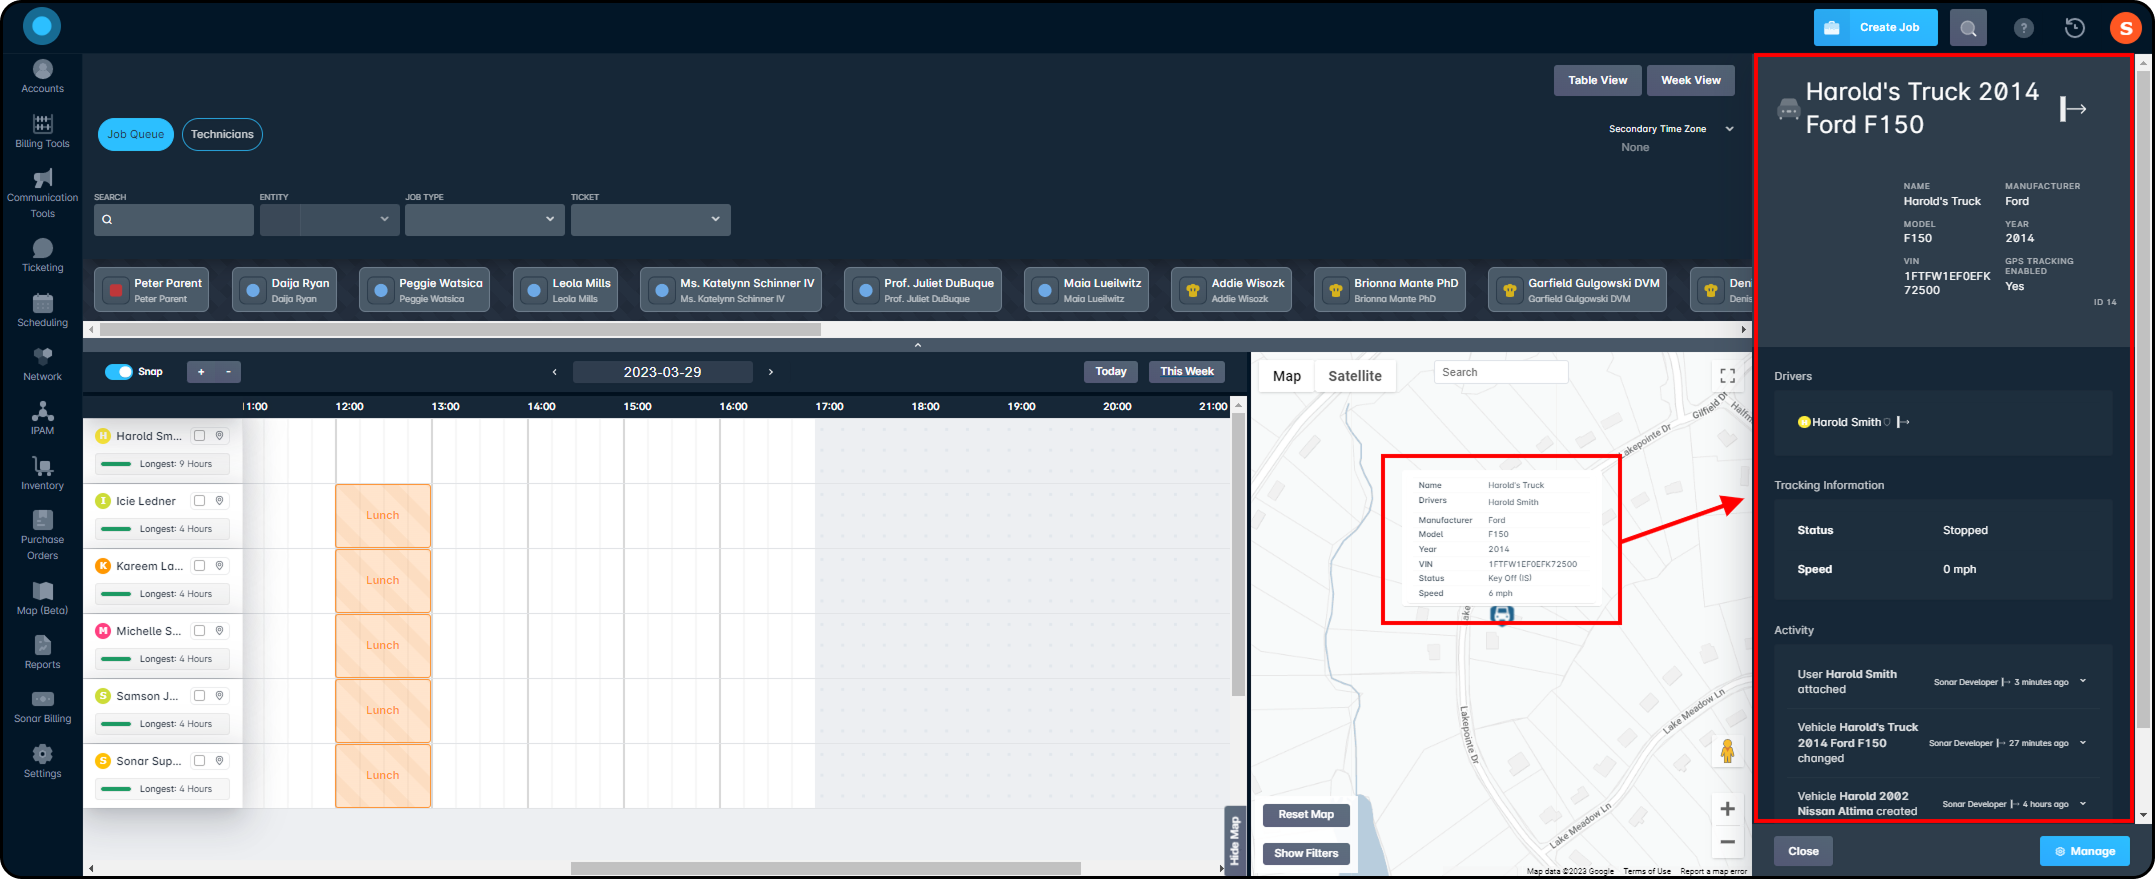
Scheduling → Dispatcher View
Via the Dispatcher View within Scheduling, you'll see vehicle icons on the map section of the page. To populate the mini-menu, you can either hover over a technician's name in the calendar portion, or hover over a vehicle found on the map; the former method allows you to quickly locate the whereabouts of a particular technician. The mini-map that appears will reflect vehicle information and its status; some tracking providers may show additional information, such as the speed the vehicle is traveling. Like in the Map interface, you can access a sidebar menu by clicking on the icon, and can then access the inventory page of the vehicle by clicking on Manage.
# Vehicles option.