In the Ticketing: Overview article, we looked at the basic features of the Ticketing page. This article goes a step further by highlighting more advanced tools—where to find them, how they appear to admins and users, and how to use them to streamline your work in the ticketing interface.
Mass Editing Tickets
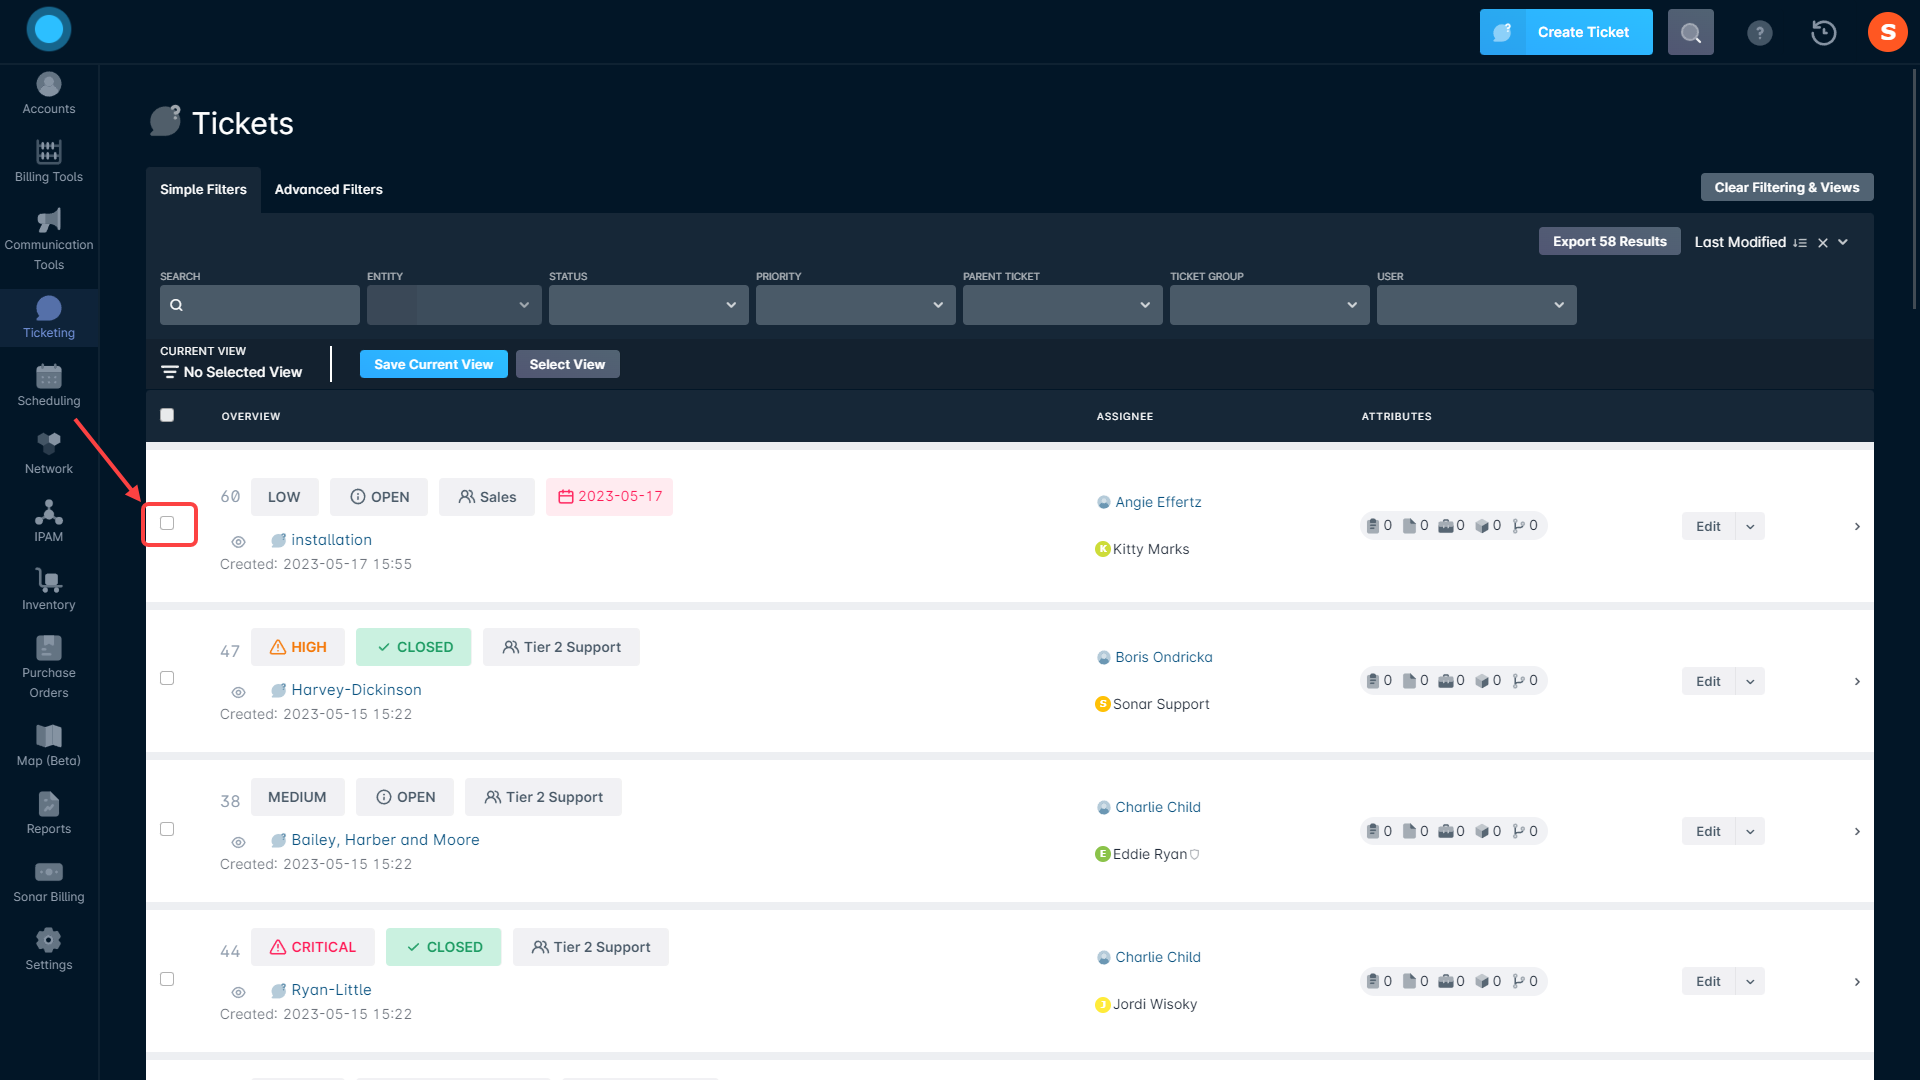
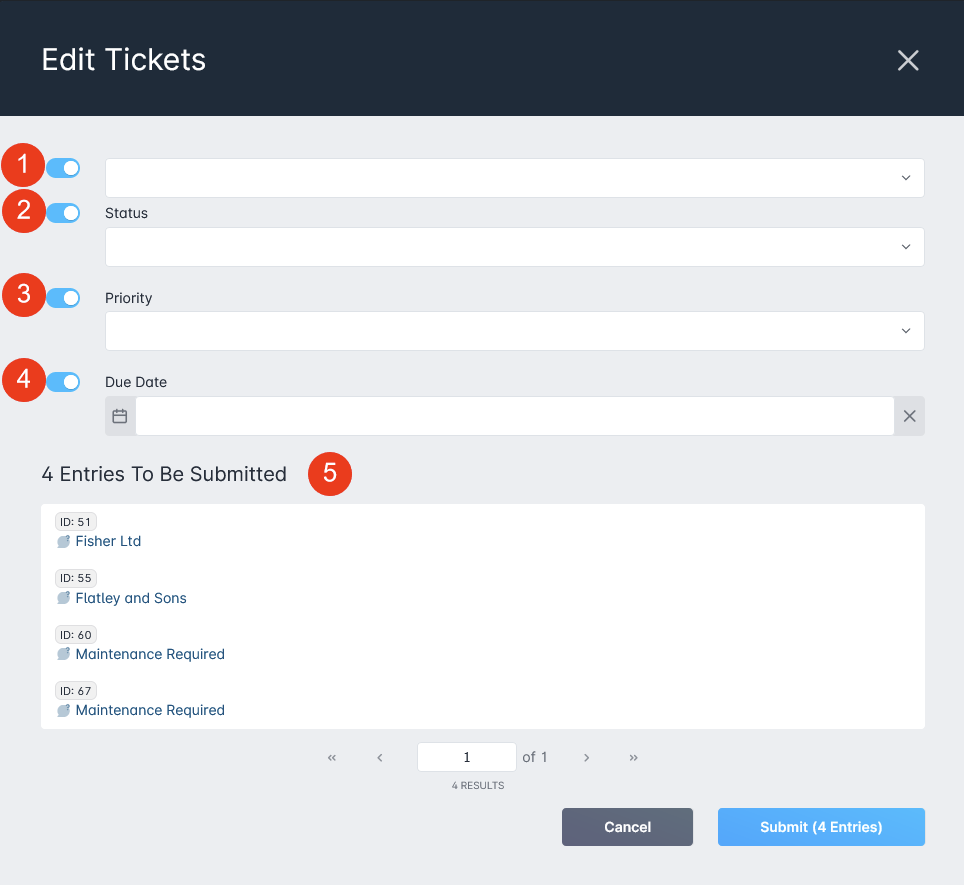
While the Overview article covered how to edit a single ticket, you can also edit multiple tickets at once. Mass editing lets you apply the same changes to a group of tickets. To begin, simply check the box next to each ticket you want to include in the update.
As you check each box, the ticket name is added to a banner at the bottom of the page.
Once you’ve selected all the tickets you want to edit, click the edit button at the end of the banner.
The Entity selector allows you to modify the Account or Network Site the ticket is assigned to.
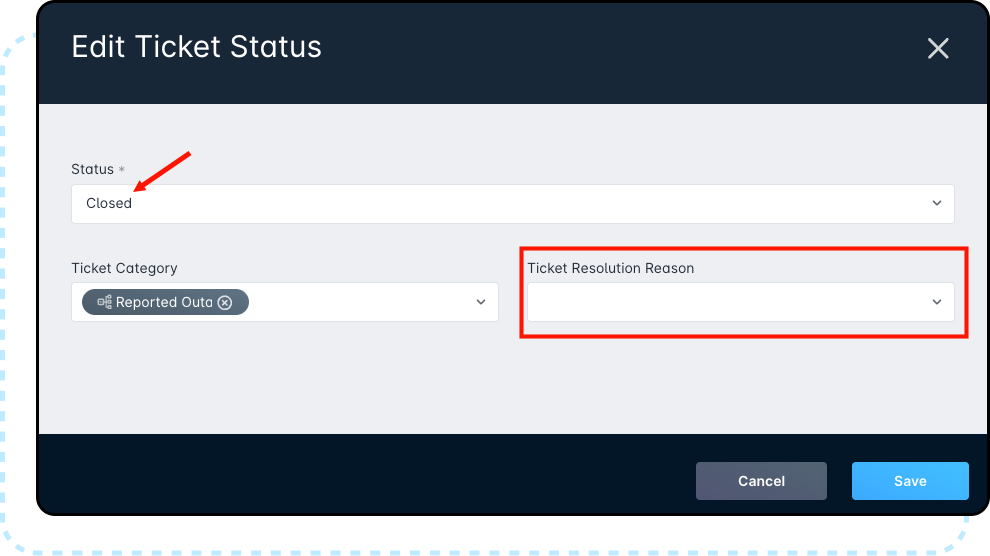
The Status selector allows you to modify the status of all the tickets you've selected for mass modification. You can choose between:
Closed
If Ticket Resolution Reasons are enabled in your system, you’ll see a field where you can select the resolution reason.
Open
Pending (External)
Pending (Internal)
The Priority selector allows you to modify the priority of all selected tickets. You can select from:
Critical
High
Low
Medium
The Due Date selector allows you to set a specific date that all selected tickets are due by.
This section will list all tickets that will be edited by these changes. Once the “Edit Tickets” modal is open, you can no longer remove or add tickets.
The changes made in this modal will apply to all tickets, you can't selectively change tickets within those selected.
Unlike Using Parent Tickets, mass editing tickets doesn't allow you to add comments or details concerning why changes are being made. The changes are simply made, and will only appear in the logs of each ticket.
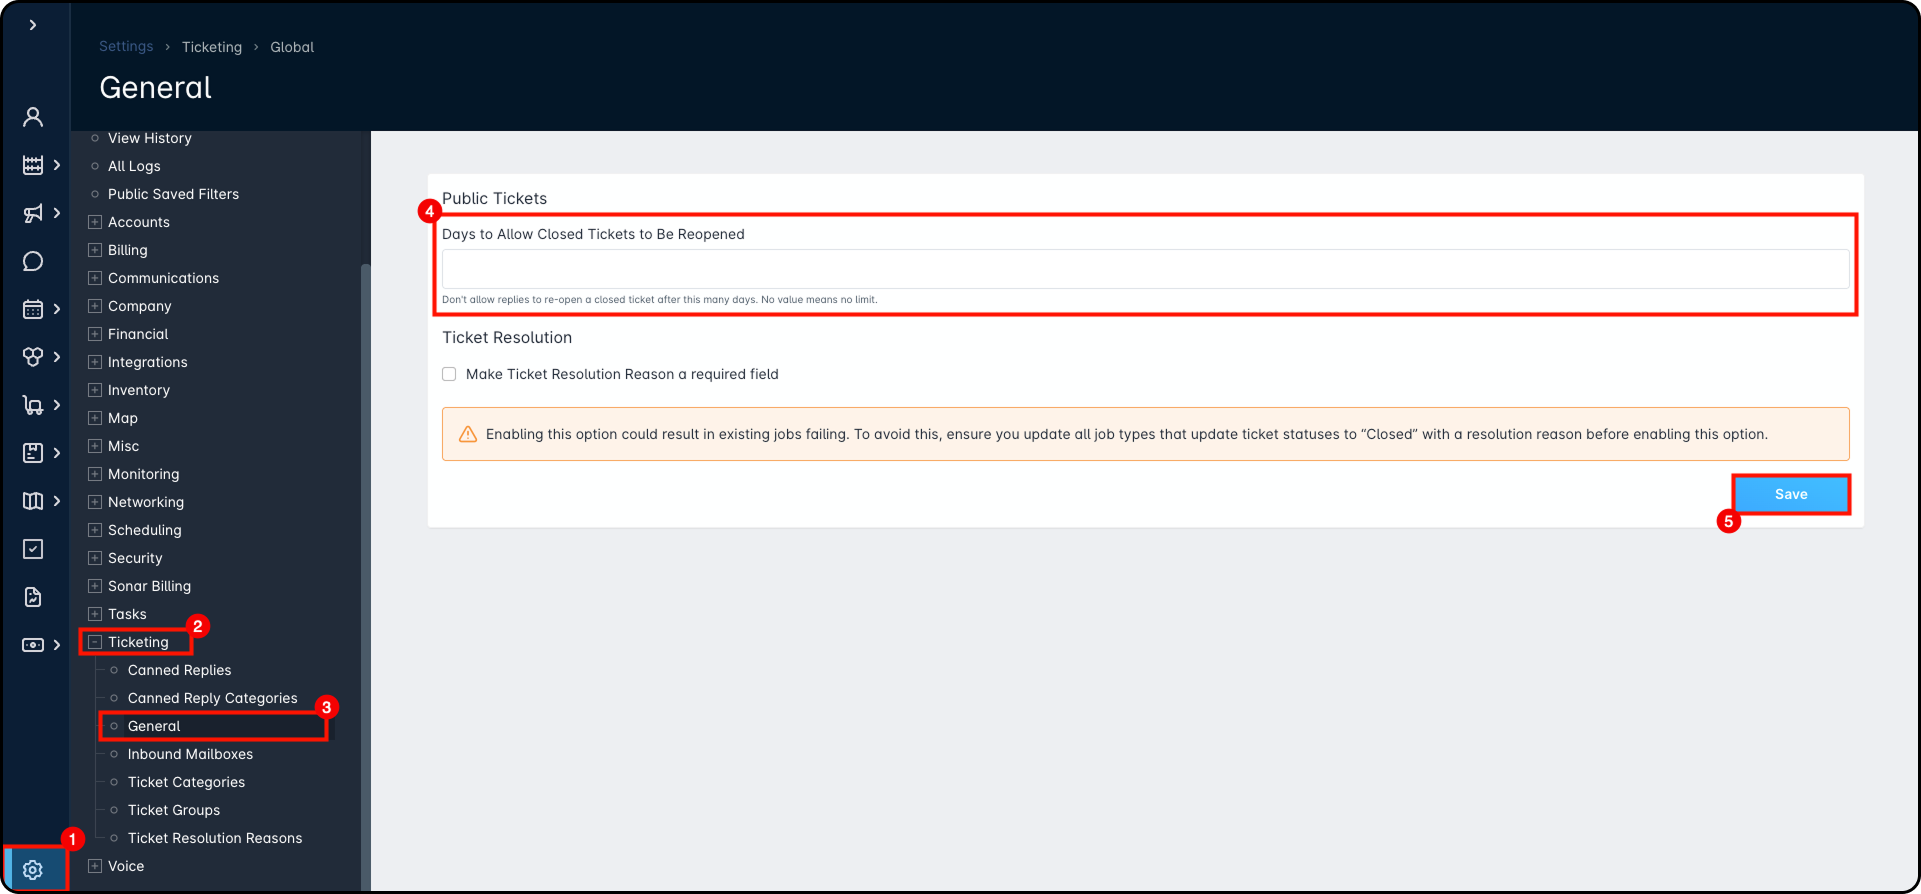
Prevent Tickets from Reopening after X days (Inbound Emails only)
By default, if a customer replies to an email ticket that you’ve already closed, Sonar will reopen the same ticket and add the new message to its history—no matter how long it’s been, as long as the subject line stays the same.
This setting applies to inbound email tickets only and lets you define how many days a ticket must remain closed before an email reply will stop reopening it (portal ticket workflows are not affected).
How to Configure this Setting
Go to Settings.
Expand Ticketing.
Click on General.
Set “Prevent tickets from reopening after X days” to the number of days you want.
Click Save.
What this Changes
If a customer replies to a closed email ticketwithin X days: the ticket reopens and the reply is added to the same ticket.
If a customer replies after X days: Sonar creates a new ticket instead of reopening the old one.
This feature applies only to inbound emails that would otherwise reopen an existing email ticket.
Tickets created through the Customer Portal are not affected. Portal tickets will continue to be reopened and updated each time the customer makes contact through the portal workflow.
When This is Useful
This helps keep conversations clean and on-topic—especially for customers who reply to an old ticket email weeks or months later for a completely different issue. After X days, their reply becomes a new ticket, so you’re not sorting through outdated history to resolve something unrelated.
Currently Viewing
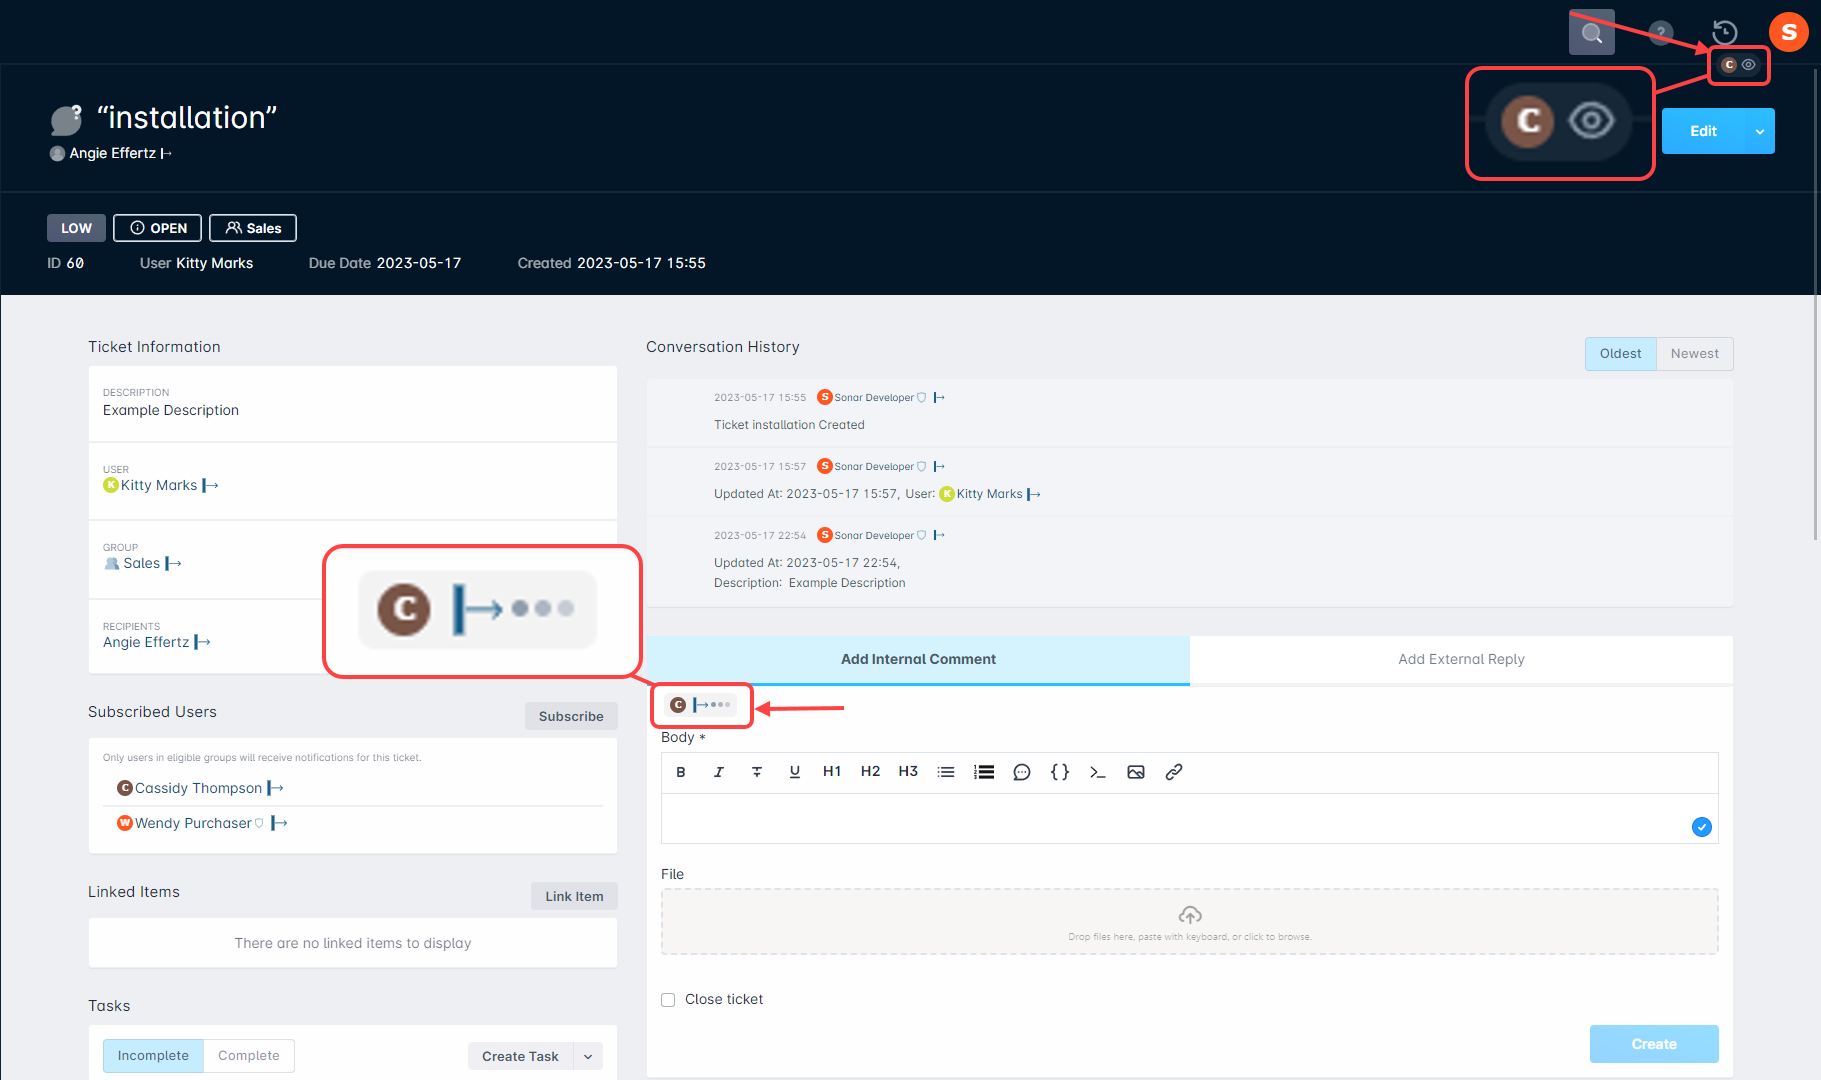
In best practice, the user assigned to a ticket is the party who will be responsible for seeing that ticket through to completion, or the next point of escalation. However, circumstances may arise that would prompt another user to interact with the same ticket. In these scenarios, another user may be in the process of detailing vital information via a new comment at the same moment that the assigned user is typing a reply to the customer with now inaccurate information.
The Currently Viewing feature allows you to see if another user is viewing the same ticket as you, by displaying the user's avatar in the top-right corner of your instance – hovering over the avatar will display the user's full name. If the user is actively typing a comment or reply, another icon will also be visible and is used to indicate that a response is being written by another user. With indicators like these, you can help to eliminate duplicate efforts and contacting customers with outdated information.
Merging Tickets
Merging tickets in Sonar allows you to combine the conversation history and contents of two or more tickets into a single ticket. To merge tickets together, you'll need to ensure they're assigned to the same account or network site, and you'll need to do the following:
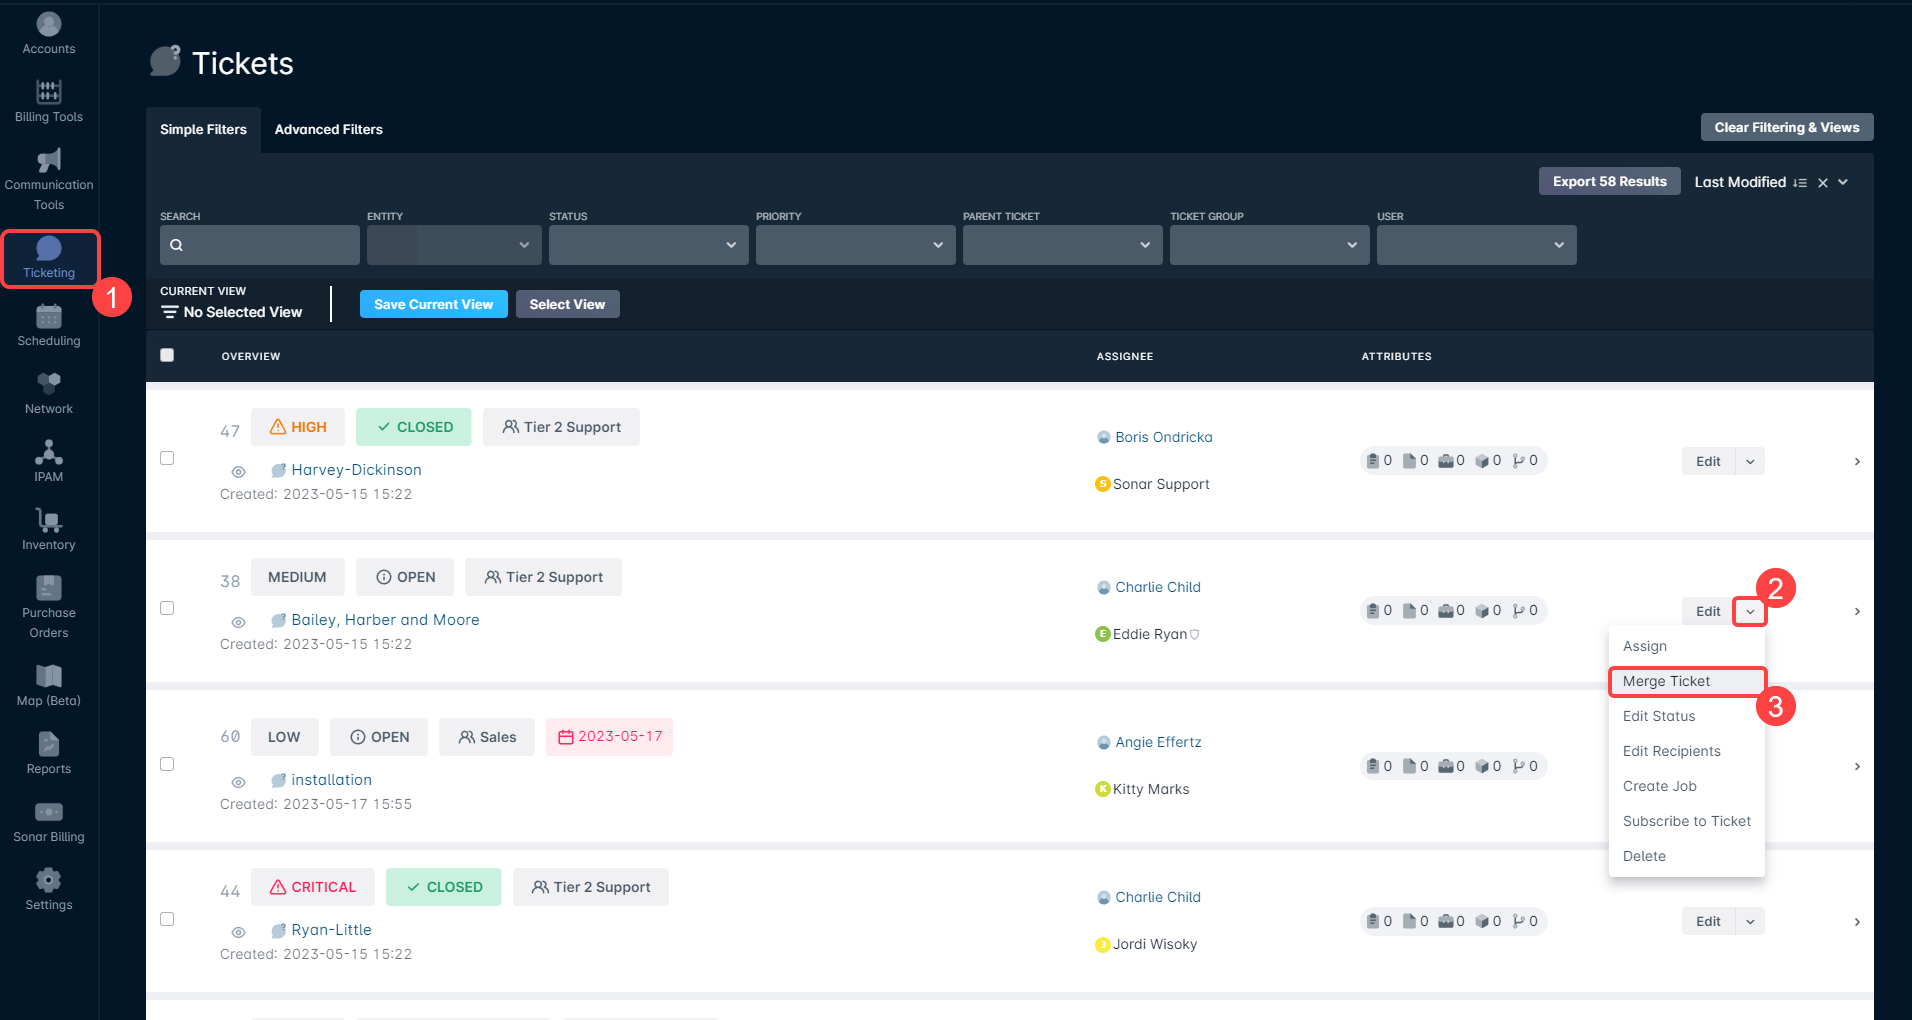
From the Ticketing interface, locate the ticket you'll use as the host (or main) ticket
Expand the dropdown next to the Edit button and select “Merge Ticket” from the list of actions
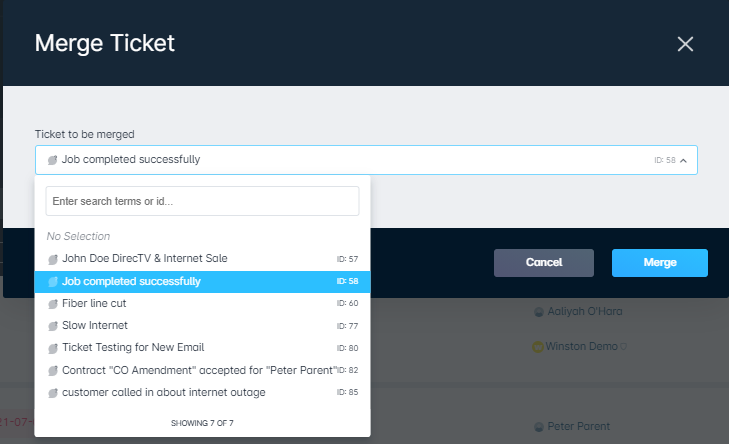
From the modal that appears, select the ticket to be merged from the dropdown
You can filter and search by typing in either the ticket ID or the ticket name.
The filtered list that appears in this modal will show all tickets that are assigned to the same account or network site (excluding the ticket you're currently using as the host). In this example, all tickets assigned to Peter Parent's account are displayed.
If the ticket you selected as the host ticket isn't assigned to any account or network site, this list will display all other tickets in your instance that are similarly unassigned, up to a maximum of 50, which can be further refined by entering search terms.
Once you have the ticket selected, click the “Merge” button
The conversation history of the merged ticket will now appear in the list on the host ticket, in addition to a note within the ticket that the merge occurred.
When This is Useful
Merging tickets occupies a functionally similar role to Child Tickets. However, there are a few distinct use cases where tickets could be merged instead of added as a child ticket:
If a customer is creating a new conversation/ticket with every reply, whether as a result of cc'ing a different mailbox or simply sending a new email rather than a reply. In this case, the new ticket should be merged rather than treated as an independent child ticket.
If an internal tracking ticket is being used for network outages, you can simply merge alert emails or notices into a master ticket to capture relevant details rather than having multiple similar tickets open.
Essentially, merging is useful when the information and conversations contained within a ticket can easily be grouped together in one main ticket, while child tickets are used when multiple similar customer tickets exist and each customer should receive a reply.
Considerations When Merging Tickets
Merged tickets have two caveats to them:
When a ticket is merged, its description will be overwritten – only the description of the host ticket will remain after merging.
Once a ticket is merged, it's impossible to separate the 2 tickets. The merged ticket ceases to be accessible once the merge is complete.
Subscribing to Tickets
Subscribing to tickets allows you to keep track of interactions that have occurred on open tickets, even if you're not directly responsible for that ticket. Whether you're using it for escalation tracking or training opportunities, subscribing to tickets lets you keep your eye on, and receive notification for, any ticket in your instance. To subscribe to a ticket:
From the ticketing interface, identify the ticket you'll want to track
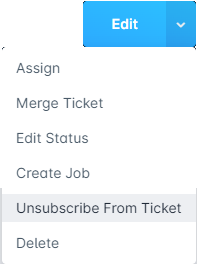
From the “Edit” dropdown, select “Subscribe to Ticket”
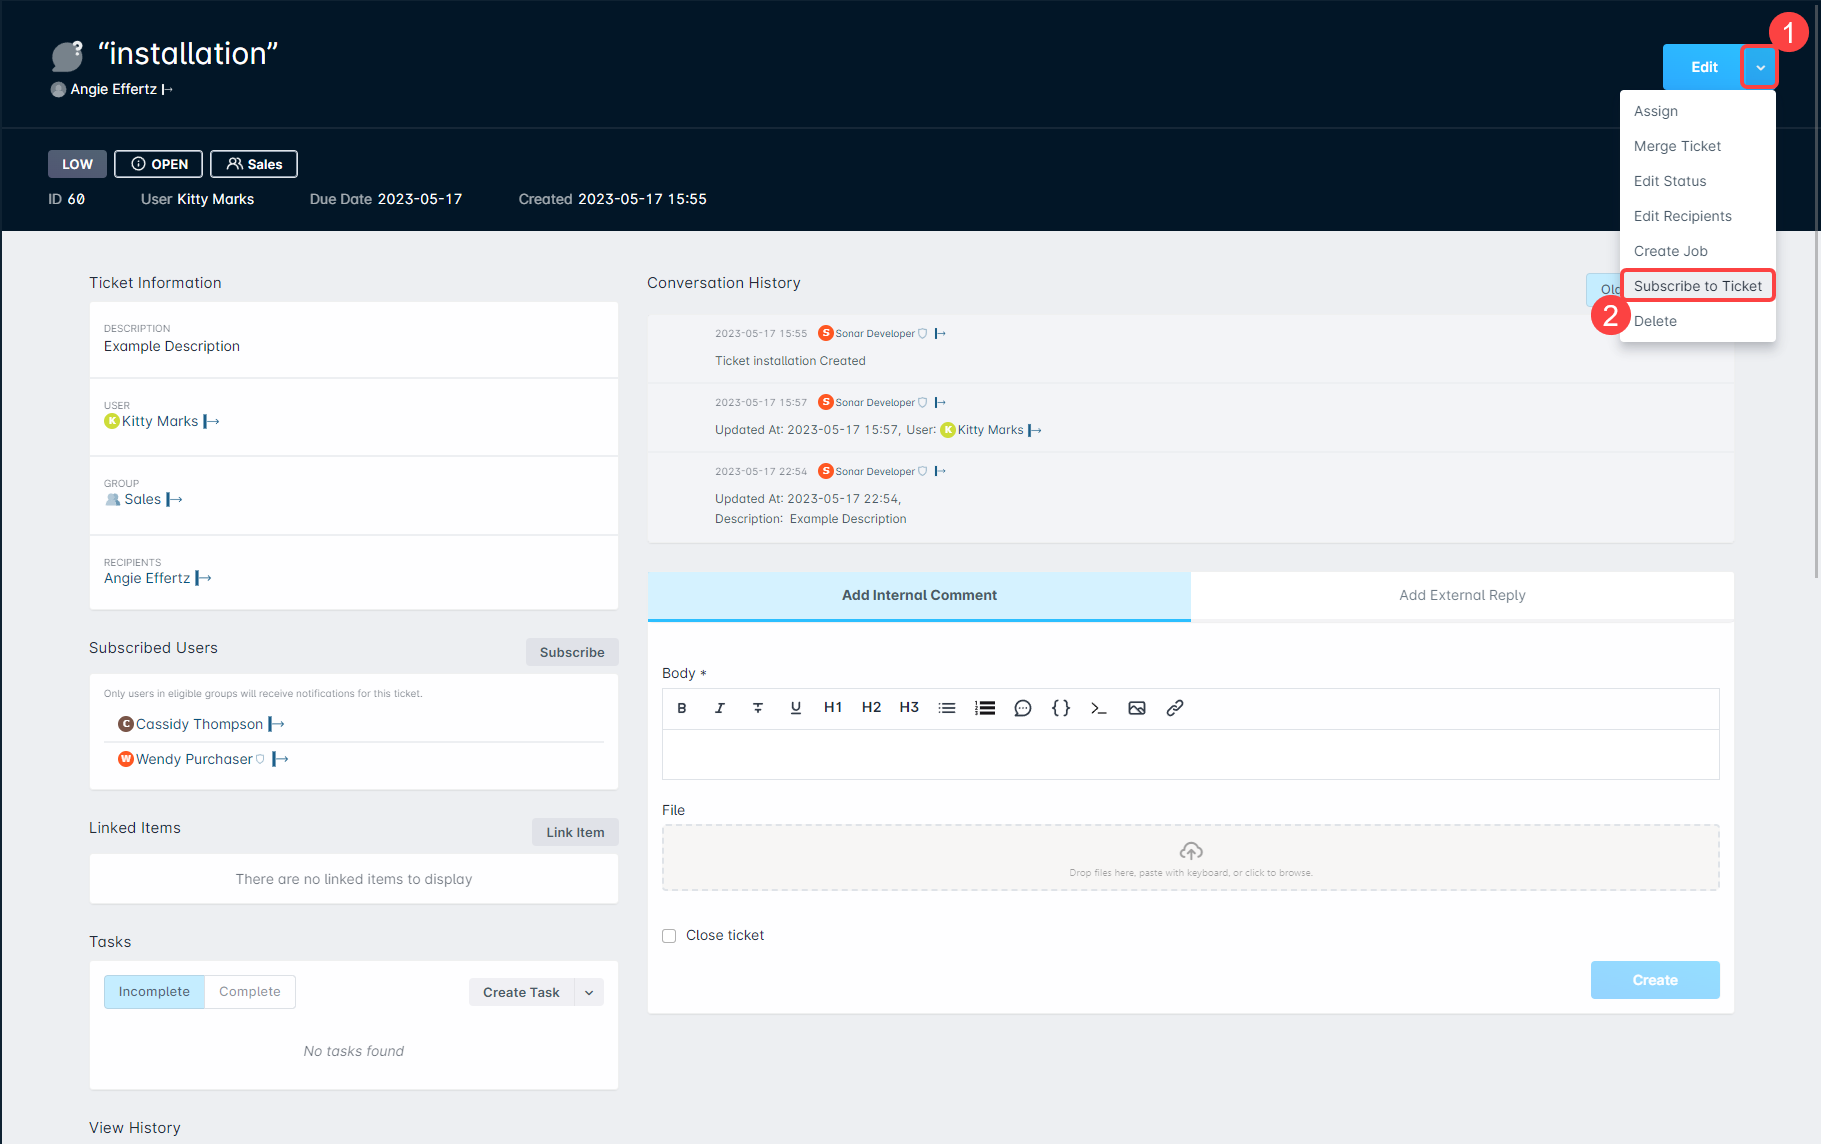
You can also subscribe to a ticket while it's open. From the ticket details page, open the “Edit” menu and select “Subscribe to Ticket”.
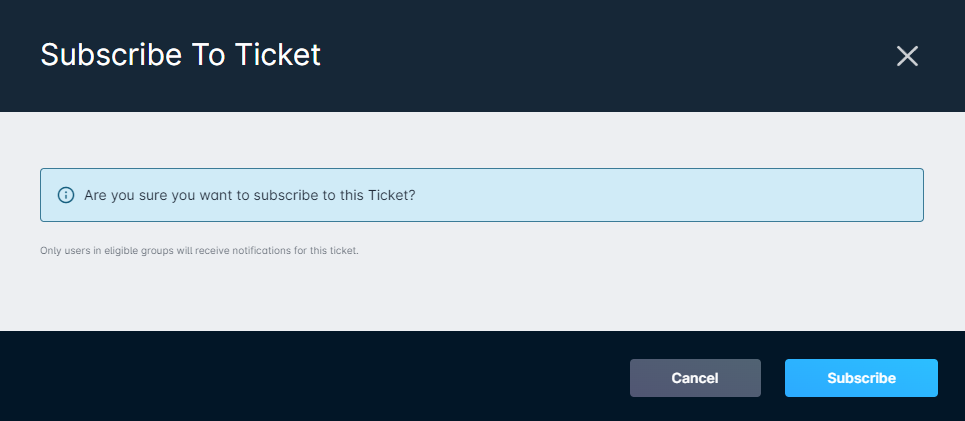
From the modal that appears, click the button to confirm the ticket subscription.
How it's Used
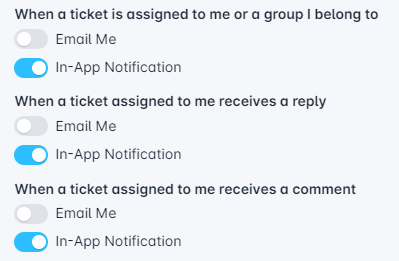
The Ticket Subscribe function is used to begin receiving notifications whenever a comment is left on a ticket, a reply is received on the ticket, or a message is sent from the ticket. These notifications follow the same principles as other notifications in Sonar, and can appear in both your email, and as a notification in Sonar.
The notifications sent by Ticket subscriptions use the same framework as ticket notifications for tickets you're assigned. Updates will be sent, based on your notification settings, for:
1. Assignment changes 2. Replies received 3. Comments added
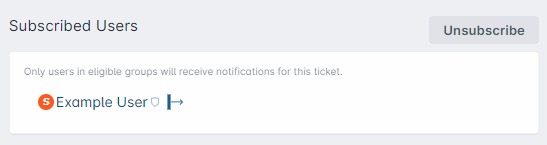
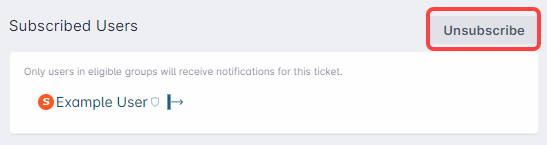
Once subscribed to a ticket, other users who open the ticket will be able to see all users currently watching it. This will appear as a panel within the ticket details page:
Suspended Subscriptions
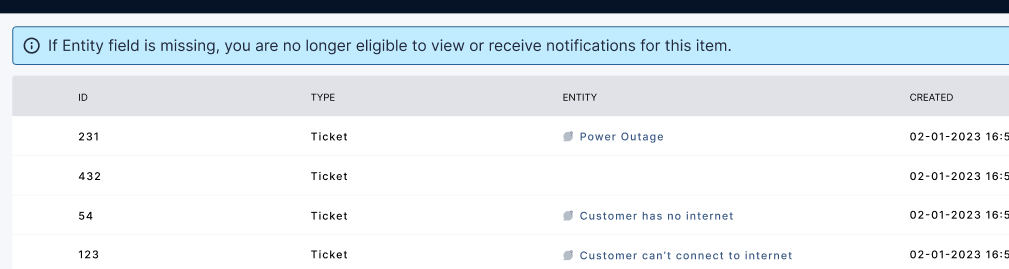
If you are subscribed to a ticket and your ability to view this ticket is removed (i.e., Ticket Group reassignment), your subscription will be suspended. A suspended subscription will no longer receive notifications, but if the ticket becomes accessible to you again, the notifications will resume.
A suspended subscription is indicated by a empty "Entity" value in your Subscriptions list, found in your User Settings.
Unsubscribing from the ticket will remove your name from the list, and prevent any additional notifications from being sent to you. Unsubscribing can be down in two ways:
From the “Edit” dropdown, select “Unsubscribe from Ticket”, available from the ticket details page and the ticket list view.
In the ticket details page, in the “Subscribed Users” box, click “Unsubscribe”
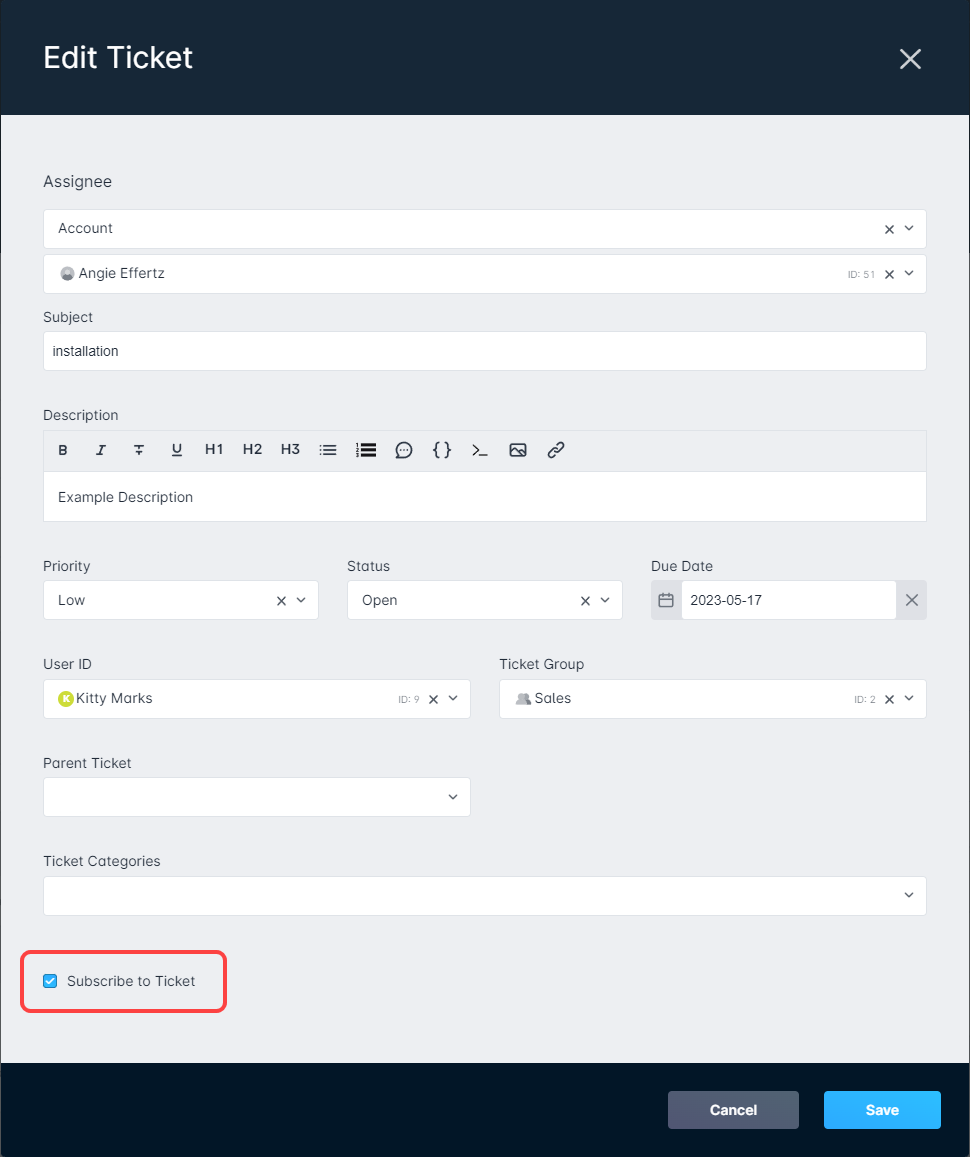
Subscribing and Unsubscribing from a ticket can also be done from the Ticketing Edit modal. Whenever that modal is open, whether it's Ticket Groups, Assignees, or complete ticket editing, you'll have the option to Subscribe to the ticket. This checkbox will not change wording, and the subscription status is indicated entirely by whether the box is checked or not. Unchecking the box then saving your ticket changes will unsubscribe you from any additional ticket notifications.
When This is Useful
Whenever you subscribe to a ticket, whether you also select to receive notifications or not, you're choosing to follow the progress of the ticket from creation to resolution. Read on to find some key scenarios where you can use Ticket Subscriptions to maximize your customer management experience in Sonar.
Training Use Cases
Ticket subscriptions can be useful when training new employees that interact with customers. You can either:
Subscribe to this employee's ticket communications, allowing you to monitor their conversation.
This can be used to jump in preemptively when the employee encounters difficulty in determining the answer, or for ensuring communication guidelines are being followed.
Provide example tickets that your new employees should subscribe to, allowing them to effectively shadow a more experienced agent and gain important context for the how and why of communication procedures within your organization.
Escalation Resolutions
In scenarios where your organization handles ticket escalations in-house, allowing your lower-tier support representatives to subscribe and follow along with the resolution that occurs from an escalation can provide them with valuable experience. Keeping these pathways open can facilitate organic upskill and improved ticket handling in the future.
Monitoring High-Value Contacts
As your organization grows, you'll often have a section of your customer base that requires white-glove service. Whether due to special considerations with the customer, or as a method of handling repeat issues, subscribing to tickets that are raised by high-value contacts allows you to ensure your agents with the most expertise are handling each ticket correctly.
Subscribing to tickets for this purpose provides not only accountability, but also demonstrates that the contact is well taken care of at all times.
 Updated
by Mitchell Ivany
Updated
by Mitchell Ivany


 If the ticket you selected as the host ticket isn't assigned to any account or network site, this list will display all other tickets in your instance that are similarly unassigned, up to a maximum of 50, which can be further refined by entering search terms.
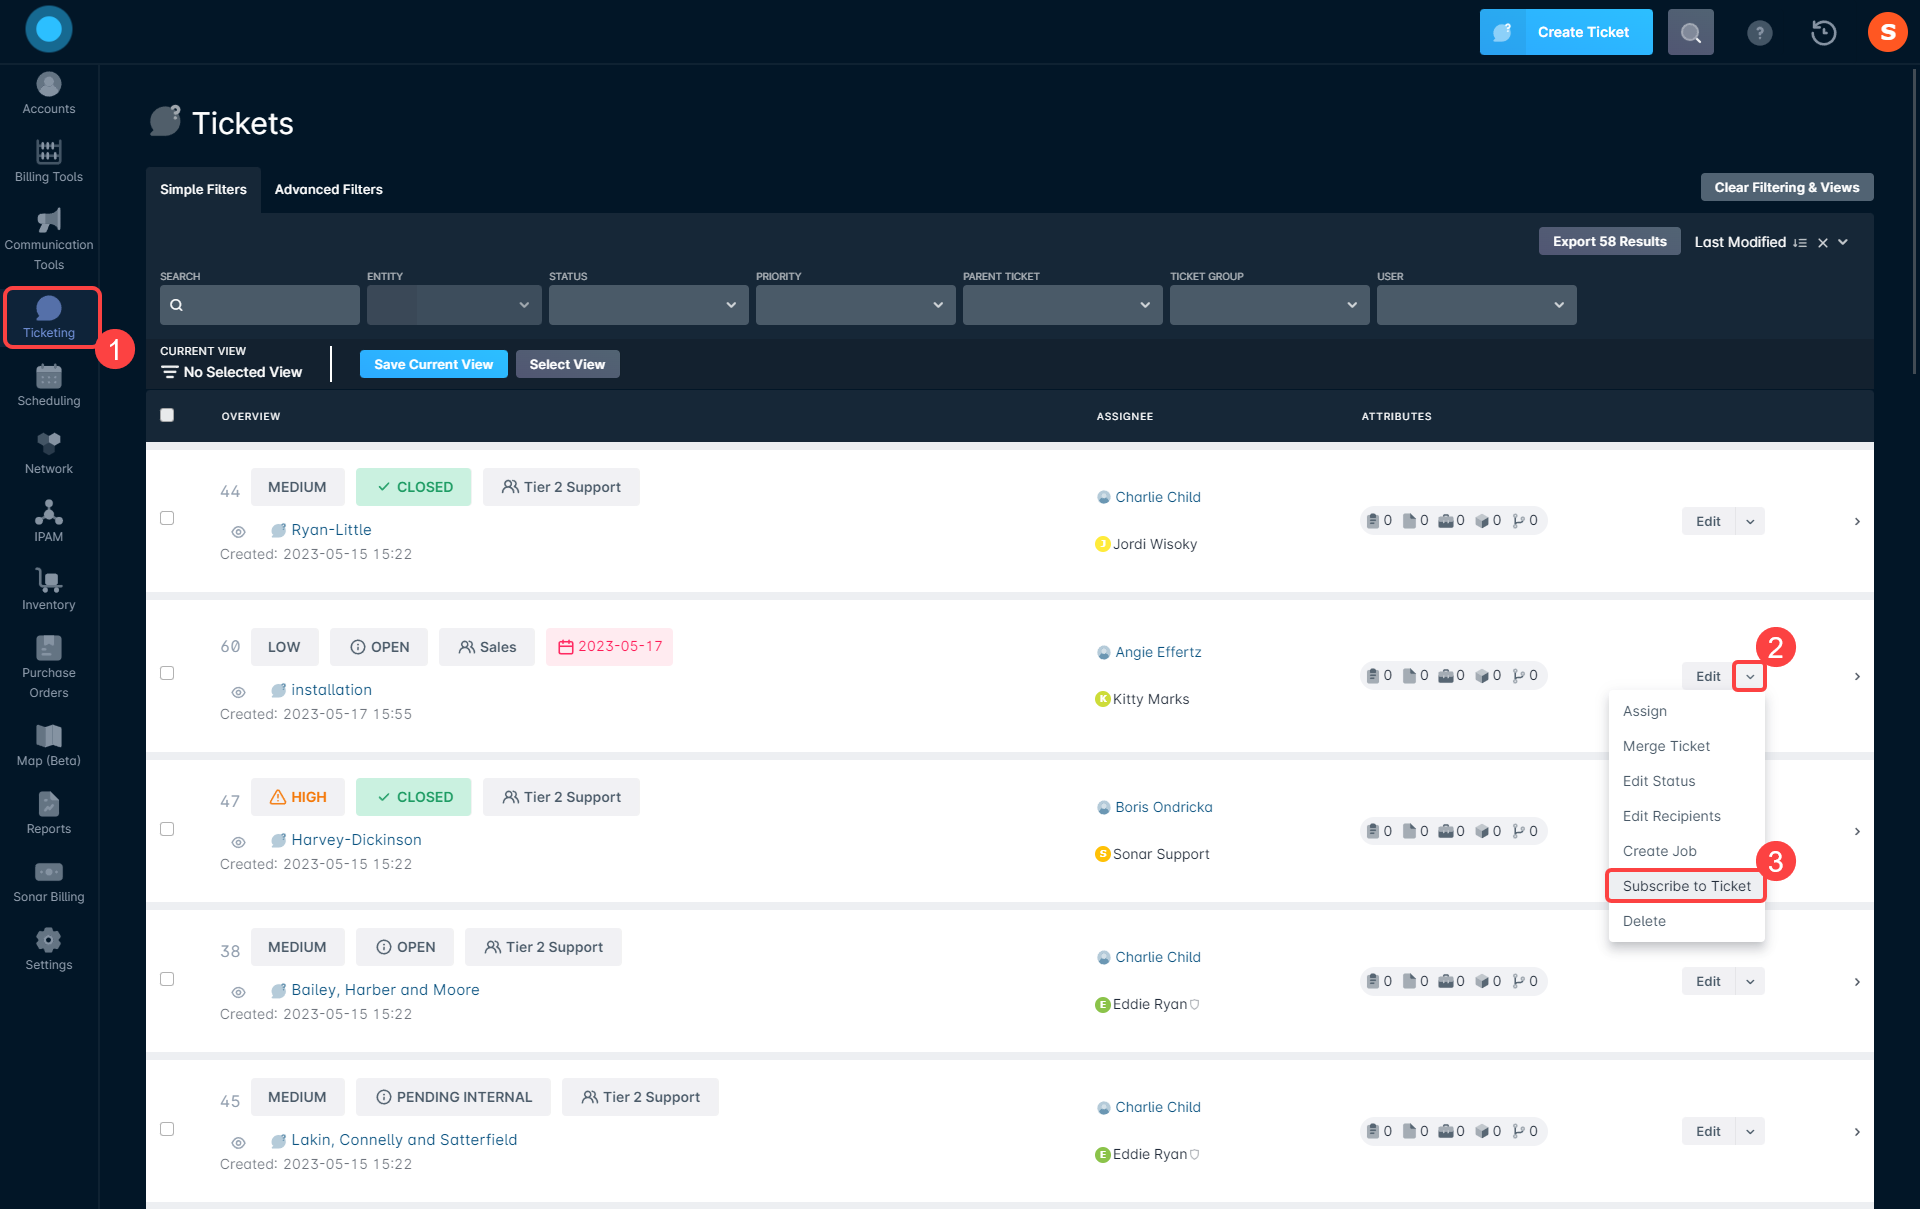
 button to confirm the ticket subscription.