Table of Contents
Auth0: Overview
 Updated
by Kristen Fiddes
Updated
by Kristen Fiddes
Read Time: 10 mins
What is Auth0?
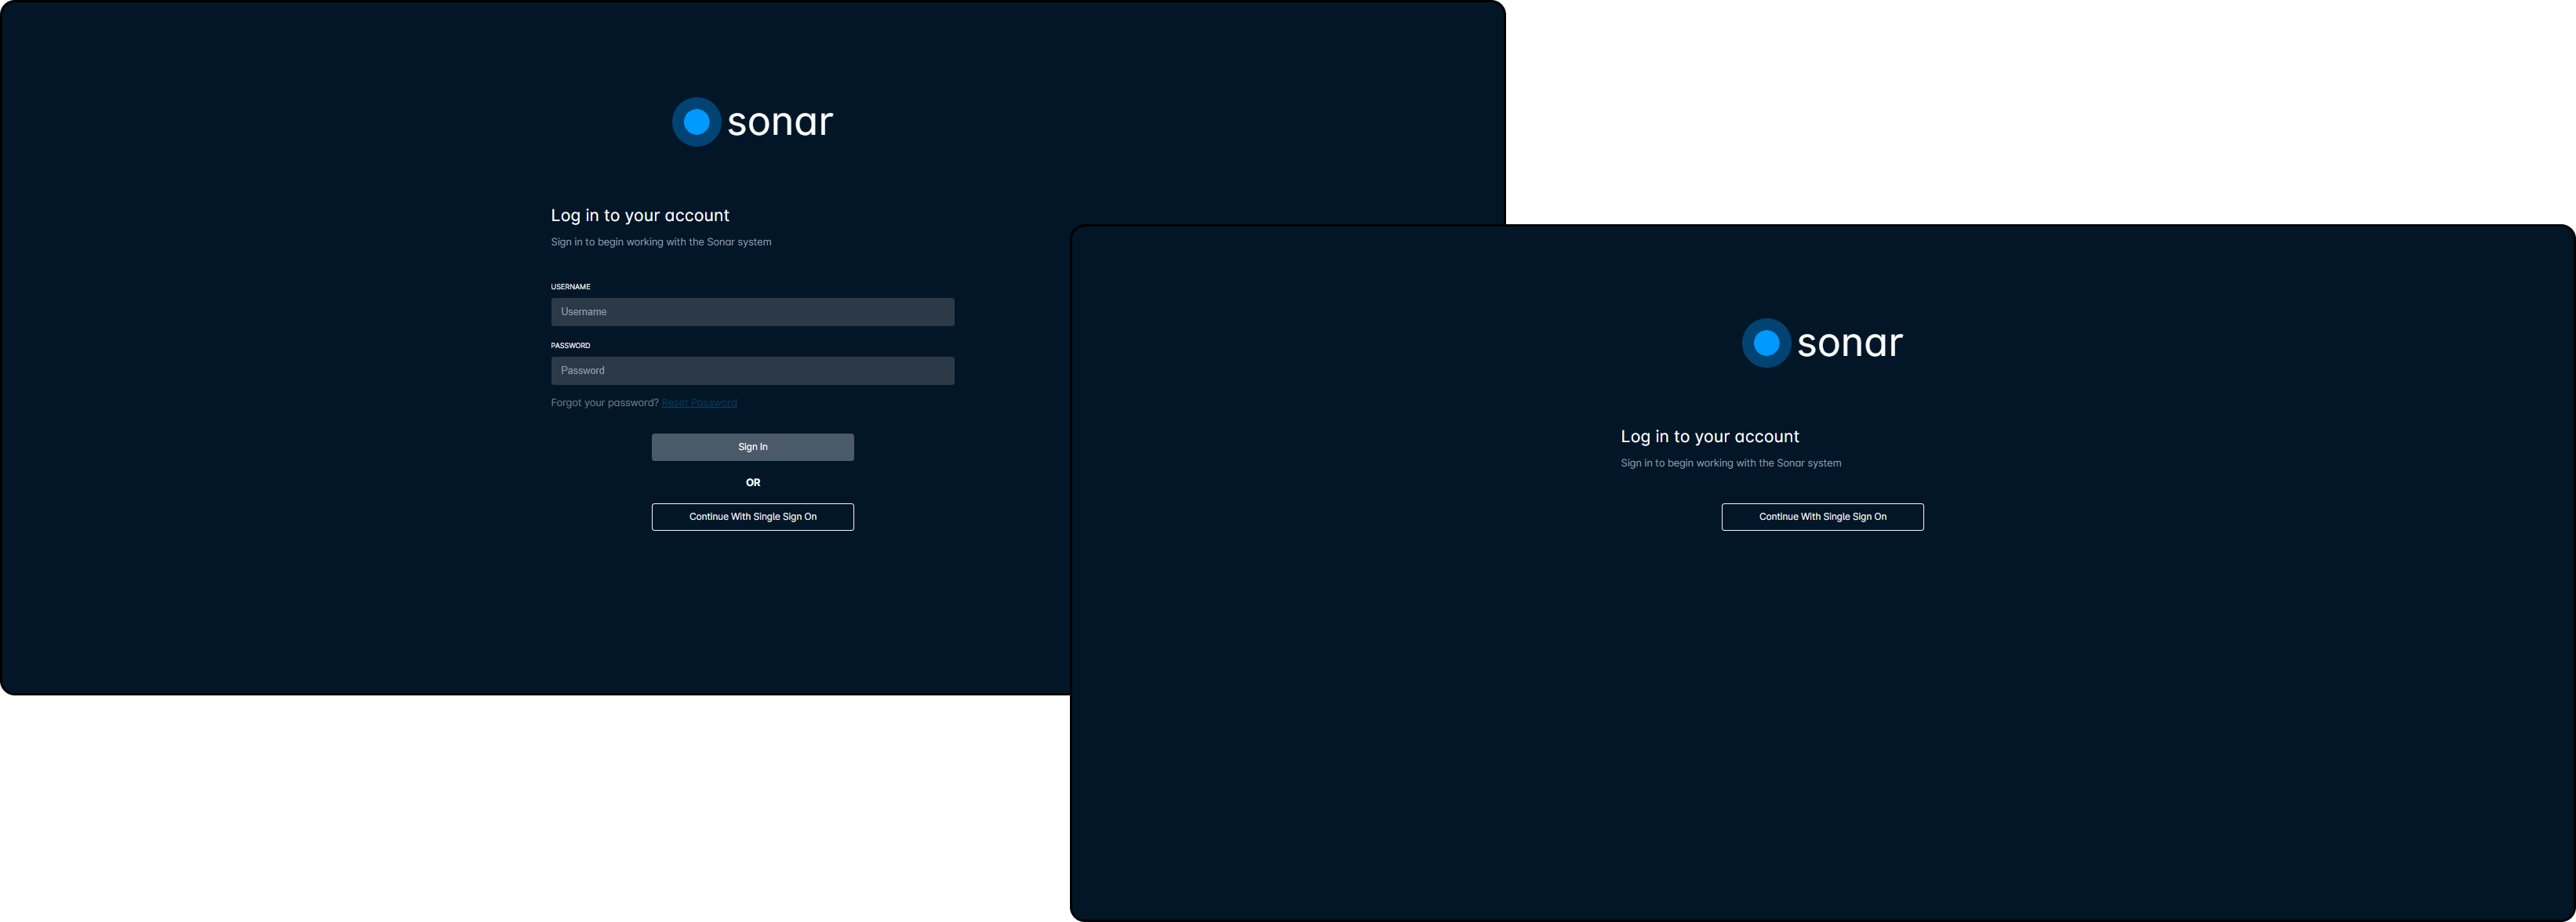
Auth0 offers a way to add authentication services to your applications. With it integrated into your Sonar instance, users would select Continue With Single Sign On rather than inputting their Sonar credentials. Implementing Auth0 in your Sonar instance provides multiple, customizable, Single Sign-On options. The following authentication services are available:
- Google, including personal and Google Workspace accounts
- Microsoft social, limited only to personal email accounts.
- Active Directory services
- SAML Authentication Providers
Configuring Auth0
Before fully configuring Auth0 with your Sonar instance, you must first integrate it with your Google or Microsoft system. Following this, you'll be provided a Client ID and Client Secret, which will be used during the integration with your instance.
For both options, the following information will be utilized:
sonar.softwareandauth0.comwill be required for the authorized domains/auth/userinfo.emailand/auth/userinfo.profilewill be the options selected when choosing from the list of scopeshttps://sonarsoftware-prod.eu.auth0.com/login/callback?connection={connection_name}is to be used as the application home page
During the setup process, you'll be given the option of whether you want to restrict use to your domain or include external domains too. Which option you select depends on your business use, but any will work with the Sonar integration.
Setting Up Auth0 with Google
For details on integrating Auth0 with your Google dashboard, read this instead.
When configuring Sonar with Auth0 using Google, it generally means you are setting up authentication using Google accounts. The limitation mentioned here likely means that you can only authenticate users who have Google accounts. This typically includes accounts registered with Google services like Gmail or Google Workspace (formerly G Suite). It may not support authentication for users with accounts from other identity providers.
Setting Up Auth0 with Microsoft
For details on integrating Auth0 with Microsoft Azure, read this instead.
When configuring Sonar for Auth0 authentication using Microsoft, it typically means you are setting up authentication using Microsoft accounts. However, there will be a limitation with Microsoft authentication in that it will be limited to personal Microsoft accounts (e.g., outlook.com, live.com) and not support organizational accounts (e.g., accounts associated with a company's Microsoft Azure AD).
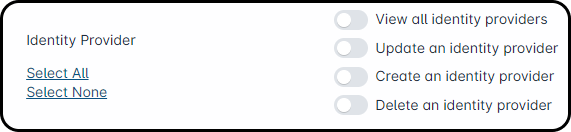
Permissions
To make use of the Auth0 feature, the corresponding role permissions must be enabled first. Please take a moment to review these new permissions, and ensure that the relevant roles have them added before proceeding with any walkthrough steps below.
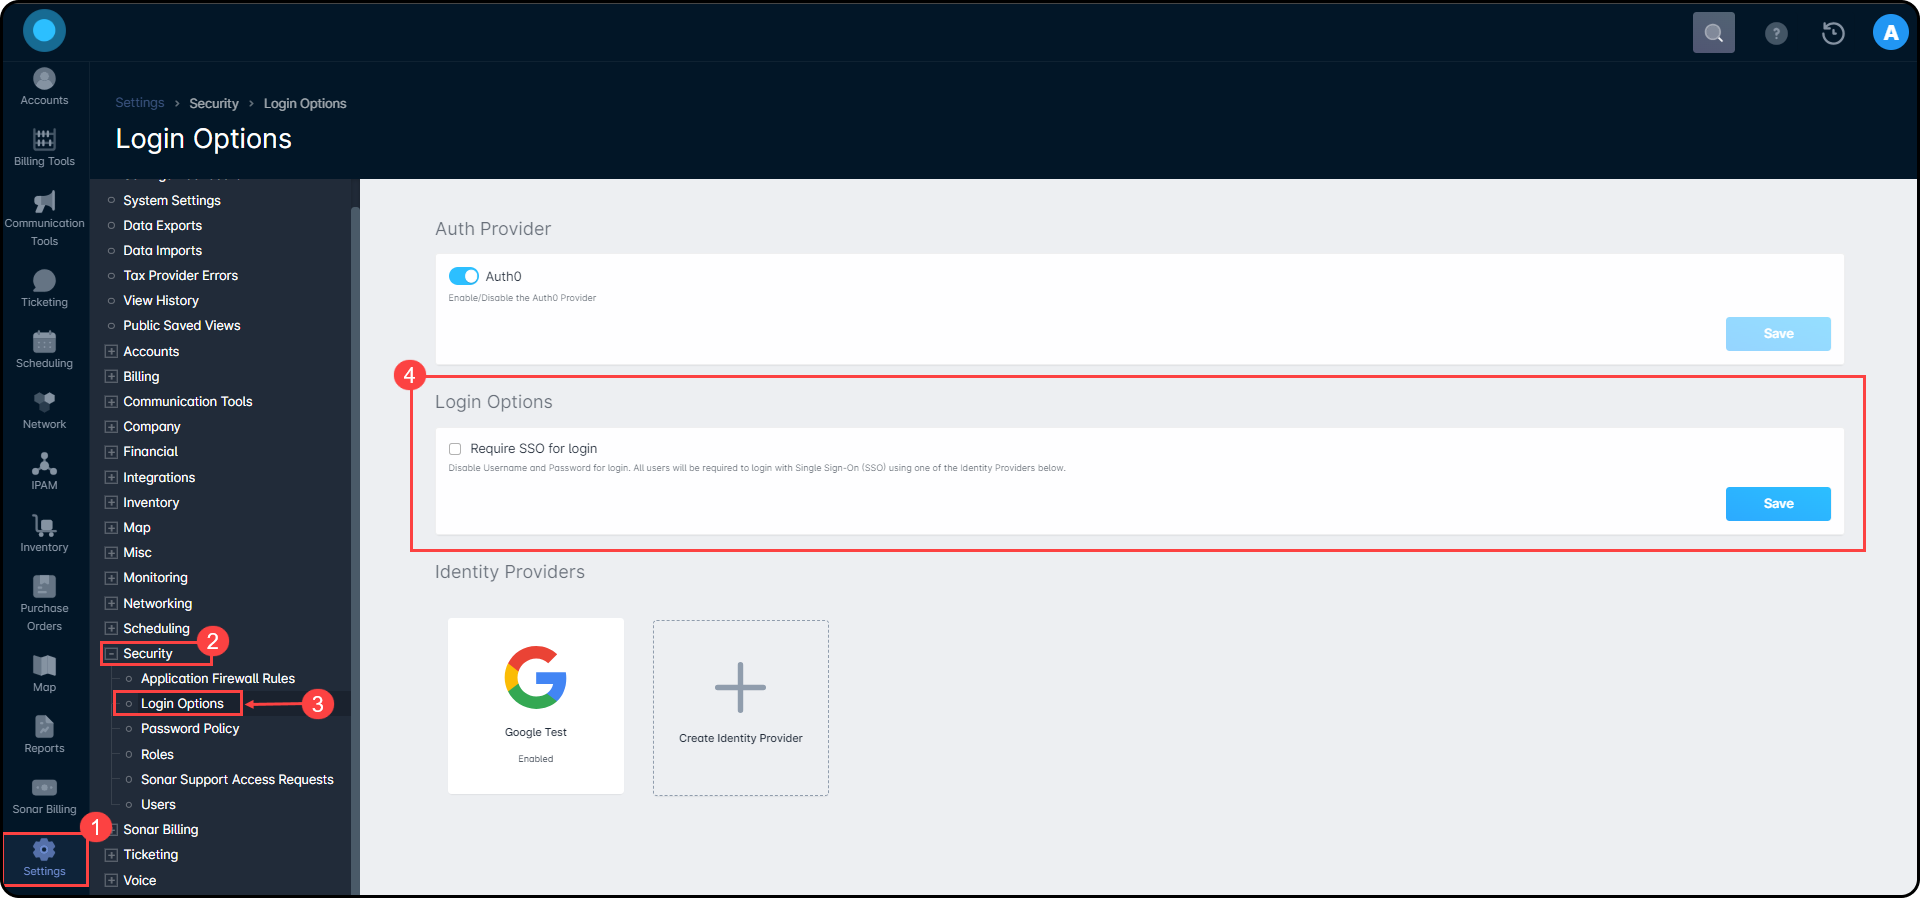
Navigate to Settings → Security → Roles and either choose to edit an existing Role or create a new Role. When the next page populates, locate the permissions reflected in the screenshots below and enable whichever ones are applicable to that Role.

Configuring Auth0 in your Instance
Before your users can take advantage of SSO (Single Sign On) with Auth0, you must enable and configure the feature within your instance. You can add up to 5 IDPs (identity providers) at a time, but for our example, we'll just be adding one:
- Navigate to Settings → Security → Login Options, toggle the Auth0 option, and then click on Save.
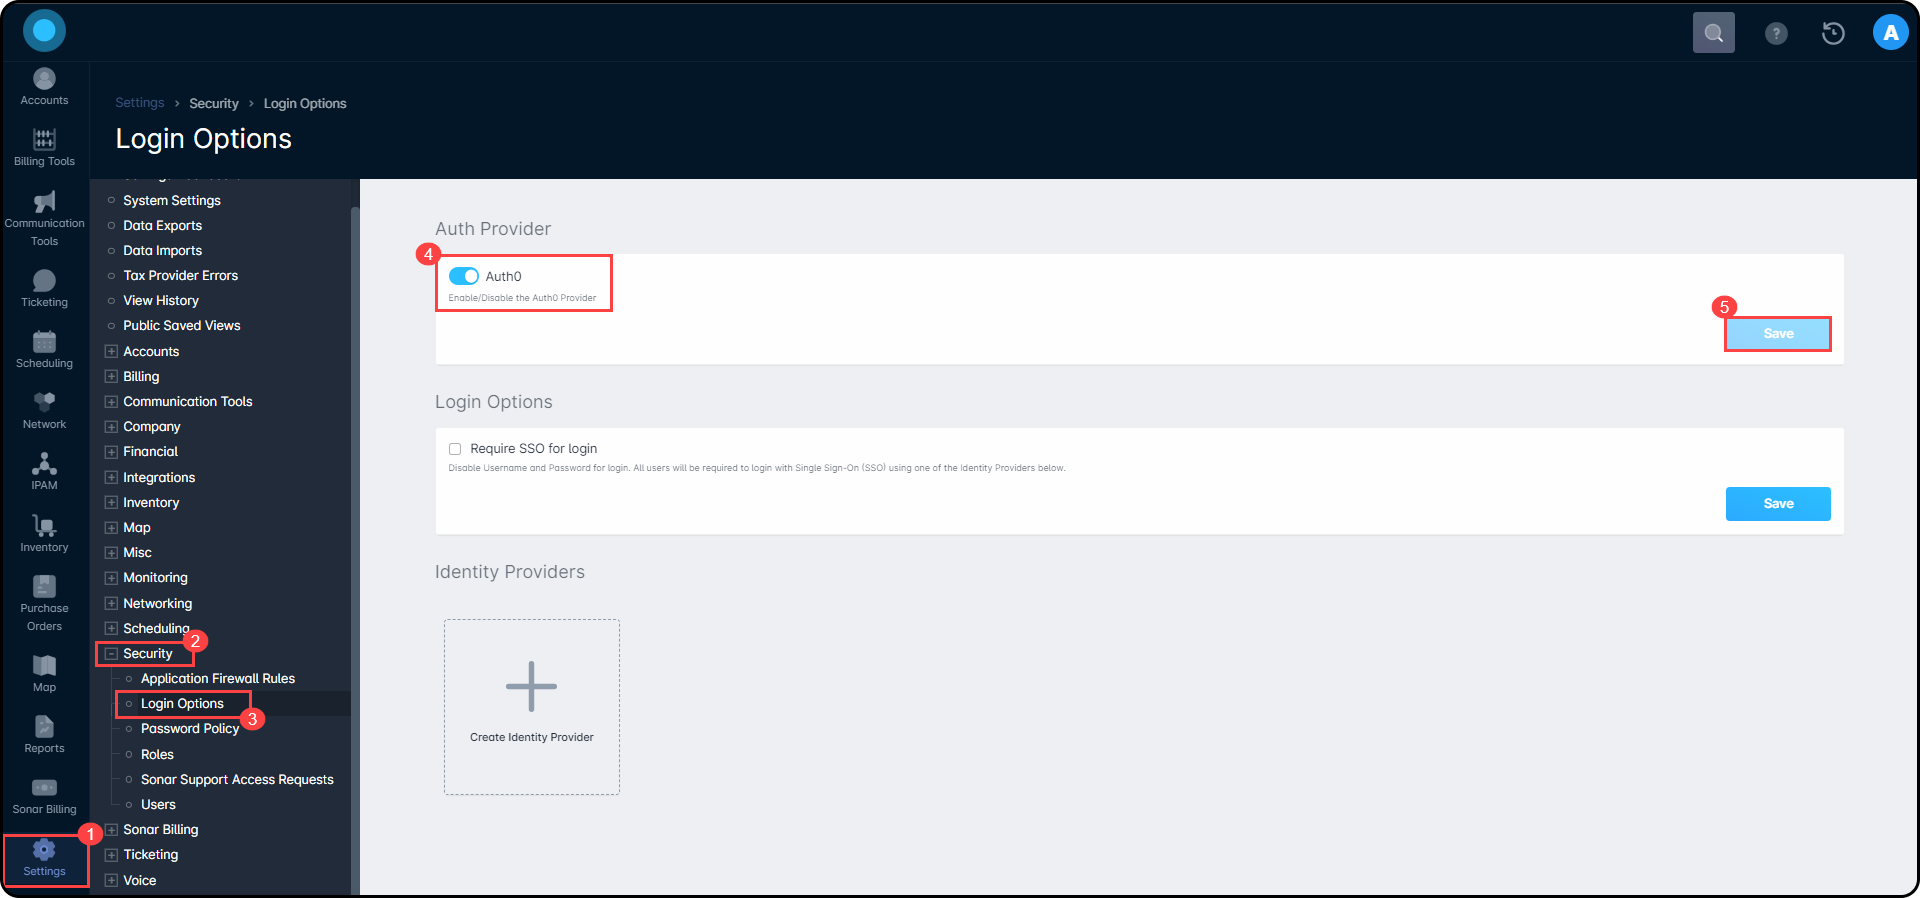
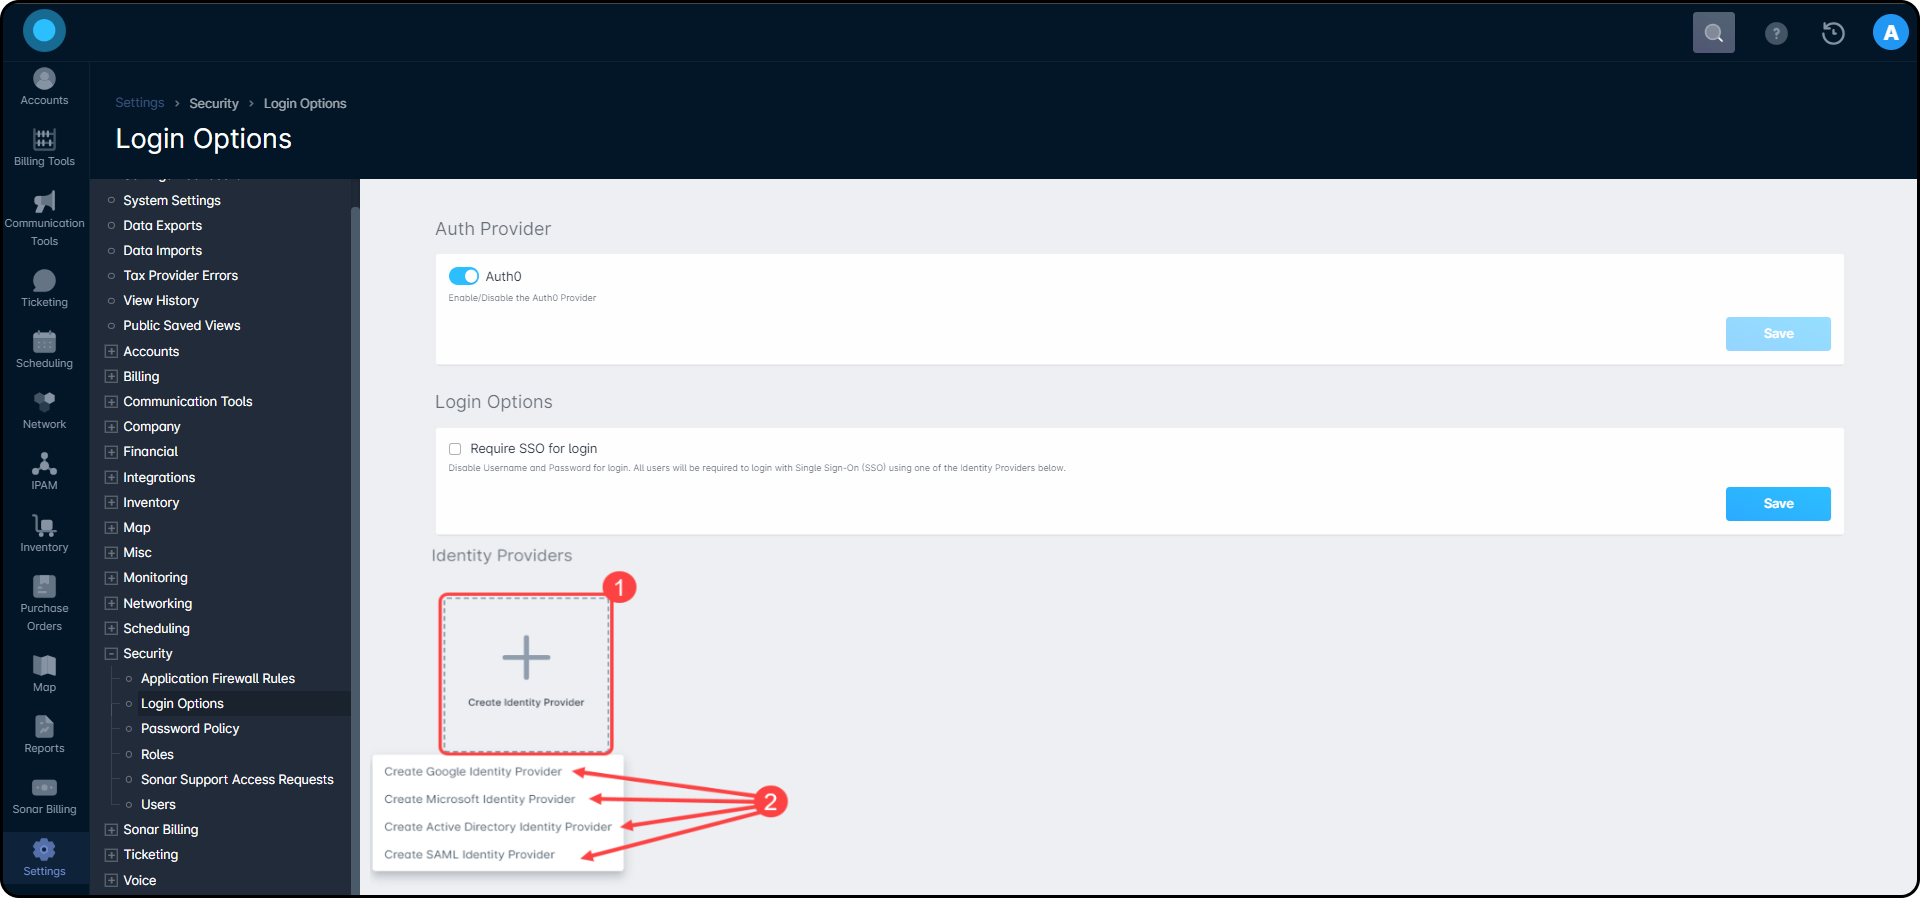
- Once Auth0 is enabled, click on Create Identity Provider and select your provider type
- A modal will appear where you will input the configuration settings.
Google Provider example
For our example below, Create Google Identity Provider was selected: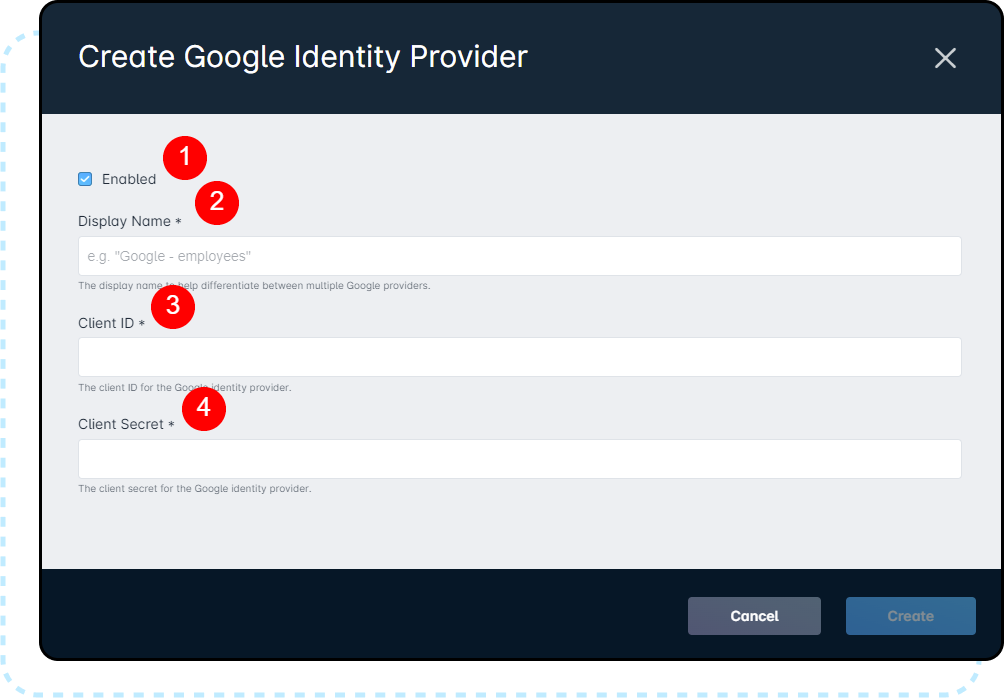
1. Enabled allows you to toggle the IDP on and off. If you were to disable an active one, it would prevent users from logging in via that method.
2. The Display Name, which must be unique within your instance to facilitate multiple providers.
3. The Client ID field is where you'll input the one provided by your identity provider host.
4. Similarly, the Client Secret section is for the secret provided by your identity provider host.
Note
There is no validation for the Client ID and Client Secret you add here; if the information is incorrect, then users will be unable to sign in via SSO.Microsoft Provider example
For the example below, Create Microsoft Identity Provider is selected: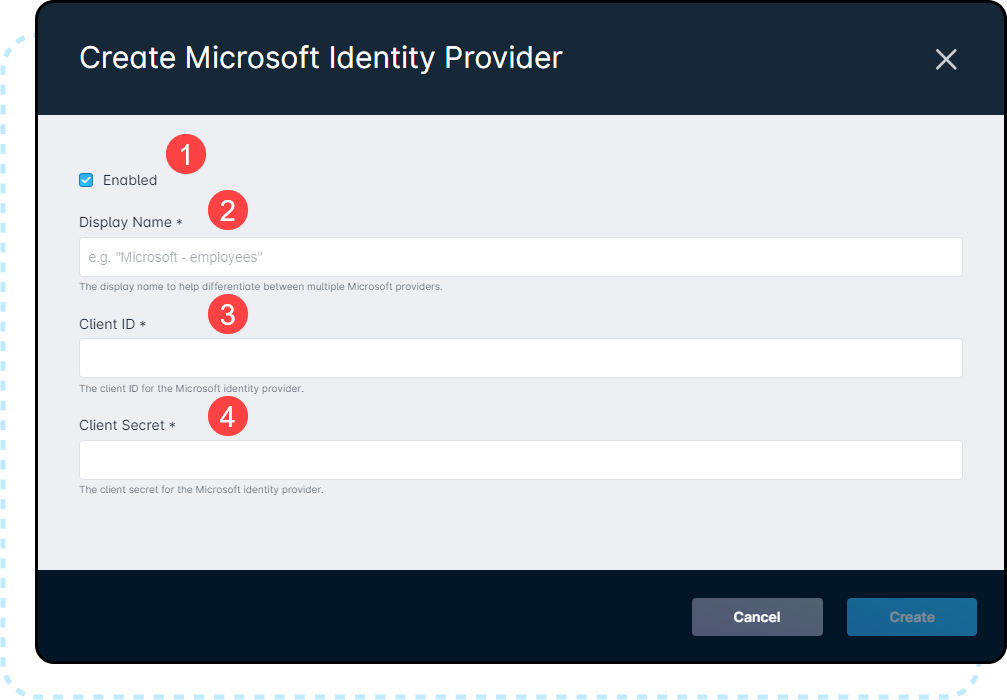
1. Enabled allows you to toggle the IDP on and off. If you were to disable an active one, it would prevent users from logging in via that method.
2. The Display Name, which must be unique within your instance to facilitate multiple providers.
3. The Client ID field is where you'll input the one provided by your identity provider host.
4. Similarly, the Client Secret section is for the secret provided by your identity provider host.
Note
There is no validation for the Client ID and Client Secret you add here; if the information is incorrect, then users will be unable to sign in via SSO.Active Directory Provider example
For this example, Create Active Directory Identity Provider was selected: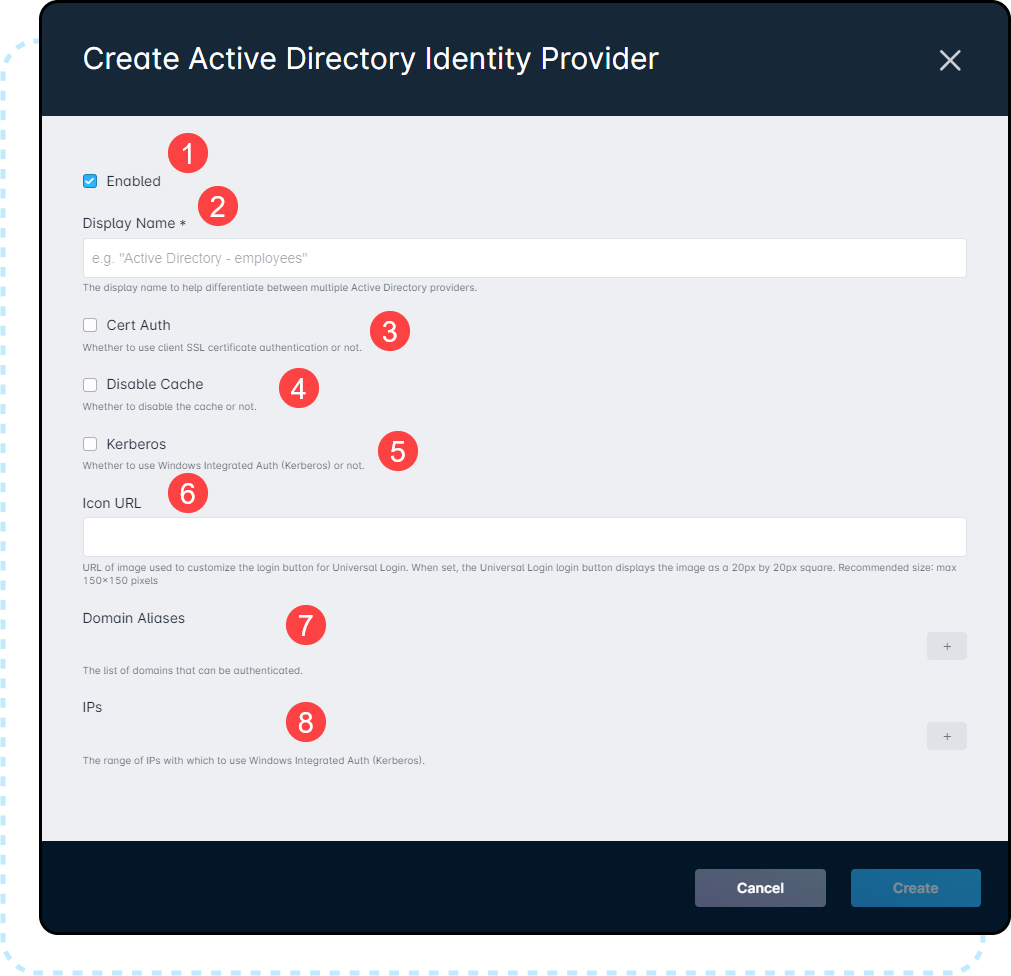
1. Enabled allows you to toggle the IDP on and off. If you were to disable an active one, it would prevent users from logging in via that method.
2. The Display Name, which must be unique within your instance to facilitate multiple providers.
3. Cert Auth must be enabled if your Active Directory server uses Client SSL certificate authentication.
4. Disable Cache will affect your Active Directory login cache. For more information, refer to your Active Directory documentation.
5. Kerberos must be enabled if your Active Directory server uses Windows Integrated Auth
6. The Icon URL can be set to add a custom URL to the Universal Login button when a user selects it in Sonar.
7. Setting Domain Aliases determine which domains users can belong to when logging in using Auth0. Users belonging to domains that have not been added will be unable to use Universal Login.
8. Setting IPs controls the IP ranges users can be connected through in order to authenticate with Auth0. This function can only be used when Kerberos is enabled.
Unlike Google IDP or Microsoft IDP, connecting Active Directory as an Identity Provider requires both the Sonar configuration to complete, and Active Directory middleware in place, which you can get here. Once your IDP information is filled in, a Ticket URL will be generated for use with Active Directory.
To access the ticket URL, and other IDP details, click on the AD Identity Provider that's been added, and select “View Details”. From the side panel that opens, copy the ticket URL, and add it the the connector.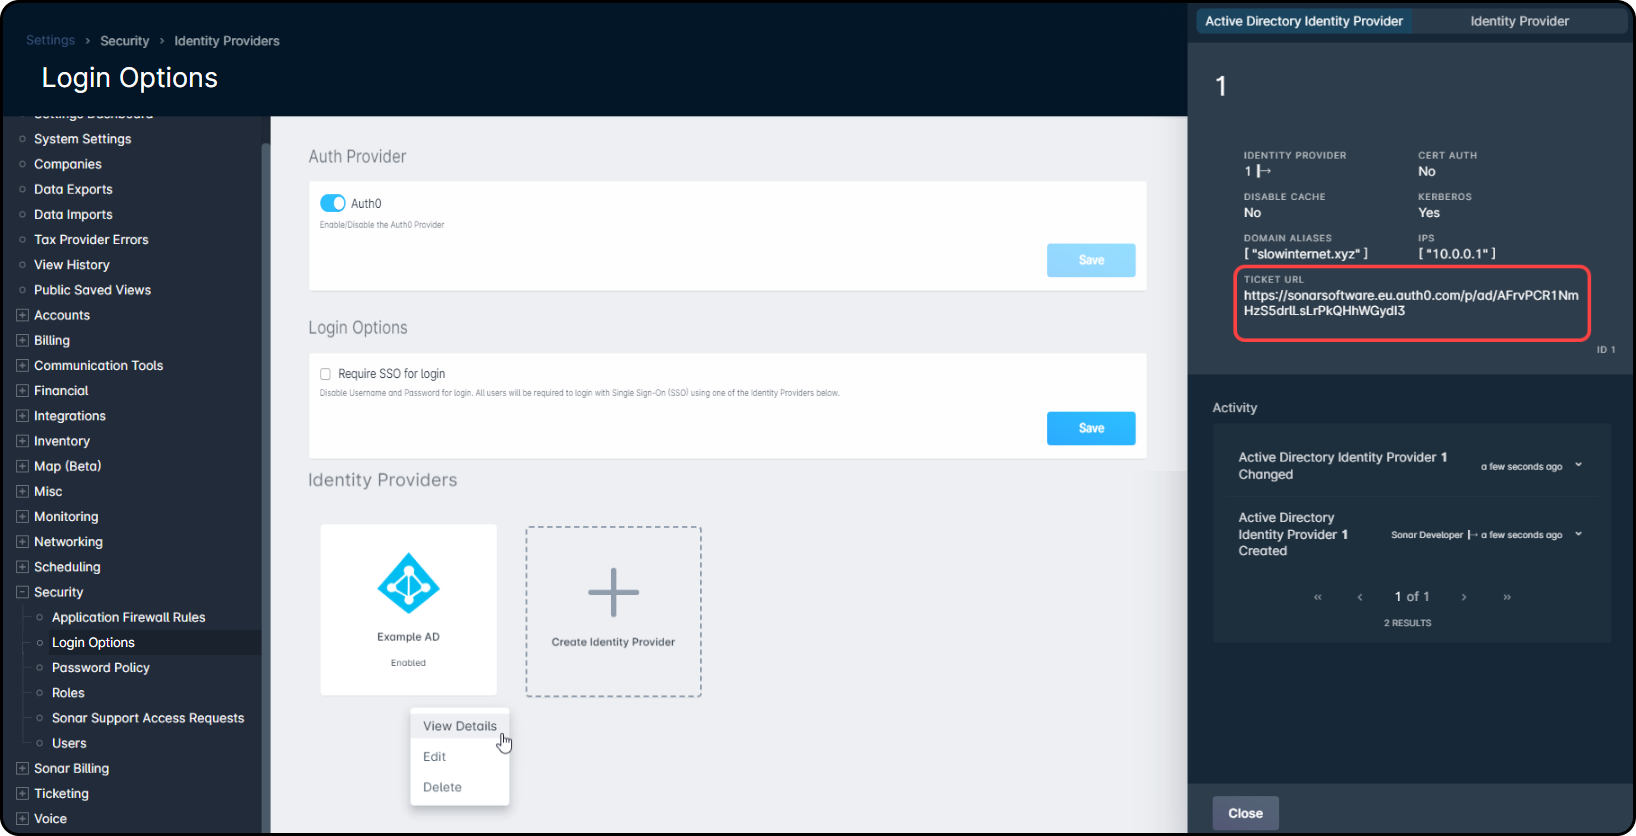
SAML Provider example
For more information on setting up SAML with Auth0, check out the dedicated article here: Auth0 | Setting Up SAML - When all the fields are filled out, click Create.
Configuring Auth0 for your Users
Any email addresses intended to be used via Auth0 must be associated with an existing user in their Sonar instance. If someone were to attempt to log in when a user does not yet exist, they'll be met with the following error message:

Our Users: Overview article details how you can create a user. Once the user is set up, it must remain “enabled” for that person to continue to be able to log in.
If a new user is created with the intention of solely utilizing the Auth0 feature, they will not have to follow through with the initial setup email that is automatically sent out via the instance. Instead, once they've successfully logged in for the first time using Auth0, you'll notice “Yes” underneath the “Completed Setup” column header.
Auth0 in Use
Once Auth0 has been set up and enabled, existing users can take advantage of the Auth0 feature. This option is visible on the login screen to access their instance.
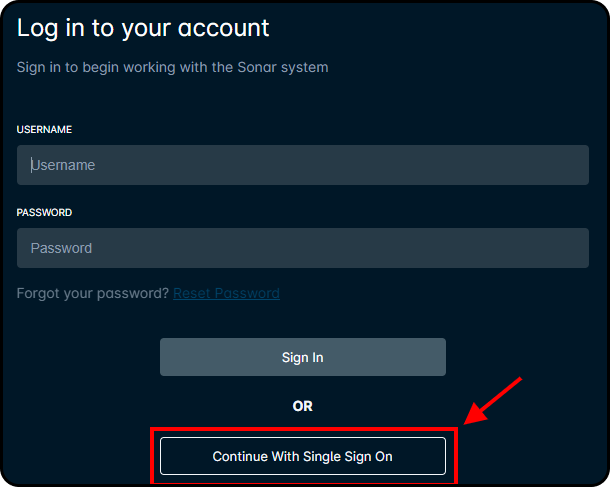
When a user clicks Continue With Single Sign On, a new page will populate that lists the options available to log in with. In our example, we've set up an instance to utilize Google only, and therefore we see the following page:
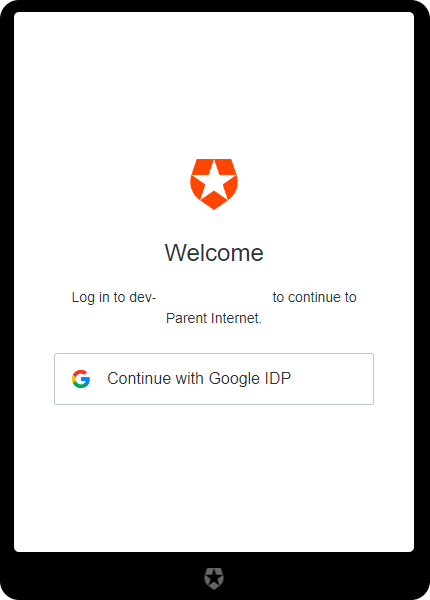
From here, we will select Continue with Google IDP and be directed to the Google login page, then we'll be prompted to accept permission to pair the app.

As long as an account exists — and is enabled — with the email address you are attempting to log in with, you'll be able to successfully access the instance.
Field Tech App Consideration
SSO is not possible via the Sonar Field Tech App; any user intending to use the app will need to ensure they have a password set within their Sonar instance. Existing users should already have a password attached to their login that can be used, and new users should either continue with the initial account setup email they received or, alternatively, can request a password reset on their login screen.
Require SSO for Login
Once you have Auth0 setup within your instance, you can force your users to use SSO only and remove the ability to log into Sonar with their user credentials. By forcing your users to use SSO, Sonar will hide the Sonar Login form from the web app, preventing your users from utilizing that as an option to bypass the SSO option enabled.
To enable this option, navigate to Settings → Security → Login Options → Require SSO for Login.
If you are unable to login using SSO and you need to disable the “Require SSO for Login” option from your instance, you must reach out to our Support team.
Enforce MFA with Directory Services and Identity Providers
If you have required SSO login for your instance, you may have the option to further enhance your security by enforcing Multi-Factor Authentication (MFA) through your active directory or identity provider. Below are some of the common providers along with their help articles for setting up MFA.