Table of Contents
Building Alerting Rotations
Read Time: 10 mins
Alerting rotations are used to define periods of time in which network alerts are sent to certain users within Sonar. A network alert would be triggered as a result of a network event that occurs. Network events are considered to be when a device moves into a warning state, a down state, or begins flapping. Alerting rotations can be used to set up an on-call rotation for specific users, during which they would be alerted about any network events that happen.
Device States Overview
Device State | What This Means |
ooo Good | The device is working normally |
ooo Warning | The device has either: violated an ICMP threshold defined in a monitoring template, an SNMP query has failed due to a configuration error (i.e. an invalid OID), or an SNMP OID threshold has been violated |
ooo Down | The device has failed to respond to ICMP (if ICMP monitoring is enabled), or it has failed to respond to SNMP (if SNMP OIDs are configured) |
Flapping | The device is moving between states in a quick sequence |
Creating an Alerting Rotation
Alerting rotations are set up in two different pieces; first, you need to configure the alerting rotation itself, and then you need to define which day(s)/time(s) of the week the alerting rotation should be active on. An in-depth overview on setting up both of these pieces is provided below.
1. Alerting Rotation Setup
To set up an alerting rotation:
- Navigate to the Alerting Rotations screen by clicking Settings menu > Monitoring > Alerting Rotations
- Click "Create Alerting Rotation"
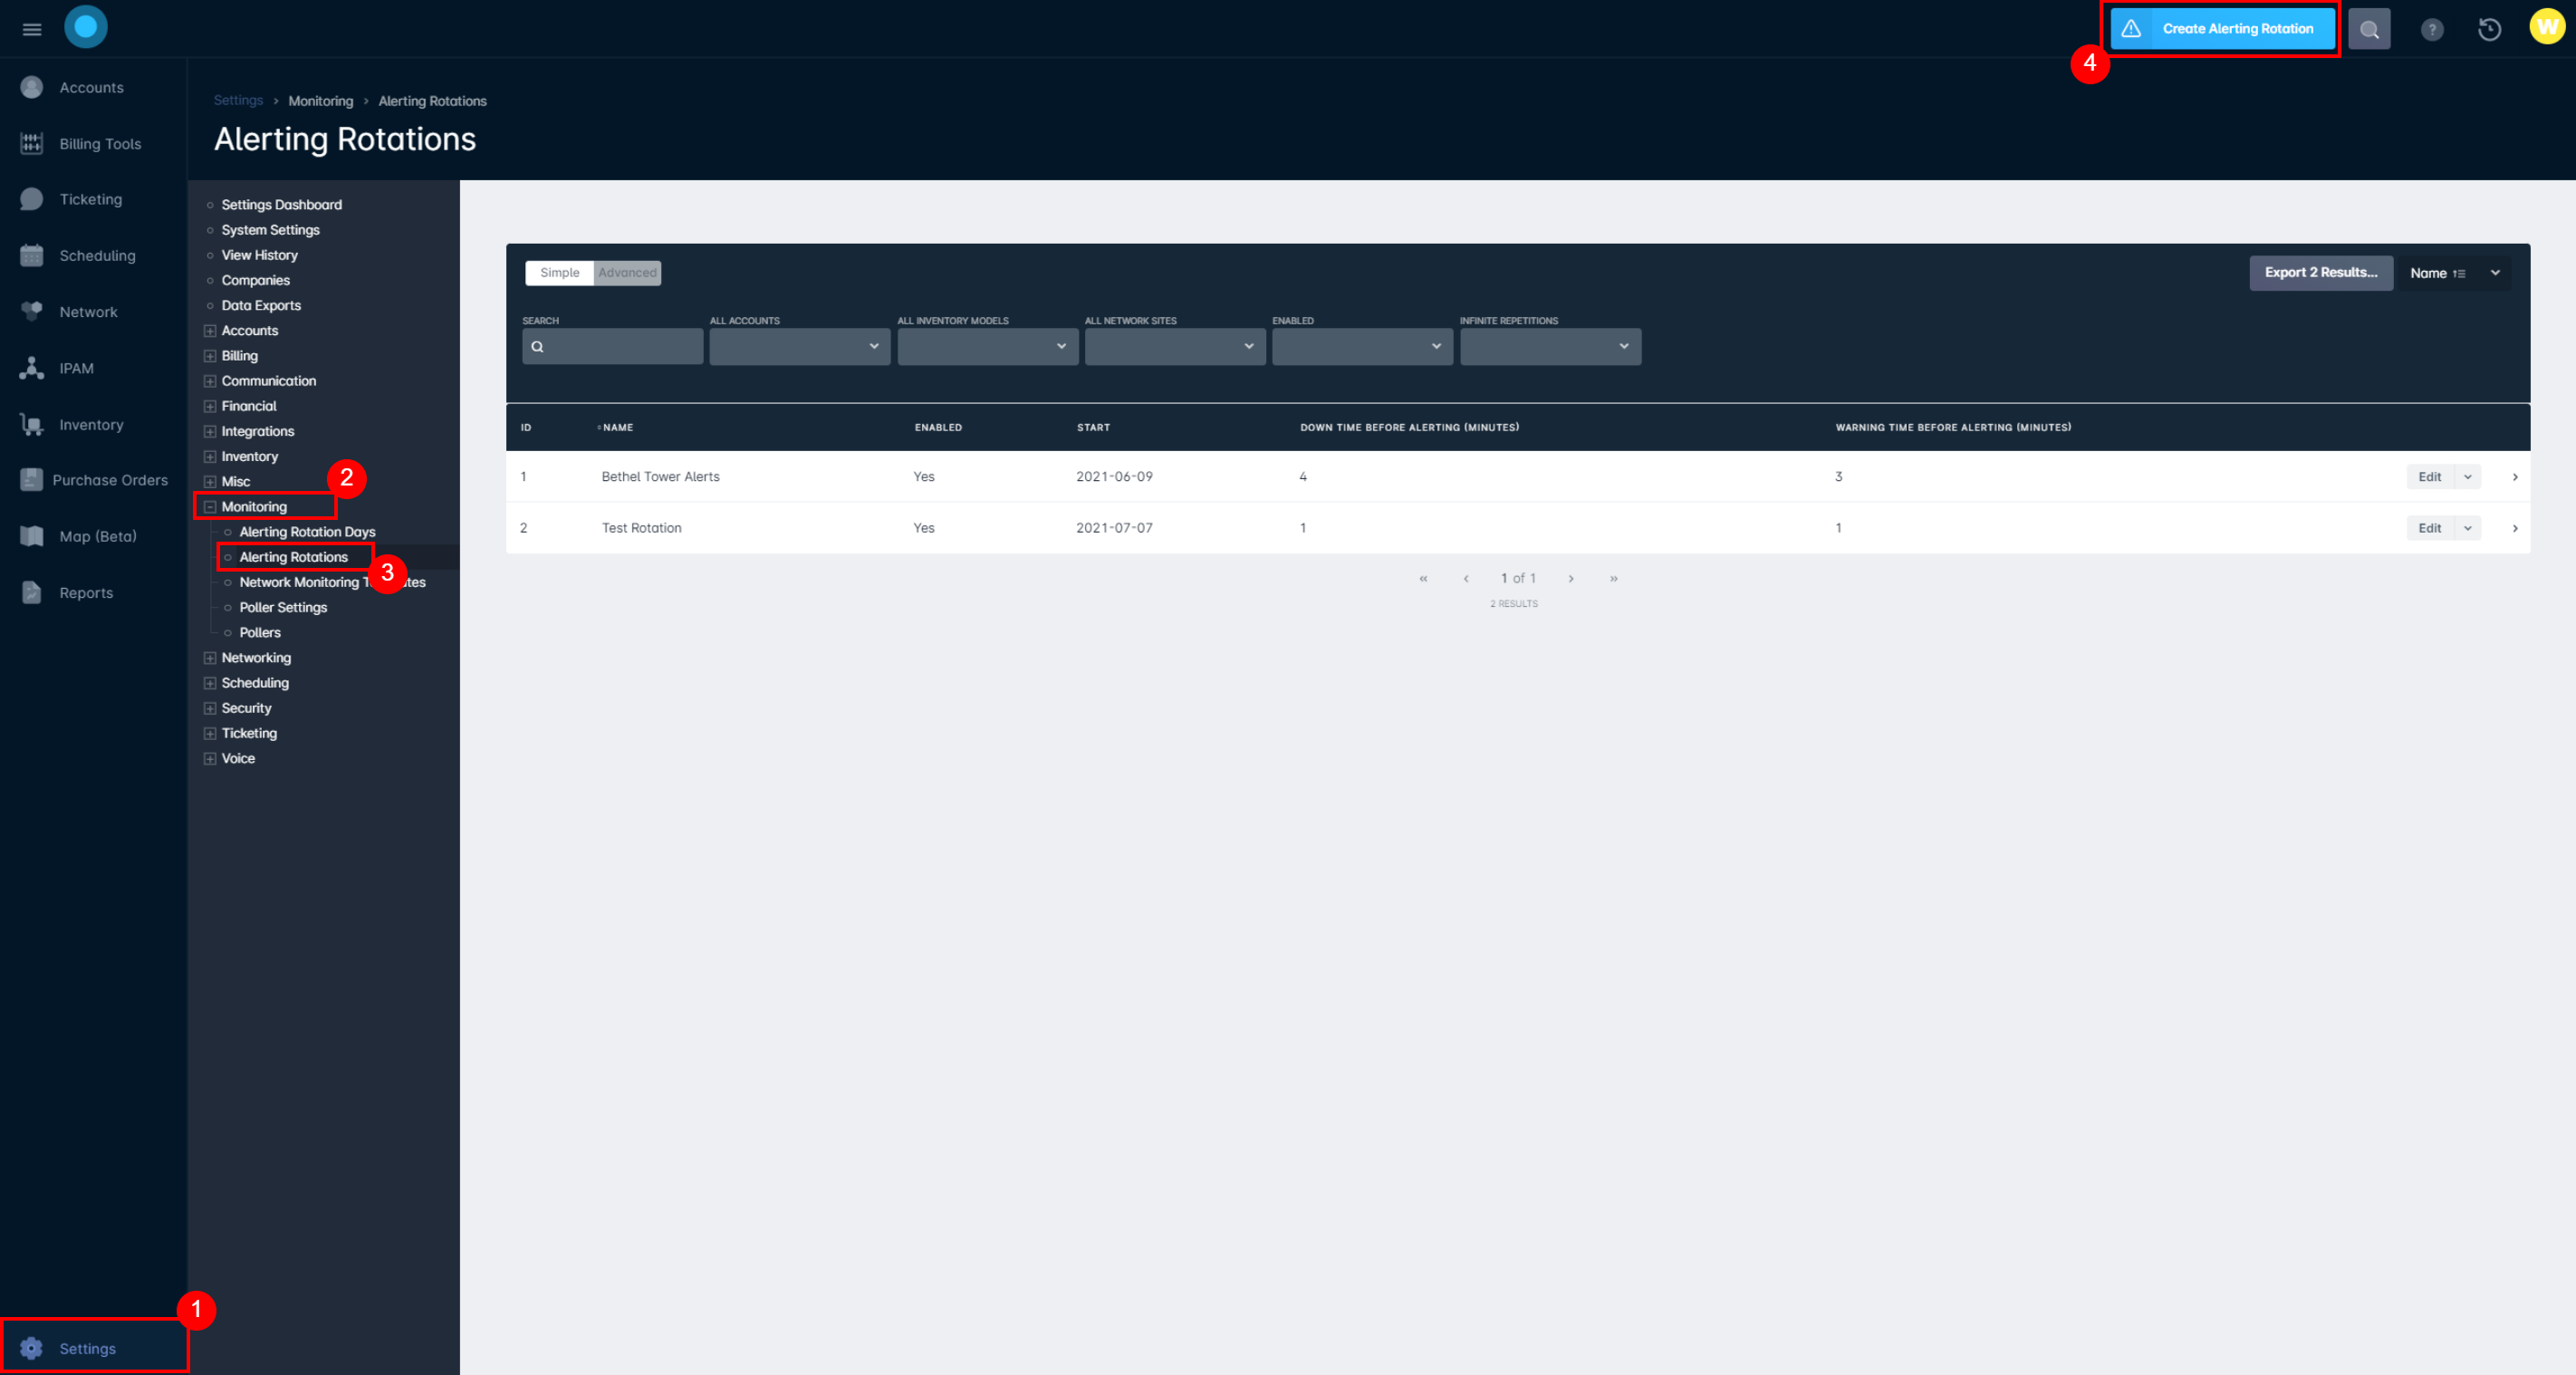
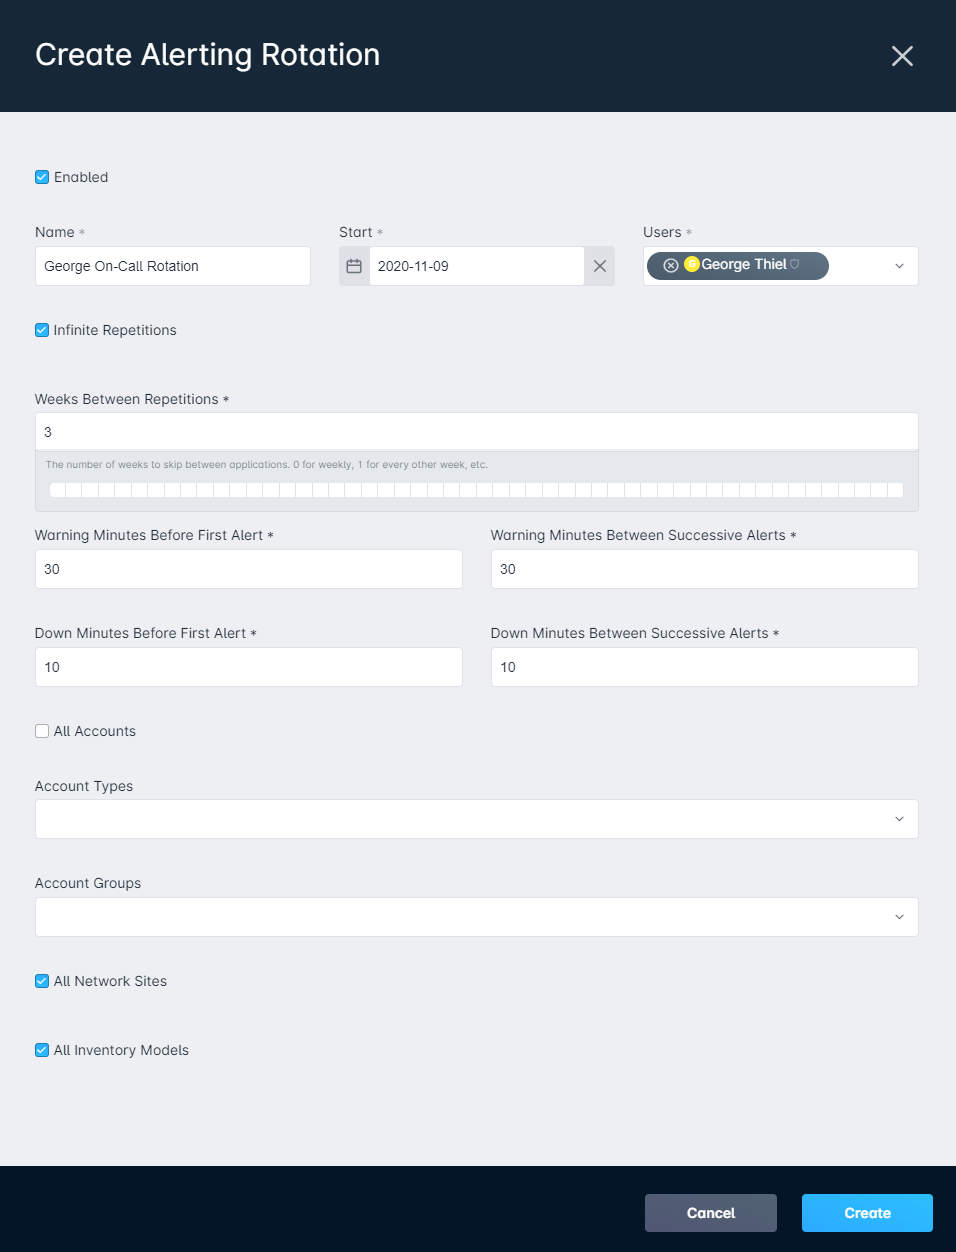
- You will be presented with the Create Alerting Rotation window, where you can set the details for this rotation - an explanation of the fields you will see here and how to use them is provided below:
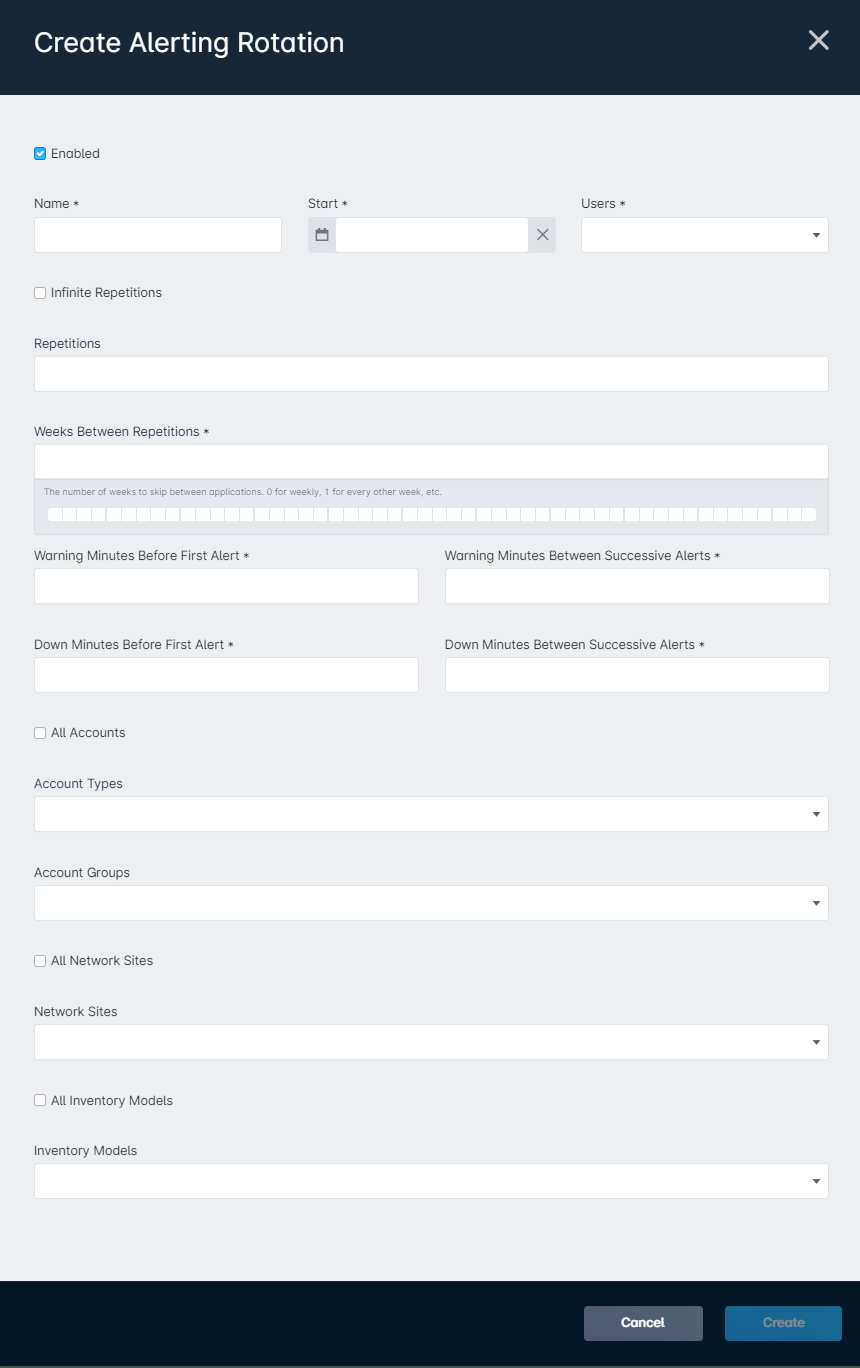
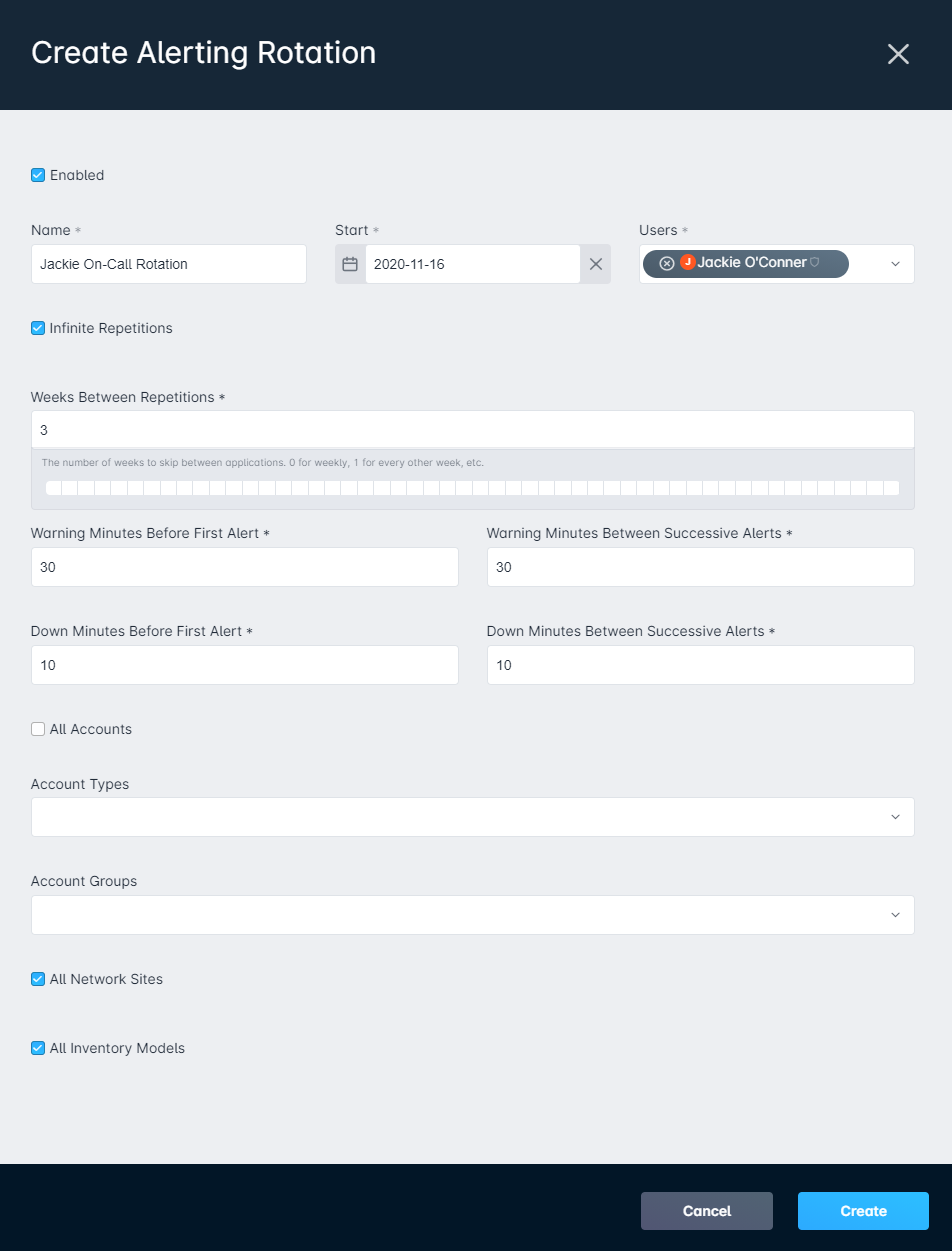
- Enabled: This is what determines if the alerting rotation is currently being used, or if it is disabled.
- Name: A descriptive name for the rotation.
- Start: The date this rotation should start.This can be set for a future date, but the rotation will not be applied and users will not start receiving notifications until that date.
- Users: The users that are part of this alerting rotation and who will therefore receive notifications of the network events.
- Repetitions: If Infinite Repetitions is checked, this rotation will repeat forever; if unchecked, this rotation will repeat until the Repetitions value is met and will then stop.
- Weeks Between Repetitions: This is how often the rotation repeats; for example, if 0 it will repeat every week, if 1 it will repeat every other week, etc.
- Warning Minutes Before First Alert: The number of minutes a device can be in warning state before notifications are sent. This is ignored if the device is in warning due to violating an SNMP threshold, as the thresholds themselves have a time parameter.
- Warning Minutes Between Successive Alerts: The amount of time in minutes that should elapse before the next alert is sent out for a device in warning state.If you are only looking to receive alerts for the initial state changes, set this to a significantly higher number, such as 999999.
- Down Minutes Before First Alert: The number of minutes a device must be in down state before an alert is sent out.
- Down Minutes Between Successive Alerts: The amount of time in minutes that should elapse before the next alert is sent out for a device in down state.If you are only looking to receive alerts for the initial state changes, set this to a significantly higher number, such as 999999.
- Accounts: If All Accounts is checked, this rotation will be applied to all accounts; otherwise, you can specify which account types and/or groups this rotation should be applied to through the Account Types and Account Groups fields.
- Network Sites: If All Network Sites is checked off, this rotation will be applied to all network sites; otherwise, you can specify which particular network site(s) this rotation should be applied to through the Network Sites field.
- Inventory Models: If All Inventory Models is selected, this rotation will be applied to all inventory models; otherwise, you can specify which particular inventory model(s) this rotation should be applied to through the Inventory Models field.
2. Alerting Rotation Days
Once you have set up an alerting rotation, you can set up the days that the alerting rotation should be active. To set up alerting rotation days:
- Navigate to the Alerting Rotation Days screen by clicking Settings menu > Monitoring > Alerting Rotation Days
- Click "Create Alerting Rotation Day"
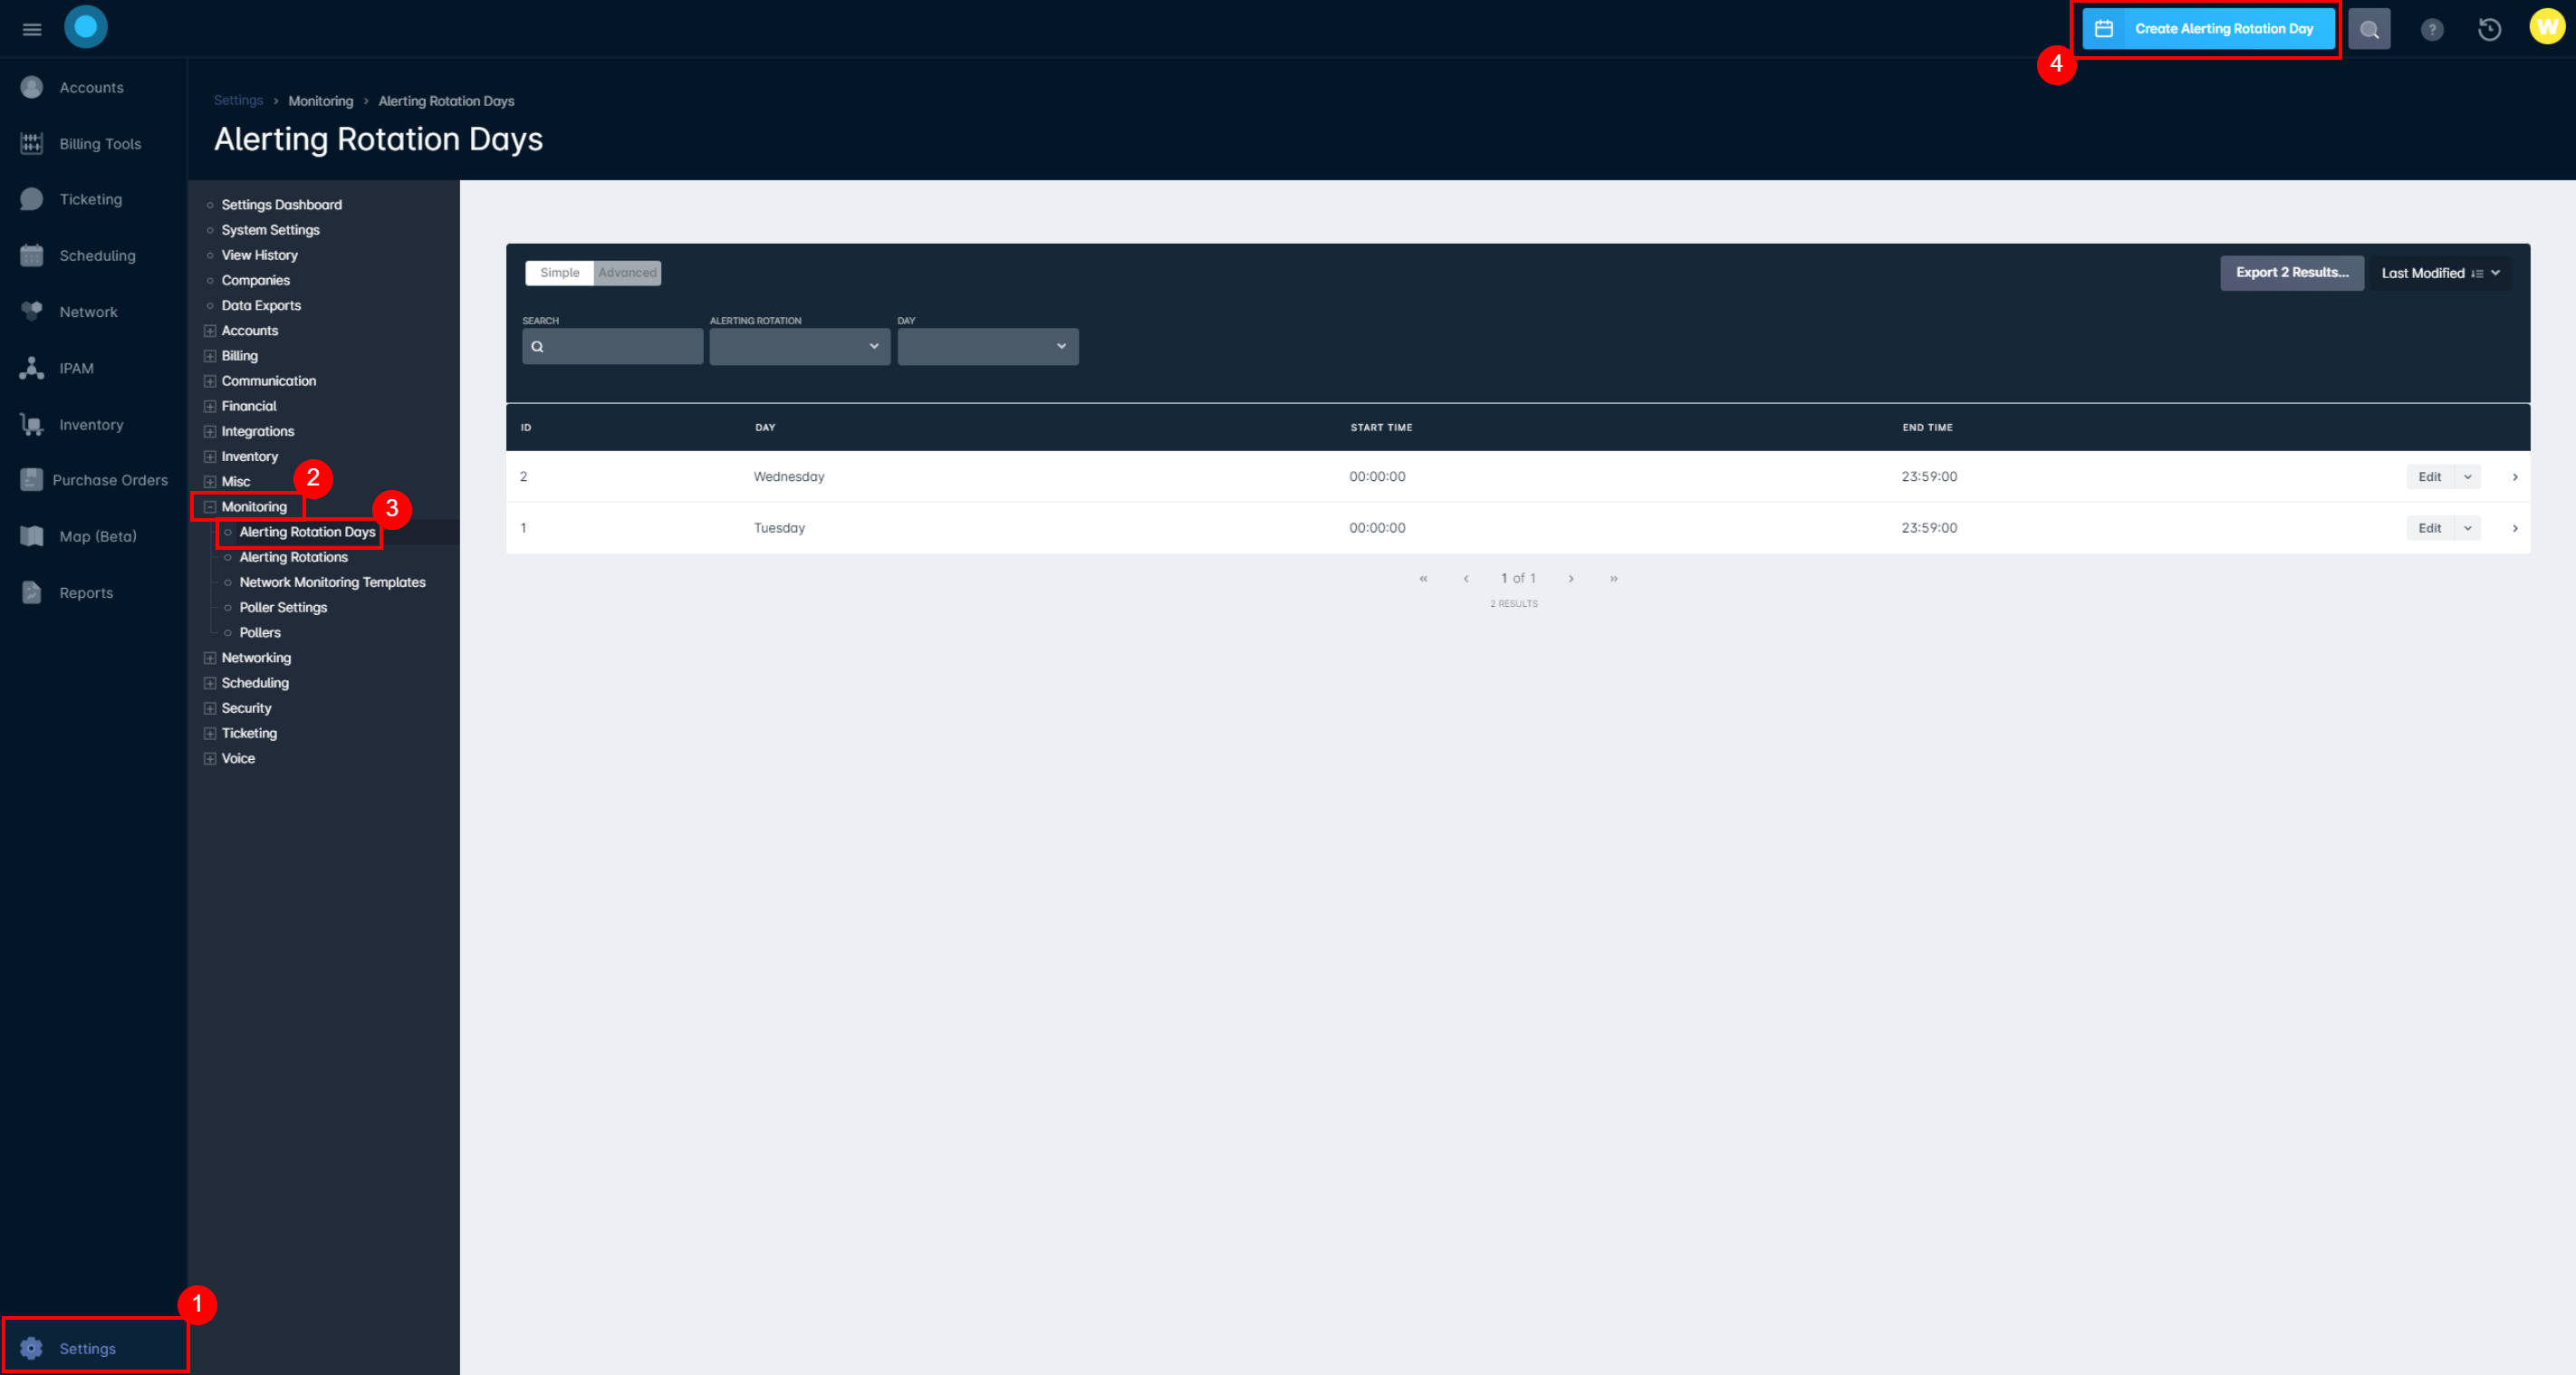
- You will be presented with the Create Alerting Rotation Day window, where you can define the day and start/end times for the rotation. An overview of the fields contained within this window is provided below:
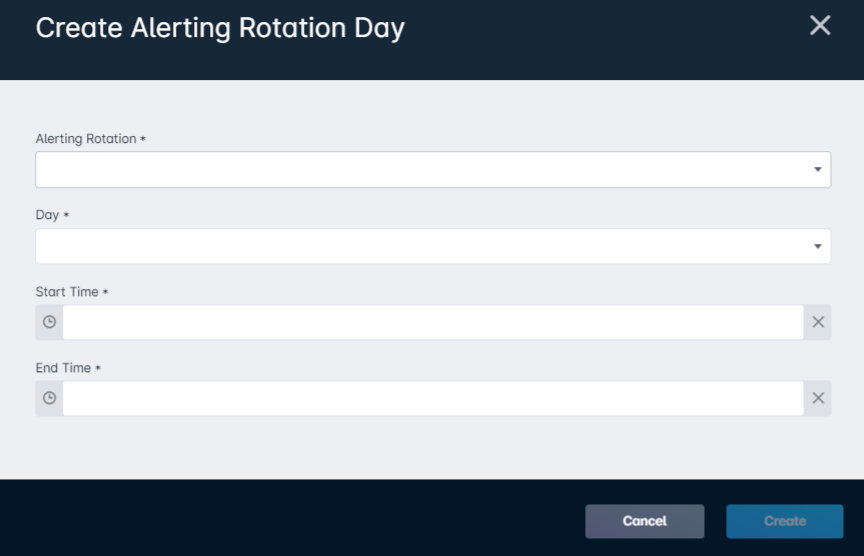
- Alerting Rotation: Any alerting rotations that have been configured will appear in the list here - select the alerting rotation that you wish to define the days for.
- Day: The day that this alerting rotation should be active on.
- Start Time: The time that this particular alerting rotation should begin.
- End Time: The time that this particular alerting rotation should end at.
Alerting Rotation Notifications
Notifications for alerting rotations can be sent out as an email or as an in-app notification, and this configuration is controlled on a per-user basis. In order to access the notification settings for alerting rotations, follow the steps below:
- Click on your user icon in the top-right corner and select "Notification Preferences" from the menu that appears

- Scroll through the "Network Preferences" section until you see the
When a network alert is generated for one of my alerting rotationsoption: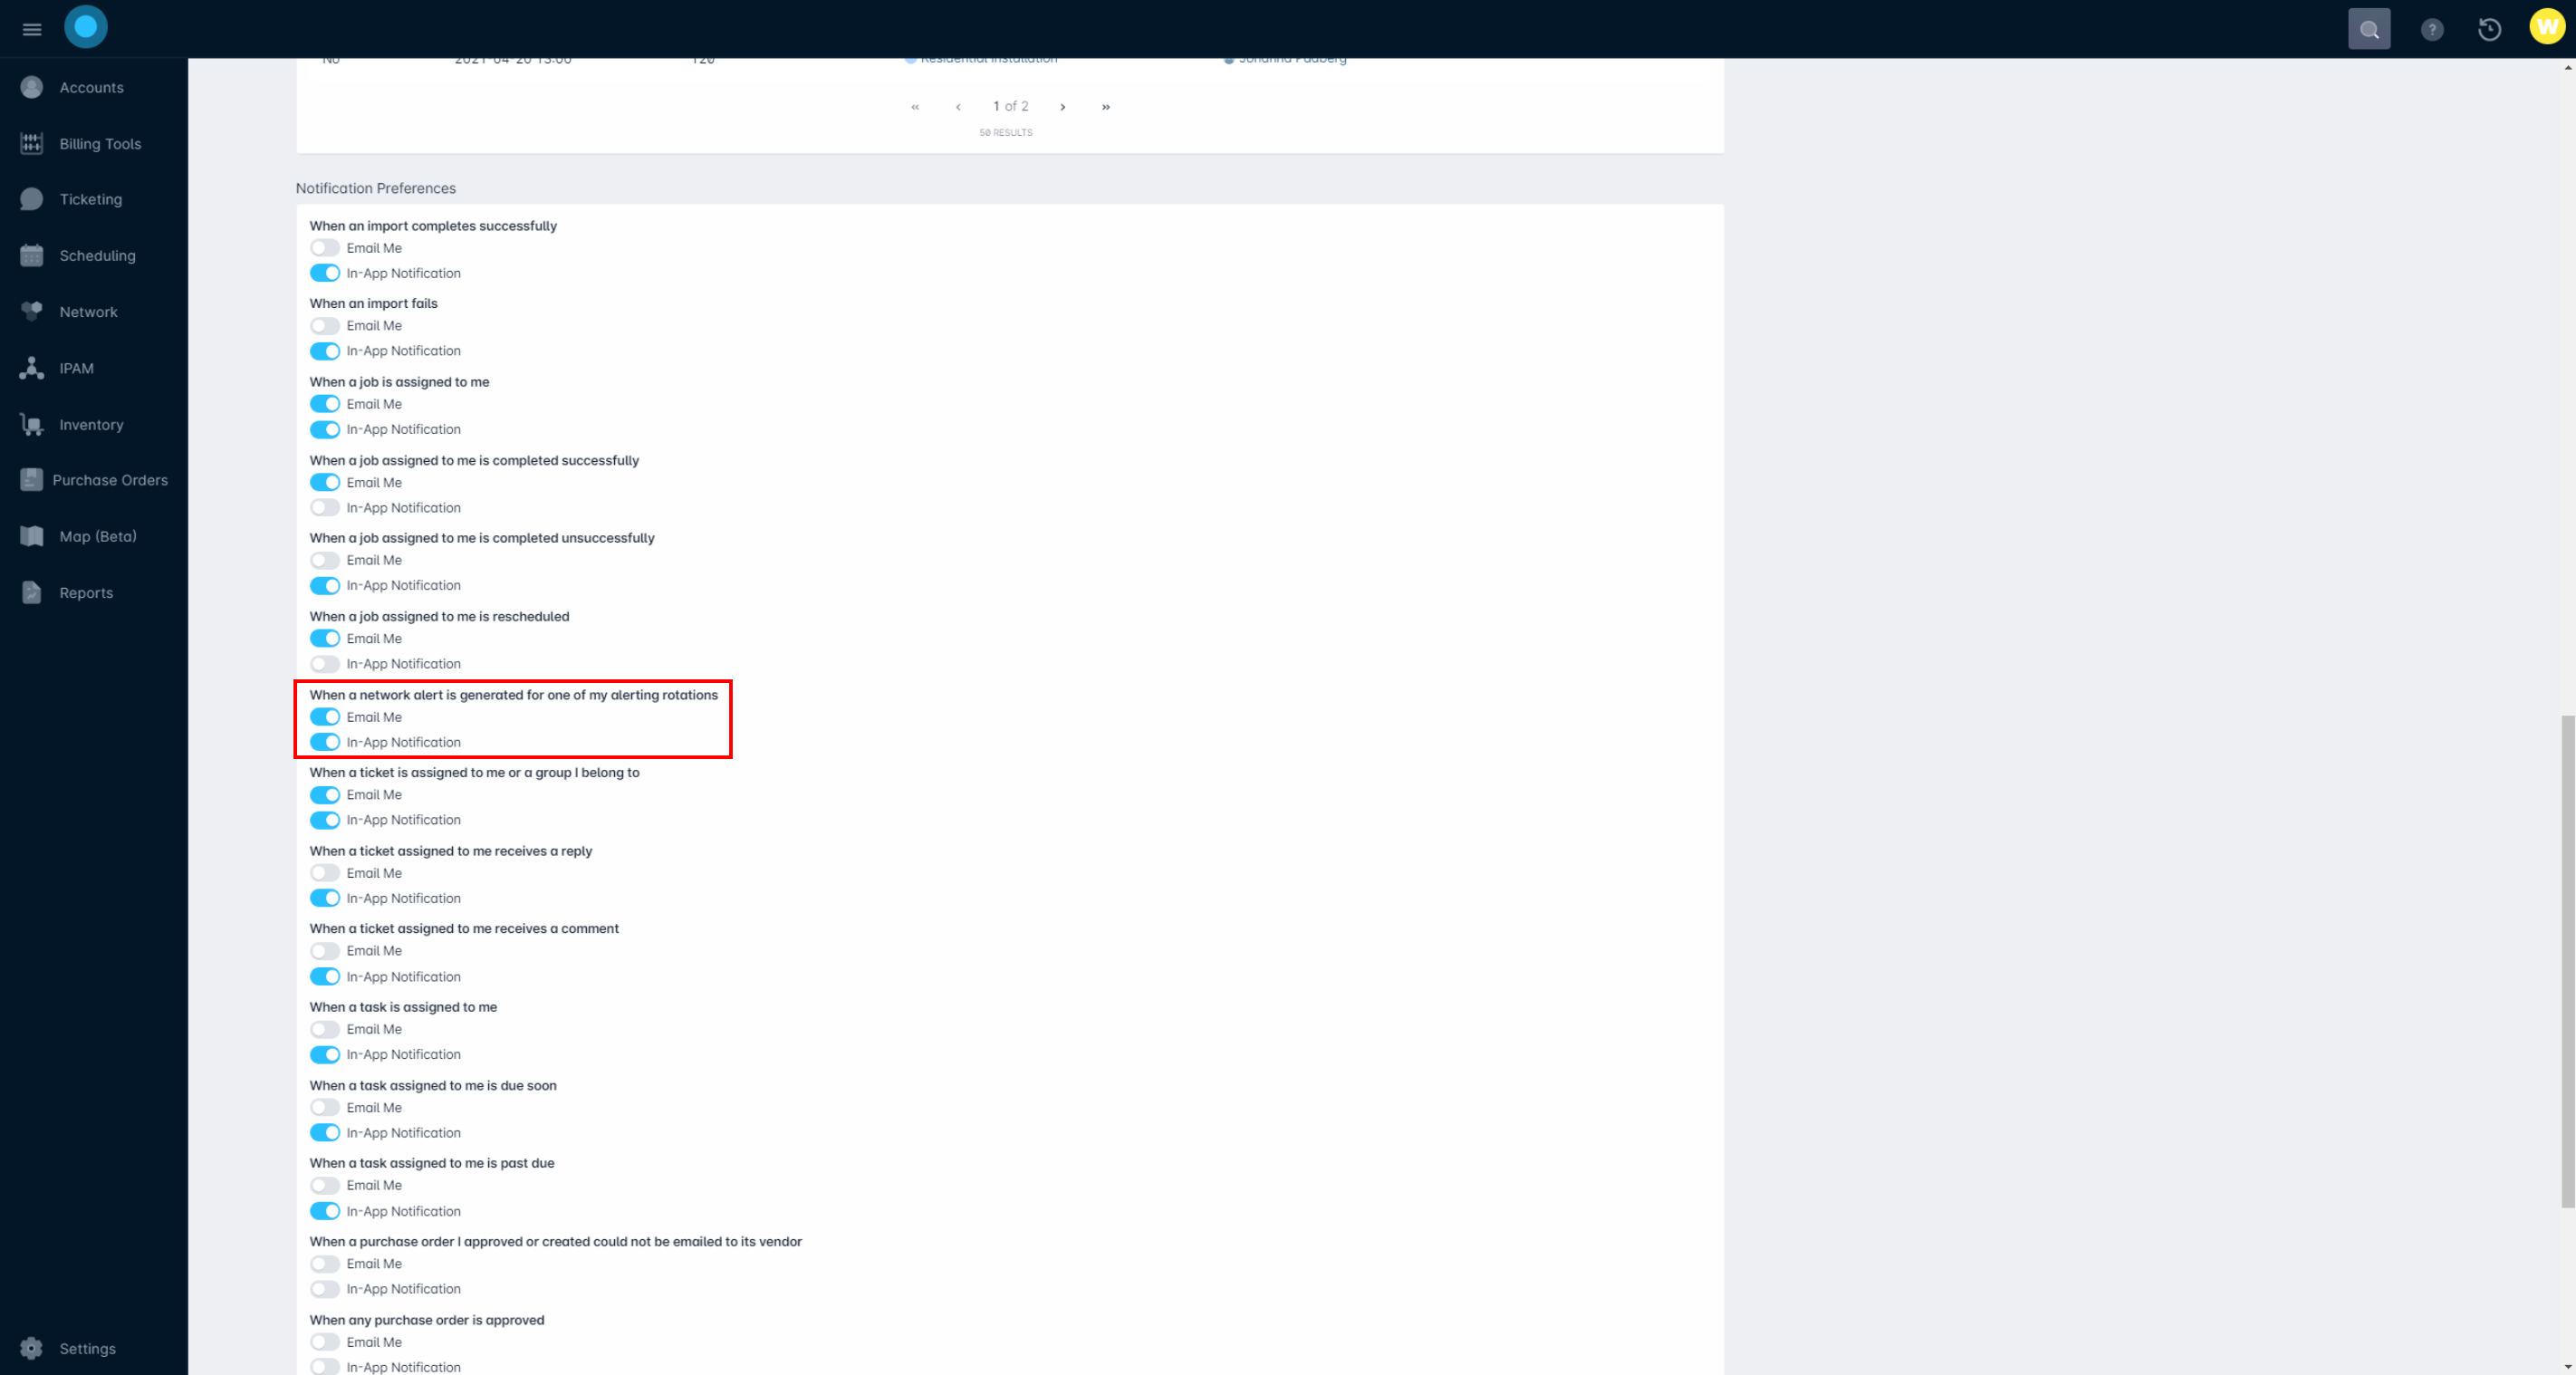
- This section is where you can enable or disable notifications for alerts generated on devices you're tasked to monitor.
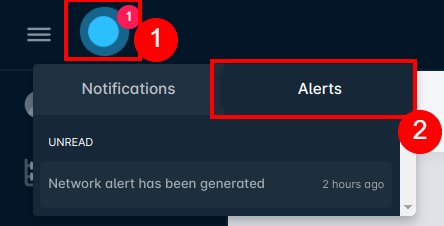
- When enabled, in-app notifications will appear on the Sonar logo in the upper-left corner of the page, on the Alerts tab:
- When enabled, email notifications will be sent to the email address listed on your account. The email will appear in the following template:
The following items [are now in a warning or down state / have returned to a healthy status / are newly flapping / are still flapping]
- Inventory item ID, status, model, and manufacturer
- When enabled, in-app notifications will appear on the Sonar logo in the upper-left corner of the page, on the Alerts tab:
Claiming a Device & Suppressing Alerts
Although the main use of alerting rotations is to be notified of any network events, there are certain situations where you might want to suppress further alerts from being sent out - this can be done in two ways:
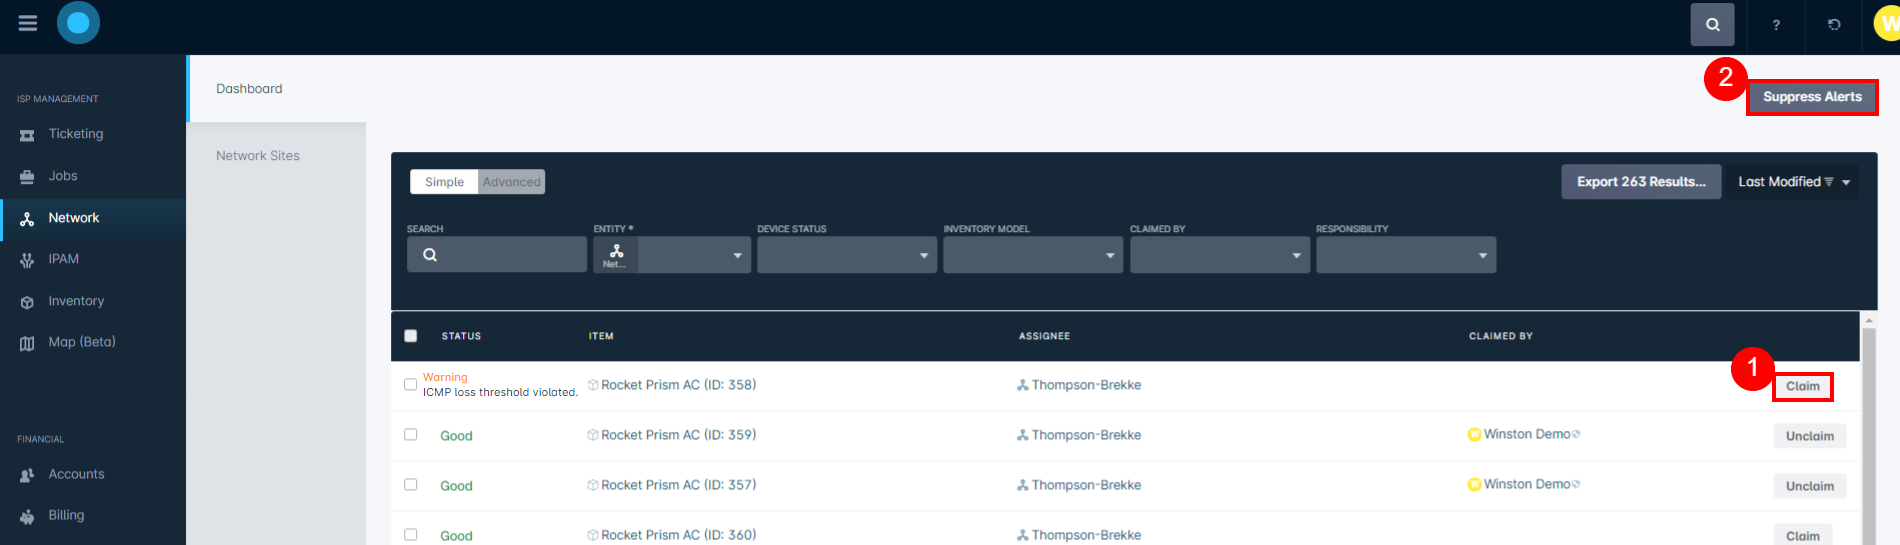
1. Claiming a Device
When an alert is generated and sent to a user, they have the ability to suppress further alerting for the item by claiming that device. Claiming a device is done individually for each inventory item, and can be done by clicking "Claim", as seen in the image above. Once a user claims an item, the user will be displayed under the Claimed By column, and alerting for the item will be suppressed until the item is unclaimed, or the monitoring for the item returns to a Good state.
2. Suppress Alerts
Through the "Suppress Alerts" button you can halt all alerting rotation notifications from being sent out. Clicking this button will open a new window where you will specify the date and time you would like to suppress alerting until - this will effectively prevent everyone in the system from receiving any configured alerts until the specified date/time, at which point the notifications will resume. Typically, you would only use this button when you have some sort of global monitoring outage, and want to suppress notifications as you are currently aware and working to resolve the issue.
Alerting Rotation Example Build Out
Let's say that we have 3 technicians (Jerry, George, and Jackie) dedicated for our company's after-hours network monitoring, operating on a rotating on-call basis. Each technician covers one week at a time, working Monday through Friday between the hours of 5 pm to 8 am the following morning (so each technician works one week and then is off for the following two weeks). Below we will walk through setting up the alerting rotations for each technician, as well as the alerting rotation days to accommodate our scenario.
Part 1: Configuring the Alerting Rotations
Since these technicians are all responsible for the same job, most of the alerting rotation settings are the same between them. All of the alerting rotations are enabled so that they are ready to be activated on our specified start dates, and are set to repeat infinitely with 3 weeks in between each repetition. With 3 weeks in between repetitions, we can stagger each technician's start date by 1 week, to create the weekly on-call rotation. Our alerts are also for monitoring network sites only, including all inventory models, and do not include customer account equipment. Since our main concern is with an item moving into a down state, we have configured the 'minutes before first alert' and 'minutes between successive alerts' fields accordingly.
For Jerry, we have given his rotation a descriptive name, selected him as the user, and set his start date as November 2nd, 2020. This means that Jerry's rotation will be the first to start out of the 3 technicians, so he will be on-call from November 2nd through to November 6th, at which point George's rotation week will begin.

George's rotation has been given a descriptive name, his instance user has been selected, and he has a start date of November 9th, 2020; so George will start his first rotation the week of November 9th - 13th. After his rotation week ends on the 13th, his next rotation will not be until November 30th - December 4th, since there are 3 weeks between repetitions.
The rotation for Jackie has also been named accordingly, has her user selected, and a start date of November 16th, 2020. This means Jerry will be on-call the first week (November 2nd - 9th), George will be on-call the second week (November 9th - 13th), and Jackie will be on-call the third week (November 16th - 20th). Once Jackie's rotation week is complete, she will not be on-call again until December 7th - 11th.
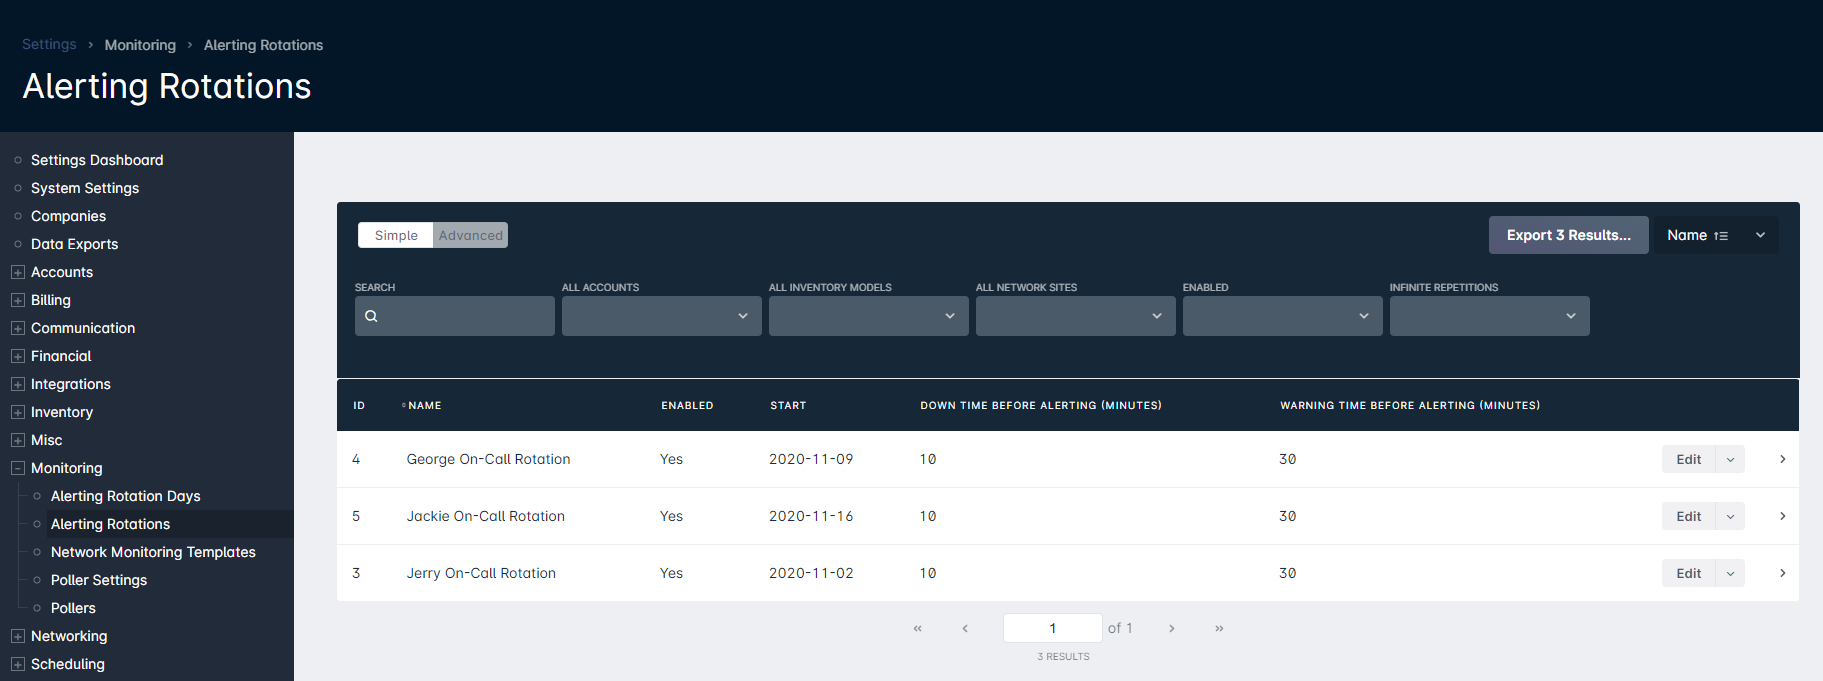
Once the technicians' alerting rotations have been saved, they will appear within the alerting rotations table. With these configured rotations, the flow will be as follows:
- November 2nd - 6th 2020: the first week of the on-call rotation, which Jerry will be on-call for
- November 9th - 13th, 2020: the second week of the on-call rotation, which George will be on-call for
- November 16th - 20th, 2020: the third week of the on-call rotation, which Jackie will be on-call for
- November 20th - 27th, 2020: the on-call rotation will start over, since we have it set to infinite repetitions and there are 3 weeks between each repetition; Jerry will be on-call for his 2nd week
Part 2: Adding the Alerting Rotation Days
Now that we have our alerting rotations configured, we need to define the days and times of the week that they will be active for. Since our technicians operate outside of business hours, we need to set up the alerting rotation days to cover 5 pm to 8 am the following morning.
To account for these hours, we will need to set up 2 alerting rotation days for each day of the week - one to cover the time between midnight and 8 am of the day, and one for 5 pm to midnight of the same day. Therefore, we will need to set up 10 alerting rotation days for each technician to accommodate this schedule.
Starting with Jerry's rotation, we will set up 2 alerting rotation days for the first day, Monday:
- One alerting rotation day for Monday from midnight to 8 am

- And one alerting rotation day for Monday from 5 pm to midnight

Once we have finished creating Jerry's alerting rotation days for the remaining days (Tuesday through Friday), we will repeat this process for George and Jackie as well.
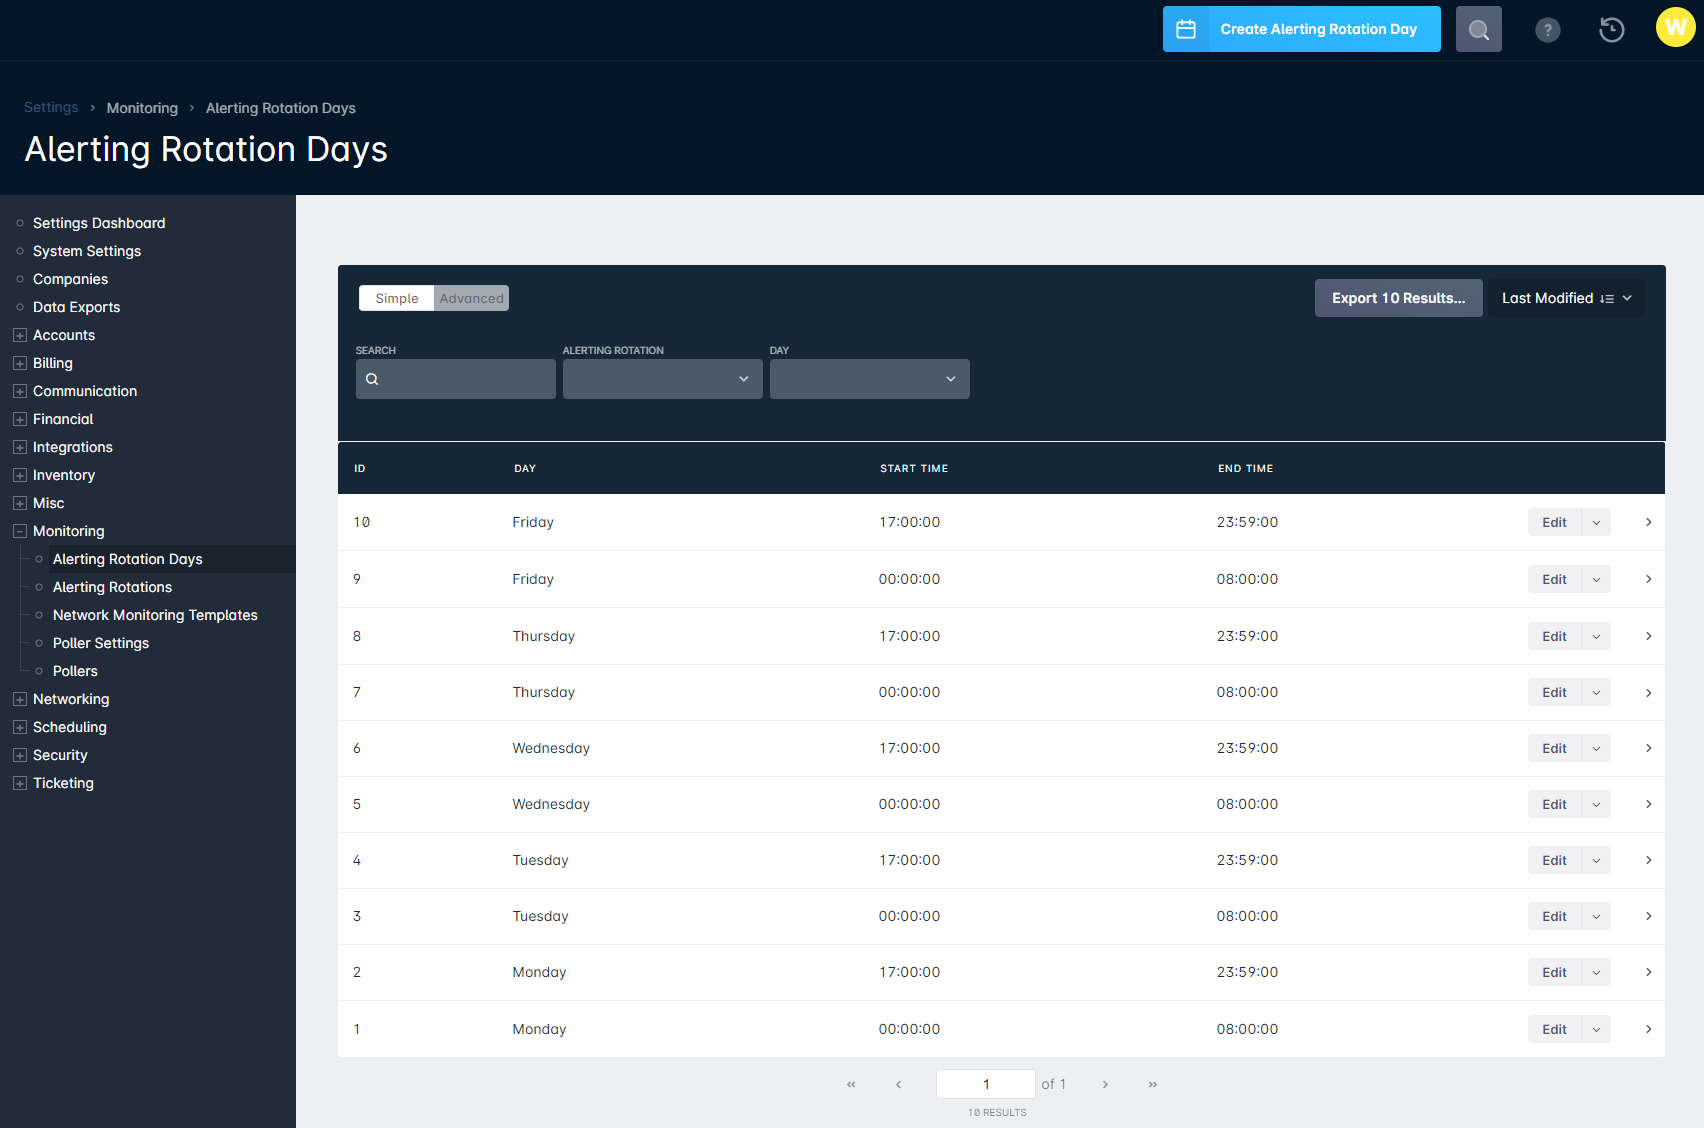
When we are finished setting up all of our alerting rotation days for George and Jackie, our on-call alerting rotation schedule will now be complete and take effect starting Monday, November 2nd, 2020, repeating infinitely.