Table of Contents
ACH Batching: Overview
 Updated
by Mitchell Ivany
Updated
by Mitchell Ivany
Read Time: 9 mins
In Sonar, there are numerous methods available to take payments. Whether it's manually adding cash payments, or making use of bank account payments, the money needs to flow to your bank account. In this article, we'll review the process surrounding ACH payment processors, and what separates them from other payment processors.
When using ACH Batching and accepting ACH Payments from customers, you'll generally need to contact your financial institution in order to gather the required processor information and confirm your financial institution accepts ACH Batches.
ACH vs e-Check
When creating a payment processor designed to handle bank account payments, there are two different approaches you can take; e-Check processors and ACH processors.
While both these processors will allow you to take bank account payments, they handle the transaction and deposit process slightly differently. An e-Check is fundamentally a digital check, which means that it should be treated nearly the same way. When you receive a payment via e-check, the processor will typically verify the funds and add the amount to your account in 1-2 days, although in some cases it may occur instantly as the processor will verify funds independently of the deposit. However, if the payee has insufficient funds to cover the balance of the payment, the funds could potentially be withdrawn from your account days after the initial payment.
Conversely, the ACH process involves more manual work. In order to submit ACH payments to your bank, you need to create something called an ACH batch, which is effectively a list of all payments made within a specific period. While you do need to add a processor for ACH payments, the processor only determines the format of the ACH batch. When compared directly to e-Check transactions, ACH transactions lose some flexibility as they can not automatically handle refunds, reversals, and rectify payments. Additionally, some financial institutions may impose limits on ACH transactions, so check with your financial institution when considering this payment method. ACH Transactions and processors are largely used when the cost of using e-check processors is more than the cost of manually managing your bank account payments.
ACH Payment Processors
In order to set up a Bank Account processor for ACH payments, follow the steps below:
- Go to Settings
- Expand the Billing section
- Click on Bank Account Processors
- Click on "Create Bank Account Processor"

This opens the Bank Account Processor selection modal:
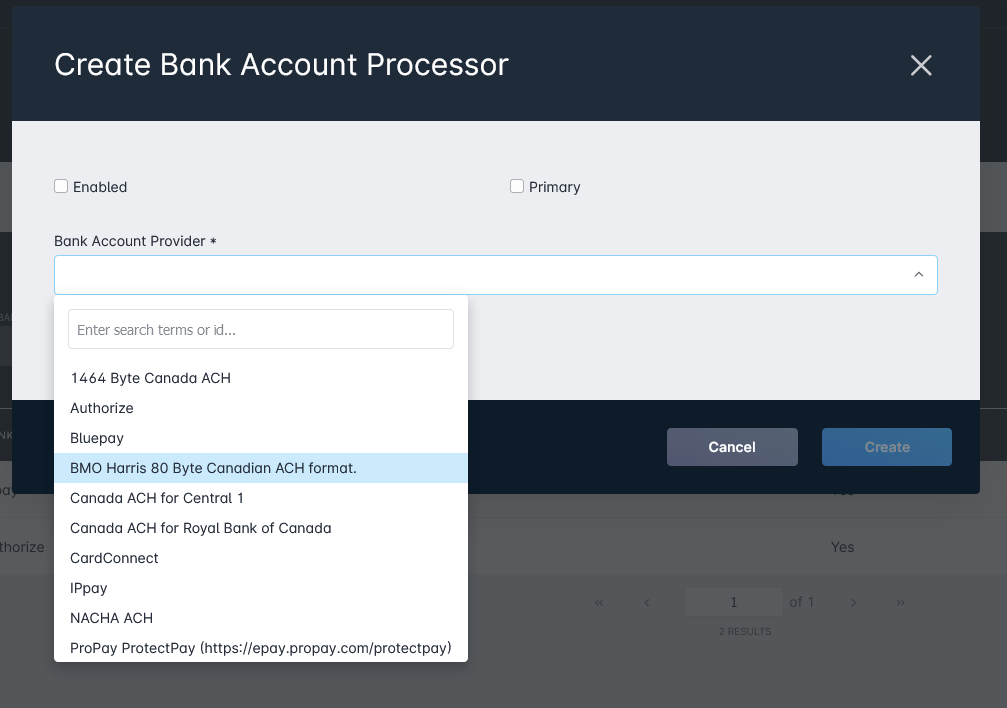
The provider list will display all e-Check and ACH payment providers, and you can see the requirements for each provider available in the Setting up Bank Account & Credit Card Processors, and below you can see the requirements for each ACH processor.
1464 Byte Canada ACH

- The Provider is always selected from this dropdown.
- The Bank Account Number defined here will be the Account Number of the account designated to receive deposits from the Financial Institution processing the ACH payments
- The Company Name is the name of your Company as registered with your Financial Institution, and should match the name on the account provided above.
- The Data Center Code is provided by your financial institution and will vary depending on region and bank.
- The Institution ID is the combination of your Financial Institution's Bank Number and Transit Number with an additional 0 at the beginning of the number.
- For example, start with a 0, then Royal Bank would have a Bank # of 003, and a Transit Number of 04356. This would result in an Institution ID of 000304356 (0 + three-digit Bank# + five-digit Transit#).
- The Originator ID is assigned to you by your financial institution.
BMO Harris 80 Byte Canadian ACH Format
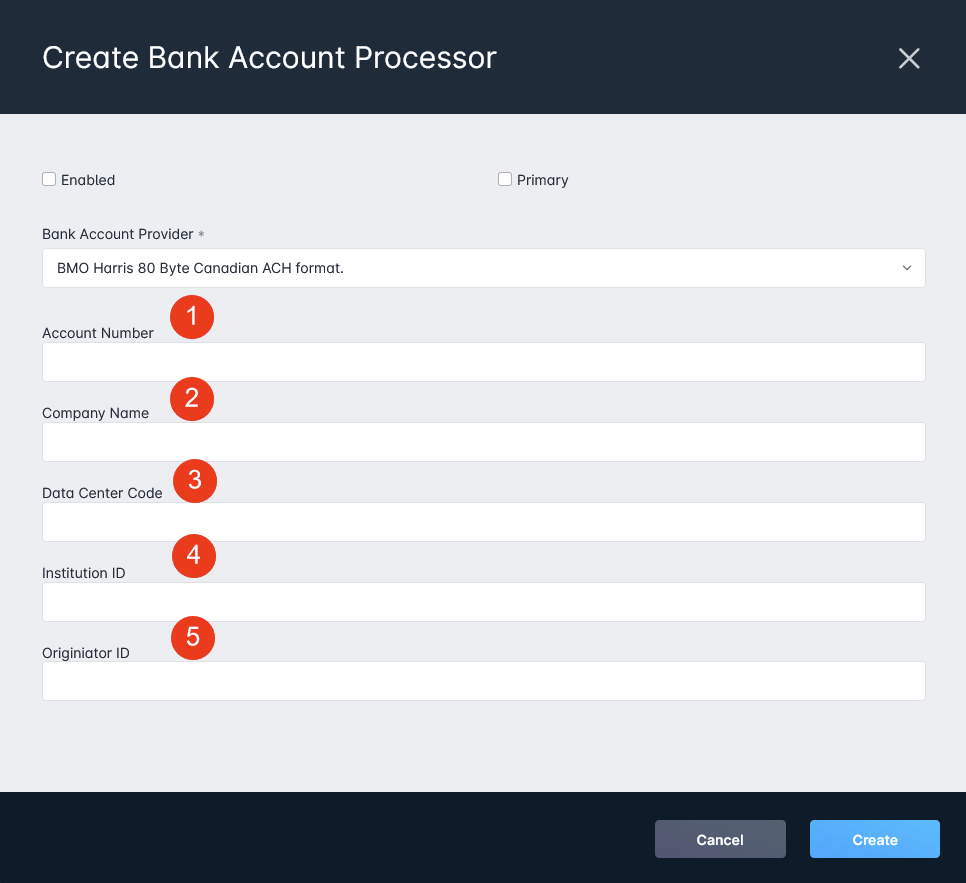
- The Account Number defined here will be the Account Number of the account designated to receive deposits from the Financial Institution processing the ACH payments
- The Company Name is the name of your Company as registered with your Financial Institution, and should match the name on the account provided above.
- The Data Center Code is provided by your financial institution and will vary depending on region and bank.
- The Institution ID is the combination of your Financial Institution's Bank Number and Transit Number
- For example, Royal Bank might have a Bank # of 003, and a Transit Number of 04356. This would result in an Institution ID of 00304356 (three-digit Bank# + five-digit Transit#)
- The Originator ID is assigned to you by your financial institution.
Canada ACH for Central 1
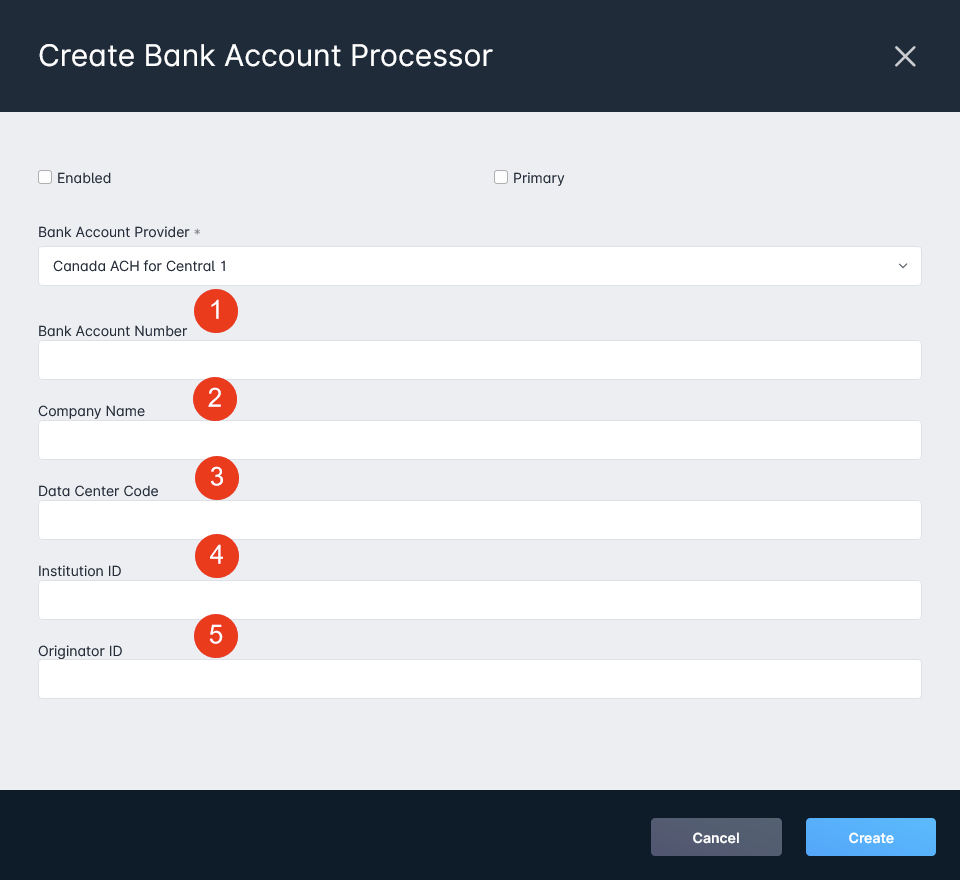
- The Bank Account Number defined here will be the Account Number of the account designated to receive deposits from the Financial Institution processing the ACH payments
- The Company Name is the name of your Company as registered with your Financial Institution, and should match the name on the account provided above.
- The Data Center Code is provided by your financial institution and will vary depending on region and bank.
- The Institution ID is the combination of your Financial Institution's Bank Number and Transit Number
- For example, Royal Bank might have a Bank # of 003, and a Transit Number of 04356. This would result in an Institution ID of 00304356 (three-digit Bank# + five-digit Transit#)
- The Originator ID is assigned to you by your financial institution.
Canada ACH for Royal Bank Canada
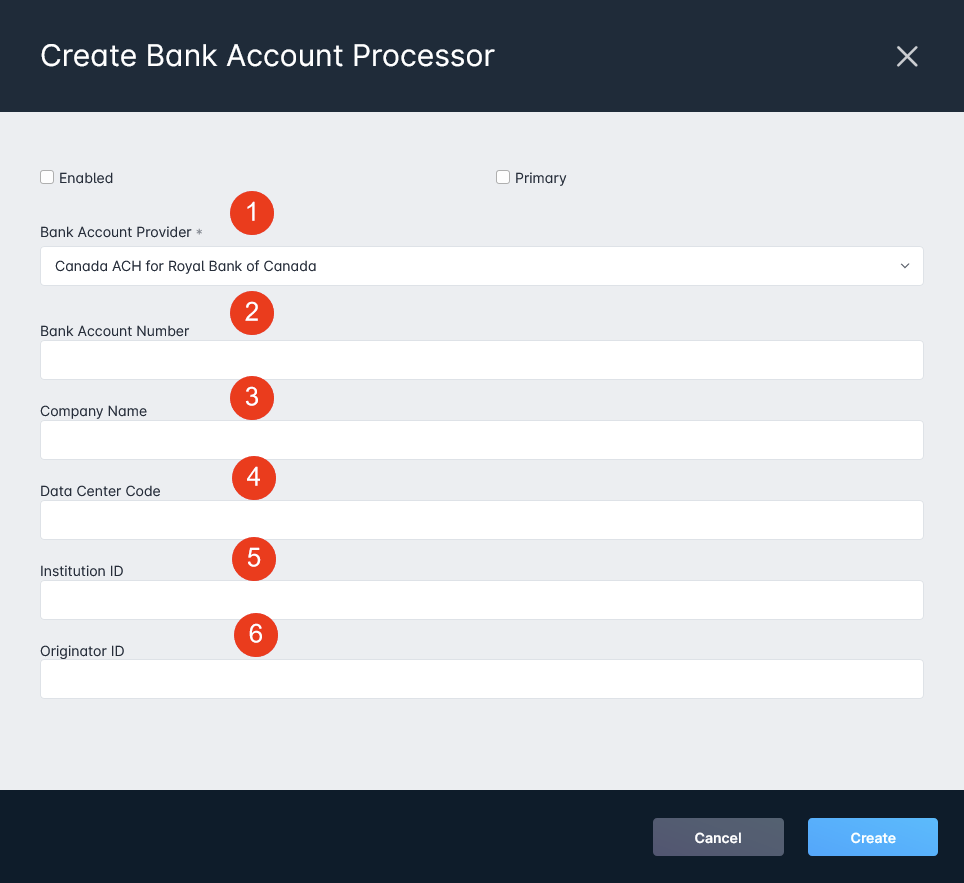
- The Bank Account Number defined here will be the Account Number of the account designated to receive deposits from the Financial Institution processing the ACH payments
- The Company Name is the name of your Company as registered with your Financial Institution, and should match the name on the account provided above.
- The Data Center Code is provided by your financial institution and will vary depending on region and bank.
- The Institution ID is the combination of your Financial Institution's Bank Number and Transit Number
- For example, Royal Bank might have a Bank # of 003, and a Transit Number of 04356. This would result in an Institution ID of 00304356 (three-digit Bank# + five-digit Transit#)
- The Originator ID is assigned to you by your financial institution.
NACHA ACH
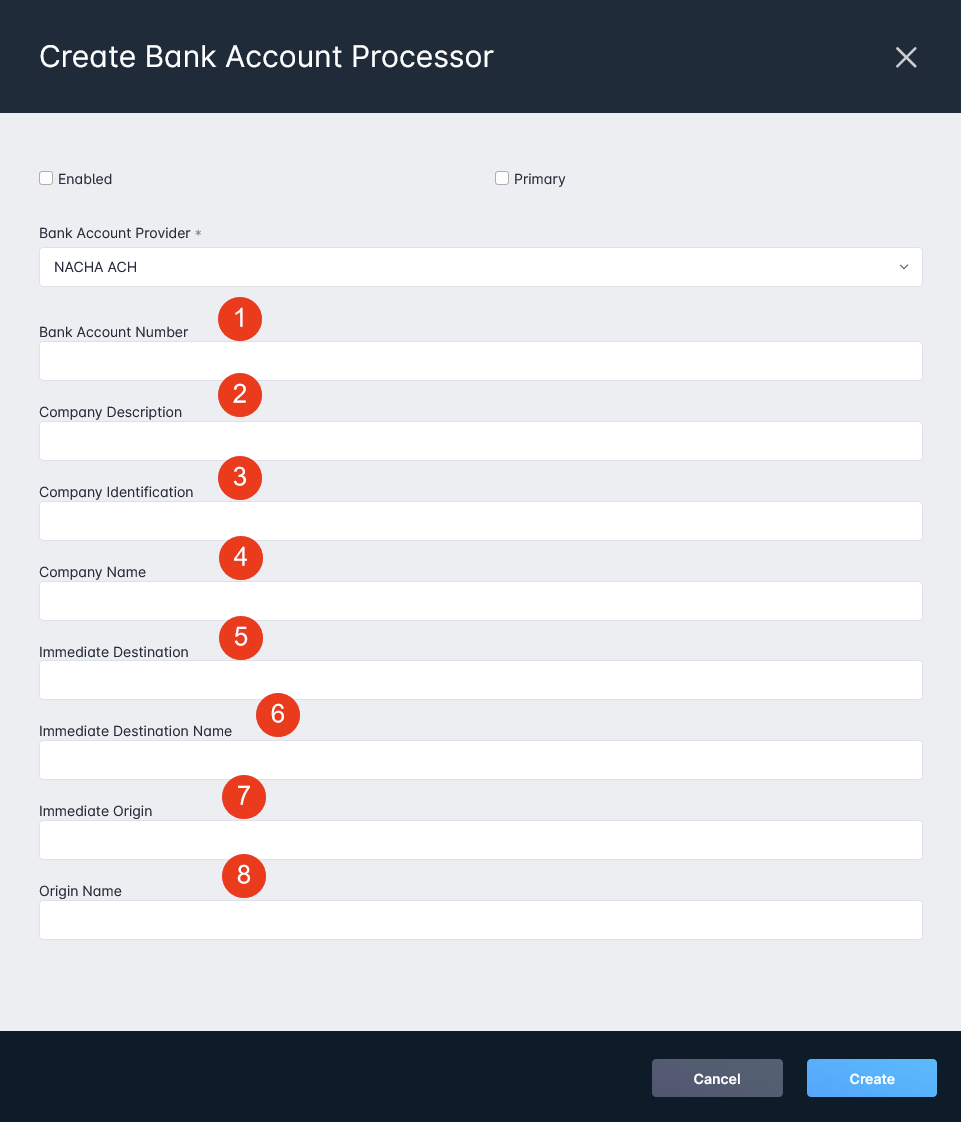
- The Bank Account Number defined here will be the Account Number of the account designated to receive deposits from the Financial Institution processing the ACH payments
- The Company Description field will need to match the information you've provided to your financial institution.
- The Company Identification field will need to match the information you've provided to your financial institution.
- The Company Name is the name of your Company as registered with your Financial Institution, and should match the name on the account provided above.
- The Immediate Destination field will be provided by your financial institution.
- The Immediate Destination Name field will be provided by your financial institution.
- The Immediate Origin field will be provided by your financial institution.
- The Origin Name field will be provided by your financial institution.
Adding Bank Accounts as a Payment Method
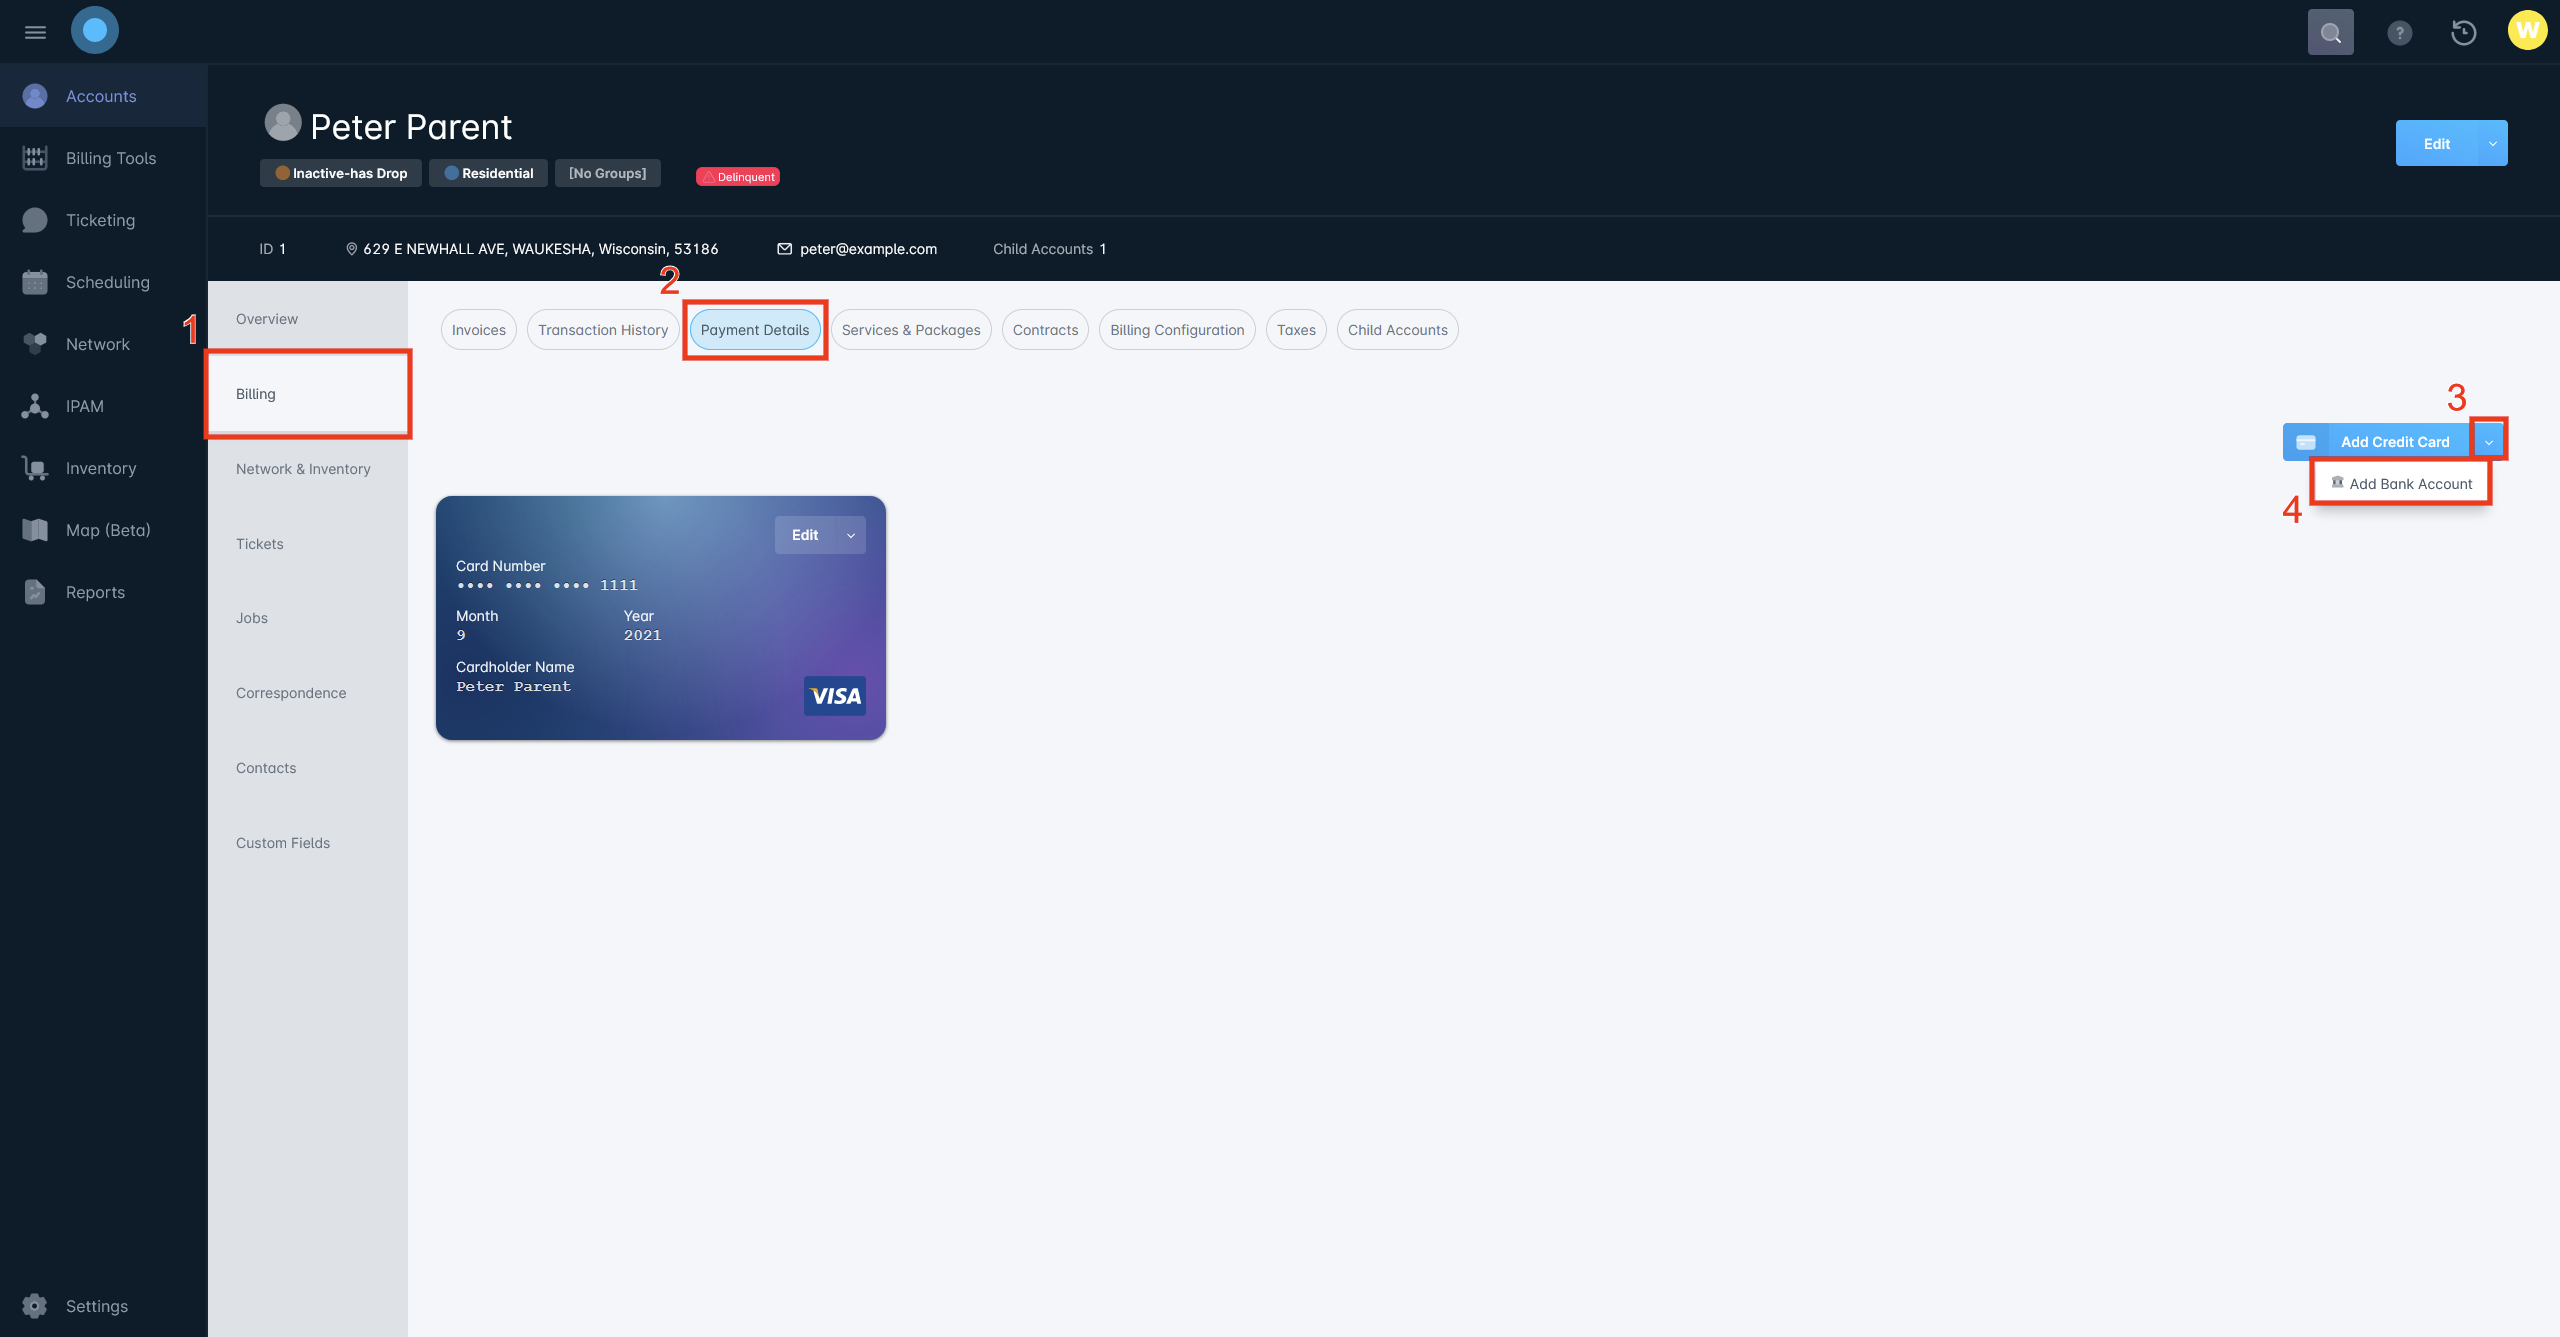
Once your payment processor is selected, payment methods need to be added to individual accounts. To add a customer's bank account information as a payment method, follow the below steps:
- Open the account's management page
- From the Account list, click on the account name, then click on the "Manage" button in the sidebar which appears

- From the Account list, click on the account name, then click on the "Manage" button in the sidebar which appears
- Once the account is open, navigate to the Billing tab, then the Payment Details sub-tab. This page will be different if you've already a payment method, but you can always expand the dropdown next to the "Add Credit Card" button, and select "Add Bank Account".
- That opens the Create Bank Account Modal, where the customer's bank account information needs to be entered

- The Name On Account field is the customer's name, as registered with their Financial Institution.
- The Bank Account Type allows you to set whether the customer's account is a Checking or Savings account.
- The Account Number is the customer's account number, as registered with their Financial Institution.
- The Routing Number is dependant on the customer's financial institutionFor Canadian Banking institutions, the Routing Number needs to be in the following format:
0XXXYYYYYwhere XXX represents the institution number and YYYYY represents the transit number
You can use our Canadian ACH tool to quickly generate your Routing Number. - The Auto Payment toggle will set this payment method for Auto-Payment, which will charge the payment method on the invoice due date.
- The Address fields will auto-fill based on Google Maps information and needs to match the address information the customer's Financial Institution has on file.
Once all the fields are filled out, the payment method can be added and payments can be made against this information.
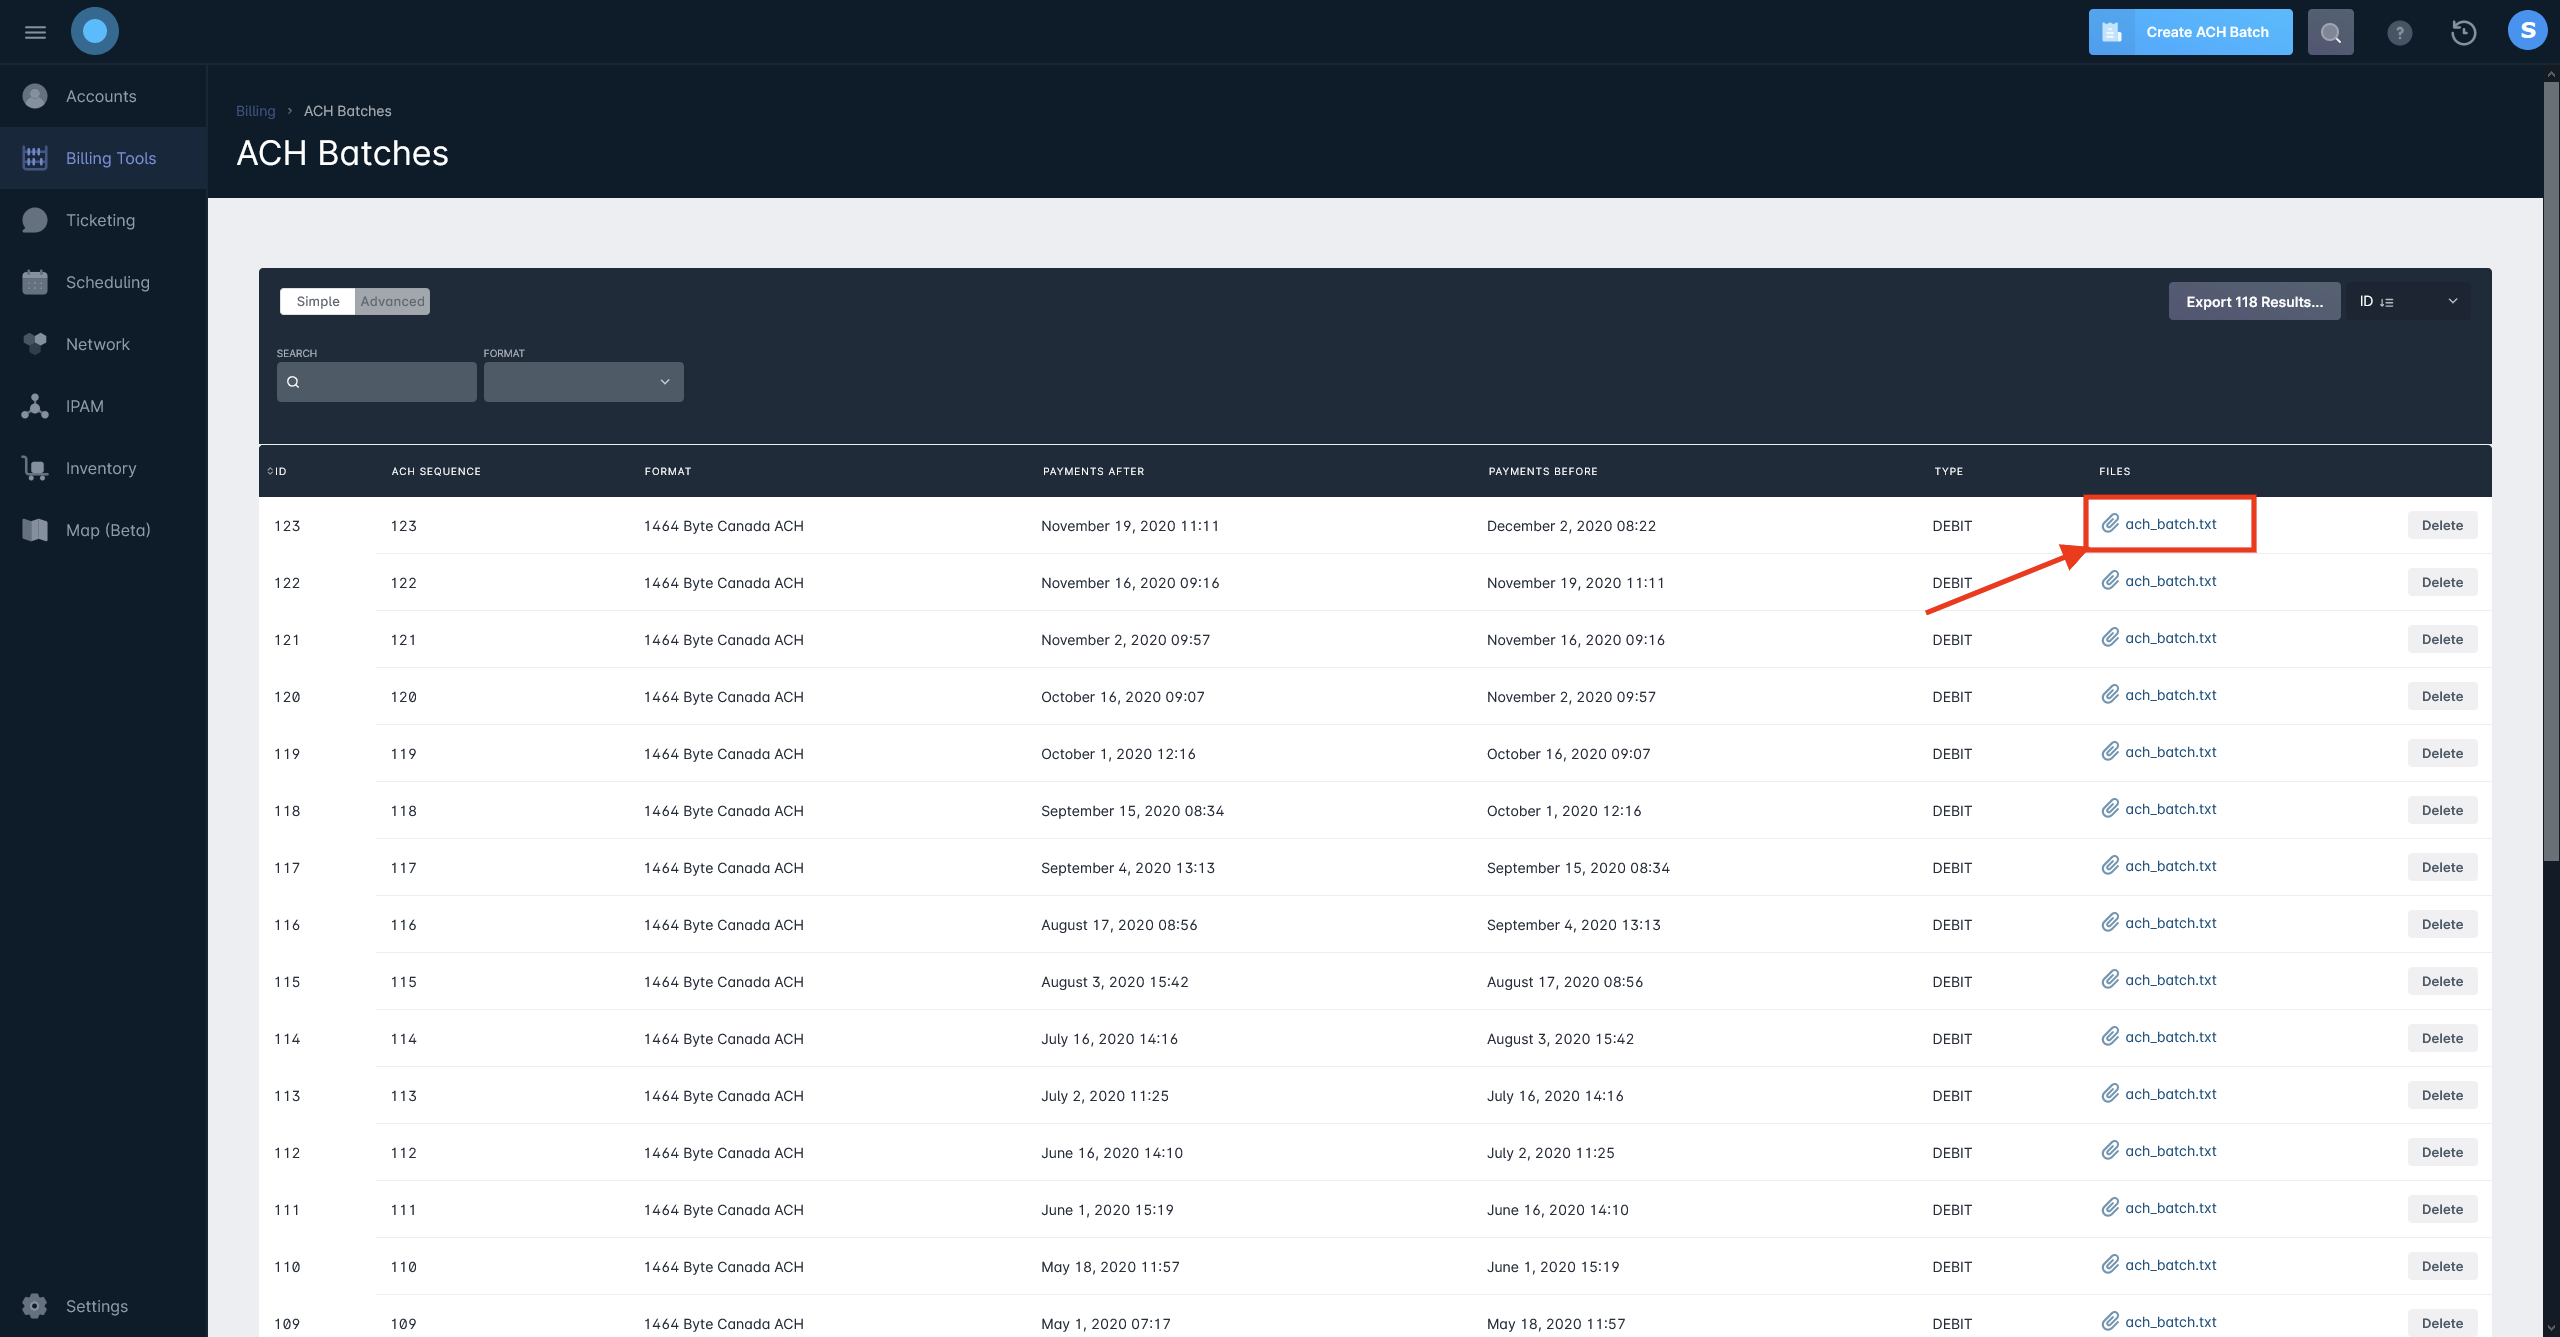
Creating ACH Batches
Unlike e-Check or Credit Card transactions which are directly handled by the payment processor, ACH payments must be submitted to your bank manually. Once you've received at least 1 payment from a customer using Bank Account payments, you can create a batch of ACH transactions. An ACH Batch is a formatted list of transactions that is submitted to your financial institution in order to finalize the payments and charges
To create an ACH Batch, follow these steps:
- Click on the Billing Tools category
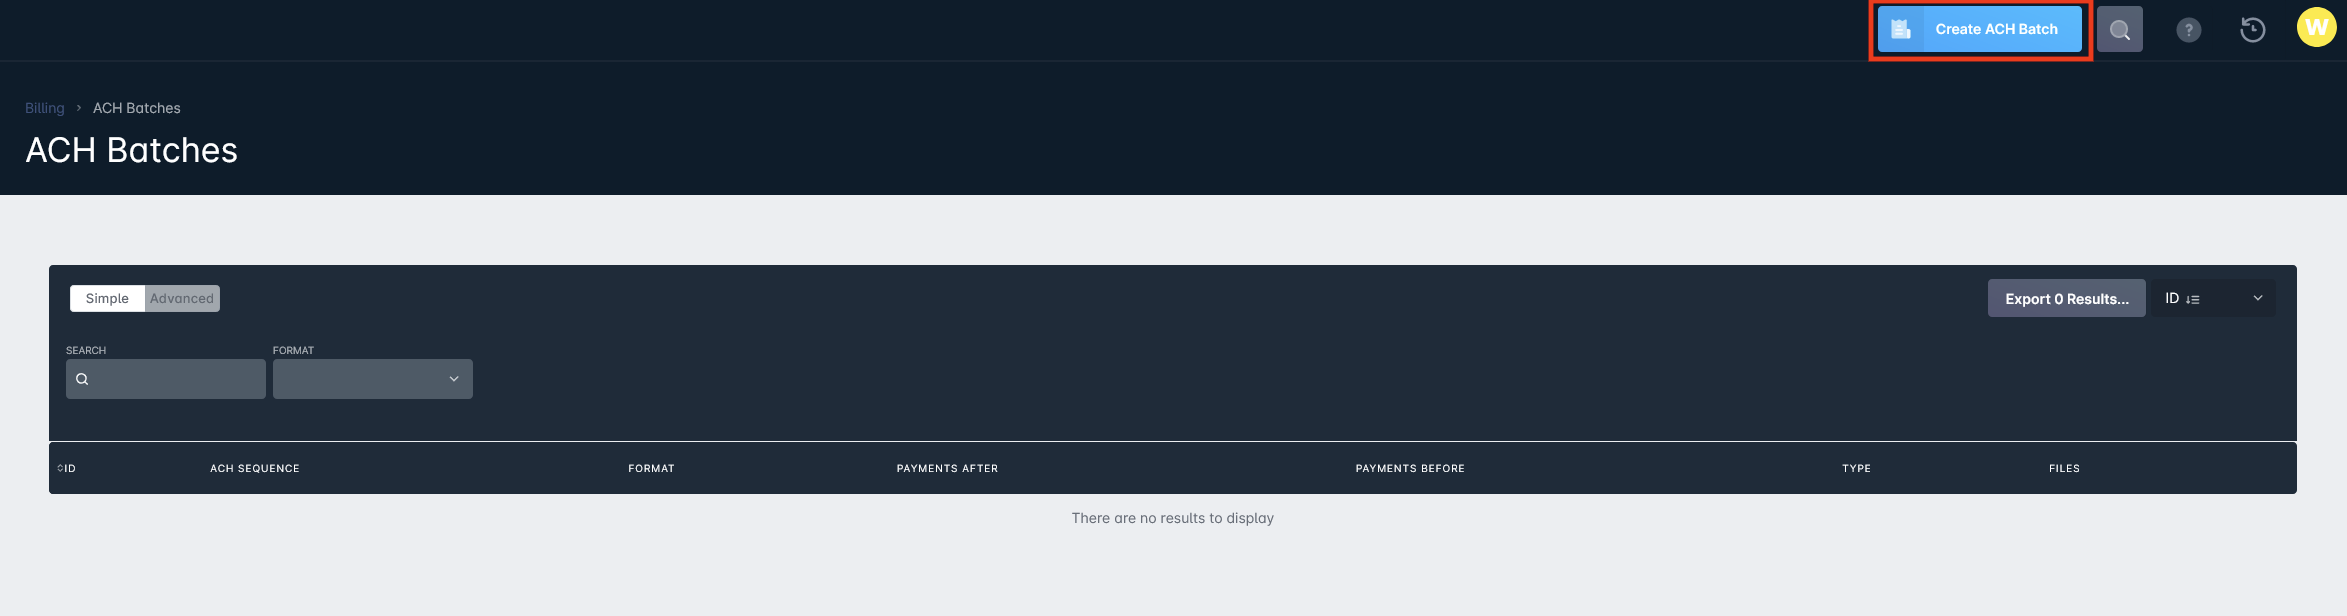
- Select the ACH Batches tool
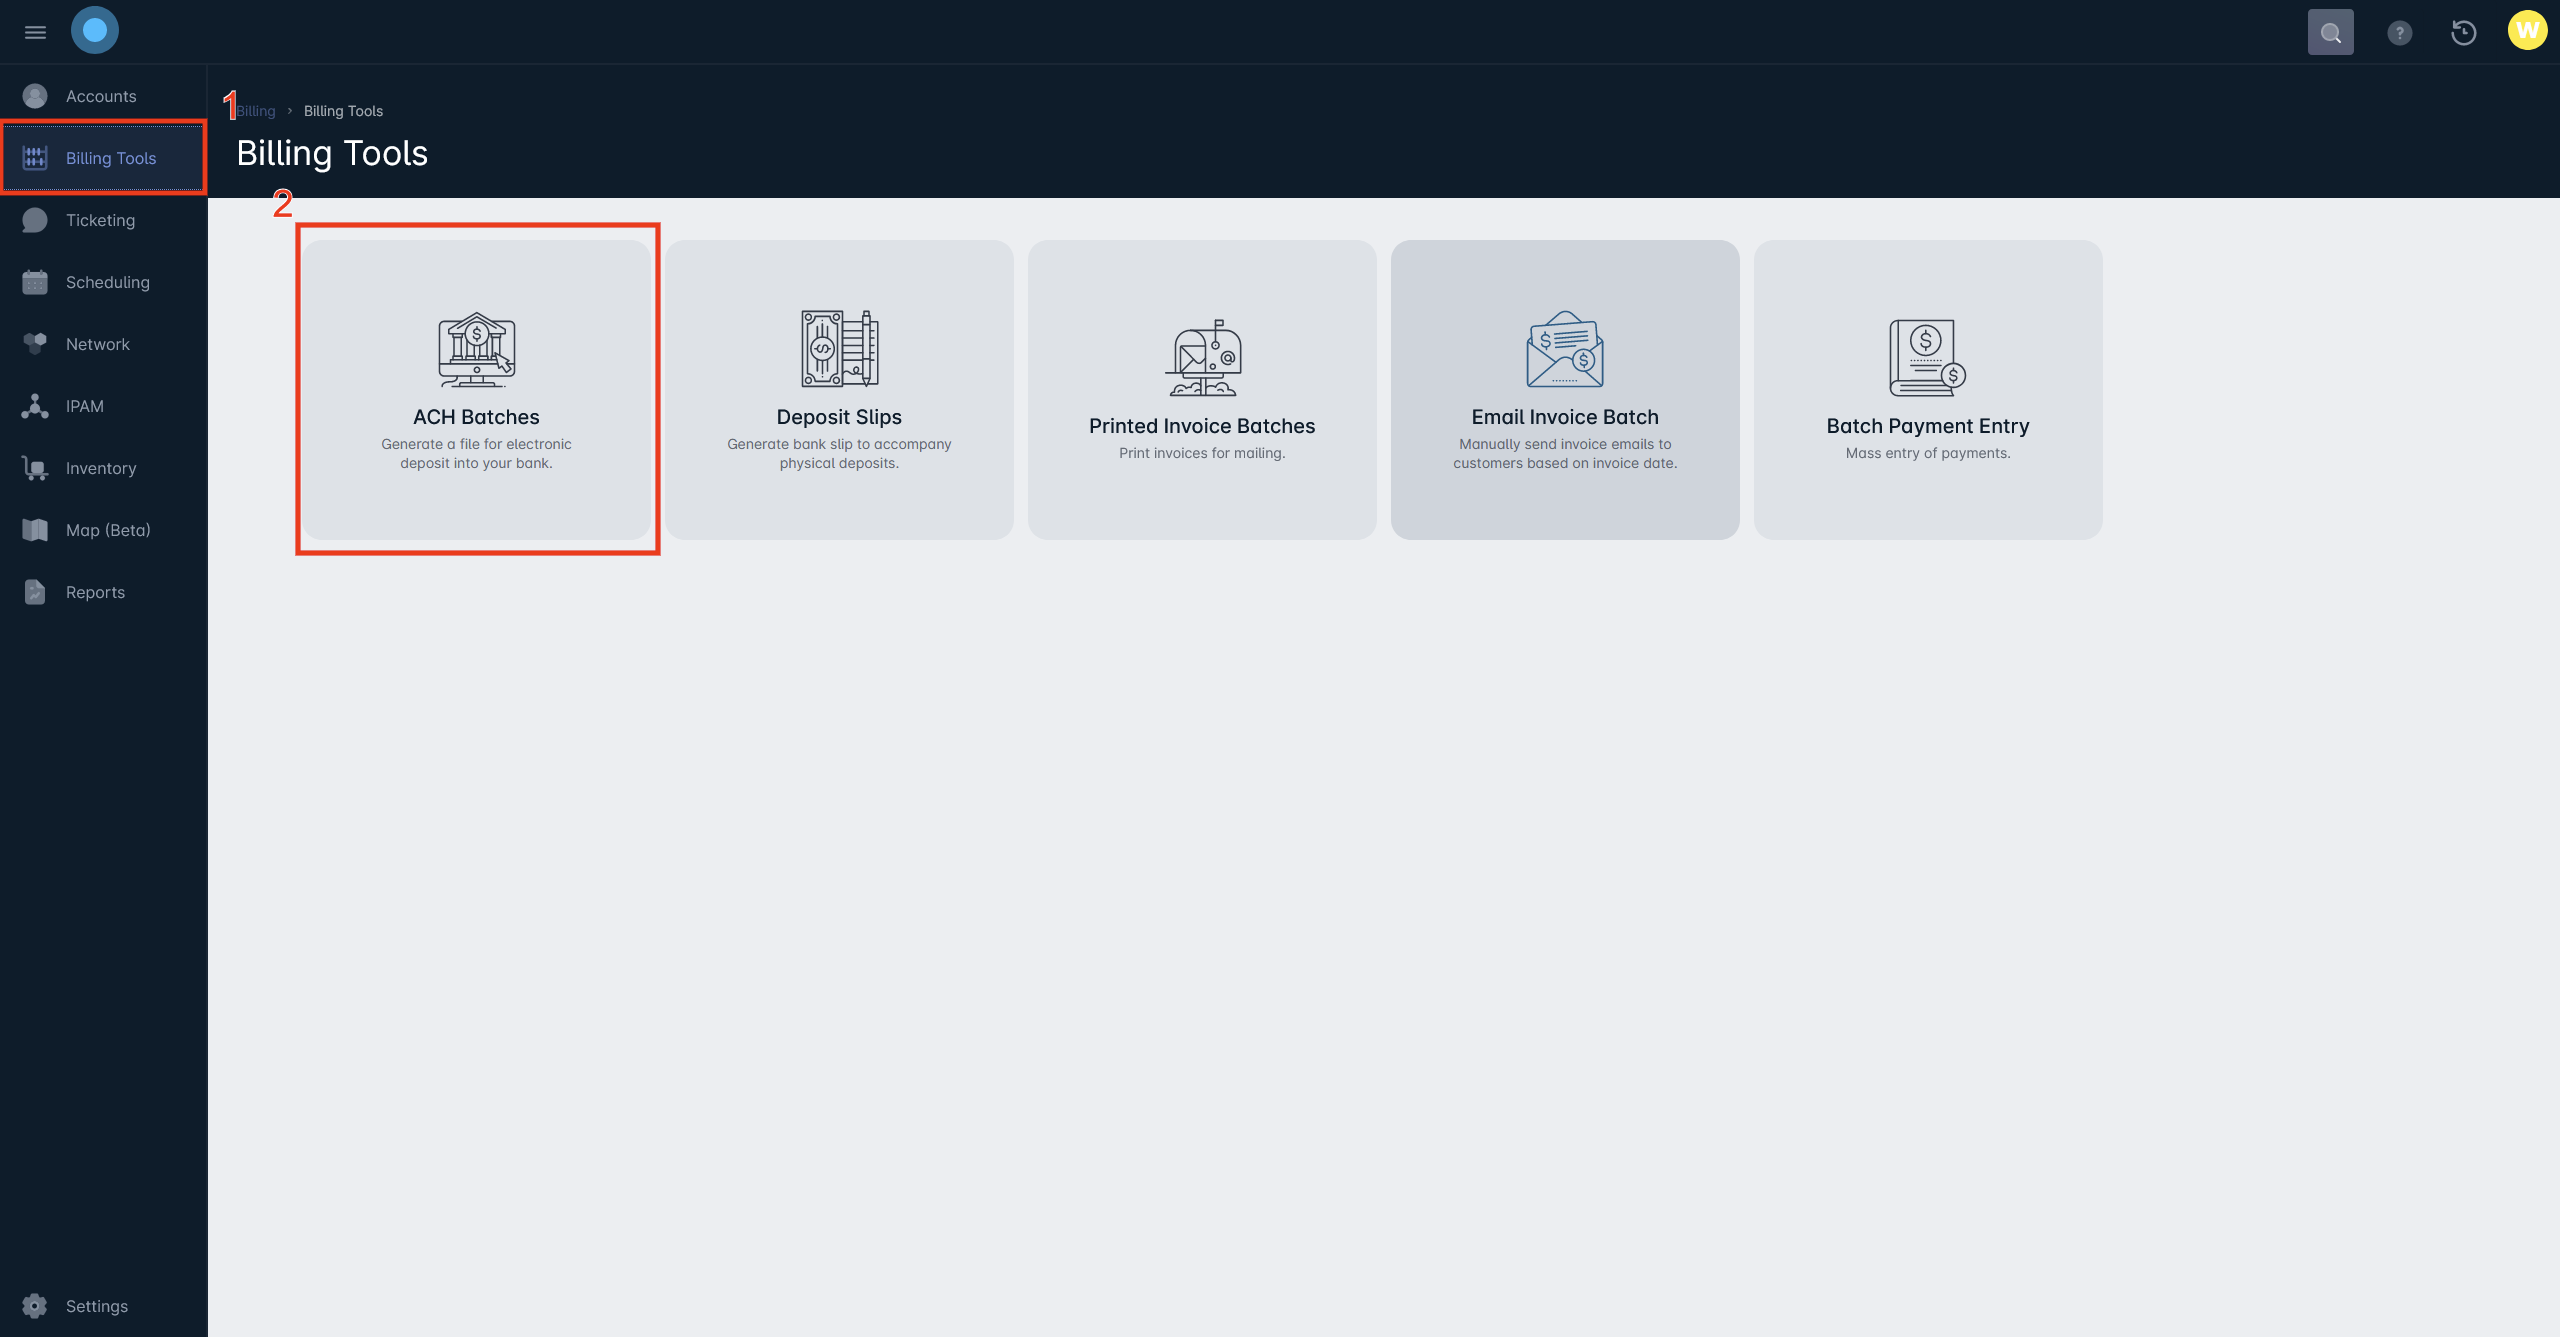
- Click on "Create ACH Batch"
- Once done, you'll be presented with the Create ACH Batch modal, which contains two details:
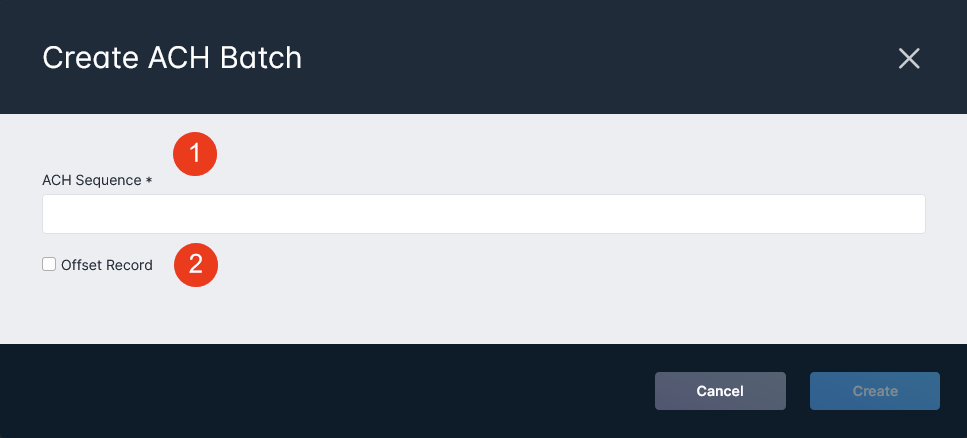
- The ACH Sequence is the ID for the batch that your financial institution would have on file.In most cases, the ACH Sequence can be left to increment on its own, unless you've used ACH Batches with your financial institution in the past.
- You can use the Offset Record checkbox to produce a separate csv file that gives the total. Some banks require an offset record to be uploaded as well.
- The ACH Sequence is the ID for the batch that your financial institution would have on file.
- Once the ACH Batch information is filled out, click create - this will generate a new ACH Batch, which will appear in the list. Click on the attached file to download the batch which needs to be provided to your bank.