Table of Contents
Using Sonar's FCC Broadband Label Generation Tool
 Updated
by Jennifer Trower
Updated
by Jennifer Trower
Read Time: 13 mins
You are responsible for checking that both your inputs and the tool’s outputs are accurate.
You also understand that Sonar may log information, such as your company details, in line with its privacy policy to better understand users and improve its products and services.
This article explains how to gather your FCC Broadband Consumer Labels report, complete the data entry process, and use Sonar’s FCC Broadband Label Generation Tool.
Populating Your FCC Broadband Consumer Label Data
Non-Sonar V2 Users
If you are using Sonar’s FCC Broadband Label Generation Tool without a Sonar V2 instance, you can still use it. Use the provided CSV template and the Data Entry Guide below to fill in the information needed for the tool.
Click here to download the CSV Template
V2 Instances
Sonar provides most of the information needed to create your FCC Broadband Consumer Labels report, so only a small amount of manual work is required.
Generating the report is straightforward. To get it from your Sonar V2 instance:
- Navigate to Reports → Accounts and run the FCC Broadband Consumer Labels report.
- Click the three dots menu in the top right of the report tile and select Download Data.
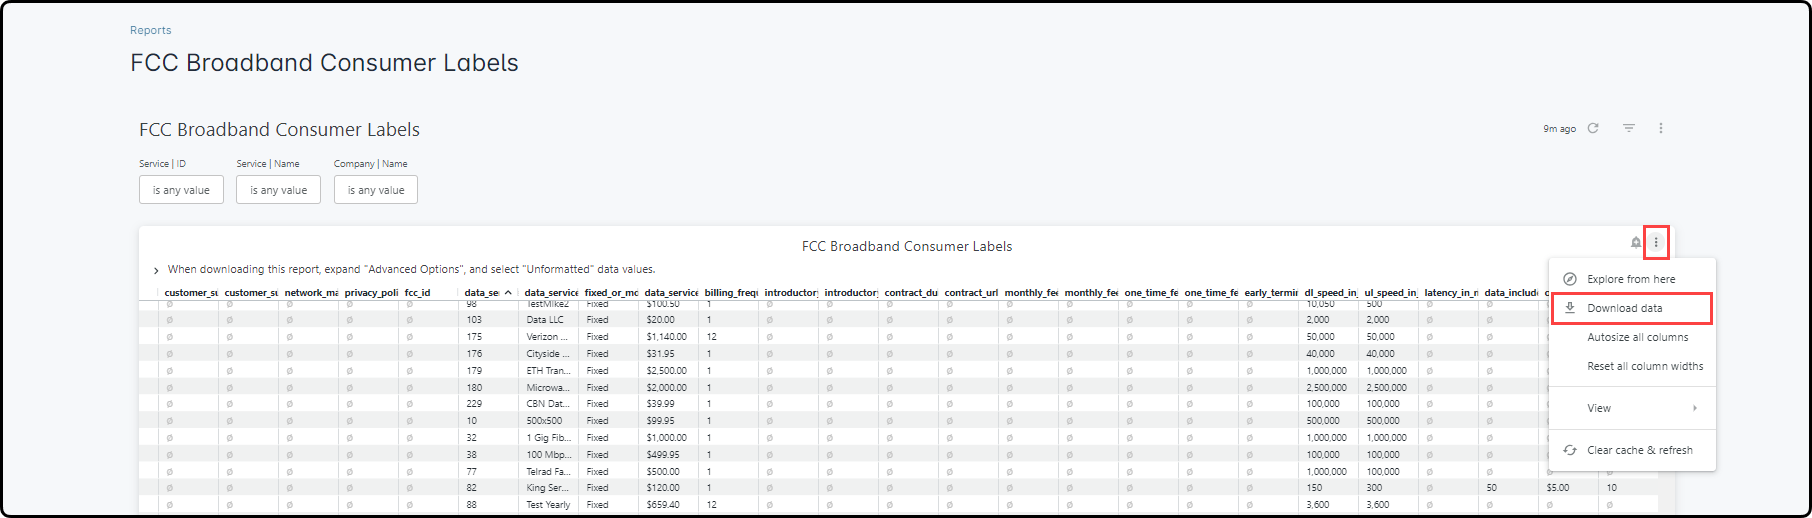
- Select CSV format from the selection list (the default), then click Advanced data options.
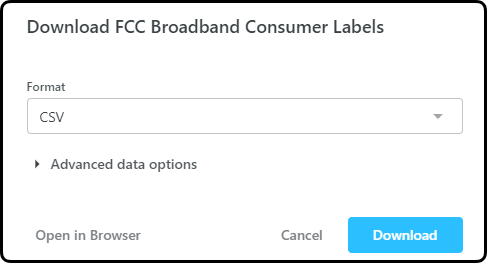
- Ensure the data values are set to
Unformattedand then click Download.

- Open the CSV file, preferably in a spreadsheet application, and fill in any blank columns for each data service as needed. Use the Data Entry Guide to help with the required information.Be sure to keep the header row, since the label generator uses it to verify the file format. You can delete any rows you do not need labels for.
- Save the completed file in CSV format.
Data Entry Guide
Some columns in the CSV will be filled in automatically by Sonar when you generate the FCC Broadband Consumer Labels report in V2, while others will need to be completed manually.
The good news is that many of the fields you enter will be the same for every data service, so you can enter the value once and copy it down the column.
Column | Field | Format | Data provided in Sonar report? | Notes |
A | company_name | Text, e.g., “Example ISP” | Yes | The rows in the report will be grouped by company for ease of data entry. If no company is specified, the data service will be listed for every company defined in the Sonar instance. |
B | discounts_and_bundles_url | URL, e.g., https://www.exampleISP.com/bundles | No | Enter the URL of the company webpage which describes the discounts and bundles available for your data services. |
C | customer_support_url | URL, e.g., https://www.exampleISP.com/support | No | Enter the URL of the company’s customer support site. |
D | customer_support_phone | Phone Number, e.g., 123-456-7890 | No | Enter the company’s customer support phone number |
E | network_management_url | URL, e.g., https://www.exampleISP.com/network | No | Enter the URL of the company’s network management policy page. |
F | privacy_policy_url | URL, e.g., https://www.exampleISP.com/privacy | No | Enter the URL of the company’s privacy policy page. |
G | fcc_id | Text, maximum 25 characters | No | Enter the company’s FCC ID Note: the label generator uses the company FCC ID as part of the Unique Plan Identifier. |
H | data_service_id | Text, e.g., “123”, maximum 15 characters | Yes | The label report pre-populates this with the ID of the data service record in Sonar, but you can change it to whatever you need, so long as it is a combination of letters and numbers (e.g., SONAR123). The label generator will left-pad the ID with zeros to the required 15 characters for the Unique Plan ID. If you intend to use the Sonar Customer Portal to display the labels to your customers, DO NOT change this from the data service ID as this will prevent the portal from knowing which label to display. |
I | data_service_name | Text, e.g., “MaxSpeed 100” | Yes | The report populates this with the name of the data service in the Sonar app. |
J | fixed_or_mobile | Text, e.g., “Fixed” or “Mobile” | Yes | For fixed plans, enter “Fixed”. For mobile plans, enter “Mobile”. The report will always input “Fixed”. Ensure to update if necessary. The label will note whether the plan is a Fixed or Mobile plan. Located both in the label heading and the Unique Plan Identifier. |
K | data_service_price | Dollar amount, e.g., 70.95 | Yes | This amount is pre-populated from the Sonar app. If you do need to enter a price manually in the label CSV file, enter dollars and cents up to two decimal places (that is, to the penny). If you are charging a dollar rate with no cents (such as $50.00), you can just enter the whole number with no decimals (50). This is the regular service price after any introductory discount period is completed. |
L | billing_frequency_in_months | Integer (Number of months), e.g., 1 | Yes | The FCC requires all billing to be per month on the label, so if the frequency listed here is different from 1 (i.e., twice a month would be 2), then the label generator will calculate the prices accordingly. |
M | introductory_period_in_months | Integer (Number of months), e.g., 6 | No | Enter how long (in months) the introductory period is for the data service. If there is no introductory service, leave this field blank. |
N | intro_rate | Text, e.g., “Yes” or “No” | No | This field is used to denote whether the monthly rate is introductory pricing |
O | introductory_price_per_month | Price (e.g., ###.##), e.g., 50.00 | No | Enter the introductory price per month in dollars and cents up to two decimal places (that is, to the penny). If you are charging a dollar rate with no cents (such as $50.00), you can just enter the whole number with no decimals (50). If there is no introductory service, leave this field blank. |
P | agreement_duration | Integer (Number of months), e.g., 12 | No | Enter the agreement duration in months. If there is no agreement required with this data service, leave blank. |
Q | agreement_url | URL, e.g., https://www.exampleISP.com/agreements | No | Enter the URL where the agreement details may be found. If there is no agreement required with this data service, leave blank. |
R | Tax | Text, one of "Included", "Varies by location", or [amount] (formatted as $00.00) | No | Enter the applicable tax details that match one of the following values exactly:
|
S | monthly_fee_name_1 | Text (e.g., “Modem rental”) | No | If there are any additional monthly service fees attached to the data service, they may be listed here (see below for a note on how to add additional monthly fees to the CSV.) Important: the CSV file must at minimum contain the monthly_fee_name_1 column. Do not delete this column. Leave blank if not needed. FCC description of additional monthly fees: These fees include all charges that providers impose at their discretion, i.e., charges not mandated by a government. Providers must give each fee a simple, accurate, easy-to-understand name, thus enabling consumers to understand which charges are part of the provider’s rate structure, and which derive from government assessments or programs. Further, the requirement allows consumers to more meaningfully compare providers’ rates and service packages, and to make more informed decisions when purchasing broadband services. Providers must list fees such as monthly charges associated with regulatory programs and fees for the rental or leasing of modem and other network connection equipment. |
T | monthly_fee_price_1 | Price (e.g., ###.##), e.g., 100.00 | No | Enter the monthly price corresponding to the monthly fee name above. Important: the CSV file must at minimum contain the monthly_fee_price_1 column. Do not delete this column. Leave blank if not needed. If you need to list more than one monthly fee, add more columns to the CSV directly after the provided monthly fee name and price columns, and number them accordingly. i.e., if you have two additional monthly fees as part of a data service, you would add four additional columns so that the entire monthly fee section in the CSV shows: monthly_fee_name_1,monthly_fee_price_1,monthly_fee_name_2,monthly_fee_price_2 If you do not need to add monthly fees for any other data services in your CSV, you can just leave them blank for those rows where they are not applicable. |
U | onetime_fee_name_1 | Text (e.g., “Technician visit”) | No | If there are any additional one-time service fees charged when the data service is first purchased, they may be listed here (see below for a note on how to add additional one-time fees to the CSV). The CSV file must at minimum contain the onetime_fee_name_1 column. Do not delete this column. Leave blank if not needed. FCC description of additional one-time fees: Include the name and cost of each one-time fee assessed by the provider when the consumer signs up for service. This section will identify one-time fees such as a charge for purchasing a modem, gateway, or router; an activation fee; a deposit; an installation fee; or a charge for late payment. The provider must also identify any one-time fees that will be imposed if the customer cancels their broadband service before the end of a agreement term (e.g., an early termination fee) and provide a link to a full explanation of when such a fee is triggered. |
V | onetime_fee_price_1 | Price (e.g., ###.##), e.g., 100.00 | No | Enter the one-time price corresponding to the one-time fee name above. Important: the CSV file must at minimum contain the onetime_fee_price_1 column. Do not delete this column. Leave blank if not needed. If you need to list more than one one-time fee, add more columns to the CSV directly after the provided one-time fee name and price columns, and number them accordingly, following the same conventions as for additional monthly fees above. As with additional monthly, fees, if you do not need to add one-time fees for any other data services in your CSV, you can just leave them blank for those rows where they are not applicable. |
W | early_termination_fee | Price (e.g., ###.##), e.g., 100.00 | No | If there is a fee for terminating the data service before the arranged date, enter a fee here, otherwise leave it blank. |
X | dl_speed_in_kbps | Formats: Integer, e.g., 100000, interpreted as Kbps. | Yes | Any decimals will be omitted. This field will be pre-populated from the data service fields in Sonar. |
Y | ul_speed_in_kbps | Formats: Integer, e.g., 100000, interpreted as Kbps. | Yes | Any decimals will be omitted. This field will be pre-populated from the data service fields in Sonar. |
Z | latency_in_ms | Integer (Milliseconds), e.g., 120 | No | Enter the average latency in milliseconds. |
AA | data_included_in_monthly_price | Integer (GB), e.g., 1000 | Yes | This field will be pre-populated if you have attached an overage service to the data service. Otherwise, you may enter the details manually. If the data service is unlimited, leave this field blank. |
AB | data_allowance_policy_url | URL, e.g., https://www.exampleISP.com/data-policy | No | Enter the URL where the Data Allowance details, known in Sonar as Usage Based Billing Policies, may be found. If the data service is unlimited, leave this field blank. |
AC | overage_fee | Price (e.g., ###.##), e.g., 5.00 | Yes | This field will be pre-populated if you have attached an overage service to the data service. Otherwise, you may enter the details manually. If the data service is unlimited, leave this field blank. |
AE | overage_data_amount | Integer (GB), e.g., 5 | Yes | This field will be pre-populated if you have attached an overage service to the data service. Otherwise, you may enter the details manually. If the data service is unlimited, leave this field blank. |
How it Works
Once you’ve filled in your CSV with all required data, you’re ready to generate labels.
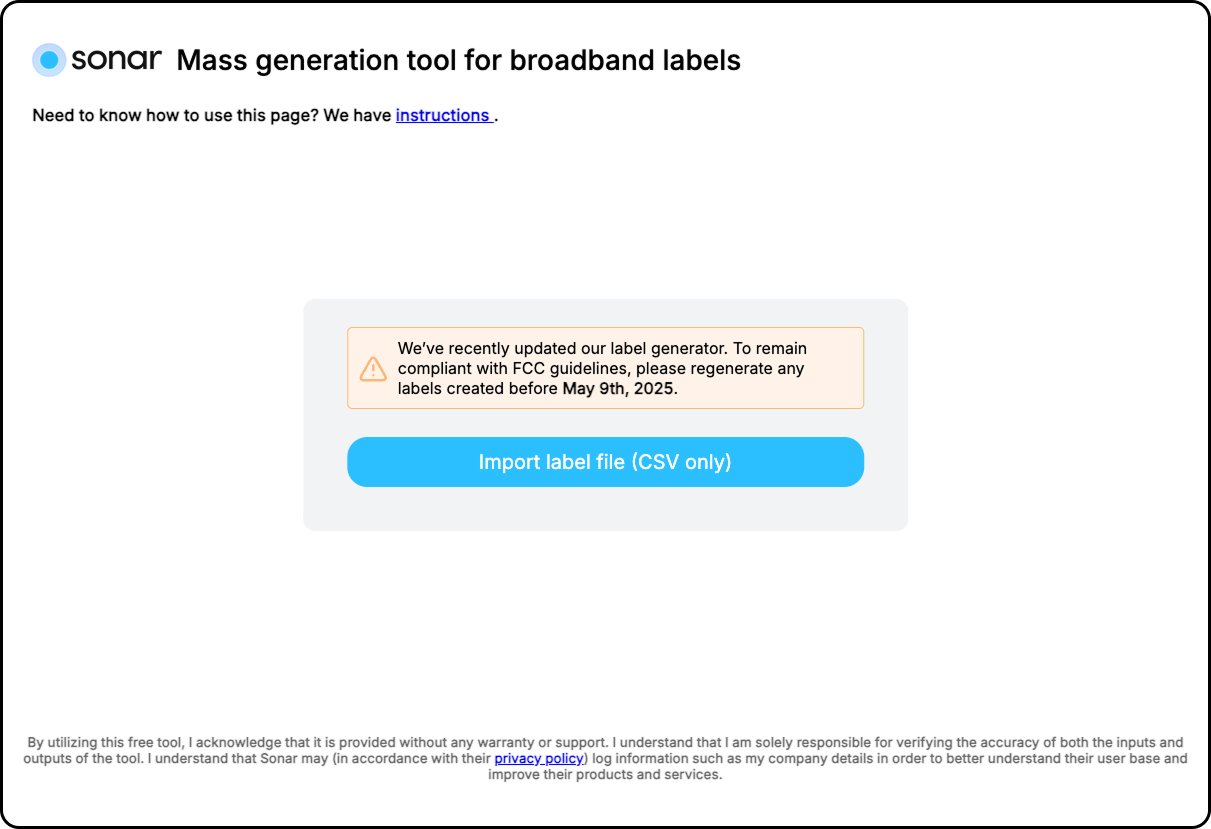
To access Sonar’s FCC Broadband Label Generation Tool: click here.
You’ll first see the landing page with two options:
- Click Instructions to open this Knowledge Base article.
- Click Import label file (CSV only) to upload your CSV file.
Importing a File
Click Import label file to open your downloaded files and select the CSV you want to import.
After choosing your file, you’ll see two options for how to continue.

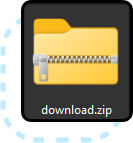
- Download: Downloads the file you imported as a ZIP file.
- Import Again: Takes you back to the start so you can choose Import label file again. If you do this, the original file you selected will be cleared.
File Downloaded
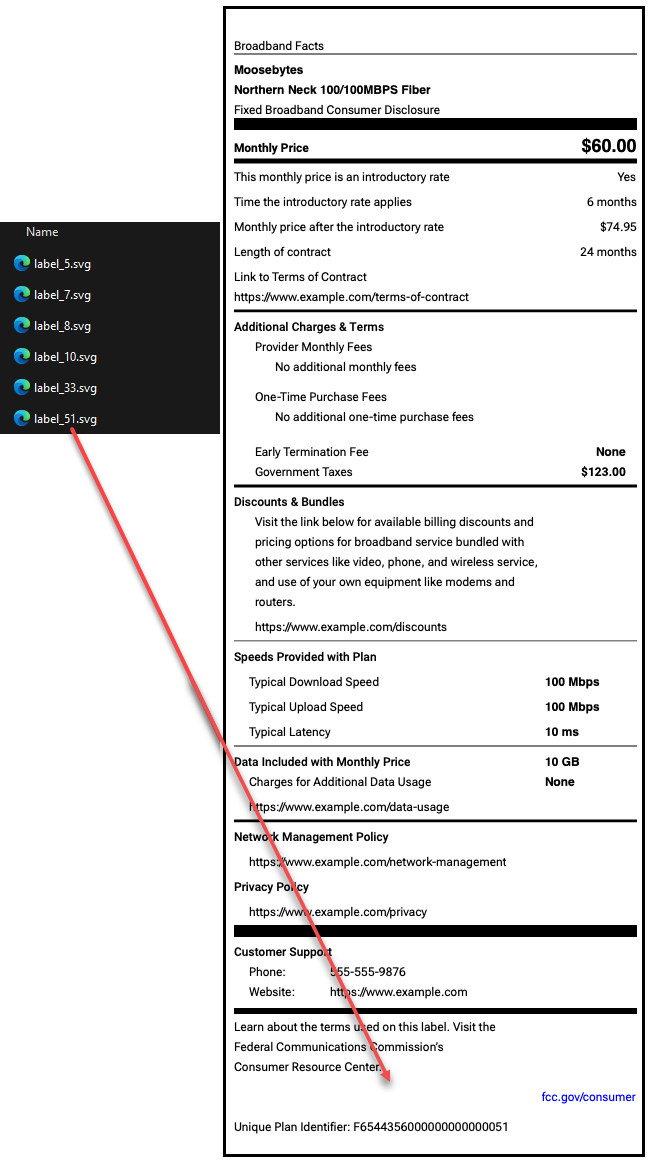
Click the downloaded ZIP file to view your generated labels.
Each label file is named based on the related service plan, using the company ID and service ID from your CSV file. It’s a good idea to review each label to make sure the information is correct.
Implementing Your Labels Into Your Sonar Customer Portal
Once your FCC labels are created, the next step is to upload them to your customer portal so subscribers can view the label for their selected plan.
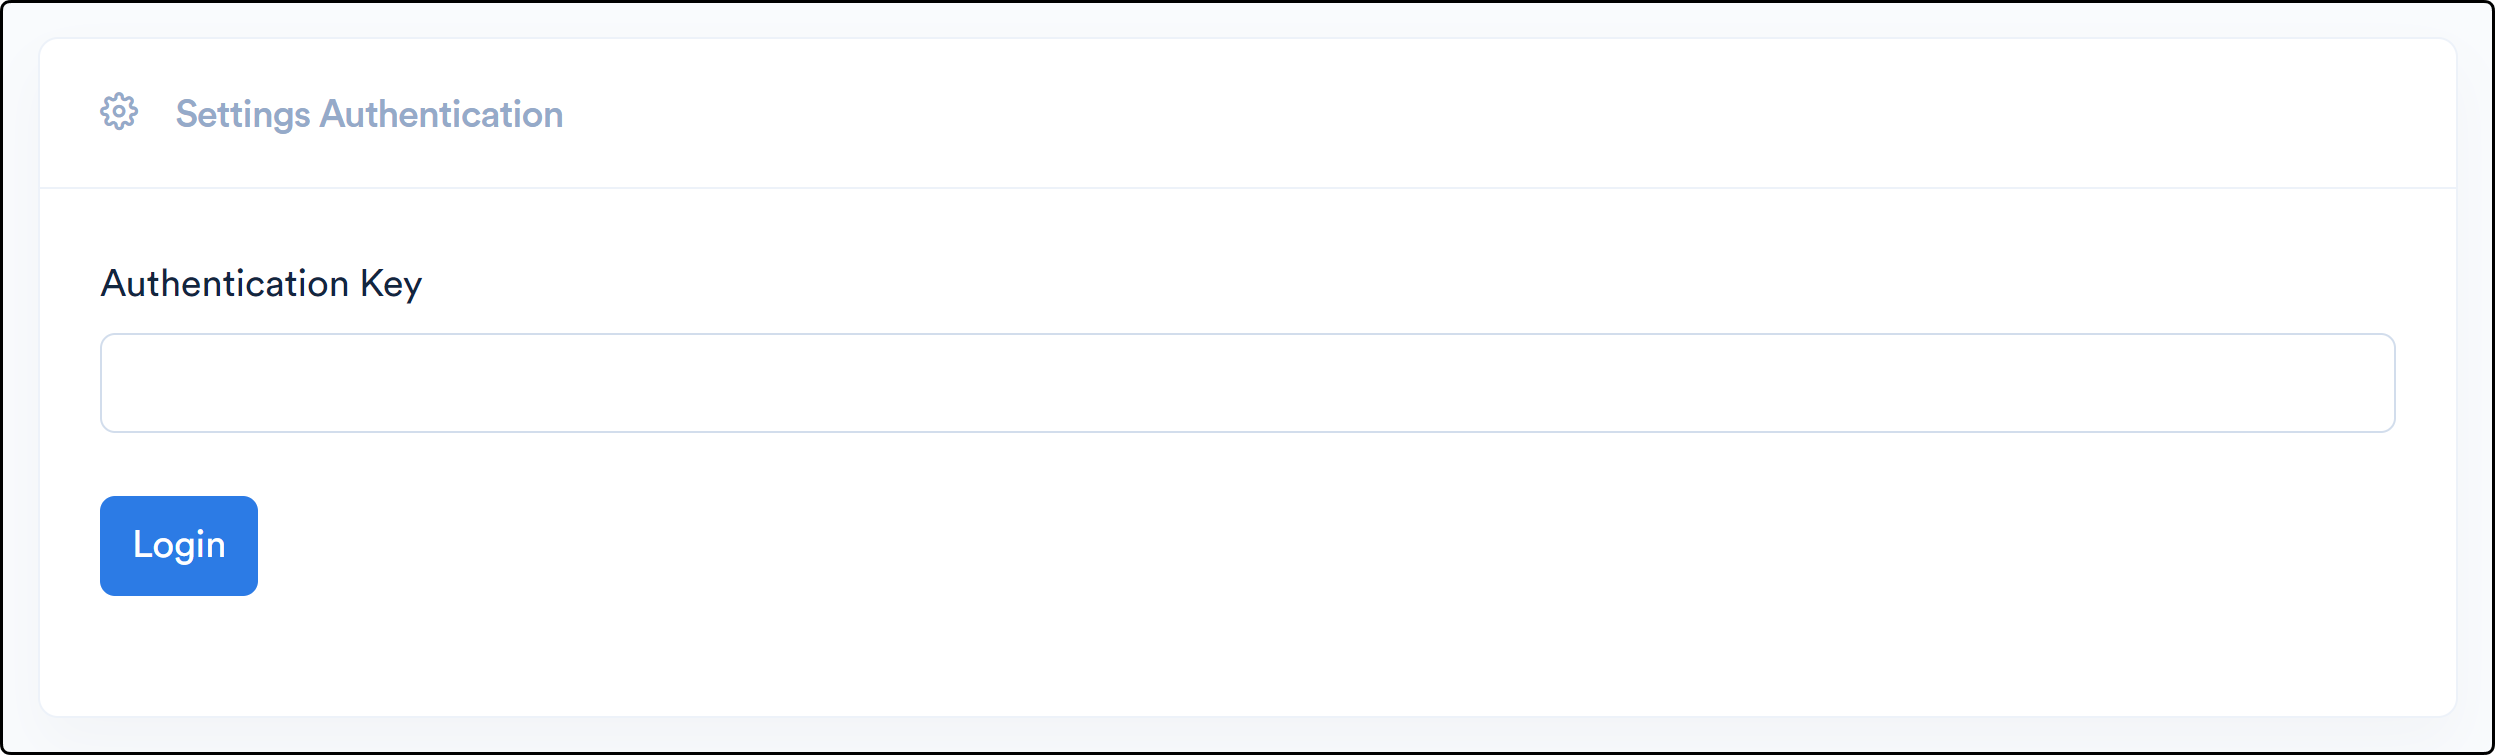
To complete this, navigate to your customer portal settings by entering https://portal.yourcompanyname/settings into your browser.
This will provide you with your login landing page, where you will input your Authentication Key to login.
Once you’re logged into the portal settings, go to Design Settings → FCC Label Zip File → Choose File.
Select the ZIP file downloaded from the FCC Broadband Label Generation Tool, then scroll to the bottom and click Save Changes.

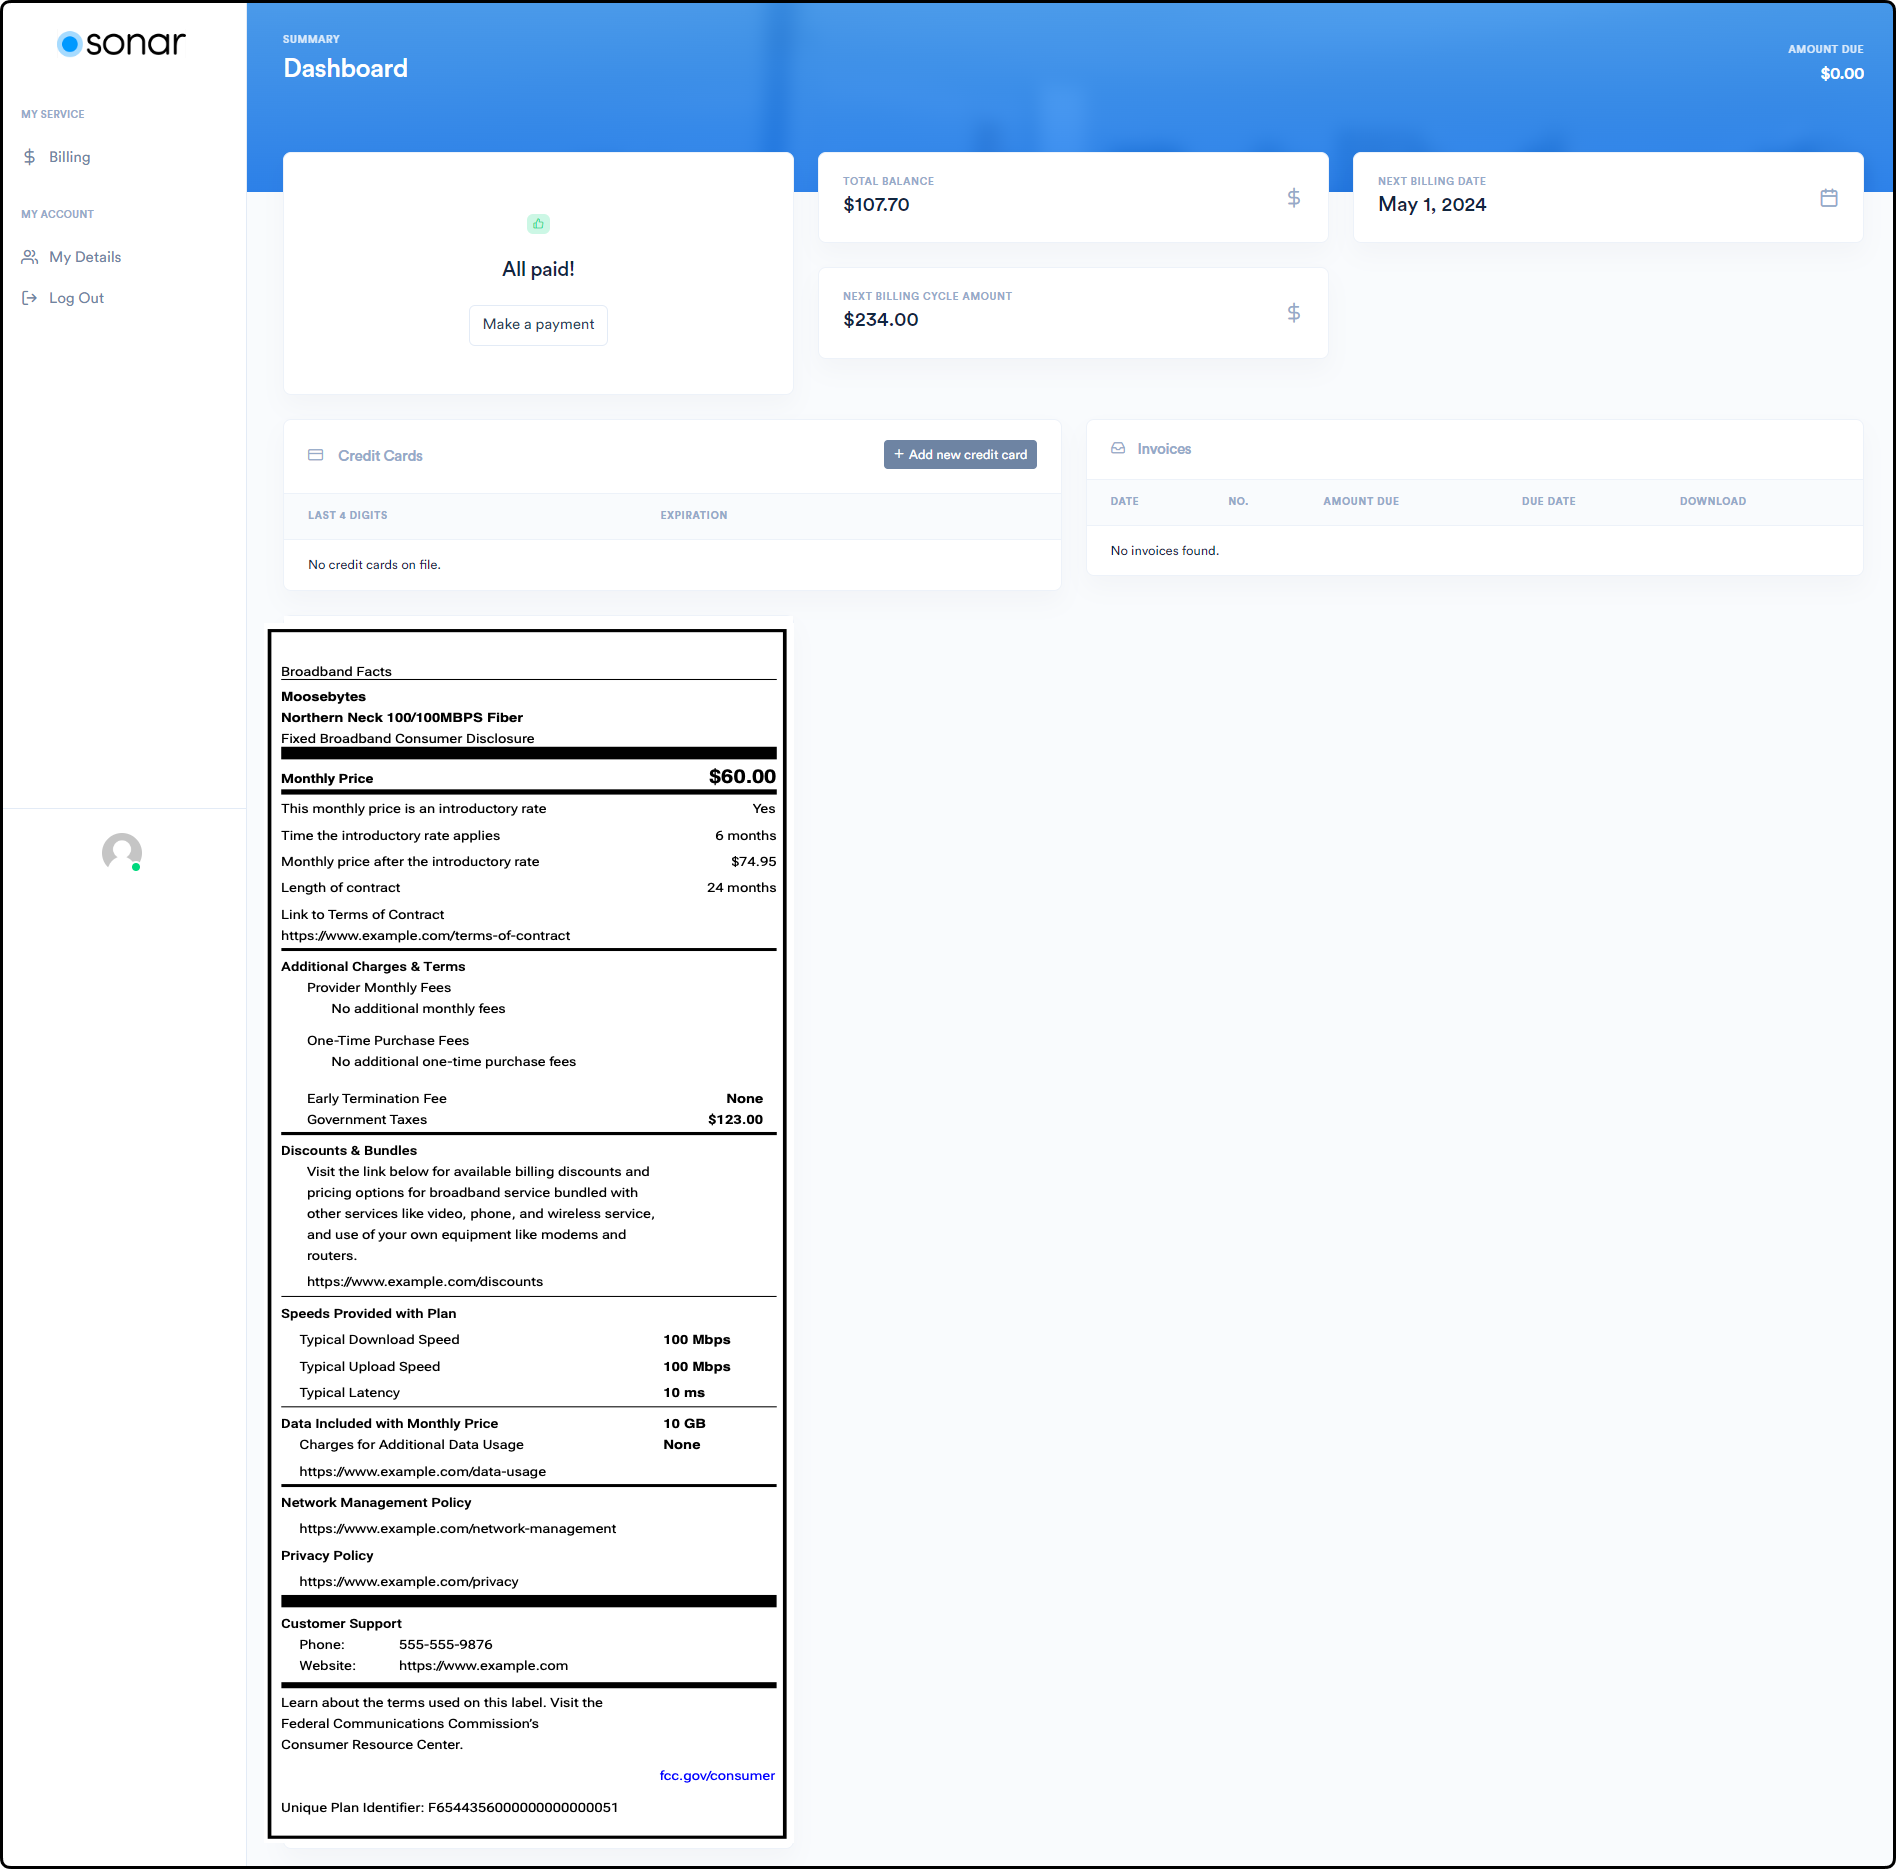
After you save your changes, subscribers will be able to view the FCC Broadband Label for the plan on their account in the customer portal.
To make sure all service plans have labels, review your CSV file carefully before using the Sonar FCC Broadband Label Generation Tool.
Generated Label Usage Information
- The generated labels are text-based SVGs, not paths. This makes them machine-readable and accessible to screen readers, in line with FCC requirements.
- Each SVG already includes the required styles and font imports, so you do not need to add extra CSS.
- To display the labels correctly, copy and paste the SVG code directly into the webpage.
Do not use an<img>tag or other file-linking method, since this will ignore the built-in styles and cause formatting issues. - The labels will automatically resize to fit their parent container on the page.