Our Products & Services
Getting Started
First Time Setup
Getting Started With Jobs
Getting Started with Accounts
Getting Started with Inventory
Getting Started with Ticketing
Setting Sonar up for Billing
Baseline Configuration
How To: Using Sonar's Customer Portal
User Specific Resources
Accounts
Account Groups: Overview & Example Use Cases
Account List View: Overview
Account Management View: Overview
Account Overview Customization
Account Statuses: Overview & Example Use Cases
Account Types: Overview & Example Use Cases
Anchor & Linked Serviceable Addresses: Overview and Best Practices
Archiving an Account: Overview
CPUC Fixed Broadband Deployment by Address
Child Accounts: Best Practices & How Tos
Creating a New Account
Direct Messages: Overview
Disconnecting an Account
Disconnection Reason Management: Overview
Exploring Task Groups
FCC Broadband Data Collection (BDC) Filings: How Sonar Can Help
FCC Data Exports: General Overview and Usage
Future Serviceable Addresses: Overview
Lead Intake Form Processing
Notes: Best Practices & Use Cases
Scheduled Events: Overview & Use Cases
Serviceable Addresses: Overview and Usage
Specify Account ID upon Creation
Tasks & Task Templates: Overview
Using Sonar's FCC Broadband Label Generation Tool
Billing
ACH Batching: Overview
Accounts in Vacation Mode
Avalara: Overview & Setup
Batch Payments & Deposit Slips: Overview
Billing Calculator
Billing Defaults
Billing Settings
Building Packages
Building a Data Service
Canadian ACH tool
Changing Service Pricing in Sonar: Best Practices
Considerations When Using Avalara with Voice Services
Creating Discounts for Services and Packages
Delinquency Billing Best Practices
Delinquency Exclusions: Overview and Use Cases
Dual Data Services: Overview
Email Invoice Batch: Overview
General Ledger Codes: Overview
General Transactions: Best Practices
How Sonar Prorates Billing
How to Take Bank Account Payments
How to: Adding a Service to an Account
Invoice Templates: Overview
Leveraging PayPal as a Payment Method in Sonar
Manual Transactions
Multi-Month Billing & Multi-Month Services
Print to Mail
Printed Invoice Batches: Overview
Services: Overview
Setting Up Payment Methods and Taking Payments
Setting up Bank Account & Credit Card Processors
Taxes Setup
Usage Based Billing Policies: Overview and Usage
Usage Based Billing Policy Free Periods: Overview and Usage
Using Tax Exemptions - How To
Communication
Communications: Call Logs Overview & Best Practices
Communications: Messages Overview
Email Variables & Conditions
Message Categories: Overview & Use Cases
Phone Number Types: Overview and Use Cases
Saved Messages: Overview
Setting up an Outbound Email Domain
Trigger Explanations
Triggered Messages: Setup
Using Outbound SMS
Using the Mass Message Tool
Companies
How to: Setting Up a Company in Sonar
Managing Multiple Companies in Sonar: Best Practices
Rebranding your Sonar Instance
Financial
Contract Templates
Invoice Attachment Use Cases & PDF Examples
Invoice Messages: Overview & Use Cases
Invoices in Sonar: Examples, Creation & Contents
Integrations
Atlas Digital CORE Integration
Calix Cloud Data Field Mappings
Calix SMx Integration: Overview
CrowdFiber Integration
External Marketing Providers
GPS Tracking Providers: Overview
GoCardless Integration: Overview & Setup
How to Connect Cambium to your Sonar Instance
How to Connect Preseem to your Sonar System
How to: Using Webhooks in Sonar
Integrating with Calix Cloud
RemoteWinBox - Integration with Sonar
Sonar Retain: AI-Powered Customer Retention & Quality Intelligence
The Sonar Field Tech App
Tower Coverage Integration: Overview
VETRO FiberMap V2 Integration: Overview
VETRO FiberMap V3 Integration: Overview
Webhooks in Sonar: Basic PHP Example
iCalendar Integration
Inventory
Inventory List View: Overview
Inventory Model Management: General Overview
Network Inventory: How-to & Usage Guide
Segmentable Inventory: How-to & Usage Guide
Setup of Inventory: Manufacturers, Categories, and Assignees
Tracking and Using Consumable Inventory
Jobs
Applying Task Templates to Jobs
Edit Job Options
Example Jobs & Templates
Geofences: Overview
Job Types: Best Practices
Jobs and Scheduling: Overview
Scheduling Dispatcher View: Overview
Scheduling How-to: Creating and Booking a Job
Scheduling Table View: Overview
Scheduling Week View: Overview
Setting Up Schedules General Overview
Mapping
Misc.
Combining Custom Fields & Task Templates for Information Storage
Custom Fields Overview & Use Cases
Custom Links: Overview
Task Templates Overview & Use Cases
Monitoring
Building Alerting Rotations
Building a Monitoring Template
Poller Troubleshooting
Pollers: General Overview, Deployment Strategy, Build Out & Setup
Networking
Adtran Mosaic Cloud Platform Integration: Overview
Assigning RADIUS Addresses
Assigning an IP Address Using Sonar's IPAM: How to
Automating IP Assignments, Data Rates, and Network Access in Sonar
Building Address Lists
Building RADIUS Groups
Building a Device Mapper
Cable Modem Provisioning
Controlling Customer Speeds with Sonar: General Overview
DHCP Delivery
Data Usage Available Methods
Finding your OIDs
FreeRADIUS 3: Build-Out & Integration
How Sonar Communicates - Egress IPs Explained
IP Assignments & Sonar
IPAM: Basic Setup
IPAM: Overview
LTE Integration
MikroTik as an Inline Device: Integration With Sonar
MikroTik: Controlling Access
MikroTik: Controlling Speeds
MikroTik: Setting Up a Sonar Controlled DHCP Server
Netflow On-Premise Integration: Setup and Overview
Network Dashboard: Overview
Network Sites: Management View Overview
PacketLogic: Integration With Sonar
Pulse, Polling, and PHP
RADIUS: Build-Out & Integration with Sonar
RADIUS: Building Reply Attributes
Setting Up CoA Proxy
Sonar Flow
Sonar IP Addressing
Using Multiple Network Devices in Sonar
Purchase Orders
Release Notes
Reporting
Enhanced Business Intelligence - Tips & Tricks for Advanced Users
How To Enhance Your Reporting With Custom Field Data
Report Licenses
Sonar's Business Intelligence: Overview
Understanding Sonar Reports
Using Sonar DataConnect to Connect BI Applications with Your Sonar Instance
Security
Application Firewall: General Overview and Best Practices
Auth0: Overview
Multi-Factor Authentication: Overview
Password Policy In Depth
Removing a Terminated Employee In Sonar
Role Creation using GraphiQL
User Role Creation & Best Practices
Users: Overview
Sonar Billing
sonarPay
sonarPay Canada Disbursements: Overview
sonarPay Chargebacks & Disputes: Overview
sonarPay Disbursements: Overview
sonarPay Monthly Statement: Overview
sonarPay Overview
sonarPay Reversals, Voids, & Refunds: Overview
sonarPay: Token Migration Process
System
A Deeper Dive into the New Sonar API
API Calls Using Third Party Applications: Personal Access Tokens
Browser Compatibility and Minimum Hardware Requirements for Sonar
Consuming the Sonar API
Controlling Your Landing Page: Personal Preferences
Customizing Your Customer Portal
Date/Time Picker: Overview
Dynamic Time Zones in Sonar
Filtering: Overview
Frequently Used Terms
Getting Your Data into Sonar
GraphQL Rate Limiting Overview
How To Use GraphiQL to Understand the Sonar API
How Your Data is Backed Up
How to Best Use Global Search
Interacting with Files via the API
Introducing the New Sidebar
Main Menu: Overview
Mutations in the Sonar API
Notification Preferences
REST API Wrappers for V1 Compatibility
SMS Notifications
Sonar's Rich Text Editor
System Settings: Overview
The New Sonar API
Troubleshooting the Customer Portal
Upgrading your Ubuntu OS - Customer Portal Upgrades
User Profile: Your Personal User Settings
Ticketing
Advanced Ticketing Features
Canned Replies Examples & Templates
Canned Reply Categories
Exploring Ticket Groups
How Sonar Manages Spam Tickets
How to Integrate Inbound Mailboxes with Slack
Inbound Mailboxes Example Build
Ticket Category Families & Ticket Categories: Overview
Ticket Resolution Reasons: Overview
Ticketing: Overview
Using Parent Tickets
Voice
API Changes for Voice Billing
Best Practices to Remain CPNI Compliant
Billing Voice Services in Sonar
Deploying Voice Services in Sonar
Working With the Sonar Team & Additional Resources
Sonar's Security Practices & Certifications
Sonar and General Data Protection Regulation (GDPR)
Sonar's Security Strategies
Technical Security Overview
Best Practices for Fast Tracking a Support Request
Feedback Portal / Suggest a Feature
Learning with Sonar: Tools and Resources
New Client Training Overview
Sonar Casts Table of Contents
Submitting Bugs vs. Feature Requests
The Sonar Community Forum
The Sonar Status Page
Third Party Customer Support Referrals
Table of Contents
- All Categories
- Ticketing
- Inbound Mailboxes Example Build
Inbound Mailboxes Example Build
 Updated
by Jennifer Trower
Read Time: 4 mins
This article explains how to set up an inbound email account in Sonar to automatically convert emails into public support tickets. It also outlines the required settings and features that enhance ticketing communication.
Inbound email integration allows you to manage support requests more efficiently by automatically creating public tickets in Sonar from emails sent to a specific address. This feature ensures customer replies are tracked and responded to directly from Sonar’s ticketing system.
Replies: Sent from Sonar and emailed to the customer.
Comments: Internal notes not visible to or emailed to the customer.
How to Create an Inbound Mailbox
How It Works
When you create an inbound email account in Sonar, a unique forwarding address is generated (for example, something@sonarticketing.rocks). You then set your public-facing support email (like support@yourdomain.com) to forward incoming messages to this address. Sonar will use the configured "from" address to send replies and will automatically create tickets from emails sent to this inbox.
Inbound Mailbox Settings Overview
Navigate to Settings -> Ticketing -> Inbound Mailboxes, then click Create Inbound Mailbox.
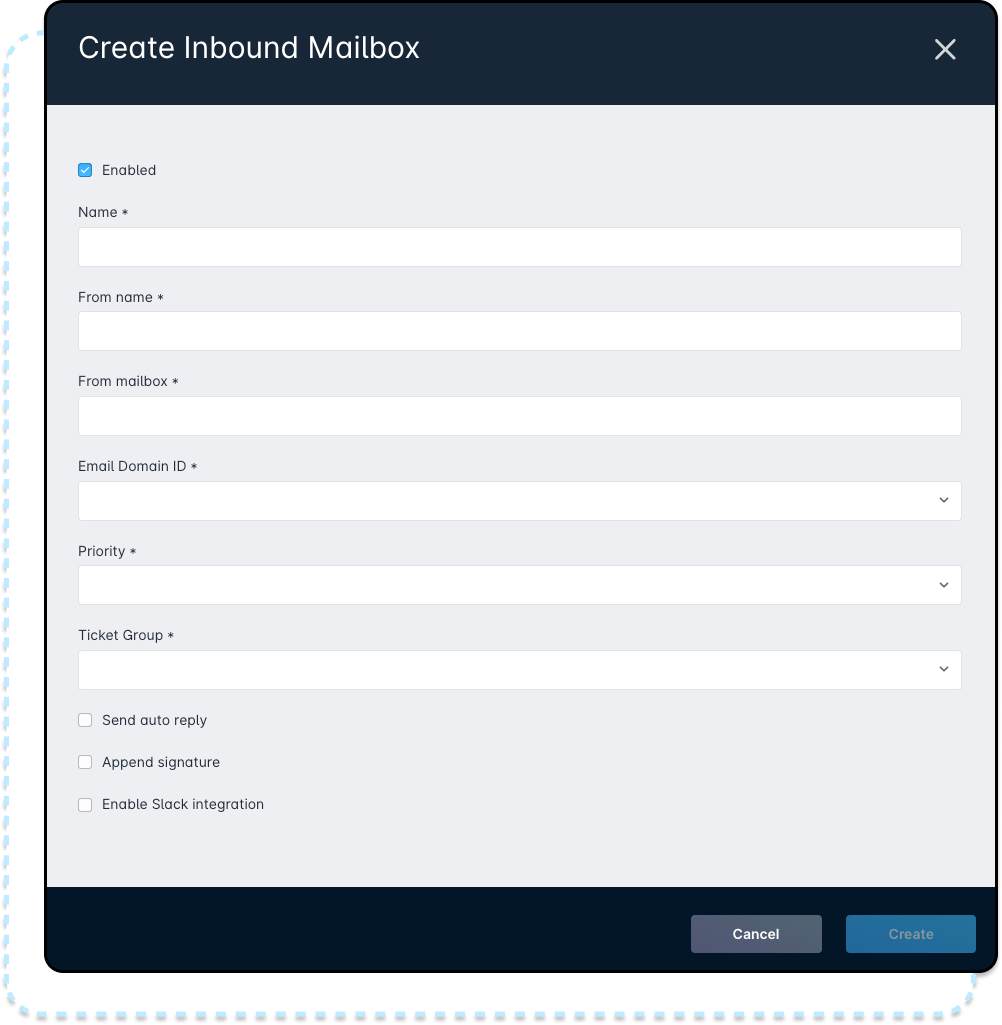
When creating an inbound mailbox, you will be presented with a Create Inbound Mailbox screen that contains several fields that are required to be filled out before you can successfully create it. An overview of these fields and what they mean are below.

- Enabled: Enable this to start receiving emails.
- Name: Label for internal identification (for example, Support Tickets).
- From name: Name shown as the sender on ticket replies.
- From mailbox: The username part of the email (for example, "
support"). - Email Domain ID: Domain part of the email (for example, "
yourdomain.com"). There must be a valid outbound domain in Sonar. - Priority: This determines the priority of the ticket created when email is received into this particular mailbox - choose ticket priority (Critical, High, Medium, Low).
- Ticket Group: Assign a default group for the tickets.
- Send auto reply: If this is enabled, an additional text box will appear where you can optionally send an automated confirmation email when a ticket is created.
- Append signature: If this checkbox is enabled, an additional text box will appear where you can set up a signature that will be appended to any responses to tickets that are sent out from this inbound mailbox.You can use
[PUBLIC_NAME]to insert the agent’s name. - Enable Slack integration: If using Slack, you can post ticket activity to a Slack channel via webhook. You can also pick to include the email body in these notifications. For more information on this, please refer to the Slack webhook documentation.
Inbound Mailbox Example Build
We are going to create an inbound mailbox for our incoming support tickets. First, we need to navigate to the Inbound Mailboxes page. This can be done by navigating to Settings -> Ticketing -> Inbound Mailboxes, then clicking Create Inbound Mailbox.

The Create Inbound Mailbox modal will appear once you click "Create Inbound Mailbox" and is where we will fill out all the necessary details for this mailbox.

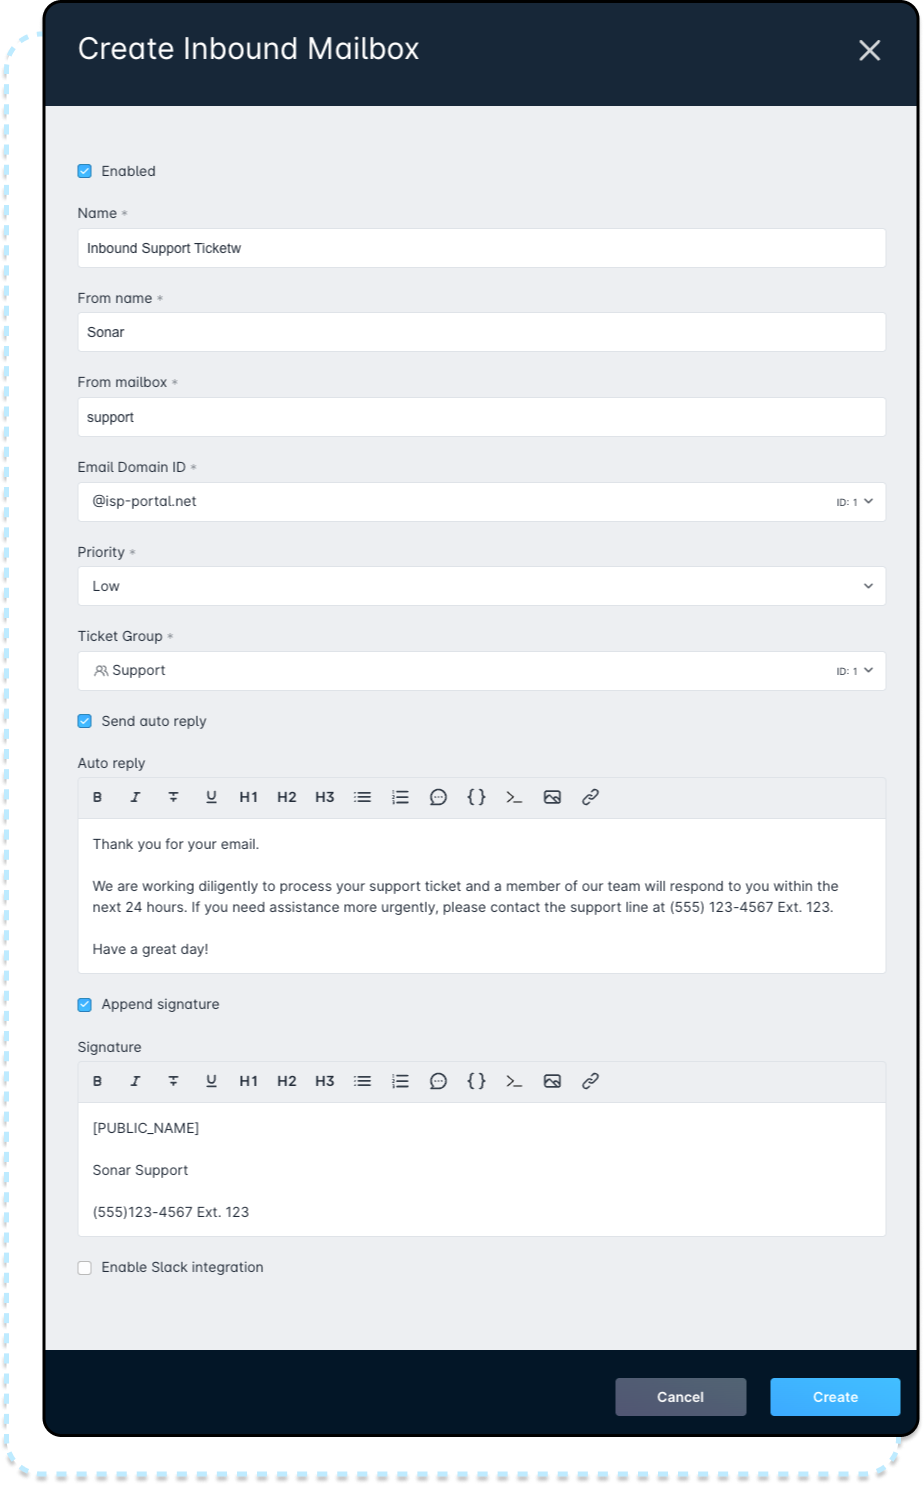
We’ve filled out all the required fields for our new inbound mailbox. It’s currently enabled and named Inbound Support Tickets so our team can easily recognize its purpose.
The From Name is set to Sonar, and the Inbound Email ID is support@isp-portal.net. This works because we’ve already set up isp-portal.net as a valid outbound domain in Sonar.
We’ve set the default Priority to Low, allowing agents to adjust it later if needed. All tickets created from this inbox will go to the Support Ticket Group since they’ll handle these requests.
We’re not using the Slack integration right now, as our team actively monitors tickets. However, we may choose to enable it later.
We’ve added an auto reply to confirm receipt of the email and provide customers with a response timeline and alternate contact option. Our signature uses the [PUBLIC_NAME] field to show the name of the replying agent, followed by Sonar Support and our support phone number.
After reviewing all fields, we click Create. The mailbox is now active and appears in the Inbound Mailboxes list, ready to receive emails.

Once your inbound email account is created, you can view, edit, or delete it from the same screen using the Edit menu next to the mailbox.
