Table of Contents
Anchor & Linked Serviceable Addresses: Overview and Best Practices
 Updated
by Mitchell Ivany
Read Time: 14 mins
Before You Start
Expanding on the basic functionality and features offered by the Serviceable Addresses feature in Sonar, Anchor and Linked addresses provide a new way to define and manage your serviceable locations. This article uses several terms that are part of the core construction for this feature. As you read this article, keep these terms and their definitions in mind. These terms are:
- Anchor addresses: These can be thought of as the host address. Whether that be the main street address of a building with multiple dwelling units, or the headquarters of a corporation for which you provide service to multiple branches, the Anchor will always be the central point of association. An Anchor address can exist on its own, but may also be associated with an account.
- Linked addresses: These are the subsidiary addresses of the Anchor. These can similarly take many forms, although the most common will be individual units within a dwelling complex, or satellite offices for a large corporation. A linked address can also be associated with an account, whether the account is a traditional customer account, or a Shell account.
- Shell accounts: These exist to generate basic account information for addresses being added in bulk. These accounts are designed to exist without needing to be modified at a base level. The intention for Shell Accounts is to create an account record for locations that may be receiving service, but the occupant may not be paying for it (i.e., no payment information is required). This may be because these accounts receive complimentary service with their rent or condo fees, or because the deployment is still waiting for active residents.
Post-creation, shell accounts can be fully activated and renamed as required, but can also exist indefinitely in their initial state, depending on what service is being delivered, and how that service is being received. - Service Subsidy: This concept allows you to attribute the billing (or a portion of the billing) for a service provisioned to a Linked Address to the Account connected with its associated Anchor Address.
- MDU or Multi-Dwelling Unit: When this term is used throughout the article, it refers to any property that contains multiple distinct service locations. An MDU does not represent multiple individuals residing within a single home or apartment as housemates.
- Wholesale Billing: Wholesale Billing enforces a set of instructions, defaults, and restrictions on the Anchor and Linked addresses. If Wholesale Billing is enabled for the Anchor Address, a Billing Default will need to be selected. The Billing Defaults available in this list are only those that apply to Anchor and Linked Addresses. For more information, read the Billing Defaults article.
Wholesale Billing can be considered as a programmatic way to deliver on agreed-upon services when provisioning an MDU. This is because the Billing Defaults configured to work with Wholesale Billing let you define the basic obligations you need to meet as a provider, and Sonar will automate the delivery and simplify onboarding.
Anchor and Linked Addresses work by associating service locations that should (or could) share:
- Physical location details, such as an apartment complex or Multi-Unit Dwelling
- Service qualification limitations or availability, such as an HOA or new neighborhood
- Wholesale solutions, where one business might be responsible for the billing of other branches' physical locations
If you're familiar with Parent & Child accounts in Sonar, you may be wondering how Anchor and Linked Serviceable addresses differ from that feature. With a Parent and Child relationship, it is always established at the account level, with the Child account able to have distinct Billing Settings and Services. Anchor and Linked addresses are connected at the Serviceable Address level, allowing a deeper level of connection, control, and flexibility. Anchor and Linked addresses can be used to limit available services, removing the guesswork or sticky note system that this mechanism requires when deployed as Parent and Child accounts.
Permissions
Navigate to Settings → Security → Roles and either choose to edit an existing Role or create a new Role. When the next page populates, locate the permissions reflected in the screenshot below and add it if applicable to that Role. While Anchor & Linked Addresses do not, on their own, require any specific permissions, special attention should be made to the “View Billing Defaults” permission:

Without this permission enabled for your Roles, users will be unable to see services associated with the Billing Defaults or Anchor Subsidy details when applied.
Using Anchor & Linked Addresses
Creating a New Anchor Address
Creating an Anchor address is hardly any different from creating a regular Serviceable Address. Rather, the entire process revolves around adding new details to the address. As you create an Anchor Address, you need to first select that it is, indeed, an Anchor, then select whether this and the linked addresses will have Wholesale Billing applied.
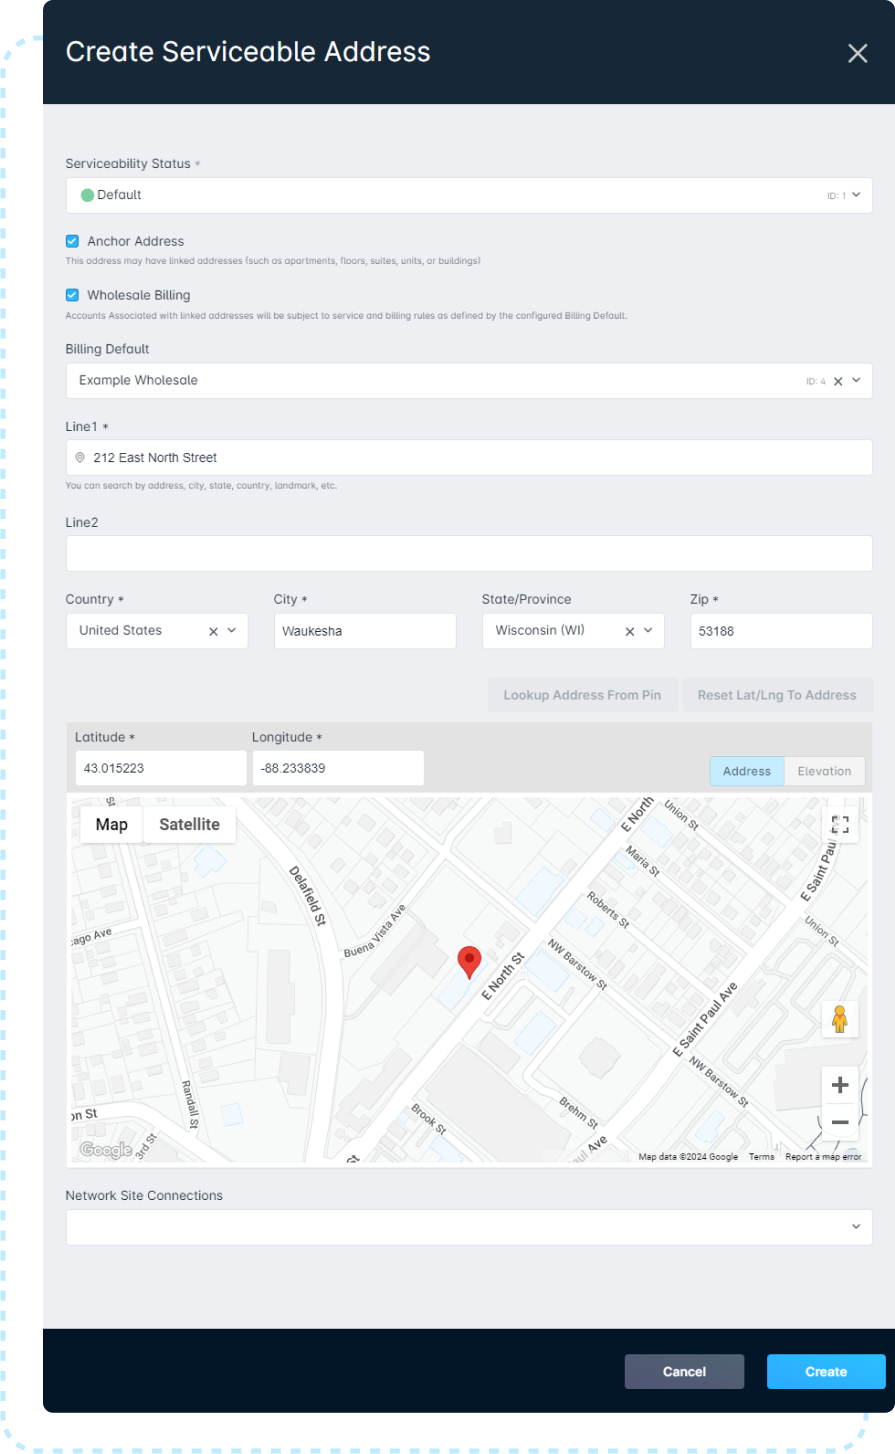
Wholesale Billing
To apply Wholesale Billing on Anchor and Linked addresses, a Billing Default needs to be selected from the list of available options. The Billing Defaults that appear in this list will exclusively be those created for Anchor and Linked accounts — Account-type Billing Defaults will not be available. Opt to use Wholesale Billing if you have a need to restrict, rename, or set unique pricing for services sold to this Anchor's Linked Accounts. If you wish to make use of our Service Subsidy logic, you must use Wholesale Billing.
Creating a New Linked Address
Linked Addresses can be created or converted. Whichever way you choose, the action happens from the Anchor's Serviceable Address Management view. To access the Linked Addresses page, follow these steps:
- Click on the arrow to open the Anchor address's side panel
- Click on the "Manage" button in the button's right corner
- On the Management view, click on the Linked Addresses tab
- Click on "Create Linked Address"You can also use "Link Existing" if the address already exists in your Sonar instance, which allows you to select it from a list of all unlinked addresses.
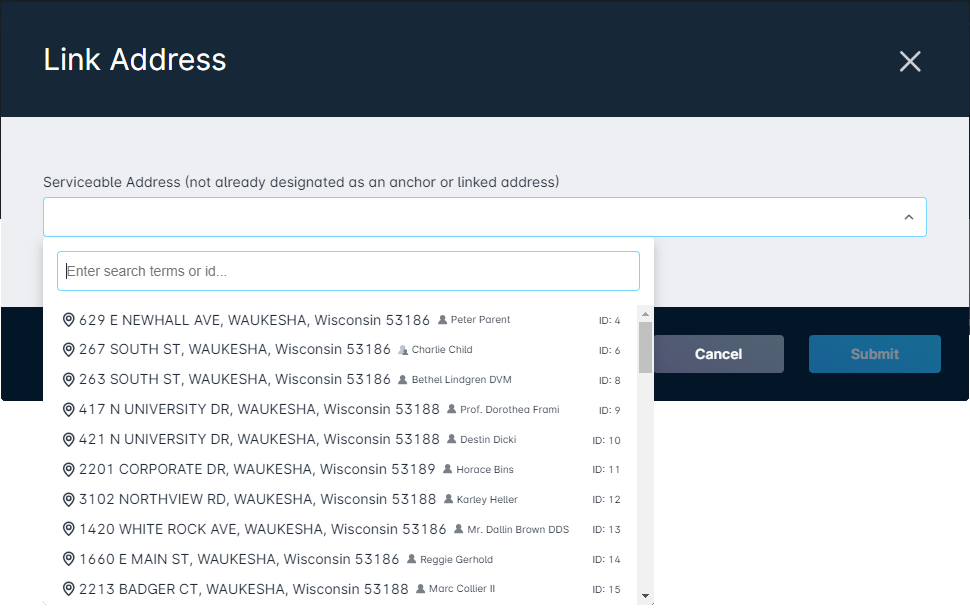 If the existing address is already associated with an account, the Anchor address you're Linking it to must also be associated with an account if Wholesale Billing is being used.
- In the address creation modal that appears, fill out the address information for the linked address
- A new checkbox is available in this window, “Linked address is a subset of the anchor address”, which will autofill all address information except for Line 2 to accelerate the process
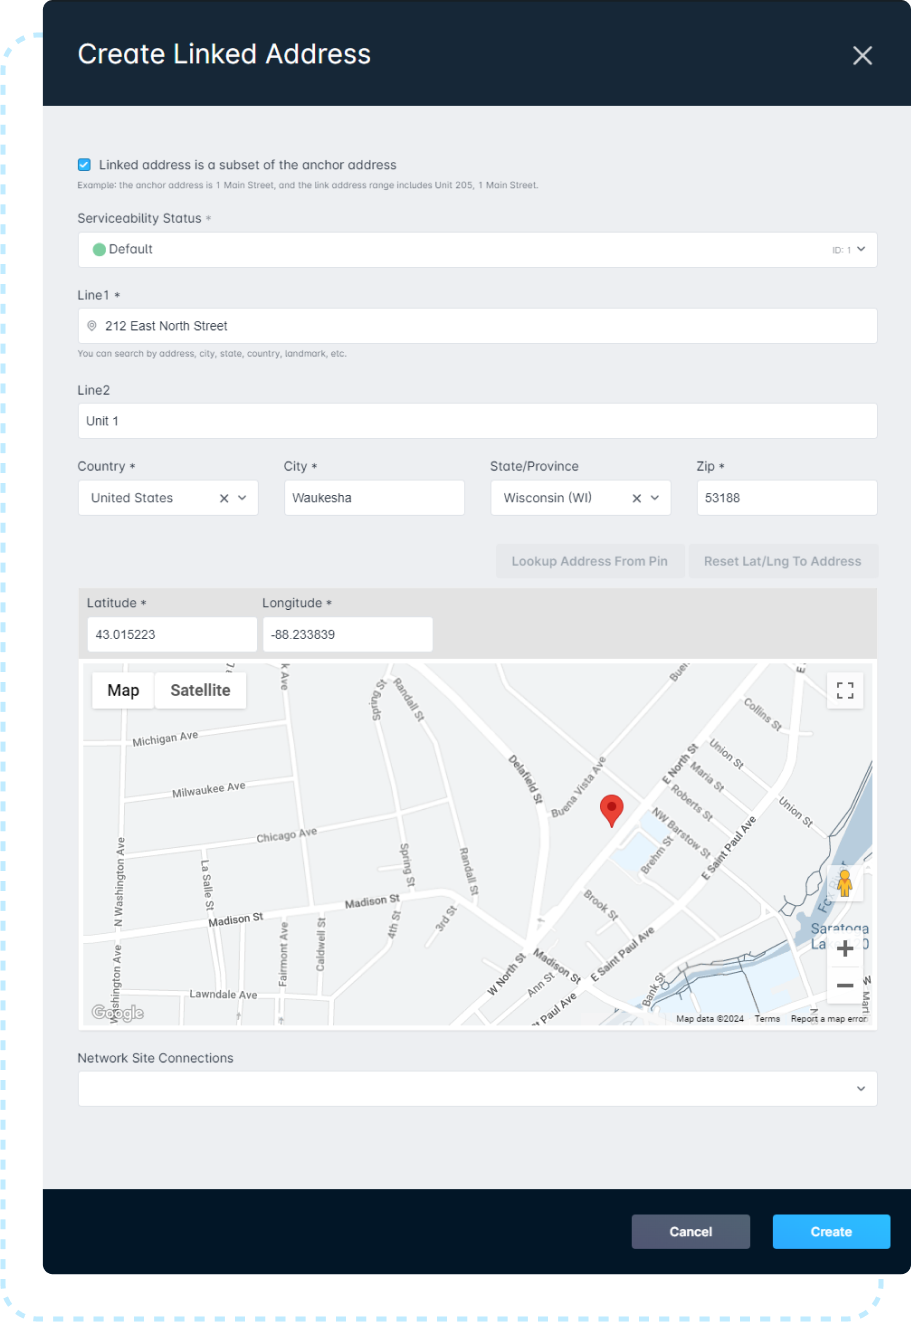
Once you're done adding the address, it will be added to the table on the main tab view.

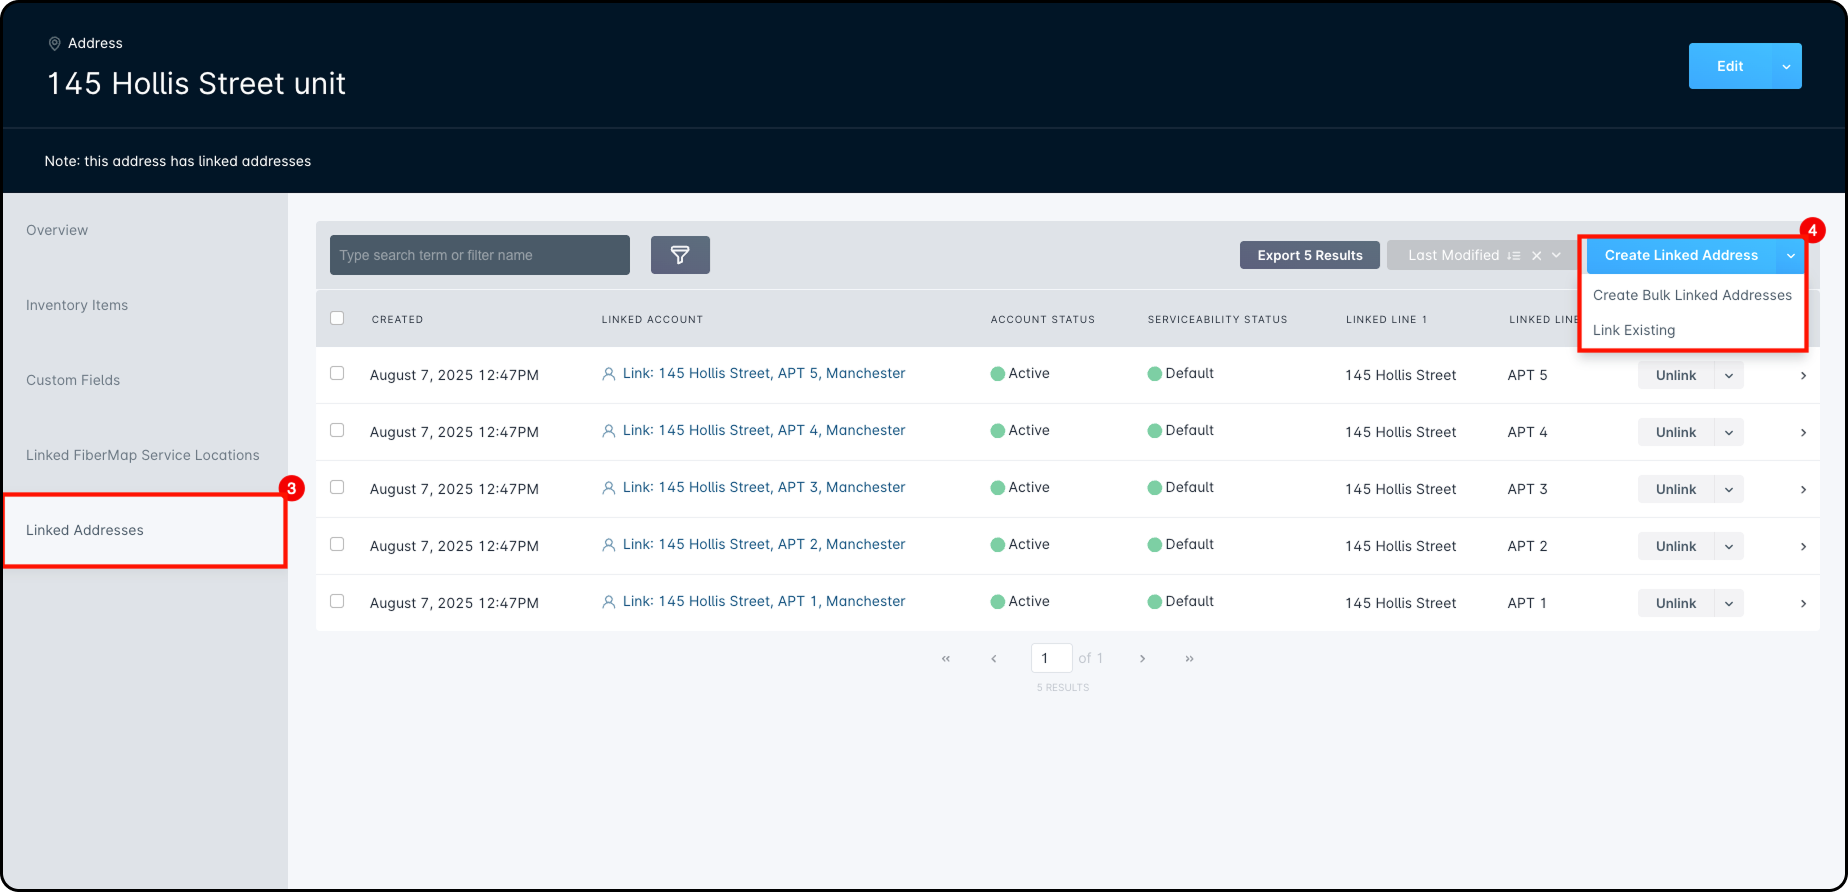
With the page completed, reviewing the information contained within it shows:
- A Note, letting anyone reviewing the Serviceable Address immediately recognize that there are addresses linked to it as an Anchor. This Note is visible from any tab on the Management view.
- The “Create Linked Address” button, and “Link Existing” which is available from the dropdown menu.
- Information about the linked addresses, collected in this table. It shows:
- When the address was created in your instance
- The account linked to the address, if applicable.
- The status of that linked account
- The Serviceability Status of the address, as defined during address creation
- The Line 1 information for the address
- The Line 2 information for the address
- The “Unlink” button, and the “Delete” option available from the dropdown
- The sidebar arrow, which will open the sidebar for the linked address, and provide access to the linked address's Management page
Bulk Creating Linked Addresses
As you roll out service to large apartment buildings, creating each address and linking them individually will eat up your valuable time. This is especially true for deployments where the number of units can grow to 50 or more. When you're defining this sort of property, you can leverage the Bulk creation tool to quickly add and increment the various Linked Addresses.
To access the Bulk Linked address tool:
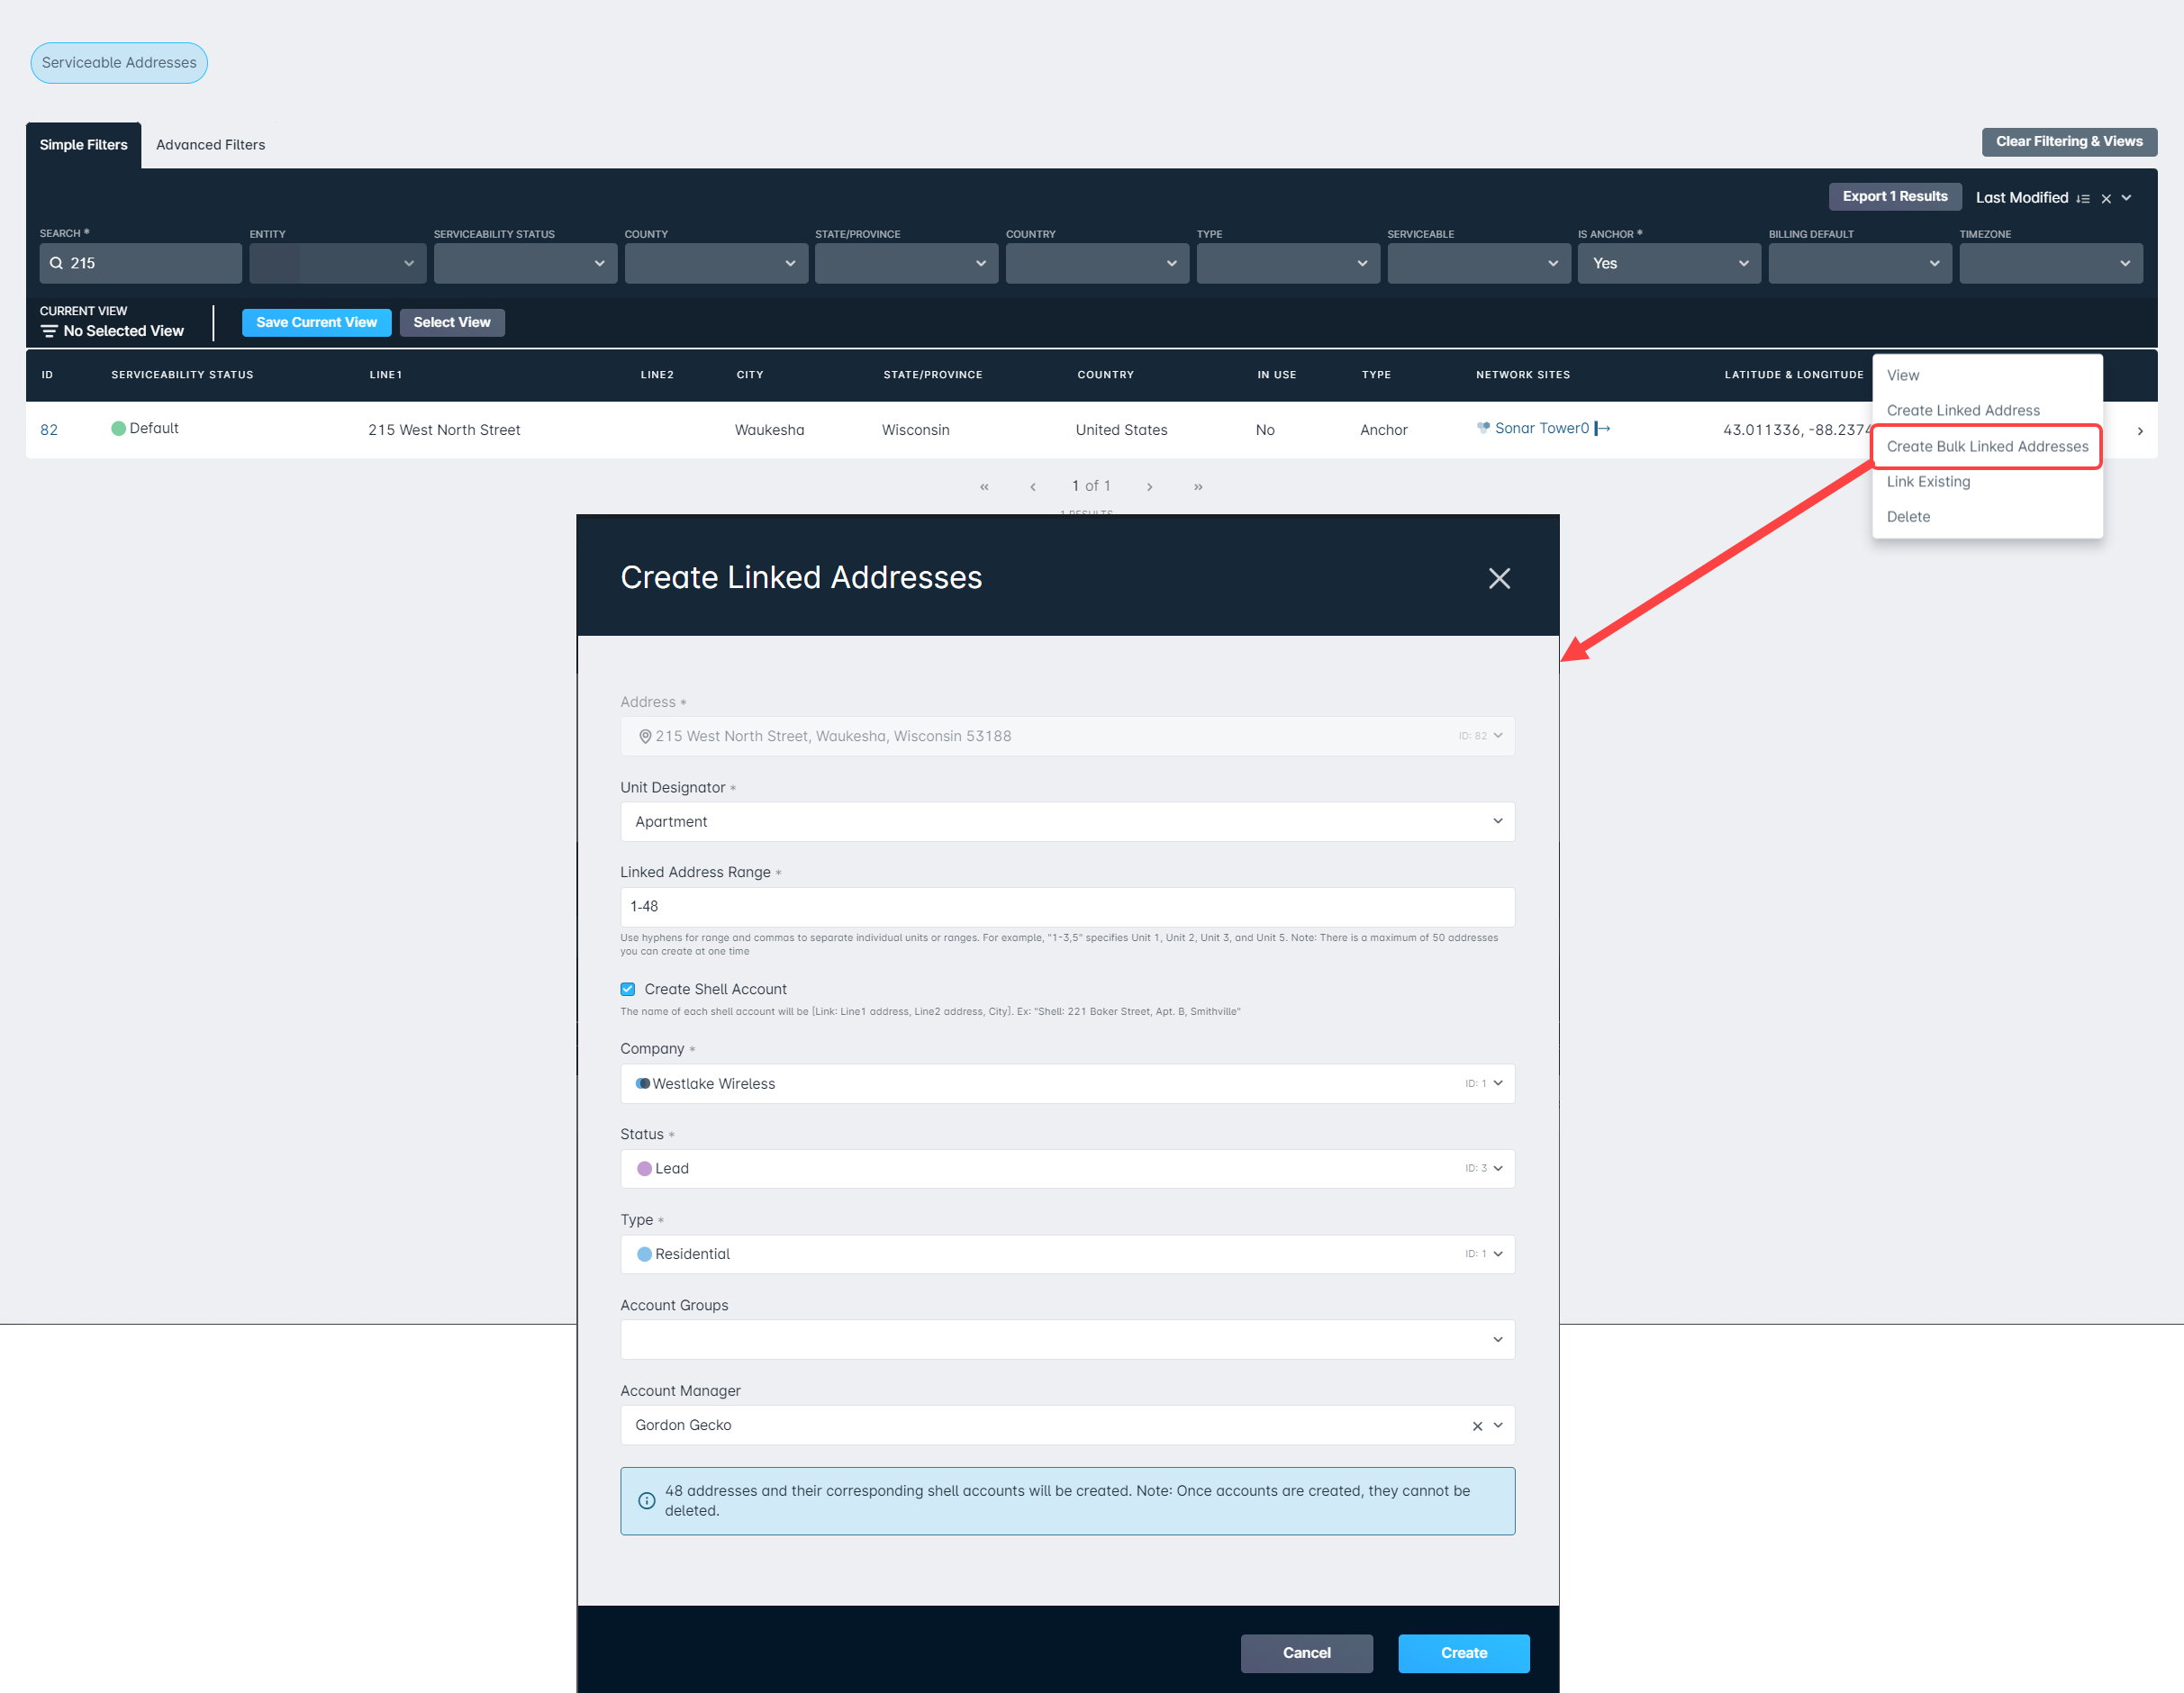
- From the main menu, go to Location Tools → Serviceable Addresses. In the table of serviceable addresses, locate your created Anchor address, click the dropdown arrow for that address, and select Create Bulk Linked Addresses.
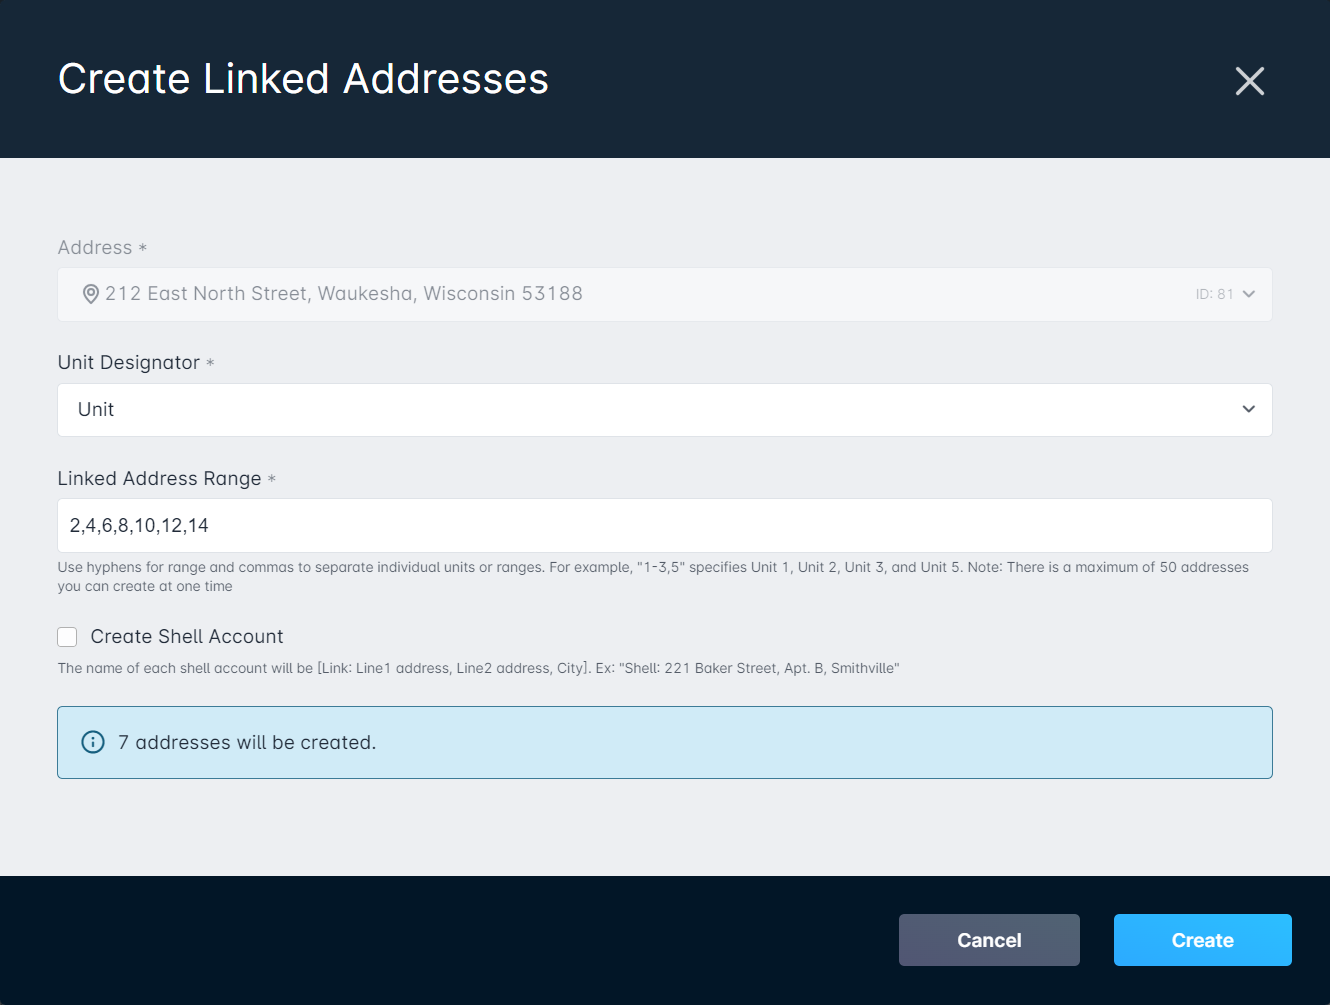
- In the modal, the Address field will be filled in automatically. You’ll need to choose a Unit Designator and set the Address Range.
- Unit Designator: Select from a preset list of unit types (based on the USPS-approved list) to set the Line 2 prefix.
- Address Range: Enter the starting and ending numbers that will appear in Line 2 of each linked address.
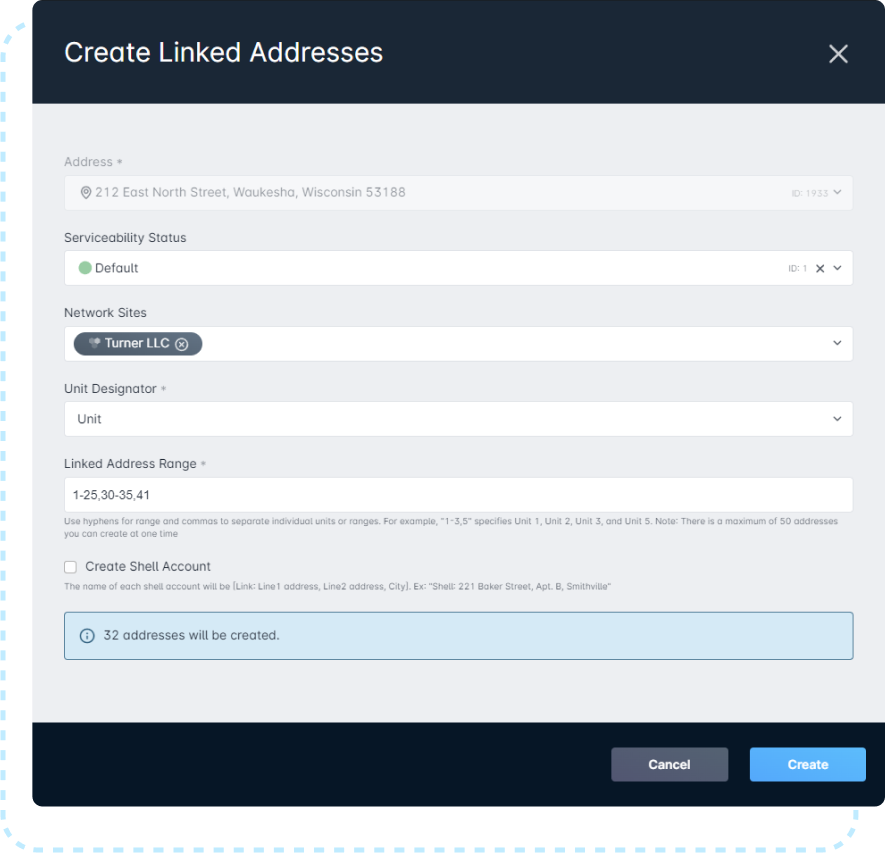
- The final configurable option is "Create Shell Account". Enabling this option will generate, effectively, blank accounts for each unit being added. During creation, you're able to define the company these accounts will belong to, their Status upon creation, the Account Type, their Account Group, and any Custom Fields that can be applied to accounts.Shell accounts will use the following name format (which can be modified post-creation):
Link: [Line 1], [Line 2], [City]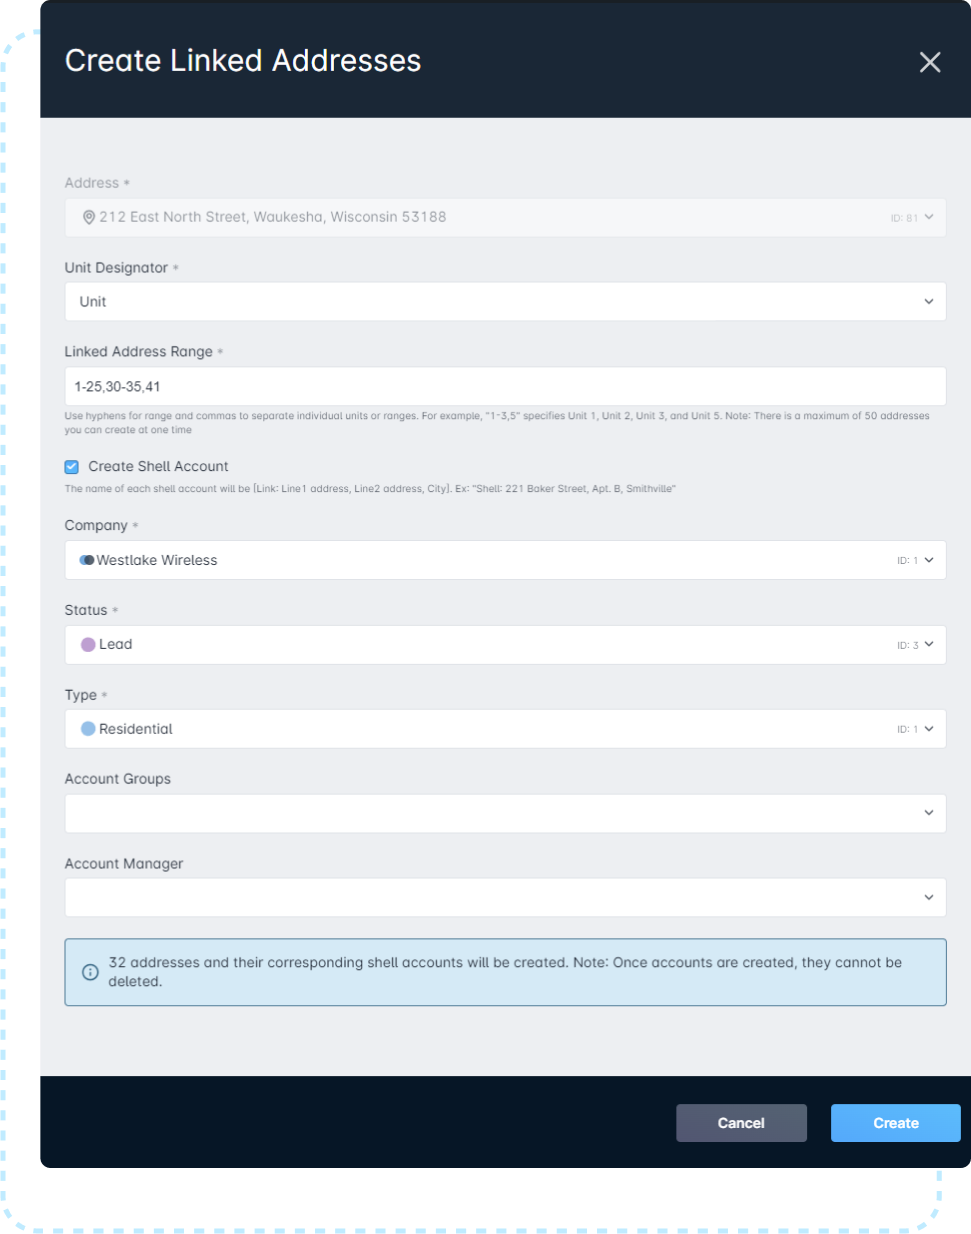
Considerations for Shell accounts
If you plan to convert Shell accounts to traditional customer accounts, consider leaving the Shell accounts in “Inactive” or “Lead” status. Having Shell accounts activate upon creation will prevent important activation triggered messages from being sent to the customer once the account is created.
How Billing Defaults Apply
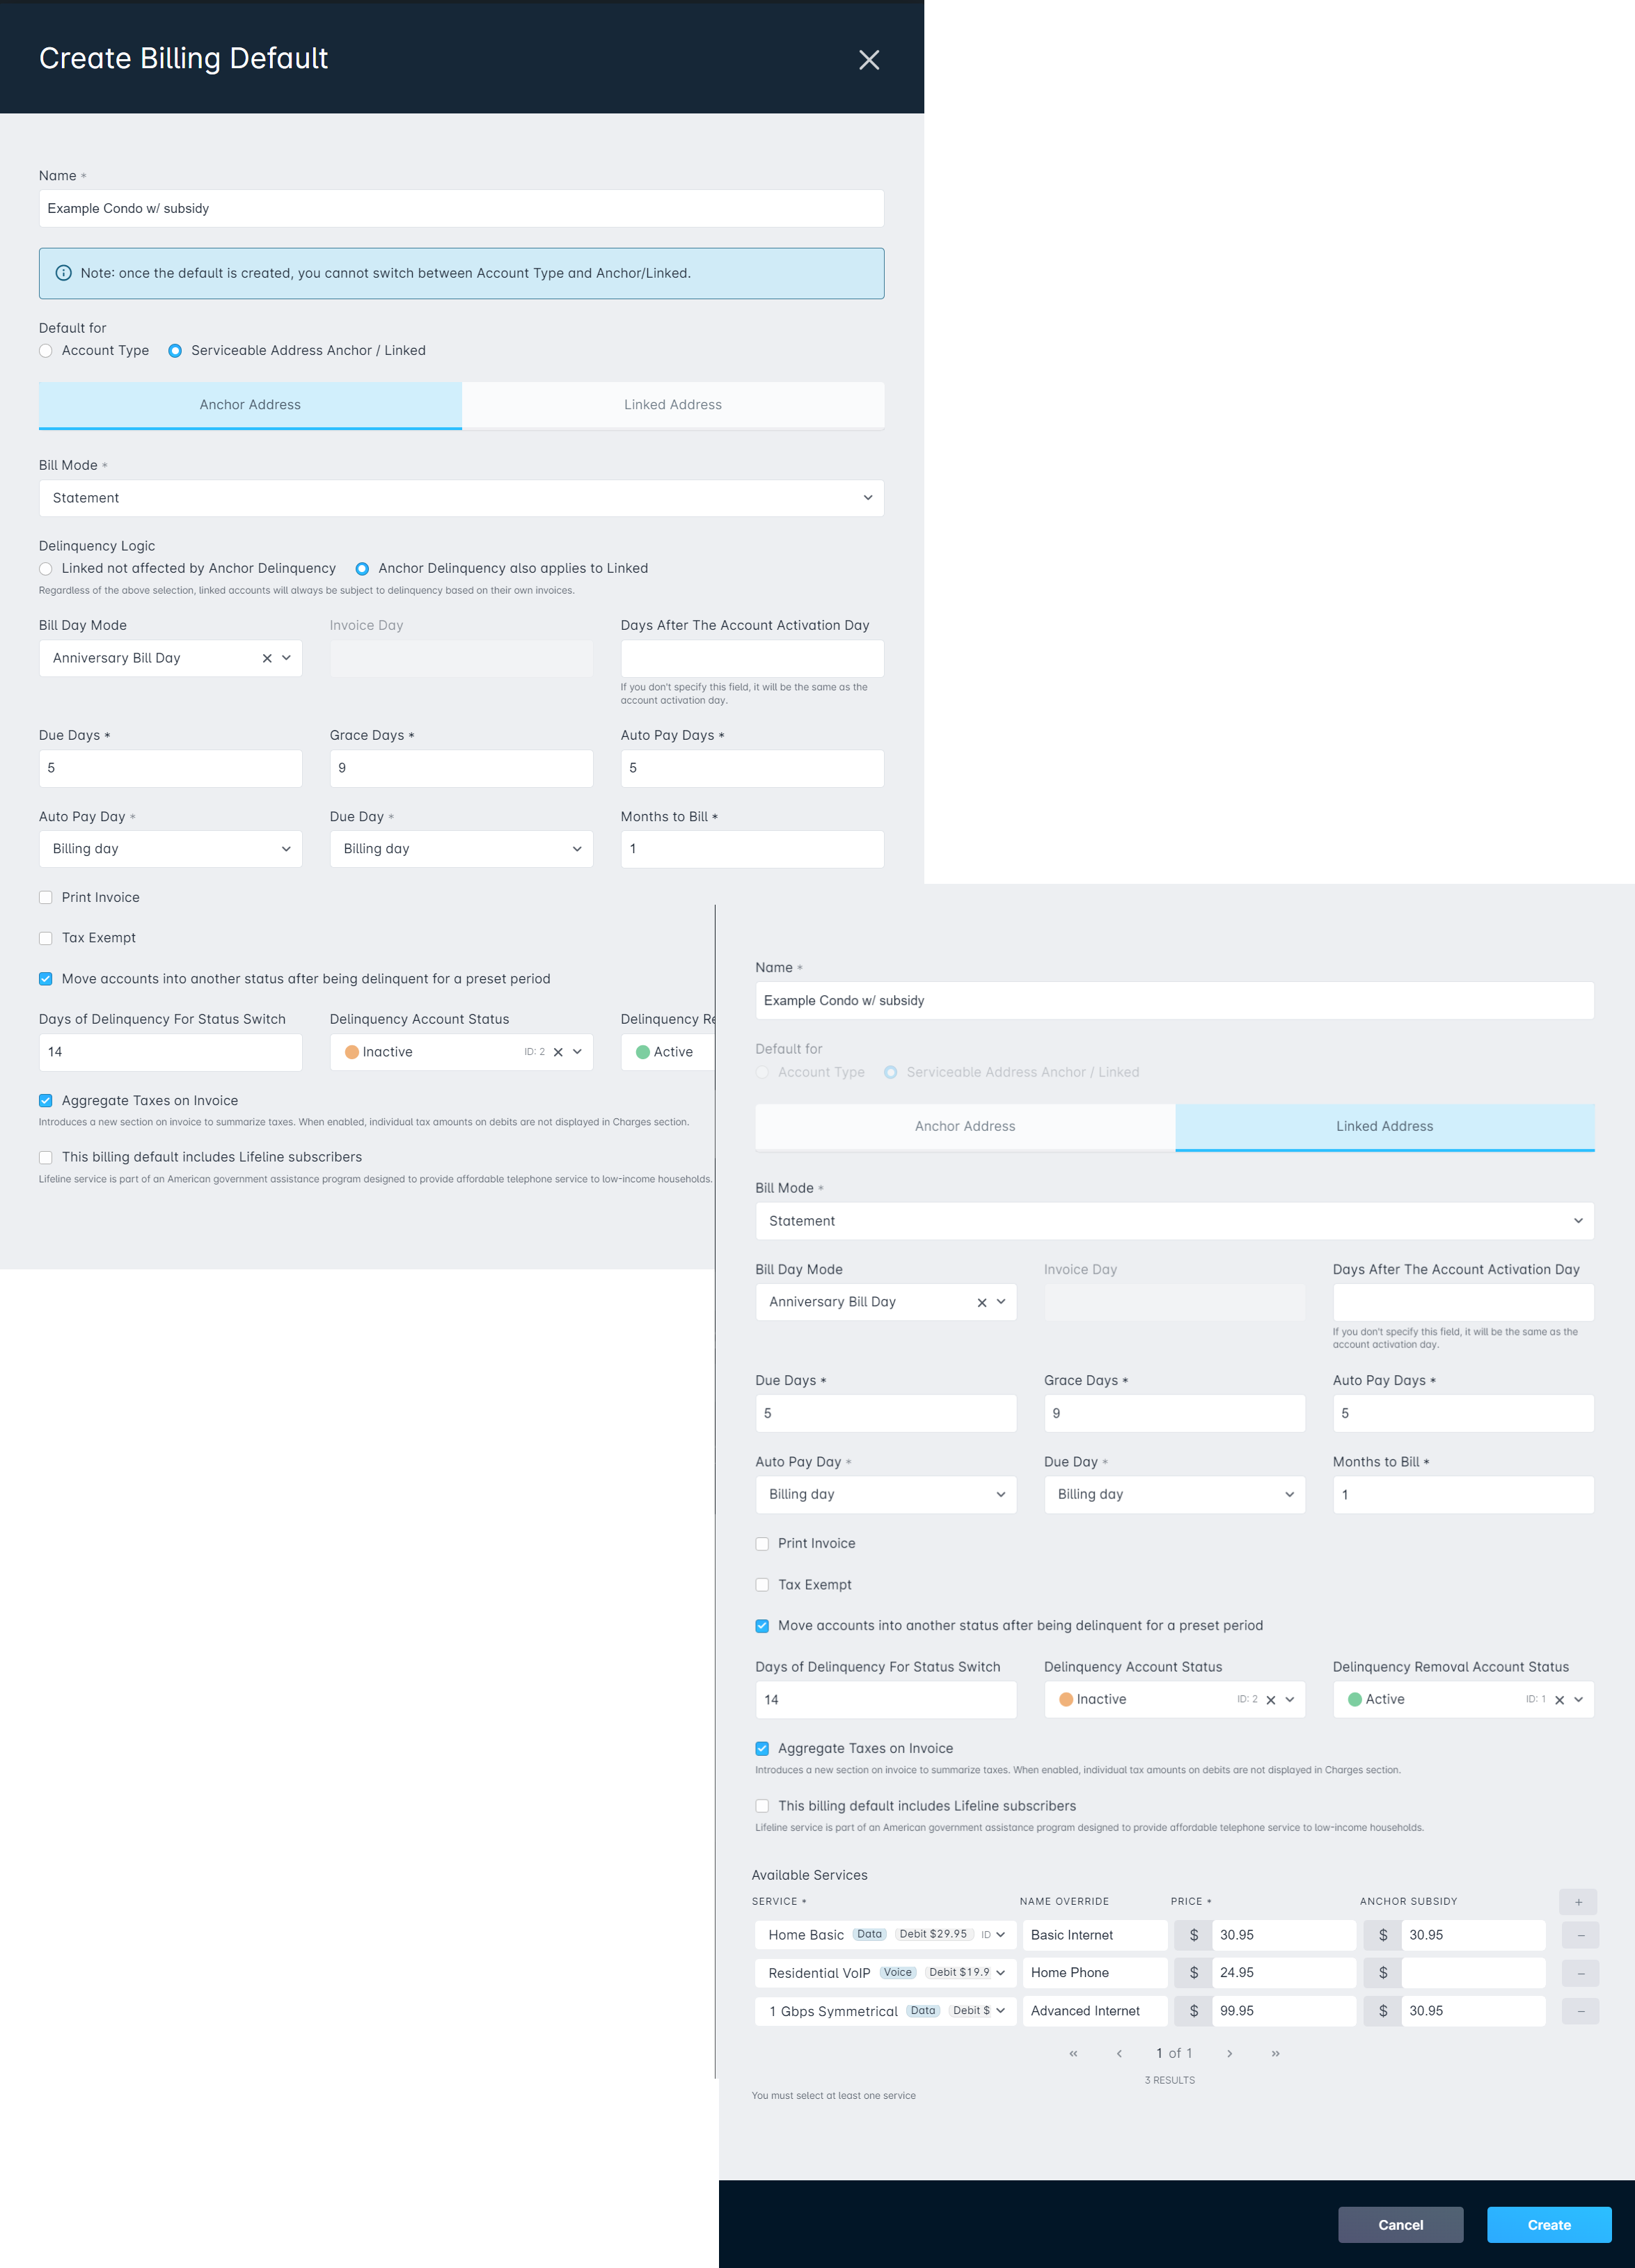
Traditionally, with Account Type Billing Defaults, they defined the account's billing parameters upon creation. Enabling Wholesale Billing flips the script somewhat, defining Billing Defaults at the address level. This means that upon association with these addresses, accounts will inherit certain Billing Settings and restrictions when this is enabled for the Anchor address.
Additionally, with Billing Defaults selected for Wholesale Billing, certain account billing parameters cannot be changed when an account is added and associated with the address. Under these conditions, a warning will be displayed in the account creation modal:
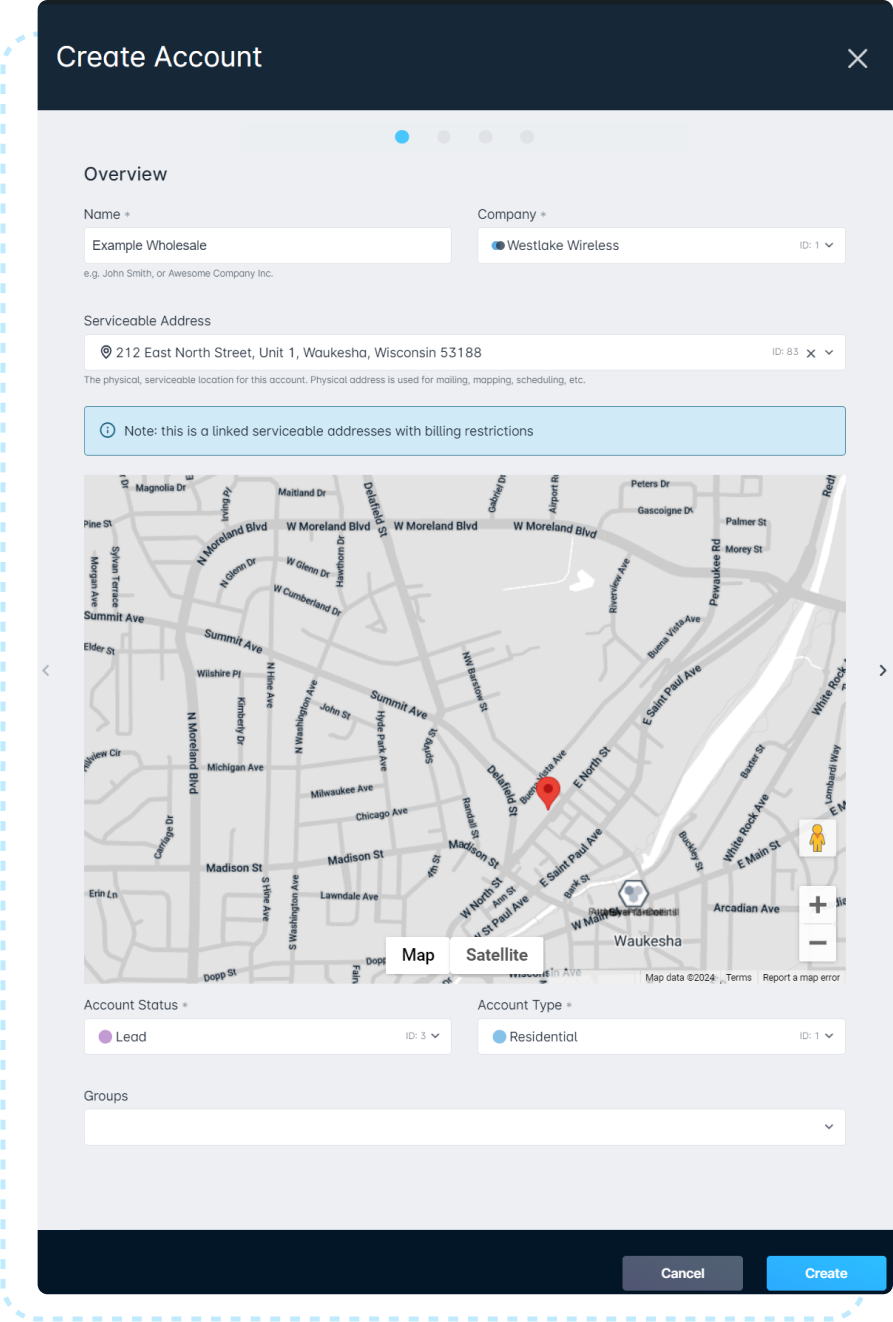
These configured Anchor and Linked Billing Defaults also determine how Delinquency will be addressed for the related accounts. Two options are available to you, applied if the Anchor account were ever to become delinquent:
- Linked not affected by Anchor delinquency
- If the Anchor becomes delinquent, this setting will result in the Anchor account being made delinquent, while the Linked accounts will remain in their appropriate status relevant to their payment state. While delinquent, status switches can also be applied based on specific settings in the Billing Default.
- Anchor Delinquency also applies to Linked
- If the Anchor becomes delinquent, this setting will result in all Linked accounts also being made delinquent, regardless of their current payment state. While delinquent, status switches can also be applied based on specific settings in the Billing Default.
Example Use Cases
In most cases, usage of Anchor & Linked Serviceable addresses will be associated with standard Multi-Dwelling Units. However, their usage is not limited to only that scenario. This section will go over different methods where you could apply Anchor & Linked addresses to benefit your business.
Example 1: Multi-Dwelling Units or Condos
In this scenario, the Anchor Address will be the street address of the Condo building, with no Line 2 being added
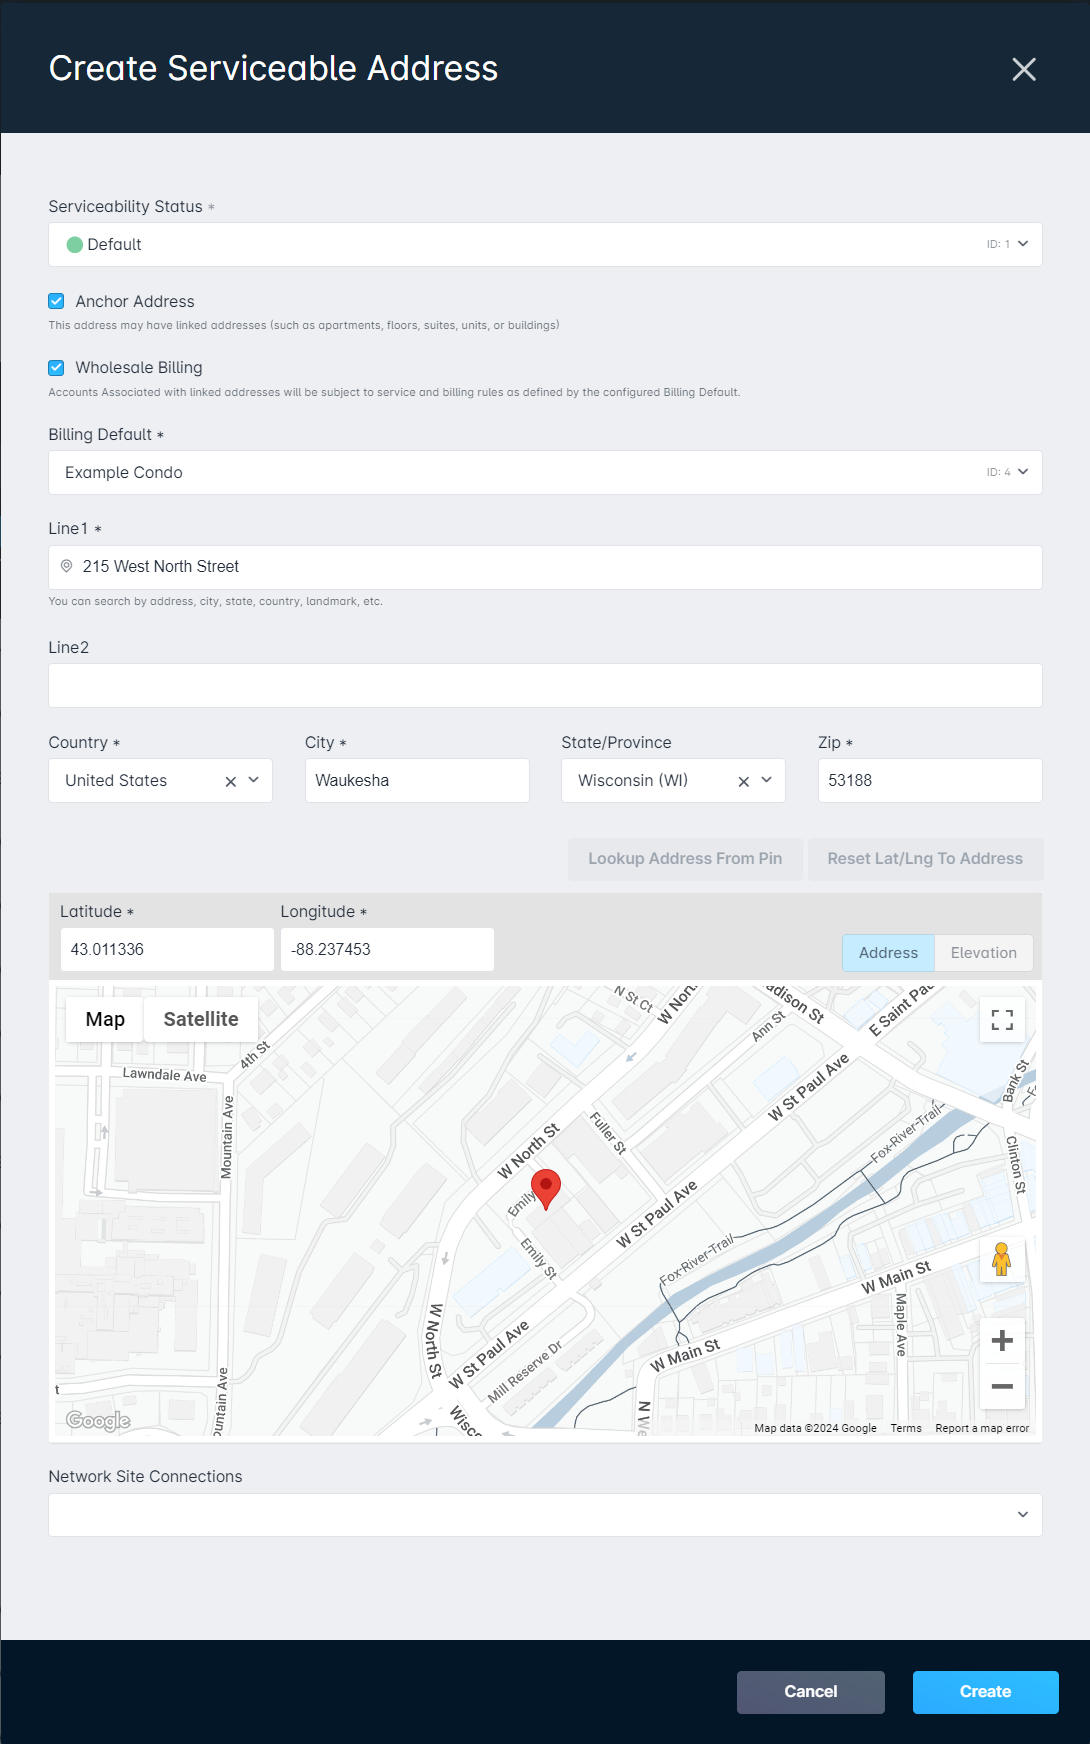
The Linked Addresses that are added will share the same Line 1, and have their Line 2 (unit or apartment details) added. Each unit in the multi-unit dwelling should be added as a linked address. The Anchor address may not be receiving service, but there will be an assumption of minimum service levels tied to each unit. This is delivered through the configured Billing Default, which has the basicc cost of internet subsidized for Linked accounts
Because this example will make use of bulk address creation and Shell accounts, the Anchor address needs to have an account before the next step. If you're unfamiliar with account creation, a guide is available in the Creating a New Account article. Once done, locate the Anchor address from Location Tools (main menu) → Serviceable Addresses, expand the dropdown, and select "Create Bulk Linked Addresses"
Each of these added units can now be converted into an account and activated as occupants subscribe to your services.
Example 2: Neighborhood Build-Out and HOAs
The Anchor address in this example must be an address within the HOA, and in this case will be the home of the HOA president.
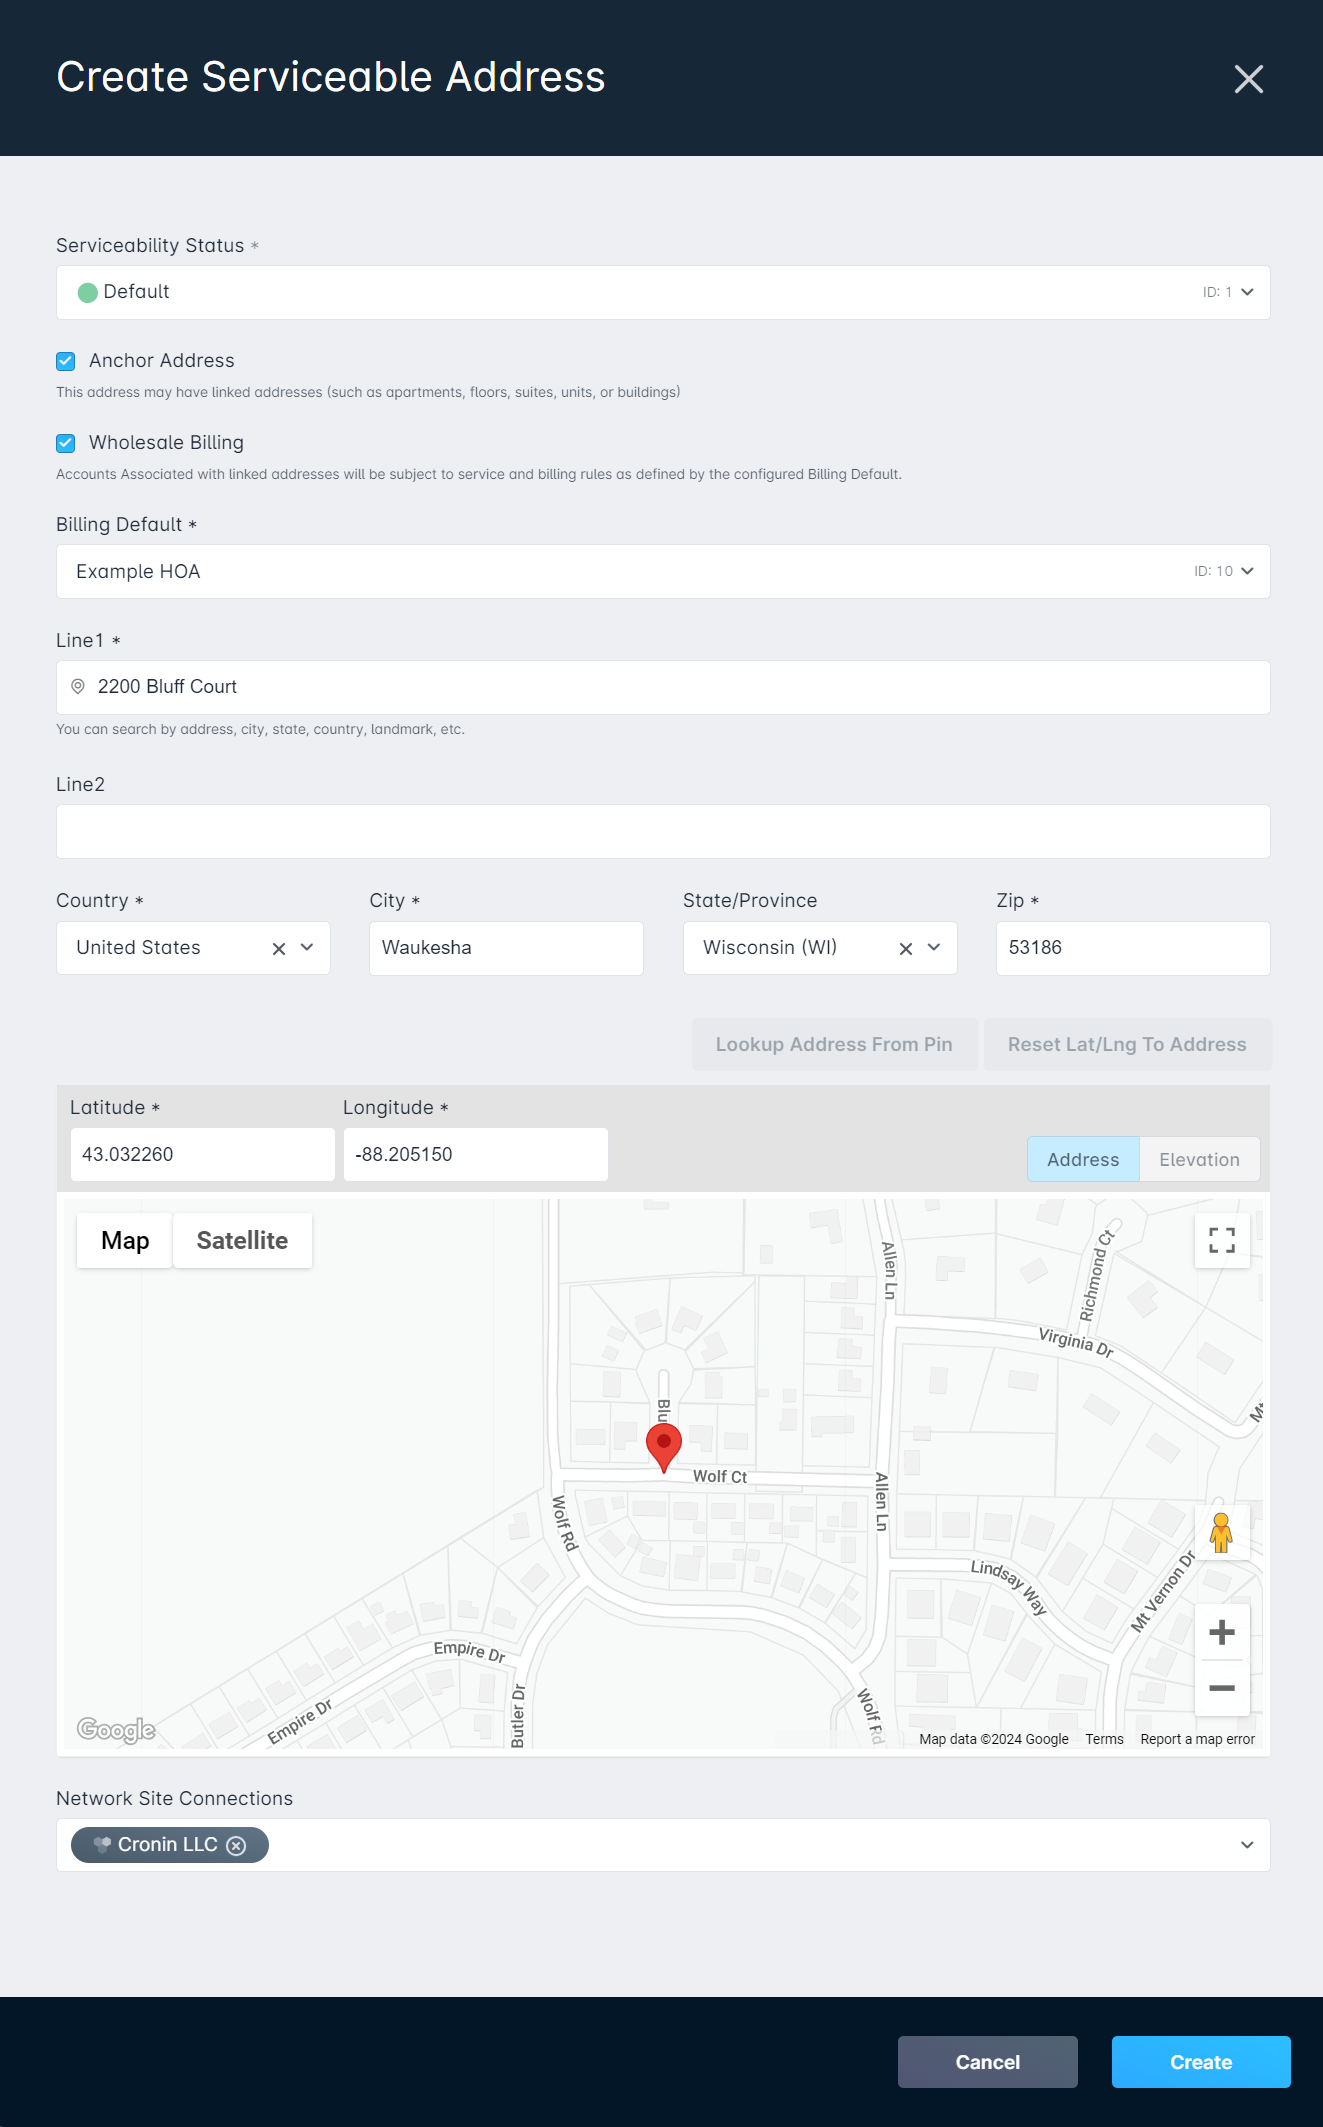
There are a few important things to bear in mind. First, that Wholesale Billing is enabled for the Anchor address, and that a Billing Default is selected, enforcing the Available Services. Services that do not appear in this list cannot be assigned to accounts associated with these addresses.
Note: In this example, the Anchor subsidy will not be used. The Anchor subsidy reduces the price of the service when it's applied to Linked accounts and is instead charged to the Anchor account. You might use an Anchor subsidy when basic Internet service is provided as part of the rent payment, or when a company with satellite buildings is paying for all the networks. For more information on the Anchor Subsidy, review the relevant section in the Billing Defaults article.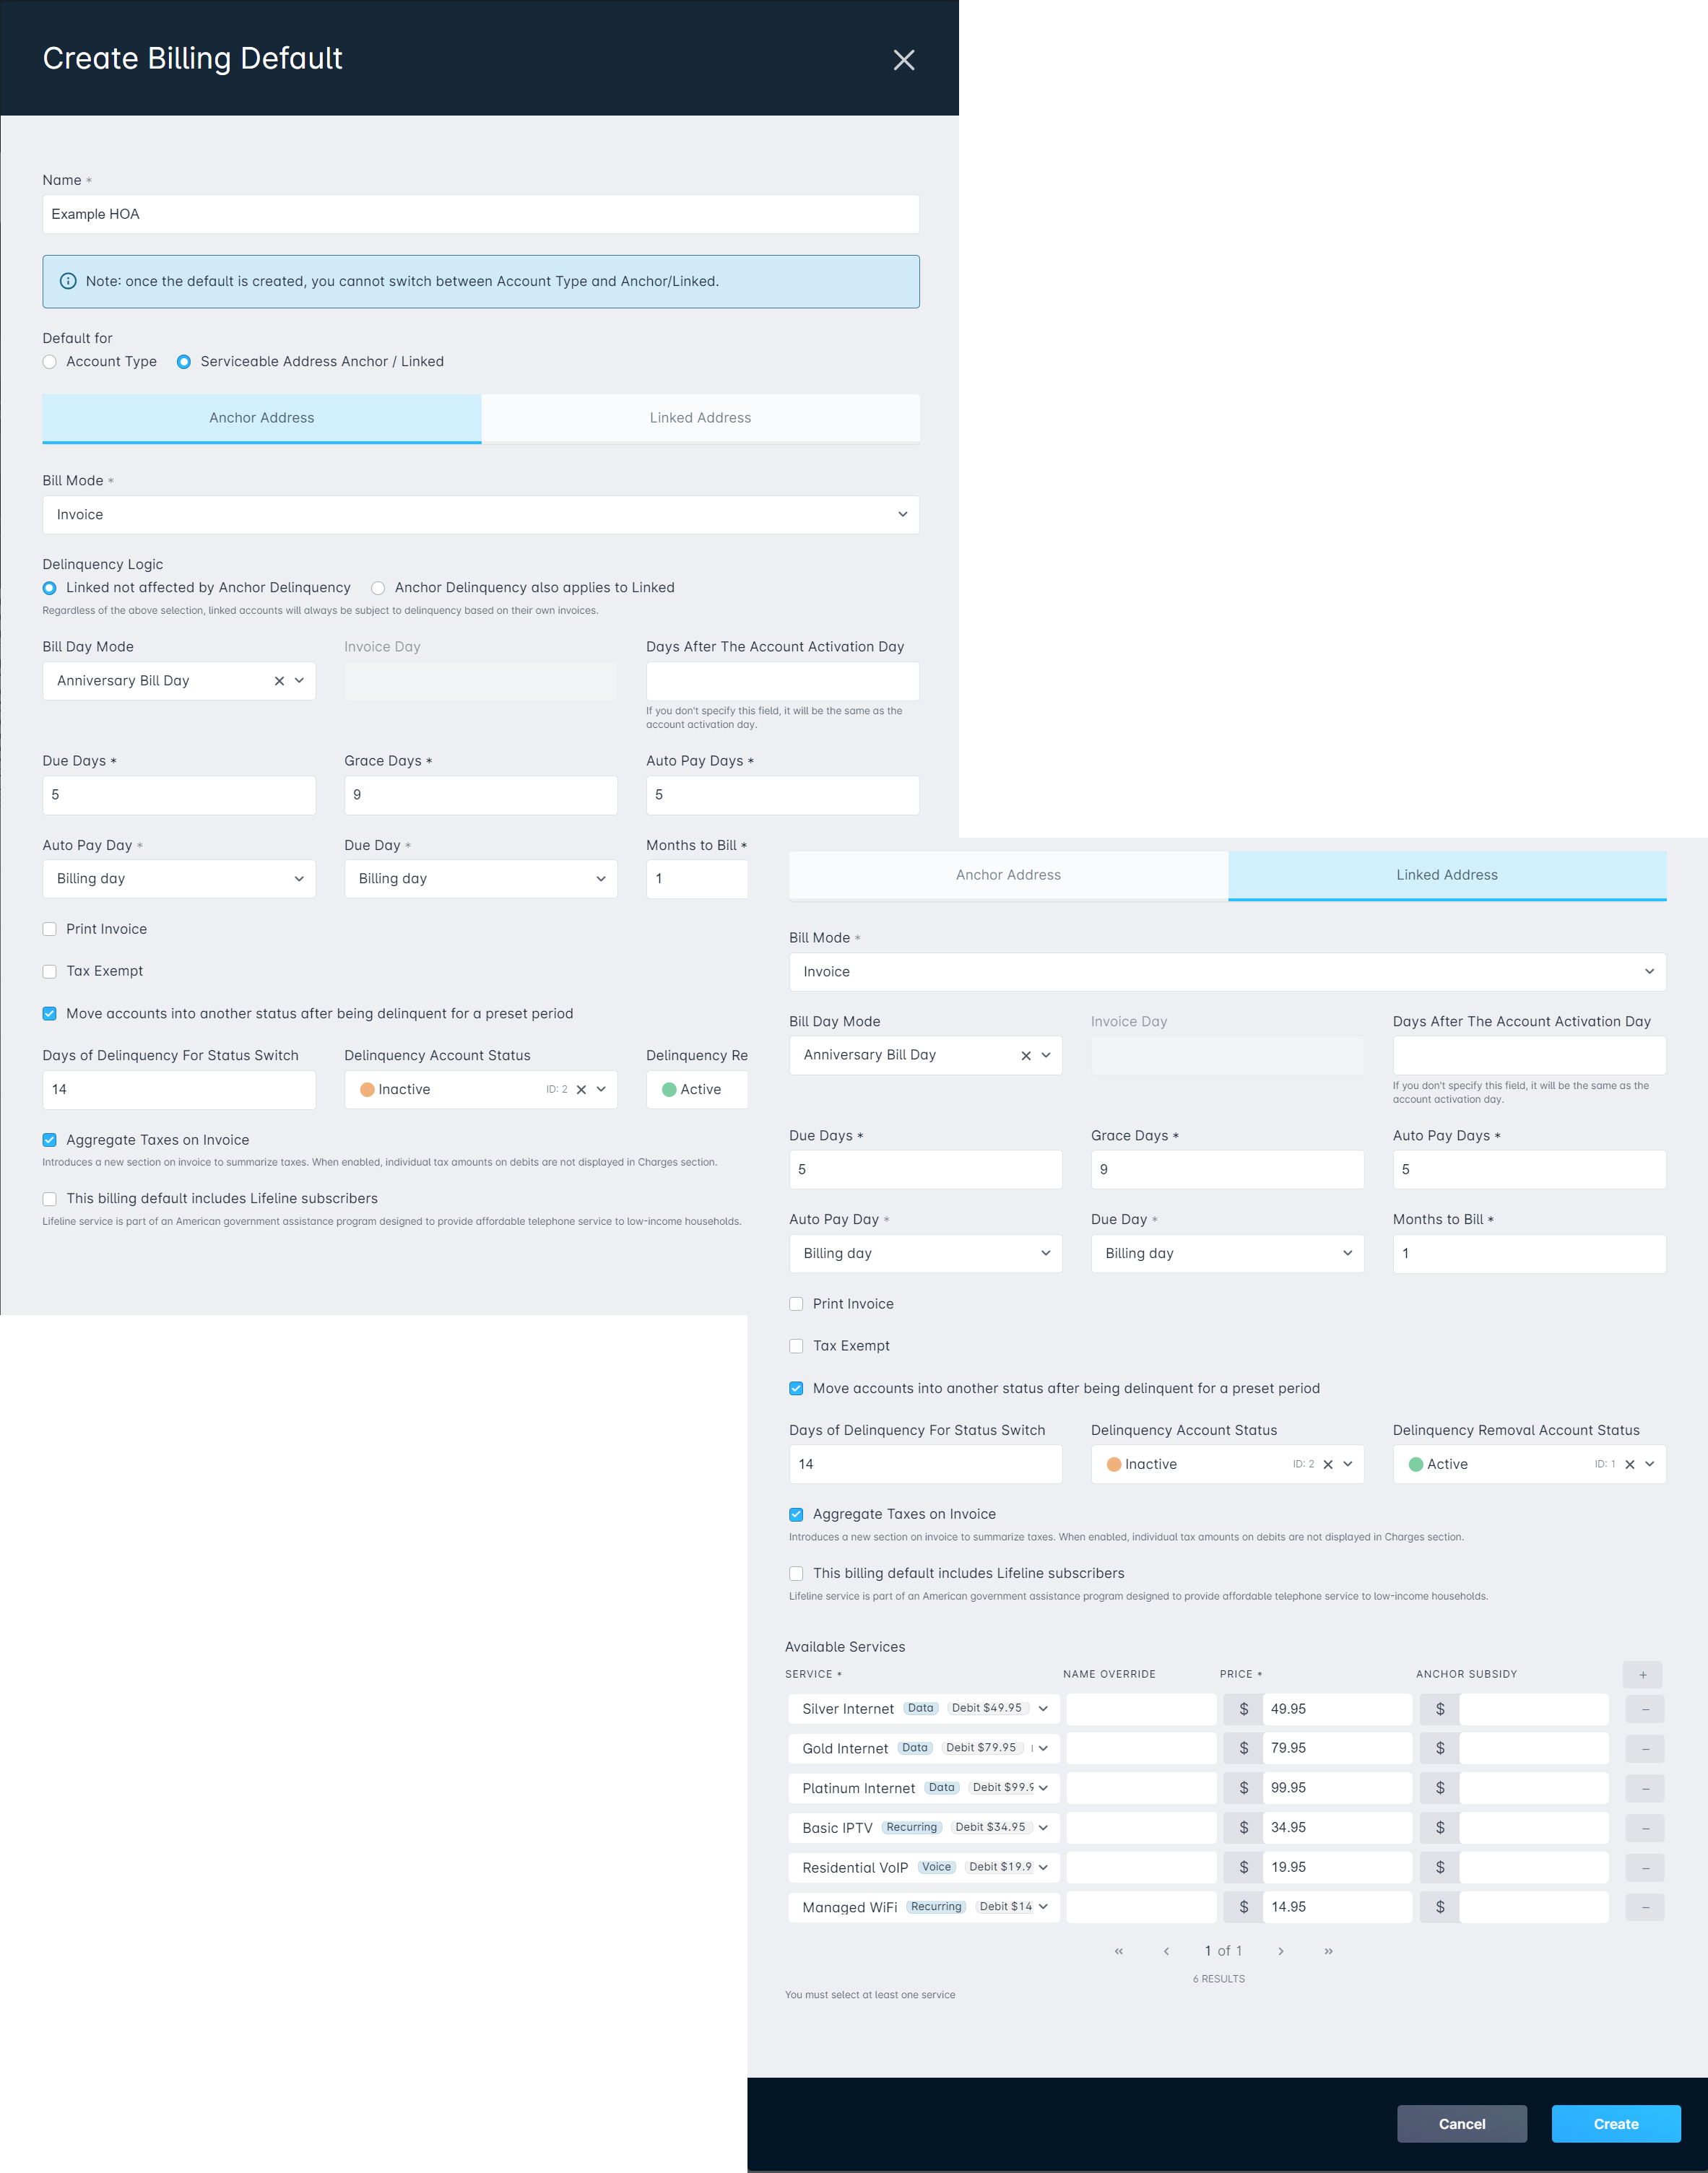
Adding Linked address must be done one at a time, as there are no shared Line 1 details between the various homes being serviced. Addresses are linked individually by navigating to Location Tools (main menu) → Serviceable Addresses, expanding the dropdown, and selecting "Create Linked Address". Alternatively, if any of the HOA member Serviceable Addresses are already in Sonar, you can use the "Link Existing" option.
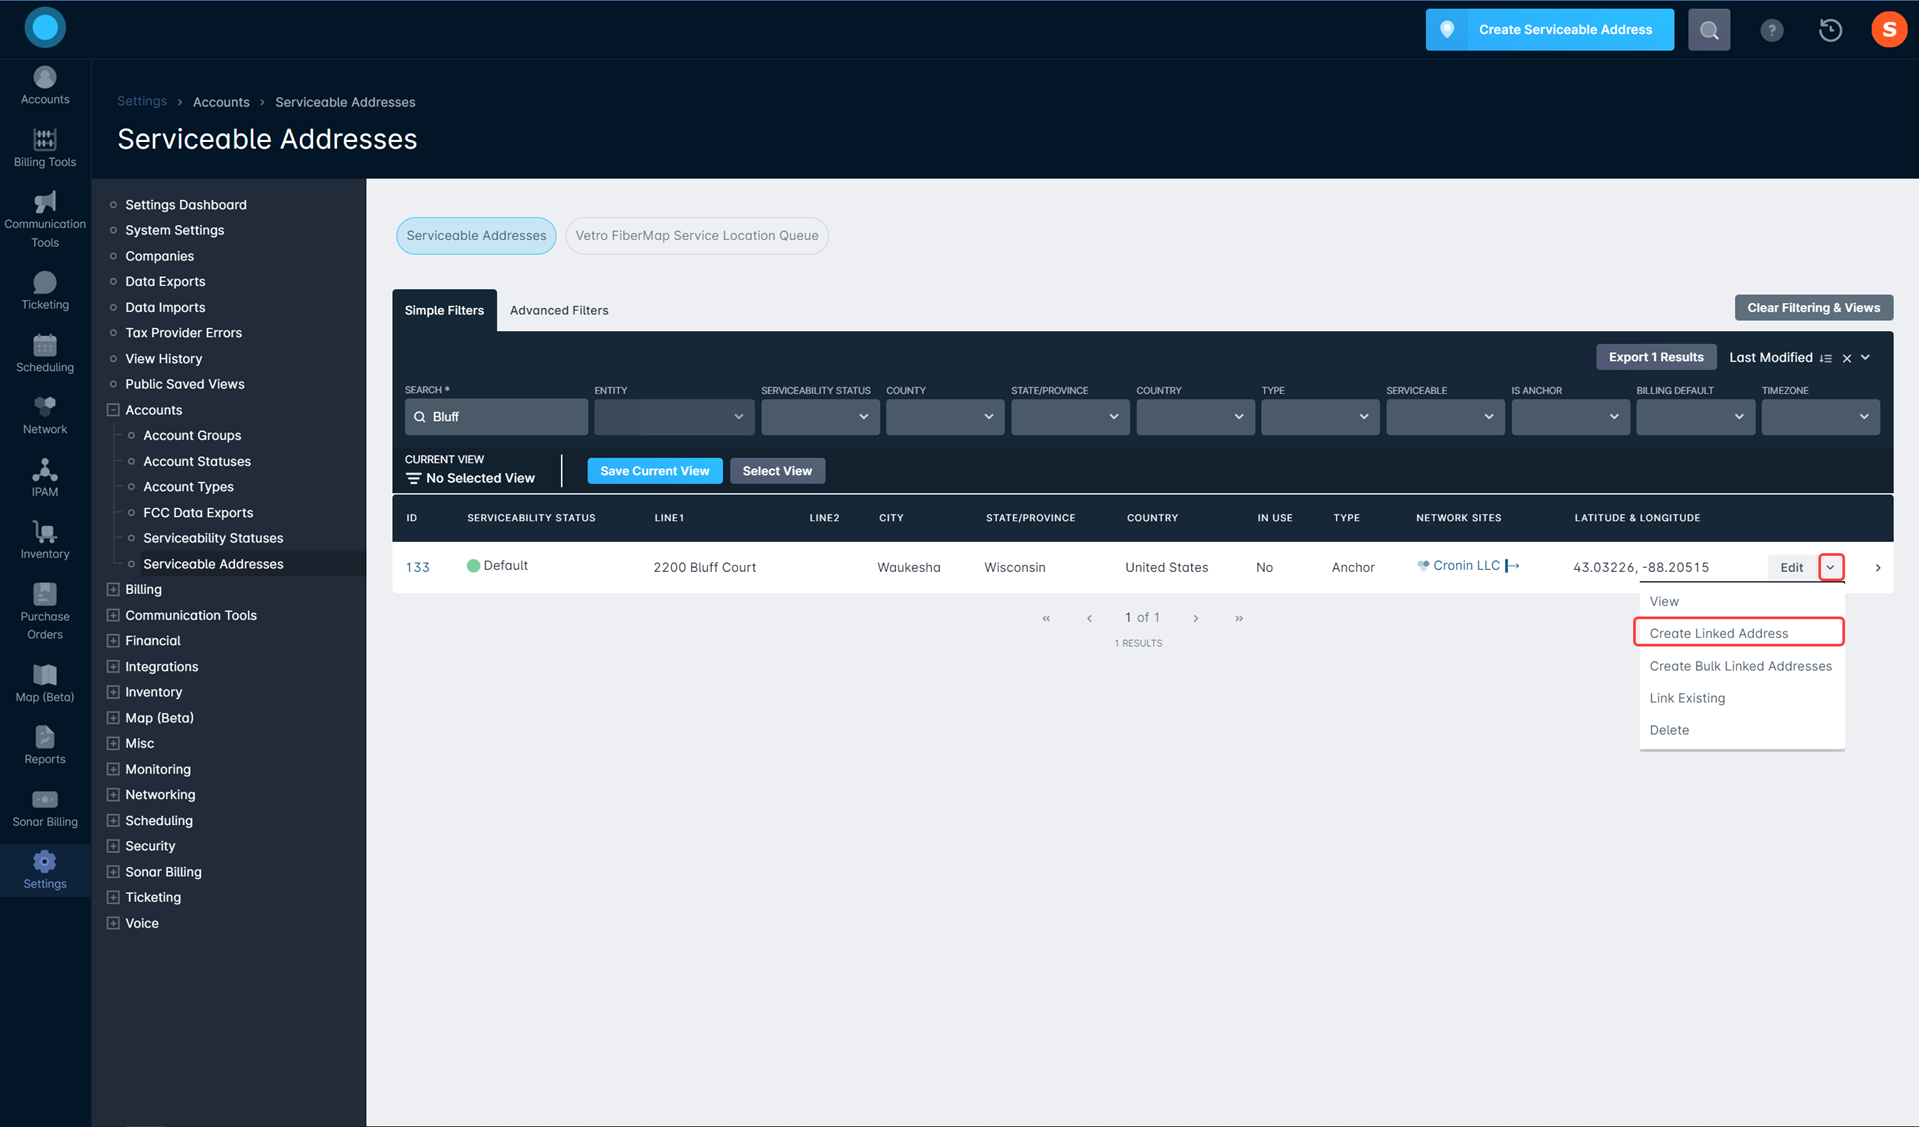
As homes are linked, accounts can be created for their residents, who can select from any of the Services that were made available.
Example 3: Serving a Multi-Unit Business Park
In this example, no Wholesale Billing policy will be enforced, as each business will have different needs, and there is no responsible party that would pay any subsidies delivered to the businesses. When creating the Anchor address for this use case, you can pick any of the units within the Business Park, or use the main street location as we have done below.
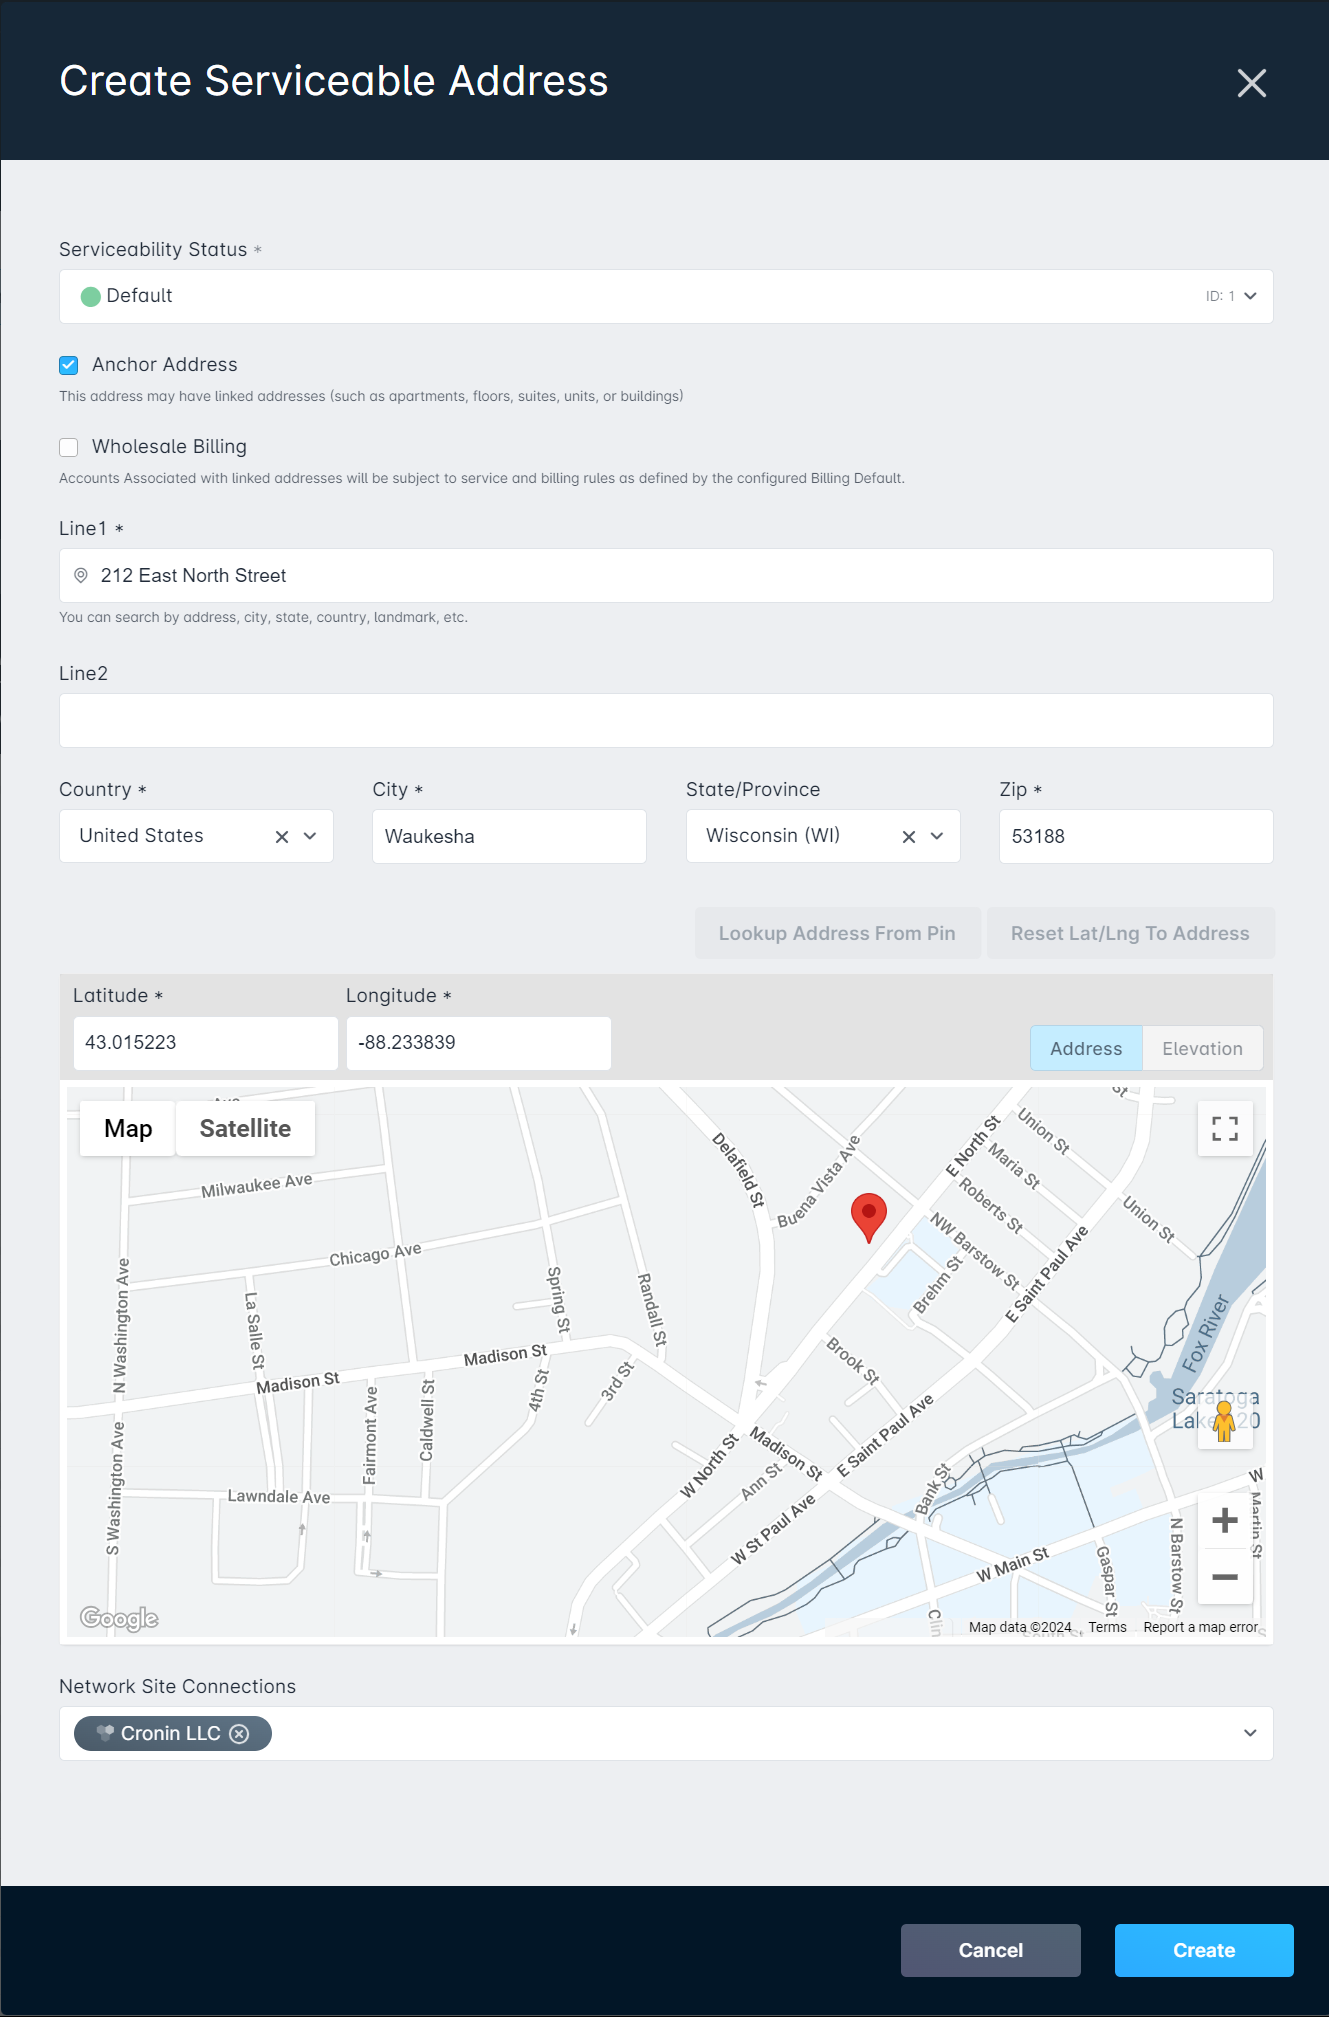
From there, simply create new Serviceable Addresses for each linked unit in the Business Park, and associate them with the Anchor address. As businesses move in, accounts would be created, and they would be able to select services based on their needs, with no requirements enforced by the Anchor address. Depending on the size of the business park, Linked addresses could also be added in bulk.
In this example, the Business Park only has even-numbered units. As a result, the Bulk Address creator will be used to add all those units, and the Linked Address Range field will contain "
2,4,6,8,10,12,14" adding all 7 accounts.