Table of Contents
MikroTik: Controlling Speeds
Read Time: 8 mins
Prerequisites
Before you can use Sonar to control speeds in a MikroTik, you need to build address lists and add the MikroTik as an inline device in Sonar. Once both of these prerequisites are met, follow the steps below to start controlling speeds based on services assigned in Sonar. For the purposes of this guide, we are going to set up rules for a "Silver" data service that is 10 Mbps download and 2 Mbps upload.
Creating Connection Marks
For each Address List in Sonar that we would like to control speeds, we will need to create a connection mark for the download, as well as one for the upload. This means, for example, if we have five address lists that we would like to control speeds, there should be 10 connection marks. In the examples below, we will build out both connection marks for the "Silver" address list.
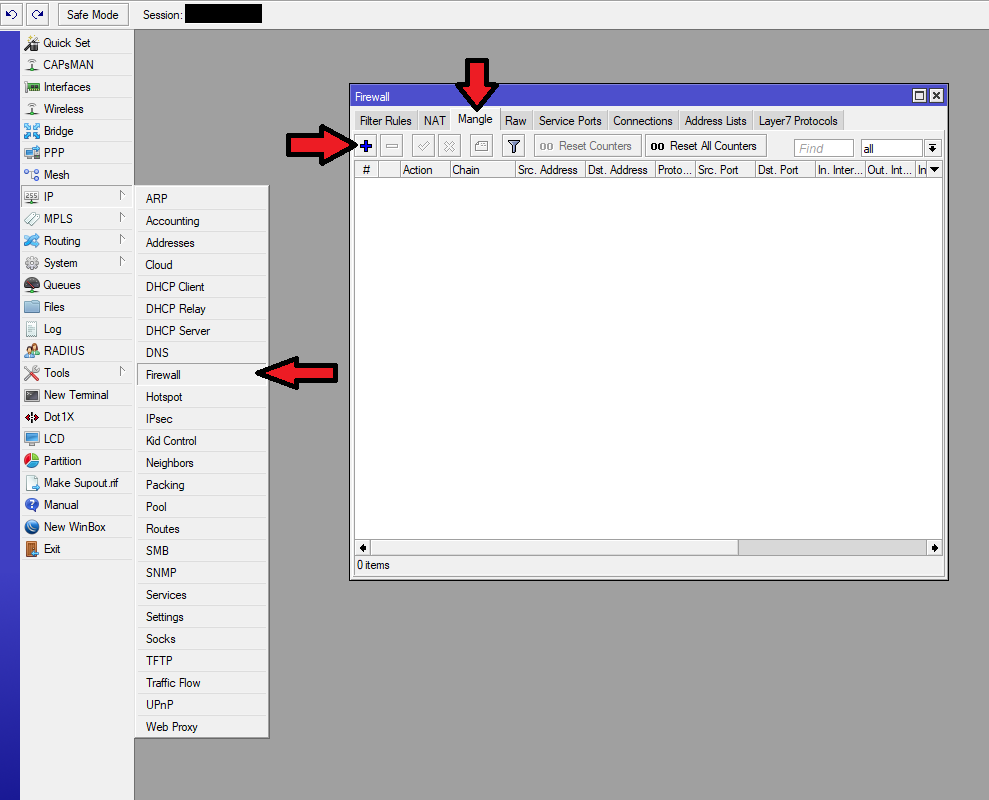
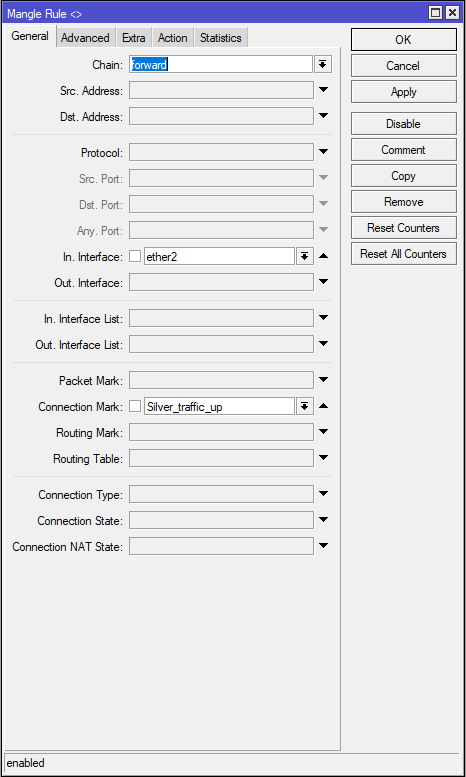
- Winbox into the MikroTik you would like to setup rules in and go to IP > Firewall > Mangle, then hit the blue "+" button to create a new mangle rule.
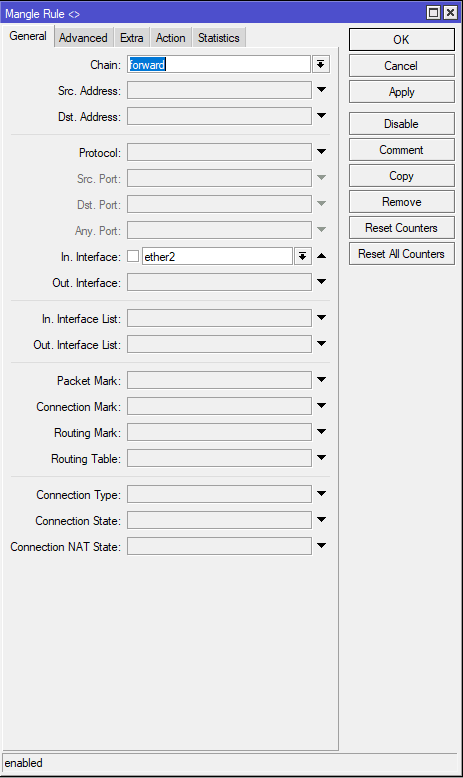
- In the General tab, set the chain to forward and the Out. Interface to whichever interface is customer-facing. If you have more than one physical interface that faces customer devices, common practice would be to set this up as a bridge and use the bridge as the Out. Interface.

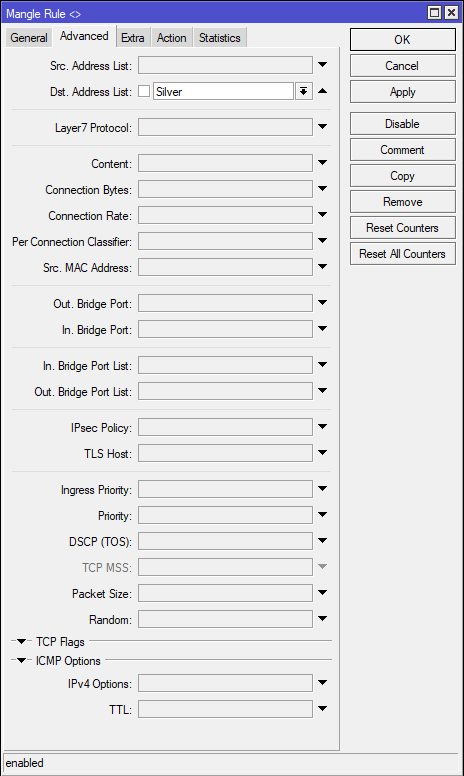
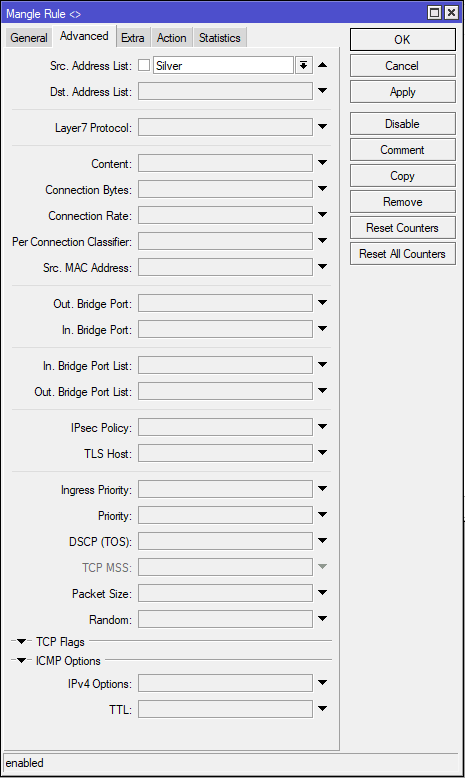
- In the Advanced tab, set the Dst. Address List to "Silver". This option should already be in the drop-down from synchronizing your inline device, but keep in mind that if no IP addresses are already a member of this address list, you may need to manually type in this name. Just make sure that it perfectly matches the name you setup in the Address Lists configuration in Sonar.
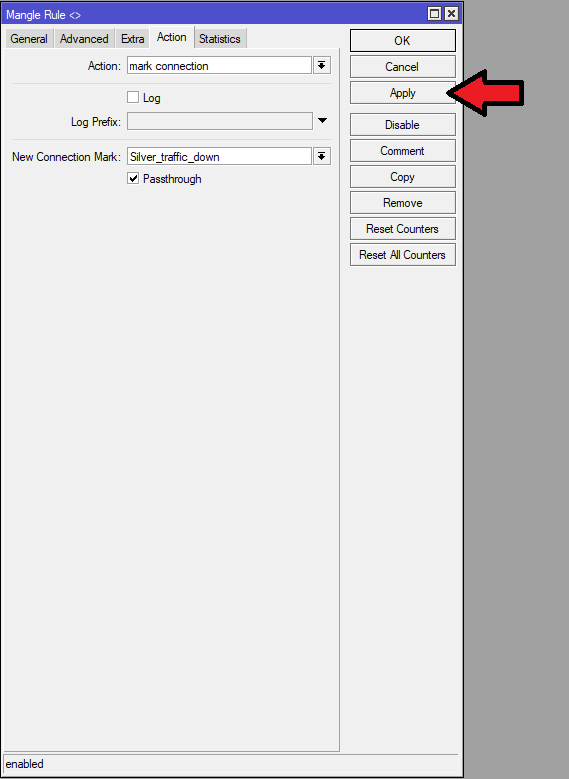
- In the Action tab, set the Action to "mark connection". Set the New Connection Mark to "Silver_traffic_down". Make sure the Passthrough checkbox is checked. Once this is completed, click Apply.
- Hit the blue "+" button to create a new mangle rule. In the General tab, set the chain to forward and this time, set the In. Interface to whichever interface is customer-facing.
- In the Advanced tab, set the Src. Address List to "Silver".
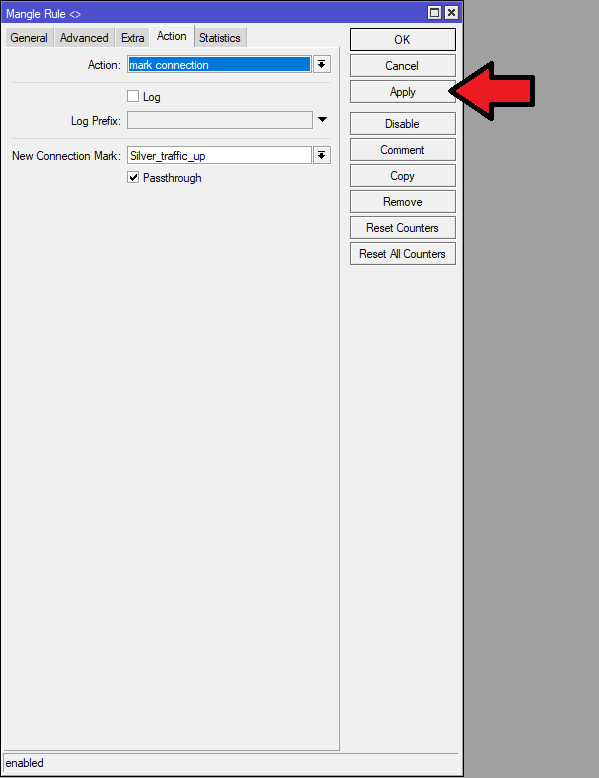
- In the Action tab, set the Action to "mark connection". Set the New Connection Mark to "Silver_traffic_up". Make sure the Passthrough checkbox is checked. Once this is completed, click Apply.
Once you have one pair of connection mark rules built, you can just Copy each rule and modify the Dst. or Src. Address List you are selecting as well as the name of the New Connection Mark to build additional marks.
Creating Packet Marks
Similar to Connection Marks, for each Address List in Sonar that we would like to control speeds, we will need to create a packet mark for the download, as well as one for the upload. In the examples below, we will build out both packet marks for the "Silver" address list.
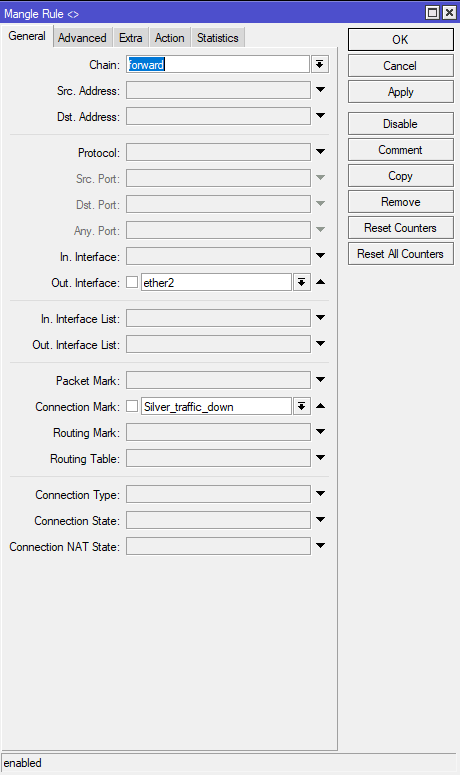
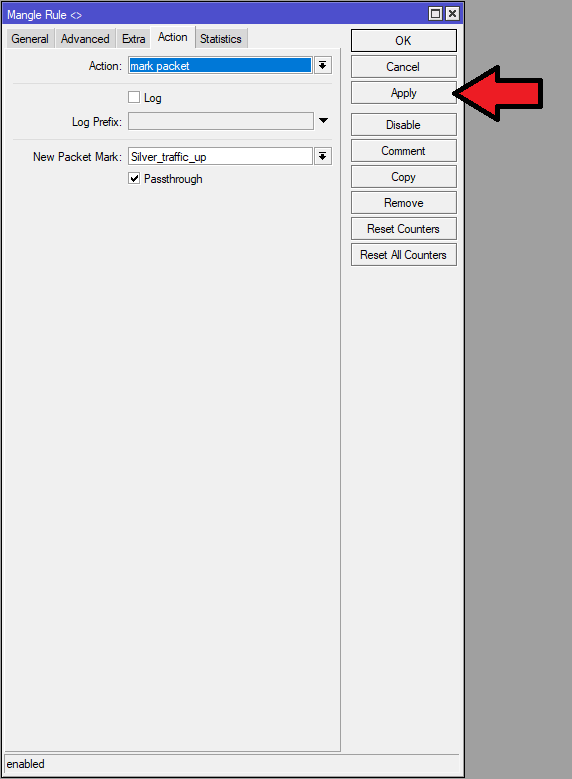
- Hit the blue "+" button to create a new mangle rule. In the General tab, set the chain to forward, set the Out. Interface to whichever interface is customer-facing, and set the Connection Mark to "Silver_traffic_down".
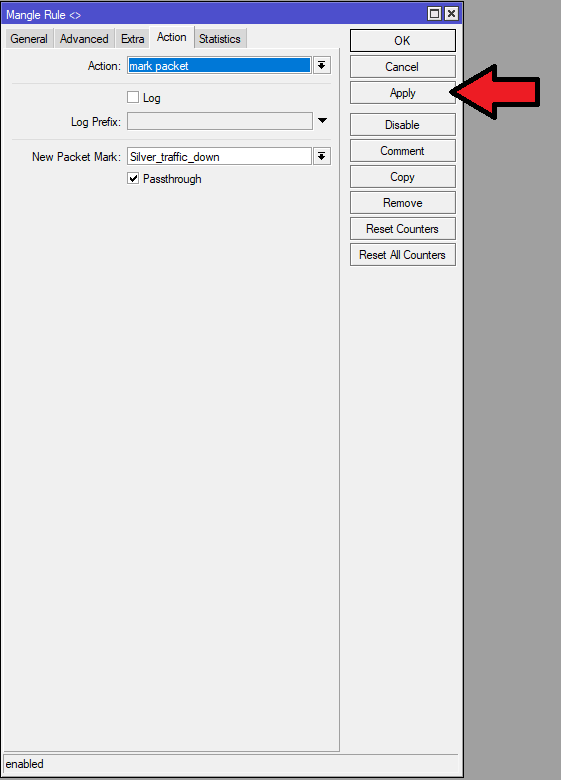
- In the Action tab, set the Action to "mark packet". Set the New Packet Mark to "Silver_traffic_down". Make sure the Passthrough check box is checked. Once this is completed, click Apply.
- Hit the blue "+" button to create a new mangle rule. In the General tab, set the chain to forward, set the In. Interface to whichever interface is customer-facing, and set the Connection Mark to "Silver_traffic_up".
- In the Action tab, set the Action to "mark packet". Set the New Packet Mark to "Silver_traffic_up". Make sure the Passthrough check box is checked. Once this is completed, click Apply.
Once you have one pair of packet mark rules built, you can just Copy each rule and modify the Connection Mark you are selecting under the General tab as well as the name of the New Packet Mark under the Action to create new marks.
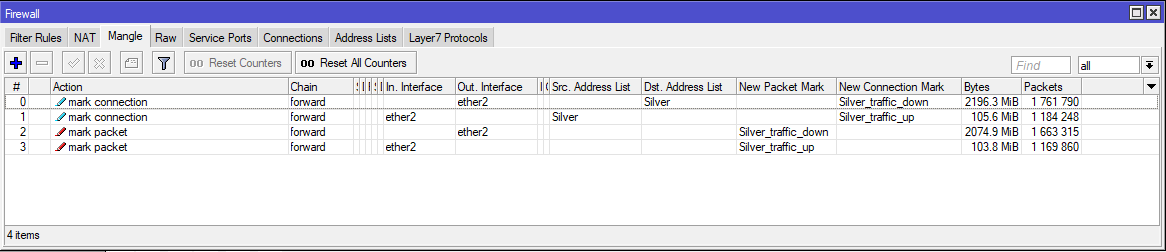
Once you have both connection marks and packet marks, if you have built these rules on a live network, you should see both the Bytes and Packets tables climbing for each mangle rule.
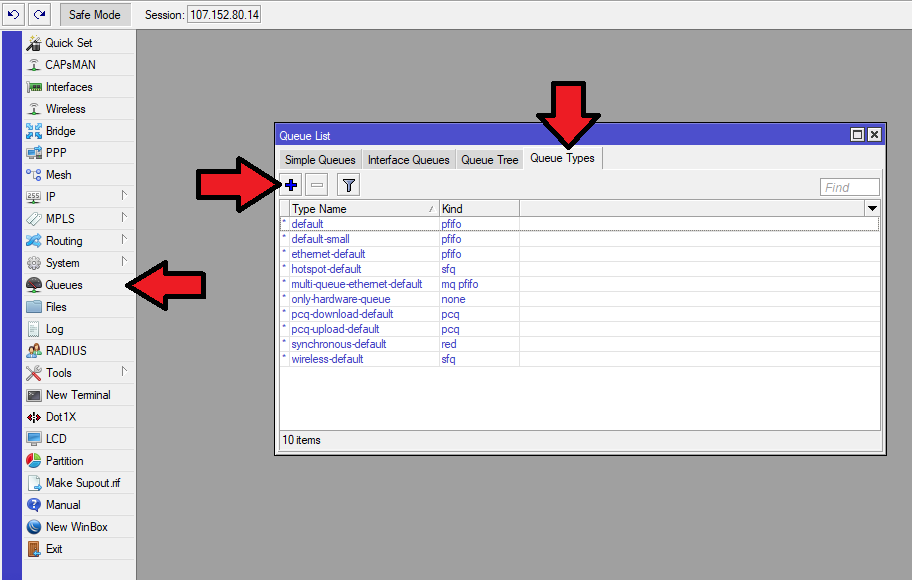
Creating PCQ in Queue Types
- Navigate to Queues > Queue Types, and click the blue "+" button.
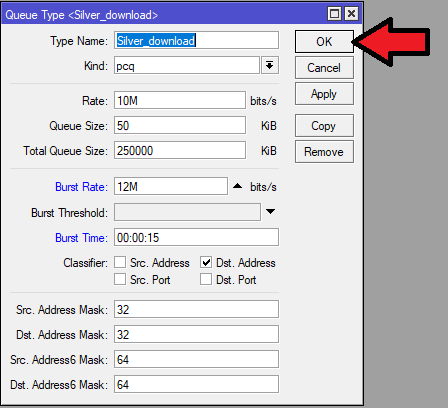
- Set the Type Name to "Silver_download", the Kind to "pcq" the Rate to 10M, the Queue Size to 50 and the Total Queue Size to 250000. You can also set the Burst Rate to 20% higher than the Rate limit (12M in this case) and the Burst Time to 00:00:15. This will allow speed tests to show a little above full speed but limit bulk downloads to the actual speed of the service. Lastly, set the Classifier to "Dst. Address" and hit OK.
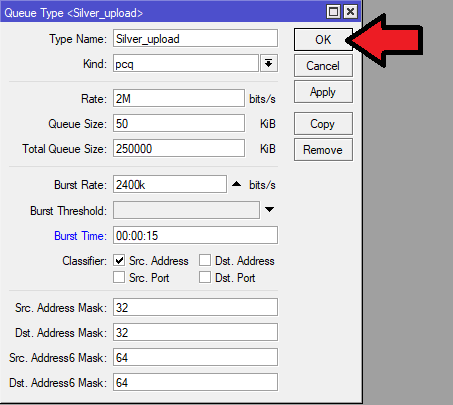
- Click the blue "+" button once again. Set the Type Name to "Silver_upload", the Kind to "pcq" the Rate to 2M, the Queue Size to 50 and the Total Queue Size to 250000. You can also set the Burst Rate to 20% higher than the Rate limit (2400k in this case) and the Burst Time to 00:00:15. This will allow speed tests to show a little above full speed but limit bulk uploads to the actual speed of the service. Lastly, set the Classifier to "Src. Address" and hit OK.
Once you have one pair of PCQ queues built, you can just Copy each queue and modify the Type Name as well as the Rate and Burst Rate to build additional queues.
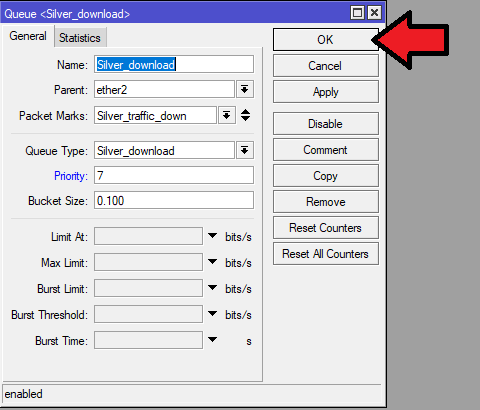
- Under the Queue Tree tab, hit the blue "+" button. Under the General tab, set the Name to "Silver_download". Set the Parent to the customer facing interface. Set the Packet Marks to "Silver_traffic_down" and set the Queue Type to "Silver_download". Set the Priority to 7 as this will allow for lower priority shaping queues in the future if need be. Hit OK.
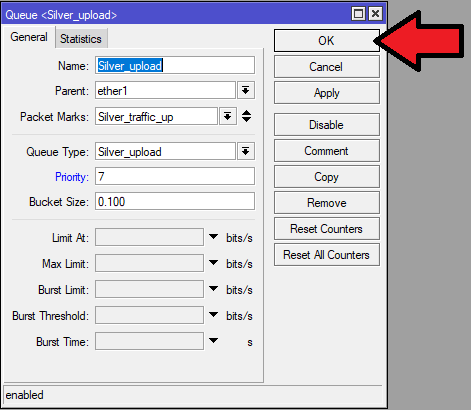
- Hit the blue "+" button once again. Under the General tab, set the Name to "Silver_upload". Set the Parent to the internet facing interface. Set the Packet Marks to "Silver_traffic_up" and set the Queue Type to "Silver_upload". Again, set the Priority to 7 and hit OK.
Once you have one pair of queues built, you can just Copy each rule and modify the Name, Packet Marks, and Queue Type to build additional queues.
Alternative Setup: Using the Mangle Queue Generator
While manually creating your PCQ and your Queue Trees does allow you to familiarize yourself with the process, requirements, and Winbox, Sonar has built a tool that allows you to simply enter your desired speeds then copy a created set of commands into the terminal of Winbox for your MikroTik device.
- Go to https://legacy.sonar.software/generate/mikrotik-mangle-queue from any browser in order to access the Mangle Queue Generator.
- Fill in the presented fields with the information taken from your network and MikroTik device:
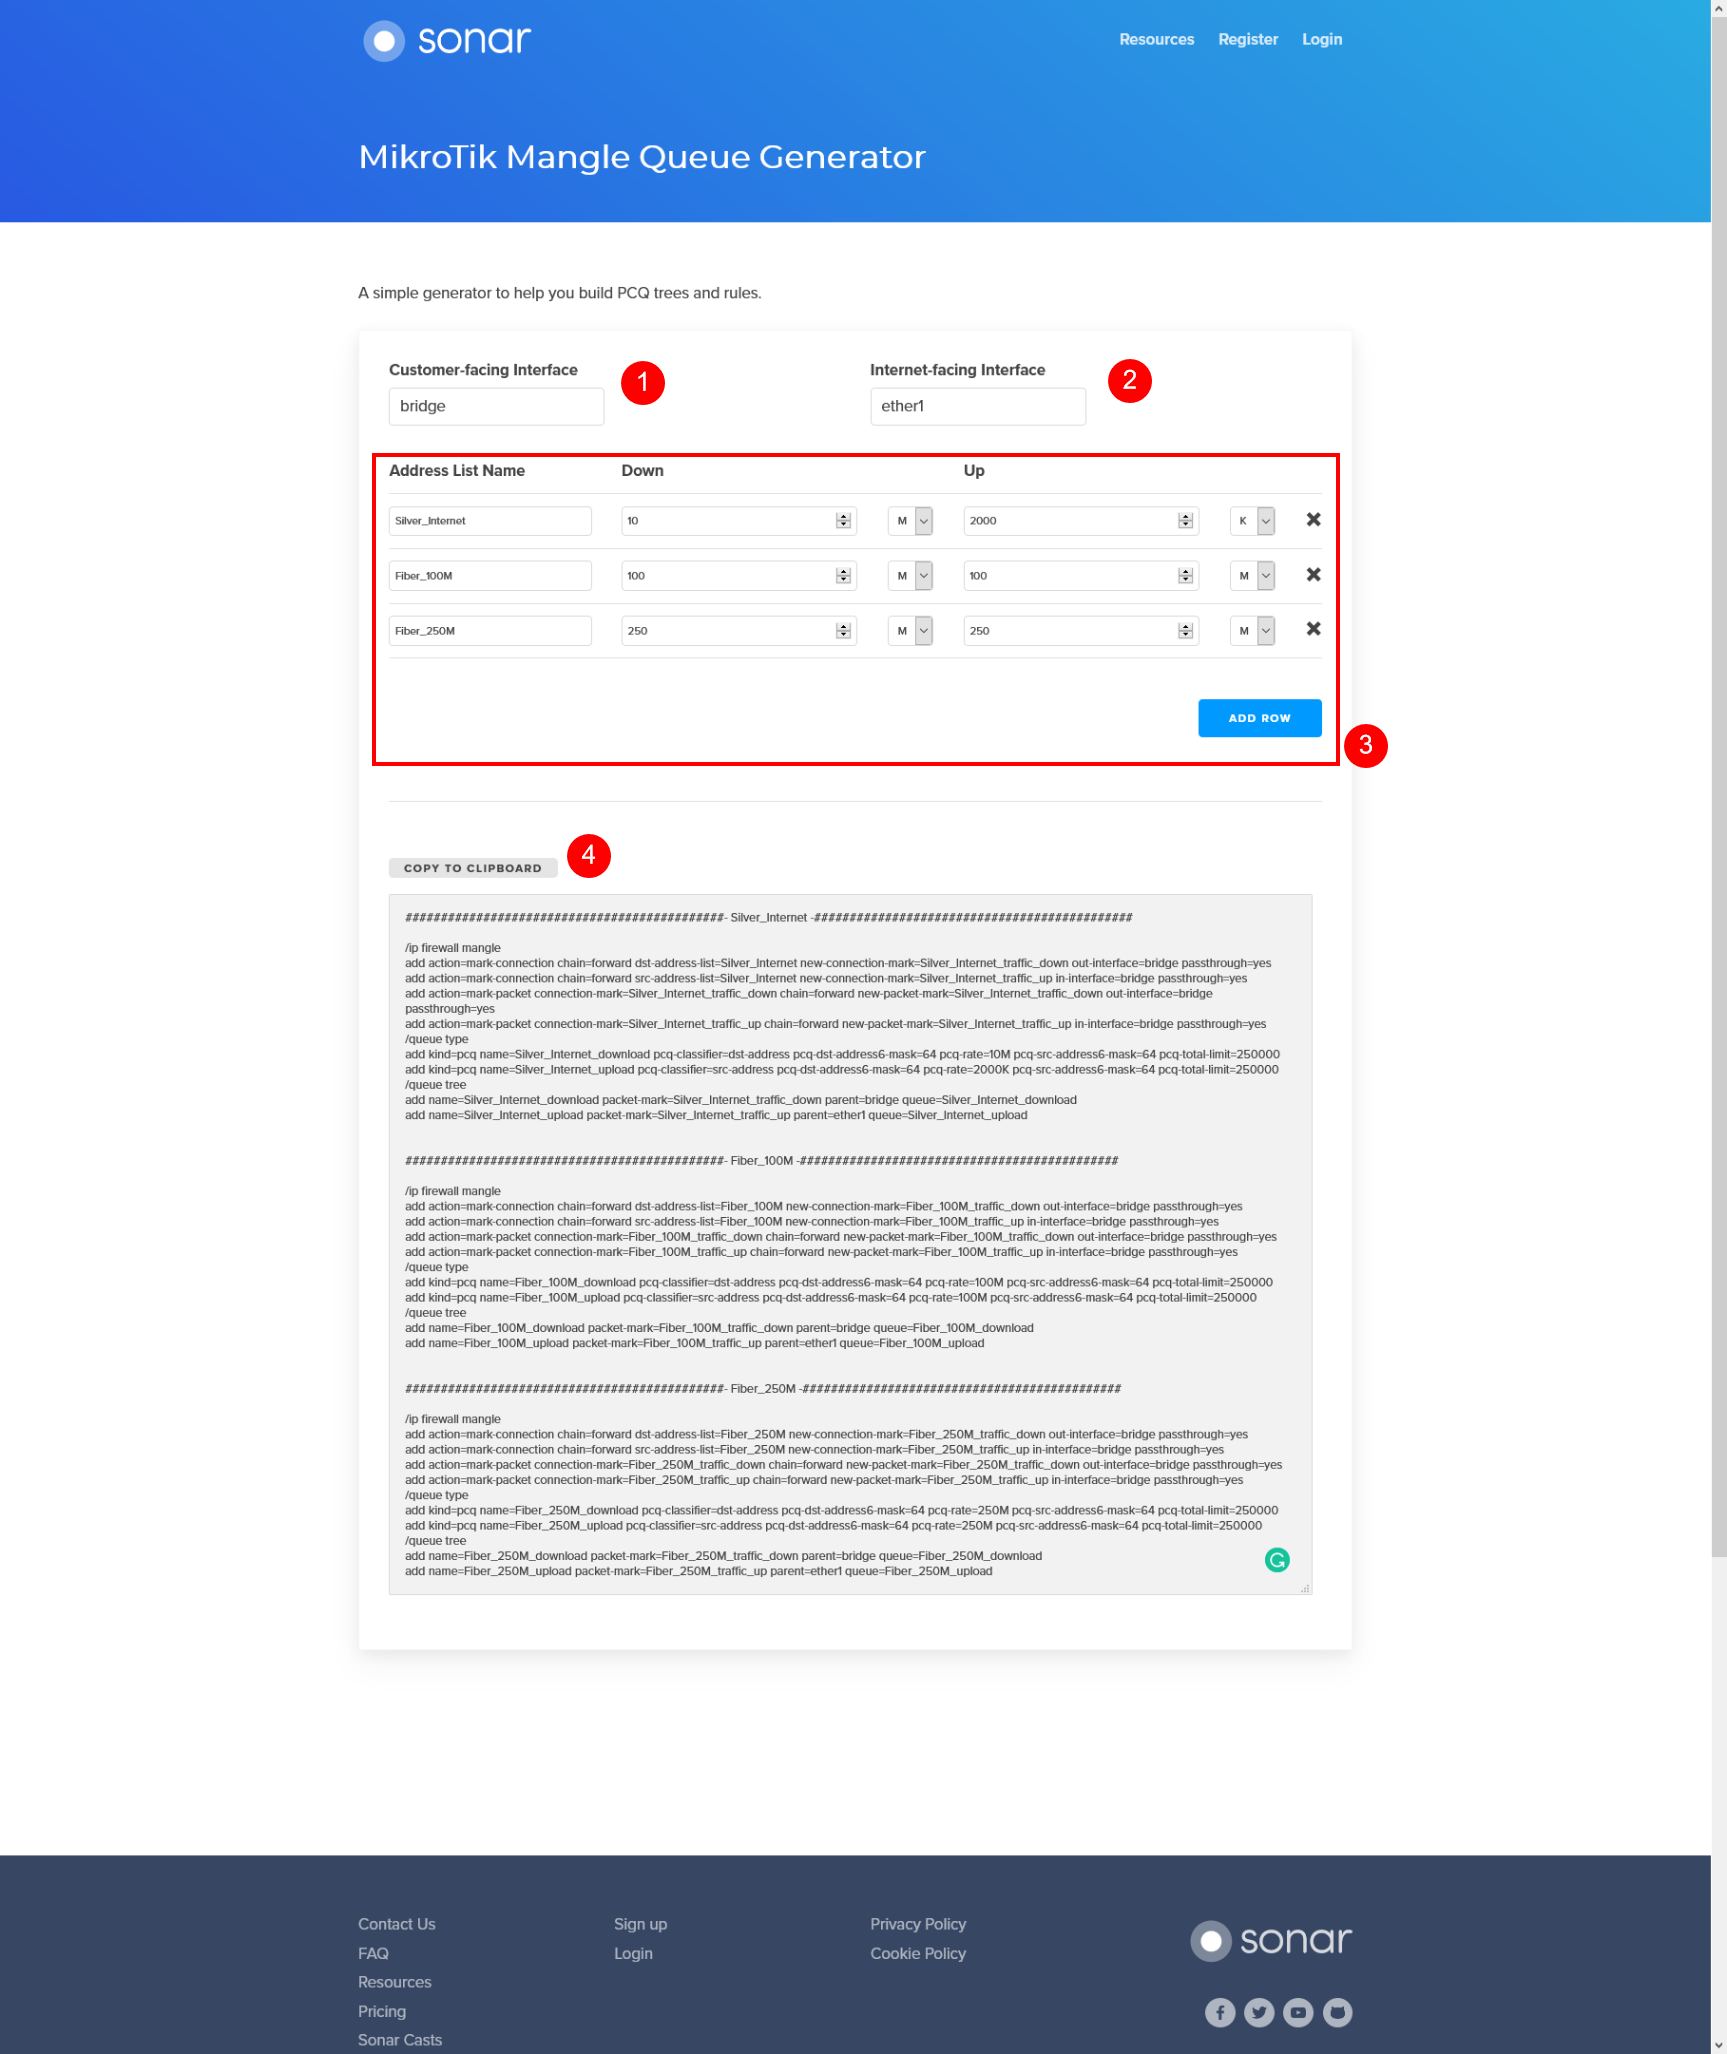
Mangle Queue Generator Field Breakdown
1. The Customer-Facing Interface is the actual physical interface the customers connect to on your device.
2. The Internet -Facing Interface is the physical interface on your MikroTik that connects to the internet.
3. The Address List section allows you to add multiple Address Lists, Packet Markers, and Queue Trees in a single Terminal session.
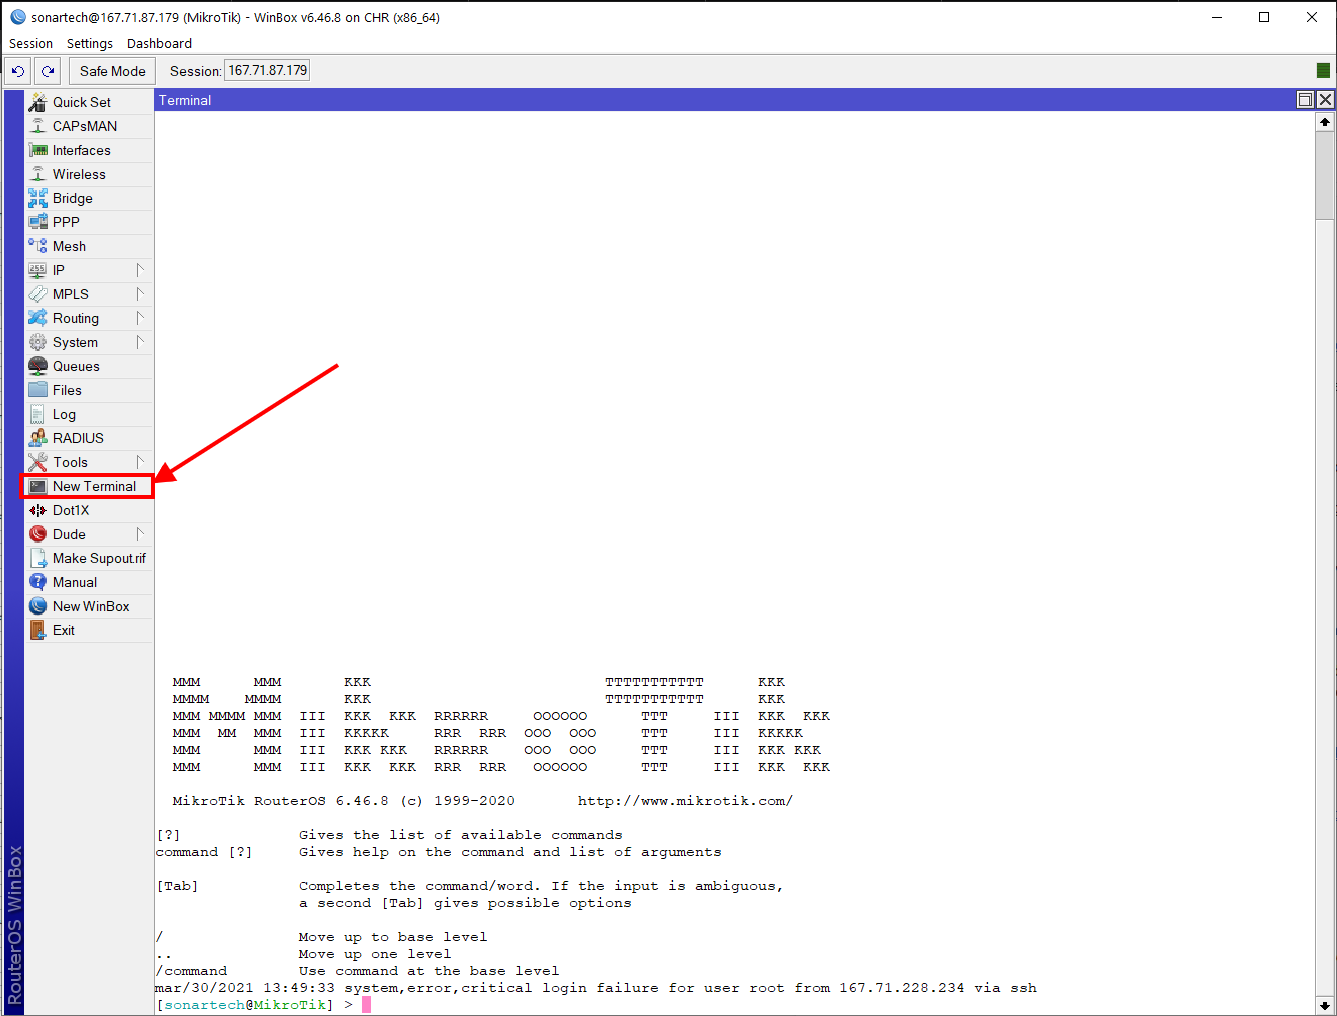
4. Once you've entered in the necessary interfaces and Address Lists, you can copy the entire command list and paste it into the Terminal - Open Winbox and connect to your MikroTik, then open the Terminal:
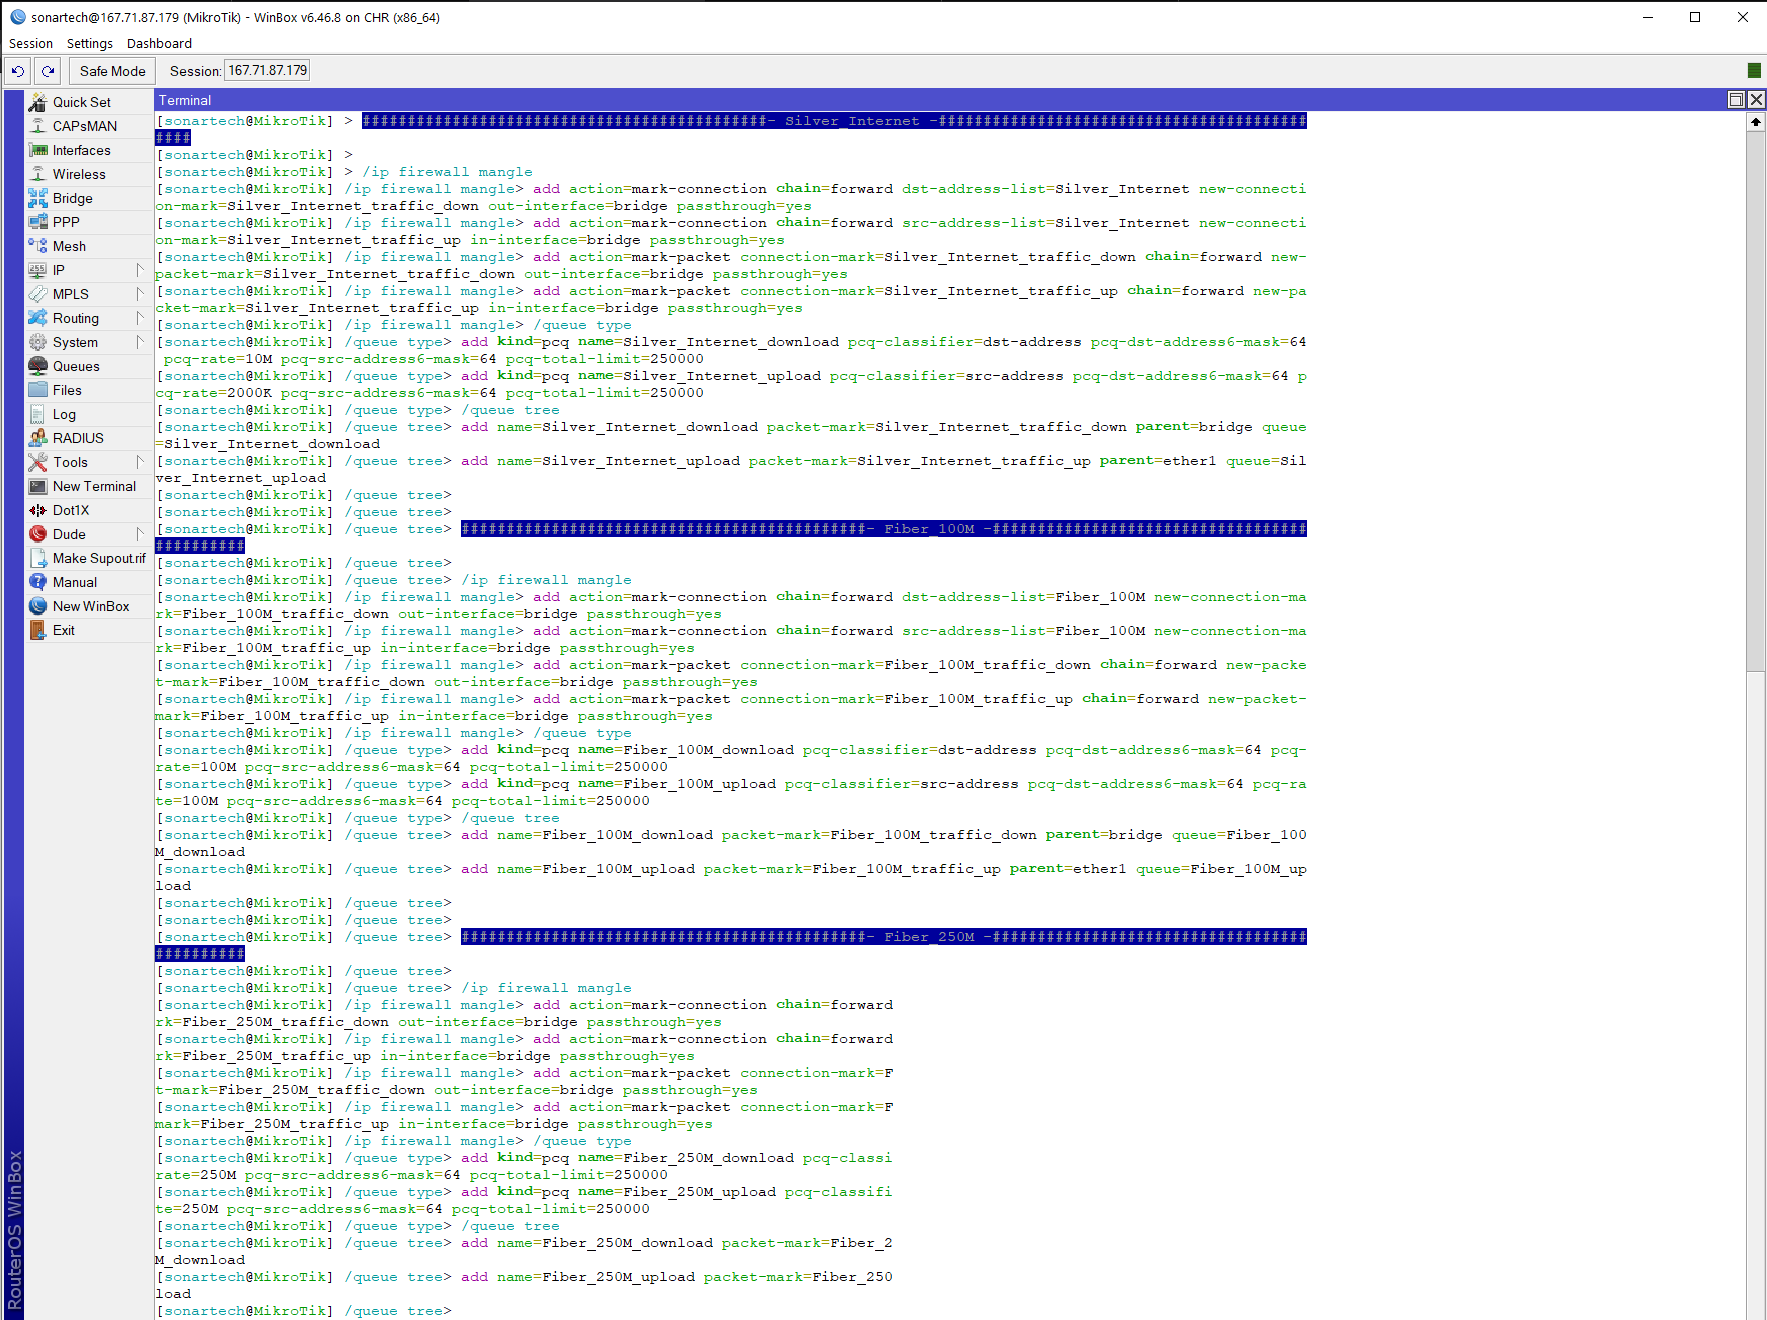
- Paste the results from the generated Mangle Queue into the terminal:Pasting in Winbox can only be done by right-clicking and selecting "Paste" from the context menu.
- This will generate the Queue Tree, which you can review by going to Queues, and selecting the Queue Tree tab
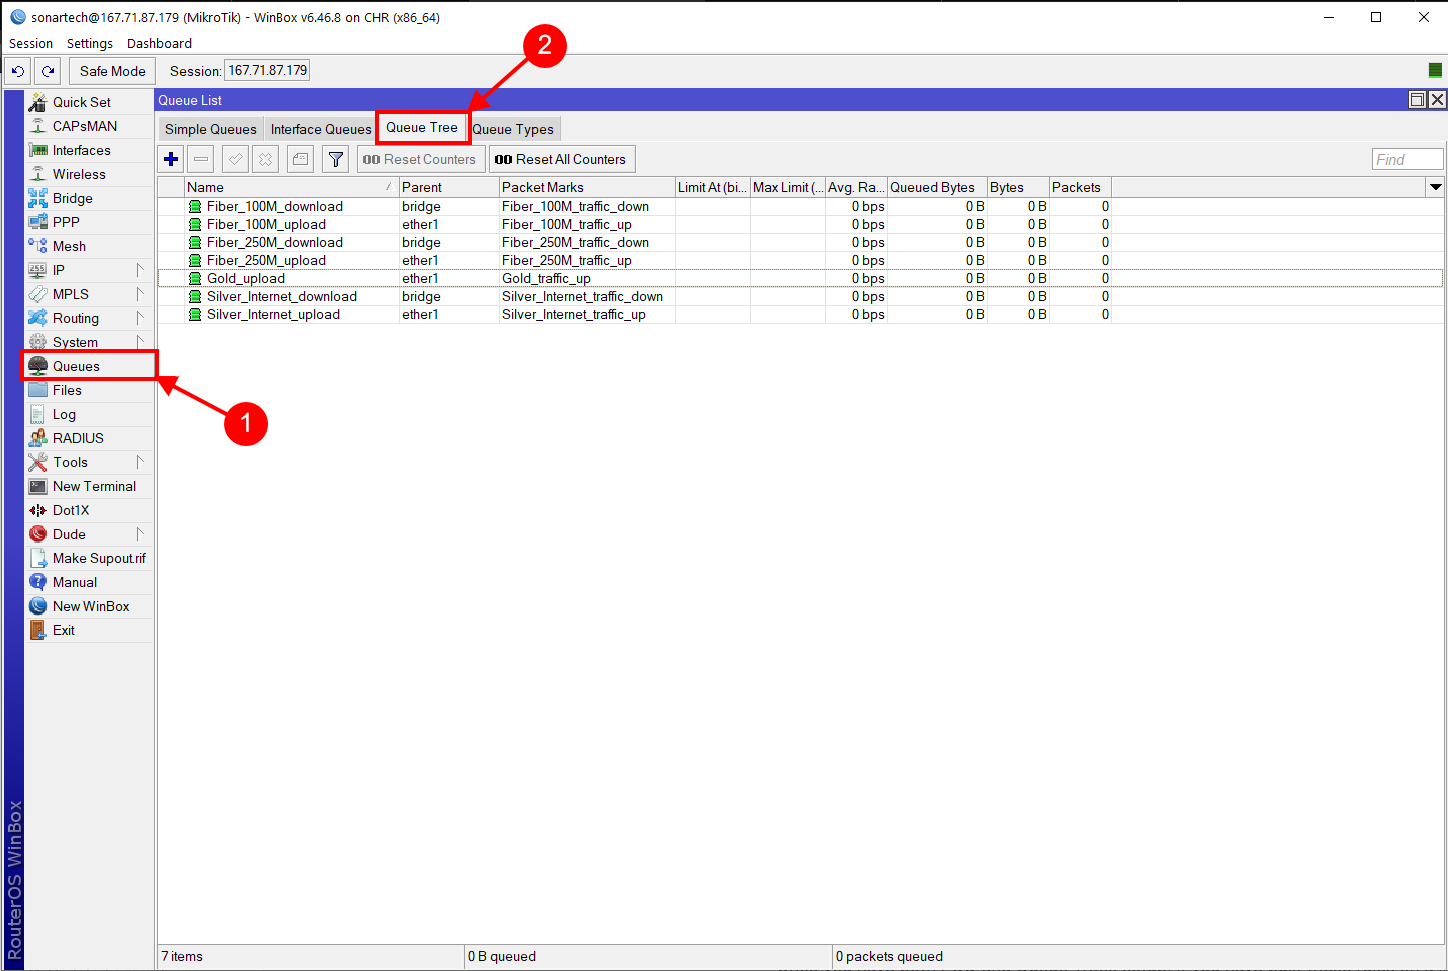
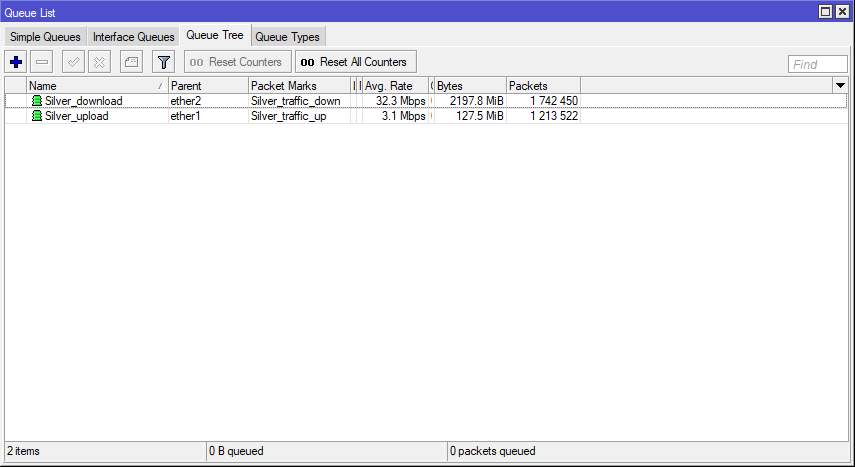
Once you have both PCQ and Queue Trees setup, if you have built these rules on a live network, you should see both the Bytes and Packets tables climbing for each queue tree, as seen in the example below:
If you do not see bytes and packets climbing in a live network, please contact Sonar Support for troubleshooting. Otherwise, you can continue to MikroTik: Controlling Access.