Table of Contents
Controlling Customer Speeds with Sonar: General Overview
 Updated
by Mitchell Ivany
Updated
by Mitchell Ivany
Read Time: 7 mins
If you're providing your customers a data service in Sonar, you need some way of enforcing speed and access restrictions. In this article, a brief overview will be provided of the various mechanisms and features within Sonar that allow you to measure and control the speeds being delivered to your customers.
Inline Device(s)
An Inline device is a networking appliance that serves as a mid-point between your network providing equipment and customer premises equipment. Inline devices help to handle customer speeds through their robust customization options, and the devices Sonar supports are listed below.
MikroTik as an Inline Device
What this is
Using a MikroTik as your inline device is one of the ways you can manage speeds in Sonar. By combining data services on accounts, account groups, and account statuses with address lists, you can effectively control the speeds your customers are actively receiving.
The address lists created in Sonar are then forwarded through the MikroTik API into the MikroTik Firewall settings as address lists, and IP addresses are dynamically updated to the different address lists as these account parameters change in Sonar. Behavior for how to treat each IP address is configured within the MikroTik itself, typically in the form of Mangle Queues for the different data services and firewall filters or routing rules for various account statuses and delinquent accounts.
Set up in Sonar
This section will cover the basics of setting up a MikroTik integration in Sonar, along with configuring address lists for use with your inline device.
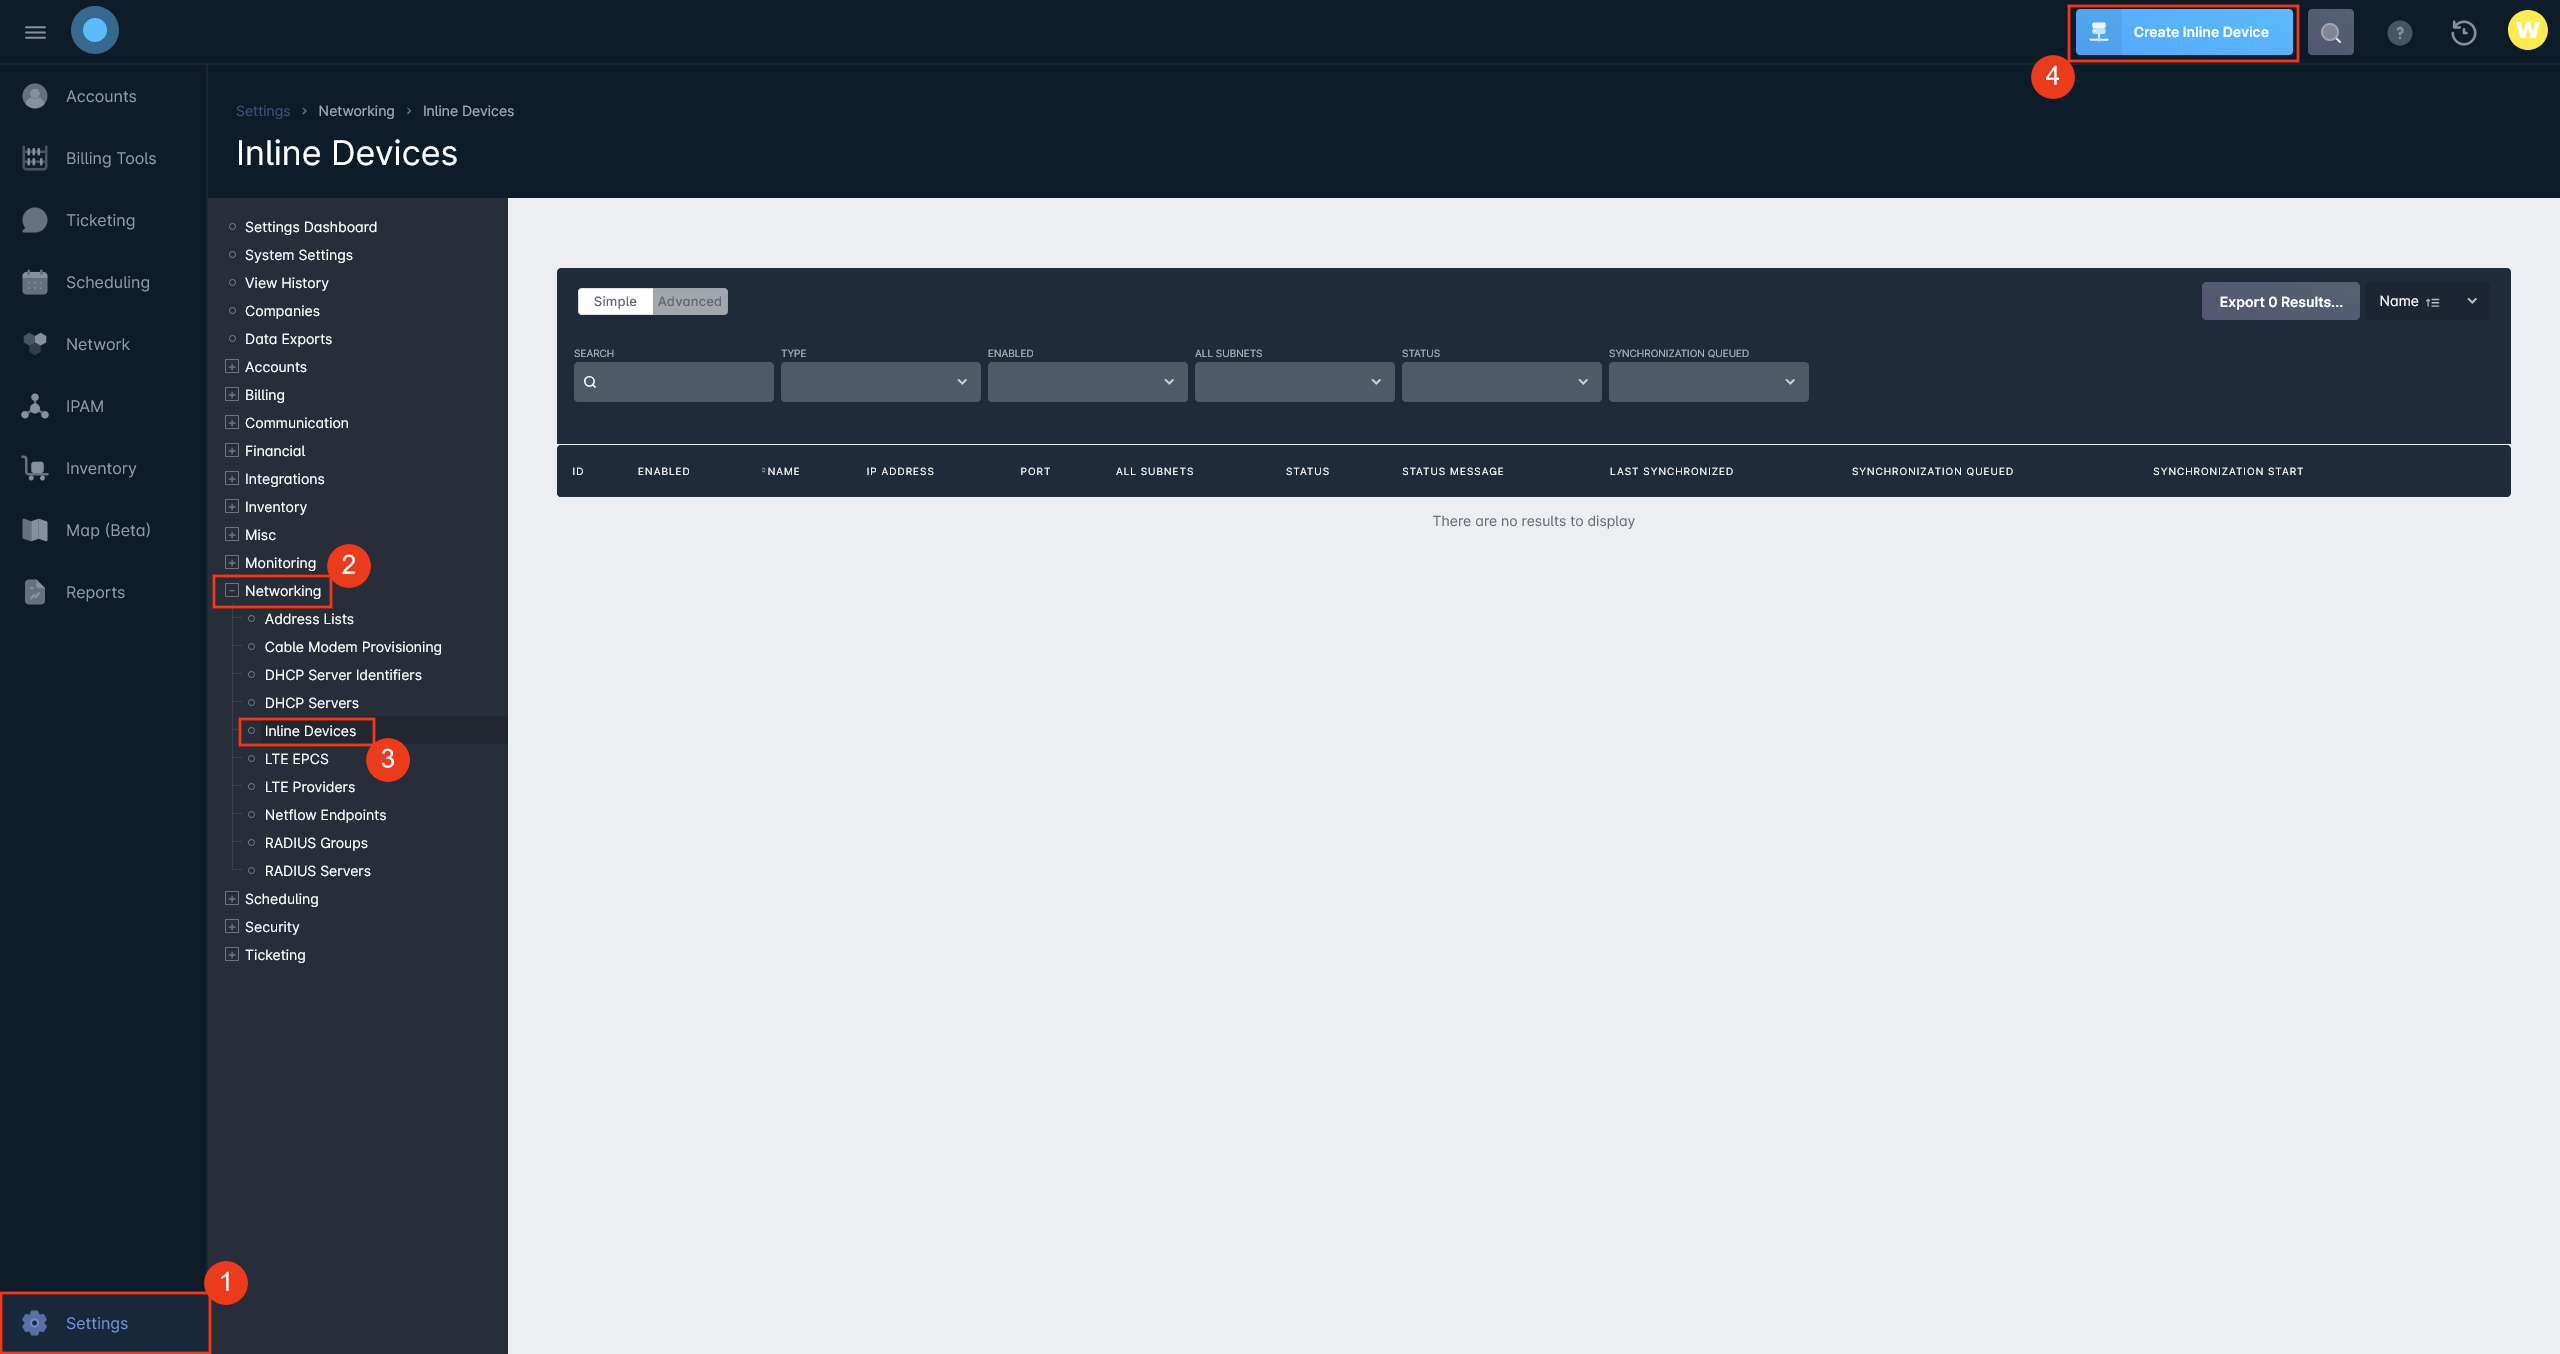
- Add your MikroTik as an inline device by going to Settings -> Networking -> Inline Devices -> Create Inline Device and fill in all required information:
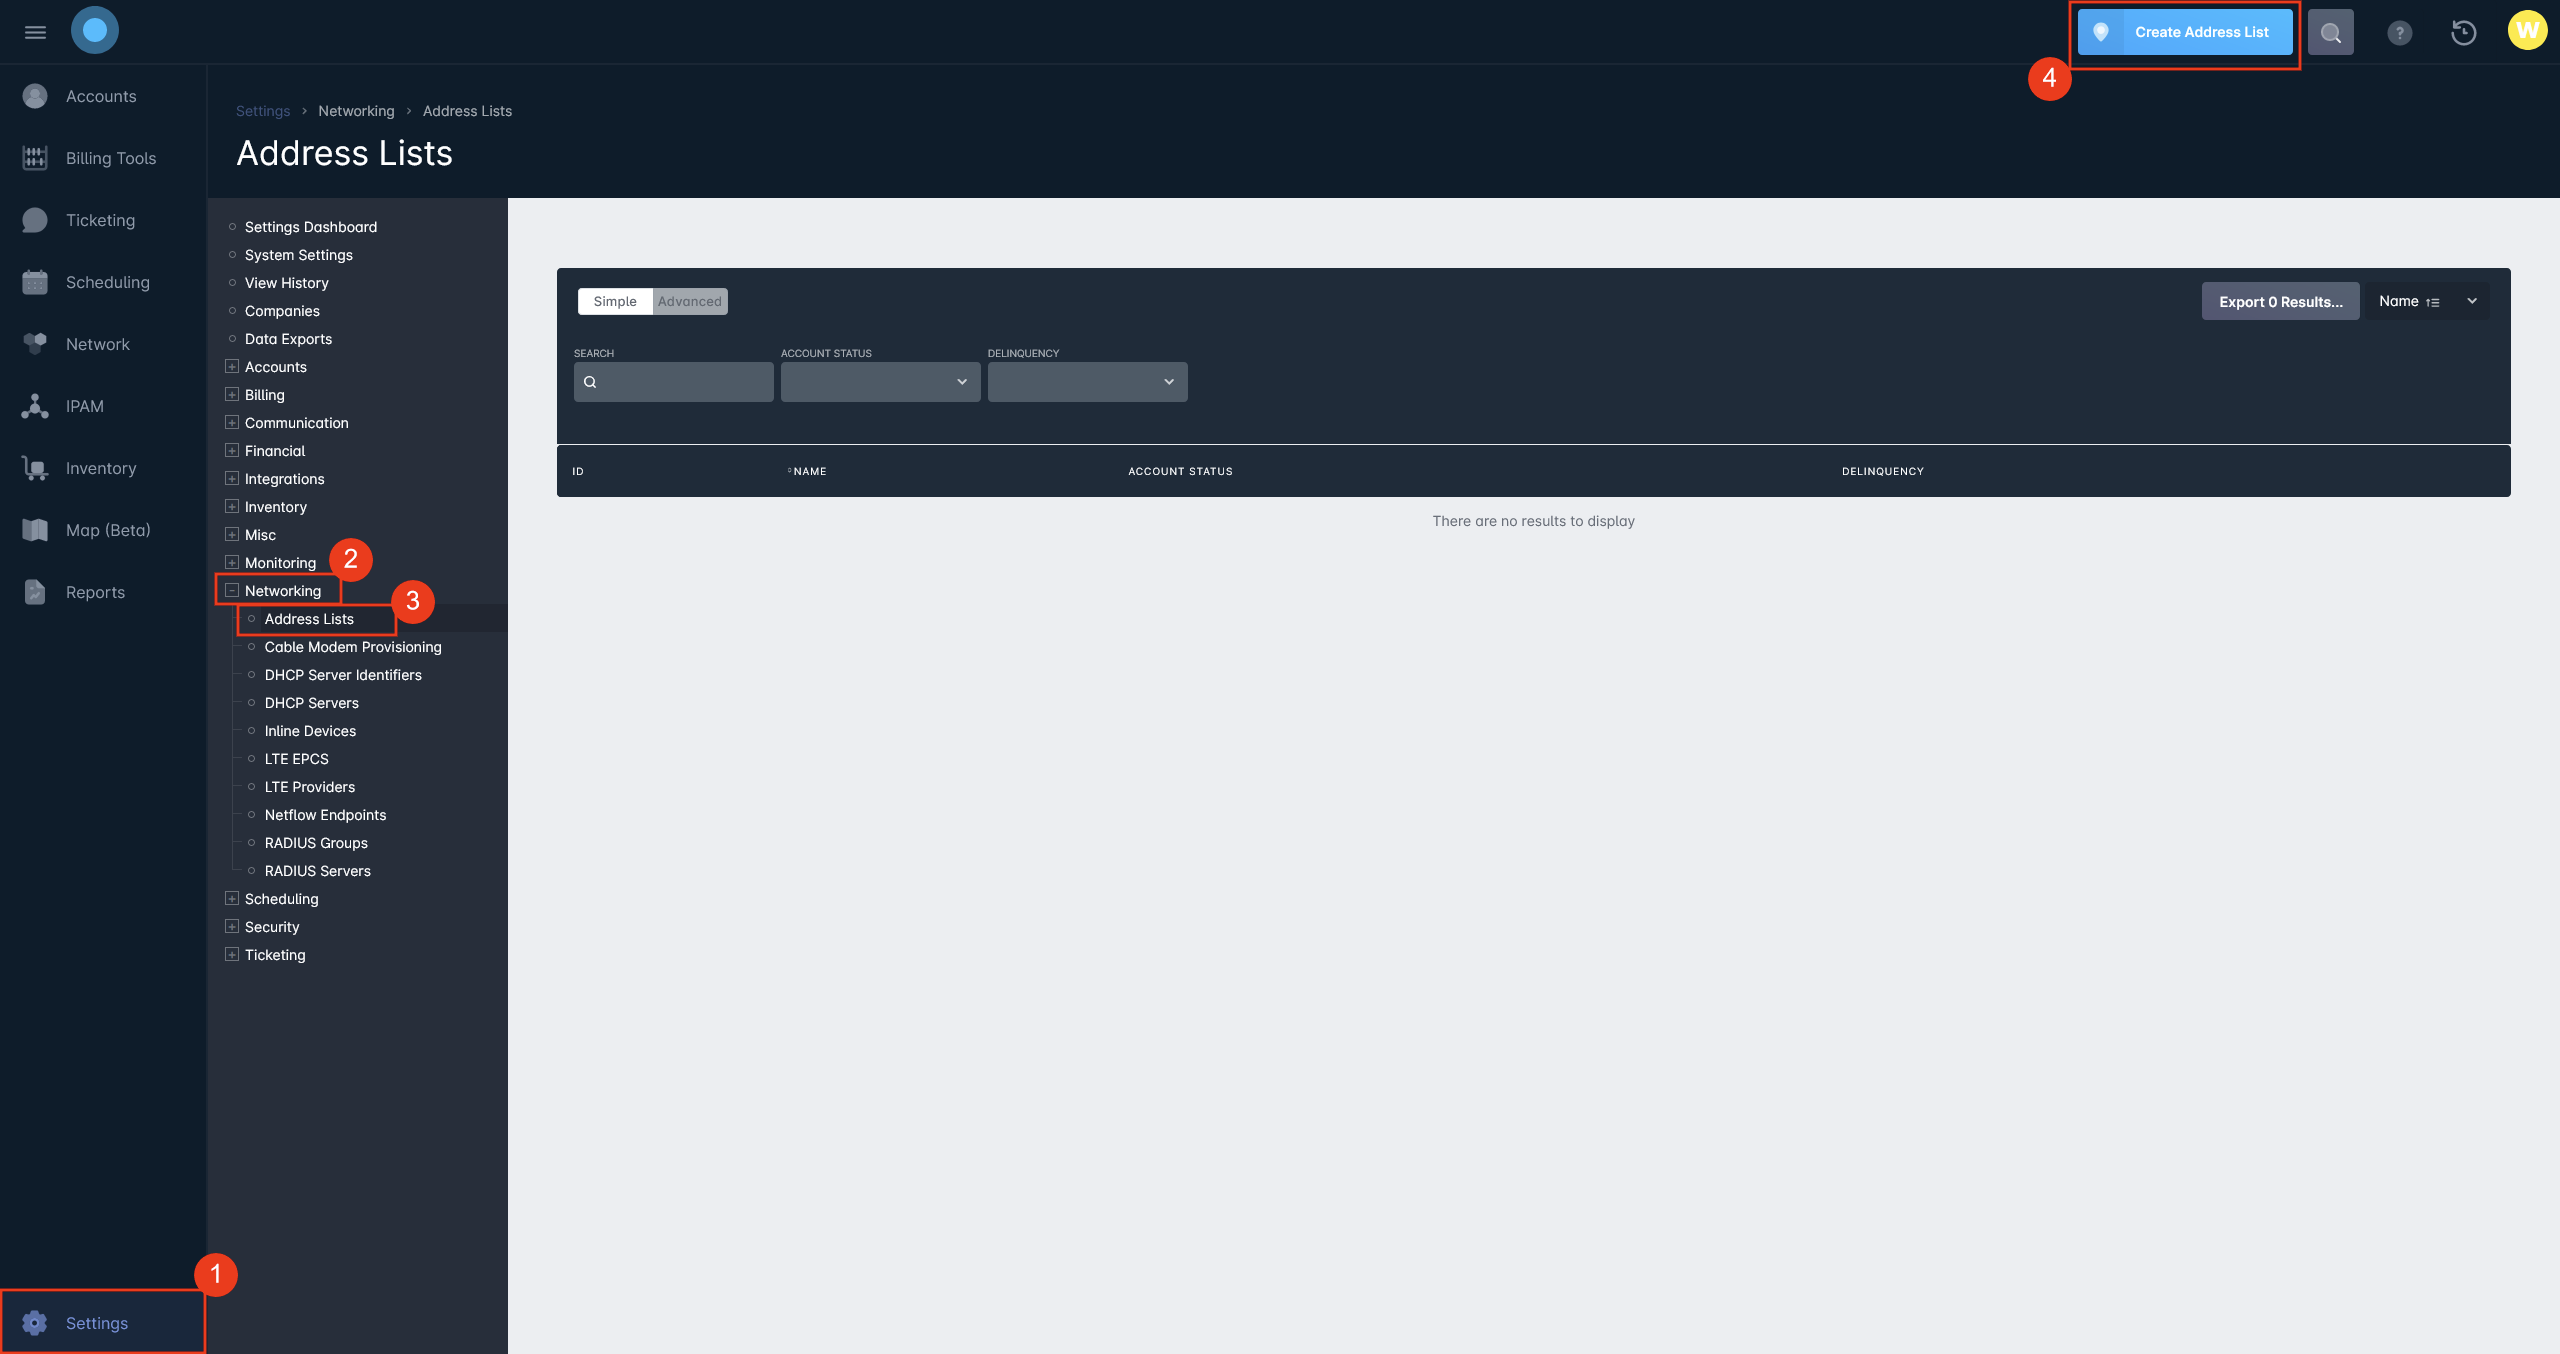
- Create address lists as required for your various account statuses, account groups, and invoice delinquency states by going to Settings -> Networking -> Address Lists -> Create Address List and fill in all required information:
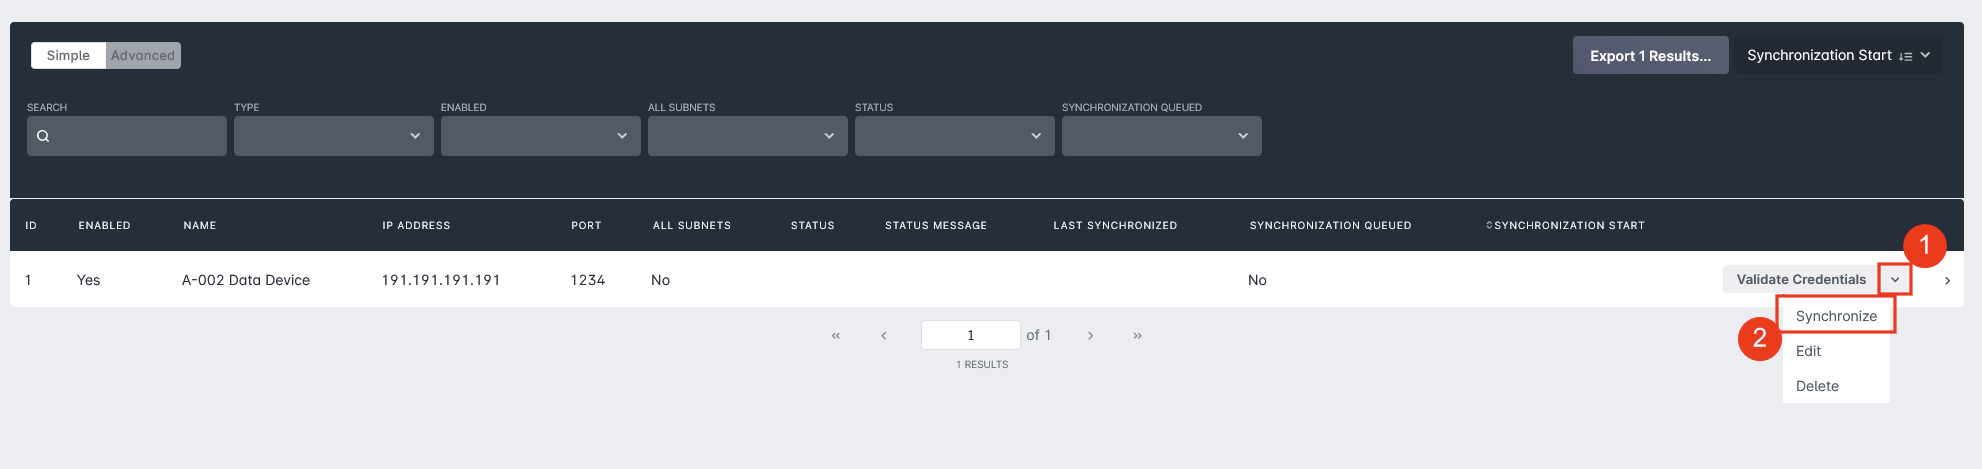
- Synchronize the address lists with the Mikrotik inline device you created:
- Within the MikroTik management interface - Winbox - create your Mangle Queues to control customer speeds:To make generating Mangle Queues easier, you can make use of the Mangle Queue Generator here.
Preseem
What this is
Implementing Preseem as an inline device in your Sonar instance allows the upload and download speeds of data services to be queried directly from the service details, then mapped to any account that has the data service applied to it. Preseem will perform the necessary setup actions for mapping the data services, and optionally, Preseem can apply a default rate when no service mapping is found; some companies will also implement a very low data rate, such as 28 kbps, for delinquent accounts.
Preseem can also be set up to apply a ratio globally to all data services, such as multiplying the data rates on all services by 1.1 so that speed tests will return results that are always just slightly above the advertised speeds.
Set up in Sonar
Configuring a Preseem device in Sonar is a multi-step process, parts of which require providing API credentials within the Preseem interface. If you need assistance with the Preseem integration, you may need to contact their support team in addition to Sonar support.
- Create a dedicated user in your Sonar instance so the Preseem appliance has the credentials to make queries to the instance.Information on specific permissions for the user role can be found here: Role Creation.
- Provide a Personal Access Token from this user to the Preseem team so they can finish the setup on their end.
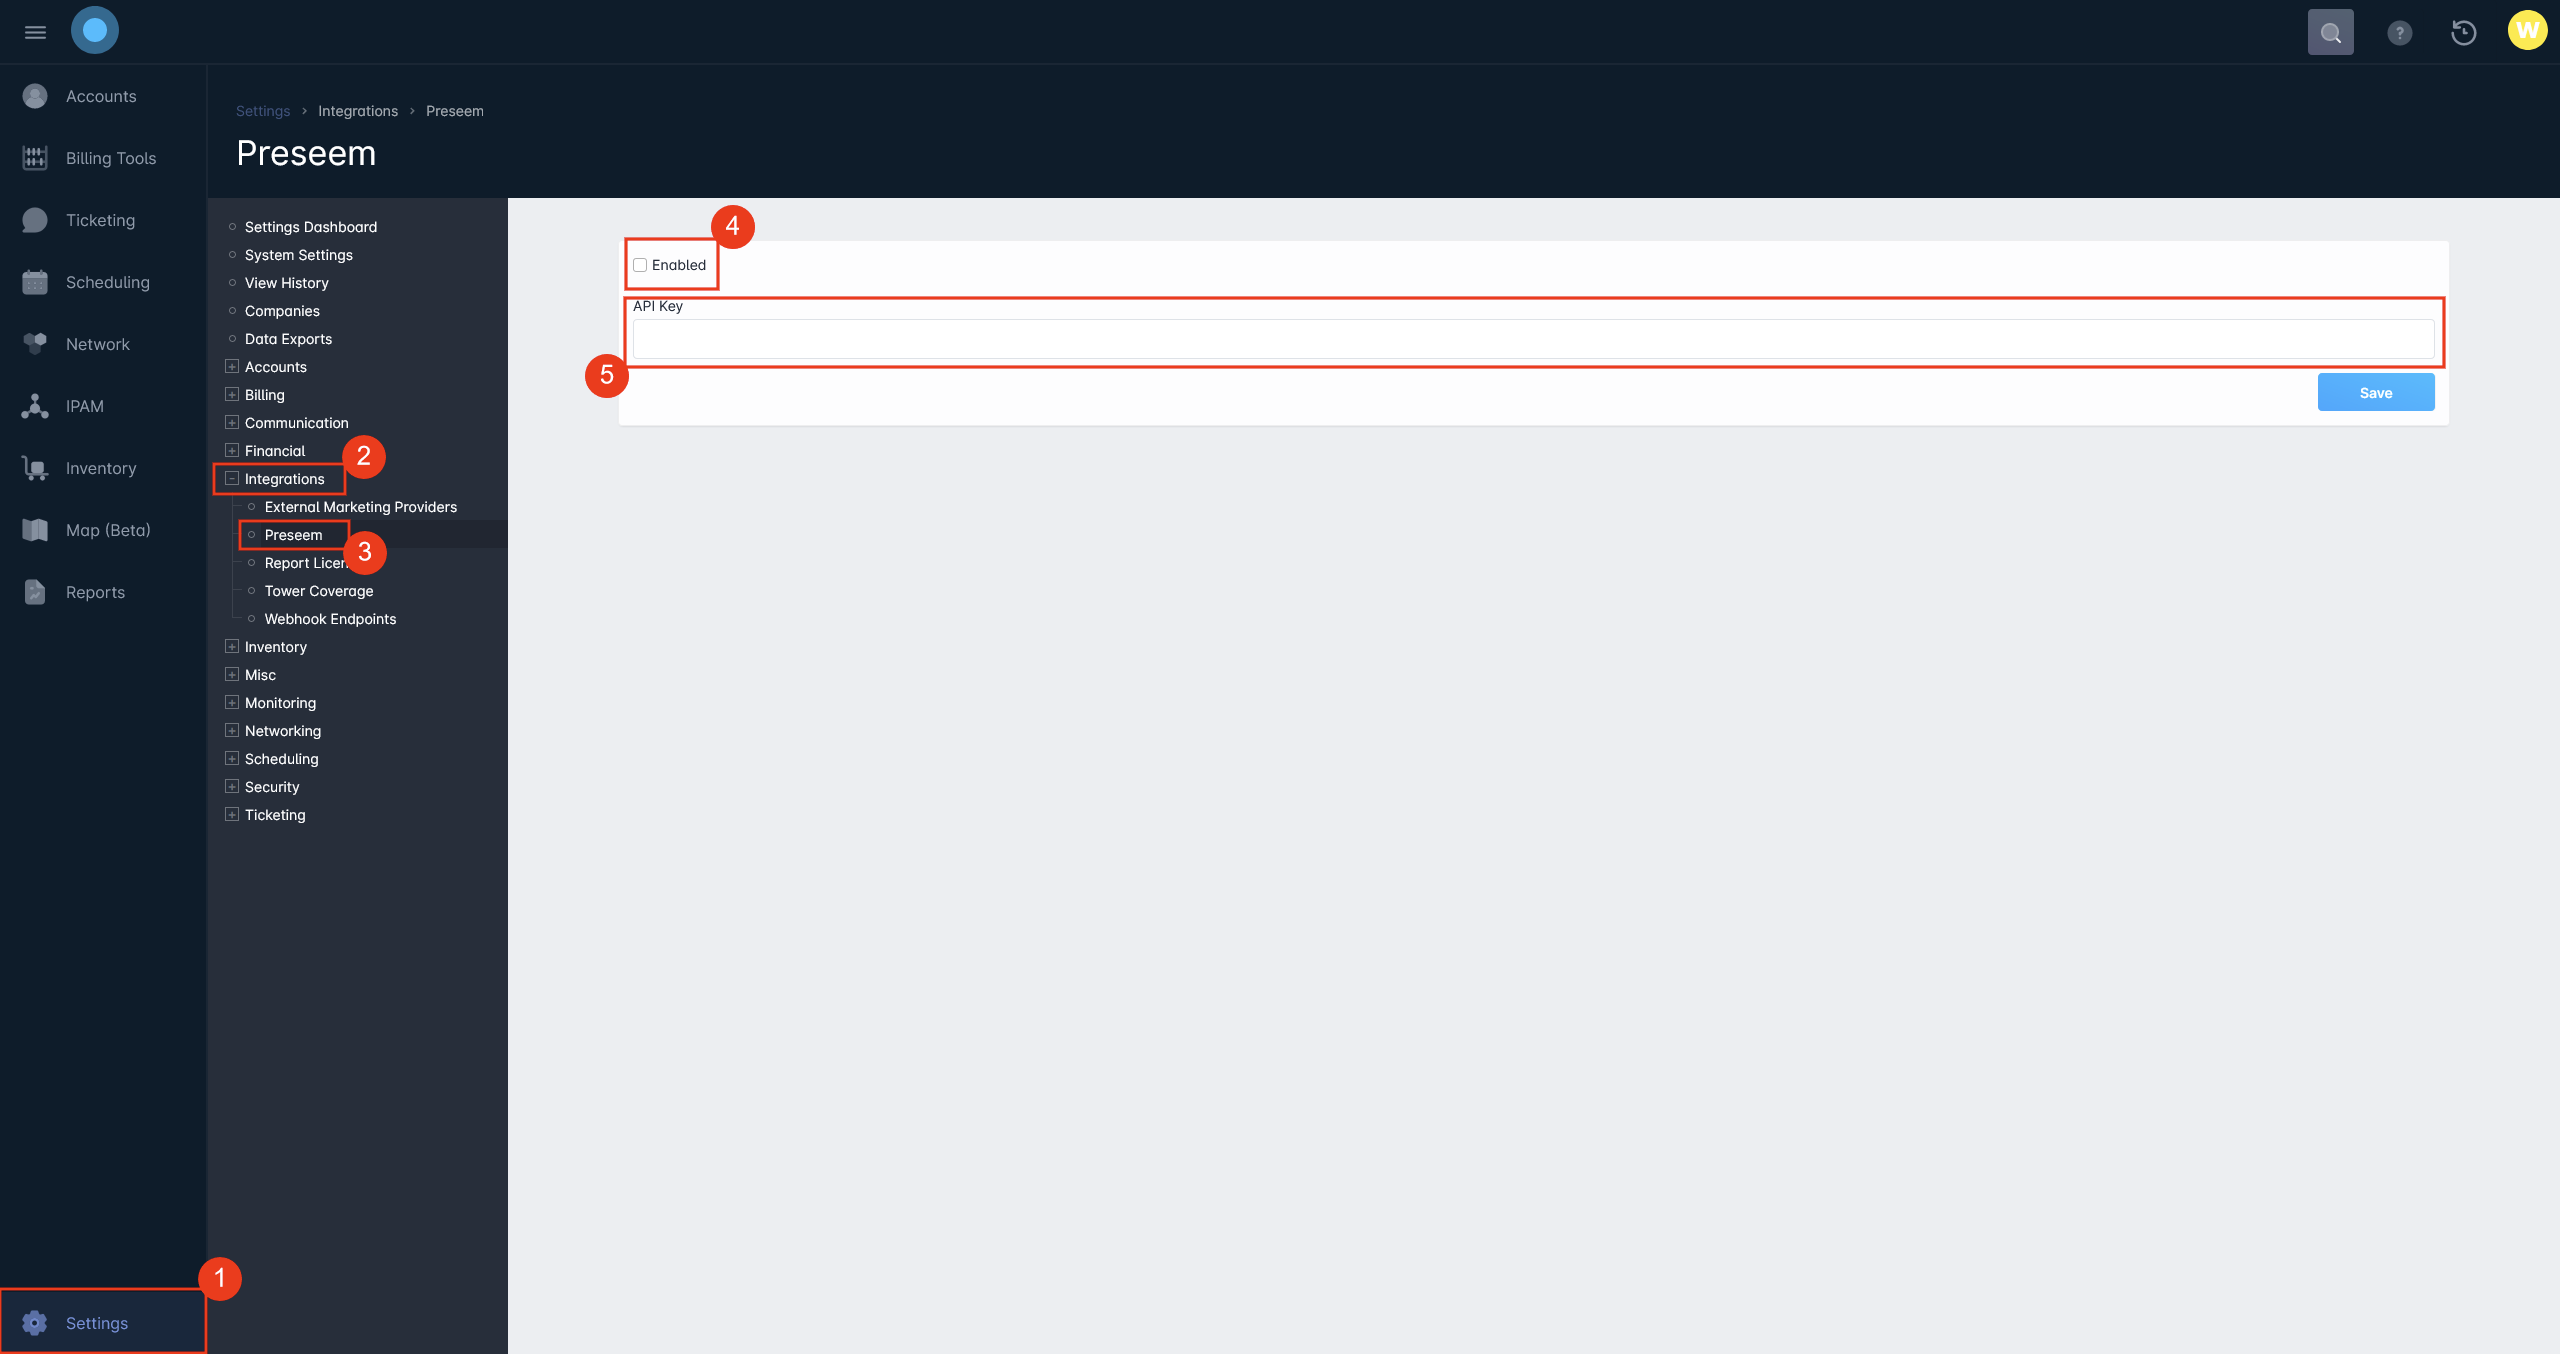
- Complete the Preseem integration within Sonar by going to Settings -> Integrations -> Preseem and then enable the integration and supply the API Key:Enabling the integration at this stage is optional, but recommended. Enabling it allows accounts to display an "Open in Preseem" option, as well as network site devices displaying a "Preseem Status" which summarizes if the device is starting to regularly see increased latency due to capacity limits being reached.
RADIUS
What this is
Using RADIUS to control customer speeds is more about using RADIUS groups, which aggregate different data services, account groups, and account statuses as uniquely managed groups. These RADIUS groups and their configured reply attributes are forwarded to the RADIUS server and following that are sent to the RADIUS concentrator in order to enact speed limits.
Set up in Sonar
Configuring RADIUS to control speeds in Sonar is relatively straightforward, and the steps below provide a quick glance at this process.
- First, you need to add a RADIUS server to your instance by going to Settings -> Networking -> RADIUS Servers -> Create RADIUS Server and fill in all required information:

- Next, create your RADIUS groups by going to Settings -> Networking -> RADIUS Groups -> Create RADIUS Group and fill in all required information:

LTE Providers
What this is
Configuring LTE Providers to control speeds with Sonar involves integration with your provider's cloud controller, such as Magma, BaiBOSS, or Breezeview, then controlling speeds by mapping data services. Mapping data services will take a look at the data services you've created within Sonar and will push corresponding service profiles to your LTE provider, which in turn will set the speeds on devices configured with a matching SIM and IMSI type.
Set up in Sonar
- Add your LTE Provider credentials in Sonar by going to Settings -> Networking -> LTE Providers -> Create LTE Provider:

- Add an inventory model to Sonar with IMSI as a required field.For information on creating a new inventory model, you can review the linked article.
- Add SIM cards and their IMSI in Sonar and within the LTE Provider you've configured in Sonar.
- Map account data services in Sonar to data services in your LTE Provider.The process for mapping services will differ for each provider, as each provider has a unique process.
Cable Modem Provisioning
What this is
Cable modem provisioning in Sonar is supported through Incognito. Setting up the integration with Incognito will allow Sonar to activate, deactivate, and affect rate limits based on account statuses and invoice delinquency.
Data service mappings with Cable Modem provisioning is based on account data services.
Set up in Sonar
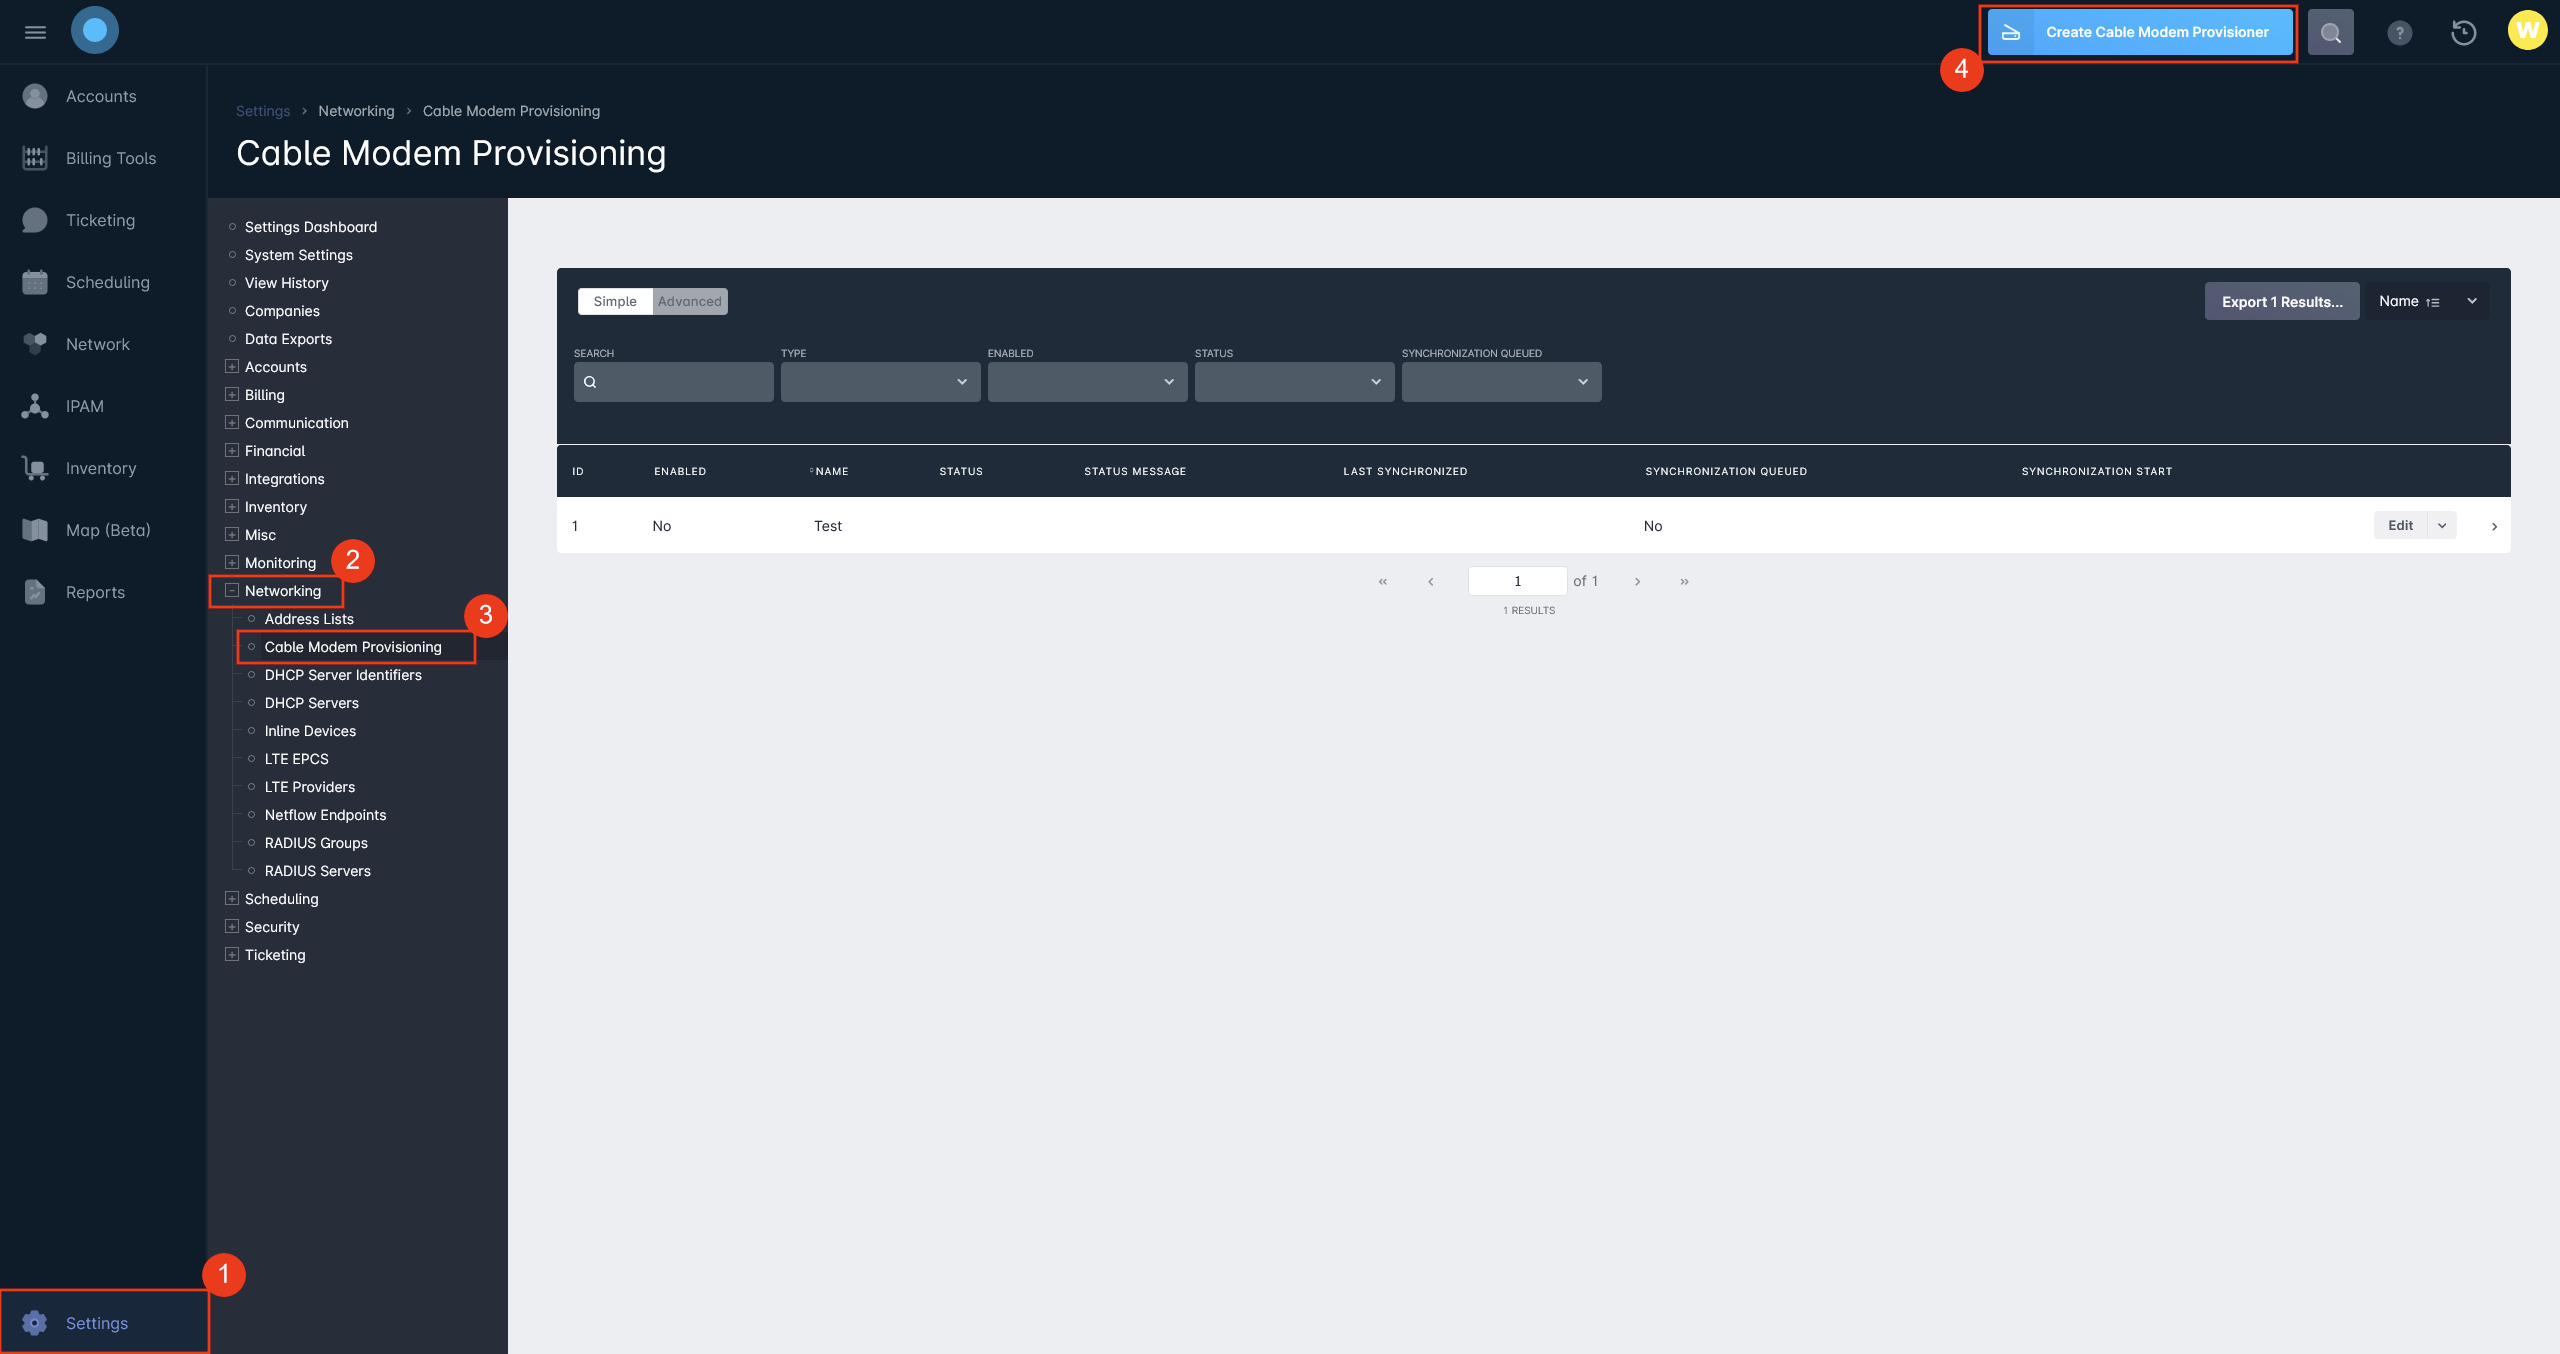
- Connect your Cable Modem Provisioning Provider with Sonar by going to Settings -> Networking -> Cable Modem Provisioning -> Create Cable Modem Provisioner and fill in all required information:At this time, Incognito is the only supported Cable Modem Provisioner.
- Once the device is linked, map data services manually using Incognito to control speeds for connected customers.
Using API & Webhooks
What this is
Using API and Webhooks is an alternative means to control customer speeds if Sonar doesn't natively support your network hardware or architecture. By using this method, you allow Sonar to automate provisioning to any vendor or controller that does not have a native integration. Webhooks are used to trigger an action outside of Sonar (with your network equipment) based on account status, billing, delinquency, or data service changes. The GraphQL API is used to deliver any data into Sonar that is required for populating the variables used for customer provisioning.
Set up in Sonar
Setting up Webhooks and API integration to control speeds is the most complicated method available within Sonar, however, if you're using provisioning hardware or software that isn't natively supported in Sonar, this would be your only option.
- Create your webhook endpoints and webhooks endpoint events to act as a trigger in order to fire a webhook to a server. These initial endpoints are typically account status, account service, or invoice related.These webhooks will deliver the basic data such as account ID, and IDs of any changes, such as an account status updating from "ID 3" to "ID 2".
- When this webhook fires to the middleware server, the first part of the script will call back to Sonar to gather additional required fields (ex: IP address of assigned devices, upload and download speeds in the service profile, etc.). The second part of the script will populate the appropriate payload and fire a request towards the provisioning server.