Table of Contents
Job Types: Best Practices
 Updated
by Mitchell Ivany
Updated
by Mitchell Ivany
Read Time: 7 mins
What are Job Types
A Job Type is a setting that allows you to customize and control the details of technician visits and scheduled installations. By creating several Job Types, you provide your support agents and technicians a versatile tool-belt for providing accurate schedule windows and detailed task requirements on the job.
Making the best use of Job Types means implementing Job types for all situations, implementing Task Templates, and setting up scheduling (both availability and blockers).
Creating and Managing Job Types
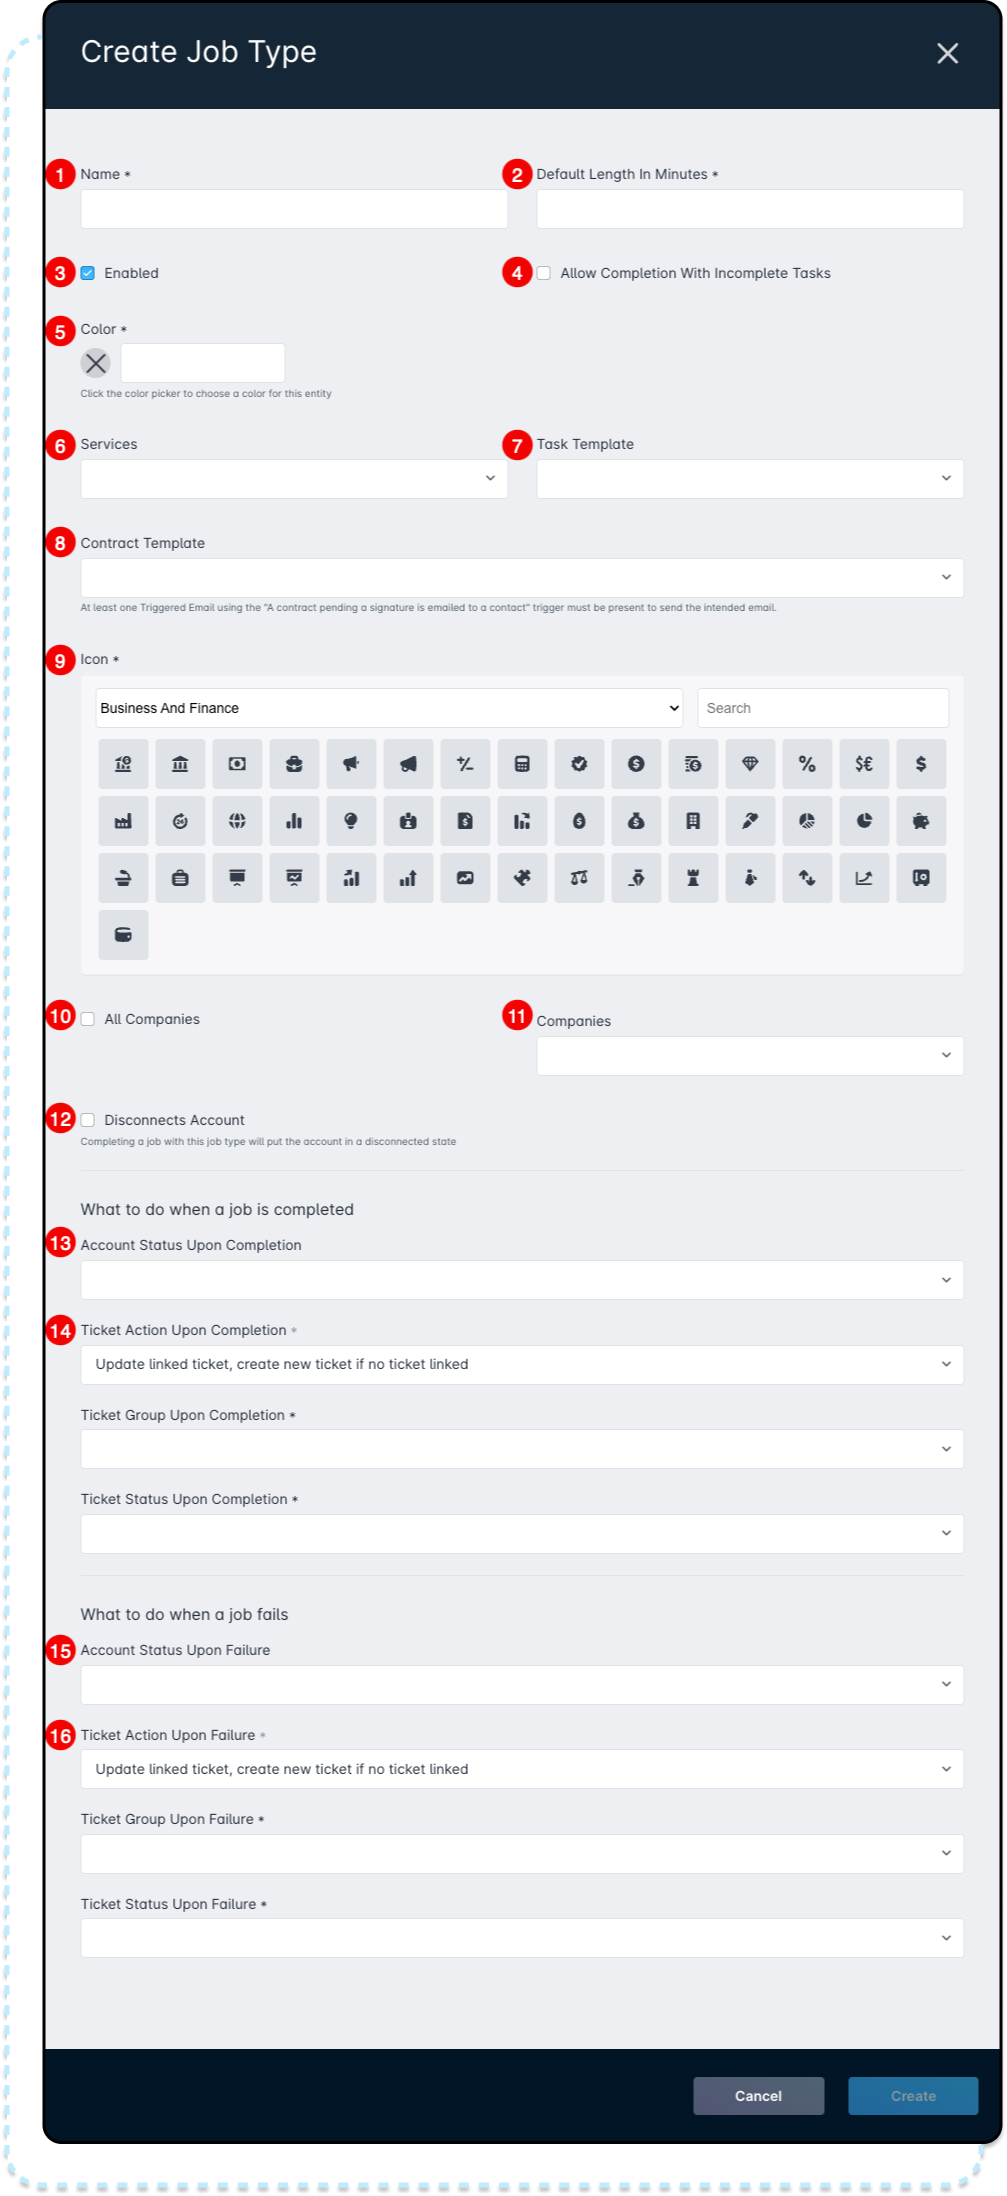
- The Name field allows you to enter a custom, descriptive name for this job type. The Name will appear when assigned to an entity and on the Scheduling List and Dispatcher views.
- The Default Length in Minutes field allows you to set a default length of time this job type is expected to take for successful completion. This value can be overwritten when creating the job and is used to calculate the availability of technicians.
- The Enabled toggle determines whether this job type can be assigned to an account or network site and scheduled. Unchecking this toggle will leave all existing jobs of this type alone, while preventing further jobs of this type from being created.
- The Allow Completion with Incomplete Tasks toggle determines whether the job can be completed and marked successful if some tasks remain incomplete. The tasks are determined by the Task templates configured under Settings > Misc > Task Templates or tasks added upon job creation.
- The Color picker allows you to select a visual indicator used to identify the Job Type when listed in the Schedule Table View
- The Services field allows you to select a service to be assigned to the account once a job is completed successfully.The fees associated with the service being applied to a job are only applied upon successful completion.
- The Task Template dropdown allows you to tie a Task Template to the job type, which will automatically add a list of tasks whenever the job is created.
- The Contract Template dropdown allows you to tie a Contract Template to the job type, which will automatically send the assigned contract to the customer upon successful completion of the job.
- For the Contract to be sent successfully, at least one Triggered Message using the “A contract pending a signature is emailed to a contact” trigger must be present to send the intended email.
- The Icon is used to quickly identify the Job Type in the Schedule Table view as well, in the same space as the color

- The All Companies toggle determines whether all configured companies in the instance can create jobs of this type or not.
- The Companies dropdown allows you to select a specific company that should be allowed to create jobs of this type. If the All Companies toggle is checked, this field won't appear.
- The Disconnects Account toggle can be enabled if the job is one that would disconnect the service from the customer's account, such as an uninstallation or an equipment collection job.This also allows for the Disconnection Reason to be tracked via the job as well. To learn more about Disconnection Reasons, refer to this article.
- The Account Status Upon Completion dropdown allows you to select the desired status of the account when the scheduled job is completed successfully.Changing the account status upon completion is generally done for installation or disconnection job types, as these jobs will fundamentally alter the way the account operates.
- The Ticket Action Upon Completion dropdown determines what process to follow for a generated ticket after the job finishes, if desired. You can select:
- None
- Create new ticket
- Update linked ticket, create new ticket if no ticket linked
- If an action is selected, additional fields will appear, allowing you to select the Ticket Group and Ticket Status
- The Account Status upon Failure dropdown is used to change the status of an account when a job is failed successfully.Changing the account status upon failure is typically used for failed installations, to switch from lead status to a failed install status for mapping and reporting purposes.
- The Ticket Action Upon Failure dropdown determines what process to follow for a generated ticket after the job finishes, if desired. You can select:
- None
- Create new ticket
- Update linked ticket, create new ticket if no ticket linked
- If an action is selected, additional fields will appear, allowing you to select the Ticket Group and Ticket Status
Task Templates & Jobs: Working Together
Using Task Templates when creating Job Types allows you to directly instruct your technicians on what needs to be completed before leaving the customer premises. Using Task Templates means saving time on similar jobs, removing the need to manually insert a long list of tasks on duplicate jobs. Additionally, if you expect some scenarios where not all tasks will be completed, then making use of “Allow Completion with Incomplete Tasks” carries forward that versatility.
Using Automated Triggers
While configuring your Job Types, you're provided two automation and integration parameters.
When using the “Account Status upon” rule, whichever account has the job scheduled will automatically change account statuses upon completion or failure of the job, depending on which field is being used. If both fields are enabled, then they will both be active and used depending on the result of the job.
The “Ticket Group upon” triggers are similar in functionality to the “Account Status upon” triggers, with their result varying depending on the outcome of the job. However, in these cases, rather than changing the account itself, a ticket is created upon job close-out, with the final destination of the ticket being determined.
Managing Job Types
With Job Types in your instance, you have the option to create as many job types as suit your need. If you find that you no longer require a certain job type, Sonar gives you the option of disabling those job types. By disabling the job type, technicians, and support agents will not be able to schedule this job, but past schedules and job reports will continue to display the job.
Schedule Availability & Job Types
Another aspect of Managing Job Types to consider is how they work with schedule availability. If a job is set to take 2 hours, only technicians with room in their availability schedule will be visible when assigning this job.
Example Job Types
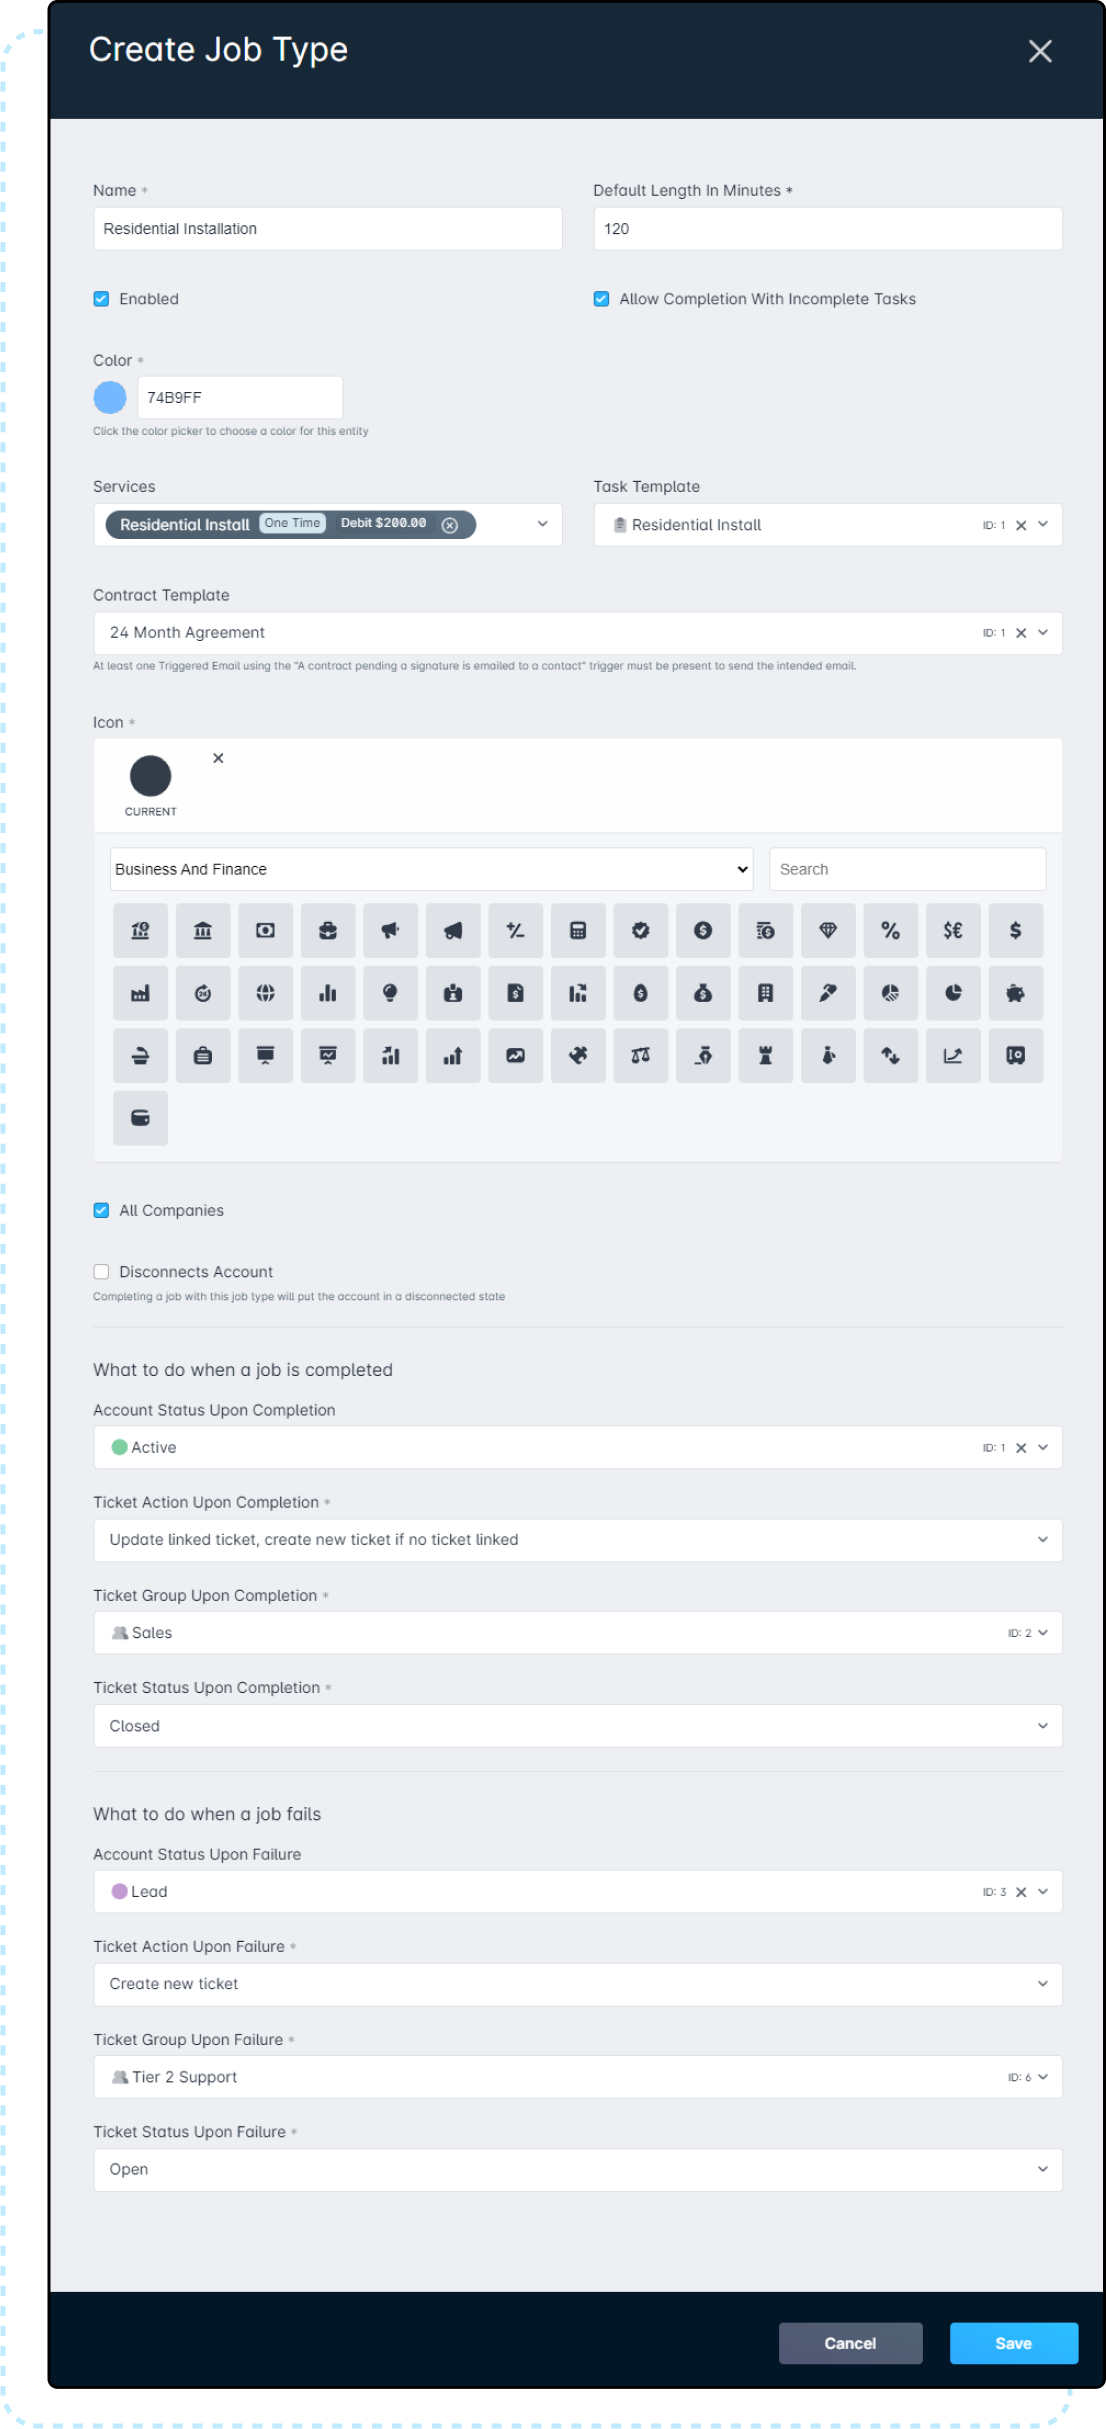
In this completed Job type form, you can see a typical representation of what an installation could be like.
When this job is added to the schedule, it will consume 120 minutes on the technician's schedule, requiring sufficient spare time to allow for travel to and from the destination, around any existing schedule blockers (and within limits of availability).
Additionally, all companies added in the instance will be able to view and use this Job Type — not only is that selection enabled, but no recurring, data, or voice services are being added by default during this job, removing any possible conflict there.
Finally, touching on the automation and integration portion of the installation, this job is configured both with an automatic ticket and status switch. Upon completing the installation, the account will become active, and a ticket created for the Sales team to ensure the customer understands their service. If the installation fails, a ticket is created in the Support queue, and the account is set to Lead for ease of filtering.
Finally, the tasks to follow are set in a task template titled “Residential Installs”, and upon successful completion, the customer will be charged for the Residential Installation service.