Table of Contents
Using Outbound SMS
 Updated
by Mitchell Ivany
Updated
by Mitchell Ivany
Read Time: 10 mins

Proactively reaching out to your subscribers builds trust, reduces support interactions, and facilitates positive interactions when customers contact you. Being able to establish a consistent chain of proactive messages can be challenging, as each customer can prefer different means of communication. Built on the same backbone as Messages in Sonar, Outbound SMS provides a flexible, reliable way to keep in touch with your US or Canadian customers, whenever needed.
Two-way communication through the Outbound SMS feature isn't possible. Instead, the Signature system is put into place, which provides your customers with the information they need to contact your team directly. These signatures are pre-configured, and will be covered in more detail throughout this article.
Setting up Outbound SMS
Permissions
Before getting started with the configuration, your user roles will need to be adjusted to account for the permissions required to use the Outgoing SMS feature. These permissions are not viewable outside the US or Canada.


For a role to be able to send messages, the minimum permissions of Create a new SMS message and View SMS messages must be enabled.

Activating the Feature
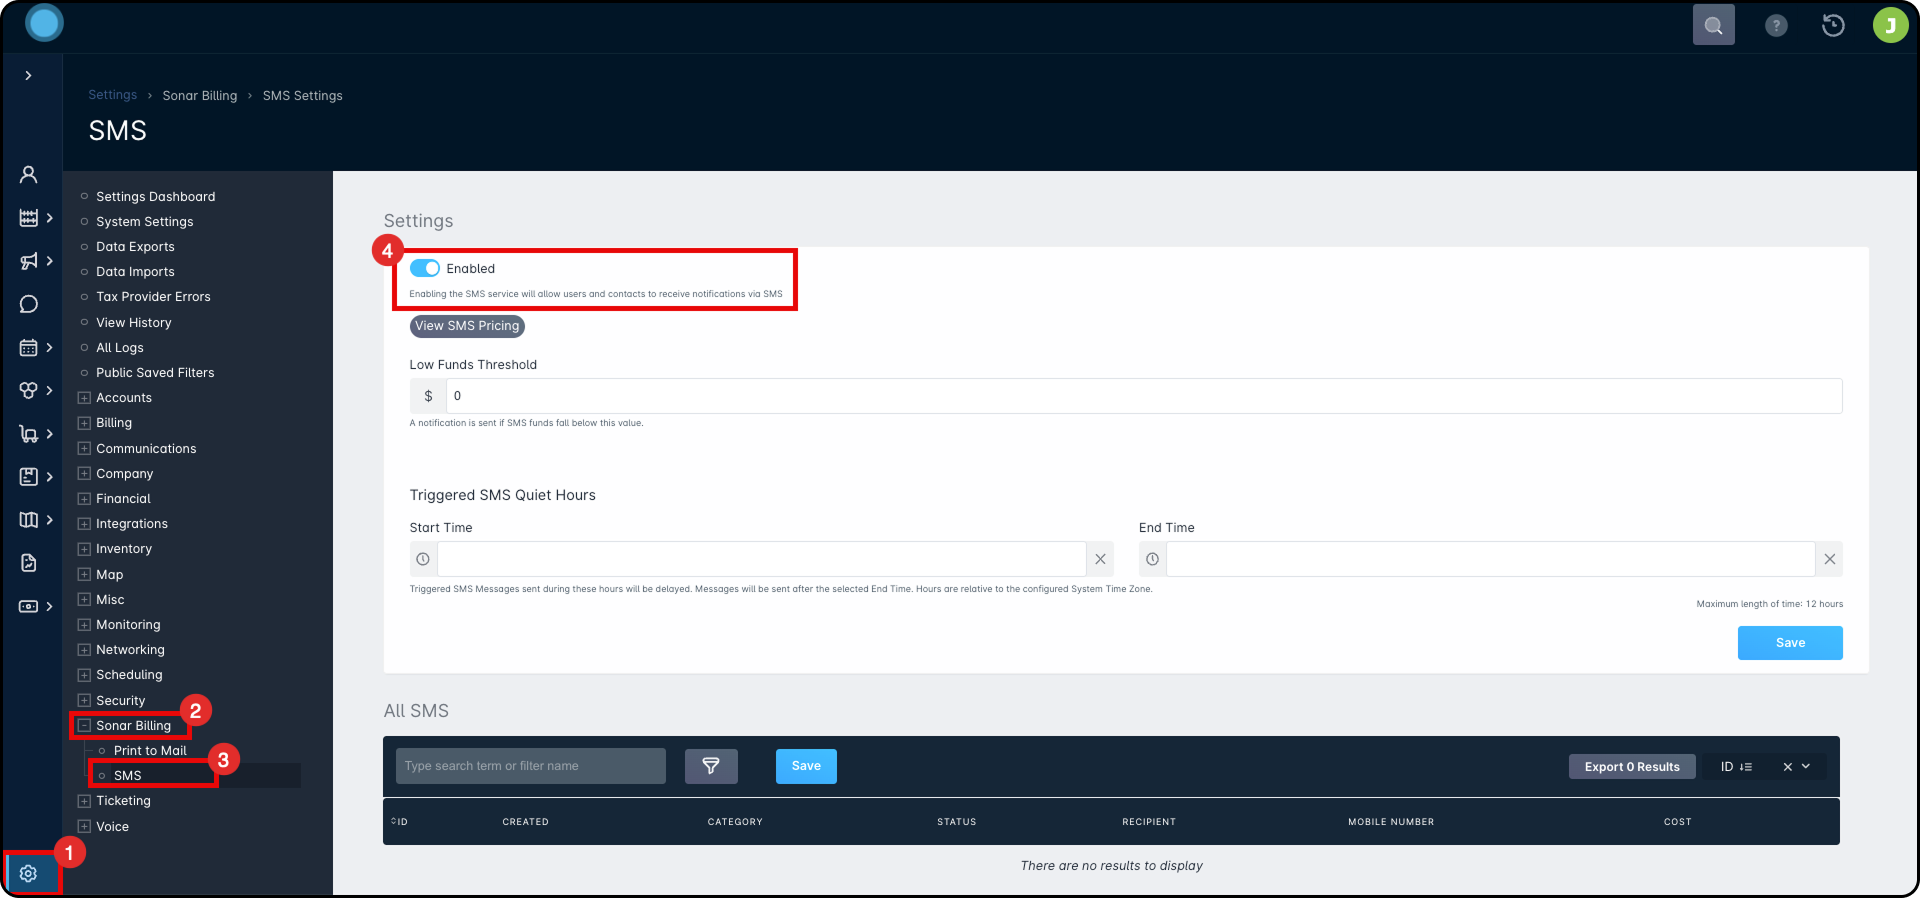
The SMS feature is part of the Sonar Billing feature-set, and controlling the feature's active status is through the Settings page:
- Click on Settings
- Expand the Sonar Billing section
- Click on Sonar Billing
- Toggle the “Enabled” option
How it works
Once enabled, Sonar's SMS service can be used to reach out to US and Canadian customer Contacts with their SMS-enabled mobile numbers. Each sent SMS message will be billed based on the number of characters contained within the message.
SMS messages are configured and can only be sent as Triggered Messages or Mass Messages, unlike emails, which can also be used for direct communication. For SMS messages to work, you'll need to:
- Deploy Companies, and Departments alongside them.
- Define SMS-capable Phone Number Types.
- Set SMS signatures, which are used to add custom sections to the canned messages.
- Ensure account contacts opt-in to receiving SMS messages.
- Make sure your account has a positive balance (and preferably auto-buy) in the Sonar Billing section.
Setting up Signatures
Before sending any messages, signatures need to be configured. These text snippets are appended to any message sent from your Sonar instance, and provide a personal touch to each interaction with your customers. To meet regulatory requirements, the option to unsubscribe through SMS must be available. Because of these requirements, and to minimize the impact on message length, Sonar provides a set list of available Signatures.
Signatures are configured by navigating to Communications → Messages → Configure → Signatures.
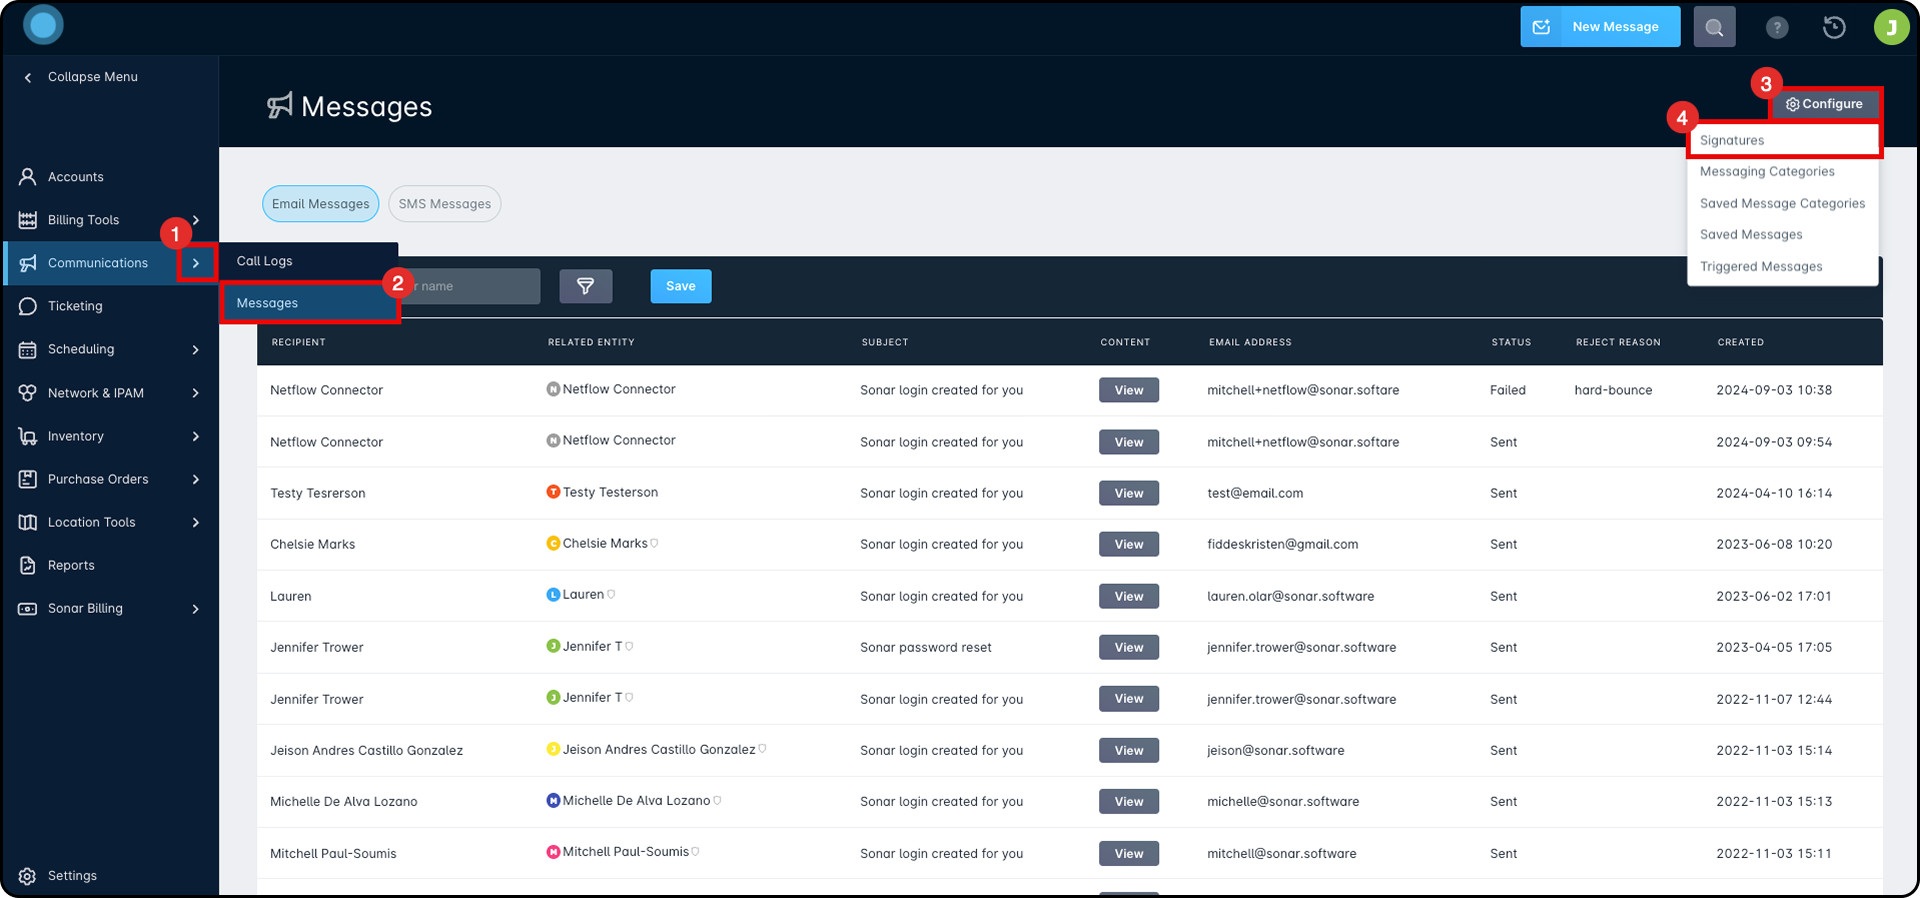
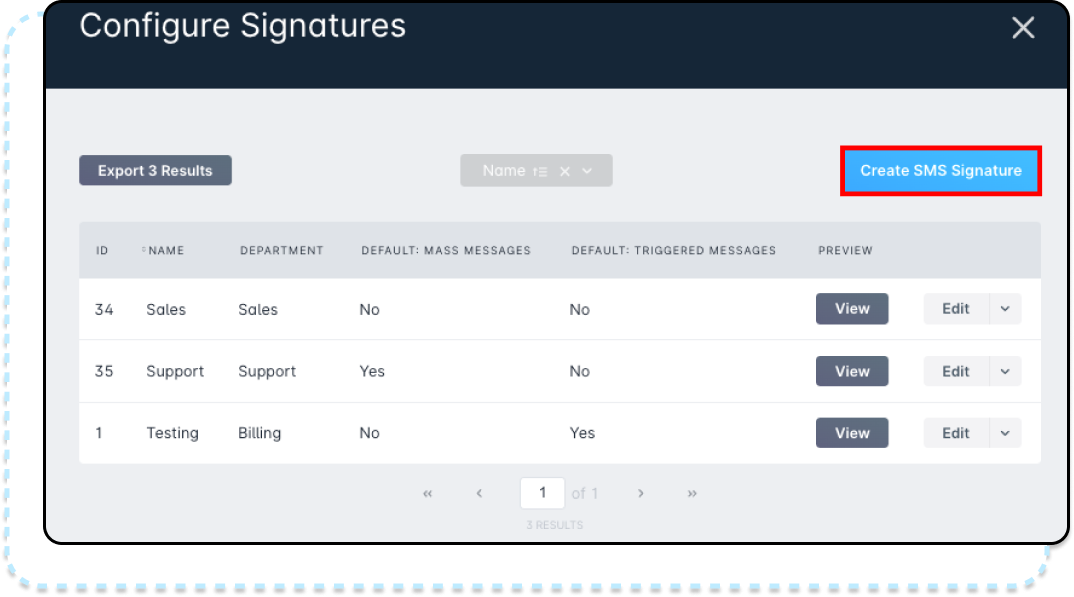
Opening the “Configure Signatures” modal, you'll be presented with a list of current signatures, and the option to create a new one:
An SMS signature consists of 3 components:
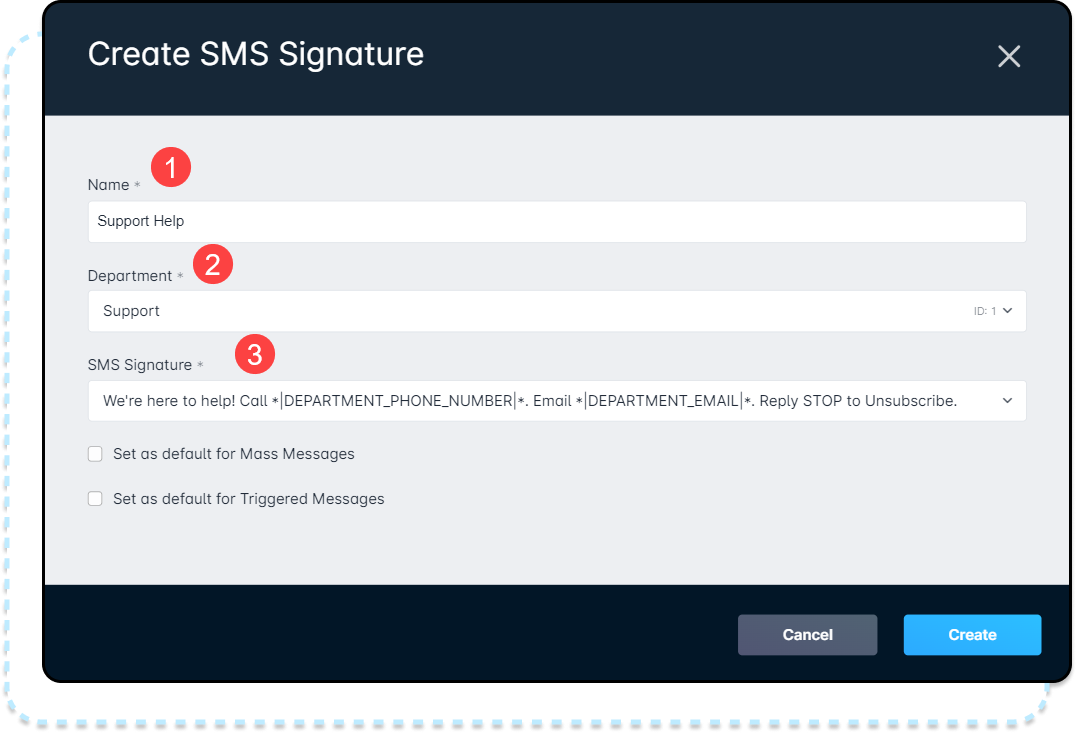
- An instance-unique Name for the signature
- A Department selection, with departments available based on their existence in your instance.
- Based on what information was provided alongside the Department when it was added to your instance, this field will determine what phone number and email address values are dynamically substituted when an SMS Message is sent.
- An SMS Signature, available from a pre-defined list that will autofill variables. The available signatures are:
Reply STOP to unsubscribe.Need something else? Call |DEPARTMENT_PHONE_NUMBER|. Email |DEPARTMENT_EMAIL|. Reply STOP to unsubscribe.Looking for more information? Call |DEPARTMENT_PHONE_NUMBER|. Email |DEPARTMENT_EMAIL|. Reply STOP to unsubscribe.Have a question? Call |DEPARTMENT_PHONE_NUMBER|. Email |DEPARTMENT_EMAIL|. Reply STOP to unsubscribe.Need to chat? Call |DEPARTMENT_PHONE_NUMBER|. Email |DEPARTMENT_EMAIL|. Reply STOP to unsubscribe.We're here to help! Call |DEPARTMENT_PHONE_NUMBER|. Email |DEPARTMENT_EMAIL|. Reply STOP to unsubscribe.
There are two additional options, allowing you to set the created signature as the default for Mass Messages, Triggered Messages, or both.
Opting-in Contacts
We recommend you view your state regulations to ensure you are meeting their requirements before opting-in your contacts.
After Phone Number Types have been defined as SMS capable, those numbers need to be added to customer contacts, and opted-in to receive SMS messages.
- Open the customer's account and navigate to the Contacts tab.
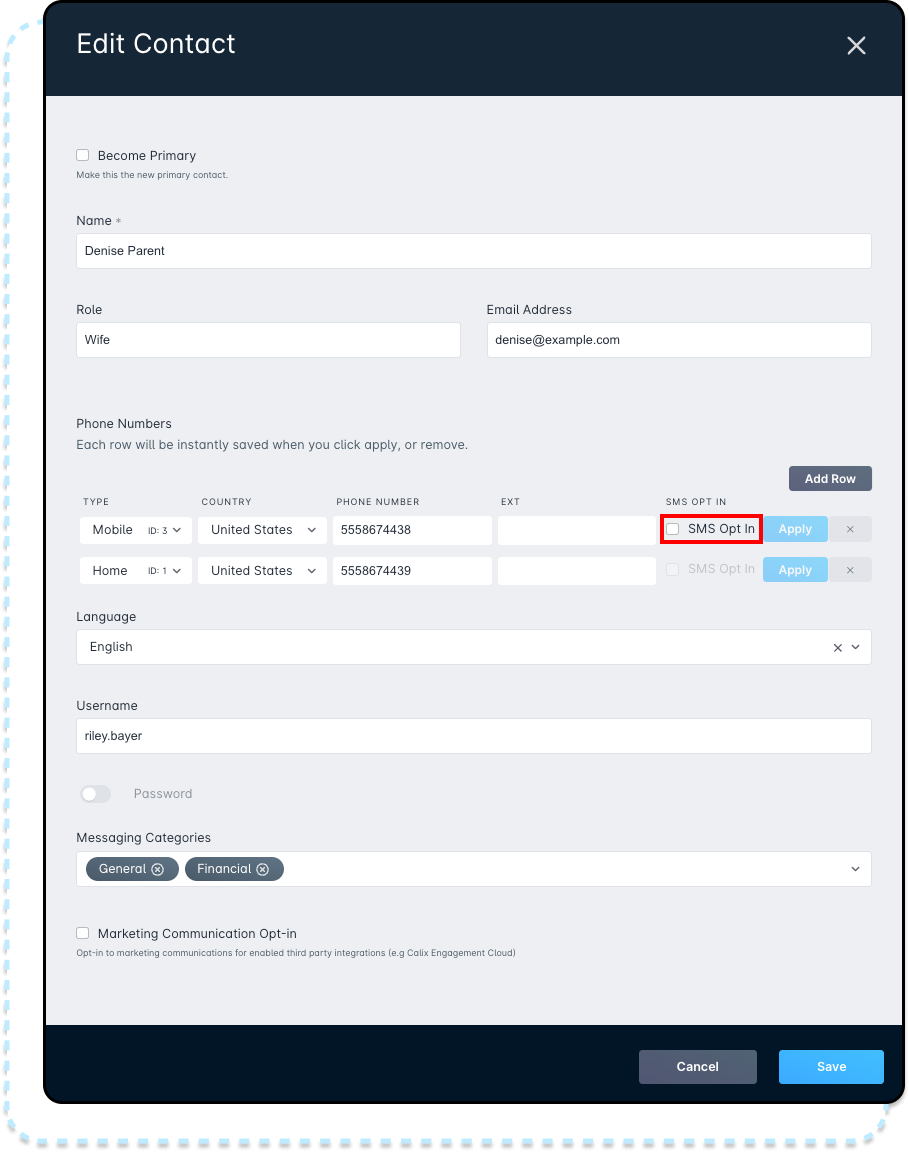
- Open the Edit menu.
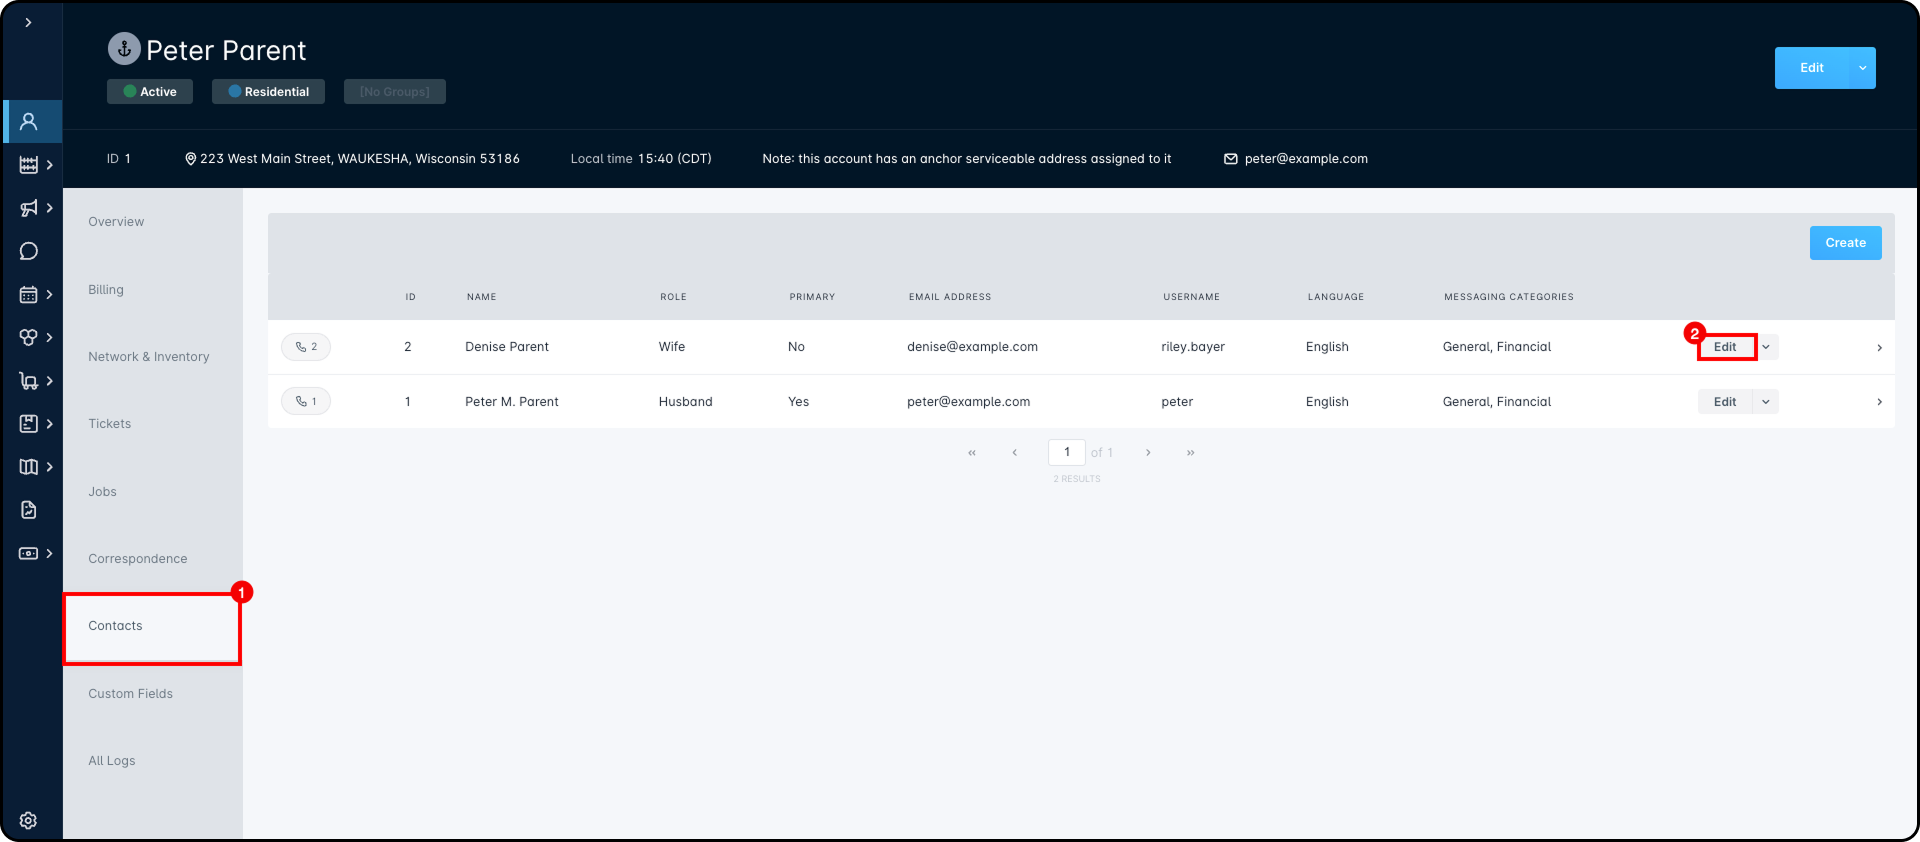
- In the Edit Contact modal, check the “SMS Opt In” box to complete the customer's enrollment
Opting Contacts Out
Customer contacts can be opted out of receiving text messages in two ways:
- Deselect the checkbox from the "Edit Phone Number" modal
- The customer can reply STOP to any text message sent from your instance, which will also serve to opt them out in your instance.If the customer does opt out in this way, they can opt back in by messaging “START” to the same number. This method of opting in and opting out will affect the customer's number across any instance this number may exist in.
Sending SMS Messages
SMS messages can only be sent as Triggered Messages or as Mass Messages. Individual messages, such as a ticket reply, are not possible through Sonar. To send a message, you'll generally follow these steps:
- Check the “Send as SMS Message” box
- Select the outgoing Phone Number, if applicablePhone Number selection will only be available if multiple sending numbers have been configured for your instance. At this time, only the default sending number is supported.
- Select the Saved Message applicable to the situation.Unlike Email Messages in Sonar, SMS Messages can only be sent with predefined Saved Messages.
We are unable to allow user configurable Saved Messages for SMS Messages due to regulatory constraints that require Sonar to register outbound SMS message campaigns.
A full list of available messages can be viewed by navigating to Configure → Saved Messages → SMS Messages tab. - Select the SMS Signature you'd like attached to the outgoing message.
There are slight differences between Mass and Triggered SMS Messages. For more information, refer to the relevant section.
Sending Mass SMS Messages
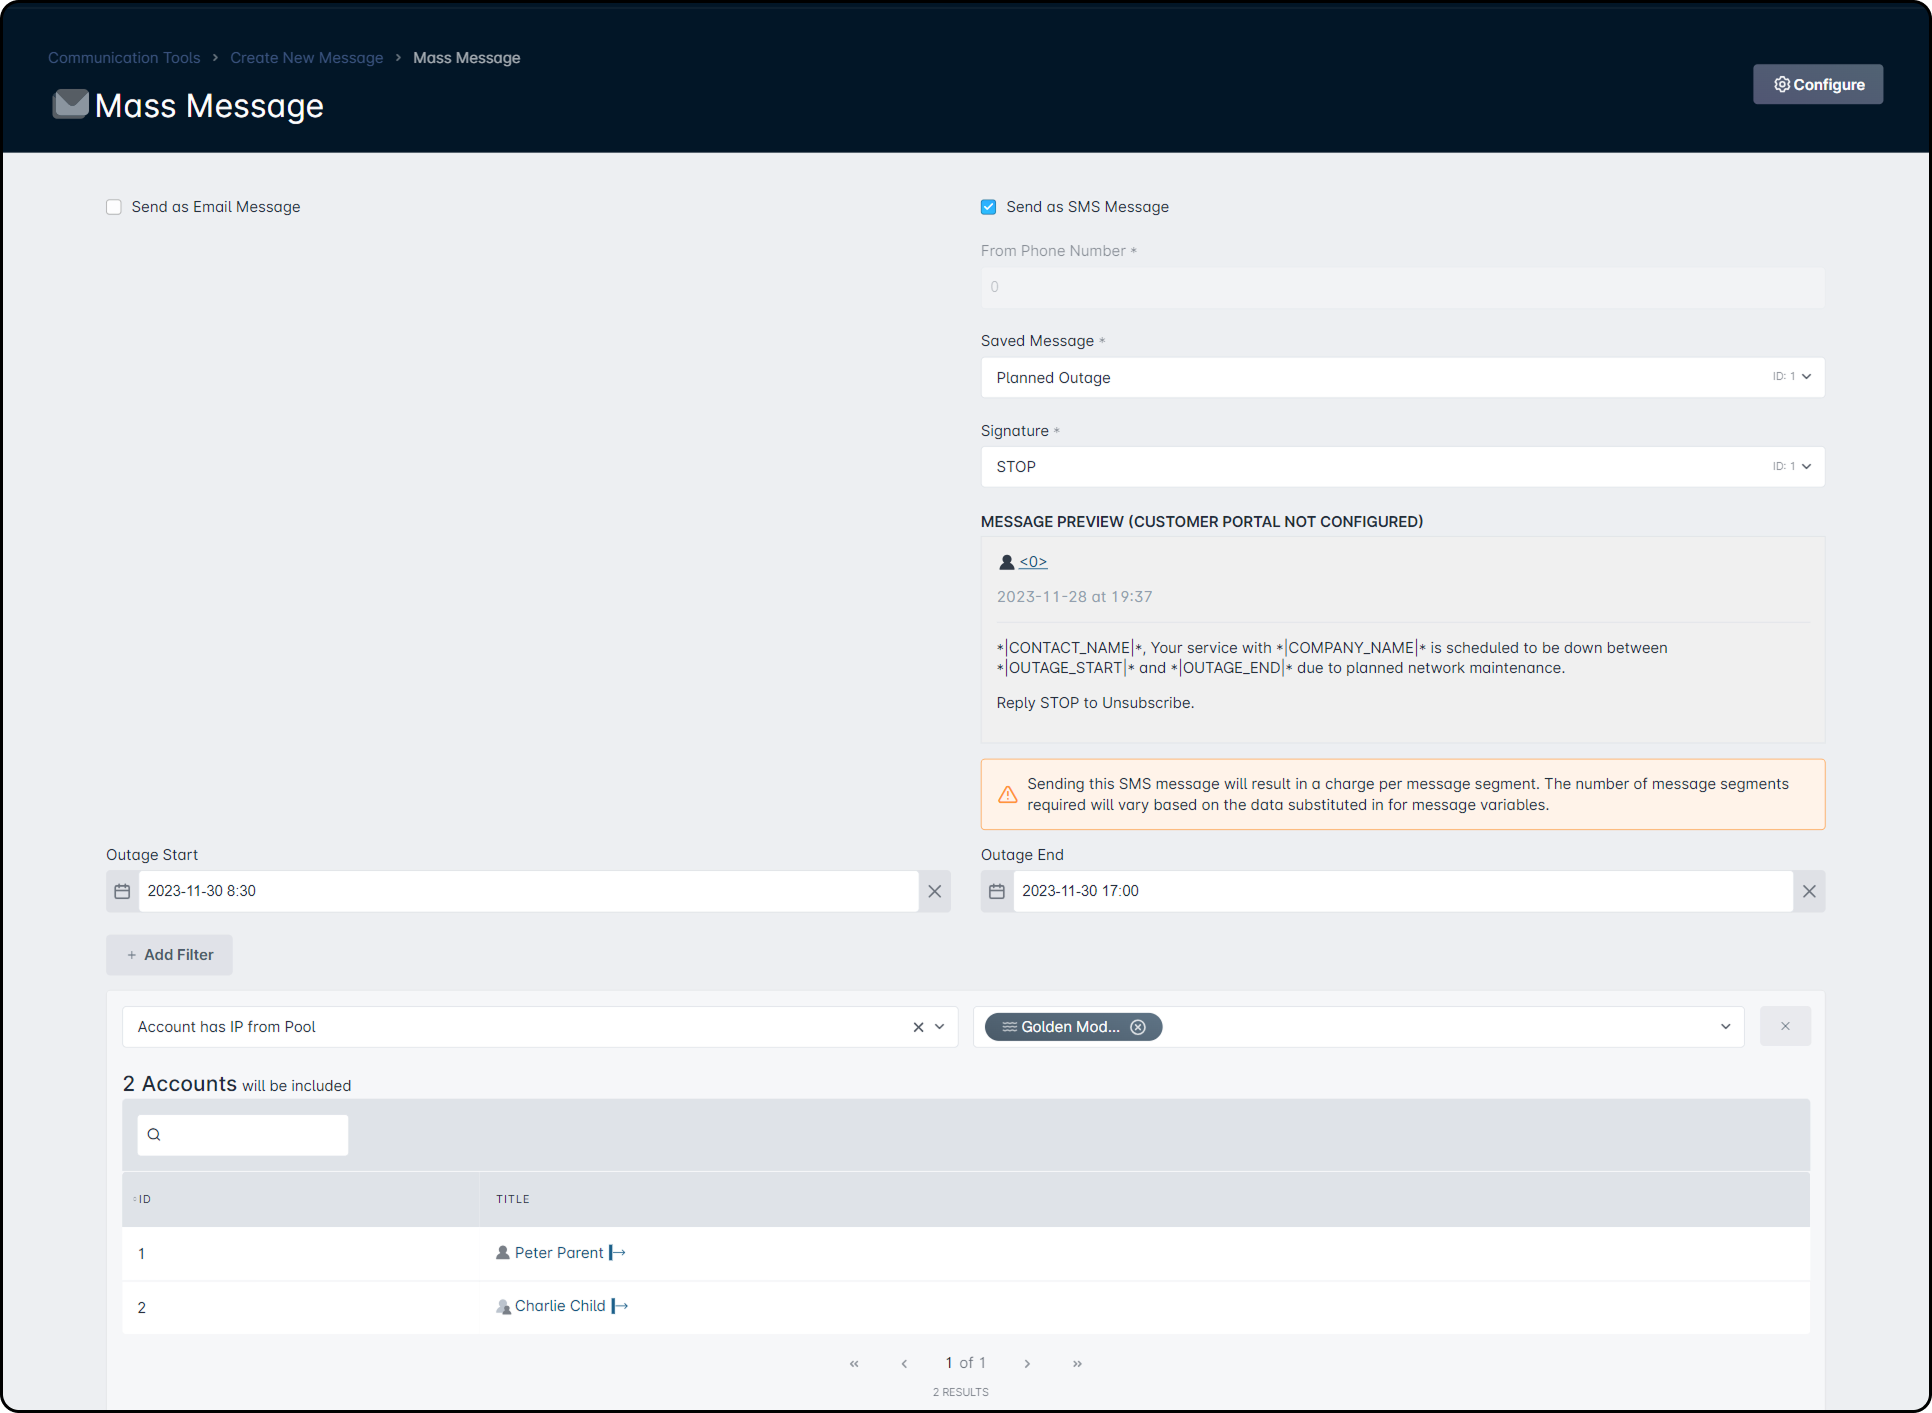
Mass Messages are relatively restricted, as they are subject to strict guidelines and regulations. To minimize the risk of Sonar's SMS service being flagged, Mass SMS Messages use preconstructed templates, and you may select one of three Saved Messages:
- Planned Outage
- Unplanned Outage
- Unplanned Outage (no restoration ETA)
Selecting any of these three will modify both the available filters, and the Outage Start and End fields being displayed.
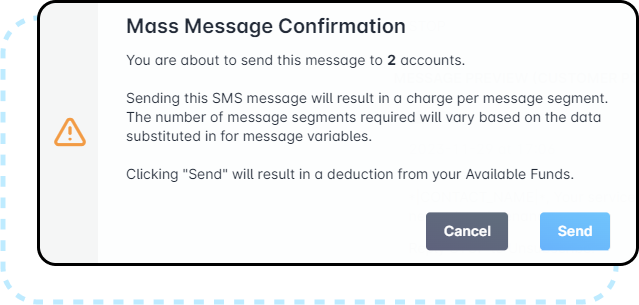
When a Mass Message is sent, a confirmation message will appear, confirming the number of customers that will receive this message, and that charges will occur:
Example of a Mass Outbound SMS Message
US Recipient: $0.0113 USD
Canadian Recipient:$0.022 CAD
1. What you see before variables are added into the SMS message:
*|CONTACT_NAME|*, Your service with *|COMPANY_NAME|* is scheduled to be down between *|OUTAGE_START|* and *|OUTAGE_END|* due to planned network maintenance. Looking for more information? Call *|DEPARTMENT_PHONE_NUMBER|*. Email *|DEPARTMENT_EMAIL|*. Reply STOP to Unsubscribe.
2. The completed version of the SMS message that the customer will receive:
Ab Child, Your service with A-Fiber is scheduled to be down between December 3, 2025 9:54PM and December 3, 2025 10:55PM due to planned network maintenance. Looking for more information? Call 555-222-3333. Email support@afiber.com. Reply STOP to unsubscribe.
Or
Peter Parent, Your service with A-Fiber is scheduled to be down between December 3, 2025 9:54PM and December 3, 2025 10:55PM due to planned network maintenance. Looking for more information? Call 555-222-3333. Email support@afiber.com. Reply STOP to unsubscribe.
Because contact names, company names, and even dates vary in length, the total characters in each SMS can differ — which affects how many segments are within an SMS message.
The message to Ab Child uses 259 characters (2 segments).
The message to Peter Parent uses 263 characters (2 segments).
So, sending this SMS to Peter Parent costs the same as sending it to Ab Child, because both messages use 2 segments, no matter the exact character count.
Sending Triggered SMS Messages
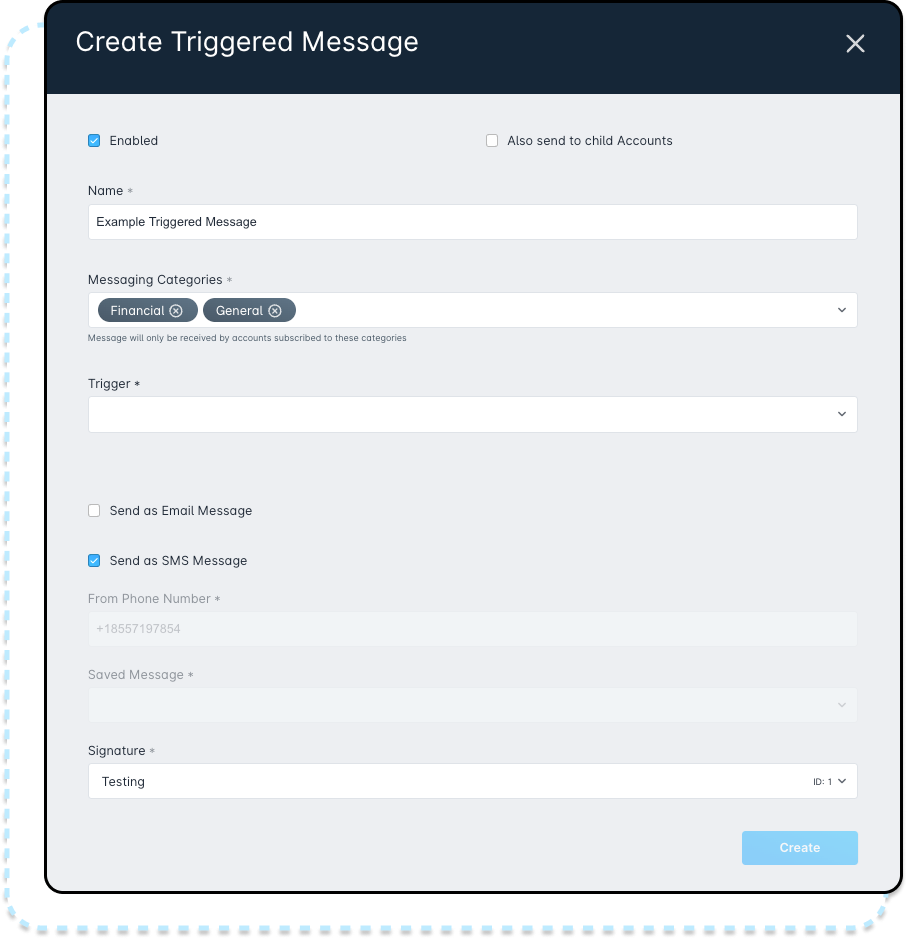
Triggered SMS Messages operate a little differently when compared to Mass Messages. Rather than configuring the SMS Message directly, you configure the Trigger, which will automatically set the SMS Message. Before a Trigger is set, the SMS Message field will be blank and unmodifiable, as pictured.
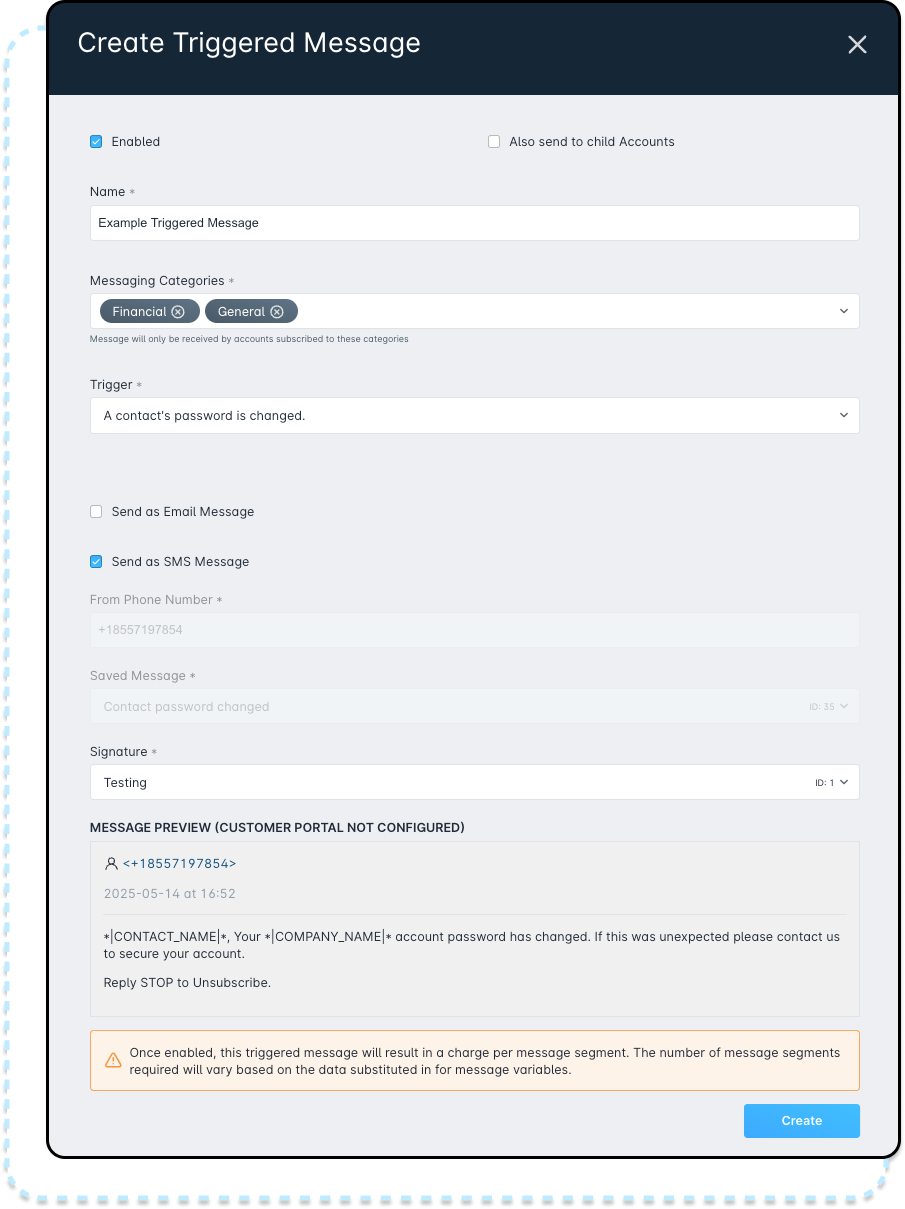
Once a trigger is selected, the Saved Message will be automatically selected, with the only customizable elements being the phone number (if multiple are added in your instance), and the message signature.
Example of a Triggered Outbound SMS Message
US Recipient: $0.0113 USD
Canadian Recipient:$0.022 CAD
1. What you see before variables are added into the Triggered SMS message for Westlake Wireless vs Go Fiber for a Past due balance.
a. Westlake Wireless Triggered Message:
*|CONTACT_NAME|*, Your invoice with *|COMPANY_NAME|* with a balance of *|AMOUNT_DUE_ON_INVOICE|* has been past due for *|DAYS|* days. Please remit payment ASAP. Need something else? Call *|DEPARTMENT_PHONE_NUMBER|*. Email *|DEPARTMENT_EMAIL|*. Reply STOP to Unsubscribe.
b. Go Fiber Triggered Message:
*|CONTACT_NAME|*, Your invoice with *|COMPANY_NAME|* with a balance of *|AMOUNT_DUE_ON_INVOICE|* has been past due for *|DAYS|* days. Please remit payment ASAP. Reply STOP to Unsubscribe.
2. The completed version of the Triggered SMS message that the customer will receive for Westlake Wireless vs Go Fiber.
a. Westlake Wireless
Dr. Alford Schimmel PhD, Your invoice with Westlake Wireless with a balance of $89.95 has been past due for 3 days. Please remit payment ASAP. Need something else? Call 555-444-1111. Email payments@westlakewireless.com. Reply STOP to Unsubscribe.
b. Go Fiber
Marjolaine Ober, Your invoice with Go Fiber with a balance of $1249.95 has been past due for 3 days. Please remit payment ASAP. Reply STOP to Unsubscribe.
Because contact names, company names, emails, and phone numbers vary in length, the total characters in each SMS can differ — which affects how many segments are within an SMS message.
The message to Dr. Alford Schimmel PhD uses 247characters (2 segments).
The message to Marjolaine Ober uses 155 characters (1 segment).
Sending a triggered message from Westlake Wireless to Dr. Alford Schimmel PhD costs slightly more because it uses 2 segments. A triggered message from Go Fiber to Marjolaine Ober is cheaper because it only uses 1 segment.
Viewing Sent SMS Messages
All sent SMS messages are viewable by navigating to Communications → Messages → SMS Messages sub tab.
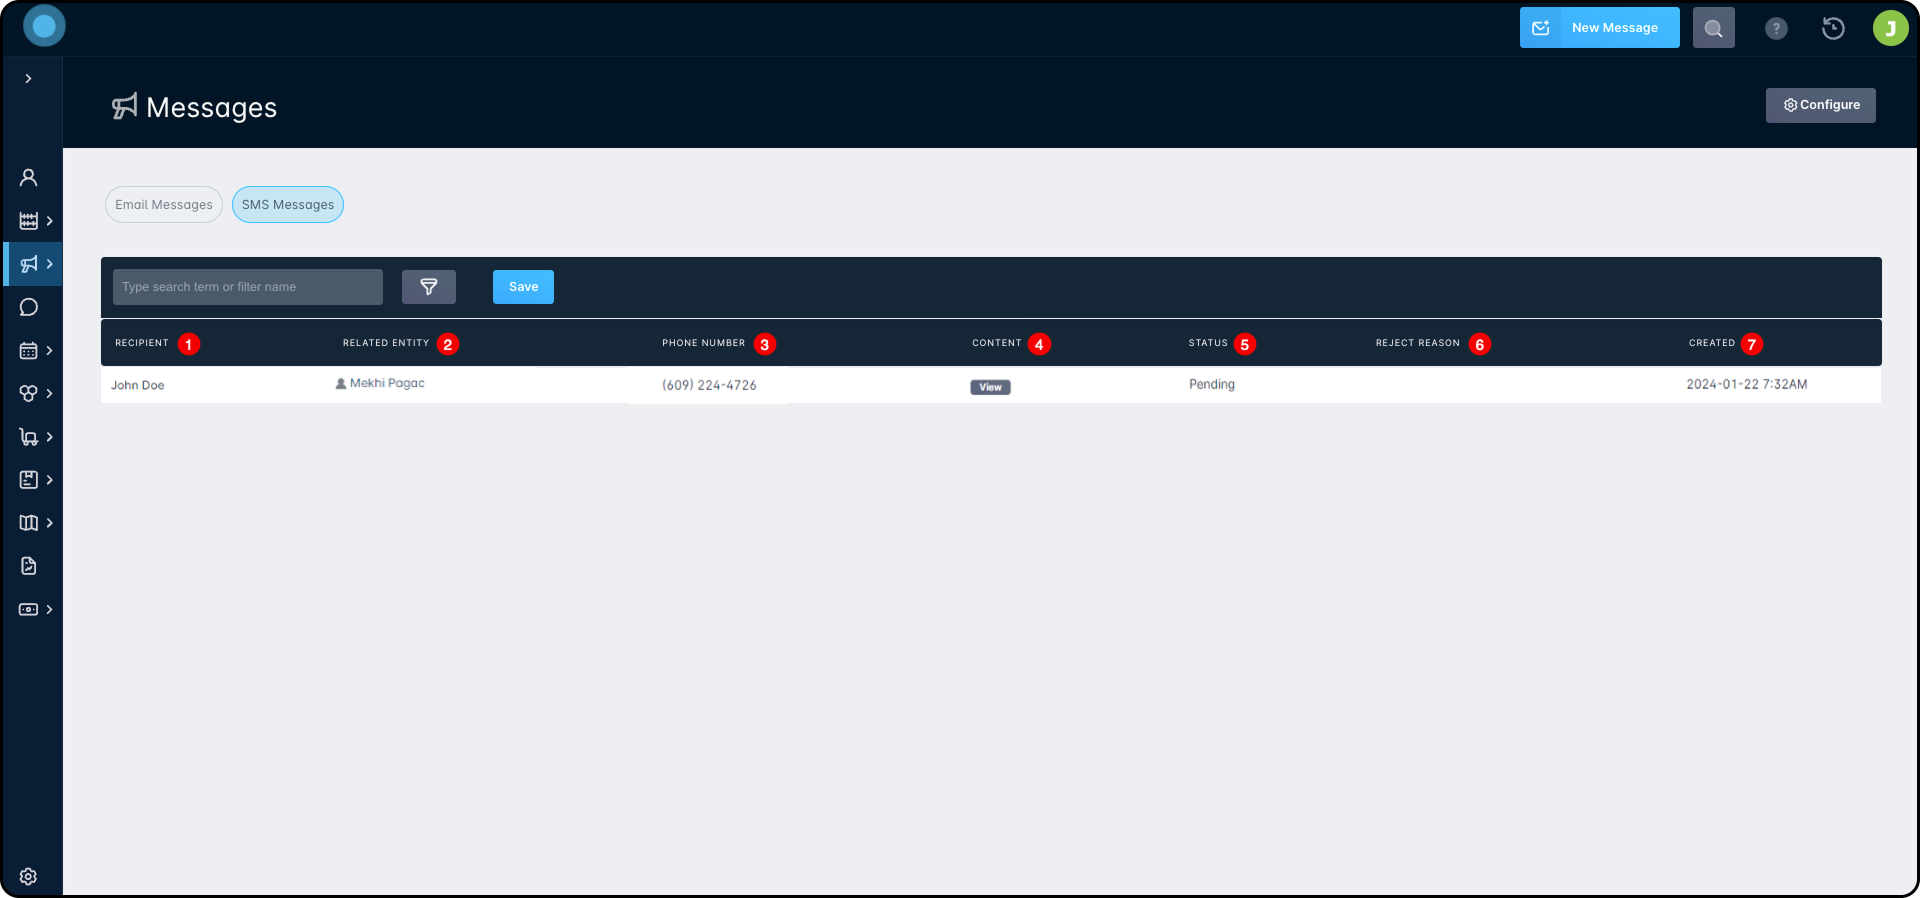
This page contains a table that lists most information you'll need to monitor and troubleshoot your SMS Messaging:
- The Recipient Name and Contact Type column provides information on whom the message was sent to
- The Related Entity column provides the account, or in some cases, Network Site, name.
- The Phone Number column provides the phone number the SMS was sent to.
- The Content column provides a “View” button, which can be clicked on to view the message sent to the customer, with the variables filled in.
- The Status column provides the current status of the SMS Message, which can be any of the following:
- Delivered
- Failed
- In Progress
- Insufficient funds
- Pending (Waiting to be processed)
- Sent
- The Reject Reason column
- The Created column
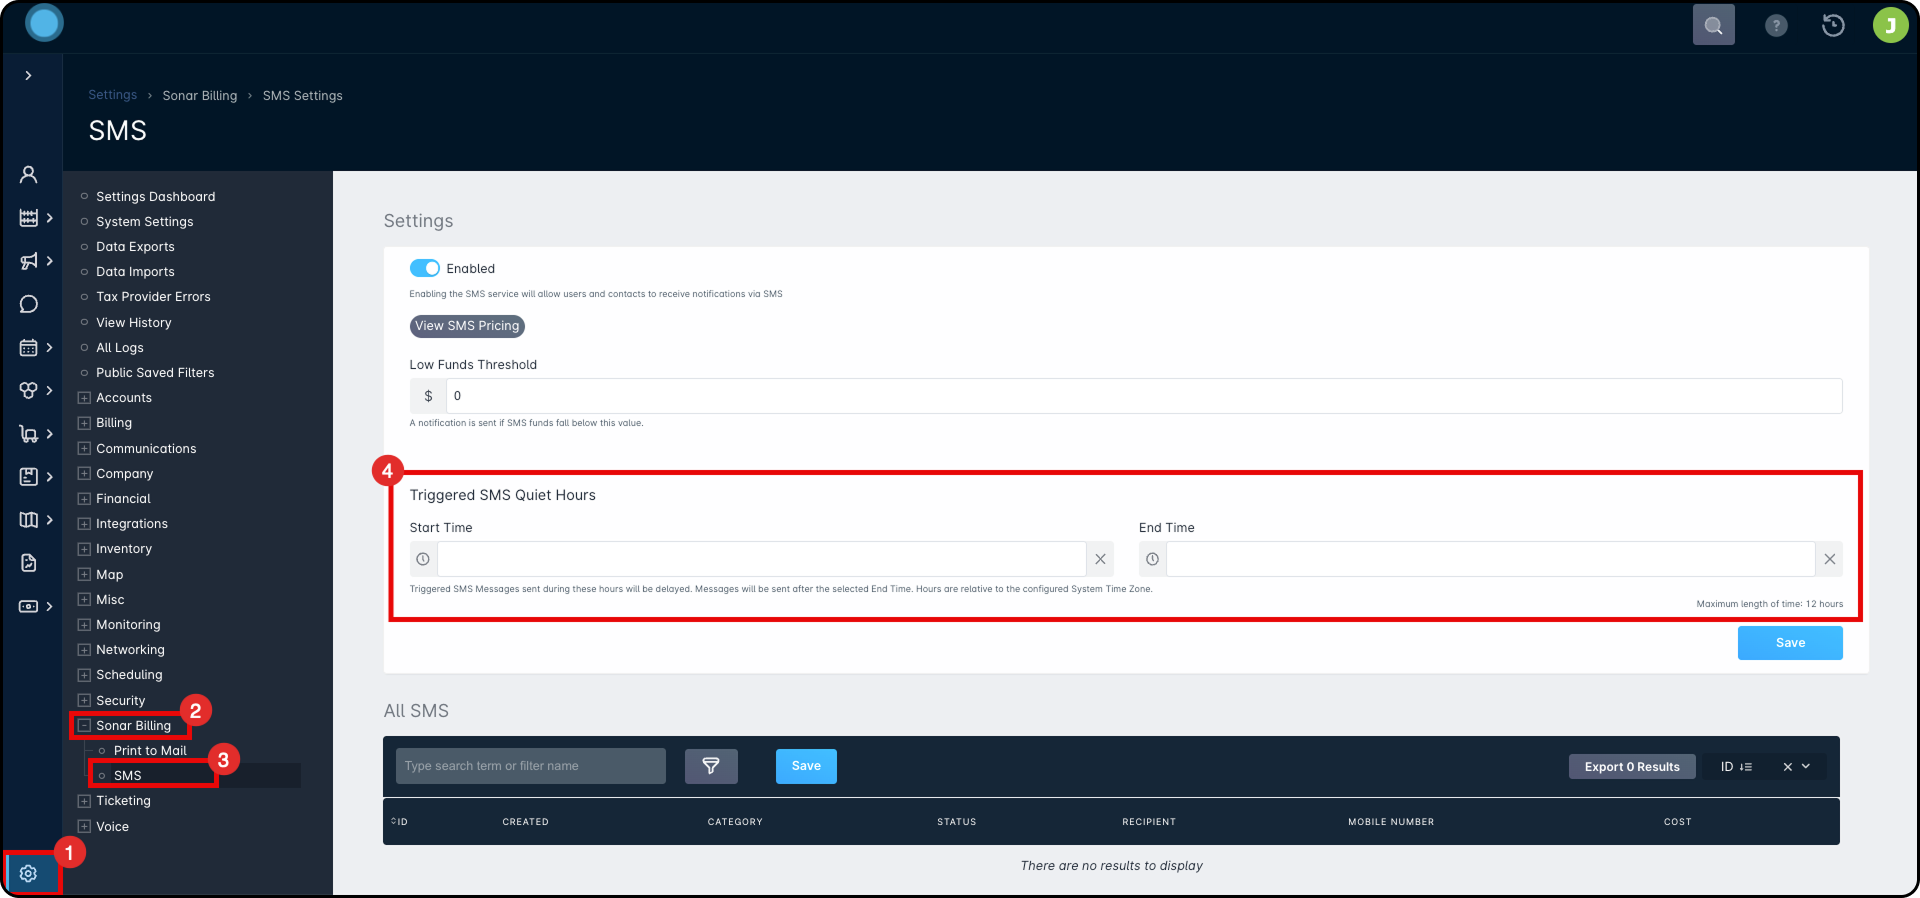
Configuring Quiet Hours
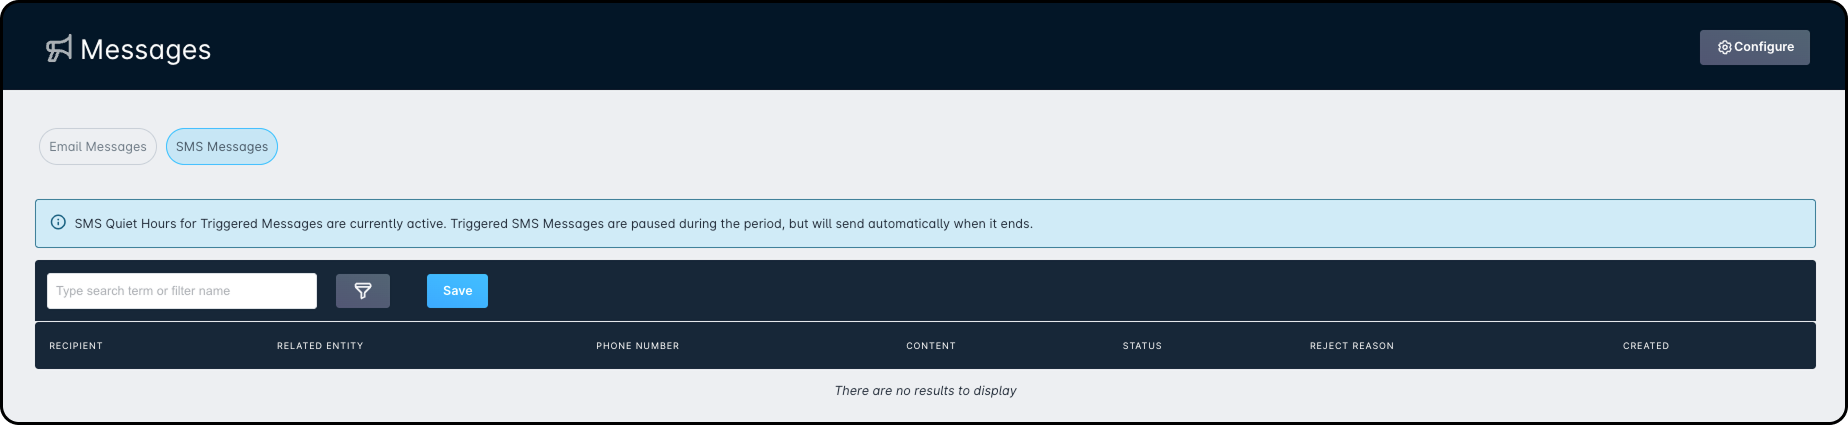
Quiet Hours let you set a time range when Triggered SMS Messages should not be sent. To set them up, go to Settings → Sonar Billing → SMS and enter a Start and End time. These times always use your system time zone.
Once added and saved, any Triggered Messages will remain in a “Pending” status, viewable by navigating to Communications → Messages → SMS Messages.
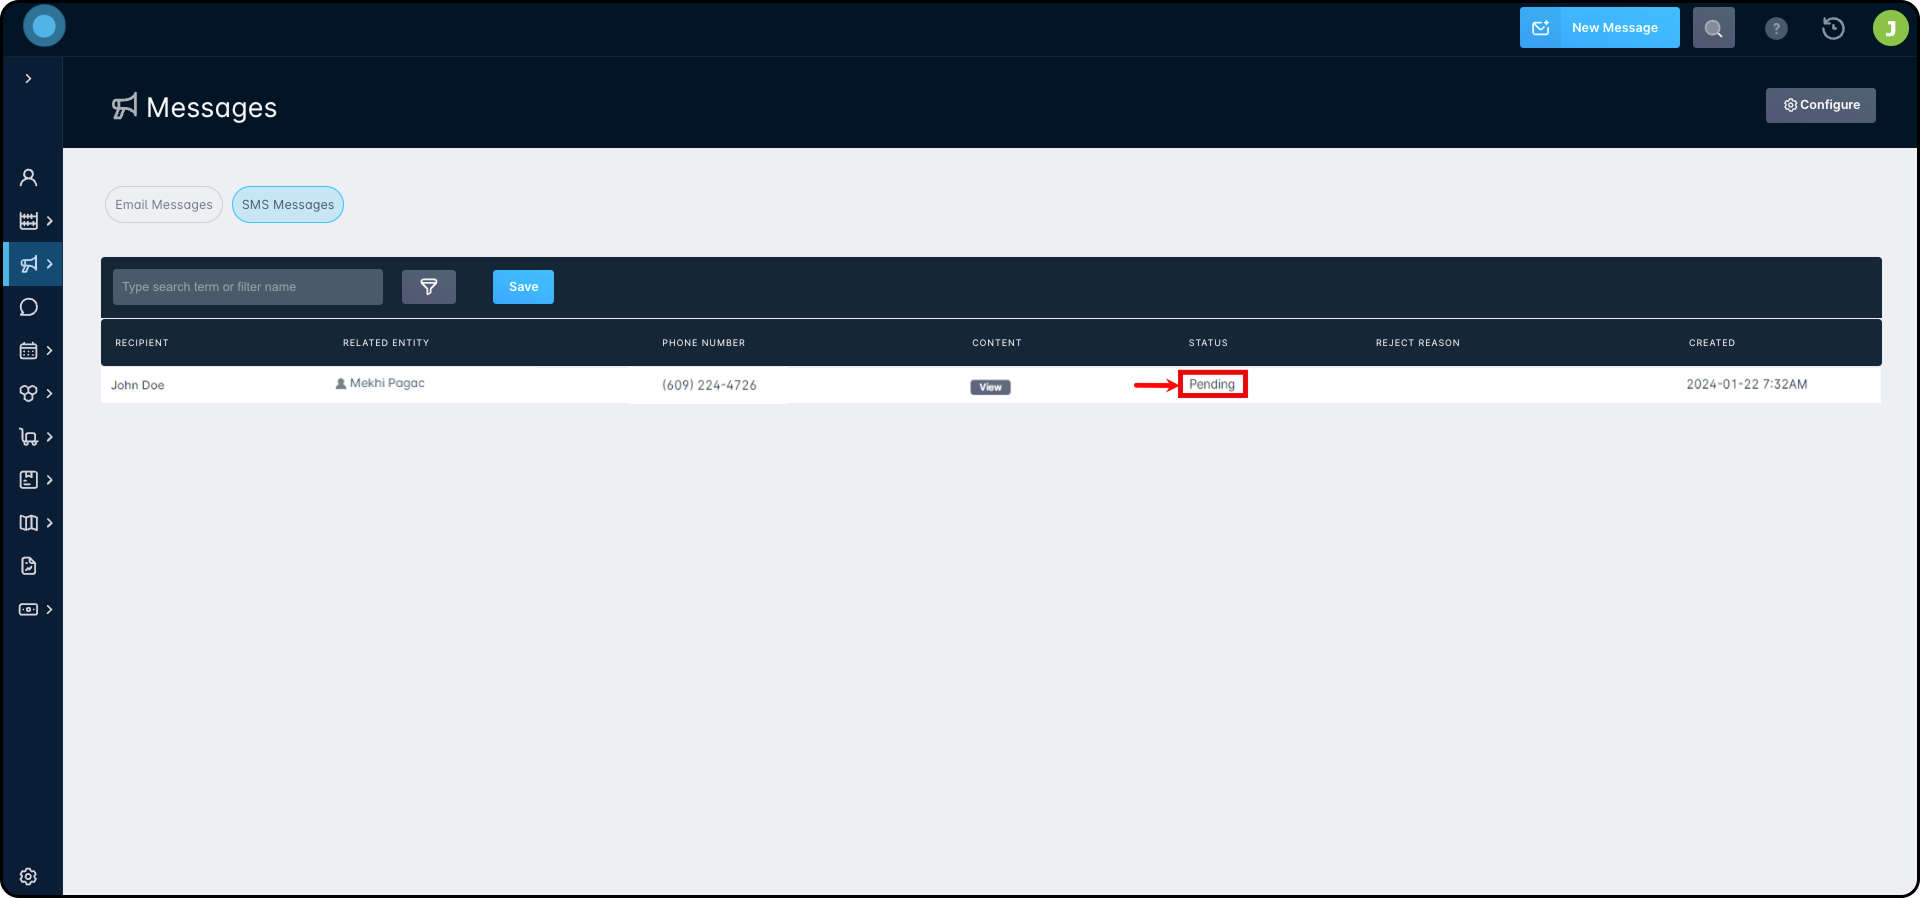
1. Communications > Messages > SMS Messages.
2. On the subscriber’s account under Correspondence at the top of the page.
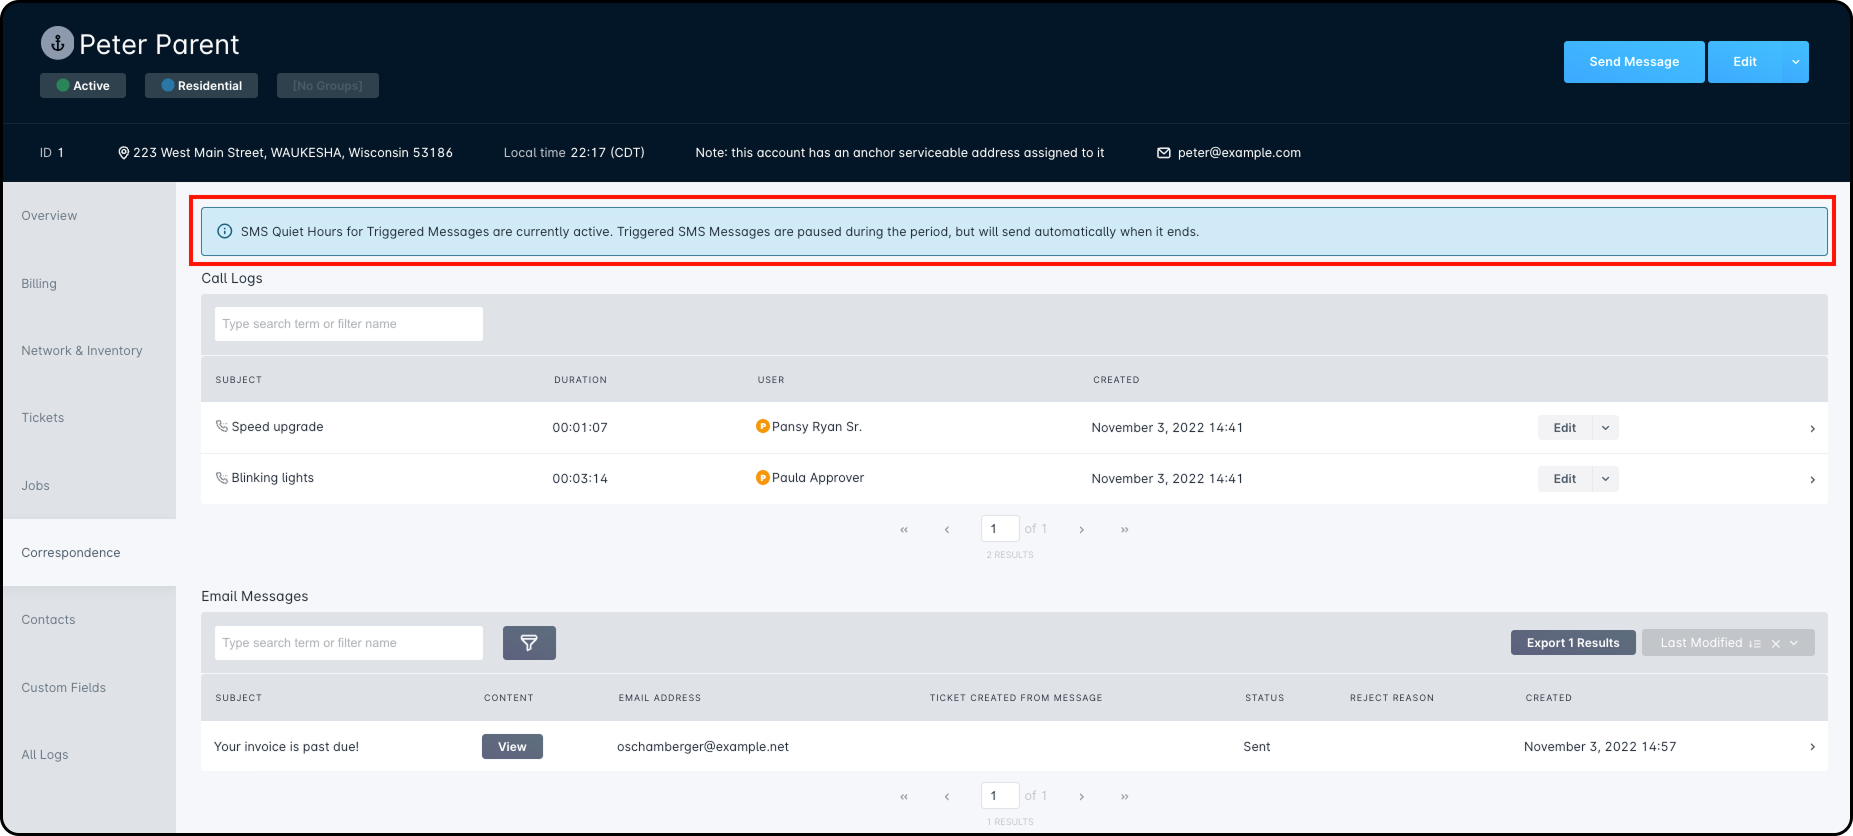
Once quiet hours are no longer active, the message will no longer be visible.
Complexity Behind how Per-message Costs are Calculated
When it comes to the pricing for Outbound SMS, the cost is not a fixed cost, but rather a variable one, and below will explain why.
Message Segments
An SMS message under 160 characters, containing no special characters/Links, or URLs, would be 1 message segment. As many of the SMS message templates include variable substitution (such as Contact Name, Job Type, etc.), it can be especially difficult to accurately anticipate how many message segments will be required for any particular message. Beyond the variability of variable substitutions, the inclusion of URLs and/or Unicode characters/emojis also has an effect on message segment calculation.
Special Characters
Unicode is an international character encoding standard that provides a unique number for every character across languages and scripts, making almost all characters accessible across platforms, programs, and devices. Emojis are a unique character type that too falls under the Unicode standard.