Table of Contents
Scheduling How-to: Creating and Booking a Job
 Updated
by Mitchell Ivany
Updated
by Mitchell Ivany
Read Time: 11 mins
In the Jobs and Scheduling: Overview article, we covered the main parts of Sonar’s Scheduling pages. That should give you the foundation you need to complete basic tasks in the scheduling screen.
Sonar’s scheduling tools are easy to use, but it can be harder to see how everything works together. Knowing what each section does on its own doesn’t always help when you’re trying to plan and manage schedules effectively.
In this article, you’ll learn how to use the ideas from Job Types: Best Practices, Setting Up Schedules: General Overview, and Example Jobs & Templates together. By the end, you’ll be ready to schedule and send field technicians to the right locations—whether that’s a network site or a customer’s address.
Technician Requirements
Role Permissions
Before you can schedule a technician on a job, you’ll need to create a Field Technician role (or a similar role that fits your workflow) and assign that role to the appropriate users.
Set Technicians Schedules
Set up each technician’s working hours so Sonar knows when they’re available. A well-planned schedule helps ensure you have coverage during all business hours.
For the basics—including how to create Schedule Availabilities (the main building block for job scheduling)—see Setting Up Schedules: General Overview.
Basics of an Availability
In this section, you’ll choose which users the availability applies to and which job types it covers—both allow multiple selections.
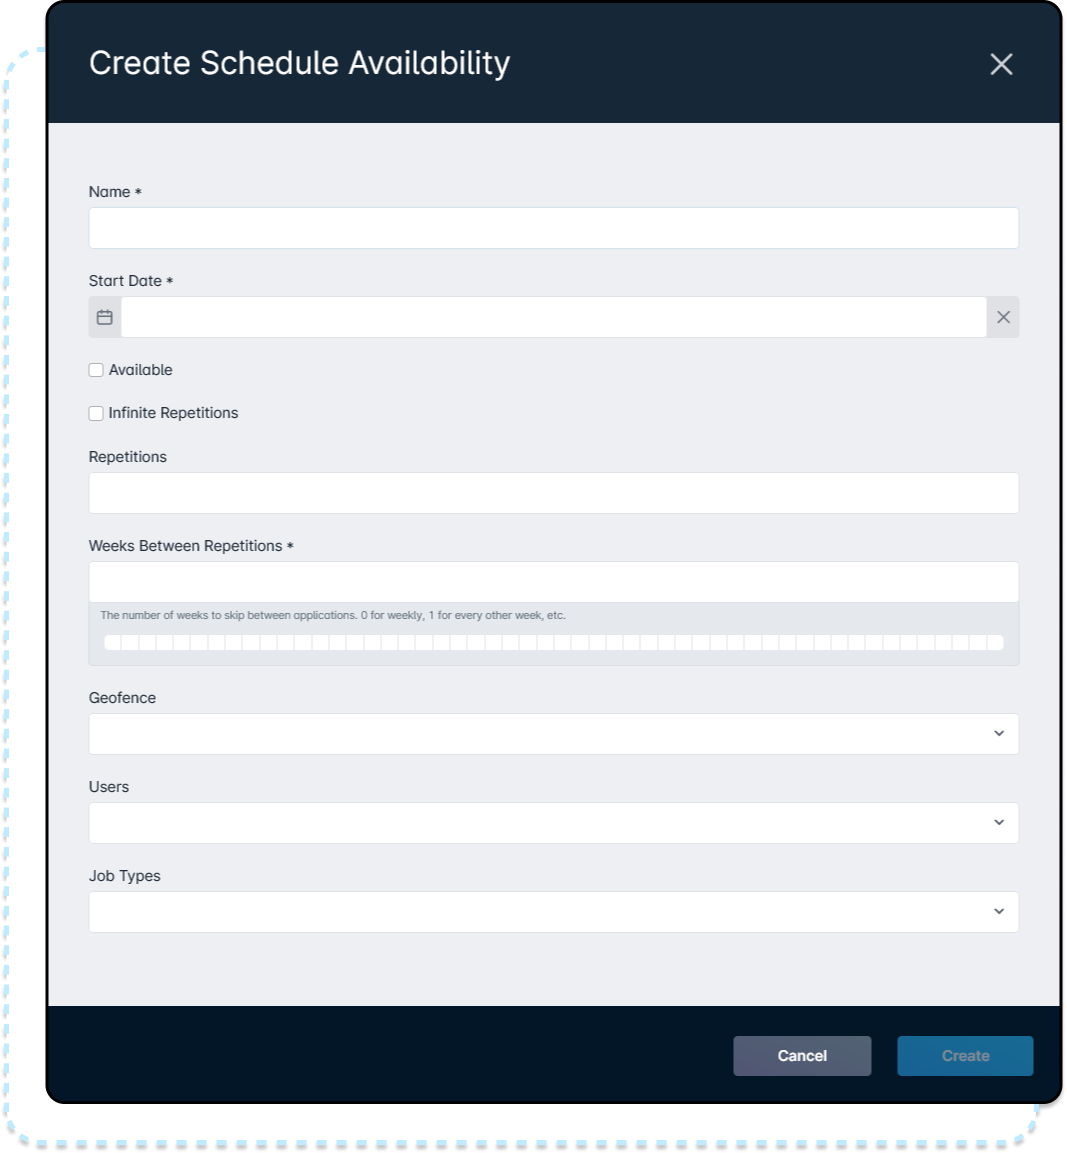
After you save the availability, set the days of the week and the hours it should apply to.

You can add more flexibility to your schedules by using Schedule Blockers, Time Off, and Schedule Addresses. These are all explained in the linked article above.
Configuring Inventory for Assignments
To make sure technicians have what they need to complete a job, you may want to assign inventory items to them. Before you can do that, you’ll need to set up your inventory system first.
All setup steps are covered in Getting Started with Inventory. Also review Setup of Inventory: Manufacturers, Categories, and Assignees—it explains how to assign inventory to things like vehicles, as well as vehicles to technicians, which can be important for technician workflows.
Field Tech App
The last requirement is the Sonar Field Technician app. It gives technicians an Android or iOS mobile app with data-friendly and offline access to Sonar, so they can view details and complete jobs without a laptop or relying on dispatch for every question.
For more information, see the Sonar Field Tech App article.
Forming the Job Requirements
Once your technicians are set up, the next step is setting up your jobs in Sonar. Jobs also need configuration so technicians have clear instructions on what to do when they’re scheduled.
- Job Types define what the job is, including the expected time needed and other key settings. Job Types are required to create jobs in Sonar, and well-built Job Types also support Sonar’s automation. Learn more in Job Types: Best Practices.
- Tasks let you list the work that needs to be completed on a job, an account, and other areas in Sonar. Setting up tasks helps create consistency and clear expectations.
- Task Templates make tasks automatic. A Task Template is a set list of tasks that Sonar will attach to every job of a specific Job Type. For more information, see Tasks & Task Templates: Overview and Applying Task Templates to Jobs.
Creating a New Job
With the setup complete, you can now create jobs for Accounts and Network Sites. In the next sections, we’ll create two sample jobs to show different ways to create jobs in Sonar—from an Account/Network Site, from a Ticket, and by cloning an existing job.
Booking a Job From an Account
The first way to create a new job is to book it from an Account. This method is also very similar when creating jobs from Network Sites.
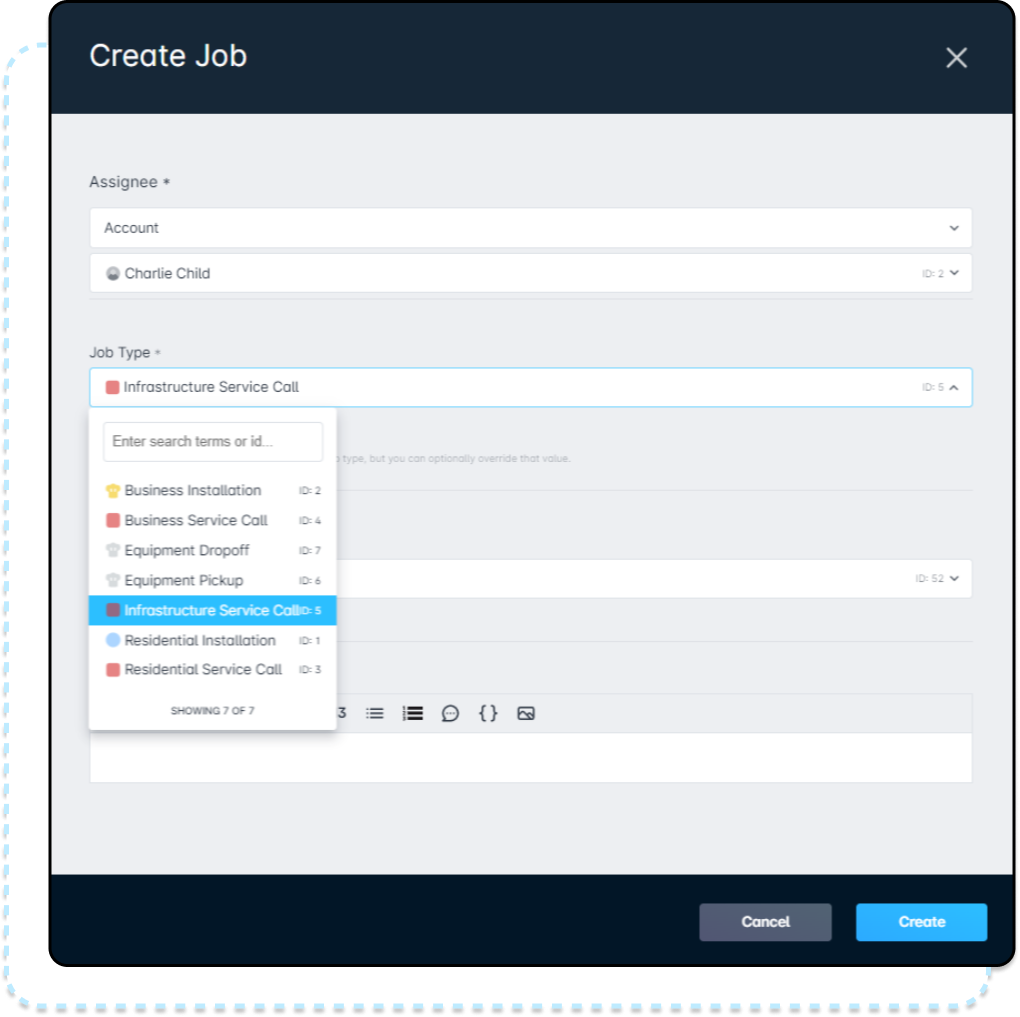
In this example, we'll create an installation job for a residential account using the Residential Installation Job Type.
- Go to the Account List and select the account.
- Click the Account Name to open the account overview page.
- Open the Jobs tab and click Create Job.
- In the Job Type dropdown, select Residential Installation (or your preferred Job Type).
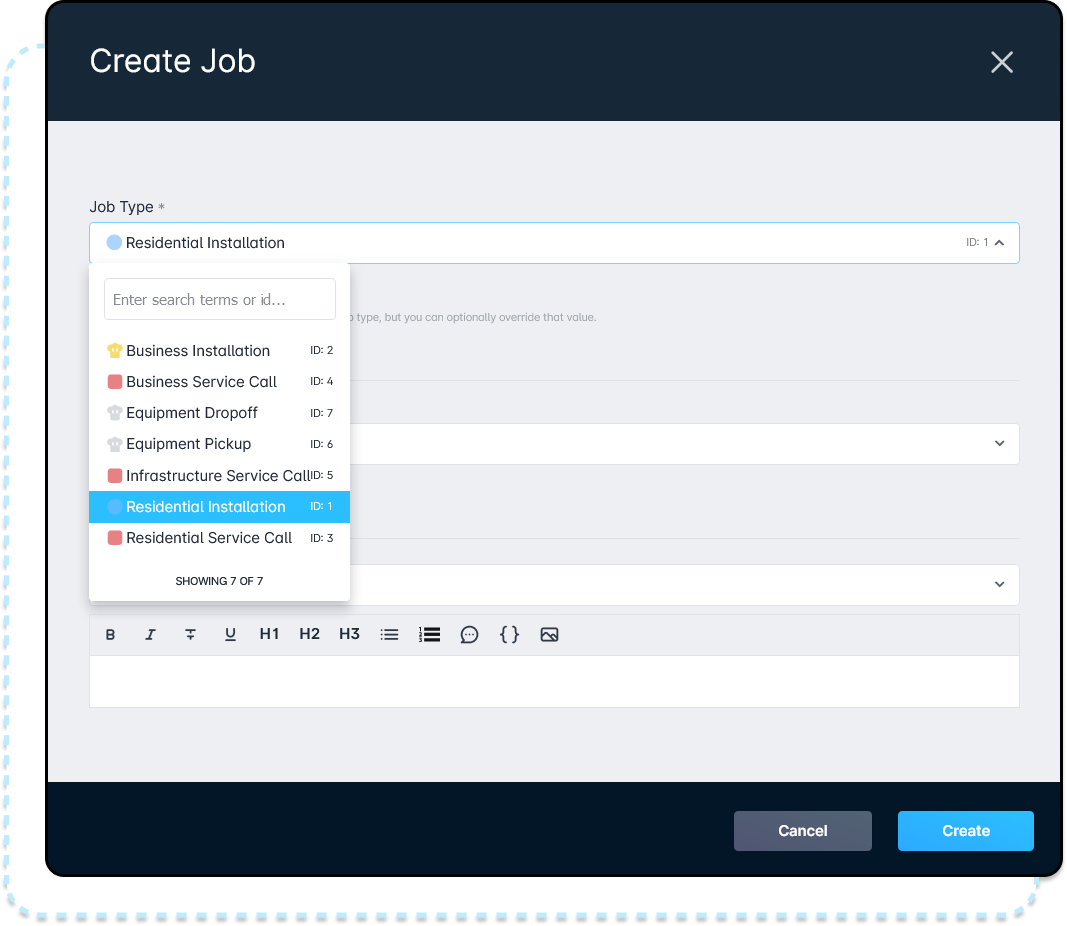
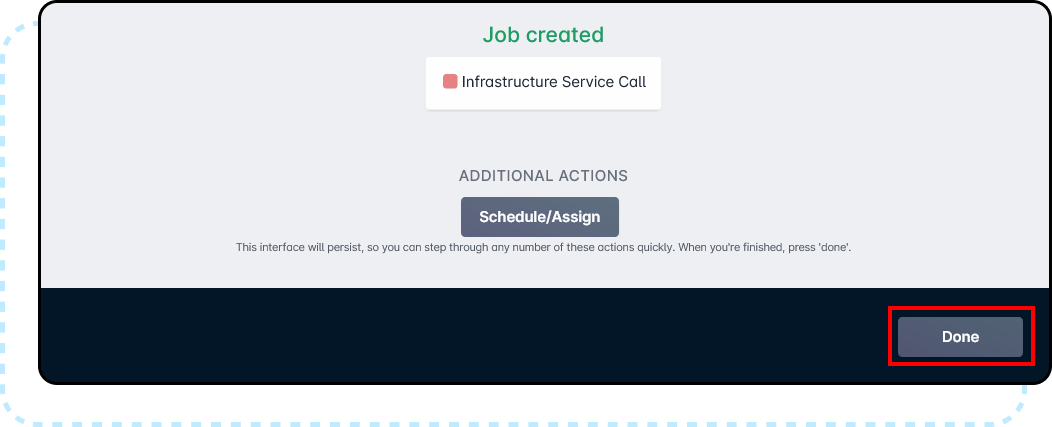
- Click Create (bottom-right), then click Done on the next screen.
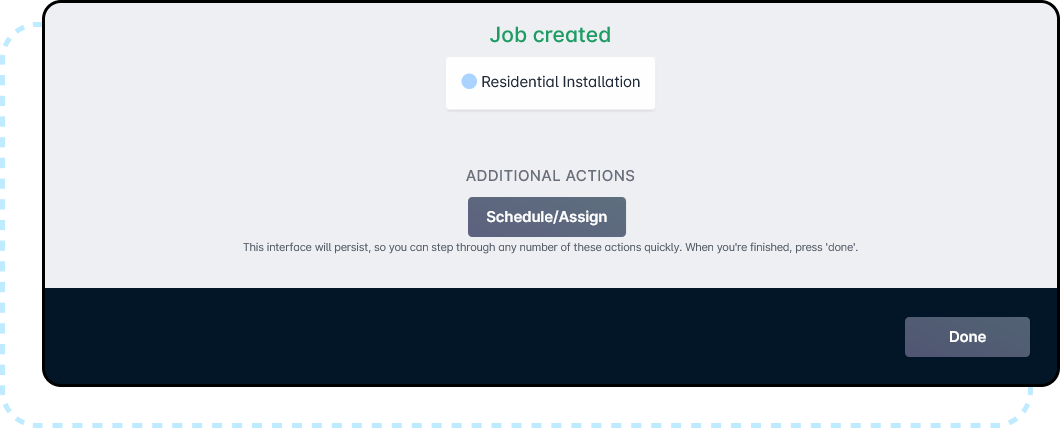
The job is now created and placed in the dispatch queue, ready to be scheduled, and we’ll cover how to schedule it later in this article.
Booking a Job Through a Ticket
You can also create a job from an existing ticket. The ticket can be created by a support technician or generated automatically, and it can be linked to the job.
- Go to the Ticket List and find the ticket that needs a job.
- Click the ticket name to open it.
- Next to Edit, open the dropdown and select Create Job.
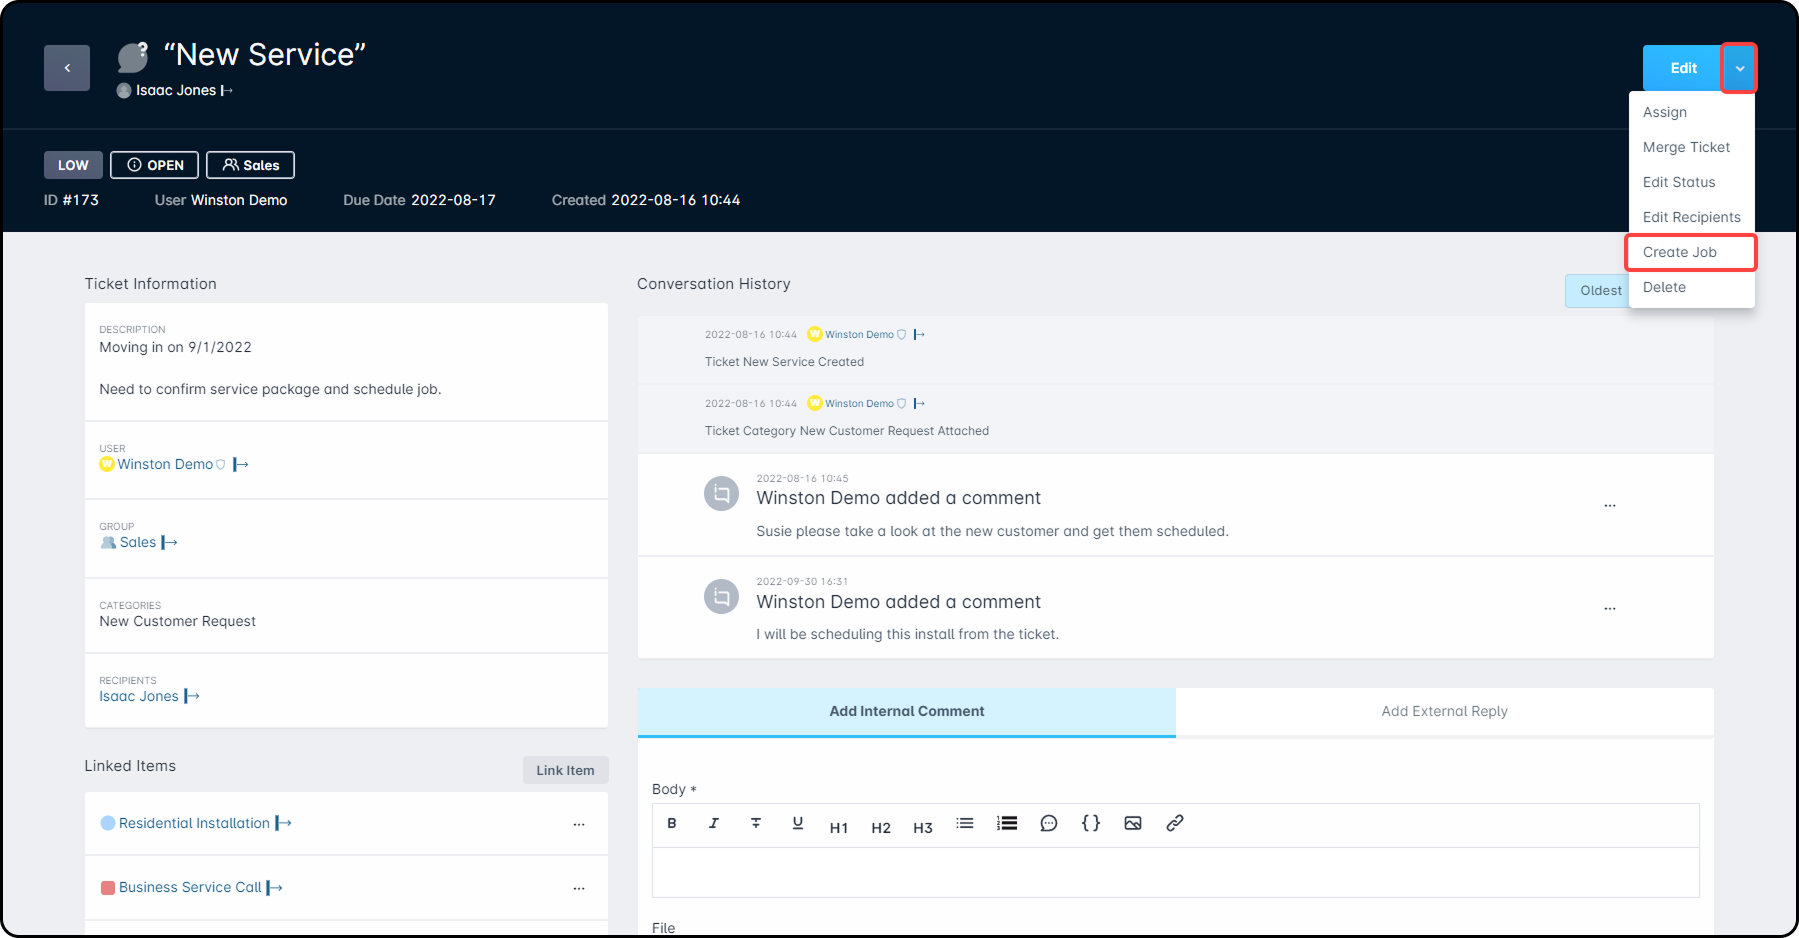
- In the Job Creation window, choose the Job Type.
 Because the job is created from a ticket, it’s automatically assigned to the same assignee as the ticket—whether that’s an Account or a Network Site.
 - Click Create, then click Done.
The job is now created and added to the job queue, ready to be assigned to a technician.
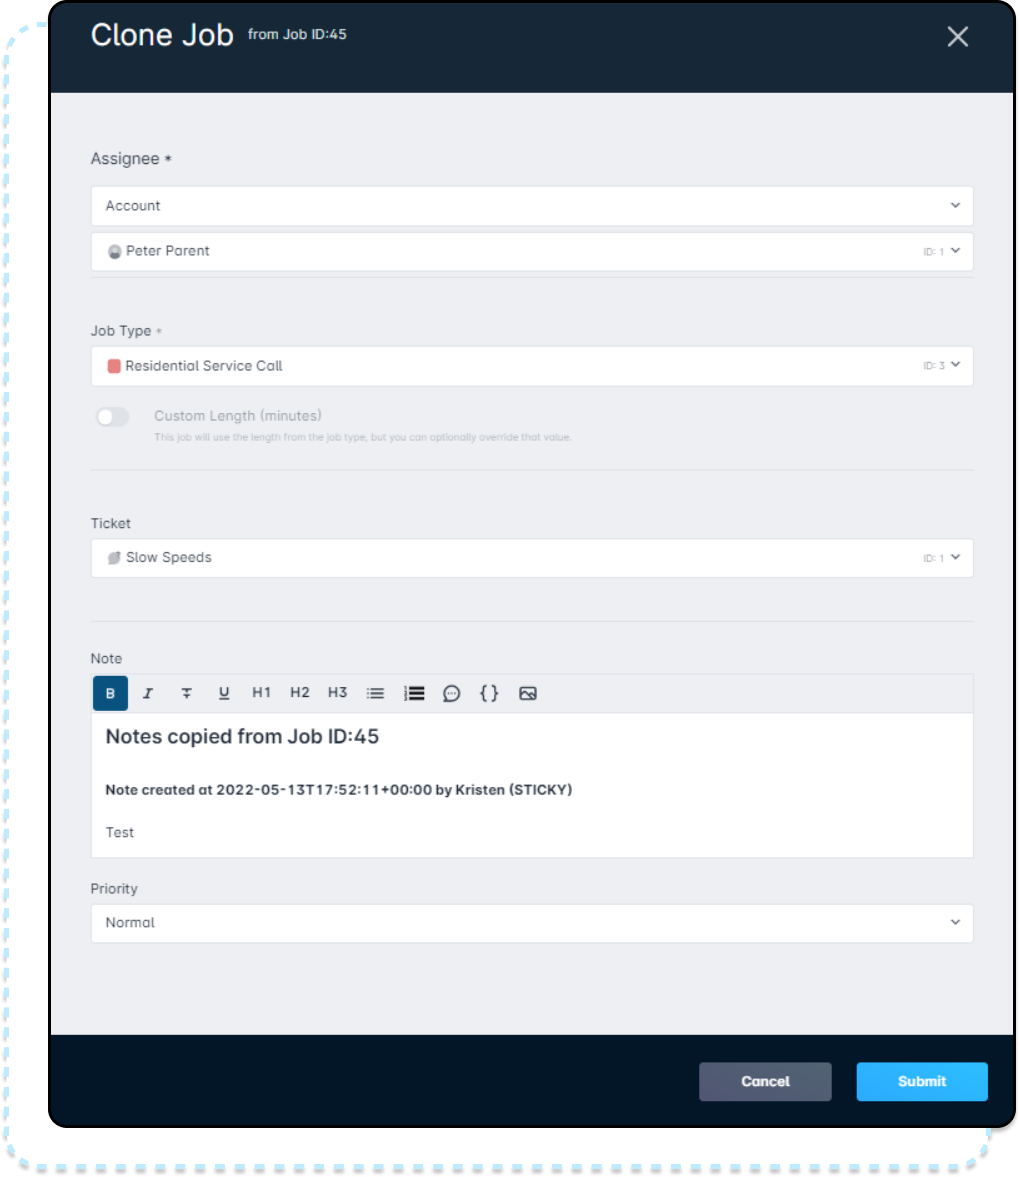
Cloning a Job
Cloning a job lets you create a new job using an existing one as a starting point. The new job is still its own separate job, but it copies the original job’s notes. You can clone any job type in any status, including jobs that are Completed or Failed.
You can clone a job in three places:
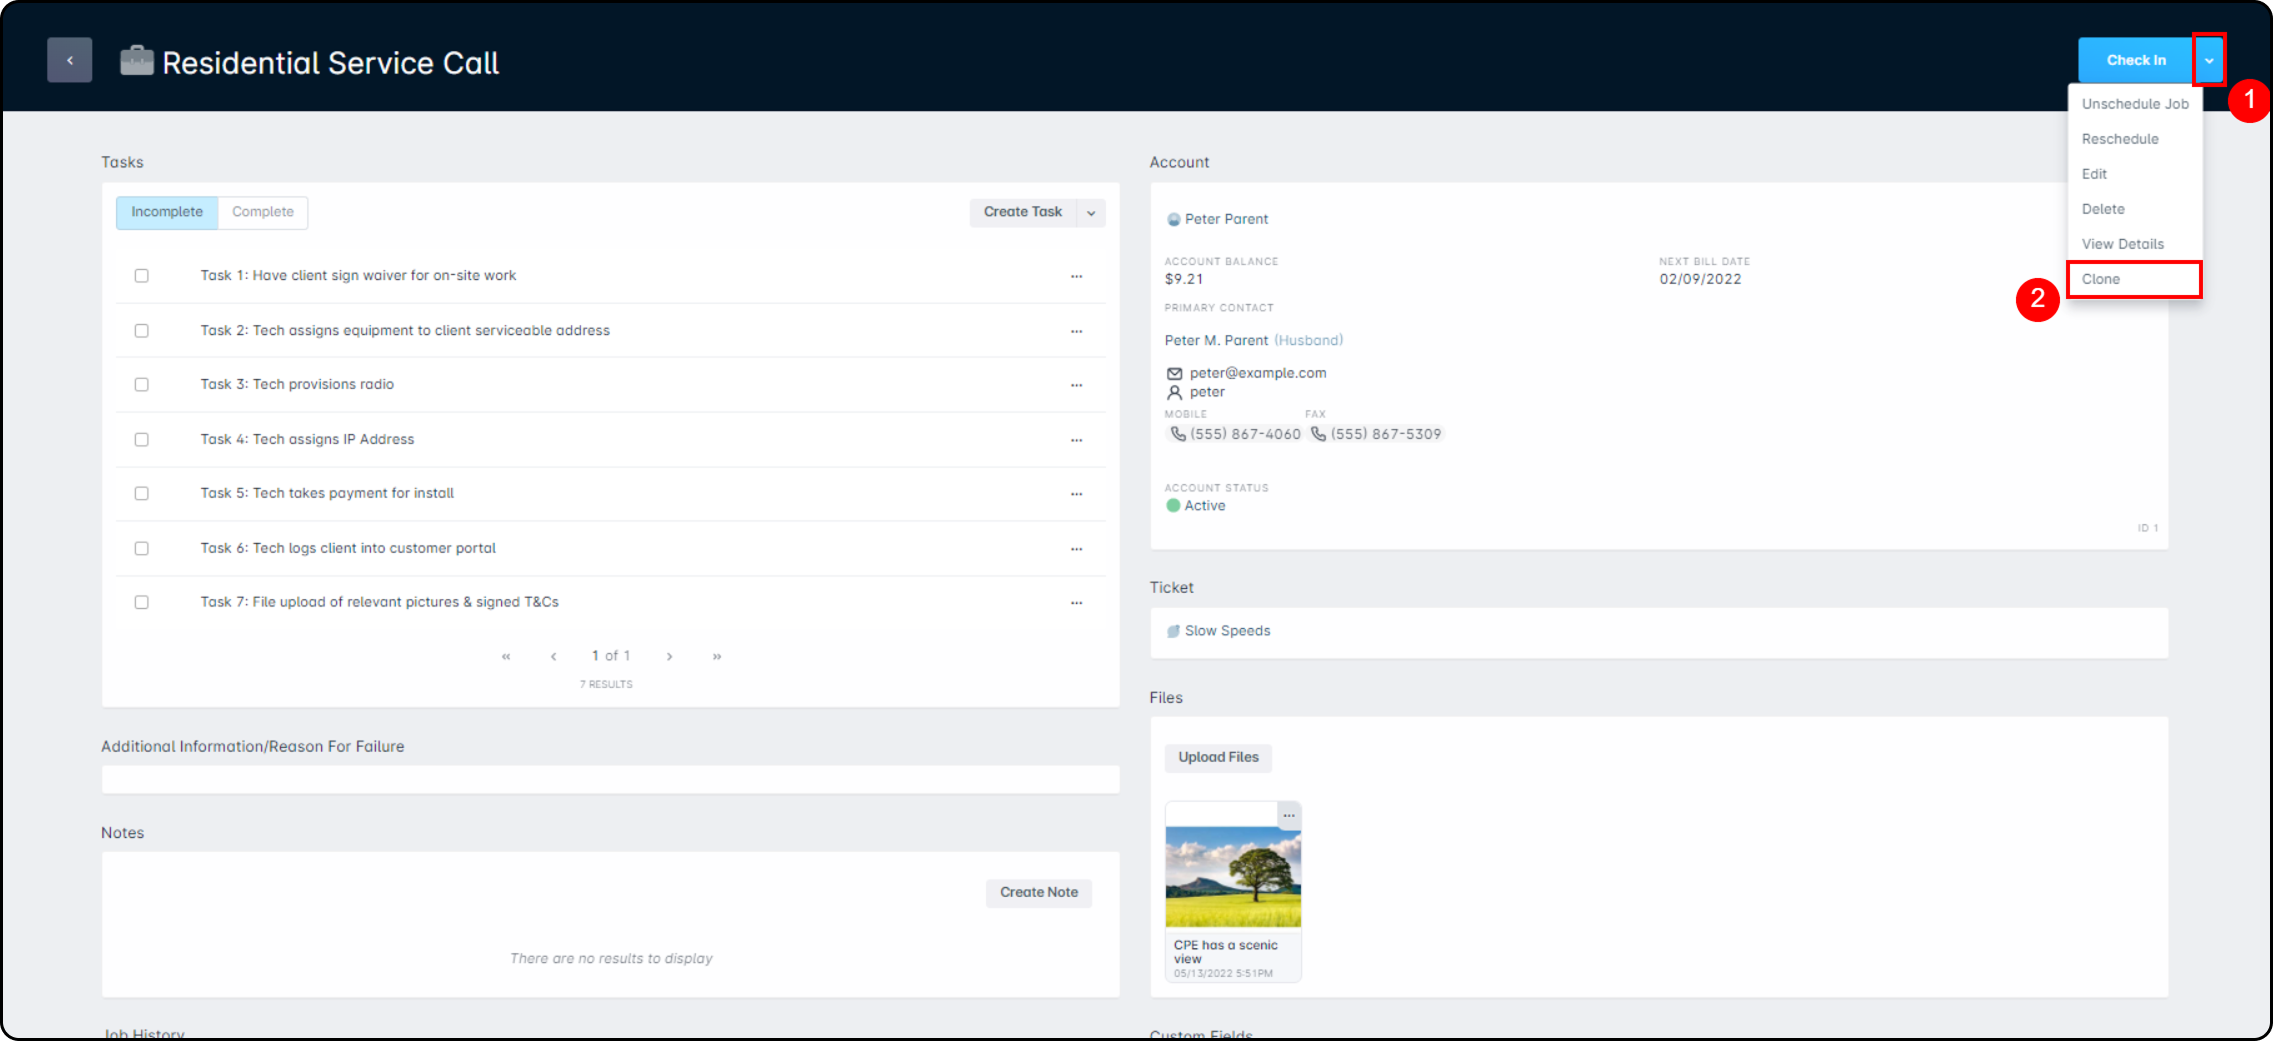
- From the Job Overview page: Click the dropdown arrow next to Check In, then select Clone.
- From Jobs Table View: Find the job, click the dropdown arrow next to Check In, then select Clone.

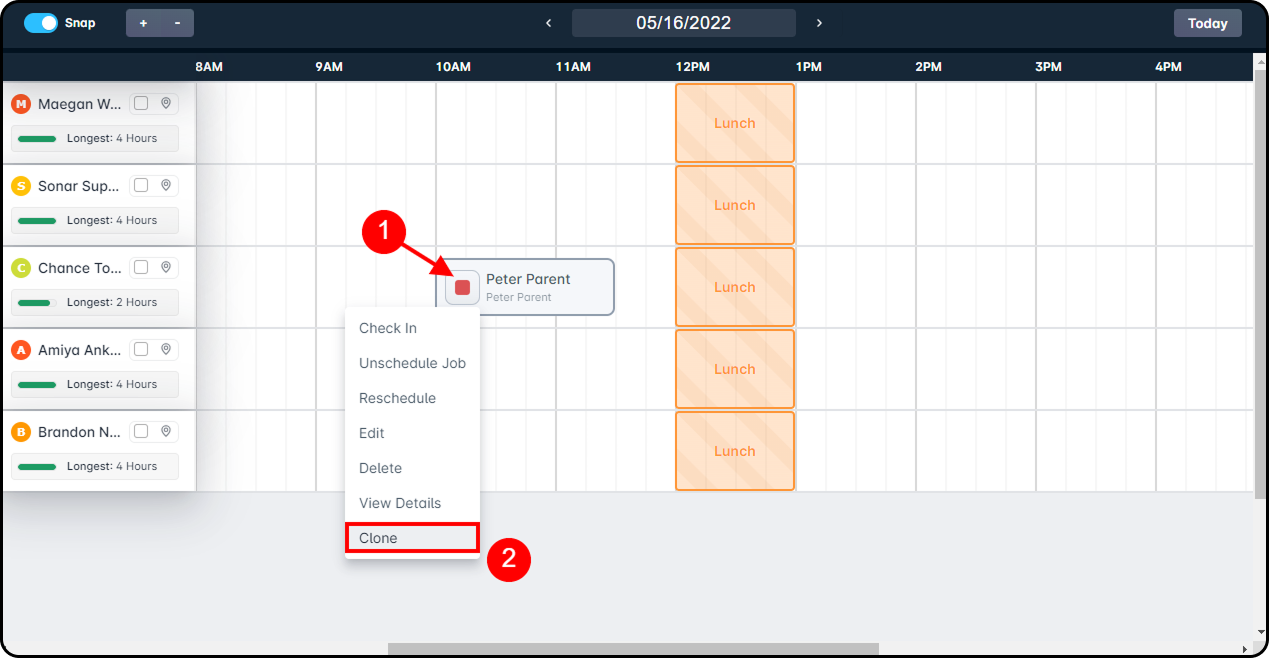
- From Dispatcher View: Find the job on the calendar or in the awaiting scheduling list, click the job icon, then select Clone.
Cloning opens the Clone Job window, which looks like the Create Job window. It will already include the Job Type, Ticket (if there is one), and a Note (including its priority). The note will mention it was copied from another job and include the original job ID. You can edit the note like normal. If the original job was Completed or Failed, the note will also include any completion or failure details.
After cloning, you can schedule the job the same way you would any new job.
Job creation versus job cloning
1. Is the customer changing the job details or scope? Create a new job or add/update tasks on the existing job.
2. Did the technician check in but couldn’t complete the work? Fail the job, then clone it and add notes explaining what happened.
3. Does the customer only need a new appointment time? Reschedule the same job—no other changes needed.
In general, if a technician checked in and the job was failed, the best next step is to clone the job.
Scheduling the Technician
Once a job is created—no matter whether it’s for an Account or a Network Site—you’ll need to schedule it for a technician. In this section, we’ll cover two ways to do that.
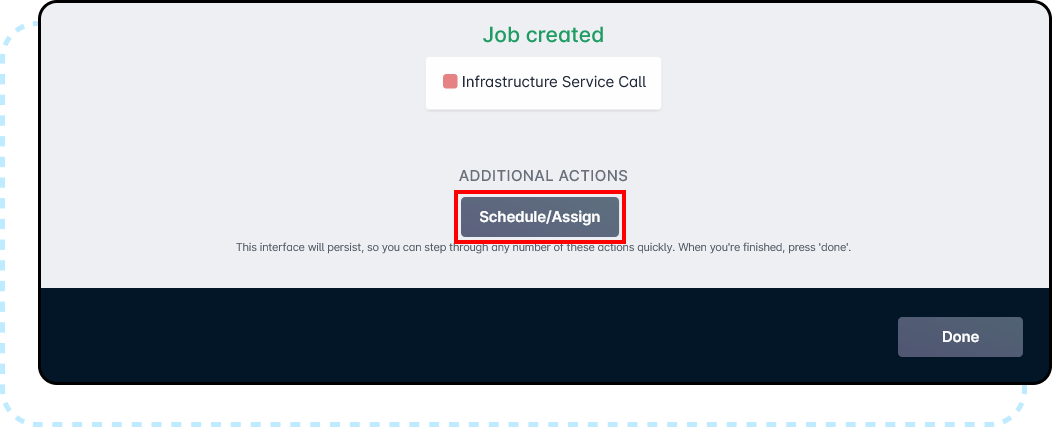
During Job Creation
When you create a job, you can schedule and assign it right away from the job card. Using the Infrastructure Service Call job as an example, here’s how it works.
- On the second page of the Job Creation window, click Schedule/Assign.
- This opens the Schedule Job window, where you choose the technician(s) and a time slot.
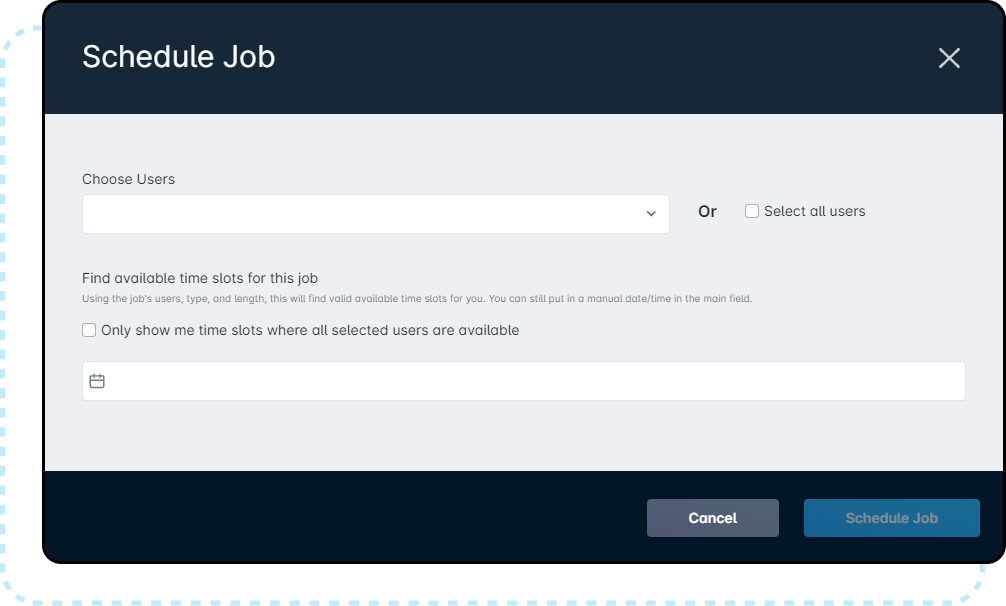
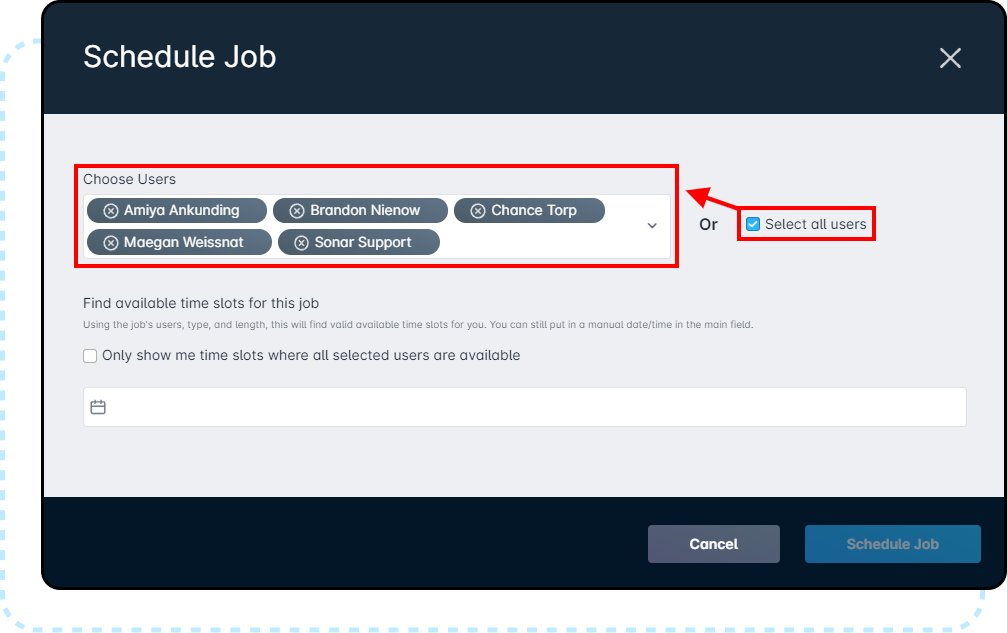
- First, select the technician(s) in Choose Users, or use Select all users if needed.
- Next, choose whether you want to see time slots when all selected technicians are available or when any of them are available.
Select a date (one day or a date range). After you click out of the calendar, Sonar will show a list of available time slots along with the technician names.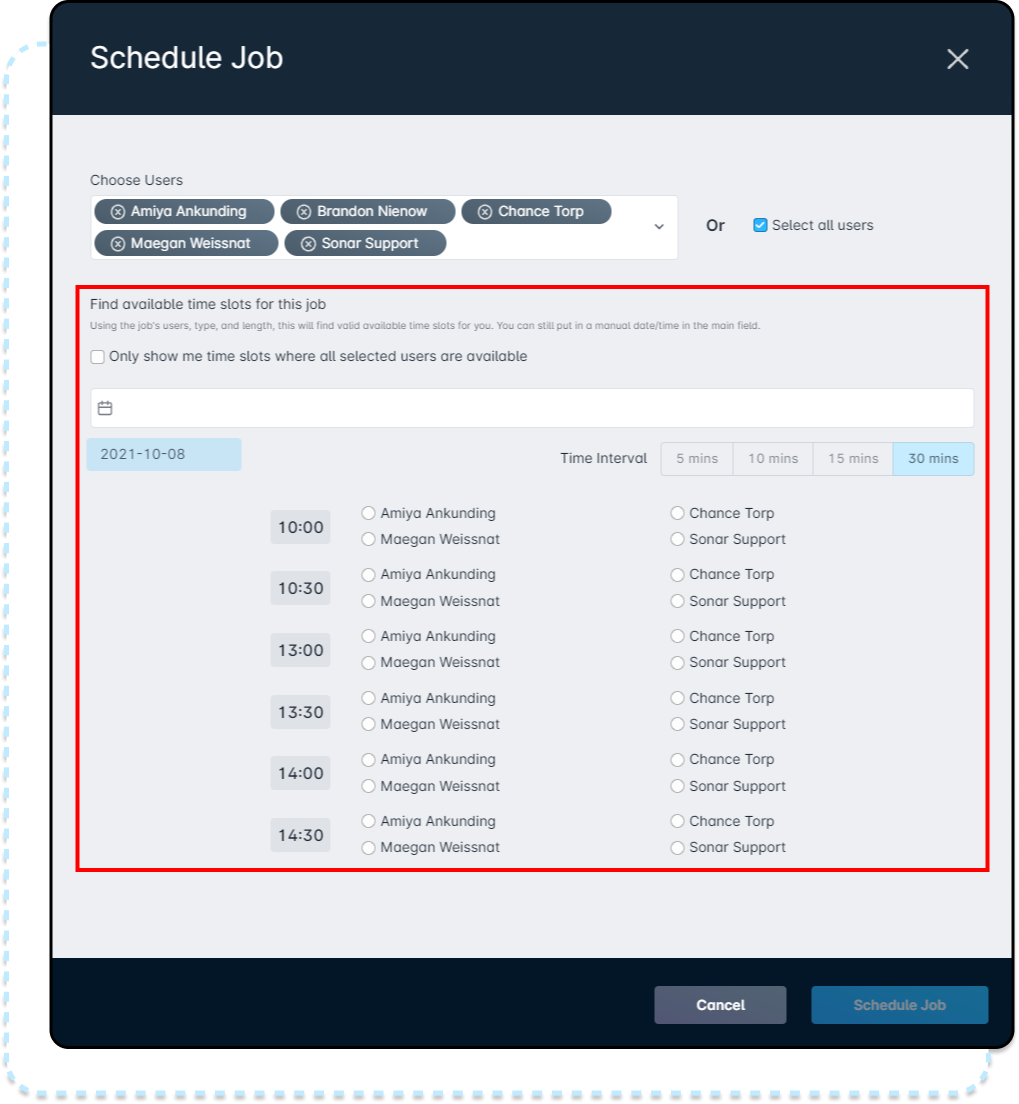
If you select a date range, use the date list on the left to view available time slots for each day.
If you need more detail, use Time Interval to show slots in 5, 10, 15, or 30-minute increments.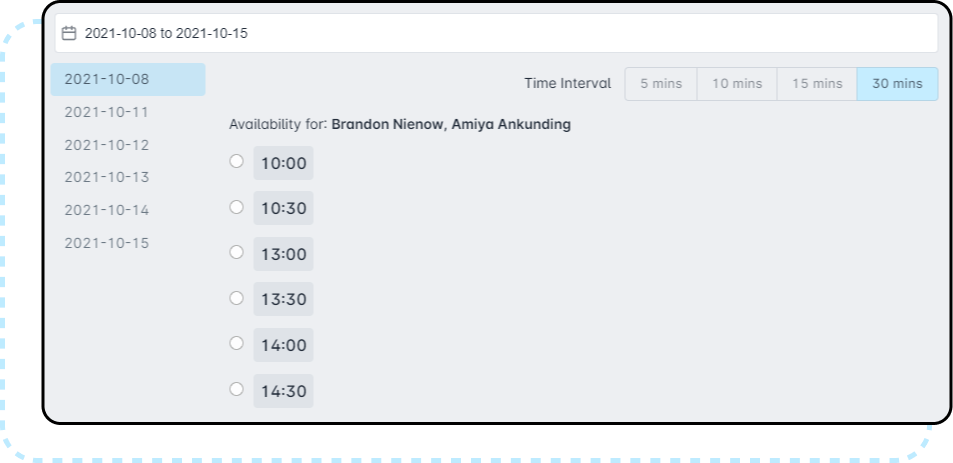
Booking multi-technician jobs
To schedule a job with two technicians, select both technicians, then choose the option to show only time slots where both are available.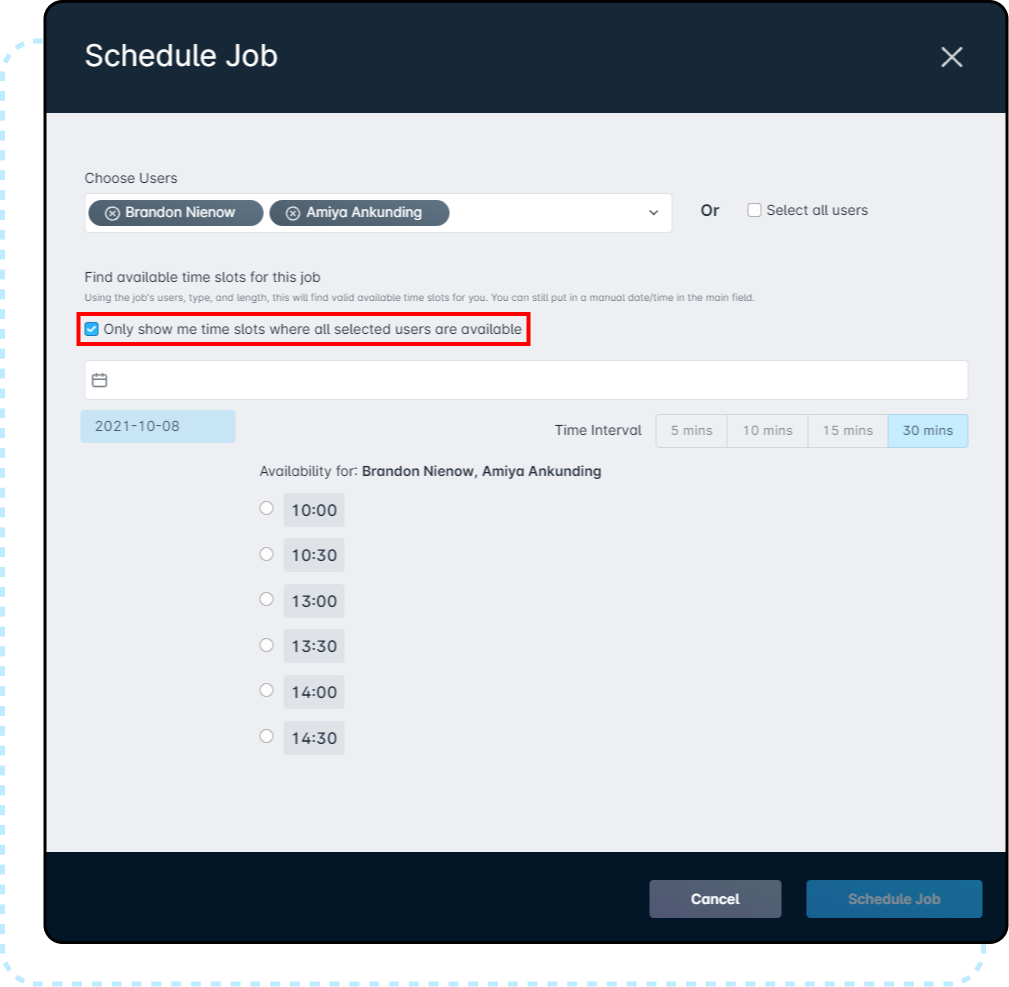
Next, choose an available time slot, click Schedule Job, and the job will be scheduled for both technicians. - First, select the technician(s) in Choose Users, or use Select all users if needed.
From the Scheduling Calendar
In many organizations, a dispatcher handles technician scheduling. The Dispatcher View in the Scheduling tab lets your dispatch team schedule and adjust jobs using a visual calendar. For a full overview, see Jobs and Scheduling: Overview.
To open Dispatcher View, go to Scheduling in the main menu, then select the Dispatcher View sub-tab.
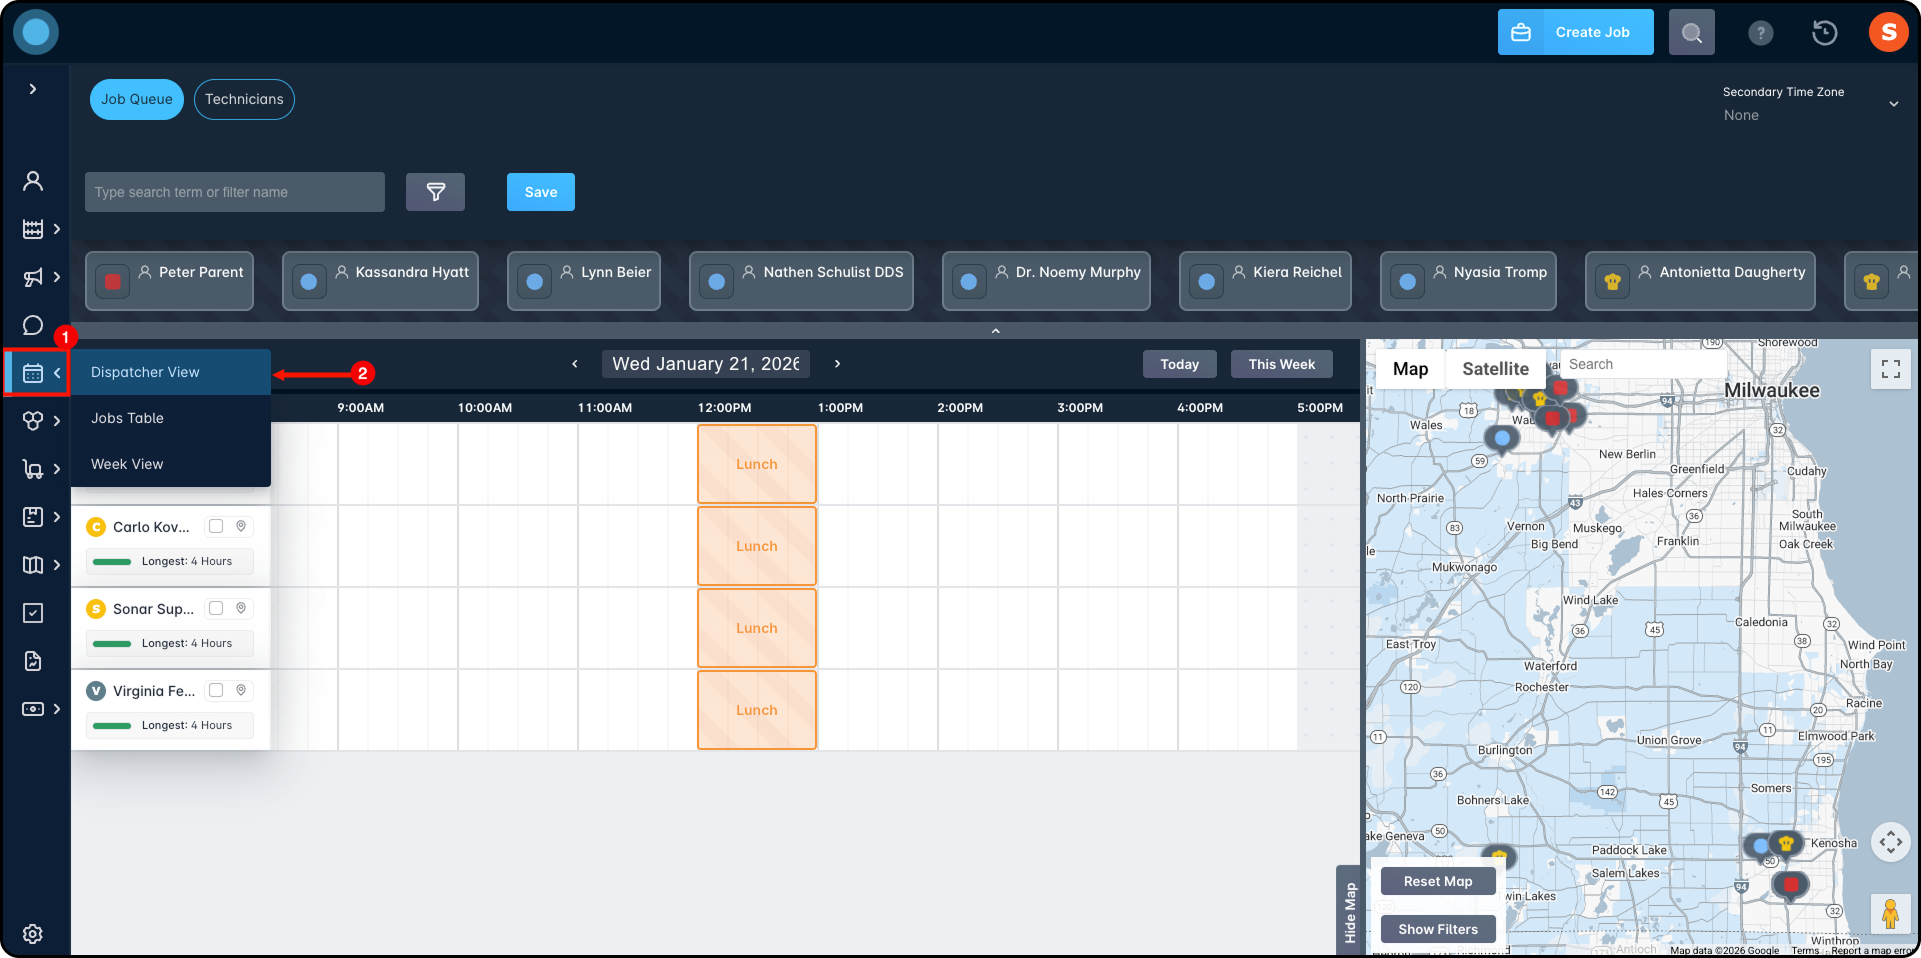
With the Dispatcher view open, you'll see a list of all queued jobs along the top banner. To schedule a job from the Dispatcher view, drag the job onto the schedule below:
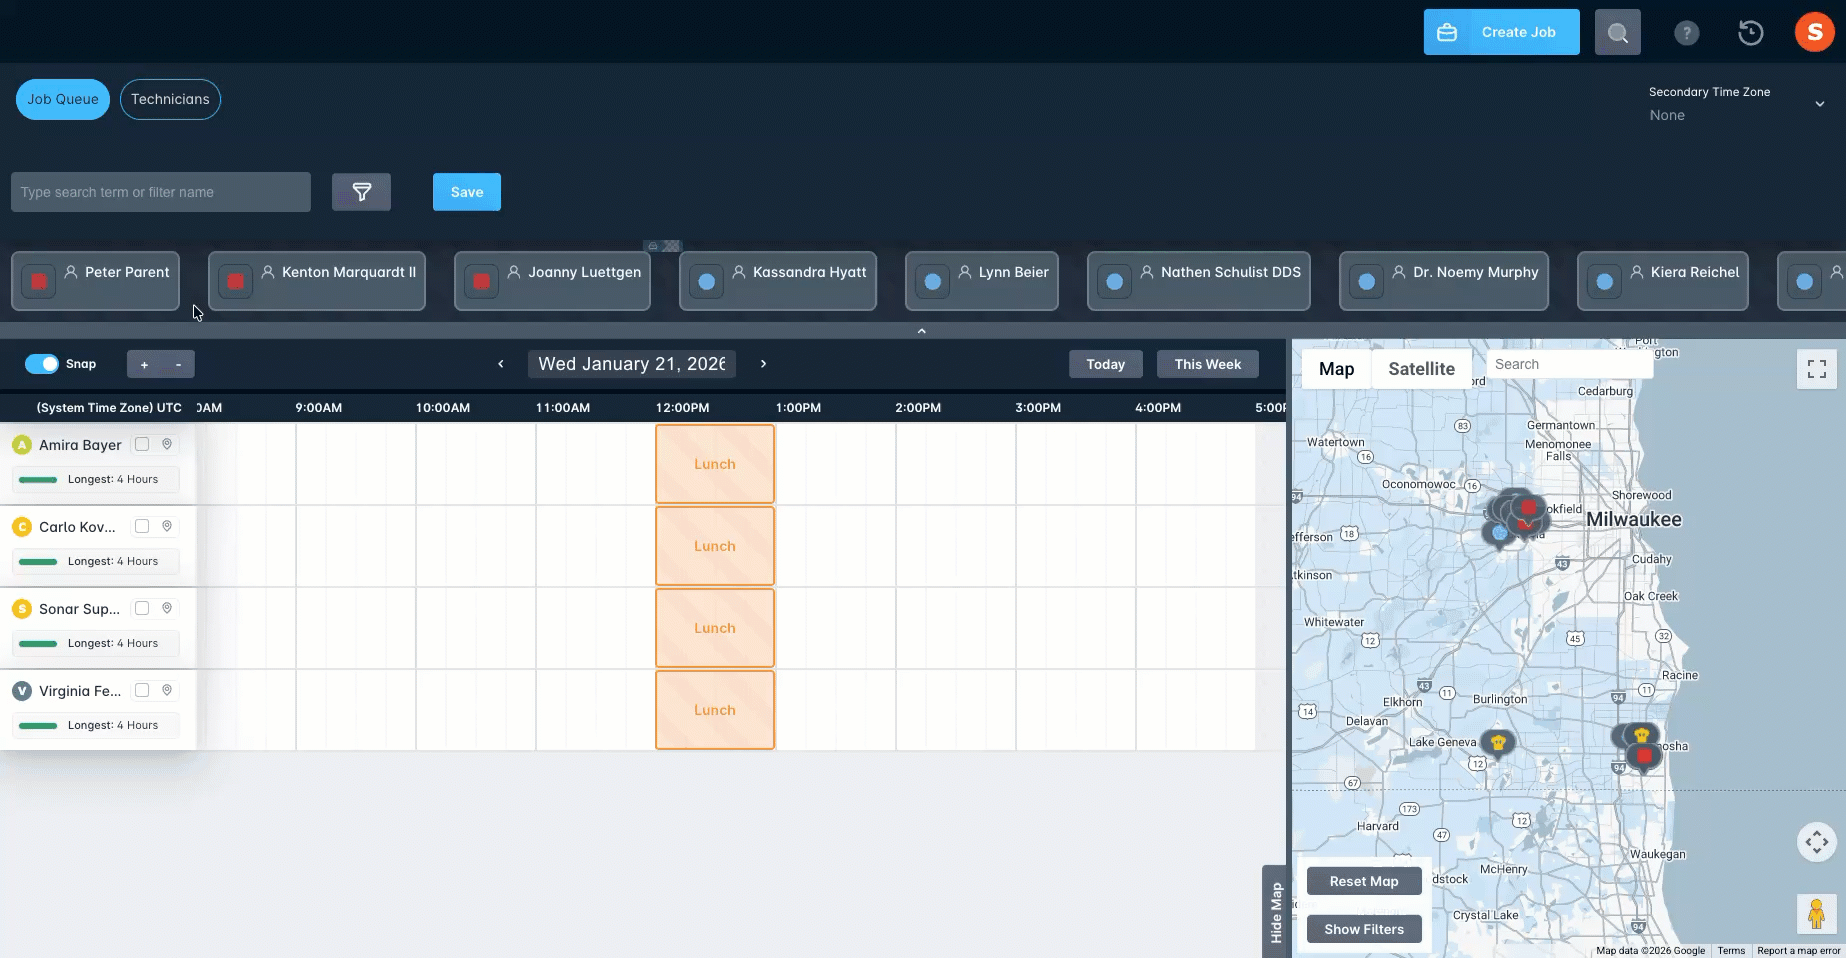
As you create jobs, Sonar adds an icon to the map at the job’s service address. If you hover over the icon, you’ll see a quick summary of the job. You can also click Show Filters (under Reset Map) to filter which jobs appear on the map.
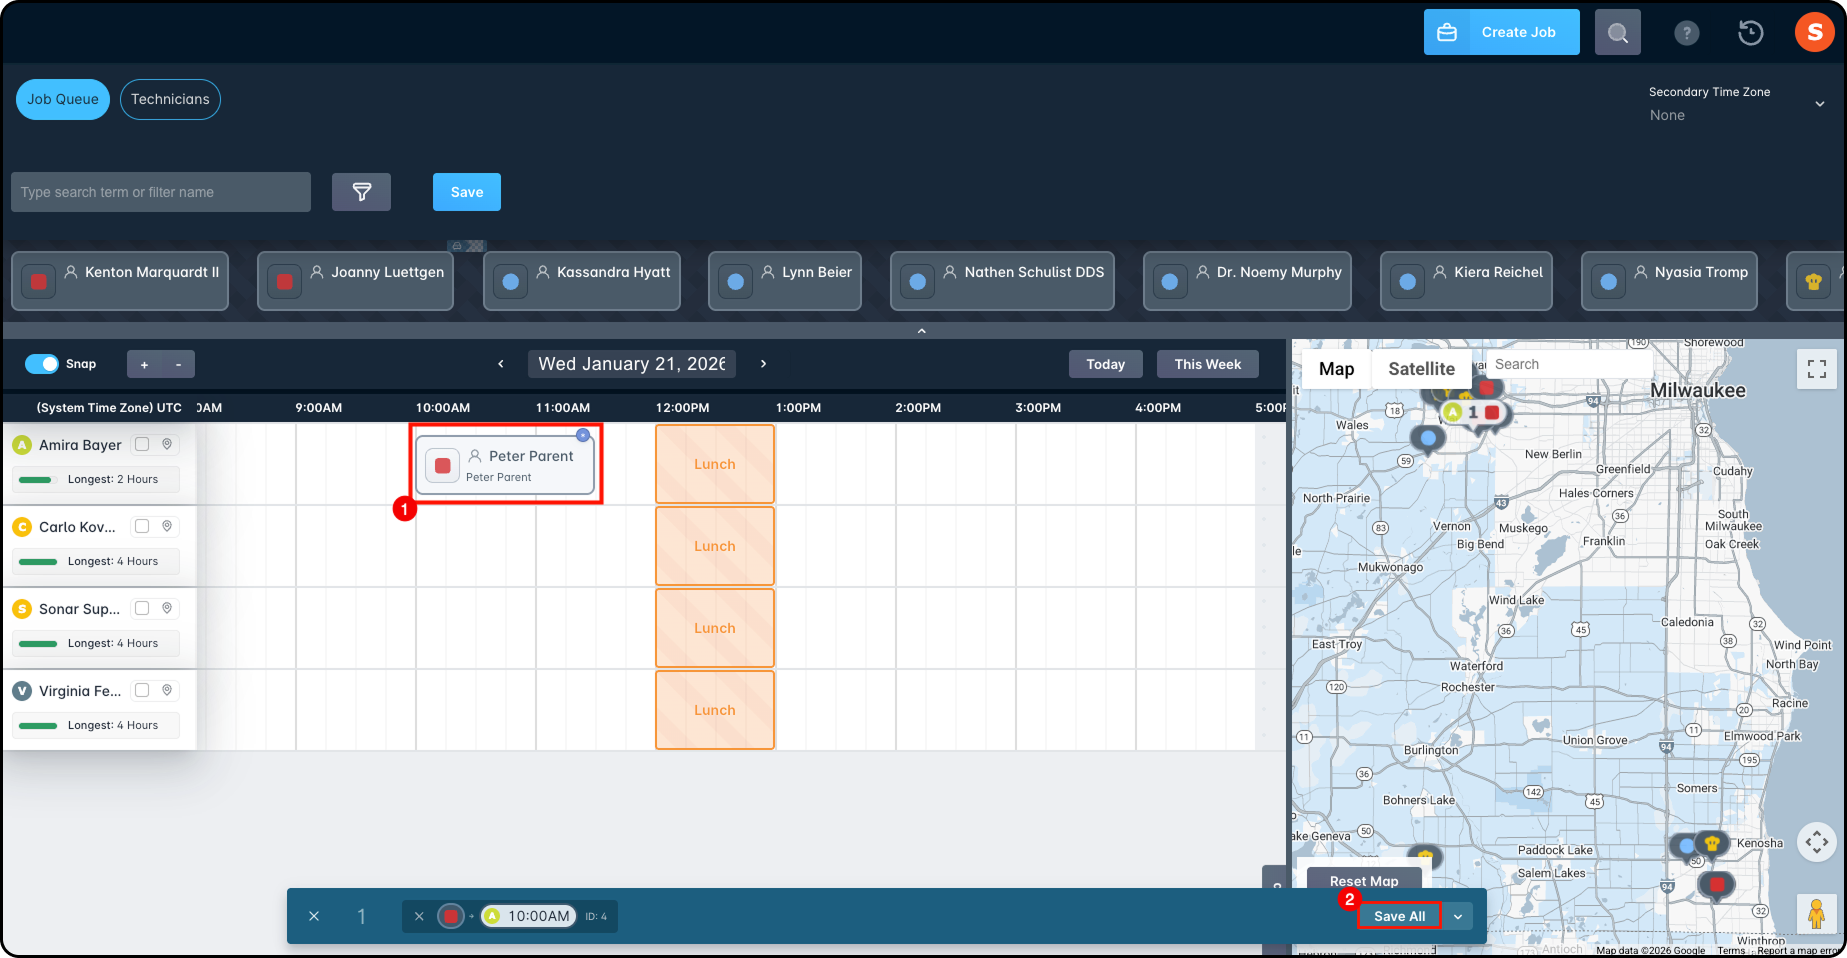
If a job isn’t scheduled yet, you can drag it from the map onto the job grid to schedule it.
After you drop it, the job will appear on the technician’s row. Any unsaved changes show in a blue banner at the bottom of the screen—once you save, the job is officially scheduled.
Drive Time Calculation
The Scheduling view automatically estimates how long it will take a technician to drive between locations. These times come from Google Maps, so accurate addresses matter.
- Drive time on the left of the first job shows travel time from the technician’s Start Point (their Schedule Address) to that first job. More on Start Points and Schedule Addresses is in Setting Up Schedules: General Overview.

- Drive time on the right of a job shows travel time from that job to the next job on the schedule, based on each job’s service address.

- Even if there’s a gap in the schedule (like a blocker between jobs), Sonar still calculates the travel time between the job locations. It can also calculate travel time from the last job to the technician’s End Point address.

Scheduling Errors on the Calendar
If you place a job on the calendar where it doesn’t fit—such as outside a technician’s availability, on the wrong job type, or overlapping another job—Sonar will mark it as Invalid.
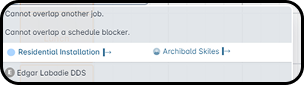
Hover over the Invalid job to see what caused the problem.
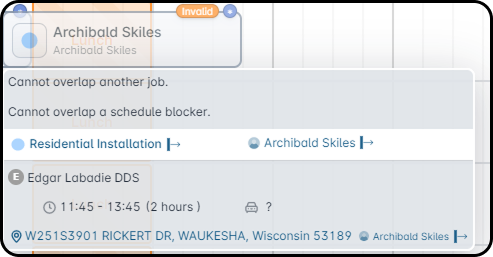
If you try to save while an Invalid job is still on the calendar, Sonar will show a window listing the jobs and their validation status.
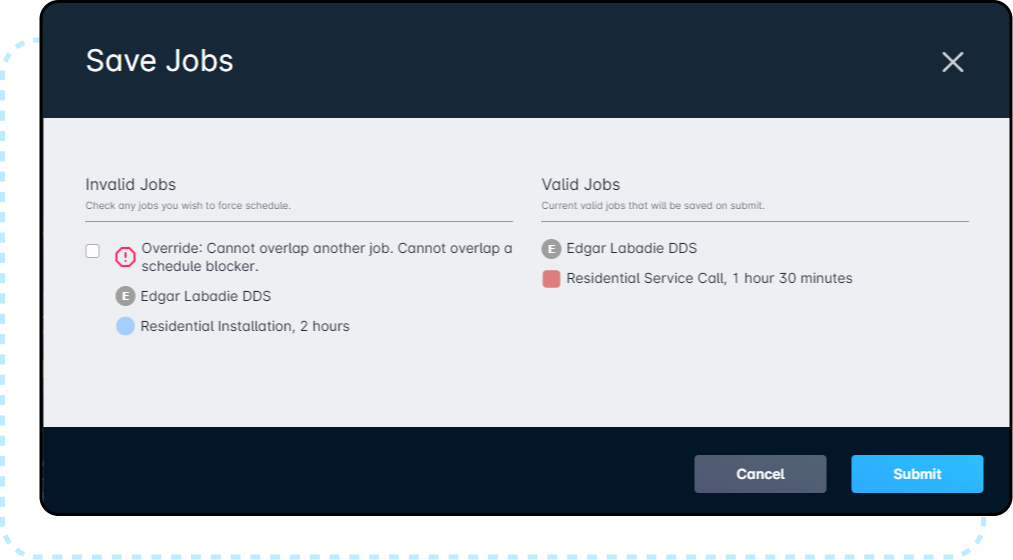
Users with the right permission can save anyway by overriding the error. To allow this, add the Update a job skipping validation permission (in the Misc category) to the user’s role.
To override, check the box next to the Invalid job and click Submit. The schedule will save, and the job will be scheduled even though the validation error remains.