Table of Contents
Communications: Messages Overview
 Updated
by Kristen Fiddes
Updated
by Kristen Fiddes
Read Time: 17 mins
The Messages menu in Sonar allows you to manage all customer communications, including sending mass and triggered messages, and setting up messaging defaults, categories, and templates.
Permissions
Before getting started with Communications, the corresponding role permissions must be enabled first. Below, the following sections outline which permissions control specific abilities, giving you a clear understanding of how to configure user roles.
- Mass Messages: Create and view sent messages.

Permission Details
The Mass Message permissions category has two options.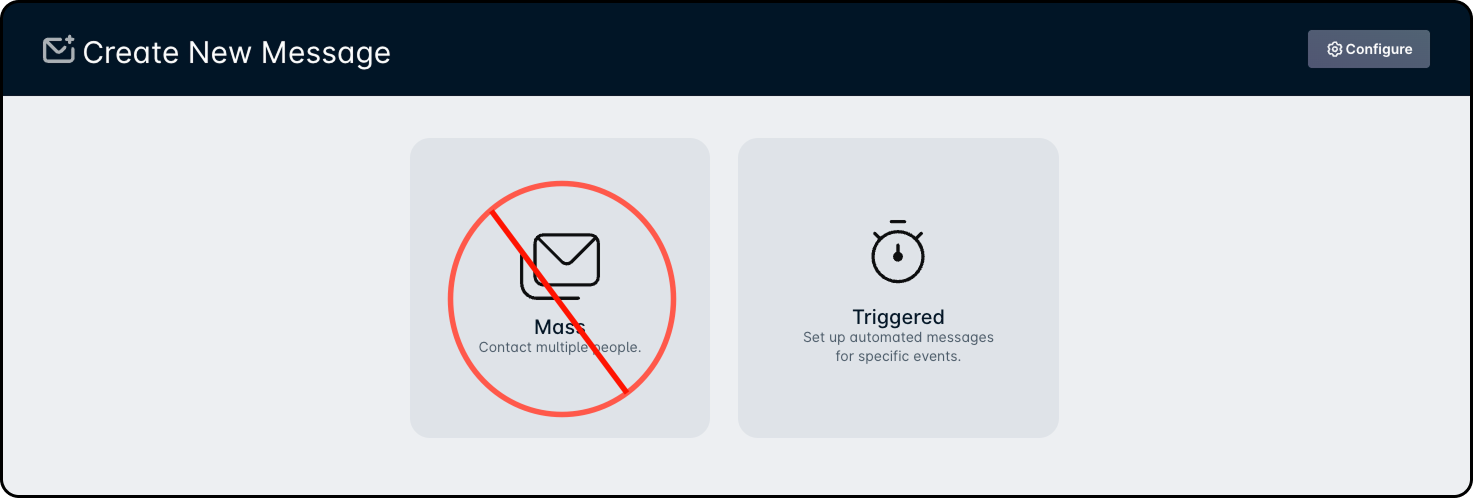
1. Create a mass email communication: If mass email communication is disabled, users will only be able to create triggered messages — the option to send a mass message will not be available.
2. View all mass emails: If this is disabled, users will be unable to view mass emails sent out. - Triggered Messages: Create, view, edit, and delete triggered emails or SMS messages.
Permission Details
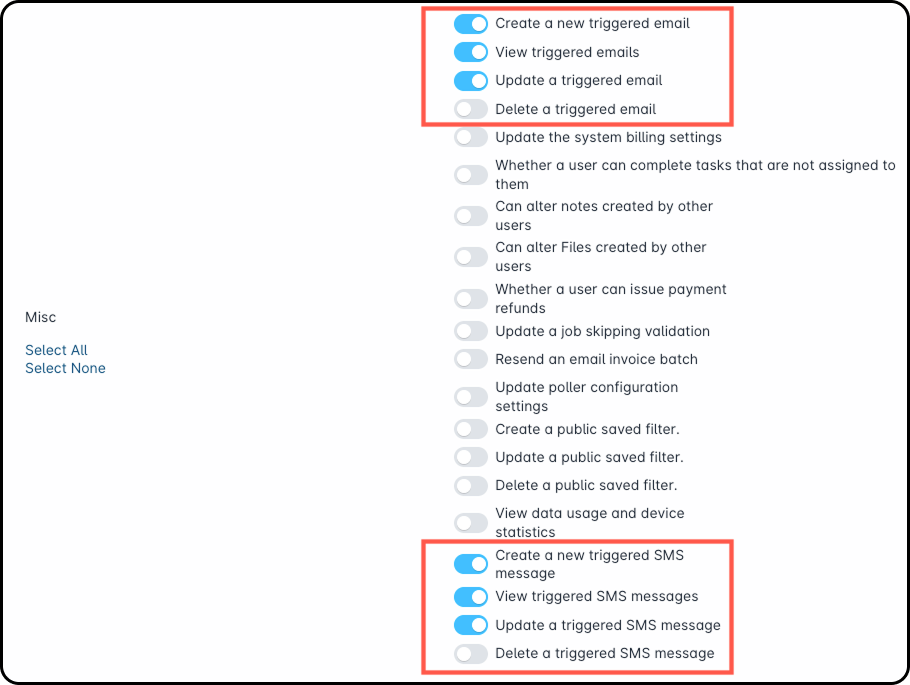
The Triggered Message category of permissions has four options for Triggered Emails and four options for Triggered SMS messages.
Triggered Emails:
1. Create a new triggered email: If this is disabled, users can’t create triggered messages — only the “Mass” option will appear when they select “New Message.”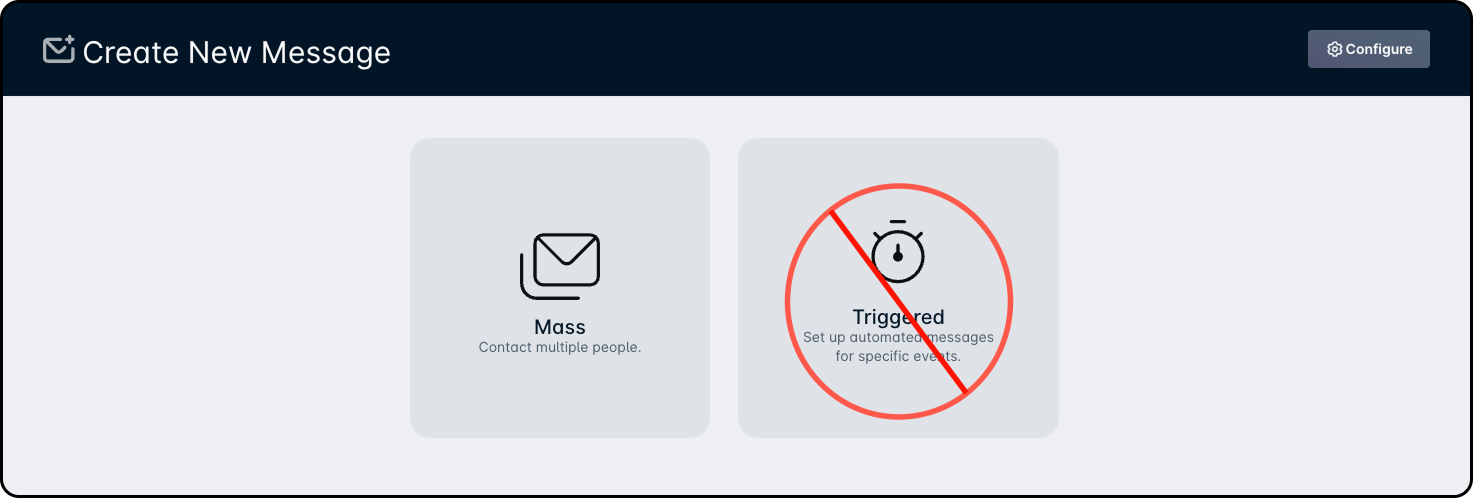
2. View triggered emails: If this is disabled, the “Triggered Messages” option under “Configure” won’t appear. Without it, users also won’t be able to edit or delete existing triggered messages.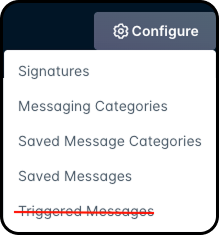
3. Update a triggered email: If this is disabled, users will only see the “Delete” option next to triggered messages — “Edit” won’t be available.
4. Delete a triggered email: If this is disabled, users won’t be able to delete triggered messages.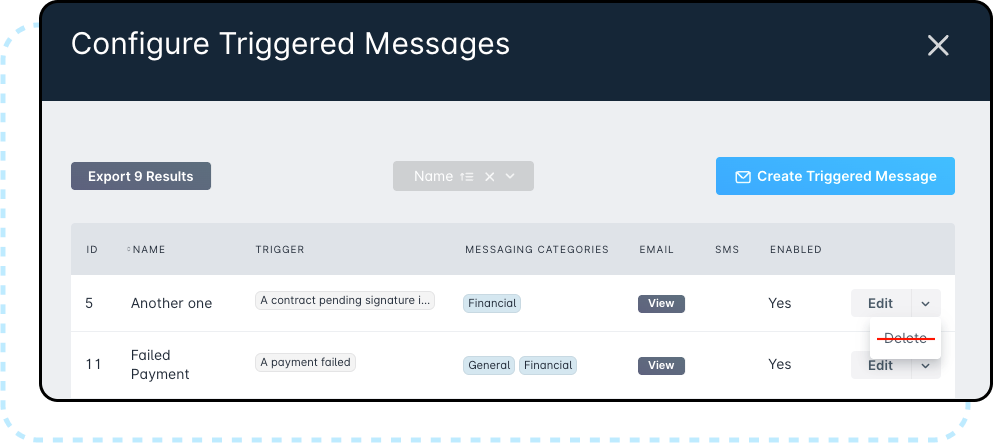
Triggered SMS messages:
1. Create a new triggered SMS message: If this is disabled, users can’t create triggered SMS messages — only the “Mass” option will appear when they select “New Message.”
2. View triggered SMS message: If this is disabled, the “Triggered Messages” option under “Configure” won’t appear. Without it, users also won’t be able to edit or delete existing triggered SMS messages.
3. Update a triggered SMS message: If this is disabled, users will only see the “Delete” option next to triggered SMS messages — “Edit” won’t be available.
4. Delete a triggered SMS message: If this is disabled, users won’t be able to delete triggered SMS messages. - Messaging Categories: Create, view, edit, and delete categories.

Permission Details
The Messaging Category of permissions has 4 options.
1. Create a new messaging category: If this is disabled, users cannot see the option “Create Messaging Category”.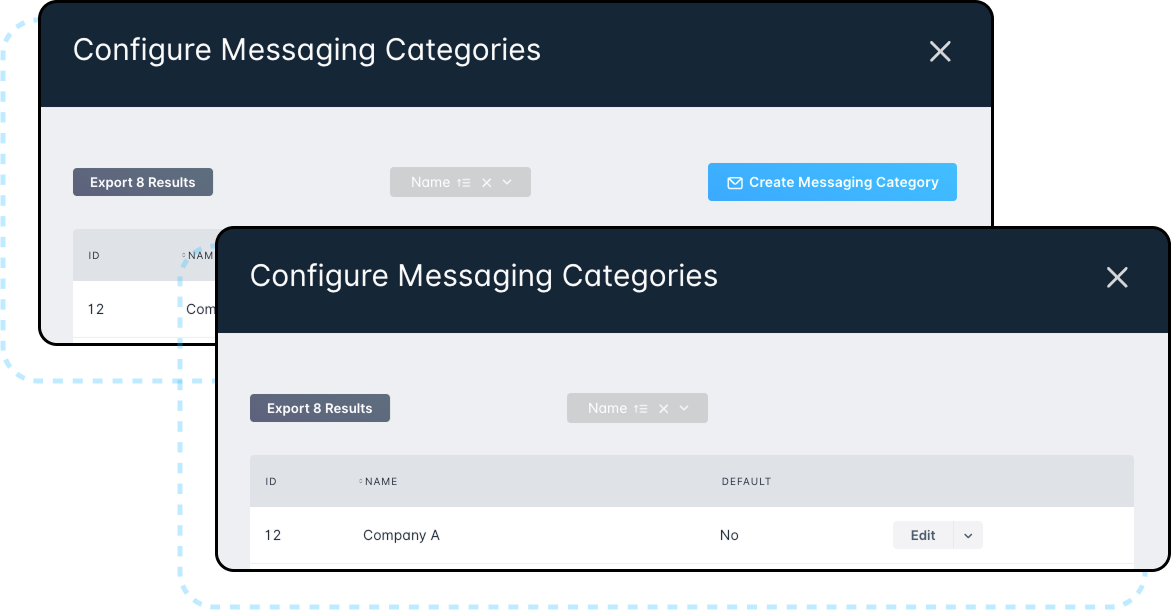
2. View messaging categories: If this is disabled, the “Messaging Categories” option under “Configure” won’t be visible. Users also won’t be able to create, edit, or delete messaging categories.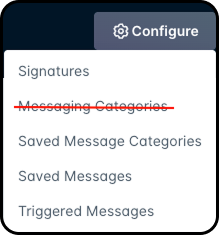
3. Update a messaging category: If this is disabled, users will only see the “Delete” option next to messaging categories — “Edit” won’t be available.
4. Delete a messaging category: If this is disabled, users won’t be able to delete messaging categories.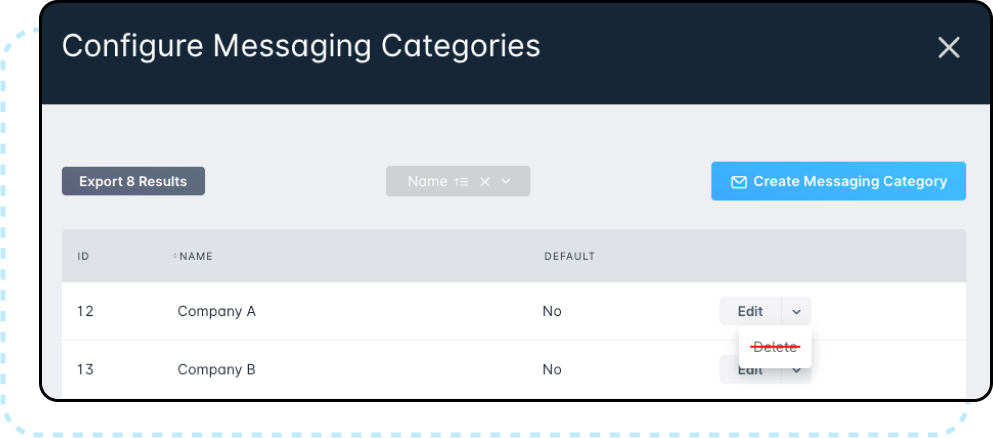
- Saved Messages: Create, view, edit, and delete message templates.
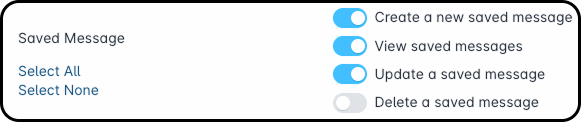
Permission Details
The Saved Message category of permissions has four options.
1. Create a new saved message: If this is disabled, users are unable to create a saved message.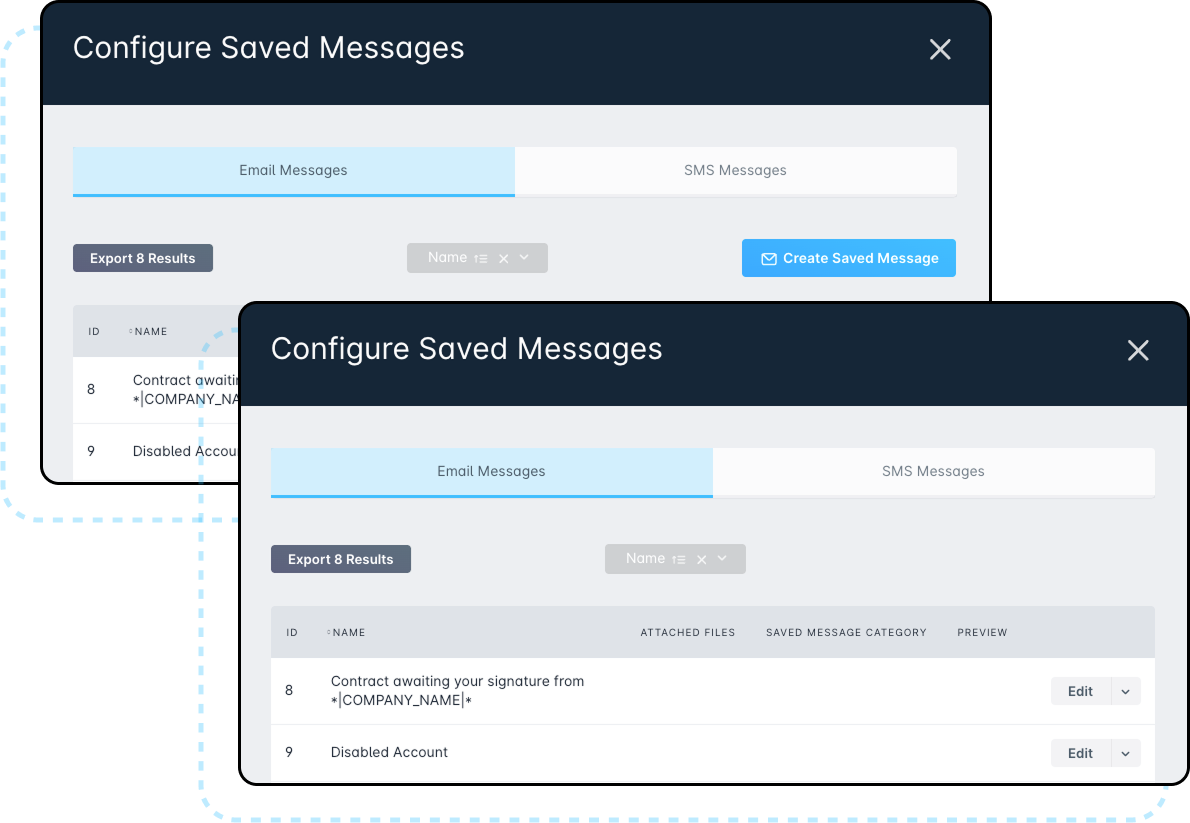
2. View saved messages: If this is disabled, the “Saved Messages” option under “Configure” won’t appear. Users also won’t be able to create, edit, or delete saved messages.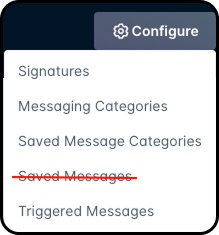
3. Update a saved message: If this is disabled, users will only see the “Delete” option next to saved messages — “Edit” won’t be available.
4. Delete a saved message: If this is disabled, users won’t be able to delete saved messages.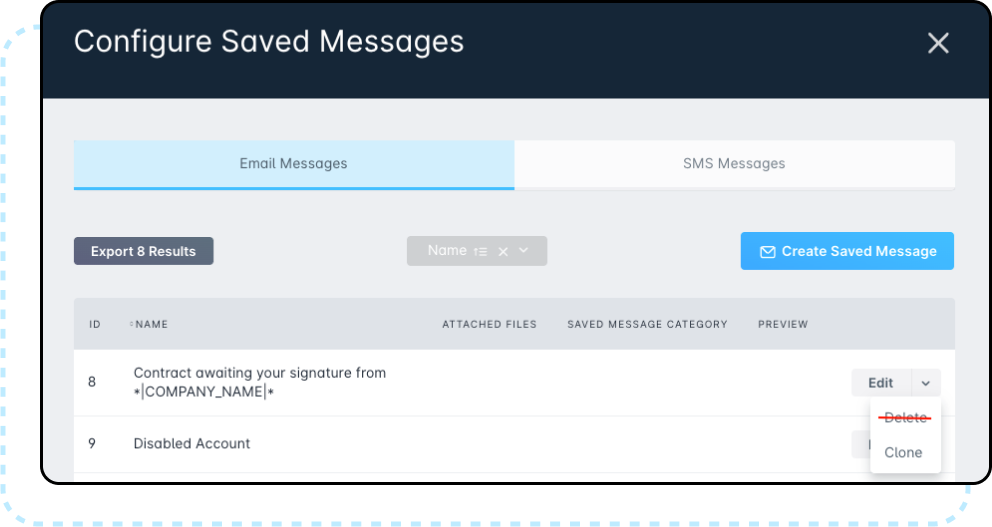
- Saved Message Categories: Manage categories for saved messages.
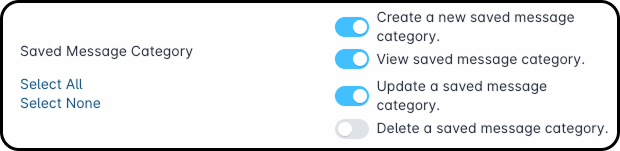
Permission Details
The Saved Message Category of permissions has four options.
1. Create a new saved message category: If this is disabled, users won’t see the option to create a saved message category.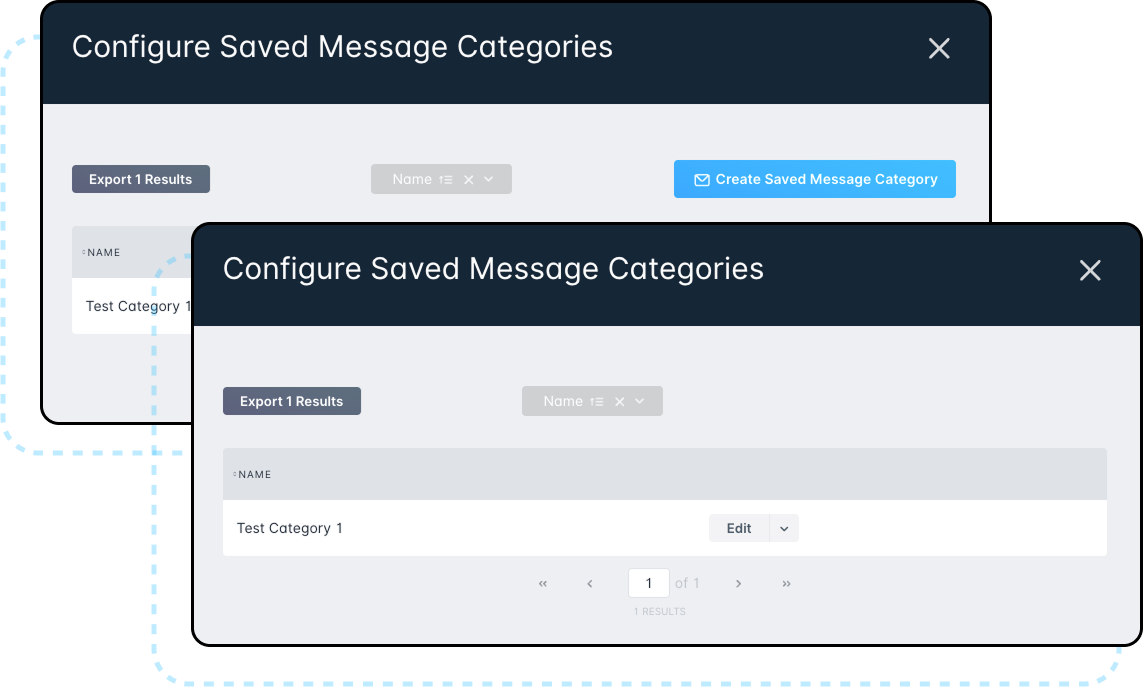
2. View saved message category: If this is disabled, the “Saved Message Category” option under “Configure” won’t appear. Users also won’t be able to create, edit, or delete saved message categories.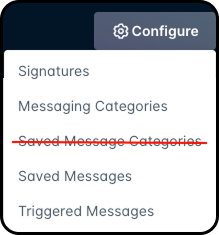
3. Update a saved message category: If this is disabled, users will only see the “Delete” option next to saved message categories — “Edit” won’t be available.
4. Delete a saved message category: If this is disabled, users won’t be able to delete saved message categories.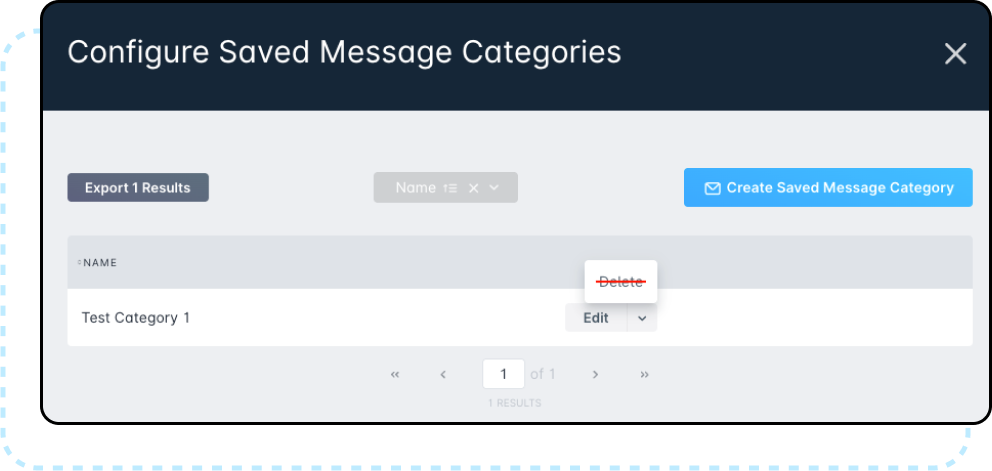
Overview
To access this area, locate the “Communications” navigation icon in the main menu located to the left of your screen, then select “Messages”.

Communications Defaults
While Communications is ready to use without setup, you can customize default values in System Settings.
To update these, go to Settings → System Settings and scroll to the bottom. These fields are optional and can be changed by users when creating a Mass or Triggered Message.

- Default Message 'From' Name: Sets the sender name shown on messages.
- Default Email Message 'From' Address: Sets the email address messages appear to come from.
- Default Email Message 'From' Domain: Sets the domain shown on messages. Only verified domains in your Sonar instance will appear in the dropdown.
New Message
Clicking on the blue New Message button will populate a new page that offers the ability to either send a mass message or a triggered message. In the sections below, we'll take a look at the creation process for both of these options.
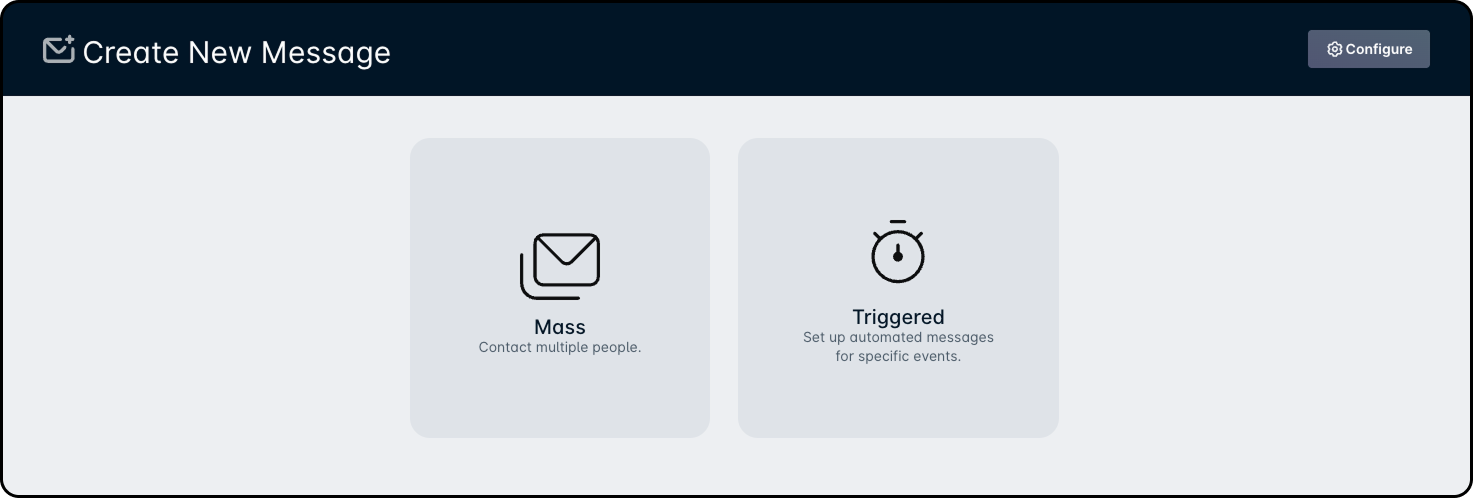
Mass
The Mass Message feature lets you send messages to many customers at once, using filters to target specific accounts — saving time over manual selection.
It's often used for network updates like maintenance or outages, but can also share promotions, discounts, or service price changes.
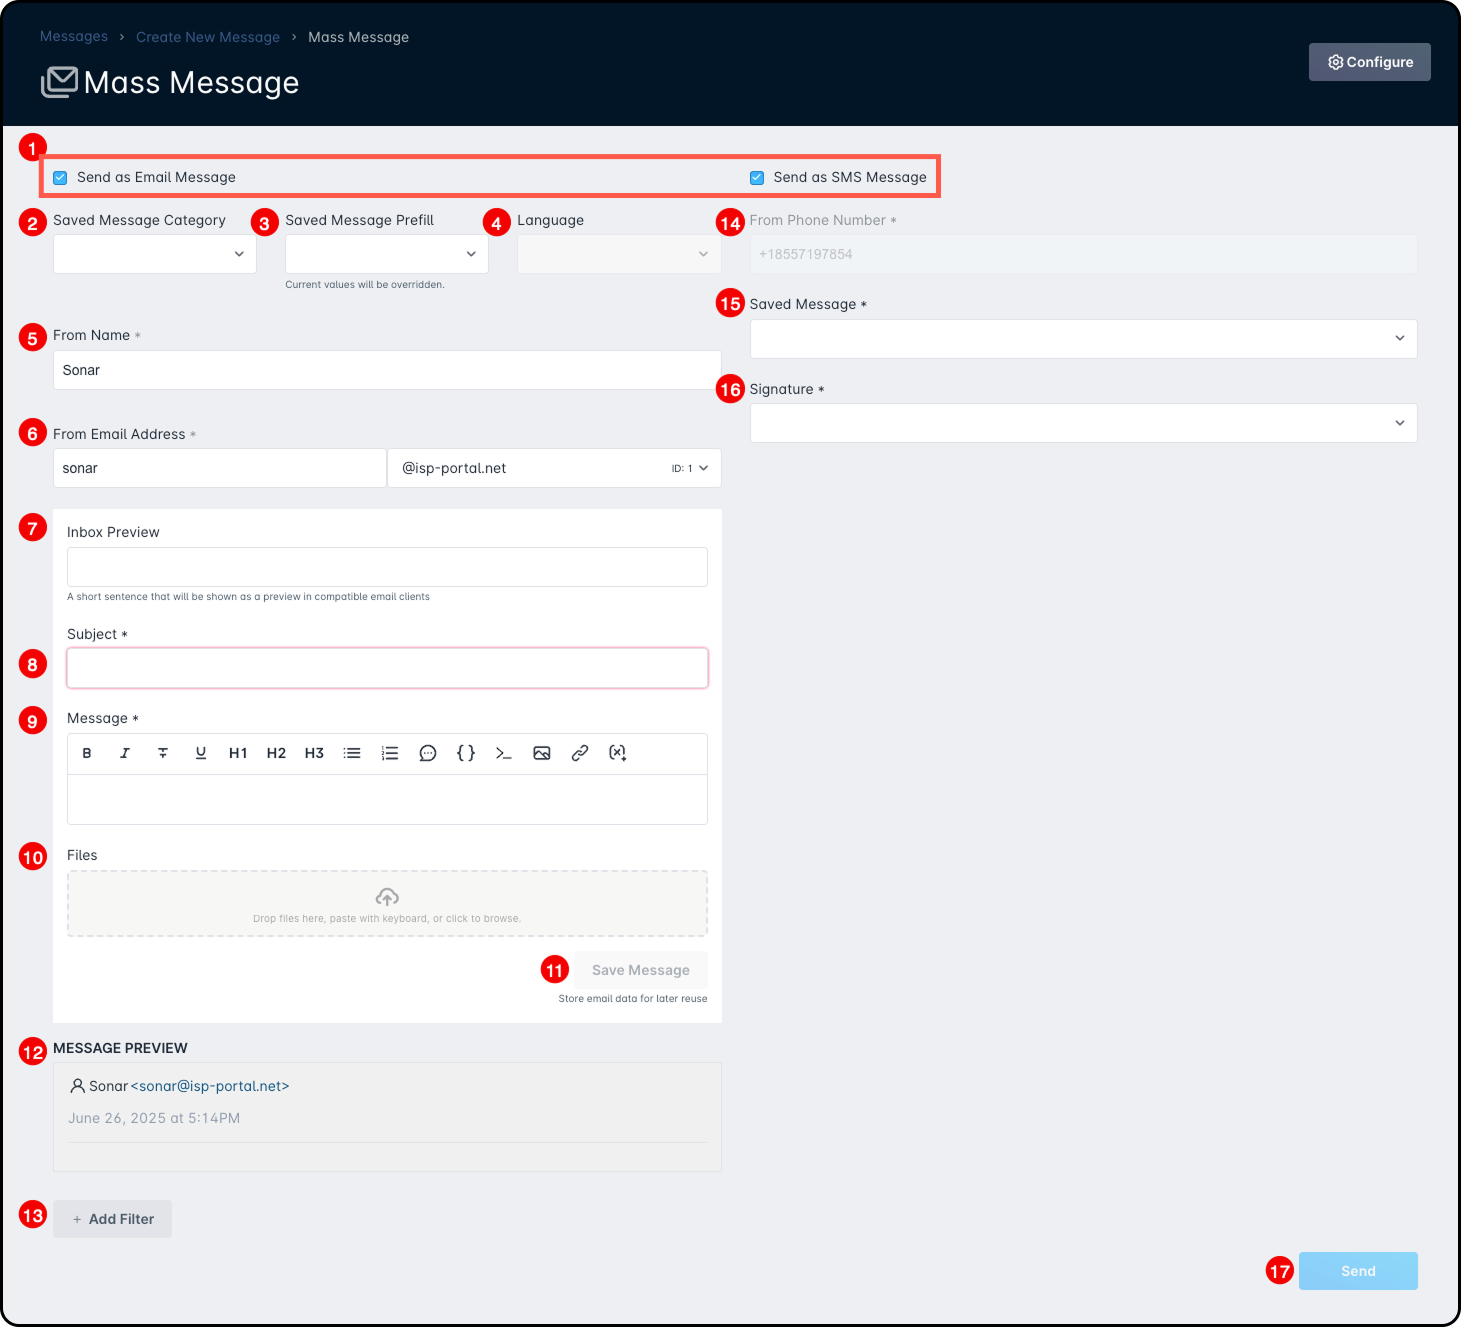
- Check boxes: Allows you to choose from creating a Mass Email Message and/or a Mass SMS Message.
- Saved Message Category: A message category can be assigned to the mass message, which allows only contacts with the same category to receive that message.
- Saved Message Prefill: This field allows you to select from any existing saved messages in your instance.
- Language: If you are selecting a saved message that has two languages included, a new dropdown will appear to the right titled “Language” where you can select which one to utilize.
- From Name (required): This field determines the sender name that the message will appear from.
- From Email Address (required): This is the email address your message will be sent from.The “From Email Address” must use a domain that’s already verified in Sonar. To learn how to set this up, refer to our knowledge base article here.
- Inbox Preview (optional): Lets you add a short preview of the message that appears in the recipient’s inbox — helpful for giving a quick idea of what the email is about before it’s opened.

- Subject (required): Enter the subject line that will appear in the recipient’s inbox.
- Message (required): This is where you write the main content of your message.For a full guide and examples on using Sonar’s rich text editor, see the documentation here.
Available Variables
The available variables within the mass message creation process are as pictured below: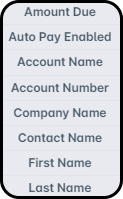
Amount Due: This variable will display the amount due on any unpaid invoices. This variable is useful for mass emails targeted at many delinquent customers.
Auto Pay Enabled: This variable can be used to conditionally show message content based on an account's auto-pay status.
Account Name: This variable will include the respective account name on the mass message upon receipt.
Account Number: Similarly, this variable will include the respective account number on the mass message upon receipt.
Company Name: This variable will include your company name in the message.
Contact Name: The contact name variable places the name of the designated recipient on the email.
First Name & Last Name: This variable will insert the recipient's first and last name per their contact information. - Files: Here, you can attach a file to include with your mass message.Keep in mind that the maximum file size allowed for attachments is 500 MB.
- Save Message: This button lets you save your message setup so you can reuse it later by selecting it from the “Prefill From Saved Message” field.
- Message Preview: Provides a preview of how your message will appear to recipients.
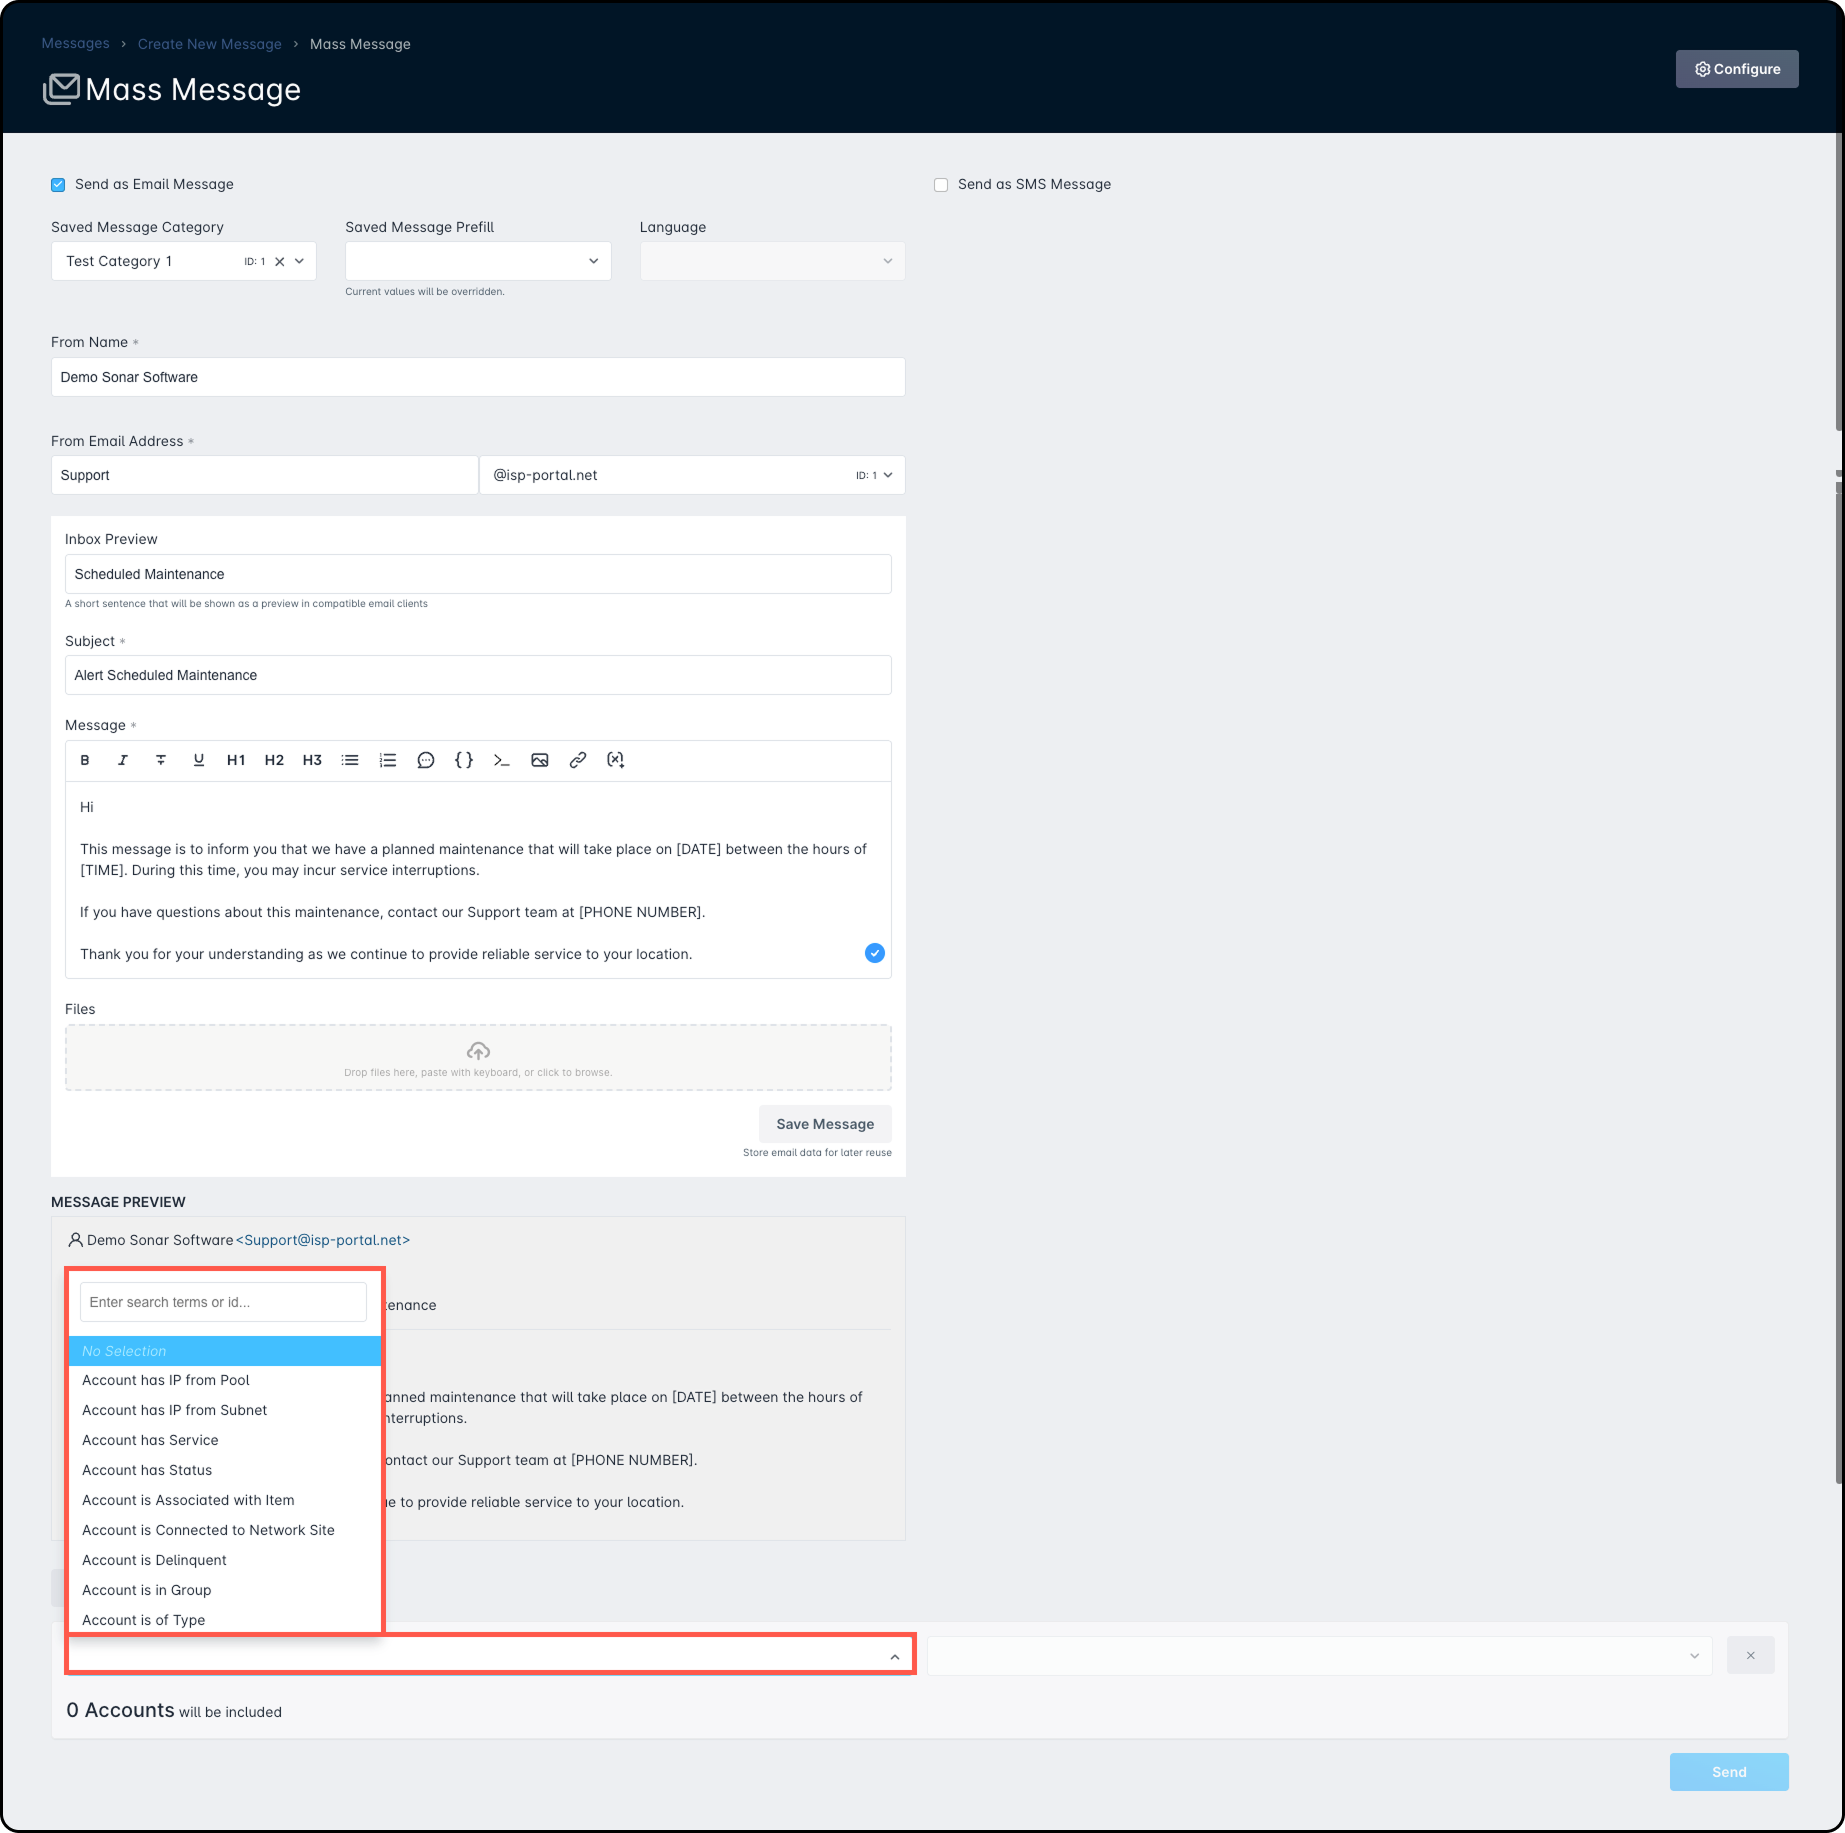
- Filters: From here, you can define the criteria needed for accounts to be included in this run. As multiple filters are added, the recipients will shrink accordingly.
- From Phone Number: Select the outgoing phone number, if applicable. This option appears only if your instance has more than one sending number set up. Currently, only the default number is supported.
- Saved Message: SMS messages in Sonar must use predefined saved messages — custom messages aren't allowed due to regulations that require outbound SMS campaigns to be registered.You can view all available messages by going to Configure → Saved Messages → SMS Messages tab.
- Signature: Select the SMS signature you'd like to attach to the message.
- Send: Click this to send your mass message. You’ll be redirected back to the “Messages” page, where you can view all sent messages under the “Email Messages” or “SMS Messages” tab.
Example: Sending a Mass Message for AP Maintenance
1. Go to Communications → Messages → New Message → Mass.
2. Fill in the message details to inform customers about the upcoming maintenance.
3. To target only customers on the affected AP, click Add Filter.
4. In the first dropdown, select the account that's associated with item.
5. In the second dropdown, choose the inventory item (the AP undergoing maintenance).
To double-check which customers are connected to the AP, go to the Network Site, then click Connected Devices for that AP.
Triggered
Triggered messages let you send automatic messages to customers when certain events happen — like reaching a data limit or when a credit card is about to expire. Below is a quick guide on how to set them up.
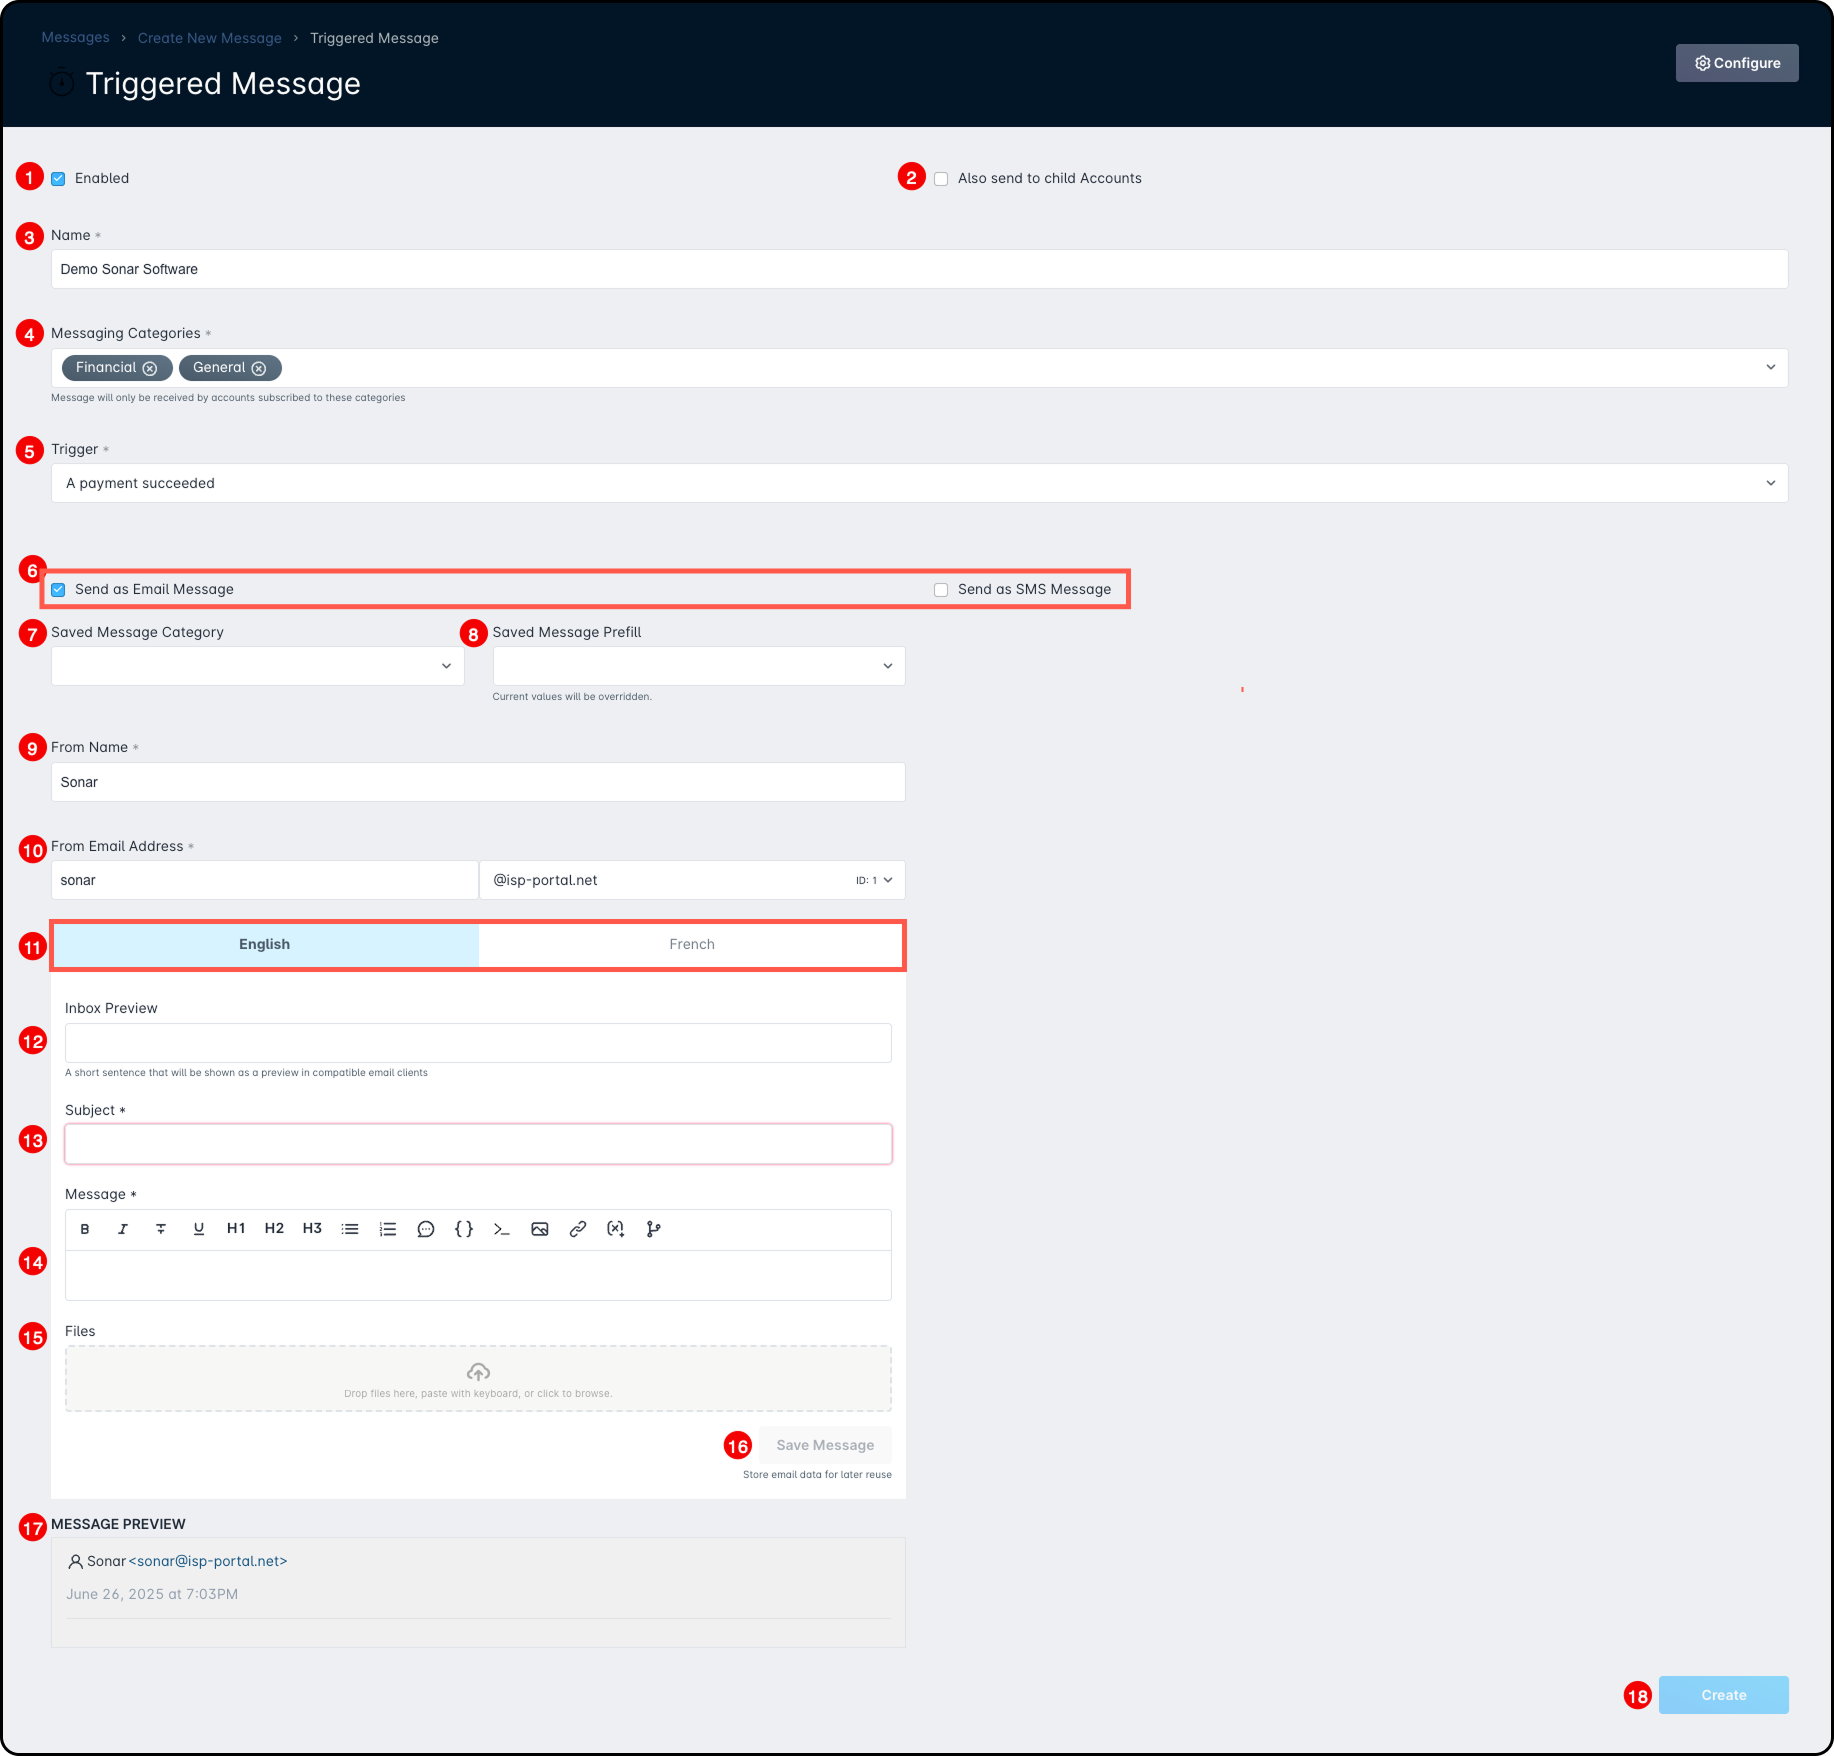
- Enabled: This checkbox determines whether the triggered message is active and currently being sent out to customers, or if it is disabled and therefore not being used.
- Also send to child accounts: This checkbox determines whether the triggered message will be sent out to child accounts or not. If disabled, then only the parent account would receive a triggered message.
- Name: This is used for the name of the triggered message itself and is a required field.
- Messaging Categories: This is where you can select which category(ies) the triggered message should fall under, if any. Messaging categories are used to determine the type(s) of emails that a contact should receive, and can be defined for each contact listed on an account.
- Trigger: Here is where you would select the event that would trigger the message to be sent out, from a predefined dropdown list of available triggers. This is also a required field.
- Checkboxes: Allow you to choose from creating a Mass Email Message and/or a Mass SMS Message.
- Saved Message Category: A message category can be assigned to the Mass message, which allows only contacts with the same category to receive that message.
- Saved Message Prefill: This field allows you to select from any existing saved messages in your instance.
- From Name: This section determines the sender name that the message will appear from. This is also a required field.
- From Email Address (required): This is the email address your message will be sent from.The “From Email Address” must use a domain that’s already verified in Sonar. To learn how to set this up, refer to our knowledge base article here.
- Language: This section allows you to select which language the message is available in. Currently, the two available options are English and French only.
Language Considerations
If you use the “Language” setting for account contacts, make sure to add message content for each selected language.
For example, if a contact like Peter has “French” set as their language and the triggered message only includes English content, he won’t receive it. To avoid this, include both English and French versions in the triggered message.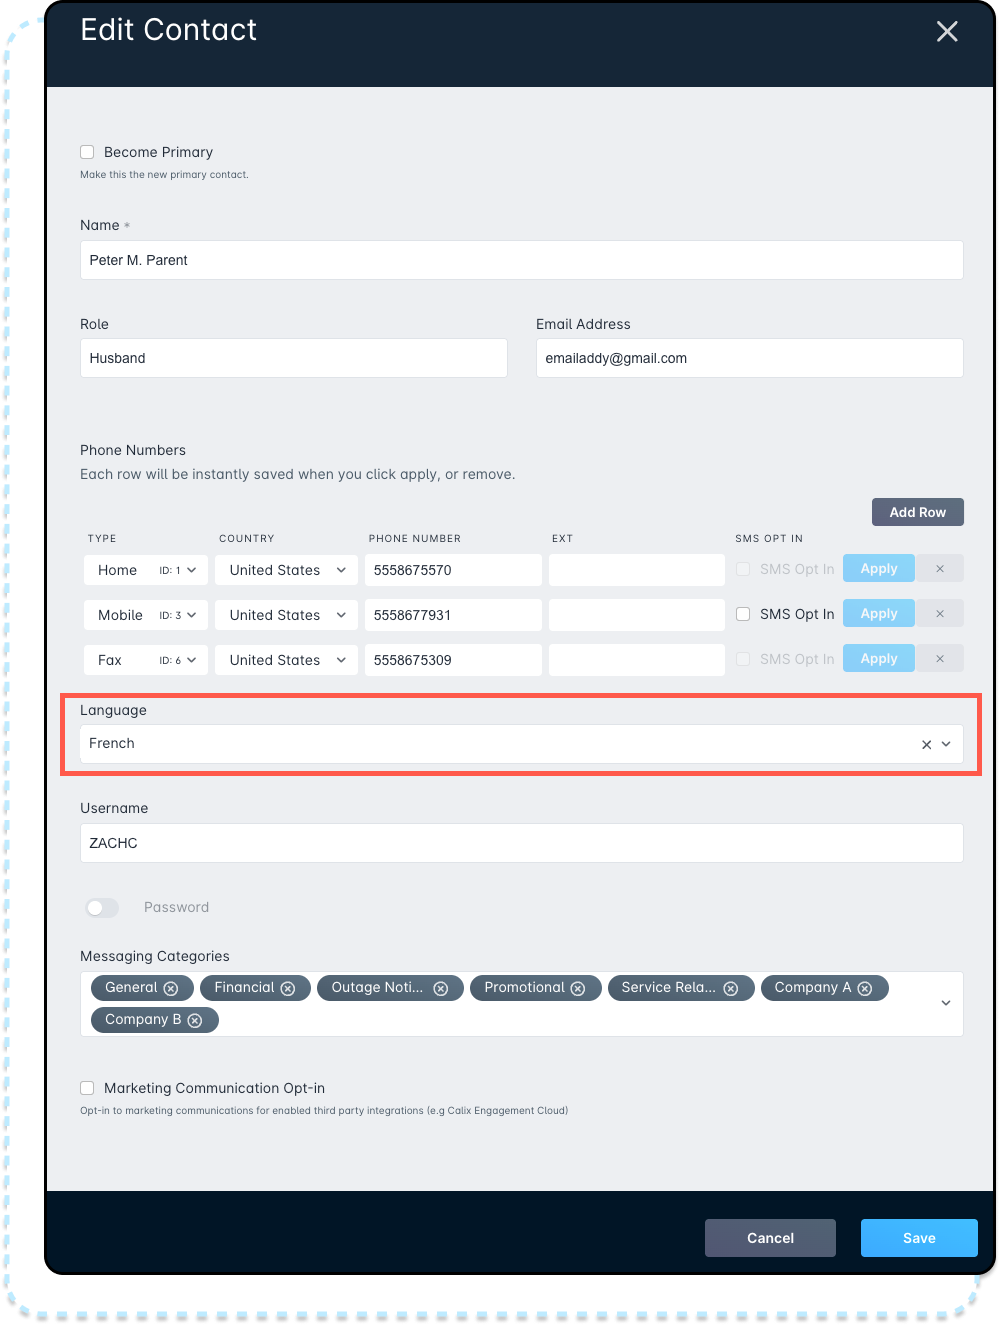
- Inbox Preview: This field is not required, but allows you to set an inbox preview for the message - this can be used to provide a sneak peek to the recipient of what the email is regarding before they actually open the email.

- Subject (required): Enter the subject line that will appear in the recipient’s inbox.
- Message (required): This is where you write the main content of your message.For a full guide and examples on how to use Sonar’s rich text editor, see the documentation here.
You can use conditional statements and variables in these messages to customize content for each customer. For example, the variable |AMOUNT_DUE_RAW| shows how much a customer owes.
Using a simple IF/ELSE condition, you can display different messages:
If the amount is more than 0, the email will say, “You owe money!”
If it’s 0, it will say, “You don’t owe any money!”
Each customer will only see the message that applies to them.
*|IF:AMOUNT_DUE_RAW > 0|*
You owe money!
*|ELSE:|*
You don't owe any money!
*|END:IF|* - Files: Here, you can attach a file to include with your mass message.Keep in mind that the maximum file size allowed for attachments is 500 MB.
- Save Message: This button lets you save your message setup so you can reuse it later by selecting it from the “Prefill From Saved Message” field.
- Message Preview: Provides a preview of how your message will appear to recipients.
- Create: Finally, this button allows you to save the configuration of the triggered message. If the message is saved successfully, a message will appear in the upper-left corner indicating “Triggered Message created”.
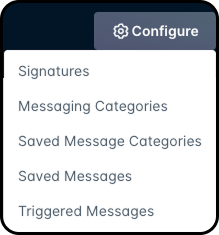
Configure
The Configure button is always visible within the Messages section and displays five options when clicked:
Signatures
For SMS messages, signatures are required by regulations and must include an opt-out like “Reply STOP to unsubscribe.”
Sonar provides signature templates you can use for each department and set as the default for Mass or Triggered messages. The system automatically adds the right department’s phone number and email when sending.
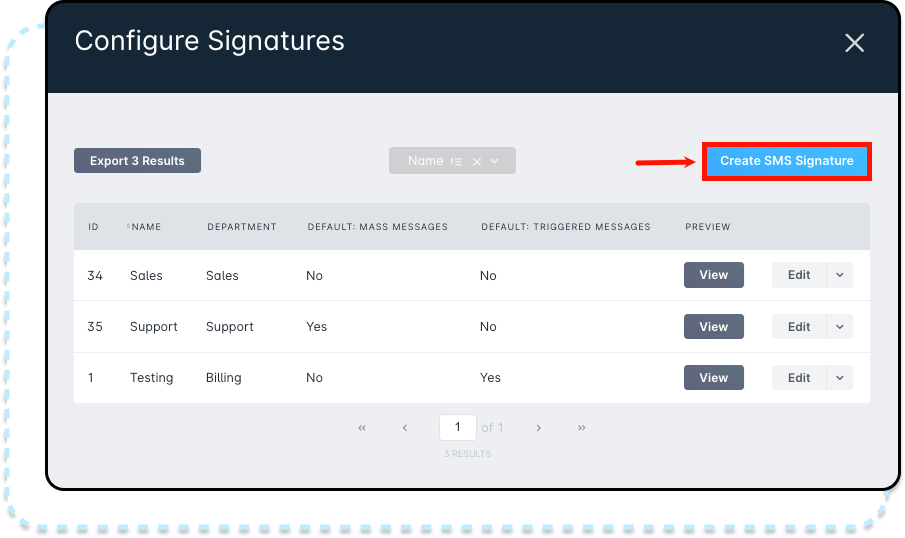
To configure a new signature, click on "Create SMS Signature" to get started.
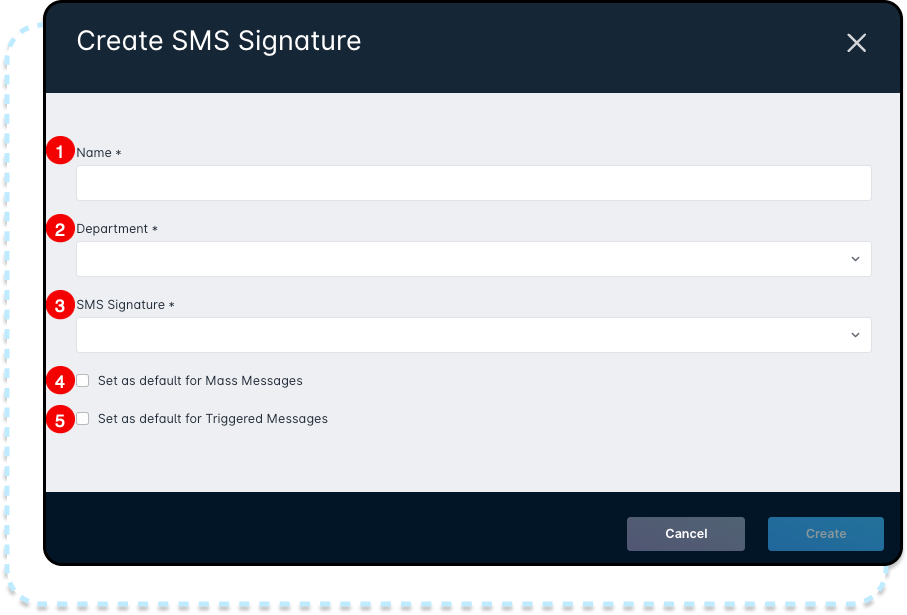
- Name: Must be a unique name for the signature.
- Department: Select a department, based on those set up in your instance. The department determines which phone number and email are automatically added to the message.To learn more about how to set up departments within your instance, refer to this article.
- SMS Signature: Choose an SMS Signature from the predefined list, which includes:
- Reply STOP to unsubscribe.
- Need something else? Call |DEPARTMENT_PHONE_NUMBER|. Email |DEPARTMENT_EMAIL|. Reply STOP to unsubscribe.
- Looking for more information? Call |DEPARTMENT_PHONE_NUMBER|. Email |DEPARTMENT_EMAIL|. Reply STOP to unsubscribe.
- Have a question? Call |DEPARTMENT_PHONE_NUMBER|. Email |DEPARTMENT_EMAIL|. Reply STOP to unsubscribe.
- Need to chat? Call |DEPARTMENT_PHONE_NUMBER|. Email |DEPARTMENT_EMAIL|. Reply STOP to unsubscribe.
- We're here to help! Call |DEPARTMENT_PHONE_NUMBER|. Email |DEPARTMENT_EMAIL|. Reply STOP to unsubscribe.
- Set as default for Mass Messages checkbox: If enabled, this signature is automatically included with all Mass Messages.
- Set as default for Triggered Messages checkbox: If enabled, this signature is automatically included with all Triggered Messages.
Messaging Categories
Messaging Categories help make sure the right contacts get notified when triggered messages are sent. In this modal, you can see which categories are marked as “default,” and edit or delete categories if you have appropriate permissions.
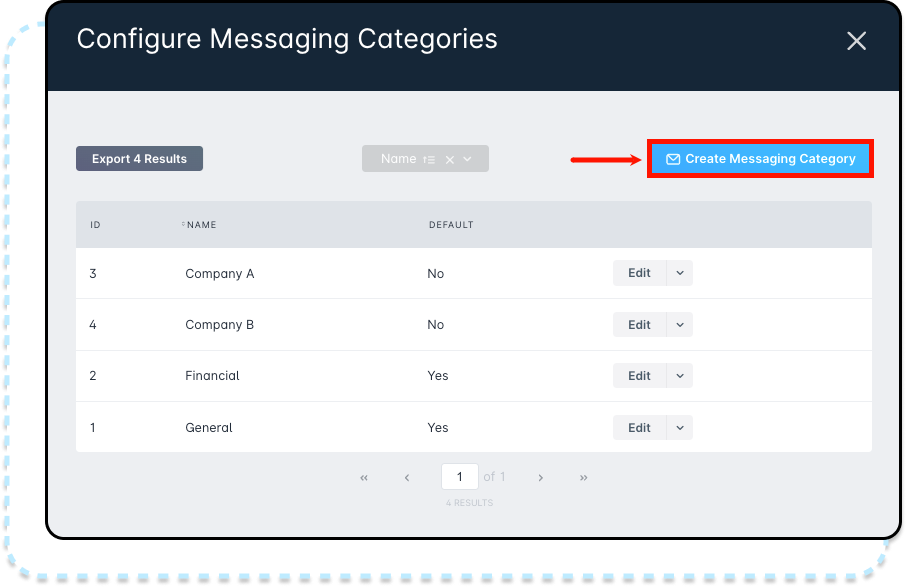
Click Create Messaging Category to add a new category.
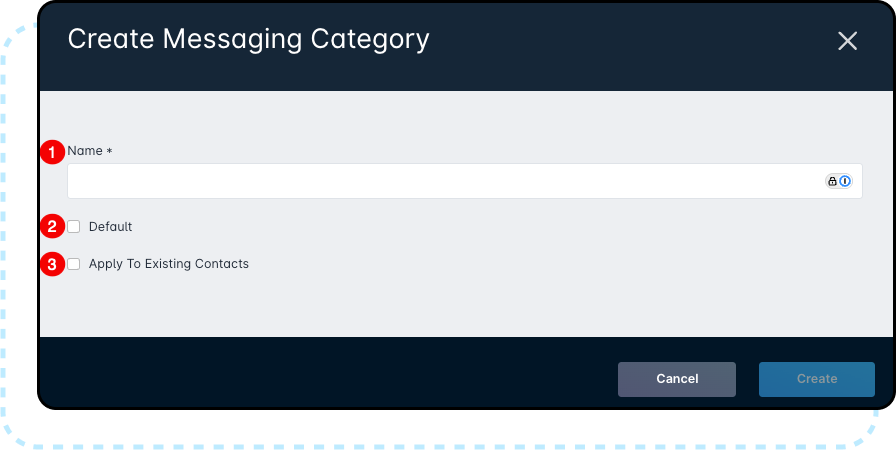
- Name: Required field to identify the category’s purpose.
- Default: If checked, new contacts will automatically be added to this category.
- Apply To Existing Contacts: If checked, all current contacts are added to this category.
When editing a messaging category, you’ll see an extra checkbox:
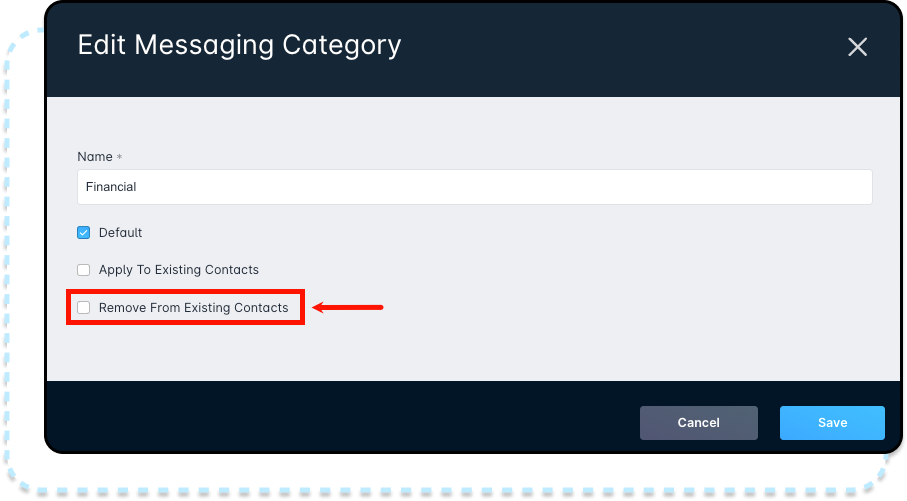
Check this box and click Save to remove the category from all contacts who currently have it.
Saved Message Categories
Saved Message Categories help organize your Saved Messages, making them easier to find when creating a Mass Message. This is especially useful if you have many messages to sort through.
To add a new category, click Create Saved Message Category.
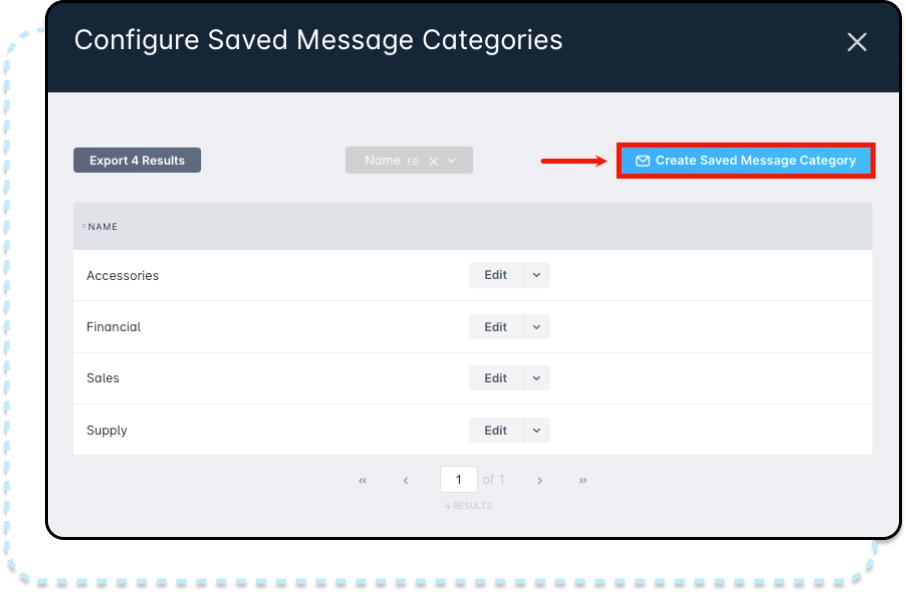
An additional window will appear where you can enter the name. Once saved, it will be available to select when creating a Mass Message. In this window, you can also edit existing Saved Message Categories or delete one by clicking the downward arrow and selecting Delete.
Saved Messages
Clicking on Saved Messages opens a window showing all existing messages, including their name, language, and category. In this window, you can edit, clone, or delete a Saved Message.
Cloning a Saved Message opens a new window with all fields pre-filled from the original, including both languages if used. You can then make changes and save it as a new message.
To create a new Saved Message, click Create Saved Message to open the creation window.
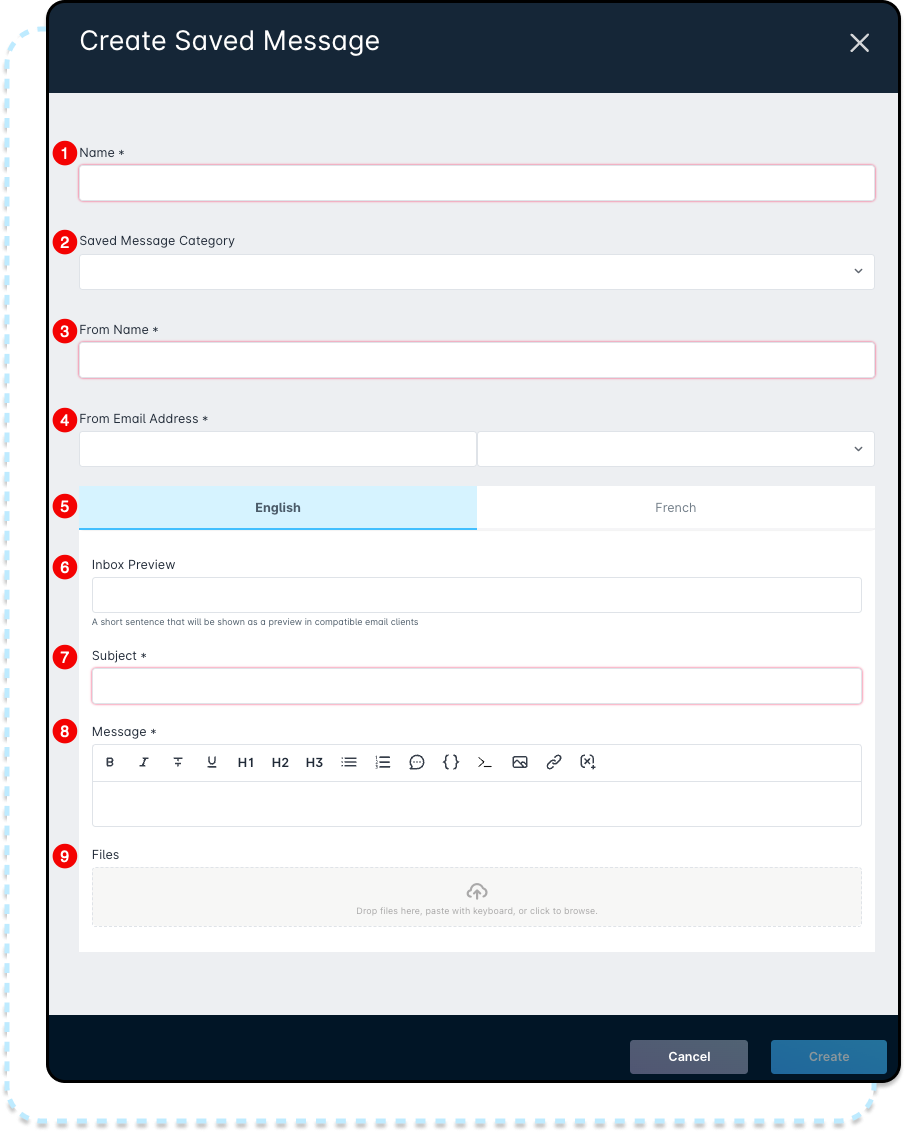
- Name: This field is used to create an easily identifiable name for the message and is required.
- Saved Message Category: A message category can be assigned to the mass message, which allows only contacts with the same category to receive that message.
- From Name (required): This field determines the sender name that the message will appear from.
- From Email Address (required): This is the email address your message will be sent from.The “From Email Address” must use a domain that’s already verified in Sonar. To learn how to set this up, refer to our knowledge base article here.
- This section allows you to select which language the message is available in. Currently, the two available options are English and French only.
Language Considerations
If you use the “Language” setting for account contacts, make sure to add message content for each selected language.
For example, if a contact like Peter has “French” set as their language and the triggered message only includes English content, he won’t receive it. To avoid this, include both English and French versions in the Triggered Message. - Inbox Preview (optional): Lets you add a short preview of the message that appears in the recipient’s inbox — helpful for giving a quick idea of what the email is about before it’s opened.

- Subject (required): Enter the subject line that will appear in the recipient’s inbox.
- Message (required): This is where you write the main content of your message.For a full guide and examples on how to use Sonar’s rich text editor, see the documentation here.
- Files: Here, you can attach a file to include with your mass message.Keep in mind that the maximum file size allowed for attachments is 500 MB.
Triggered Messages
Earlier, we covered creating a triggered message. By going to Configure → Triggered Messages, you can view and manage all existing triggered messages.
In this window, you can preview a message by clicking the language in the Preview column or edit it by clicking Edit.
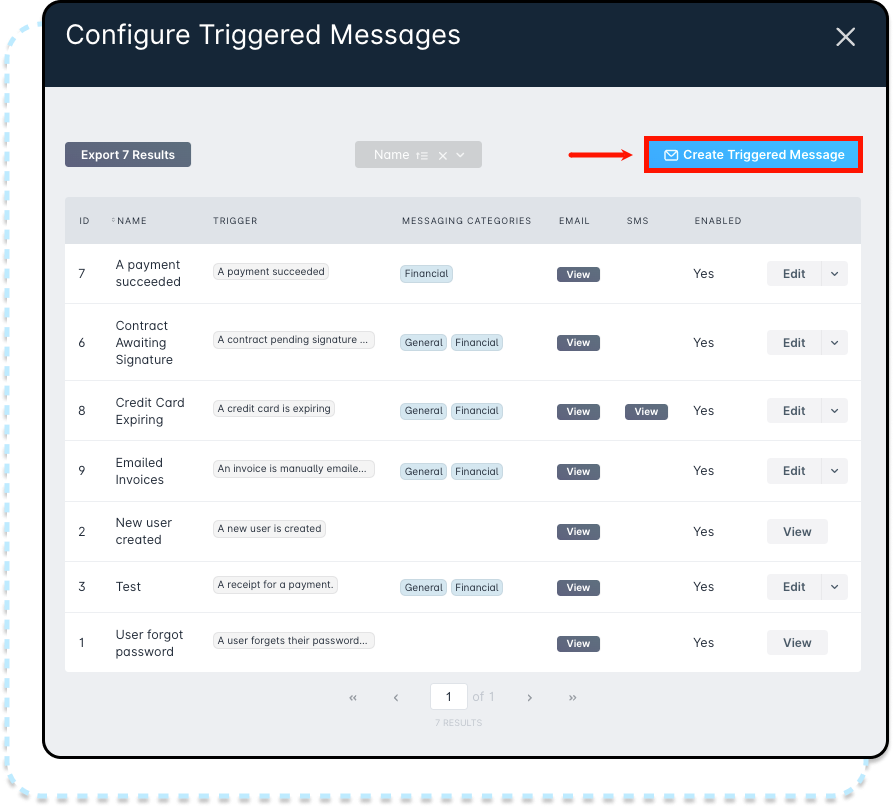
Clicking Create Triggered Message opens a window with the same configuration fields as when you go through New Message → Triggered.
Sent Emails
The Messages page shows all emails sent in your instance, including ticket replies, triggered messages, and mass messages.
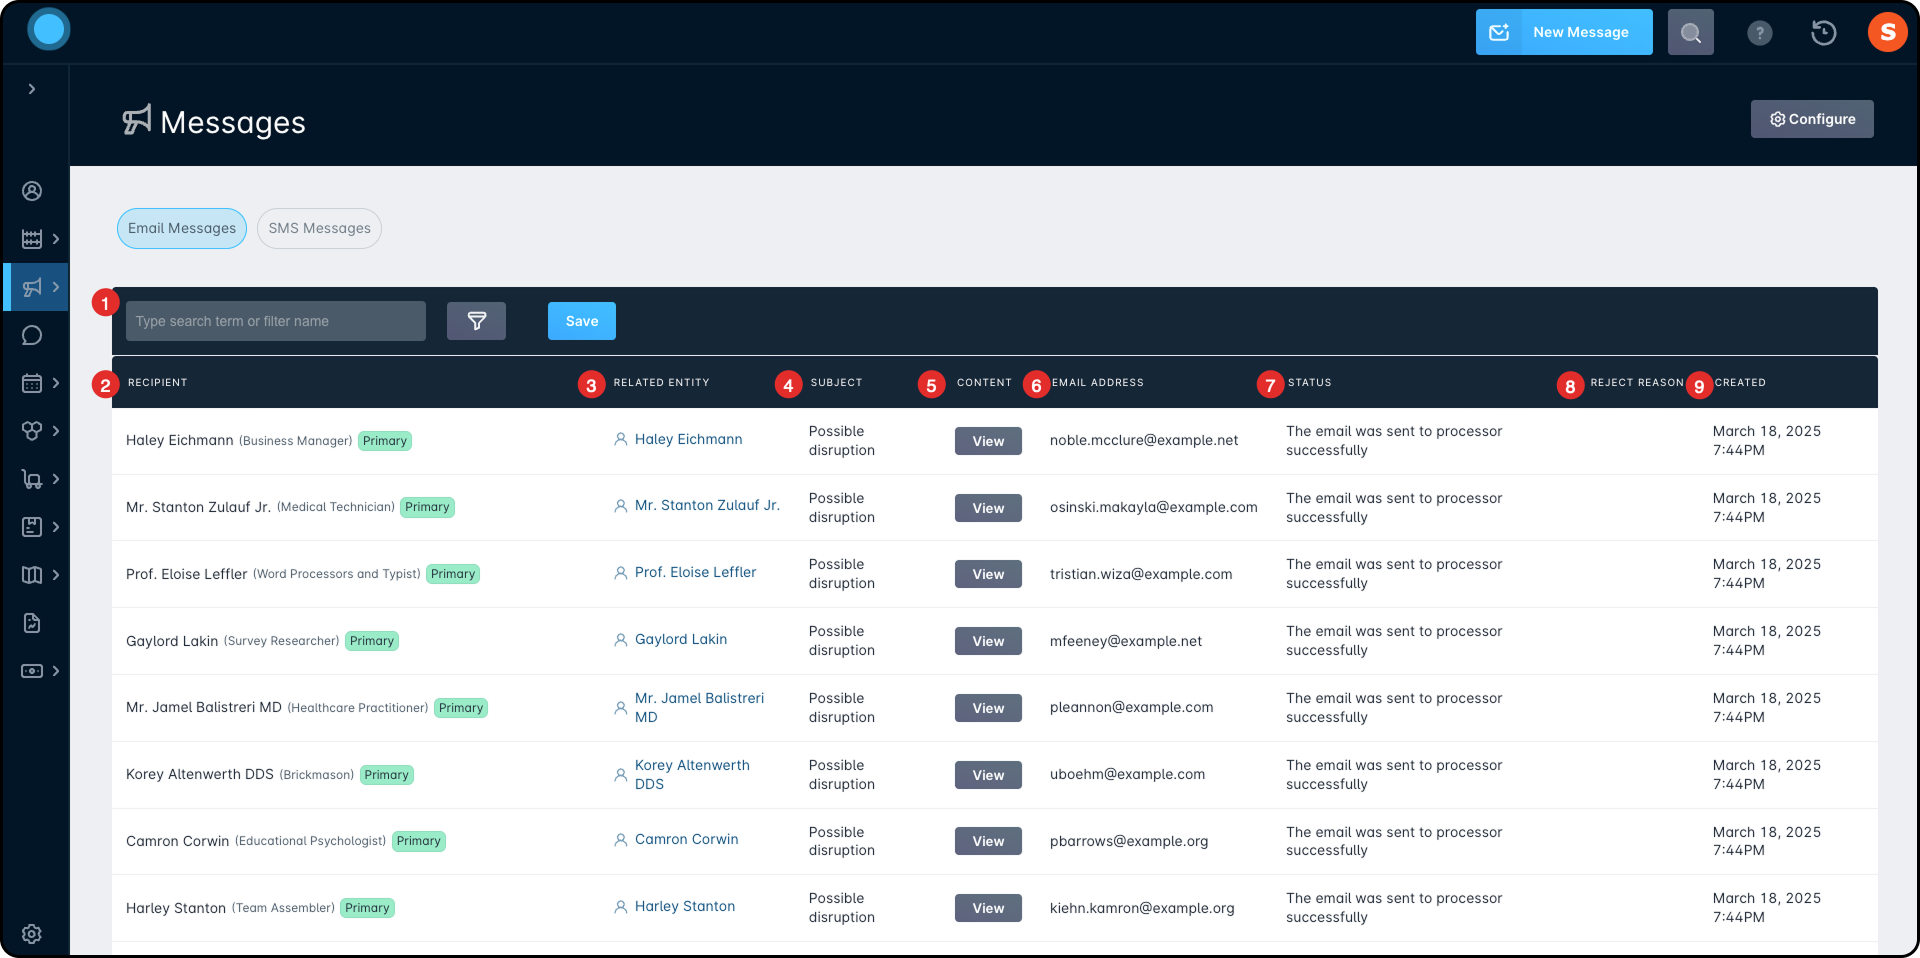
- You can use filters to quickly find specific emails, just like in other parts of your instance. Filter by reject reasons, entity, or other details to locate emails sent to certain accounts or contacts.For more on filtering, click here.
Use the Status filter to quickly find emails that weren’t delivered to recipients. - Recipient: Shows the name of the account contact the email was sent to.
- Related Entity: Displays the account name the recipient belongs to.
- Subject: Shows the email’s subject line.
- Content: Lets you view the content of the sent message.
- Email Address: Shows the email address the message was sent to.
- Status: Shows if the email was delivered successfully.Statuses include:
Sent to processor: Successfully handed off to the delivery system, queued for sending.
Sent: Delivered successfully.
Failed: Rejected by the recipient’s mail server (permanent reasons like “mailbox does not exist” will appear here). - Reject Reason: If delivery failed, this column will show why.
- Created: Shows when the system generated the email.