This documentation applies to the legacy (V2) version of the VETRO FiberMap integration. The underlying API is no longer supported by VETRO, and is no longer available for adoption.
This page remains available only as reference for customers who are currently using the legacy integration as they transition to the V3 integration.
Integrating VETRO FiberMap with your Sonar instance allows for the automation of FiberMap data into your instance, which can include generating new network sites and serviceable addresses, as well as pulling in any associated customer data. The level of data you wish to pull in depends on which elements you enable, which we'll detail below.
VETRO FiberMap Prerequisites
The process to integrate this feature begins by validating that certain fields exist within VETRO FiberMap, and if they do not, ensuring they are created before following any of the steps specific to your Sonar instance. If changes are made to your Service Locations or Customer Records after you set up the integration, it may cause duplicate entries within Sonar.
This integration has been designed with the methodology that a “project” represents a town and an associated “plan” is representative of the neighborhoods within it. There is a limit to how many service locations can successfully sync under a single plan - if you run into failures syncing these items, then you may have to split up the larger plans into smaller sections.
The steps underneath the following three sections are all to be followed within VETRO FiberMap.
Service Locations
As your Service Locations in FiberMap relate to Serviceable Addresses in Sonar, it's important that the fields be labelled a certain way so that the data within them is successfully synced.
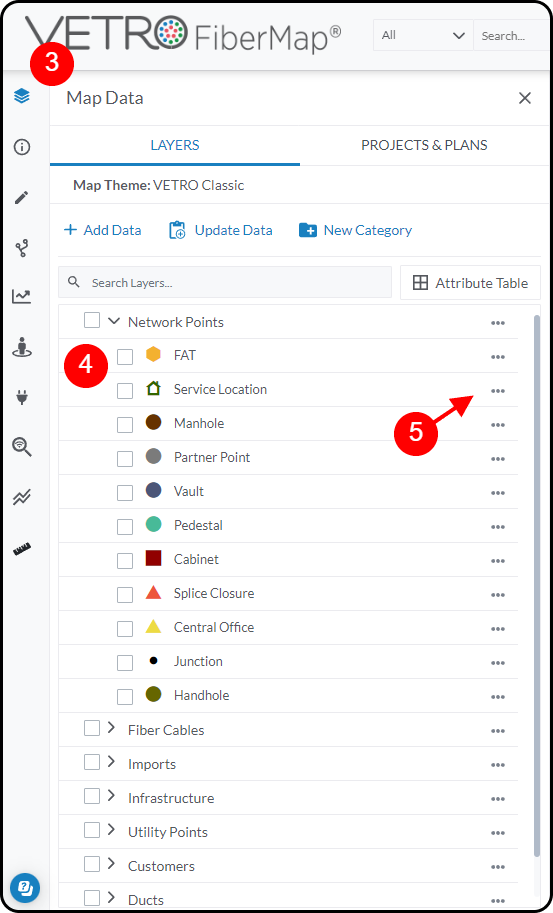
Click on the blue lock icon in the top-right corner so that it becomes unlocked.
With the unlocked icon present, locate the blue text to the left and click on it to populate a dropdown.
To the left of the screen, verify that you have the top item selected and can see the header “Map Data”.
Underneath “Layers”, expand “Network Points” and then locate “Service Location”.
Click on the three dots to the right of “Service Locations” and select “Open Attribute Table”.
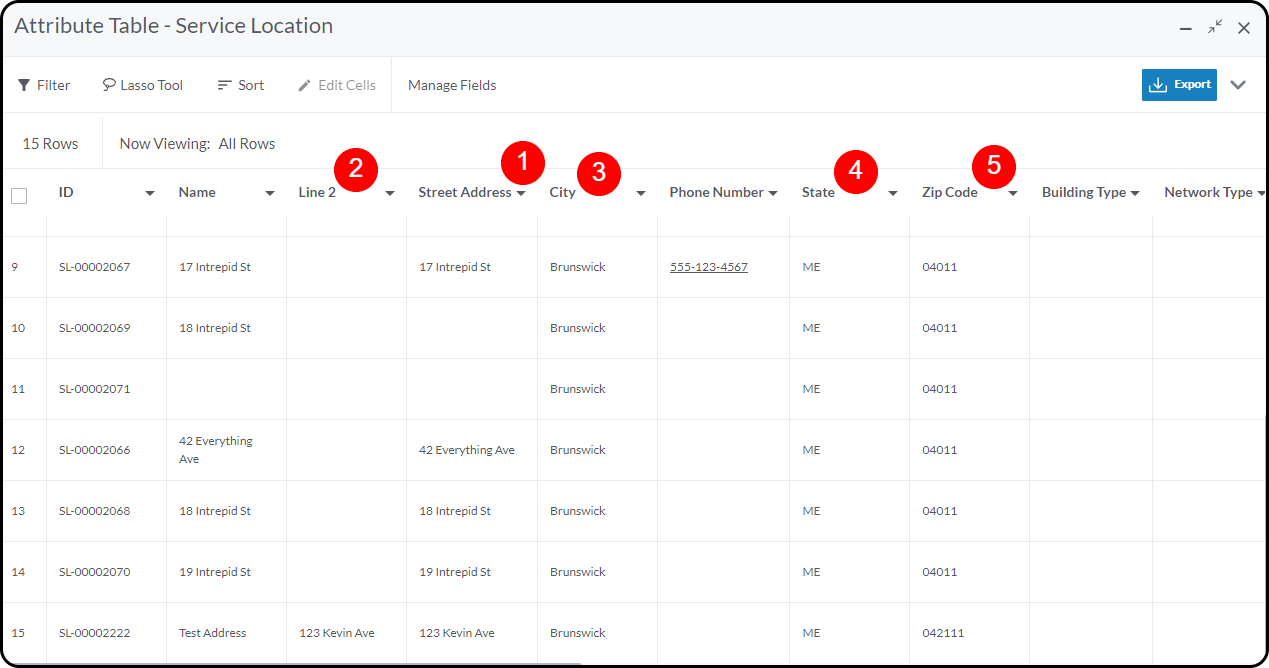
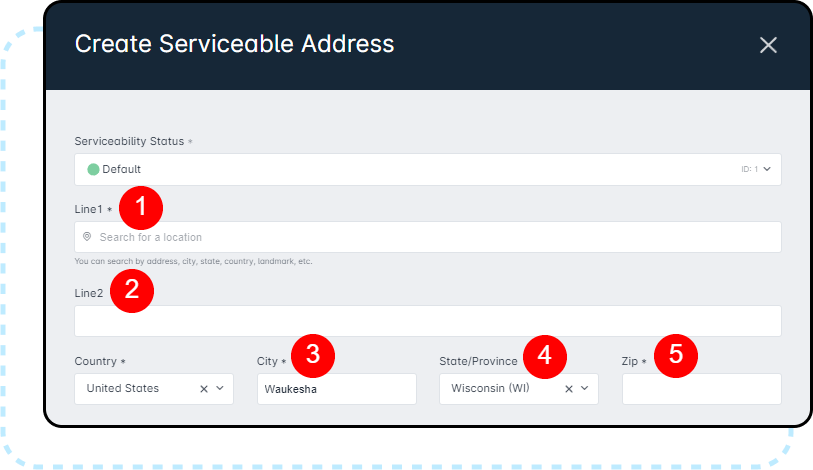
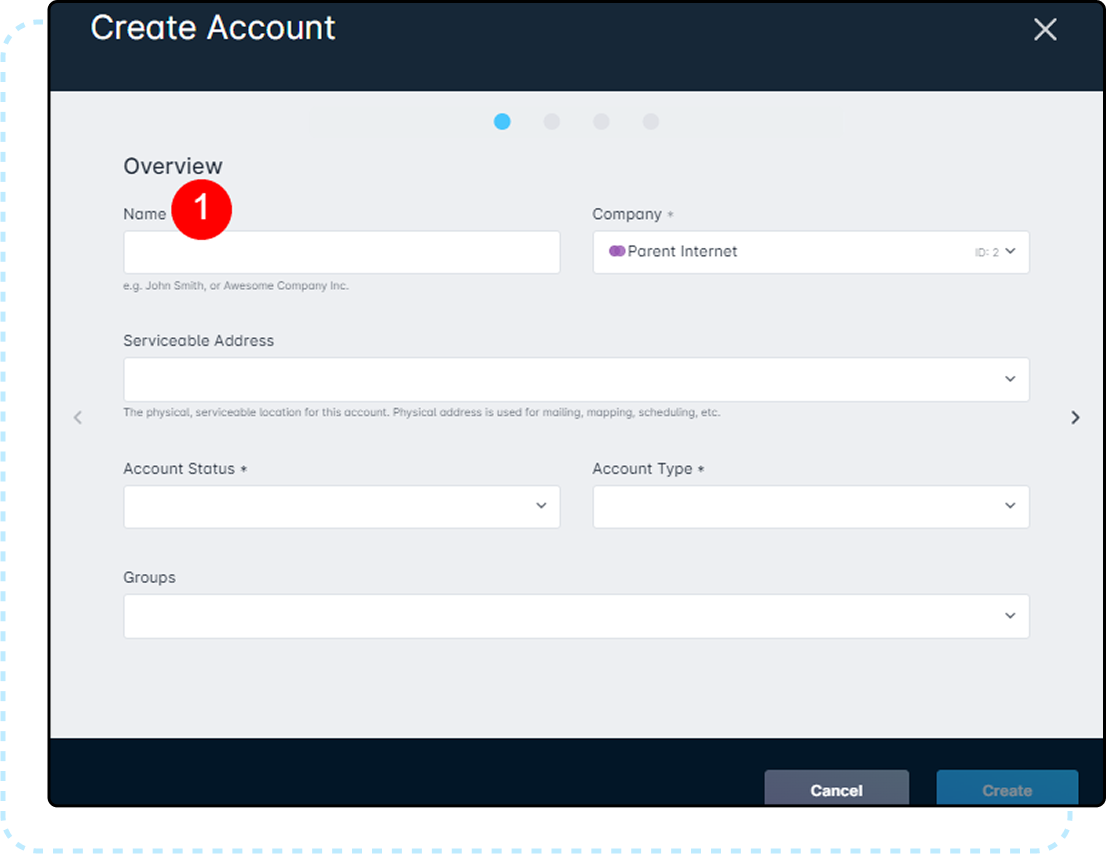
The following fields should exist in order for Sonar to successfully interpret the VETRO data. If you would like to see examples of how these would look, please expand the fold underneath. 1. “Street Address” or “Line 1” will map to Line1 in Sonar 2. “Line 2” will map to Line2 3. “City” will map to City 4. “State”, “Province”, or “Subdivision” will map to State/Province 5. “Zip”, “Zip Code”, “ZipCode”, “PostalCode”, or “Postal Code” will map to Zip
Service Location Attribute Table vs. Create Serviceable Address modal
Located below are screenshots taken from within VETRO FiberMap and Sonar. The corresponding numbers relate to the data above, as well as assisting to visualize which data relates to which areas.
Customer Records
Customer Records within FiberMap relate to Customer Accounts in Sonar. Similar to the last section, there are a number of fields that must be configured in a particular way in order for the data to be successfully relayed.
With all the “Service Location” layers enabled, locate an existing Service Location and click on it to populate a new sidebar.
Scroll down to the bottom of the sidebar and click on “Responses” alongside Customer Records.
In the newly populated modal, select “Attribute Table”.
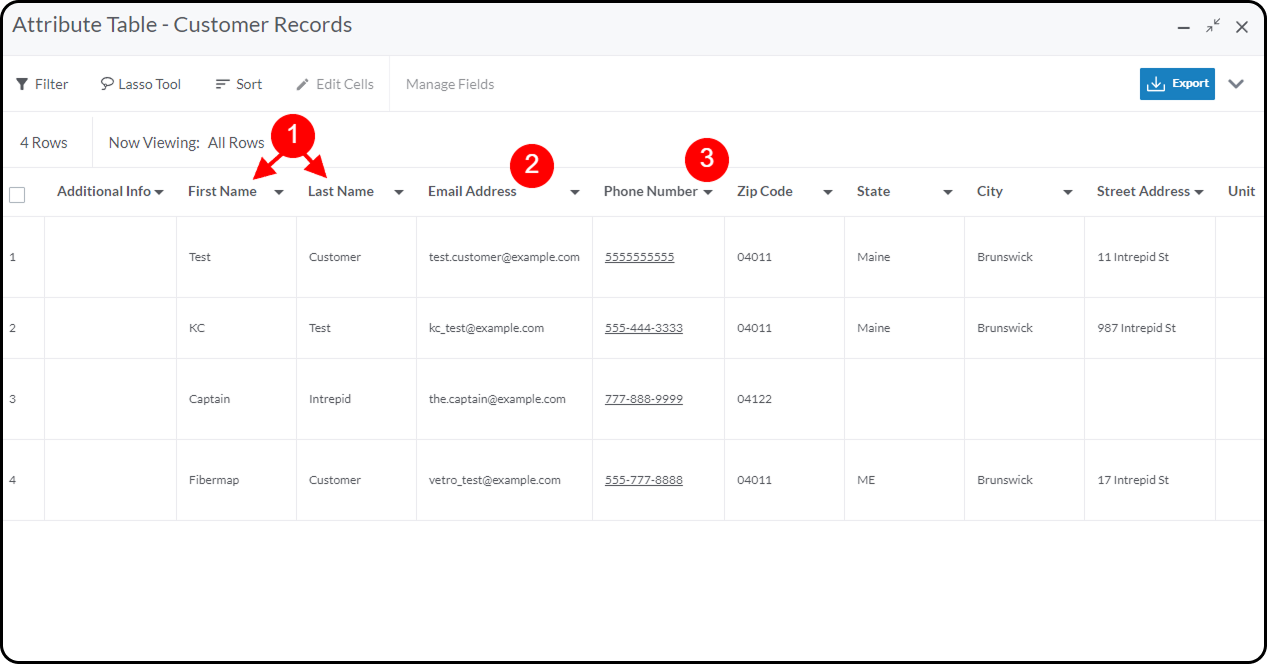
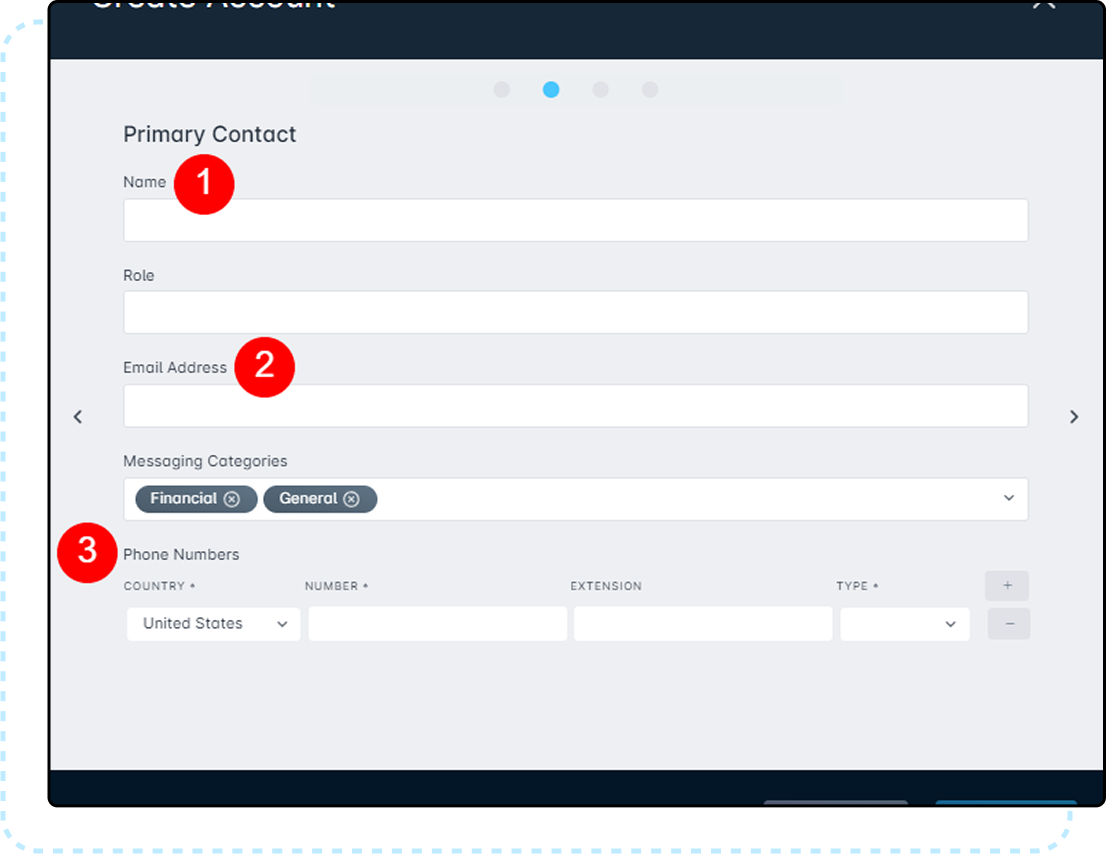
The following fields should exist in order for Sonar to successfully interpret the VETRO data. If you would like to see examples of how these would look, please expand the fold underneath. 1. “Name” or “First Name” and “Last Name” will map to Name in Sonar. 2. “Email” or “Email Address” will map to Email Address. 3. “Phone”, “Phone Number”, or “Telephone” will map to Phone Numbers.
Customer Records Attribute Table vs Create Account Modal
Located below are screenshots taken from within VETRO FiberMap and Sonar. The corresponding numbers relate to the data above, as well as assisting to visualize which data relates to which areas.
Permissions
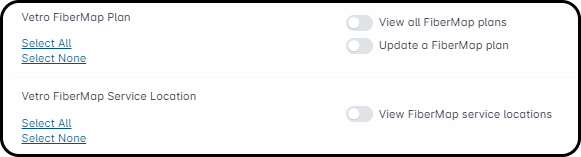
To configure a new FiberMap integration, or make any adjustments to an existing integration, the corresponding role permissions must be enabled. Please take a moment to review these new permissions and ensure that the relevant roles have them added before proceeding with any walkthrough steps.
If you're a Super-Admin of your Sonar instance, no permission changes are required for your account. For more information on Roles and Permissions overall, please review this linked article.
Navigate to Settings → Security → Roles and either choose to edit an existing Role or create a new Role. With the next page populated, locate the permissions reflected in the screenshot below and enable whichever ones are applicable to that Role.
All users who access The Map Interface will be able to see FiberMap custom overlays in action, but without the permissions reflected above, they'll be unable to modify the integration settings.
The following permissions relate to how the FiberMap integration works with your Serviceable Addresses and Network Sites. Users who intend to manage the day-to-day of the integration should have the following permissions enabled:
Additionally, these users should also ensure they have the relevant permissions to action network sites, custom overlays, and serviceable addresses.
FiberMap Integration Settings
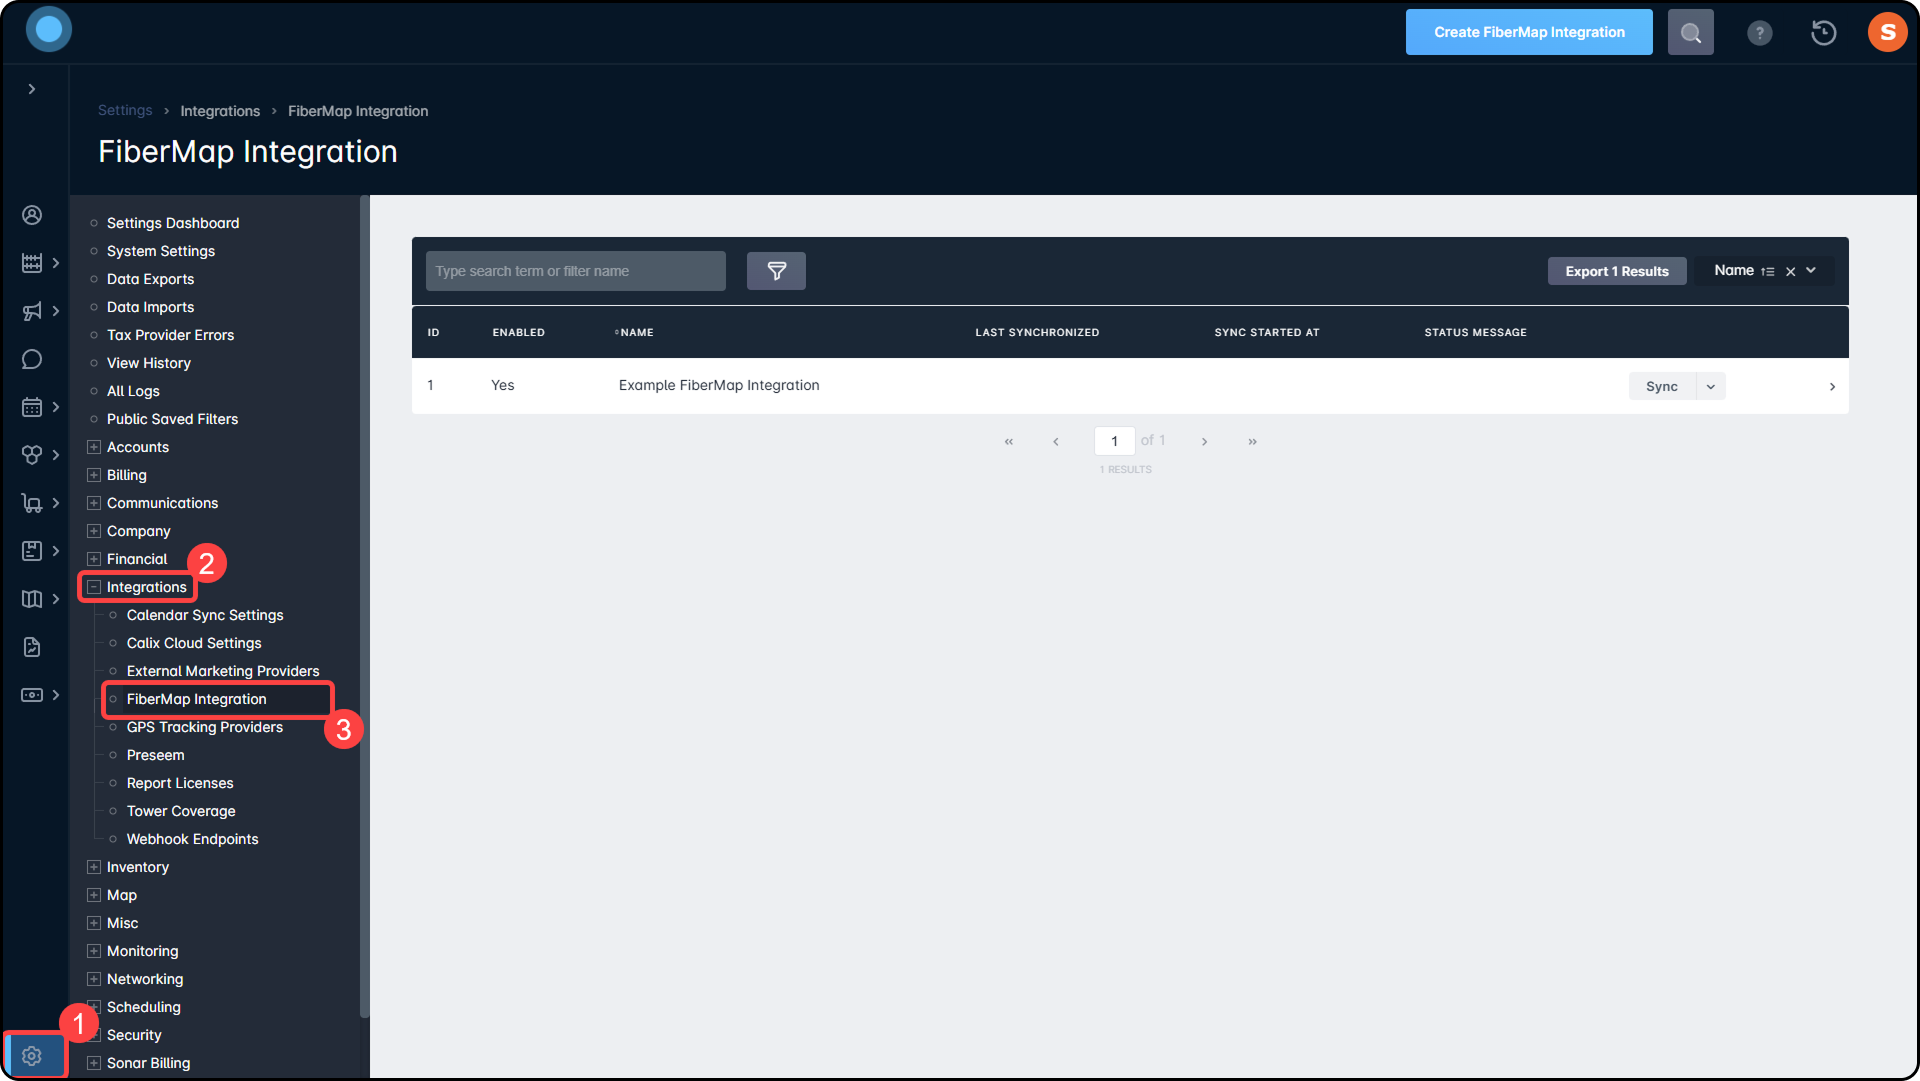
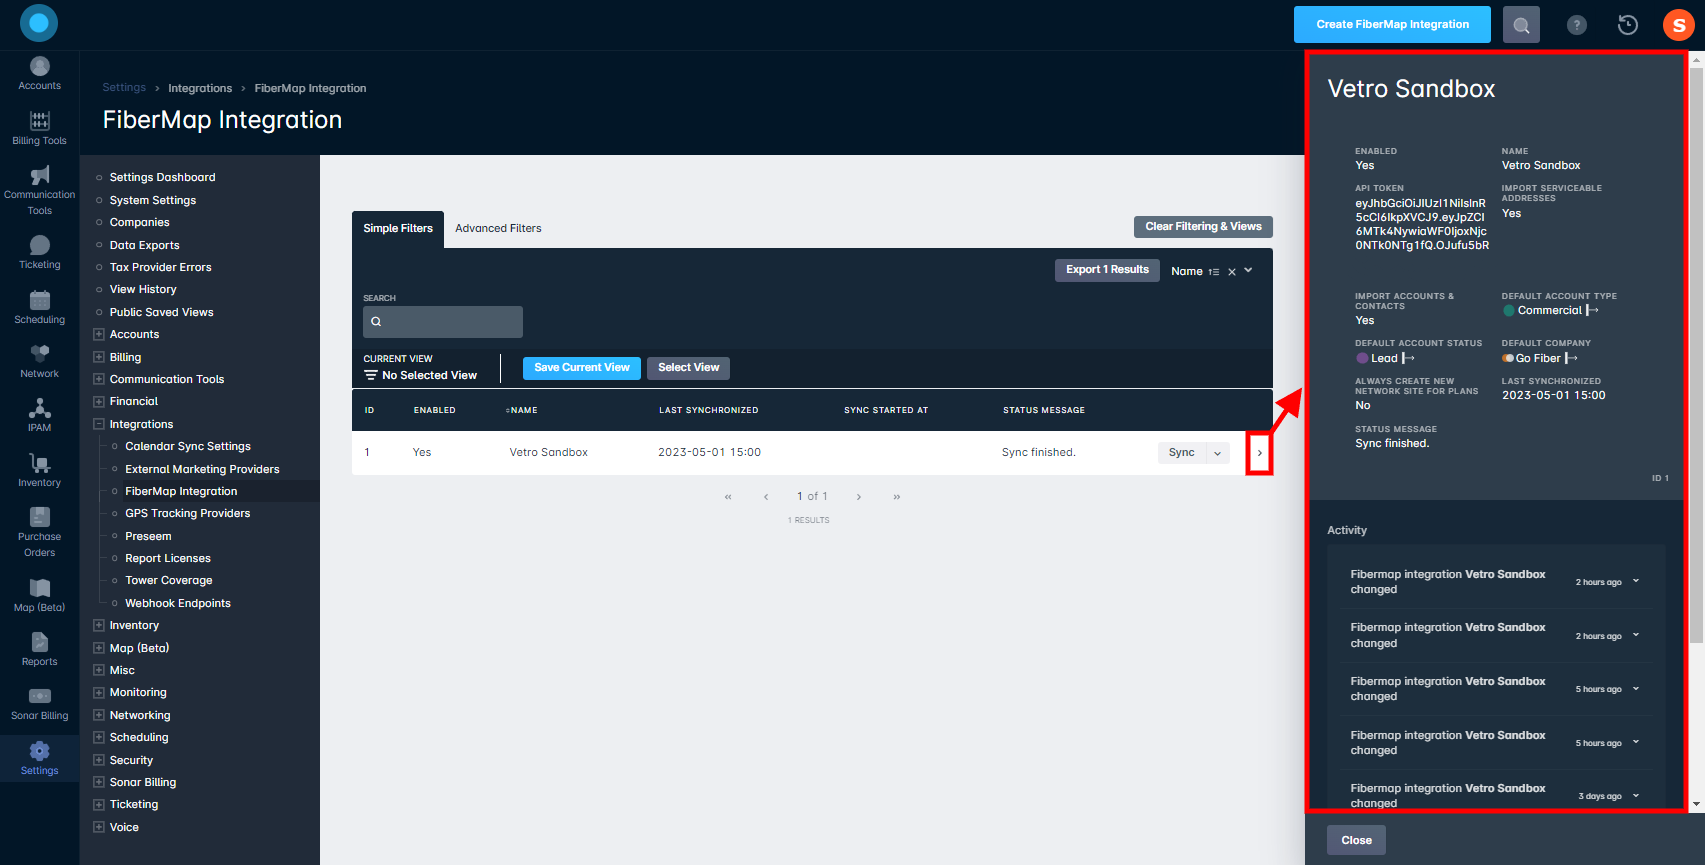
The FiberMap Integrations page can be accessed by navigating to Settings → Integrations → FiberMap Integration. This page reflects all existing FiberMap integrations within your instance; it is possible to have multiple added.
Below, we'll break down the table portion of the page:
The Enabled column allows you to see which integrations are currently active.
The Name column reflects the name you will provide upon the initial setup.
If you intend to add multiple VETRO integrations, it's important you distinguish between them with a clear name.
Last Synchronized details the date and time of the last data sync; in most cases, this should automatically update every three hours.
Details below Sync Started At are only visible when a data sync is actively processing; the date and time it began will be reflected, and upon completion, the column will become blank again.
The Status Message column reflects the current state of the integration.
The Sync button offers the ability to initiate a manual data sync of the VETRO FiberMap integration data.
Clicking the downward-facing arrow will reveal the options to Edit or Delete the line item.
Clicking the arrow to the far right will prompt a sidebar to open that will detail information such as the API Token, the default parameters you've set, and the activity history of the integration.
How to Add a FiberMap Integration
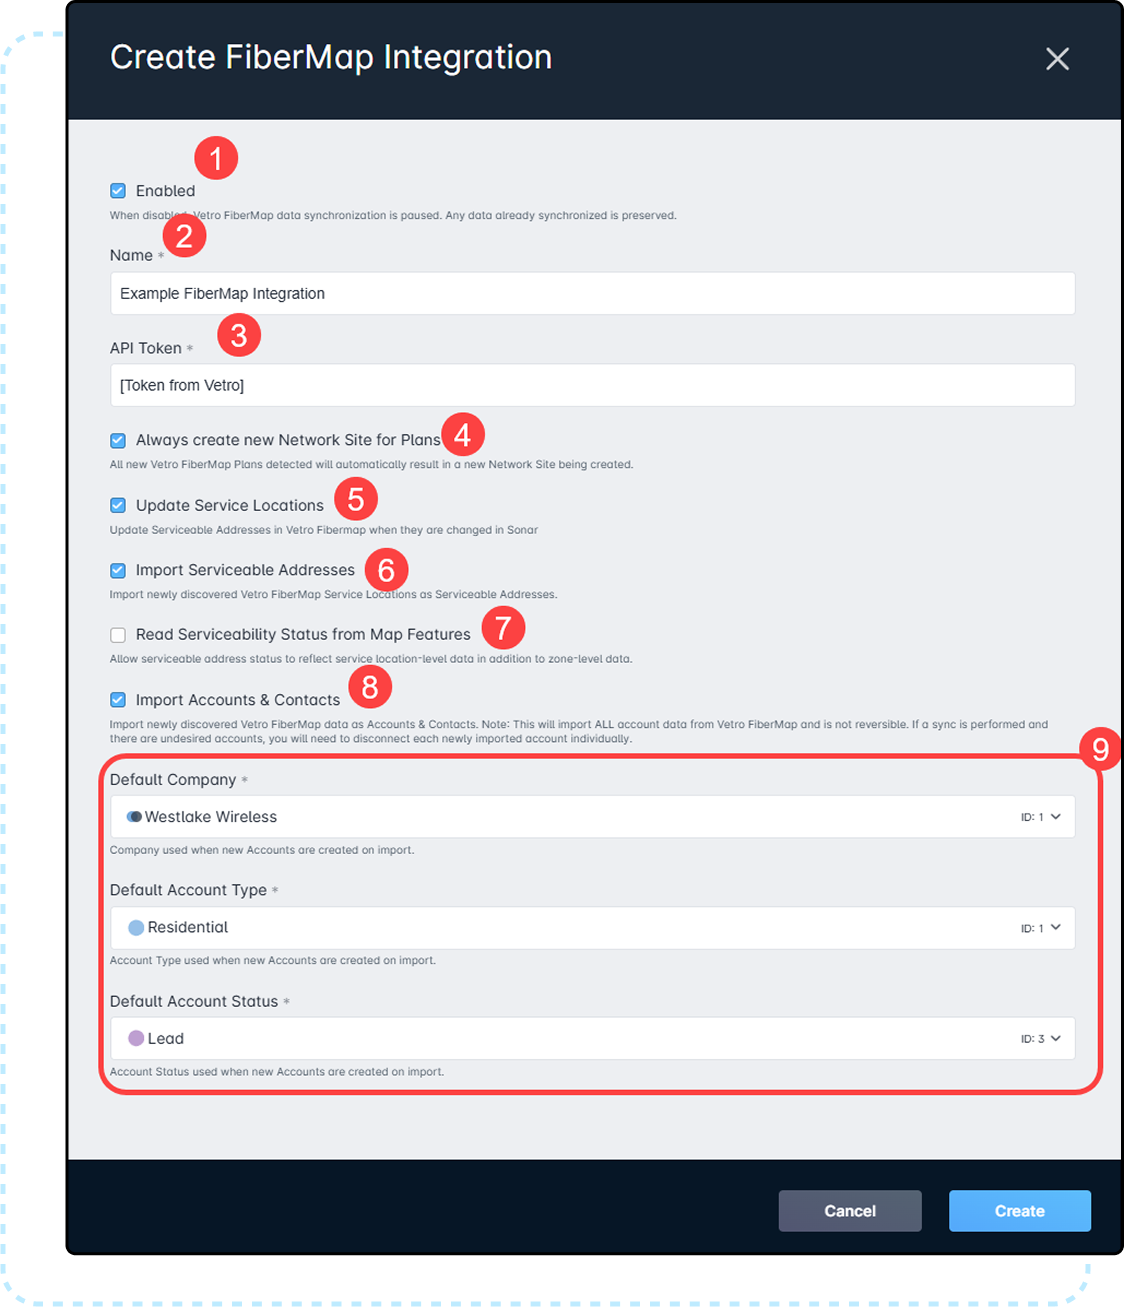
While on the FiberMap Integration page, click the blue Create FiberMap Integration button in the upper-right corner of your screen. Doing so will populate the following modal:
Enabled: If you decide not to enable the integration upon creation, you can enable it at a later time.
Name: If you plan to integrate multiple FiberMap's (perhaps in the event you're supporting multiple companies in your instance), it's worthwhile to ensure the name offers a clear label.
API Token: The API Token can be found within VETRO by navigating to the User Dashboard and then expanding the API Access panel.
Always create new Network Site for Plans: When enabled, any new VETRO FiberMap plans detected by your instance will prompt the creation of a new network site. If disabled, a queue will populate within the Network portion of your instance where you will have to manually update the associated network sites; we will detail these steps underneath FiberMap and Your Network.
Update Service Locations: When enabled, a change in the Serviceable Addresses in Sonar will also modify the Service Location in VETRO, creating a two-way address synchronization process.
Import Serviceable Addresses: When enabled, newly detected service locations synced from FiberMap will automatically be added as new serviceable addresses within your Sonar instance.
If this feature is not enabled, no additional options will be displayed in the modal.
Read Serviceability Status from Map Features: When enabled, Serviceable Addresses imported into Sonar through VETRO will also include service location-level data in addition to the typical zone-level data.
Import Accounts & Contacts: Enabling this option allows the customer record data in FiberMap to synchronize with your Sonar instance, mapped to accounts along with corresponding contact details (if applicable).
Selecting this will import all account data from VETRO FiberMap into your instance, and the action is not reversible. If accounts are created that you do not want, you will need to disconnect each applicable account individually. This process is detailed in our Disconnecting an Account document.
If a duplicate account already exists within your instance, the sync for that customer data would fail without notice.
If this feature is not enabled, the following options will not display.
Default Company,Account Type, andAccount Status: This section allows you to define some account parameters to be used as defaults for new accounts created from syncing the FiberMap data to your instance.
Once you've clicked to Submit the configuration, and the integration is enabled, the data should begin to sync within a minute and then will continue to do so every three hours.
VETRO API Access Token
Following a successful integration, an API Access Token is automatically created within VETRO FiberMap. It's recommended to check this following the above steps to ensure that the necessary permissions are present.
Log in to VETRO FiberMap and click on your user in the top right corner
Select “Dashboard” from the dropdown that appears
Navigate to “API Access” to view the generated Tokens
Click on the three dots alongside the token being used with Sonar and select “Assign Permissions”
In the modal that populates, verify that “Viewing” and “Editing” are enabled for the existing projects you intend to sync, along with “Future Projects & plans”.
Any items that do not have these toggles enabled will not import into Sonar. If you do change your mind about this at a later time, you would need to enable the permissions and manually sync the data within Sonar.
Disabling or Deleting the Integration
While the options exist to disable or delete the integration, doing so will have no effect on the data that already exists within Sonar.
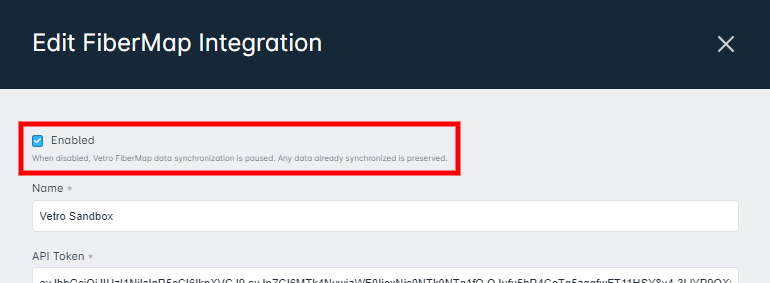
How to Disable
Disabling FiberMap can be found by clicking the downward-facing arrow and selecting Edit. In the modal that populates, remove the checkmark from alongside Enabled and Save your changes. The work queues with pending plans and service locations will continue to exist with any data synced ahead of the change, but no new items will be added until the integration is enabled again.
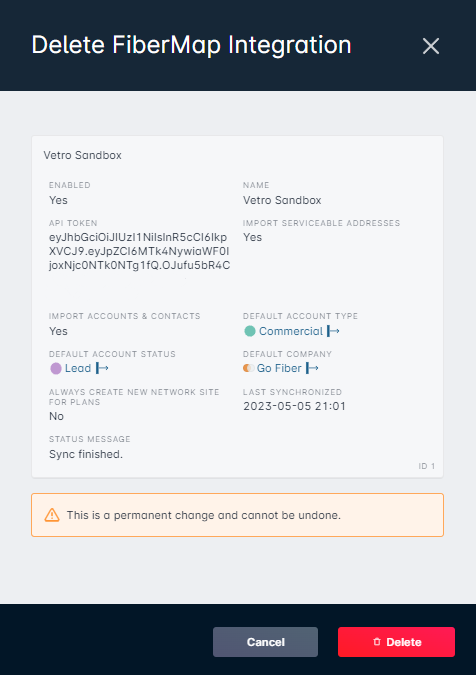
How to Delete
Deleting an existing FiberMap Integration can be found by clicking the downward-facing arrow and selecting Delete. Following this, a new modal will populate that details the current configuration of the integration, including the API key and the time it was last synced. A warning message is also displayed to caution you that it is a permanent change:
Following the deletion, the plan, and service location queues, will be removed from your instance, along with any data that existed in them that had yet to be actioned. All other data already linked with items will continue to exist, though they will not receive any updates from FiberMap.
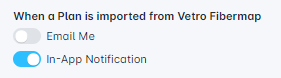
User Notifications
As the VETRO FiberMap integration includes data being pulled into your instance, it's important to be aware of when pending plans are awaiting your attention. The following notification options are found in your individual user notifications:
VETRO FiberMaps in Use
FiberMap and Your Network
FiberMap plans translate to network sites within your Sonar instance; whether this is automatic or requires your intervention depends on whether you enabled Always create new Network Site for Plans when you configured the integration.
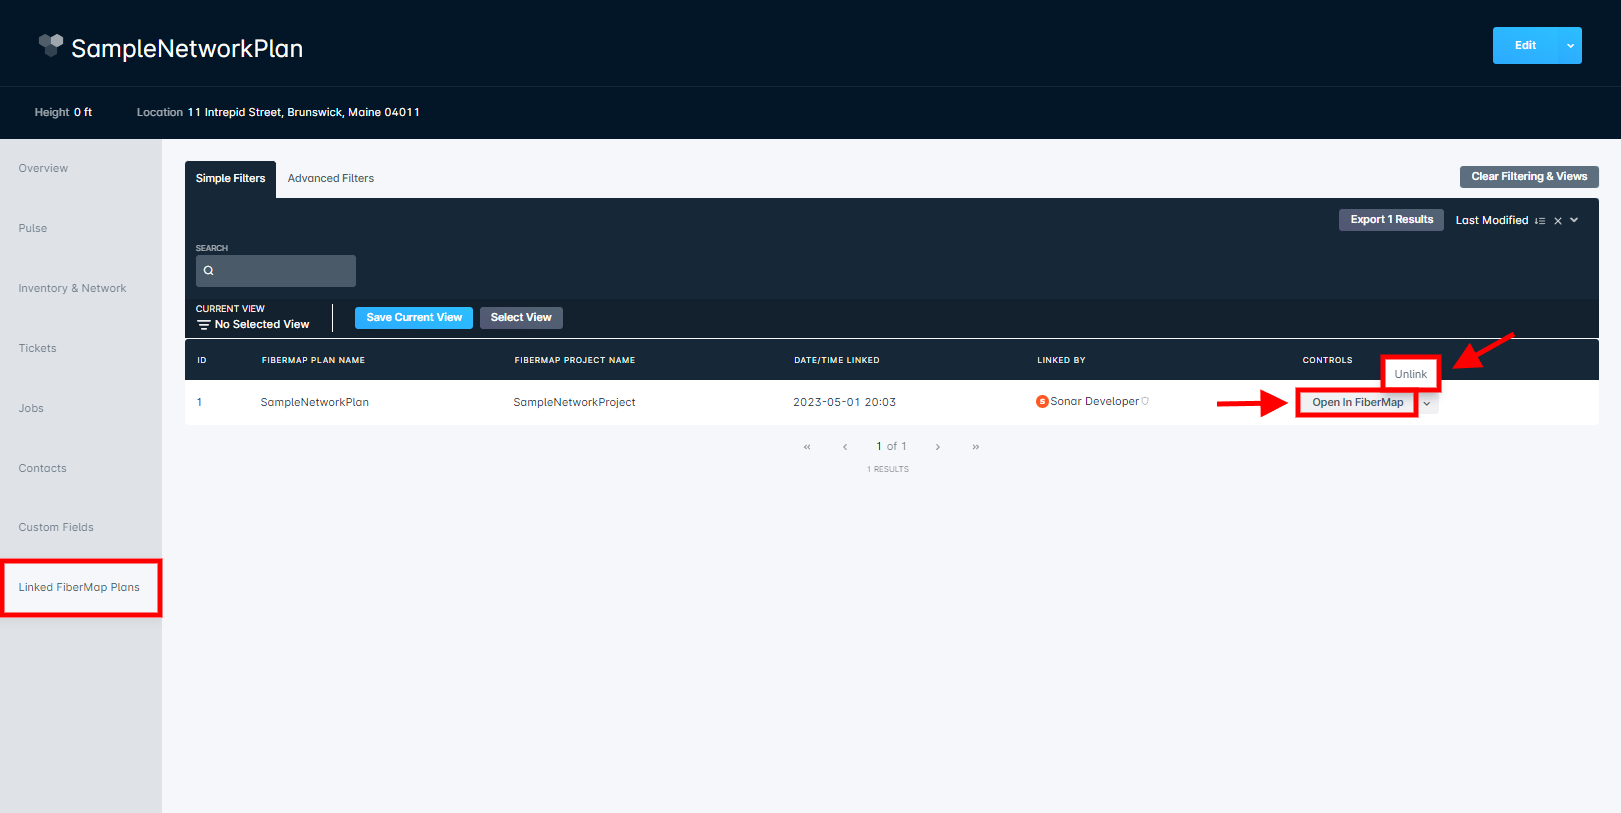
When a FiberMap plan is associated with a network site, an entry will be visible within the Linked FiberMap Plans tab of the site management page. This tab will reflect the plan and project name, the time the connection was made, and by whom. Additionally, you can utilize the Open in FiberMap button to populate the plan within FiberMap, as well as unlink the plan from the network site by clicking the downward-facing arrow and selecting Unlink.
As FiberMap plans don't have an associated parent address, the address reflected in your instance is created by taking the average of all the coordinates in the geometry of that plan, translating that into a single latitude and longitude, and then using that data to determine the applicable address.
With Always create new Network Site for Plans enabled:
Upon initial synchronization of the integration, any existing FiberMap plans will be pulled into your Sonar instance as a new network site. These can be found by navigating to Network → Network Sites and locating the new site; the name will be the same as the plan within VETRO FiberMap. The newly created network sites act as any other within your instance, which means you can alter the name and any details if required.
Going forward, any newly identified plans within FiberMap will continue to sync with your instance and be automatically made into new network sites.
Without Always create new Network Site for Plans enabled:
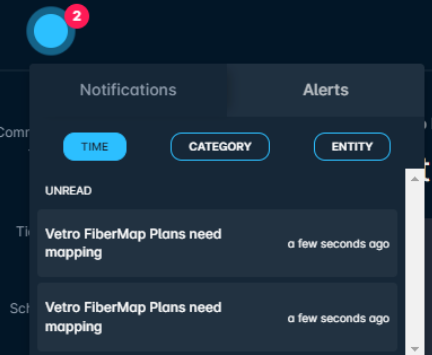
As the integration syncs, any FiberMap plans found will populate within your instance underneath Network → FiberMap Plans. If you have the applicable user notification enabled, you'll be alerted to the new additions via your notifications:
Clicking on the notification will bring you to the Network page, where you can then reach FiberMap Plans and see the items that require action:
By default, the Visibility Status filter is set to Visible. This filter exists as there may come a time when you don't want to integrate a plan with your instance, whether it be a temporary choice or permanent, and so you can hide the line item by clicking the downward-facing arrow alongside the plan and clicking Hide. In the event you want to find any hidden plans, you would only need to adjust the filter to All or Hidden, and they will be revealed.
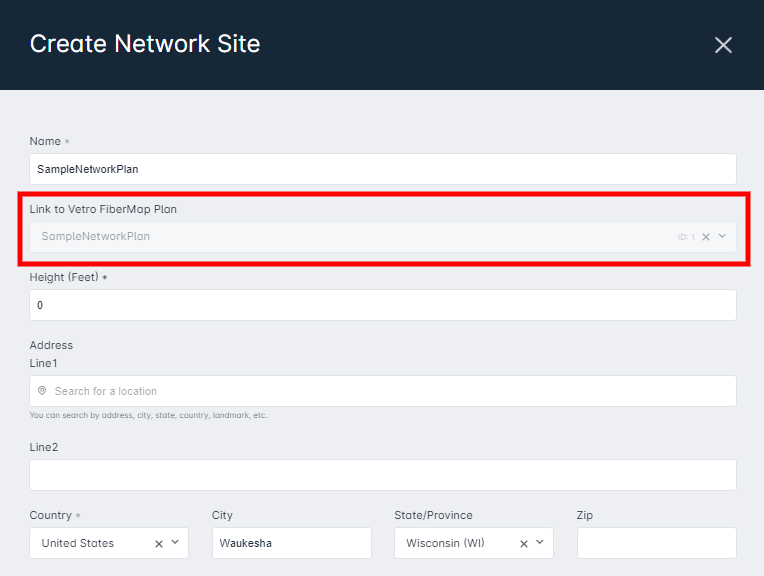
With each entry on this page, you have the option to link it to an existing network site or create a new site from scratch.
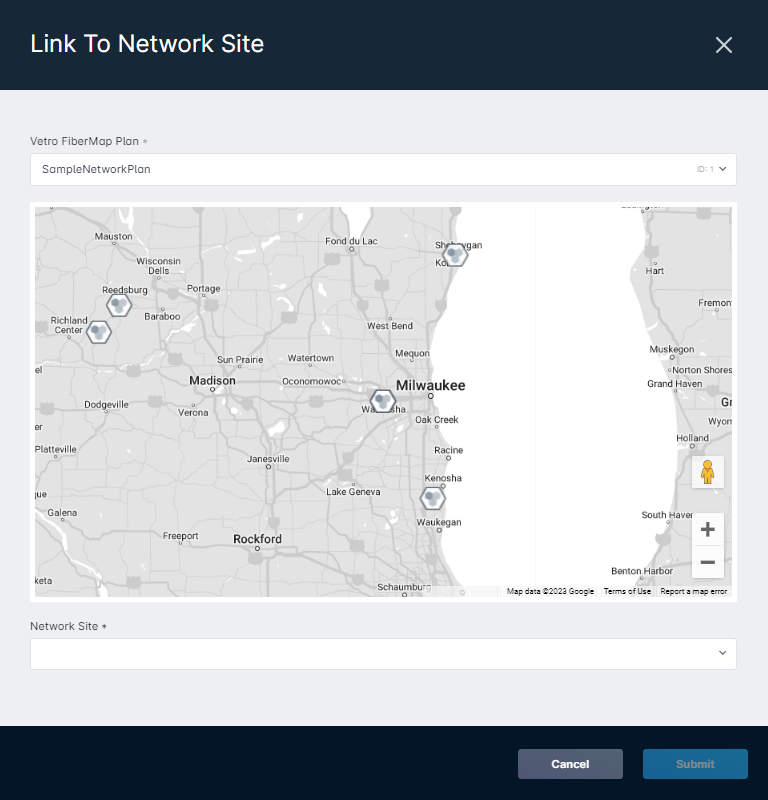
Clicking on Link will populate the following modal:From here, you can select the applicable network site either using the map tool or by using the dropdown tool underneath. Once your selection has been made, click on Submit to finalize your changes.
Clicking on Create Network Site will populate a modal that is almost identical to the typical creation of a network site, with one key difference:The plan you're actioning will be automatically associated underneath the Link to VETRO FiberMap Plan header.
In either scenario, once the plan is associated with a network site, it'll be automatically removed from FiberMap Plans. Following this, the mapping details of the plan will be visible as a Custom Overlay associated with the network site, as detailed in the section below.
FiberMap Custom Overlays
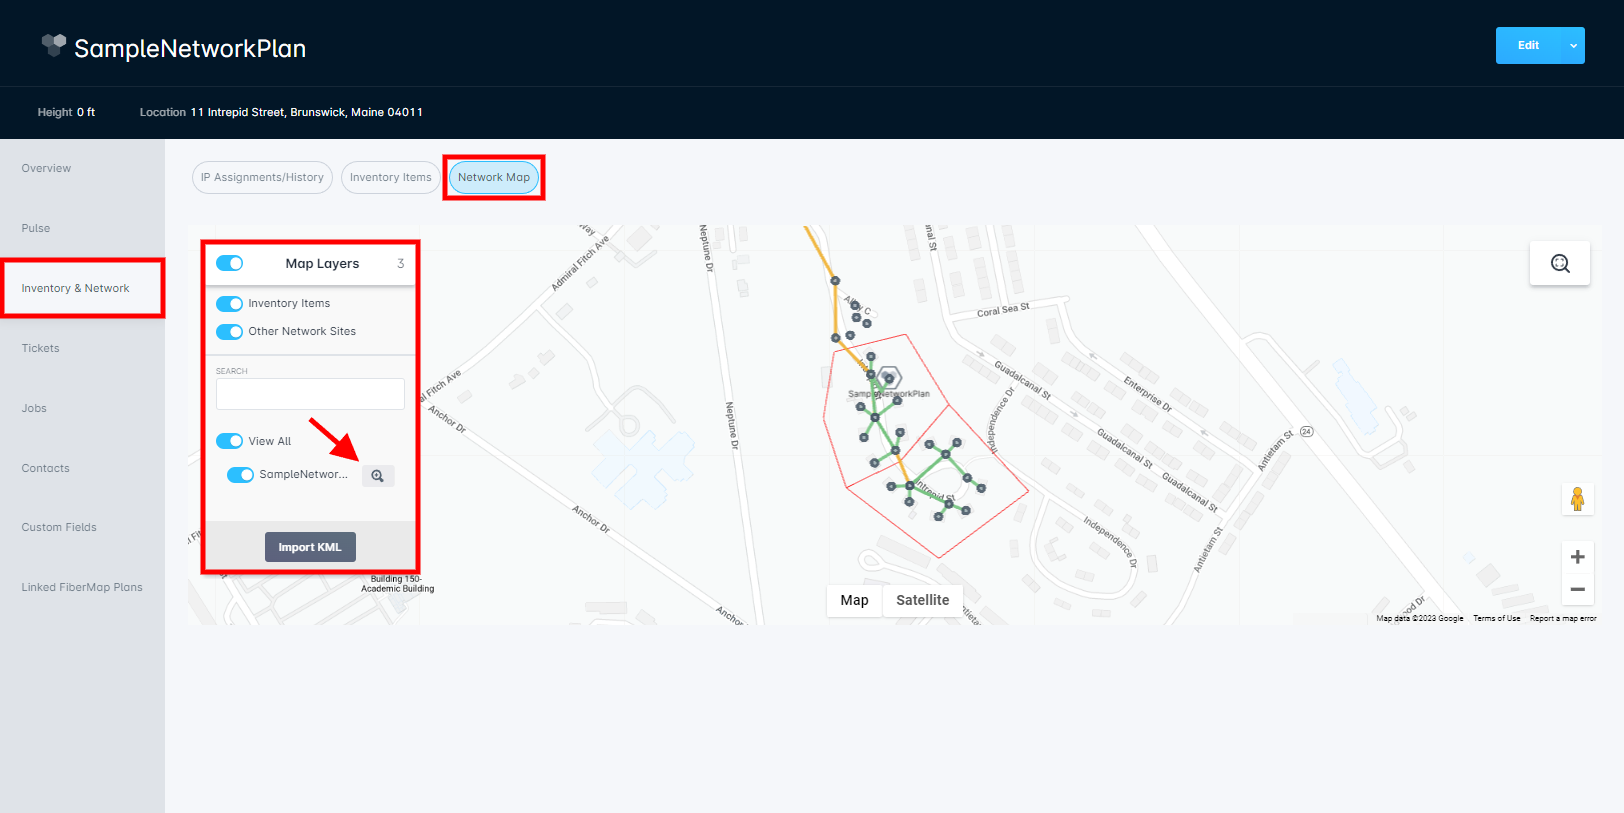
Custom overlays are automatically created when a FiberMap plan is synced with your Sonar instance. When a plan is associated with a network site, the corresponding overlay can be found by accessing the network site's management page, clicking on Inventory & Network, and then Network Map. From there, you can expand the Map Layers and use the magnifying icon alongside the plan name to quickly zoom into the overlay.
Outside the network site management page, custom overlays can also be viewed by navigating to Map (Beta).
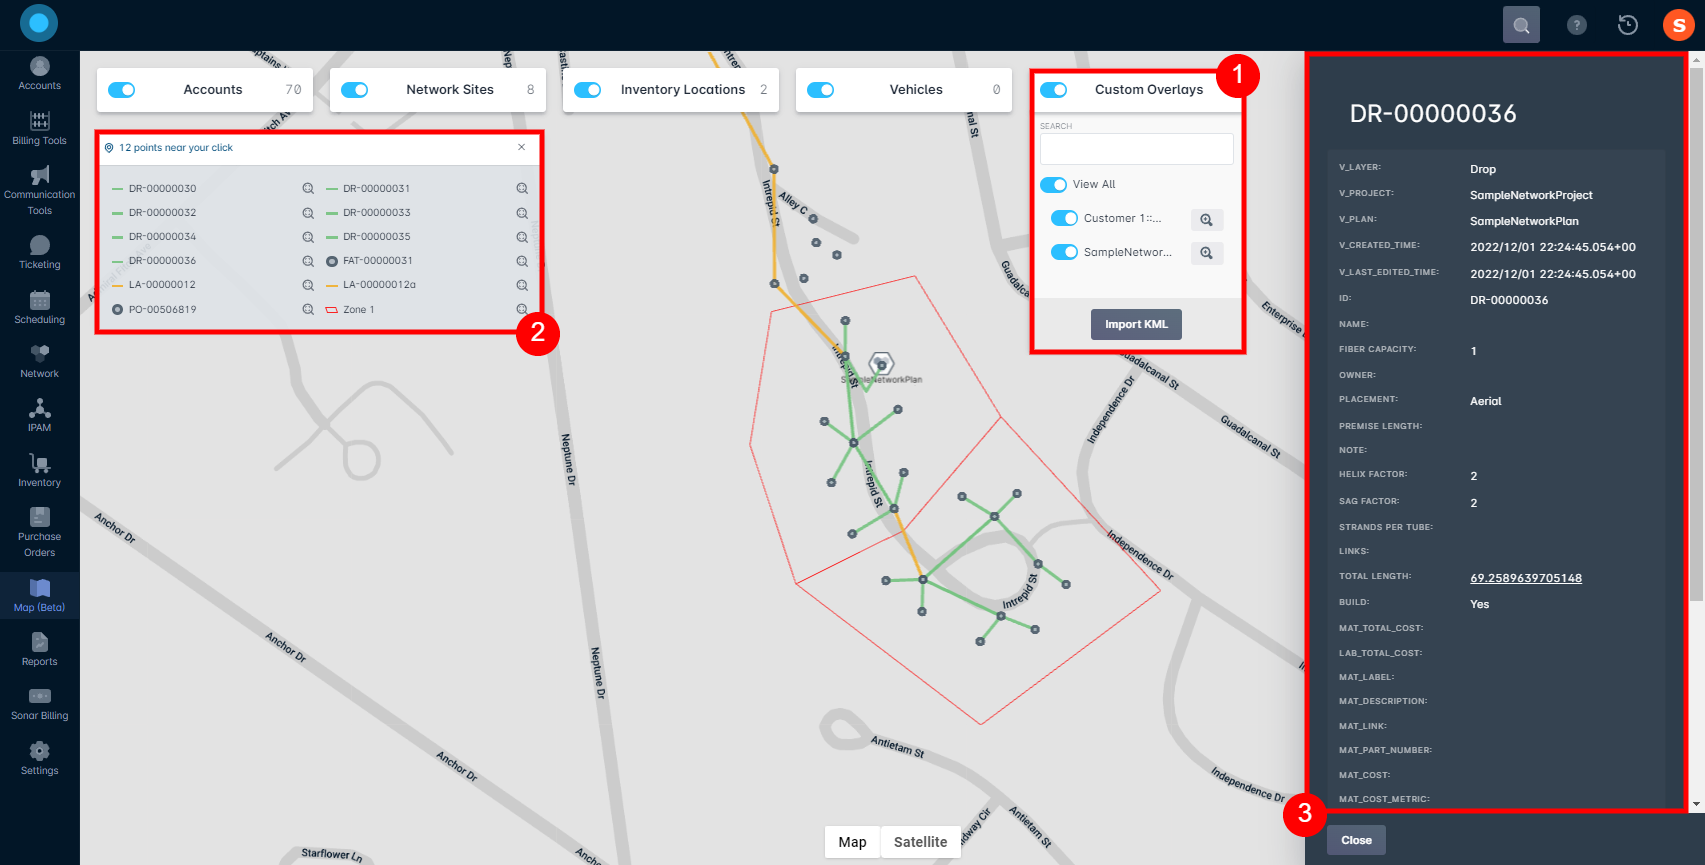
The Custom Overlays toggle is where you'll find all existing overlays in action within your instance. To take a closer look at a specific overlay, you would click on the magnifying glass alongside the respective name and be automatically zoomed in. In the event you have multiple overlays, you can use the search box within the Custom Overlays filter to quickly locate the applicable overlay, and you can toggle them on or off to clear up the map view.
Upon clicking around your mapping, a new modal will appear titled # points near your click, which displays the individual components nearby. With this present, you're able to click on an individual name and populate the sidebar menu.
The sidebar menu details information associated with that service location; the information present will depend on what information is reflected in FiberMap for that entry.
The ability to alter the name of the overlay can be found by navigating to Settings → Map (Beta) → Custom Overlay. Locate the line item you wish to adjust, and then click Edit alongside it.
For additional information on Custom Overlays, click here.
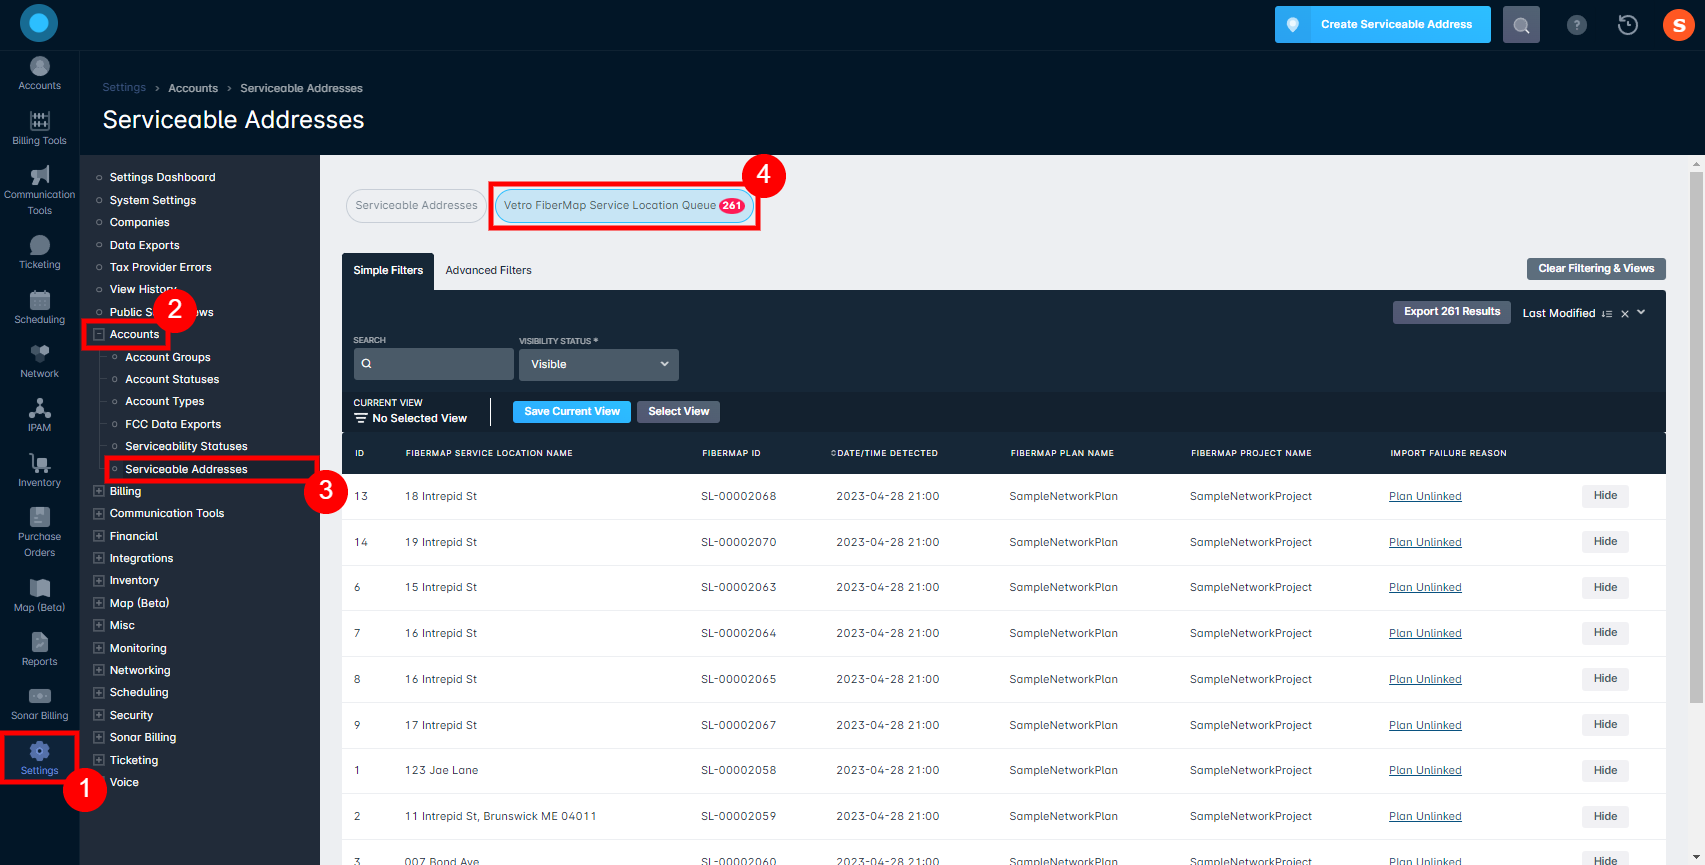
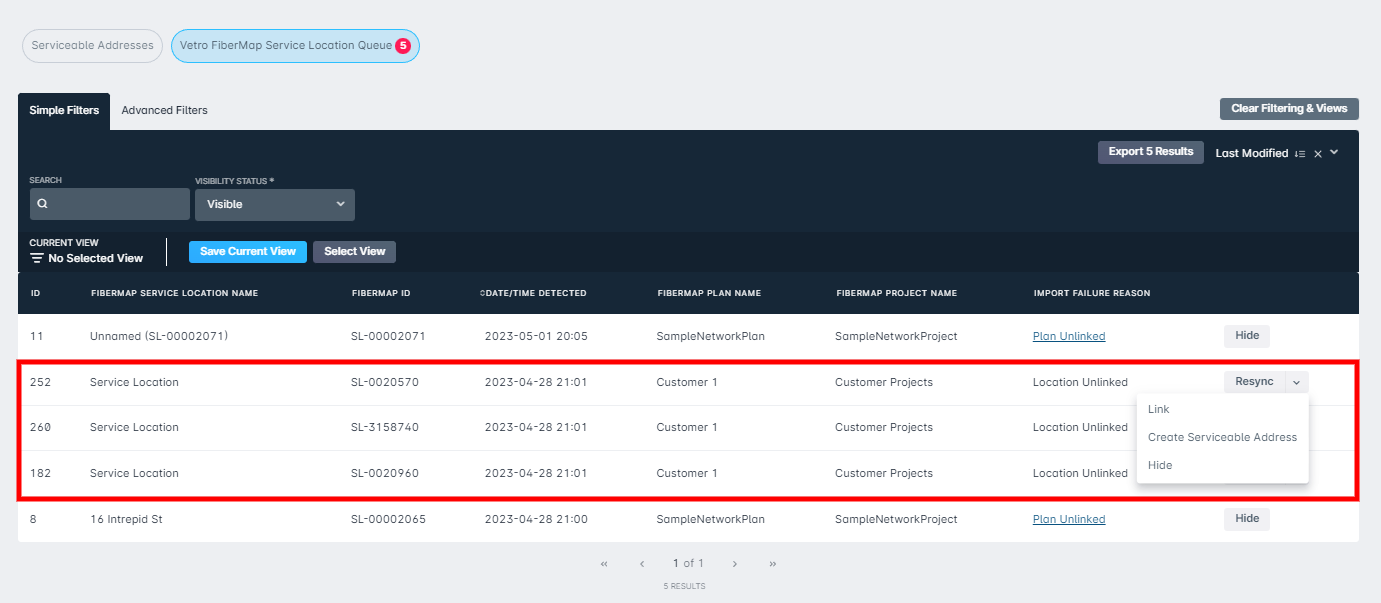
FiberMap Service Location Queue
If you had chosen to enable Import Serviceable Addresses during the setup process, a new tab will populate within the Serviceable Addresses portion of your instance:
The VETRO FiberMap Service Location Queue displays a list of all service locations that have not yet been paired with a serviceable address in your instance. The information reflected is representative of the data taken from your FiberMap, and entries can populate here due to incomplete data being present in FiberMaps, a duplicate address issue, or even due to the associated FiberMap plan not being linked to a network site yet.
Before we look at the steps taken to action these entries, let's take a look at the default filter option. At the top of the table, you can see that the filter titled Visibility Status is set to Visible. This option exists as you're able to hide line items and focus only on the FiberMap data you deem necessary at that time.
Actioning Service Location Entries
If the Import Failure Reason shows as Plan Unlinked:
Plan Unlinked indicates that a FiberMap Plan exists in your instance but has not yet been associated with a network site. To resolve this, you must follow the steps below FiberMap and Your Network and then do one of the following steps:
1. Return to VETRO FiberMap Service Location Queue and select Resync for the applicable line item. This is recommended when you only have a few items to resync. 2. Otherwise, if you have numerous entities to sync, navigate to Settings → Integrations → FiberMap Integration and click on Sync.
If the Import Failure Reason Shows as Location Unlinked:
Location Unlinked indicates that the FiberMap service location has address data that could not be imported into Sonar, most typically due to it being a duplicate address entry. To solve this error, you have a few options:
1. You can attempt to correct the customer record in FiberMap and then click Resync in Sonar. 2. An alternate solution is linking the FiberMap entry with an existing serviceable address to combine the data. To do this, click the downward-facing arrow for the applicable line item and then click on Link. In the modal that populates, locate the matching and existing serviceable address and click on Submit. 3. Finally, you can manually link the FiberMap data to a new serviceable address by clicking the downward-facing arrow and selecting Create Serviceable Address; the address you create will automatically be associated with the applicable FiberMap location. If none of the above options are applicable, or you want to action the service location at a later time, you can choose to hide the entry by clicking the downward-facing arrow of the line item and selecting Hide.
If the Import Failure Reason Shows as No Address:
No Address indicates that the FiberMap service location has bad address data. To solve this error, there are a few options:
1. The first option is linking the FiberMap service location to an existing serviceable address in your instance, thereby combining the data. To complete this, click on Link alongside the respective line item, and then in the modal that populates locate the serviceable address and click on Submit. 2. Another option is to create a serviceable address from scratch and have it linked to the service location upon creation. This can be accomplished by clicking the downward-facing arrow alongside the line item and selecting Create Serviceable Address; the following modal will allow you to add the necessary address details. 3. The final option would be to correct any of the bad data within FiberMap and then resync the entity; this option can be found by clicking on the downward-facing arrow and clicking Resync.
If none of the above options are applicable, or you want to action the service location at a later time, you can choose to hide the entry by clicking the downward-facing arrow of the line item and selecting Hide.
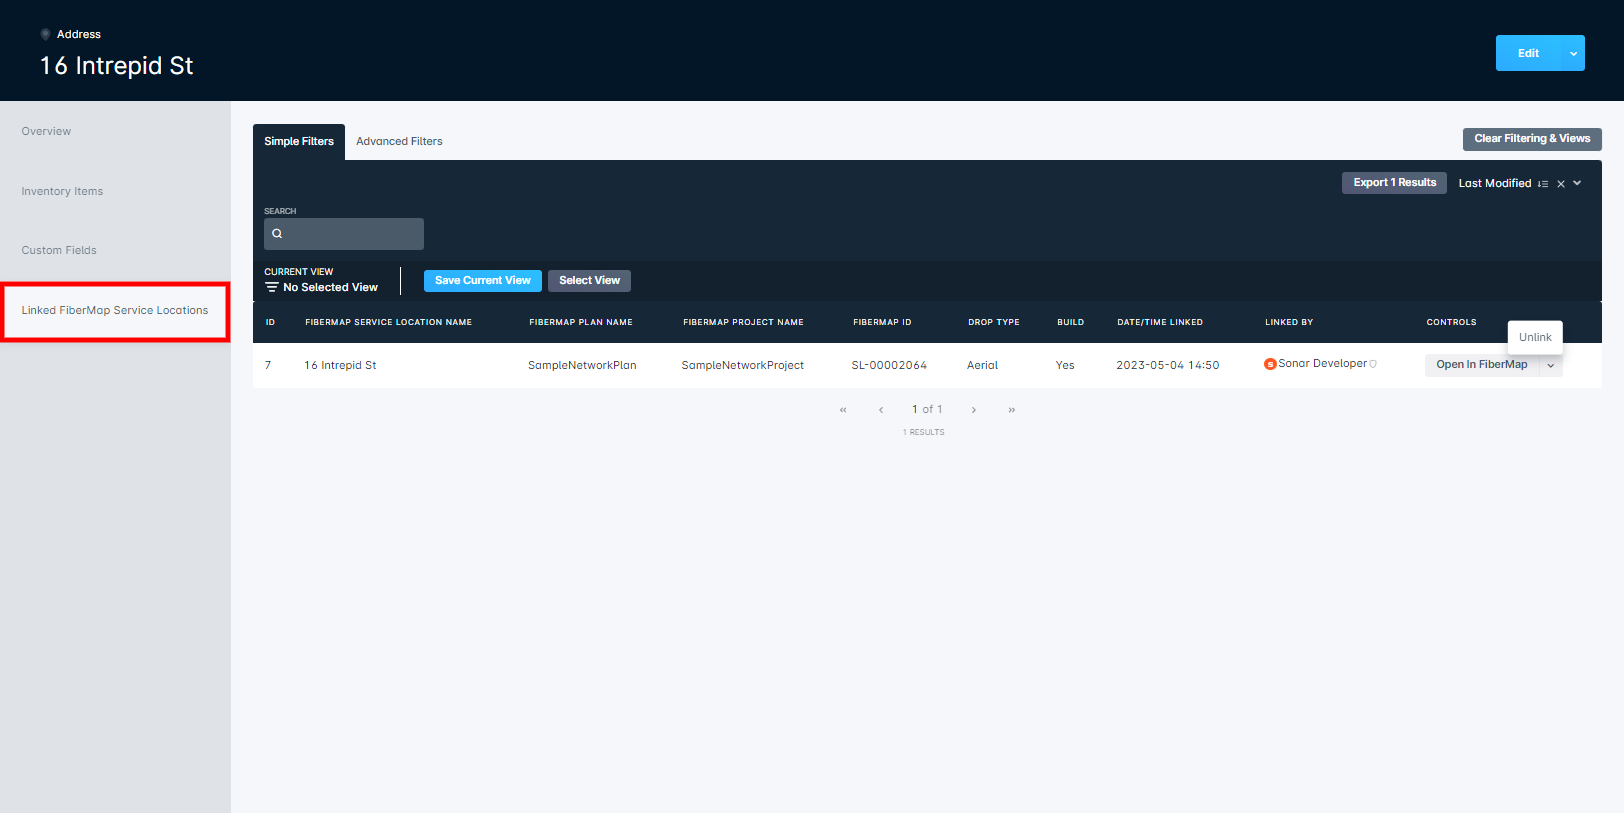
FiberMap and Your Serviceable Addresses
Once FiberMap service locations have been associated with a serviceable address, the individual connection can be identified via the Linked FiberMap Service Locations tab found on the address's management page. This tab reflects various FiberMap details such as the plan and project name, the FiberMap ID, and the service location name.
If you already have a FiberMap tab in session, clicking on Open In FiberMap will automatically populate the related plan in VETRO. In the event you need to remove the service location from the serviceable address you're viewing, clicking the downward-facing arrow and selecting Unlink will prompt the data to return to the FiberMap Service Location Queue, ready to be actioned or hidden.
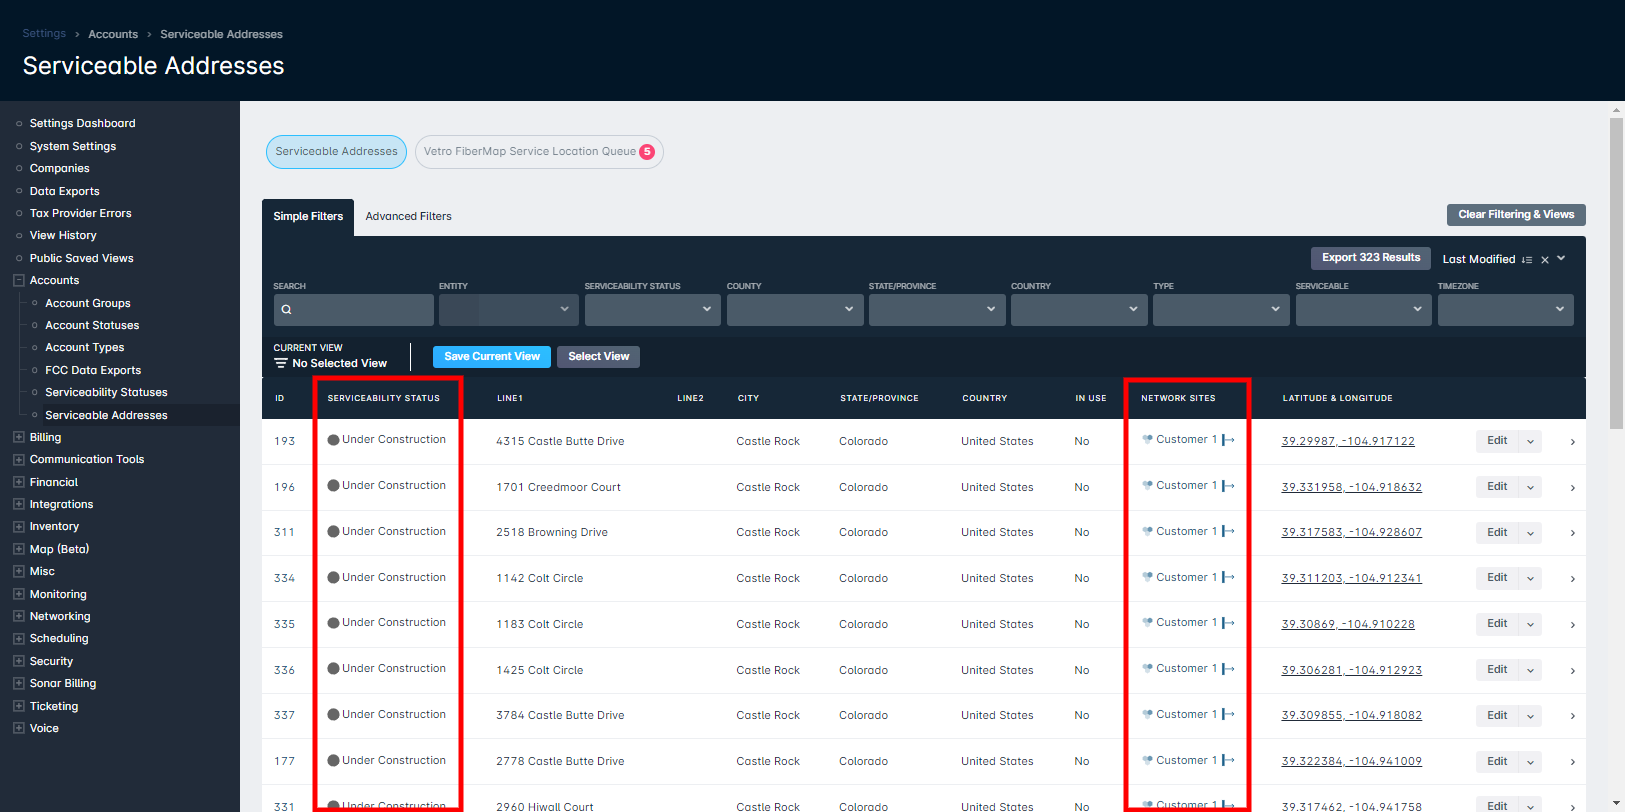
An additional feature of the integration is the automatic serviceability statuses and associated network sites for serviceable addresses:
The zone status from FiberMap is relayed into Sonar as a serviceability status that is automatically applied to serviceable addresses. Similarly, as the plan requires a connection to a network site within the instance, that is automatically associated with the address too.
To read more on Serviceability Statuses, click here.
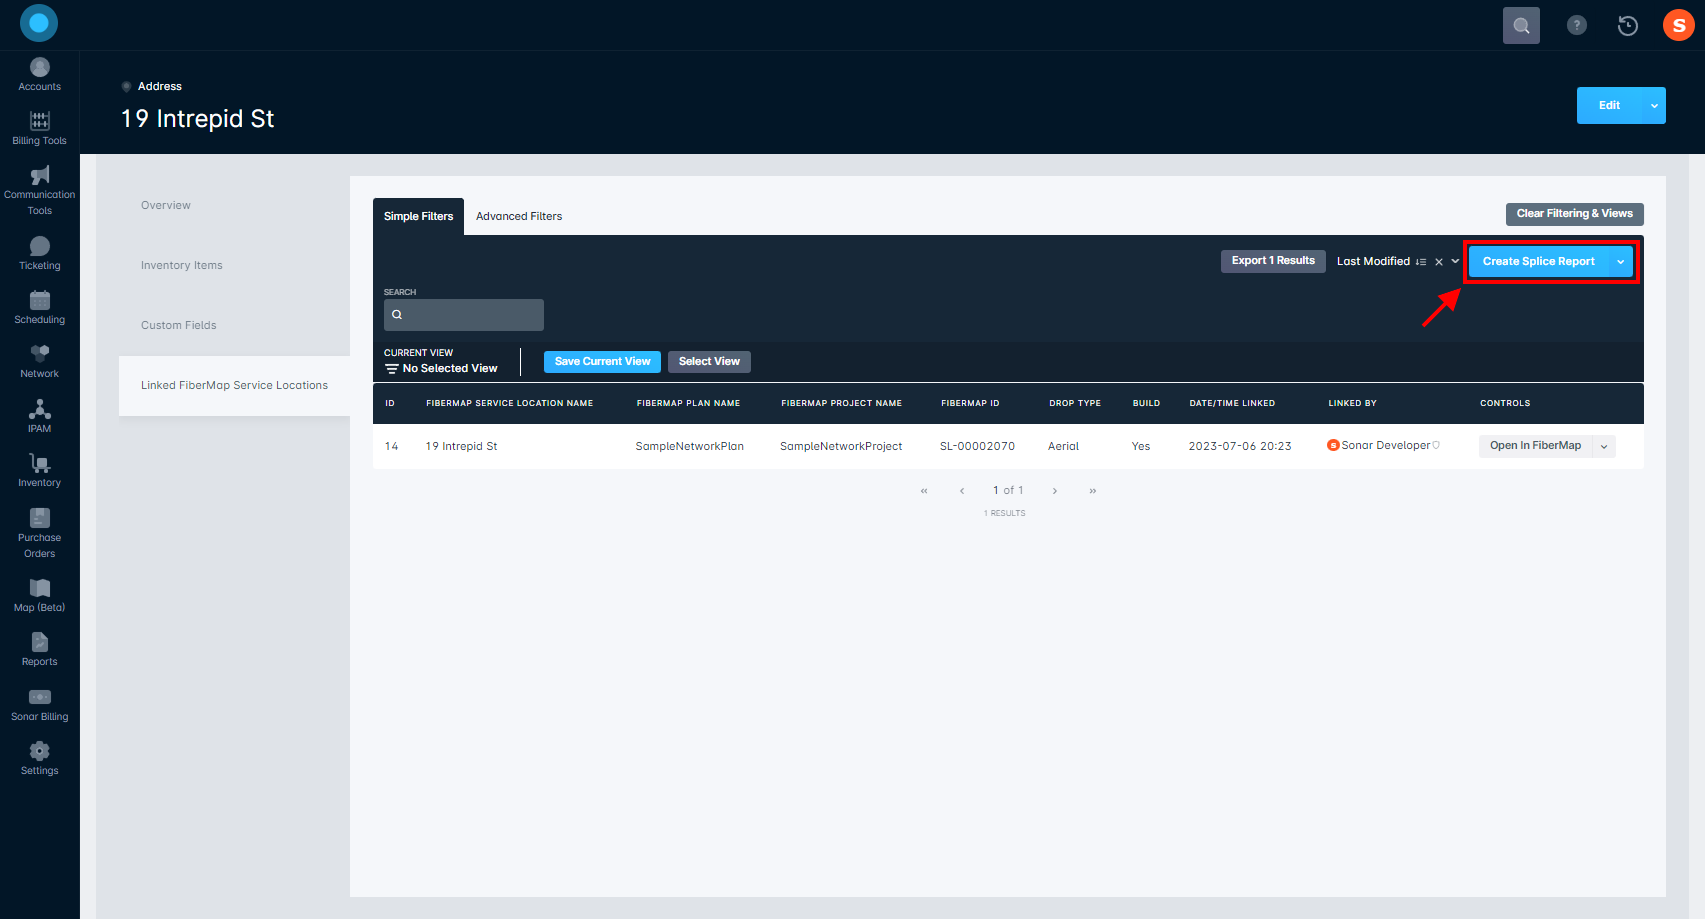
Splice Reports
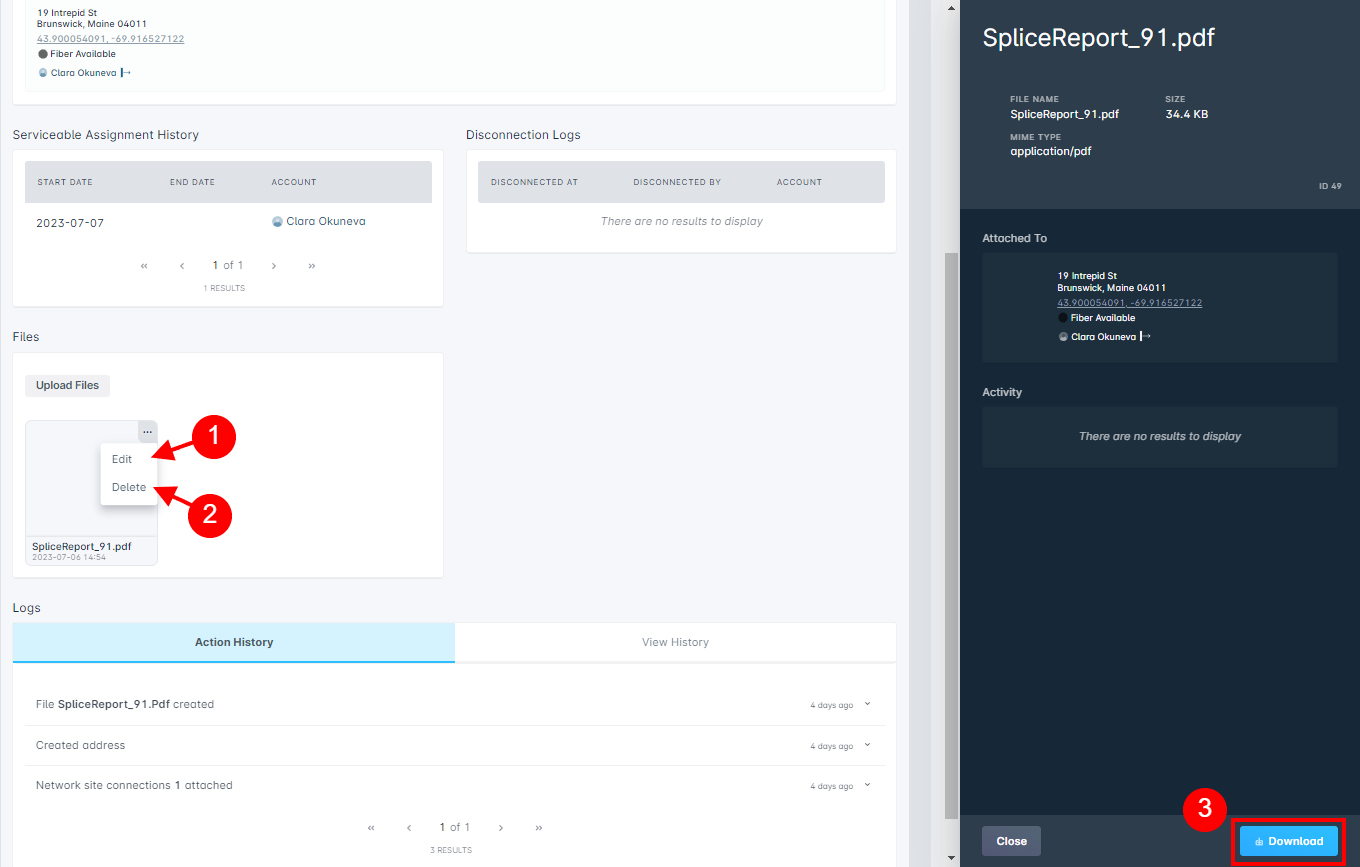
If a serviceable address is associated with a FiberMap service location, you can download a PDF copy of the splice report for that location.
To do so, you would need to populate the serviceable address, navigate to Linked FiberMap Service Locations and either:
Select Create Splice Report, which will prompt a PDF file to be associated with the serviceable address. This file can then be downloaded as needed by whoever is viewing the location.
Click on the downward facing arrow and select Download Splice Report. Doing so will automatically download the PDF file to your device.
If you select the option to create the report, the file will be accessible by navigating to Overview → Files. From here, there are a few options available to you.
Clicking on Edit will populate a new modal that provides the ability to add a description and select whether it should be the primary image associated with the serviceable address.
Selecting Delete will prompt a confirmation modal letting you know that the change is permanent. However, the ability to create a splice report will remain available as long as a FiberMap service location is associated with the serviceable address.
The ability to download the PDF file is accessible by clicking on the tile which will prompt a sidebar menu to populate; from here, you're able to select Download.
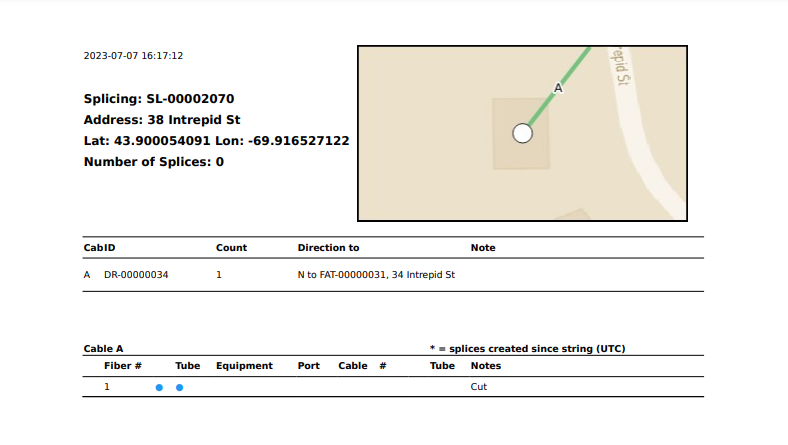
An example of the PDF is reflected below, though the information may vary depending on the data found in your FiberMap GUI:
In the event a splice report is not available for a serviceable address, the Download Splice Report option will result in the error “Splice report could not be generated”. With the same circumstances present, selecting Create Splice Report will attach a .txt file to the serviceable address with the text “Splice Report not found for this service location.”
FiberMap and Your Customer Accounts
While the majority of the integration is focused on the physical portion of your network and its relation to serviceable addresses, the opportunity to have customer accounts automatically created is available if you have chosen to enable Import Accounts & Contacts and an associated customer record exists in FiberMap.
The customer record must exist and be tied to a service location ahead of the sync; retroactively adding a customer record within FiberMap will not prompt a new account to be created within Sonar.
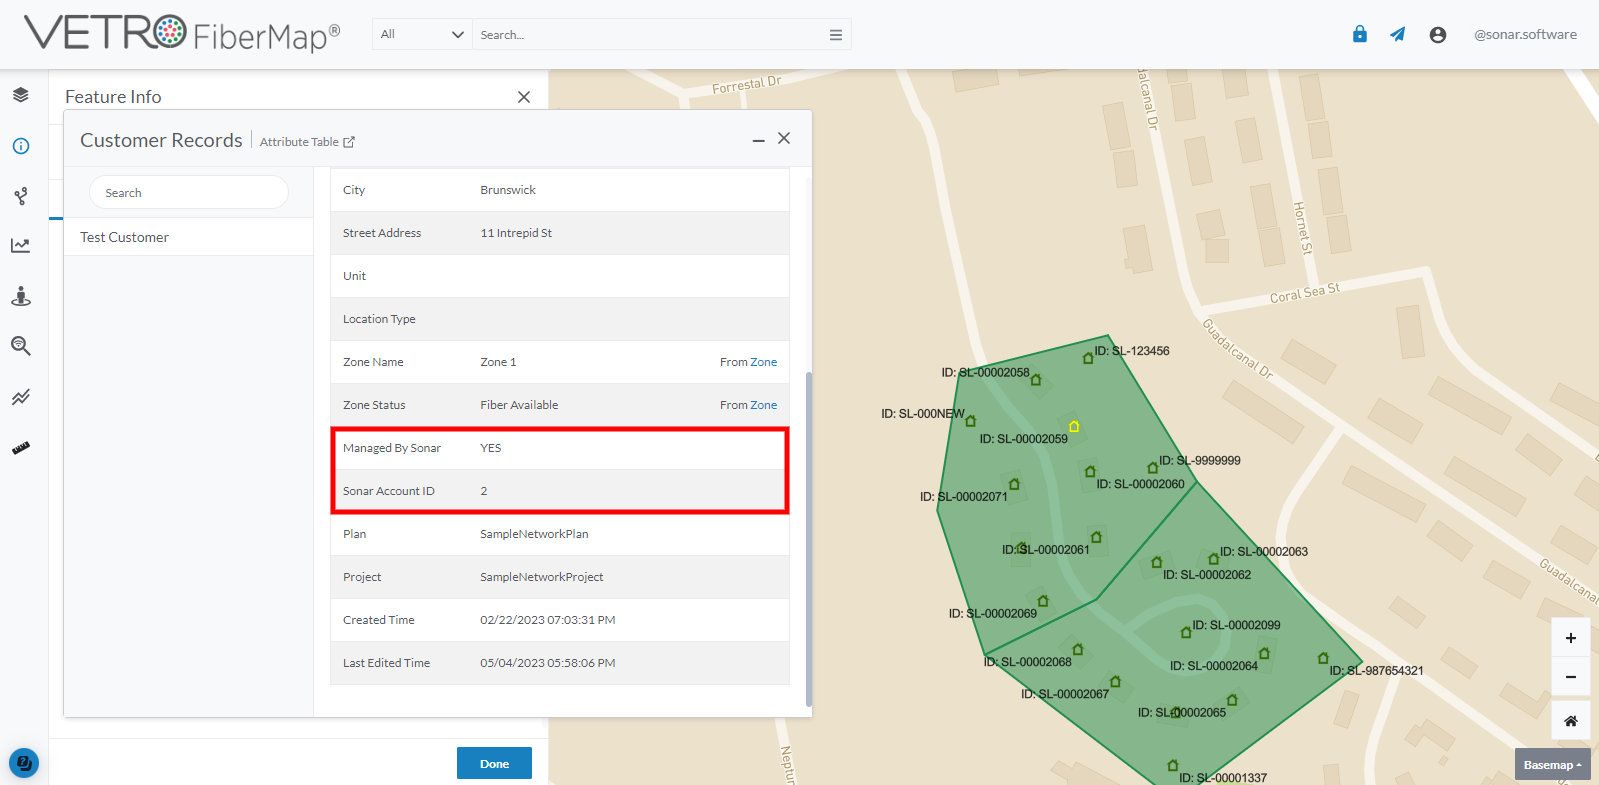
If an account is born from the integration, the Managed By Sonar and Sonar Account ID customer record fields in FiberMap are updated to reflect the Sonar data.
How It Comes Together
Below, we've outlined the logic of how the synchronization works following the integration.
FiberMap Plan Synchronization Logic
FiberMap Service Location Synchronization Logic
Migrating from V2 to V3
If you are currently using the FiberMap V2 version within your instance, we recommend moving to the FiberMap V3 version. To complete this integration update, you will navigate to Settings → Integrations → FiberMap Integrations.
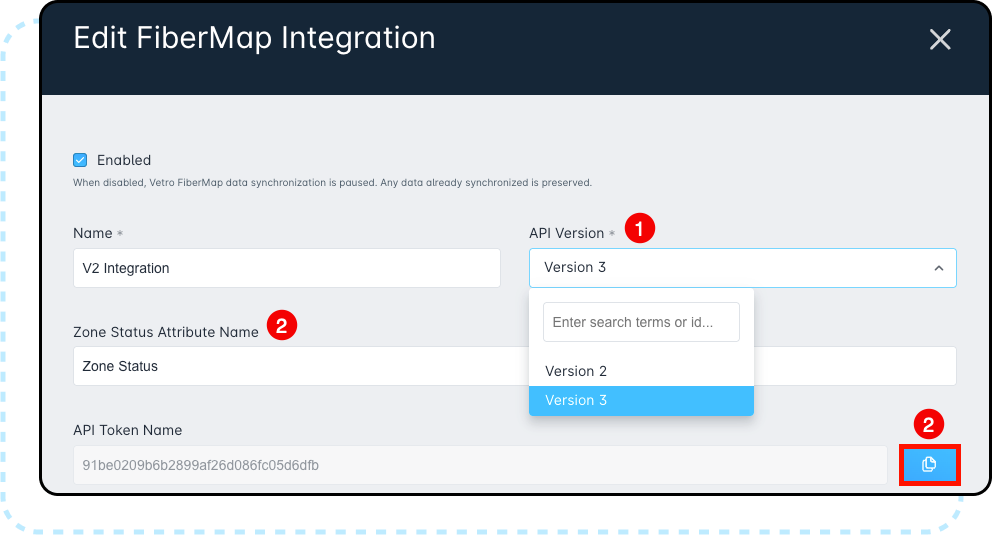
Click Edit and change the version to V3.
Update the Zone Status Attribute Name (To ensure serviceability status syncs properly between Sonar and VETRO, this field must exactly match the zone status field name used in VETRO under service locations. To set this up, please contact VETRO support), copy the API Token Name, then click Save.
Configuring VETRO
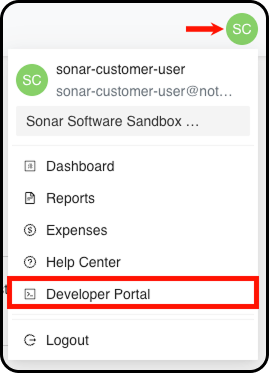
In the VETRO Developer Portal, navigate to your avatar in the top-right corner and select Developer Tools → Tokens.Configuring VETRO
1. Within the VETRO Developer Portal, go to your avatar in the top right corner of the screen and select Developer Tools.
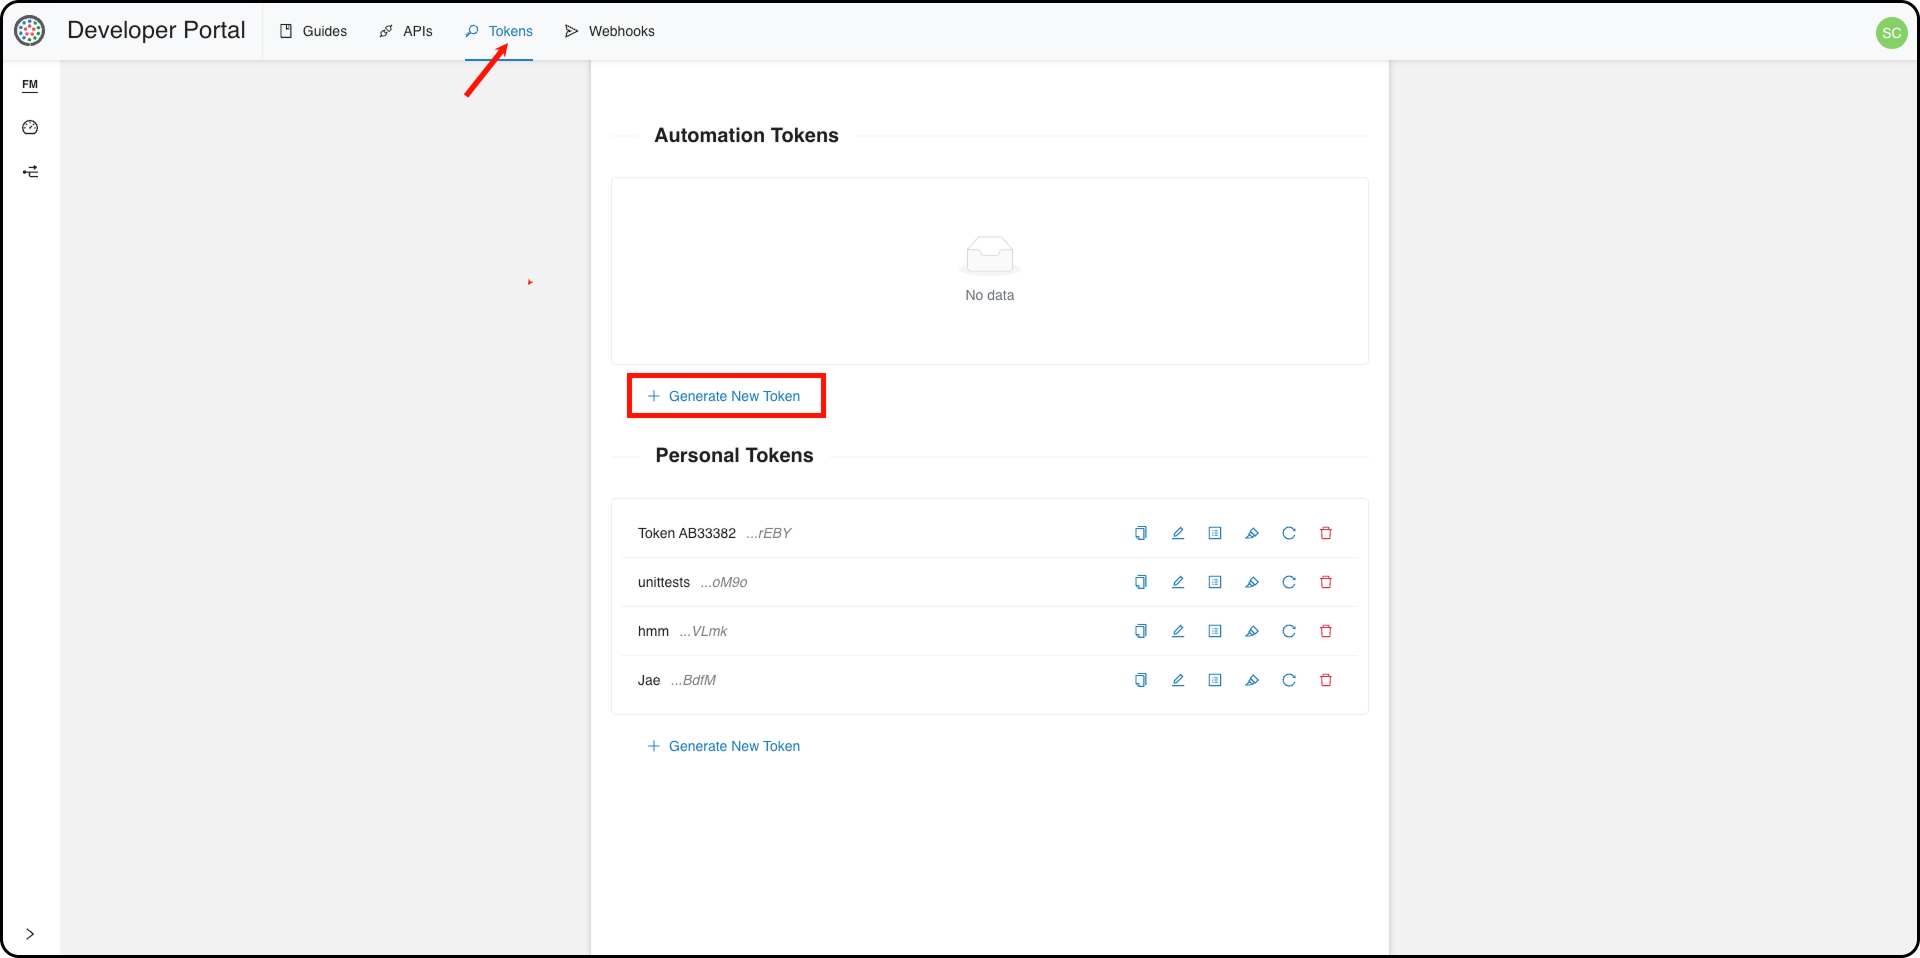
2. Select Tokens -> Generate New Token.
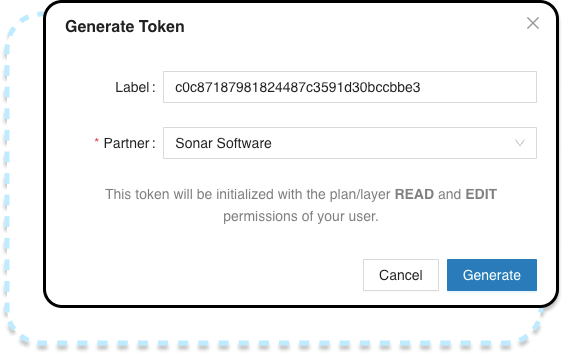
3. Paste the API token name copied from Sonar into the Label field. Then select Sonar Software as the partner.
5. Generate the token.
Finalizing the Integration
Return to your Sonar instance and click the down arrow associated with the new integration.
Click Validate Credentials to test the connection.
Once validated, click Sync to import the data immediately.
Validate and sync as needed.
Handling Address and Account Records
The integration attempts to match existing serviceable addresses and avoid duplicates.
Imported accounts will default to the status selected during setup.
Best practice: use a placeholder status (e.g., “VETRO Lead”) and update statuses manually as needed.
Sync Direction and Data Handling
One-way sync from VETRO to Sonar:
Map overlays
Network plans
Service locations
Customer records
Limited two-way sync from Sonar to VETRO:
Address updates.
Account tagging as “Managed by Sonar”.
Splice Report Functionality
The Splice Report feature is no longer available in V3 due to VETRO API changes.
 Updated
by Kristen Fiddes
Updated
by Kristen Fiddes