Table of Contents
Services: Overview
 Updated
by Jennifer Trower
Updated
by Jennifer Trower
Read Time: 8 mins

Overview
The Services page is where you create and edit services in Sonar. To access it, go to Settings > Billing > Services.
Services are used to add debits or credits to an account. Sonar includes seven service types:
- Adjustment Service
- Data Service
- Expiring Service
- One Time Service
- Overage Service
- Recurring Service
- Voice Service
The Services Screen
The Services screen lists all services in your Sonar instance. From this page, you can create, filter, export, edit, disable, or delete services.
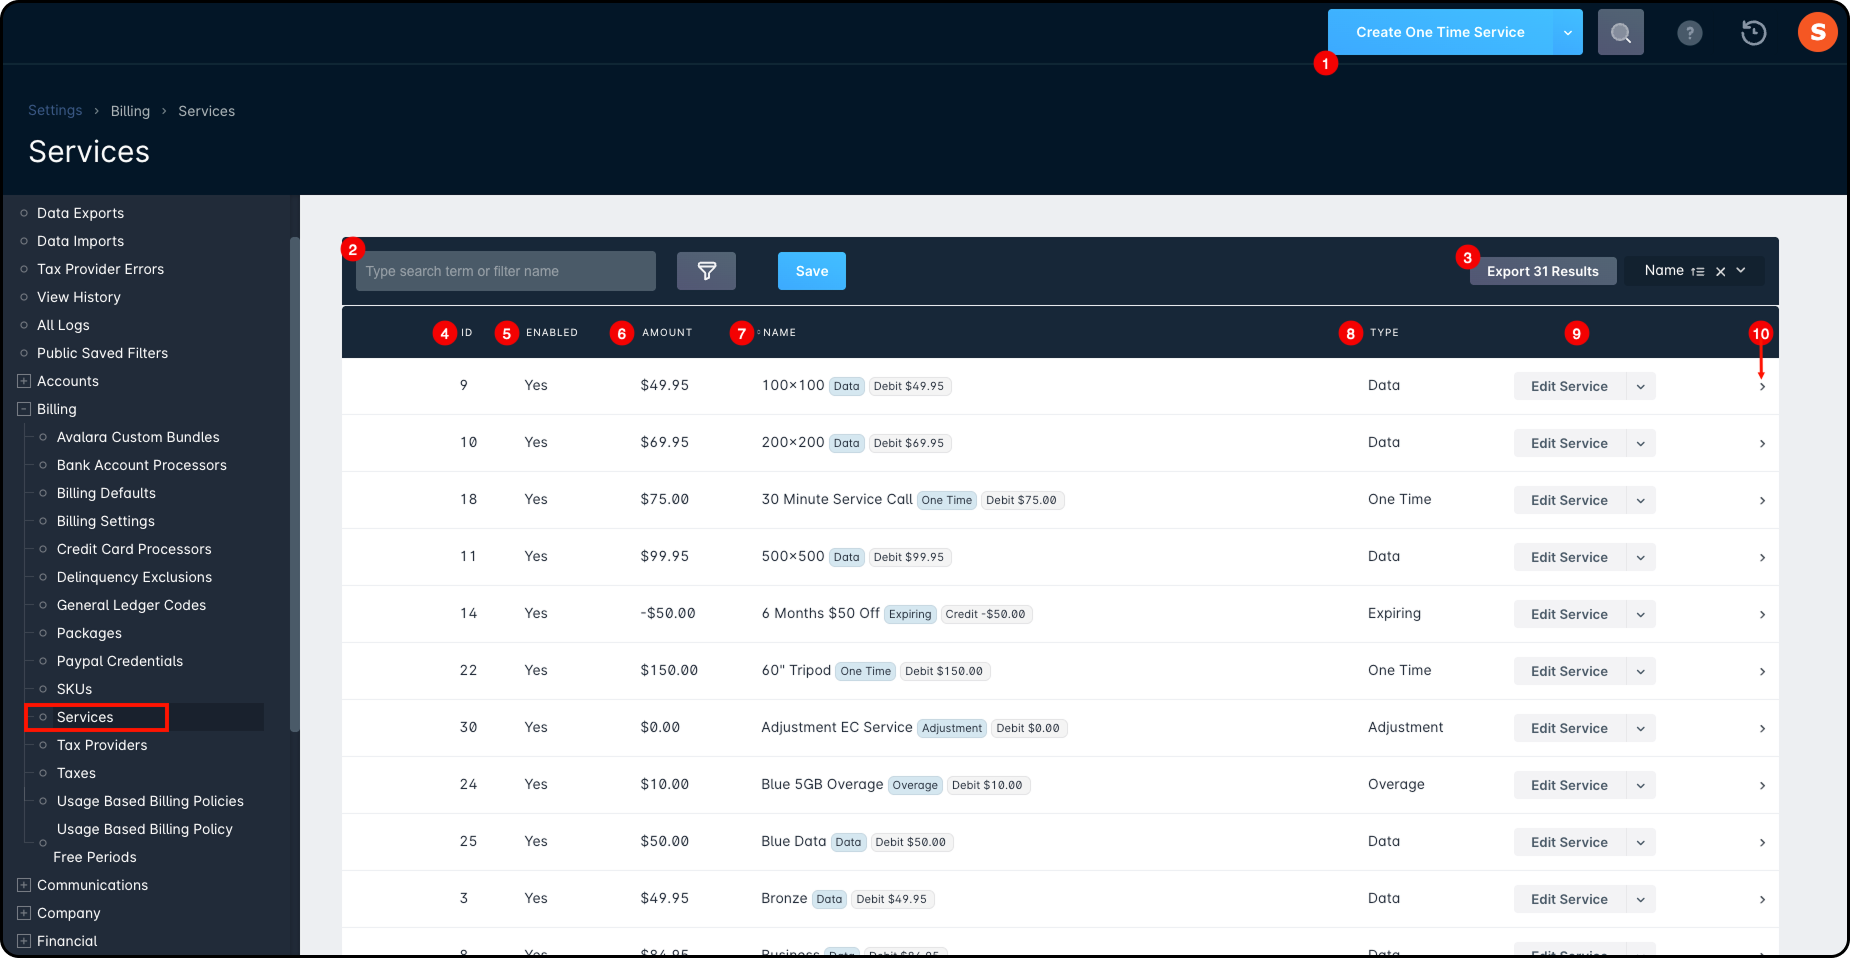
- Create a Service: Create a new service. Use the dropdown arrow to select a specific service type.
- Filters: Use simple or advanced filters to narrow the services shown in the table.For a more detailed look at filtering, refer to our Filtering: Overview article.
- Export: Download the services table in JSON or CSV format.
- ID: Shows the service’s instance ID.
- Enabled: Shows whether the service is active and can be added to accounts.
- Amount: Shows the cost of the service.
- Name: Shows the service name, type, credit or debit label, and amount. Click the name to view more details.The service Name can be customized for each account when the service is added.
- Type: Shows the service type.
- Edit Menu: Edit the service, modify metadata, or delete the service.
- Modify Metadata: Add internal fields that can be tracked per account for reporting or integrations.Metadata is for internal use only and does not appear on customer invoices.
- Delete Service: Deletes the service from the instance.A service cannot be deleted if it is currently used on accounts. Disable the service instead to prevent future use.
- Modify Metadata: Add internal fields that can be tracked per account for reporting or integrations.
- Details: Opens a sidebar with additional service information.
Creating a Service
Some fields change based on the service type you are creating, but certain fields are always required. The Service Fields Breakdown section covers the fields you will always use, while the Service Type Breakdown section covers fields that only apply to specific service types.
Service Fields Breakdown
The following fields are available when configuring a service. Depending on the service type, you can also define service eligibility criteria to control which accounts can receive that service.
These criteria can include Company, Account Groups, Account Types, and Geofences. You can select multiple values for each supported field to define service availability more precisely. Geofences are evaluated using the account’s serviceable address.
This example uses the Create One Time Service modal to illustrate the field details.

Field Details
- Enabled: Controls whether the service can be added to accounts. Disabled services cannot be added to new accounts but remain on existing ones.
- Name: The name of the service shown to customers.
- Application: Determines if the service is a Debit (charge) or Credit (discount).
- Amount: The value charged or credited to the account.For more details, see the Adjustment Service section below.
- General Ledger Code: Assigns a code used for financial reporting.
- Taxes: Applies taxes to the service and allows partial tax exemptions if needed.
- SKU: An optional identifier used for tracking or integrations.
- Company: Limits the service to accounts within the selected company or companies.Service eligibility is checked when adding services to accounts, so only eligible services appear for selection.
To learn more, refer to our Configure Service Eligibility Criteria: Overview article. - Account Groups: Limits the service to accounts in the selected group or groups.Service eligibility is checked when adding services to accounts, so only eligible services appear for selection.
To learn more, refer to our Configure Service Eligibility Criteria: Overview article. - Account Types: Limits the service to specific account types, such as Residential or Commercial.Service eligibility is checked when adding services to accounts, so only eligible services appear for selection.
To learn more, refer to our Configure Service Eligibility Criteria: Overview article. - Geofences: Limits the service to accounts within selected geographic areas based on the serviceable address.Service eligibility is checked when adding services to accounts, so only eligible services appear for selection.
To learn more, refer to our Configure Service Eligibility Criteria: Overview article. - Display on invoice if amount is zero: Controls whether the service appears on invoices when the amount is $0.This does not apply to services discounted by separate credit services—those will still appear on the invoice, even if the final amount is $0.
Service Type Breakdown
The sections below explain each service type in Sonar, including common use cases and any fields that only apply to that service type.
One Time Service
A one-time service charges an account a single time and is automatically removed after billing. It is commonly used for items like installation fees, equipment sales, or labor charges.
Recurring Service
A recurring service charges on a regular basis for non-data and non-voice services, such as equipment rentals or email services.
Creating them as recurring services may make FCC477 or CPAC reporting inaccurate.
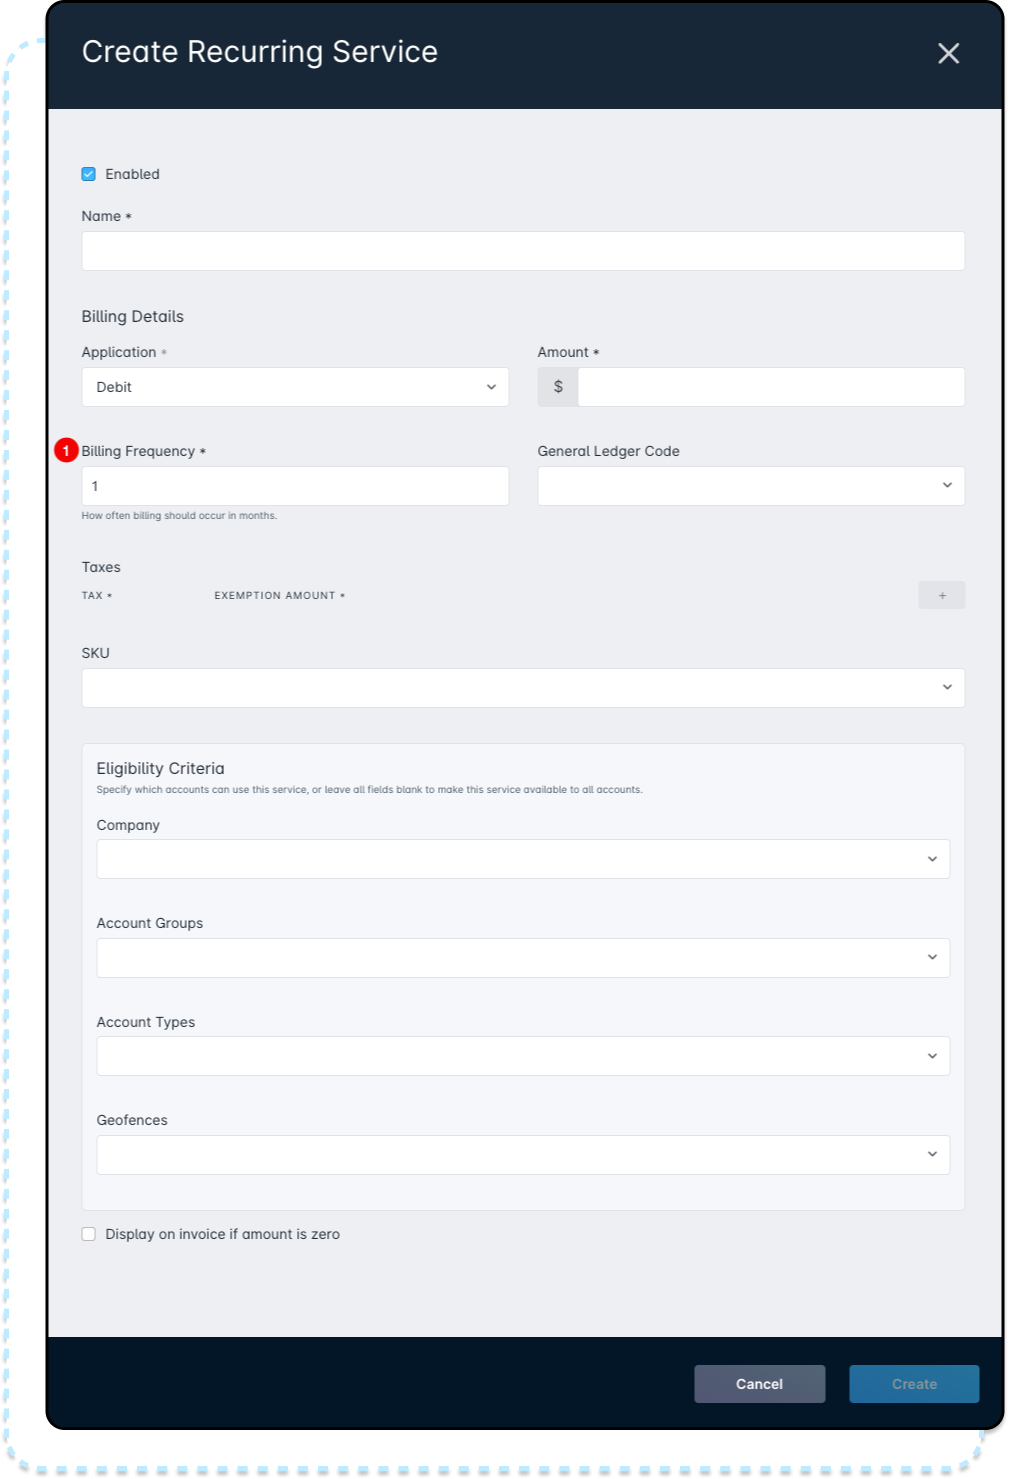
Additional Fields:
- Billing Frequency: Defines how often the service is billed. For example, a value of 12 bills the service once per year.Only available for accounts set to bill monthly.
Expiring Service
An expiring service is a recurring service that automatically removes itself from an account after a set amount of time. It is commonly used for temporary discounts or rent-to-own equipment.
Expiring services cannot be prorated.

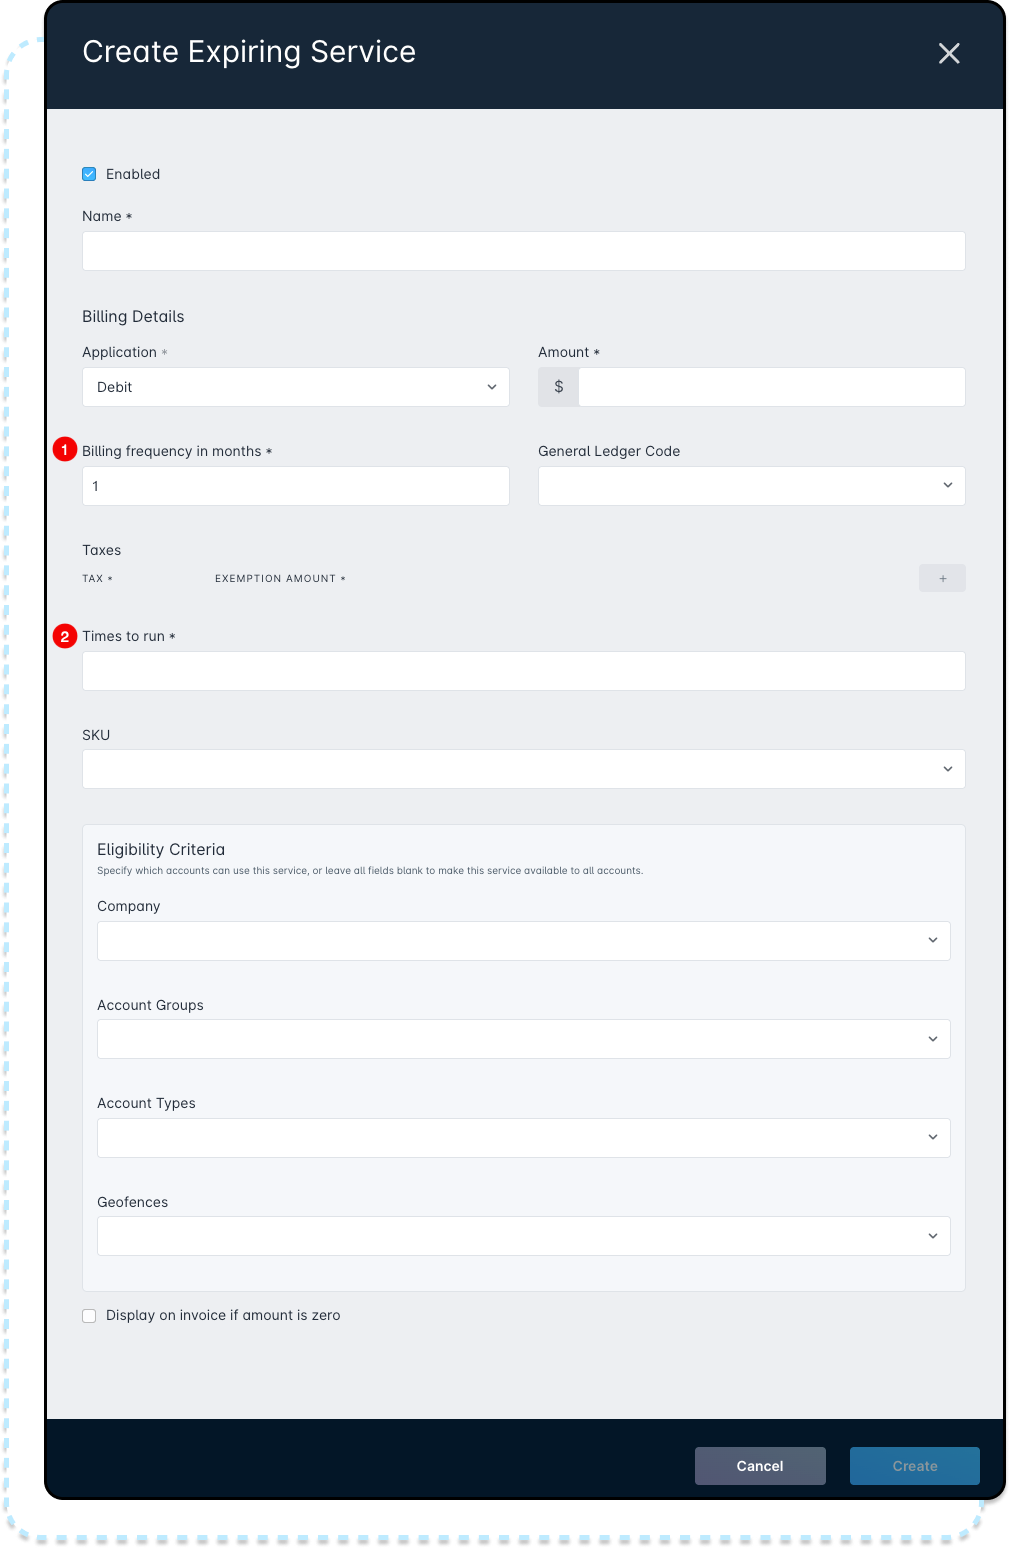
Additional Fields
- Billing Frequency (months): Defines how often the service is billed. For example, a value of 12 bills the service once per year.Only available for accounts set to bill monthly.
- Times to Run: Sets how many times the service will bill before it is automatically removed from the account.
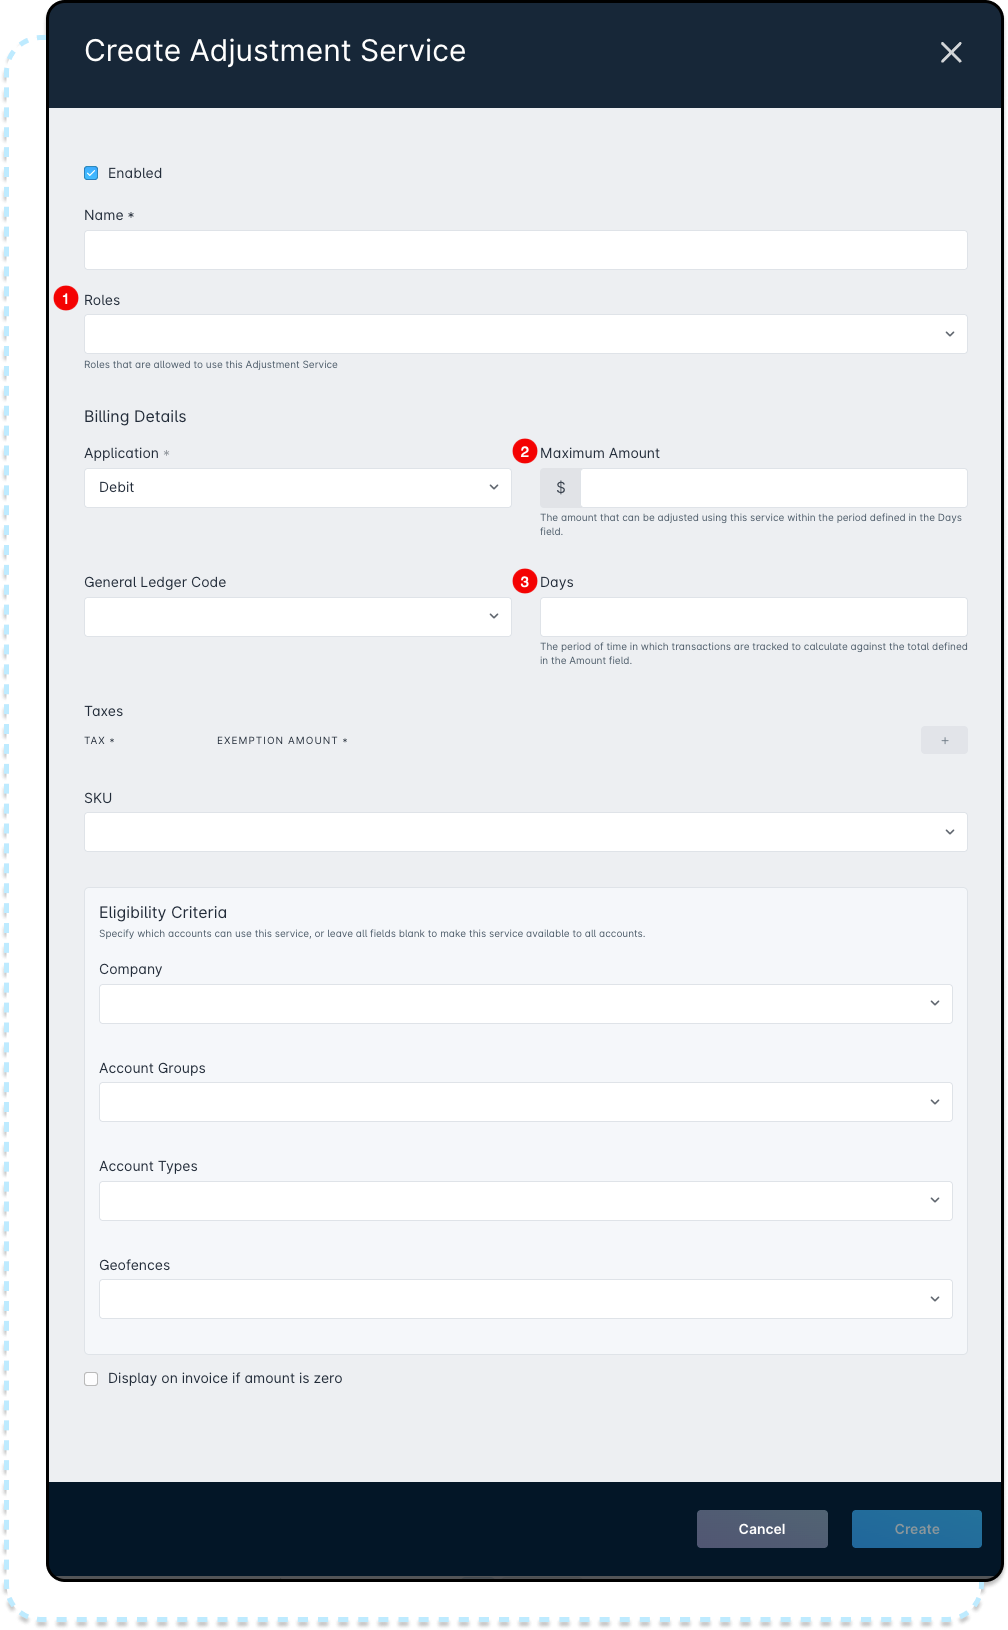
Adjustment Service
An adjustment service is used to apply a custom debit or credit amount to an account. It is commonly used for bill adjustments, outage credits, or charges that do not follow a standard pricing model.
Additional Fields:
- Roles: Limits who can use the adjustment service based on user role.Super Admin users are not restricted by the maximum amount limit.
- Maximum Amount: Sets the maximum total amount a user can adjust within the selected time period.Leave blank if no limit is needed.
- Days: Defines the time period used with the Maximum Amount limit. For example, a $100 maximum over 60 days means each user can apply up to $100 in adjustments during that 60-day period.
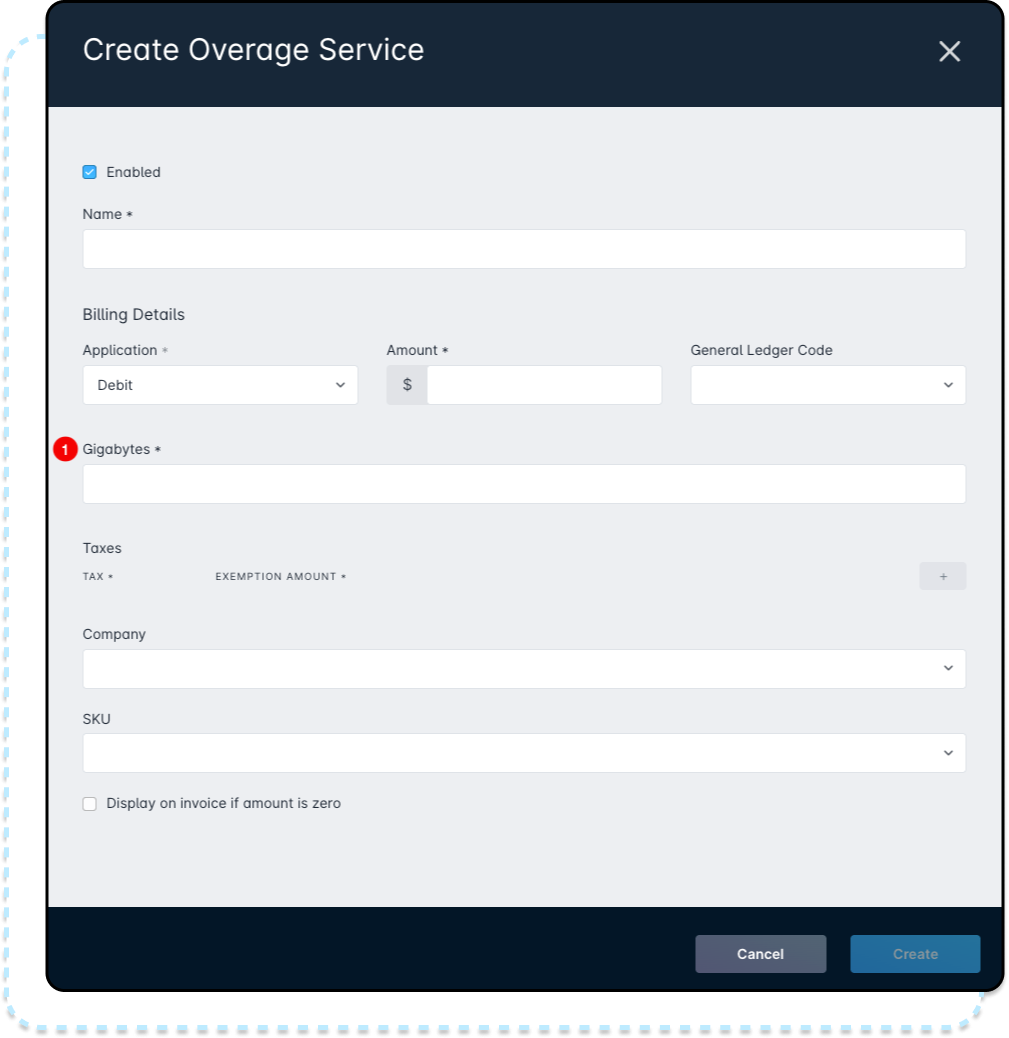
Overage Service
An overage service works with data services to automatically charge customers for extra data usage.
Additional Fields:
Exception: Overage services currently only support Company restrictions.
- Gigabytes: Sets how many additional gigabytes are added to the account’s usage-based billing policy for the billing period. For example, entering 10 adds 10 GB of extra data.
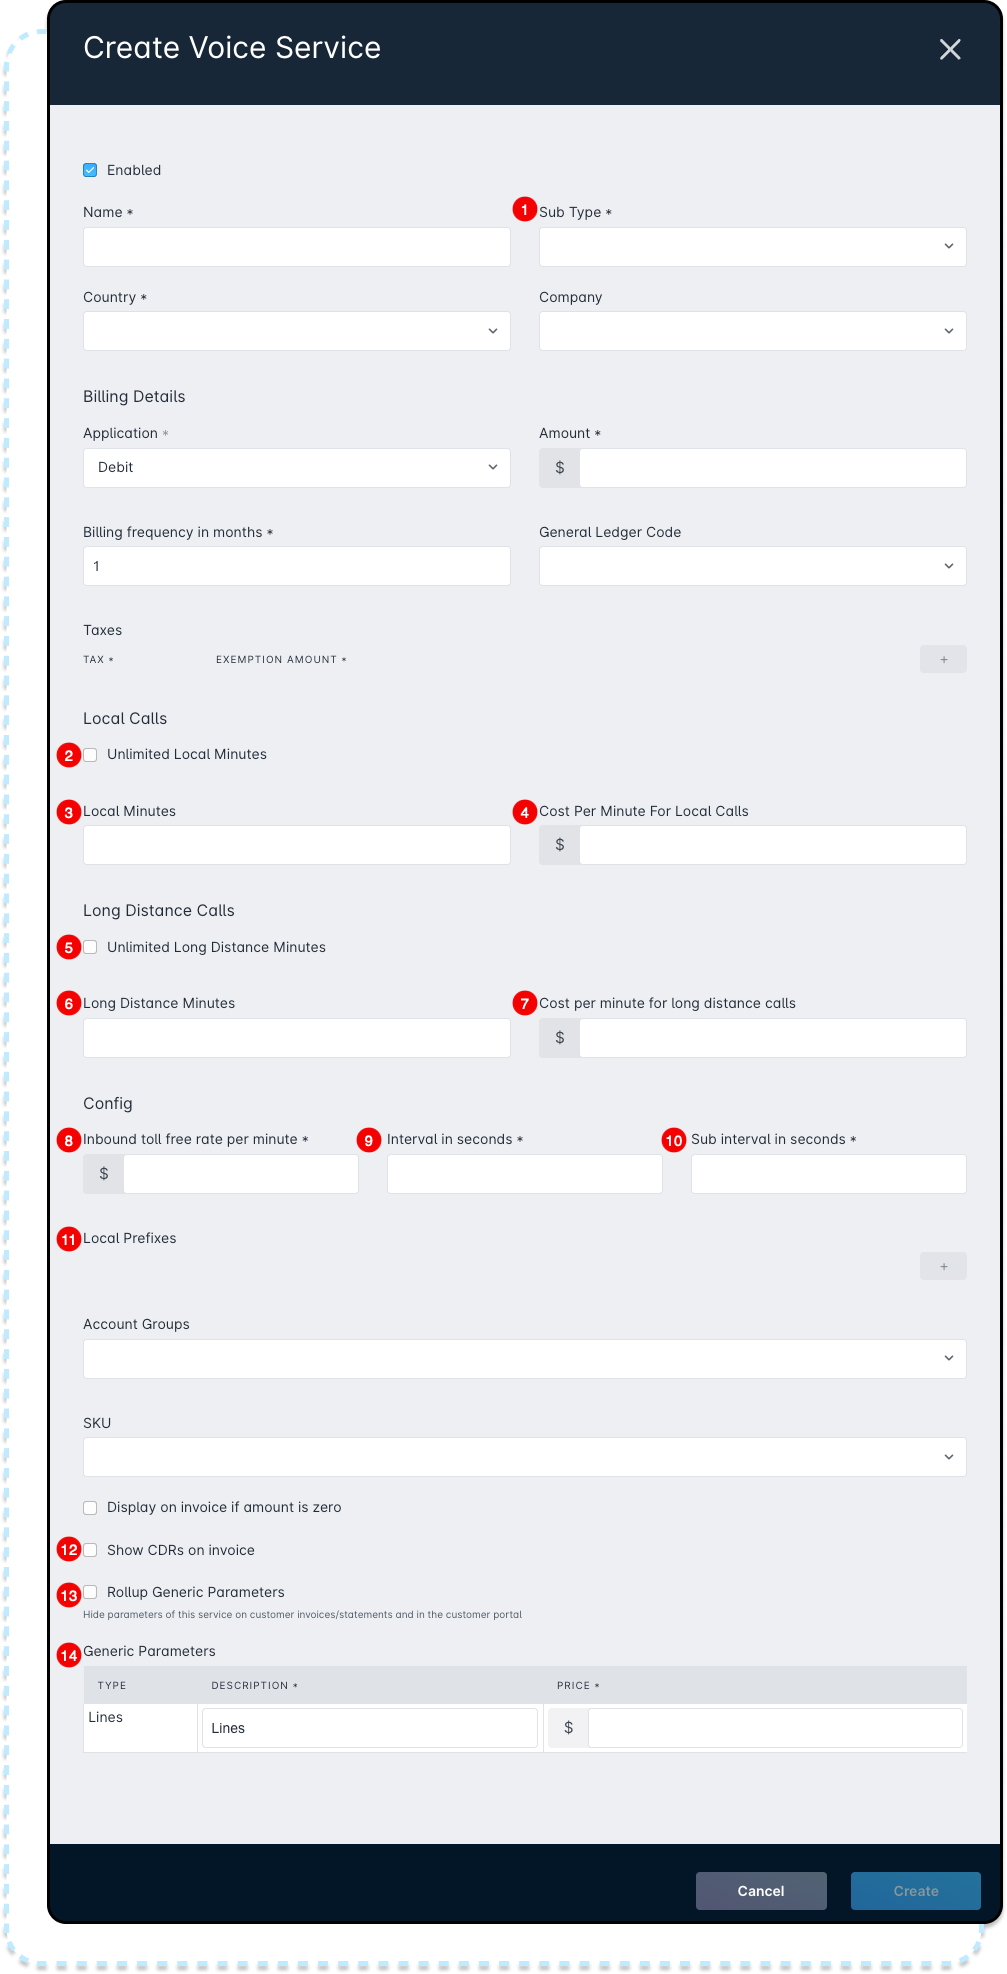
Voice Service
A voice service is a recurring service used to track included minutes and per-minute costs for local and long distance calls. It also includes billing interval settings for how call time is charged.
Additional Fields:
Exception: Voice services currently only support Company and Account Group restrictions.
- Sub Type: Defines the type of voice service being created.
- Unlimited Local Minutes: Allows unlimited local calls at no additional charge.
- Local Minutes: Sets the number of included local minutes.
- Cost Per Minute for Local Calls: Sets the local call rate after included minutes are used.
- Unlimited Long Distance Minutes: Allows unlimited long distance calls at no additional charge.
- Long Distance Minutes: Sets the number of included long distance minutes.
- Cost Per Minute for Long Distance Calls: Sets the long distance call rate after included minutes are used.
- Inbound Toll Free Rate Per Minute: Sets the rate charged for inbound calls to a toll-free number.
- Interval in Seconds: Sets the minimum billable call duration.
- Sub Interval in Seconds: Sets the billing increment after the first interval.
- Local Prefixes: Defines which prefixes count as local calls.
- Show CDRs on Invoice: Includes call detail records on the customer invoice.
- Rollup Generic Parameters: Combines generic parameter charges into one total on invoices.
- Generic Parameters: Defines additional billable voice items, such as lines or other service-related charges.Additional generic parameters can be added as needed, such as charges for voicemail or other features. These can be configured after the service is created—see the Modify Generic Parameters section within the Deploying Voice Services in Sonar article.
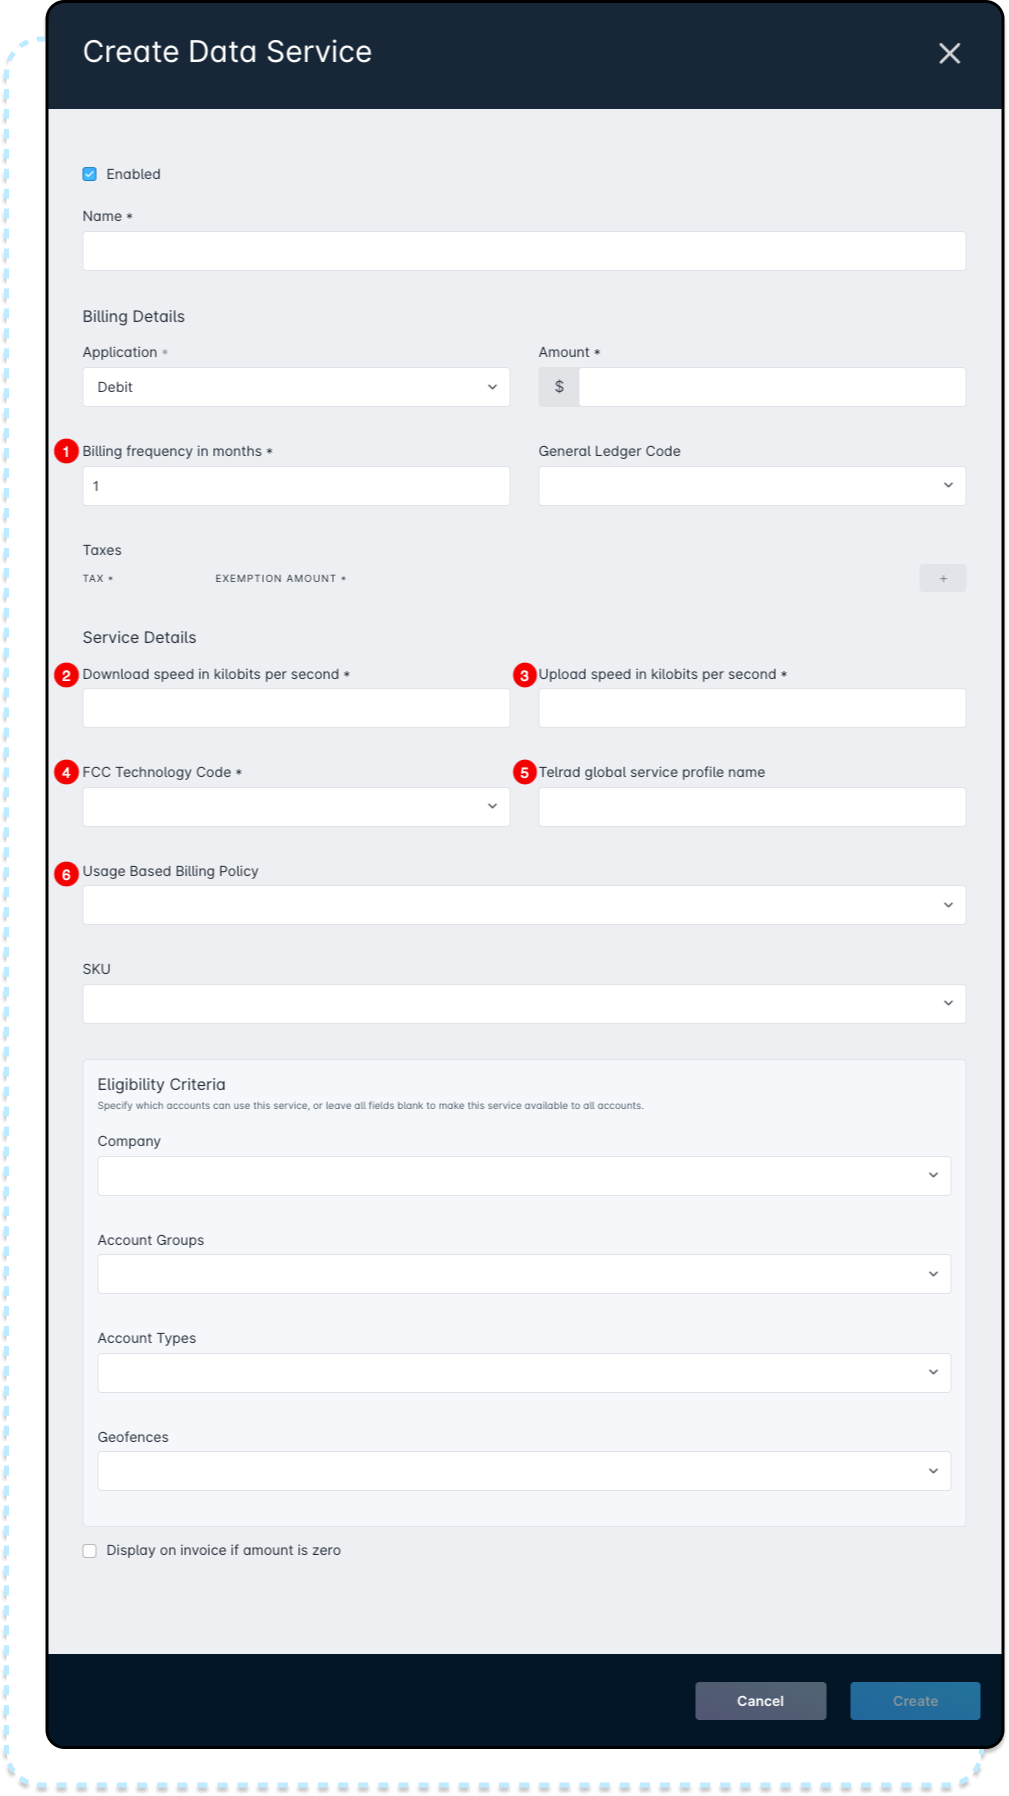
Data Service
A data service is used for internet or network services where data usage and speeds are tracked. It also allows you to define the FCC technology code.
Additional Fields:
- Billing Frequency (months): Defines how often the service is billed.
- Download Speed (Kbps): Sets the download speed for the service.
- Upload Speed (Kbps): Sets the upload speed for the service.
- FCC Technology Code: Identifies the technology type for reporting purposes.
- Telrad Global Service Profile Name: Used when integrating with Telrad systems.
- Usage Based Billing Policy: Links a usage-based policy to track data usage and overages.