Table of Contents
Custom Fields Overview & Use Cases
 Updated
by Mitchell Ivany
Updated
by Mitchell Ivany
Read Time: 7 mins
Custom fields in Sonar make it easy to track specific data that isn’t captured by default. They let you store unique details on various entities, whether new or existing, and you can also report on this data. For example, you might use a custom field to track contract expiration dates, inventory serial numbers, or accessibility notes for a serviceable address. Below, we’ll walk through how to create a custom field, including examples of common use cases.
How To Create A Custom Field
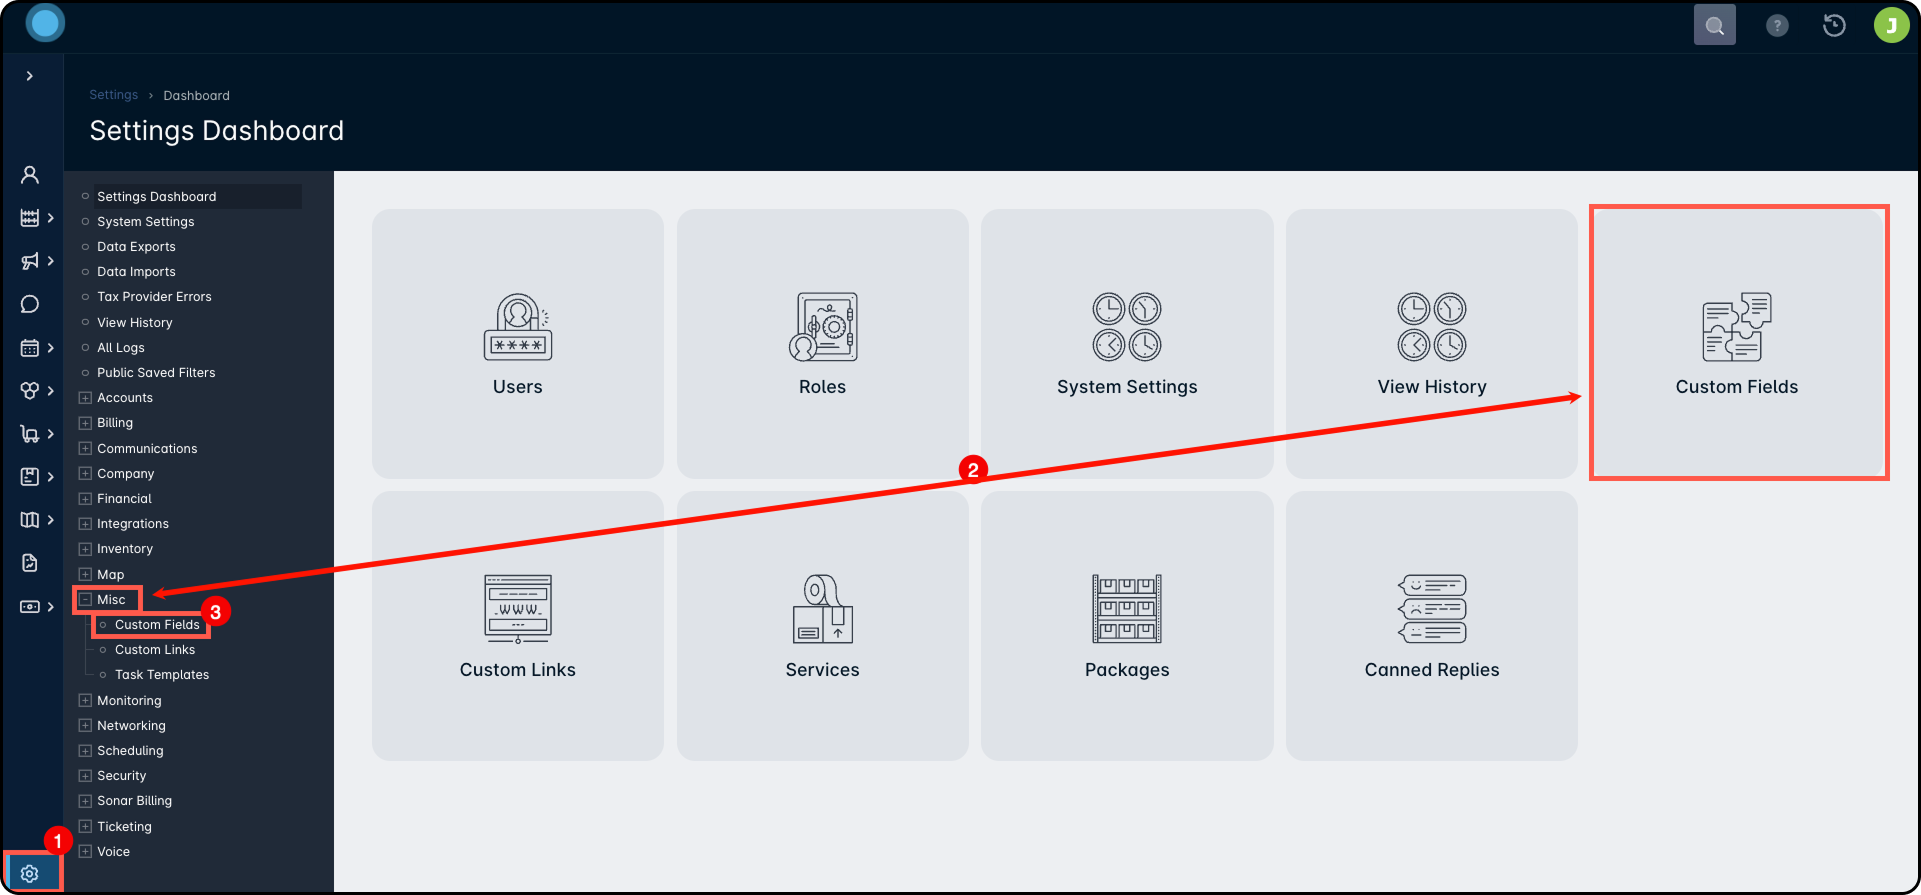
To get started, go to the Custom Fields screen. You can find it in the Settings menu—either by clicking Custom Fields on the main Settings Dashboard or by selecting it under the Misc section in the Settings list.
Once you navigate to the Custom Fields screen, click “Create Custom Field” and the Create Custom Field window will appear.
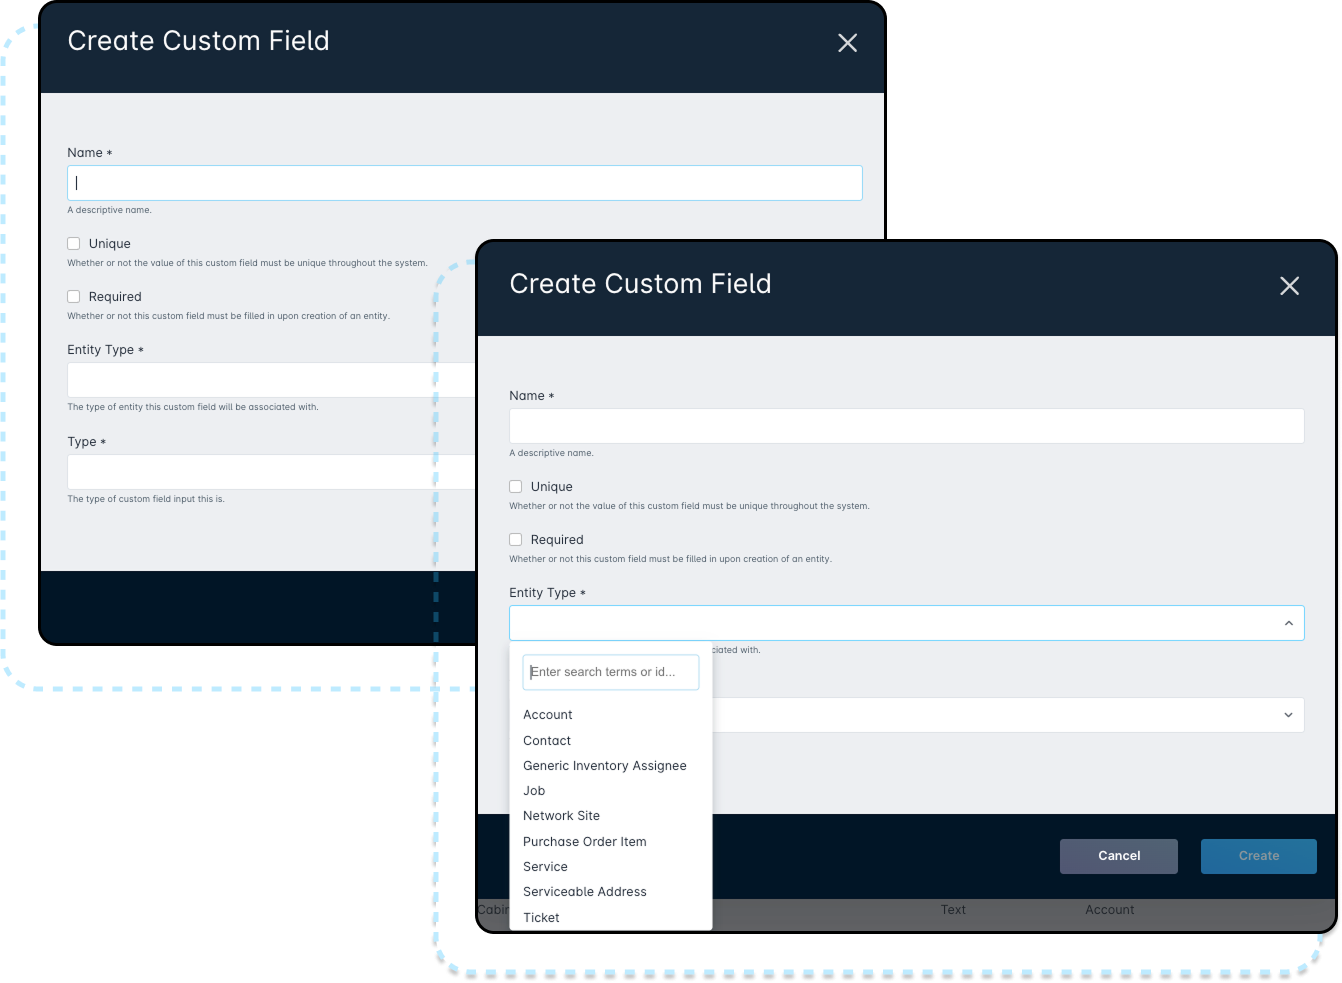
Once within the Create Custom Field window, you will need to complete the required fields before creating the custom field. An explanation of each field within this window and what it controls is provided below.
Name: This is a descriptive name for the custom field.
Entity Type: The type of entity that this custom field will be associated with. This can include Account, Contact, Generic Inventory Assignee, Job, Network Site, Purchase Order Item, Service, Serviceable Address, or Ticket.
Type: This defines how the custom field will store the data and what the input format will be. The available options are:
- Boolean - Appears as a dropdown with Yes/No values.
- Date - Presents a date selector with a format matching your selection in your system settings.
Accessing your Date Format settings
Navigate to Settings -> System Settings, and under the “Formatting” header, locate the “Date Format” field.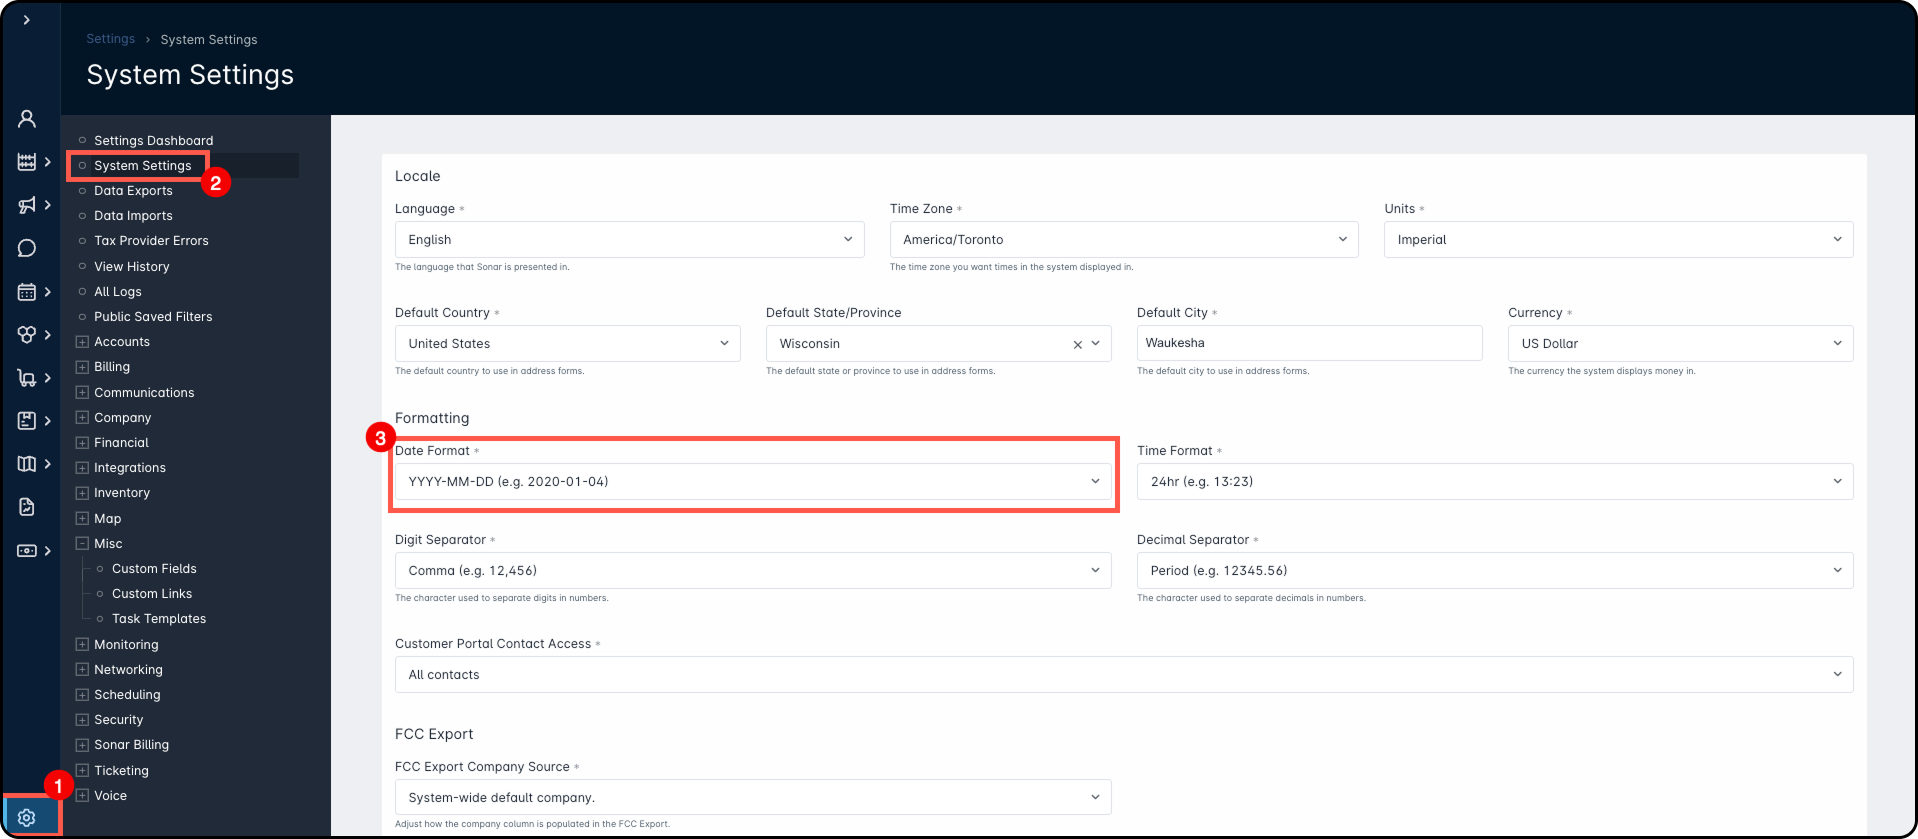
This dropdown allows you to select from the following formats:
1. YYYY-MM-DD (e.g. 2021-03-24)
2. MM-DD-YYYY (e.g. 06-30-2021)
3. DD-MM-YYYY (e.g. 25-12-2021)
4. Verbose (e.g. January 1st, 2022) - Text - A free form text field that allows the input of data.
Required: This checkbox allows you to determine whether a custom field should be required to be filled out when the entity it is associated with is created.
Unique: This checkbox can enforce that each value input for this custom field must be unique throughout the system.
Once you have successfully created your custom field, it will appear in the list on the Custom Fields screen.
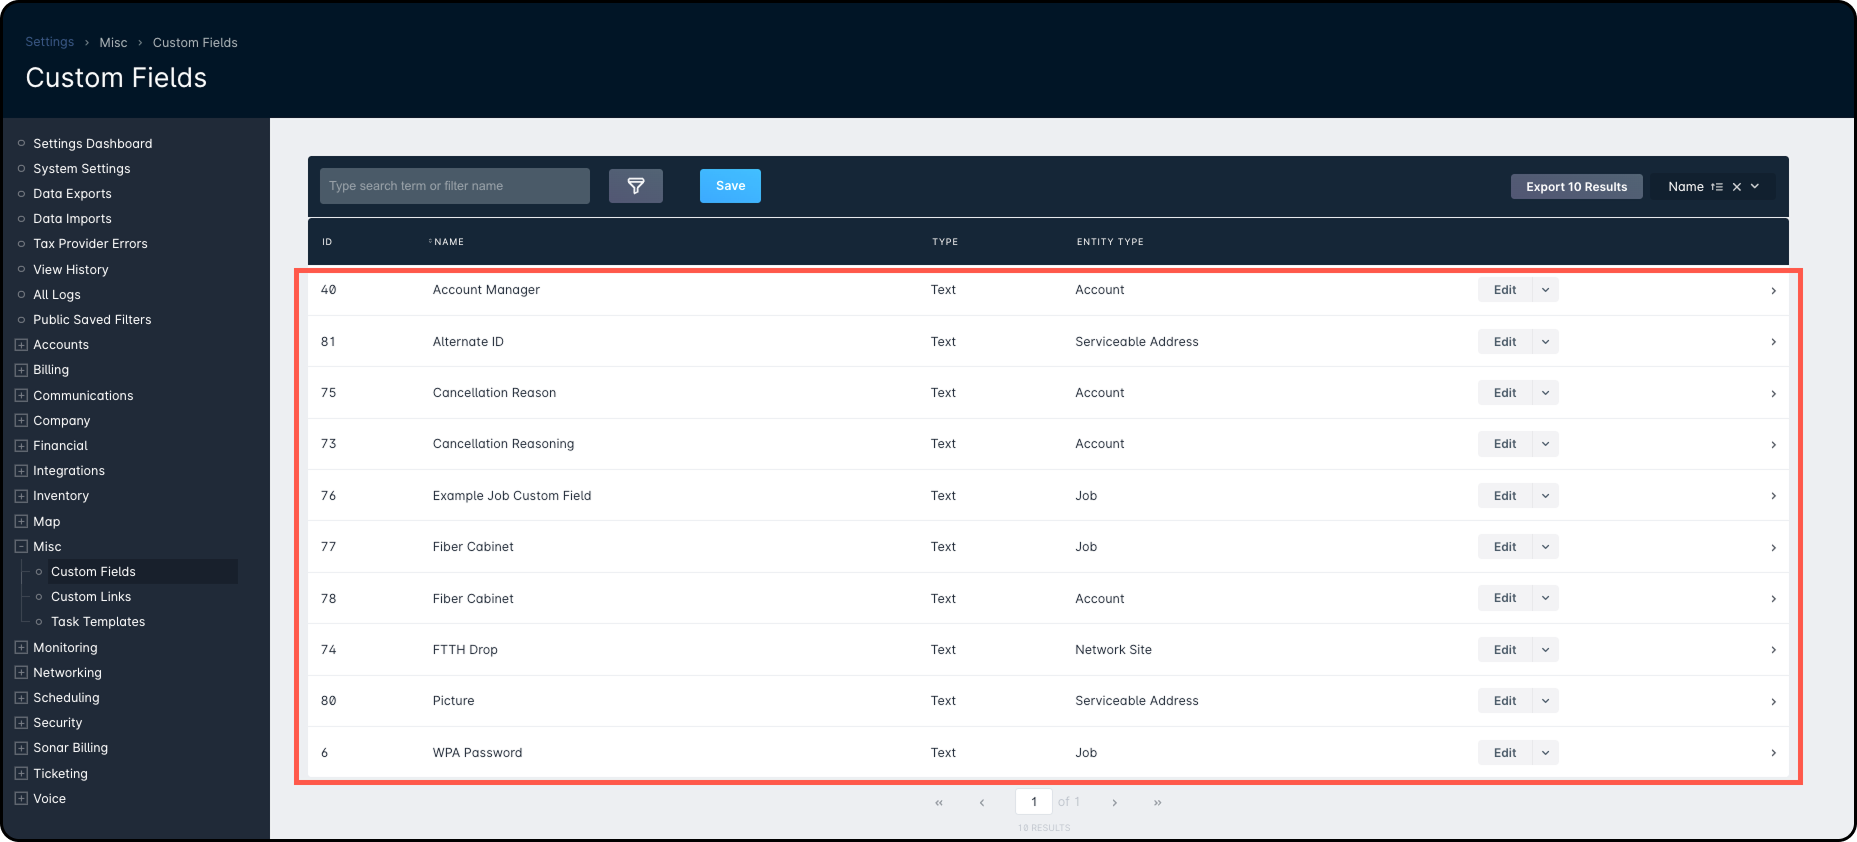
Once the field is created, you can edit it by clicking Edit or delete it using the Delete option from the dropdown menu. Clicking the arrow next to Edit opens a sidebar with field details and an activity log. You can also use filters on this page to easily find specific custom fields when the list is long.
Example Use Cases
Below are a few examples of commonly used Custom Fields, along with an overview of how to set them up within Sonar.
Use Case #1: How Did You Hear About Us
In this example, we’ll create a custom field to track how customers heard about us. Since we’re running several marketing campaigns, this will help us see which ones are most effective and worth continuing—and which ones are not getting results.
Begin by navigating to Settings → Custom Fields → Create Custom Field, which will display the Create Custom Field window, allowing you to complete the required fields.
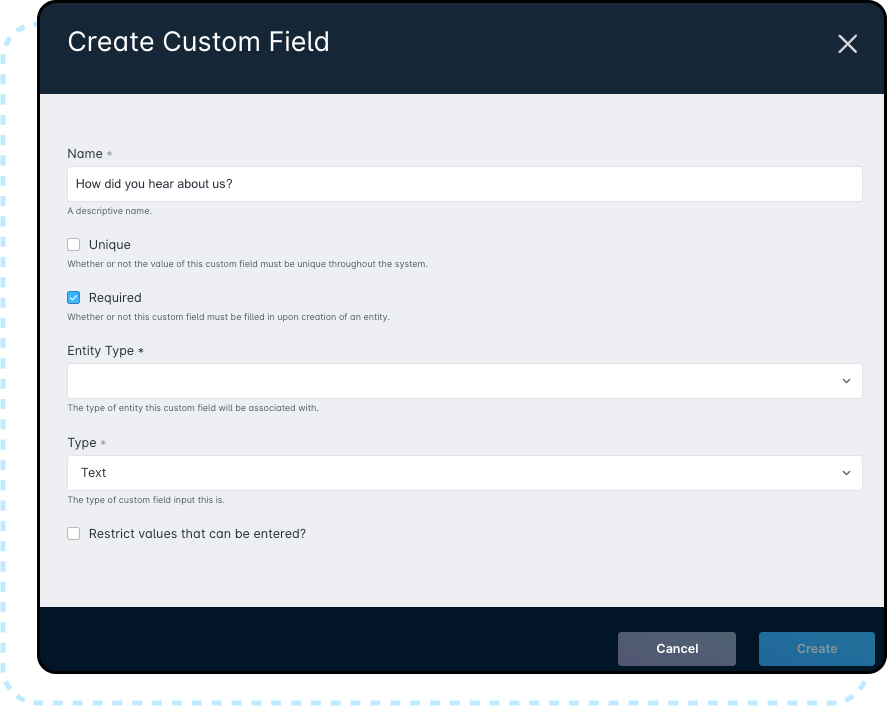
We’re making this custom field required to ensure it’s filled out when creating new accounts. Since many customers may share the same response (e.g., social media or referral), the field doesn’t need to be unique, so we leave that option unchecked.
The Entity Type is set to Account because we want to gather this information at the account level. While we could choose Contact, multiple contacts can belong to the same account and likely heard about us the same way. Using Account avoids entering the same information multiple times.
We set the Type to Text to allow detailed responses. A dropdown could limit input, but we want flexibility—for example, noting which social media platform or identifying a specific referring customer. The Text type supports this level of detail.
Once everything is configured, click Create to finalize the custom field. From now on, each new account must include this information. Over time, you'll collect enough data to generate reports and identify which marketing efforts are most effective, helping guide future strategy.
Use Case #2: Account Manager
In this example, we’ll create a custom field to record the Account Manager for each new account. This helps us quickly identify who manages which accounts, making it easier to route customer inquiries and internal questions. It also allows us to run reports to check workload distribution across account managers.
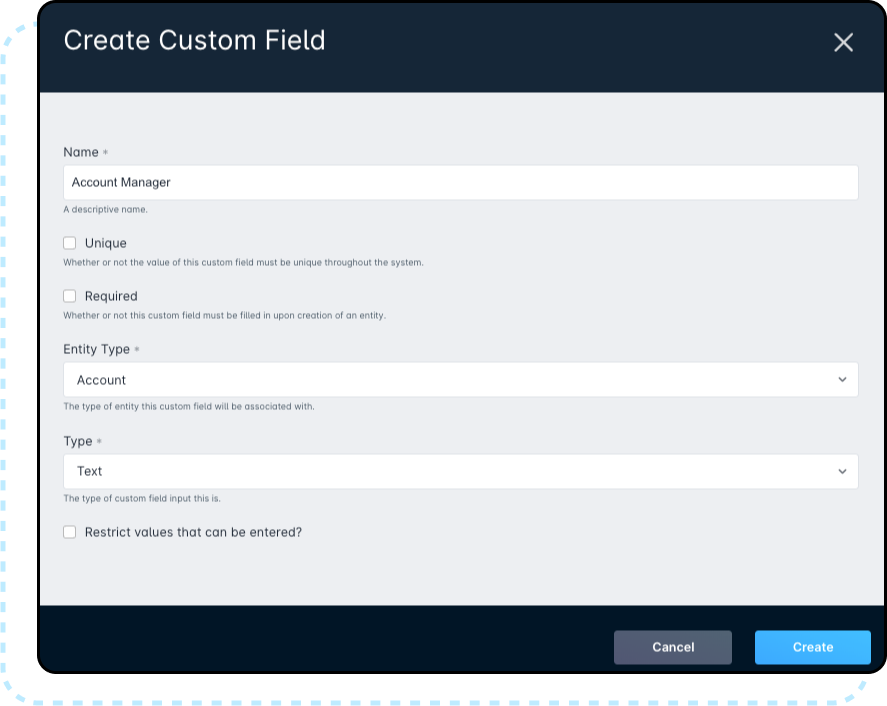
We select Account as the Entity Type because account managers oversee accounts, not individual contacts. The Unique box is left unchecked, since multiple accounts can share the same manager. As account managers aren’t always assigned when an account is created, we also leave the Required box unchecked for now. Later, once our process is more consistent, we can update the field to be required. We choose Text as the Type and use a drop-down for consistency and ease, ensuring names are entered correctly and saving employees from typing them each time.
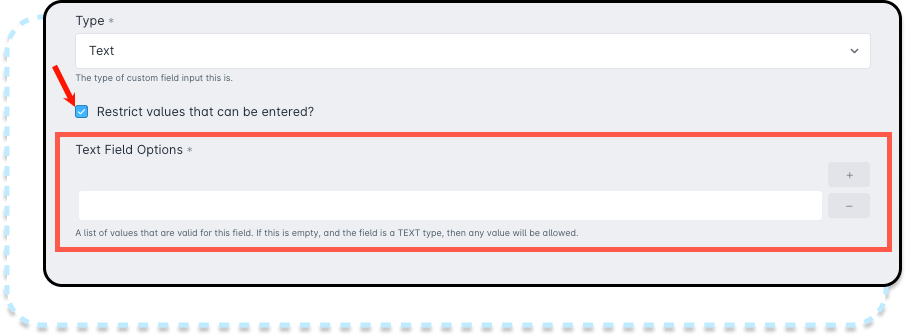
To create the drop-down, check the Restrict values that can be entered? box. Use the “+” button to add items and the “–” button to remove them. Since we have five account managers, we add each of their names to the list, then click Create.
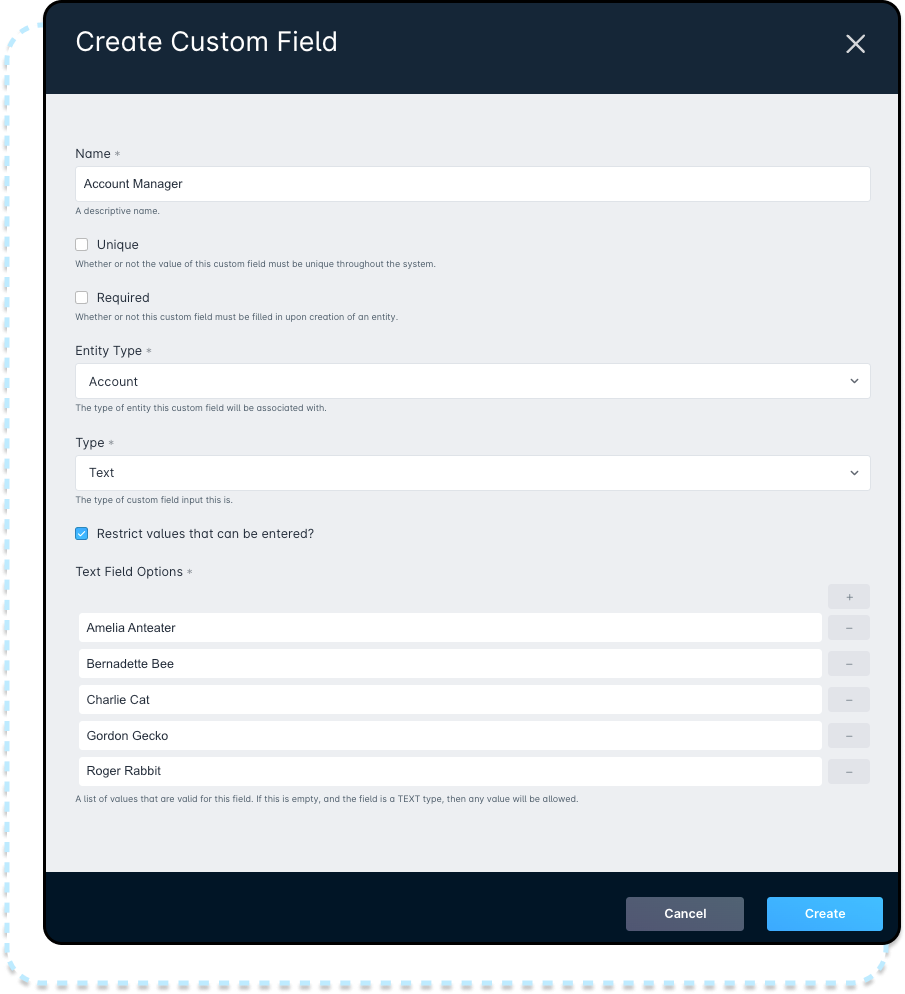
The Account Manager custom field is now set up and ready to use. You can start adding this information to existing accounts, as well as to any new accounts going forward.
Use Case #3: Customer Reference Number
In this example, we’ll create a custom field to store a unique customer code required by our payment system. This code helps identify which invoice is being paid and must appear on the customer’s invoice, as required by federal regulations. The code is generated outside of Sonar when the account is created, so we need a way to track and link it to the customer’s account.
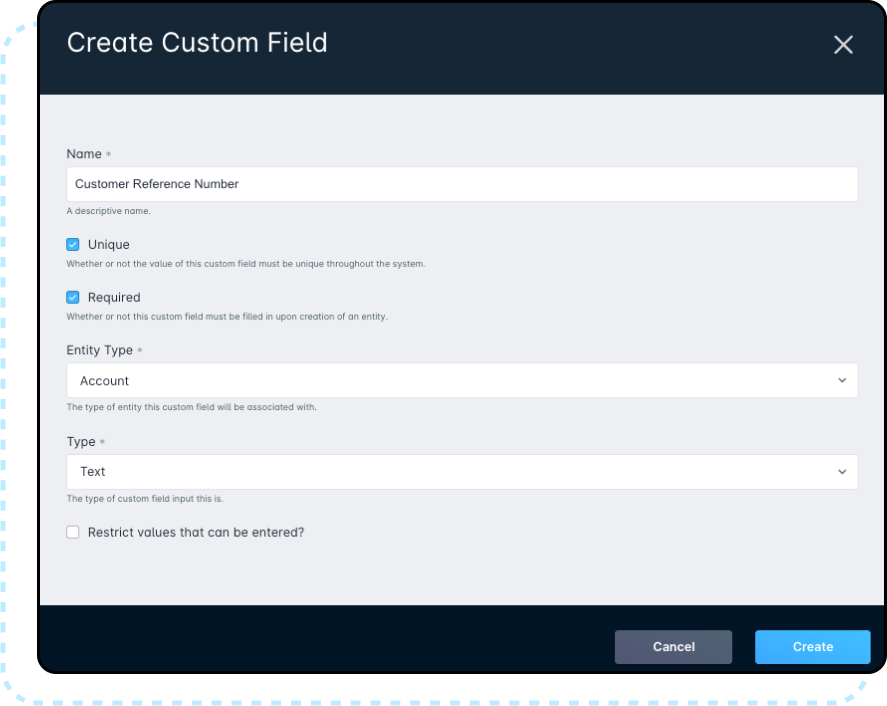
We set the Entity Type to Account because the reference number applies to the entire account, not individual contacts. Both Unique and Required are checked, since this number must be different for each account and is legally required on invoices. Making it required ensures the field is completed during account creation.
We choose Text as the field type because the reference number contains 5 to 20 digits. We don’t restrict values, so each entry can be unique. Once all details are entered, we click Create, and the new field appears in the Custom Fields table.

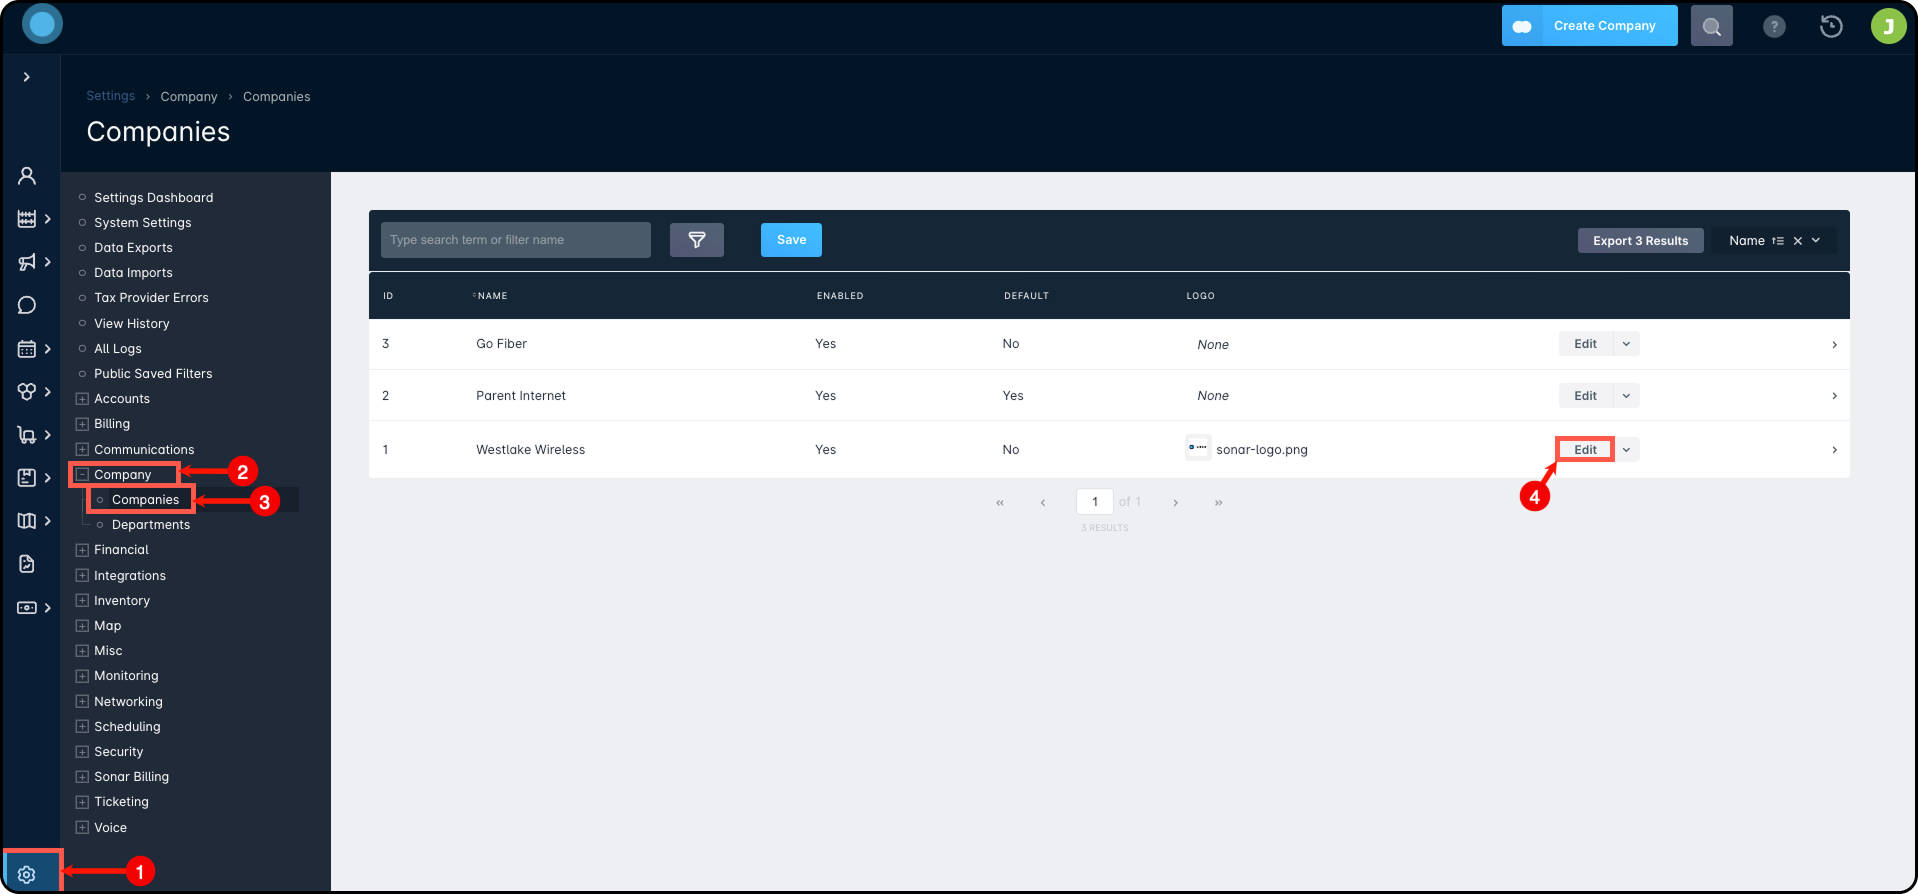
Now that the field is created, we can add it to customer invoices. To do this, navigate to Settings → Company → Companies, then click Edit next to the company you want to update.
Upon clicking the edit button, the Edit Company window will appear, where we can select our custom field from the dropdown list provided.
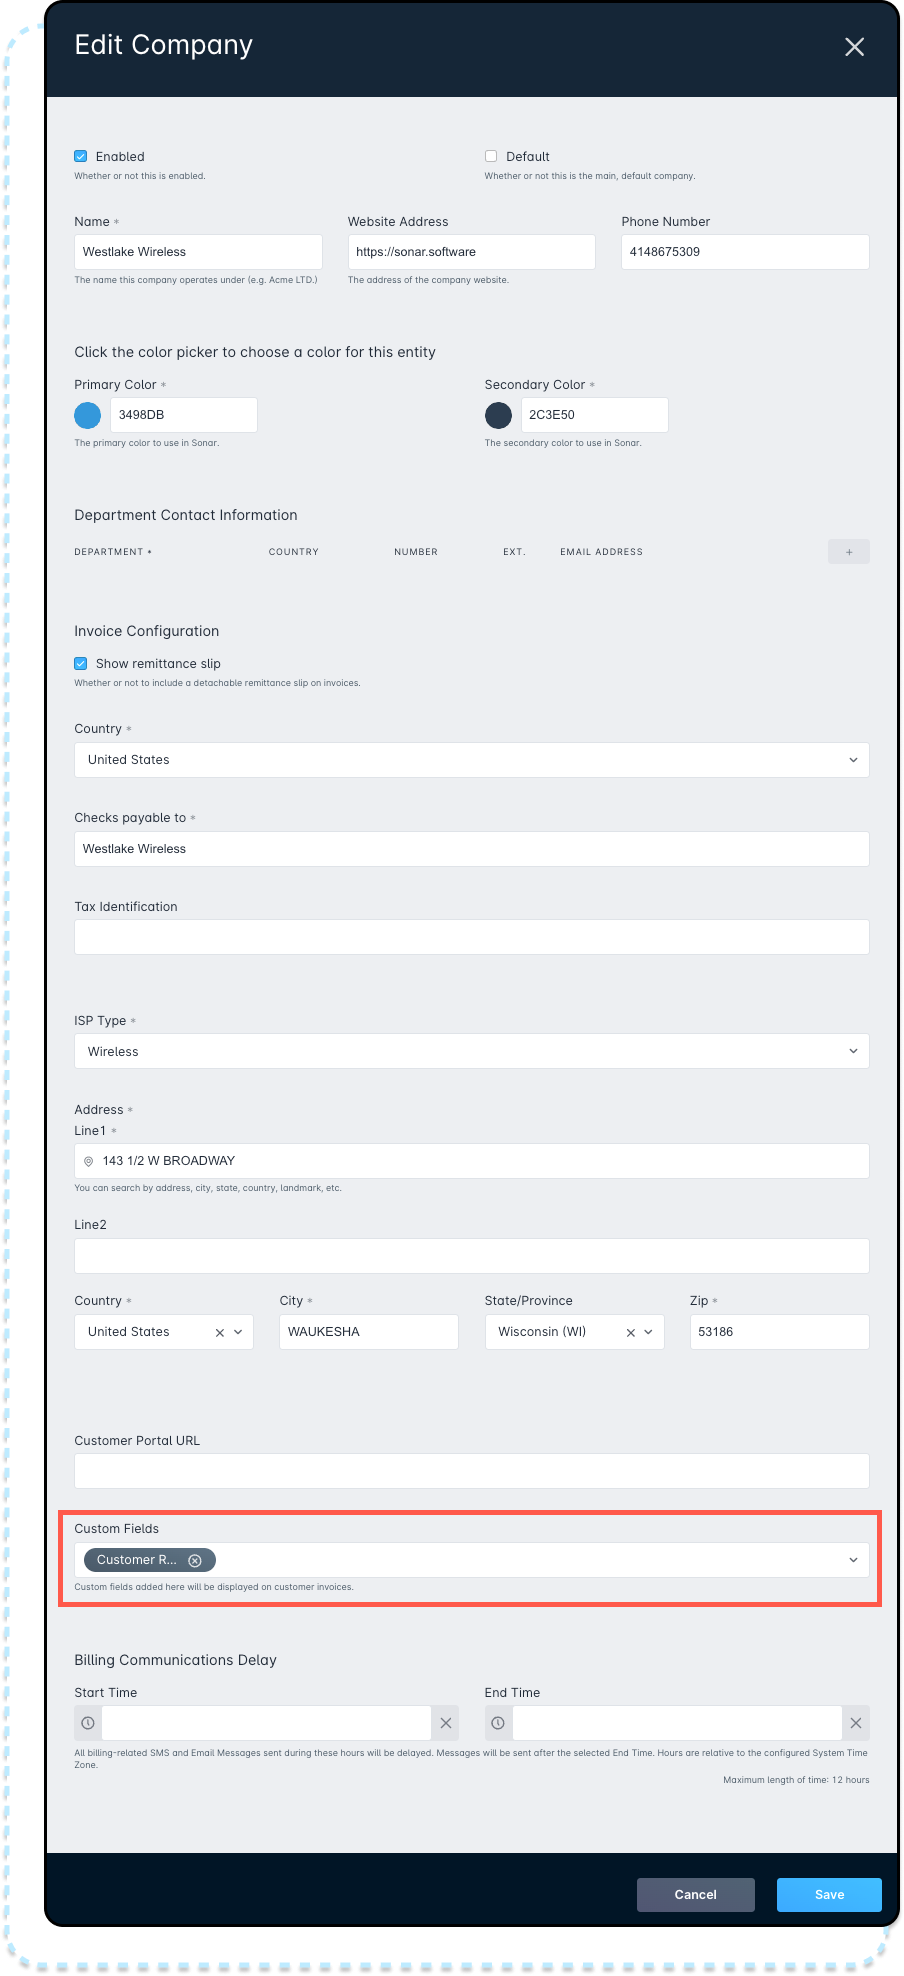
Now that we have set up the custom field to be displayed on the invoices, anytime customers receive their invoices they will now see their customer reference number displayed along with the rest of the information.

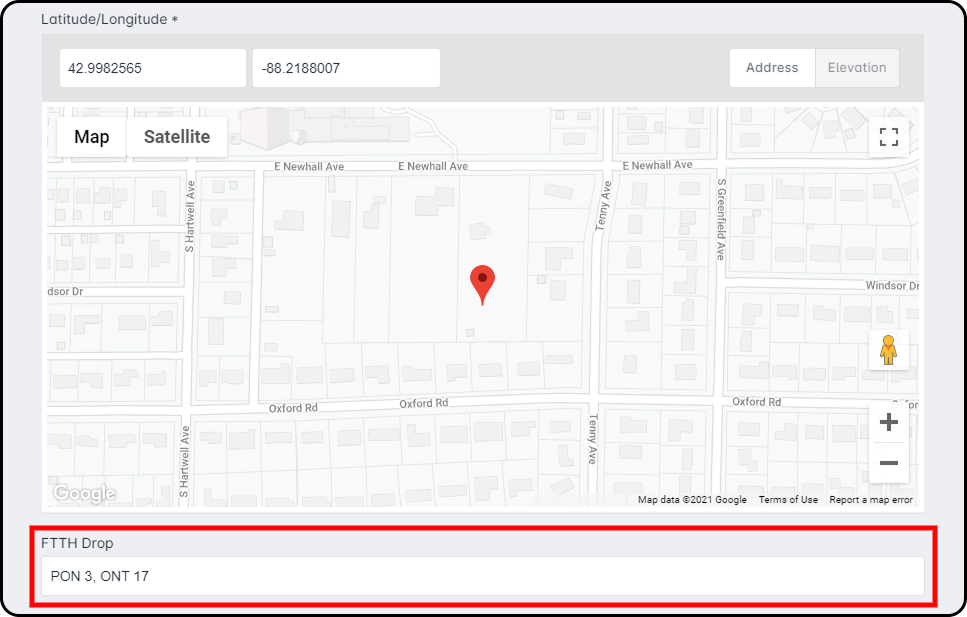
Use Case #4: Tracking FTTH
We’ll create a custom field for serviceable addresses to track FTTH deployments by PON and ONT. Storing this information at the property level—rather than on customer accounts—means it stays with the location even if the customer changes. This approach can also be used for accessibility notes or CPE location details.
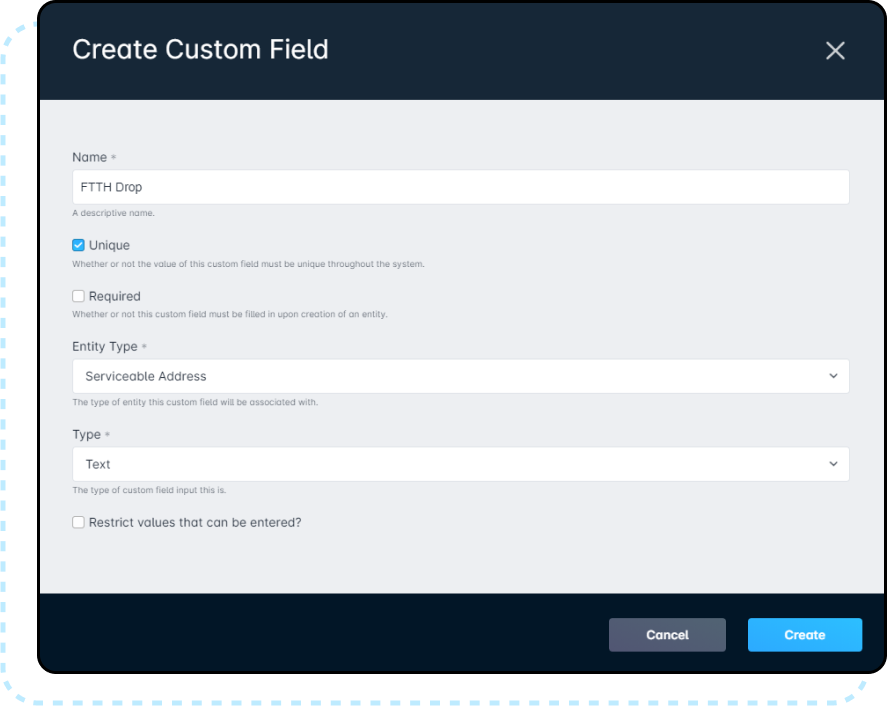
We’ll name the field FTTH Drop to match its purpose. Since each PON and ONT is unique to an address, we check the Unique box to avoid duplicates. We select Serviceable Address as the Entity Type, so the data stays linked to the property, not the customer. The field type is set to Text to allow alphanumeric entries like “PON 3 - ONT 17,” and we don’t restrict values. After filling in the details, we click Create, and the new field appears in the Custom Fields table. This field can now be used when creating or editing serviceable addresses to track fiber information.