Table of Contents
Calix SMx Integration: Overview
 Updated
by Kristen Fiddes
Updated
by Kristen Fiddes
Read Time: 24 mins

Calix offers a range of solutions to meet your networking needs; however, this article specifically focuses on the integration of an SMx server with your Sonar instance. Utilizing this feature allows you to map data from your instance through to SMx and vice versa. Below, we'll walk you through preparing your instance for the integration and how to configure it, along with individual features you can take advantage of and how best to use them.
Before You Start
To enable communication between Sonar and your SMx, there are a few things that should be in place before creating the integration.
- First, an Integration-specific user should be created in your SMx instance. While this is optional, and you can use any user, segmenting your SMx in this way ensures audits and logging will maintain a clear distinction between user-performed and Sonar-performed actions.
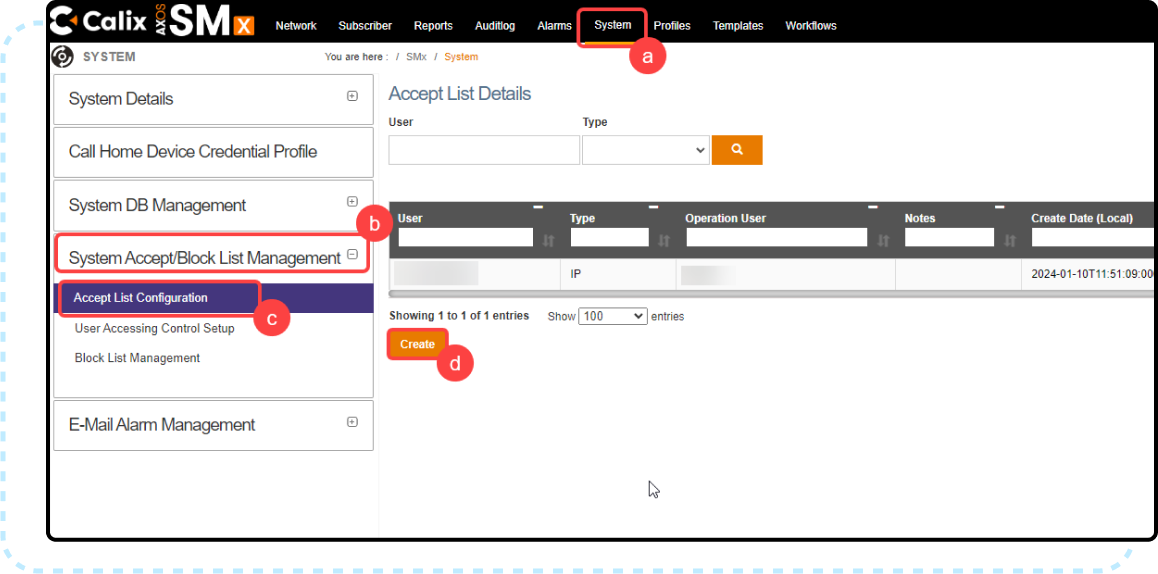
- Next, you'll want to ensure that Sonar's Egress IP Addresses are allowed to connect with your SMx. While the common term for this is “Whitelist”, in SMx, you'll need to add them to the “Accept List”.
- Click on the
Systemtab - Then expand the
System Accept/Block List Managementsection - Next, click on Accept List Configuration
- Click on “Create” to define an allowed IP address for a specific SMx user.Sonar has several Egress IP Addresses that might communicate with your SMx. For this reason, ensure that all Egress IPs from the Sonar IP Addressing article are added to SMx and tied to the user created for the Sonar integration.
- Click on the
Setting Up the Integration in Sonar
The process to configure the Calix integration is best started with creating the associated inventory items (and their corresponding fields) and the services you intend to use with your Fiber customers. Both of these fields will come up during the final integration modal; however, the services can be returned to and edited at a later time.
Permissions
As always, the first step in any integration is ensuring the relevant users can access it. Using Calix requires several key permissions for applicable roles. Please take a moment to review these new permissions and ensure that the relevant roles have them added before proceeding with any walkthrough steps.
Navigate to Settings → Security → Roles and either choose to edit an existing Role or create a new Role. With the next page populated, locate the permissions reflected in the screenshot below and enable whichever ones are applicable to that Role.
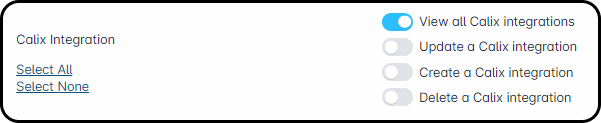
These permissions allow a user to control the connection between your Sonar instance, and Calix SMx. Additional permissions are required to control connectivity between SMx and customer accounts:
- Account Calix Service Details
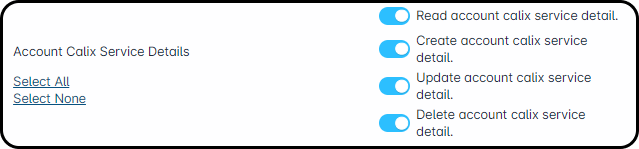
- Field Mapping

- Service Mapping

Creating Inventory Models
For every ONT you plan to use, you must create its own corresponding Inventory Model. It is recommended that the “Model Name” chosen matches the Profile ID found in SMx; this can be found by logging into your SMx server and navigating to Profiles → Common → ONT. However, if another name is to be used instead, then the Profile ID field of the model should then be set to “Required”. This will be touched on below.
Furthermore, it's important that the Inventory Category is correctly configured, reflecting “RG”, “ONT”, or other Calix device categories. Because the Category Name field is user-configured, it is important to match this syntax exactly, or the integration will not pass through the related Device ID data successfully. These categories are used with the Calix Cloud Integration.
With the Inventory Model created for your ONT, you can then add the following model fields with the same attributes reflected below:
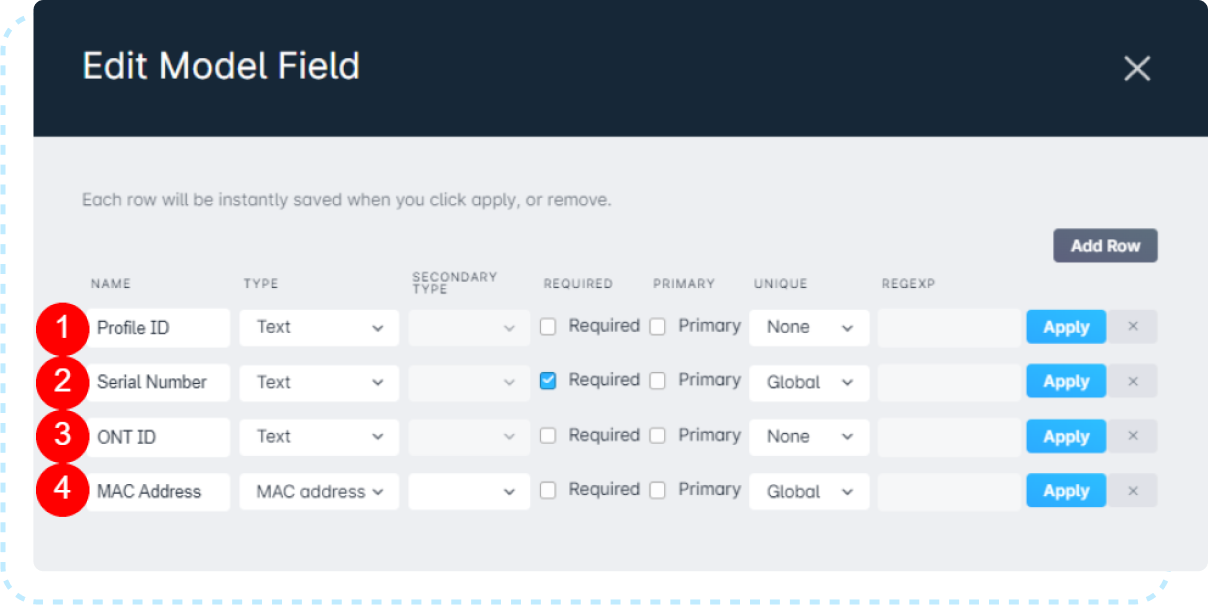
- The Profile ID field.
In most cases, this field will be left blank, as it'll already be defined by the model name. If the model name does not already match the Profile ID and this field is filled, it will override the model name; in this event, it must match whatever is reflected in the SMx server. - The Serial Number field.
This field should be set to “Required”. The number inputted should match the hardware serial number of the ONT, e.g., CLCX00003892.Some models of Calix ONTs will have an FSAN instead of a serial number. These fields are interchangeable in Sonar when adding an item. When adding hardware to Sonar, this field must be entered in ALL CAPS, otherwise an error will occur when the devices synchronize. - The ONT ID field.
Pre-provisioned ONTs in SMx are mapped from the inventory information in Sonar using the data input into the ONT ID Field. If left blank, Sonar will generate an ONT ID and create a new pre-provisioned ONT in SMx. If the ONT is already defined in the SMx server, entering the ONT ID in Sonar allows Sonar to identify an existing ONT entry in SMx. - The MAC Address field is optional, but recommended.
If a MAC Address is added to an inventory item, the IP assignment will be applied to the MAC Address. Without the MAC Address field present, the IP will instead be assigned to the inventory item.
Creating Services
As SMx is the management resource for the Calix ONT devices, the actions processed in it are responsible for the speeds and services pushed through to a Calix ONT. Part of the integration process is creating a link between the service template in SMx and a service within Sonar; this allows staff without access to SMx to provision package changes. To set this up, you should already have an existing service template attached to a specific policy map (which details the speeds a customer will be capable of via their ONT) in SMx.
- Navigate to Settings → Billing → Services and begin to build data service.How to create a data service is detailed in our Building a Data Service article | click here
- In the populated modal, ensure that the fields for “Download speed in kilobits per second” and “Upload speed in kilobits per second” match what is detailed via the policy map in SMx. While SMx is the management system for ONT speeds, it is helpful to have the correct speeds reflected in your Sonar instance for your staff to reference accurately.
- Before creating the new service, ensure that the name is reflective of it being for Fiber customers only (if you offer a range of Internet solutions).
Static IPs with Sonar & Calix SMx
Sonar’s Calix SMx integration does not manage static IP addressing (no IPAM-to-SMx synchronization, no static-IP provisioning payloads, and no special handling when a static IP is present). Static IP assignment must be handled outside of the integration—either operationally in SMx (or related Calix systems) and/or via your internal network/IP workflows.
What this means
- Bundle static IPs into a single service vs. separate line items.
- The SMx integration does not treat bundled vs. separate static-IP line items differently because it doesn’t manage IPs at all.
- Mapping services with static IPs (templates, policy maps, “Does Sonar send anything differently?”)
- Sonar and services/IPs are decoupled in Sonar, but the integration only manages the service objects you’ve configured it to manage (service templates, policy maps, etc.).
- Sonar does not send anything IP-specific to SMx during provisioning—even if a static IP is associated to the account/service in Sonar.If you attach static-IP configuration in SMx to a service that Sonar is “managing” via the integration, then service changes initiated from Sonar (add/remove/reprovision) can overwrite/reset service state in SMx—meaning static IP assignments in SMx may be lost if they’re tied to the managed service.
- Does assigning a static IP in Sonar IPAM push to SMx automatically?
- No. Assigning a static IP in Sonar IPAM does not get pushed to SMx by the integration.
- Multiple static IPs per customer/ONT
- Sonar can track multiple static IP assignments, but the Sonar ↔ SMx integration will not provision any of them.
- Whether multiple static IPs can be applied to a subscriber/ONT in SMx, and how that should be modeled, is entirely on the Calix/SMx side—and must be implemented outside Sonar’s SMx integration.
Configuring Your Calix Integration
- Navigate to Settings → Networking → Calix and click on “Create Calix Integration”:
- Complete the required fields across all 5 pages, as detailed below:
Page 1
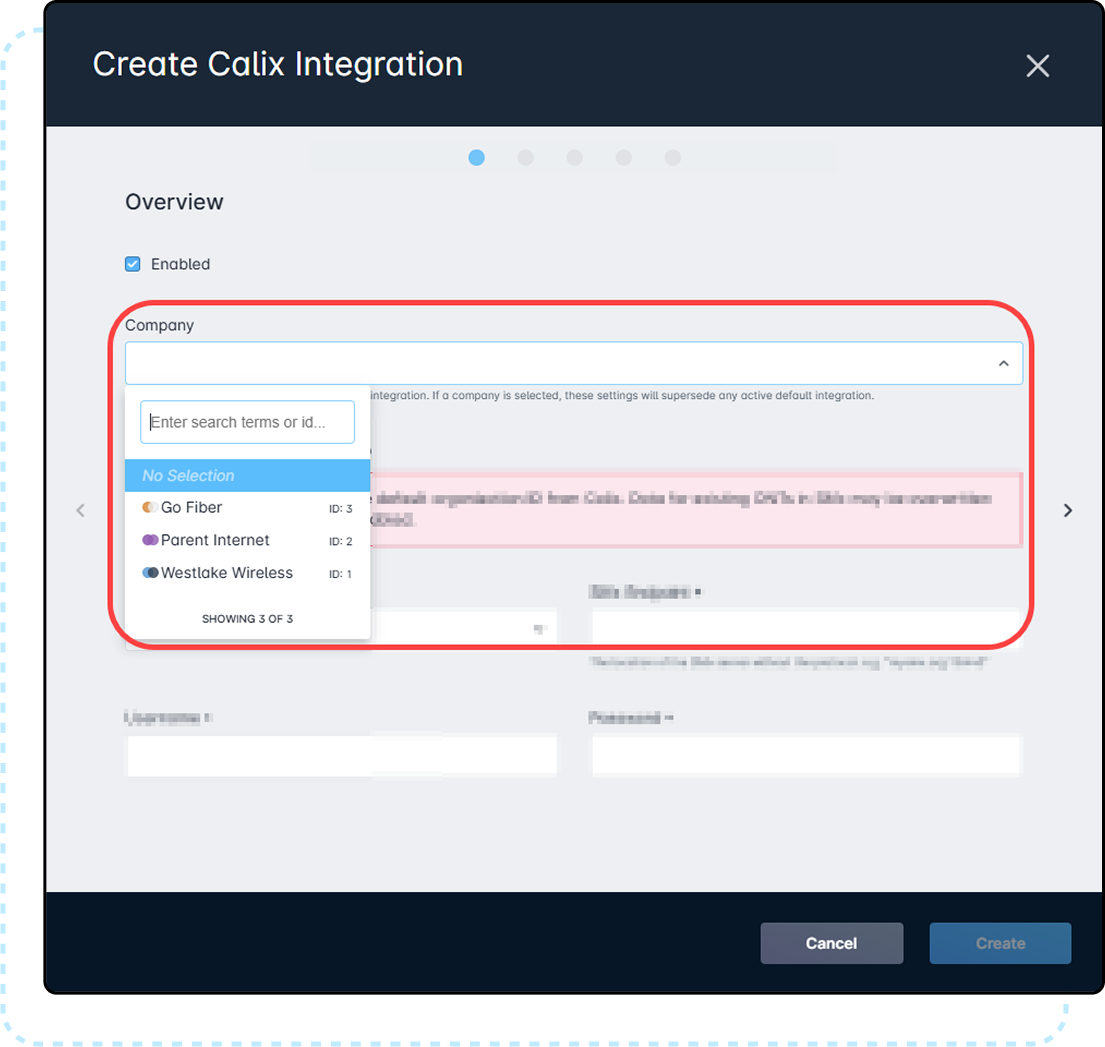
The first page you'll interact with is the “Overview” portion of the integration.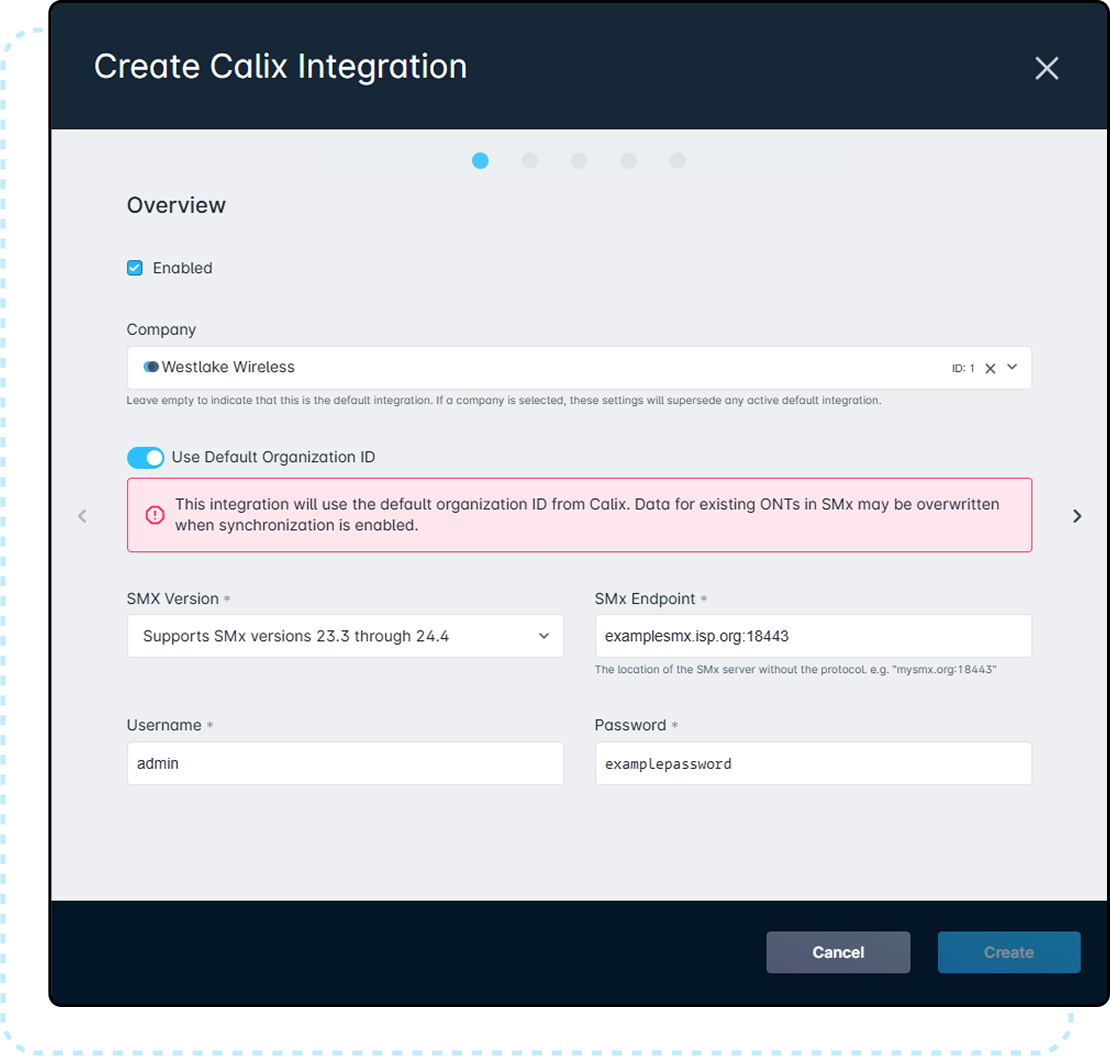
The "Company" dropdown allows you to configure this particular integration to manage the provisioning of only those accounts linked to the set Company in your Sonar instance. Leaving this field blank will create a "Default" integration that will be used as a fallback for any accounts that do not belong to a company-defined SMx integration. Only a single SMx integration can be created for a given Company.
In most cases, “Use Default Organization ID” will be enabled which uses the ID “Calix”. If your Organization ID is different, you are able to toggle this off and a new field will populate where you can input the correct ID.
If you do toggle this off, duplicate entries may appear in SMx for any ONTs synchronized under the new ID.
The SMX Version field offers a dropdown that configures the Sonar Integration to communicate with specific SMx software revisions. Failure to set this to the correct version for your specific SMx appliance will result in connection and provisioning failures.
The “SMx Endpoint” will be the hostname or IP address of your SMx server. If you're using the default port (18443), adding it to the end of the input is optional (mysmx.org and mysmx.org:18443 are the same). If you have a custom port, add it to the end of the hostname/IP address, for example:
192.0.2.5:8443
mysmx.org:8443.
Finally, the “Username” and “Password” is whatever login you use to access SMx.
Page 2
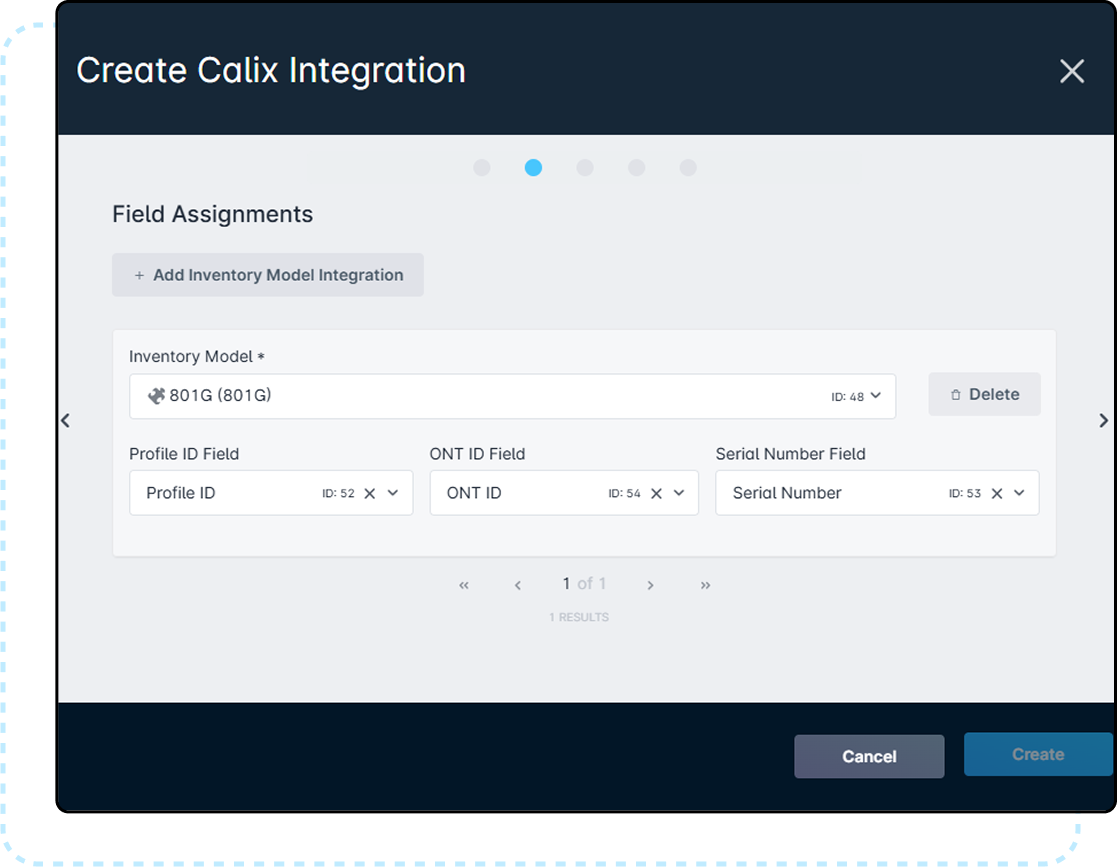
Using the “+Inventory Model Integration” button will populate a new section where you can select the applicable inventory model and attach the already-configured fields of that model.
Page 3
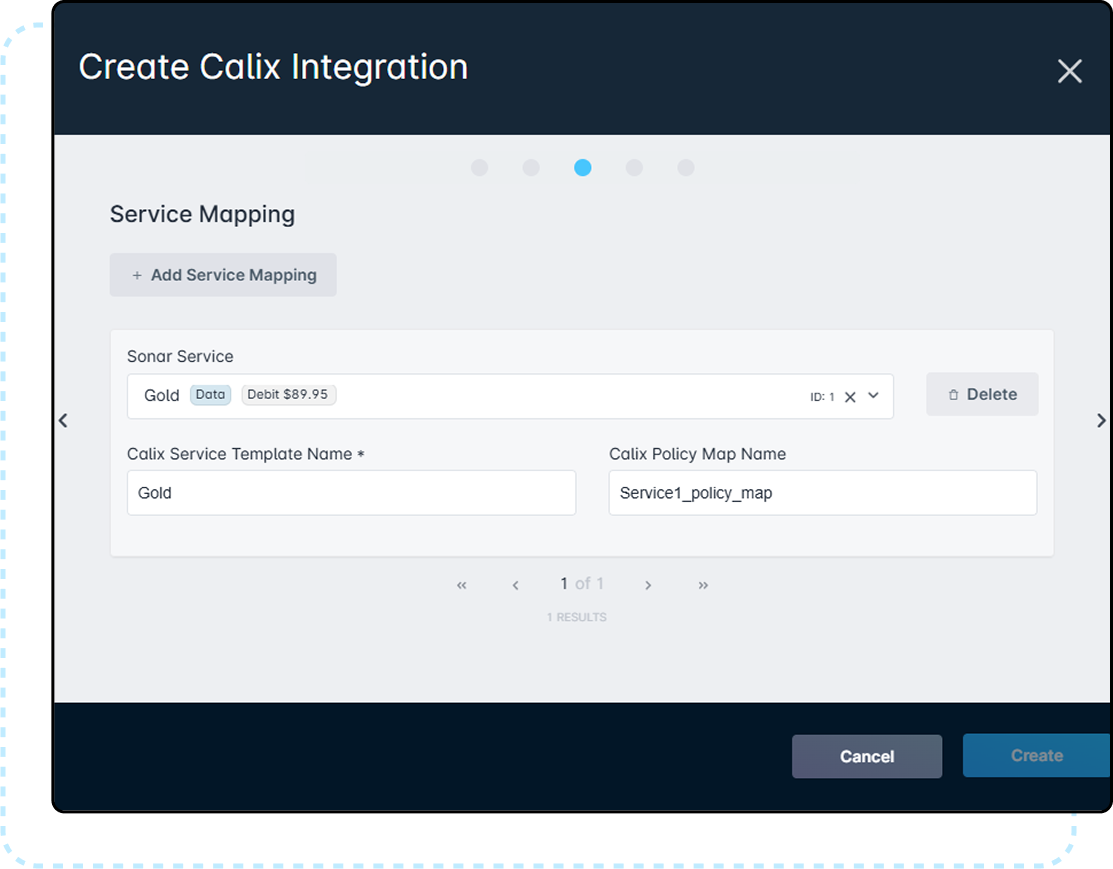
Underneath the “Service Mapping” header, you can select the Sonar Service previously created for your Fiber customers; only data services can be applied here. Alongside the service chosen, underneath “Calix Service Template Name”, you will then select the Service Template Name from the available list. This list comes directly from SMx, as long as your integration credentials are correct.
The fields here are required.
Once the Service Template Name is selected, the Calix Policy Map Name can also be selected. The Policy Map Name field is optional, and allows for more precise control over your network.
To identify your existing service templates in SMx, navigate to Templates -> Service -> AXOS Systems.
Additional Data Services can be mapped by clicking on the
+ Add Service Mapping button, and filling out the fields that appear for each service.Page 4
These fields are optional, but the service template must be added before the Policy Map.
To identify your existing service templates in SMx, navigate to Templates -> Service -> AXOS Systems.
Page 5
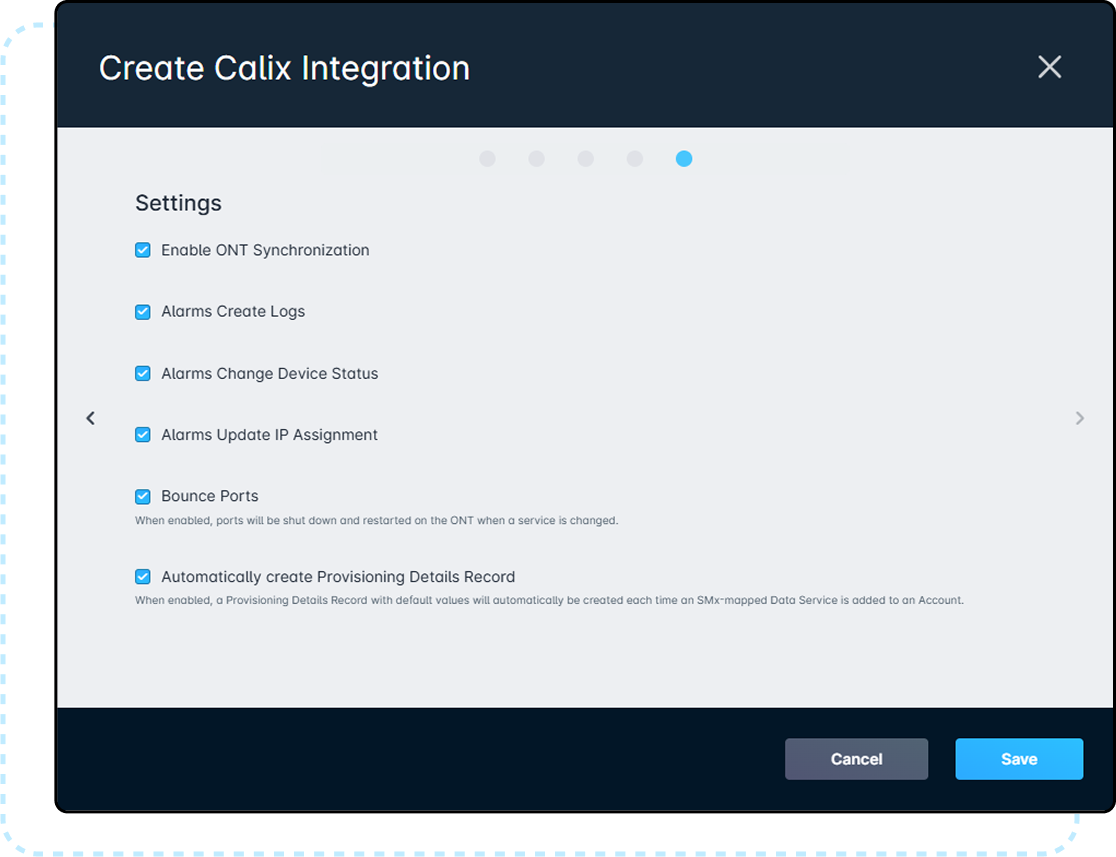
Enable ONT Synchronization is what determines if Sonar can communicate with the Calix SMx server. Without this enabled, the sync will not take place, which also means automatic provisioning will not be possible.
Alarms Create Logs allows you to toggle whether you want SMx server alarms to populate in Sonar. If this is not enabled, the alarms will only be visible by accessing SMx.
Alarms Change Device Status, when enabled, allows devices in Sonar to be updated dependent on their status in SMx. So, if the OLT is unable to reach an ONT, it would reflect this in Sonar too.
Alarms Update IP Assignment acts similarly to the option above, any changes reflected in SMx are pushed through to Sonar if this field is enabled. With this enabled, any IP assignments updated in SMx will automatically populate in Sonar, though a prerequisite here is that the Supernet and Subnet must already be created within IPAM first. If a MAC address field exists, it will assign the IP to the MAC address. Otherwise, it is assigned to the Inventory Item directly.
Bounce Ports control ports on the ONT being shut down and restarted whenever a service is changed. Enabling this will increase the sync time as it'll have to account for the port shutting down and being brought back up when a service is removed and again when a service is added.
Automatically create Provisioning Details Record controls the Provisioning records on an account. If this is enabled, once a Data Service associated with this Calix Integration are added, the account will be automatically provisioned with SMx. Sonar recommends enabling this option to streamline subscriber management.
If the field is filled out manually and does not correspond to an entry in SMx, the mapping won't work until those values are created.
Following a successful integration, a custom field titled “Calix SMx subscriber ID” will automatically populate on every account in your instance. If you are integrating an SMx with existing subscribers, using this field will prevent duplicate subscriber entries. Whatever is listed in the “Account” column in SMx simply has to match with what you're entering into the custom field on a customer's account in Sonar.

For example, if we were to activate an account in Sonar for Johnathan Doe, a new subscriber entry would be created in SMx. However, if we add “John Doe” to the “Calix SMx subscriber ID” custom field, then the integration would know to map this subscriber in SMx to the account in Sonar.

Full Synchronization
When initially configuring the integration, you're able to prompt a full synchronization, which will transfer data from Sonar to SMx for any accounts that meet the following conditions:
- A Calix-associated service must be assigned to an account (as determined under “Service Mapping” in the integration modal).
- An inventory item is assigned to the serviceable address of an account, complete with Serial Number and, if applicable, Profile ID.
- The account must be in an active status.

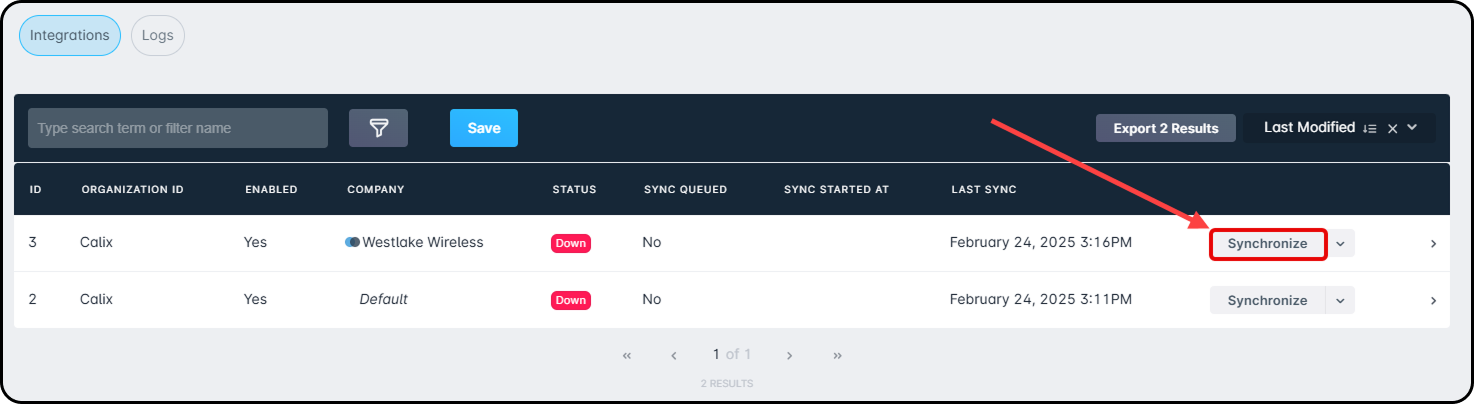
To begin this process, click on the “Synchronize” button in the last column of the Calix SMx Integration table. Once selected, it will begin to sync immediately, which can be reflected by the date and time updating below “Sync Started At”. The data in SMx will update in real-time as the synchronization processes. Full Synchronization is capable of transferring approximately 1,000 accounts per hour, though network conditions may affect this throughput.
Using the Integration with Sonar
Automatic Provisioning
Automatic Provisioning functions using the same attributes needed for Full Synchronization. “Enable ONT Synchronization” must be enabled, and accounts must meet the following criteria to be automatically mapped between Sonar and SMx:
- A Calix-associated service must be assigned to an account (as determined under “Service Mapping” in the integration modal).While Automatic Provisioning will provision the account with VLANs and Service Ports at this time, adding an Inventory Device is still required to deliver service to the subscriber, despite not being essential for Provisioning from Calix.
- An inventory item is assigned to the serviceable address of an account, complete with Serial Number and, if applicable, Profile ID.
- The account must be in an active status.
Deactivating Service to an ONT
It is possible to deactivate services to an ONT using one of three actions:
- Removing the Calix-associated service from an account
- Unassigning the ONT from the customer's serviceable address
The aforementioned two options will only remove services from the ONT in SMx. The customer account in Sonar will remain active following these two actions and can continue to accrue fees depending on other services on file.
- Deactivating the customer's account
Delinquency
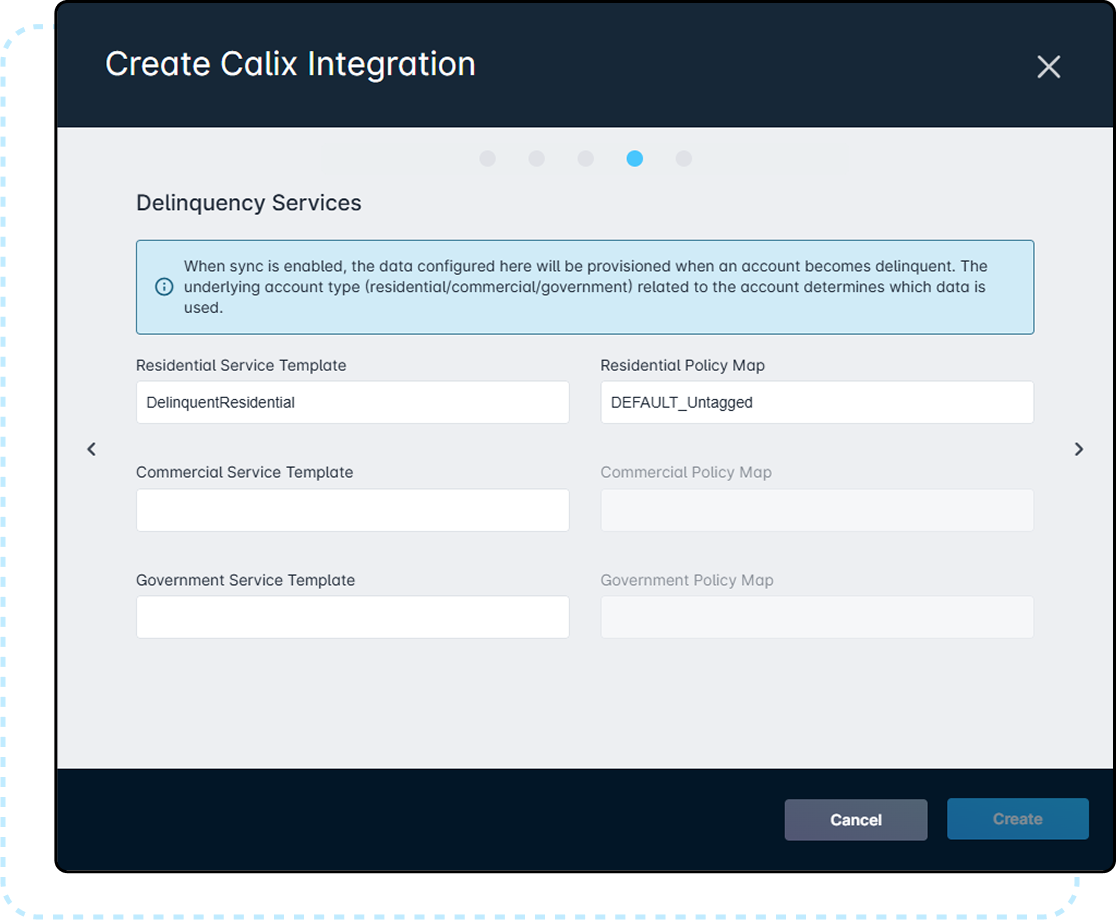
In the event a customer is delinquent, it is possible to automatically have their service switched via SMx; this was briefly touched on during Configuring your Calix Integration (see the fold titled “Page 4”). This option can be left blank if you do not wish to change the service they subscribe to, but in the event you would like to take advantage of this automation, please see below.
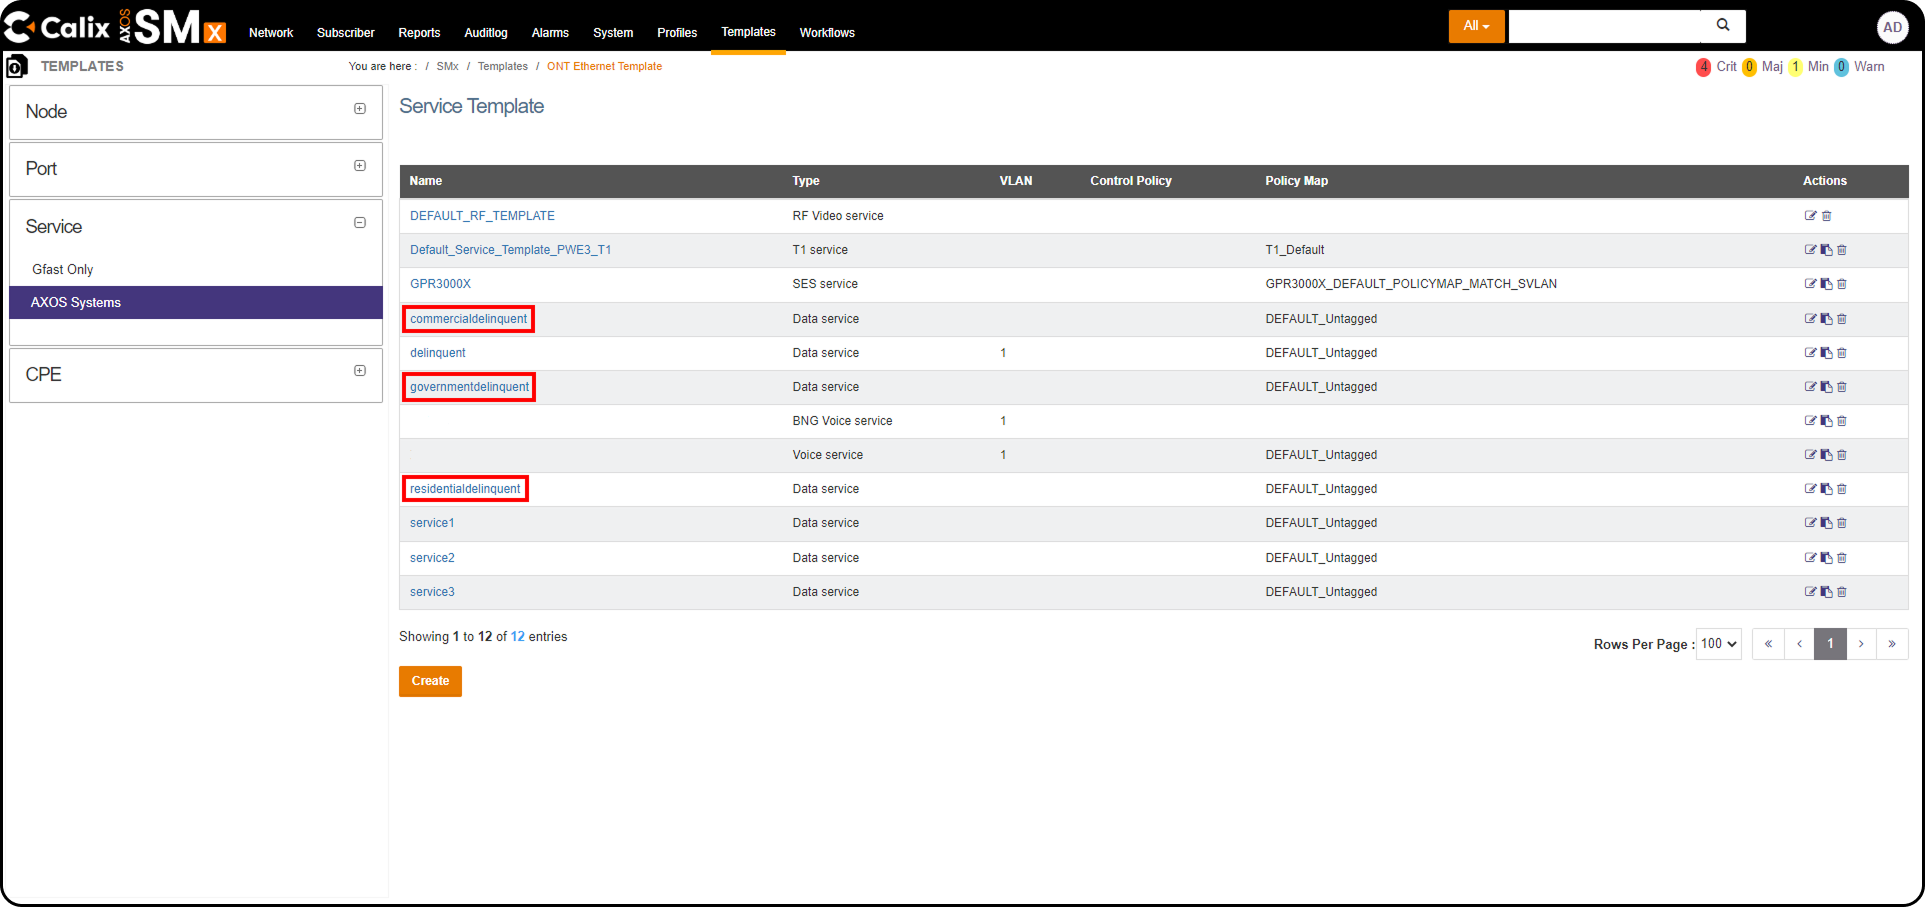
SMx allows you to create numerous service templates, and up to three of them can be utilized within Sonar to outline how delinquent traffic should be handled. During the Calix Integration process, you can differentiate between Residential, Commercial, and Government account types. However, the same service template can be used for each account type if that is your preference. The most important part here is ensuring that the names outlined during this integration process match exactly to what is reflected in SMx.
Industrial and Senior Citizen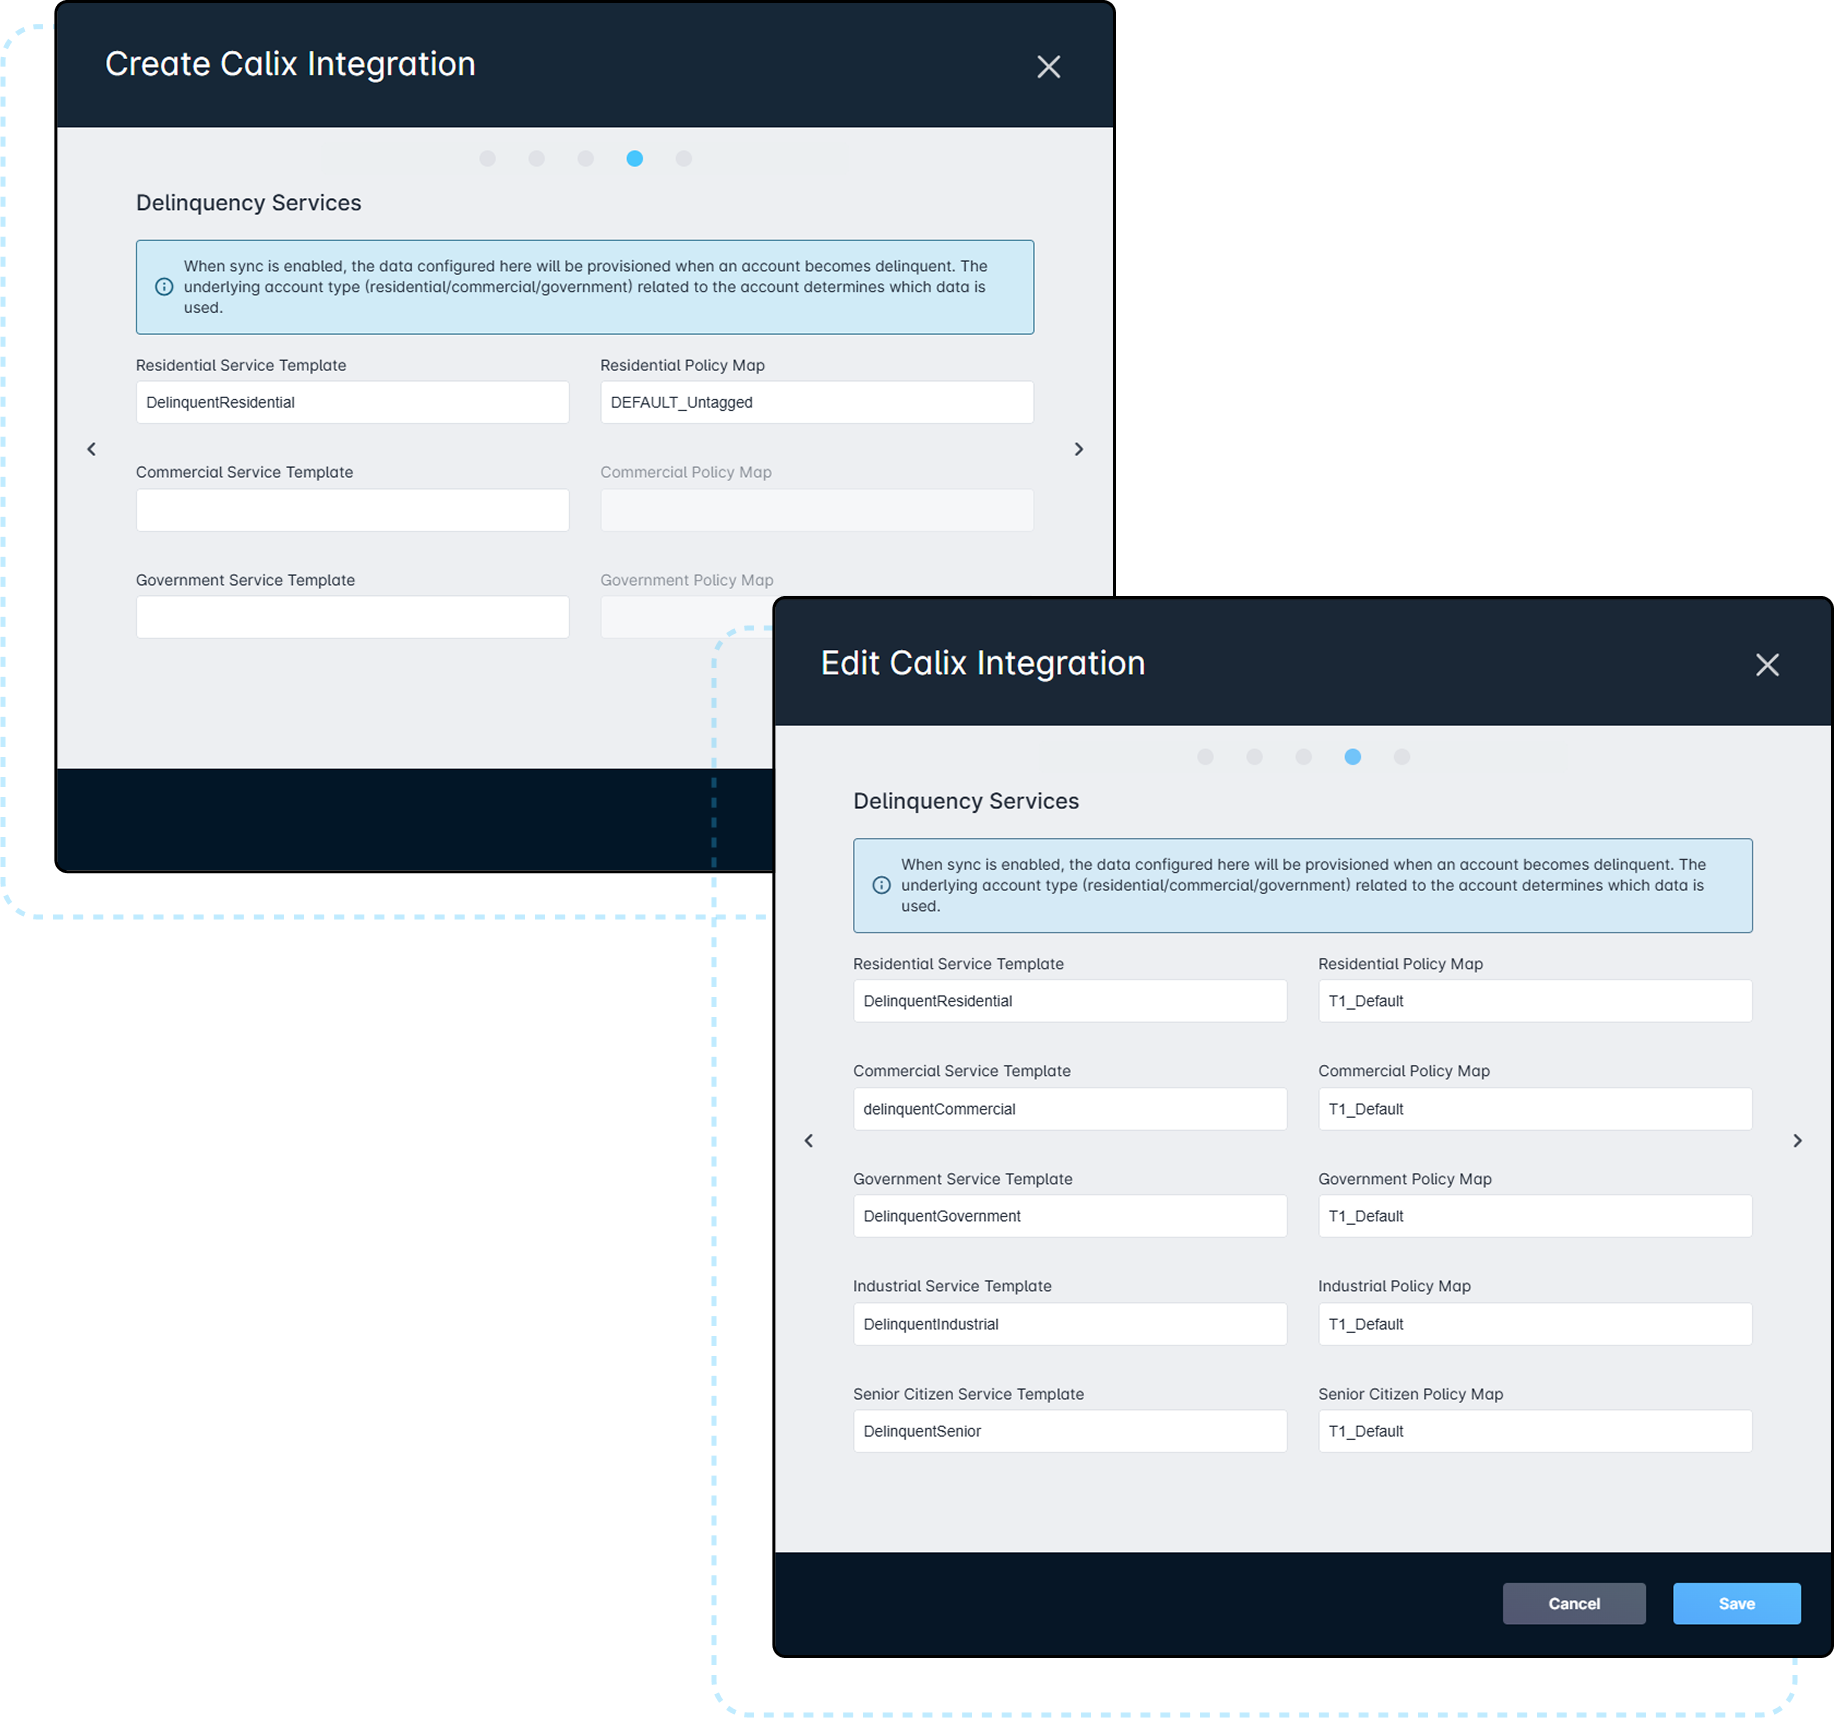
Alternatively, it is possible to route your Fiber traffic through a MikroTik router and use this as an inline device in Sonar, though we do not recommend this method.
Device Alarms
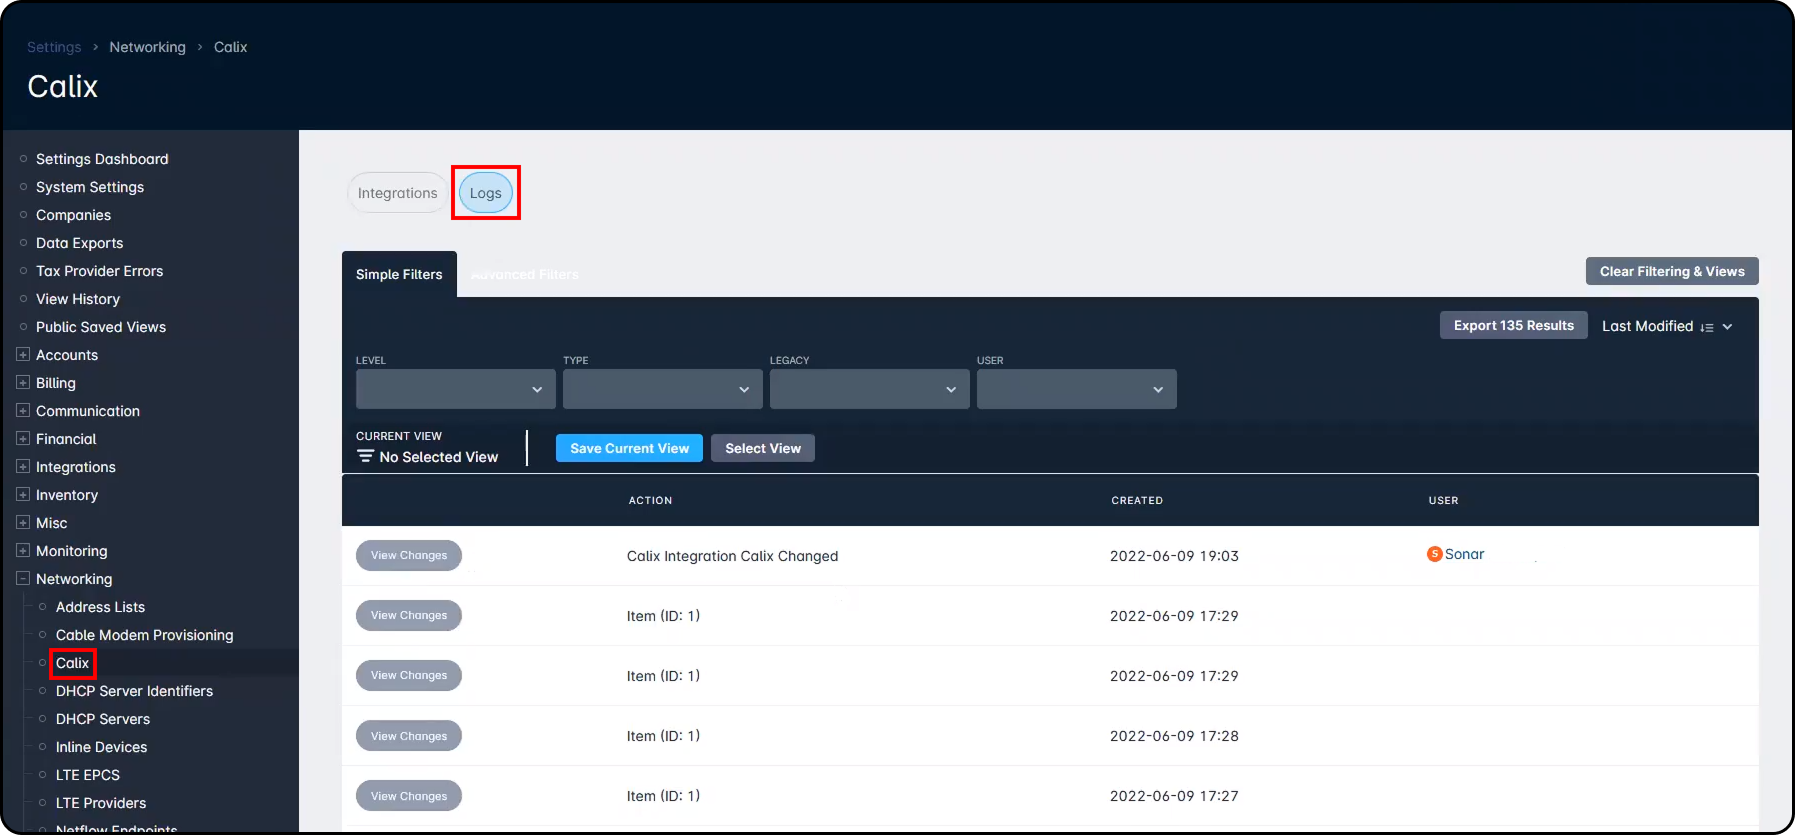
Device Alarms in SMx alert you to any issues within the Fiber circuit, whether it be originating at the OLT or at the customer's ONT. With this integration, ONT alarms can be reflected within your Sonar instance as well by enabling “Alarms Create Logs” in the integration modal. With this checked, you can see any alarms by navigating to Settings → Networking → Calix → Logs.
Each Device Alarm is created in your instance as an individual line item, which includes the date and time the alarm was triggered. To view more information on the specifics of the alarm, you would click on “View Changes”. Similarly, if changes are made to the Calix Integration, a line item would show here also, along with the name of the user who implemented those changes.
Device Status
Continuing on from this, if you want alarms to update the status of a device (from “Good” to “Down” etc.), then “Alarms Change Device Status” must be checked during the integration as well. Along with this option checked, you will need to create a monitoring template with ICMP enabled for each device that you want to use this feature with.
Alarm and Service Affecting in SMx | Device Status in Sonar |
Critical and service affecting | Down |
Major and service affecting | Down |
Minor and service affecting | Down |
Warning and standing | Warning |
Clear and not service affecting | Good |
Provisioning accounts with Calix
First Steps
To provision an account in Sonar with Calix, you simply need to add the inventory item and service associated with the Calix integration to the customer account.
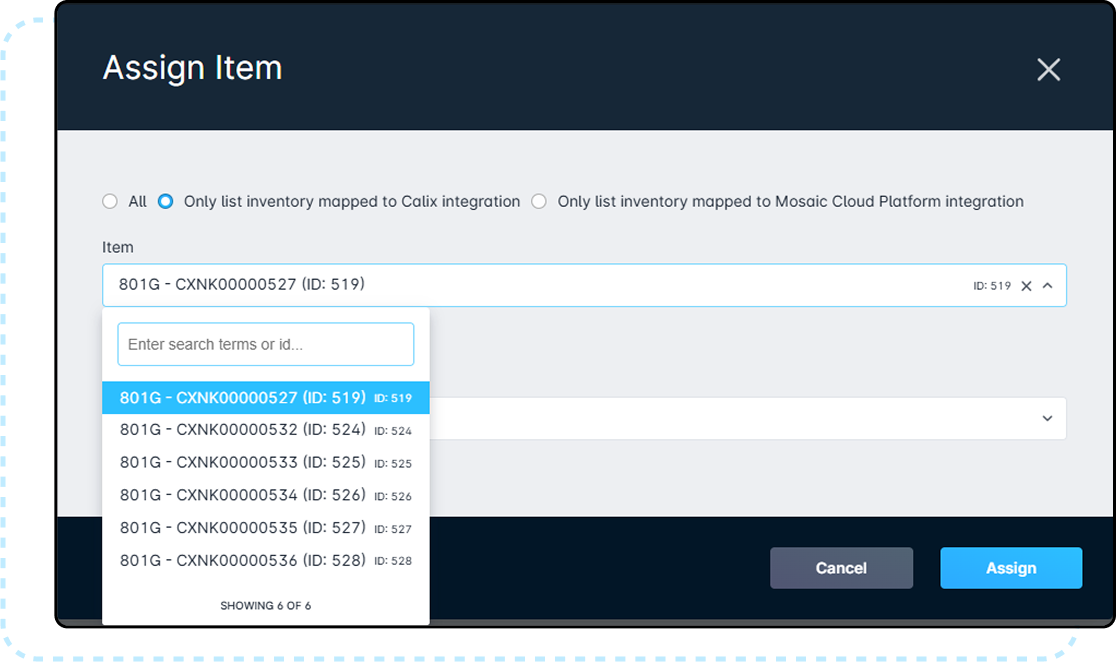
- Adding inventory to the Account can be done by going to the Network & Inventory → Inventory items → Assign item. This opens a modal which provides you with a checkbox that will filter services to only list inventory mapped to a Calix integration.
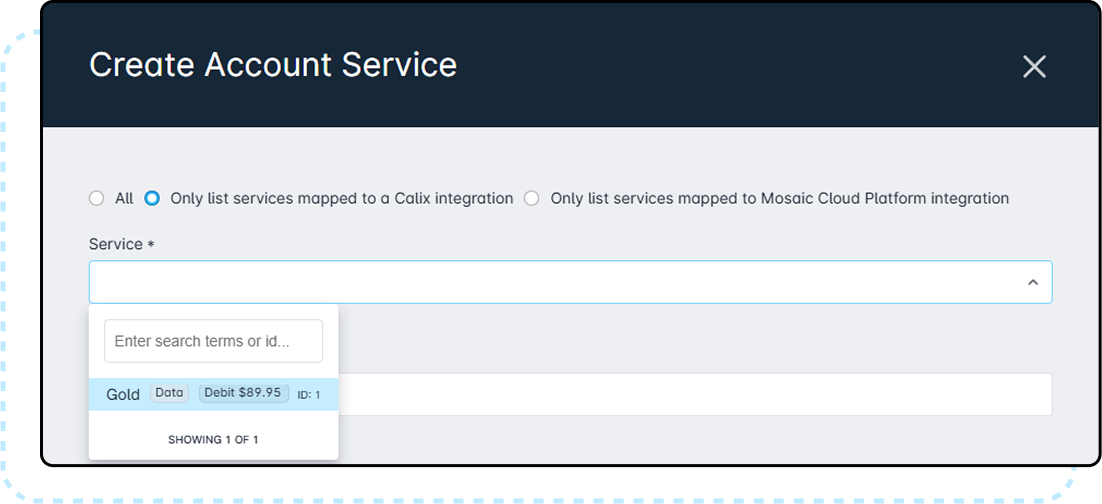
- Adding the account service can be done by going to the Billing tab → Services & Packages → Add Service. This opens a modal which provides you with a checkbox that will filter services to only list services mapped to a Calix integration.
Provisioning Details
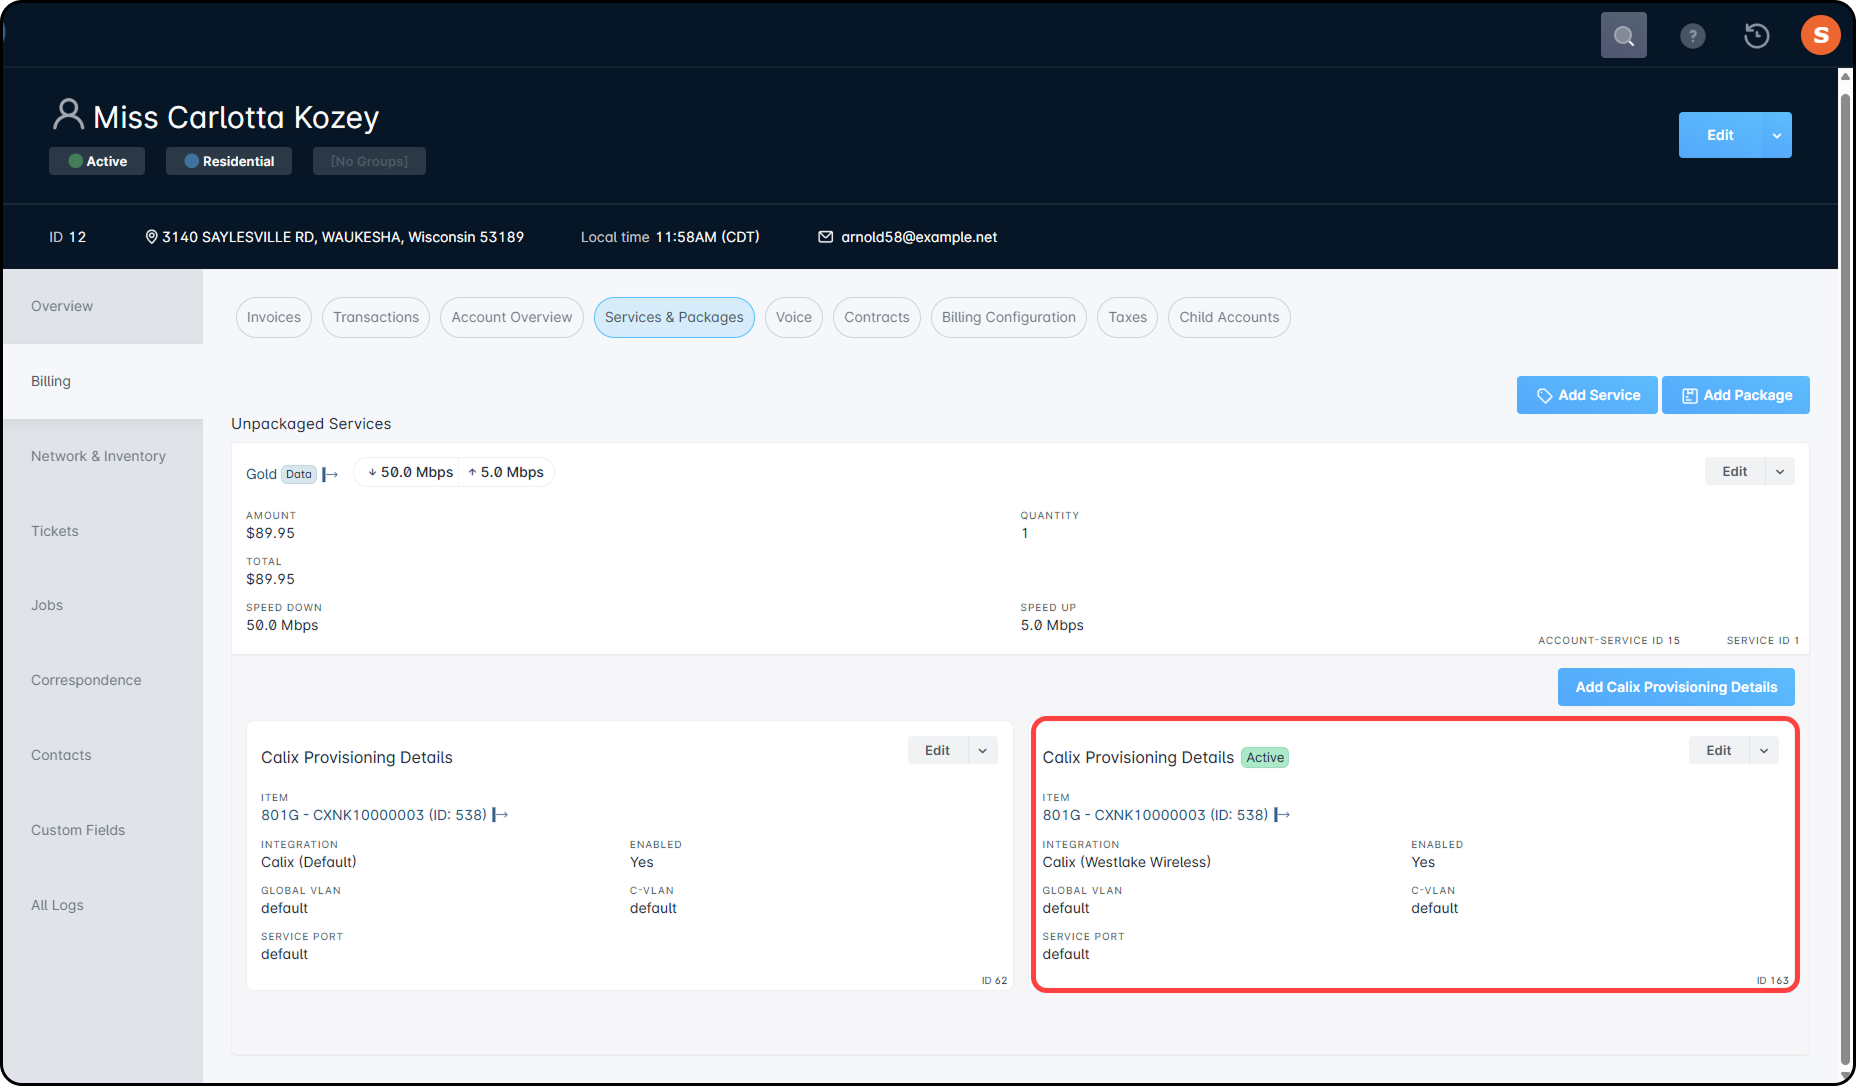
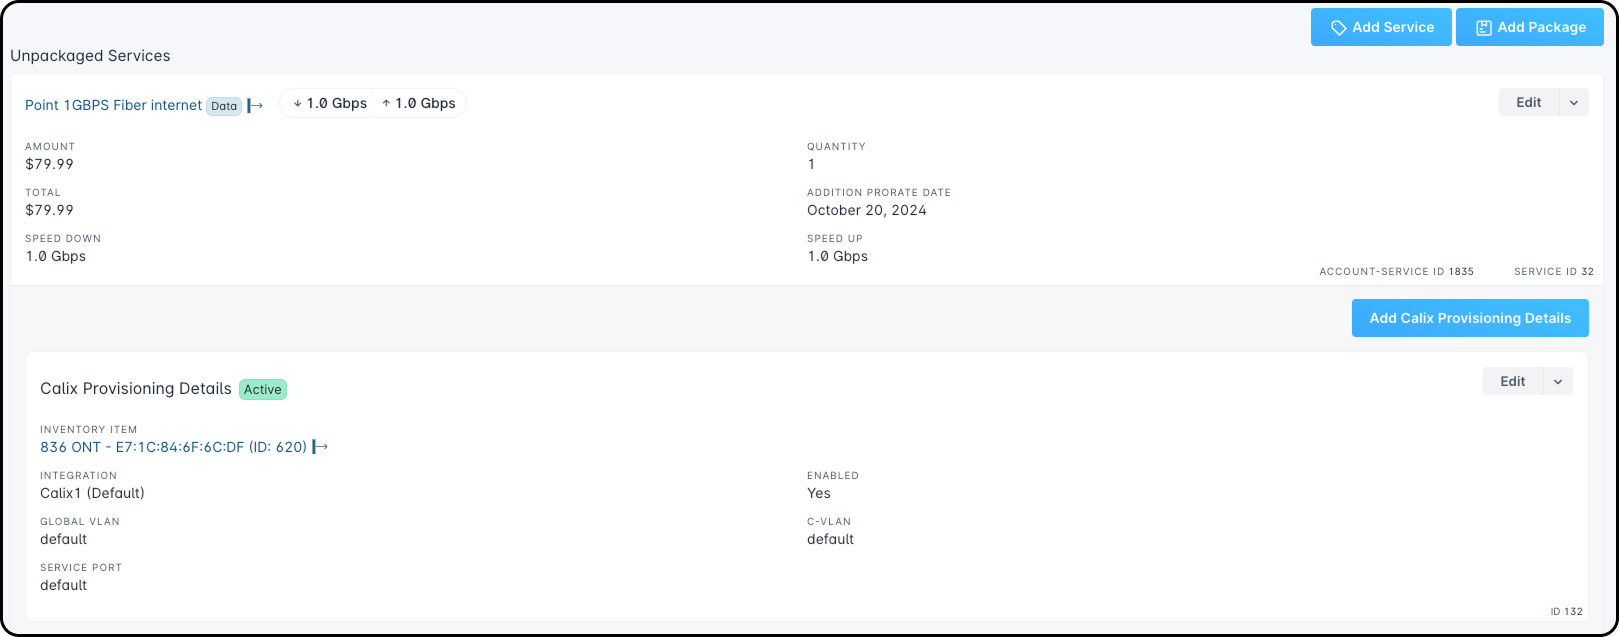
Once the Inventory Item and Data Service are added to the account, it becomes possible to Provision the account with your Calix SMx Server(s). Only one SMx integration will be active for each account, indicated by the “Active” tag, and the “Active Integration” line on the Provisioning details.
Automatically create Provisioning Details Record was checked during the Calix SMx Integration, this provisioning will happen as soon as the Data Service is added to the account, with no user-input required unless the values need to be changed. However, an Inventory Item mapped to the Calix SMx integration is still required to complete service delivery to the subscriber.From the Billing → Services & Packages section of the subscriber's account, you'll have a message stating the following:
This service is eligible for Calix provisioning. You may click "Add Calix Provisioning Details" to provision the account.
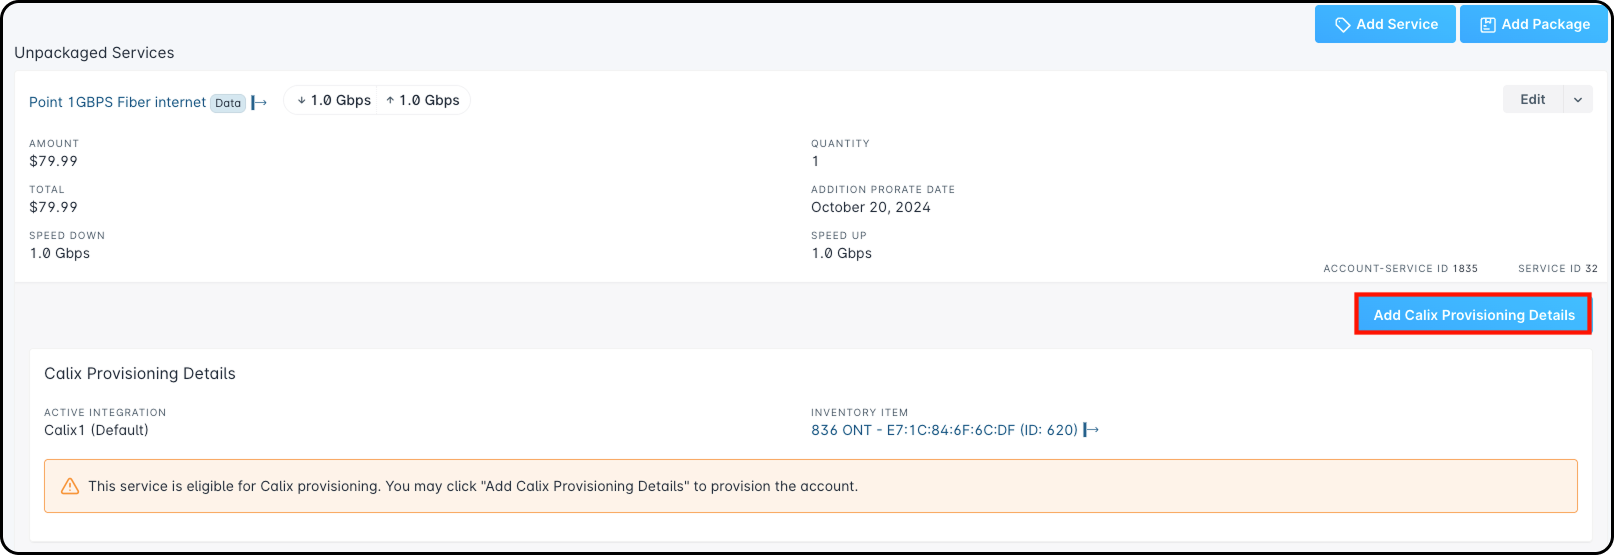
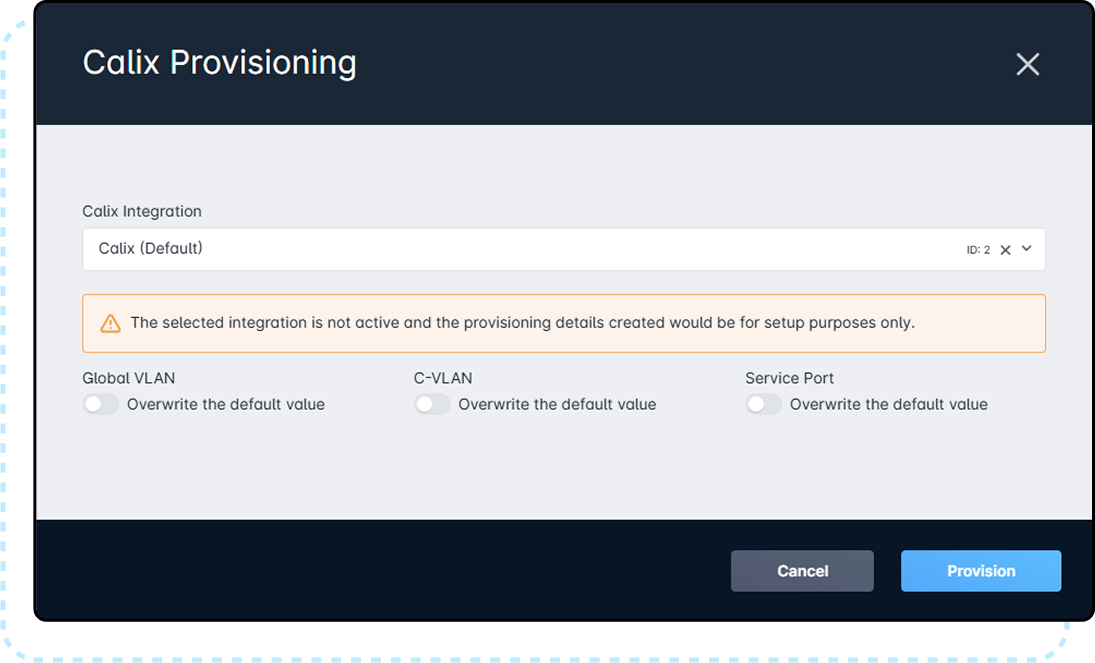
Clicking the “Add Calix Provisioning Details” button will open the Calix Provisioning modal, where you can configure the specific provisioning for your service
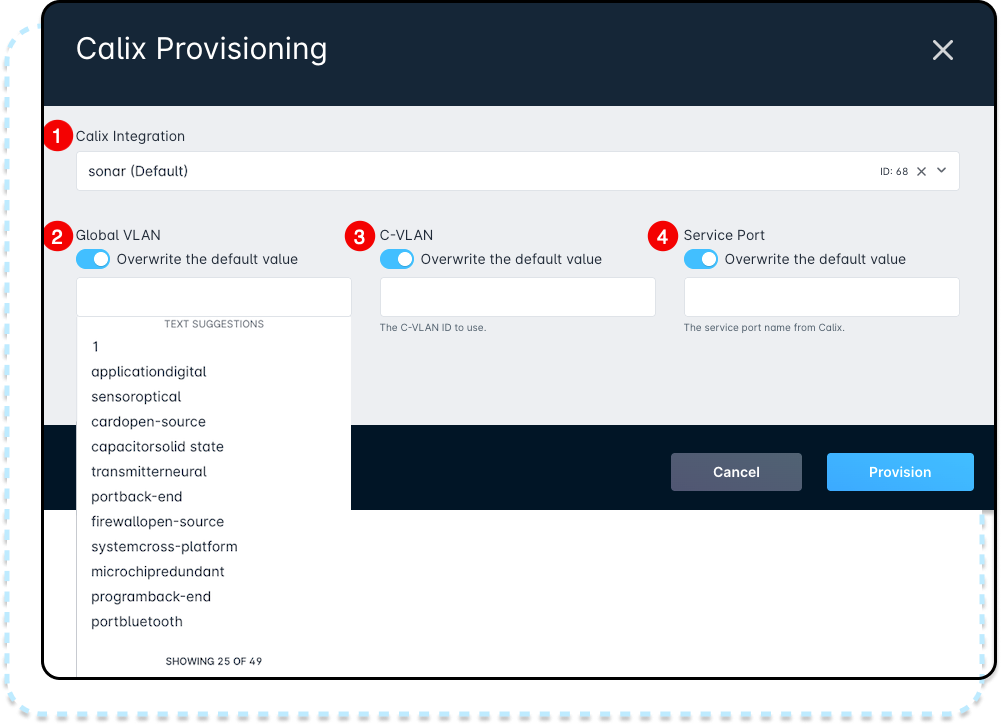
- The Calix Integration field appears when multiple Calix SMx integrations exist in your instance as part of a multi-company solution. This field provides a dropdown, used to select which SMx Integration will have the provisioning details added
- Global VLAN field gives you a dropdown box where you can choose from all the Global VLANs setup within your SMx.
- If you decide to override the default settings, it is important to note that you will need to check the override box within SMX next to the Global VLAN setting. If left unchecked, the provisioning override you select here in this modal will cause the provisioning to fail.
- C-VLAN field is set up for manual input of numbers only. If text is added, then the Provision button will fade out and won't allow for the provisions to be saved.
- Service Port field provides a dropdown box with the specific Service ports associated with the inventory model assigned to the account.
- If the inventory item is not assigned to the account at this time, this field will not provide a dropdown with the associated ports available.
Manually Adding or Editing Provisioning Details
If Automatically create Provisioning Details Record isn't enabled for your Calix SMx Integration, you will need to manually set the Provisioning details. Once added, the Provisioning details will become visible underneath the associated service.
Adding Provisioning for an associated service is done through the "Add Calix Provisioning Details" button, visible on any Data Service associated with the Calix SMx integration.

If provisioning has already been added to the service and you need to make adjustments, follow these steps:
- To make changes, select the Edit button.
- The Calix Provisioning modal will appear.
- Make the necessary adjustments and click Save.
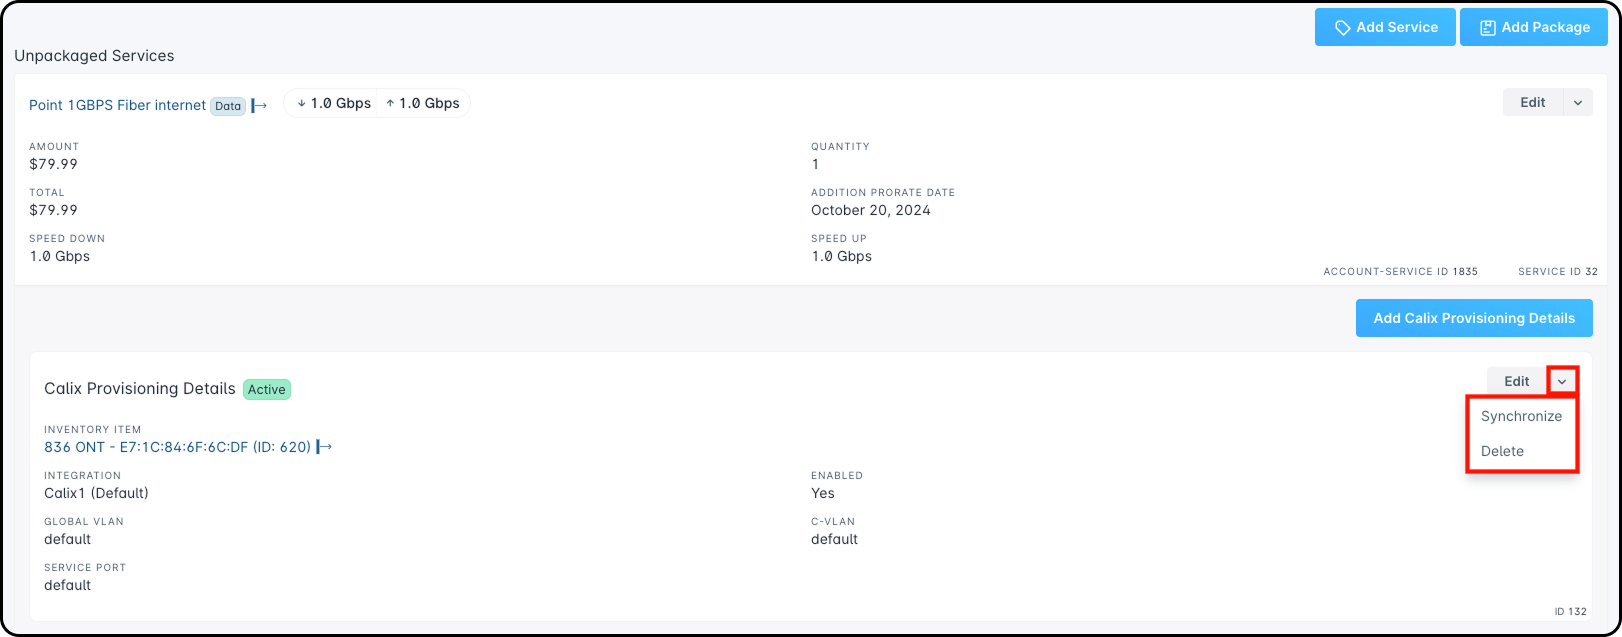
- To access additional options, select the dropdown arrow adjacent to the Edit button.
From this menu, you can choose one of the following actions:- Synchronize – Use this new option to synchronize the active Calix Provisioning Details record with SMx. This ensures the provisioning data stays up to date without manually deleting or re-adding it.
- Delete – Remove the current provisioning details from the service. Once deleted, you can select Add Provisioning Details to manually re-enter the necessary provisioning settings.Deleting the Provisioning Details record will result in service being removed in SMx.
Provisioning with Multiple SMx Integrations
Leveraging the multi-company potential of Sonar's SMx integration allows for additional refinement of your network management compared to having a single SMx server for all companies in your Sonar instance. While the integration creation process remains the same, providing a value for the company field does modify functionality in the background.
Automatic Provisioning
If Automatically create Provisioning Details Record is enabled for your company-specific Calix SMx server and the “Default” Calix SMx server, two provisioning records would be created. However, only the Company-specific integration will be active and receive provisioning details about the account.
Adding or Removing Company-Specific Integrations
If you're converting to, or moving away from, Company-Specific integrations, it's important to be aware of what will be affected. First, to ensure service continuity, it's important to have a Default Calix SMx integration. This Default integration would provision clients that aren't associated with the specific Company integrations in your instance, and if a Company-specific integration is removed, the Default integration will be in place to handle provisioning.
Deleting Provisioning and Fallback
Deleting the “Active” provisioning data from an account associated with a Company-specific SMx integration will remove the service from the associated SMx, the same as it would in a single-SMx instance. Additionally, in the event both a Company-specific and Default SMx integration exist in your Sonar instance, there is no automatic fallback to the Default provisioning. To use the Default provisioning SMx integration, the Company-specific integration would need to first be disabled.
However, the Default integration can still be configured manually, which would be used in the event the Company-Specific integration is disabled.
Monitoring your API Rate Usage
With the introduction of API Rate Limits in SMx 24.3, increasing your network size will also increase the traffic passing between your Sonar Instance and Calix SMx. For this reason, it's important to know where you can find the traffic details to facilitate monitoring.
- Log in to the SMx UI
- Click on “System” in the header
- Expand “System Details” on the left side
- Click on “Health”
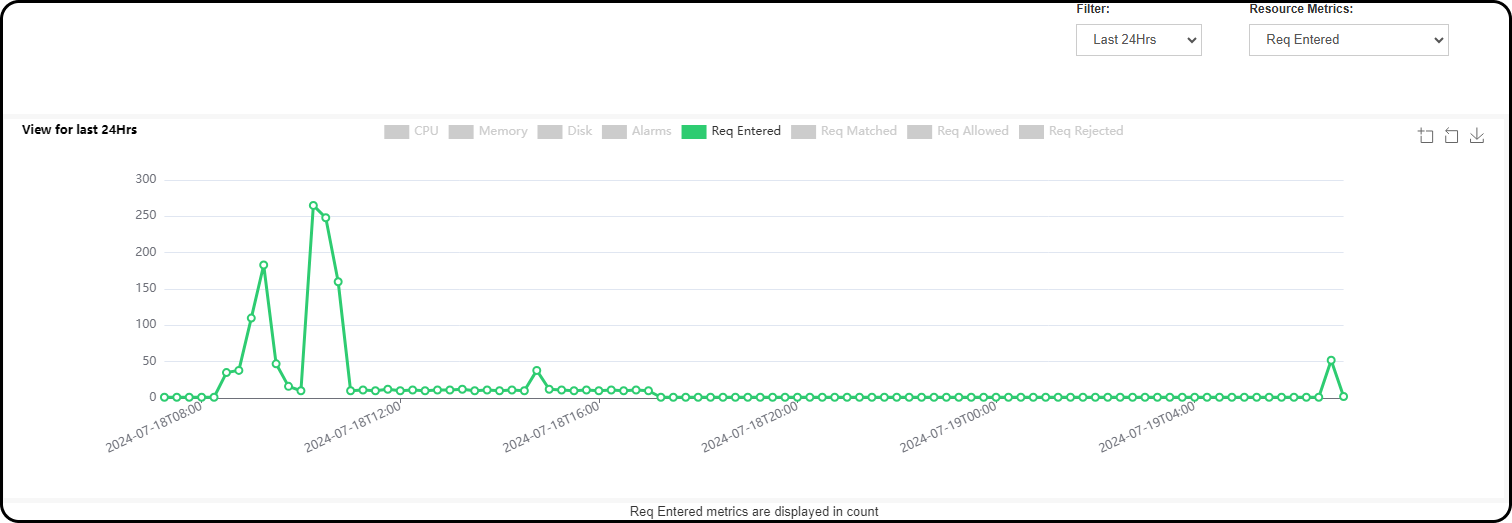
- Modify your filters. For the “Resource Metrics” option, you'll always want
Req Entered. For the Filter, it can vary depending on your requirements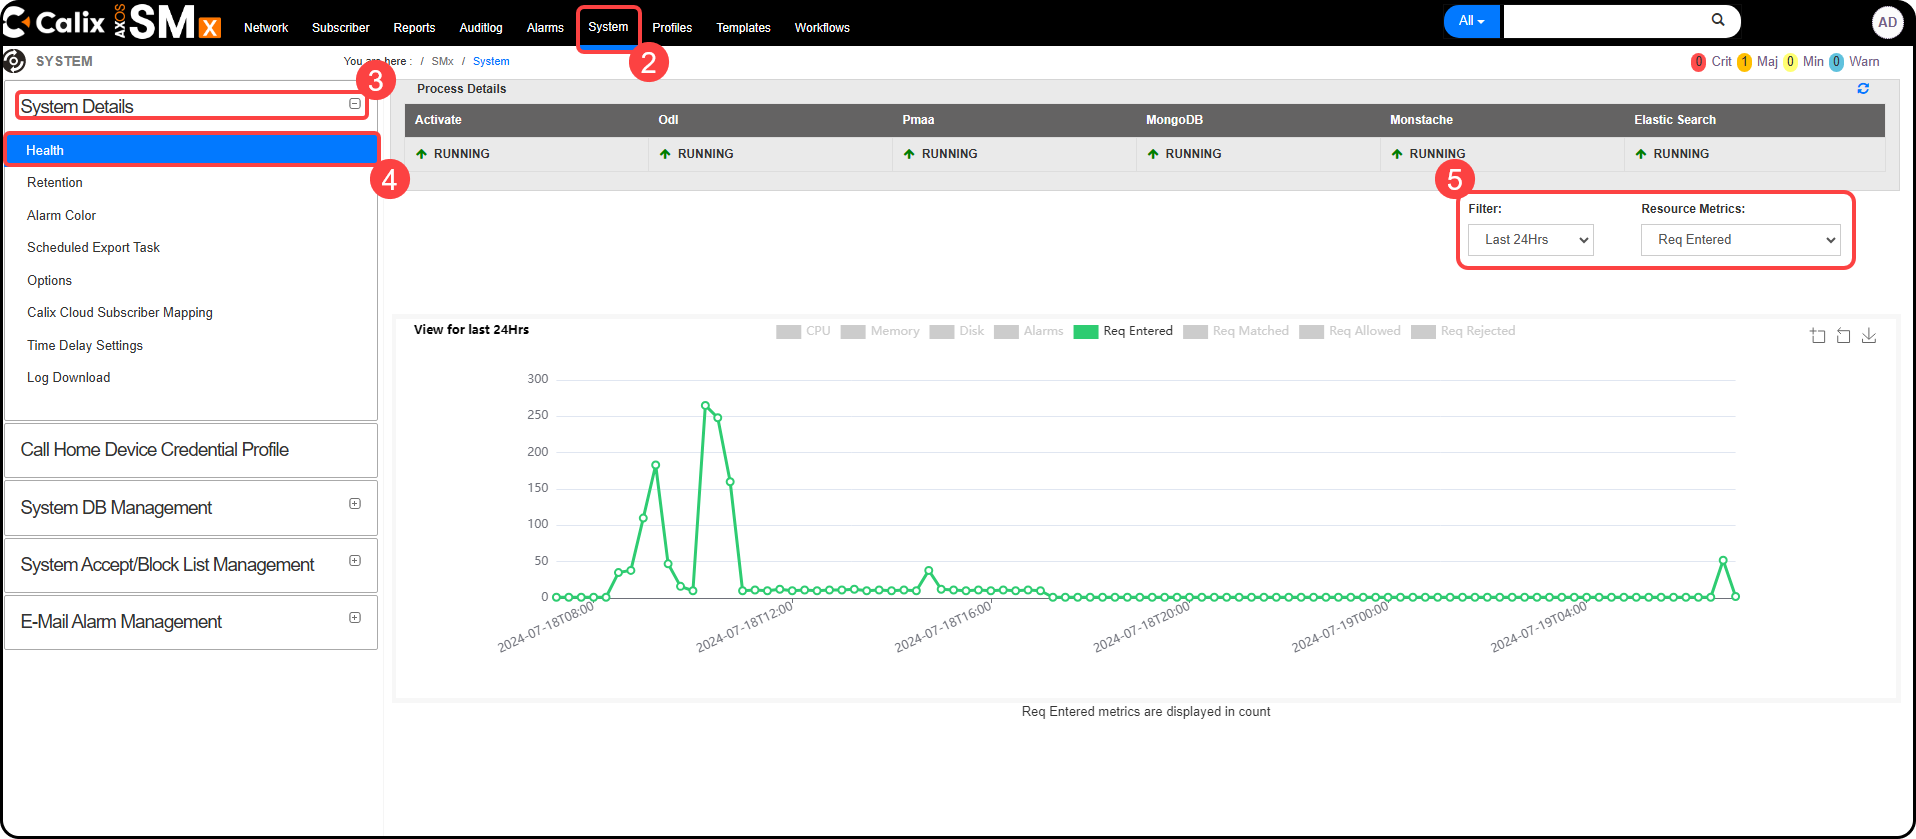
- The 24-Hour filter shows usage at 15 minute intervals, showcasing the last 24 hours. This provides a decent balance between overall usage and occasional spikes.
- The Hourly filter provides the same usage breakdown, showing requests at 15 minute intervals. This can provide a more precise look at the data transfer, but can miss some spikes, unless they occurred recently.
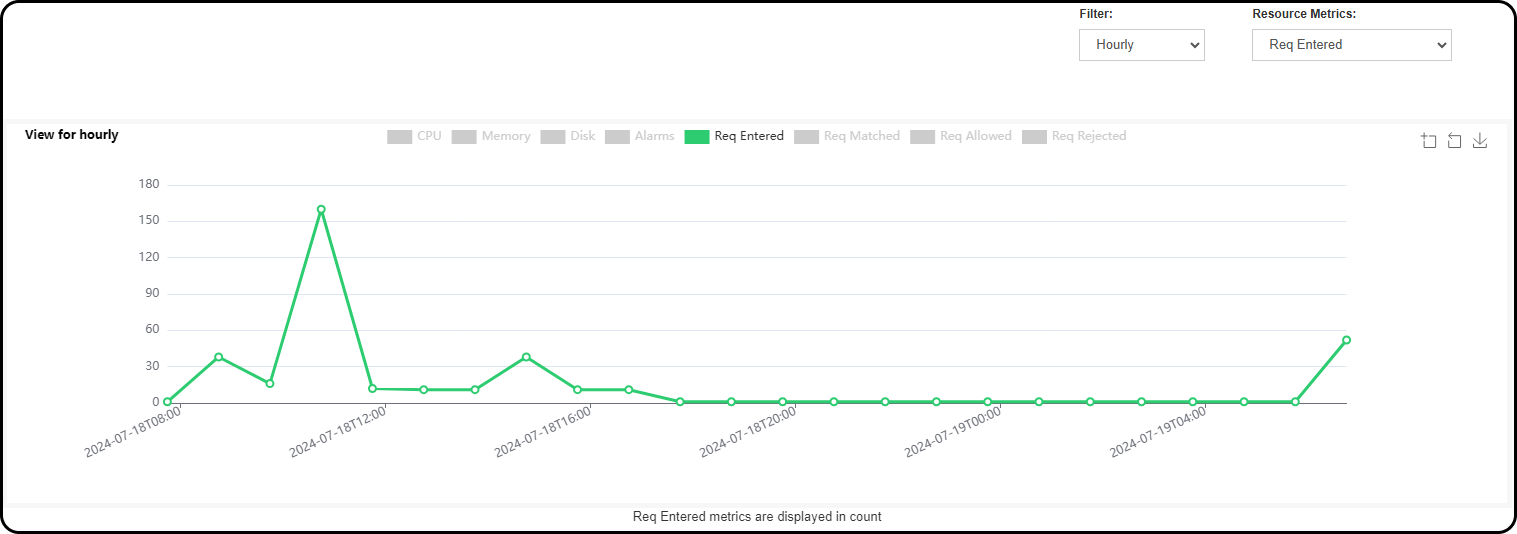
- Larger windows are available, but the wider the lens, the less precision there will be for individual spikes.
- The 24-Hour filter shows usage at 15 minute intervals, showcasing the last 24 hours. This provides a decent balance between overall usage and occasional spikes.