Table of Contents
Agreement Templates
 Updated
by Jennifer Trower
Updated
by Jennifer Trower
Read Time: 8 mins

Electronic agreements in Sonar help you collect customer signatures for important documents. You can use them for items like terms of service, acceptable use policies, or service confirmation forms.
Create an Agreement Template
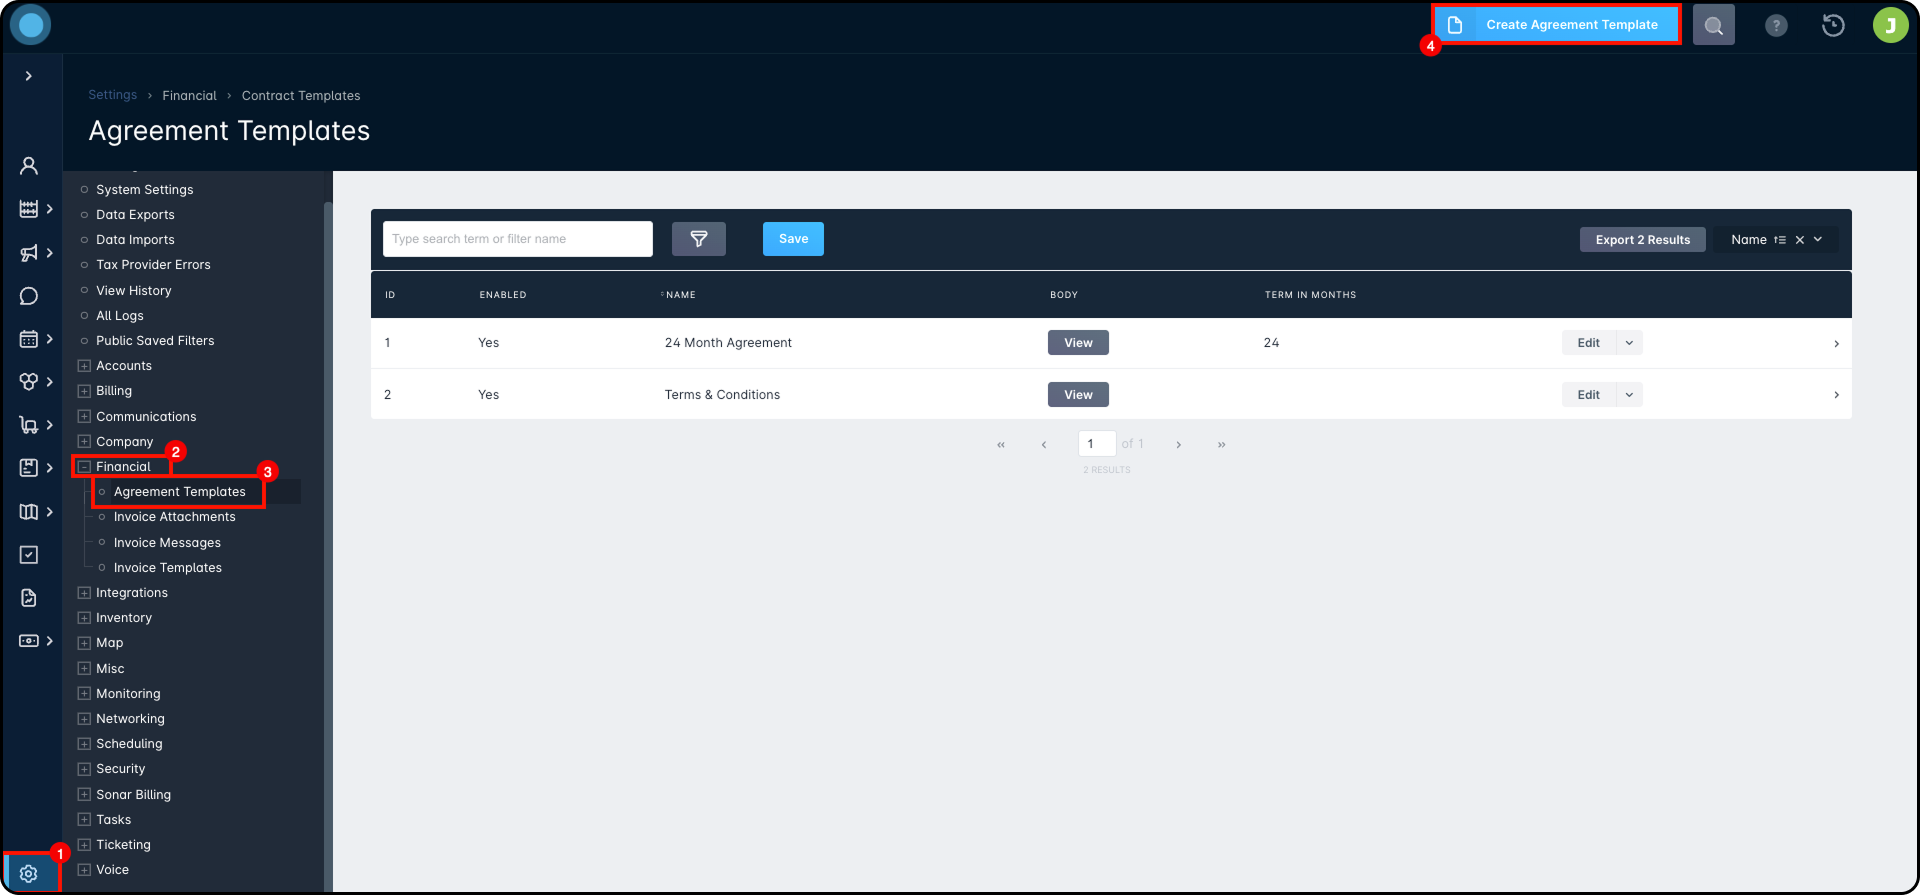
Agreement templates define the document a customer will sign. To create one, go to the Contract Templates page under Settings and click Create Contract Template.
When creating the template, you will use these fields:
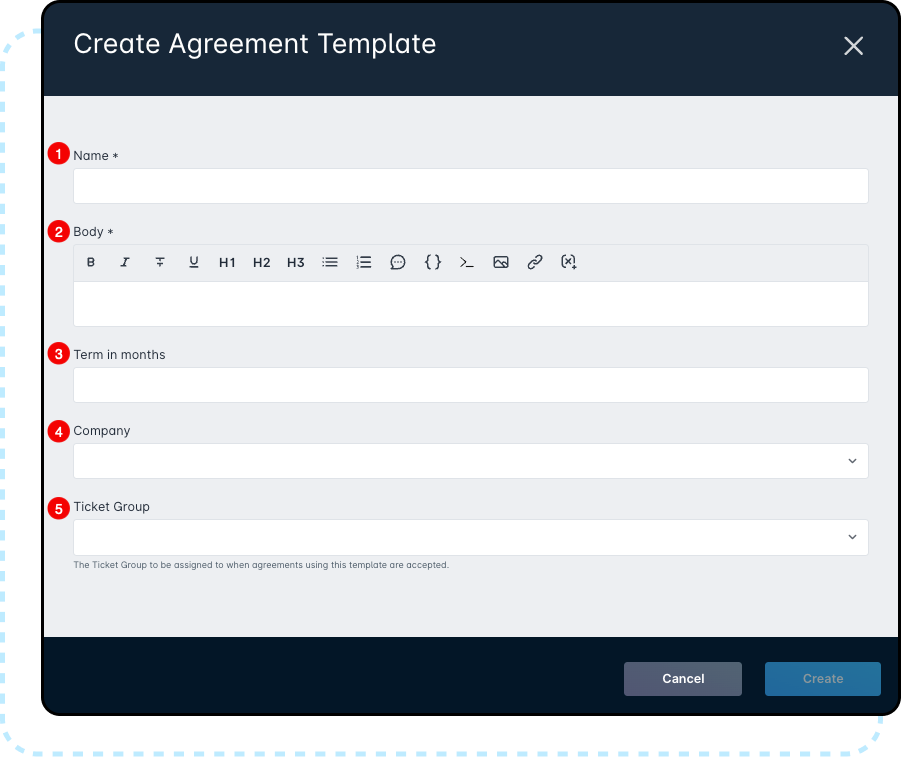
- Name: The name of the agreement shown to the customer.
- Body: The content of the agreement. You can use HTML formatting and variables. Variables are placeholders that fill in customer or account details when the agreement is sent.For more information on the tools available within the text editor, review the article on Sonar's Rich Text Editor here.
- Term in months: Sets how long the agreement lasts. The expiration date is based on the date the customer signs it.
- Company: Optional. Limits the template to accounts in a specific company.
- Ticket Group: Optional. Assigns a ticket group when agreements from this template are signed.
Agreement Template Table
After you create the template, it will appear in the templates table. From there, you can search, review, edit, disable, or delete templates. A template must stay enabled to be available when adding an agreement to an account.

The templates table includes the following details:
- Search/Filters: Helps you find templates.
- ID: The Sonar ID for the template.
- Enabled: Shows whether the template is available for use.
- Name: The template name shown to customers.
- Body: Lets you view the template content.
- Term in Months: Shows the agreement term, if one is set.
- Edit menu: Lets you edit or delete the template.If a template has already been used on a customer account, it cannot be deleted and must be disabled instead.
- Details Panel: Shows more information, including recent activity.
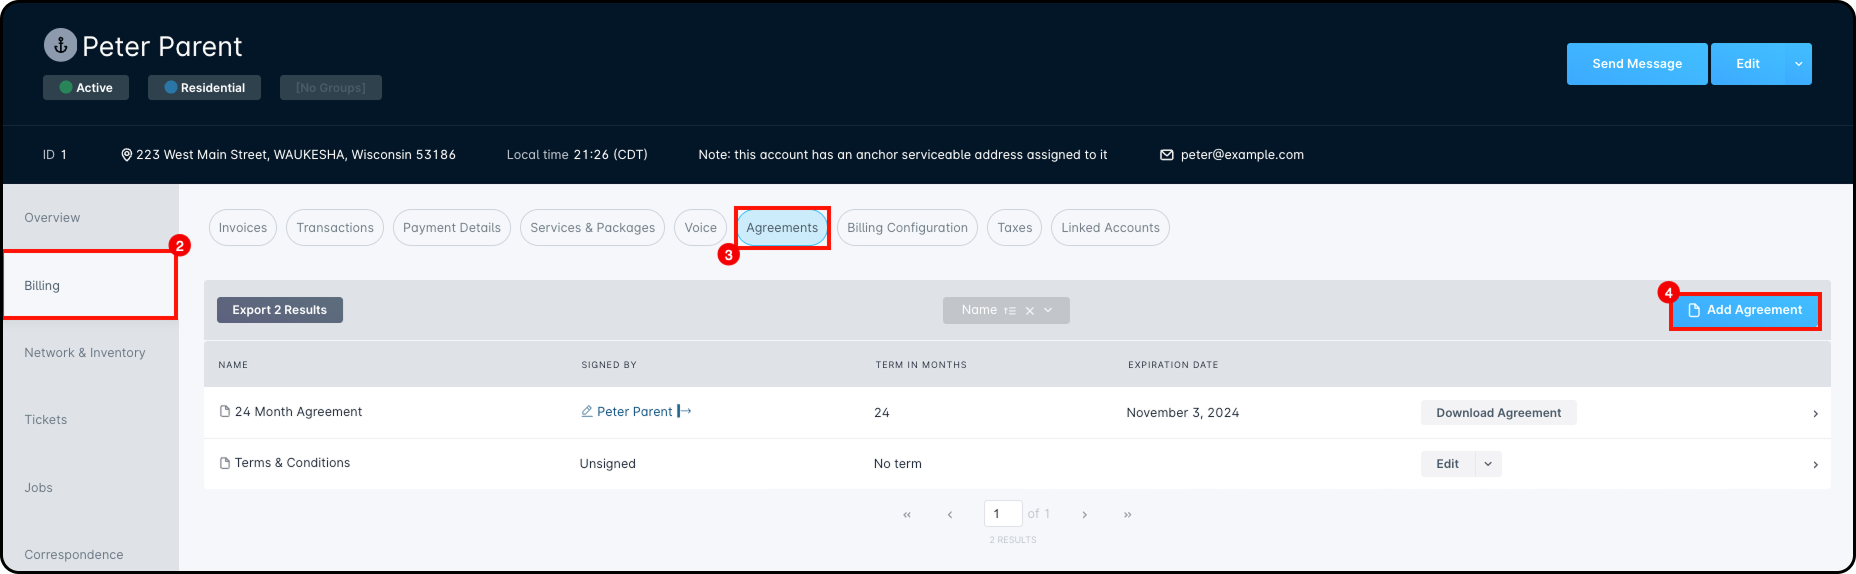
Add an Agreement to a Customer Account
Once the template is ready, you can add an agreement to a customer account.
- Open the customer account.
- Click the Billing tab.
- Click the Agreements sub-tab.
- Click Add Agreement.
In the Create Agreement window, complete these fields:
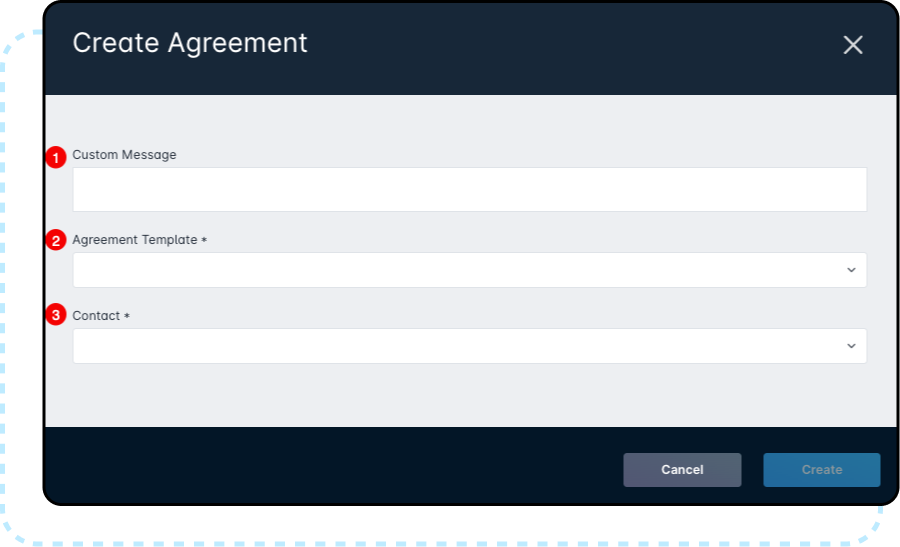
- Custom Message: Optional. Adds a message for the customer on the signing page.
- Agreement Template: Select the template the customer will sign.
- Contact: Select the contact responsible for signing the agreement.
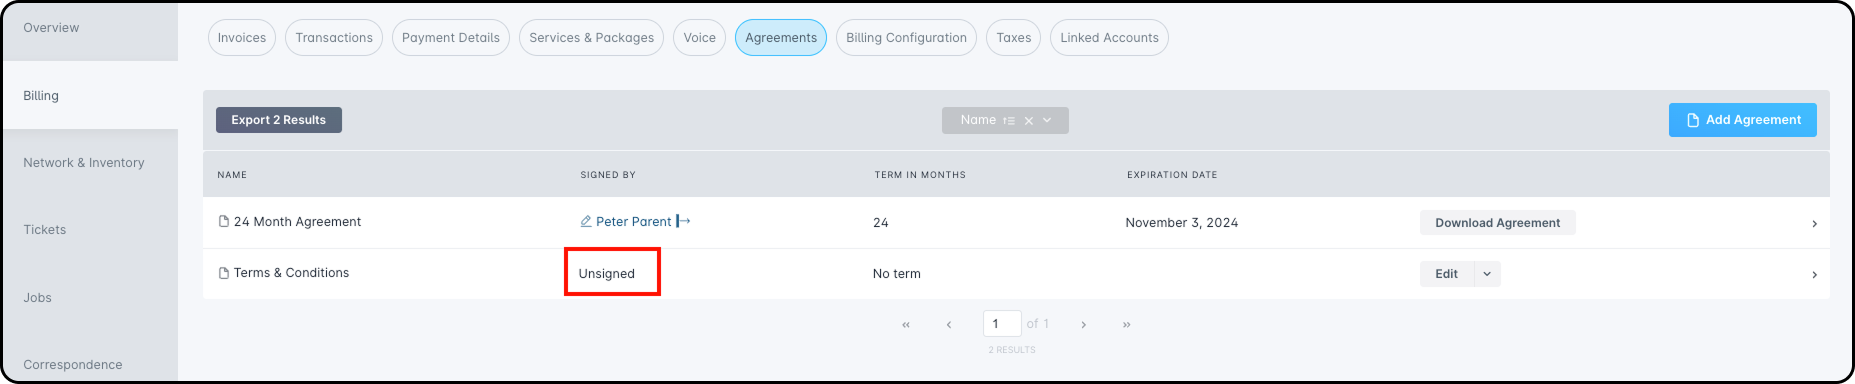
After the agreement is added, the selected contact immediately receives an email with a signing link. Until the agreement is signed, the Signed By column shows Unsigned.
How Customers Can Sign an Agreement
Customers can sign an agreement in three ways.
By Email Link
When an agreement is added to the account, the selected contact automatically receives an email with a link to sign it. This gives the customer direct access without needing extra instructions.
By Customer Portal
If the Customer Portal is enabled, customers can sign agreements there.
- Log in to the Customer Portal.
- Open the Agreements tab from the left menu.
- Review the agreement.
- Click Sign Agreement.

After the agreement is signed, the status updates, and the customer can download a copy.
By Technician in the Field
A technician can also collect a signature using the Sonar Field Tech app.
Workflow for the Field Tech App
2. Tap Account.
3. Scroll to the Agreement section.
4. Select the agreement to be signed.
5. Let the customer review the agreement.
6. Tap Sign Agreement.
7. Have the customer type their name and add their signature on the device.
After signing, the agreement shows as completed, and the signature is visible in both the main Sonar instance and the Field Tech app.
After an Agreement Is Signed
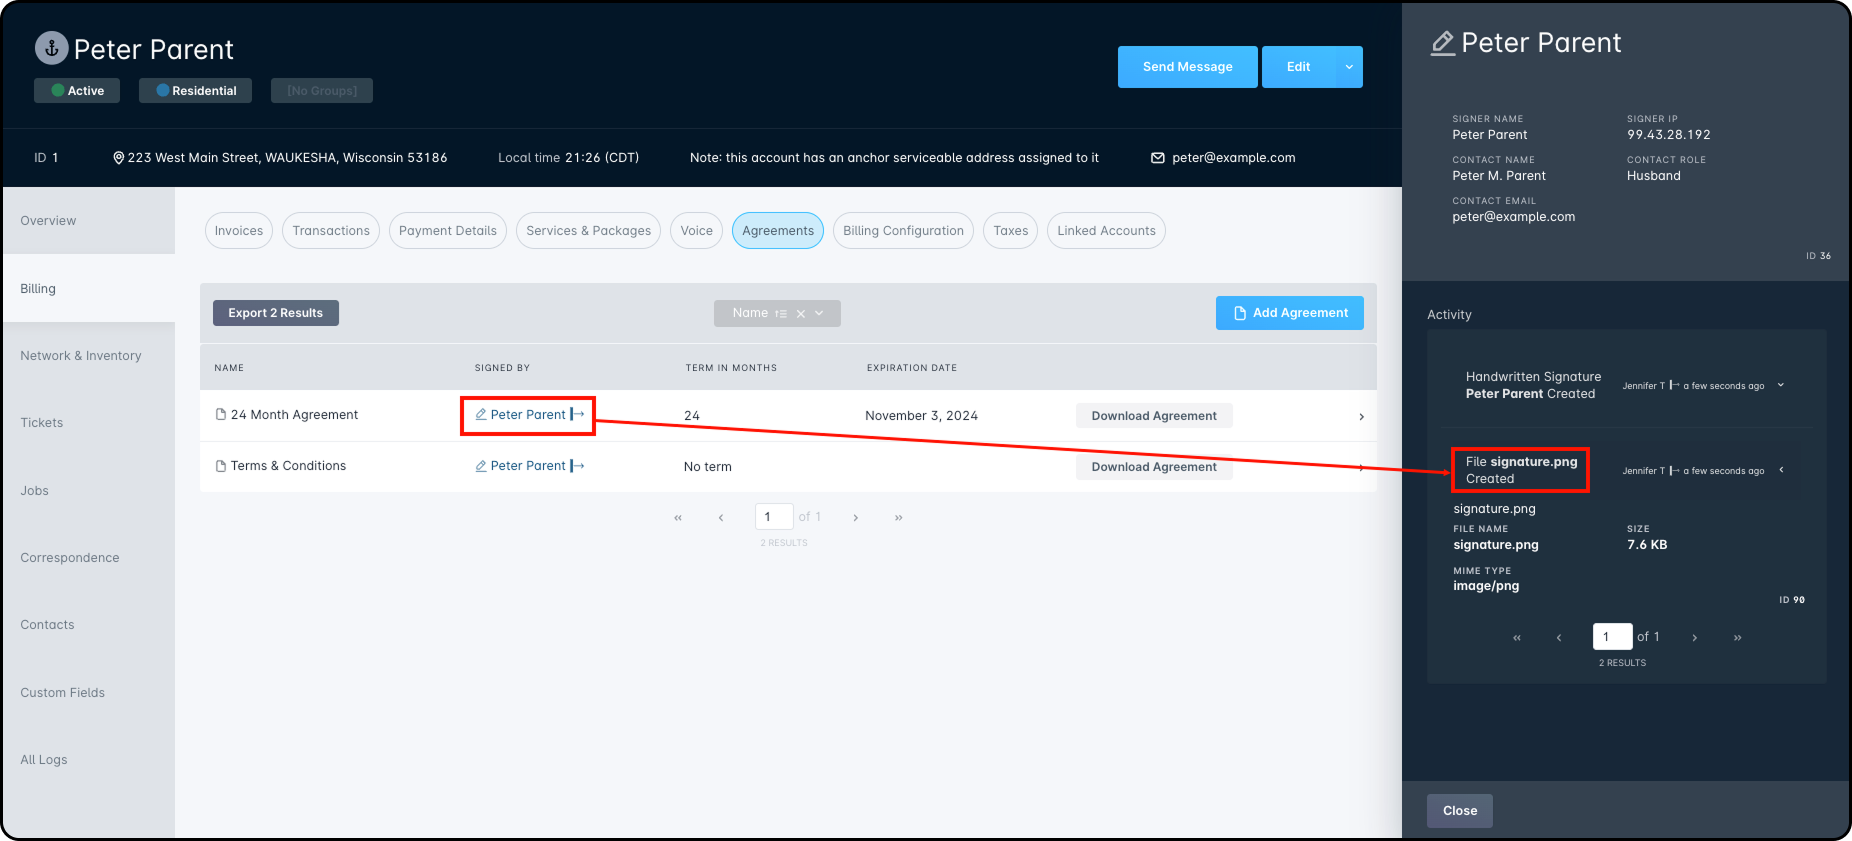
Once a customer signs an agreement, the Signed By column updates with the name entered during signing. If the agreement includes a term, the table will also display the agreement’s expiration date after it has been signed. At that point, the agreement can no longer be deleted, and the main available action is to download a copy.
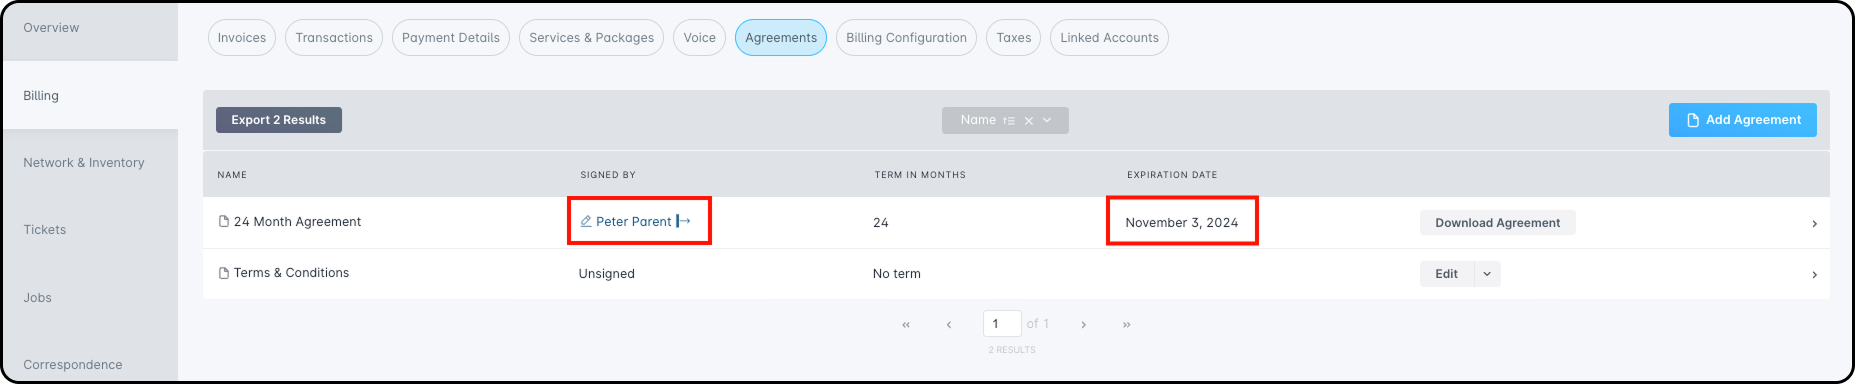
Clicking the signed name opens a sidebar with agreement details and activity history. You can also review the captured signature there.
Triggered Messages
Triggered Messages can send automatic notices during the agreement process. Two triggers are available:
- An agreement pending signature is emailed to a contact.
An example of the message subject and body would be:
Subject:Agreement awaiting your signature from *|COMPANY_NAME|*
Body:Hello,
An agreement from *|COMPANY_NAME|* is awaiting your signature. Please click here to sign it: *|AGREEMENT_SIGNING_URL|*
*|CUSTOM_MESSAGE|* - A signed agreement is emailed to a contact.
An example of the message subject and body would be:
Subject:Your agreement from *|COMPANY_NAME|* is now available to view.
Body:Hello *|CONTACT_NAME|*,
Please see your signed agreement here *|CUSTOMER_PORTAL_URL|*.
These messages can include variables such as company name, signing link, agreement name, customer portal URL, and custom message text.
Agreement Template Examples
Example templates are available in the source material for learning purposes. These include a service call sign-off and a terms of service agreement. They are examples only and are not intended for legal use.
Example #1: Service Call Satisfaction Sign Off
I, *|CONTACT_NAME|* agree that the service call performed on *|DATE|* has been completed to my satisfaction under this agreement.
Example #2: Terms of Service Agreement
The services provided by Example ISP are subject to the “Example ISP Terms of Service Agreement.” By signing this agreement, I/We confirm that I/We have read, understood, and accepted its terms and conditions. I/We understand that any violation of the “Example ISP Terms of Service Agreement” may result in the termination of my/our service connection.
Payment of Fees
I/We authorize Example ISP to charge my/our Credit Card or Bank Account each month for Internet service charges during the applicable billing period. Charges will be applied using the payment method listed on the attached Payment Authorization Document. If Example ISP is unable to process the monthly payment using the provided Credit Card or Bank Account, an administrative fee of $25.00 will apply. If I/We fail to meet the obligations outlined in this agreement, I/We agree to pay Example ISP all reasonable collection costs and legal fees related to unpaid charges, in addition to any other legal remedies available to Example ISP for losses or damages arising from my/our actions.
Term of Agreement
This Terms of Service Agreement becomes effective on the day after it is signed. Unless terminated earlier in accordance with this agreement, it will automatically renew on a month-to-month basis.
Termination of Agreement
I/We understand that either I/We or Example ISP may terminate this Terms of Service Agreement at any time. If this agreement is terminated by either party, I/We remain responsible for paying any outstanding balance and any charges incurred up to the date of termination.
Security
Example ISP is not responsible for any content, materials, or online activity encountered by you, your employees, or your family while using the internet. By signing this agreement, I/We release Example ISP from any claims, liabilities, losses, or indirect damages related to the use of services or equipment provided by Example ISP, including damage to hardware, software, files, or data.
Liability Release
I/We request that Example ISP install and maintain any equipment necessary to provide service. By allowing Example ISP or its technicians to enter my/our premises, and by signing this agreement, I/We release Example ISP from any claims, liabilities, losses, or damages arising directly or indirectly from installation work performed by Example ISP, as well as from the continued use of any services or equipment provided by Example ISP, including damage to my/our hardware, software, files, or data.
Equipment
All equipment provided by Example ISP will remain the property of Example ISP at all times unless otherwise stated in writing. I/We agree not to sell, transfer, lease, assign, mortgage, or otherwise place any claim, interest, or encumbrance on any part of the equipment. I/We further agree to pay Example ISP the full cost to repair or replace any equipment that is lost, stolen, not returned, damaged, sold, assigned, or otherwise encumbered, including any related labor costs. All equipment must remain at the listed service address and may only be used for the Example ISP Internet service to which I/We subscribe. I/We understand that up to a $400.00 guarantee has been provided for the assigned rental equipment, and that this amount may be charged in the event of loss, damage, or encumbrance of the equipment.
Authorization
I/We acknowledge that I/We have read and understood all terms and conditions contained in the “Example ISP Terms of Service Agreement.” I/We further represent and warrant that all persons whose signatures are required to sign this agreement have done so.