Table of Contents
Billing Settings
 Updated
by Mitchell Ivany
Read Time: 13 mins

In this article, we'll be reviewing the Billing Settings, looking through each section of the settings, and detailing what each field controls, as well as how this will affect the billing behavior of your Sonar instance.
First Time Setup
When signing in to your Sonar instance for the first time, you may be greeted by the initialization process. These sets of pages are designed to get your Sonar instance off the ground and cover the basic functionality of your instance. One of these pages deals with the configuration of your Billing Settings:

These parameters function identically to those contained in the instance, and each section exhibits the same behavior.


Billing Settings
The overall page of the Billing Settings is available by:
- Clicking on Settings
- Expanding the Billing category
- Clicking on Billing Settings

Proration
Proration in Sonar calculates the difference between the current amount paid and the new amount due through the days that have gone by in the month. The Proration check-boxes in Billing Settings will determine whether these boxes are checked by default when changing customer accounts.

- The Prorate Services checkbox allows you to edit customer services mid-bill cycle and adjust the pricing as the change is made.
- The Prorate Service Quantity checkbox allows you to add additional amounts of an identical service to a customer account while only billing them for the time left in the billing cycle.
- The Prorate Account Status Change checkbox allows you to make account changes on a customer's account, such as canceling a customer account, and the remaining bill amount will automatically be refunded to the account's payment method.If an account is set to have activation day billing as well as an initial invoice generated upon activation (the “Generate Invoice on Account when First Activated” field is enabled under Settings menu → Billing → Billing Settings), you will also need to have the “Prorate Account Status Change” field enabled (under Settings menu → Billing → Billing Settings).
If the other settings are in place but the “Prorate Account Status Change” field is not enabled, the invoice will not be generated until the next billing period. - The Prorate Account Delinquency Status Change checkbox allows you to control whether the account is prorated by default when the Delinquency Status becomes active, then returns to inactive on an account.Within Billing Defaults, if an account is enabled with the “Move accounts into another status after being delinquent for a preset period” option, and moves between an 'active' and 'inactive' status, then having this box checked will by default prorate going into Delinquency and coming out of Delinquency (Active → Inactive, Inactive → Active).

- The Prorate Billing Day Change checkbox allows you to prorate any amount due as a result of a change in billing day, made through either customer request or for company requirements – such as migrating all customers to a first of the month billing cycle.
- The Round Prorated Amounts checkbox allows you to configure round dollar amounts, either to the nearest cent or dollar, depending on your company's preferences.
General Accounting
The General Accounting section of the Billing Settings allows you to control the limitations of the accounting period, controlling when the instance checks due invoices for delinquency, and whether to use daily billing.
The accounting period being closed determines the cutoff point where you can no longer delete payments made, allowing you to reconcile the transactions in accounting software.

Accounting Period options
The Accounting Period is divided into two portions – Accounting Period Close Date and Accounting Period Auto Close.
- The Accounting Period Close Date allows you to manually set a specific date to close the accounting period, useful for situations where an outside accounting firm does the finances on a set date every month.
- The Accounting Period Auto Close allows you to set a repeating time to close the accounting period, useful for an accountant on staff who frequently does the books.
Implications of closing the accounting period
Most accounting in Sonar requires that changes to existing transactions be performed by applying adjustments to rectify any errors. You cannot typically edit or delete any transactions. The exceptions to this are reversing an invoice credit and reversing a discount. When you attempt to reverse a discount transaction or reverse an invoice credit and the accounting period is not closed, the transaction will be zeroed and marked as void. This is because, in an unclosed period, these transactions have not yet affected your financial reporting.
However, if the accounting period is closed, you cannot reverse an invoice credit, and reversing a discount will create a corresponding debit transaction with the current date, rather than zeroing the transaction.
For this reason, it is recommended to close your accounting period at the end of every day when you enter your data into accounting software. This allows you to rectify small errors made the day they are made, but forces a reconciliation if they are modified on the following days.
Days to Check Delinquency
Working hand in hand with the Billing Defaults described further down, unchecking these boxes will disable the delinquency check on those days, designed to prevent calls due to disconnected accounts.
Daily Billing
Daily Billing will run at 12:05 AM local to your instance's time zone and automates the following actions in your Sonar instance:
- Automatic invoice generation
- Automatic invoice emailing
- Automatic service billing (debits & credits)
- Automatic payment application
Always Round Taxes Up
When toggled OFF: Taxes will round to the nearest two decimals, e.g., $15.136 becomes $15.14 while $15.132 would become $15.13.
When toggled ON: The value will always round up, e.g., $15.136 still becomes $15.14, as does $15.132.
Payment & Card Management
In this section of the Billing Settings, you can configure parameters related to the payment card as configured on the customer account. This section also determines the Autopay attempts, minimum credit card payments, and the minimum amount which will be charged to the associated credit card.

- Delete Expired Credit Cards: Enabling this option prompts credit cards that expire to be removed from the account and thus unable to be used for payments.For credit cards created using sonarPay, when enabled, the card will also be deleted if it has been marked as closed or invalid.
- Autopay Runs Entire Amount Due: Enabling this option means that any amount due on an account is included in autopay; this includes any delinquencies and added transactions atop the typical bill amount.
- Generate Invoice On Initial Activation Of Account: Enabling this option will prompt an invoice to be created the moment an account is moved to an active status for the first time.
- Run Autopay On Account Activation Invoice: Enabling this option will prompt autopay to run on the invoice created the moment an account is moved to an active status for the first time.This option is only available if you have the
Generate Invoice On Initial Activation Of Accountoption enabled. If this box is not checked, then you will no longer see this option available.
- Account Activation Invoice Autopay Days: The number entered here into this field will indicate when you want autopay to run on the account activated invoice. For example, if you select 0, then autopay will run on the same day the invoice is generated. If you select 1, autopay will run the day after the invoice is generated.
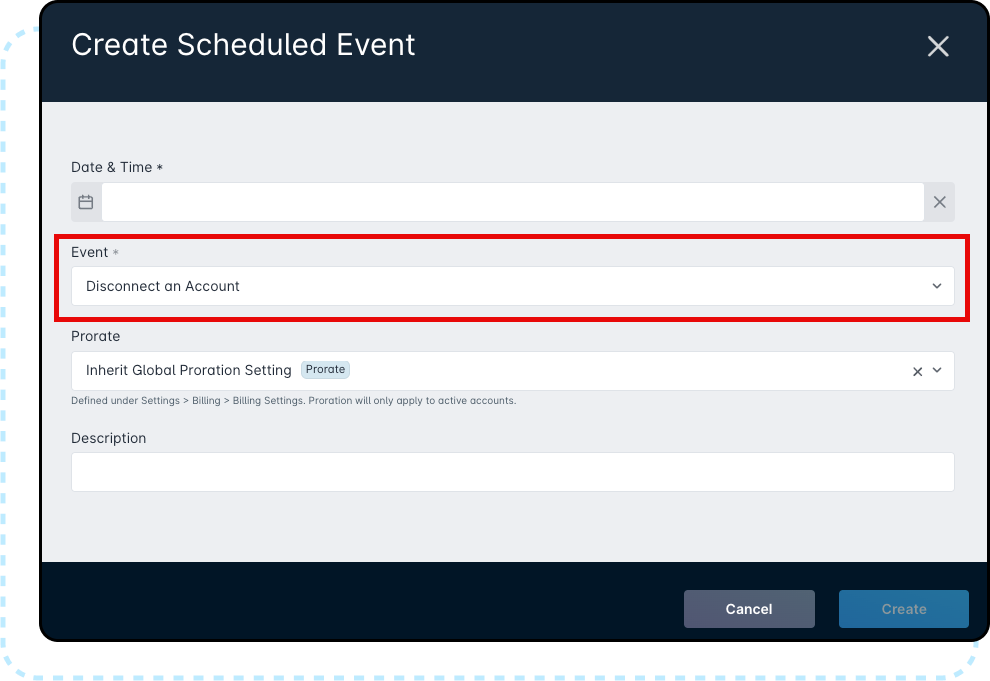
- Run Autopay On Disconnect Invoice: Enabling this option will prompt autopay to run on the final invoice created the moment an account is “Disconnected”.There are 3 ways to accomplish an account Disconnect within your instance.
1. From the Account itself, by navigating to the Edit Drop Down → Disconnect.
2. By using Scheduled Events to schedule the Disconnect of an Account.
3. Once a Job is completed, that has the setting on to “Disconnects Account” upon completion of the job. Moving an Account from an Active → Inactive status will not initiate this option to run. The Account must be “Disconnected” for this option to work.
 - Account Disconnect Invoice Autopay Days: The number entered here into this field will indicate when you want autopay to run on the account disconnect invoice. For example, if you select 0, then autopay will run on the same day the account is disconnected and the invoice is generated. If you select 1, autopay will run the day after the invoice is generated.
- Credit Card Payment: The number entered here is the minimum amount needed to process a credit card payment. In the event an invoice is generated with a value less than the amount entered, it will remain unpaid until the next cycle.
- Minimum Bank Account Payment: Similar to the minimum credit card payment above, this would also allow you to control the amount needed to process a bank account payment.
- Minimum Amount Due For Delinquency: This field allows you to set the minimum amount left on an invoice to be considered delinquent. For example, you may wish to forgo flagging accounts as delinquent if the amount is less than $5. This amount should consider the minimum set for both credit card and bank account payments, so customers are not moved into a delinquent status due to parameters set by your company.
- Autopay Credit Card Attempts: The number you enter into this field will dictate how often a credit card is attempted before the payment is considered declined.
- Autopay Credit Card Retry Interval In Days: This field allows you to control when you retry a credit card payment in the event it declines on the initial attempt; this works with the credit card attempts field.
- Autopay Bank Account Attempts: The number you enter into this field will dictate how many times a credit card is attempted before the payment is considered declined.
- Autopay Bank Account Retry Interval In Days: This field allows you to control when you retry a bank account payment in the event it declines on the initial attempt; this works with the bank account attempts field.
Additional Management
The remaining options available within Billing Settings deal with the invoice itself, the management of fees automatically charged to customers, and controlling the account status once an account is disconnected from the network.

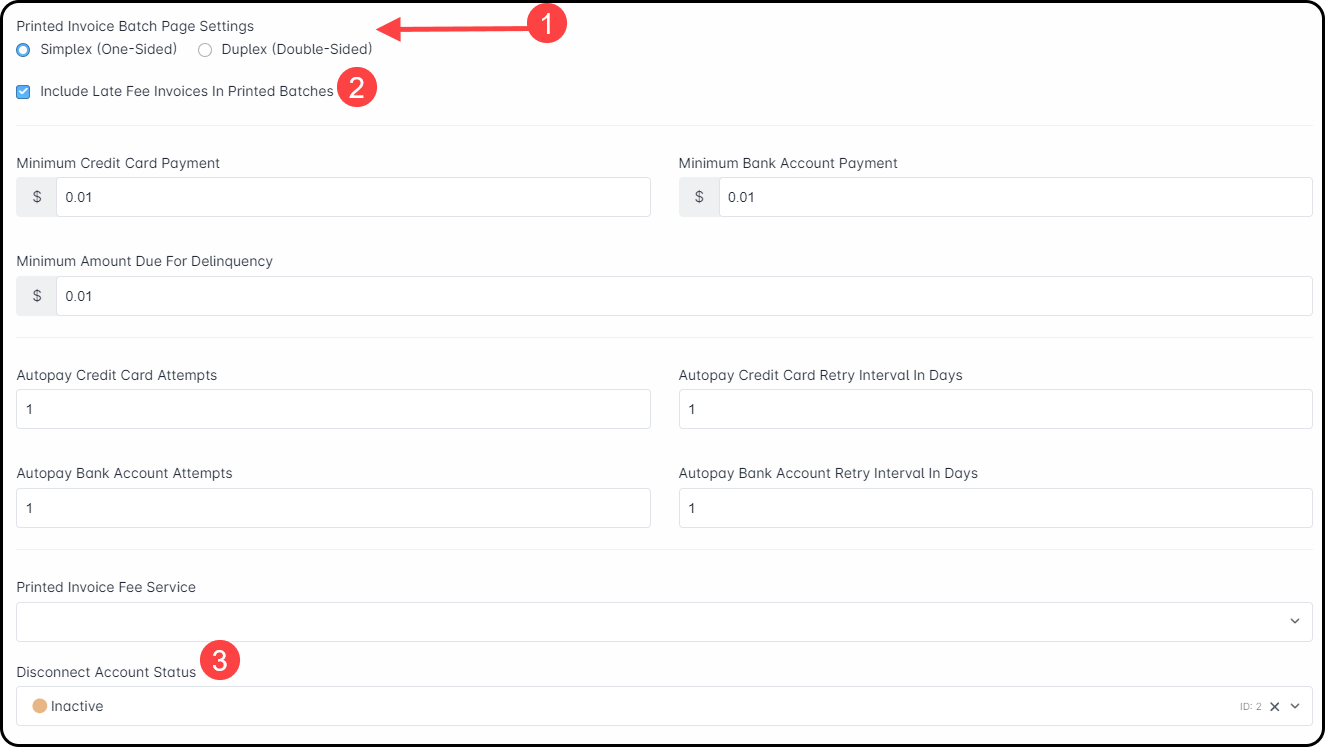
- The options below Printed Invoice Batch Page Settings allow you to control whether invoice batches are printed as simplex (one-sided) or duplex (double-sided).To continue reading about Printed Invoice Batches, click here.
- The Include Late Fee Invoices in Printed Batches option will send invoices generated as a result of Late Fees to the Print Invoice and Print to Mail batches. This applies when Invoice and Email Late Fees Immediately is also enabled.
- The Disconnect Account Status dropdown allows you to set a global default for what status accounts should switch to after being disconnected. For more information on account disconnection, review our Disconnecting an Account article.
Printed Invoice Fee Service

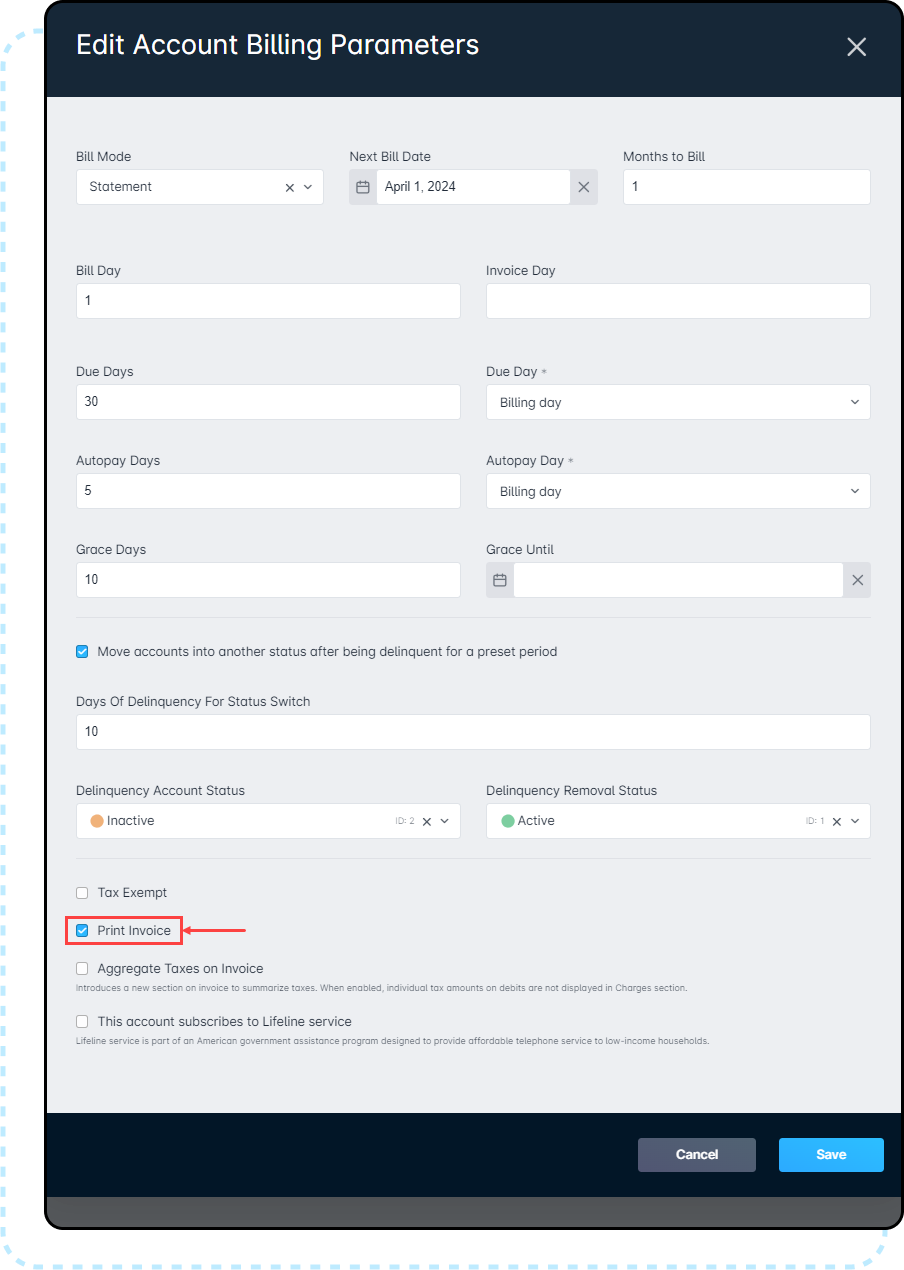
The Printed Invoice Fee Service dropdown allows you to apply a debit to customer accounts when they choose to receive a paper invoice or statement. This service will get applied whenever an invoice for the account is batched, and we have an article on Invoice Batching you can review for more information.

Late Fees
The Late Fees configuration portion of the Billing Settings page is enabled by checking the “Apply Late Fees” checkbox, located near the bottom of the page:

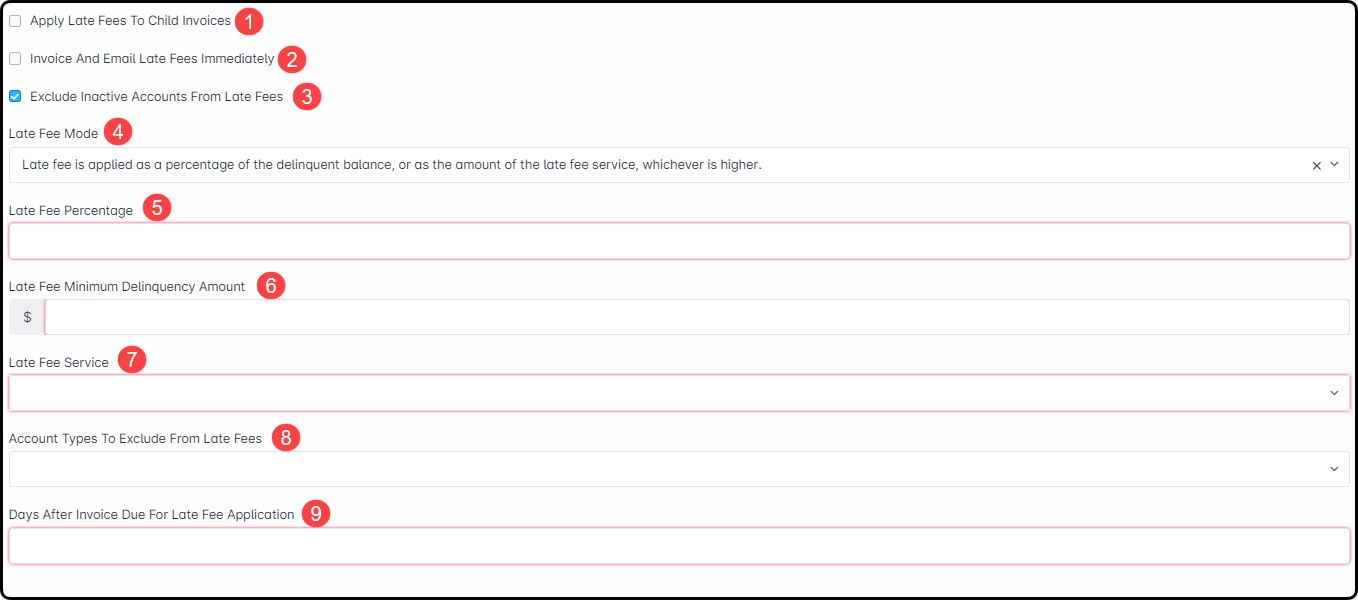
Once that box is checked, several options will appear:

- The Apply Late Fees to Child Invoices checkbox will apply only to accounts in a Parent/Child structure and will Apply Late Fees to the Child invoices in addition to Parent invoices when the payment due date is missed. For more information on Parent and Child account relationships, please refer to the Child Accounts: Best Practices & How Tos article.
- The Invoice and Email Late Fees Immediately checkbox determines how Late Fees are handled. If this box is unchecked, Late Fees will be added as a transaction on the account and invoiced in the next service period. If checked, an invoice would be created immediately and emailed to the customer for immediate notification.Invoices generated by Late Fees will have their due date set to the very next day, but will never themselves incur additional late fees.
- The Exclude Inactive Accounts from Late Fees option will allow the system to ignore any accounts which have already been deactivated and have an amount owing.
- The Late Fee Mode dropdown allows you to select from two options for applying late fees:
- Late Fee is applied as a fixed charge, based on the amount associated with the late fee service
- Late Fee is applied as a percentage of the delinquent balance, or as the amount of the late fee service, whichever is higher
- The Late Fee Percentage field will only appear if the Late Fee Mode is set to “Late Fee is applied as a percentage of the delinquent balance, or as the amount of the late fee service, whichever is higher” and allows you to determine the percentage of the invoice amount to be charged as a late fee.
- The Late Fee Minimum Delinquency Amount allows you to set a minimum amount on an invoice before charging the Late Fee. This is useful if you'd like to avoid charging late fees on invoices generated by small fees, such as service change or vacation mode fees.
- The Late Fee Service allows you to set a created Late Fee Service, which will be applied as a debit on the customer's account when the invoice becomes past due. For more information on Services and how to create them, please review the Services: Overview article.
- The Account Types to Exclude from Late Fees dropdown allows you to select one or multiple account types which will be excluded from the late fee parameters configured here.
- The Days After Invoice Due for Late Fee Application allows you to set when the Late Fee is applied to the invoice and is separate from any billing parameters apart from the due date configured as a Billing Default.

