Table of Contents
Avalara: Overview & Setup
 Updated
by Kristen Fiddes
Updated
by Kristen Fiddes
Read Time: 9 mins
What is Avalara?
Avalara helps automate all of your tax compliance within Sonar. It's a tax automation tool for businesses that automatically calculates in real-time tax calculation and automatic returns filing.
Avalara Basic Explanation Video: https://youtu.be/rEyXbf7gGSM
Avalara API documentation: https://developer.avalara.com/communications/dev-guide_rest_v2/reference/
Avalara Determine Taxes: https://knowledge.avalara.com/bundle/qvv1656594440497/page/determine_taxes.html
Why Would You Want to Use Avalara?
While Sonar does offer the capability to calculate and manage taxes within your instance, this could quickly become a very involved and manual process due to ever-changing tax jurisdictions.
It’s still your responsibility to keep up with the ever-changing tax jurisdictions across the various countries and regions where you offer service to customers. Anytime one of those tax jurisdictions makes a change, you’re responsible for updating it within your instance to stay compliant. As your company grows and expands coverage, it can become a hassle to keep track of everything while remaining compliant, and manual tax compliance can cost your business thousands of dollars in time and effort.
Avalara makes it easy to stay compliant, no matter how big or small your company is. Their platform works on a global scale to keep track of tax rates and taxability rules for millions of products and services in real-time for more than 12,000 tax jurisdictions.
However, calculating taxes is just one part of the equation. You are also required to file and remit payments back to the proper jurisdictions by individual deadlines – Avalara handles and automates this part of the process as well.
How Much Does Avalara Cost?
Avalara operates on a volume-based pricing model designed to scale with your business. For more information on pricing and plans offered by Avalara, check out their Products & Pricing FAQ.
How to Configure Avalara in Your Instance
If you have your “Accounting Period Auto Close” set to “Never close the accounting period automatically” and are manually closing the accounting period, this will prevent Avalara from processing.
The steps needed to implement Avalara in your instance are outlined further below.
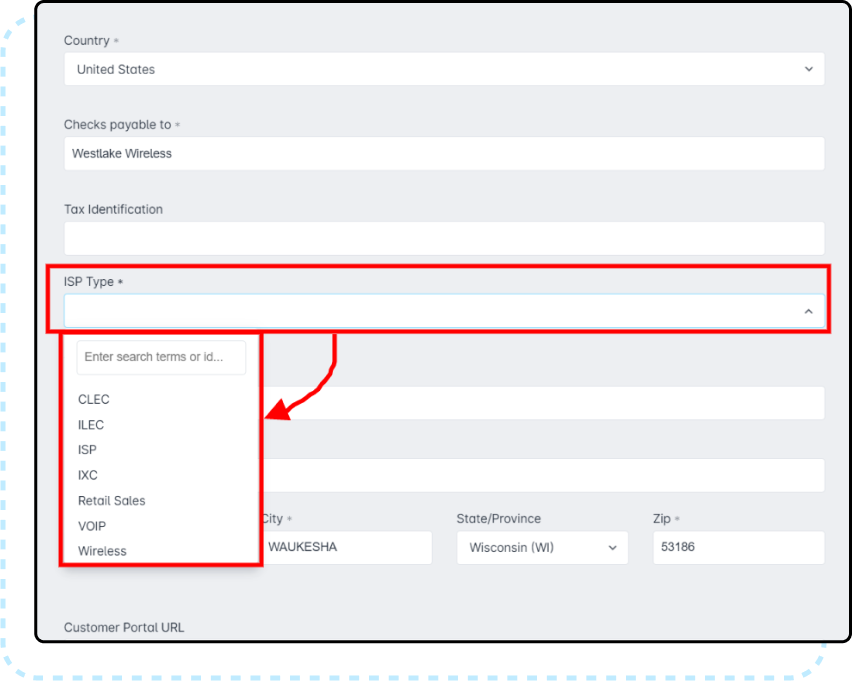
How to Apply Avalara to Companies
Whether you have a single company configured in your instance or multiple, you will need to set the ISP Type for each using Avalara. The type should match whatever is defined with your Avalara account.
- Navigate to Settings → Companies.
- Click on the Edit button alongside the applicable company title.
- In the new modal, locate ISP Type and use the dropdown below it to select the type.
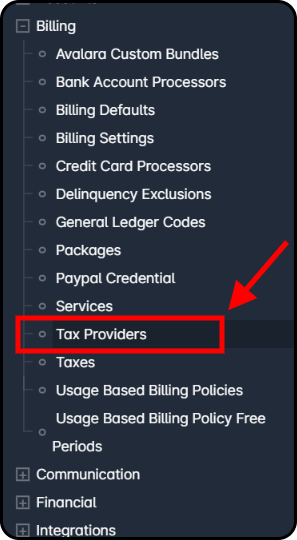
How to Add Avalara as a Tax Provider
Navigate to Settings → Billing → Tax Providers and then click on Create Tax Calculation Method.
The Create Tax Calculation Method window will then appear, where you'll need to fill out the tax calculation method information. An overview of this window and the fields contained within it is provided below.
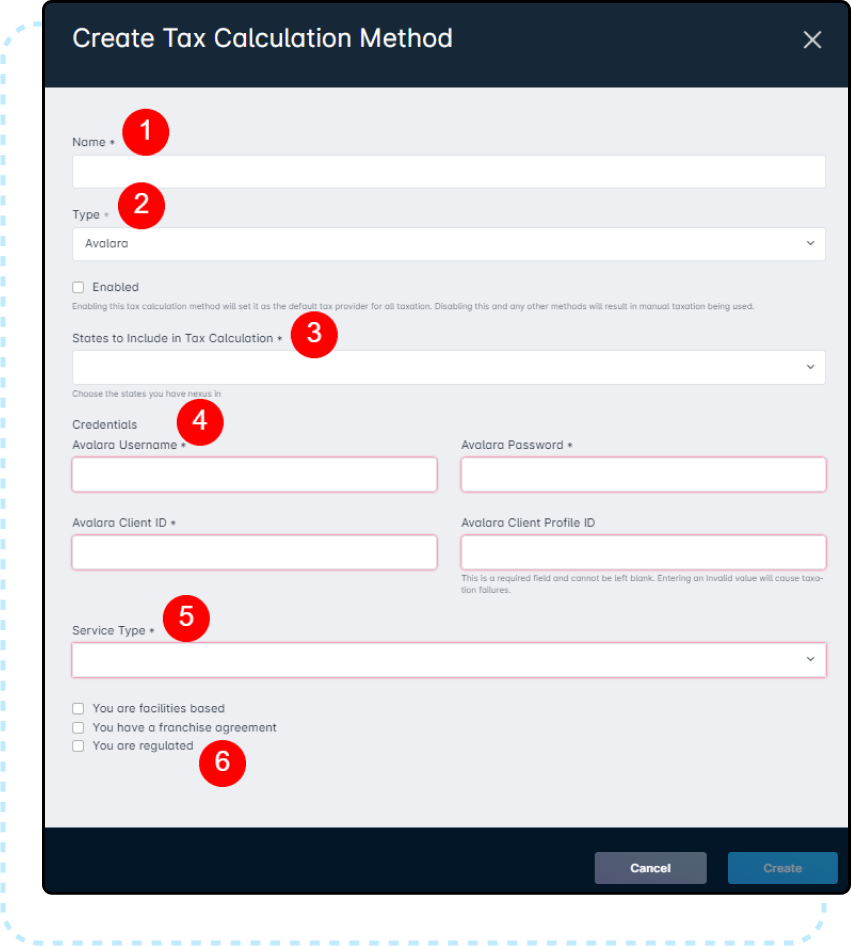
- If you have multiple tax options set up in your instance, the Name will help distinguish them when you're tying services to a Tax Type.
- The Type field is where you'll select Avalara, and if the intent is for this to become the default method within your instance, then you would also check the “Enabled” box.
- Selecting States to Include in Tax Calculation provides a dropdown where you will select all applicable states.
- The fields below Credentials are where your Avalara credentials are to be input – these would be the same credentials you use to access Avalara's login page.
- The credential validation will not check the Avalara Client ID or Avalara Profile ID within Sonar.The Avalara Client ID field cannot be left empty. Contact Avalara to get the value necessary to input into this field. Providing the wrong value in this field will cause the API tax to fail/no taxes generated.
- The credential validation will not check the Avalara Client ID or Avalara Profile ID within Sonar.
- The two options available in the dropdown for Service Type are “Primarily Local” and “Primarily Long Distance” – here you would select whichever you were directed to use by Avalara.
- The checkboxes alongside You are facilities based, You have a franchise agreement, and You are regulated are to be used as directed by Avalara.
How to Apply Avalara to Services
Each service you intend to use with Avalara needs to be configured individually – this can be done as you create a new service or when editing an existing service.
- Navigate to Settings → Billing → Services.
- Open the modal by clicking Edit Service alongside the service (or by using the creation button at the top of the modal, if you are creating a new service).
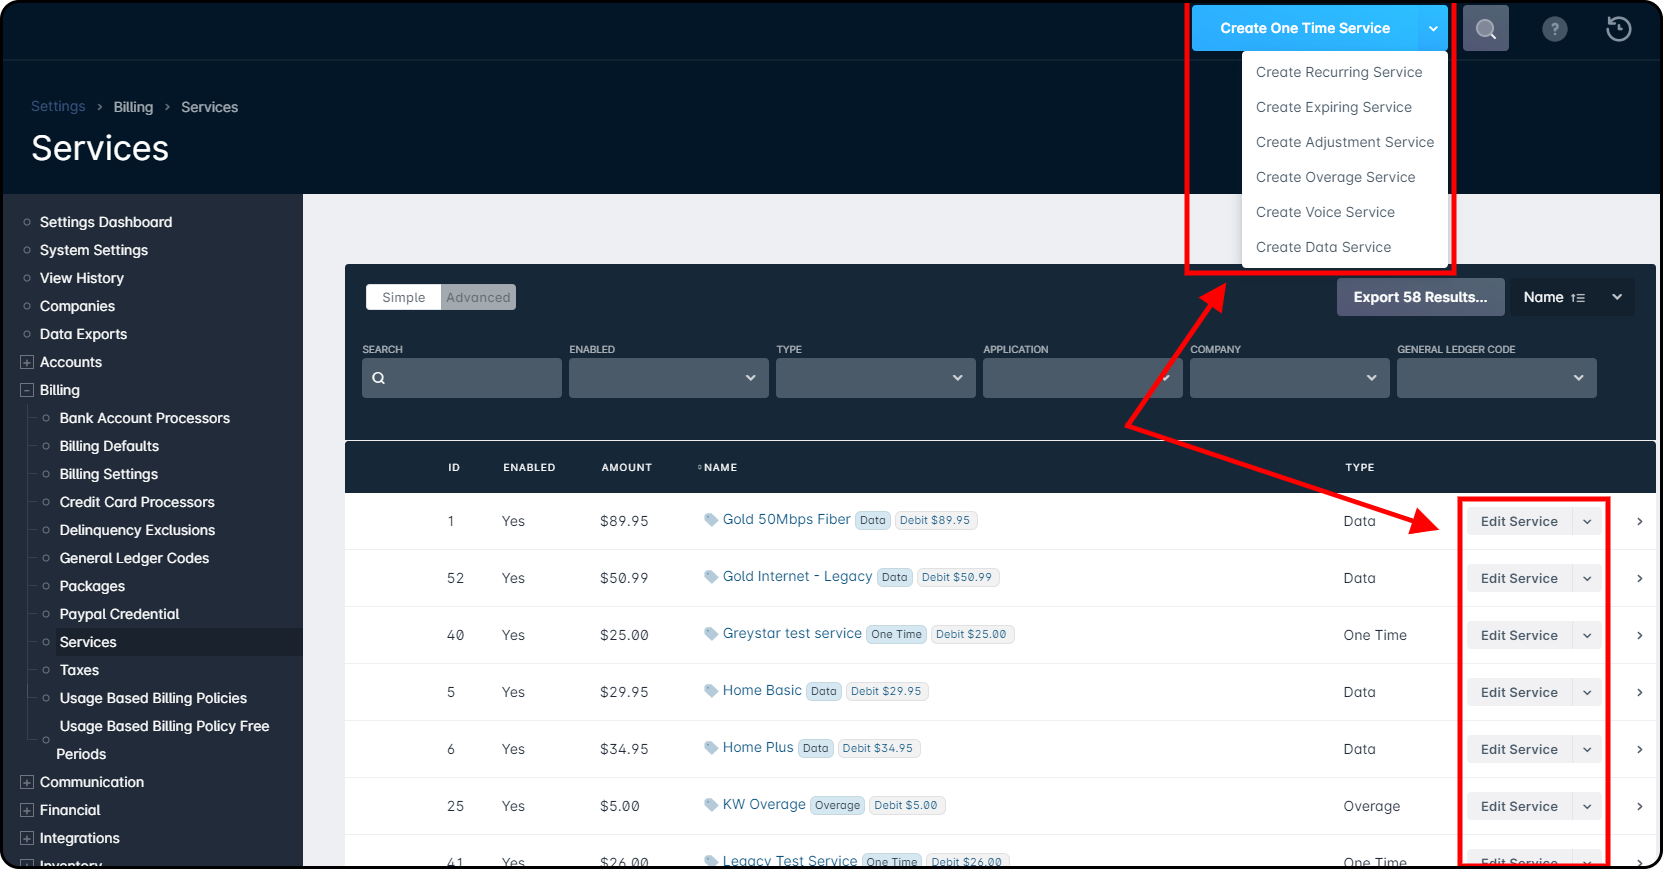
- Scroll to the middle of the modal to locate Tax Type and Discount Tax Type; this is where you will input the applicable tax types as determined by Avalara. Any custom bundles created in your instance can be used here too. For more information on creating Avalara custom bundles, please refer to the section below.
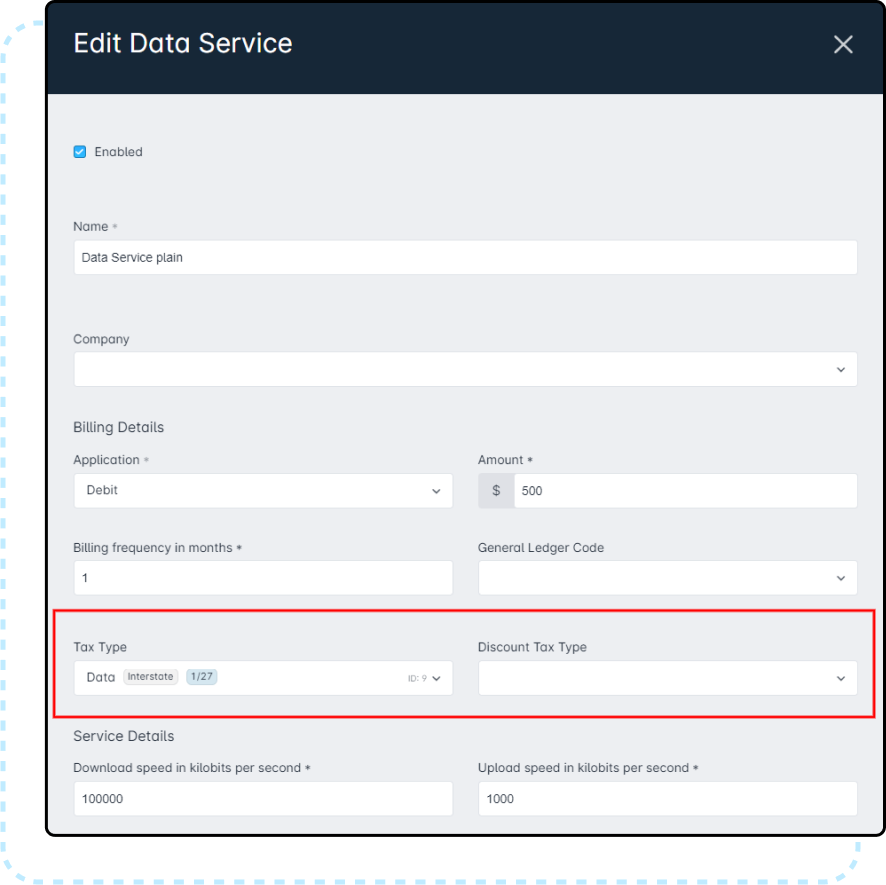
- Click on Save.
Creating an Avalara Custom Bundle
Custom Bundles are built by Avalara dependent on specific classifications. When used, a custom T/S Pair is provided by Avalara to be added to your instance. The steps below detail how to do this so that it can be leveraged on customer accounts.
- Navigate to Settings → Billing → Avalara Custom Bundles.
- Click on Create Avalara Custom Bundle.
- In the new modal, add a name for the bundle and then input the Avalara-provided T/S Pair under Service Type.
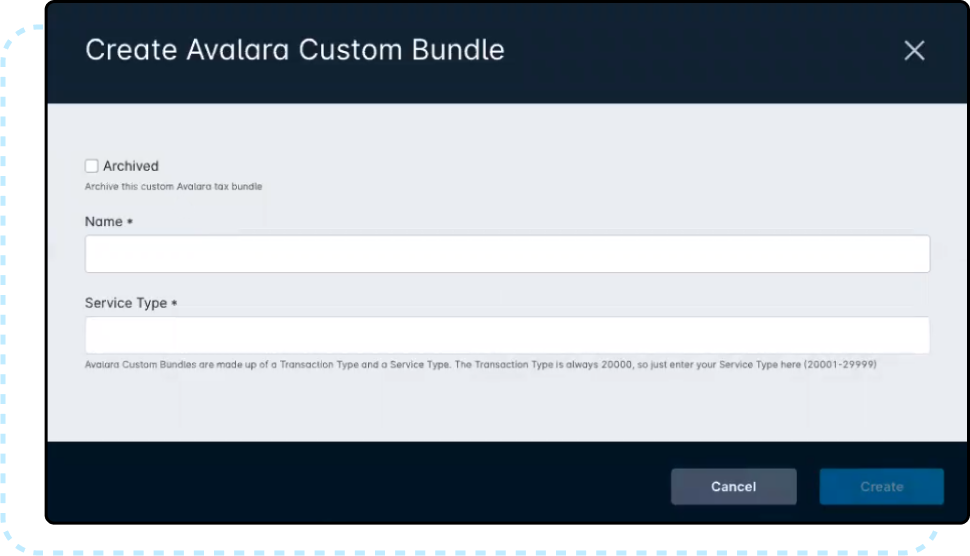
- Click on Create.
How to Apply Avalara to Voice Services
- Navigate to Settings → Billing → Services.
- Locate the applicable voice service and then click on the gray GP button found on the same line as the service.

- In the newly populated table, click on Edit Generic Parameter.

- Underneath Tax Type, add in the appropriate types as directed by Avalara.
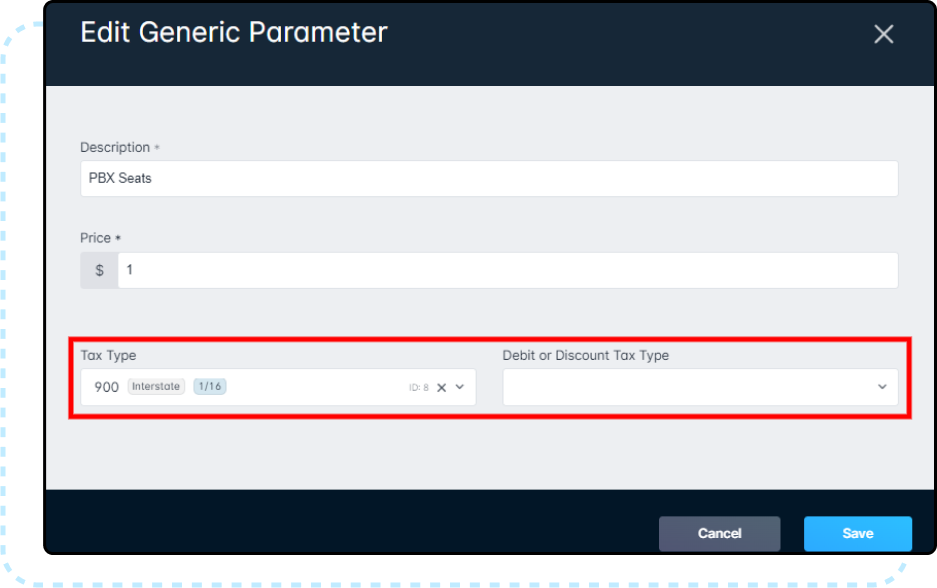
- Click on Save.
For more information on Generic Parameters, click here.
Considerations when using Avalara with Voice Services
A dedicated article covering these considerations is available. Please follow this link for more information.
Viewing Taxes on a Customer Account
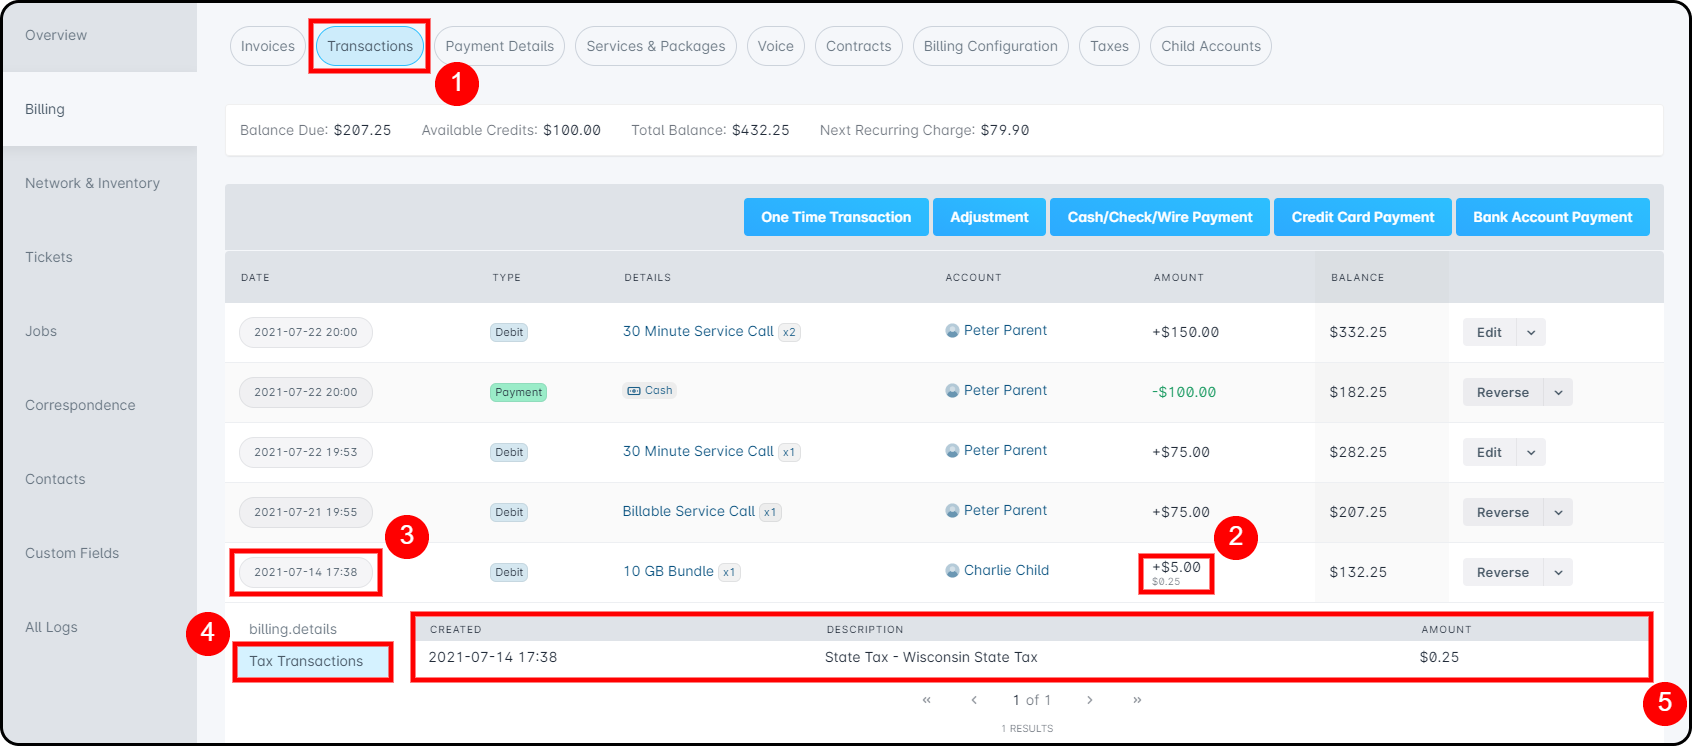
- While in a customer account, navigate to Billing → Transactions.
- At a glance, the tax charged is visible under the Amount column (shown underneath the service charge and in a smaller font size).
- For a further breakdown, click on the corresponding date to expand another menu.
- With the newly populated menu visible, select Tax Transactions.
- Here, we can identify which tax types were included in this transaction and get a breakdown of each type's charge if there are multiples included.
Viewing and Adding Tax Exemptions
Tax Exemptions may be required in certain circumstances, such as servicing a non-profit; in this event, you will need to add an exemption to the customer account.
- While in a customer account, navigate to Billing → Taxes.
- Under the Tax Exemptions table, click on Create.
- In the new modal, add a name that best reflects the tax exemption. Use the dropdown below Jurisdictions to select the appropriate inclusions. And finally, use the dropdown underneath Categories to select the tax types they are exempt from.
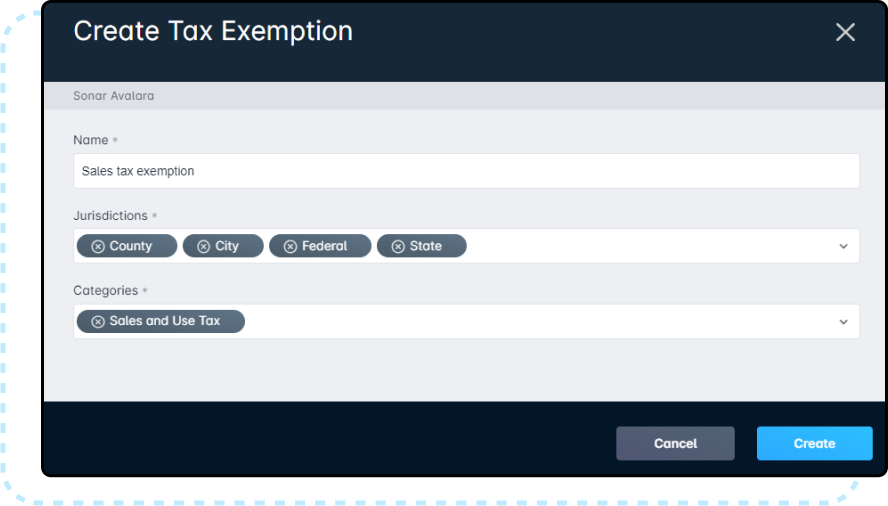
- Once complete with the modal, click Create.
To view existing exemptions on an account, navigate to Billing → Taxes and you will see a list detailing the exemption name, the jurisdictions, and the tax provider. Exemptions can be edited using the Edit button alongside the line item, or deleted by clicking on the downward arrow and selecting Delete.

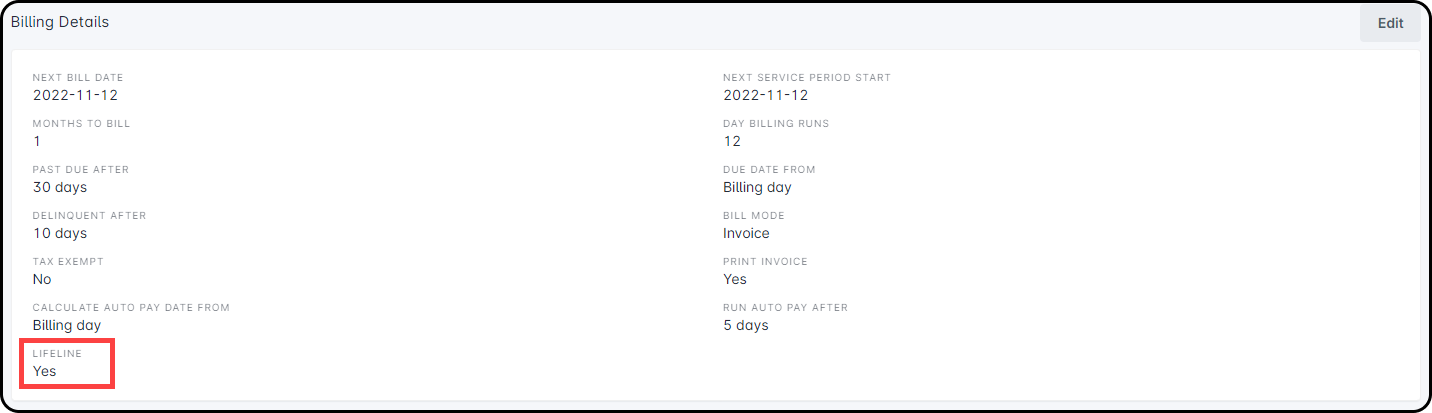
Configuring Lifeline on Customer Accounts
Lifeline exists as a way for lower-income subscribers to receive the same high-quality service without being hampered by the full cost. While Lifeline is essentially a recurring discount, the automatic calculation and its presence on customer accounts are only available when Avalara is configured in your Sonar instance.
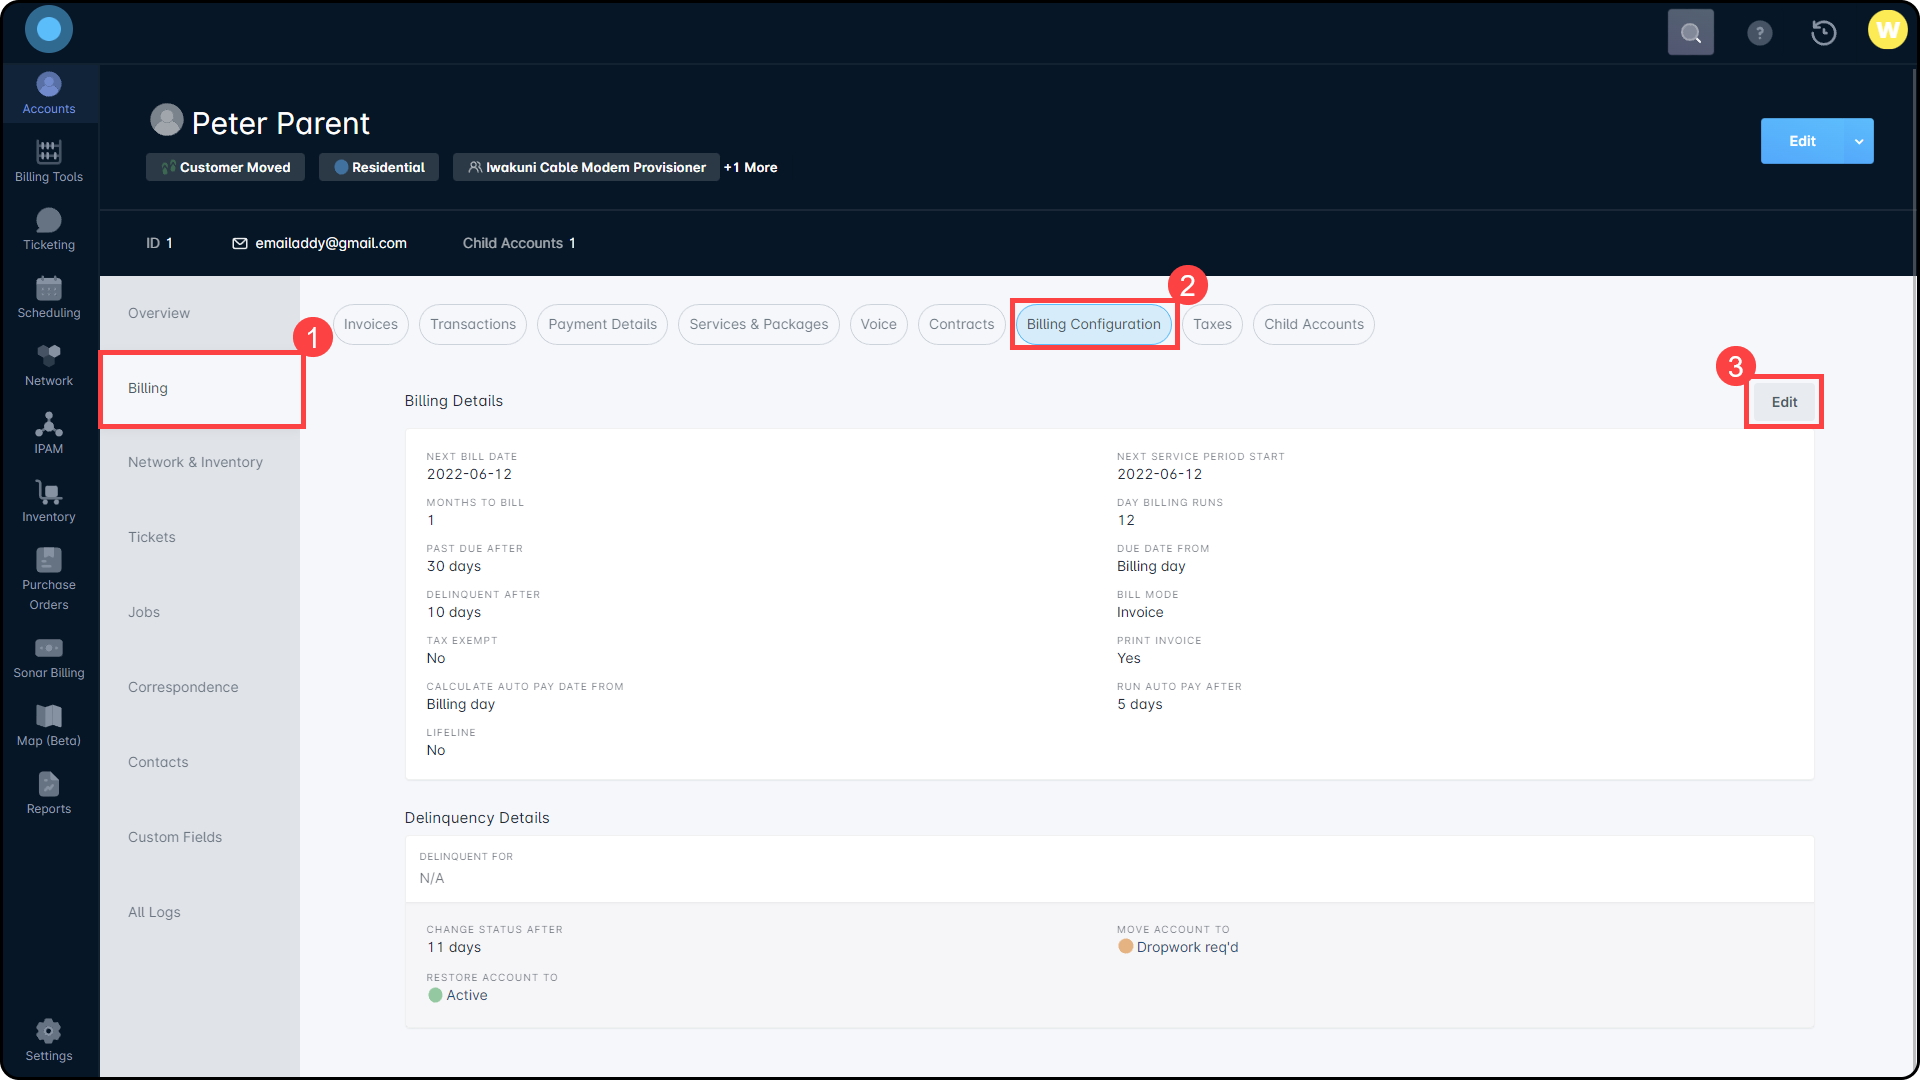
Adding Lifeline to a customer is simple:
- Navigate into the customer's account.
- Click on the Billing tab, then select the Billing Configuration sub-tab.
- Finally, click on the Edit button:
- In the modal that appears, scroll down until you reach the checkboxes section. The last checkbox allows you to set whether the account subscribes to the Lifeline service:
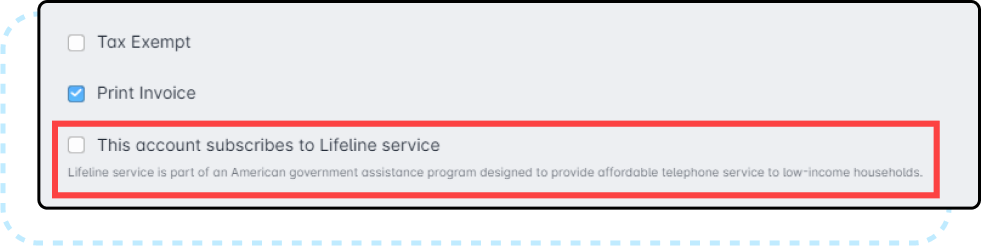
If the box is checked, the setting on the Billing Configuration sub-tab will switch to “Yes” and Avalara will automatically add a credit to the customer's invoice when it's generated.
Where to Locate Error Logs
Error Logs can be found in two separate locations within your instance; on each customer account and within your instance settings.
For the customer account-specific errors, navigate to Billing → Taxes. Underneath the header Tax Provider Errors, you will see a list including the detailed error message, along with the date and time of the error.
The complete list of errors in your instance can be found by navigating to Settings → Tax Provider Errors. Each line item includes a message detailing the error, a link to the associated customer account, and the date and time of the error.