Table of Contents
Integrating with Calix Cloud
 Updated
by Mitchell Ivany
Updated
by Mitchell Ivany
Read Time: 13 mins
The Calix Cloud integration exists as an automated solution for record synchronization between your Sonar instance and the Calix Cloud suite. With Calix Cloud, you can view monitor and manage a wide range of Customer Premises Equipment, such as initiating reboots and updating firmware, while also having access to intelligent recommendations and tracking for your subscribers based on Calix’s data. Leveraging this data, and the customer data you have in Sonar, can facilitate service upgrades, hardware upselling, and churn prevention.
Prerequisites
There are two prerequisites for leveraging the Calix Cloud integration in Sonar:
- Before you get started with the Calix Cloud integration, the relevant permissions need to be enabled to unlock both the visibility and control permissions of this page.If you're a Super-Admin of your Sonar instance, no permission changes are required for your account. For more information on Roles and Permissions overall, please review this linked article.Navigate to Settings → Security → Roles and either choose to edit an existing Role or create a new Role. When the next page populates, locate the permissions reflected in the screenshot below and add it if applicable to that Role.

- Configure your Calix Cloud instance to ensure
Subscriber IDis present for your devices. Only devices with populatedSubscriber IDfields will be considered by the audit.
Setting up the Calix Cloud Integration
This integration relies on API communication to your Calix Cloud account. Because of this, setting up the integration requires configuration in your Calix Cloud account, in addition to configuration within Sonar.
Since the integration requires an API user to exist in your Calix account, it's crucial that you perform the Calix Cloud setup before trying to set up the Calix Integration in Sonar. A MyCalix account requires manual approval from Calix, and this process may take time. Until the account is "Approved, the integration cannot be completed successfully. For more information, please contact Calix.
Assigning the API Role to Your New MyCalix User
To Assign a Role to the New User
- Go to Administration → Users.
- Click the pencil associated with the user.
- In the Add/Delete Roles field, begin typing “API user role” for the role to appear.
- Select the “API user role” from the list, and click Add.
- Click Save.
Allowing the Sonar Instance to Access Your Calix Cloud
With your user created, and the role assigned, we'll now add Sonar as an authorized application.
- Log in at developers.calix.com with the newly created API user
- Once you're logged in, click on
Appsin the top-right corner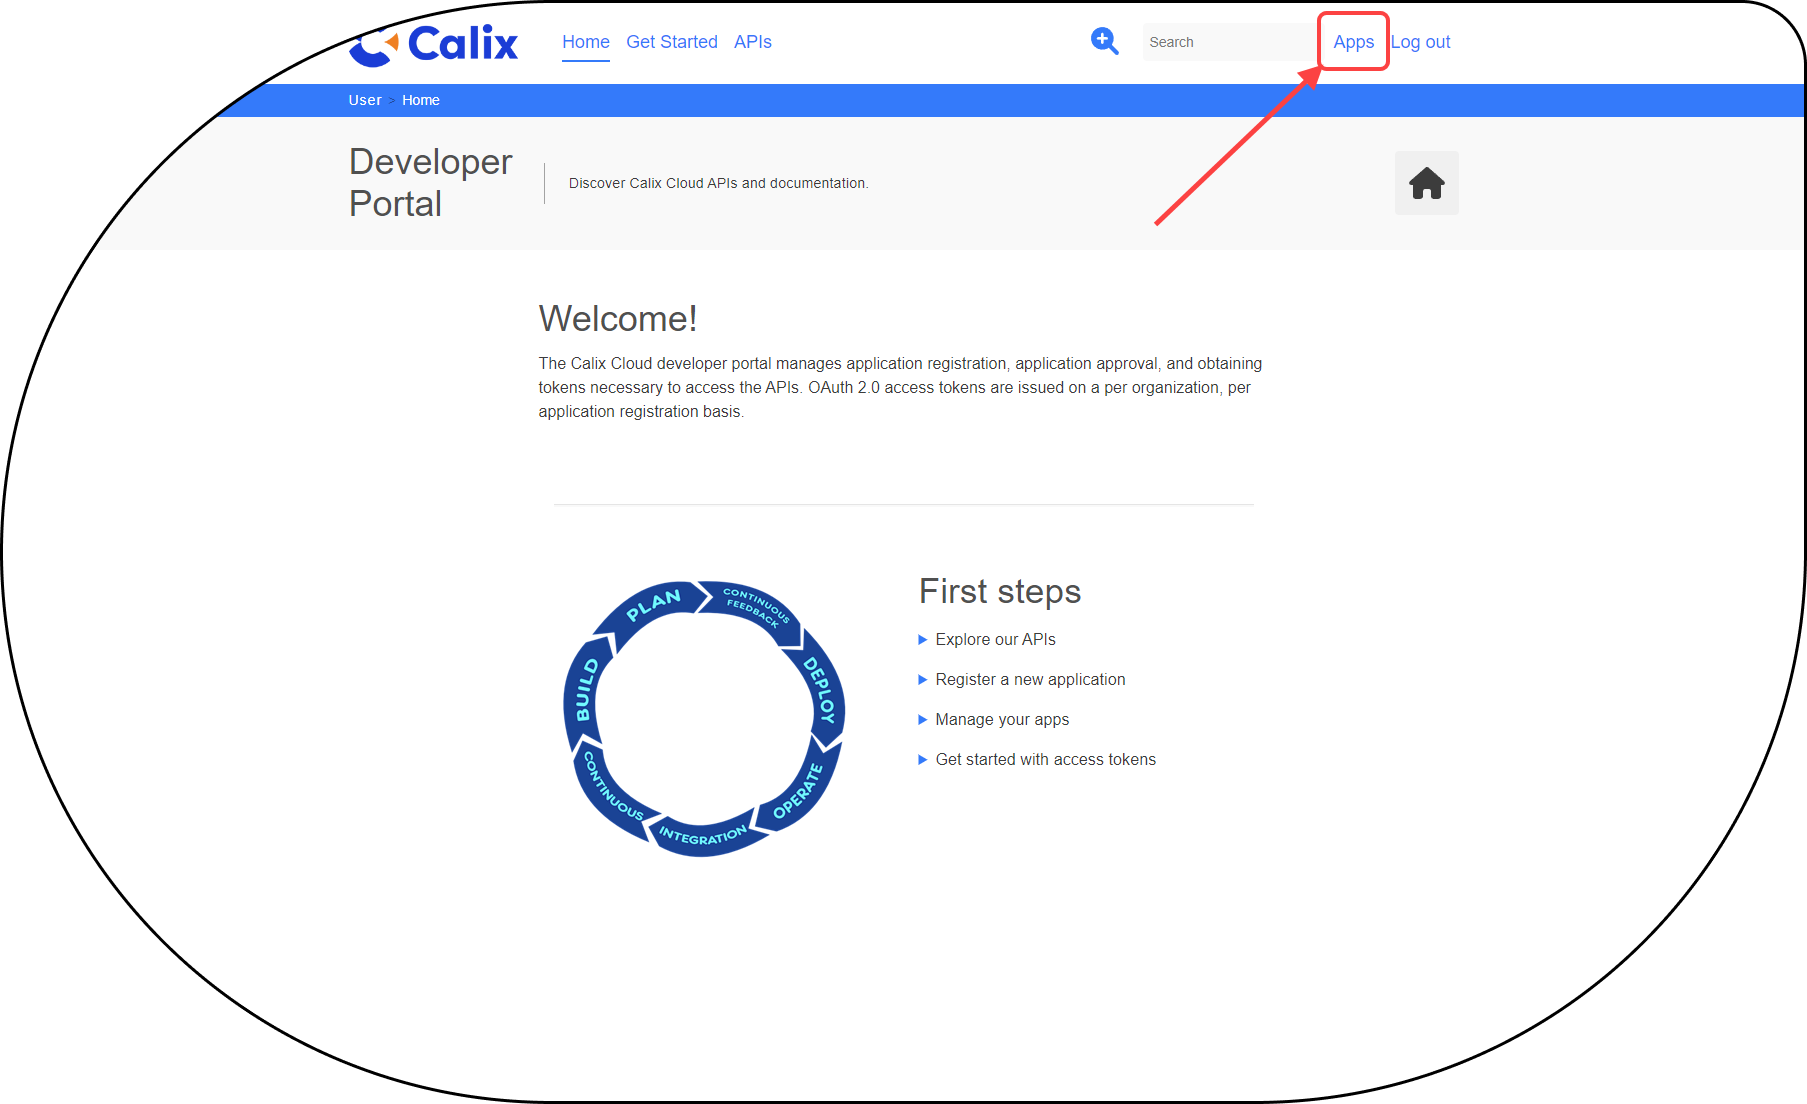
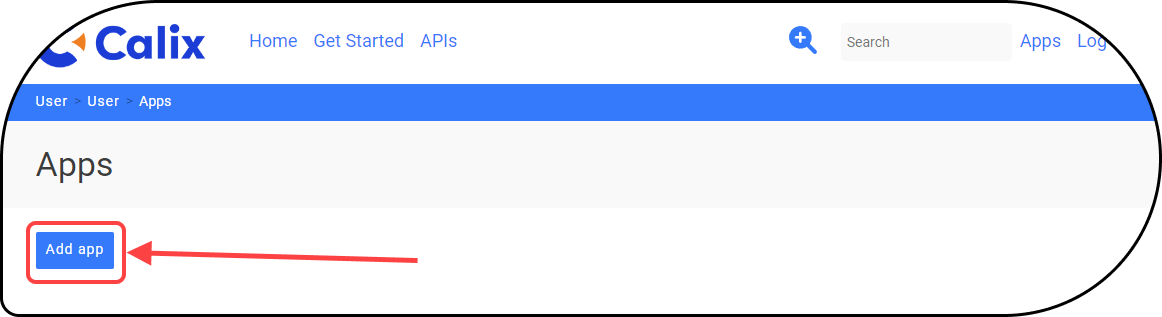
- Click on Add app
- For the Sonar Calix Cloud Integration, the created app requires:
- An App Name
- An Optional Description
- Subscriber Service selected as the API
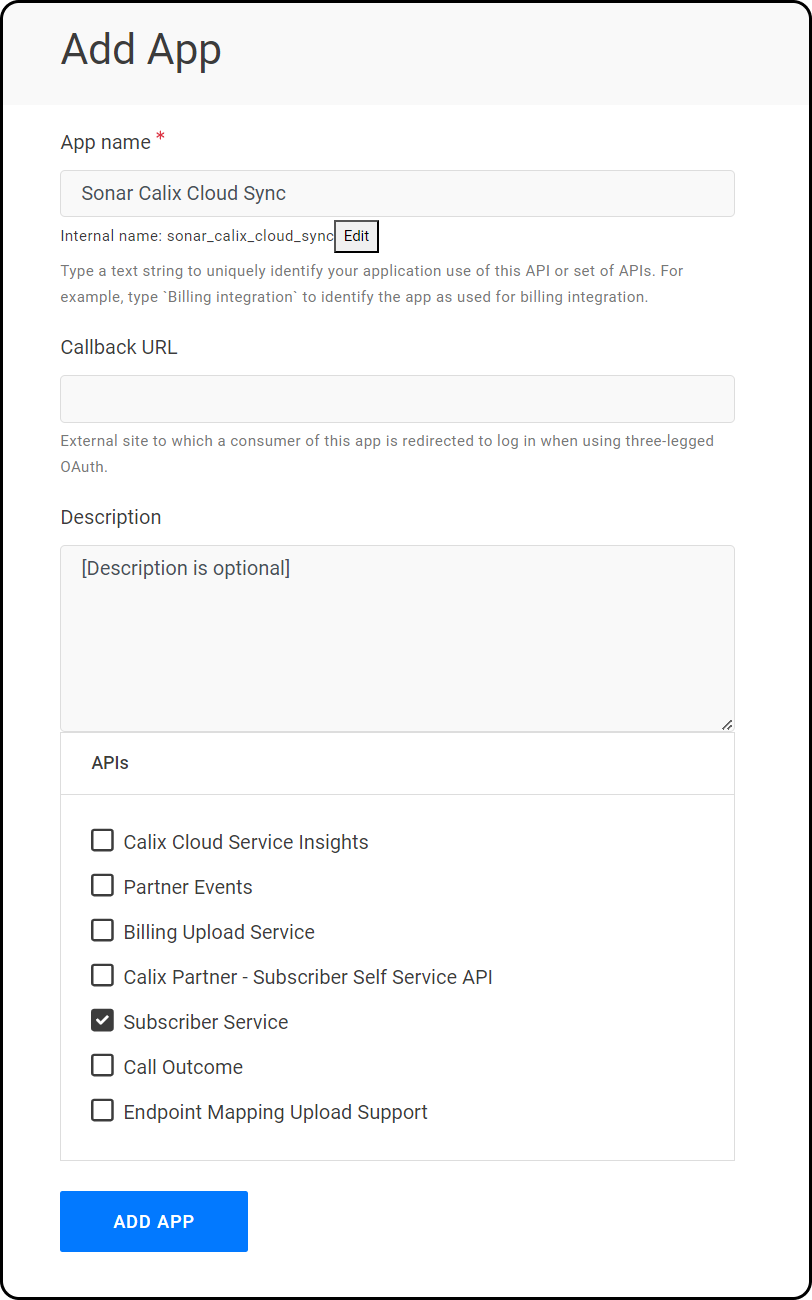
- Click Add app at the bottom of this modal
- Wait for authorization from CalixThe authorization process will vary from account to account, and app to app. For more information on their criteria, please reach out to Calix directly.
- Once the app has been approved, return to the developer portal, and click on the app to expand it. Take note of the locations of the
X-Calix-ClientIDand theClient Secret, as these will be required to complete the integration.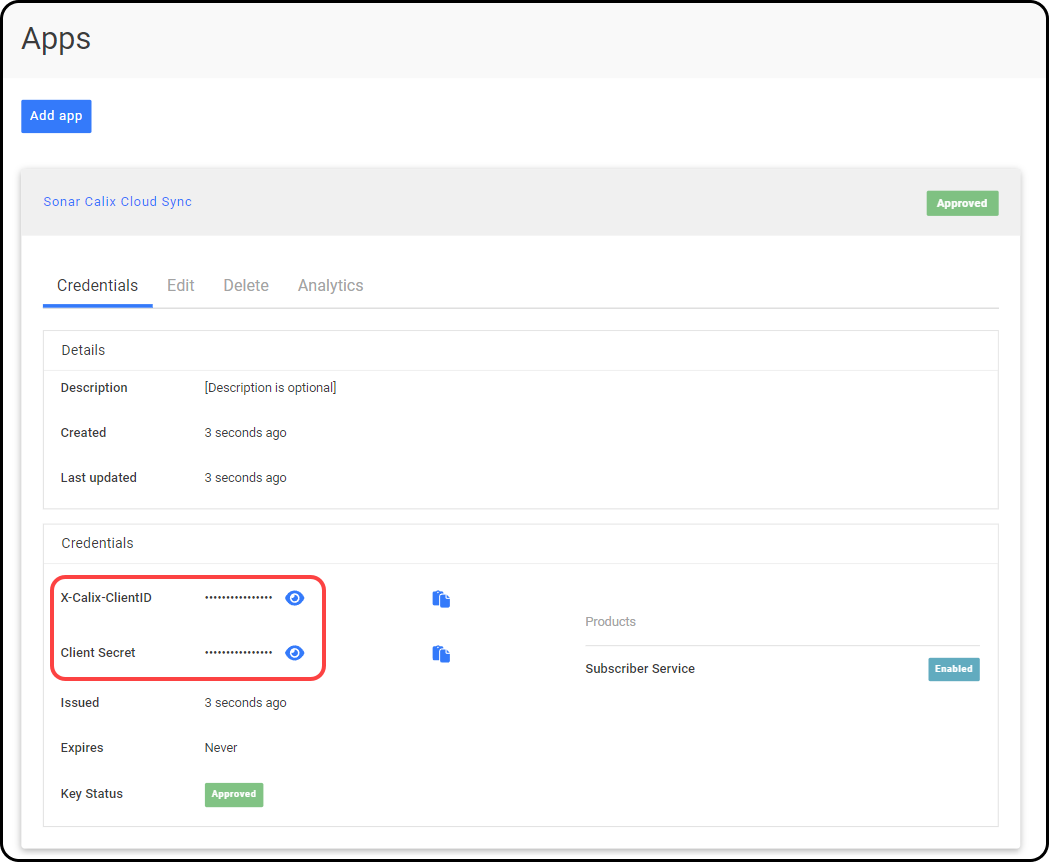
Connecting the Calix Integration in Sonar
The final set up step for this integration is done in Sonar.
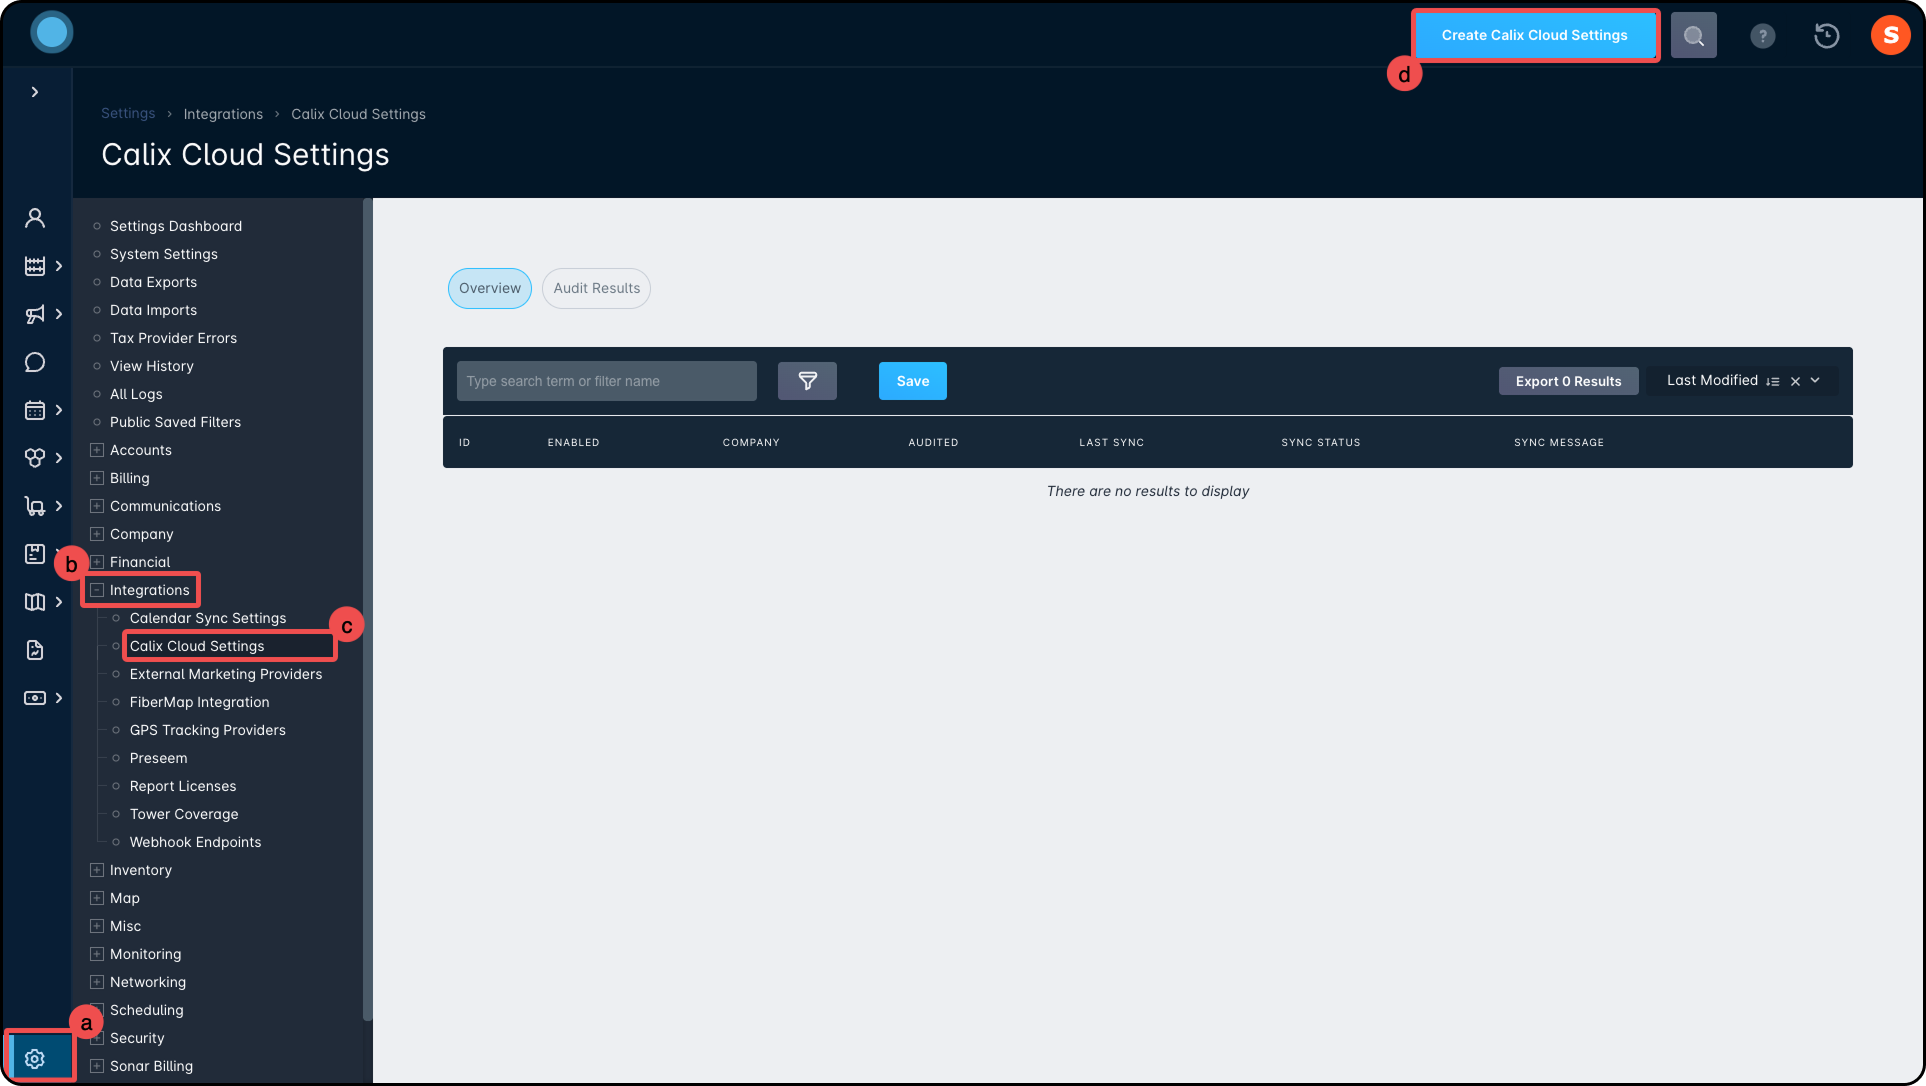
- Access the integration by going to Settings → Integrations → Calix Cloud Settings, then click on the “Create Calix Cloud Integration” button in the top-right
- In the modal that appears, the first of three pages requires information from your Calix-approved app created in the developer portal.

- The Enabled checkbox defines whether the integration will operate. If this box is unchecked, synchronization and audits will not occur for this Calix Cloud integration.
- The Client ID, which maps to the
X-Calix-ClientIDfield shown in the approved app added in your developer portal - The Client Secret, which maps to
Client Secretthe field shown in the approved app in your developer portal - The Username, which must be the username of the API user you created in your MyCalix account.
- The Password, which must be the password for the API user you created in your MyCalix account.
- The Company, which is an optional field. Leaving this field blank will set it to be the default integration for your entire instance. Selecting a company will have the integration run against accounts belonging to the company only.
- The second page is where you define which Inventory Model(s) and the field of that model that maps to the associated Calix Device ID field. For more information on Field Mapping, and how Calix works with Sonar inventory devices, check out the Calix Integration: Overview article.Whatever field you select for Device ID, that field should be set as a Required Field on the Inventory Model, ensuring that a value is present. Submitting and empty value can result in errors, leading to unknown devices and unmatched records.Despite not being specified here, the Inventory Category related to the integration's associated Inventory Models will determine how its Device ID field information is synchronized to the Calix Cloud.
How your Model Category is Used
For the integration to inform the “Flow Endpoint Matching Options” record in Calix Cloud, your associated Inventory Models must have a Model Category of eitherRGorONTconfigured. Categories are managed in Settings → Inventory → Categories. Because the Category Name field is user-configured, it is important to match this syntax exactly, or the integration will not pass through the related Device ID data successfully. Before initial sync, you can edit the Name on an existing Category to adhere to the required syntax, or opt to create a new Category, and edit the configured Category association(s) by visiting Inventory → Manage Items, and clicking Edit Details on the existing Models you wish to change.
TheRGCategory will map to “Endpoint Matching Option 1” in the Calix Cloud, whileONTwill map to “Endpoint Matching Option 2”. Any mapped Inventory Model with a Category other thanRGorONTwill be map to “Endpoint Matching Option 3”.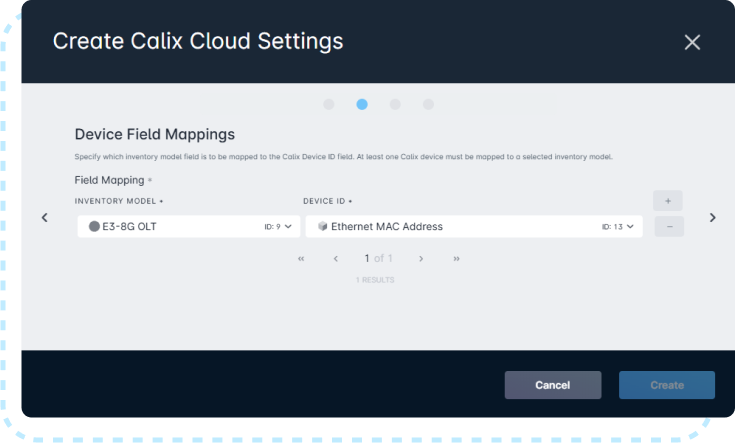
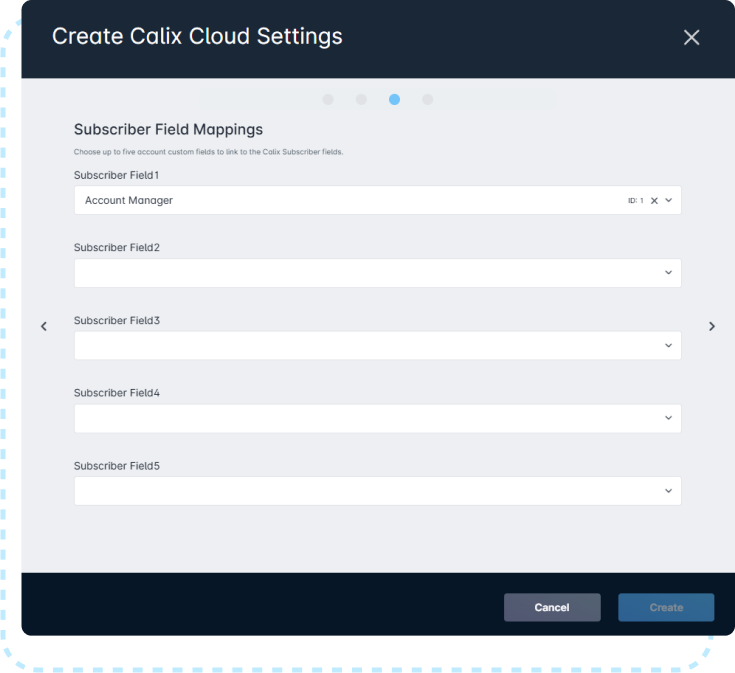
- The third page of the Calix Cloud Integration set up allows you to map Custom Fields in your Sonar instance that would be associated with your accounts to Subscriber fields in your Calix Cloud. This ensures that any essential information is included in both your Sonar instance and your Calix Cloud instance.Only Custom Fields belonging to the “Account” type will be available to select on this page.
- The fourth page of the Calix Cloud Integration set up controls your Calix Engagement Cloud parameters, letting you define Subscriber region and location information alongside service tier information, which will filter which subscribers will receive relevant marketing material based on what you set in Engagement Cloud.

- Subscriber Region matches against the
regionvalue in Calix Engagement Cloud. This is a high-level grouping or tag of subscribers. It can be used to distinguish major markets, serving areas, or even subsidiary operating companies.As Region and Location can vary based on your needs, both fields can be set to the same value (City, Subdivision, or Zip) in the integration settings. - Subscriber Location matches against the
locationvalue in Calix Engagement Cloud. This is a smaller division, often representing a neighborhood, remote, or wire center. This setting allows precision targeting of subscribers and comparison of similar subscribers in a small area.As Region and Location can vary based on your needs, both fields can be set to the same value (City, Subdivision, or Zip) in the integration settings. - The Service Group Tiers section allows groups together data services into groups or tiers based on the download speed in Kbps. A maximum of 10 groups can be defined for any given integration. The groups defined here cannot overlap in speed, in either the “From” or “To” fields. Once configured, services that match the speed profiles will be used to populate eligible subscribers for marketing purposes. If a service does not fall into any of these buckets, its subscribers will simply not be populated.
- Subscriber Region matches against the
Managing Communications for Calix Engagement Cloud
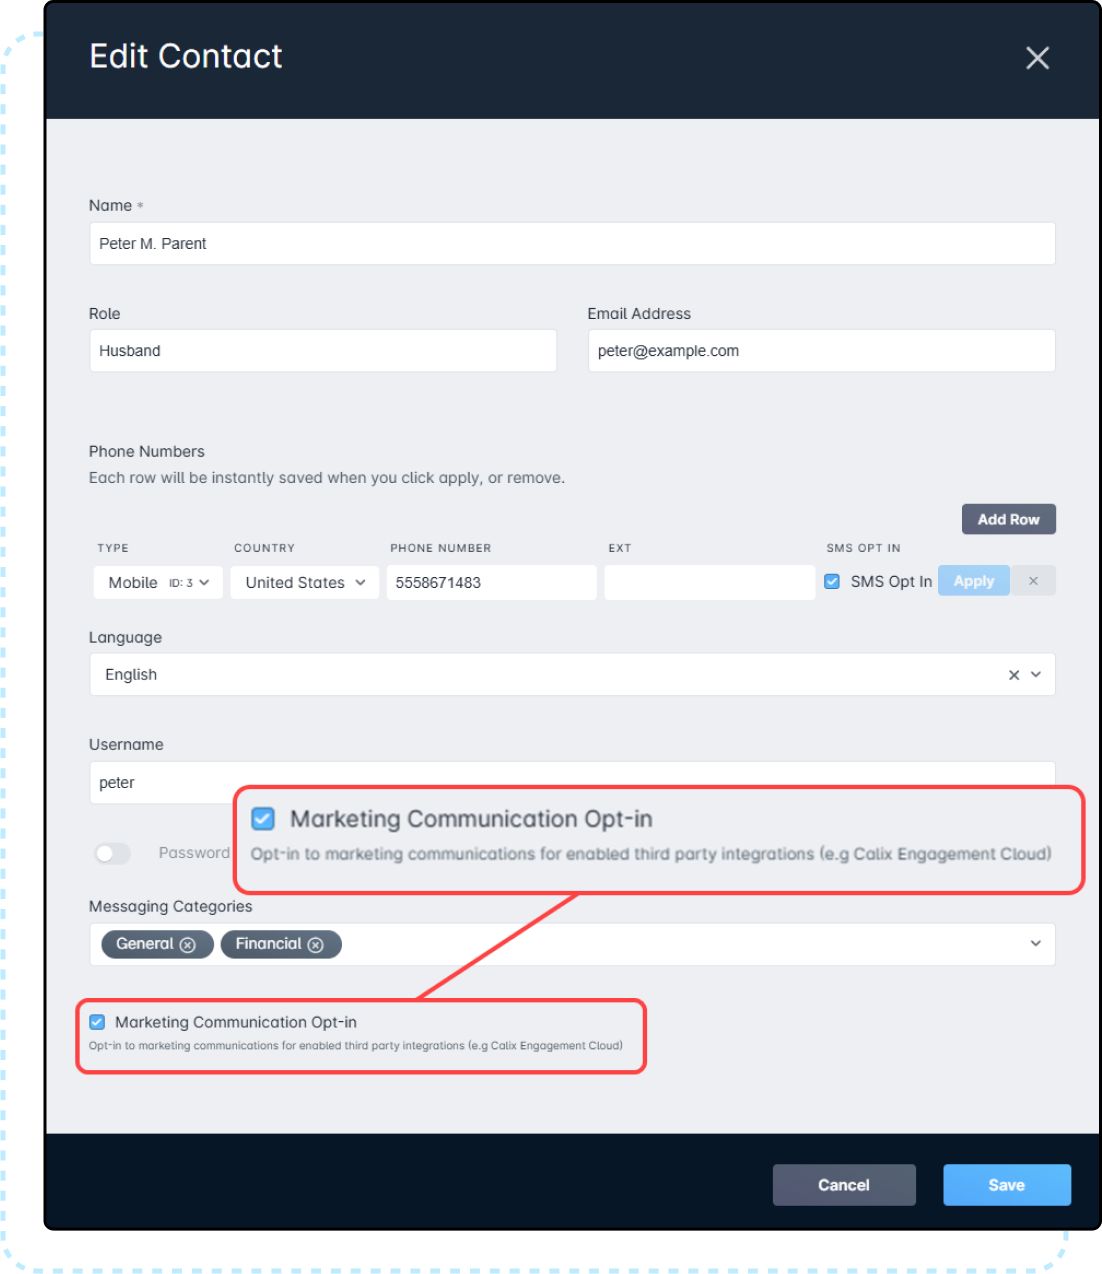
Before launching your Calix Cloud Integration, you need to confirm which subscribers should be receiving communications for your marketing materials. This setting, in addition to the filters defined during the creation of your integration, will prevent uninterested or unneeded parties from receiving your marketing communications. Marketing notification management is done through the Contact page on the subscriber's account. For more information, you can read the Contact Creation section of the Account Management View: Overview article.
Overview
The Calix Cloud integration has two pages, the Overview page that you land on as soon as it's accessed, and the Audit page, that contains details about your Calix Cloud audits and any unmatched accounts.
You can access the Calix Cloud Integration by going to Settings → Integrations → Calix Cloud Settings.
Landing Page
The Landing Page shows you information related to your existing Calix Cloud integration.
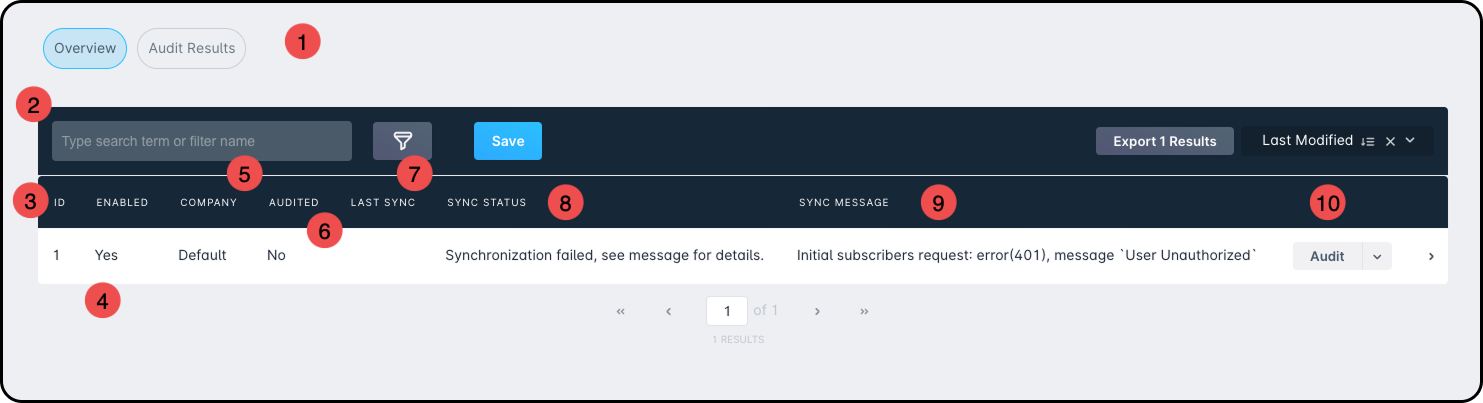
- Page Selector: This lets you switch between the Overview page (the visible page), and the Audit Results page.
- Filter Panel: More information on filters can be found in the Filtering: Overview article.
- ID: This column will list the ID of the Calix Cloud integration. This value will increment as more integrations are added.
- Enabled: This column will provide a “Yes” or “No” for each Calix Cloud Integration you've configured for your instance.
- Company: This column will list which company the Calix Cloud integration is associated with.
- Audited: This column will provide a “Yes” or “No” for whether the integration has ever been Audited through Sonar.
- Last Sync: This column will show the last date and time that a full synchronization to your Calix Cloud account occurred.The incremental, automatic synchronizations will not update this column, even though they're occurring every time a change is made to your Sonar accounts.
- Sync Status: This column shows the current status of any ongoing Synchronization occurring on the Calix Cloud integration. The Sync Status will update dynamically as it progresses.
- Sync Message: This column displays information related to the ongoing Audit or Synchronization.
- Action buttons: By default, the Action button will show either “Sync” or “Audit”, depending on what stage you're at in adding a Calix Cloud integration.An Audit must be completed on any new Calix Cloud integration before synchronization can occur.
Audit Results
The Audit Results page will show information on any unmatched or mismatched accounts between your Sonar instance and your Calix Cloud account.
How Audit Matching Works
During the synchronization process, only devices with an associated Subscriber ID field will be considered by the Audit. If you have not yet populated this field for the devices, it must be done before the audit. When an Audit runs, its purpose is to match the Account records in your Sonar instance to the Subscriber records in the Calix Cloud. If a Sonar Account ID does not match the Calix Subscriber ID, the subscriber that exists on the Calix Cloud will be flagged. If these values match, then the subscriber record doesn't need to be manually linked to an account and will be synced using the detected match.
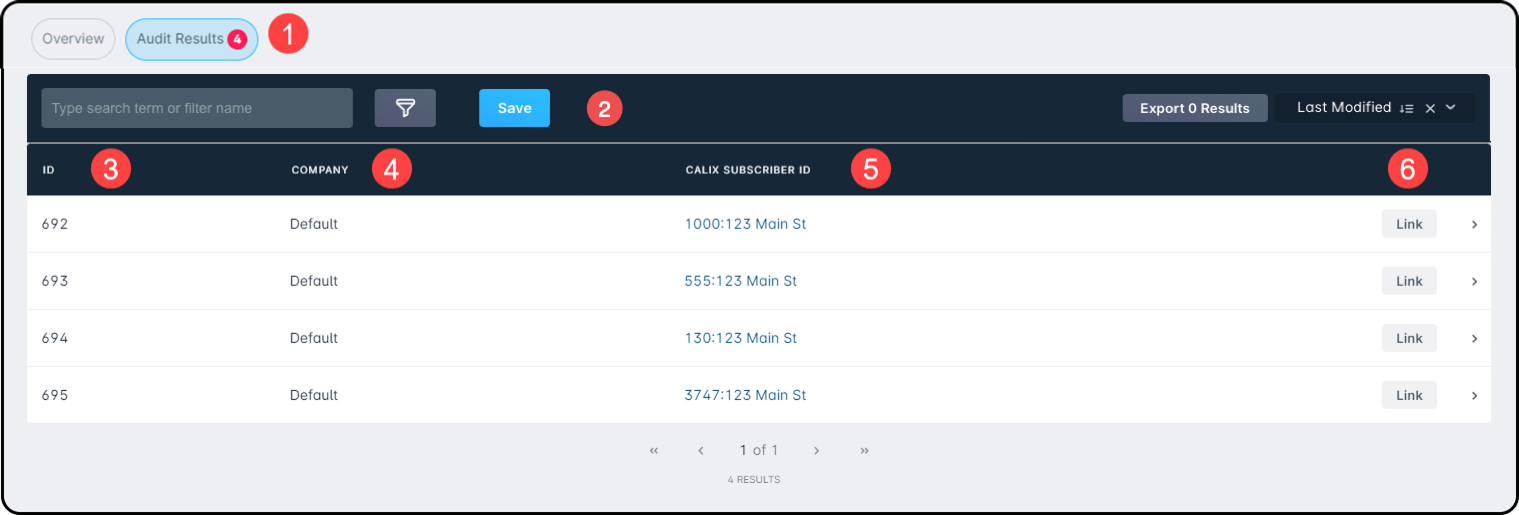
- Page Selector: This lets you switch between the Overview page, and the Audit Results page (the current visible page).
- If an Audit was run and had unlinked accounts, the number of accounts will be reflected in the Page selector.
- Filter Panel: More information on filters can be found in the Filtering: Overview article.
- ID: This column will list the ID of the Audit result. This value will increment as more audits are run.
- Company: This column will list which company the unmatched account is associated with is associated with.
- Calix Subscriber ID: The Calix Subscriber ID column will provide you with the address and account ID information of the Calix account details that are not matched to an existing subscriber in Sonar.
- Actions: This column allows you to Link an unmatched account from Calix to an existing account in Sonar. You can also expand the side panel using the
>arrow to see more details about the unmatched account.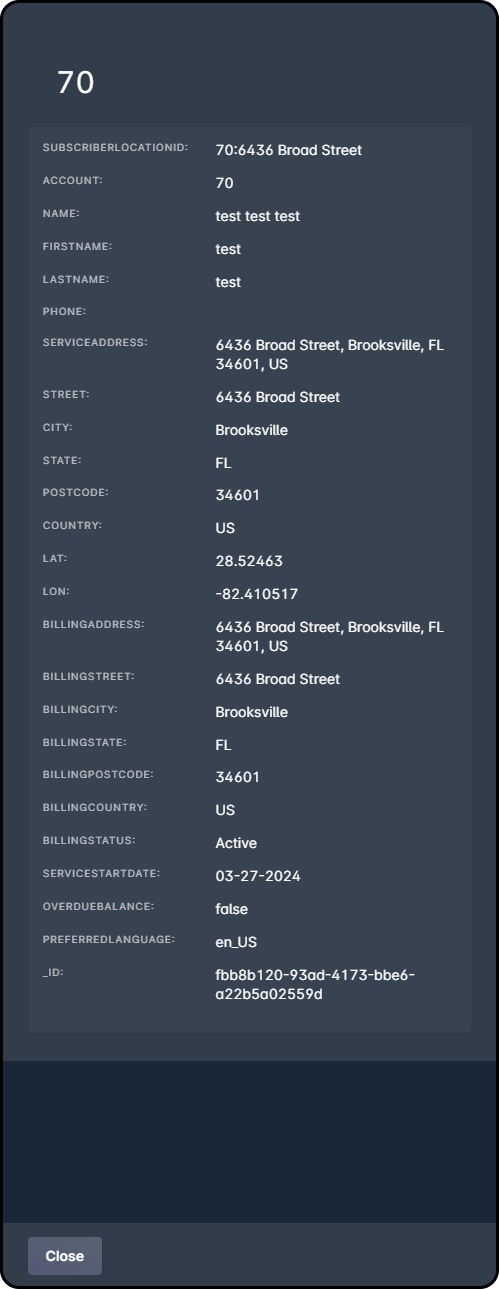
Synchronizing your Data
Performing the first manual Synchronization can be done at any time after an audit is complete. For each integration, manual synchronization is only required to initiate the connection. Further synchronizations will occur routinely and automatically in near real-time. This means that as account or service changes are made in your Sonar instance, they will automatically be reflected in Calix Cloud. There is, however, a caveat to synchronization.
If you configure multiple integrations, such as one for Company A, in addition to your initial, Default integration, then manual synchronization will need to be performed again. This is true of each new integration you add, even if no data exists for the new company yet. Once the manual synchronization has completed, and data is reassigned to the correct company's integration, automatic synchronization will resume.
Ramifications of Synchronizing your Integration
The Calix Cloud Integration is an authoritative connection from Sonar to your Calix Cloud instance. For this reason, it's important to understand how syncing your data can affect your data. Any time you start a sync, you'll receive this warning message:
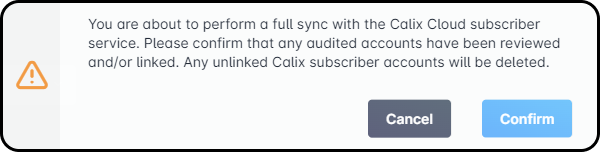
This warning means any unmatched data—even if not yet audited—will be deleted from Calix Cloud. This can seriously impact your service delivery if not handled properly. To avoid issues, make sure to carefully audit and match all accounts that appear only in your Calix Cloud subscriber service.
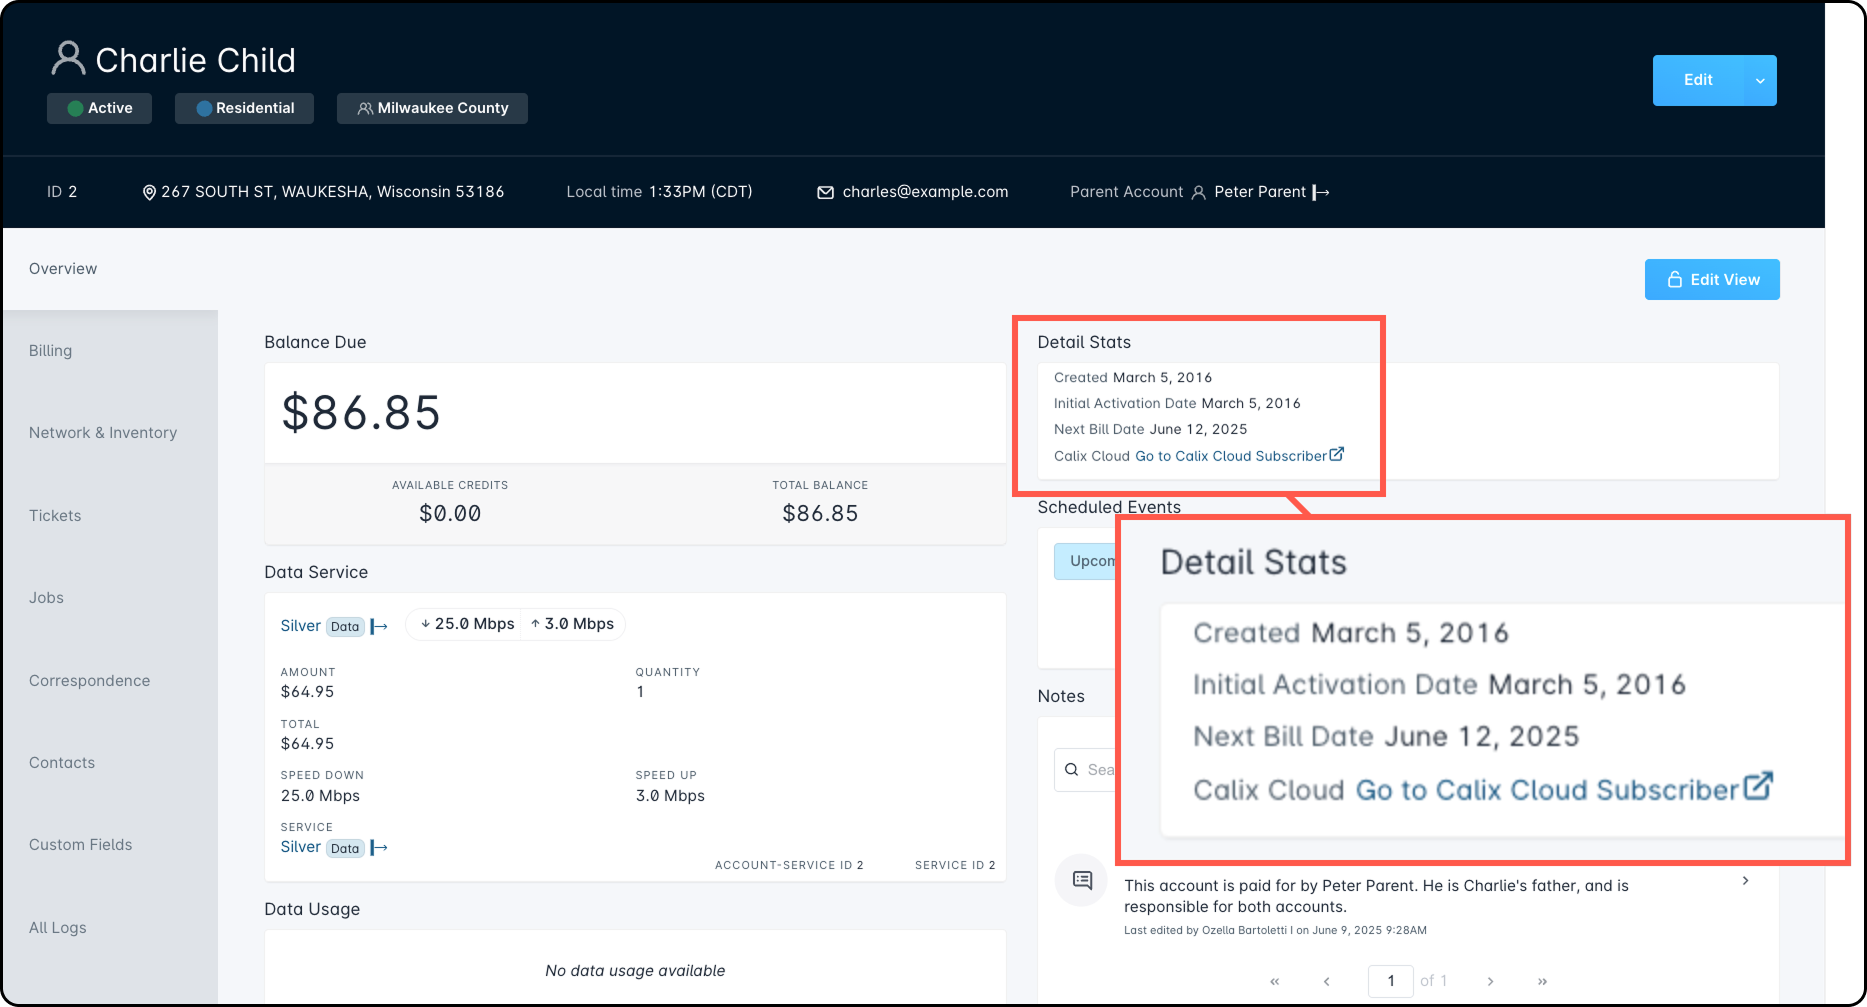
Customer Account View After Synchronizing your Data
Once your Calix Cloud integration has been audited and synchronized, you’ll see a link appear in the Detail Stats section of the subscriber’s account. This link provides direct access to the Calix Cloud data, making it easy to view and analyze key subscriber insights.
Custom Report to Flat File Data Sync (legacy)
If you are looking for documentation on the legacy data sync method, you can review those instructions here.
If you are currently using this method, switching from the Flat File Data Sync to our native API integration is easy. First, reach out to Calix Support to ensure that the timing of the pipeline transition is handled optimally. Once Calix gives you the all-clear, all you need to do is disable the scheduled SFTP delivery on the associated Looker report, then follow this guide from top to bottom.