Table of Contents
Invoice Templates: Overview
 Updated
by Jennifer Trower
Updated
by Jennifer Trower
Read Time: 11 mins

Invoice Templates let you create professional, branded invoices for the products or services you offer. You can apply templates to specific companies, account types, or use one default template across your entire instance.
Permissions
Before getting started with the configuration, your user roles will need to be adjusted to account for the permissions required to use the Invoice Templates feature.

Permission Details
2. Create a new invoice template: allows you to create new invoice templates.
3. Update an invoice template: allows you to update an invoice template.
4. Delete an invoice template: allows you to delete invoice templates.
Before you Begin
Template Comparisons
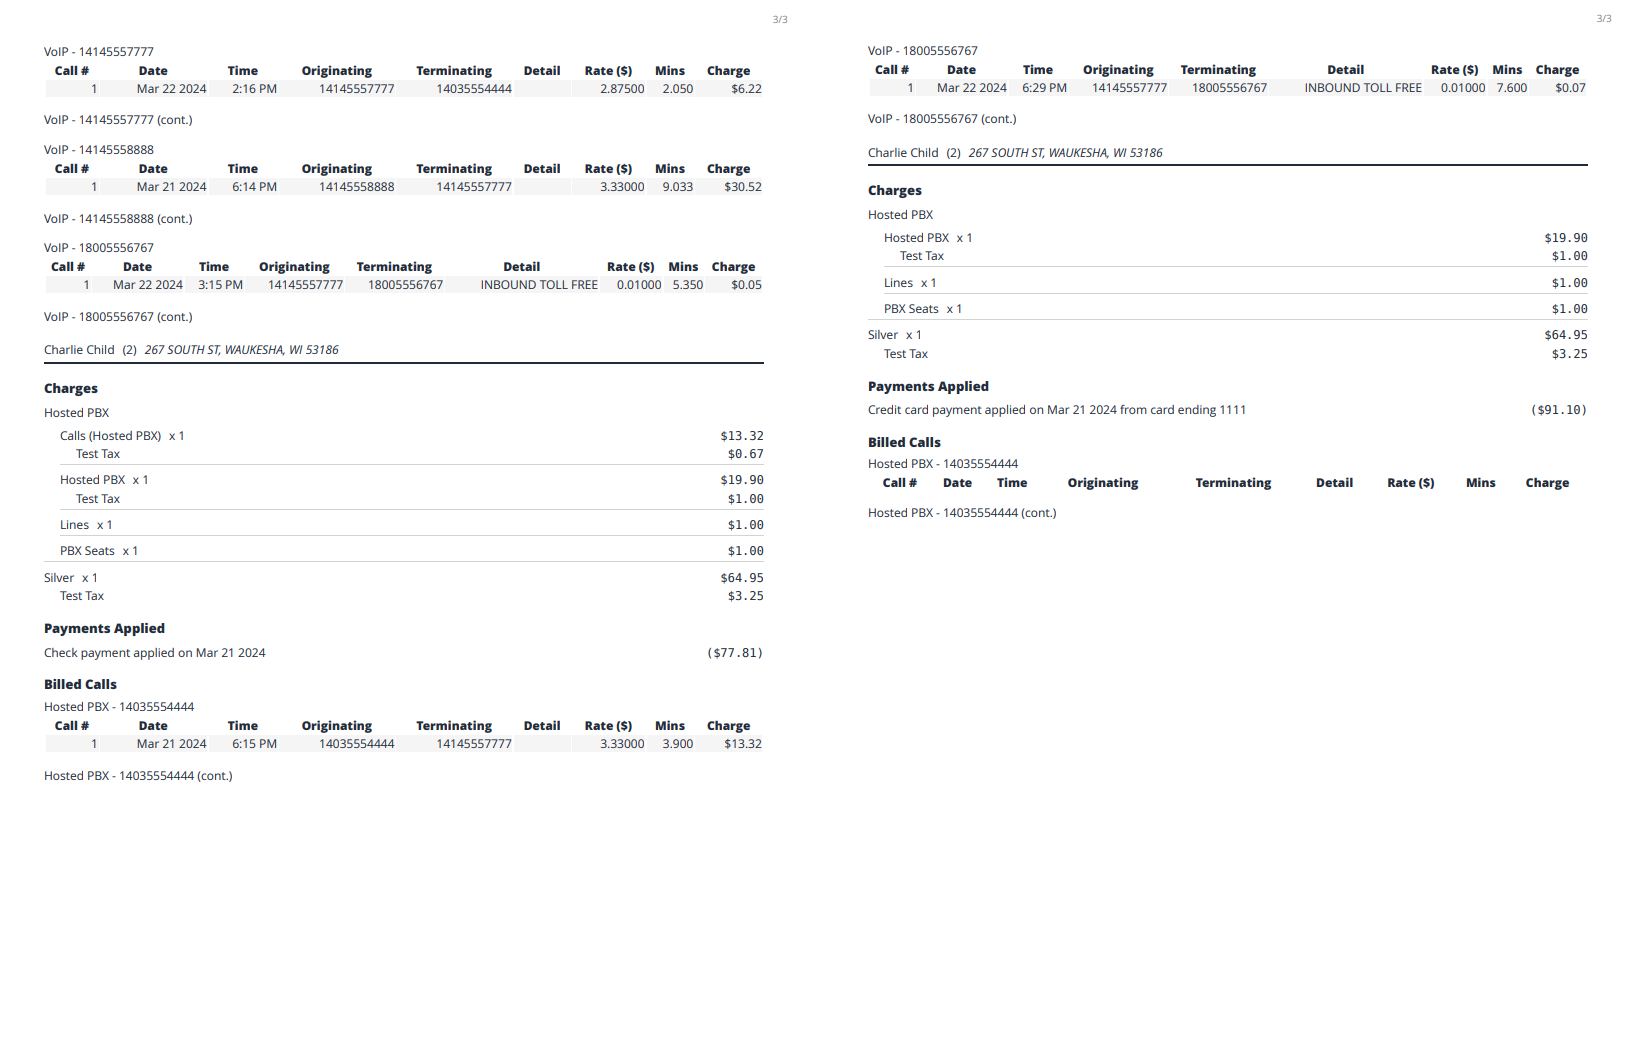
Page 1
Page 2 - Transactions
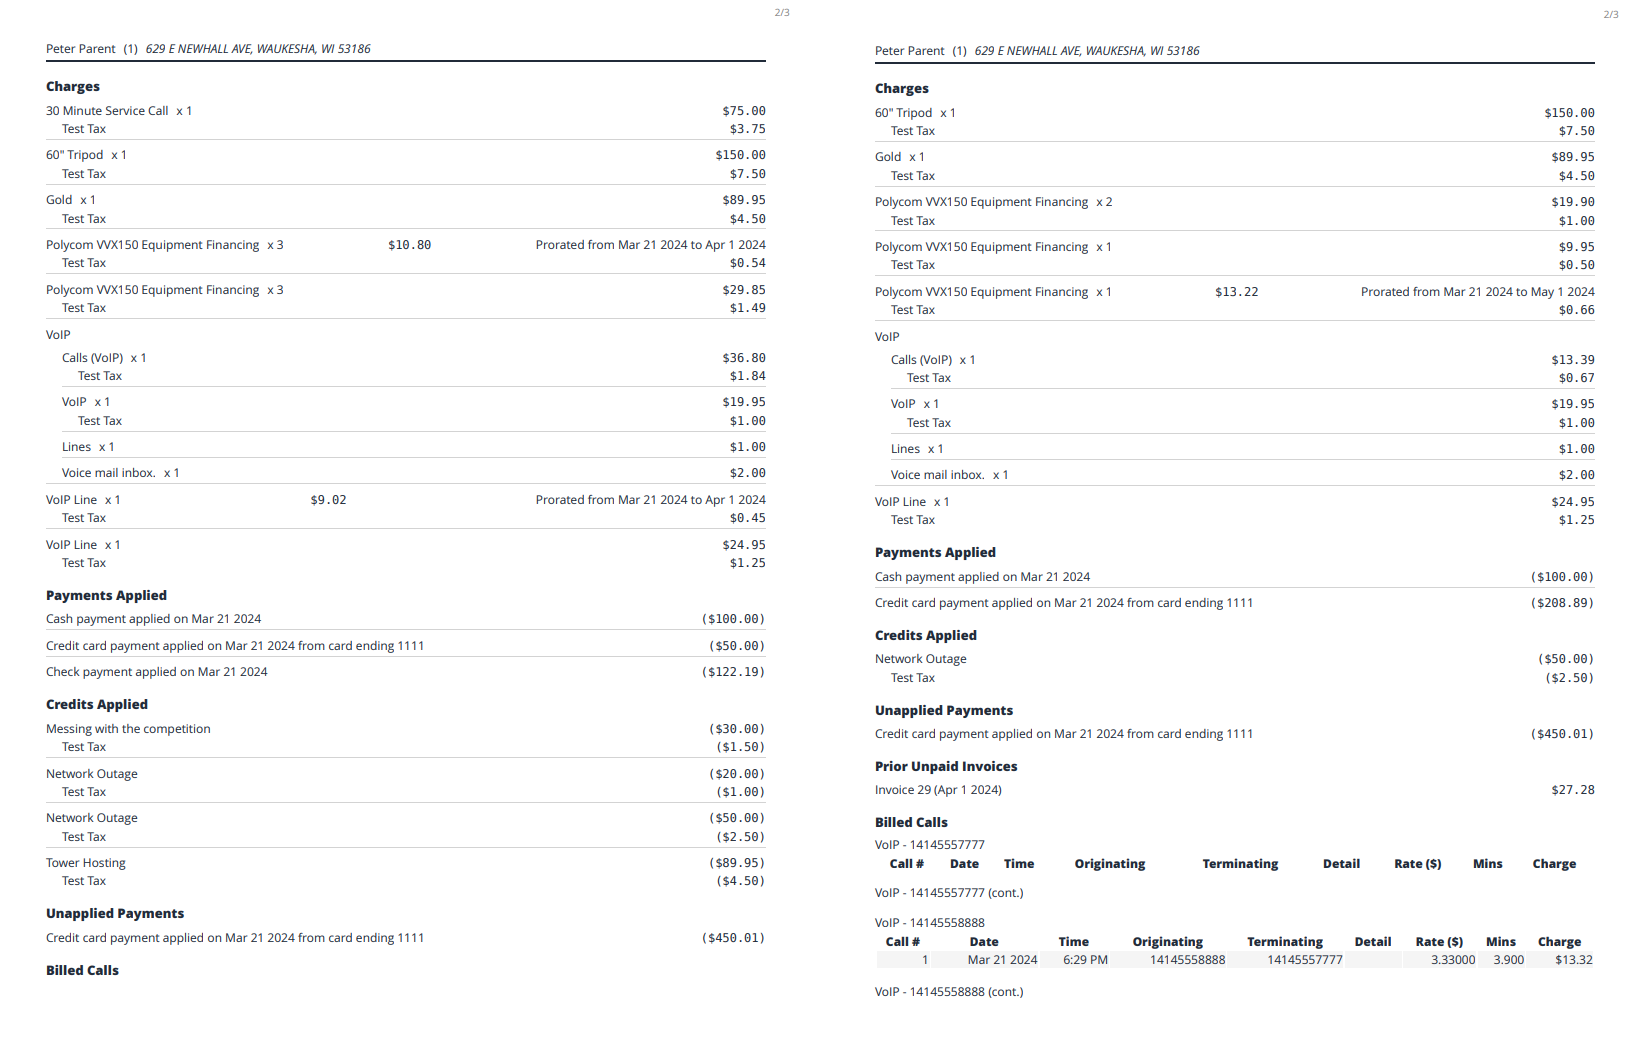
Page 3 - Transactions continued
How to Enable Invoice Templates
However, Sonar will only generate invoices using Invoice Templates after the feature is enabled.
To enable Invoice Templates, go to Settings → Billing → Billing Settings. Scroll to the bottom of the page and select Enable Invoice Templates, then save your changes.

After saving, review your other billing settings to make sure the correct information appears when using Data Blocks in your Invoice Template.

How to Configure Settings for Data Block Inserts
Before customizing your invoice templates, review the settings that control the information shown in Data Blocks. Some Data Blocks require setup in your instance before they can appear correctly on invoices.
- Company Logo: Configure in Settings → Company.
- Late Fee Mode: Configure in Settings → Billing Settings when Apply Late Fees is enabled.
- Past Due Stamp: Configure in Settings → System Settings.
- Custom Fields: Configure in Settings → Company.
- Customer Portal URL: Configure in Settings → Company.
- Company Phone: Configure in Settings → Company.
- Invoice Messages: Create in Settings → Financial → Invoice Messages, then configure in Settings → Accounts → Account Types.
- Company Website: Configure in Settings → Company.
- Tax ID: Configure in Settings → Company.
- Invoice Day: Configure in Settings → Billing Defaults → Create/Edit Billing Default.
- Bill Day: Configure in Settings → Billing Defaults → Create/Edit Billing Default.
- Show Remittance Slip: Configure in Settings → Company.
- This determines which version of the invoice is sent.
How it Works
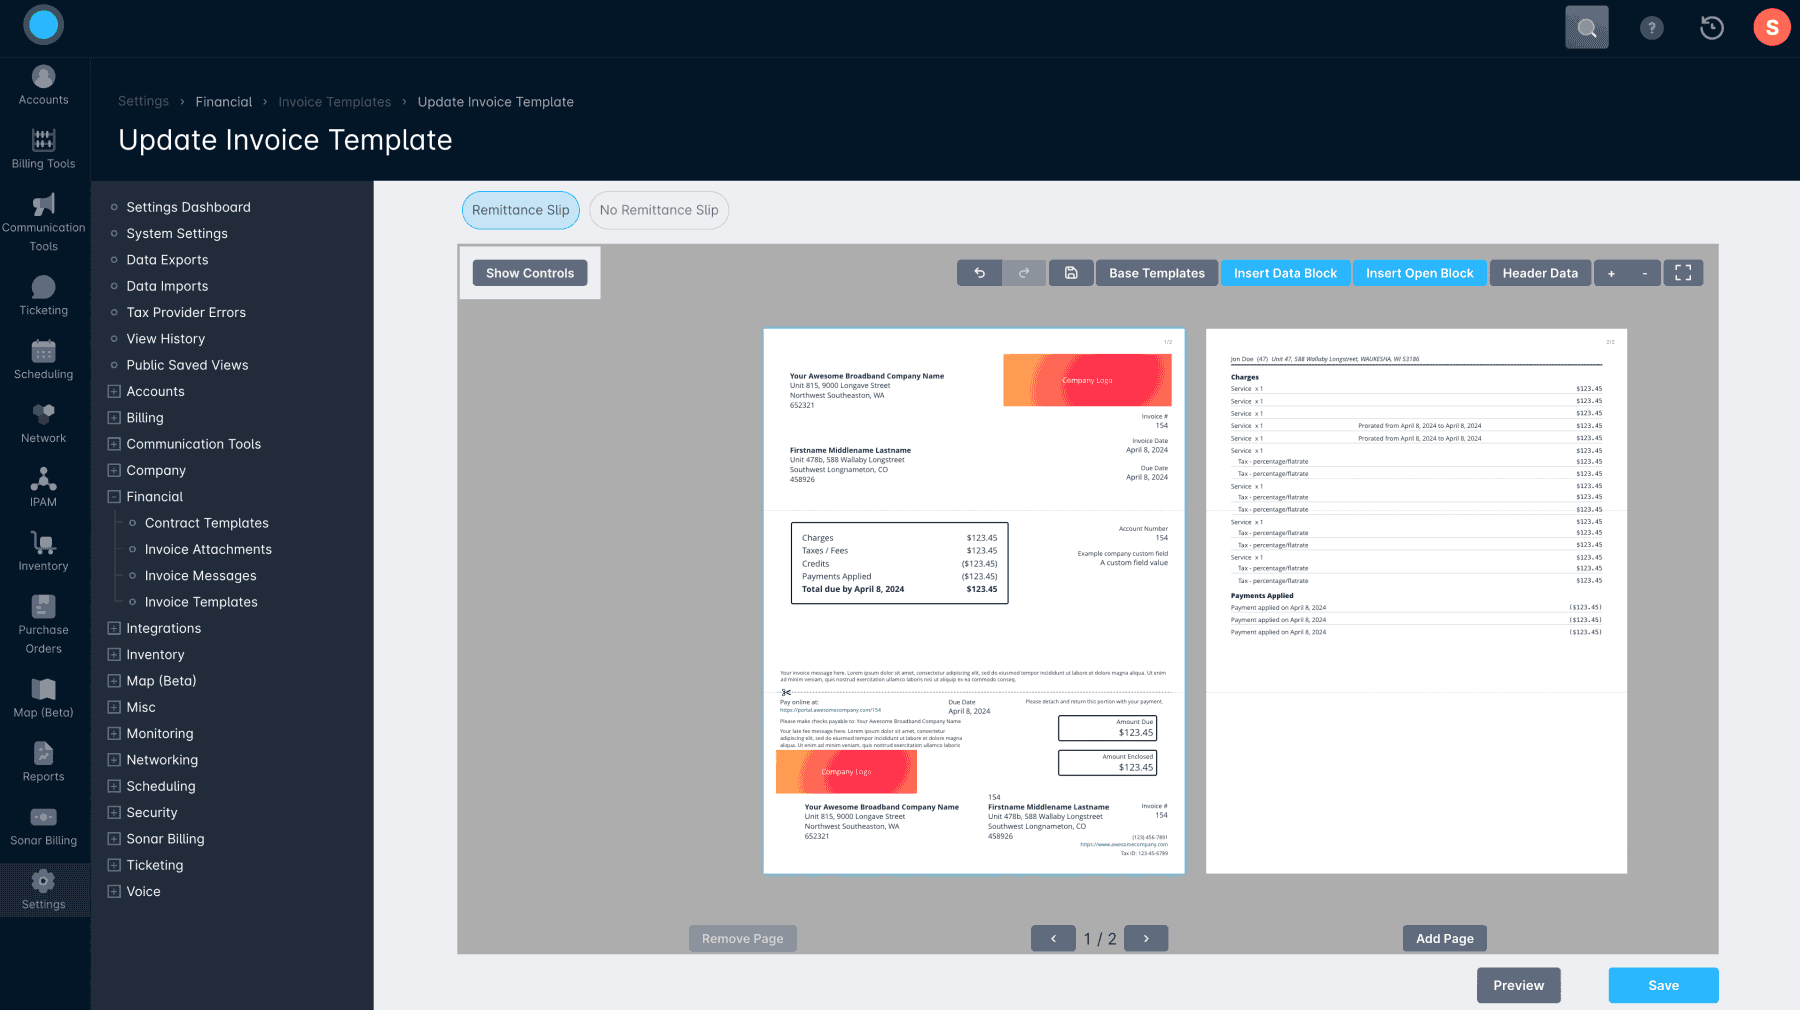
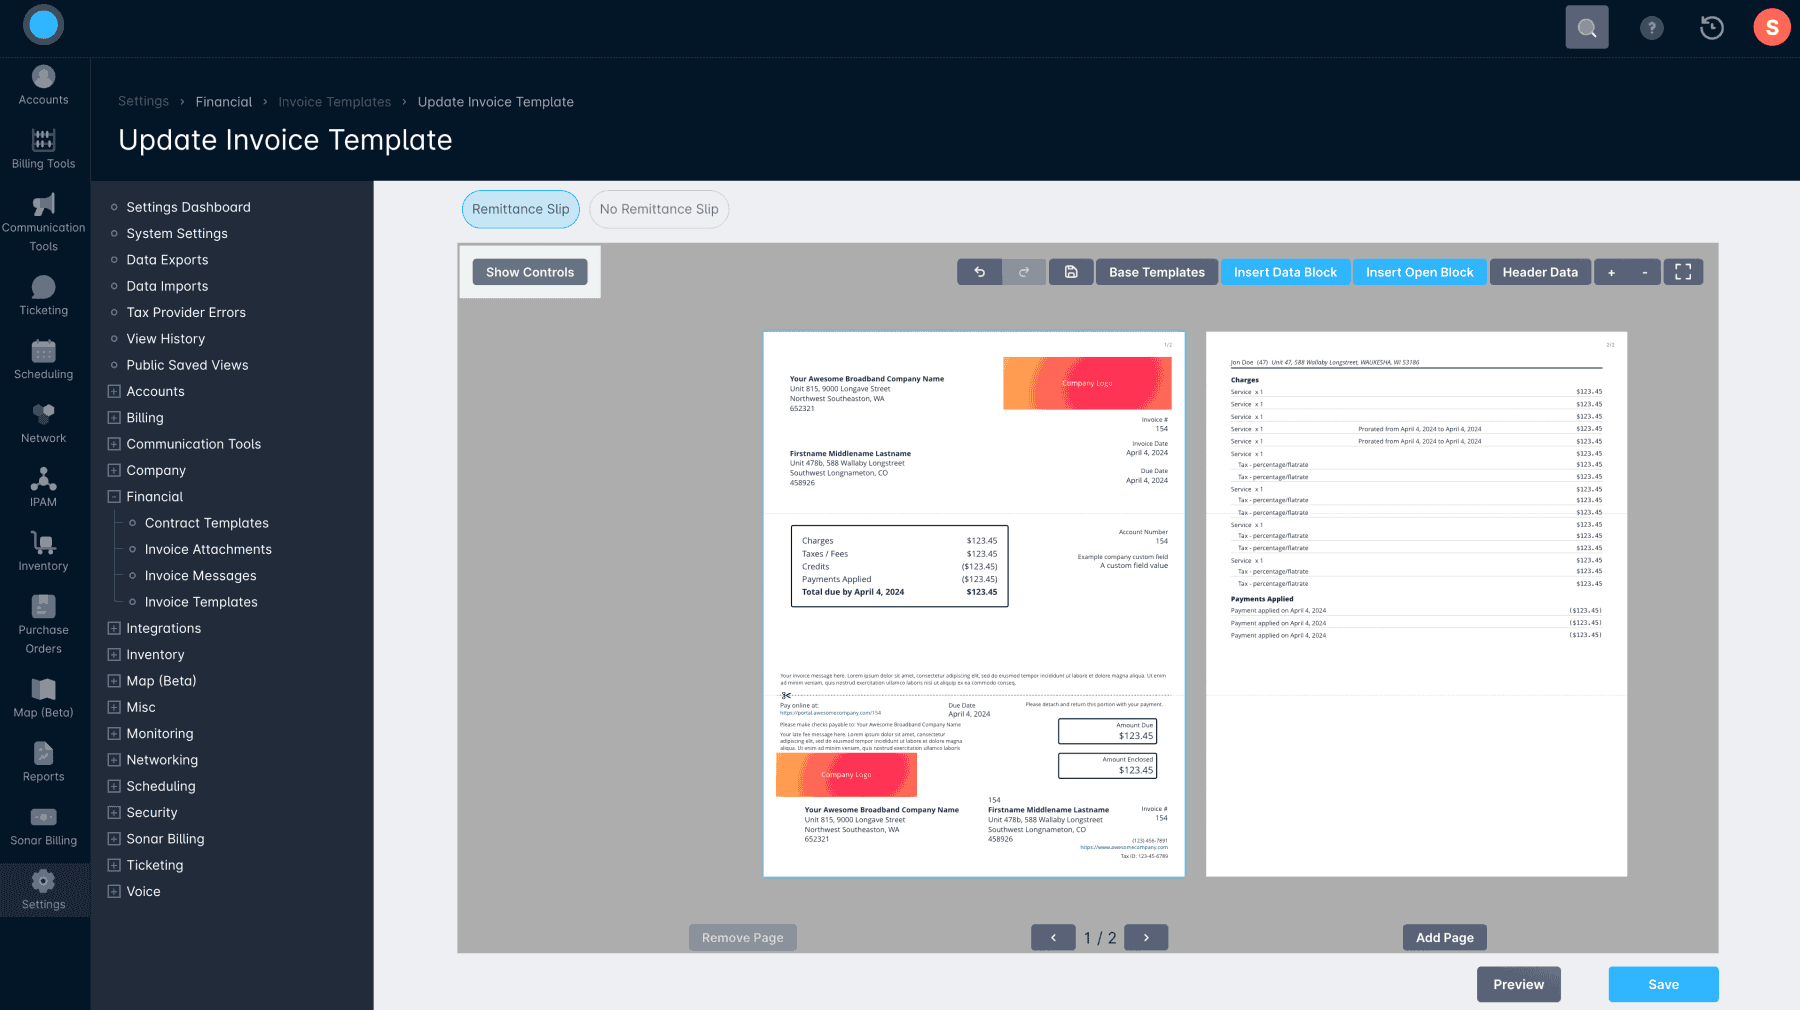
To access Invoice Templates, go to Settings → Financial → Invoice Templates.
From this page, you can view, create, and edit your Invoice Templates.
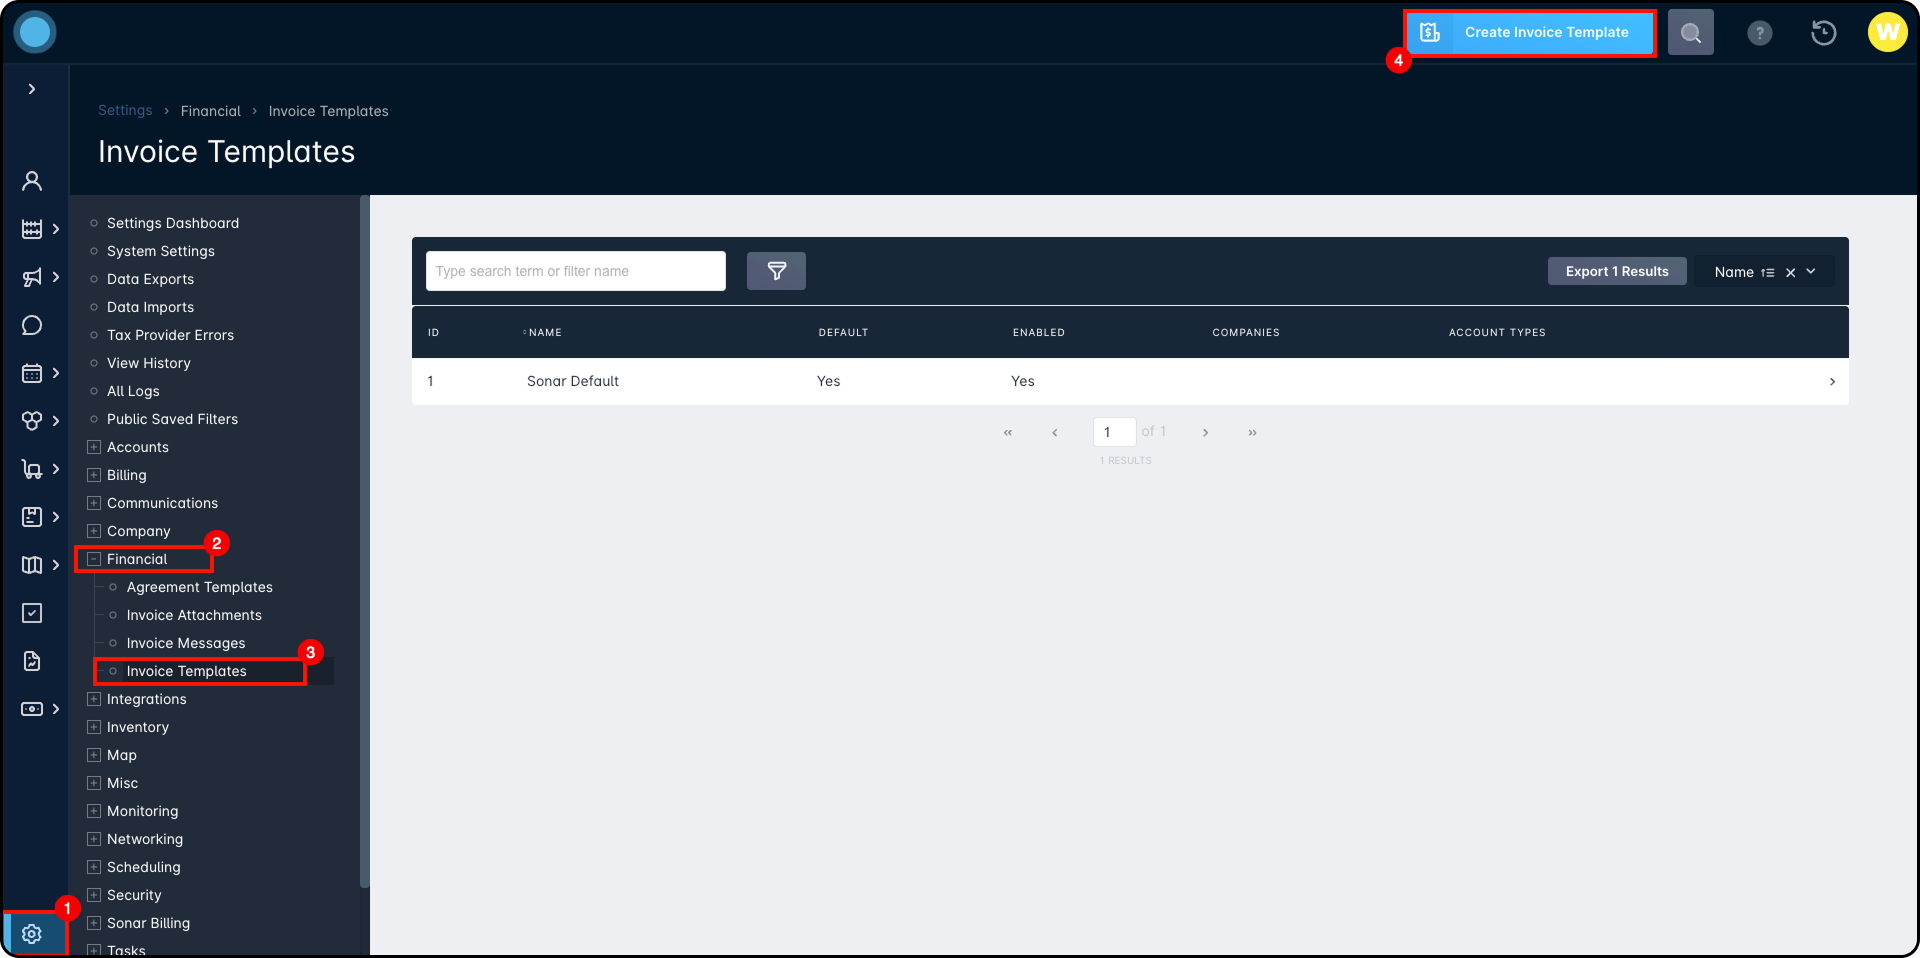
Creating an Invoice Template
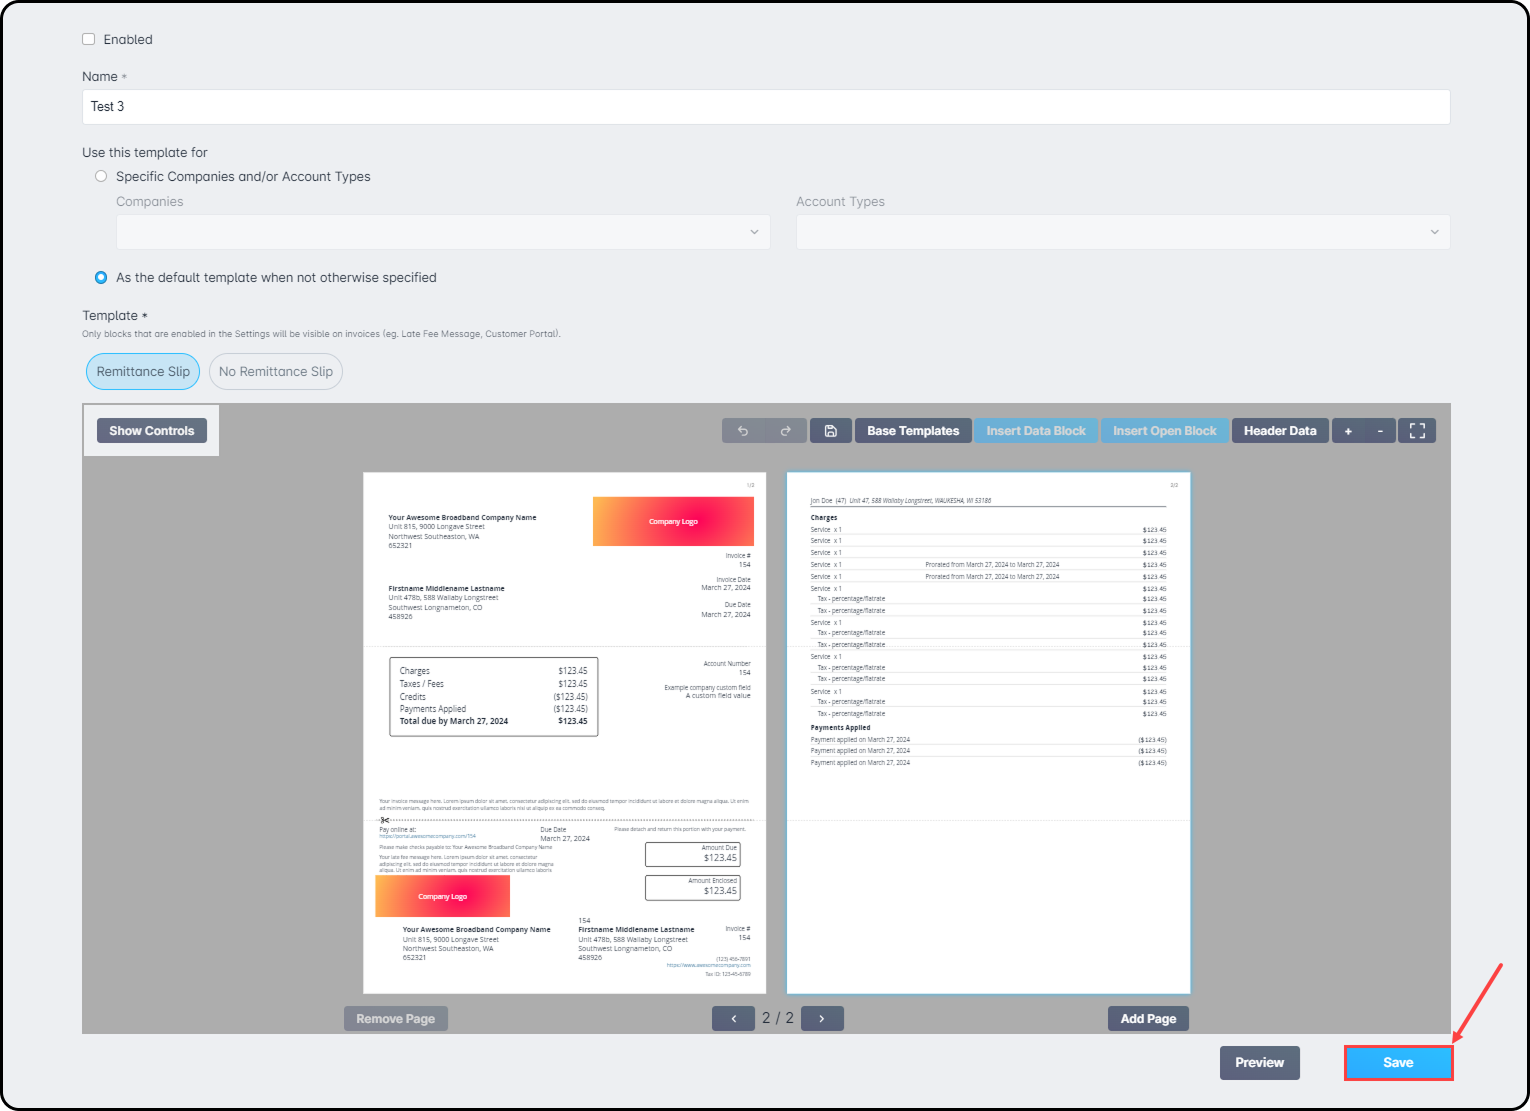
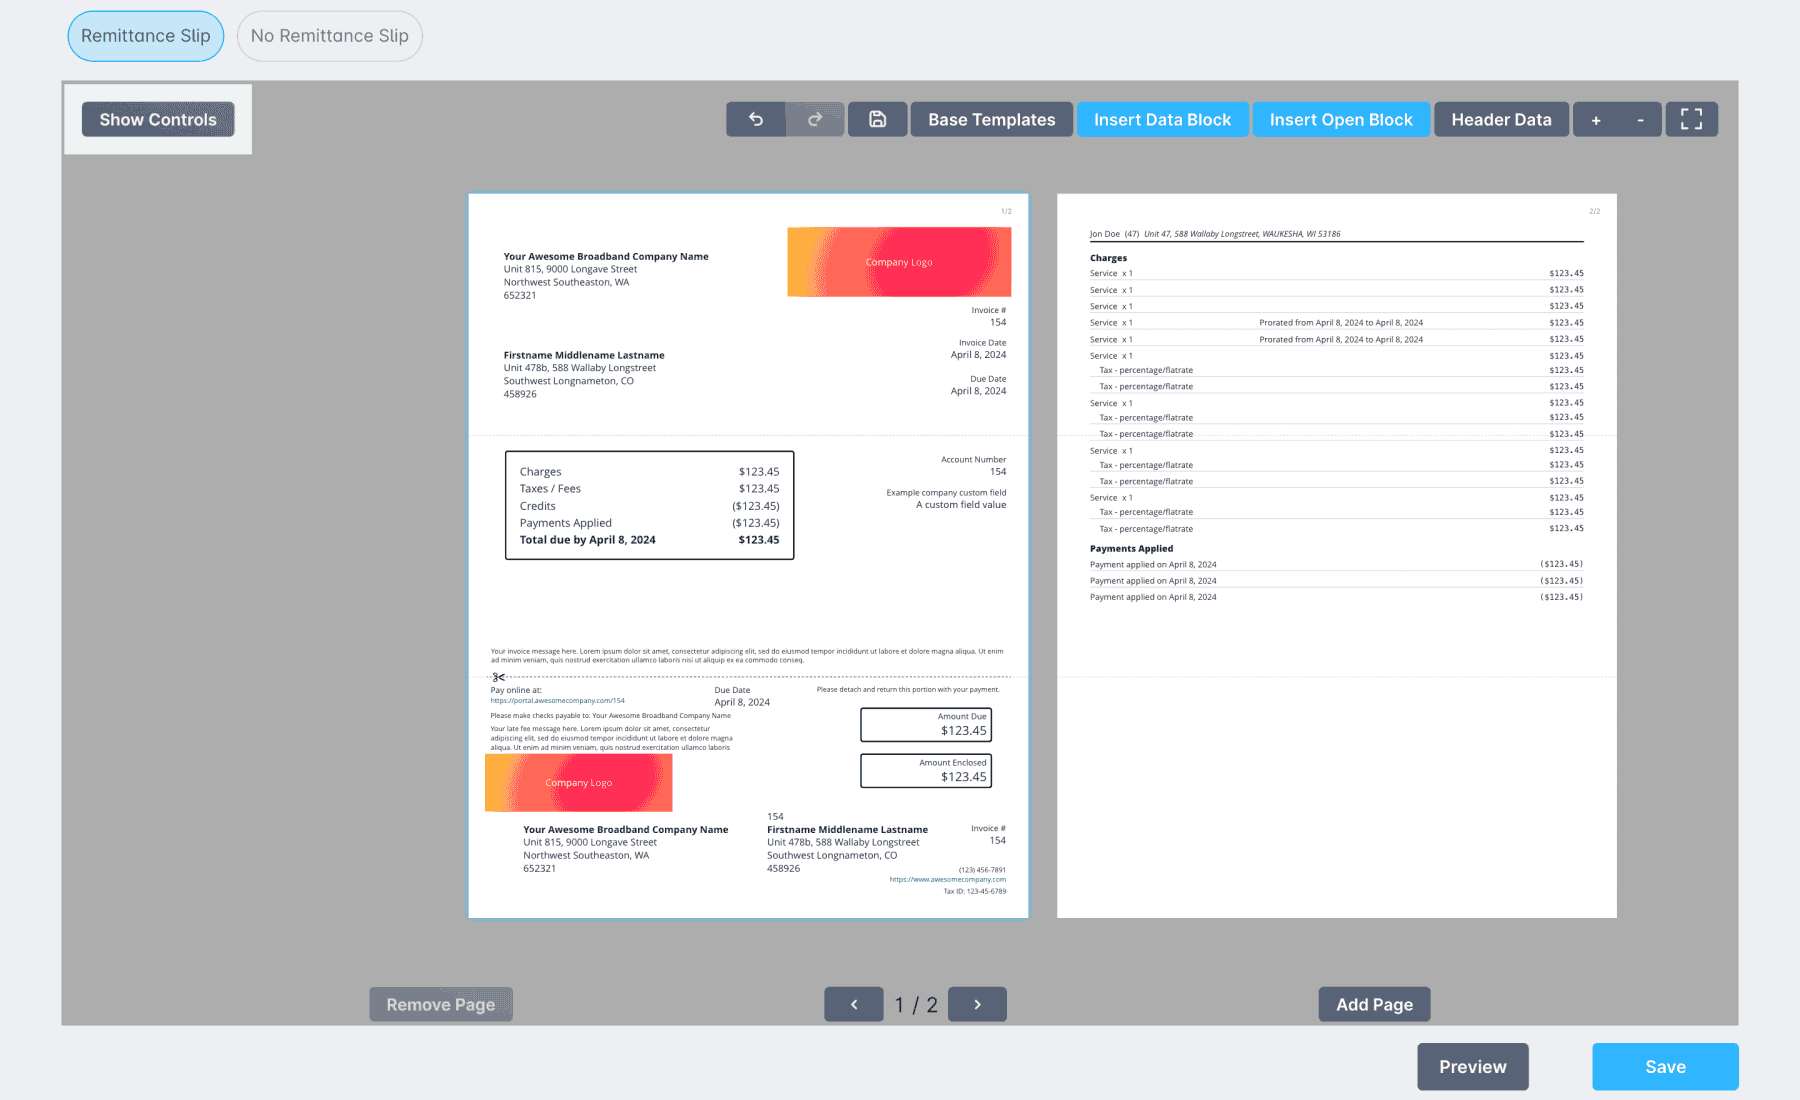
Select Create Invoice Template to open the customization page.

- Enable checkbox: Turn the invoice template on or off.
- Name: Enter a name for the invoice template. This field is required.
- Use this template for: Choose how the template should be used. You can apply it to specific companies, specific account types, or use it as the default template when no other template applies.
- Specific companies and/or Account Types
- Companies: Select one or more companies from the dropdown. This field is optional. If left blank, the template can be used for all companies.
- Account Types: Select one or more account types from the dropdown. This field is optional. If left blank, the template can be used for all account types.
Explanation for how Companies and Account Types Work
When you enable an Invoice Template as a default, only one enabled template can match each default type:
1. Company and Account Type: One template for each unique company and account type pairing.
2. Company Only: One template for each company when no account type is selected.
3. Account Type Only: One template for each account type when no company is selected.
4. General Default: One template with no company or account type selected.
If no matching template is found, Sonar will use the Sonar Default Template. - As the default template when not otherwise specified: Use this option to make the template the default for the selected companies or for your entire instance.You can create or edit multiple default templates, but only one default template can be enabled at a time.
- Specific companies and/or Account Types
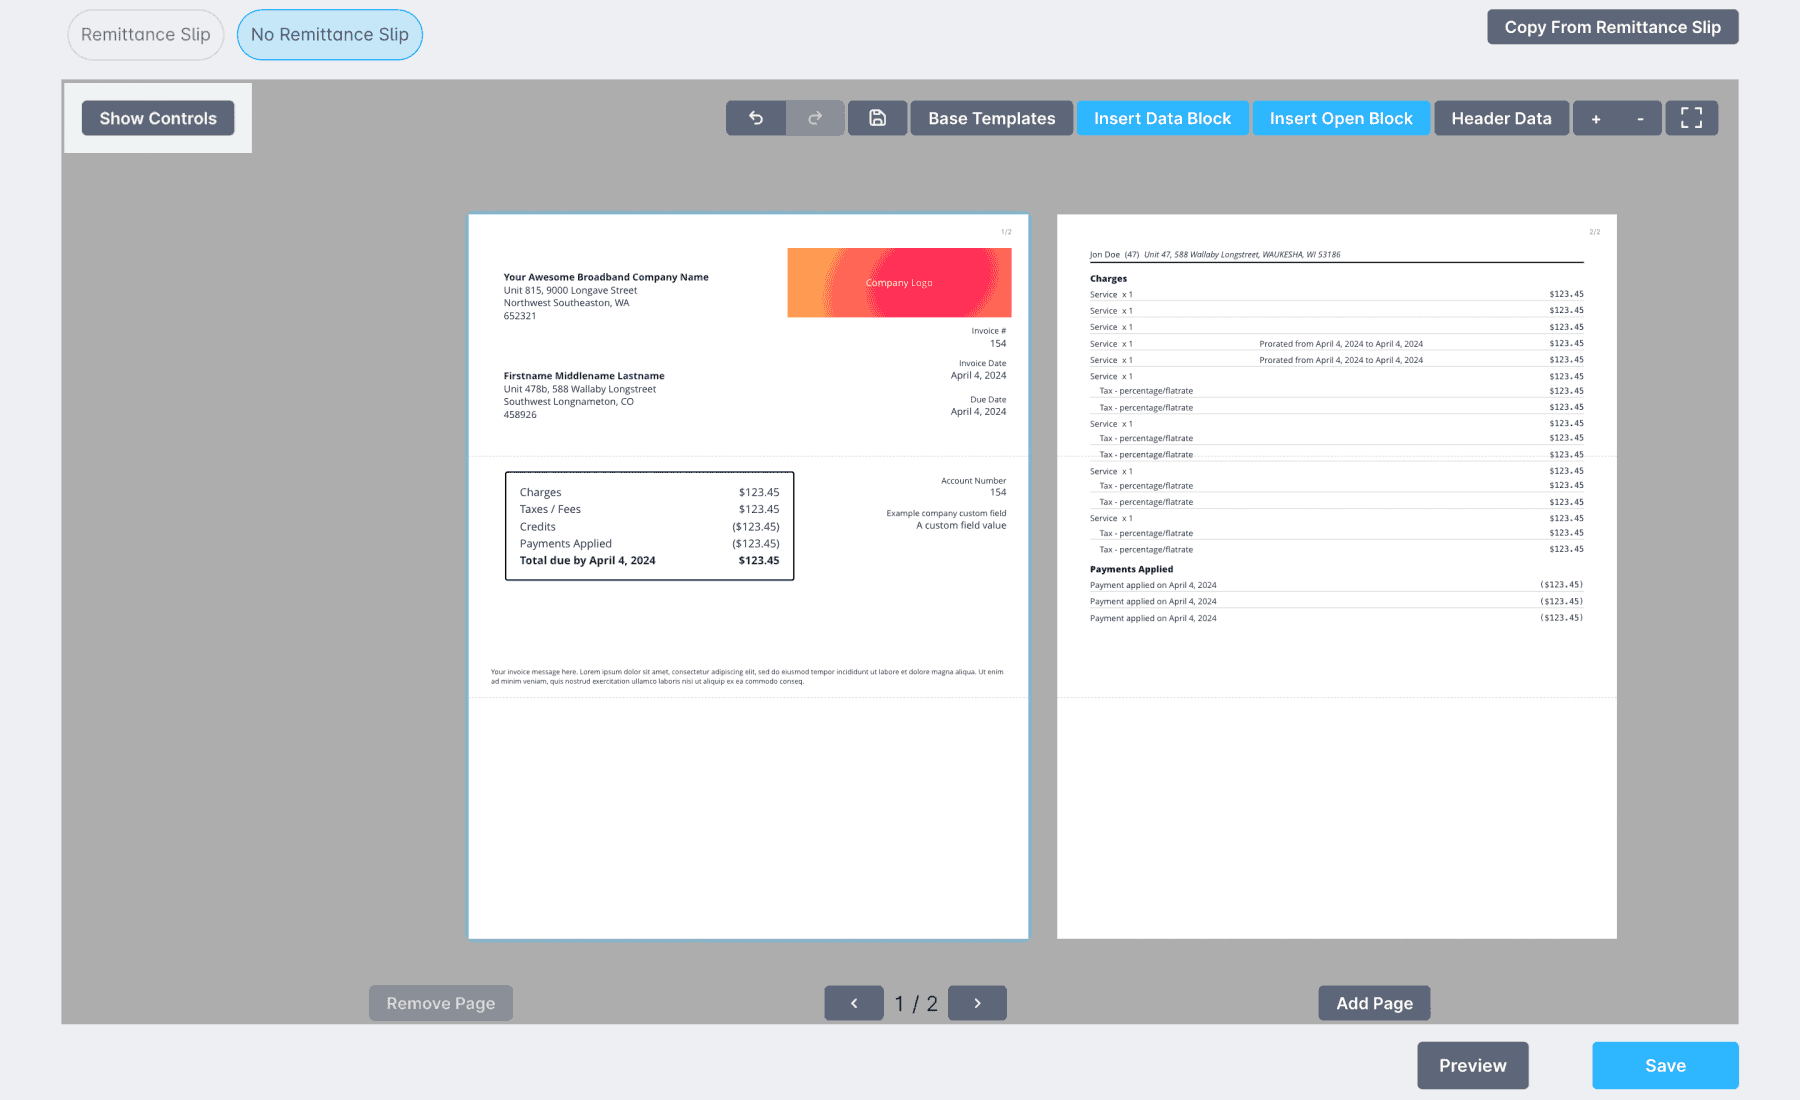
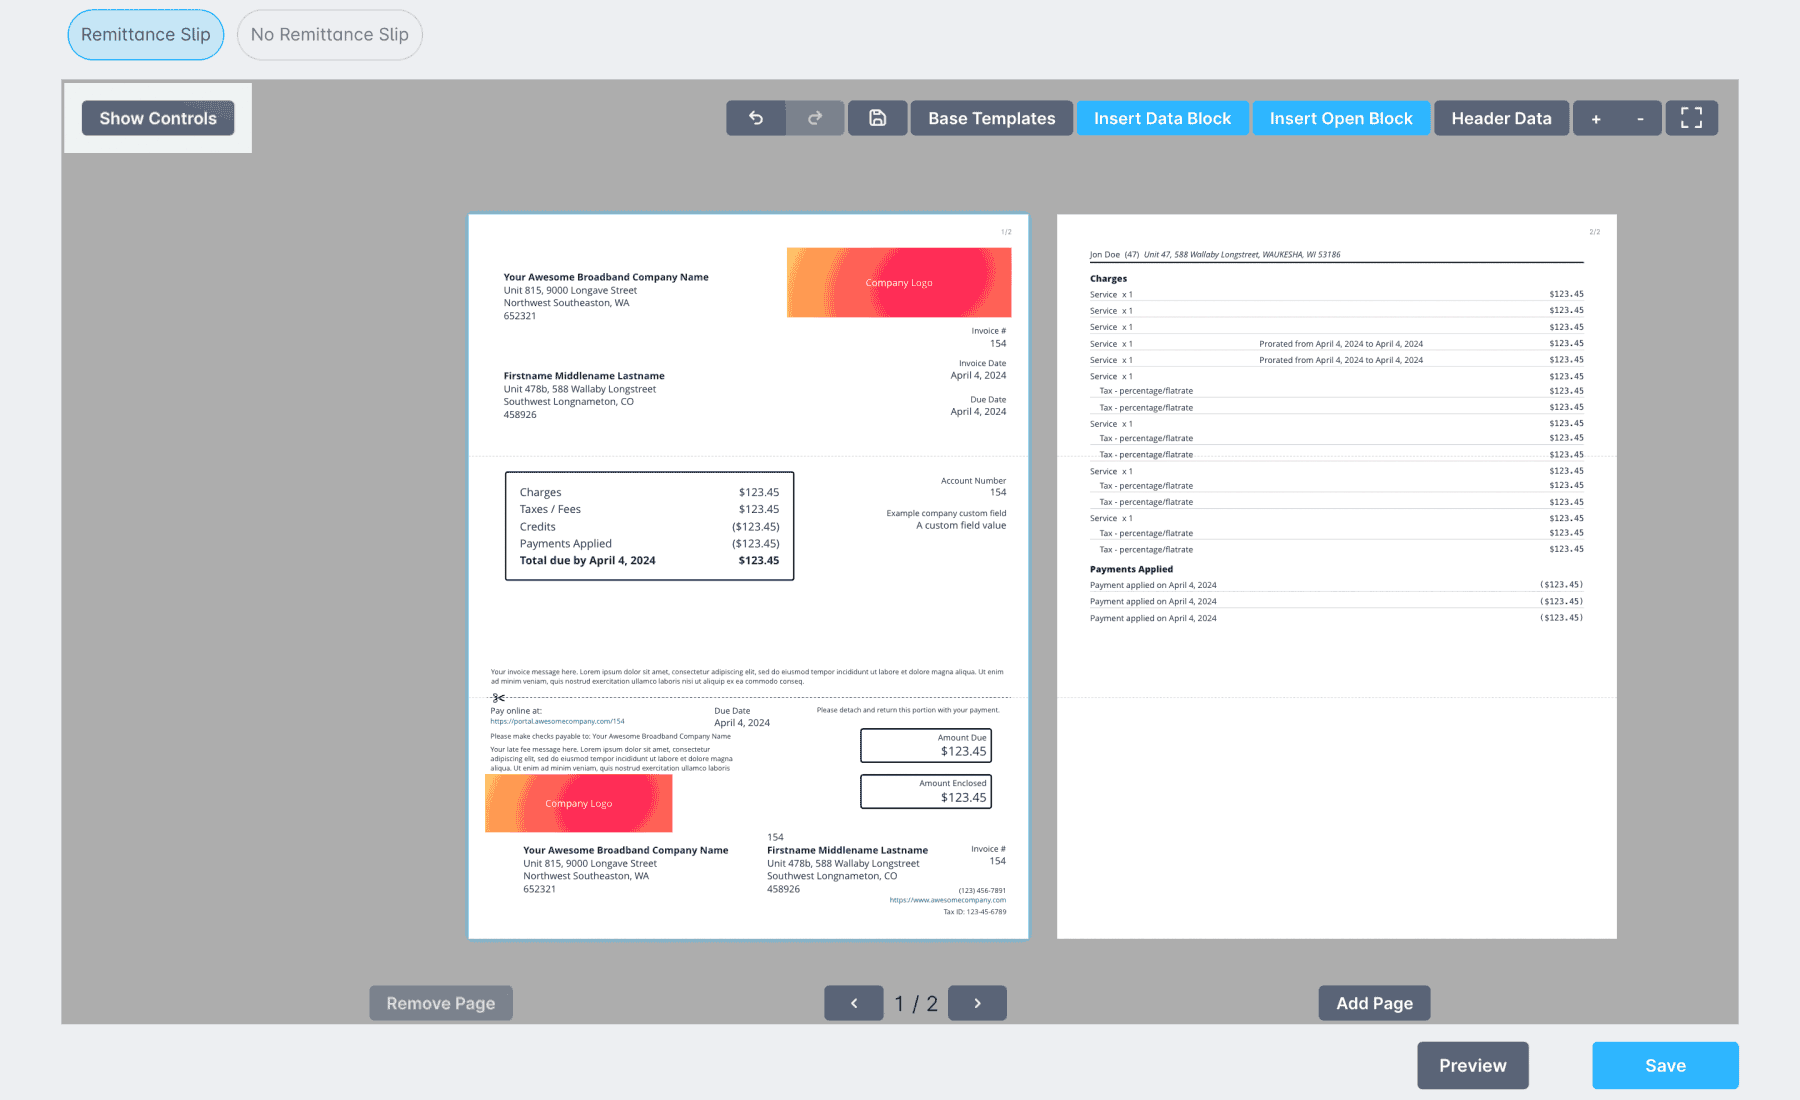
- No Remittance Slip / Remittance Slip buttons: Choose whether the invoice template includes a remittance slip. Both versions must be created for each template.
- Copy From Remittance Slip: Use this button to keep the No Remittance Slip and Remittance Slip versions in sync. It copies the Remittance Slip template content to both versions.

- Copy From Remittance Slip: Use this button to keep the No Remittance Slip and Remittance Slip versions in sync. It copies the Remittance Slip template content to both versions.
- Controls Menu: Use this menu to access tools that help you edit and preview your template, such as the envelope overlay, ruler, grid, margins, and more.
Details for the Controls Menu Options
Controls Menu -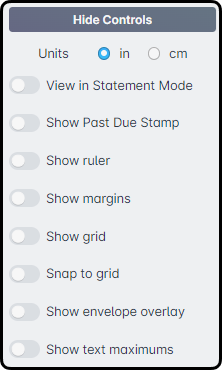
1. Units: Switch between inches and centimeters. This setting applies to the ruler, grid, and snap-to-grid tools.
2. View in Statement Mode: Adds a Previous Balance line item to the Invoice Summary Data Block.
3. Show Past Due Stamp: Displays the past due stamp on the template preview.
4. Show ruler: Shows ruler measurements at the top and left side of the template. Measurements are based on the selected unit.
5. Show margins: Adds a visual margin guide to help with layout planning. Moving the margins does not affect the content.
6. Show grid: Displays a grid to help align Data Blocks on the template. Grid size is based on the selected unit.
7. Snap to grid: Keeps Data Blocks aligned by snapping them to grid lines instead of allowing free movement.
8. Show envelope overlay: Displays a #10 double-window envelope overlay so you can confirm information is placed correctly for mailing.
9. Show text maximums: Shows the character limits for each Data Block. Turning this off does not remove any information. - Undo & Redo buttons: Undo or redo up to 20 changes while customizing the template.
- Save Progress button: Save your current customization progress.
- When creating a new invoice template, selecting Save creates the template and allows you to continue making updates if needed.
- When updating an existing invoice template, selecting Save saves your progress without closing the Update Invoice Template page.
If your template has any empty pages, you will see an error at the bottom of the customization window when you try to save.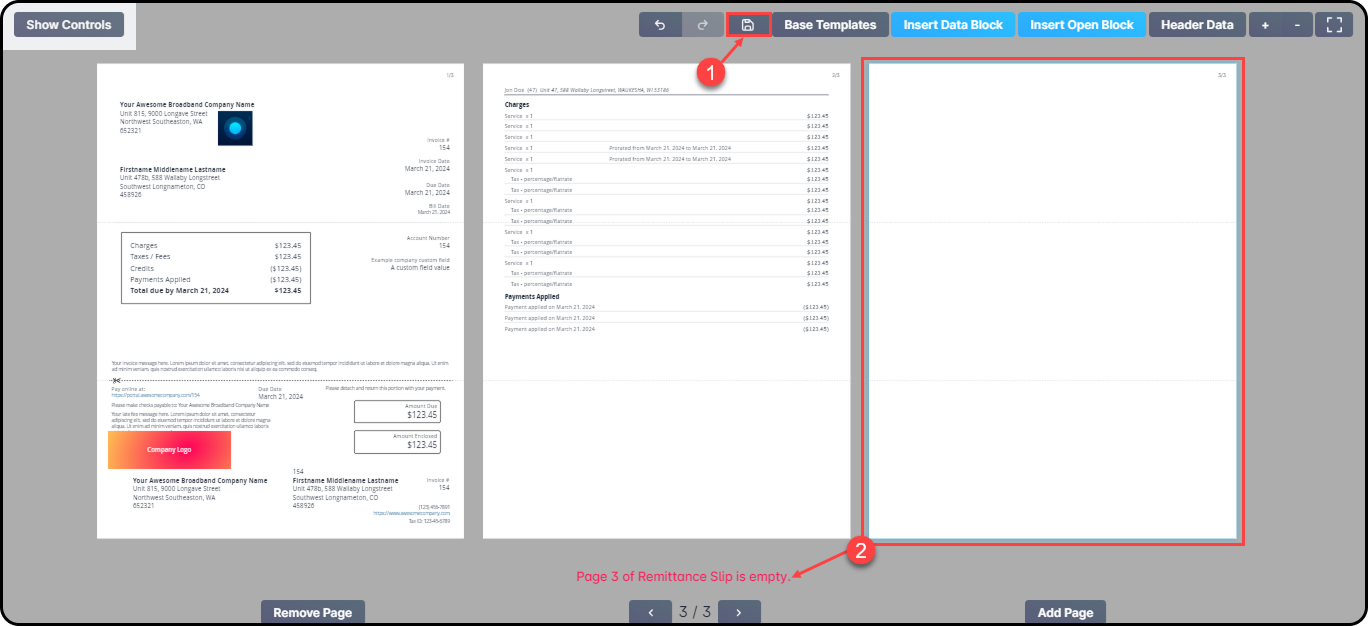
- Base Templates: Choose an existing saved template to use as a starting point. After selecting one, a confirmation window will appear.
- Insert Data Block: Add data fields to your template. Some fields must be configured in your instance before they can appear on invoices.
- Insert Open Block: Add a text or image block to your invoice template.
- Header Data: Customize the page header, when applicable.
Details for Header Data Options
Header Data Button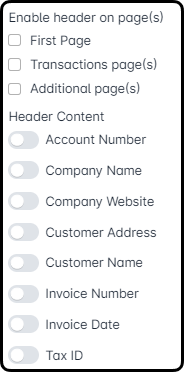
1. Enable header on page(s) section:
a. First Page: Adds the header to the first page of the invoice.
b. Transactions pages: Adds the header to the transaction pages of the invoice.
c. Additional pages: Adds the header to any additional invoice pages.
2. Header Content: Select the information you want to include in the invoice header. This information comes from the customer’s account and must be configured in your instance before it can appear.
3. Reorder header content: Drag and drop your selections into the order you want them to appear. Selecting them in the preferred order can help reduce the need to rearrange them later. - Zoom selectors (+ / -): Zoom in or out while customizing your template.
- Full Screen mode: Customize your template in full screen for a larger, easier-to-use view.Full Screen mode is recommended for the best view while customizing your invoice.
- Remove Page button: Remove pages from the invoice template.Pages 1 & 2 cannot be removed.
- Add Page button: Add new pages to the invoice after page 2.Pages 1 and 2 cannot be reordered.
- Page Selector arrows: Use the arrows to choose the page you want to customize. The selected page will have a blue border.
- Preview button: Open a preview window where you can select and view an invoice.
- Create button: Create and save the invoice template.
- When updating an existing template, this button changes from Create to Save.
Details for Insert Block Options
1. Insert Data Block -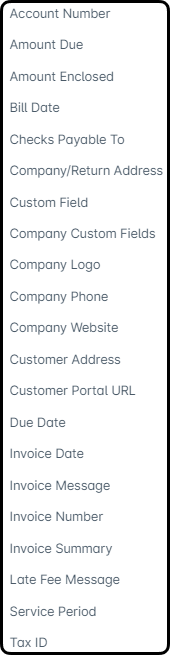
Data Block options: Add information from the customer’s account directly to the invoice. Some Data Blocks must be configured in your instance before the information can appear.
2. Insert Open Block -
a. Text - Add a blank text box to your invoice template.
a1. Bold: Bold all text in the text block.
a2. Italics: Italicize all text in the text block.
a3. Strike through: Add a line through the text.
a4. Underline: Underline all text in the text block.
a5. Text size (AA): Adjust the text size. The maximum is 255 characters.
a6. Text alignment: Choose how the text is aligned in the block.
a7. Border selector: Add or remove a border around the text block.
a8. Border Radius: Round the corners of the text block border.
a9. Variables: Insert available variables into the text block.
a10. Trash can: Delete the text block. A confirmation window will appear.
b. Image: Open a window where you can select an image from your files.
b1. Lock Aspect Ratio: Resize the image without changing its proportions.
b2. Border selector: Add or remove a border around the image block.
b3. Border Radius: Round the corners of the image block border.
b4. Trash can: Delete the image block. A confirmation window will appear.
3. Data Block Edit Toolbars:
a. Data block with a header:
a1. Label icon: Remove the header from the block.
a2. Text size (AA): Adjust the text size. The maximum is 255 characters.
a3. Text alignment: Choose how the text is aligned in the block.
a4. Border selector: Add or remove a border around the block.
a5. Border Radius: Round the corners of the block border.
a6. Trash can: Delete the block. A confirmation window will appear.
b. Data block without a header:
b1. Text size (AA): Adjust the text size. The maximum is 255 characters.
b2. Text alignment: Choose how the text is aligned in the block.
b3. Border selector: Add or remove a border around the block.
b4. Border Radius: Round the corners of the block border.
b5. Trash can: Delete the block. A confirmation window will appear.
c. Image block -
c1. Aspect ratio lock: Keep the image’s proportions while resizing it. If this is turned off, the image can be stretched to fit the full block.
c2. Border selector: Add or remove a border around the block.
c3. Border Radius: Round the corners of the block border.
c4. Trash can: Delete the block. A confirmation window will appear. - Copy & Paste: Copy content from another location and paste it into your invoice. Pasted items are added as Open Blocks.Copy and paste is currently only available through keyboard shortcuts:
Copy: CTRL/CMD + C
Paste: CTRL/CMD + V
Copy and paste buttons will be added in a future update.- Add text to an invoice by copying it from another location and pasting it into the template.
- Copy and move Image Blocks across the invoice to help customize the design.
- Copy content from one invoice and paste it into another. When copied, the invoice content will include the data’s JSON information.
- Move pasted content after it has been added to the invoice.
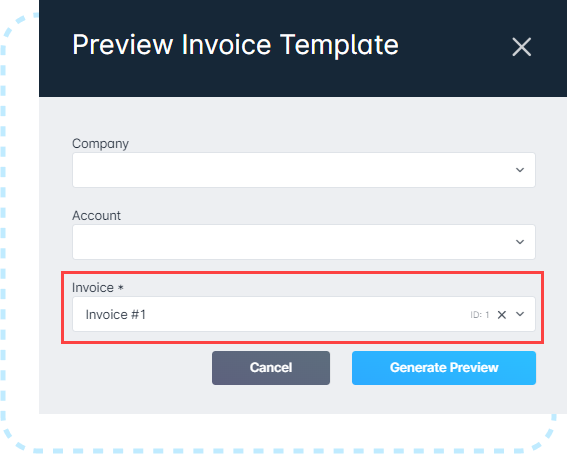
Using Preview
Before saving a new or updated Invoice Template, use Preview to see how it will look. Selecting Preview opens a window where you can choose the template based on the settings you selected during setup.
Updating an Invoice Template
To update or delete a saved Invoice Template, select Edit or use the dropdown arrow to select Delete.
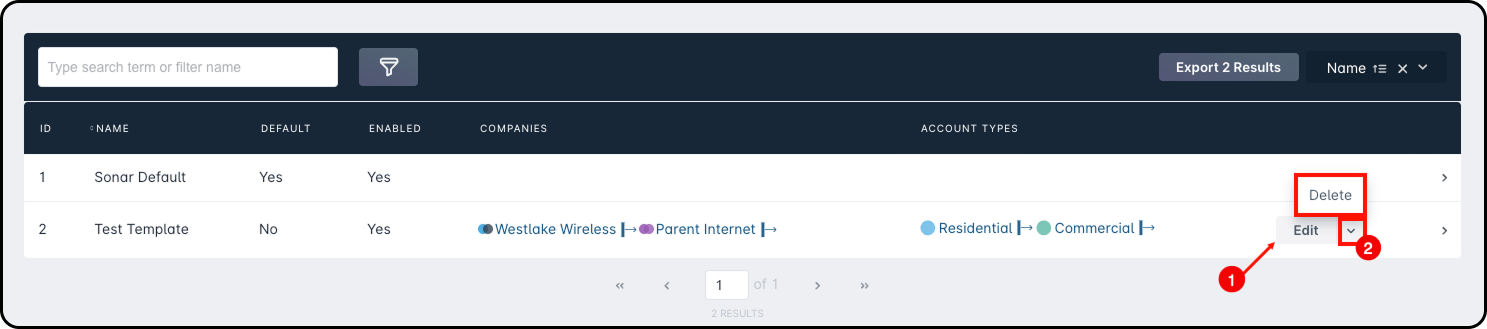
After selecting Edit, the Updating Invoice Template page will open. This page includes the same options as the Create Invoice Template page.
The only difference is that the bottom-right button changes to Save.
How Each Customization Option Functions
- No Remittance Slip/Remittance Slip buttons:

- Sync Versions:
- Controls Menu:

- Undo/Redo buttons:

- Save button:
- Base Templates:

- Insert Data Block:

- Insert Open Block:
- Header Data Button:
- Zoom selectors “+” or “-”:

- Full Screen mode:
- Add, Remove, & Page Selector buttons:
- Preview button:
- Copy & Paste:Unlike other Invoice Template tools, Copy and Paste do not have buttons on the page. Use keyboard shortcuts instead:
Copy: CTRL/CMD + C
Paste: CTRL/CMD + V
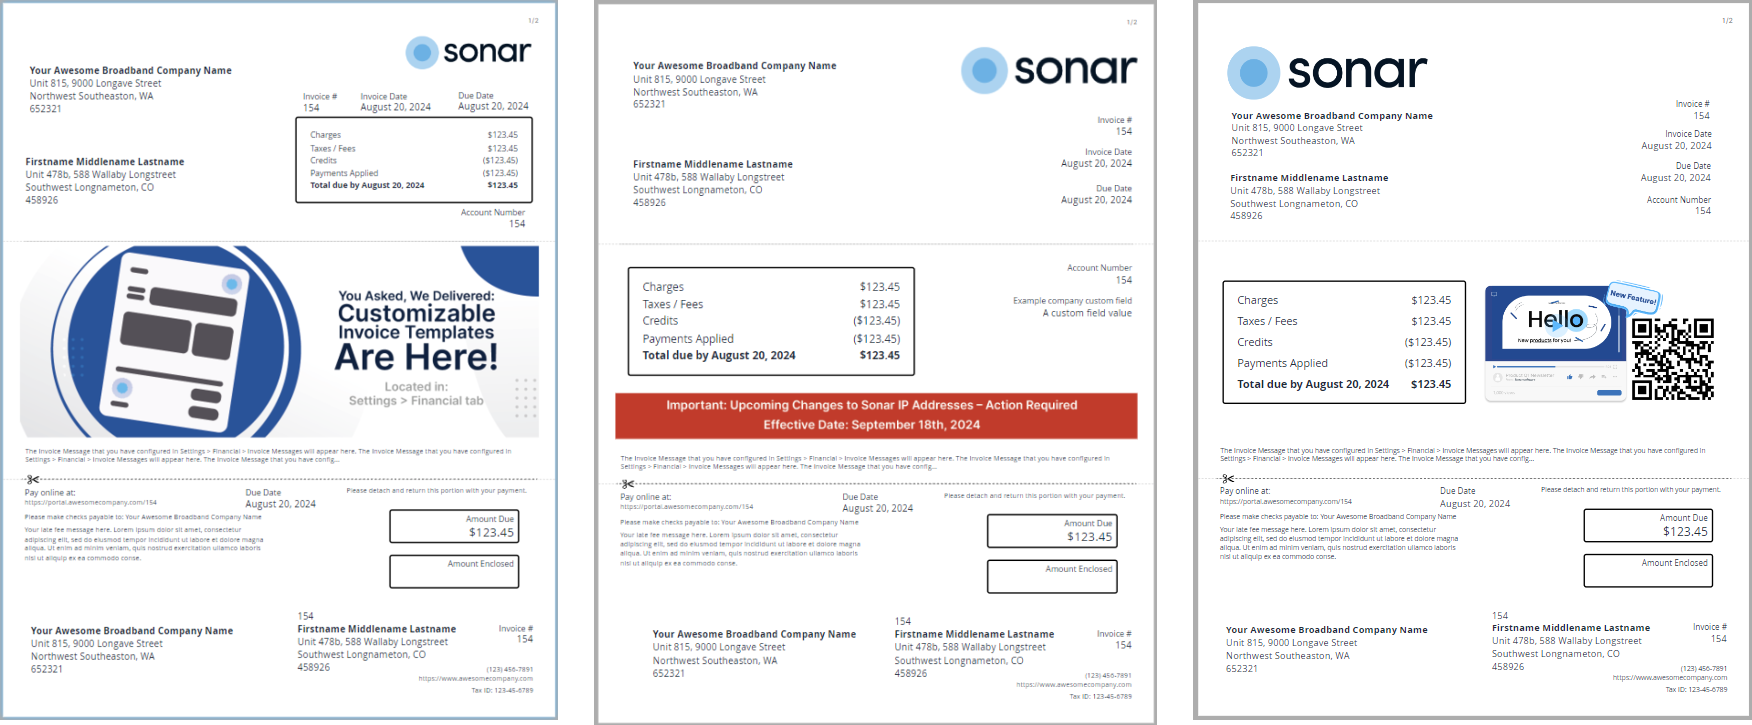
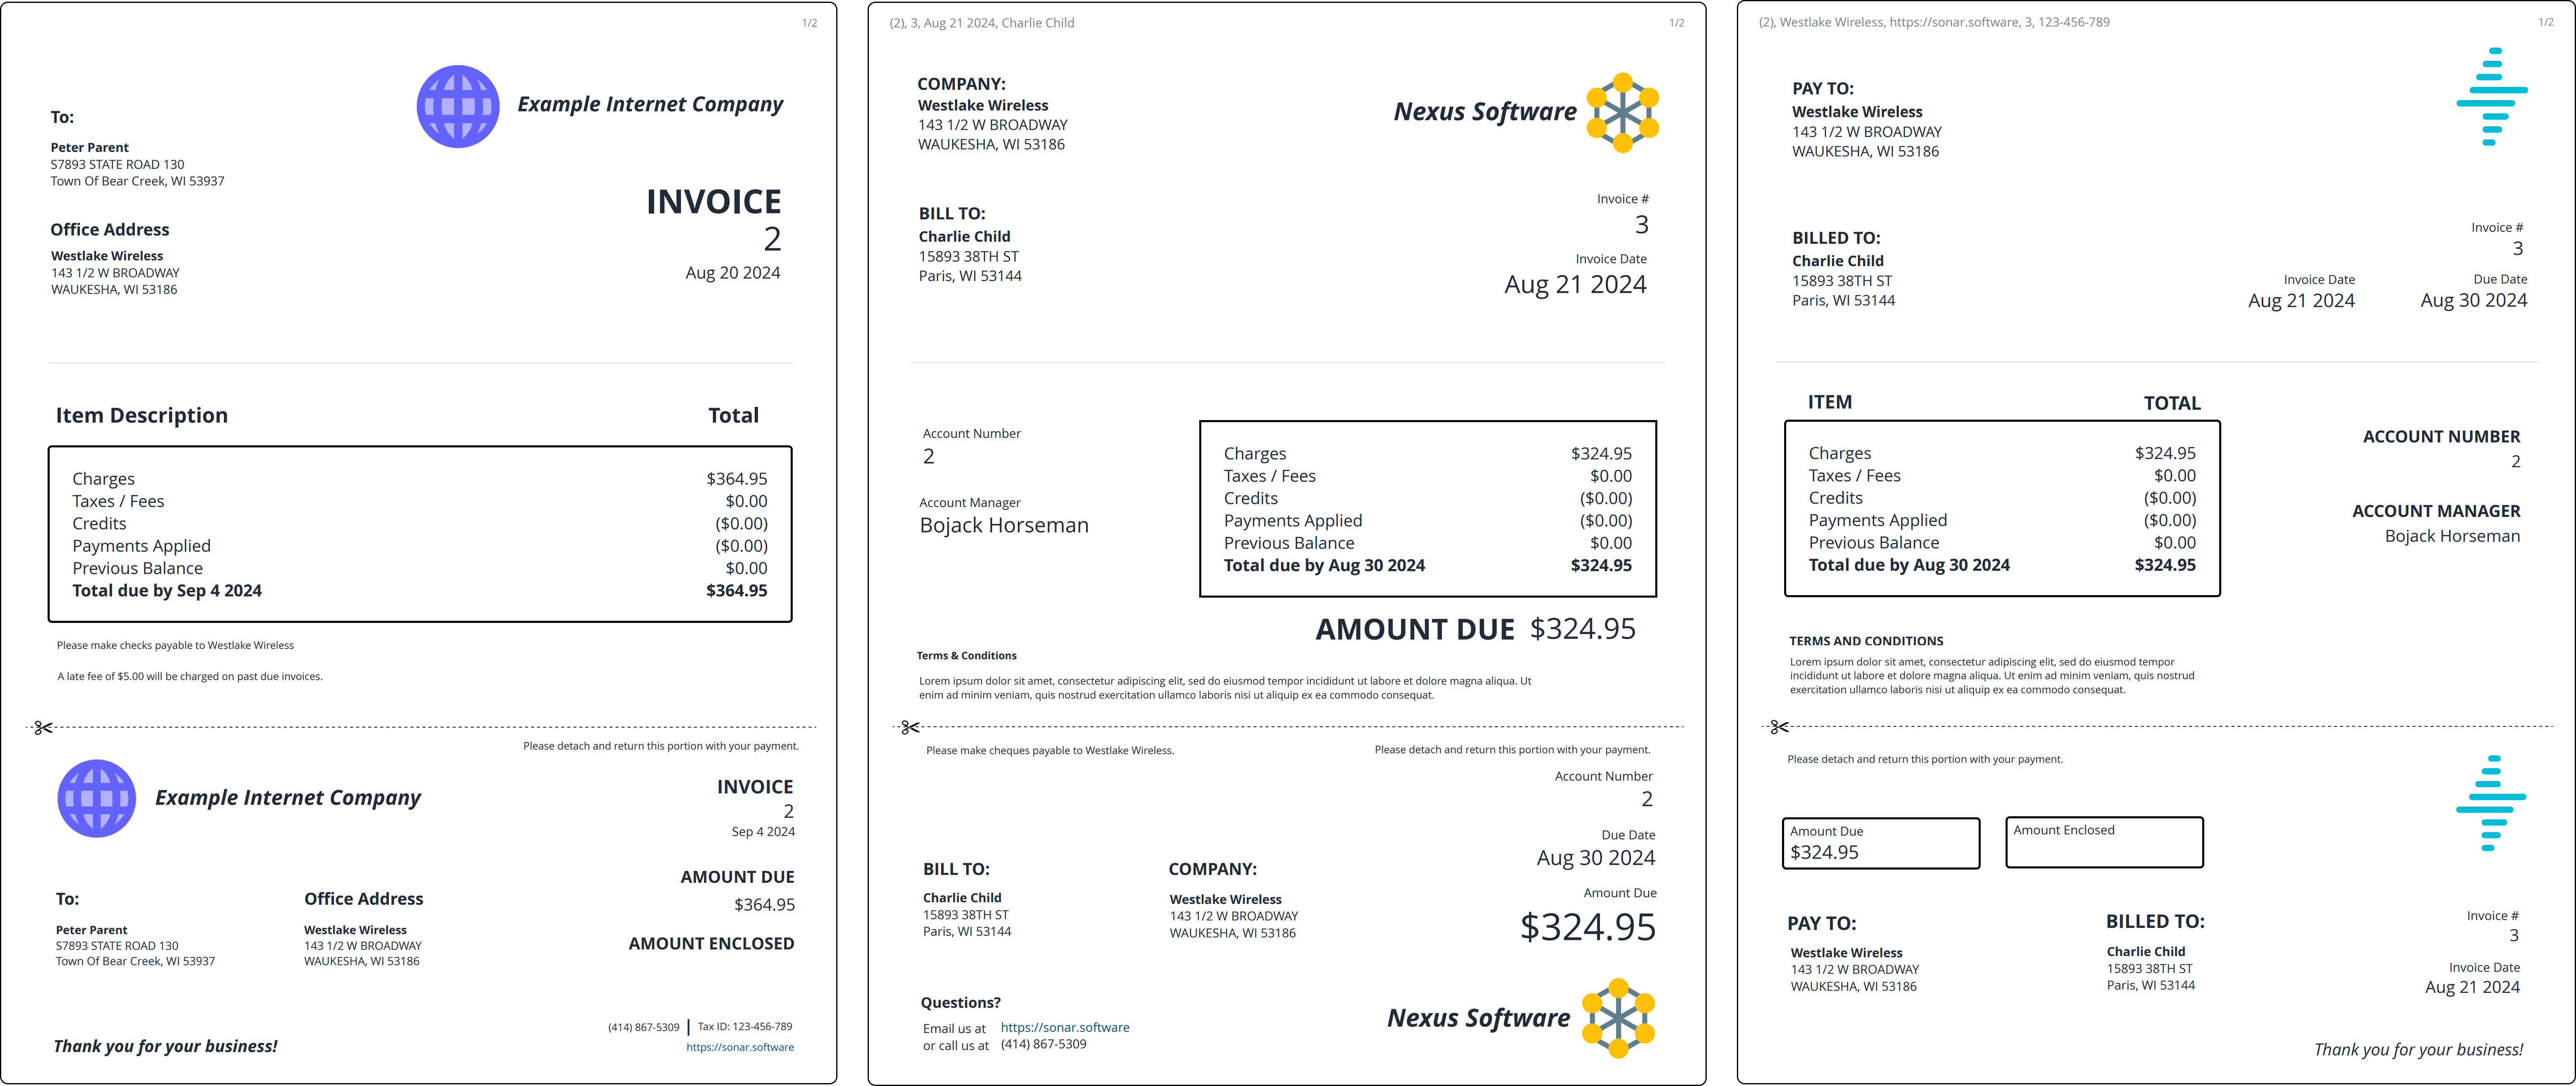
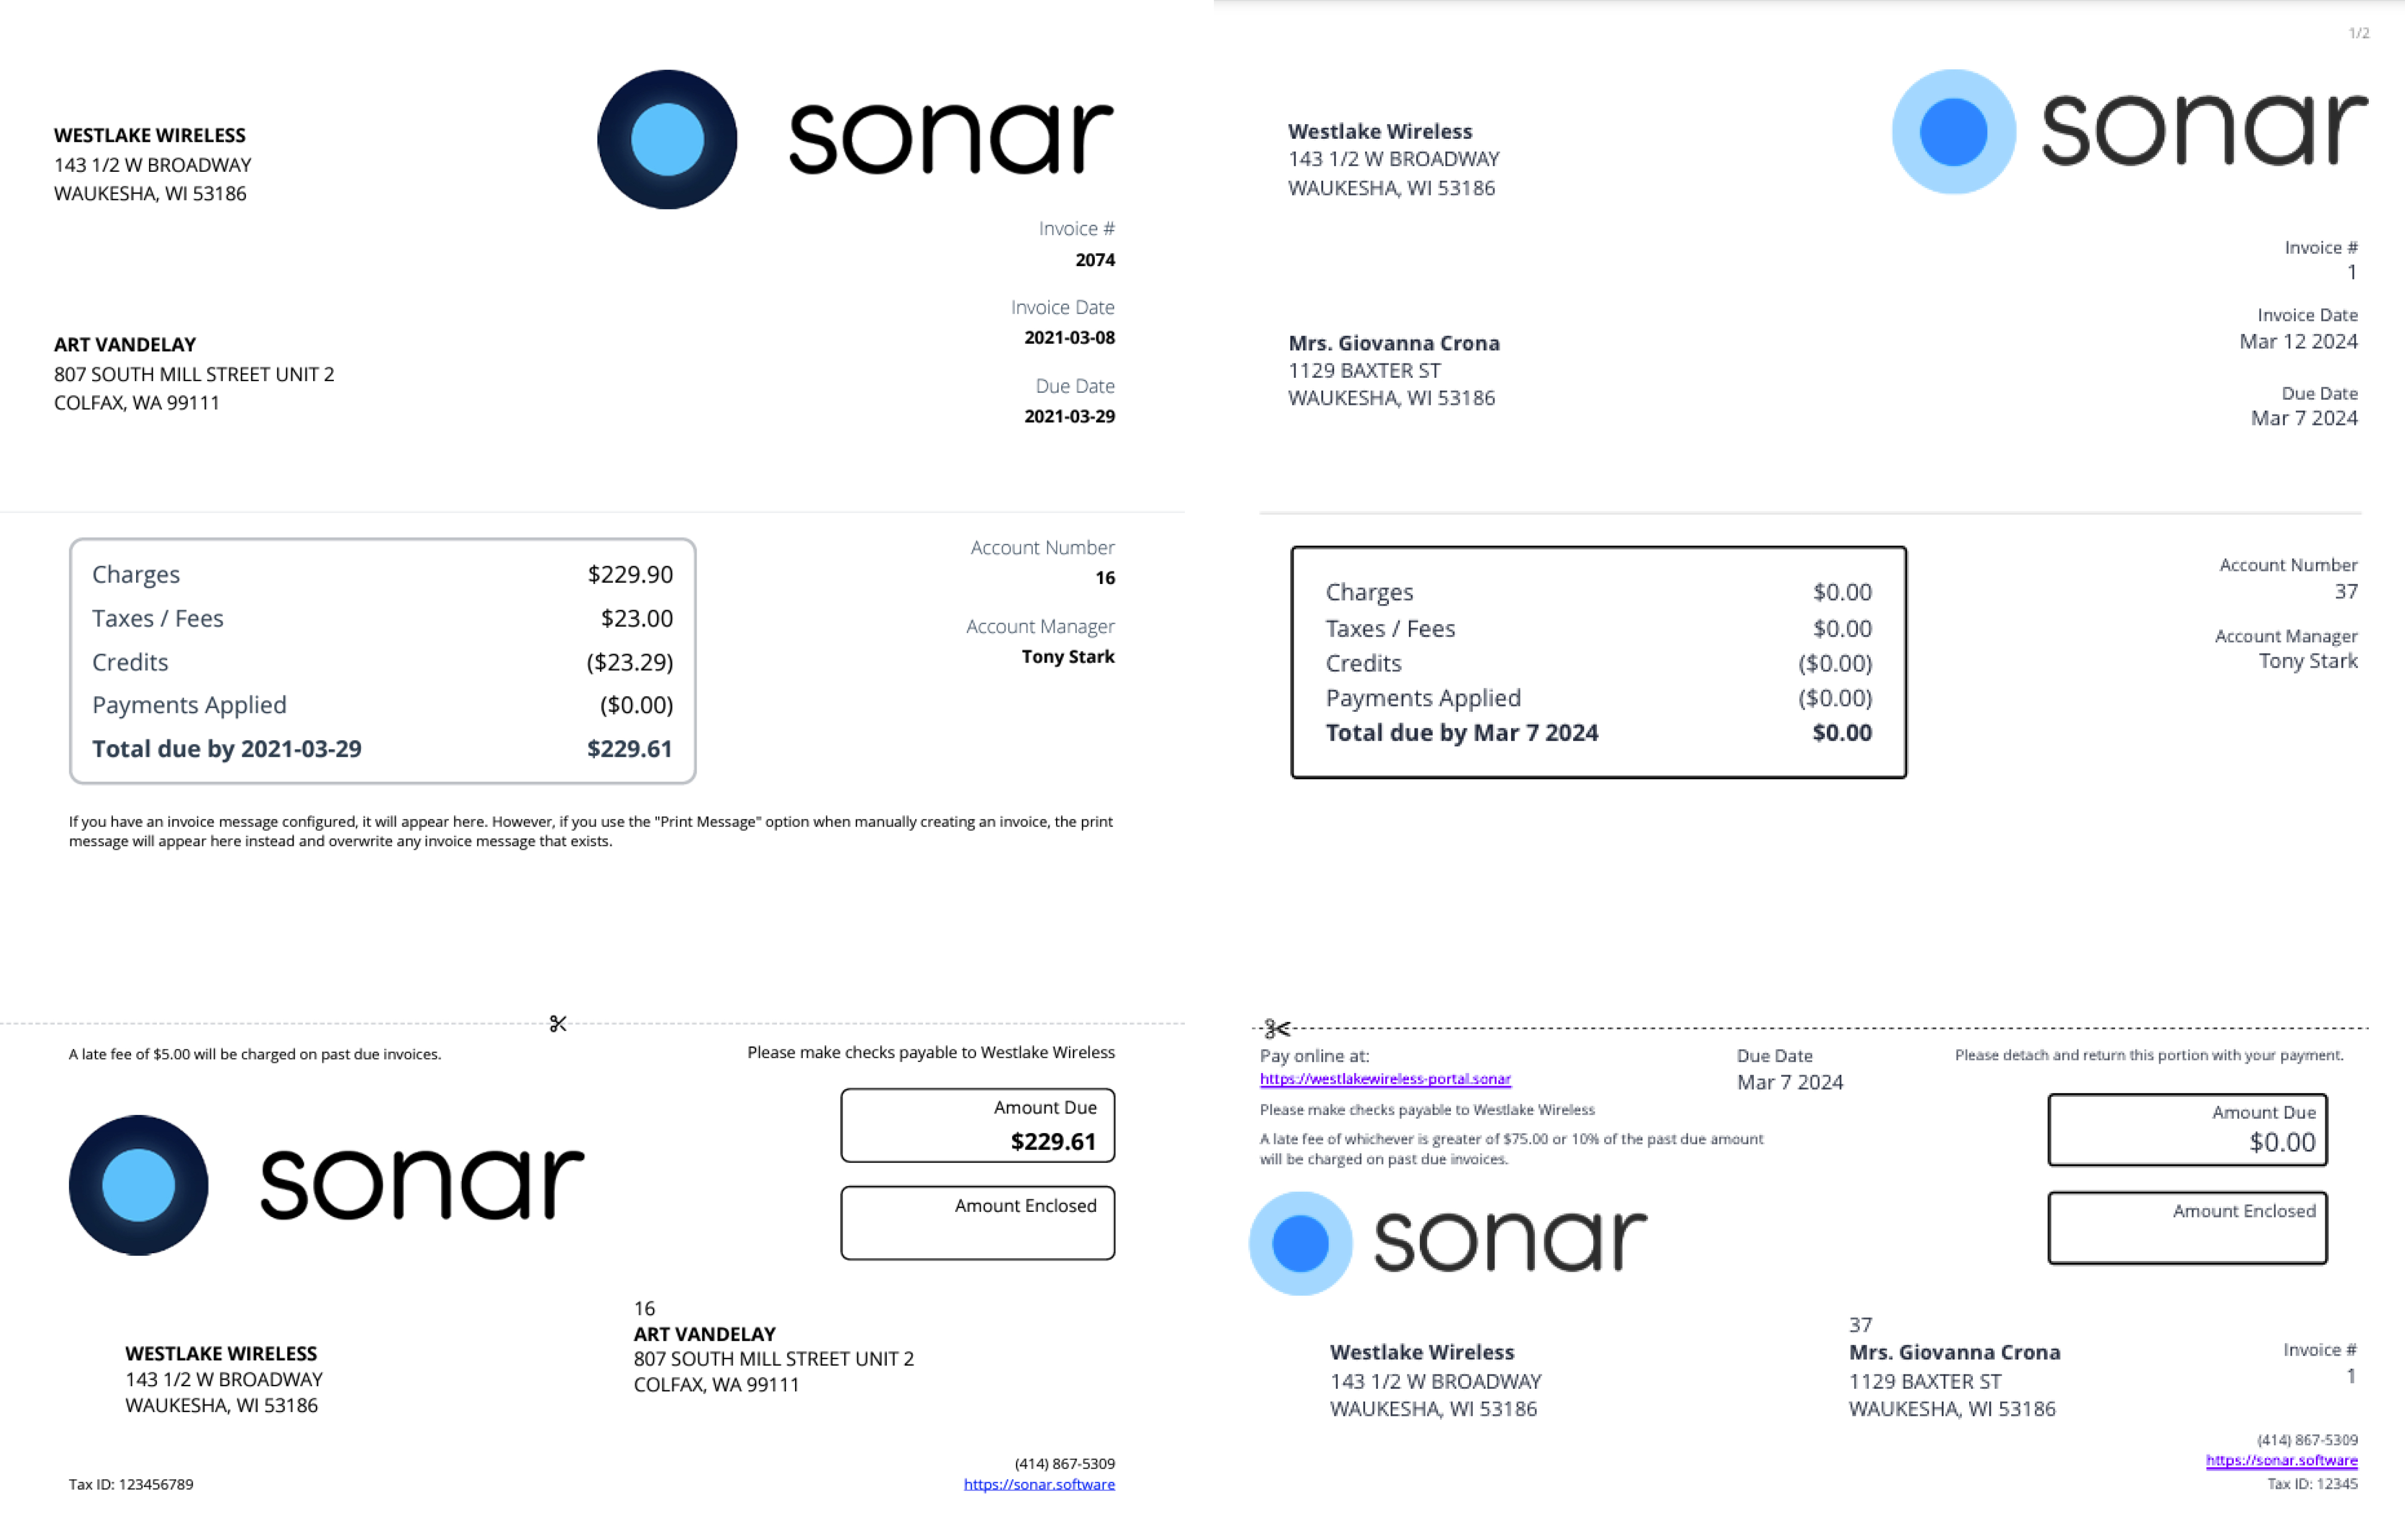
Template Examples