Table of Contents
Inventory List View: Overview
 Updated
by Mitchell Ivany
Updated
by Mitchell Ivany
Read Time: 14 mins

The main Inventory screen in Sonar is made up of 4 separate sections/views and can be accessed by clicking on the "Inventory" option from the main navigation panel. The different sections are highlighted below.
- Inventory Items List view: allows you to view all inventory items added to your instance, along with key details for each item and the ability to perform various actions for the items.
- Generic Inventory Items List view: similar to the Inventory Items view but contains generic inventory items only, allowing you to view key details and assign and/or consume the items.
- Inventory Item Management page: clicking the ID will populate the corresponding Inventory Item Management page where you can view details for, and take action on, the specific inventory item.
- Inventory Item Sidebar: clicking the arrow of a line item here will populate a sidebar, providing you quick information to details such as device status, assignee, etc. This information is similar to that available via the Inventory Item Management Page, which can also be reached by clicking "Manage" in the sidebar view.
- Inventory Model Management page: provides a view of all models in your instance, allowing you to add new models, add new items, and perform actions on the various inventory models.The Inventory Model Management page is covered in its own article that can be found here: Inventory Model Management: General Overview
We'll look at each section and its components within this article, which should provide you with the context you need to better understand the relation between the different sections of the Inventory page.
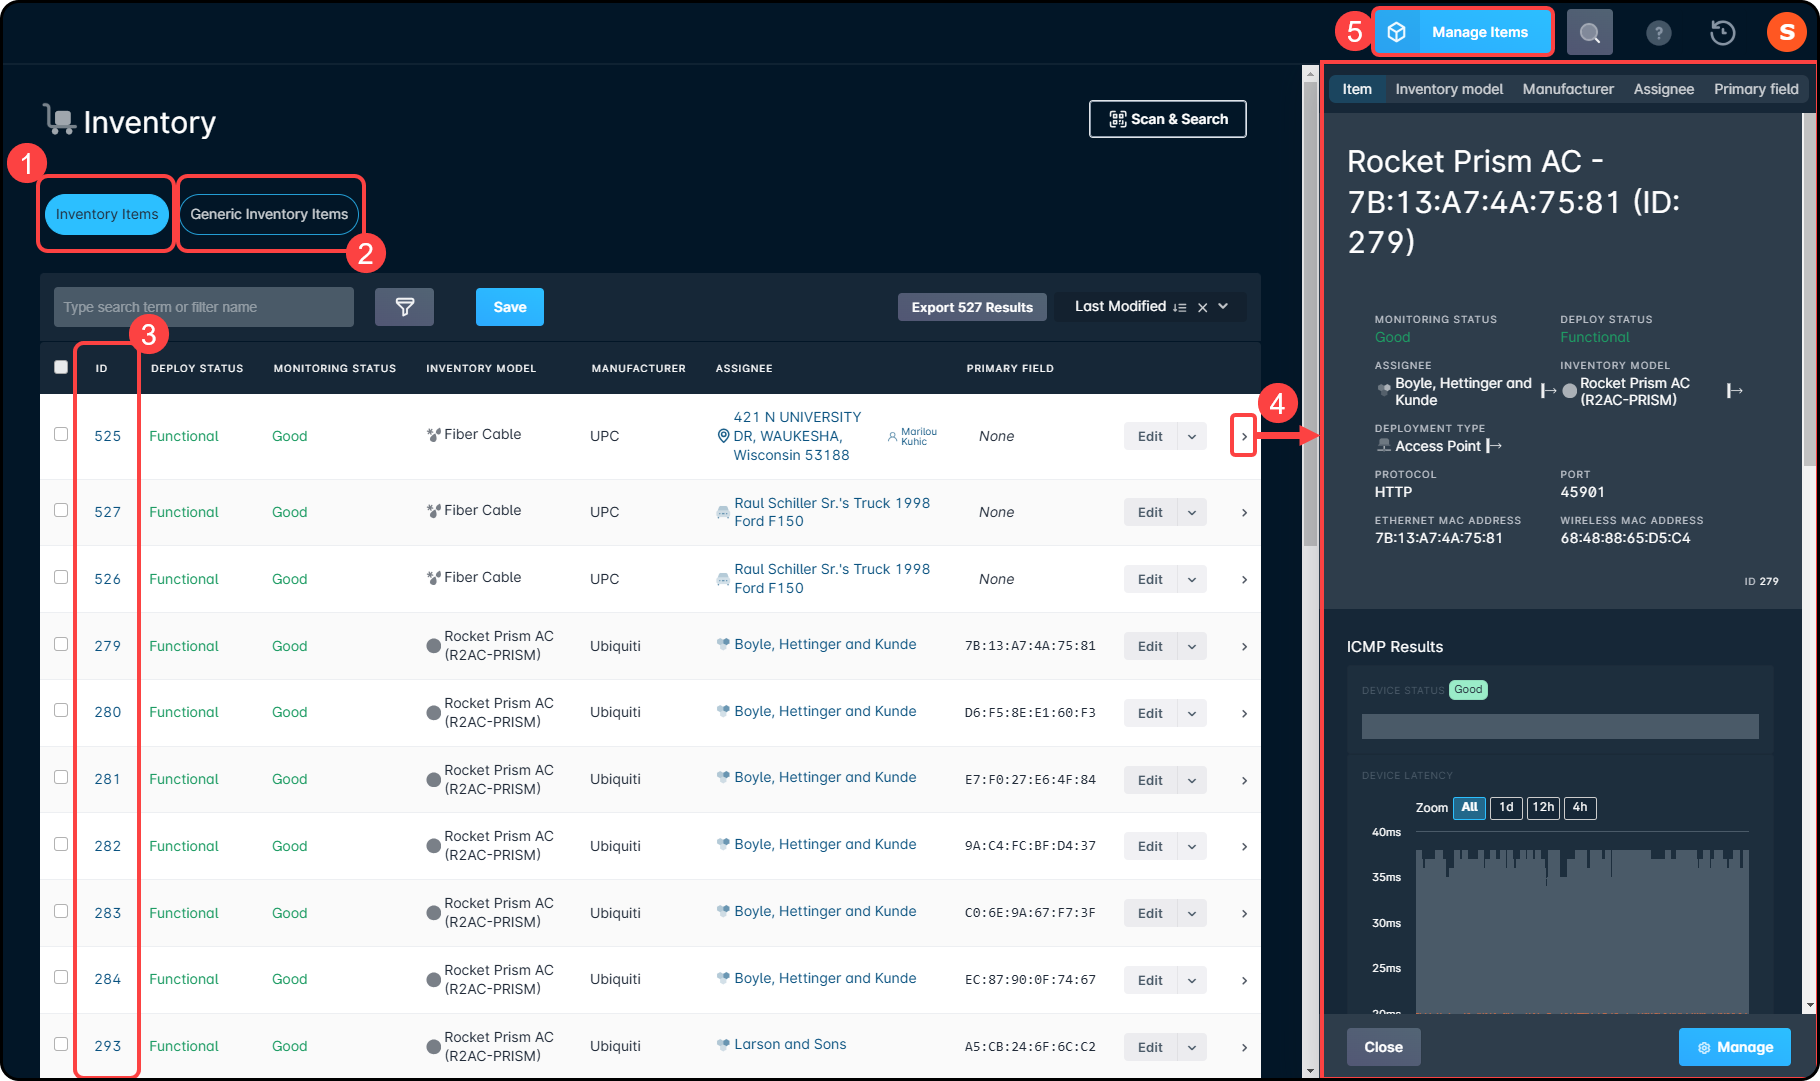
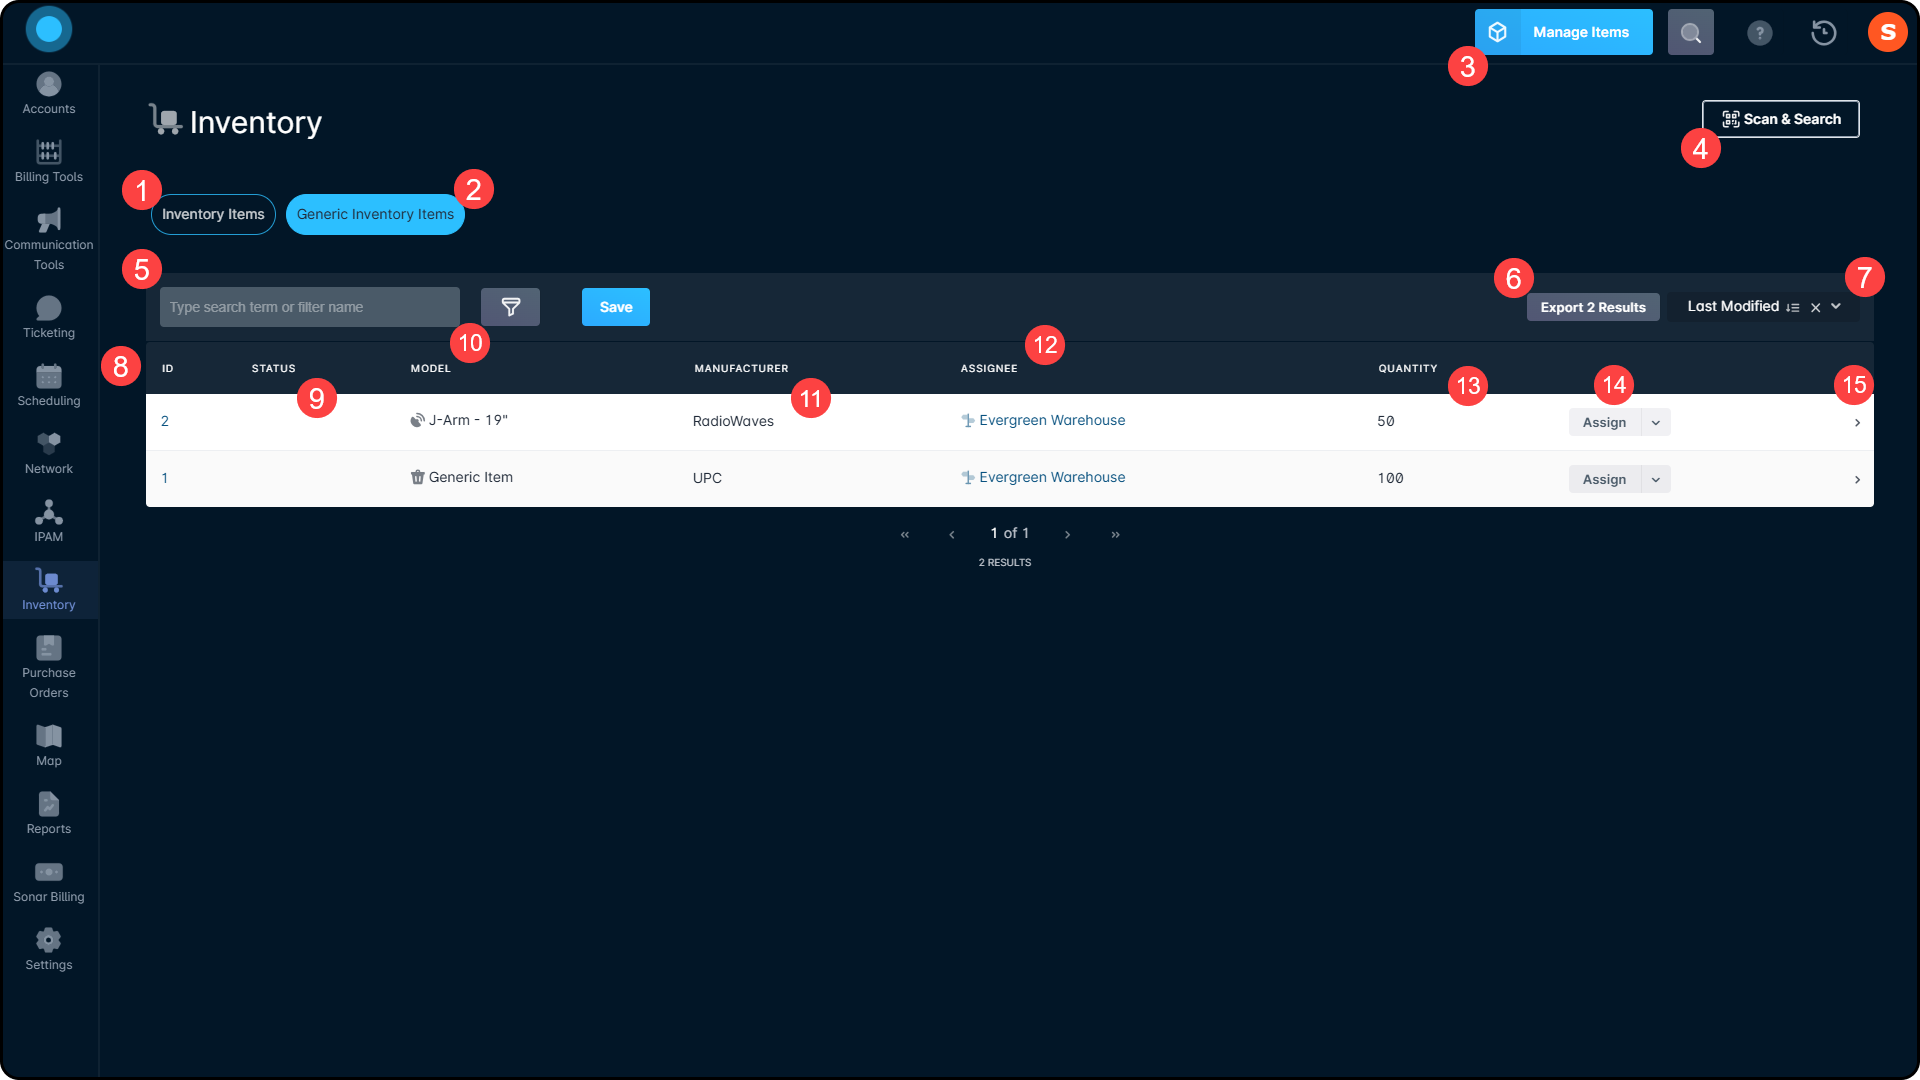
The Inventory Items List View
All non-generic inventory items that have been added to your instance will be viewable from here and contain key details at a quick glance, such as the status, model, manufacturer, and assignee. An overview of the information and actions available from this screen is provided below.

- Inventory Items: navigates you into the Inventory Items List view.
- Generic Inventory Items: navigates you into the Generic Inventory Items view.
- Manage Items: navigates you into the Inventory Model Management page (which is covered in a separate article here).
- Scan & Search: navigates you to a new page allowing you to use any barcode scanner connected to your system and scan for the searched device. This tool will look through any fields you've configured on the model, such as MAC Address, Serial Number, or IMSI.
 Most generic barcode scanners are compatible with the inventory scanning feature available in Sonar, such as the NADAMOO Wireless Barcode Scanner.
 - Filtering: this is where you can drill further into your data with the use of filters, or search for existing items with the Search box.For more information on filtering, refer to the Filtering: Overview article.
- Export Results: allows you to export the results of inventory items in the table, based on the filters that are applied. The list can be exported as JSON or CSV.
- Sort Order: provides the ability to sort the list of inventory items based on values such as ICMP Status Last Changed, Parent Inventory Item ID, Purchase Price, etc.
- Mass Edit: the checkboxes for each item allow you to perform mass edits on all of the inventory items you have selected. For more information on using the mass edit feature, please read the section below on Mass Editing Inventory Items.
- ID: displays the inventory item's unique ID. Clicking on the ID will bring you to the corresponding Inventory Item Management page.
- Deploy Status: displays the inventory items' status, being Functional, Failed, or Lost.
- Monitoring Status: displays the inventory items' status as it relates to SNMP and ICMP monitoring statistics. For more information on gathering network stats, refer to the Building a Monitoring Template article.
- Inventory Model: the model of the inventory item - clicking here will open a sidebar with additional details for the inventory model.
- Manufacturer: the inventory model manufacturer of the inventory item - clicking here will open a sidebar with additional details for the inventory model manufacturer.
- Assignee: the assignee that the inventory item is currently assigned to is displayed here, including the account, if applicable - clicking here will open a sidebar with additional details for the assignee.
- Primary Field: the primary identifier for the inventory item, based on the inventory model fields you have set up for your inventory models - clicking here will open a sidebar with additional details for the primary inventory model field.
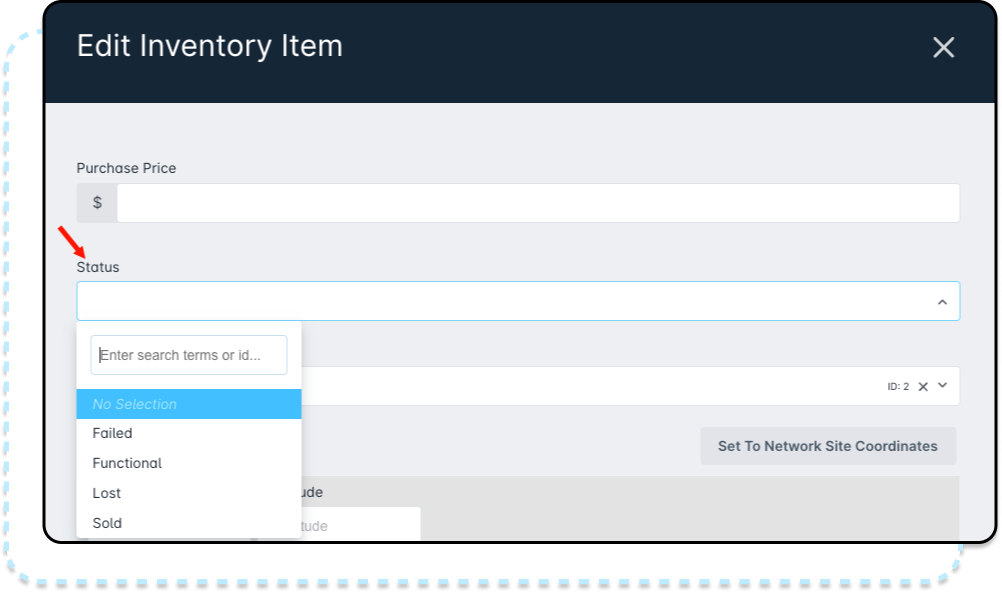
- Edit Menu: by clicking "Edit" you are able to edit an inventory item's purchase price, status, and deployment type, as well as set the inventory to the network site coordinates or input custom coordinates. These settings dictate where the equipment is visible on the Network Sites' network map page. For Fiber networks, this can be particularly beneficial to easily identify where items such as demarcation boxes are installed within the field.If inventory is moved from one network site to another, it'll automatically move to the new location on the network map. However, the visible coordinates will need to be manually set again.Through the adjacent downward arrow menu, you are provided additional actions which are listed below:
- Edit Field Values: allows you to edit the inventory item's model fields, based on the fields that have been set up for the associated inventory model.
- Change Assignee: provides the ability to quickly change the inventory item's assignee.
- Create IP Assignment: allows you to add an IP assignment to the inventory item.
- Move IP Assignment: offers the ability to move an IP assignment from this inventory item, if an IP assignment exists on the item.
- Link Ticket: allows you to link an existing ticket to the inventory item.
- Create SnmpOverride: provides the ability to create an SNMP override for the inventory item.
- Delete: allows you to delete the inventory item altogether.
- Sidebar: clicking on the side arrow here opens the sidebar menu, where you can view details for the item similar to those displayed in the inventory items list view (such as assignee, status, manufacturer, etc.) in addition to IP assignments, ICMP and SNMP results, and the action/view history logs for the item.
Details
The information provided within the inventory item's sidebar is detailed below.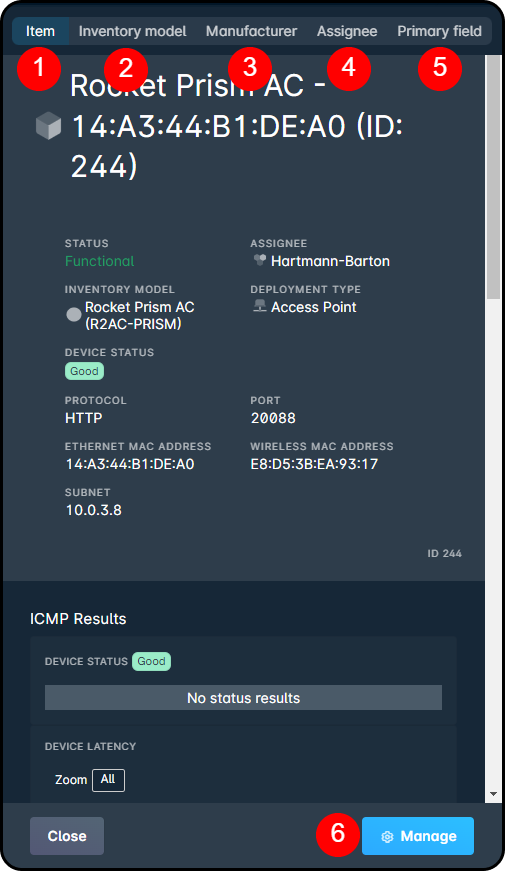
1. Item - provides you details such as the item's model, item ID, device status, and action history.
2. Inventory Model - reflects model information such as the manufacturer, name, and network monitoring template. From this tab, you can also see the model activity history.
3. Manufacturer - shows the manufacturer name and any activity history related to that manufacturer within your instance.
4. Assignee - details the current assignee and location of the inventory item, including the height the unit has been installed at (if applicable), as well as reflecting any other items at that location.
5. Primary field - provides information reflective of the model's primary field.
6. Manage - when on the "Item" tab, it populates the Inventory Item Management page. When on the "Assignee" tab, it populates a page reflective of where the item is located e.g. a serviceable address, a network site, etc. The "Manage" button is only available under these two tabs.
Mass Editing the Inventory Items
To edit multiple inventory items at once, simply begin by checking the individual checkboxes to the far left of each inventory item within the list that you wish to edit. As you check these boxes, the edit banner will appear at the bottom of the screen:

From left to right, we have:
- The Remove All button, which includes the total number of inventory items currently being edited.
- The individual item removal buttons, which appear for every item added to the edit banner.
- The inventory item information, listing the inventory model, the primary identifier field, and the item ID.
- The Edit button, which opens up the Edit Device window once you have all of your items selected.
Once you have selected all the inventory items you wish to edit, click "Edit" from the edit banner and you will be presented with the Edit Items window where you can specify the changes that you wish to be made. An overview of the fields contained in this window is provided below.
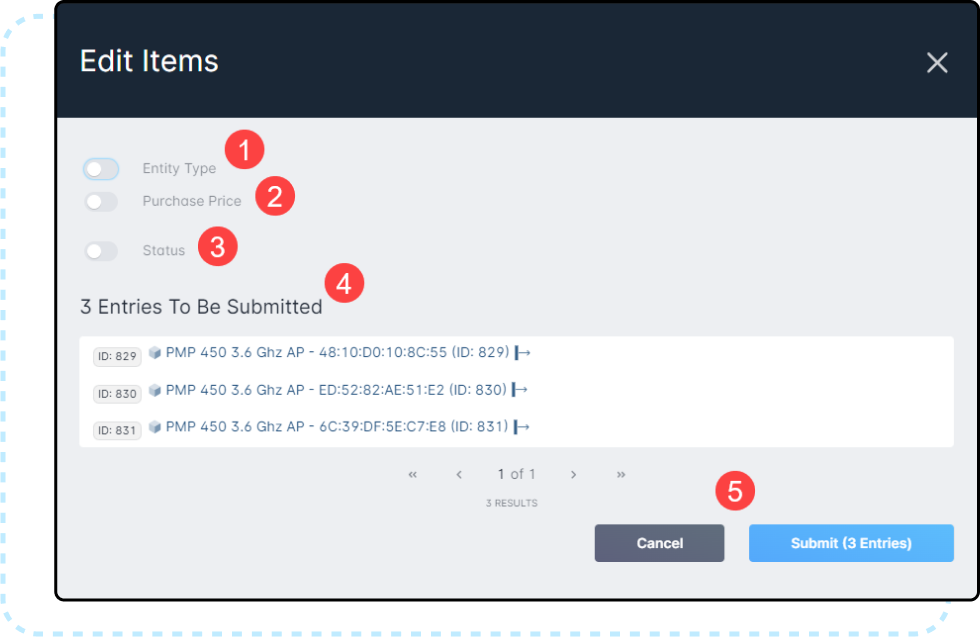
- The Assignee Entity modifier, which allows you to modify the items' Assignee in bulk. This modifier also lets you select Internal Locations if updating the assignee to an inventory location. Simply toggle the Entity Type field on and then select the assignee from the drop-down; once the entity type is selected, another drop-down will appear where you can further specify the assignee, as seen in the image below.

- The Purchase Price modifier, which allows you to set the purchase price in bulk for the selected items.
- The Status modifier, allowing you to update the item status in bulk.
- The list of inventory items to be edited - all items listed here will be affected by all changes being made.
- Canceling out of the edit will close out of the Edit Items window without any changes taking effect; if you want to commit the edits, click the "Submit" button.
The Generic Inventory Items View
All generic inventory items that have been added to your instance will be viewable from here and contain key details at a quick glance, such as the status, model, manufacturer, and assignee. An overview of the information and actions available from this screen is provided below.
- Inventory Items: navigates you into the Inventory Items List view.
- Generic Inventory Items: navigates you into the Generic Inventory Items view.
- Manage Items: navigates you into the Inventory Model Management page (which is covered in a separate article here).
- Scan & Search: navigates you to a new page allowing you to use any barcode scanner connected to your system and scan for the searched device. This tool will look through any fields you've configured on the model, such as MAC Address, Serial Number, or IMSI.
 Most generic barcode scanners are compatible with the inventory scanning feature available in Sonar, such as the NADAMOO Wireless Barcode Scanner.
 - Filtering: this is where you can drill further into your data with the use of filters, or search for existing items with the Search box.For more information on filtering, refer to the Filtering: Overview article.
- Export Results: allows you to export the results of inventory items in the table, based on the filters that are applied. The list can be exported as JSON or CSV.
- Sort Order: provides the ability to sort the list of inventory items based on values such as ID, Last Modified, or Quantity.
- ID: displays the inventory item's unique ID.
- Status: displays the inventory items' status, being Functional, Failed, or Lost.
- Model: the inventory model of the item - clicking here will open a sidebar with additional details for the inventory model.
- Manufacturer: the inventory model manufacturer of the inventory item - clicking here will open a sidebar with additional details for the inventory model manufacturer.
- Assignee: the assignee that the inventory item is currently assigned to is displayed here, including the account, if applicable - clicking here will open a sidebar with additional details for the assignee.
- Quantity: the total remaining amount of the inventory item that is available to be assigned/consumed.
- Action Menu: clicking the "Assign" button will open a window where you can specify the assignee and the quantity of the inventory item you wish to assign to the assignee. Clicking the adjacent arrow will provide the option "Consume" where you can specify the amount of the inventory item to remove from your stock.
- Sidebar: clicking on the side arrow here opens the sidebar menu, where you can view details for the item similar to those displayed in the generic inventory items list view, in addition to the activity log for the item.
The Inventory Item Management Page
The Inventory Item Management View contains detailed information relevant to the specific type of Inventory Item. This means that the page will look slightly different depending on the Inventory Model of the item being viewed. For more information on Inventory Models, read the Inventory Model Management: General Overview article.
Header and Overview tab
Regardless of the Inventory Model and Item being viewed in detail, the Header and the Overview tab remain largely unchanged. This tab contains the basic details for the item, in addition to the Notes, Logs, Files, and Tasks related to the Item.
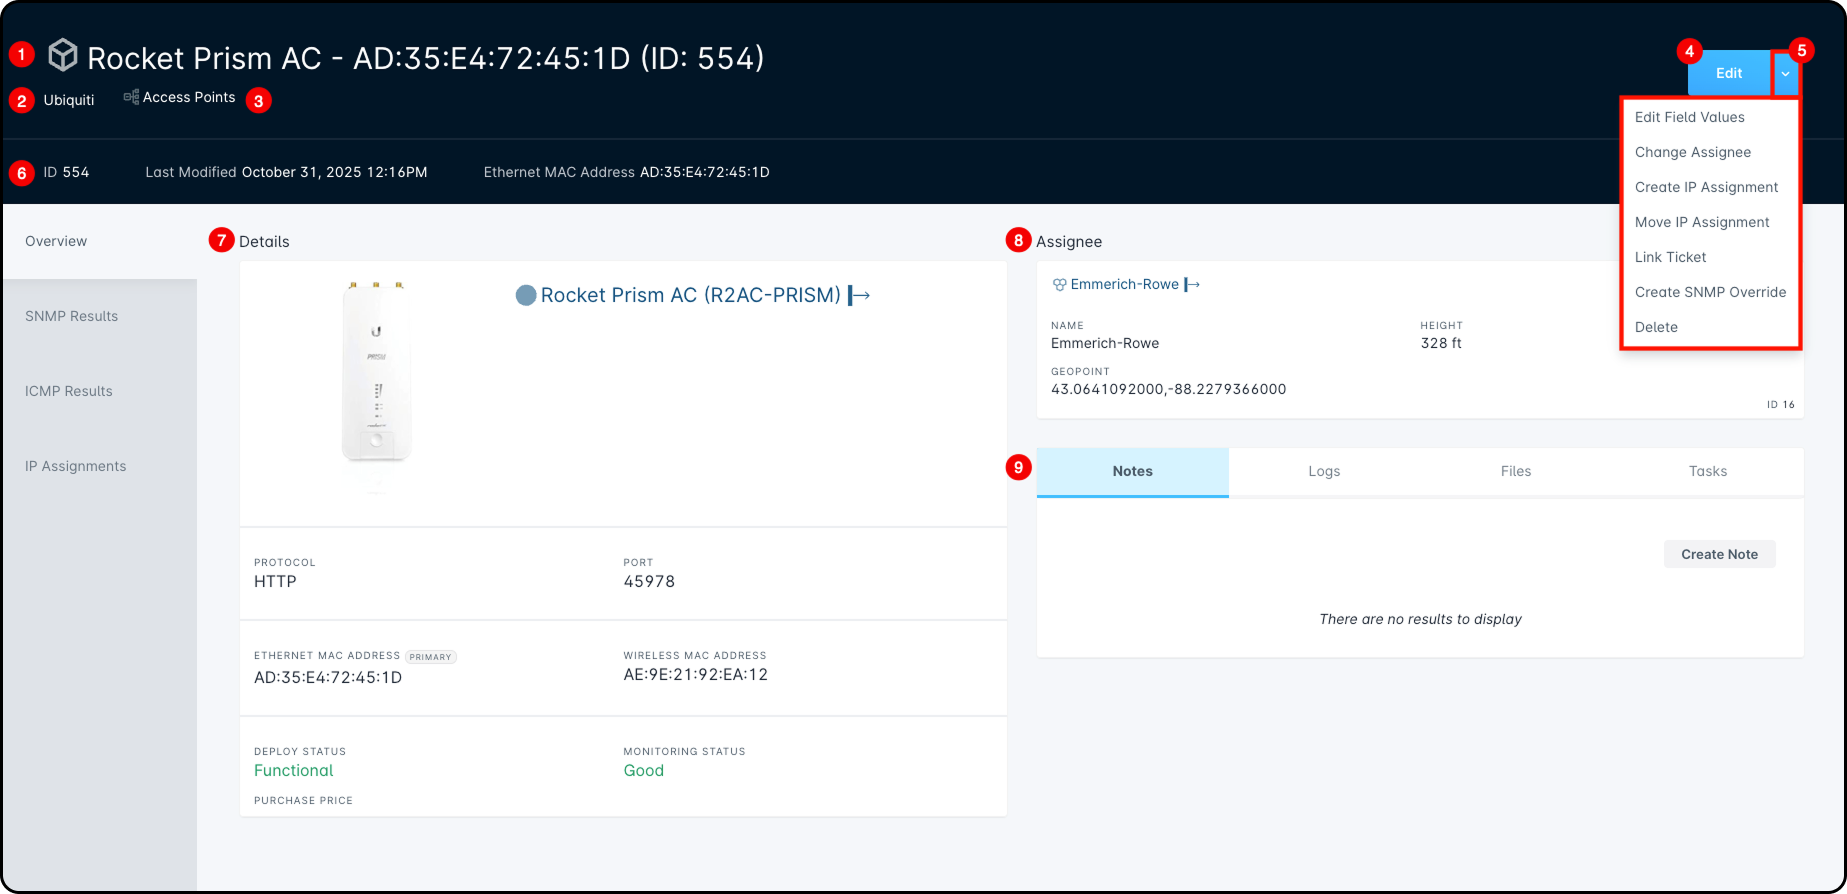
- Inventory Item Name: The inventory model name, including the Primary Identifier field, and the inventory item ID.
- Manufacturer: the inventory model manufacturer of the inventory item - clicking here will open a sidebar with additional details for the inventory model manufacturer.
- Category: The category of the inventory item model.
- Edit Button: by clicking “Edit” you can edit an inventory item's purchase price, status, and deployment type.
- Edit Menu: by clicking the downward arrow menu, you are provided additional actions, which are listed below:
- Edit Field Values: allows you to edit the inventory item's model fields, based on the fields that have been set up for the associated inventory model.
- Change Assignee: provides the ability to quickly change the inventory item's assignee.
- Create IP Assignment: allows you to add an IP assignment to the inventory item.
- Move IP Assignment: offers the ability to move an IP assignment from this inventory item, if an IP assignment exists on the item.
- Link Ticket: allows you to link an existing ticket to the inventory item.
- Create SNMP Override: provides the ability to create an SNMP override for the inventory item.
- Delete: allows you to delete the inventory item altogether.
- Along this top strip, the inventory item's ID is displayed, along with the date/time this item was last modified and the item's primary identifier field.
- Overview Details: this section contains key details for the inventory item, including:
- The image of the inventory item model, if an image exists for the model.
- The inventory item model name, primary identifier field, and ID.
- The Communication Protocol.
- The Communication Port.
- Any inventory model fields available for the inventory item will appear here.
- The status of the inventory item, such as Failed, Functional, Lost, or Sold.
- The purchase price of the inventory item.
- The Assignee section, which lists details for the inventory item's assignee.
- This area provides 4 tabs that you can cycle through for the inventory item's associated notes, logs, files, and tasks:
- The Notes section allows you to add messages or notices to this inventory item that can be seen by any user who accesses this item's management page.
- The Action History and View History logs are contained within the Logs tab, which display a list of historical activity for the inventory item. Action History logs can be expanded to view additional details regarding any change(s) that occurred as a result of the action.
- The Files tab will allow you to upload, preview, and view any files uploaded to the inventory item. Once you upload a file, it will appear as a tile within the Files area; clicking the image will cause the sidebar menu to appear which will contain further details about that particular file, including an option to download it.Files that can be uploaded to an inventory item must not exceed 100 MB.
- The Tasks tab, which allows you to set specific actions on the inventory item, which can also be assigned to a specific user within Sonar, and view existing tasks. Toggling between the “Incomplete” and “Complete” buttons will display tasks that have not yet been tackled, as well as ones that have been taken care of already. For more information on tasks, check out the Notes and Tasks: Best Practices and Use Cases article.
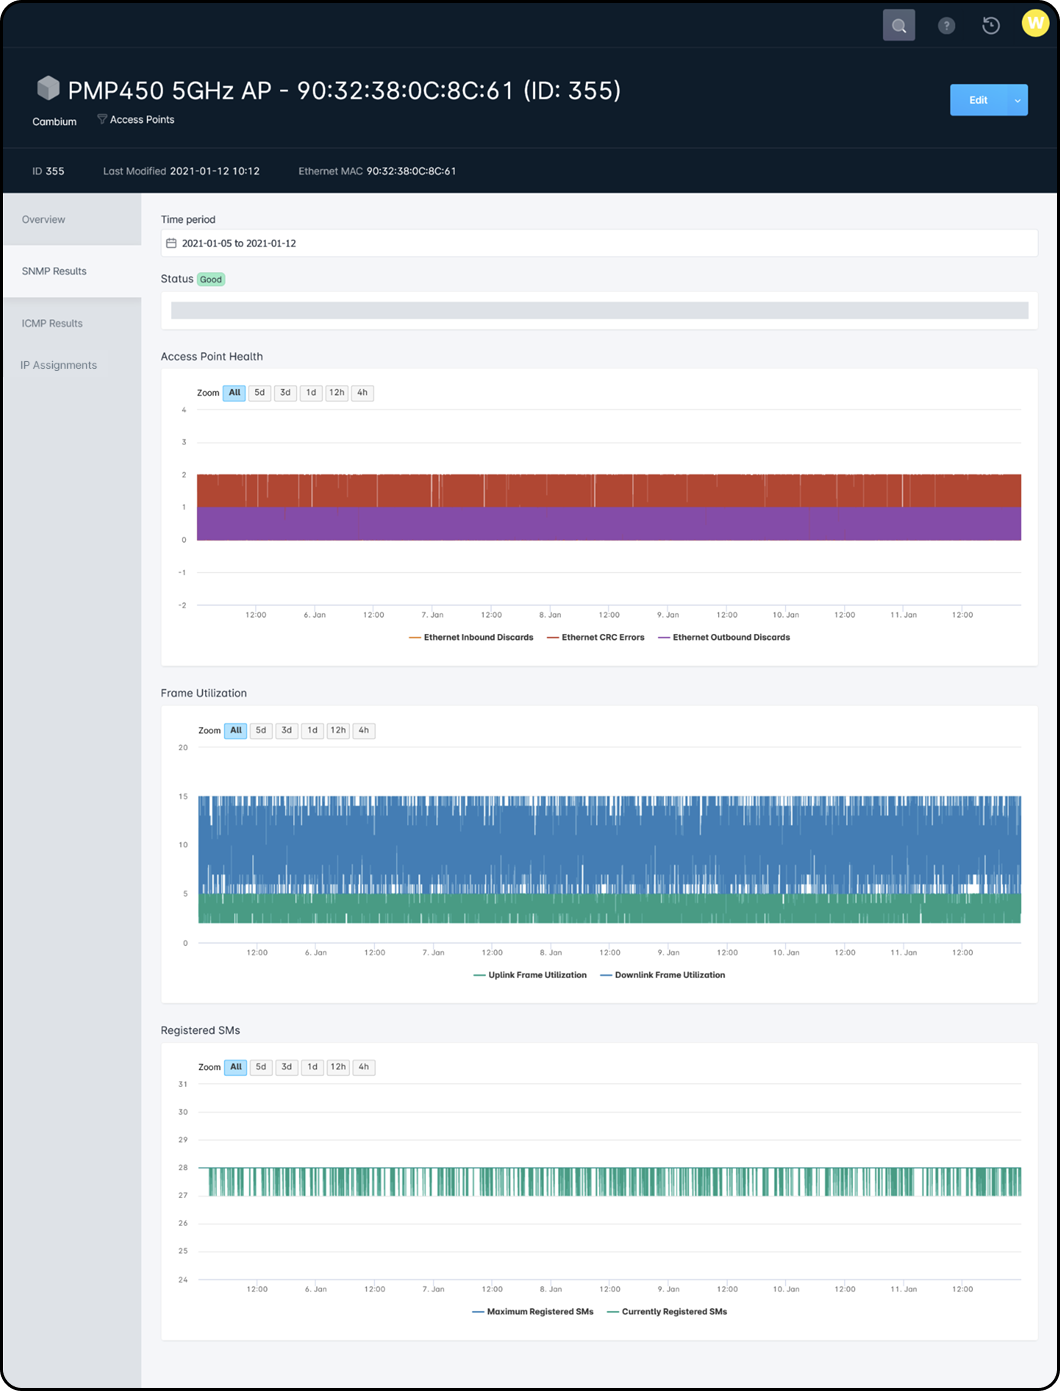
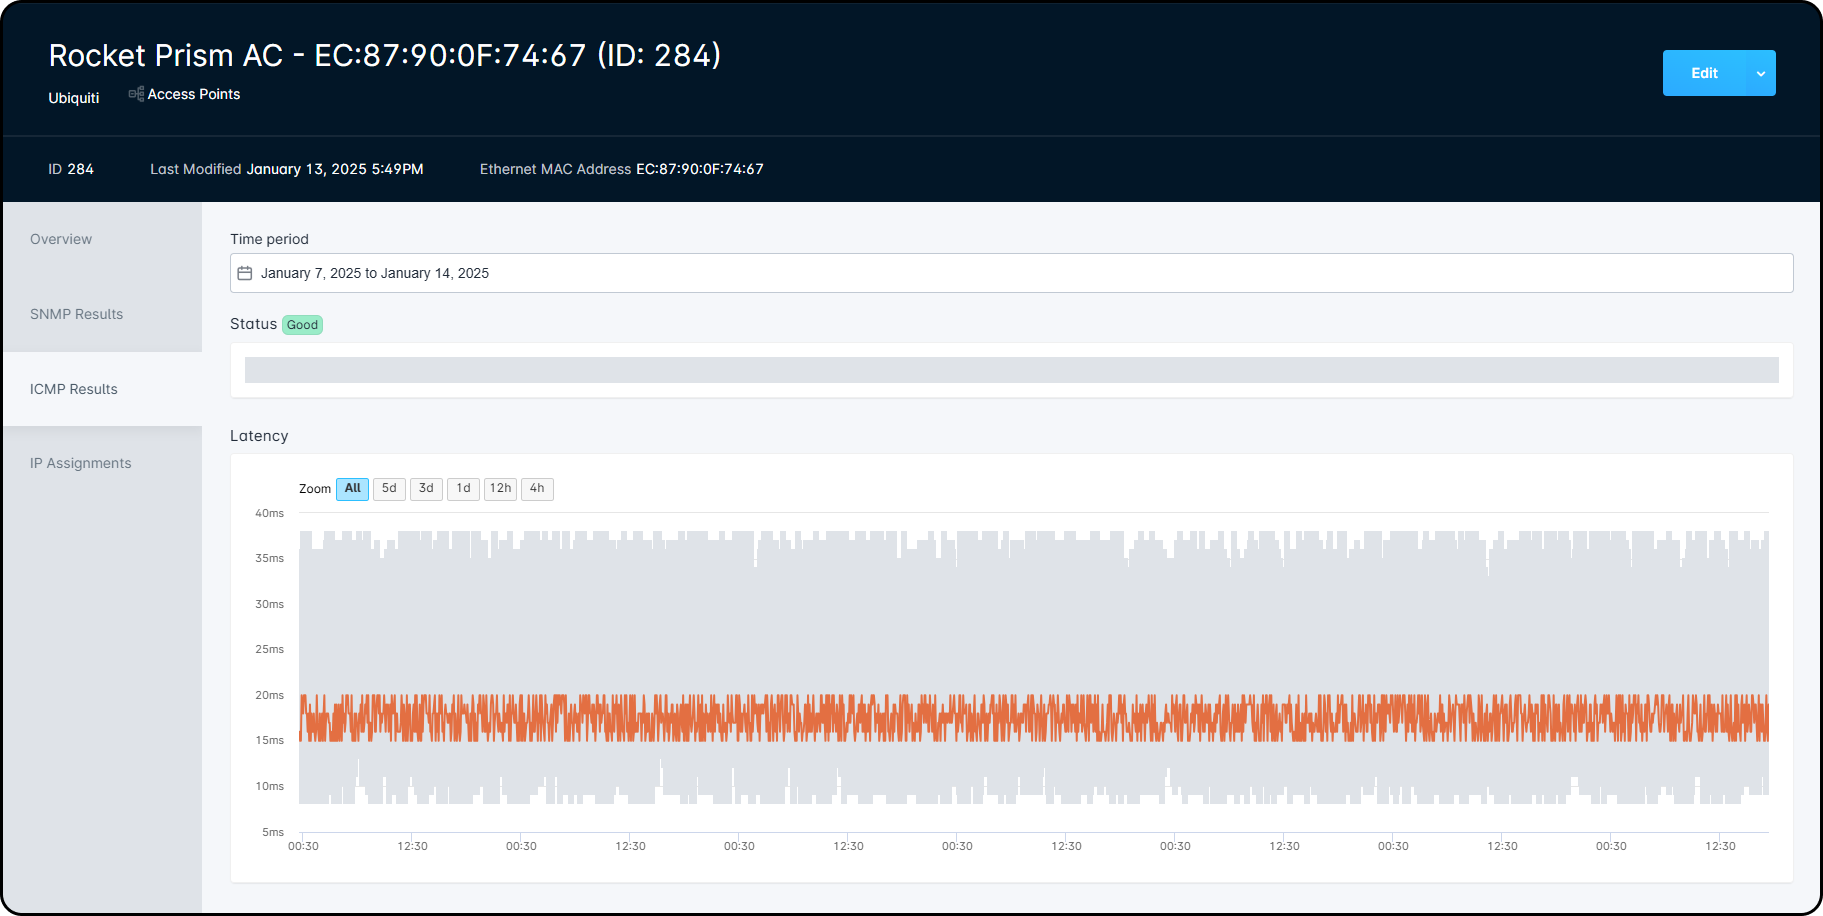
SNMP & ICMP Results tabs
The SNMP Results and ICMP Results tabs are available exclusively for Tracked Network Equipment, and display graphs which visualize the item's performance statistics as monitored by your network poller. When viewing the item statistics in this way, you're given the option of selecting a date range for the graphs to span, and within the graphs themselves you're given the chance to drill down and view the details at various levels:
- All, which spans the entirety of the selected date range
- 5 days, which spans the last 5 days of the selected range
- 3 days, which spans the last 3 days of the selected range
- 1 day, which spans the last 24 hours of the selected range
- 12 hours, which spans the last 12 hours of the selected range
- 4 hours, which spans the last 4 hours of the selected range
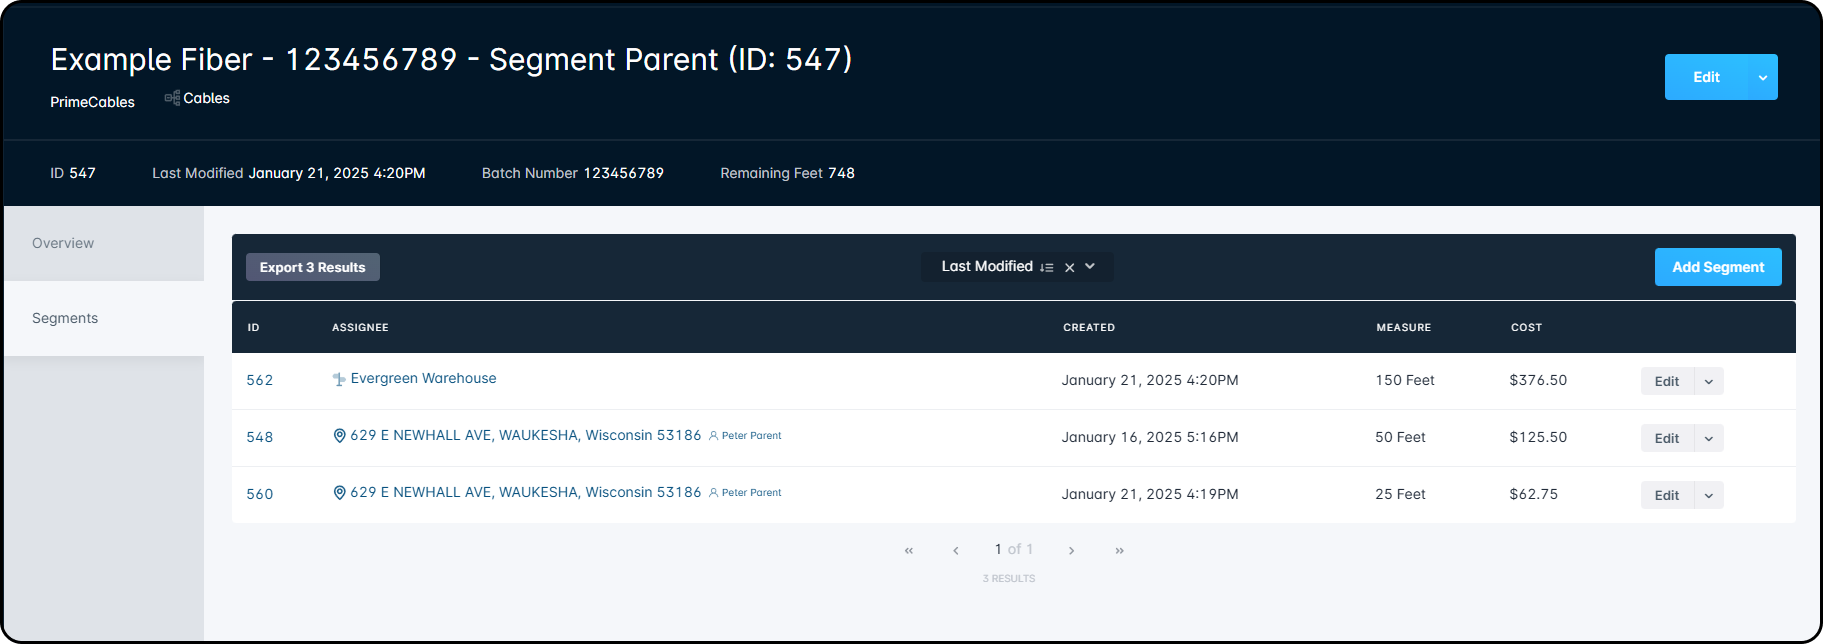
Segments tab
The Segments Tab contains details related to the child segments of a main Parent Inventory, and is only available from the Parent Segmentable Inventory. For more information on Segmentable Inventory, refer to the Segmentable Inventory: How-to & Usage Guide article.