Table of Contents
Segmentable Inventory: How-to & Usage Guide
 Updated
by Mitchell Ivany
Updated
by Mitchell Ivany
Read Time: 9 mins

What is Segmentable Inventory
Segmentable Inventory in Sonar is used to manage inventory that begins as a single item, and over the course of its lifecycle, gets subdivided into multiple items. Most commonly, this would represent anything that comes on a spool, such as fiber, ducting, or network cable.
Segmentable Inventory differentiates itself from trackable network equipment in two ways:
- Segmentable Inventory is defined by a unit of measure
- Segmentable Inventory does not support networking equipment concepts such as MAC Addresses, or ICMP/SNMP monitoring
Adding your cable spools into Sonar as Segmentable Inventory allows you to split each spool into custom lengths as required, track where each length was deployed, and track its status in the event of damage. Additionally, this layer of Inventory enables improved financial tracking and inventory reporting, a streamlined process for your field technicians, and traceability from each deployment back to a spool and purchase order.
Segmentable versus Consumable
Consumable Inventory in Sonar represents a different subset of items. While both Segmentable and Consumable items are non-networking inventory, Consumable Items are not tracked at all. If you need to track metadata such as price, or batch numbers against your deployed fiber, you must use Segmentable Inventory to do this.
Consumable inventory is focused more on non-networking items that, once used, become something that is not likely to be recovered or monitored. Think of screws and mounting hardware as examples of Consumable Inventory. For more information, and more detailed examples, refer to the Tracking and Using Consumable Inventory article.
Creating Segmentable Inventory
Creating Segmentable Inventory starts with creating a model that defines the Unit of Measure.
- Click on “Inventory” from the sidebar
- Click on “Manage Items”

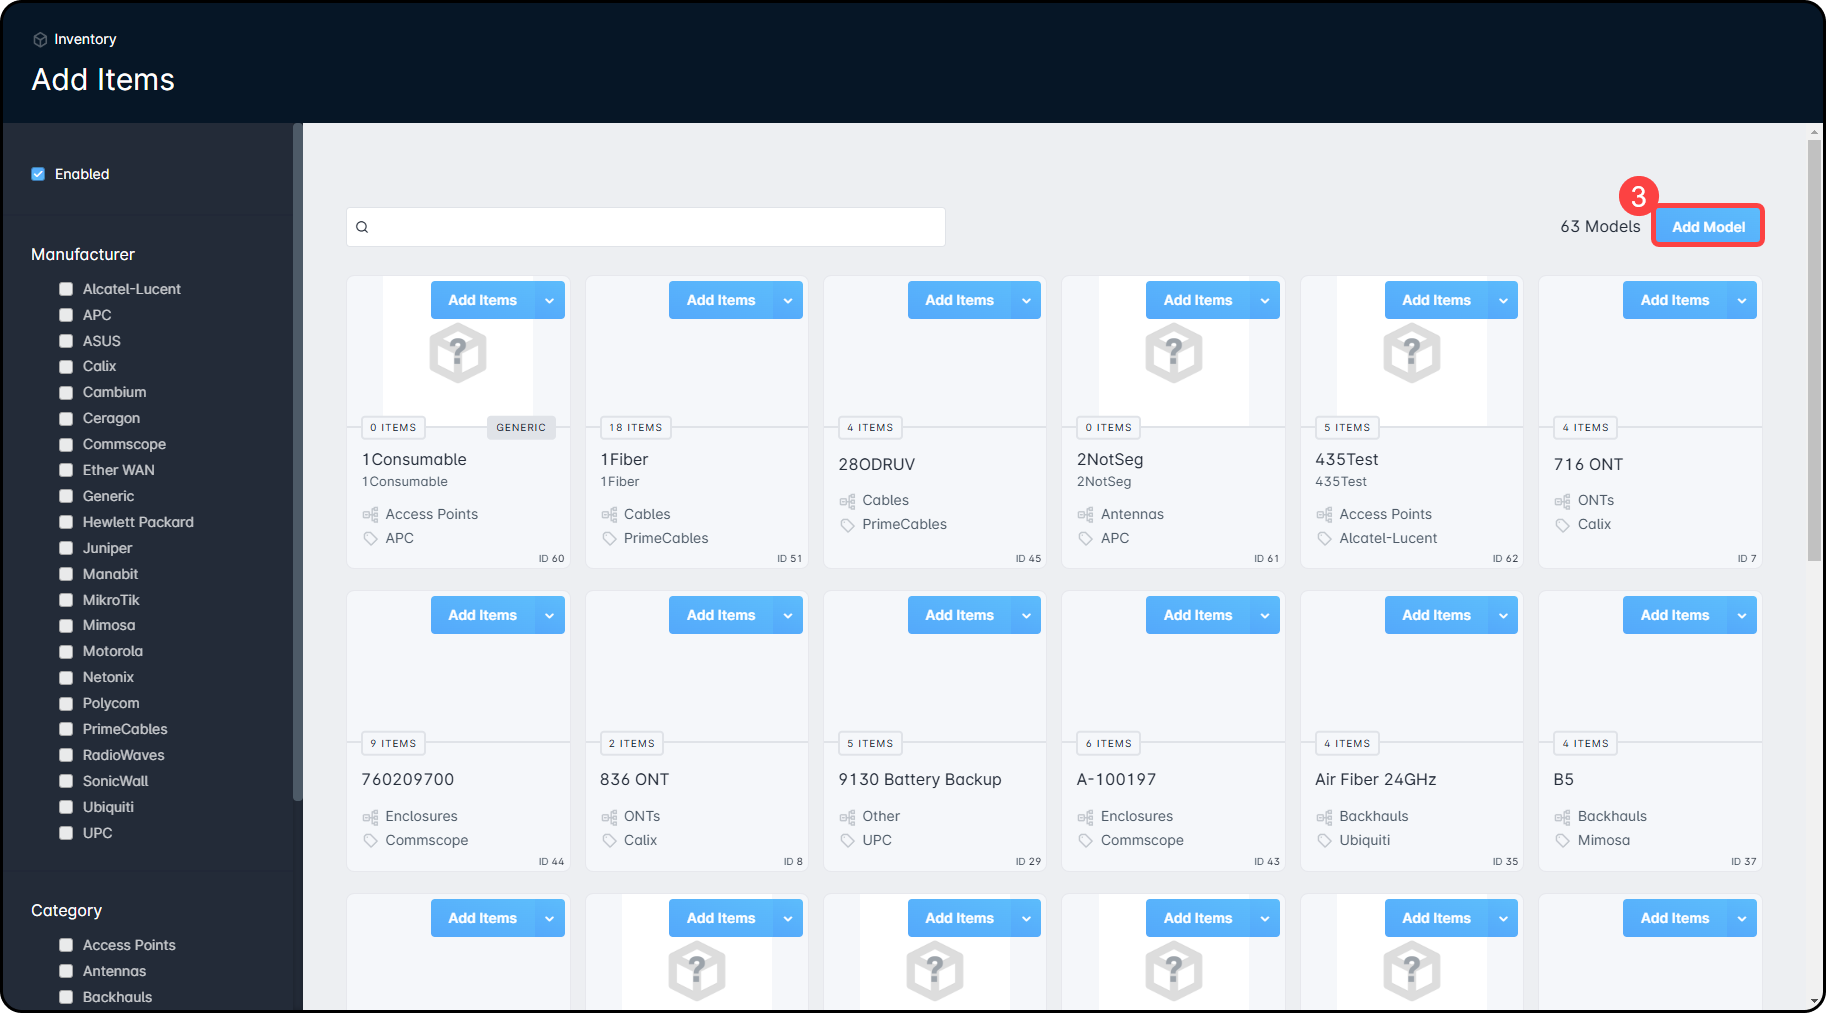
- On the Inventory Model Management page, click the Add Model button
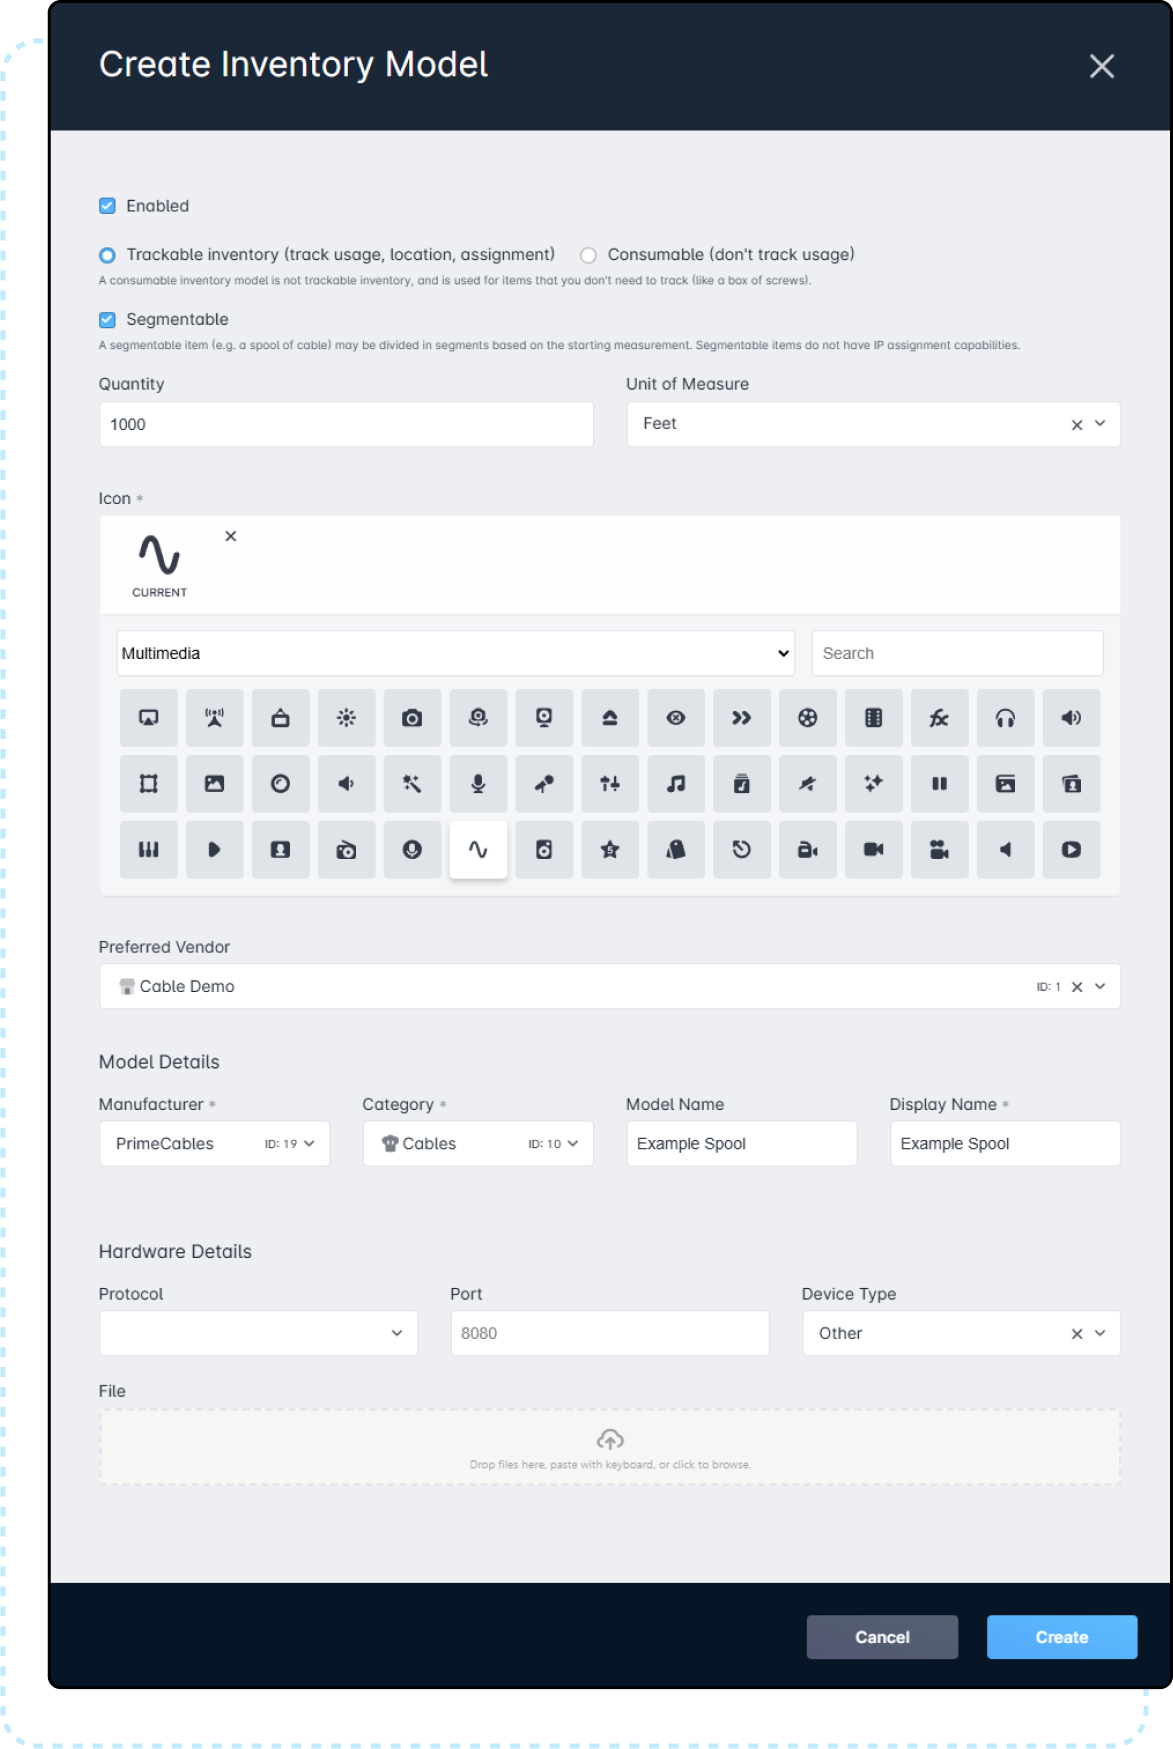
- In the window that appears, define the Segmentable Item.
- Ensure the Segmentable checkbox is selected
- Fill out all required fields, ensuring the correct Quantity and Unit of Measure values are set
Quantity and Unit of Measure Explanation
The Quantity field represents the default measure used when an item is added to the defined Inventory Model, while the Unit of Measure is used to display the set unit alongside the measure defined in Quantity. This 2-stage definition provides a way to quickly add items when ordered while also allowing flexibility when adding existing items, or items that can have a slight variance. - Click “Create”, which will save your created Inventory Model and prompt you to manage the additional details associated with an Inventory Model.
Inventory Model Configuration
Once your Inventory Model is created, you'll be given the option to modify additional information that will be associated with your Inventory Model and Inventory Items.
This form will prompt you to Add Items, add Deployment Types, Modify Device fields, Manage the LTE provisioning, and Add additional Purchase Order Vendors. Below, we'll cover these sections in the ideal order.
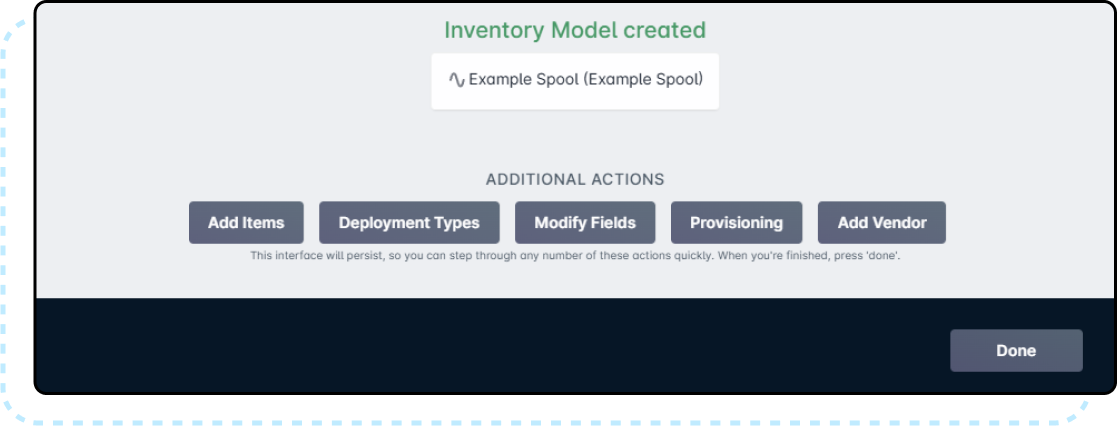
1. Modify Fields
Field Modification allows you to create new data entry fields for your inventory items, which can be filled out for searching, reporting, and provisioning purposes:
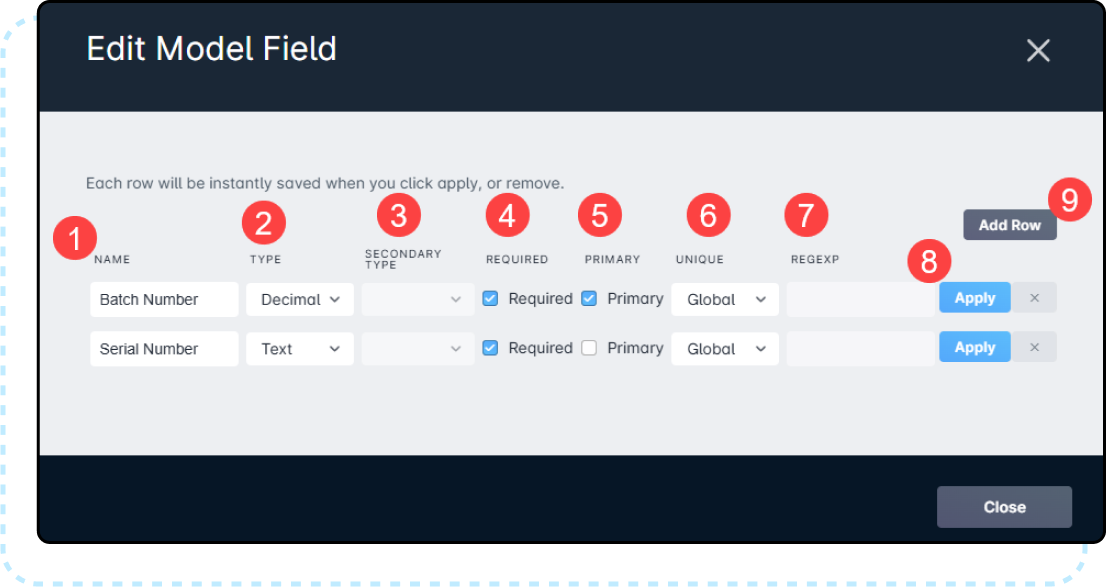
- The Name of the field, which allows for custom text entry
- The Type of the field being added, from a preset list of options:
- Decimal
- IMSI
- Integer
- LTE Auth Key
- MAC address
- OP/OPc
- Regular Expression (PCRE)
- Text
- The Secondary Type field allows you to specify if a device is a Cable Modem when MAC Address is selected as the “Type”. This would typically be used exclusively for Network Inventory.
- The Required selector enforces whether this field must be filled out to add an item to inventory
- The Primary selector determines whether this field is the primary field, used for searching, reporting, and identification
- The Unique dropdown, which allows you to enforce a unique value:
- Globally, which means all models across your instance
- Locally, which means local to only this Inventory model
- None, which doesn't enforce a unique value of any kind
- The REGEXP column allows you to define the format of the Regular Expression being entered. This column can only be filled out if the field type is set to Regular Expression.
- You might use REGEXP to force a non-FQDN host name to conform to some internal standard. For example, a host name with the requirements of a letter followed by any combination of letters, dashes, and numbers but must be at least 3 characters long would be defined as
^[a-z][-0-9a-z]{2,}
- You might use REGEXP to force a non-FQDN host name to conform to some internal standard. For example, a host name with the requirements of a letter followed by any combination of letters, dashes, and numbers but must be at least 3 characters long would be defined as
- The “Apply” button saves the field date for the current row
- The “Add Row” button allows you to add additional row to the Model, each one can contain its field data
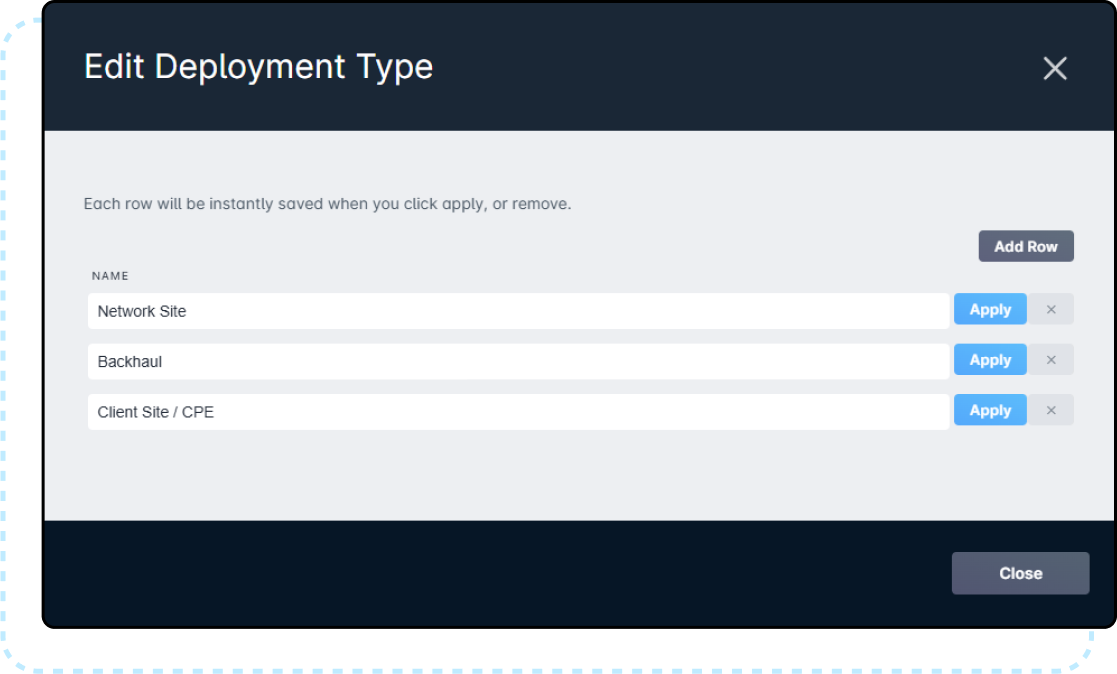
2. Deployment Types
Deployment Types are text fields which allow you to add additional precision when assigning a device to a location or user.
3. Provisioning
The Provisioning option allows you to select the type of LTE SIM in use by this device. This option is used exclusively for Inventory Models which deliver LTE-based service.
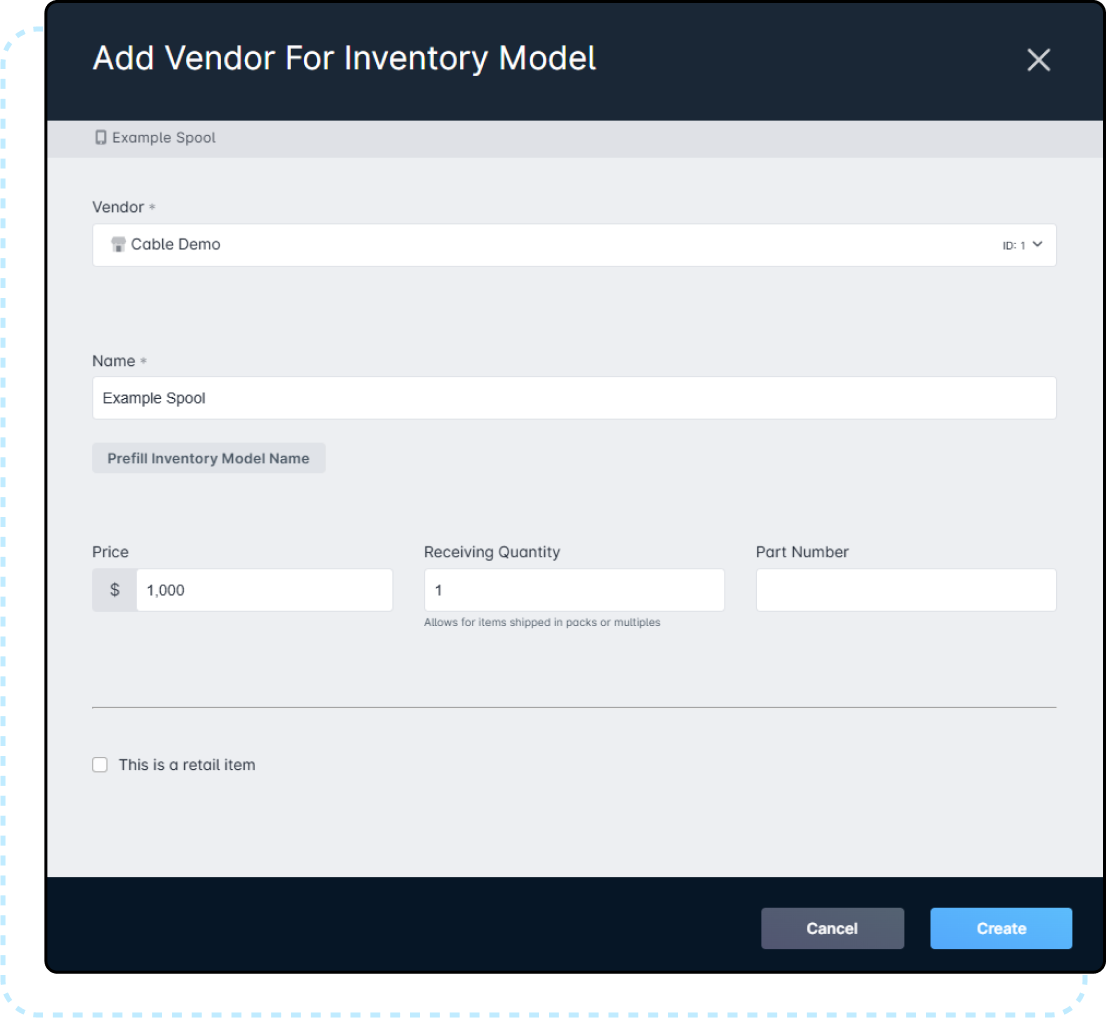
4. Add Vendor
The Add Vendor option allows you to associate this Inventory Model with a specific Purchase Order Vendor. You'll need to provide the model information and default price details. These will autofill when a Purchase Order is created, but can be modified during PO creation.
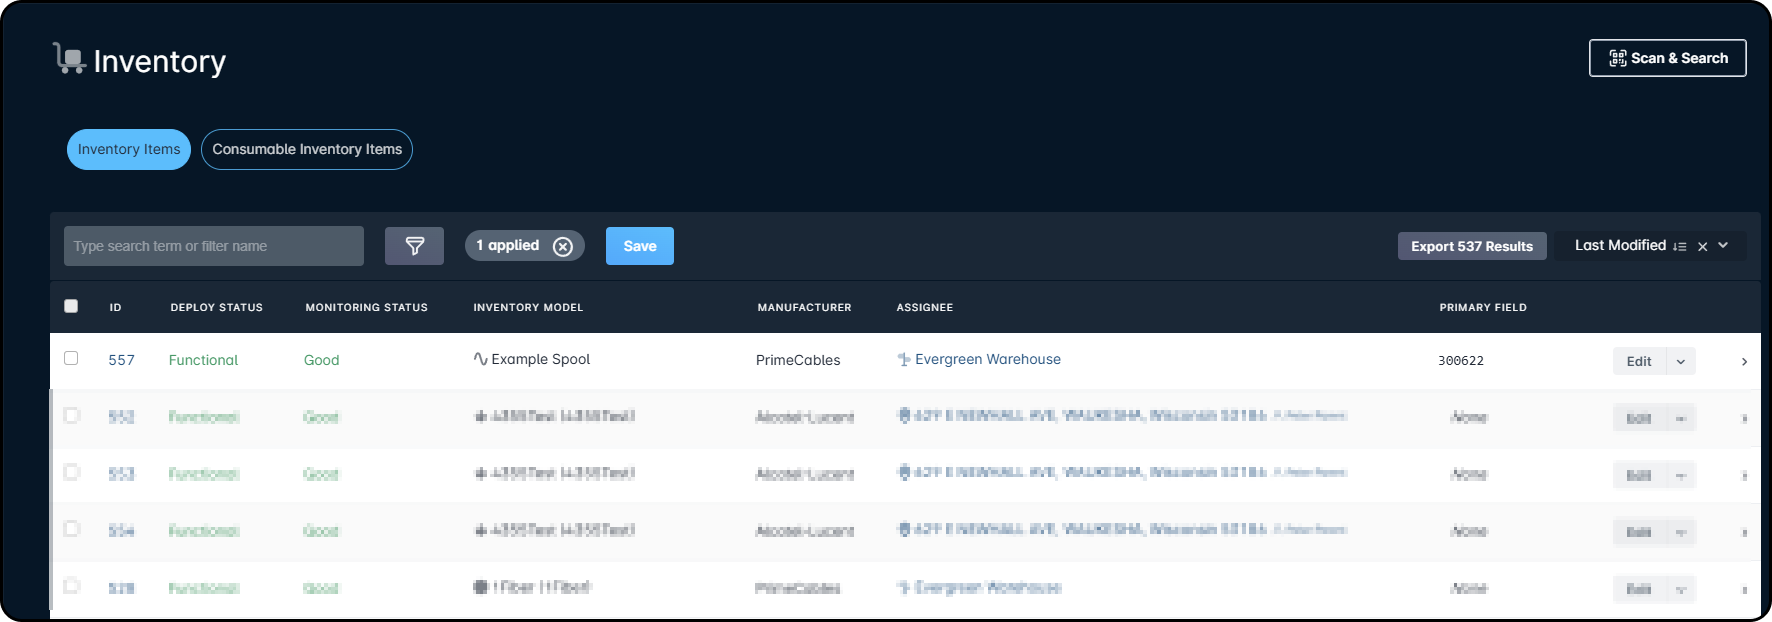
Adding & Viewing Items
Once the model is created, items can be added to it. Items can be added automatically through receiving Purchase Orders, or manually through the “Add Items” button on the Inventory Model. This will open a new modal, where you'll be prompted to provide more information about the item.
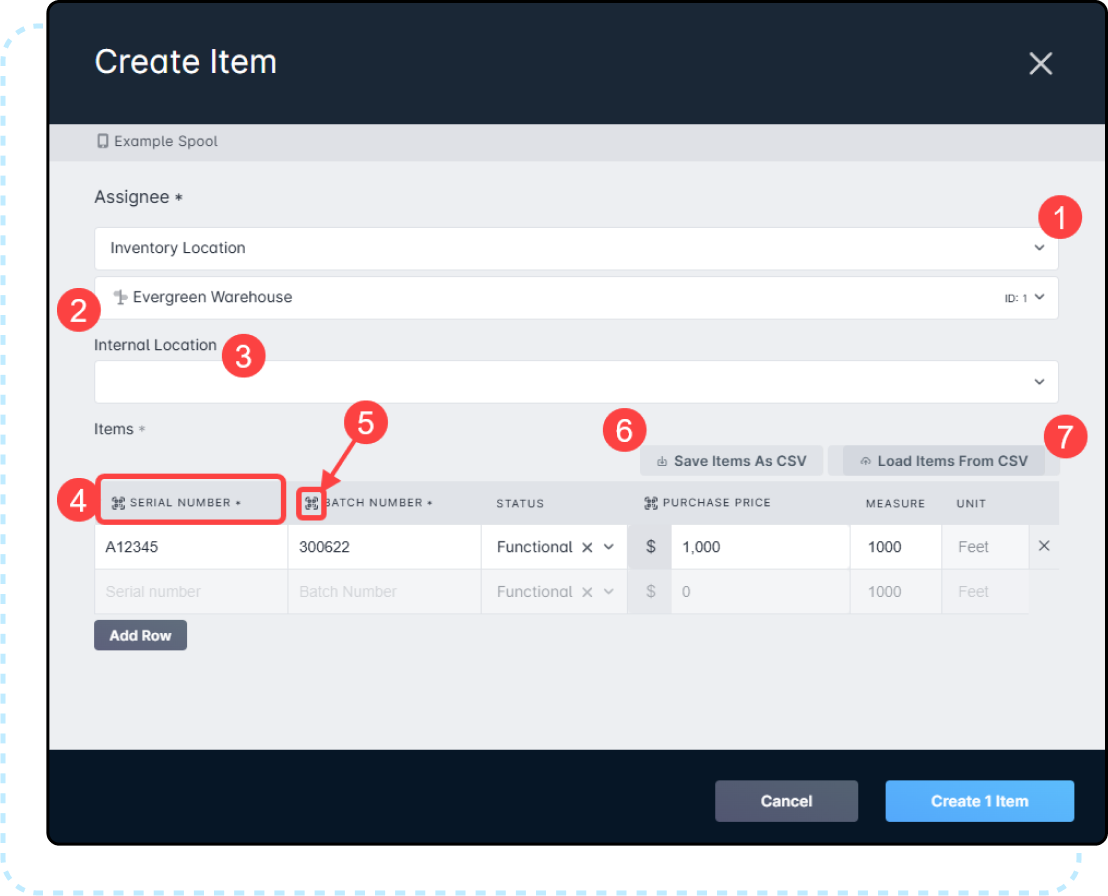
- Directly below the Assignee header, there's the primary assignee selector. The options which can be selected as an assignee are:
- Address
- Generic Inventory Assignee
- Inventory Location
- Network Site
- User
- Vehicle
- Below the main assignee, you have the specifier for that assignee. For example, an address assignee will have you select the serviceable address, while an Inventory Location will have you select the warehouse.
- If you select an inventory location, you'll be prompted to select the internal location after that. The Internal location field will be empty unless internal locations have been created in Settings → Inventory → Inventory Locations.
- The top of each column displays two things, the first of which is the name of the field that is being filled out. Certain fields will vary depending on how the inventory model was configured, but two will appear on every item:
- Status, which is a field used to represent the item's functional condition.
- Purchase Price, which is the price of the item, written in the lowest currency denomination (cents for North America, centavos in Mexico, pence in the UK, etc.)
- The second is an icon, indicating the field can receive a scanned input value from a barcode. Simply place your cursor within the entry field and scan. Anytime this icon is shown, you can scan a barcode and extract the value.Most generic barcode scanners are compatible with the inventory scanning feature available in Sonar, such as the NADAMOO Wireless Barcode Scanner
- The “Save Items as CSV” button allows you to export a file which contains the required formatting to import devices in bulk, which will include all items currently added in the modal.
- The “Load Items from CSV” button allows you to add multiple items at the same time by using a filled in template which was previously exported. Each item will be added as a new line to the modal.
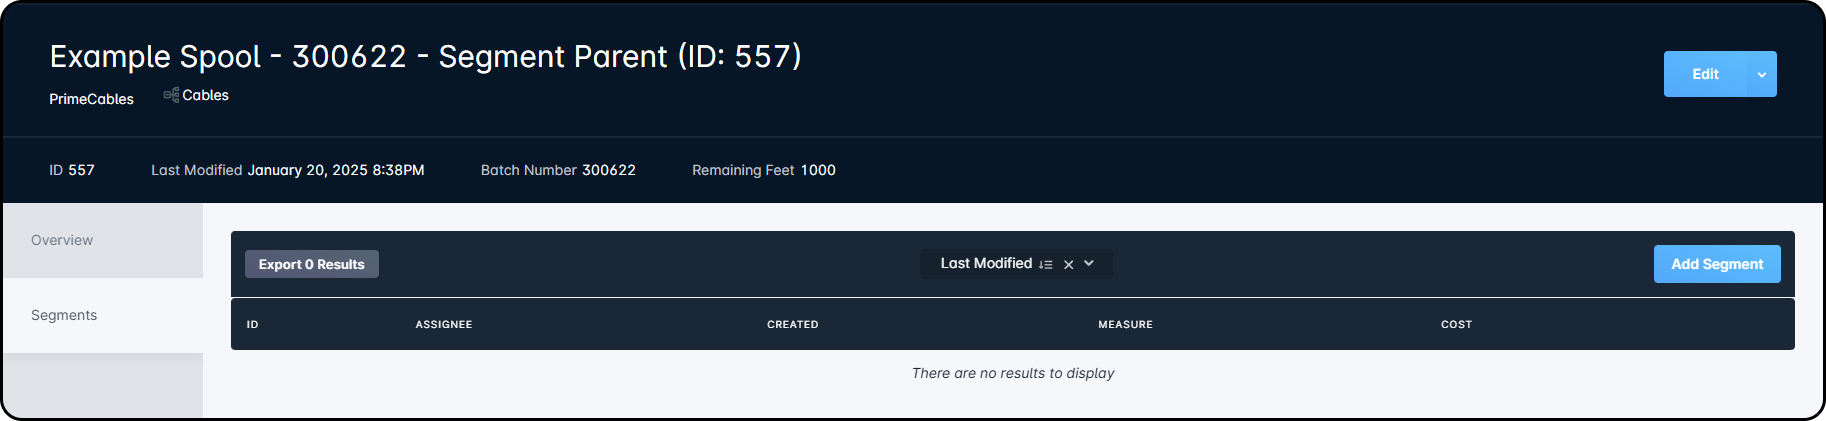
Once an item is added, it is added as a Parent Segment, and will appear in the Inventory List. Clicking on the item from the Inventory List will bring you to the Item Overview.
Creating New Segments
From the Parent Segment, smaller Child Segments can be created.
- Navigate to the “Segments” sub-tab.
- Click on “Add Segment”.
This will open a new modal, where, much like the original item creation, an assignee must be selected. Where Segment creation diverges from item creation is here — rather than filling out all fields set on the model, only the new Segment measurement must be provided.
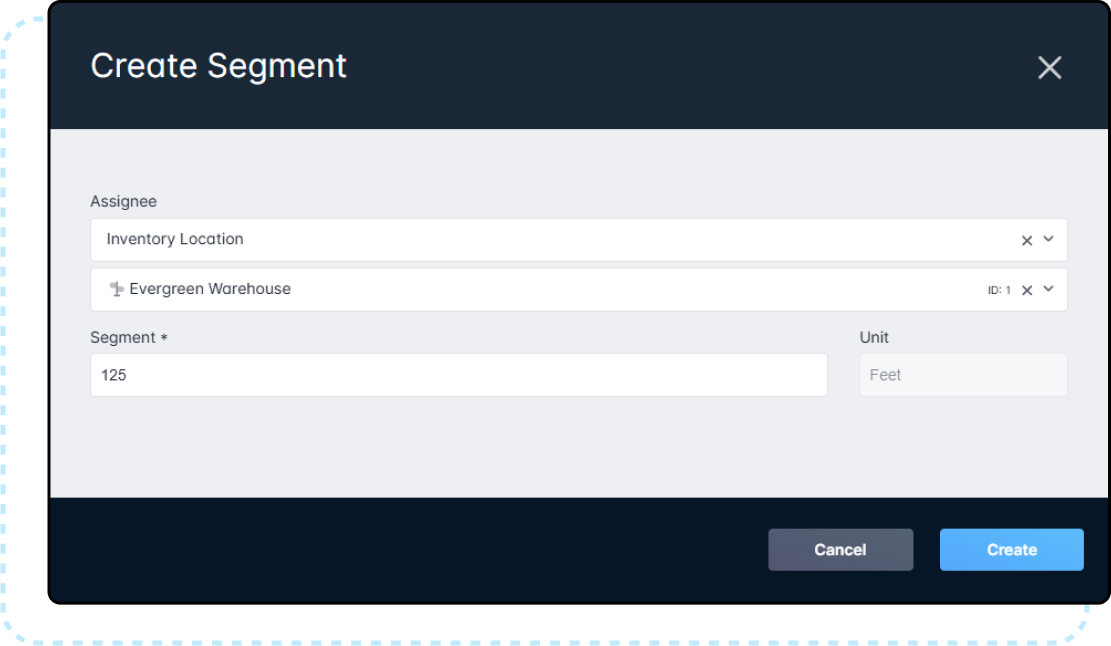
Once the Child Segment is created, the list will populate with its details, and the total available amount of the Parent Segment will update to reflect the removal of the Child Segment.

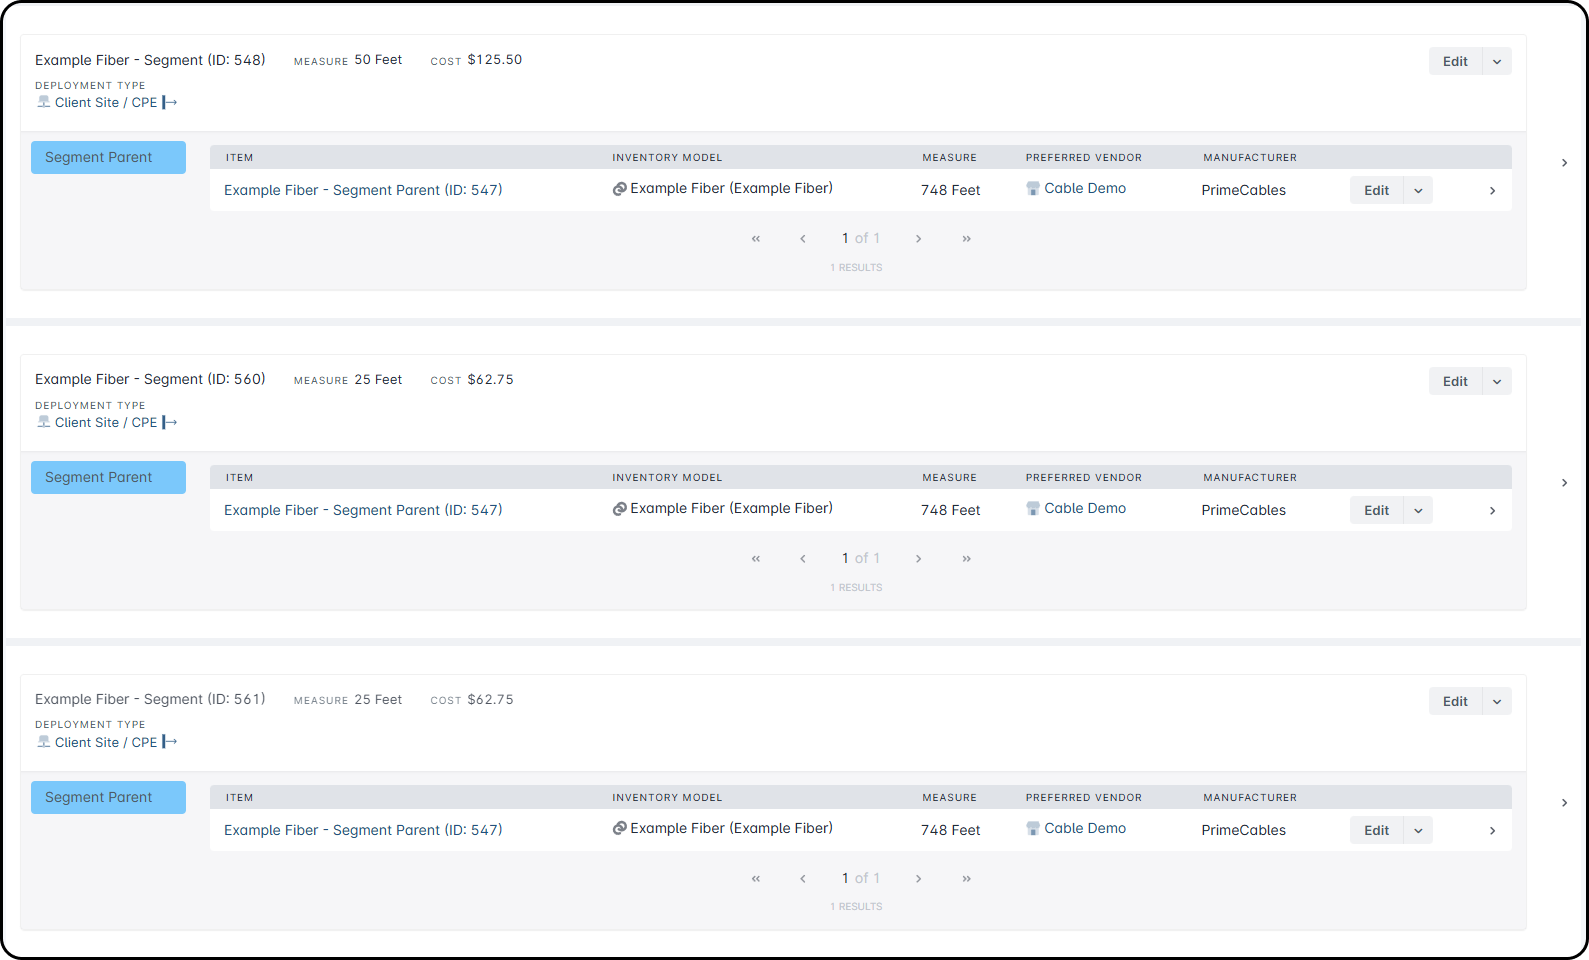
- The ID displayed in the ID column is the unique Inventory ID of the specific segment. This is used for both search reference, and for identification when assigning items to their installation locations.
- The Assignee column shows the location where the segment is currently assigned.
Dividing Sub-segments
Your segments can be further divided from their set value, without any additional navigation. From the Segments table, click on the “Edit” button for the segment you'll be further dividing.

In the window that appears, reduce the Quantity field. As soon as the modification is made, two new options will appear.
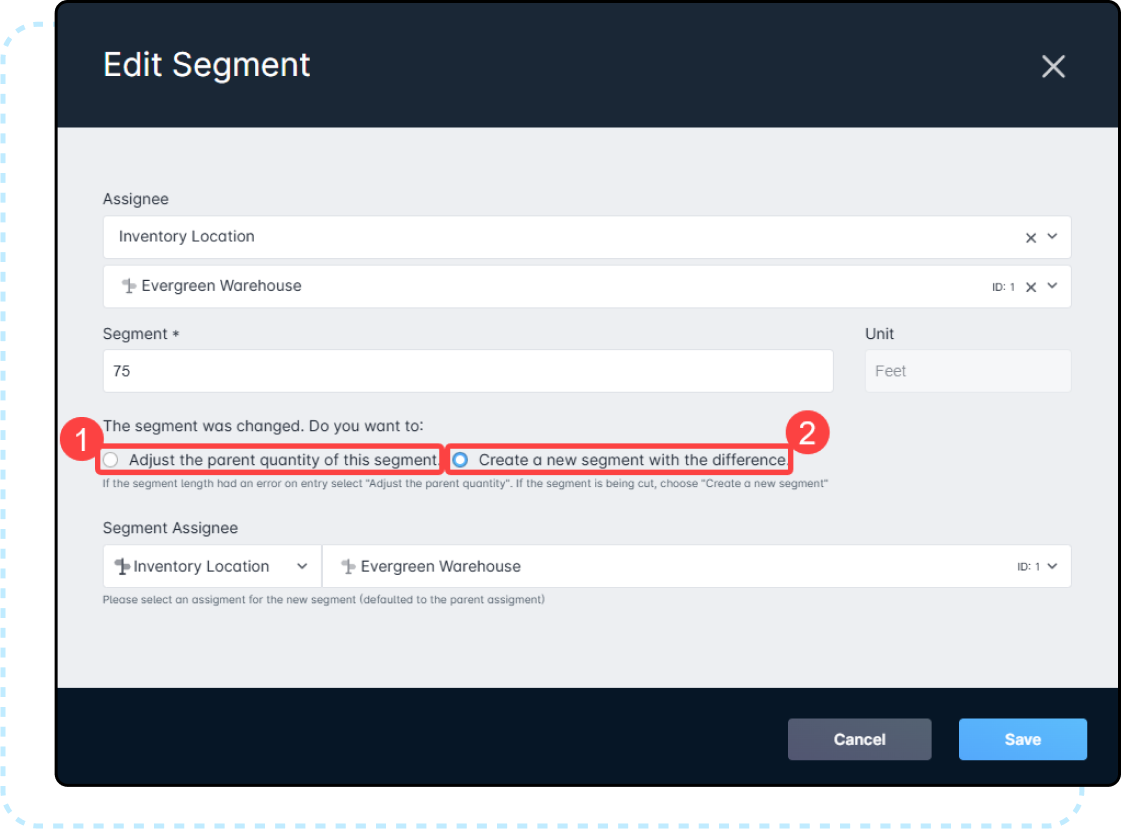
- Adjust the parent quantity of this segment
- This option will adjust both the Parent Segment and current Segment quantities, and is used to correct a measurement or cutting error.
- Create a new segment with the difference as its length
- This option will create a new Segment, belonging to the primary Parent Segment. This maintains the same reporting and tracking advantages by consistently representing the primary spool or bulk item as the ultimate top-level Inventory.
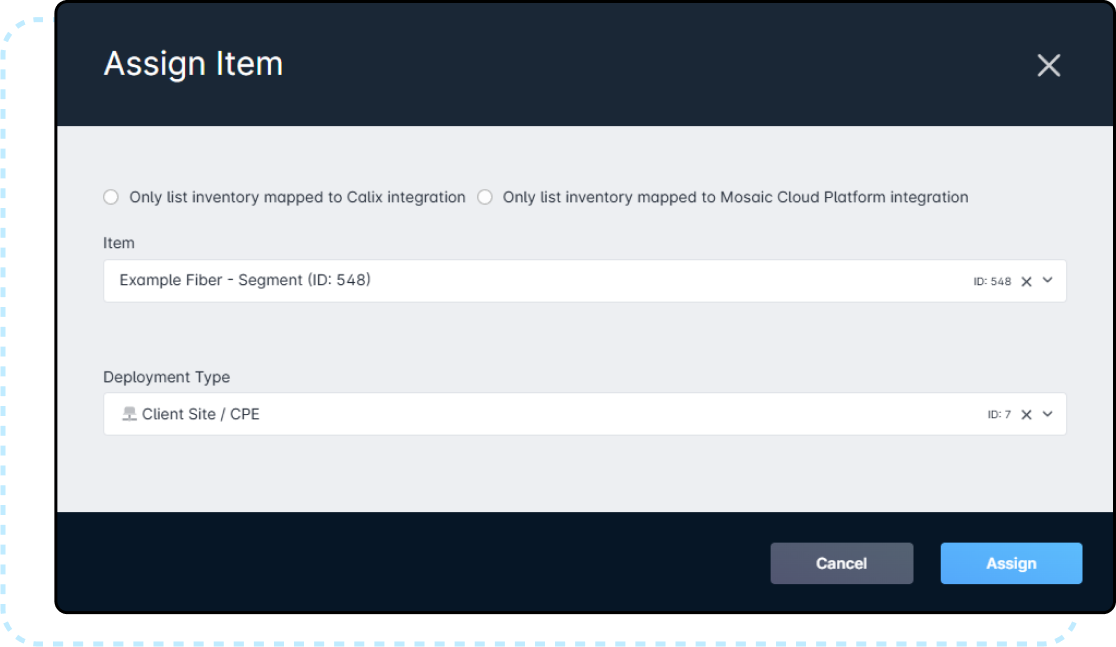
Deploying Segments
Immediately upon creation, Segments need to be assigned to an initial Inventory Location. From there, they can be re-assigned like any other inventory item. From the Segments table, you can click on the “Edit” button next to the Segment. This will open the Edit Item modal, where you can modify the Assignee value. Each child segment can be assigned to an inventory location, technician, vehicle, or serviceable address.
Segments can also be assigned as Inventory from the destination, whether that is a Network Site, Account, or Serviceable Address.
Segmentable Inventory assigned to any location can also be further segmented from that location. In this example image, the Segmentable inventory is assigned to an Account, and additional segments have been created to represent the various locations needed for the run.