Table of Contents
Pollers: Overview, Deployment Strategy & Setup
 Updated
by Jennifer Trower
Read Time: 7 mins
A poller is a server that sits inside your network. It monitors the equipment deployed on your accounts and network sites, and it sends that data back to your Sonar instance. Pollers collect data with SNMP and ICMP. They also work out which subscriber equipment is connected to which network site equipment, and Sonar uses that to draw your Pulse maps.
This article covers what a poller needs, where to deploy it, and how to set it up. Setup happens in two places: your Sonar instance and the poller's own web interface.
Prerequisites
Before you set up a poller, you'll need:
- A server or virtual machine running Ubuntu 24.04 Server Edition that meets the hardware requirements below.
- Network access from the poller to the devices you want to monitor, and outbound HTTPS access from the poller to your Sonar instance.
- Subnets configured in Sonar's IPAM. Pollers are assigned to subnets, not to individual devices. To learn more, see the IPAM: Overview article.
- Monitoring templates for the inventory models you intend to monitor. To learn more, see the Building a Monitoring Template article.

Permissions
Before getting started with the feature, your user roles will need to be adjusted to account for the permissions required to use the Pollers feature.
What is a Poller?
A poller is a dedicated server that collects monitoring data from your network and delivers it to Sonar. Sonar tells the poller which devices to monitor and what to collect from each one, based on the subnets assigned to the poller and your monitoring templates. The poller then checks each device using:
- ICMP (ping): whether the device responds, plus its latency and packet loss.
- SNMP: device details, interface statistics, and connection data. Sonar uses the connection data to link subscriber equipment to network site equipment in Pulse.
Hardware requirements
How many devices can one poller handle?
A single poller with adequate resources can typically monitor 1,000 to 2,000 devices. Real-world performance depends on your network layout and the equipment you have deployed, so some networks will see less.
If your network has 3,000 or more devices, we recommend running two or three pollers rather than one larger server.
Deployment Strategy
Host your pollers inside your own network, as close as possible to the devices they monitor. You can host a poller with a cloud provider such as AWS, Azure, or DigitalOcean, but we don't recommend it for two reasons:
- Faster, more accurate results: devices respond more quickly to a nearby poller, which gives you more accurate monitoring data.
- Better security: keeping polling traffic on your own network avoids exposing SNMP and device access to the internet.
If your network covers a large area, deploy several pollers and place each one near the devices it monitors. Assign each poller only the subnets in its area.
Setting up a poller
Setup has four parts: create the poller in Sonar, install it on your server, connect it to Sonar, and set your polling intervals.
Step 1: Create the poller in Sonar
To create a poller in Sonar, go to
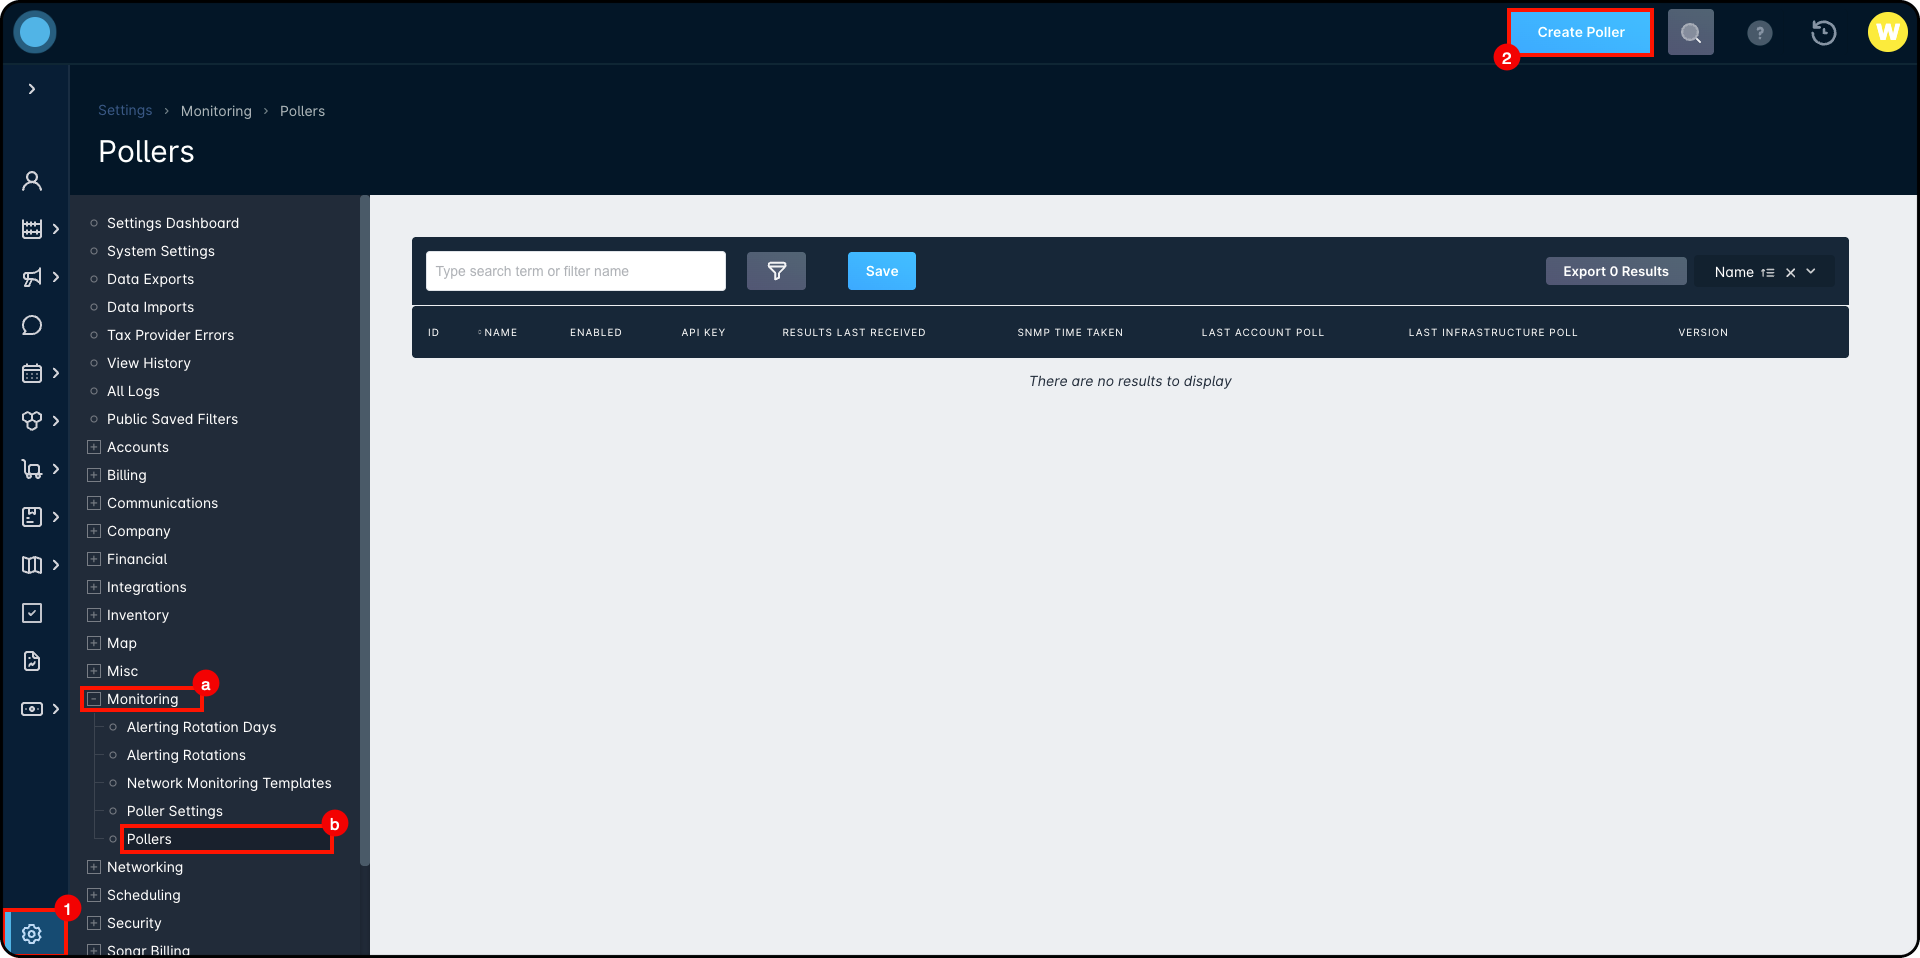
- Navigate to Settings > Monitoring > Pollers.
- Click Create Poller.
- Enter a Name. A good rule of thumb is to name the poller after its location or the subnets it polls.
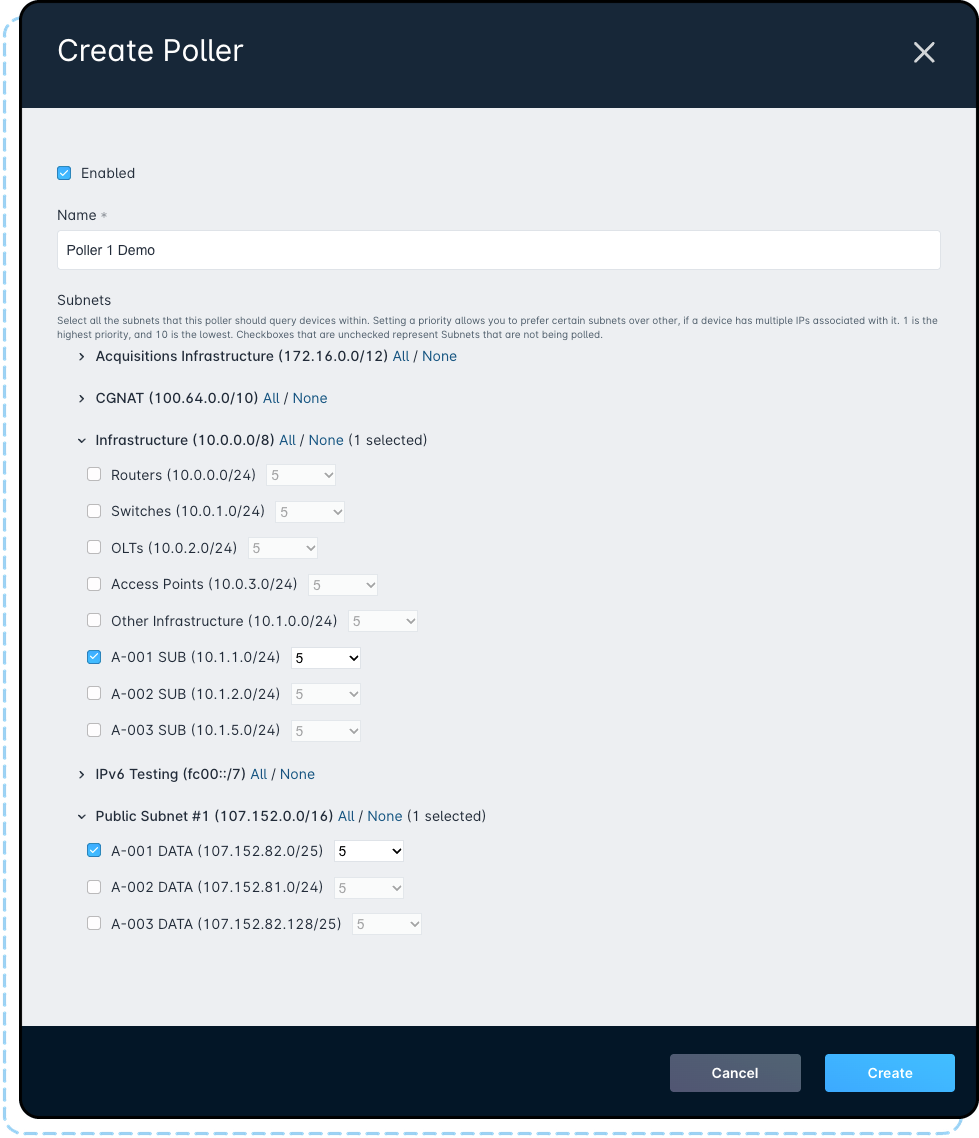
- Select the subnets this poller should monitor. To select or clear every subnet at once, use the All / None buttons.
- Set a priority for each selected subnet (see Subnet priority below).
- Save the poller.
If you already have other pollers, the Create Poller window shows “Currently Used By” under any subnet; another poller is already monitoring, along with that poller's name.
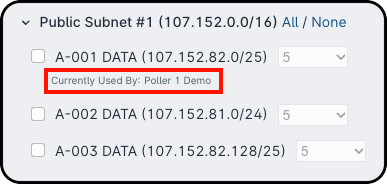
By checking off additional boxes, you can add more subnets to be polled by that poller.
After you click Create, you return to the Pollers list. Copy the poller's API key from this list, because you'll need it in Step 3. The status columns stay blank until the poller connects in Step 3.

Subnet priority
Sonar monitors only one IP address per inventory item. When an item has more than one IP address assigned, Sonar picks one to send to the poller as the polling target, and all monitoring for that item runs through that address.
Multiple IP addresses in the same subnet
If an item has more than one IP address in the same subnet, the most recently created IP assignment becomes the polling target. Subnet priority doesn’t apply in this case.
Multiple IP addresses in different subnets
If an item’s IP addresses are in different subnets and the poller monitors more than one of them, subnet priority decides which address is used. Each subnet on a poller has a priority from 1 (highest) to 10 (lowest), and the poller uses the address from the subnet with the highest priority, meaning the lowest number.
For example, a device might have one address in a management subnet set to priority 1 and another in a subscriber subnet set to priority 5. The poller monitors that device through its management address.
Step 2: Install the poller
On your Ubuntu 24.04 server, run the following commands:
wget https://raw.githubusercontent.com/SonarSoftwareInc/poller/master/setup.sh
chmod +x setup.sh
sudo ./setup.sh
The poller installs and starts automatically. For full installation details, see the Sonar Poller repository on GitHub.
Step 3: Connect the poller to Sonar
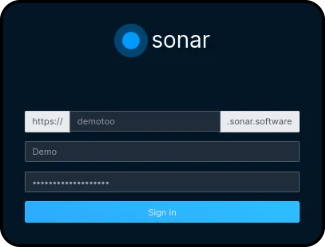
- In a browser, go to
https://SERVER_IP, whereSERVER_IPis the IP address of your poller server. - Log in with your instance name and your Sonar username and password.
- Open the Settings tab.
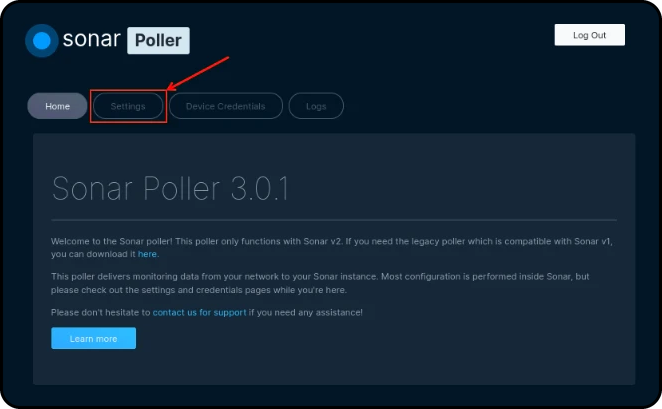
- In Sonar Instance URL, enter only your instance name. The field already includes
https://and.sonar.software. For example, if your instance ishttps://example.sonar.software, enterexample. - In Poller API Key, paste the API key you copied in Step 1.
- Click Update..
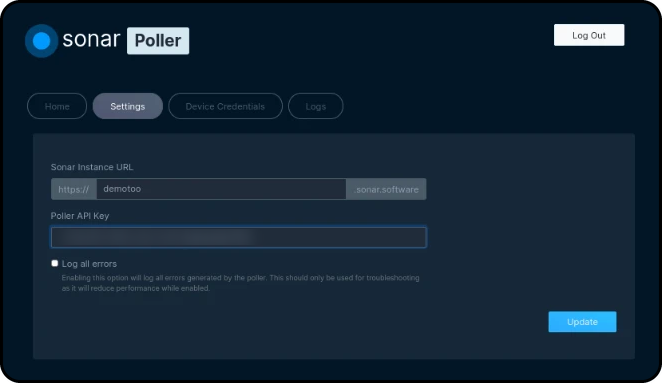
About 5 minutes after you click Update, go to Settings > Monitoring > Pollers in Sonar. Check that Results Last Received, Last Account Poll, and Last Infrastructure Poll show a recent date and time. If they’re still blank, log in to the poller server and restart the poller:
supervisorctl restart sonar_poller
Step 4: Set your polling intervals
Polling intervals apply to all of your pollers. To set them, navigate to Settings > Monitoring > Poller Settings.
- Account Polling: how often equipment deployed on accounts is polled. Don't set this lower than 5 minutes unless your network is very small.
- Infrastructure Polling: how often equipment on network sites is polled. We generally recommend 2 to 5 minutes.
Providing Device Credentials in the Poller GUI
By default, the poller collects data over SNMP using the SNMP settings from your monitoring templates. You don’t need to enter SNMP communities in the poller, because Sonar sends them to the poller automatically. For certain device types, you can add login credentials in the poller. The poller then connects to those devices directly, pulls more detailed connection data, and produces more accurate Pulse maps. This step is optional.
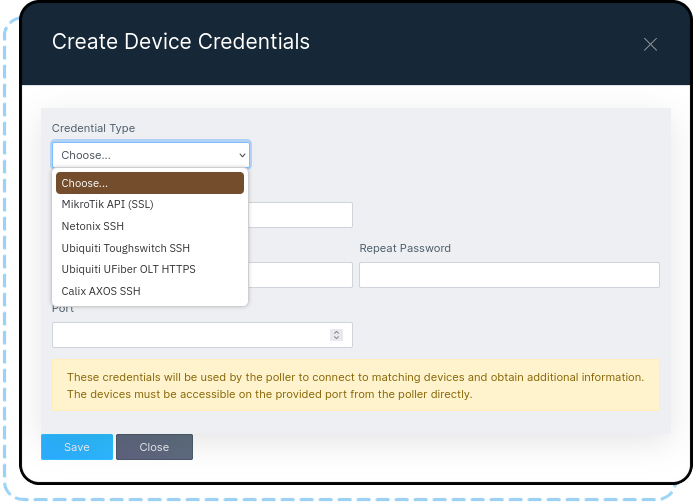
- In the poller web interface, open the Device Credentials tab.
- Click Create.
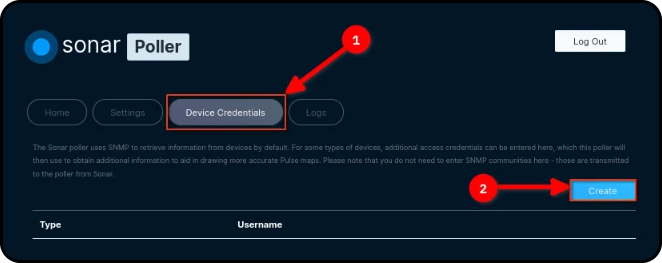
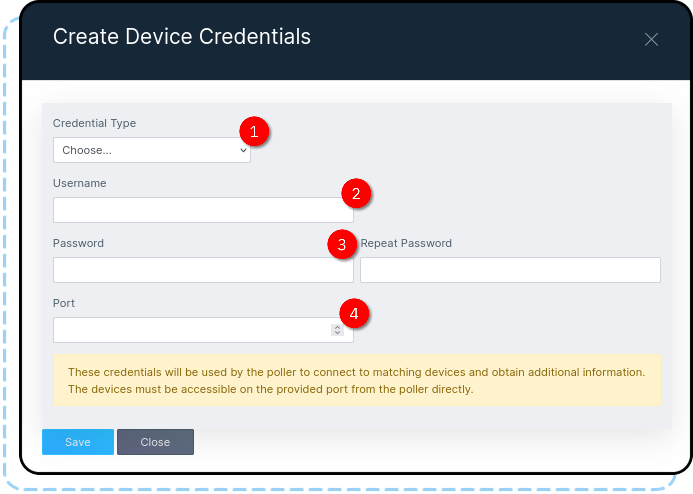
- Choose a Credential Type from the table below.
- Enter the Username of an account that already exists on the device.
- Enter the Password, then enter it again in Repeat Password.
- Enter the Port the poller should use to connect to the device.
- Click Save.
Poller Troubleshooting
If your poller isn’t returning data, or devices aren’t appearing in Pulse, see these articles:
Need a hand?
Our Support Team is here to help