Table of Contents
- What is a Voice Service?
- Basic Deployment
Deploying Voice Services in Sonar
 Updated
by Mitchell Ivany
Updated
by Mitchell Ivany
- What is a Voice Service?
- Basic Deployment
Read Time: 26 mins
If you're looking for API-related information for voice billing, please refer to this article here: API Changes for Voice Billing.
What is a Voice Service?
A Voice Service is a service offering that has configurable parameters which detail essential telephony, value-added calling features, and interconnection services you provide to your subscribers. Voice Services within Sonar support a considerable variety of voice service scenarios, including: Hosted PBX, direct-to-consumer dial-tone, VoIP, and more.
Implementing voice services allows you to associate a DID (direct inward dial) to a service so that when a CDR (call data record) is uploaded, billing for calls can occur. The following sections below will discuss what is required for the initial setup, how you can create a voice service, as well as how these voice services and DIDs are set up for an account.
Voice services are, much like other services in Sonar, completely modular. Depending on the complexity of your configuration, you may need to interact with every part of the voice module, or you may have minimal interaction with anything outside voice services. It's for this reason that the configuration of voice services proceeds on a less direct path than some other services.
Basic Deployment
Creating your Voice Service
Whether your goal is to deploy basic VoIP services, resell existing PBX seats, or provide POTS-rivaling phone service, your first step will be the creation of the voice service. Your voice service determines the service subtype and allows you to configure the flat-rate billing for your customers' phone lines. If you've created any kind of service in Sonar previously, a lot of these settings will be familiar to you, and a lot of them will be new.
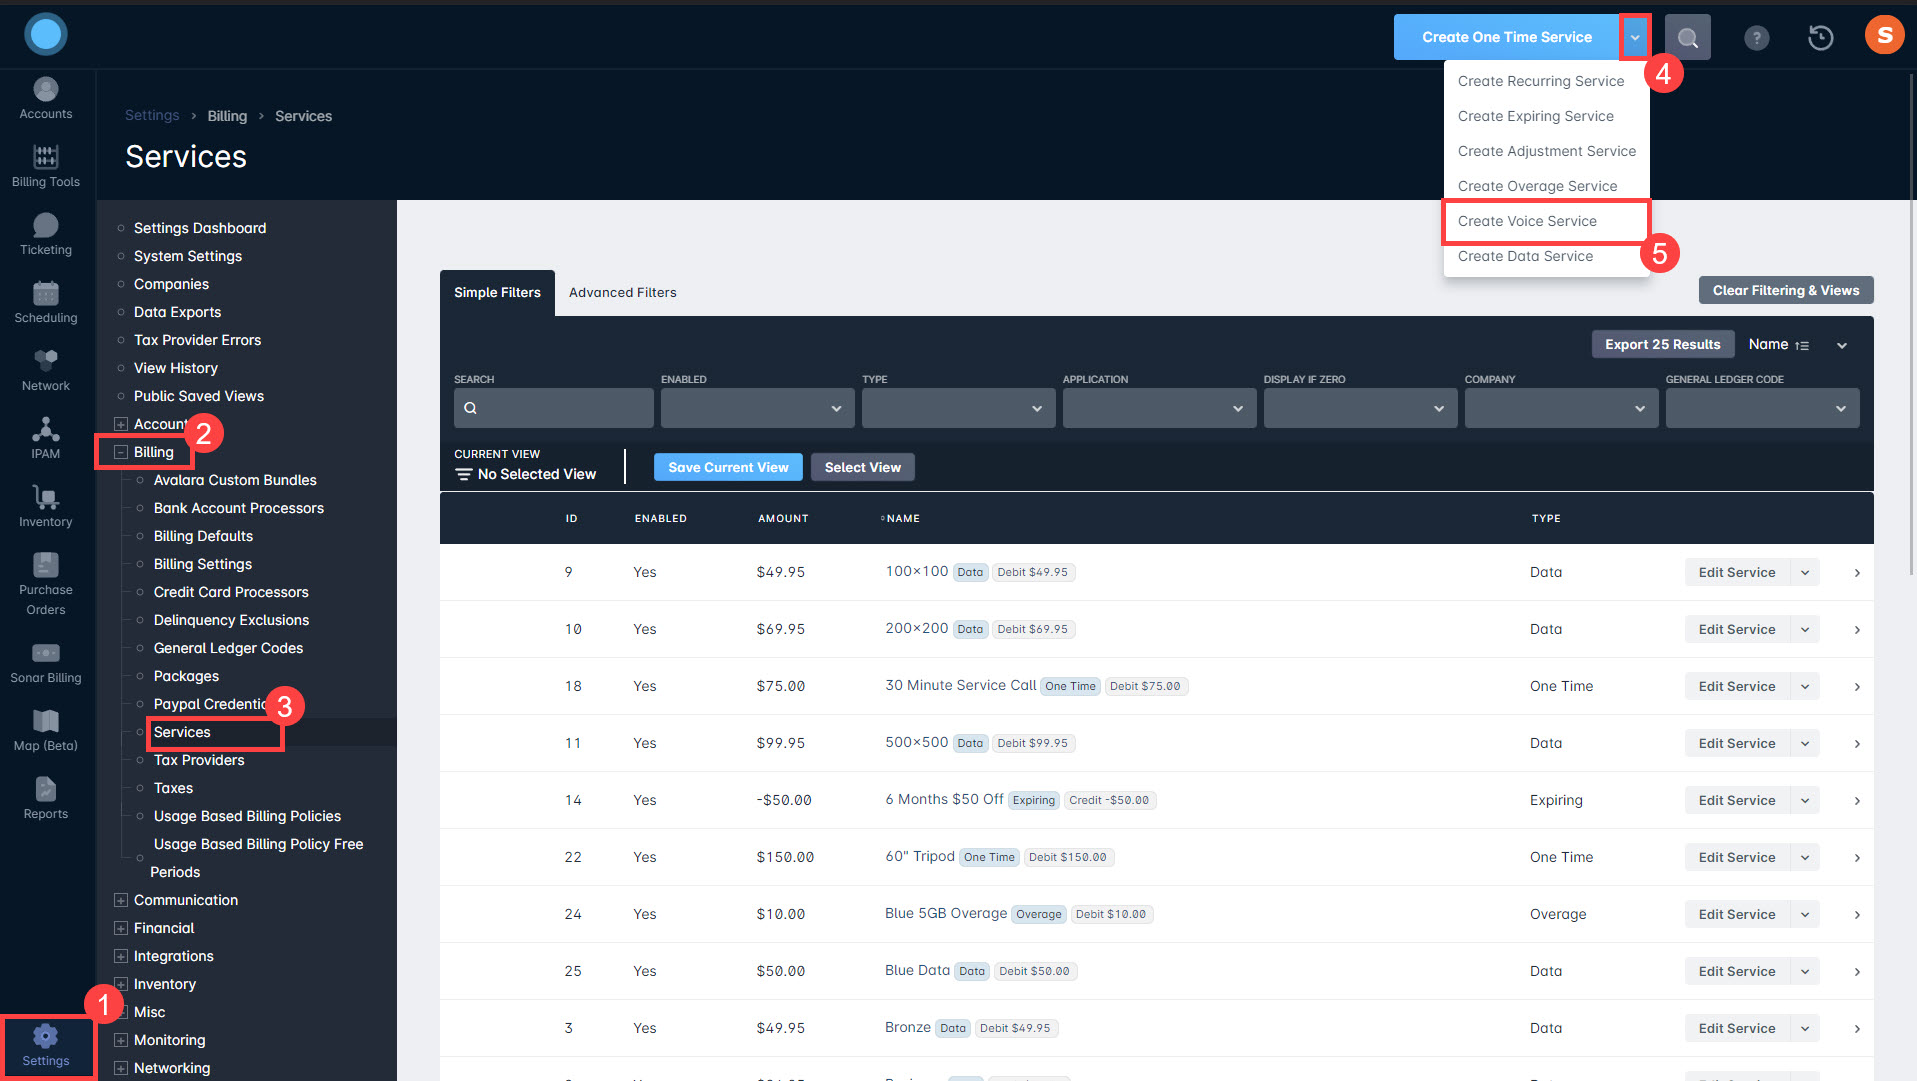
To access the Services screen and create a voice service, follow the steps below:
- From within the Settings menu, click “Billing”.
- Under Billing, click “Services”.
- From the top-right corner of the Services screen, select the downward arrow next to “Create One Time Service”.
- Select “Create Voice Service” from the list that appears.
Expand here to see how you can create a voice service
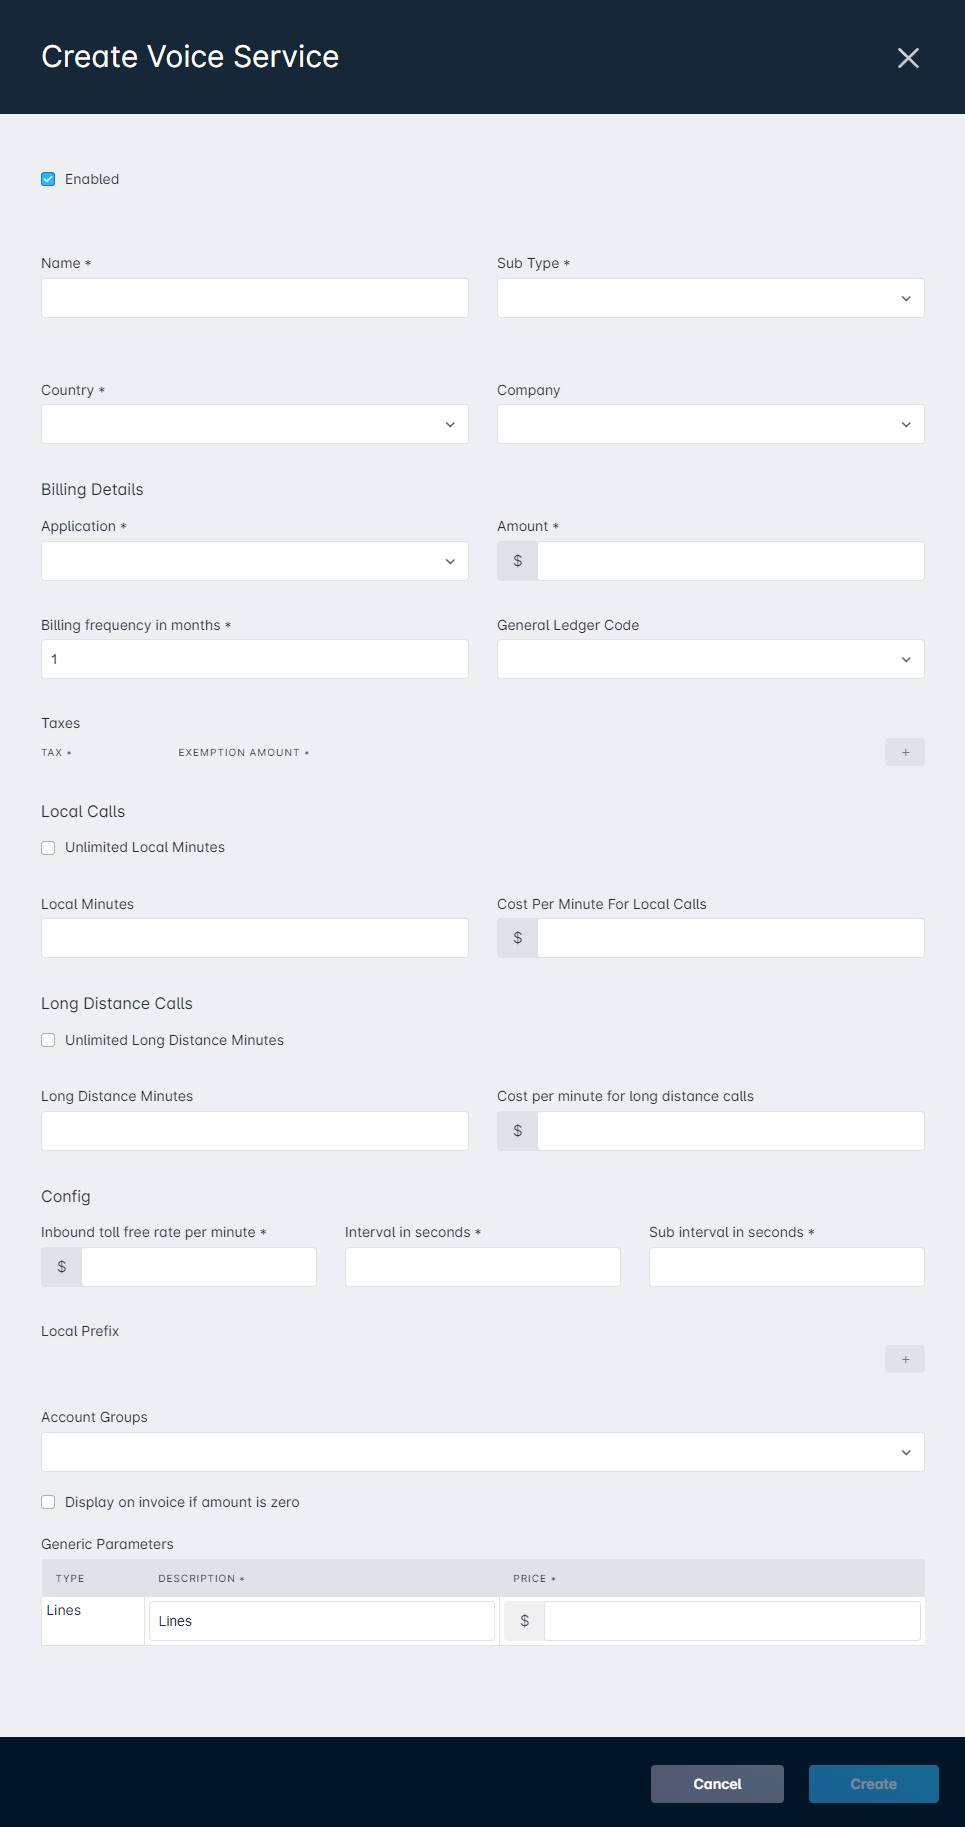
Contained in the modal that appears are several fields that you'll need to configure before deploying Voice services to your subscribers, and these are broken down into different sections within the “Create Voice Service” window. An overview of each section and its corresponding fields follows.
Full Modal View
Name & Type
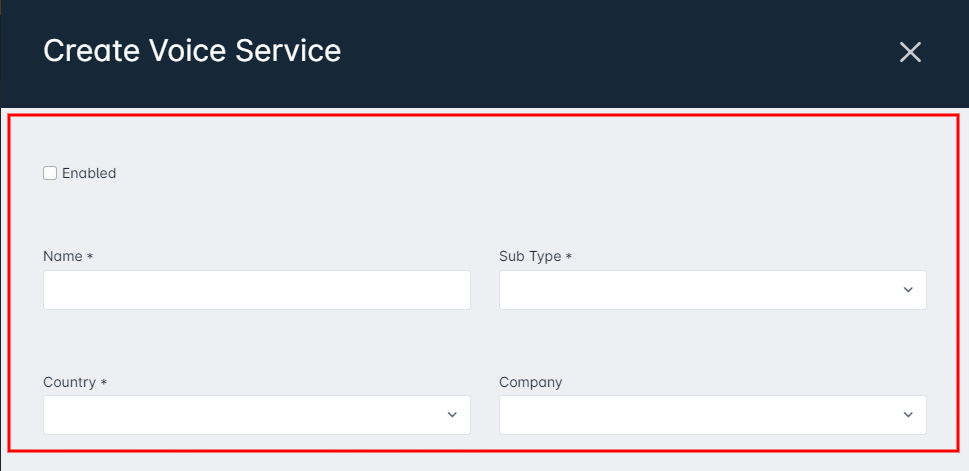
Enabled: determines whether the service is actively being used and whether it can be assigned to customer accounts; if it is not enabled, it cannot be added to any new customer accounts, but it will remain on any existing accounts where it has already been added.
Name: a descriptive name for the service, which will be visible to the customer.
Sub Type: the subtype must be defined when creating the voice service and can be “Voice” or “Hosted PBX” – depending on the subtype, additional details may need to be specified when assigning the service to an account. For example, if the subtype is “Hosted PBX”, the service will require the number of 'PBX Seats' to be defined.
Country: the selection here will be used to ensure that the local prefix(es) being added to the service (under the Config section) are valid for that area.
Company: if a selection is made here, only accounts that exist under the selected companies will have the service available to be added to them; for example, if you were to select 'Company A' here for the service, you would not be able to apply the service to any accounts that fall under 'Company B'.
Billing Details
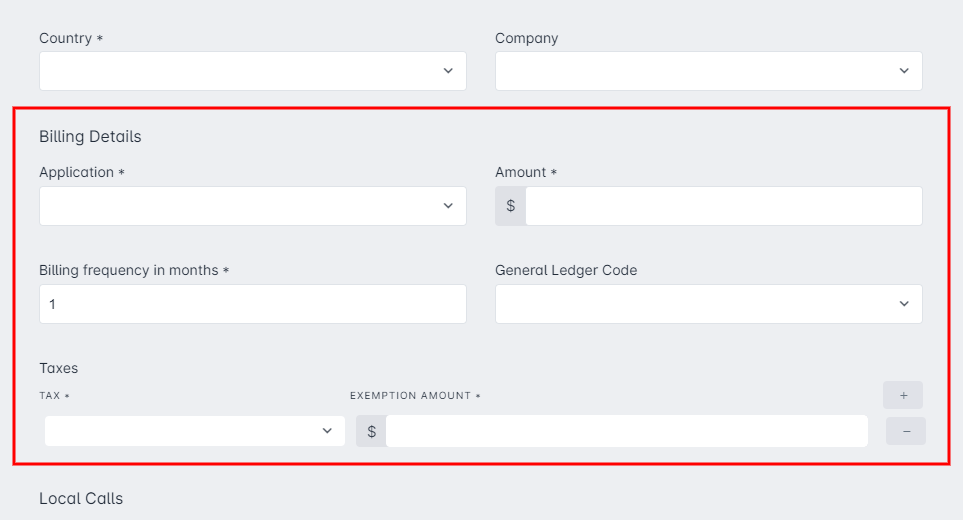
Application: can be either 'Debit' or 'Credit'; a debit service will charge a customer, whereas a credit service will provide a customer with a discount.
Amount: the amount the service transaction will charge or discount the customer.
Billing Frequency in Months: This is how often this service will bill at the rate specified in Amount. For example, if you wanted to bill your customers annually rather than monthly, you could set the Billing Frequency in Months to 12, and the Amount to the yearly cost of the service.
General Ledger Code: this will apply a general ledger code for all transactions created by this service, which can be used for financial reporting purposes.
Taxes: if you are not utilizing tax automation, you can select taxes here to apply to debit services from the list. There is also an option to exempt a certain amount of the service from taxation – this is used if there is a portion of certain services that are provided tax-free in a particular jurisdiction.
Local Calls
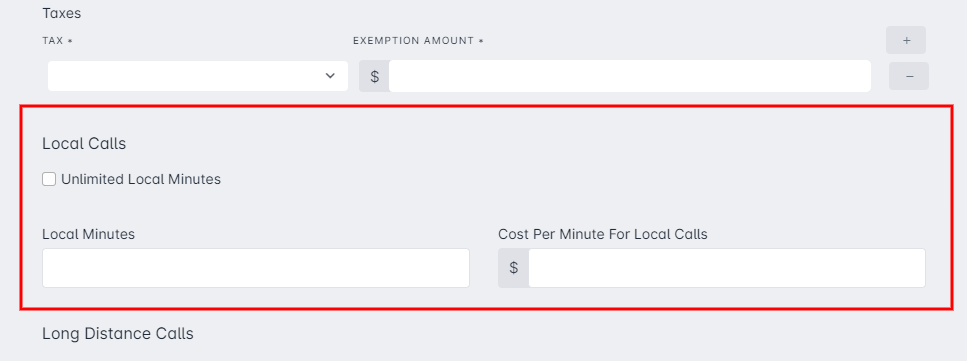
Unlimited Local Minutes: if this box is checked, every local call that is associated with this service will be free to customers (they will not be charged); if this box is not checked, the Local Minutes and Cost Per Minute For Local Calls fields will need to be defined.
Local Minutes: used to determine the number of local minutes that are free for customers (where they will not be charged).
Cost Per Minute For Local Calls: determines how much a customer will be charged for local calls per minute if they exceed the amount set for free local minutes (defined in Local Minutes).
Long Distance Calls
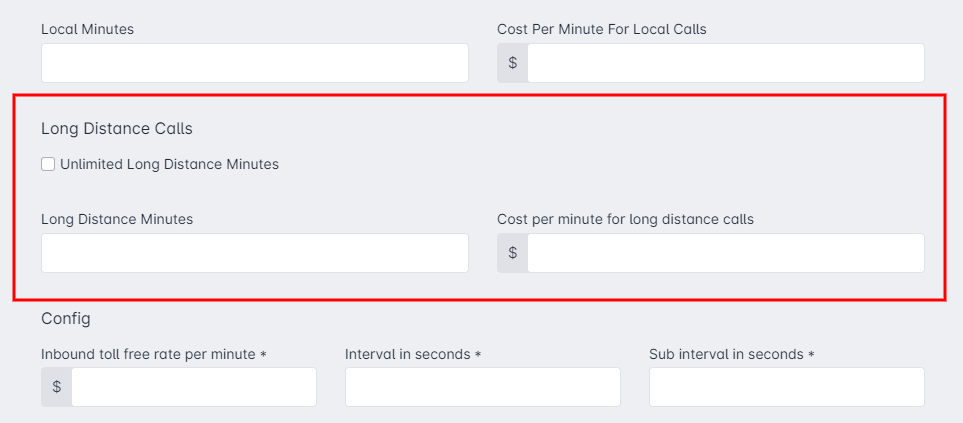
Unlimited Long Distance Minutes: if this box is checked, every long distance call that is associated with this service will be free to customers (they will not be charged); if this box is not checked, the Long Distance Minutes and Cost Per Minute For Long Distance Calls fields will need to be defined.
Long Distance Minutes: used to determine the number of long distance minutes that are free for customers (where they will not be charged).
Cost Per Minute For Long Distance Calls: determines how much a customer will be charged for long distance calls per minute if they exceed the amount set for free long distance minutes (defined in Long Distance Minutes).
How 'Long Distance' is Calculated in Sonar
First, Sonar will check the destination number against any configured Voice Provider Rates to verify international rates. If there's no matching Voice Provider Rate, then Sonar will then consider the call Long Distance, and count the call against the configured long distance minutes.
Config
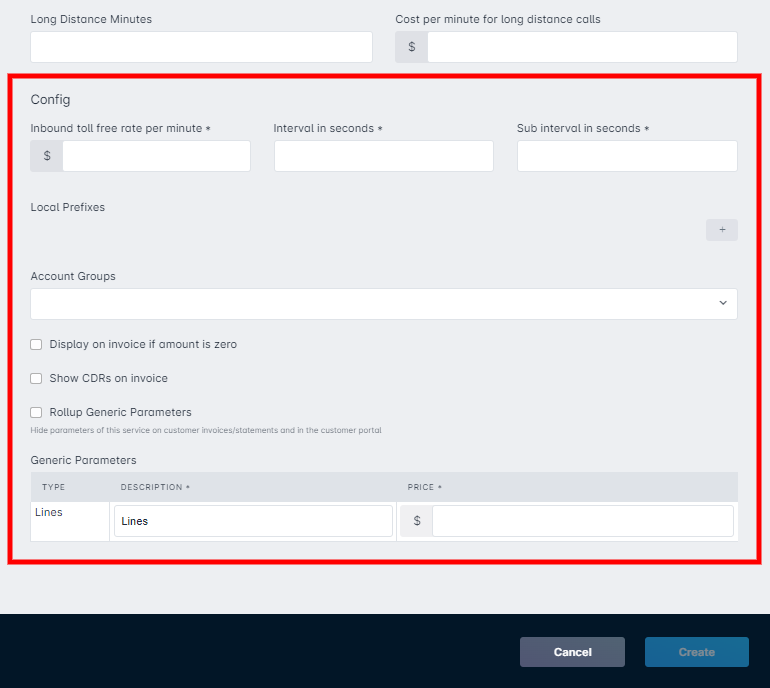
Inbound Toll Free Rate Per Minute: used to set the amount per minute that a customer would be charged for inbound calls, if you are selling toll-free services to your customers (i.e., giving your customer a toll-free number).
Interval in Seconds: used to determine the minimum amount that the customer will be billed for; for example, if this is set to 60 seconds, then even a 5-second phone call would be billed as 60 seconds.
Sub Interval in Seconds: used to determine the amount that the customer will be billed for, once the first interval has passed; for example, if you had 6 here and 60 for the Interval in Seconds, then after the first 60 seconds has passed the customer will begin to be billed in 6-second increments, meaning a 61-second call would be billed as 66 seconds.
Local Prefixes: used to define the calling areas that should be considered local; as many prefixes can be entered here as needed. Any added prefixes are validated against the Country field (in the Name & Type section) to ensure that the prefix being added is a valid calling code for the specified country. Local prefixes must contain the International calling code for validation purposes.
Account Groups: if a selection is made here, only accounts that are members of one of the selected account groups will have the service available to be added to them; for example, if you selected 'Large Business' account groups for the service here, you would not be able to apply the service to any accounts under the 'Small Business' account group, unless 'Small Business' was selected here for this service as well.
Display on invoice if amount is zero: if this option is enabled, the service will not be reflected on customer invoices if it totals $0.
Show CDRs on invoice: this option allows you to include a record of every call made or received within that billing period.
Rollup Generic Parameters: if this option is enabled, it'll prompt any costs associated with generic parameters to be rolled up into one total amount; their associated taxes will also be added together for one total tax amount.
Generic Parameters: depending on the subtype of the voice service, you will be required to define certain generic parameters. These generic parameters allow you to add items that are associated with the voice service and which you can charge customers for. For every generic parameter that exists, there will be a corresponding voice service detail present at the account level, for any account that has the voice service applied.
Each parameter will require a price to be set for it when creating the service, which will be the default price for the item even if that price is $0; when adding the service to an account, the quantity of the voice service detail will need to be specified, and the price can be overridden on a per-account basis.
- If the subtype is Voice: the Lines generic parameter must be defined. The associated Price field is used to define the default price that customers will be charged for one line. When adding the service to an account, you will need to specify the quantity, and will also have an opportunity to override the price. (i.e., if you set your default line price for the voice service to be $.05, when adding the voice service to an account, you will need to specify the number of lines the customer is being given, and can change the price to $.10 a line).
- If the subtype is Hosted PBX: the PBX Seats parameter will appear and must be defined. The associated Price field is used to define the price that customers will be charged per PBX seat. When adding the service to an account, you will need to specify the quantity, and will also have an opportunity to override the price. (i.e., if you set your default PBX seat price for the voice service to be $.05, when adding the voice service to an account, you will need to specify the number of PBX seats the customer is being given, and can change the price to $.10 a seat).
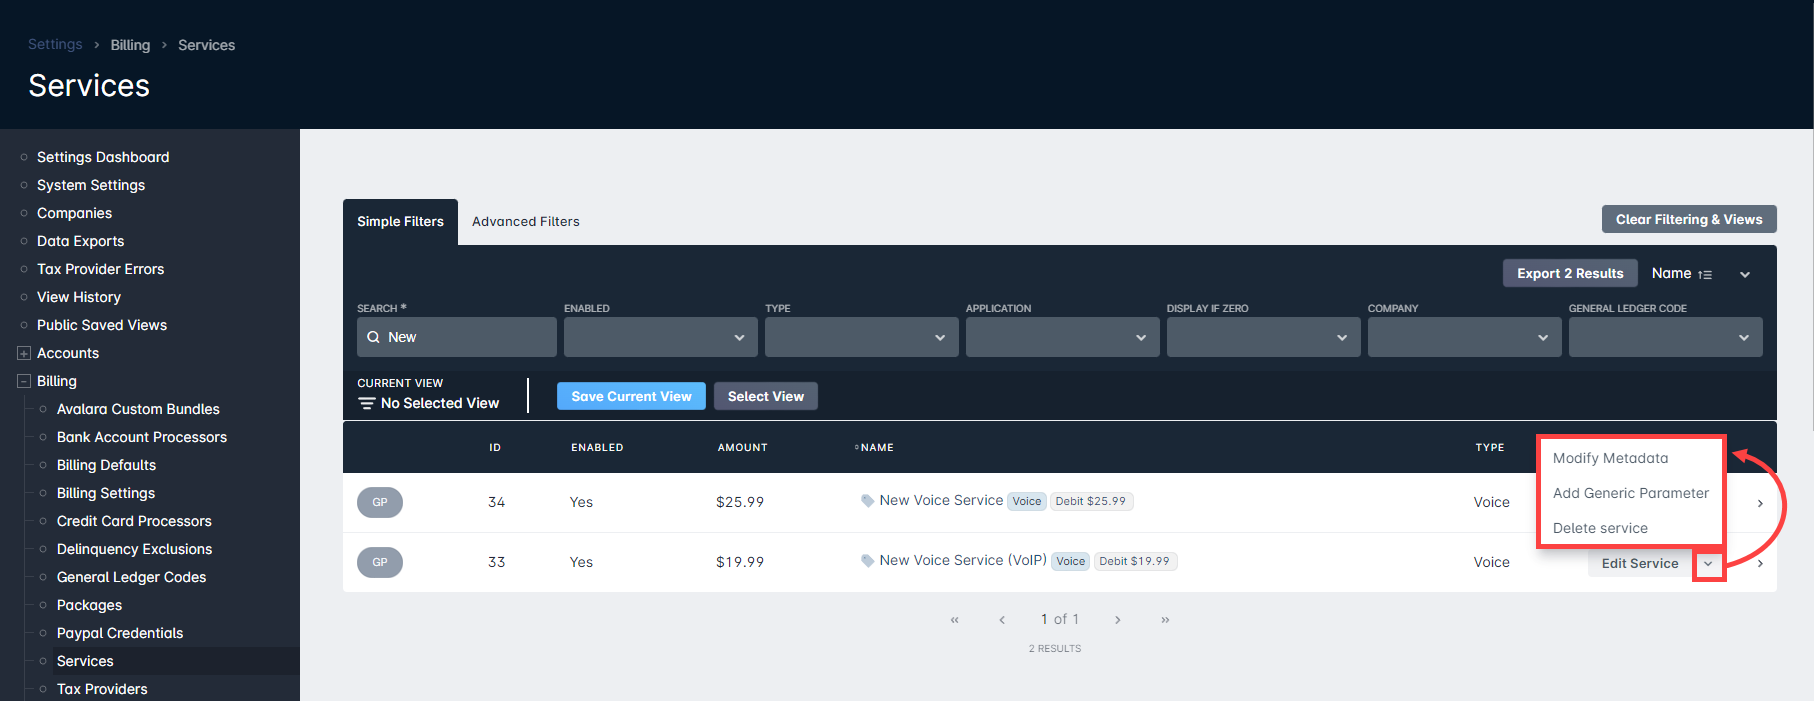
After Voice Service Creation
Once you have created your voice service, it will appear in the table on the Services screen. From here, you can edit the service (by clicking its corresponding “Edit Service” button), or you can access additional options through the adjacent downward arrow menu; from this menu, you can modify the metadata, add generic parameters (both of which are discussed in further detail below), or delete the service.

Modifying Metadata
This option will allow you to add additional fields that will be associated with the service and can be tracked on a per-account basis, commonly used for reporting and custom integration purposes.
To add or modify metadata on the service:
- Navigate to the Services screen (Settings > Billing >Services).
- Find the service you wish to modify – click the downward arrow menu, adjacent to the “Edit Service” button.
- Select “Modify Metadata” from the list that appears.
- Add in a name for the metadata field and click “Apply”.
- If you need to add additional fields, click “Add Row”, and repeat step #4 as needed; each row will be instantly saved when you click apply or remove.
- The metadata field(s) will now be available to have data added to them, when the service is added to a customer account.
Expand here for steps on how to populate metadata fields for an account
After completing the steps above, the metadata fields will now be available for you to edit on a per-account basis.
To populate an account's service metadata fields:
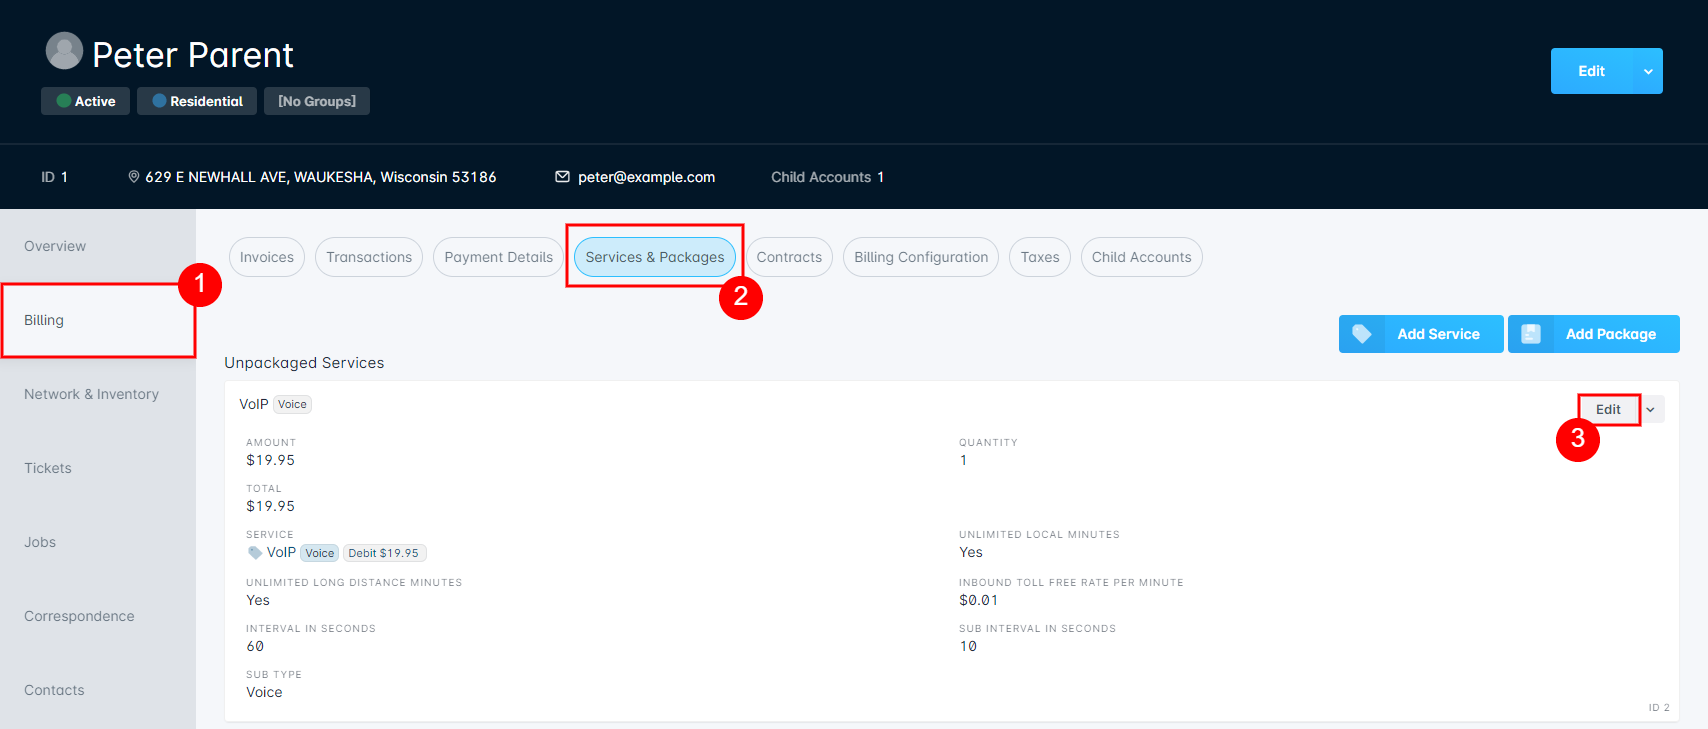
1. Navigate into the Billing tab of the customer account.
2. Navigate into the Services & Packages sub-tab.
3. Find the voice service and click “Edit”.
4. The metadata fields will appear at the bottom of the Edit Account Service window; once you're finished adding data into the field(s), click “Save”.
Adding Generic Parameters
This option allows you to add new generic parameter details for the voice service beyond lines and PBX seats. For example, you may want to create an additional generic parameter to use for charging customers for a voicemail inbox or for a piece of hardware.
To add generic parameters after the service has been created:
- Navigate to the Services screen (Settings > Billing > Services).
- Find the service you wish to modify – click the downward arrow menu, adjacent to the “Edit Service” button.
- Select “Add Generic Parameters” from the list that appears.
- From within the Create Generic Parameter window that appears, you will need to complete the following fields:
- Description: this will be used as the name of the parameter and voice service detail on the account.
- Price: the default price that customers will be charged for this parameter; this default price can be overridden on a per-account basis.
- Backfill Quantity: the quantity of the parameter that should be added to all accounts that currently have this voice service applied; you will still need to specify the quantity for any voice service details when adding this voice service to any accounts in the future.
If you are looking to modify an existing parameter: for any change to the price or description, the Backfill Quantity field must be filled out, before you can click “Apply” to have the change(s) take effect. The quantity will be used to determine how many of this parameter should be added to accounts that currently have the voice service applied. If no backfill is needed, you can enter “0”.- Taxes: if you are not utilizing tax automation, you can select taxes here to apply to debit services from the list. There is also an option to exempt a certain amount of the Generic Parameter price from taxation – this is used if there is a portion of certain parameters that are provided tax-free in a particular jurisdiction.
- Prorate: this allows you to decide whether the Generic Parameter being created will follow the overall proration settings, or select between always or never prorating.
- Once you have entered the details of the parameter, click “Create”.
- If you need to add additional parameters, repeat steps #2 through #4 as needed; each row will be instantly saved when you click “Create”
- The parameters will now be associated with the voice service, and any changes to the parameters will be automatically applied to any accounts that have this service. When you add the voice service to additional accounts in the future, you will need to provide the quantity for any generic parameters that you have set up for the service, and will also have an opportunity to specify the price of any parameters for the customer.
Listing and Modifying Generic Parameters
Generic Parameters are an essential part of Voice Services and Voice Billing in Sonar, which is why you can easily identify, list, and modify Generic Parameters associated with any Voice Service on your instance.
To modify Generic Parameters:
- Navigate to the Services screen (Settings > Billing > Services).
- Click on the “GP” button in the left-most column of any Voice Service.
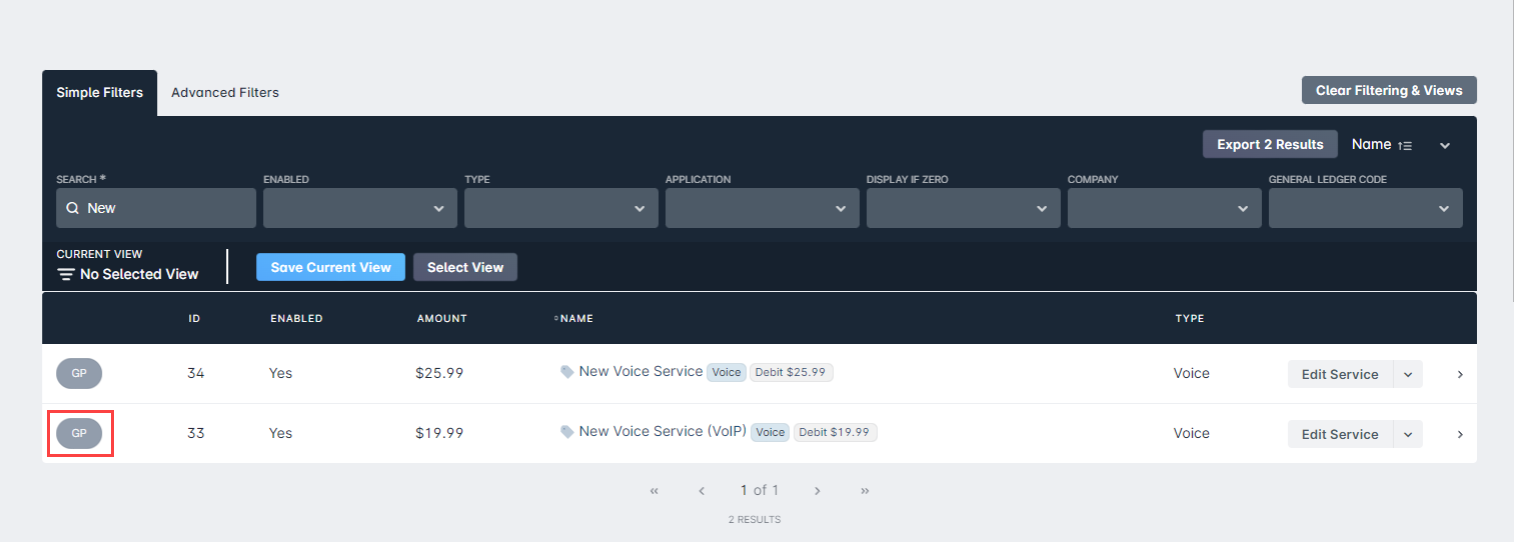
- This will expand the Generic Parameters sub-table, which lists all currently added GPs.
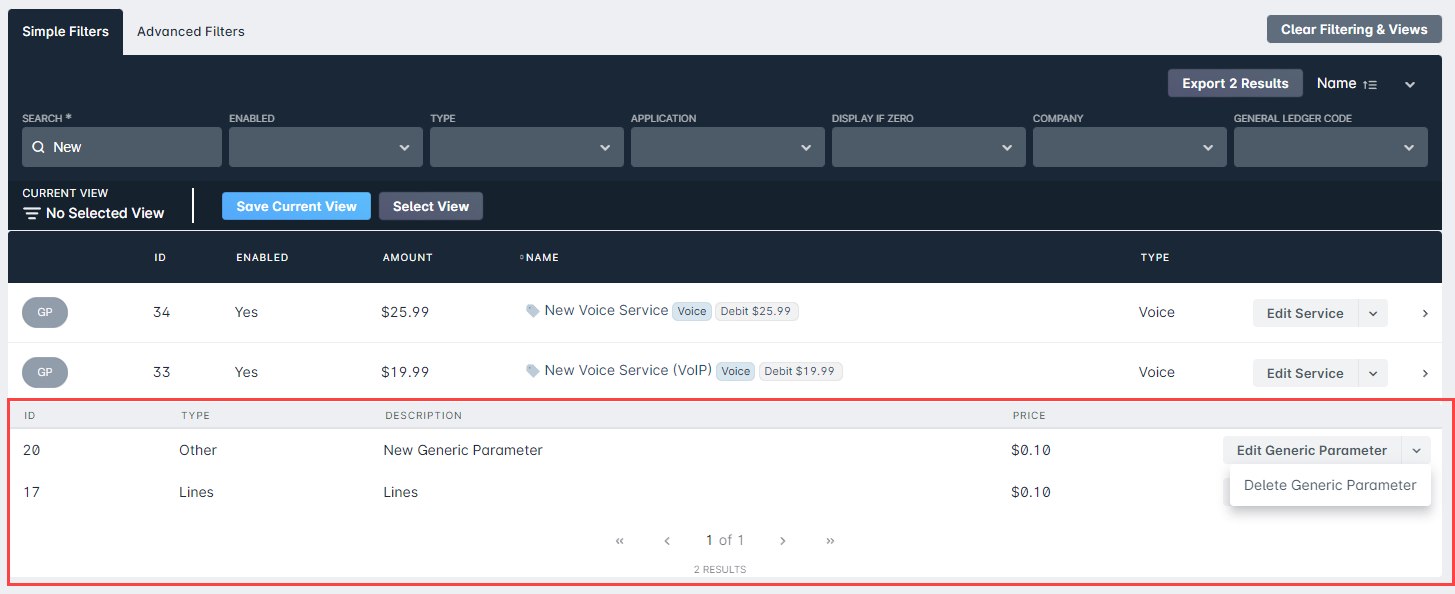
- Within this sub-table, you can modify the details of existing Generic Parameters, and for any non-default Generic Parameter, delete it within the context menu.
Expand here for steps on updating a generic parameter for an account
After completing the steps above, the generic parameters will now be available for you to edit on a per-account basis.
To modify an account's voice service generic parameters:
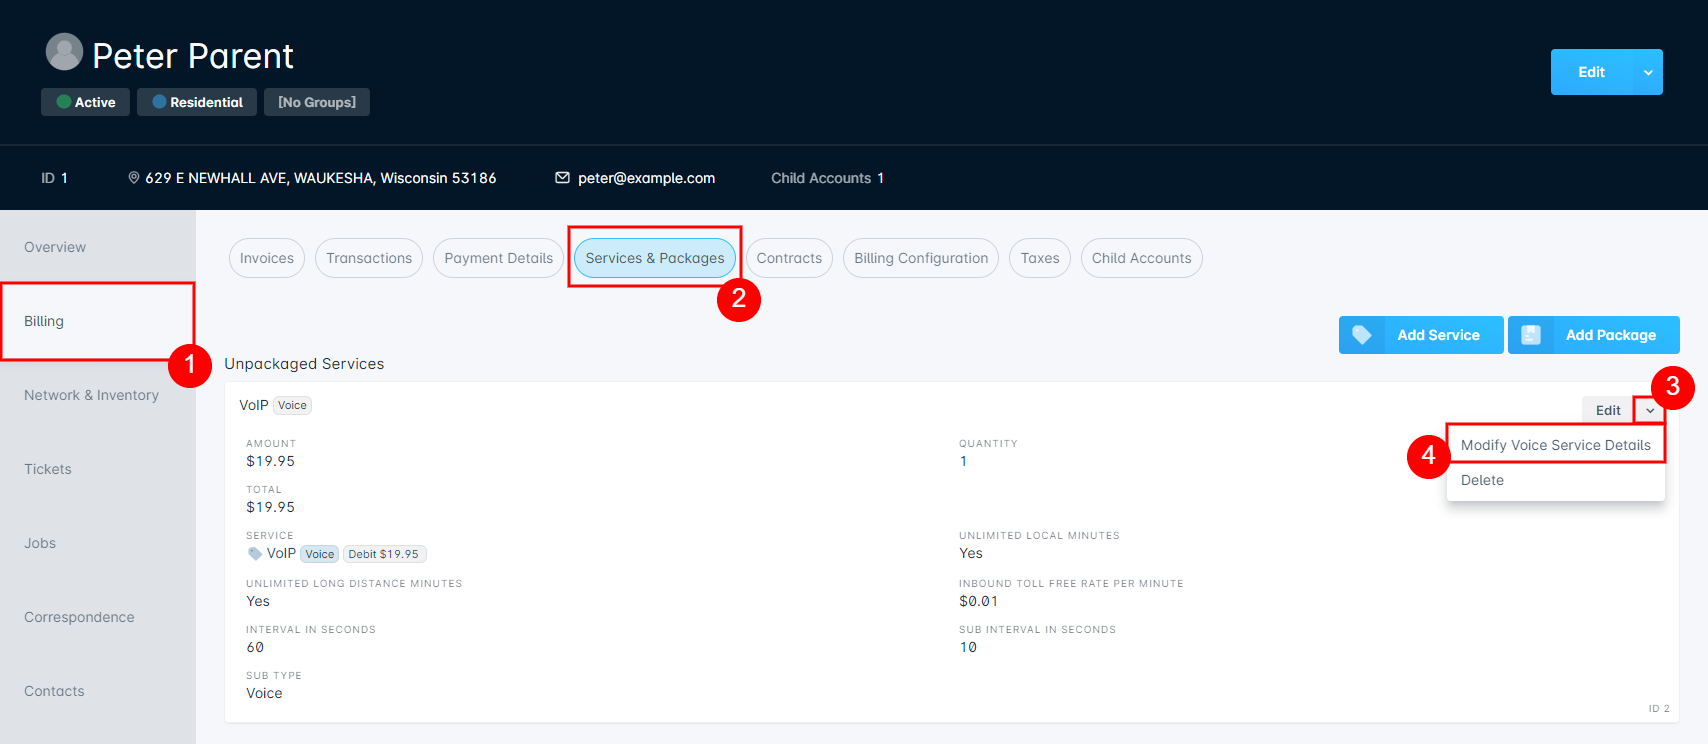
1. Navigate into the Billing tab of the customer account.
2. Navigate into the Services & Packages sub-tab.
3. Find the voice service and click the downward arrow adjacent to “Edit” – click on the “Modify Voice Service Details” option that appears.
4. From within the Edit Account Voice Service Details window that appears, make the needed changes to the quantity or price, and click "Apply" – the change for each row will be automatically saved upon clicking “Apply”.
Adding DIDs to your instance
Adding a DID to your instance allows you to assign a given phone number to a customer, associating it to a voice service. Each DID is stored in E164 format (+1 NPA-NXX-XXXX; e.g., +1 902-555-1234) and are tracked with an assignment history, similar to how IP Addresses are stored and handled in Sonar. Each time a DID is given to a new customer, their usage of it is recorded, providing you crucial information if misuse occurs.
Before you can add DIDs to your instance, you need to have at least one Voice Provider configured, denoting ownership of this number.
Creating your Voice Provider
A Voice Provider, as recognized by Sonar, is a simple, name-only field, but one that ties together several aspects of Voice deployment in Sonar. The Voice Provider is the means of association between DIDs, Local (calling) Prefixes, international and long-distance calling (Voice Provider) Rates, and CDRs.
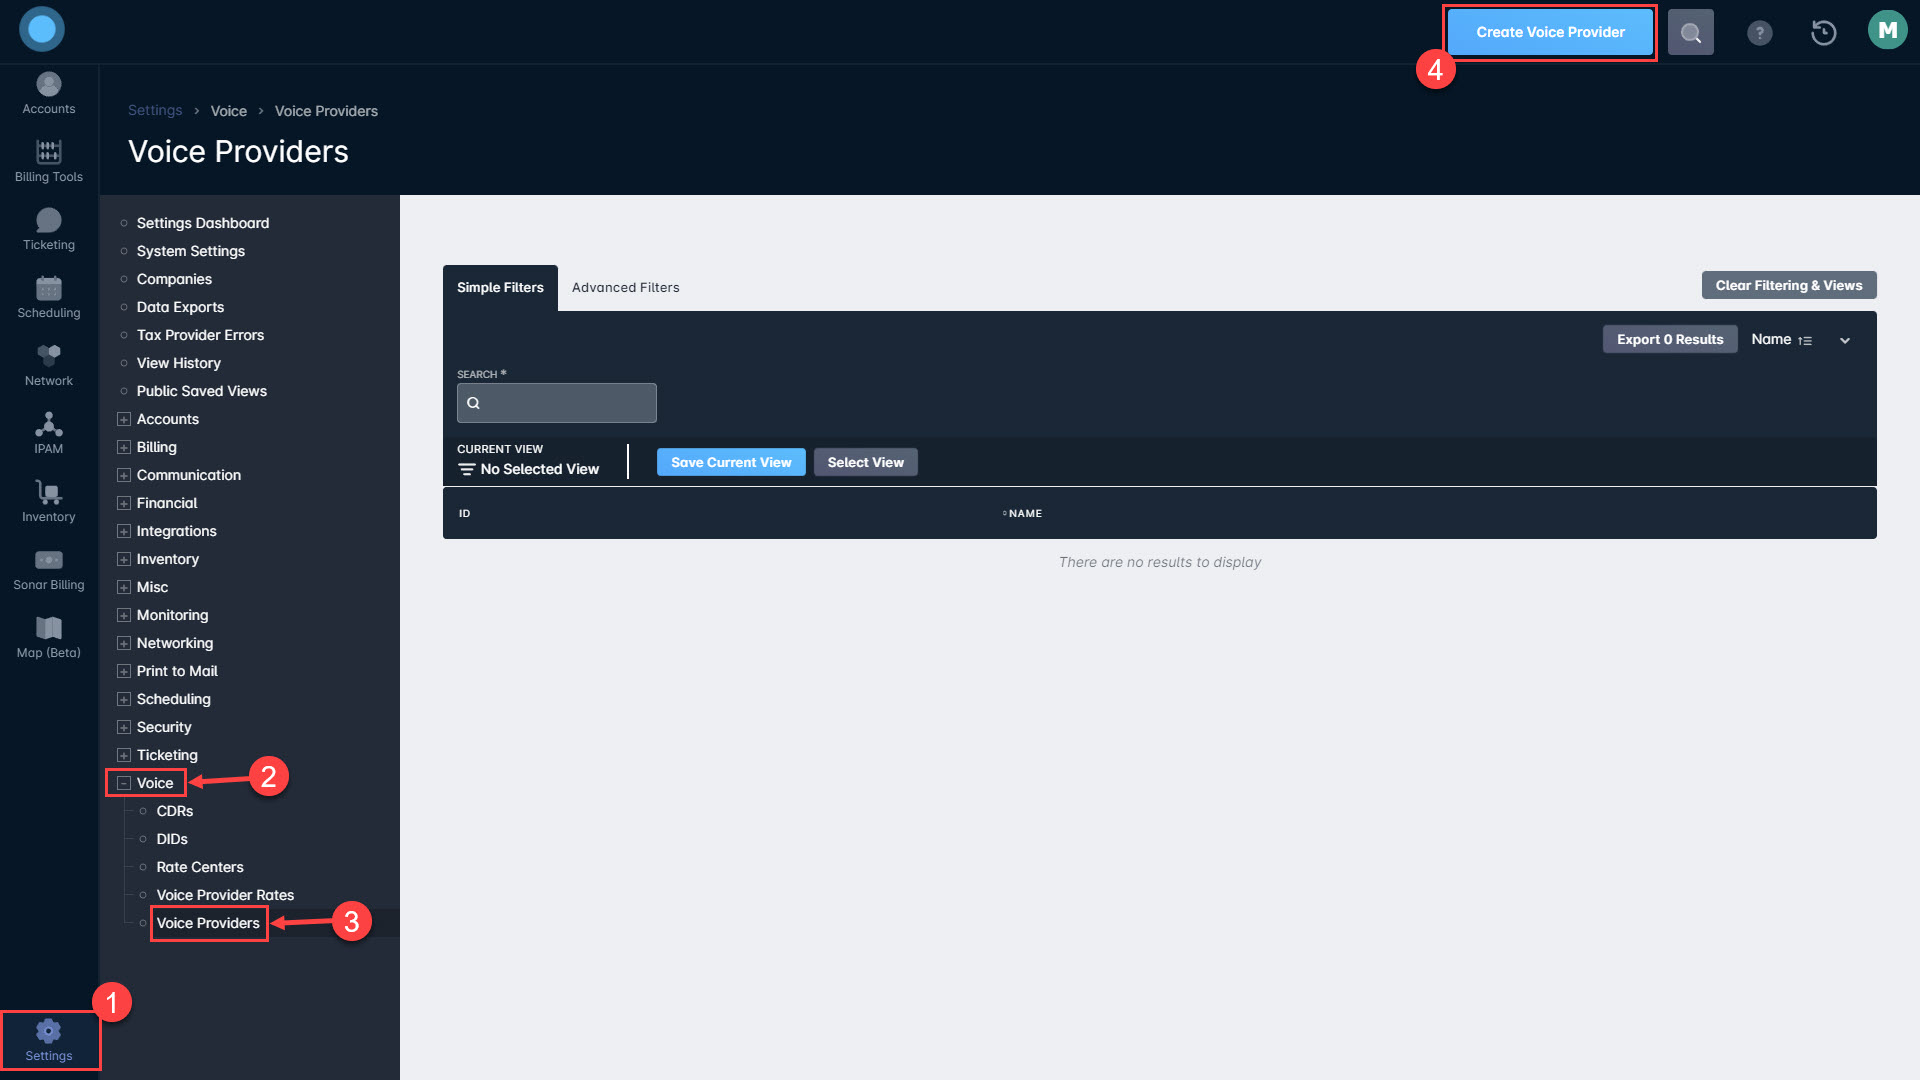
To create a Voice Provider:
- Navigate to Settings ⇾ Voice ⇾ Voice Providers
- Click on “Create Voice Provider” in the top-right corner.
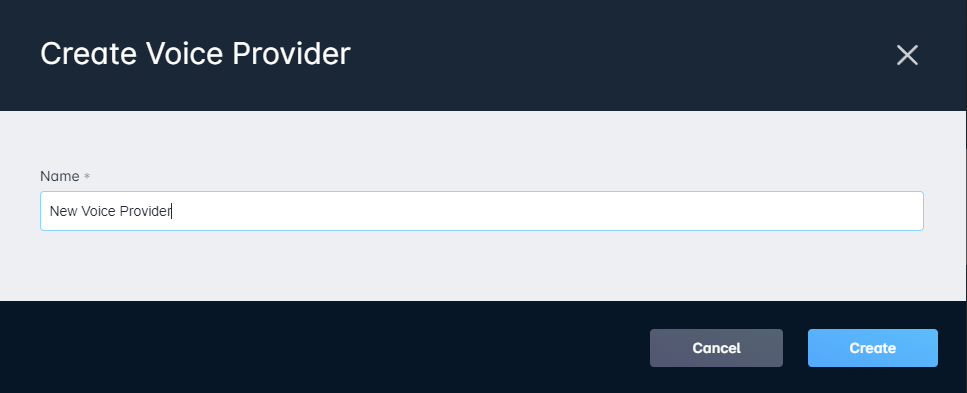
Click here to see how to create a Voice Provider
From the modal that appears, fill in the Voice Provider Name, then click “Create”. The new provider will now appear in the list.
Adding your DIDs
Adding new numbers to your Sonar instance can be done three ways:
- Directly from your Sonar instance, one at a time, or
- Programmatically, through the GraphQL API
- In bulk, with the Data Import tool
Adding DIDs with the Data Import tool
Using the Data Import tool is a multistep process, and full instructions can be found in the linked article. To summarize:
1. Access the Data Import tool through Settings --> Voice --> DIDs
2. Click on “Import DIDs” from the button in the top-right.
3. Fill out the Voice Provider and Rate Center fields.
4. Upload your file and associate the correct headers.
5. Click “Continue” then “Save and Finalize”
This section will provide instructions on both methods, and you can choose which you prefer to suit your needs.
To add a new DID through the visual interface:
- Click on Settings --> Voice --> DIDs
- Click on “Create DID” from the dropdown in the top-right corner.
Click here to see how to create a DID

- Fill out the window that appears.
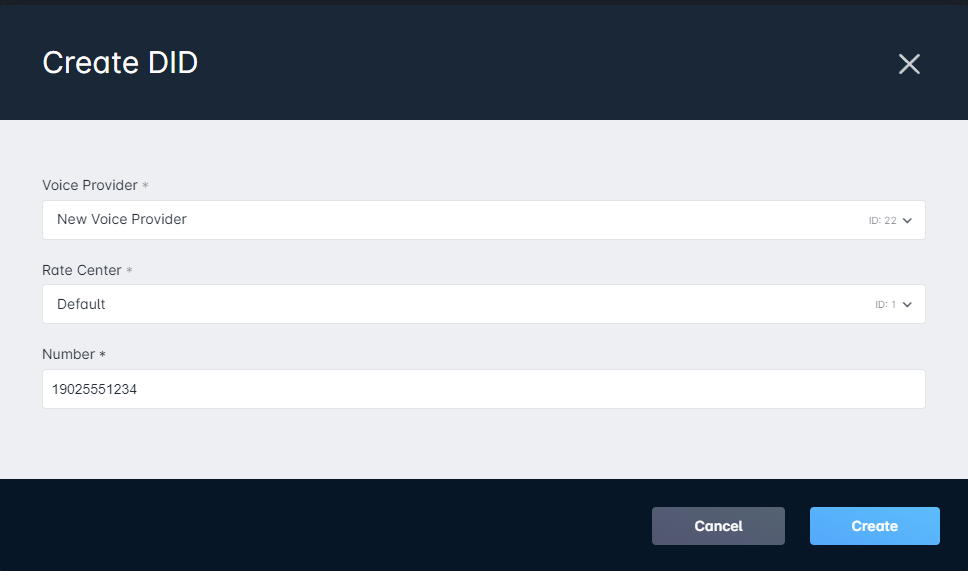
- Voice Provider: this associates the DID with a specific Voice Provider. If any Voice Provider Rates are configured, this selection will also tie the DID to those rates.
- Rate Center: this field associates the DID with a specific Rate Center. Without additional configuration, you'll only see the “Default” Rate Center.
- Number: this field is where you provide the actual number for the DID. This number will be associated with CDRs and Voice Services once assigned to an account. When entering the number, you must include the country code.
To add one or multiple DIDs through the GraphQL API:
#    Add a single DID

mutation ImportDID {
  importDids (input:{
    voice_provider_id:1, #     Associates the DID with a Voice Provider based on Voice provider ID
    dids:{
      number:"14143771569",
    }
  }) {
    success
  }
}
Importing multiple DIDs uses the same basic command structure:
#    Add multiple DIDs at once

mutation ImportDIDs {
  importDids (input:{
    voice_provider_id:1,   #   Associates the DID with a Voice Provider based on Voice provider ID
    dids:[{
      number:"14143771560",
      country:US
    },               #     Each DID is comma separated when adding multiple
    {
      number:"14143771561",
      country:US
    }]
  }) {
    success
  }
}
Adding DIDs to an account
Earlier, the assignment of DIDs was compared to the assignment of IP Addresses, and this holds true for both the assignment process and the assignment history. Assigning a DID takes place entirely on a customer account, within the Billing tab. Because Voice Services operate on a strict hierarchy, the steps for setting it up on a customer account must be followed in their entirety.
Adding the Voice Service
Once you have your voice service configured within your instance, you can begin adding the service to accounts. To add a voice service to an account:
- Navigate into the Billing tab of the account
- Click into the Services & Packages sub-tab
- Click the “Add Service” button
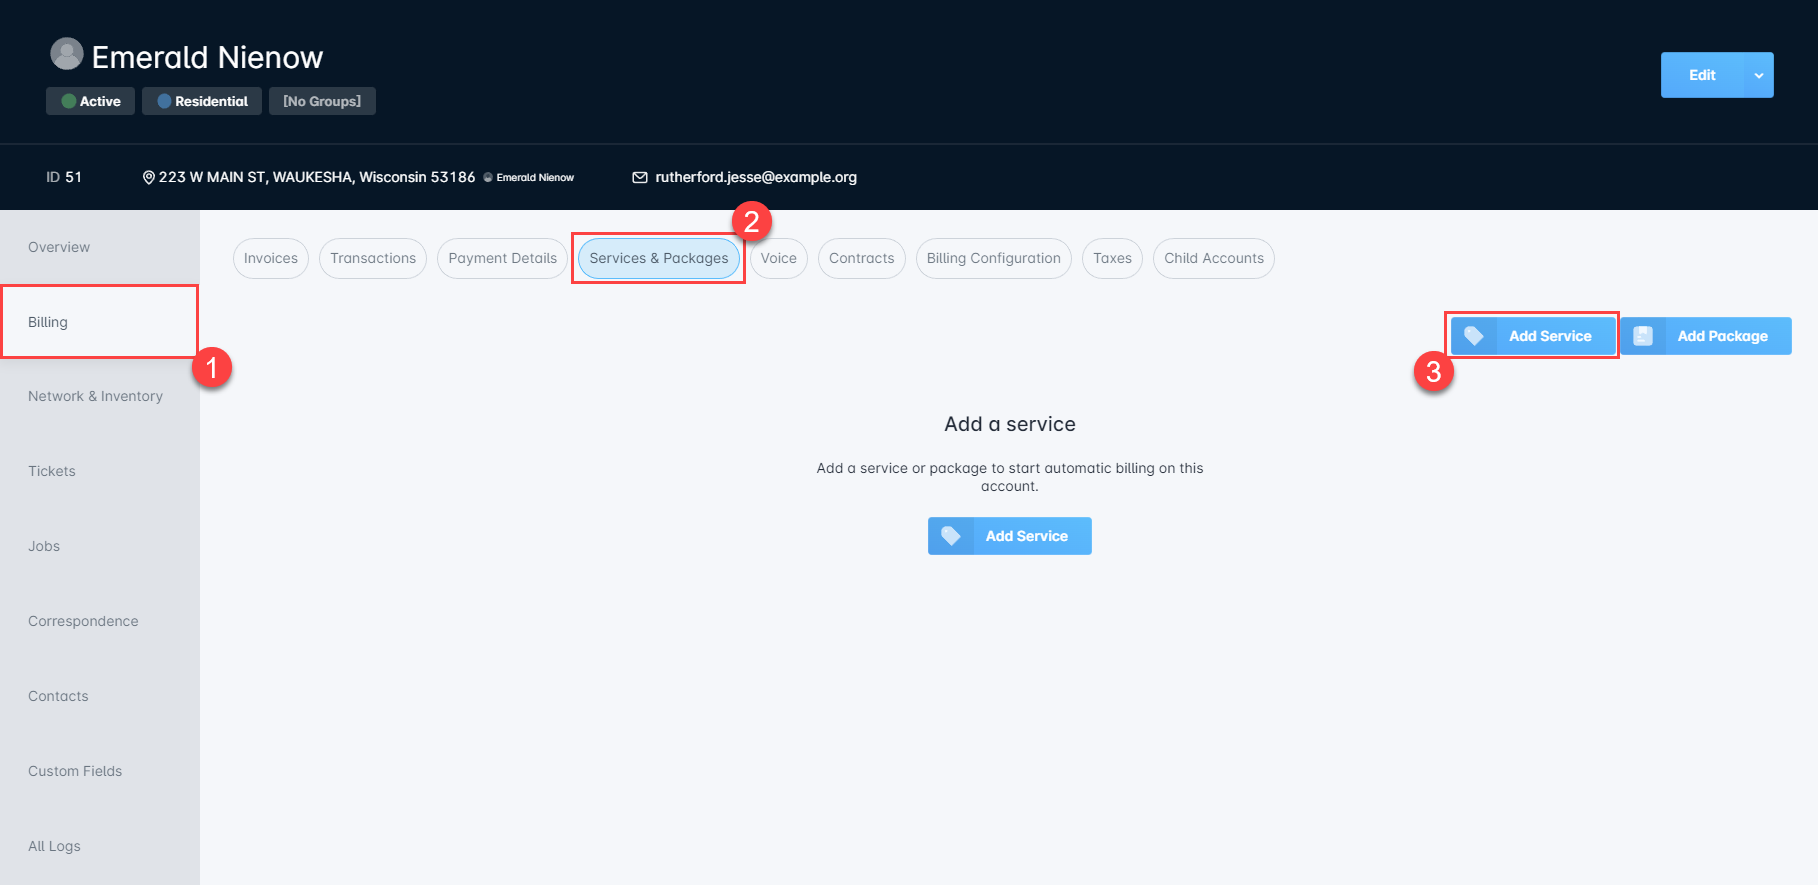
- From the window that appears, you will need to complete the necessary fields
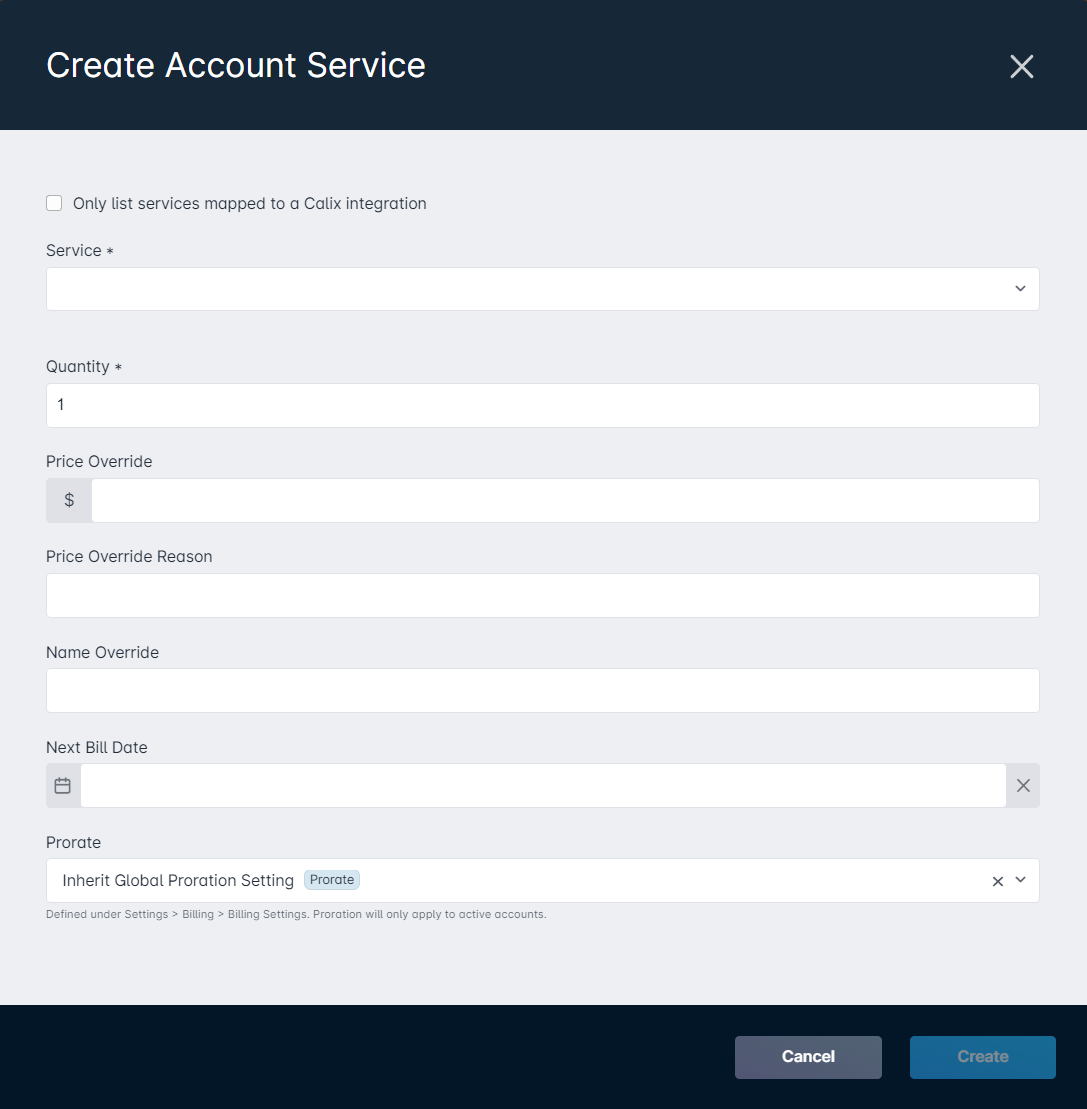
Expand this section for a breakdown of the fields within the Create Account Service window
Quantity: used to define how many instances of this service you wish to add to the account.
Price Override: if the account is being charged a different price for the service, it can be entered here (and will require the Price Override Reason field to be filled out); if this field is left blank, the account will be charged the set price for this service.
Price Override Reason: if the account has a price override for the service, you will need to provide a reason for the override here.
Name Override: allows you to provide a unique name for this service, which will appear on invoices and on the transactions list (instead of the set name for the service).
Generic Voice Service Parameters: the fields listed here will vary depending on the sub type of the voice service and if you have created any additional generic parameters for the voice service. For each field you will need to specify the quantity, and can optionally apply a price override if you wish to charge the customer a different price than what is set (the set price for the field can be seen as a label under the Description column); if a price override is performed, the corresponding Price Override Reason field will need to be filled out as well.

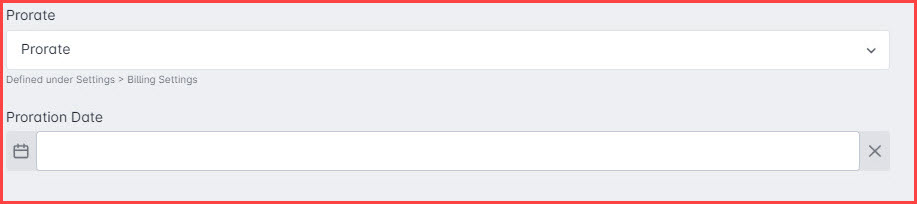
Proration: this allows you to decide whether the Voice Service being added will follow the overall proration settings, or select between always or never prorating. If “Prorate" is selected, you will need to provide a proration date.
- Once you have completed all the required fields and entered the necessary information, click “Create”
Assigning the DID
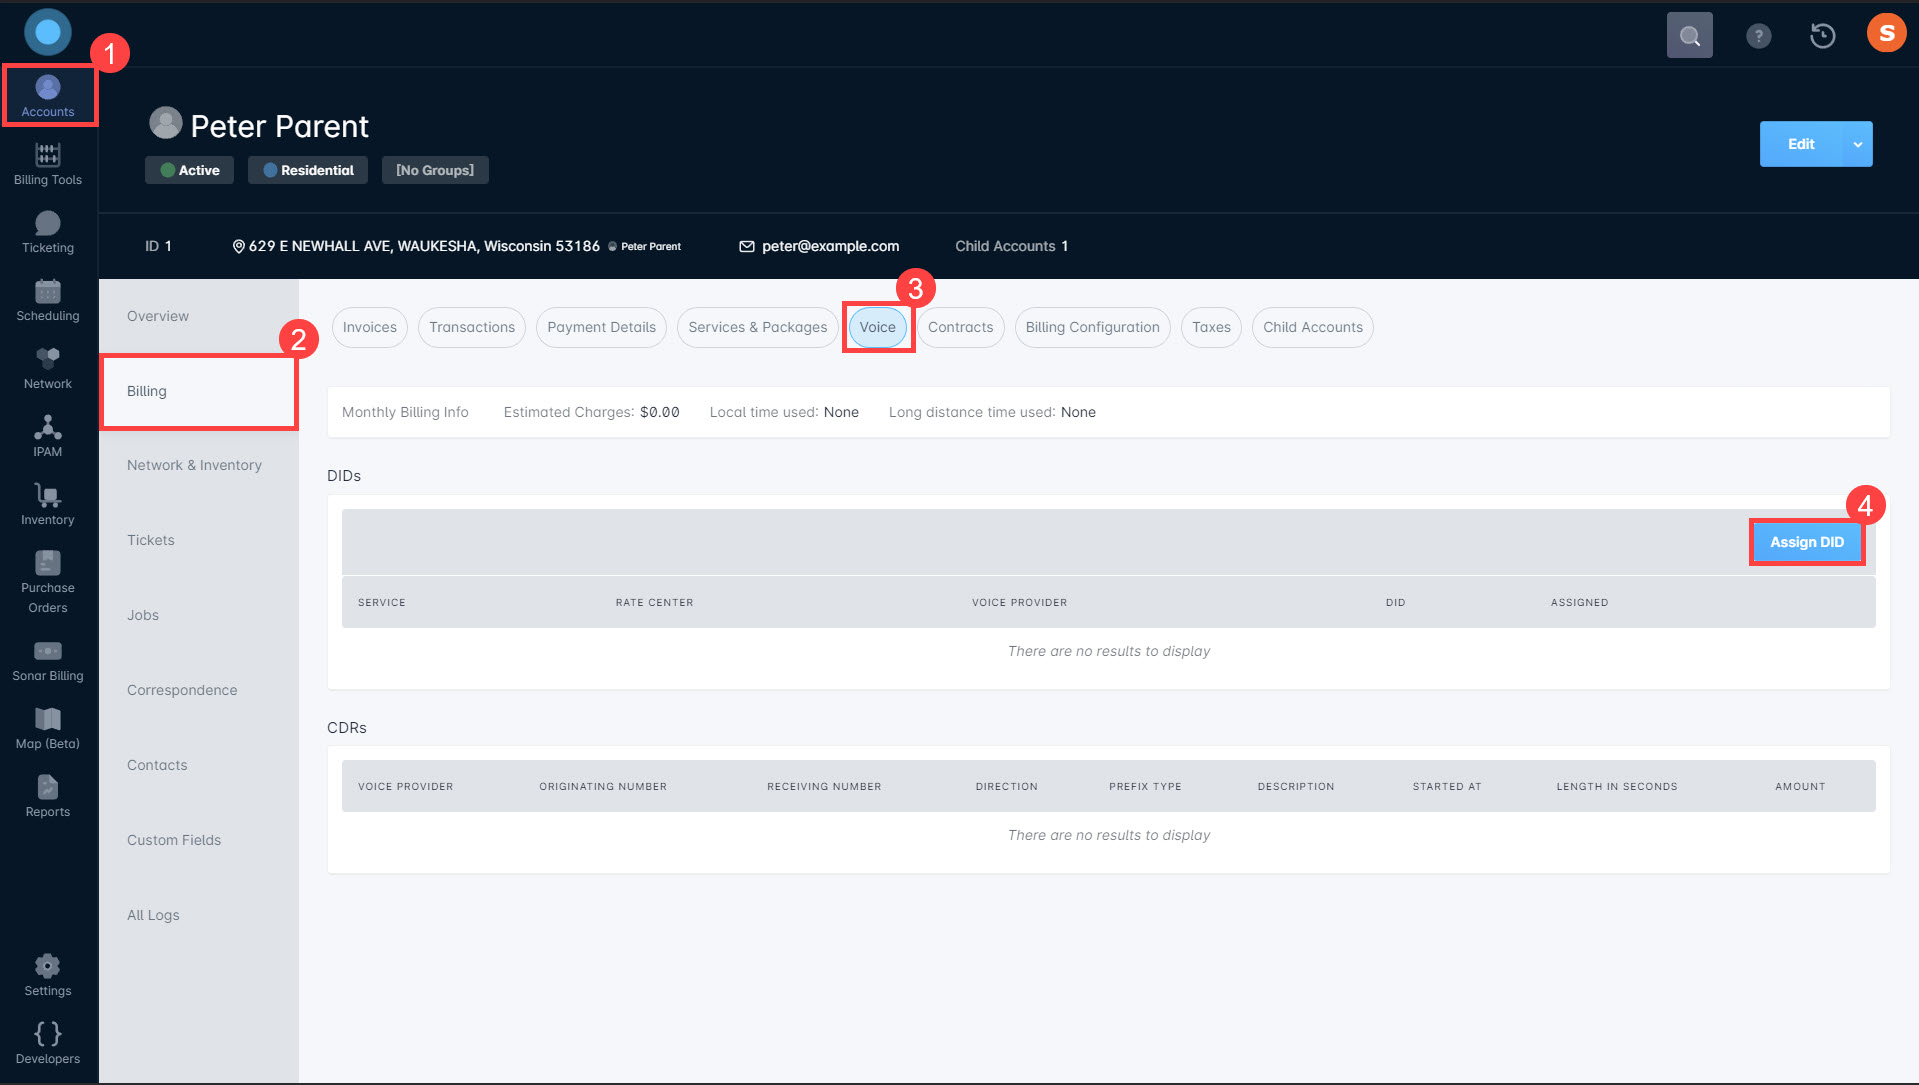
To access the “Voice” section:
- Navigate in to the account. You can do this from the Accounts module, or the search bar,
- Click on the “Billing” tab,
- Click on the “Voice” sub-tab
- Click the “Assign DID” button
Click here to see these steps
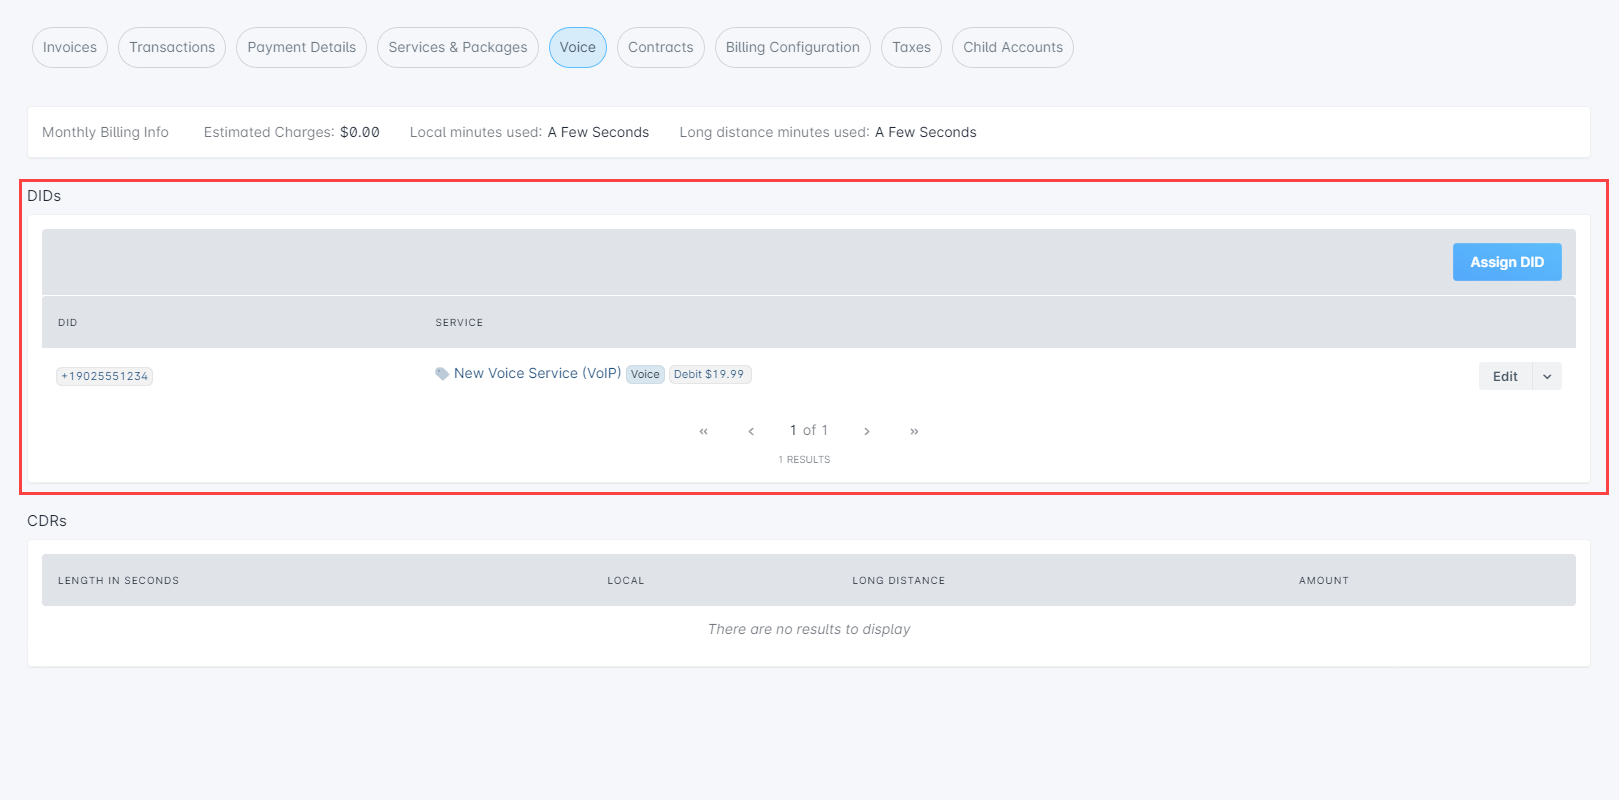
In the window that opens, you'll be able to select both the DID to assign and the Voice service that will be added to the account (and associated with the DID), then click “Create”.

The account will now display the DID and Voice service in the “DIDs” table:
Monitoring Assignment history
As DIDs get assigned and reassigned, being able to track and monitor which customers they've been assigned to and how they've been used becomes increasingly important. With Sonar, all DID assignment history is tracked within the side panel and the “DID Assignment History” table:
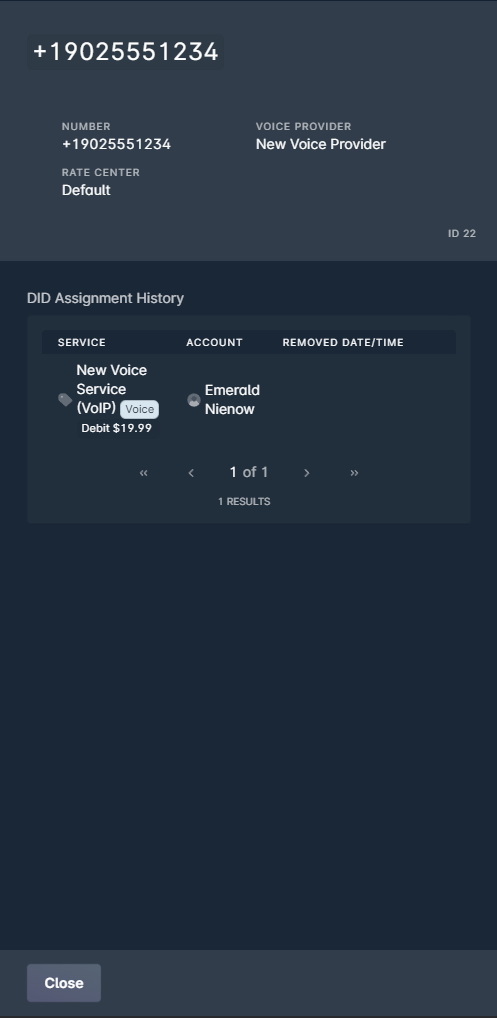
This side panel can be opened anywhere the DID can be clicked on, such as the “Voice” subtab on an account, or the DID page in “Settings”.
Advanced Deployment Options
Adding CDRs
Once you begin billing customers for active call minutes, you'll need some way to track those calls. In Sonar, that's handled by uploading the CDRs generated by your call-handling software. Because CDRs are generated by any off-hook event, every call made or received by the DIDs you've entered in to Sonar can be registered and billed.
In the UI
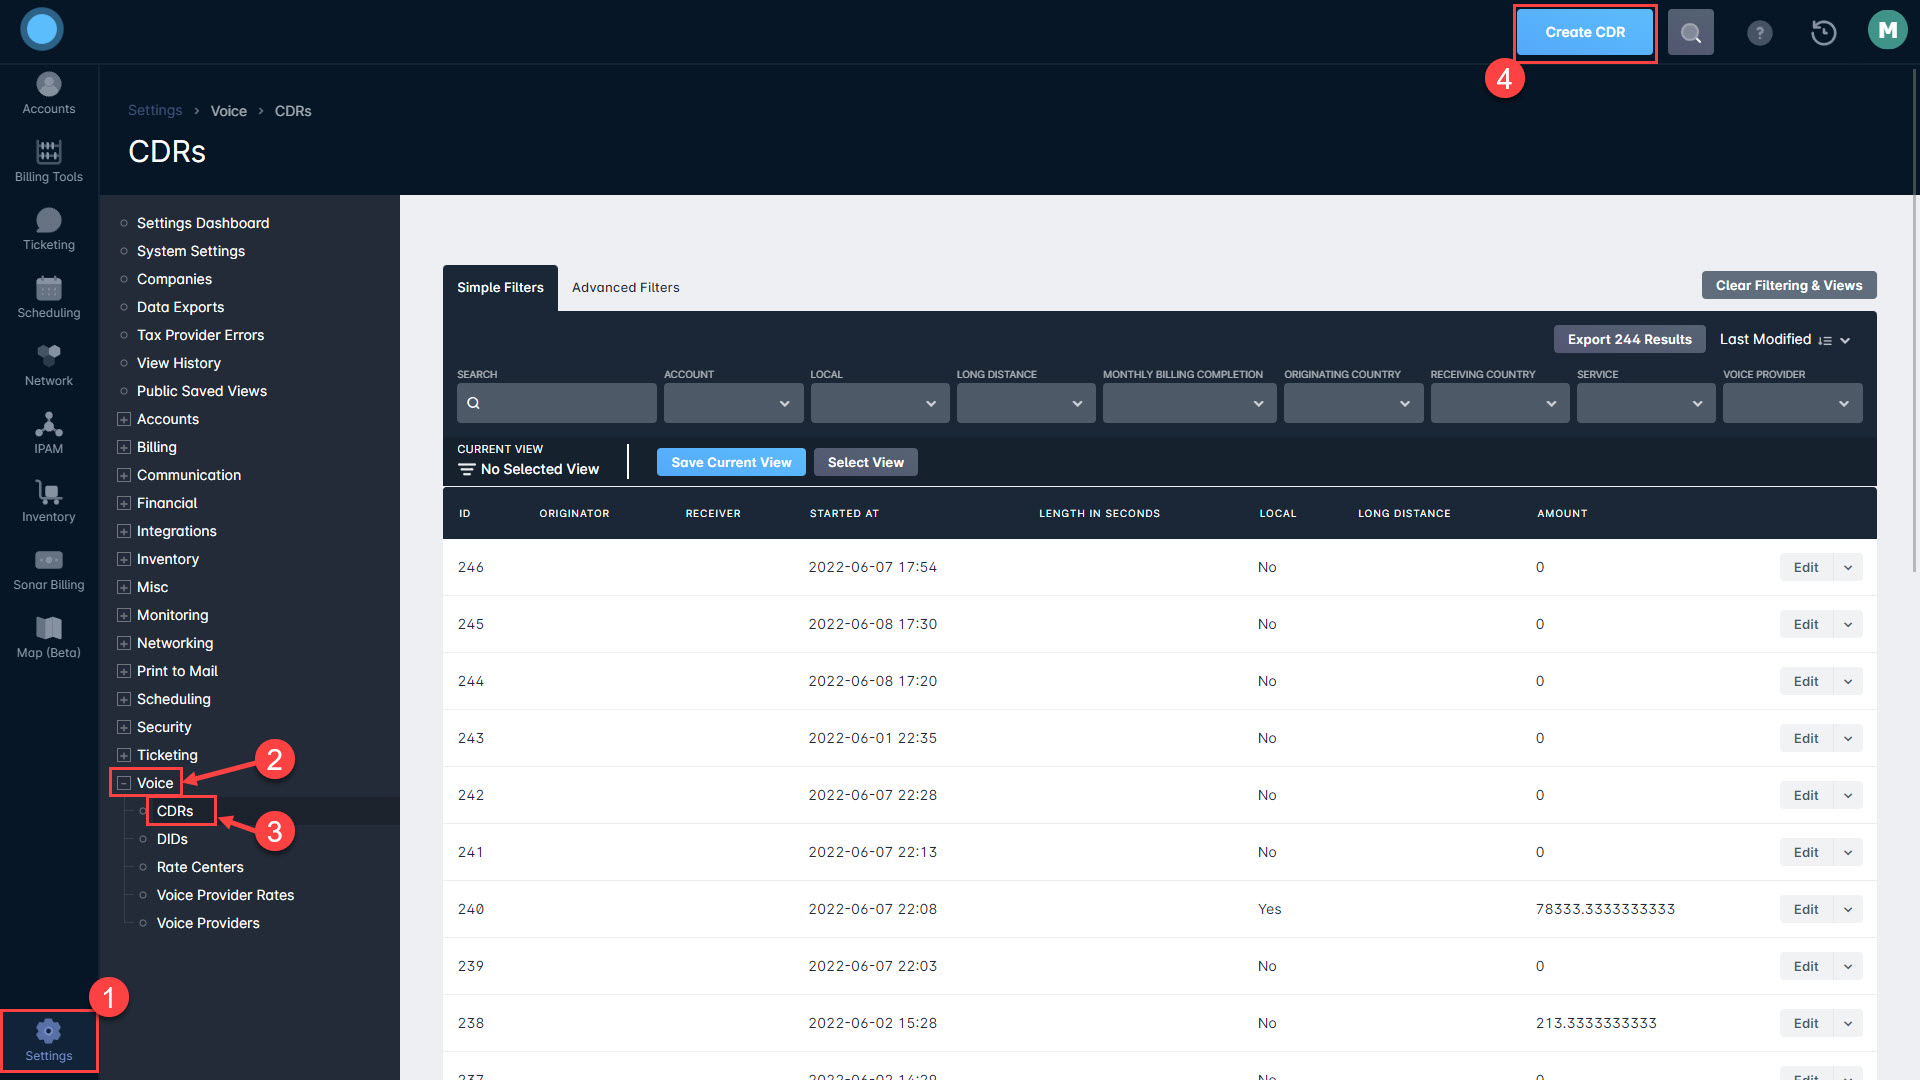
- Navigate to Settings ⇾ Voice ⇾ CDRs
- Click on “Create CDR” in the top-right corner
Click here to see these steps
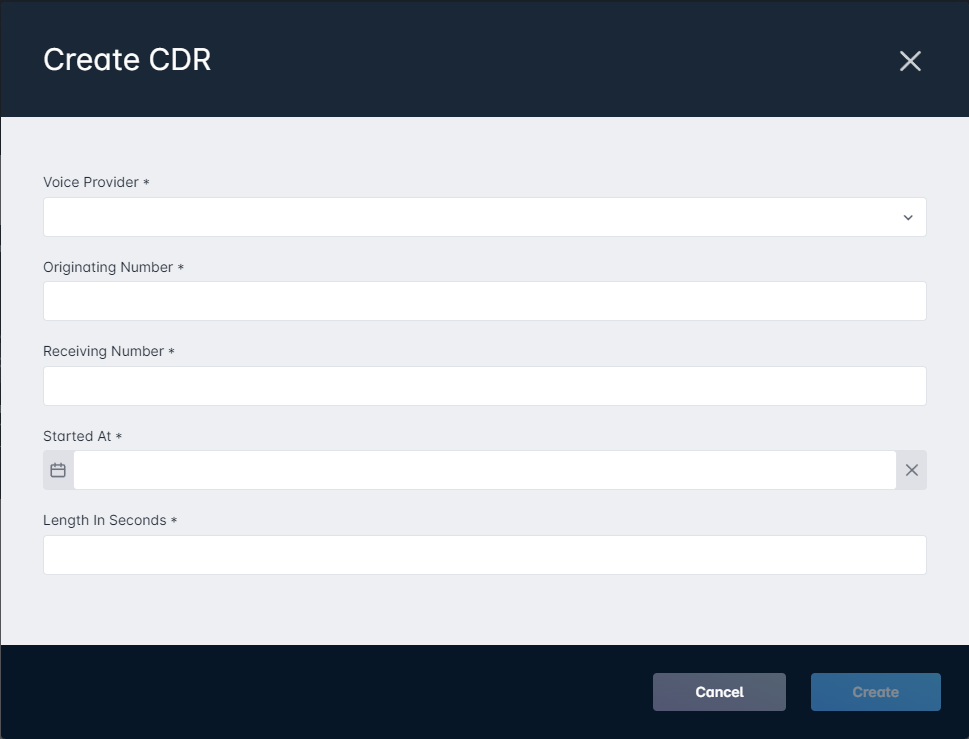
The window that appears will require you to enter information relating to the origin, destination, and length of the call:
Using the Data Import Tool
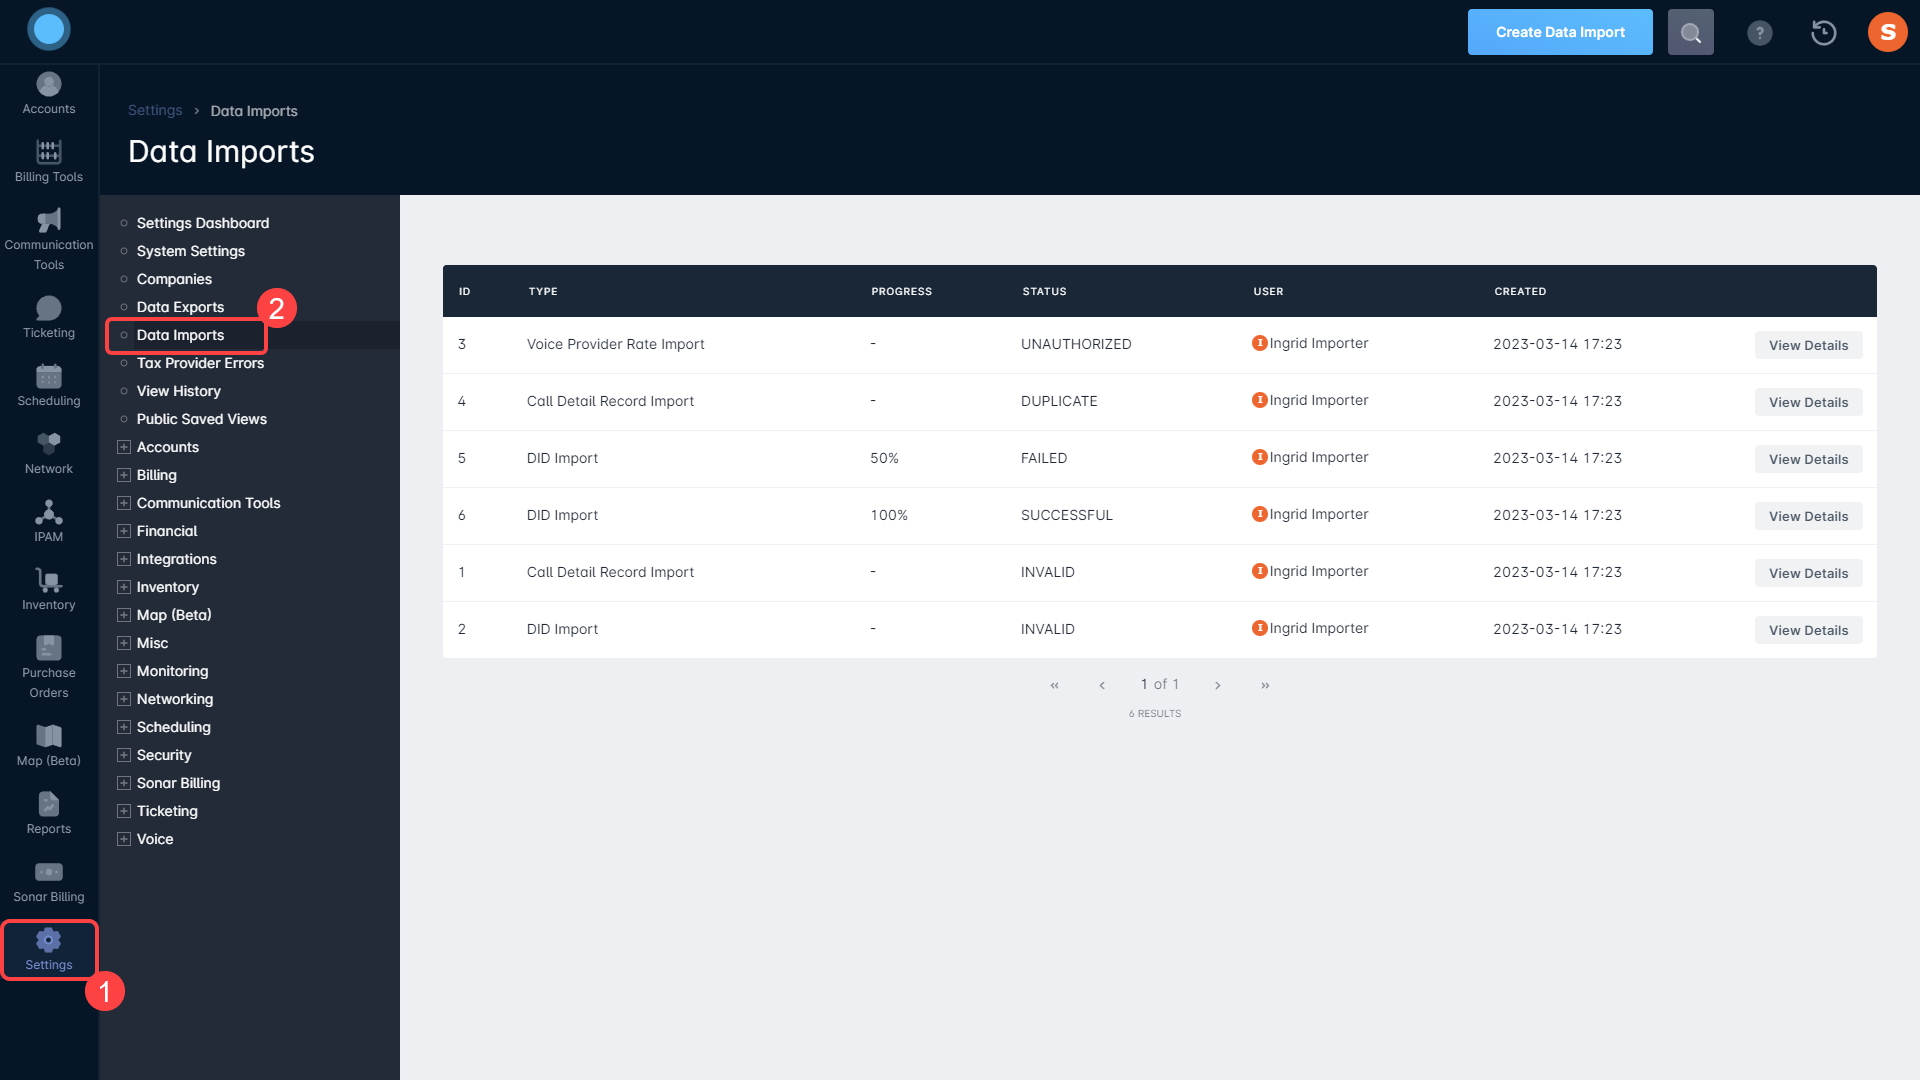
The Data Import tool is provided to automate the import of large amounts of CDRs, the kind you might see when running even a small voice-reselling business. To use the Data Import tool, follow these steps:
- Click on Settings
- Select Data Imports
 CDRs can also be imported through Settings → Voice → Call Detail Records → Import Call Detail Records.
 Click on the
 button in the top-right corner of the page.
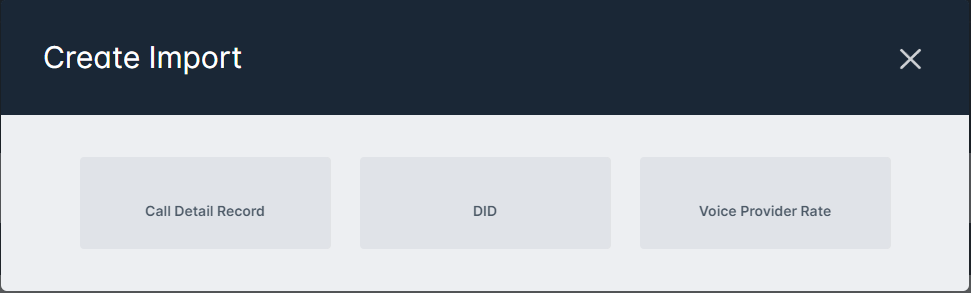
- Select the “Call Detail Record” option and add your Voice Provider from the dropdown.
- Click on “Upload File” to open the Flatfile modal, and provide your file.

- Select your file, choose your headers, and finish the import
Once the information is entered, the costs will be calculated and the amount will be displayed on both the customer's account, and within the CDR table. CDRs are identified as outbound toll-free, inbound toll-free, local, long distance, inbound (non-toll-free) or international based on the prefix in the logged call details. International calls are rated based on the Voice Provider Rates, and all other calls are rated according to the Voice Service. While CDRs are rated during the import, the customer won't be charged until the billing cycle runs, and display of individual call records can be toggled during Voice Service creation.
Voice Provider Rates
Voice Provider Rates are another piece of the cost-calculation puzzle when deploying voice services. Configuring Voice Provider Rates allows CDRs to more accurately bill calls, rather than relying on the flat-rate billing of “Long Distance Minutes” during voice service configuration.
Setting up Voice Provider Rates is simple, despite the interactions being complex:
In the UI
- Navigate to Settings ⇾ Voice ⇾ Voice Provider Rates
- Click on “Create Voice Provider Rate”
Click here to see these steps
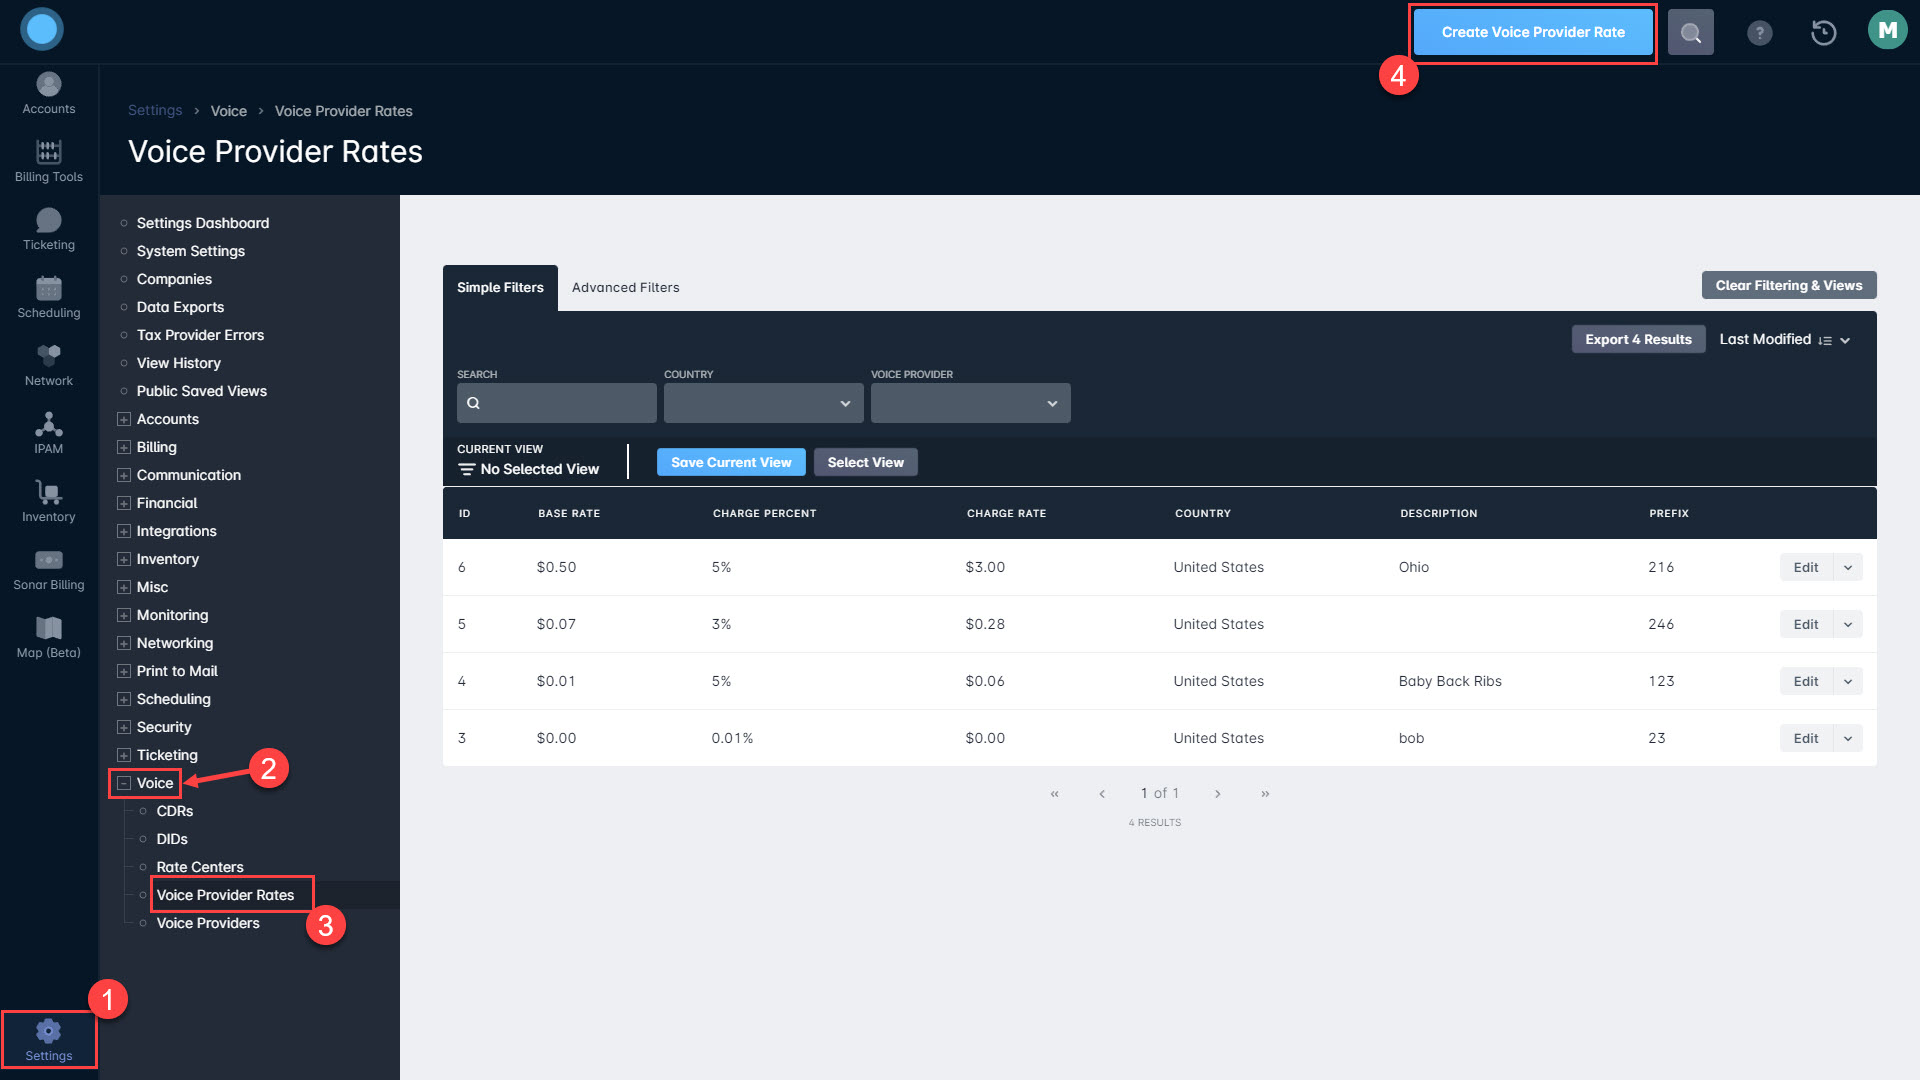
Then fill in the Voice Provider Rate information in the window that appears:
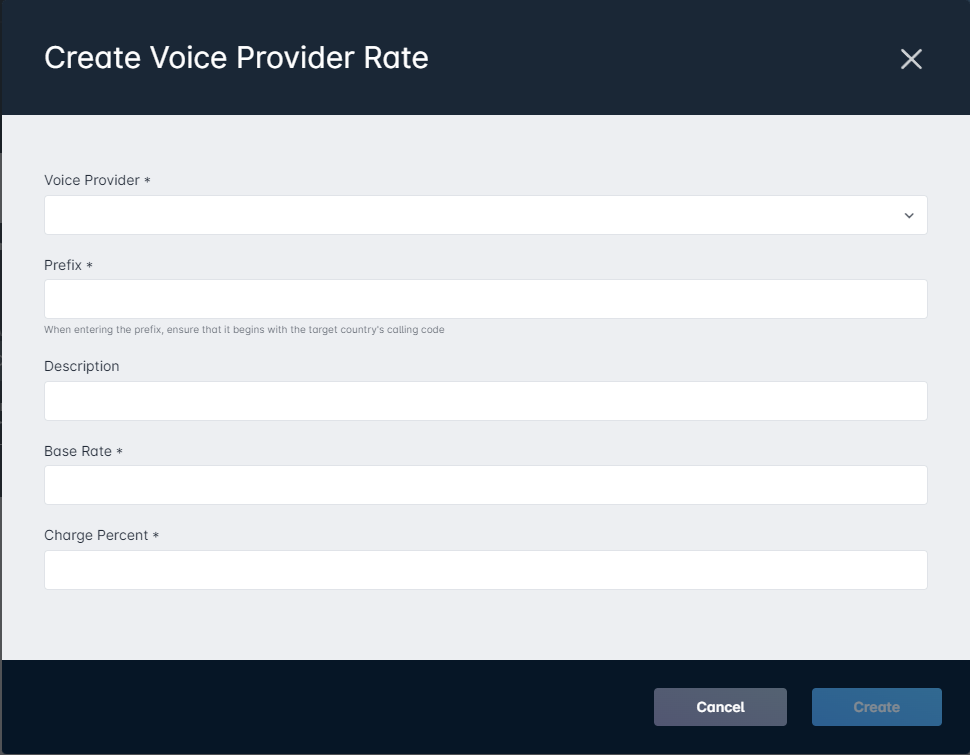
- Base Rate: this is the basic rate that your rate provider charges you for calls to that country or locality
- Charge Percent: this allows you to add another, percentage-based, markup to the rate delivered to your customers when they make calls affected by this rate.
- Description: this allows you to add an optional descriptor to the rate, such as a specific locality or city.
- Prefix: this is where you enter the specific prefix for DIDs that would fall under this rate. Prefixes must include the country code.If the rate should apply to an entire country, you can enter the international calling code only. For example, for all calls to the UK, you would enter “44” as the prefix
- Voice Provider: this allows you to associate the Voice Provider Rate with a specific Voice Provider for organizational and reporting purposes. Because you can have more than one Voice Provider with rates for the same country, this association connects Voice Provider Rates to DIDs in your instance.
Using the Data Import Tool
The Data Import tool is provided to automate the import of large amounts of Voice Provider Rates, the kind you might see when running even a small voice-reselling business. To use the Data Import tool, follow these steps:
- Click on Settings
- Select Data ImportsThis data can also be imported by going to Settings ⇾ Voice ⇾ Voice Provider Rates and clicking on "Import Voice Provider Rates" in the top-right.
Click on the
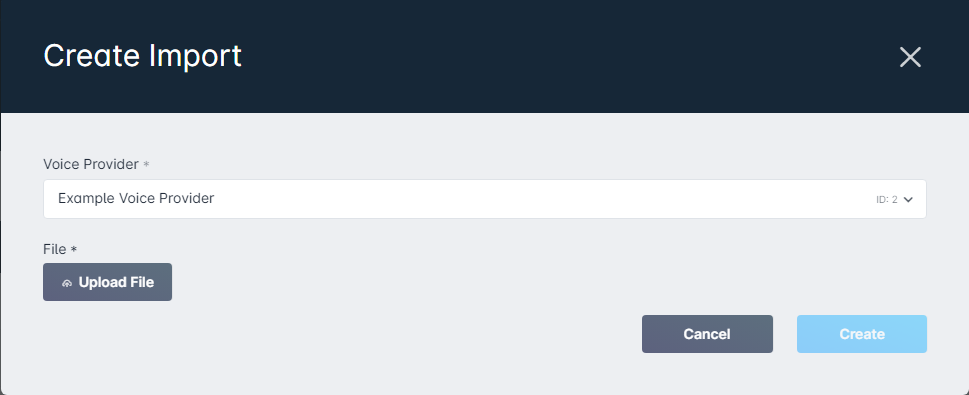
button in the top-right corner of the page.- Select the “Voice Provider Rates” option and add your Voice Provider and Charge Percent from the dropdown.
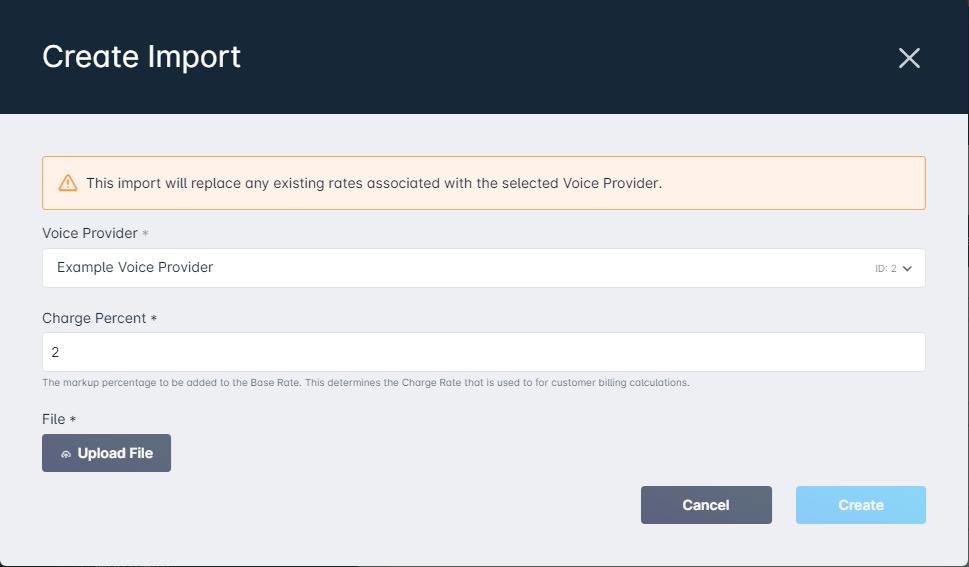 Voice Provider Rates will always overwrite any existing Rates entered into your instance
 - Click on “Upload File” to open the Flatfile modal, and provide your file.
- Select your file, choose your headers, and finish the import
Rate Centers
The final piece of the Voice module is the Rate Center. This section allows you to define an organizational system for your DIDs. If you operate across multiple Cities or Counties, having Rate Center information can be useful for ensuring DIDs local to your customer's area are being assigned to prevent long-distance charges being applied in error.
Because Rate Centers are an organizational parent, their creation requires a name only. You can create a new Rate Center by going to Settings ⇾ Voice ⇾ Rate Centers. From there, click “Create Rate Center” in the top-right corner.