Table of Contents
Ticketing: Overview
 Updated
by Jennifer Trower
Updated
by Jennifer Trower
Read Time: 11 mins
This article explains how to use the Ticketing system in Sonar to track, manage, and communicate about issues or events. It covers the differences between ticket types, how to use the interface, create and manage tickets, and how to link tickets to customer accounts.
Permissions
Before getting started with the feature, your user roles will need to be adjusted to account for the permissions required to use the Ticketing feature.
- Ticket

Permission Details
1. View all non-private tickets: Allows you to view all non-private tickets.
2. Create a ticket: Allows you to create tickets.
3. Update a ticket: Allows you to update tickets.
4. Delete a ticket: Allows you to delete tickets. - Ticket Category

Permission Details
1. View all ticket categories: Allows you to view all ticket categories and ticket category families.
2. Create a ticket category: Allows you to create a ticket category and ticket category family.
3. Update a ticket category: Allows you to update a ticket category and a ticket category family.
4. Delete a ticket category: Allows you to delete a ticket category and ticket category family. - Ticket Group

Permission Details
1. View all ticket groups: Allows you to view all ticket groups.
2. Create a ticket group: Allows you to create a ticket group.
3. Update a ticket group: Allows you to update a ticket group.
4. Delete a ticket group: Allows you to delete a ticket group. - Ticket Resolution Reason

Permission Details
1. Read ticket resolution reason: Allows you to read ticket resolution reasons on a ticket.
2. Create ticket resolution reason: Allows you to create a ticket resolution reason for tickets.
3. Update ticket resolution reason: Allows you to update ticket resolution reasons.
4. Delete ticket resolution reason: Allows you to delete a ticket resolution.
Public vs. Internal Tickets
- Public Tickets: Used for customer communication. Marked with an eye icon. External replies are emailed to recipients. File attachments are included in emails.
 Use public tickets when you need to email customers. These can be created from the customer’s account or directly from the ticketing interface.
 - Internal Tickets: Used for internal communication. Marked with an eye with a slash. Replies and comments are kept within your team.

Ticketing Interface Overview
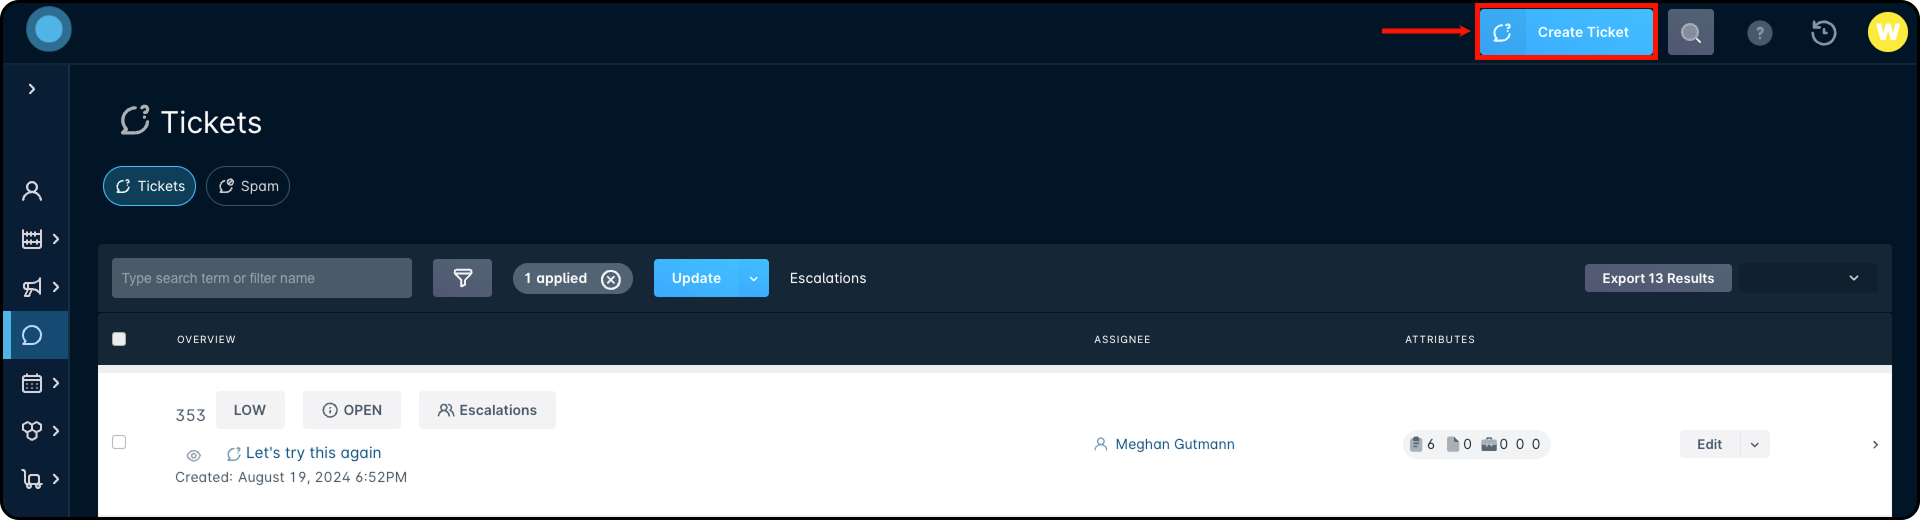
The ticketing interface is where you can view and manage all tickets. Access it by clicking the Ticketing tab in the left menu. Below is a quick overview of what you can do from this screen.
- Create Ticket Button: Click to open the window and create a new ticket from this screen.
- Ticketing Tab: Shows an overview of all your tickets.
- Spam Tab: Shows an overview of tickets marked as spam.
- Filtering: Lets you easily apply filters. Click the icon → drop arrow in the Choose Filter field to open the filter menu and pick from the available options.
- Mass Edit Checkbox: Use these to select and edit multiple tickets at once — including entity type, status, priority, and due date.
- Priority: Shows the ticket’s priority — Critical, High, Medium, or Low. Click it to change the value.
- Status: Displays the current ticket status — Open, Closed, Pending Internal, or Pending External. Click to change it.
- After a reply is sent, the status auto-updates to Pending External (waiting on customer).
- If the last reply came from the customer, it changes to Pending Internal (waiting on your team).
For tickets in a Closed status, you’ll see Ticket Resolution Reasons if the feature is set up in your instance. These reasons will reflect your company’s specific configurations. To learn more about Ticket Resolution Reasons, refer to this article. - Ticket Group: Shows the group the ticket is assigned to. If none, it will say “No Group.”Every ticket must be assigned to either a user or a group. For more details, see the Ticket Groups To Consider documentation.
- Ticket Category (Family): Displays the ticket’s assigned categories and their associated Category Family. that the categories are associated with.
- Due Date (optional): If a due date is set, it will appear here.
- Detail Row: Shows if the ticket is internal or public (hover over the icon to see which). The ticket's subject is also shown here — click it to open the full Ticket View.
- Ticket Creation Date: Displays when the ticket was created.
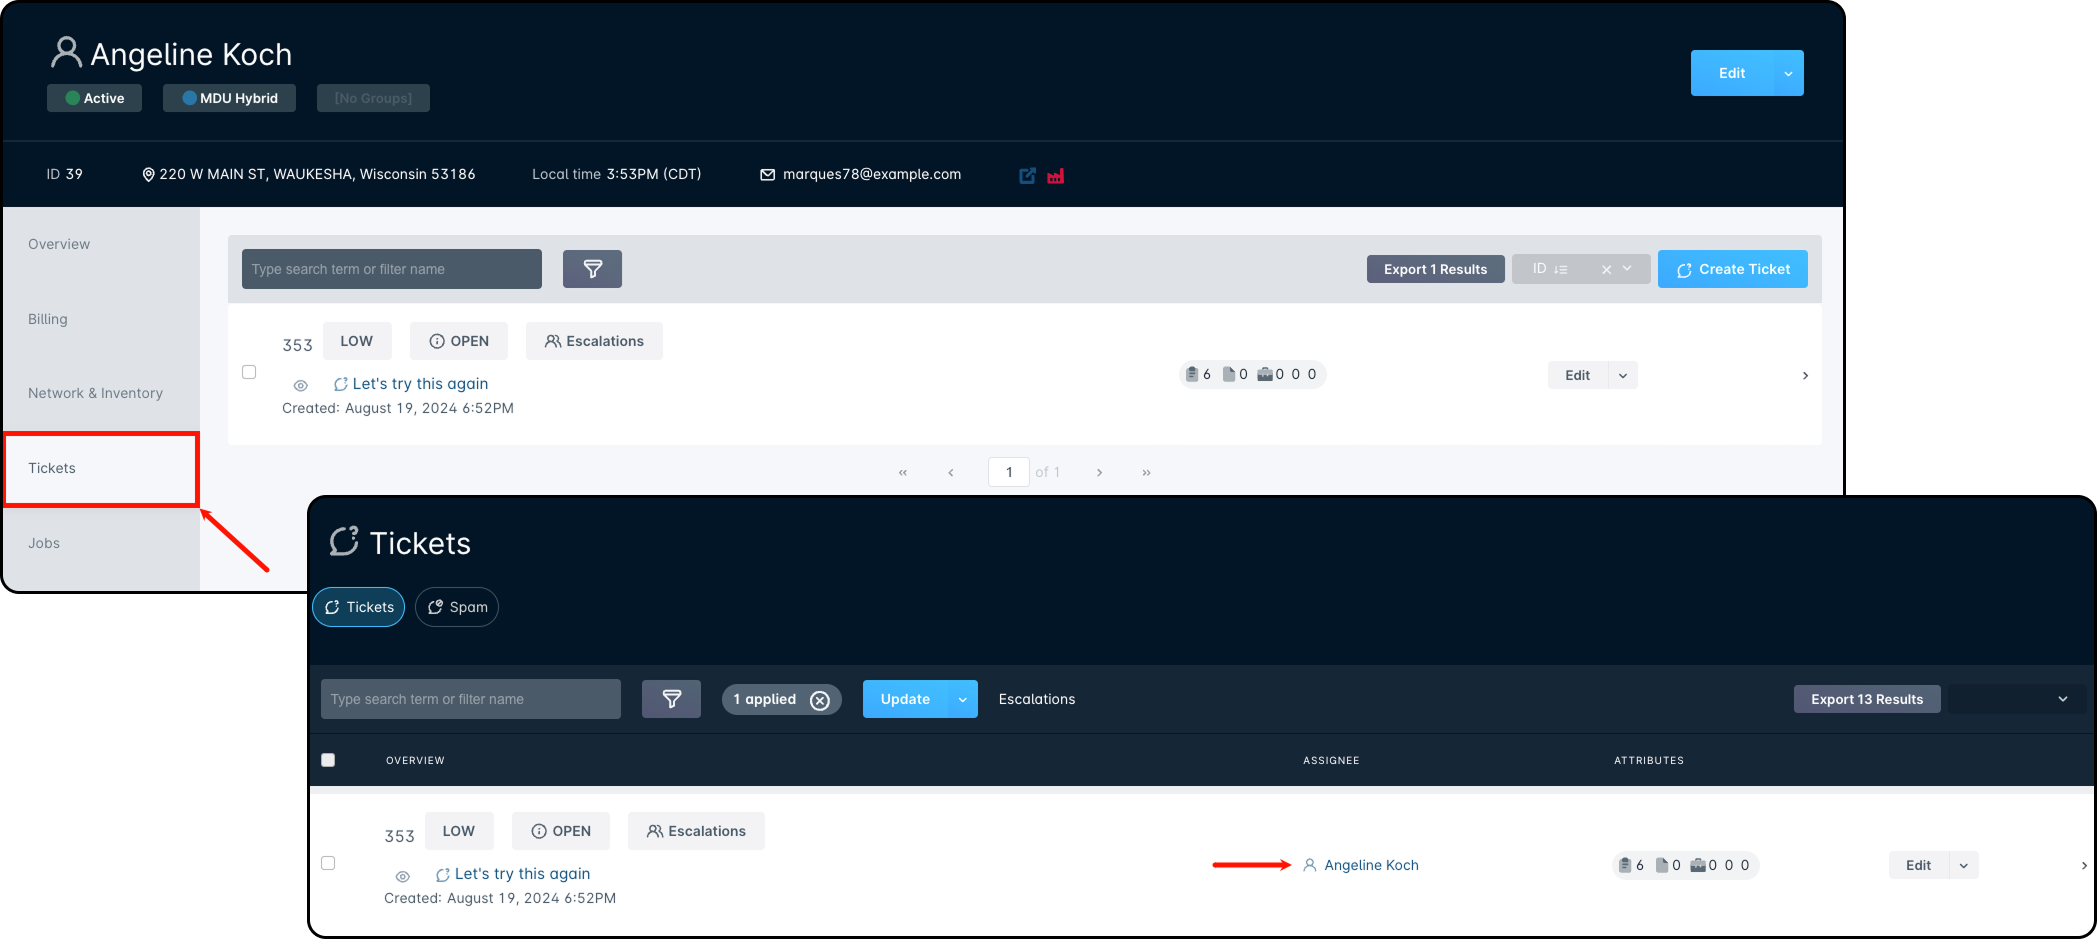
- Assignee: Shows the account or network site linked to the ticket. Click the name to open a side panel with more info. If a user is assigned, their name appears below and can also be clicked for details. Hover over the icons to see labels.
- Assigned Tasks: The number next to the clipboard icon shows how many tasks are linked to the ticket.
- Assigned Files: The folder icon shows how many files have been sent, received, or added through internal comments.
- Assigned Jobs: The toolbox icon shows how many jobs are tied to the ticket.
- Assigned Inventory Items: The cube icon shows how many inventory items are linked to the ticket.
- Linked Tickets: If the ticket is a parent, the arrows icon shows how many child tickets are connected.
- Edit: Clicking Edit opens the Edit Ticket window, where you can update ticket details. The arrow next to it opens a dropdown with more actions:
- Assign: Assign the ticket to a user.
- Merge Ticket: Combine this ticket with another.Merging will replace this ticket’s description with the other ticket’s.
- Edit Status: Change the ticket’s current status.
- Edit Recipients: Add, remove, or prefill ticket recipients from the related account or site.
- Create Job: Create a job based on the ticket (autofills the Assignee and Ticket fields).
- Subscribe / Unsubscribe: Turn ticket notifications on or off for yourself.
- Resend Auto Reply: Sends the default auto-reply after unmarking a Spam ticket.
- Mark As Spam: Moves the ticket to the Spam queue and removes it from the main list.
- Delete: Permanently removes the ticket.
- Click the arrow at the end of a ticket row to open a side panel with more details and activity. From this panel, you can also click Manage to open the full Ticket View.
Ticket View
Navigating into a particular ticket allows you to view the individual ticket interface, which provides various features available – an overview of these features is provided below.
Ticket View Breakdown
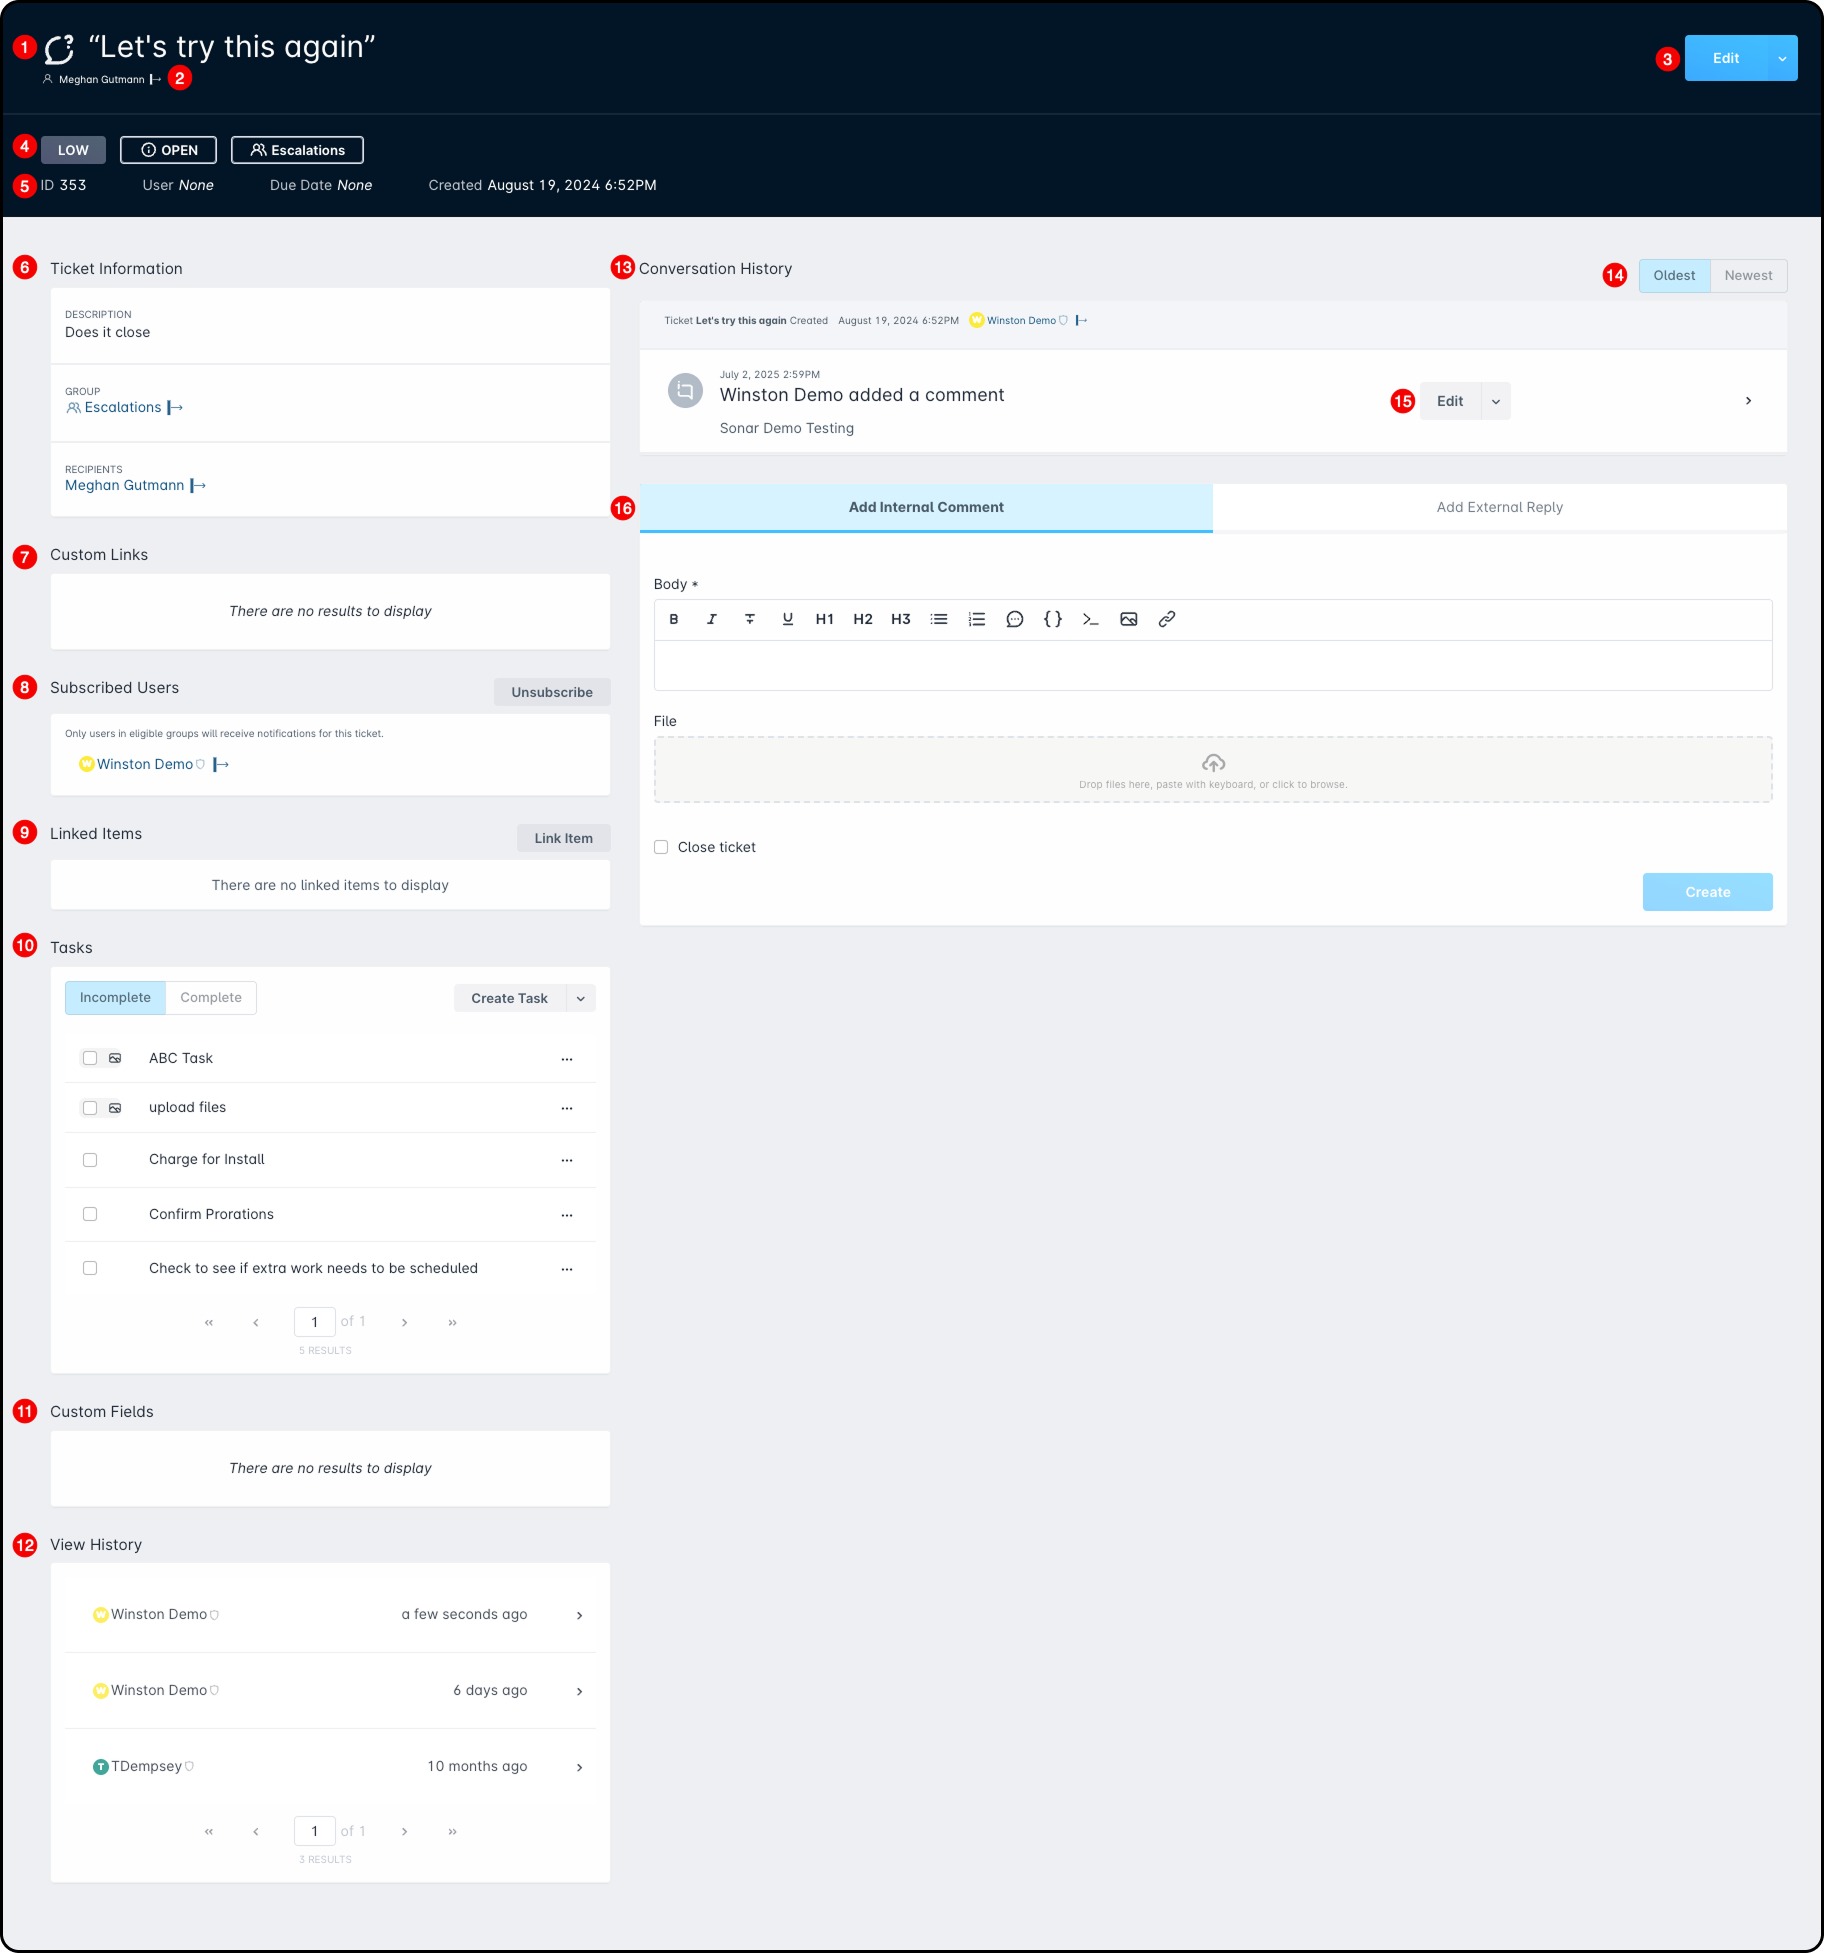
- Subject: Shows the ticket’s subject line.
- Entity: Displays the related account or network site. Click it to open more details in a side panel.
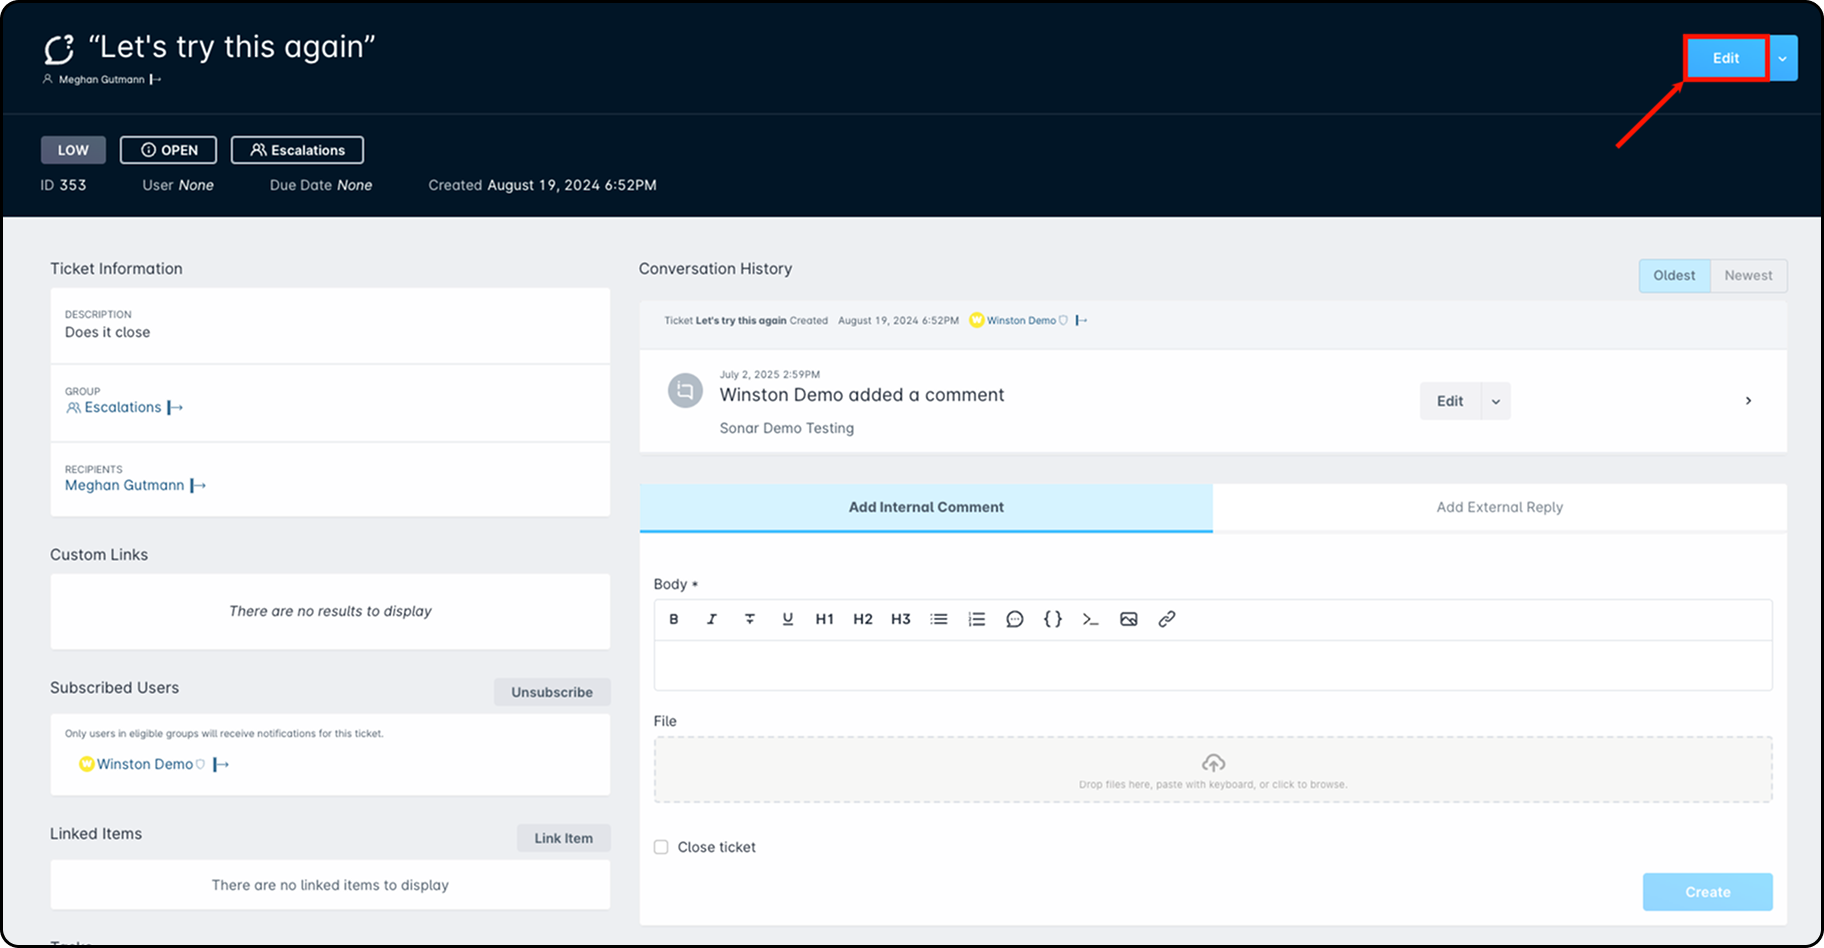
- Edit: Opens the Edit Ticket window. Click the dropdown arrow for more actions like merging tickets, assigning a user, or creating a job.
Ticket Details
- Top row: Shows priority, status, and ticket group.
- Bottom row: Includes ticket ID, assigned user (if any), due date, and when the ticket was created.
- Ticket Information: Includes the description, assigned user, group, categories, any linked parent or child tickets, and recipients. Some items open a side panel for more detail.Learn more about linked tickets in the Using Parent Tickets article.
- Custom Links: Displays any custom links tied to the ticket.
- Subscribed Users: Shows users following the ticket. They’ll get updates even if not assigned.More on this in the Advanced Ticketing Features article.
- Linked Items: Lists any connected items like jobs or inventory. Use the Link Item button to attach more.
- Tasks: Shows tasks related to the ticket. Toggle between pending and completed tasks. Use Create Task or the dropdown to add from a template.
- Custom Fields: Displays any filled-in custom fields from ticket creation.
- View History: Tracks who has viewed the ticket.
Conversation & Replies
- Conversation History: Displays all ticket messages. Use the toggle to sort by newest or oldest.
- Sort Selector: Choose your default view — oldest or newest messages first. This setting will apply to all tickets.
- Edit/Delete Comments: You can edit or delete each message.For certain messages, you’ll see a caret icon that lets you view details like headers, signatures, and raw content.
Adding Replies or Comments
- You can choose to post an Internal Comment (private) or an External Reply (sent to the customer):
- Internal Comments: Used for internal notes. You can also choose to close the ticket when saving the comment.Learn more about the editor in the Rich Text Editor article.
- External Replies: Send a message to the customer. You can use a canned reply or write your own. You can preview the message, update recipients, and change the ticket status before sending.See the Canned Reply Categories article and Canned Replies Examples & Templates article for help setting these up.
- Internal Comments: Used for internal notes. You can also choose to close the ticket when saving the comment.
Creating a Ticket
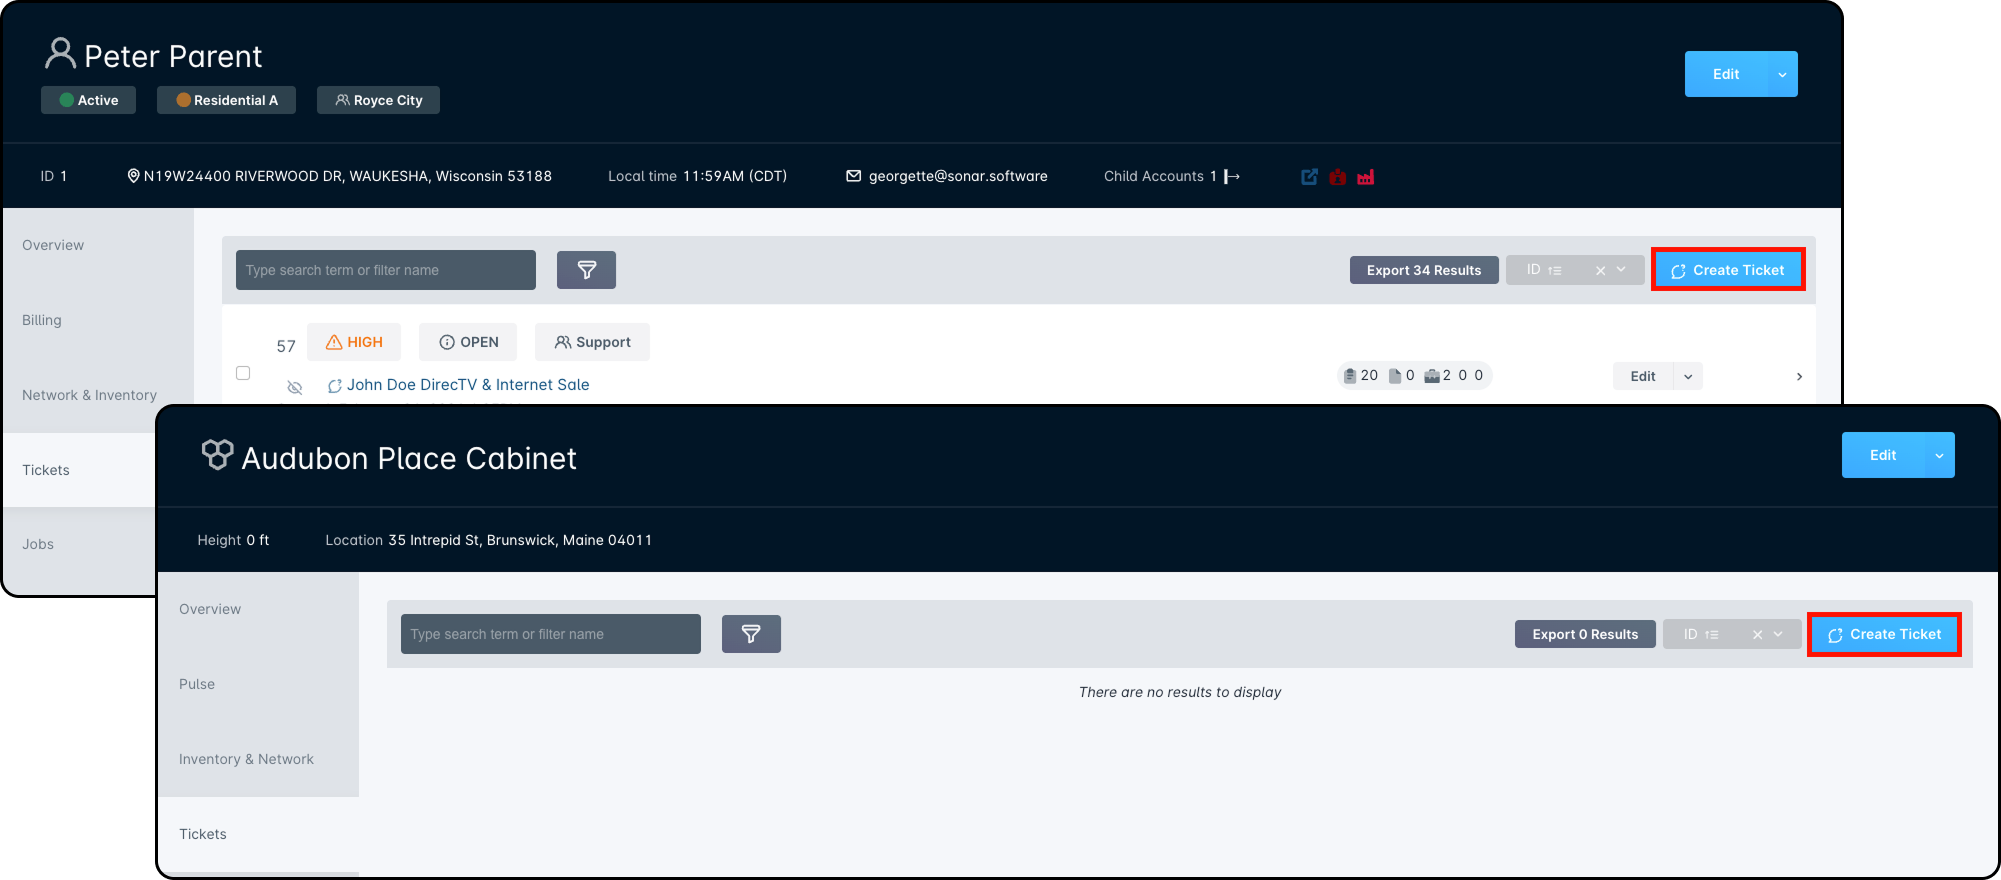
Where You Can Create a Ticket
You can create a ticket from several places in your instance:
- From the Tickets management page.
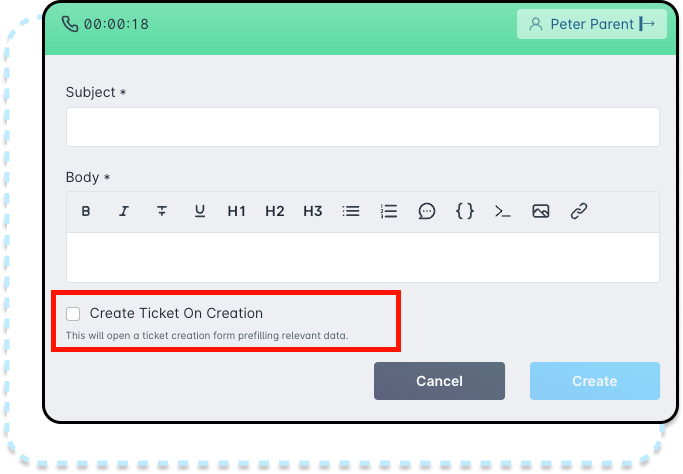
- From the Call Log window, by checking the “Create Ticket on Creation” box before saving the log.
- Within the Ticket tab of an Account or Network Site, click the Create Ticket button.
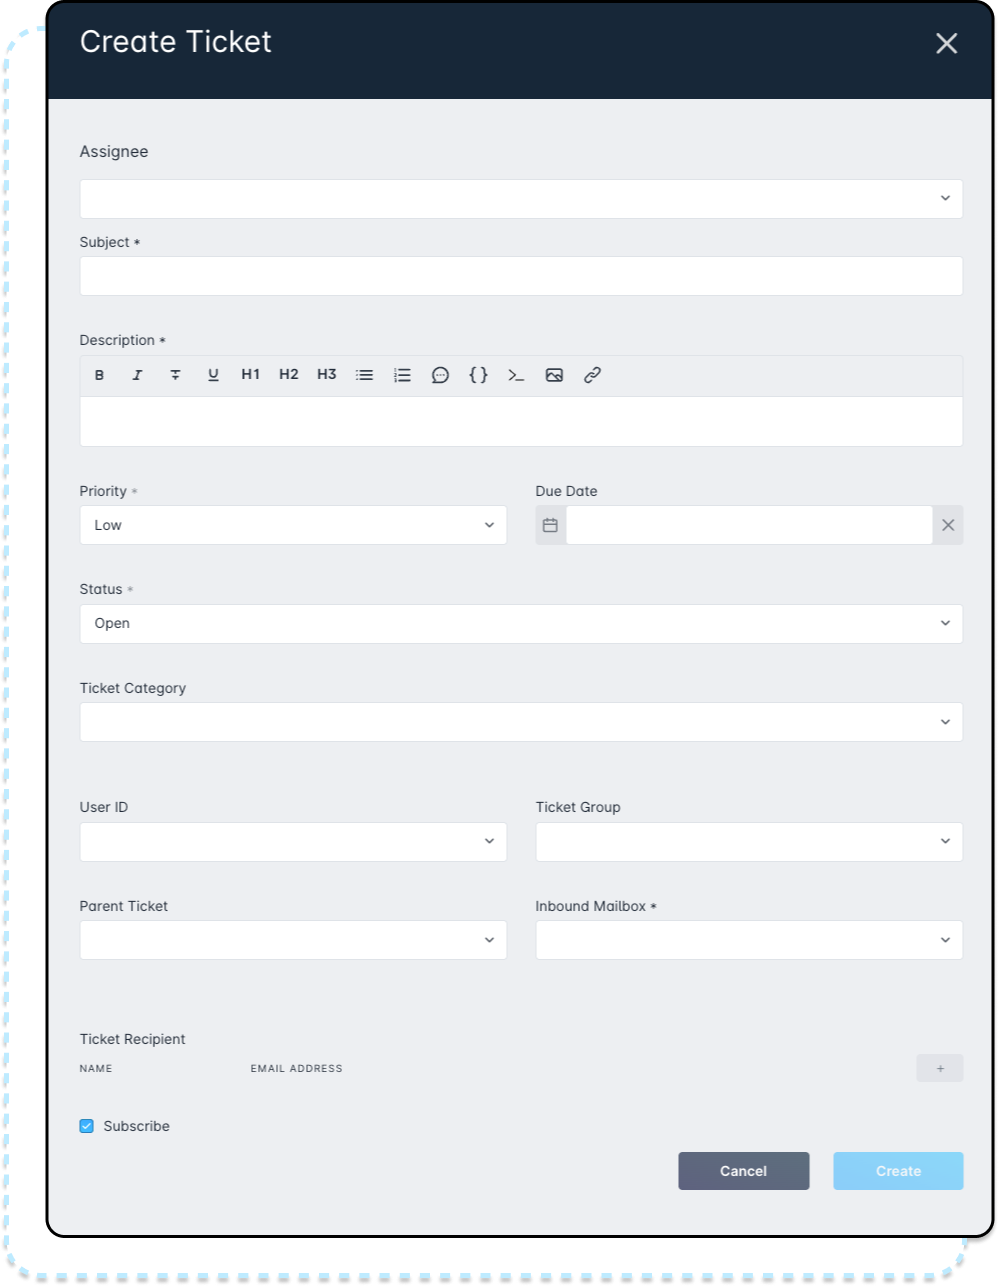
Create Ticket Window: Part 1
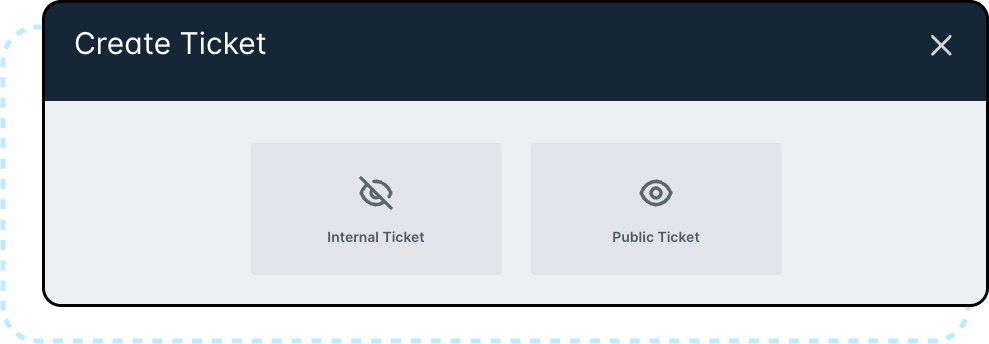
When creating a ticket, first select Internal or Public.
- Internal: For internal communication or maintenance notes.
- Public: For messages to customers.

Create Ticket Window: Part 2
No matter where you start, you’ll use the same Create Ticket window. Some fields may already be filled in, depending on where you create it. For example, creating a ticket from an account or network site will autofill the Assignee with that account or site.
- Public Ticket
- Internal Ticket

Ticket Field Descriptions
Some fields below are not shown when creating an internal ticket.
- Assignee: Choose an account, network site, or leave it blank. If created from an account or site, this fills in automatically.
- Subject (Required): For public tickets, this is the email subject. For both public and internal tickets, it shows in the ticket overview.
- Description (Required): Briefly explain the issue or what needs to be done. For public tickets, the description is internal only and not sent to the customer. You’ll create the customer message after the ticket is created.
- Priority (Required): Automatically set based on the inbound mailbox the message came from.Learn more about inbound mailboxes and ticket priorities here.
- Due Date (Optional): If set, you can filter tickets by this date later.
- Status (Required): Default is Open when the ticket is created.
- Ticket Category: Helps organize tickets within the system.
- User ID: The person responsible for handling the ticket.If created from a call log, this is automatically set to the call log creator.
- Ticket Group: The group responsible for the ticket.You must assign the ticket to either a group or a user before proceeding.
- Parent Ticket: Use to link this ticket to another ticket if it relates to a larger issue.
- Inbound Mailbox (Required): Determines which email address customers see when you reply.
- Custom Fields (only available if setup): Allows you to store specific information that isn’t covered by default fields.Learn more about Custom Fields and how to set them up here.
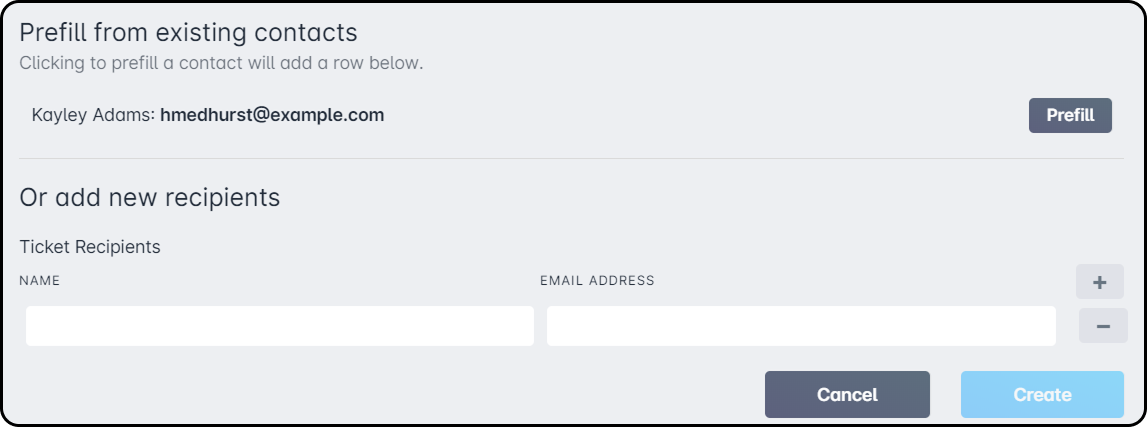
- Ticket Recipients: Add specific recipients to public tickets. Requires both a name and email.When creating a ticket from an account or network site, contacts with emails are available to Prefill. Use the Edit Recipients button in the "Add Reply" tab or the Edit menu.
- Subscribe: Check this box if you want to receive notifications about this ticket. Leave unchecked if you don’t.Internal tickets don’t show the Inbound Mailbox or Ticket Recipients fields.
Create Ticket Window: Part 3
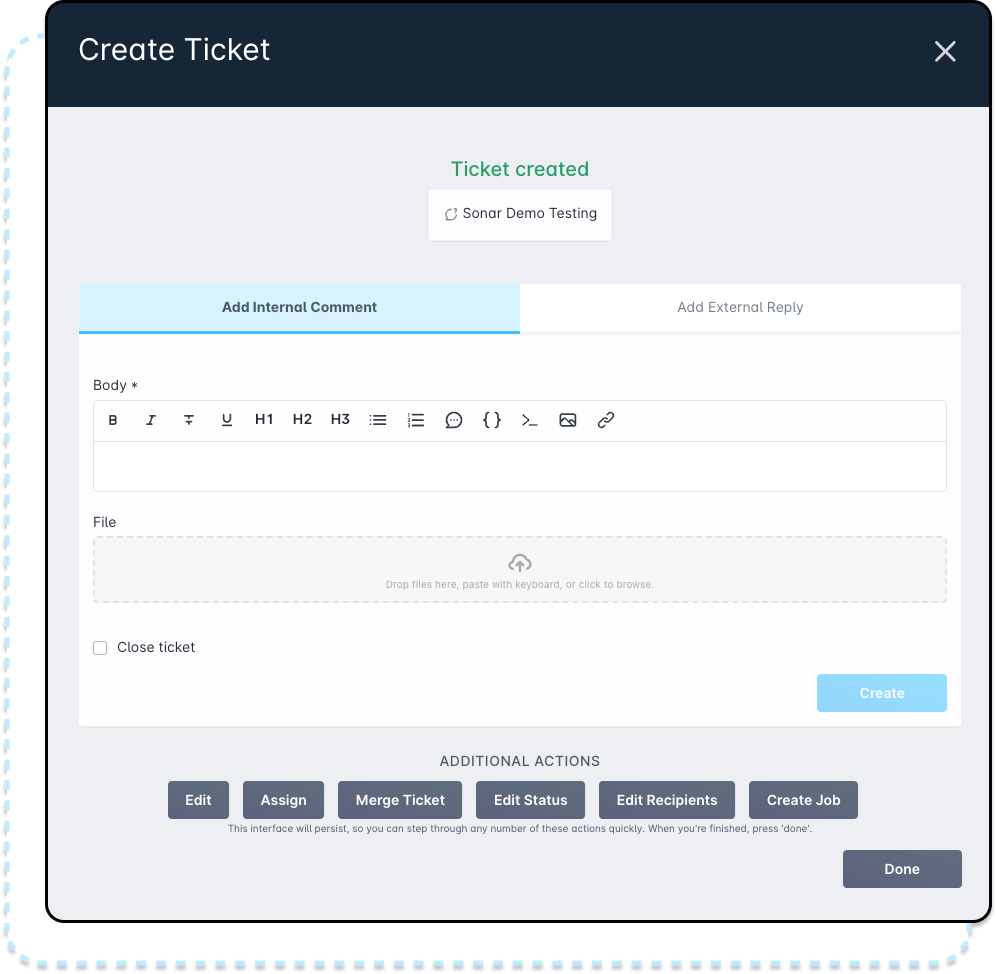
After clicking “Create,” you’ll see a second Create Ticket window. This lets you do everything you can in the regular ticket interface — like using a canned reply, adding an internal comment, or creating a job — without leaving the current window.
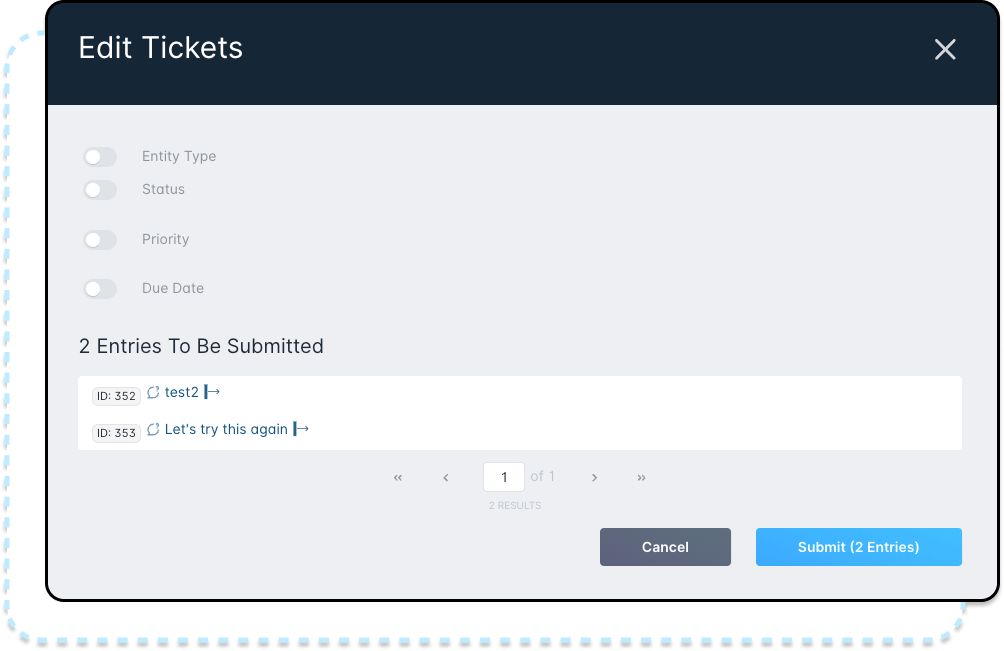
Mass Editing Tickets
You can edit multiple tickets by checking the box next to each one. A popup will appear showing how many tickets are selected, with options to remove tickets or perform a bulk Edit or Delete.
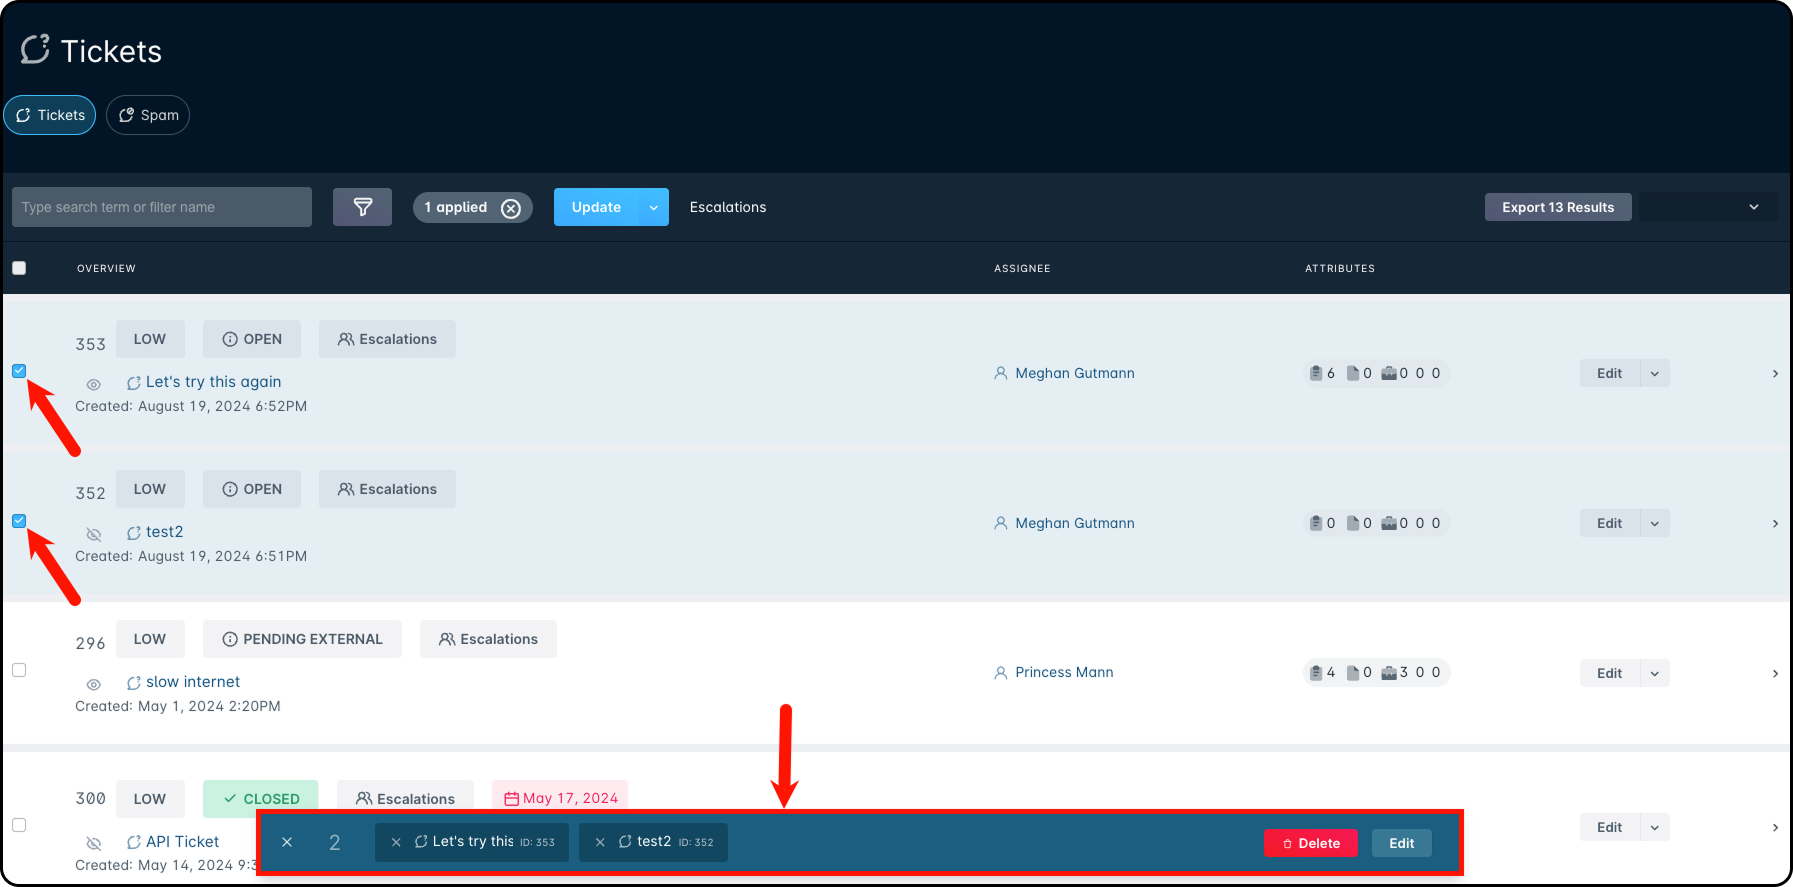
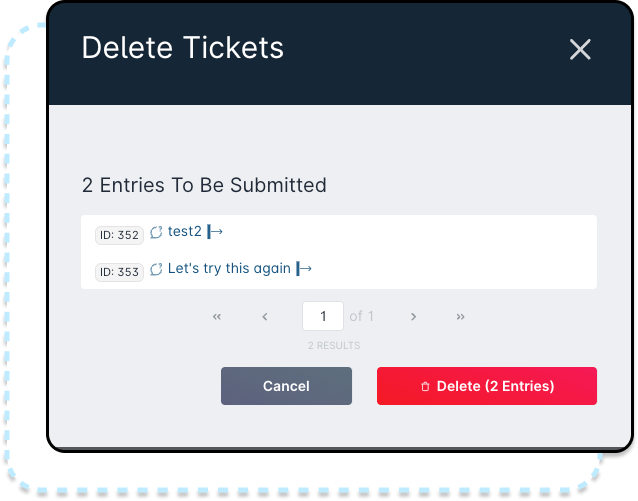
- Clicking Delete opens a confirmation window to confirm deleting the selected tickets.
- Clicking Edit opens a window where you can update the Entity Type, Status, Priority, or Due Date for all selected tickets.
Manually Linking Tickets to Accounts
When a customer emails from an address not linked to an account, the ticket won’t automatically show any contact or account history. To link it, follow these steps:
- Identify the account the email/ticket is associated with.If this email should belong to a new contact, create the contact on the account to avoid this issue in the future.
- Click the Edit button in the top-right corner of the ticket.You can also edit the ticket from the main Ticket List view.
- In the Edit Ticket window, select “Account” for the Assignee field.
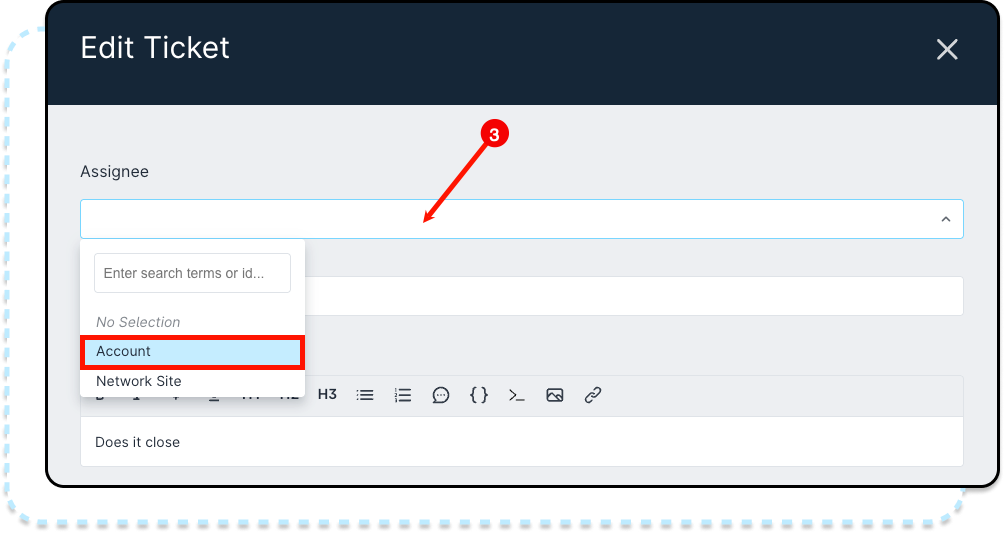
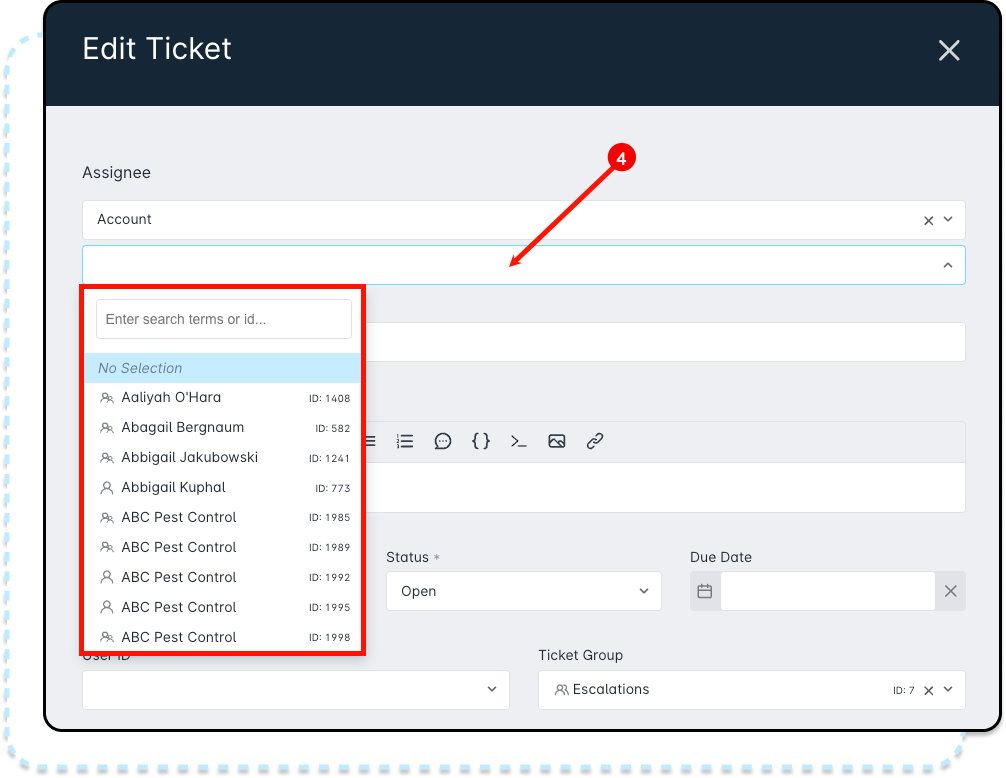
- Click the Account field and select the correct account from the dropdown.Use the search bar to quickly find the account.
- Once assigned to an account, the ticket will appear under the account’s Ticketing tab.