The Calix Cloud integration is an automated connection that synchronizes records between your Sonar instance and the Calix Cloud suite. With Calix Cloud you can monitor and manage a wide range of subscriber premises equipment, including initiating reboots and updating firmware, and you gain access to intelligent recommendations and tracking built on Calix data. Combined with the subscriber data already in Sonar, this supports service upgrades, hardware upsells, and churn prevention.
This integration is part of Calix's Early Adopter Program, their equivalent of a beta, and is only available to users with an open adoption project with Calix. Once your adoption project is open, Calix coordinates with Sonar to enable access on your instance.oordinate with Sonar to enable access on your instance.
Prerequisites
Two prerequisites apply before you can use the Calix Cloud integration in Sonar.
Configure your Calix Cloud instance so that Subscriber ID is present for your devices. Only devices with a populated Subscriber ID field are considered by the audit.
Complete the Calix-side setup described below before configuring the integration in Sonar. The integration depends on an approved API user existing in your Calix account.
Permissions
Before getting started with the feature, your user roles will need to be adjusted to account for the permissions required to use the Calix Cloud integration feature.
If you are a Super Admin of your Sonar instance, no permission changes are required for your account. To learn more, see the Roles and Permissions article.
Entity
Permission
Reason
Calix Cloud Settings
Create a new Calix Cloud setup
Required to create the integration at Settings → Integrations → Calix Cloud Settings.
Calix Cloud Settings
View all Calix Cloud setups
Required to view the integration record, the Overview page, and Audit Results.
Calix Cloud Settings
Update a Calix Cloud setup
Required to edit integration settings, run audits and synchronizations, and change the Allow unmanaged items setting.
Calix Cloud Settings
Delete a Calix Cloud setup
Required to remove an integration from your instance.
Custom Field
View all custom fields
Required to select account and serviceable address custom fields when mapping fields and Region/Location.
Address
View serviceable addresses
Required to map serviceable address values such as location, region, and attainable rate.
Account
View accounts and related entities
Required to review the accounts and subscriber records the integration audits and synchronizes.
Inventory
View all inventory
Required to map inventory models and their Device ID fields on setup page 2, and to confirm devices are categorized correctly for endpoint matching.
Contact
View contacts
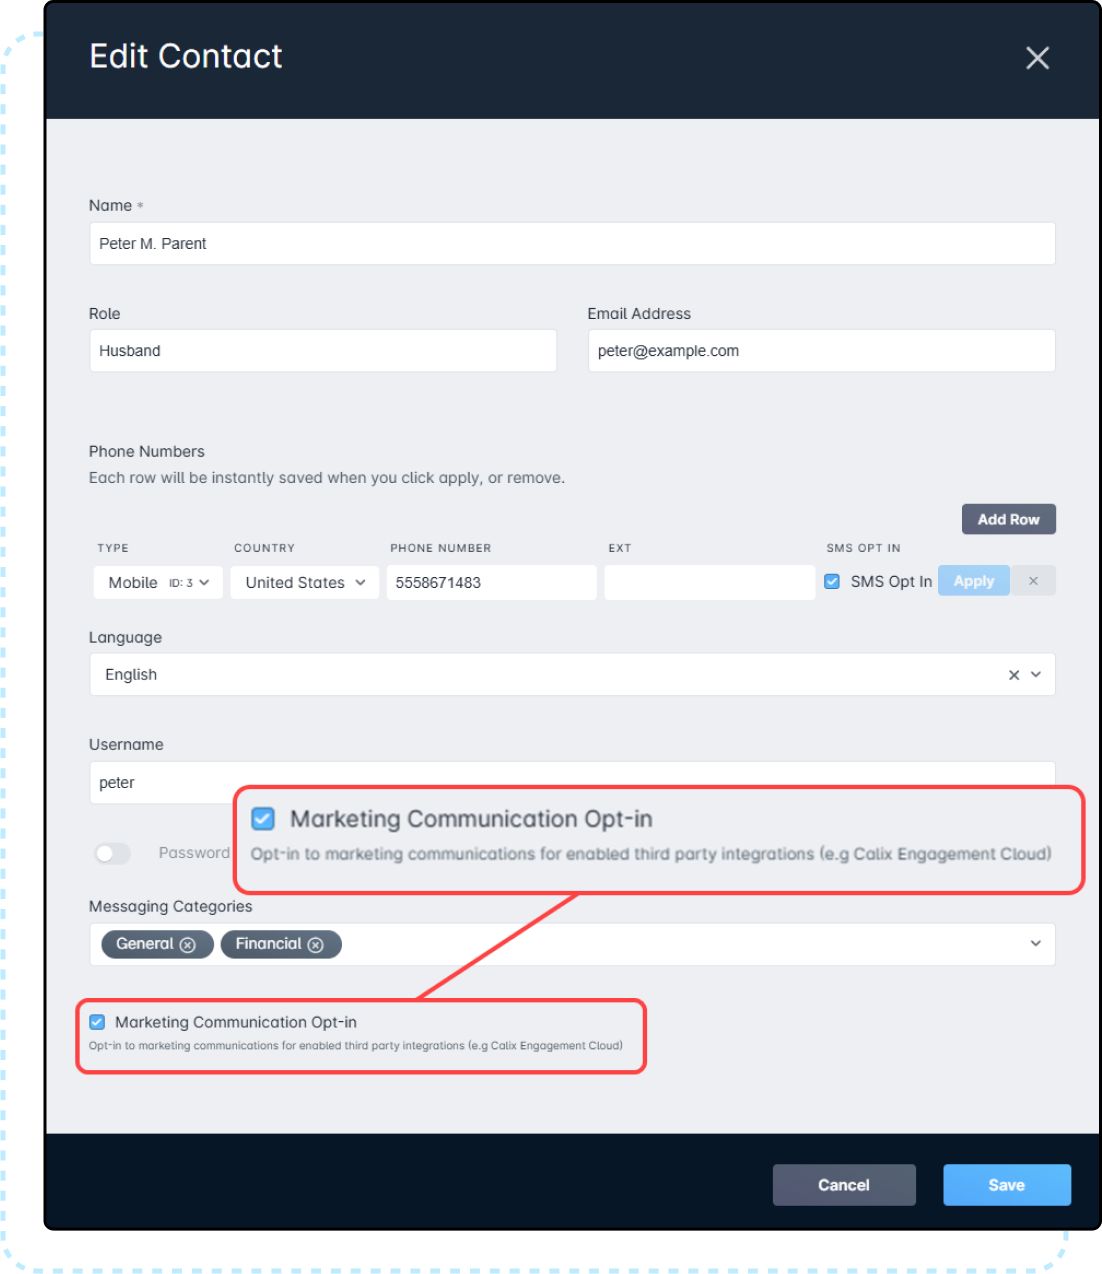
Required to manage the marketing opt-in setting on the subscriber's contact for Engagement Cloud communications.
Setting up the Calix Cloud Integration
The integration relies on API communication with your Calix Cloud account. Setup happens in two places: your Calix Cloud account first, then your Sonar instance.
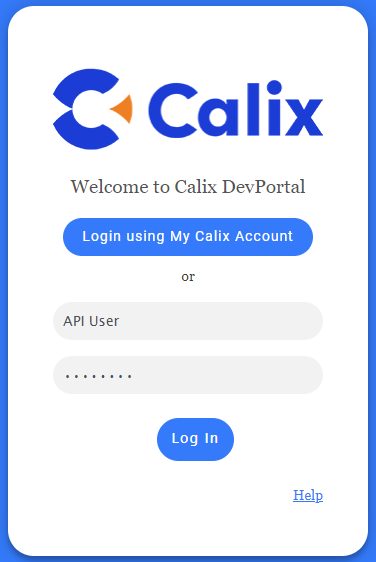
Before you can assign the API user role in the Calix Cloud Administration menu, you need a MyCalix user designated for the Sonar integration. Create it through the Calix Community “My Settings” menu, or complete the MyCalix New User Registration form online.
Complete the Calix Cloud setup before you set up the integration in Sonar. A MyCalix account requires manual approval from Calix, which can take time. Until the account is Approved, the integration cannot complete successfully. Contact Calix for more information.
Assigning the API Role to Your New MyCalix User
The steps below come from the Calix Cloud APIs: Getting Started Guide, which has more detail on the pages and permissions involved. For help generating a Calix user, contact Calix support.
To Assign a Role to the New User
Go to Administration → Users.
Click the pencil associated with the user.
In the Add/Delete Roles field, begin typing “API user role” so it appears.
Select the API user role from the list and click Add.
Click Save.
Allowing the Sonar Instance to Access Your Calix Cloud
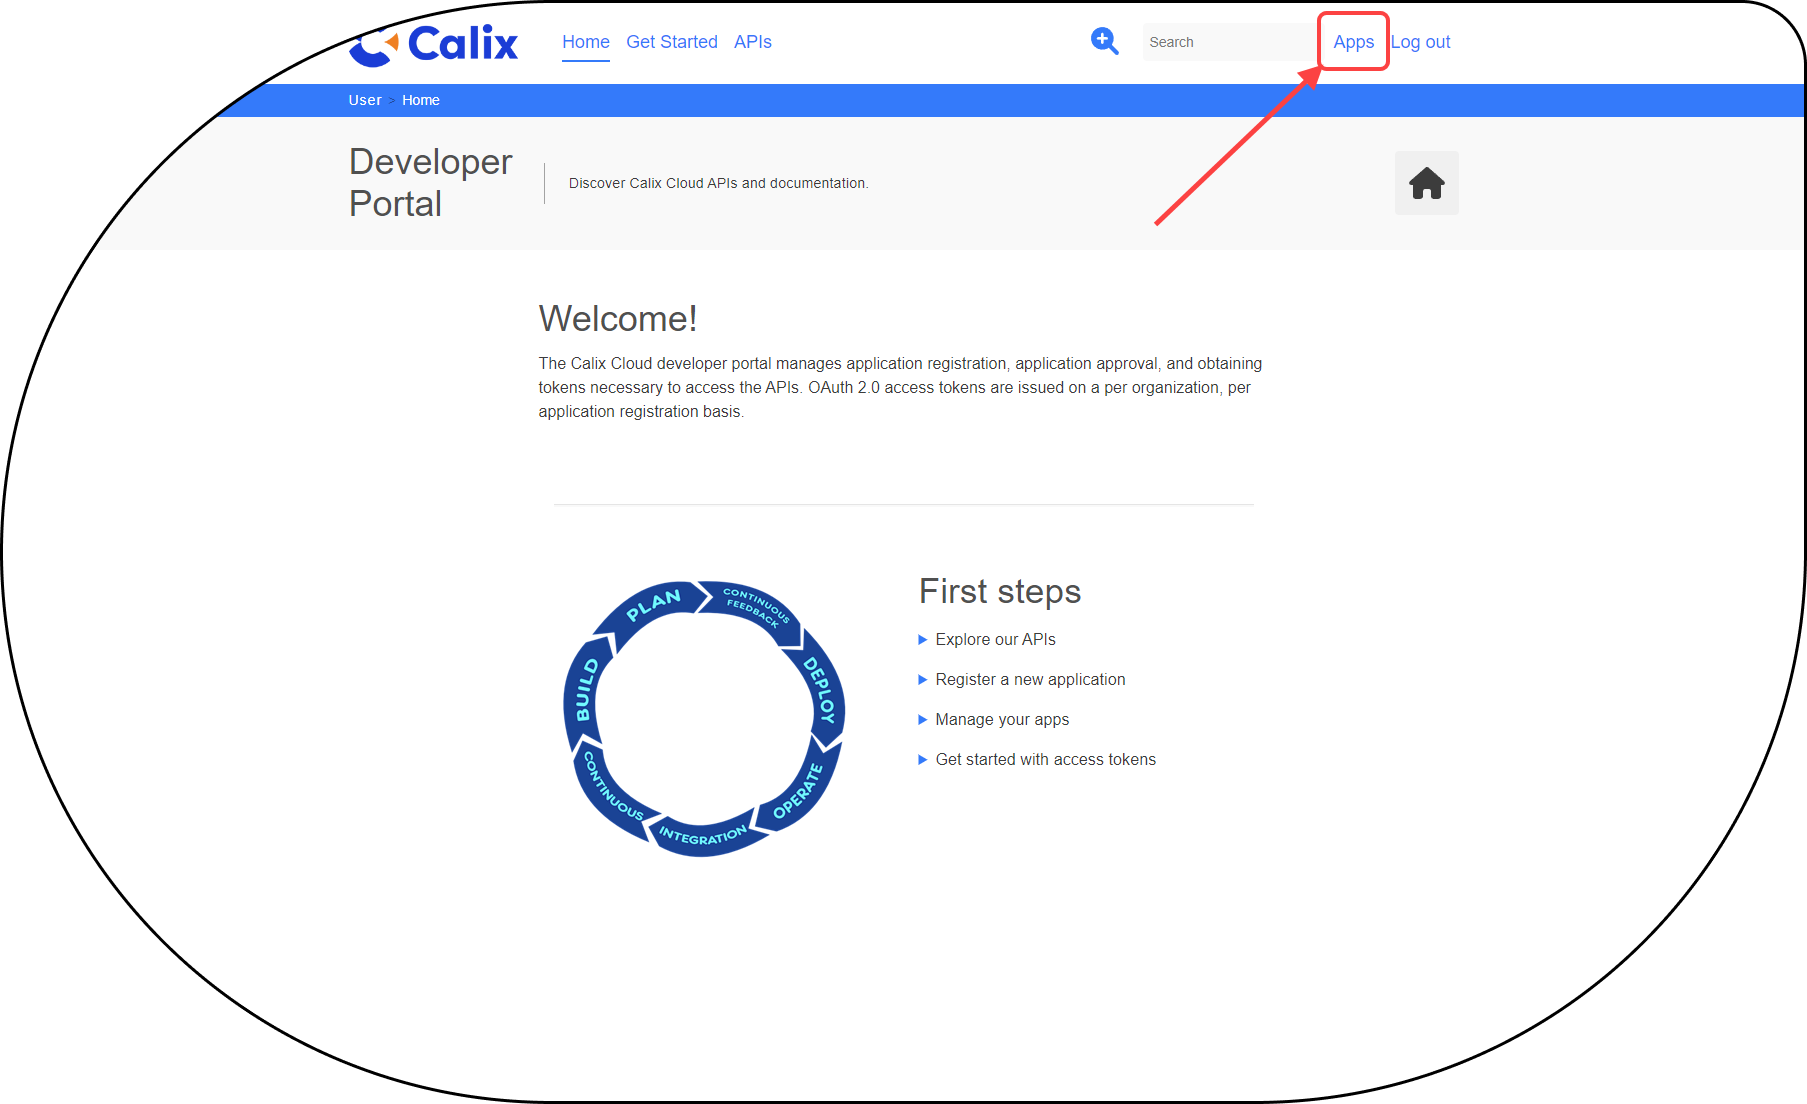
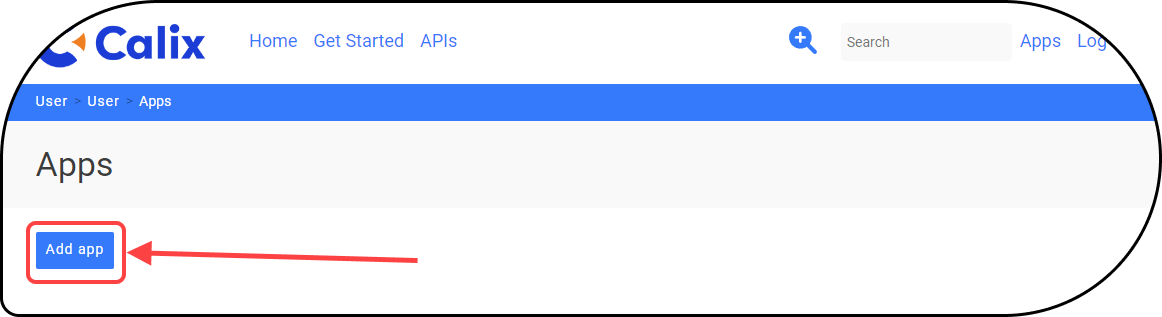
With the user created and the role assigned, add Sonar as an authorized application.
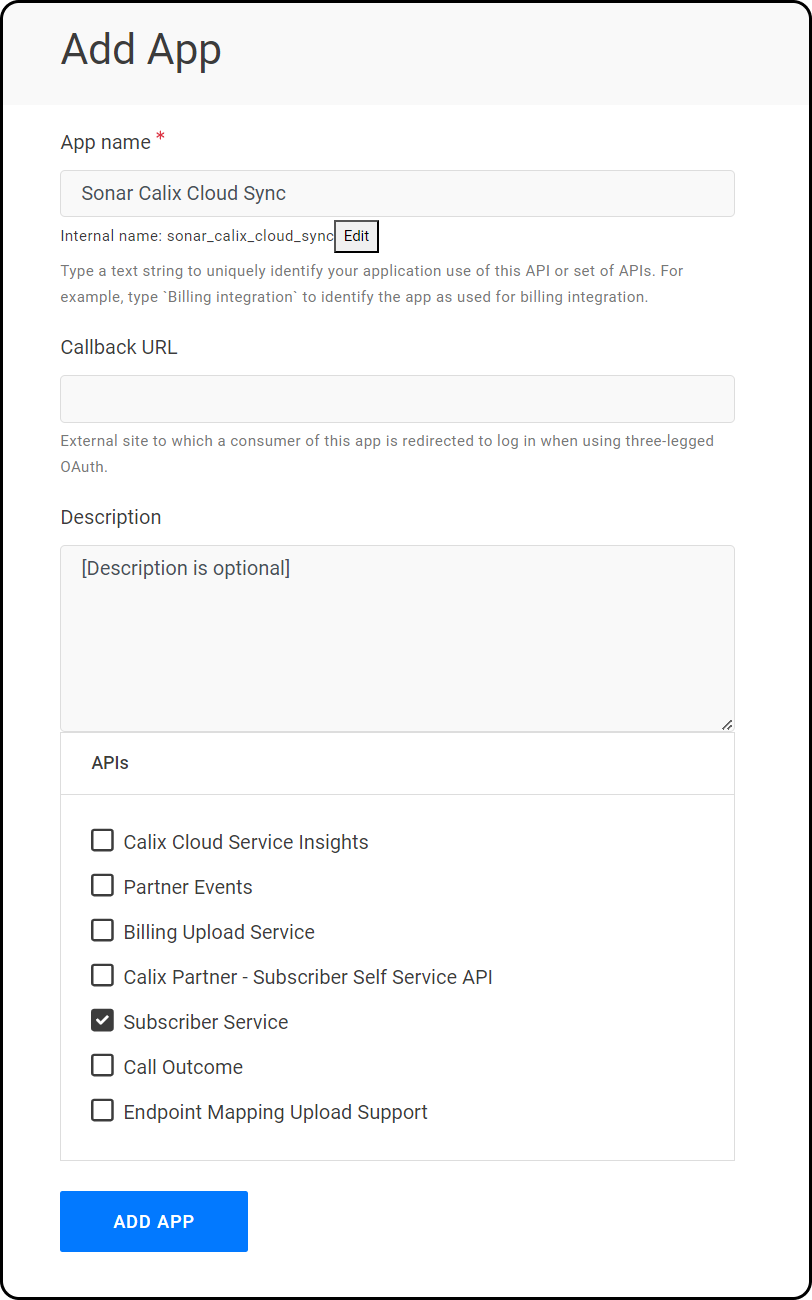
Provide an App Name, an optional description, and select Subscriber Service as the API.
Click Add app at the bottom of the modal.
Wait for authorization from Calix.
The authorization process varies by account and app. Contact Calix directly for their criteria.
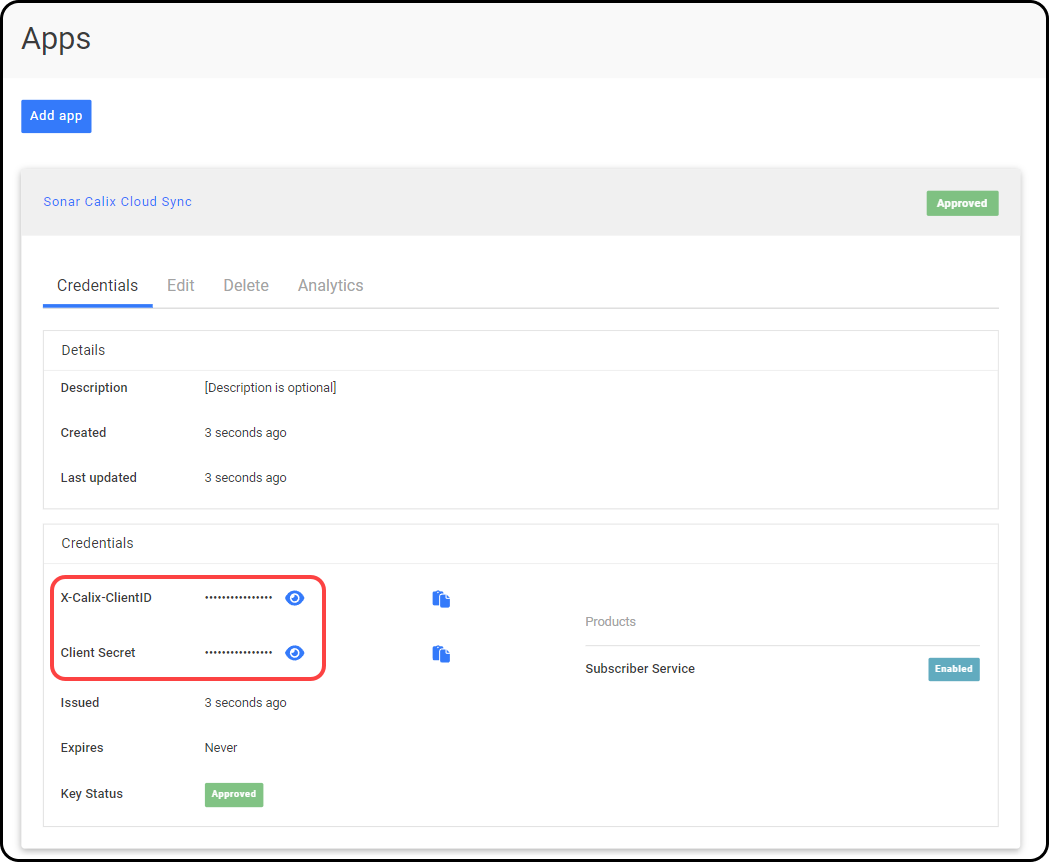
Once approved, return to the developer portal and click the app to expand it. Note the locations of the X-Calix-ClientID and the Client Secret, which you need to complete the integration.
Connecting the Calix Integration in Sonar
To understand the relationship between Sonar and Calix Cloud Data Fields as leveraged by the API integration, view this article.
The final setup step is done in Sonar.
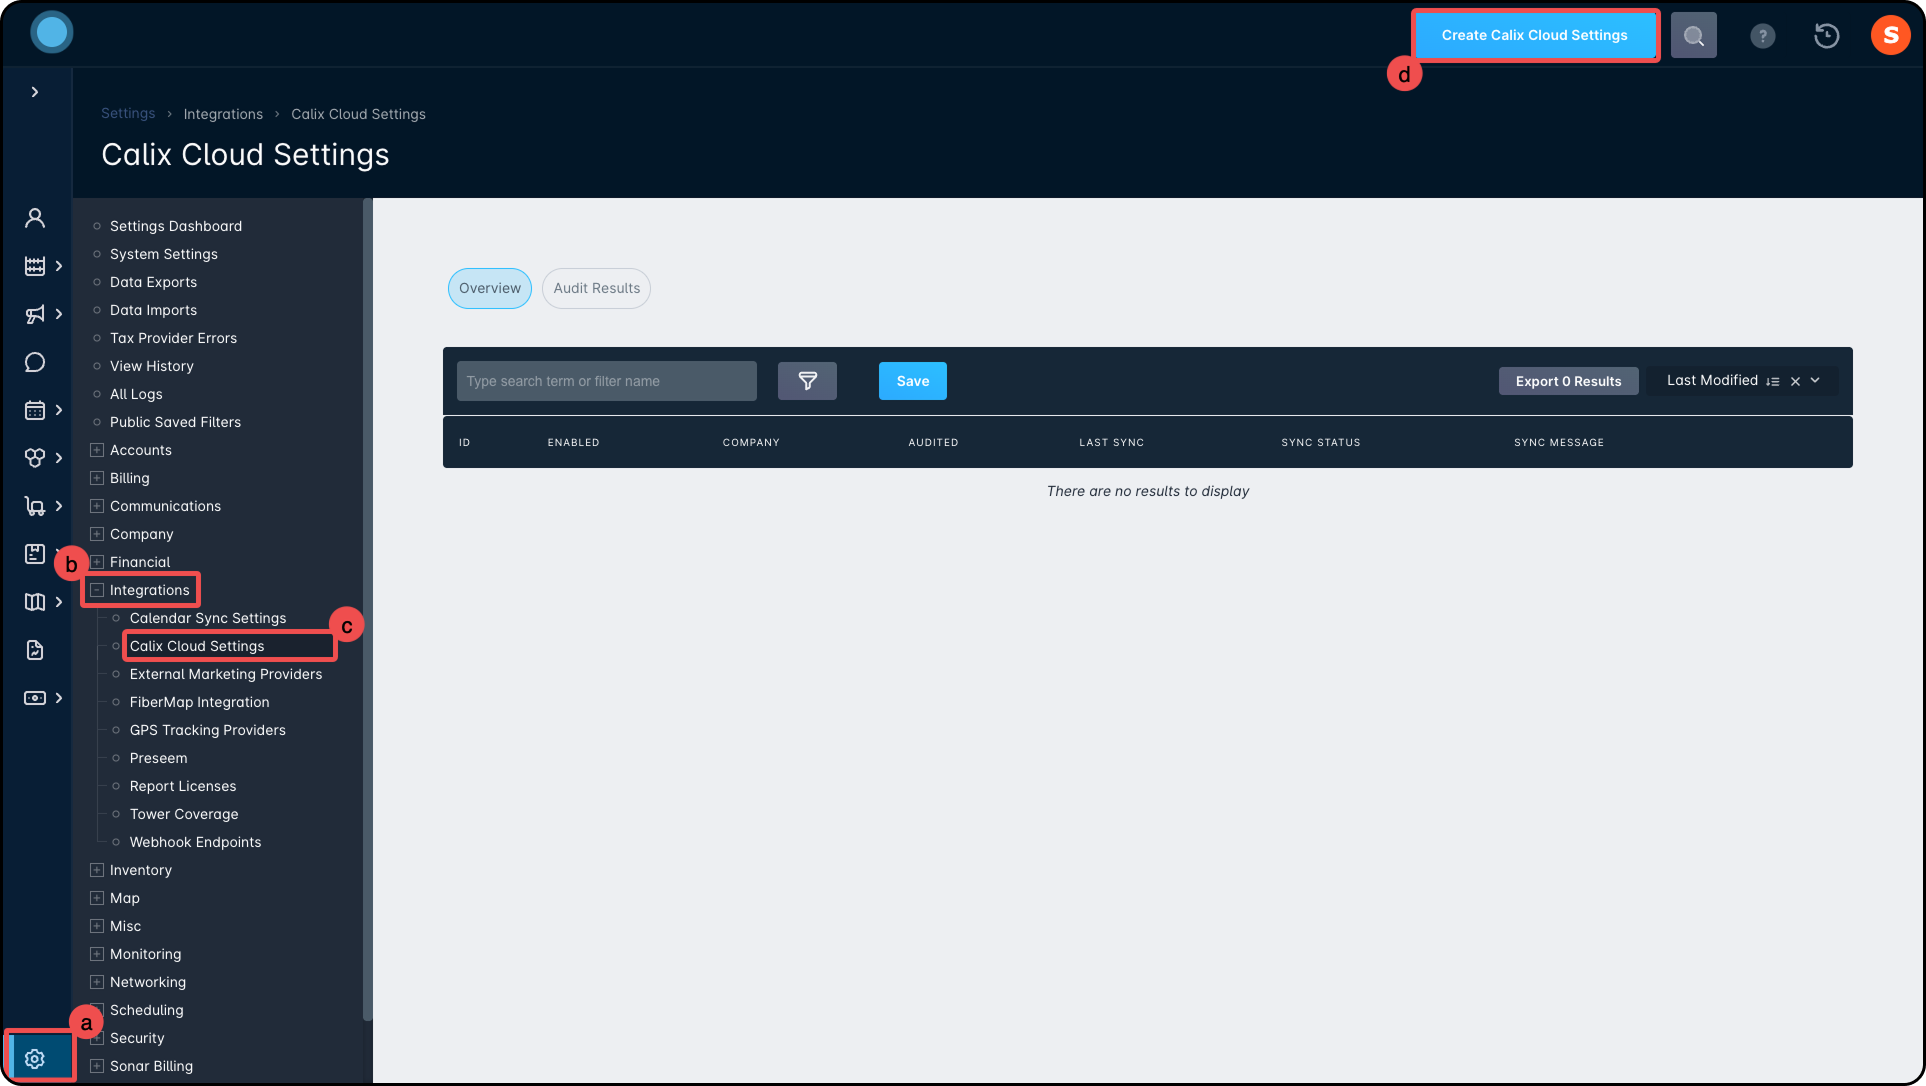
Access the integration at Settings → Integrations → Calix Cloud Settings, then click Create Calix Cloud Integration in the top-right.
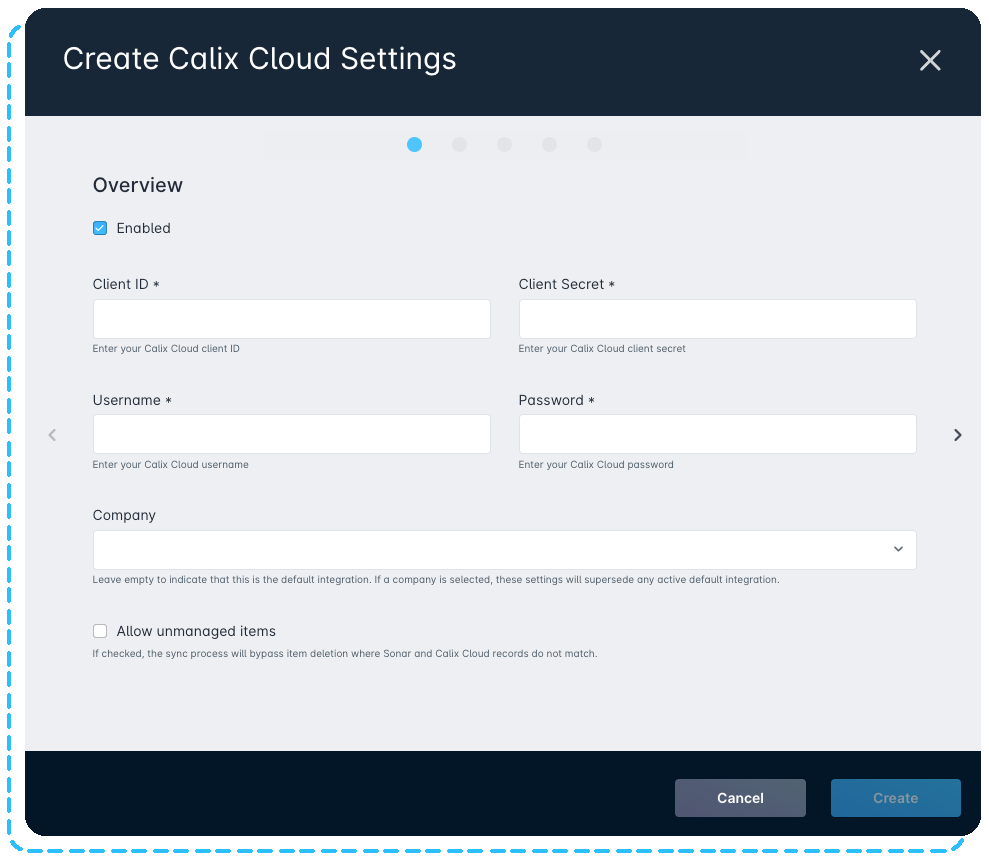
Setup page 1: Connection details. The first page requires information from the Calix-approved app you created in the developer portal.
Field
What it does
Enabled
Defines whether the integration operates. When unchecked, synchronization and audits do not occur for this integration.
Client ID
Maps to the X-Calix-ClientID field on the approved app in your developer portal.
Client Secret
Maps to the Client Secret field on the approved app in your developer portal.
Username
The username of the API user you created in your MyCalix account.
Password
The password for the API user you created in your MyCalix account.
Company
Optional. Leaving it blank sets this as the default integration for your entire instance. Selecting a company runs the integration against accounts belonging to that company only.
Allow unmanaged items
Controls what happens to records that exist in Calix Cloud but have no matching record in Sonar. See the explanation below, and choose this setting deliberately before your first sync.
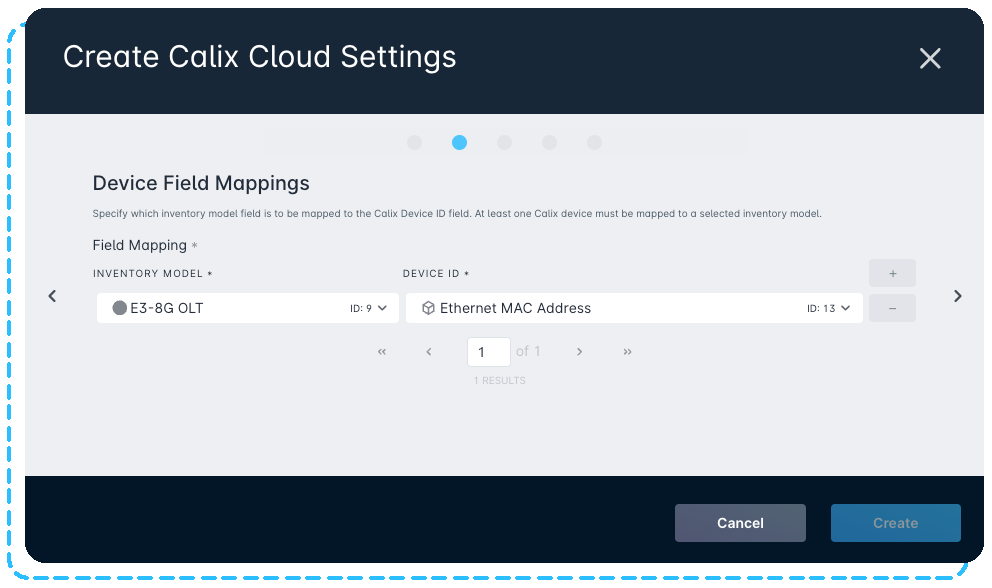
Setup page 2: inventory model mapping. The second page defines which inventory models, and which field on each model, map to the associated Calix Device ID field. For more on field mapping and how Calix works with Sonar inventory devices, see the Calix Integration: Overview article.
Set the field you select for Device ID as a Required Field on the inventory model so a value is always present. Submitting an empty value can cause errors, leading to unknown devices and unmatched records.
The inventory category tied to the integration's associated inventory models determines how the Device ID field is synchronized to Calix Cloud, even though the category is not specified on this page.How your Model Category is Used
For the integration to populate the Flow Endpoint Matching Options record in Calix Cloud, your associated inventory models must have a Model Category of either RG or ONT configured. Categories are managed in Settings → Inventory → Categories.
The Category Name field is user-configured, so the syntax must match exactly. If it does not, the integration will not pass the related Device ID data through successfully.
Before your initial sync, you have two ways to correct a mismatch. You can edit the Name on an existing category to match the required syntax, or create a new category and reassign your models to it. To change a model's category association, go to Inventory → Manage Items and click Edit Details on the model you want to change.
The category determines which Endpoint Matching Option receives the model's Device ID. The RG category maps to Endpoint Matching Option 1, and the ONT category maps to Endpoint Matching Option 2. Any mapped inventory model with a category other than RG or ONT maps to Endpoint Matching Option 3.
The Sonar Account ID is always sent to Endpoint Matching Option 4, regardless of the devices associated with the subscriber. This gives Calix Cloud a consistent identifier to correlate against for every account, including subscribers who have internet service but no Calix access equipment. RG and ONT mappings populate Options 1 through 3; Option 4 is reserved for the Account ID and is populated on every sync.
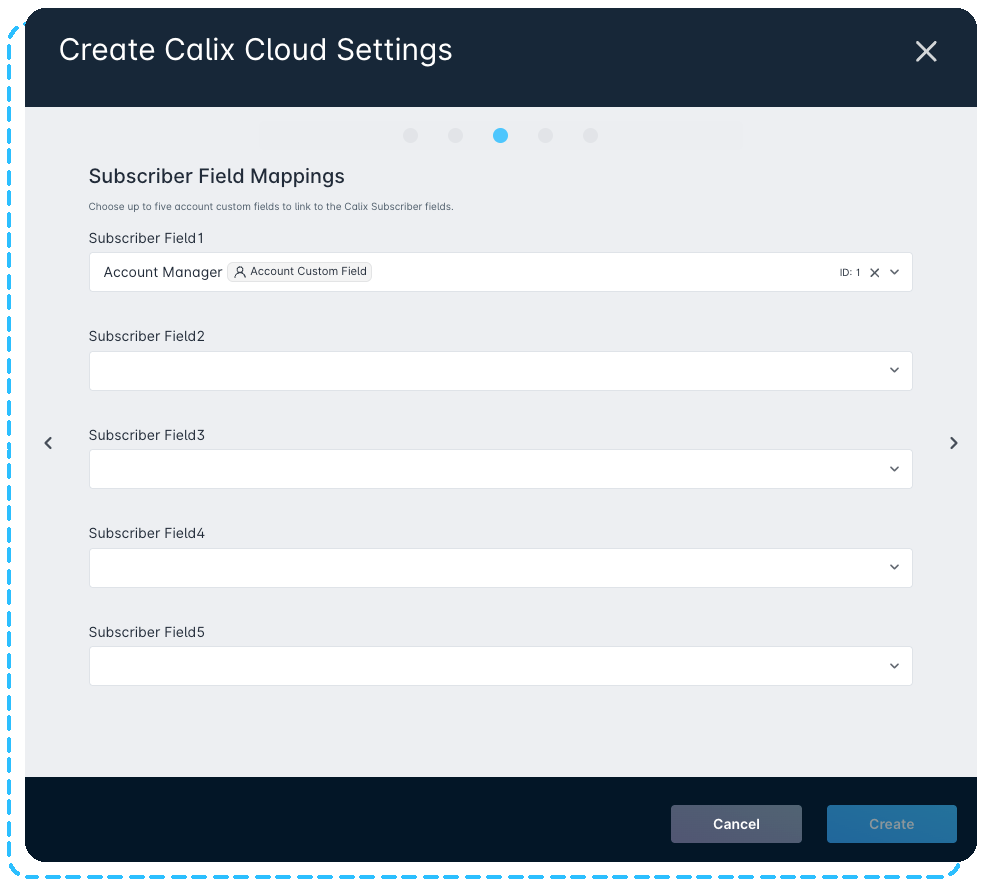
Setup page 3: Custom Fields. The third page maps custom fields in your Sonar instance to Subscriber fields in Calix Cloud, so essential information is present in both systems.
Both Account and Serviceable Address custom fields are available to map on this page. If your region and location data live at the address level, as franchise or service-area values often do, map those address custom fields directly instead of duplicating the data onto the account.
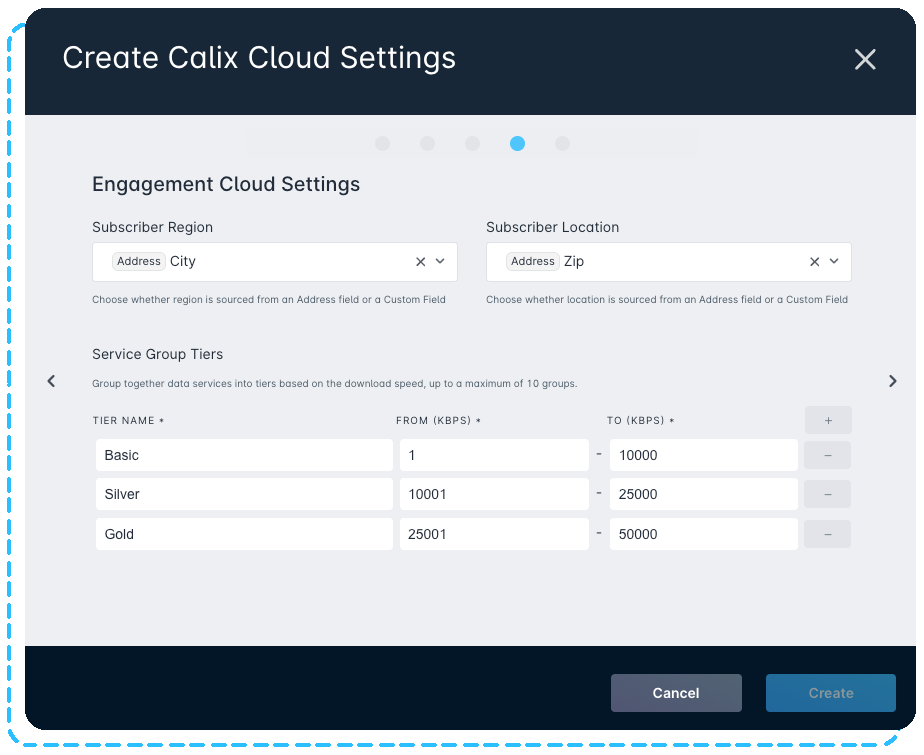
Setup page 4: Engagement Cloud Parameters. The fourth page controls your Calix Engagement Cloud parameters. Here you define subscriber region and location information alongside service tier information, which filters which subscribers receive relevant marketing material based on what you set in Engagement Cloud.Subscriber Attainable Rate matches against the attainable download and upload speed recorded on the subscriber's serviceable address in Sonar. This value is distinct from the subscriber's subscribed service speed; it represents the maximum speed the address can achieve based on the technology serving it. Engagement Cloud uses an attainable rate to build segments and target upgrade campaigns, so an address without this value populated still syncs but drops out of any segment that relies on it. The attainable rate is not used for provisioning, so a missing value does not block synchronization or affect active service.
Subscriber Region matches against the region value in Calix Engagement Cloud. This is a high-level grouping or tag of subscribers, used to distinguish major markets, serving areas, or subsidiary operating companies.
Region and Location can each be set to a fixed value (City, Subdivision, or Zip) or sourced from a custom field on the account or serviceable address. This lets the integration match how your instance already stores this data rather than forcing you to restructure it.
Subscriber Location matches against the location value in Calix Engagement Cloud. This is a smaller division, often a neighborhood, remote, or wire center. It allows precise targeting of subscribers and comparison of similar subscribers in a small area.
Region and Location can each be set to a fixed value (City, Subdivision, or Zip) or sourced from a custom field on the account or serviceable address. This lets the integration match how your instance already stores this data rather than forcing you to restructure it.
The Service Group Tiers section groups data services into tiers based on download speed in Kbps. Define up to 10 groups per integration. Groups cannot overlap in speed in either the From or To field. Once configured, services that match the speed profiles populate eligible subscribers for marketing purposes. A service that falls into no bucket simply leaves its subscribers unpopulated.
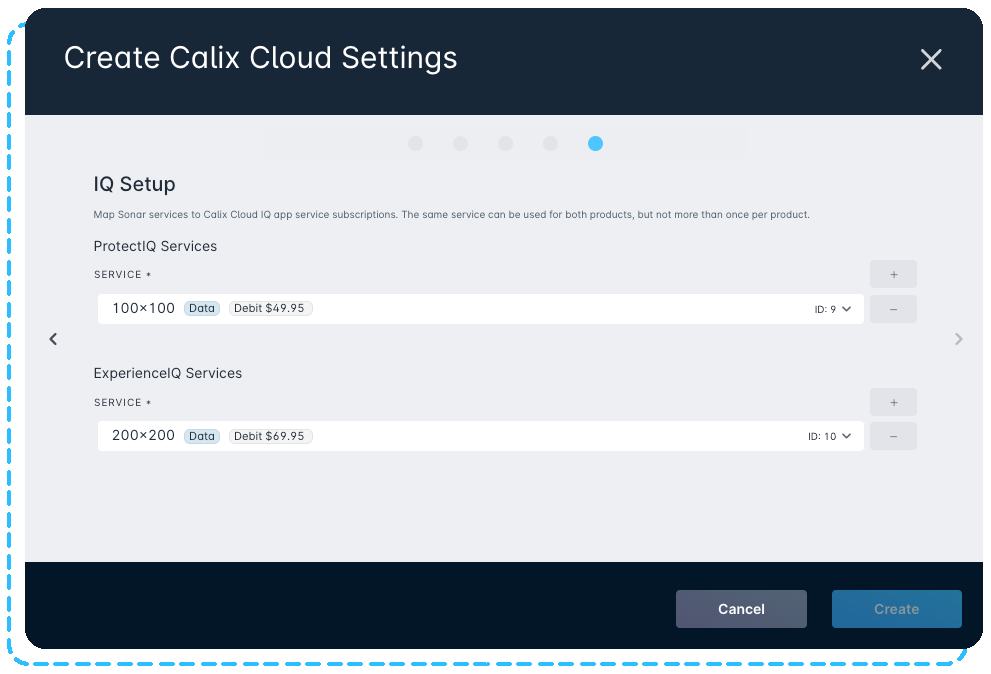
Setup page 5: IQ Setup. The fifth page maps your Sonar services to the Calix Cloud ProtectIQ and ExperienceIQ products. On the Calix Cloud side, each product is a simple active/inactive value attached to the subscriber. In Sonar, you control that value by mapping one or more services to each product. If any mapped service is present on an account, Sonar sets the corresponding product to on for that Calix Cloud subscriber.Under ProtectIQ Services, select each Sonar service that should turn ProtectIQ on. Under ExperienceIQ Services, do the same for ExperienceIQ. Use the plus and minus buttons to add or remove service rows for each product.
The same service can be mapped to both products, but it cannot be mapped more than once within a single product. If none of an account's services are mapped to a product, that product stays off for the subscriber.
Managing Communications for Calix Engagement Cloud
Before launching your integration, confirm which subscribers should receive communications for your marketing materials. This setting, together with the filters defined when you created the integration, prevents uninterested parties from receiving marketing communications. Manage marketing notifications through the Contact page on the subscriber's account. For more, see the Contact Creation section of the Account Management View: Overview article.
Overview
The Calix Cloud integration has two pages: the Overview page you land on when you access it, and the Audit page, which contains details about your audits and any unmatched accounts.
You can access the Calix Cloud Integration by going to Settings → Integrations → Calix Cloud Settings.
Landing Page
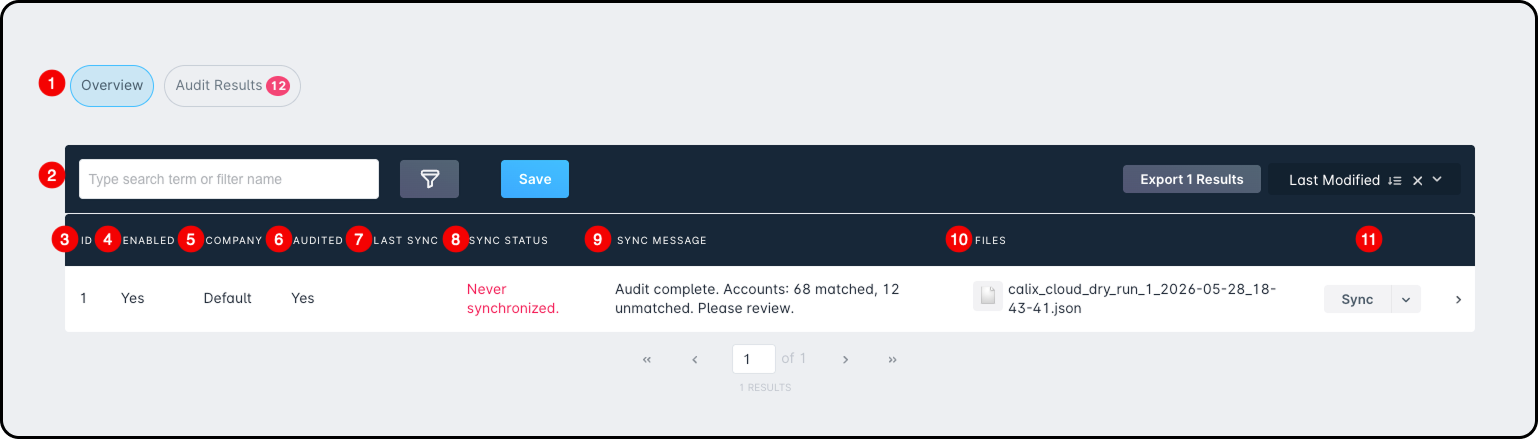
The landing page shows information related to your existing integration.
Column
What it shows
Page Selector
Switches between the Overview page and the Audit Results page.
The ID of the integration. This value increments as more integrations are added.
Enabled
Yes or No for each integration you have configured.
Company
The company the integration is associated with.
Audited
Yes or No for whether the integration has ever been audited through Sonar.
Last Sync
The last date and time a full synchronization occurred. Incremental automatic syncs do not update this column, even though they run whenever a change is made to your Sonar accounts. Dry runs do not update this column; see Performing a Dry Run Sync.
Sync Status
The current status of any ongoing synchronization. Updates dynamically as it progresses.
Sync Message
Information related to the ongoing audit or synchronization.
Files
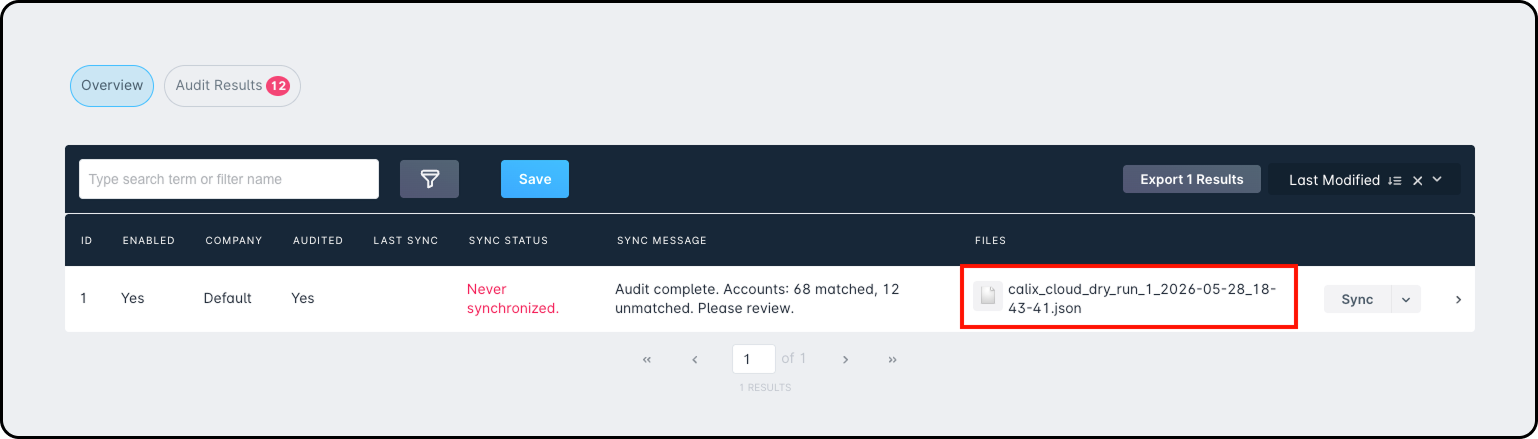
Files attached to the integration record, including the JSON file generated by a dry run. Click the file name to download it. See Performing a Dry Run Sync for details.
Action buttons
Shows Sync or Audit depending on your stage. The Sync action opens a modal with a Dry run option. An audit must be completed on any new integration before synchronization can occur.
Audit Results
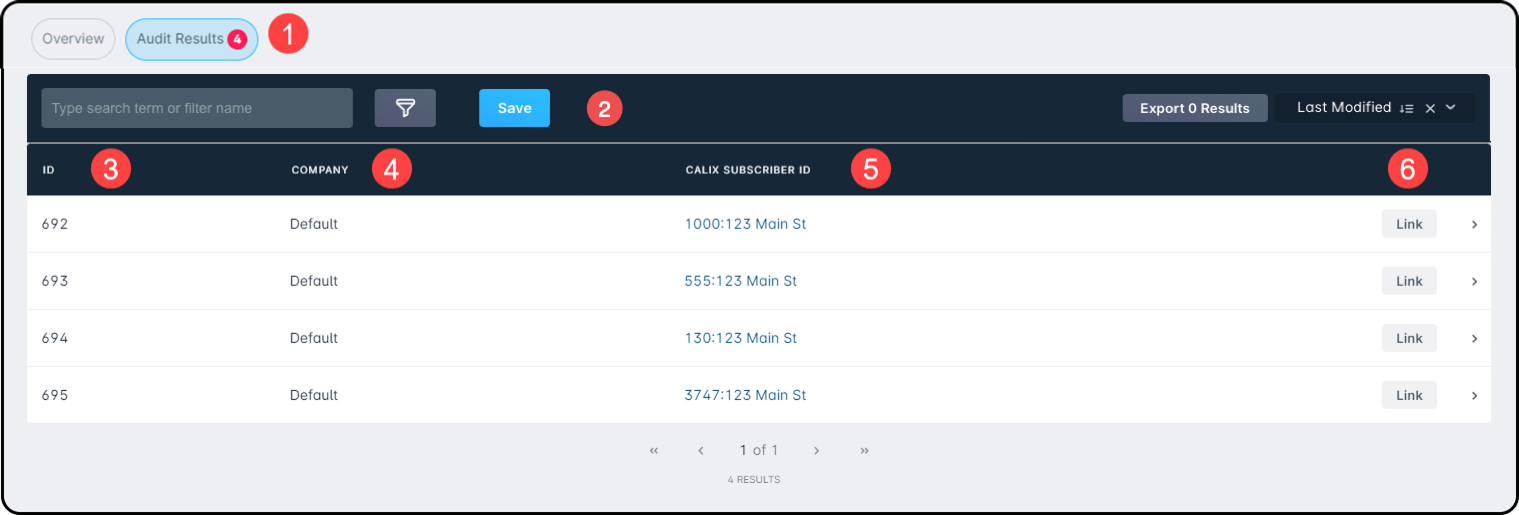
The Audit Results page shows any unmatched or mismatched accounts between your Sonar instance and your Calix Cloud account.
If an audit returns no results here, there are no errors between the two platforms. If an audit reveals a data trend best addressed by a mass correction in Sonar, Sonar may be able to help. Contact your Client Success Manager to discuss your options and receive a quote for a Professional Services solution.
How Audit Matching Works
During synchronization, only devices with an associated Subscriber ID field are considered by the audit. Populate this field for your devices before running the audit. When an audit runs, it matches the account records in your Sonar instance to the subscriber records in Calix Cloud. If a Sonar Account ID does not match a Calix Subscriber ID, the Calix Cloud subscriber is flagged. If the values match, the subscriber record is synced using the detected match and does not need manual linking.
Column
What it shows
Page Selector
Switches between the Overview page and the Audit Results page. If an audit found unlinked accounts, the count appears in the selector.
The ID of the audit result. This value increments as more audits are run.
Company
The company the unmatched account is associated with.
Calix Subscriber ID
The address and account ID of the Calix account details not matched to an existing subscriber in Sonar.
Actions
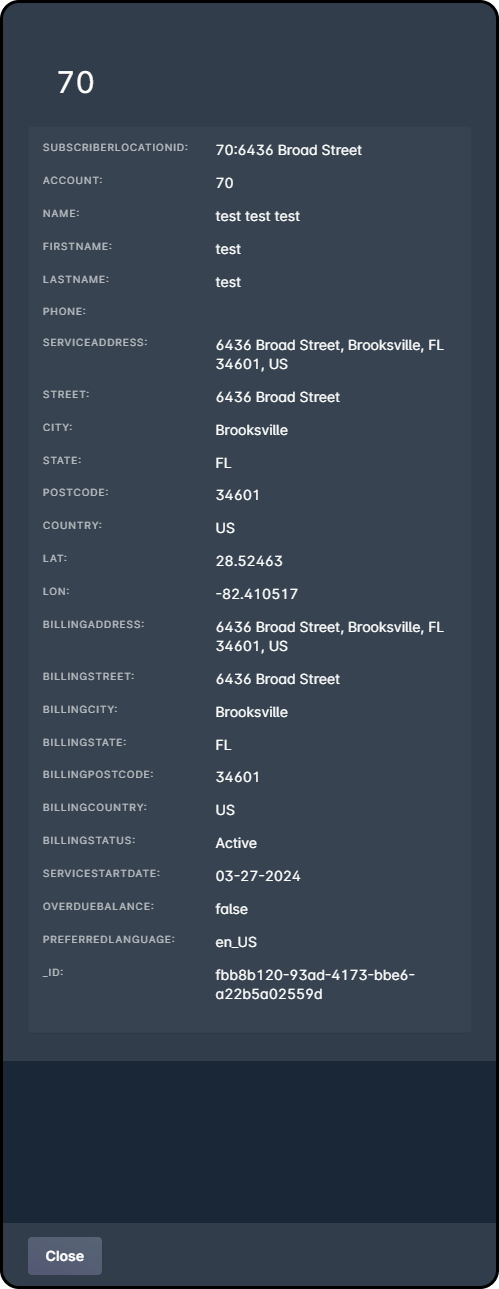
Link an unmatched Calix account to an existing Sonar account. Expand the side panel with the arrow to see more details.
Side Panel View
Side Panel View
Synchronizing Your Data
Before your first synchronization between Sonar and Calix Cloud, it's crucial that you confirm you have completed integration project planning with Calix.
The first manual synchronization can run any time after an audit is complete. Manual synchronization is only required to initiate the connection. Further synchronizations run routinely and automatically in near real time, so account or service changes made in Sonar are reflected in Calix Cloud automatically.
If you configure multiple integrations, such as one for Company A alongside your default integration, run a manual synchronization again for each new integration, even if no data exists for the new company yet. Once the manual sync completes and data is reassigned to the correct company's integration, automatic synchronization resumes.
What's Required for Go-Live vs. What's Optional
Use this section before your first sync to separate the data Calix requires from the data that only enriches marketing.
To pass Calix's QA and reach go-live, every subscriber with Calix equipment must send its RG and/or ONT system identifiers through the integration. This depends on your inventory models being categorized correctly. If a device is mis-categorized, its identifier does not reach the mapping options and the account fails QA. See How your Model Category is Used above.
Data that feeds Engagement Cloud marketing, such as attainable rate, region, and location, is not required to pass QA or go live. When that data is missing, synchronization still completes and service is unaffected. Only Engagement Cloud segmentation and reporting are incomplete until you populate it.
Performing a Dry Run Sync
Calix may request a complete record of the sync operations Sonar would perform against your Calix Cloud subscriber service for audit purposes. The Dry run option allows you to generate this record without making any changes to your Calix Cloud data.
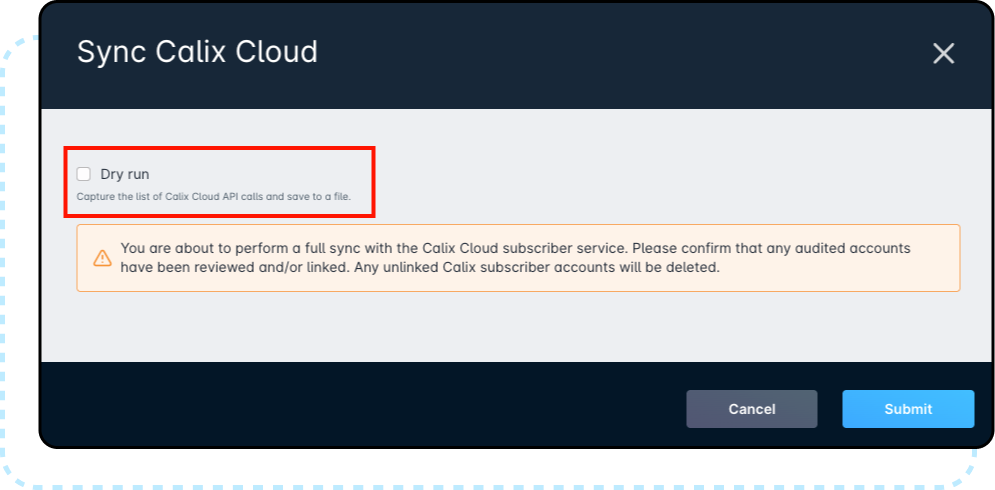
When you initiate a sync from the Overview page, the Sync Calix Cloud modal will appear with a Dry run checkbox at the top.
Enabling Dry run before clicking Submit will cause Sonar to capture every API call that would be made to the Calix Cloud subscriber service and write them to a downloadable JSON file, rather than transmitting them to Calix. The sync state of your integration prior to the dry run is preserved and restored once the dry run completes, leaving your system exactly as it was beforehand.
Once the dry run finishes, the generated file will be attached to the Calix Cloud integration record and accessible from the Files column on the Overview page. The file is named using the convention calix_cloud_dry_run_{integration_id}_{YYYY-MM-DD-HH-MM-SS}.json.
Click the file to download it, then provide it to your Calix adoption team for review.
A dry run does not delete unmatched Calix subscriber accounts, modify subscriber records, or otherwise alter data in either system. Once Calix has reviewed and approved the captured API calls, you can return to the Overview page and run a standard (non-dry-run) sync to apply the changes.
Ramifications of Synchronizing your Integration
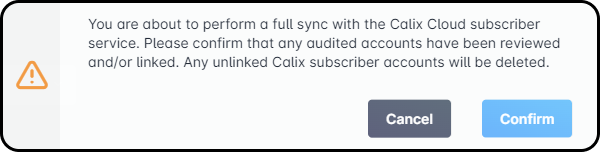
The integration is an authoritative connection from Sonar to your Calix Cloud instance, so it is important to understand how a sync affects your data. Every time you start a sync, you receive this warning:
What happens to unmatched records depends on the Allow unmanaged items setting you chose when configuring the integration.
Allow unmanaged items unchecked (default)
Allow unmanaged items checked
The sync deletes any record that exists in Calix Cloud but has no matching record in Sonar, even if it was not audited. Calix Cloud becomes an exact mirror of Sonar.
The sync bypasses that deletion. Records in Calix Cloud without a matching Sonar record are left in place.
Use this when Sonar is the single authority for your subscriber records and you want unmatched Calix Cloud records cleaned up automatically.
Use this when you maintain subscribers in Calix Cloud that are not managed through Sonar and you want the sync to leave them untouched.
Audit and match every account that appears only in Calix Cloud before you sync, so no needed records are deleted.
Unmatched Calix Cloud records are preserved, so a missed audit match does not delete data.
Remember that your first sync pushes every Sonar account into Calix Cloud, including device-less accounts. Decide how you will handle those records before you sync, using the Allow unmanaged items guidance above.
Frequently Asked Questions
Can I pause, roll back, or stop a synchronization once it begins?
Once synchronization begins, the API instructions that establish Sonar as the record of truth take effect immediately and supplant the existing records in Calix Cloud. Because these changes need to apply as soon as possible, the calls are made in short order. Synchronization happens as a push, so there is no mechanism in Sonar to pause, roll back, or prevent the modifications it makes to the Calix ecosystem, which includes Calix Cloud and Calix SMx. Removing managed devices that do not map to a record in Sonar is an intentional function of the sync, not an oversight.
If you maintain accounts or devices in Calix Cloud that are not managed through Sonar, enable Allow unmanaged items on your integration before you sync. This prevents the sync from removing those unmatched records. See the Allow unmanaged items setting and Ramifications of Synchronizing your Integration above.
Subscriber Account View After Synchronizing your Data
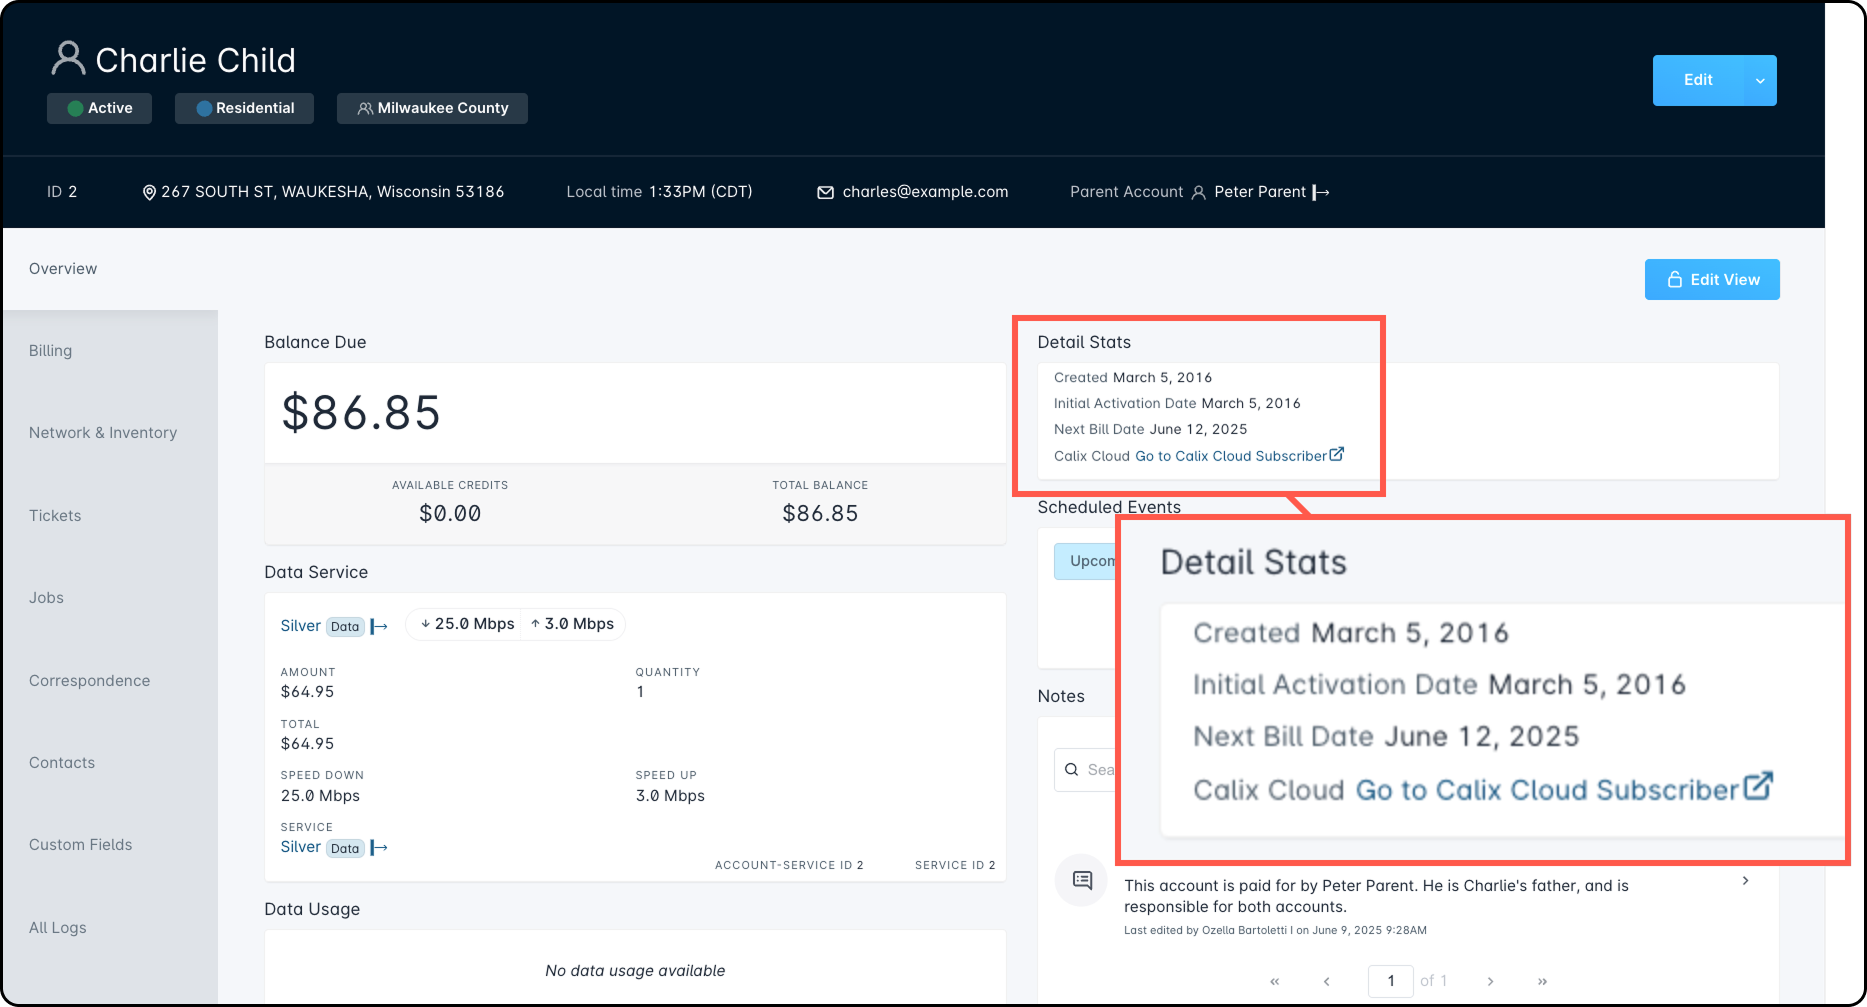
Once your integration is audited and synchronized, a link appears in the Detail Stats section of the subscriber's account. This link provides direct access to the Calix Cloud data, making it easy to view and analyze key subscriber insights.
Custom Report to Flat File Data Sync (legacy)
For documentation on the legacy data sync method, review those instructions in the legacy article.
This approach has been replaced by the native API-driven integration. Sonar and Calix recommend configuring the native Calix Cloud integration instead of the legacy report method.
If you currently use the legacy method, switching is straightforward. Contact Calix Support first to time the pipeline transition. Once Calix gives the all-clear, disable the scheduled SFTP delivery on the associated Looker report, then follow this guide from top to bottom.
 Updated
by Mitchell Ivany
Updated
by Mitchell Ivany

 The same service can be mapped to both products, but it cannot be mapped more than once within a single product. If none of an account's services are mapped to a product, that product stays off for the subscriber.