Table of Contents
Adtran Mosaic Cloud Platform Integration: Overview
 Updated
by Mitchell Ivany
Read Time: 20 mins
Integrating your Sonar instance and your Adtran Mosaic Cloud Platform infrastructures facilitates bidirectional communication between the information stored in Sonar and in Mosaic Cloud Platform. With this integration, you can automate the mapping of data from your instance to the Mosaic Cloud Platform, and vice versa. With Sonar and Mosaic CP, you'll benefit from the scalability of both solutions while reducing instances of manual intervention or manual duplication of customer and network data. This integration provides:
- Automated Data Service Provisioning.
- Device Alarm display in Sonar, with ability to affect Inventory Item Device Status.
- A deep link to jump from the Account/Device in Sonar to the Account/Device in Mosaic Cloud Platform.
- Synchronization now runs using 20 concurrent threads, supporting approximately 1,000 devices per minute and allowing windowed syncs for large environments.
- - Mosaic Cloud Platform is device-centric: there is no subscriber concept (unlike Calix SMX).
- ONTs are automatically created in Mosaic Cloud Platform at provisioning time—no need to preload inventory across servers.
- Each Sonar company can only be linked to one Mosaic Cloud Platform instance. If you operate multiple MCP environments, you must configure separate Sonar companies.
Setting up the Integration in Sonar
Before setting up the integration, you'll need to create the Inventory Models (and their corresponding fields), along with Services you plan to assign to your Adtran Fiber Network customers. Both of these fields will come up during the final integration modal; however, the Services can be returned to and edited at a later time.
Permissions
The Mosaic Cloud Platform Integration brings with it a set of specific permissions. Please review these permissions and ensure the relevant users have the permissions applied to their role.
Navigate to Settings → Security → Roles and either choose to edit an existing Role or create a new Role. With the next page populated, locate the permissions reflected in the screenshot below and enable whichever ones are applicable to that Role.

These permissions allow a user to create and manage the communication between your Sonar instance and Mosaic Cloud Platform. Additional Permissions are required to control connectivity between Mosaic CP and Customer Accounts.
- Account Mosaic Cloud Platform Service Details

- Field Mapping

- Service Mapping

Creating Inventory Models
For every ONU you plan to use, a corresponding Inventory Model must exist in Sonar. Inventory Models created for use with Mosaic CP are relatively simple, with no specific category requirements.
Click here for an example
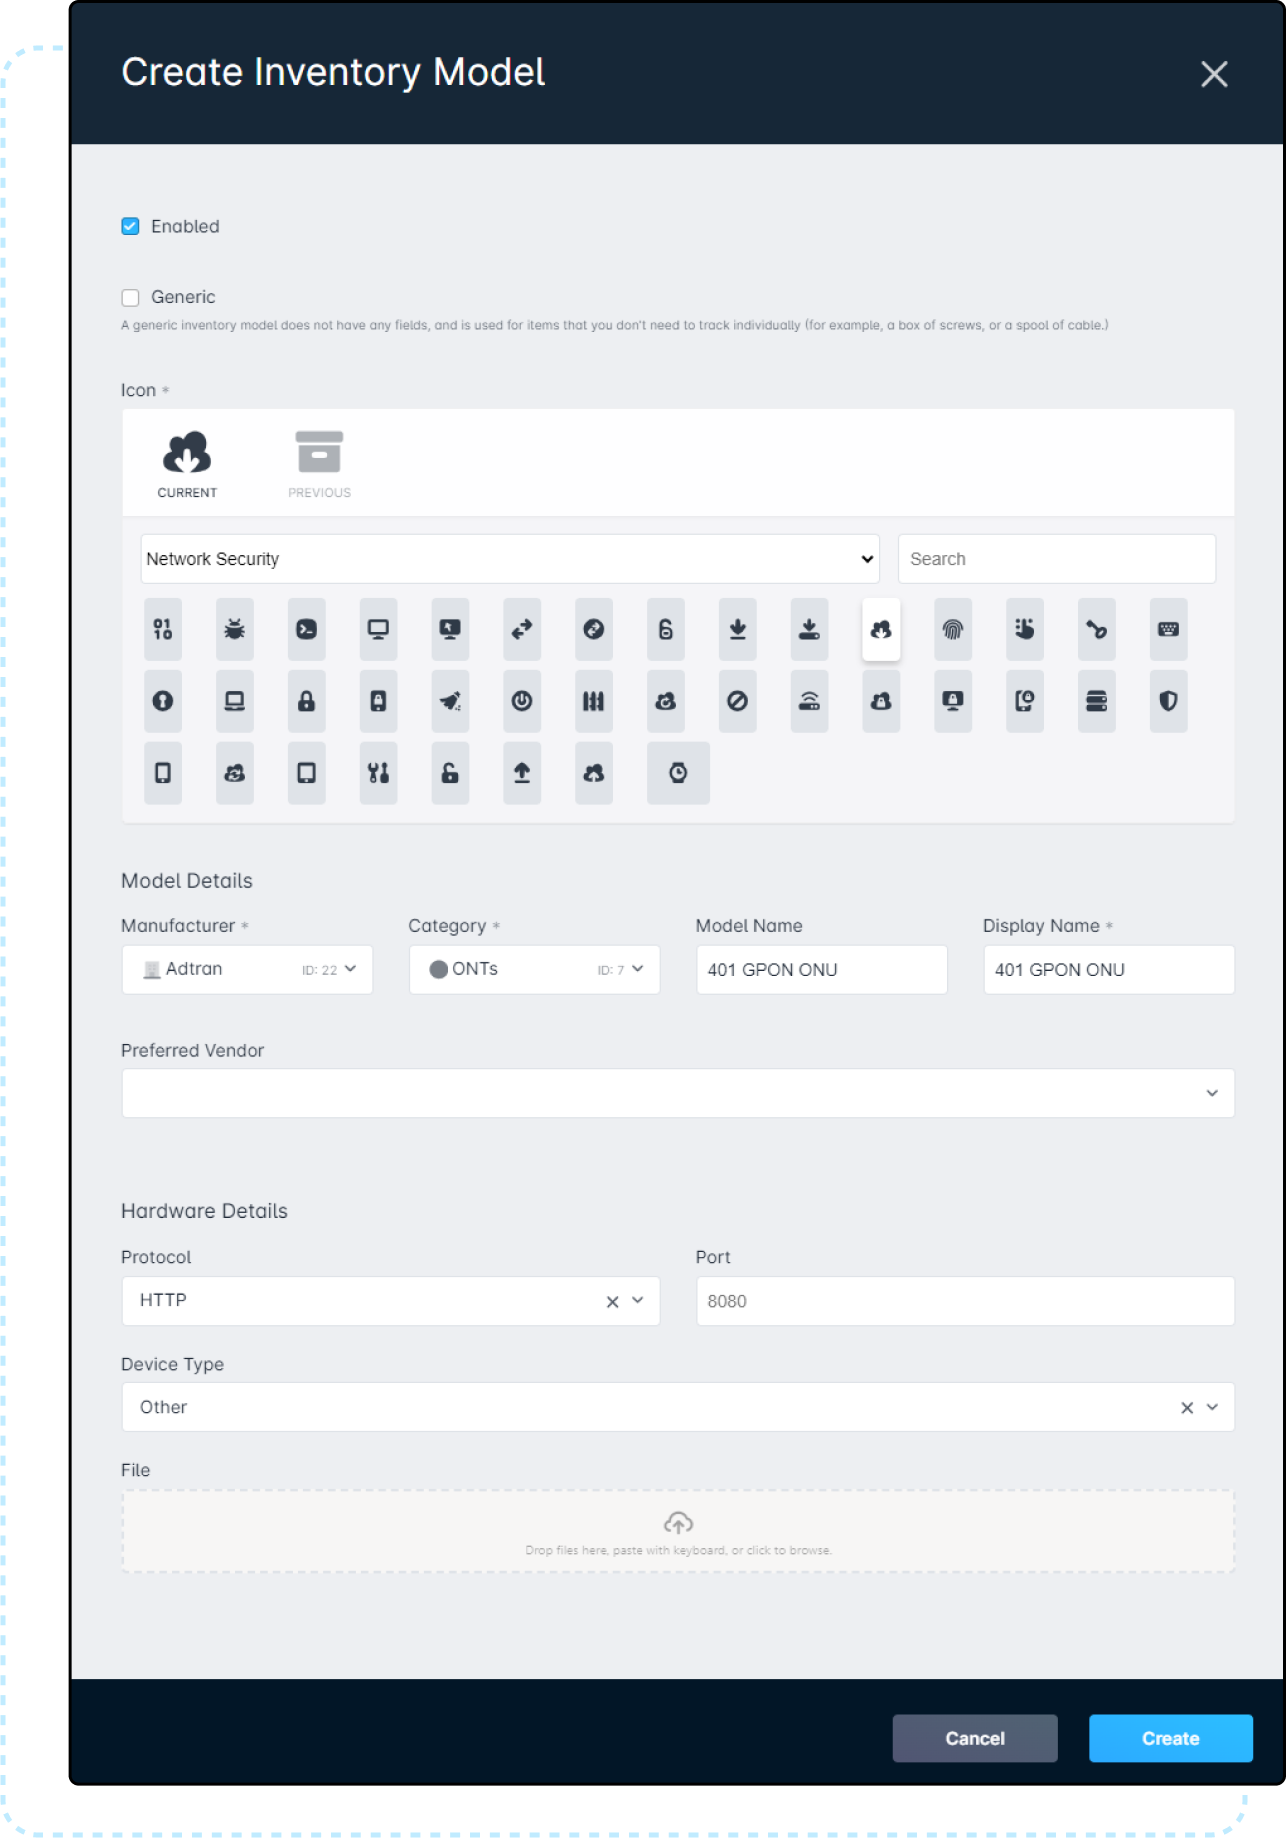
With the Inventory Model created for your ONU, you can then add the following model fields with the same attributes reflected below:
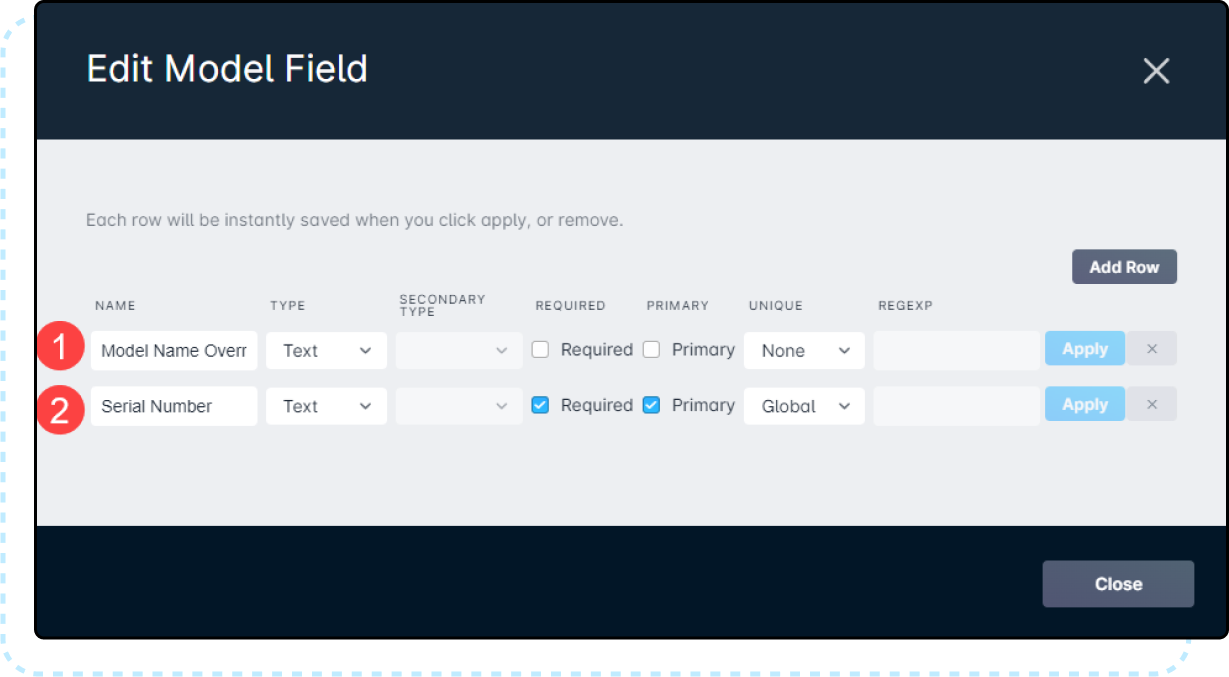
- Model Name Override
- This field is used to (optionally) replace the Inventory Model Name for the purposes of Adtran, ensuring they match in Sonar, on the Customer Account, and in Adtran. If the field is left blank when mapped to the Adtran, the default Inventory Model Name will be used.If the Inventory Model Name does not match the Model Name value stored in Adtran MCP, the Model Name Override value will need to be filled out for each new item. To improve Inventory and Provisioning efficiency, Sonar instead recommends renaming the Inventory Model to exactly match the value stored in Adtran MCP.
- This field is used to (optionally) replace the Inventory Model Name for the purposes of Adtran, ensuring they match in Sonar, on the Customer Account, and in Adtran. If the field is left blank when mapped to the Adtran, the default Inventory Model Name will be used.
- Serial Number
- This field should be set to “Required”. The number inputted should match the hardware serial number of the ONU, and cannot be left blank.
Creating Services
While Mosaic CP is responsible for managing the Services and Speeds delivered to your customers, part of the integration process is establishing a link between the Services created in your Sonar instance, and those Profile Vectors created in Mosaic CP. By mapping these Services, your staff can define account data services in Sonar and trigger service provisioning, all without requiring direct access to Mosaic Cloud Platform.
- Navigate to Settings → Billing → Services and build additional data services you will need.How to create a data service is detailed in our Building a Data Service article | click here
- In the populated modal, ensure that the fields for “Download speed in kilobits per second” and “Upload speed in kilobits per second” match what is detailed via the Profile Vector in Mosaic Cloud Platform. While Mosaic CP is responsible for managing speeds actively delivered to the customer's ONU, having the speeds in Sonar can be helpful for reference purposes while troubleshooting as well as for generating FCC reporting.
Configuring Your Adtran Mosaic Cloud Platform Integration
- Navigate to Settings → Networking → Mosaic Cloud Platform and click on “Create Mosaic Cloud Platform Integration”.
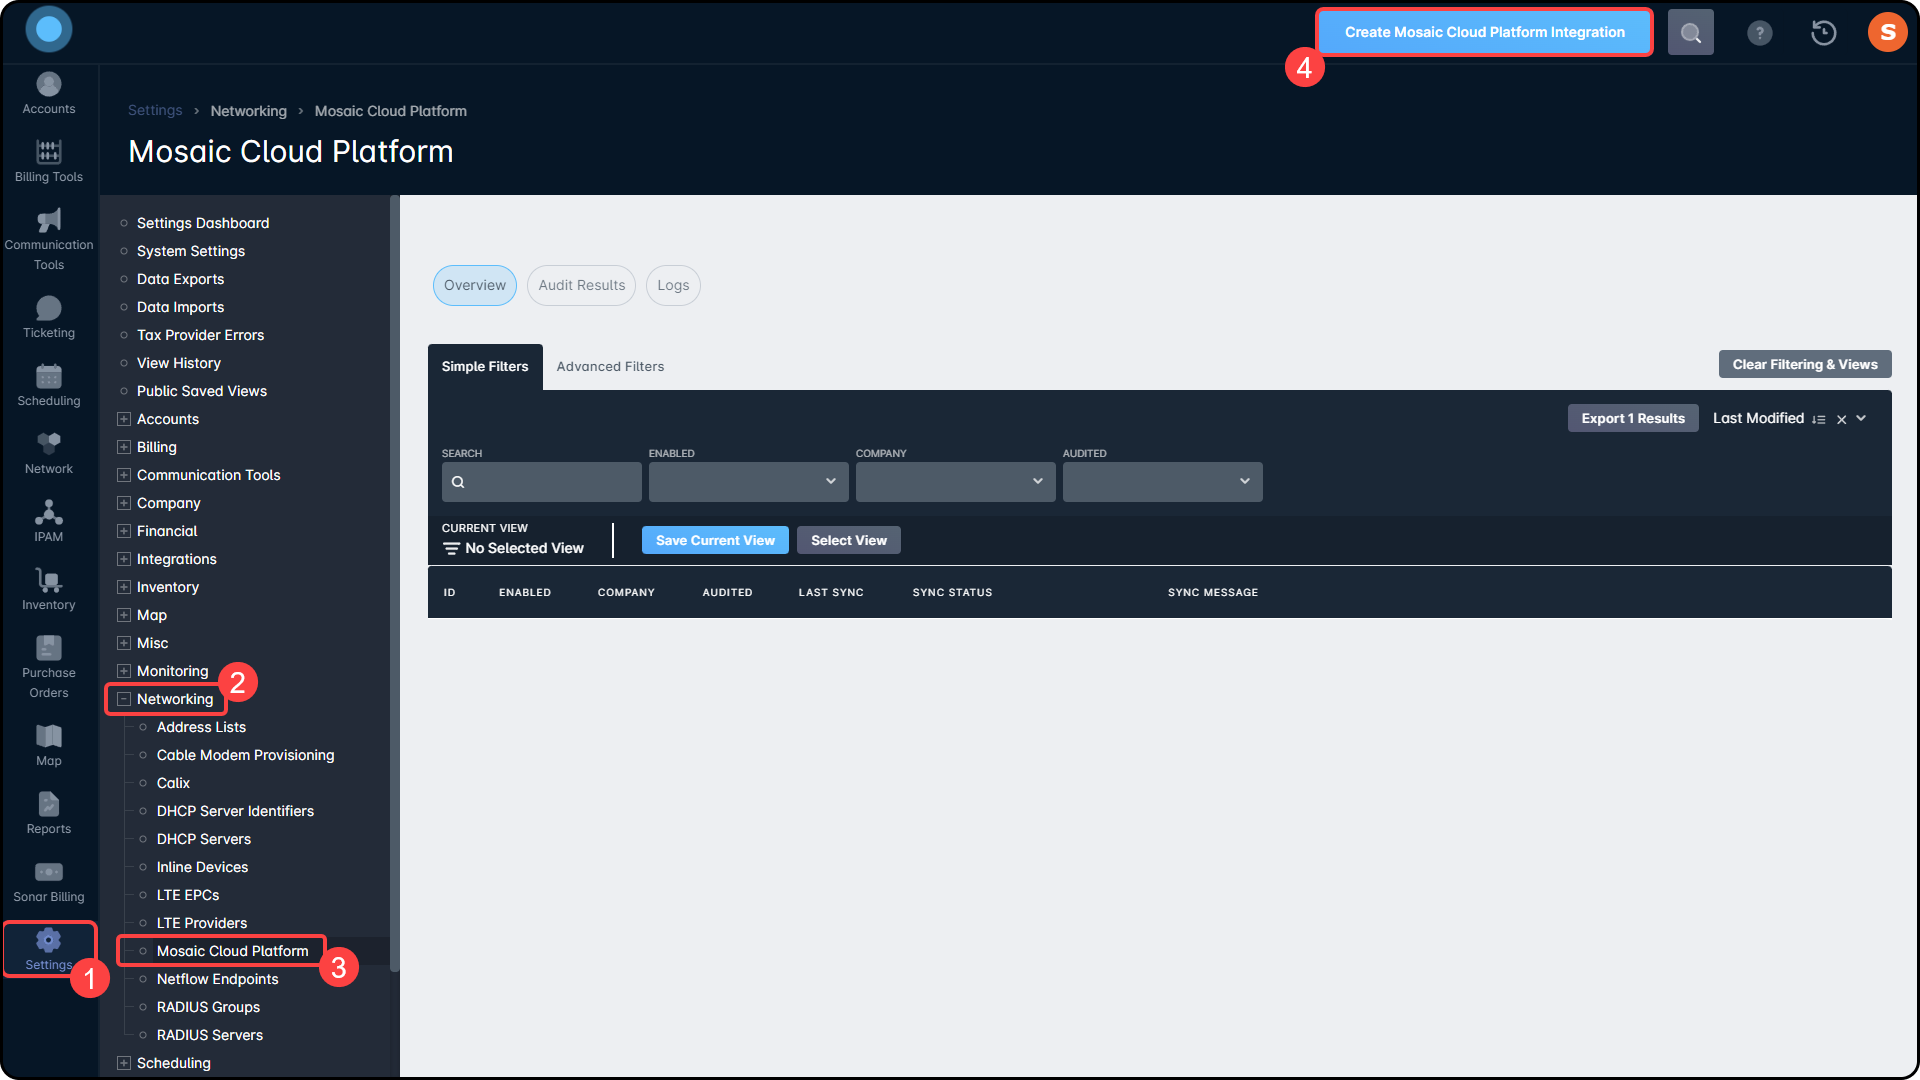
- Complete the required fields across all 5 pages, as detailed below:
Page 1
The first page of the integration setup handles establishing the connection with your Mosaic Cloud Platform. Filling out this page completely is mandatory, and correctly entering the parameters will automatically pull your Profile Vectors into Sonar for the rest of the configuration to use.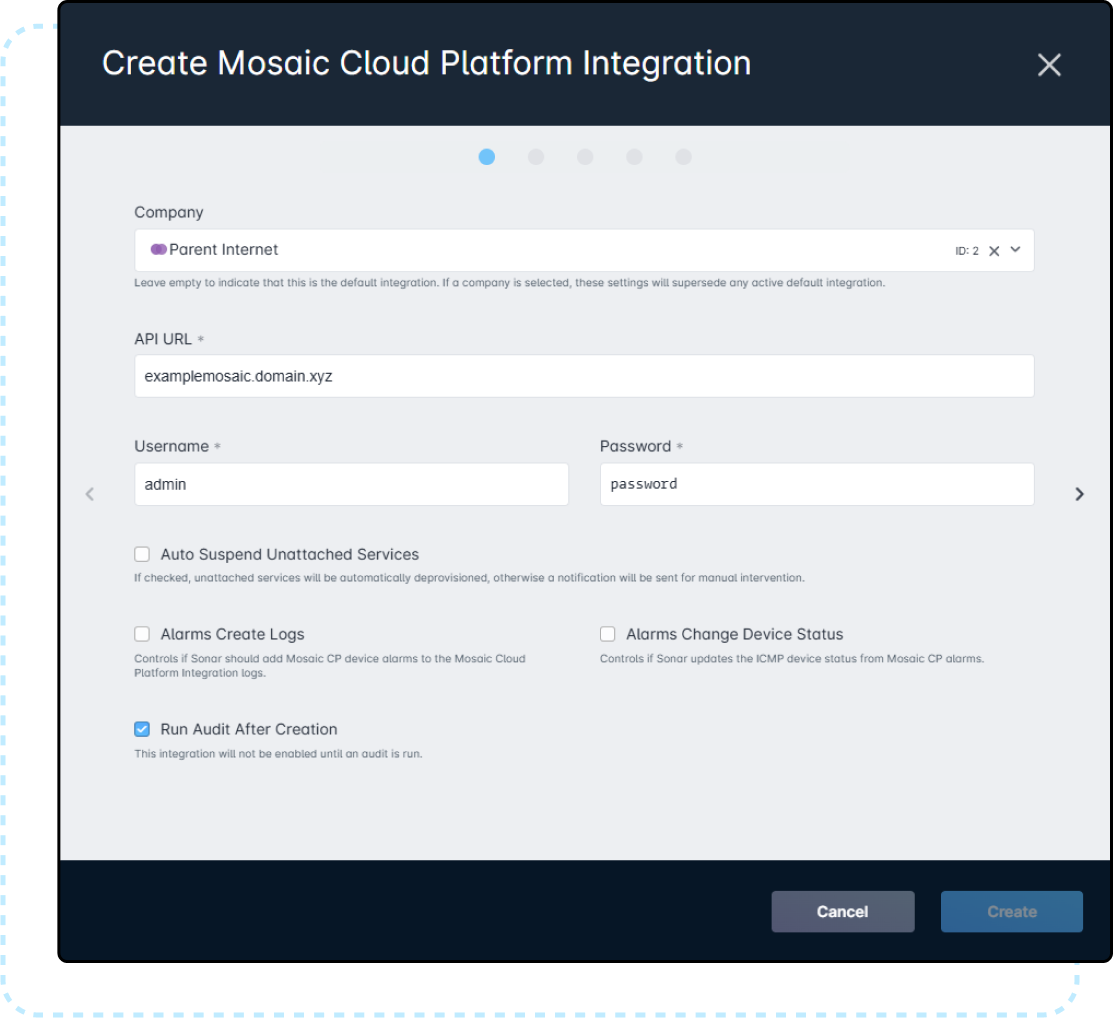
The Company dropdown is used to restrict the Mosaic Cloud Platform Integration to controlling the network of clients belonging to the selected Company only. If the field is left blank, any customers in your instance, with mapped inventory assigned to their account, would be managed by Mosaic CP. If multiple integrations are active, the Blank Company will only handle anything mapped to the integration that is not already covered by a labeled Company in other integrations.
The API URL requires the URL or IP address of your Mosaic Cloud Platform server. This will be used to immediately connect to the server, and to continuously communicate back and forth with Adtran.
The Username and Password fields are whatever you use to log in to Mosaic CP (or another, dedicated, API user).
The Auto Suspend Unattached Devices function will, if checked, ensure that any devices provisioned through Mosaic CP, but not assigned to a Customer Account in Sonar, will be automatically suspended. If unchecked, an entry will be added to the Audit log of your Mosaic Cloud Platform integration for the unattached device.
The Alarms Create Logs function will, if checked, cause MCP server alarms to populate in Sonar. If this is not enabled, the alarms will only be visible by accessing MCP.
The Alarms Change Device Status function will, if checked, allow devices in Sonar to be updated dependent on their status in MCP. So, if the OLT is unable to reach an ONU, it would reflect this in Sonar as well. For more information, see the Device Status section of this article.
The Run Audit After Creation function will, if checked, run a full audit immediately after the Integration has been added, checking through all your customer accounts and their associated devices and services. If unchecked, the audit will need to be run manually after the integration is added before it can be enabled.Page 2
This page defines the Inventory Models added to your Sonar instance that will be associated with, and have their provisioning controlled by, Sonar in the Mosaic Cloud Platform.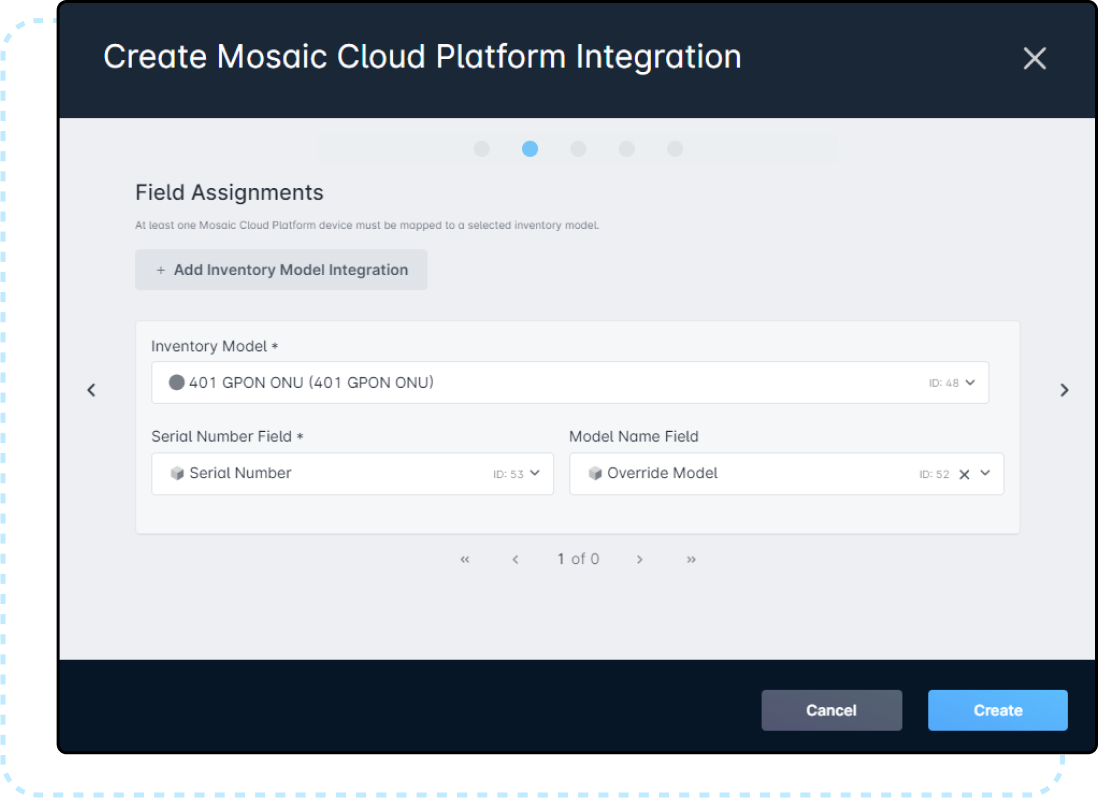
Using the “+ Add Inventory Model Integration” button will populate a new section where you can select the applicable inventory model and attach the already-configured fields of that model.Page 3
This page defines which Mosaic Cloud Platform Profile Vectors will be mapped to which Services in Sonar.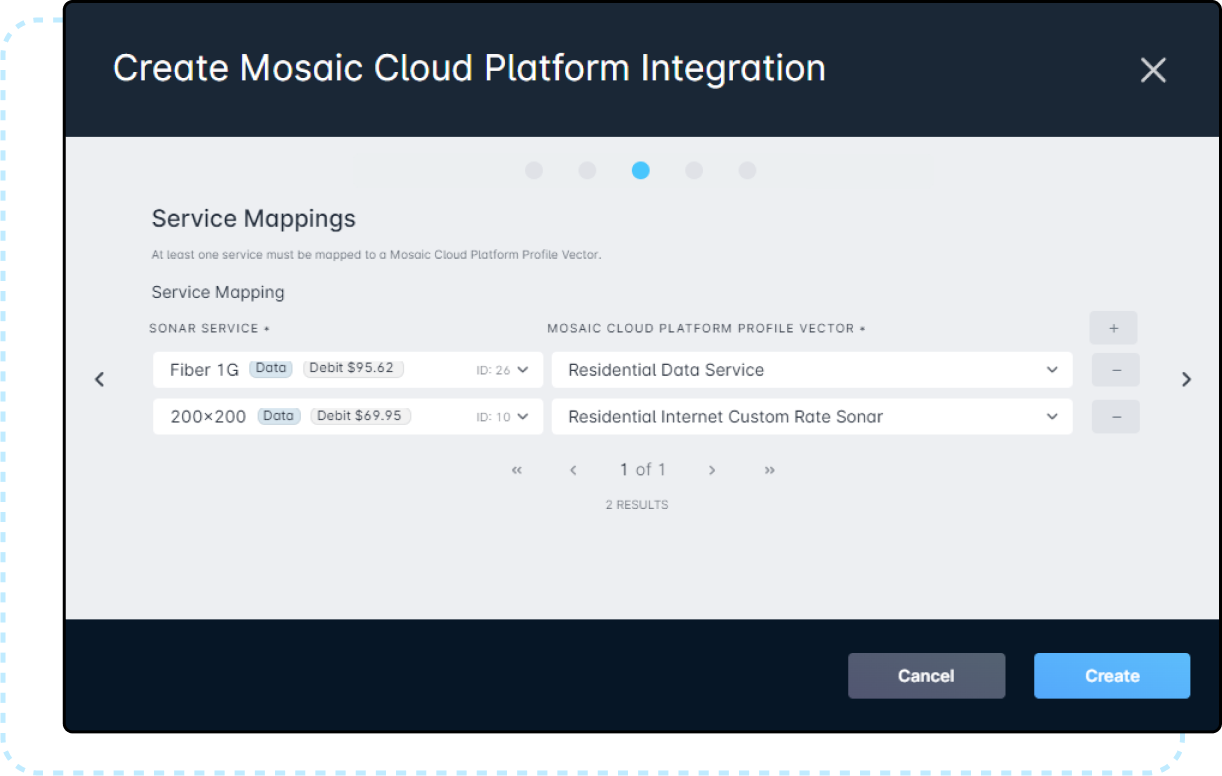
Underneath the “Service Mapping” header, you can select the Sonar Service previously created for your Fiber customers.
Note: Only data services can be applied here.
Alongside the service chosen, under the Mosaic Cloud Platform Profile Vector, your Profile Vectors will be pulled directly from Mosaic CP, populating a list that can be matched to your Sonar Services.
At least one Service from Sonar must be mapped to a Mosaic Cloud Platform Profile Vector before you can proceed.When adding your Service Mappings, note that “Configurable Rate” Profile Vectors will not work with the Mosaic Cloud Platform Integration in Sonar, as Sonar does not pass rate details to Mosaic CP.Page 4
This page defines the Default Provisioning Settings that will be used to configure accounts that are provided with an associated service and inventory item.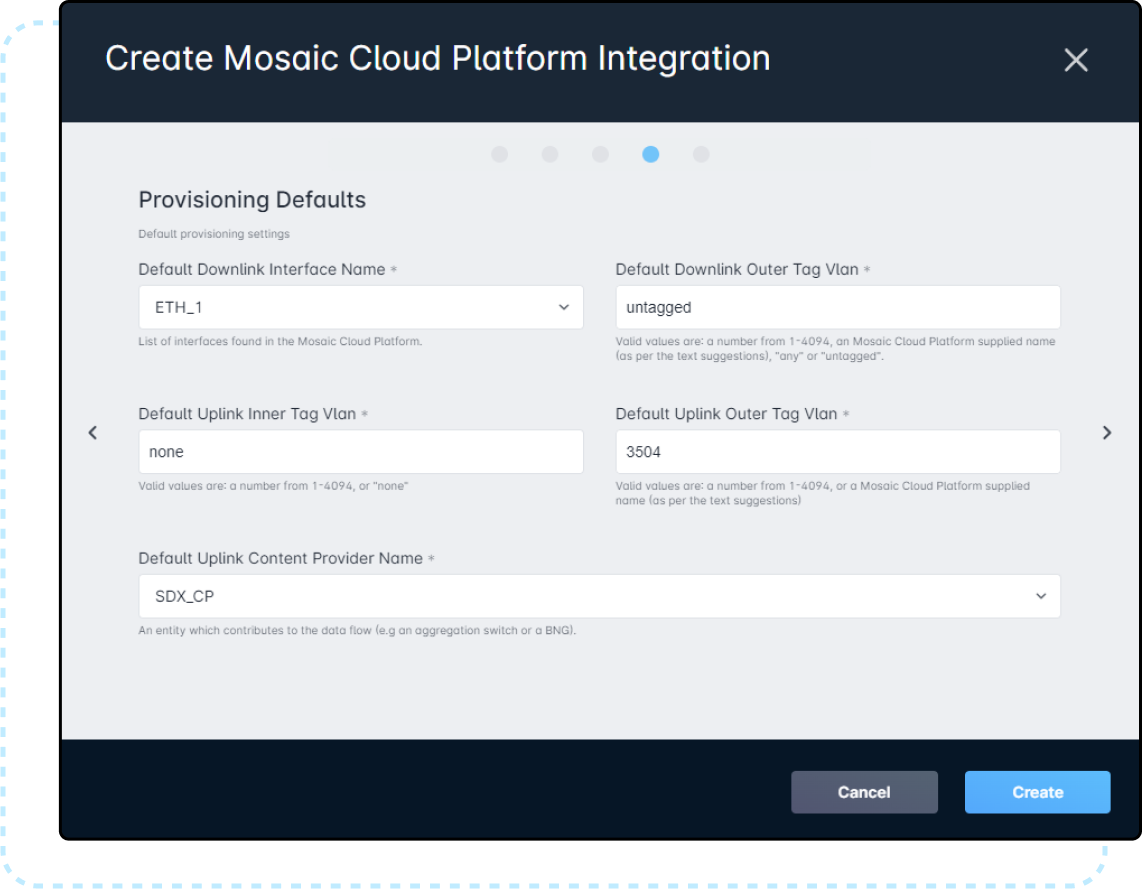
For more information on Provisioning, and the fields within this form, see the Provisioning Accounts with Mosaic Cloud Platform section below.Page 5
This page allows you to configure Bounce Port Profiles and delinquency handling. Bounce Port Ethernet Profiles are always applied as part of the Adtran MCP integration (required for all service modifications).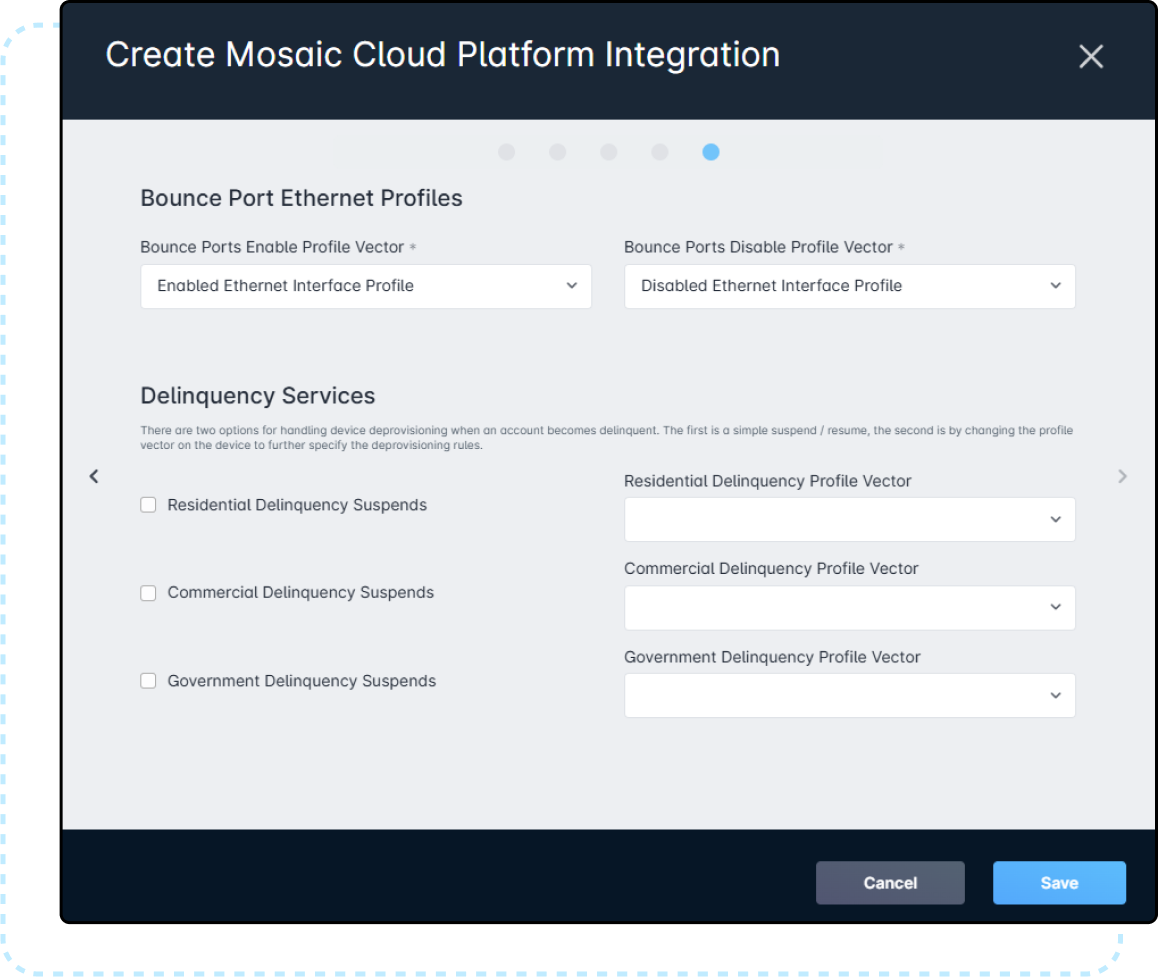
Bounce Port Ethernet Profiles are now always applied as part of the Adtran MCP integration (required for all service modifications). Whenever a service is changed, the ONU port will automatically be shut down and restarted. While this adds a brief step to the sync process, Adtran’s infrastructure processes the bounce quickly, resulting in negligible impact.
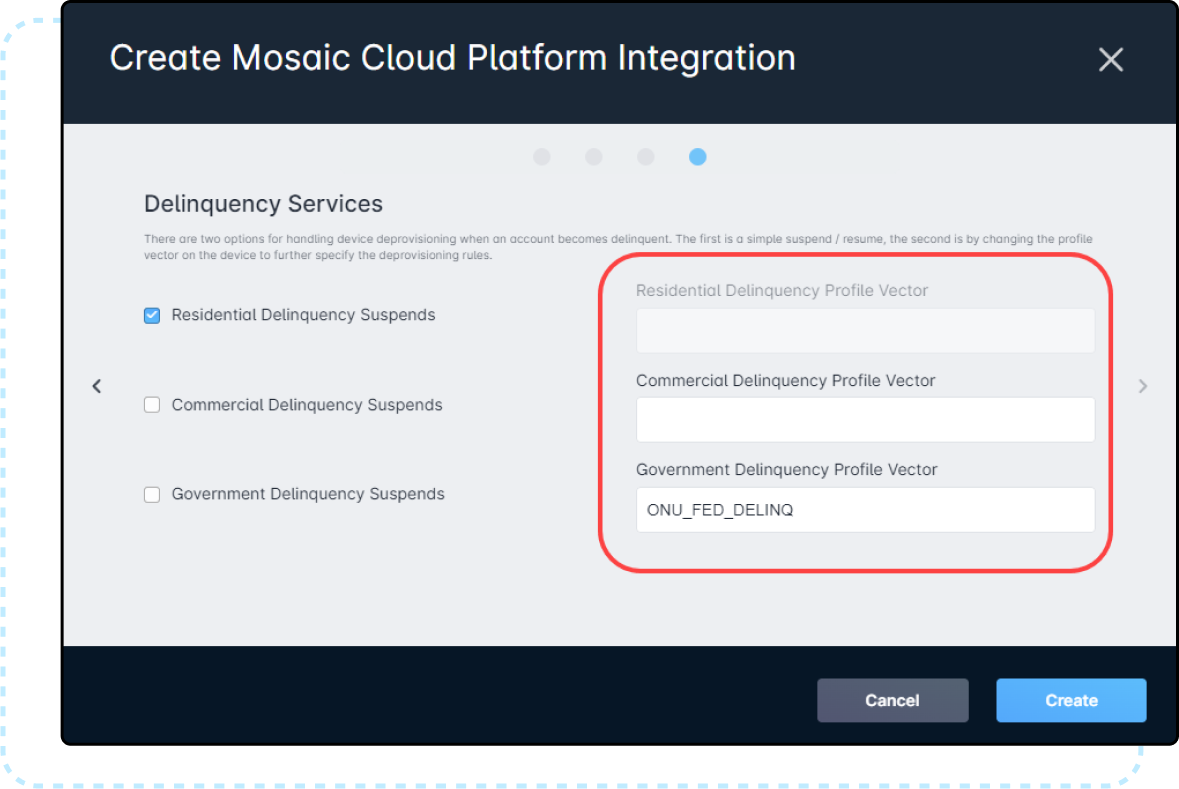
The Delinquency Services fields are optional, and you can choose to either simply suspend the Service when the account becomes delinquent, or use a specific Profile Vector to handle their delinquency. If nothing is selected, then Account Delinquency will have no effect on customer services.
Profile Vectors in Mosaic Cloud Platform can be renamed by customers. To prevent provisioning failures, Sonar allows you to specify which Profile Vectors should be used for bounce-port operations. These fields are pre-populated with Adtran’s standard names but can be customized if your MCP instance uses different naming.
More information is available in the Delinquency section.
Note: Industrial and Senior Citizen Delinquency controls will only be available if you use Avalara as a Tax Calculation method in your Sonar InstanceThe Mosaic Cloud Platform Integration makes use of Profile Vectors across both Service Mapping and Delinquency Mapping. These fields will provide options based on your Mosaic CP configuration, and cannot be filled out manually. If a Service or Delinquency Service does not have a corresponding Profile Vector, one will need to be created first. - Once the integration has been completed, a first audit will be run. If you selected “Run Audit After Creation”, it will be done automatically. Otherwise, a manual audit will need to be run.
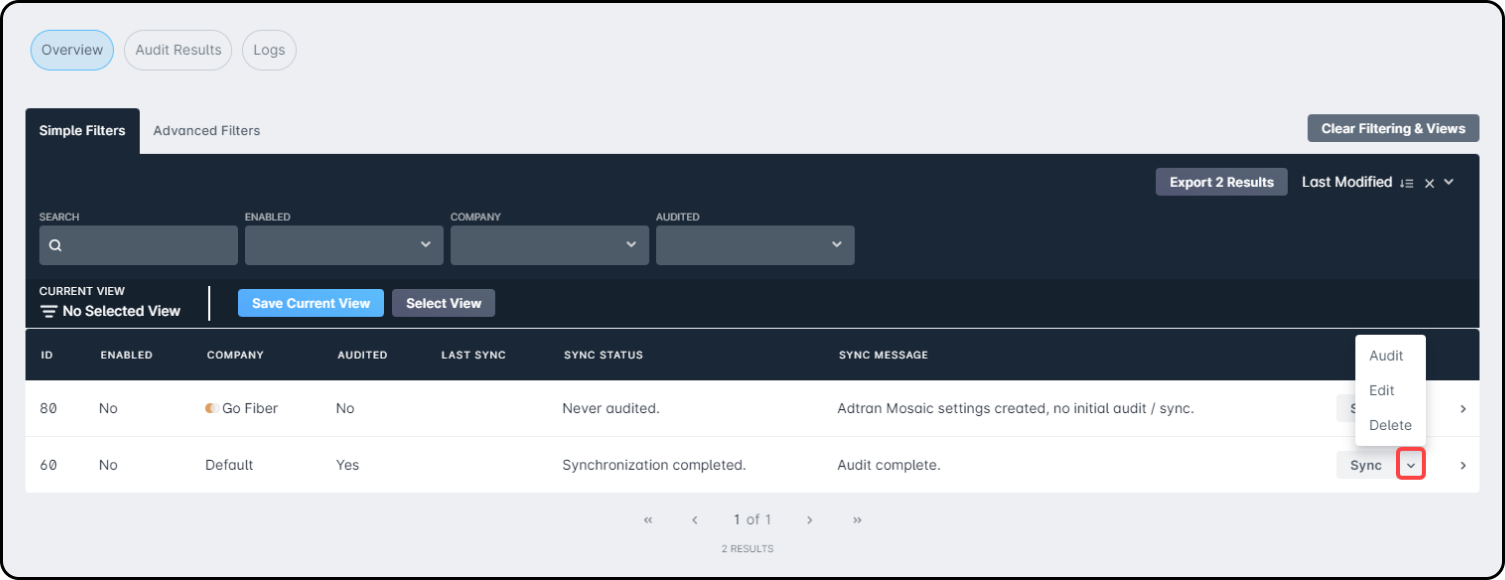 Whether the Audit is automatic or initiated manually, it must be run before the integration is enabled and Real-Time Provisioning will occur
 - Once the initial audit has been completed, any unmatched or mismatched results will appear as part of the “Audit Results” tab. This page provides:
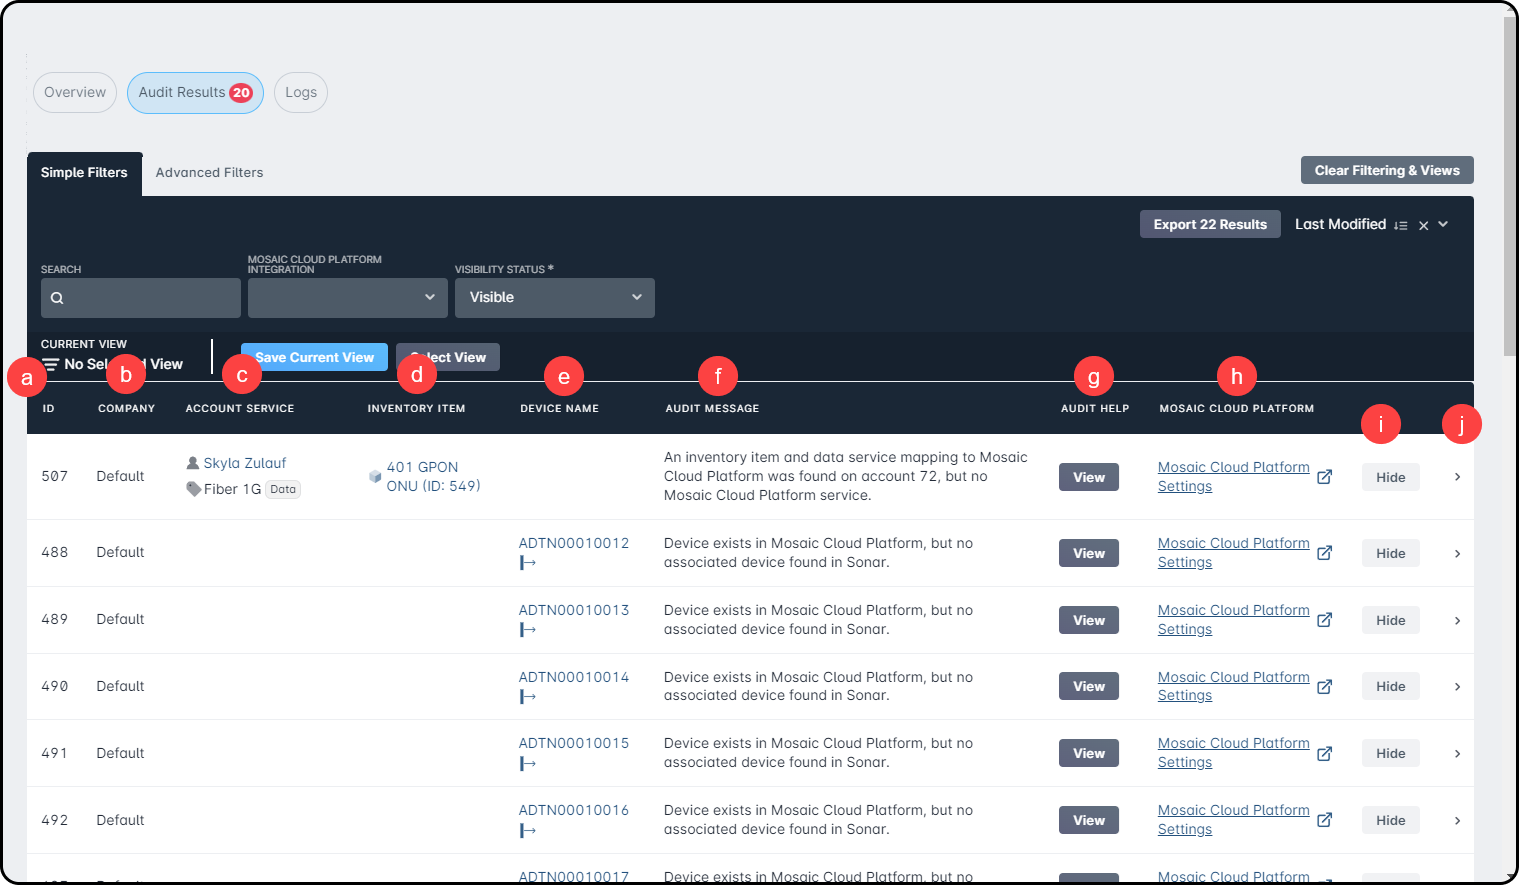
- The ID associated with the Audit Result
- The Company, set based on the value entered during the creation of the integration, associated with the result
- The Account and Data Service associated with the result
- The Inventory Item associated with the result
- The Device Name, returned by Mosaic CP. More details are available by clicking on the device name, which will open the sidebar containing the exact information and results from your Mosaic CP.
- The Audit Message, which provides information on the root cause of the mismatch.
- The Audit Message is returned from Mosaic CP, and more information on resolution steps can be found by clicking on the Information button (see
g).
- The Audit Message is returned from Mosaic CP, and more information on resolution steps can be found by clicking on the Information button (see
- The Information button will, when clicked, open a modal with details about the Audit Results. This modal will reiterate the root cause of the issue, and will also provide potential resolution steps alongside more information about the device, provisioning, or service.
If an account is part of the listed issues, a link is available that will take you directly to the Service or Inventory pages.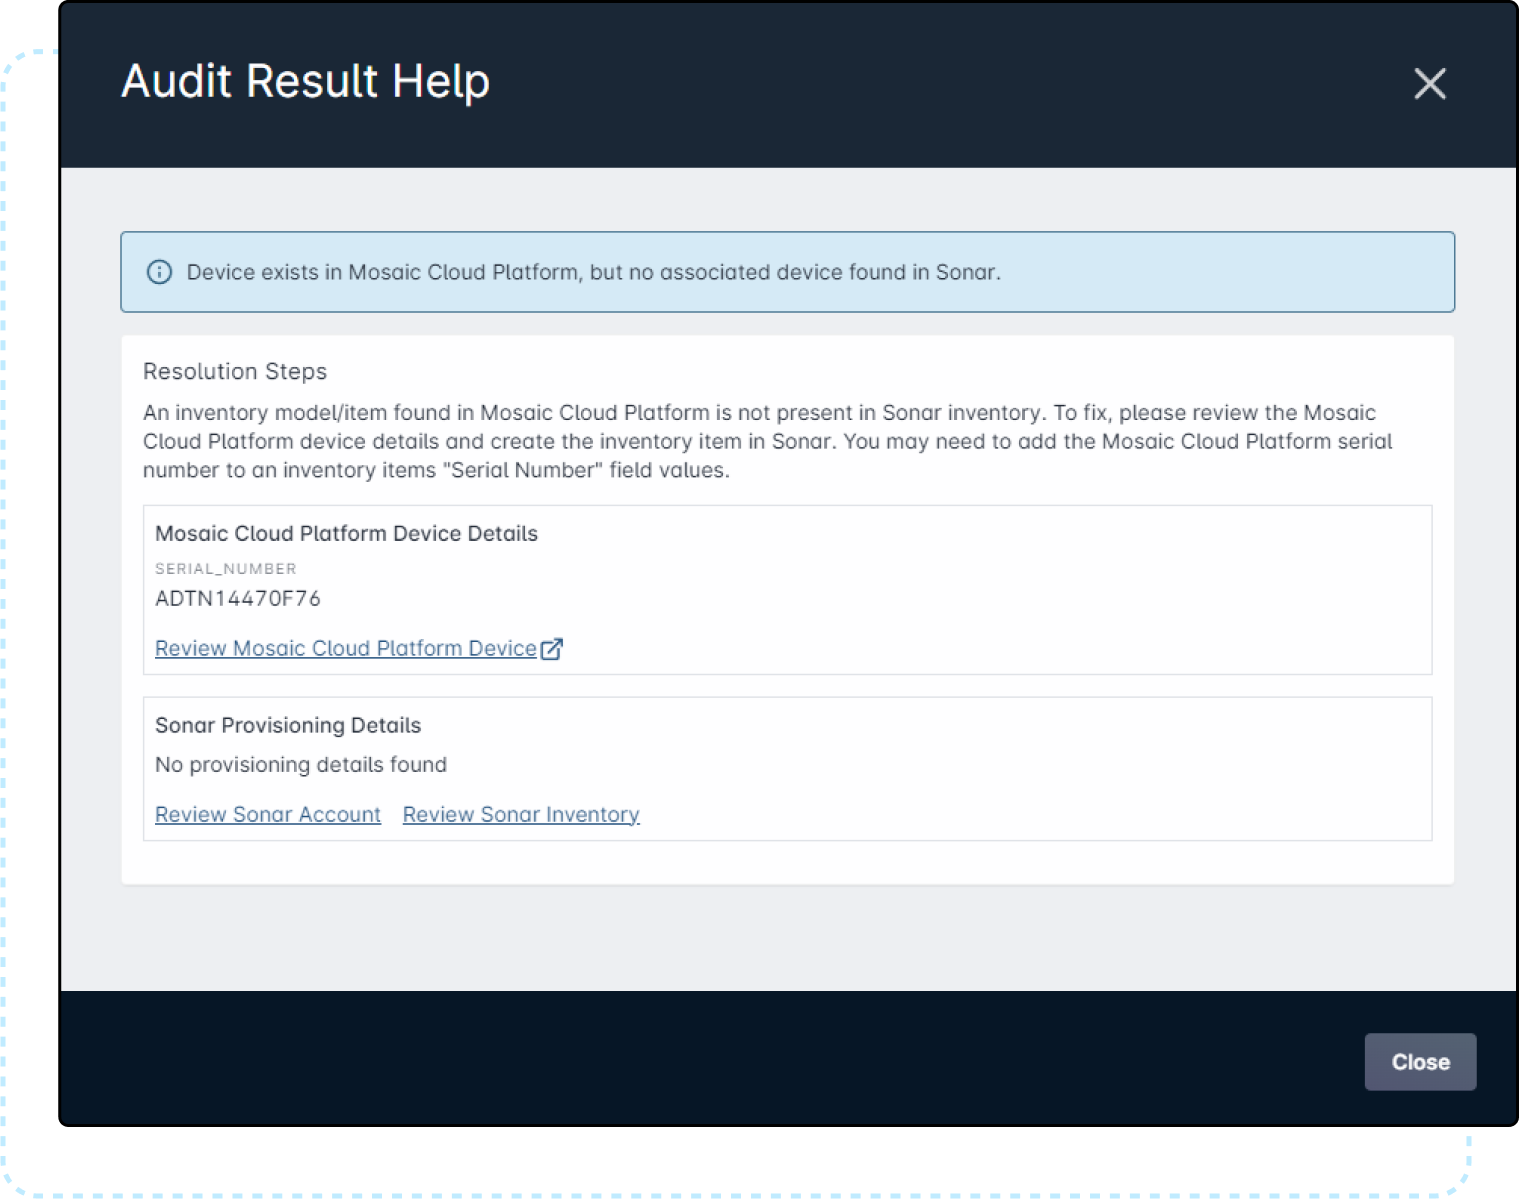
- The Mosaic Cloud Settings link will take you to the Audit Logs for the specific result located in Mosaic CP, where additional information can be obtained, and, if action is required in Adtran, it can be taken.
- Results can be Hidden if, for example, the error being given is known or expected, and will not affect deployment on your Mosaic CP network.
- The Show/Hide buttons allow you to Hide visible results, preventing them from appearing on the list of Audit Results, Similarly, the Show button can be used to make Hidden results visible in the Audit Result list.If the “Show/Hide” function is used before the initial audit is run, the results will reappear. This is because an initial audit will remove all existing listings and re-check them. Hiding and Showing results is best used after the initial audit, designed to remove known errors from constantly being present in the Audit Results.
- The sidebar can be opened for any audit result by clicking on the arrow. The sidebar contains 3 tabs you can switch between, containing details about the Adtran Mosaic Audit results, the Account Service, and the Inventory Item.

Synchronizing Mosaic Cloud Platform and Sonar
While Sonar can handle device names / interface names in a freely formatted fashion, there are some requirements on the Service names being used to accelerate lookup and allow for daily processing. The supported service names will be in <INTERFACE NAME>-Data format. This is the only supported format, as the Mosaic Cloud Platform integration currently only supports Data Services.
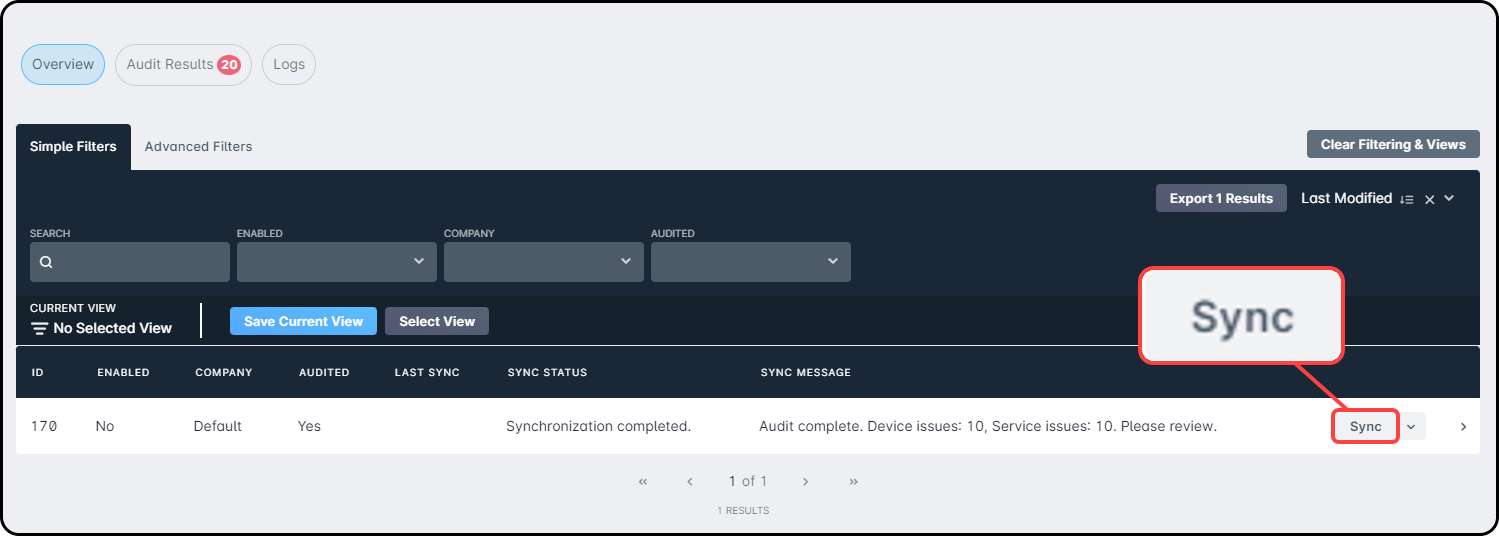
To better align your Service names with those expected by Mosaic Cloud Platform, a Sync action is available on all newly created Integrations, which will perform a Service Takeover process, renaming all Services in the configured Mosaic Cloud Platform to the supported format.

This synchronization can only be performed once per enabled integration, as the ongoing Daily Audit and Real-Time Processing should ensure the Service Names stay up-to-date in perpetuity. If, for some reason, you feel the need to resynchronize the integration, it must first be disabled, then re-enabled. This will treat the integration as new, and an Audit and Sync can be performed.
Controlling Sync Timing
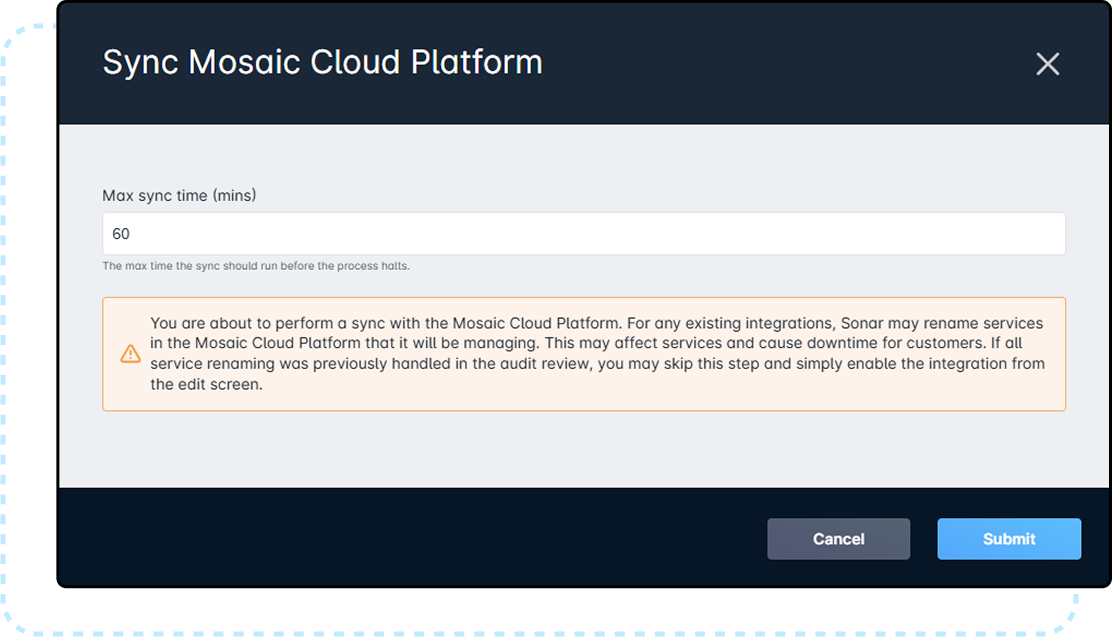
If your network is especially large, it can be challenging to synchronize all of it in a single maintenance window. For this reason, you can define the length of time you would like the synchronization to run. By entering a time, in minutes, your Mosaic Cloud Platform will begin synchronizing.
Synchronization now runs with 20 threads in parallel, processing approximately 1,000 devices per minute. This significantly improves performance over the previous single-threaded process (~50 devices per minute).
If a maintenance window closes before sync completes, it will pause, and the process will resume from where it left off during the next run.
Using the Integration with Sonar
Automatic Provisioning with Daily Auditing
For Automatic Provisioning, and in turn Daily Auditing, to occur, your Mosaic Cloud Platform integration must be enabled. If you opted to run the initial Audit immediately after creation, this will be done automatically. If you ran the Audit manually, you'll need to enable the integration, with some considerations in mind.
- If your service names need to be converted in Mosaic Cloud Platform, use the “Sync” action to perform a one-time takeover. This will rename the services in the cloud to match the required naming scheme.The “Sync” action is service-affecting. Consider running it off-peak to minimize the effect on your subscribers. A “Sync” can only be performed once per active integration — to repeat it, the integration must first be disabled.
- If your services are already named according to Adtran's recommended standard of
INTERFACE NAME-Data, you can simply enable the integration by clicking on “Edit” and checking the “Enabled” box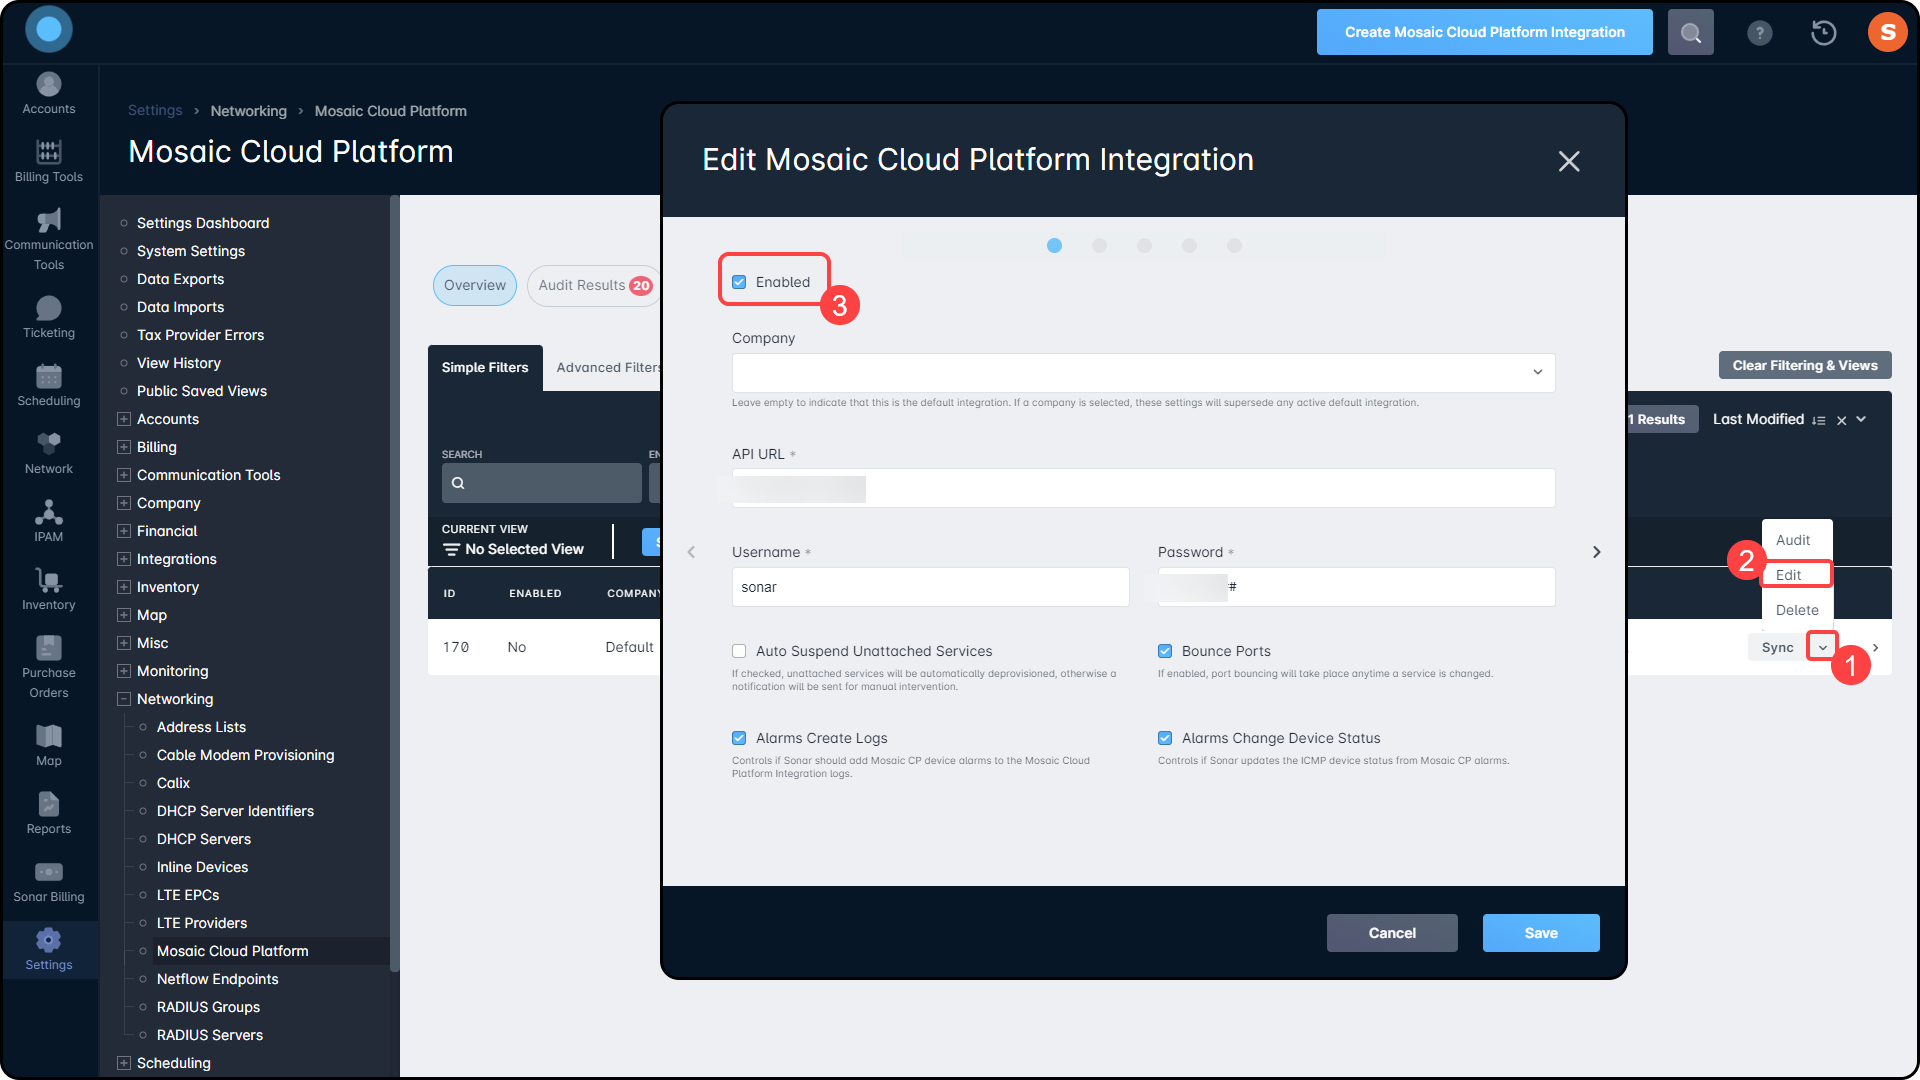
- If your services are already named according to Adtran's recommended standard of
Automatic Provisioning functions using the same principles as the initial full synchronization. Synchronized devices are monitored automatically, and any changes to the device, service, or provisioning will be captured and actioned. Daily Auditing, which will scan your accounts every day at 12 AM (midnight) UTC, will continuously monitor your network and report any issues found in Mosaic CP. To be provisioned and audited, an account must meet the following criteria:
- A Mosaic Cloud Platform-associated service must be assigned to the account (as determined under “Service Mapping” in the integration settings).
- A mapped inventory item is assigned to the serviceable address of an account, complete with Serial Number and, if applicable, Model Name Override.
- The account must be in an Activated state.
As with the initial Audit, any unmatched or mismatched results will be shown in the Audit Results and be sent as a notification for any users with the notification enabled.
Deactivating Service to an ONT
It is possible to deactivate services to an ONT using one of three actions:
- Removing the Mosaic Cloud Platform-associated service from an account
- Unassigning the ONT from the customer's serviceable address
These two options will only remove services from the ONT in Mosaic CP. The customer account in Sonar will remain active following these two actions and can continue to accrue fees depending on other services on file.
- Deactivating the customer's account, which will remove the service, provisioning, and billing.
Delinquency
In the event a customer is delinquent, it is possible to automatically have their service switched via Mosaic CP. This was briefly touched on during the configuration of your Adtran Mosaic integration (Page 5). These options can be left blank if you do not wish to change the service they subscribe to, but in the event you would like to take advantage of this automation, continue reading this section.
Mosaic CP allows you to create as many Profile Vectors as you need, and they can be used within Sonar to control traffic from delinquent accounts. During the integration setup, you can differentiate between Residential, Commercial, and Government account types. However, the same Profile Vector can also be used for all account types if you prefer. The available Profile Vectors will be automatically pulled from a list of all your Profile Vectors, and typing in the box will narrow the list. Alternatively, you can opt to simply suspend the delinquent account's service, revoking all access to the network until they're no longer delinquent.
Device Alarms
Device Alarms in Mosaic Cloud Platform alert you to any issues on your Fiber circuit, whether it be originating at the OLT or at the customer's ONU. With this integration, ONU alarms can be reflected within your Sonar instance as well by enabling “Alarms Create Logs” in the integration modal. With this checked, you can see any alarms by navigating to Settings → Networking → Mosaic Cloud Platform → Logs.
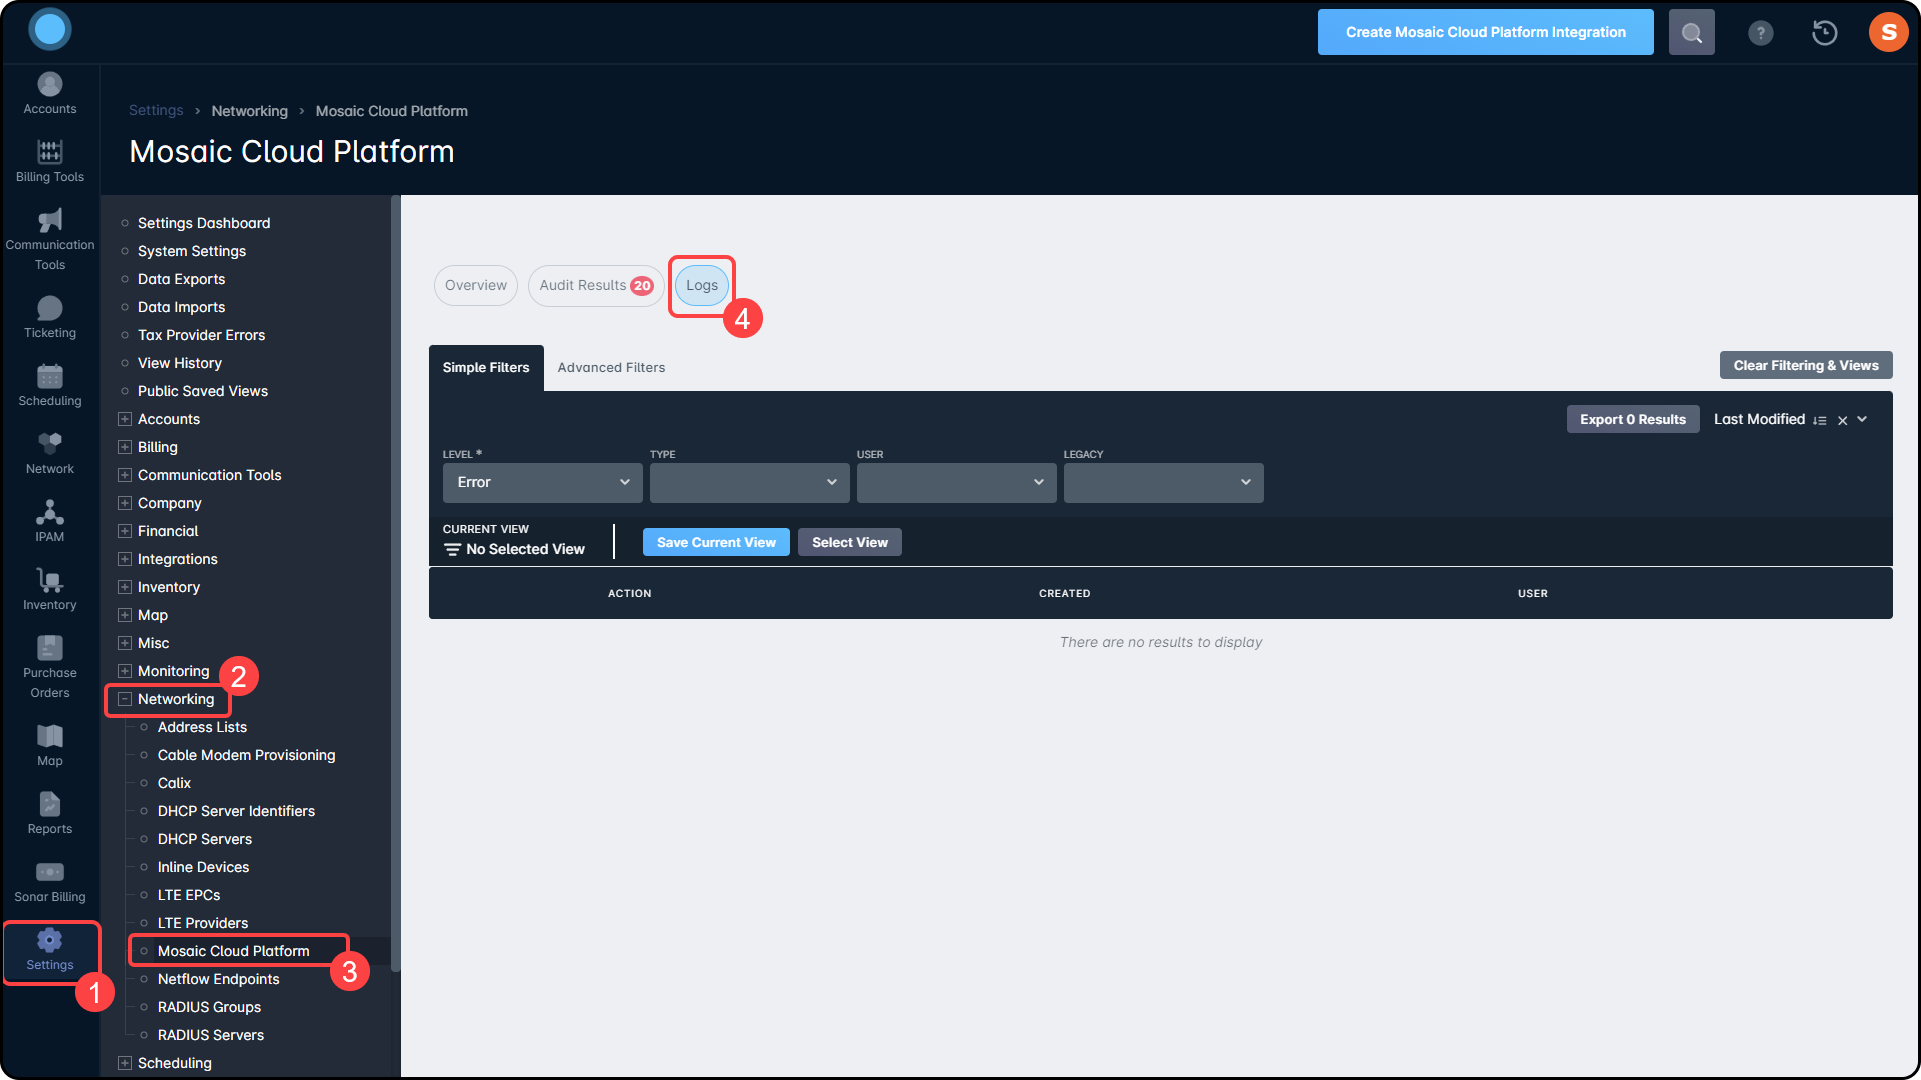
Each Device Alarm is created in your instance as an individual line item, which includes the date and time the alarm was triggered. To view more information on the specifics of the alarm, you would click on “View Changes”. Similarly, if changes are made to the Mosaic CP Integration, a line item would show here also, along with the name of the user who implemented those changes.
Device Status
Continuing on from this, if you want alarms to update the status of a device (from “Good” to “Down” etc.), then “Alarms Change Device Status” must be checked during the integration as well. Along with this option checked, you will need to create a monitoring template with ICMP enabled for each device that you want to use this feature with.
Notifications
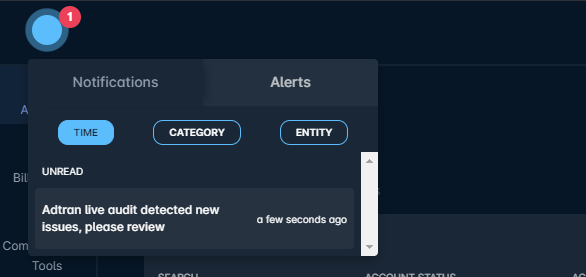
When enabled in your User Settings, you'll receive a notification any time a new issue is detected by the Adtran audit process. This will occur for the initial audit, and for the Daily Audit.
Provisioning Accounts with Mosaic Cloud Platform
To provision an account with the Mosaic Cloud Platform integration, a Mosaic CP-mapped Service and Inventory Item must be placed on the account.
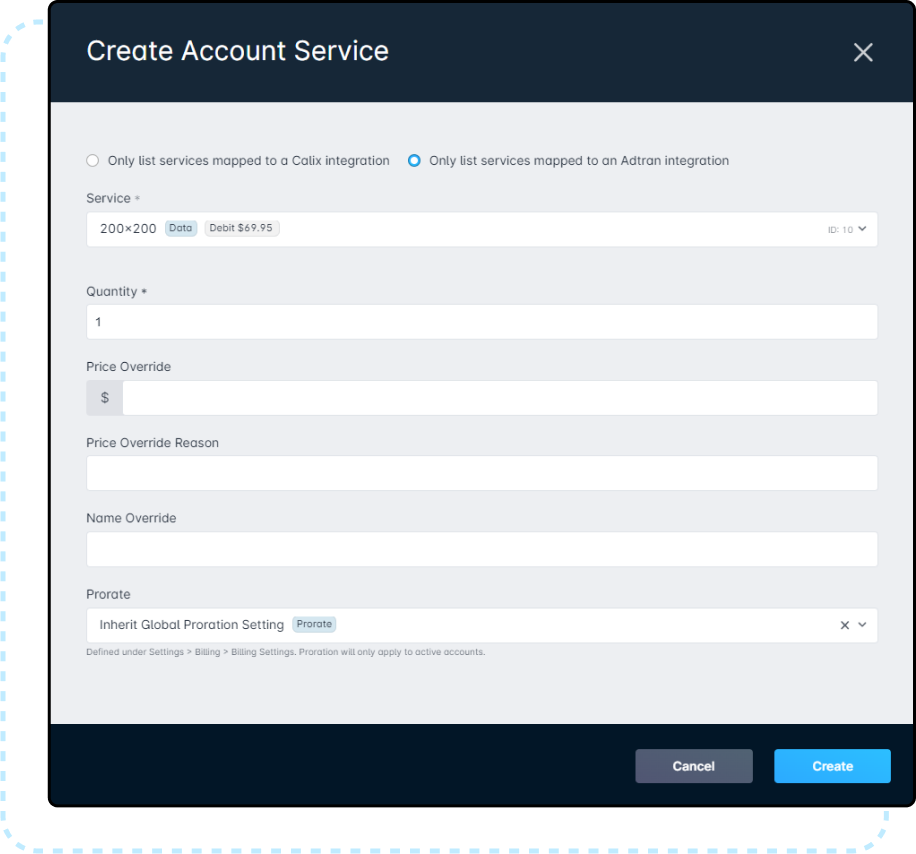
- Adding a service to the account can be done by going to the Billing tab on the customer's account, followed by Services & Packages, and finally clicking on “Add Service”.
- If the Service is added before the Inventory Item, the Default Provisioning fields will populate with a warning banner:
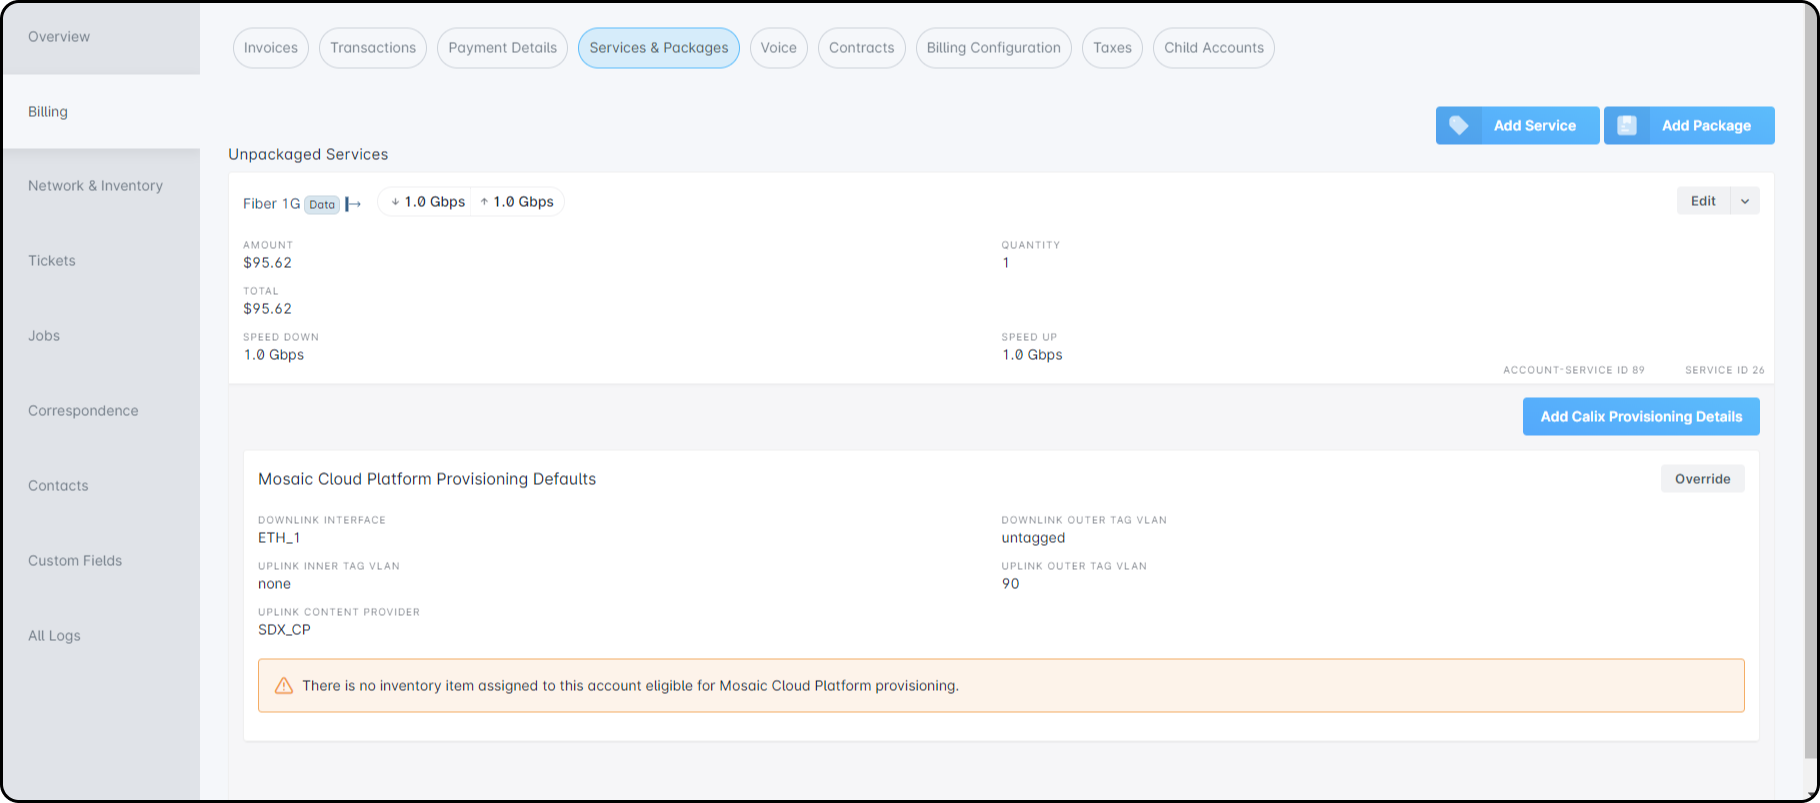
- If the Service is added before the Inventory Item, the Default Provisioning fields will populate with a warning banner:
- Adding inventory to the account can be done by going to the Network & Inventory tab on the customer's account, followed by Inventory Items, and finally clicking on “Assign item”. This opens a modal which provides you with a checkbox that will filter services to only list inventory mapped to an Adtran Mosaic integration.

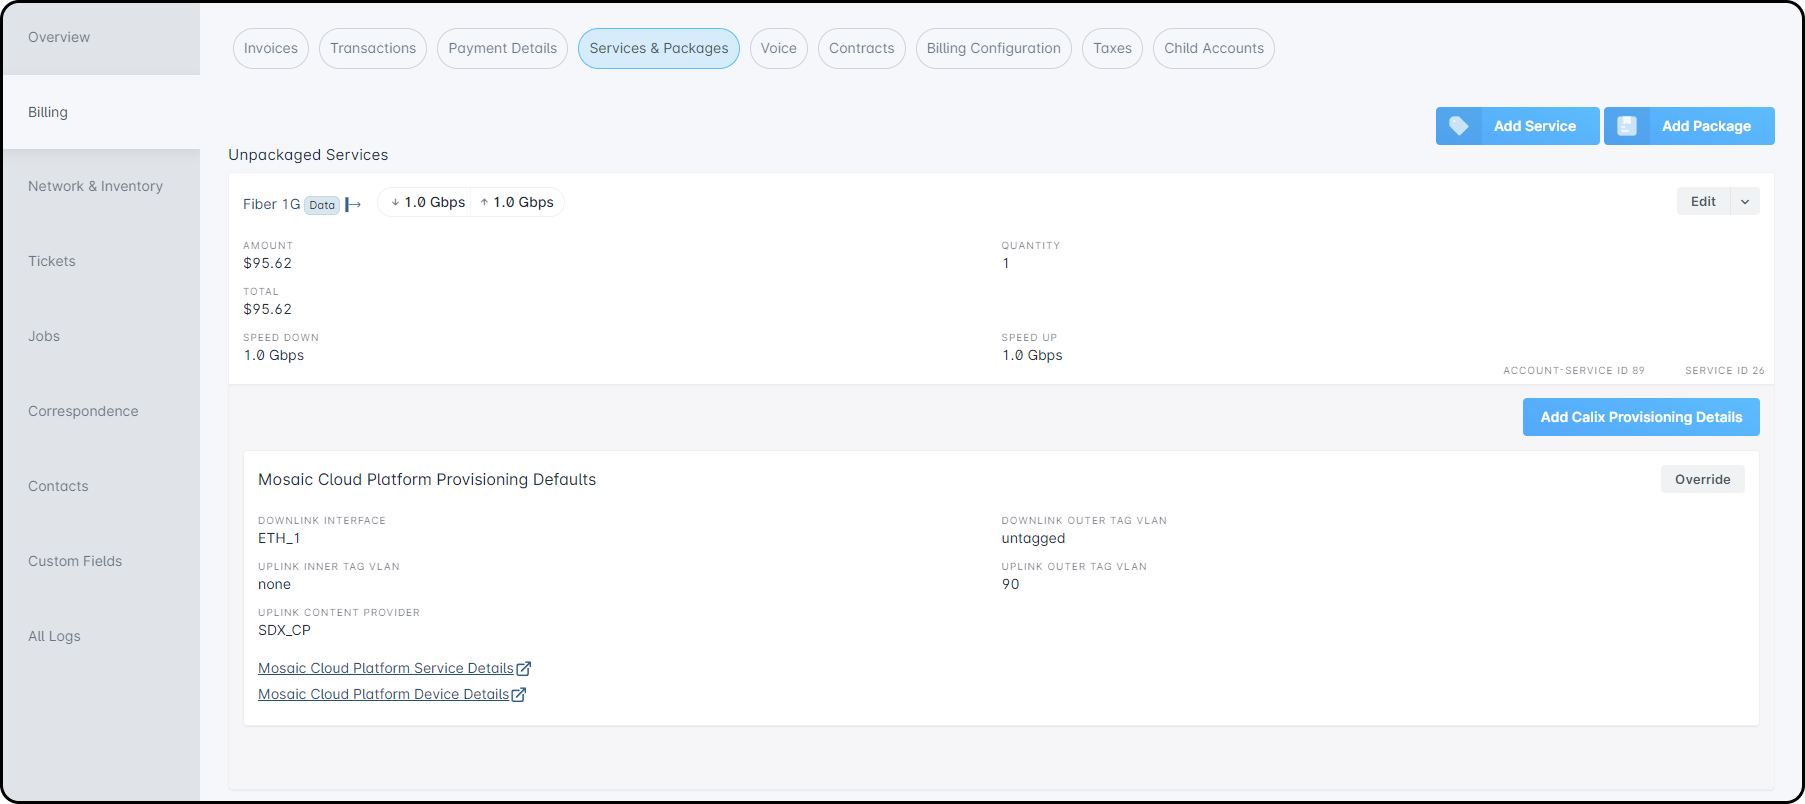
Once the Inventory Item and Service have both been added, the Default Provisioning Settings will take effect, visible from Billing → Services & Packages:
Overriding the Default Provisioning
No two deployments are ever the same, and it's possible that the Default Provisioning values will not apply for every installation, especially if your Mosaic Cloud Platform integration connects multiple Inventory Models. To get started:
- Locate the “Override” button in the Provisioning Details section, in Billing → Services & Packages, of any account provisioned with Mosaic CP.
- This will open a Mosaic Cloud Platform Provisioning modal, identical to the one found on
Page 4of the Integration setup.
Provisioning defaults and overrides do not include IP assignment. Any static IPs or DHCP configuration must be performed outside of Sonar/MCP.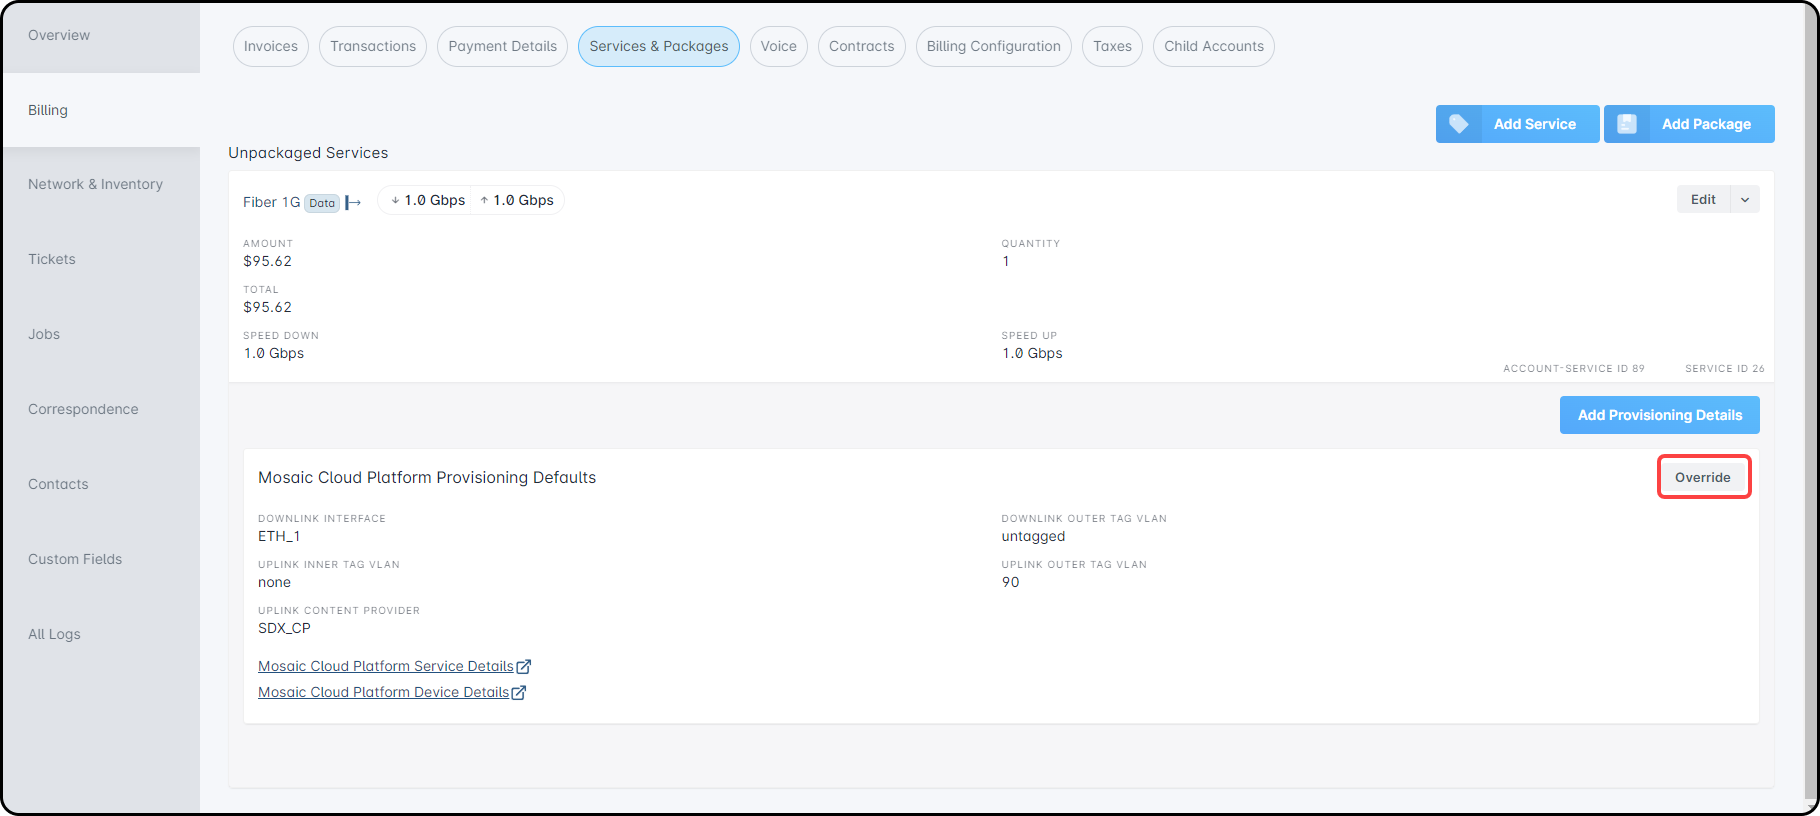
- This will open a Mosaic Cloud Platform Provisioning modal, identical to the one found on
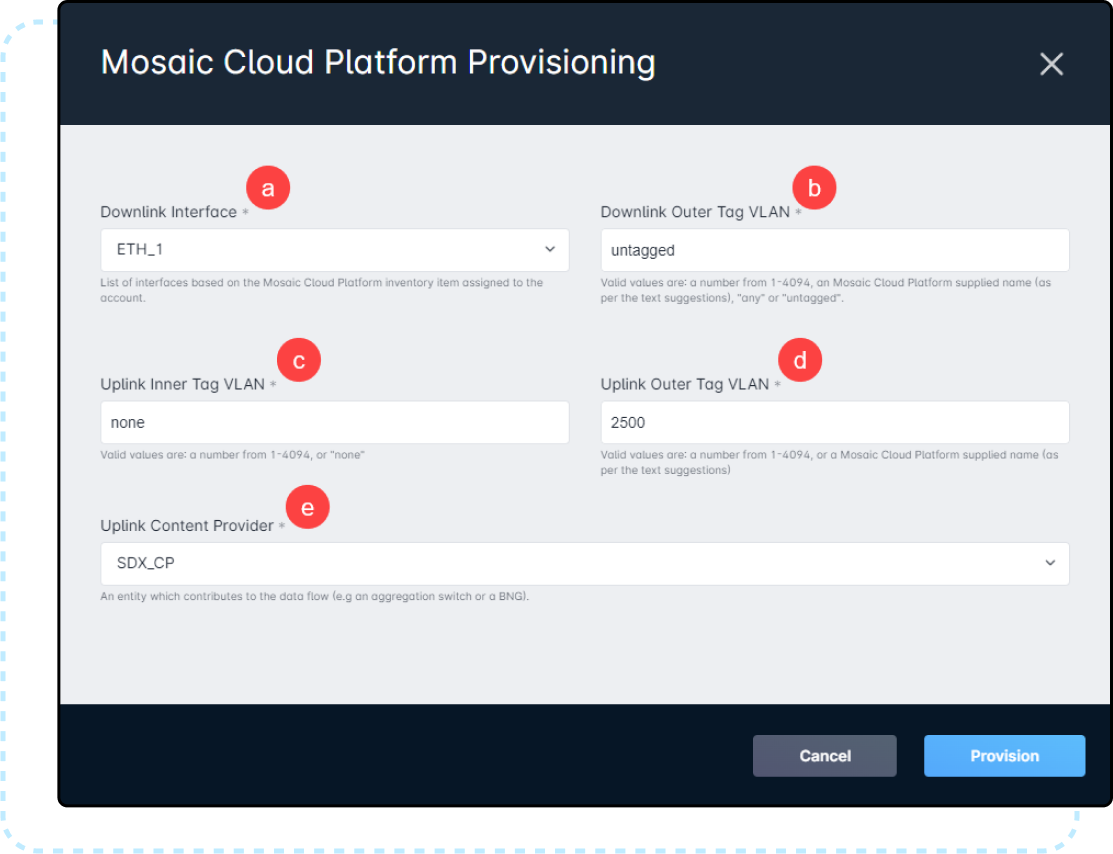
- The Downlink Interface allows you to set the specific Network Interface being used by the inventory item to communicate with downlink devices.
- This list will only allow you to select interfaces that have been configured for the inventory item in Mosaic CP.
- Downlink Outer Tag VLAN gives you the option to modify the default VLAN being used for outgoing communication with downlink devices.
- If you use this box, the only allowable values are a number from
1-4094, an Adtran Mosaic supplied name (as per the text suggestions), “any” or “untagged”.
- If you use this box, the only allowable values are a number from
- Uplink Inner Tag VLAN gives you the option to modify the default VLAN being used for the inbound uplink communication
- If you check this box, the only allowable values are from
1to4094, “untagged”, or “any”. Any other values will not be accepted, and prevent you from completing provisioning.
- If you check this box, the only allowable values are from
- Uplink Outer Tag VLAN gives you the option to modify the default VLAN used for the outgoing uplink communication.
- If you check this box, the only allowable values are a number from
1-4094, an Adtran Mosaic supplied name (as per the text suggestions), “any” or “untagged”.
- If you check this box, the only allowable values are a number from
- The Uplink Content Provider is used to define the Upstream provider if your organization uses one.
- The Downlink Interface allows you to set the specific Network Interface being used by the inventory item to communicate with downlink devices.
- Once the Provisioning fields are modified and submitted, there will be a few changes to the Provisioning section:
- The header will change from Mosaic Cloud Platform Provisioning Defaults to Mosaic Cloud Platform Provisioning Details
- The Override button will change to Edit
- A dropdown will be added to the Edit button, with a Delete option contained in it. Delete will only remove the modified provisioning details, returning the account to the configured Provisioning Defaults.

