Table of Contents
Billing Defaults
 Updated
by Mitchell Ivany
Updated
by Mitchell Ivany
Read Time: 19 mins

Configuring a Billing Default allows you to set a series of Billing and Invoice parameters for an account or address. When a new account is created, the Billing Defaults applied to them will automatically adjust their billing dates, invoice modes, and delinquency parameters. This section of Sonar allows fine control for each account type created as part of the billing setup.

Useful Terms: Bill Day and Invoice Day
Throughout this document, the terms Bill Day and Invoice Day are mentioned repeatedly. Before diving headfirst into your Billing Defaults, it's important to understand how these terms are being used, and what they mean in Sonar.
Bill Day, when used in a Billing Default, refers to the day billing will run. That means the Bill Day determines when the account will be charged for their services, when discounts will be applied, and when the next billing cycle will begin. Inside Sonar, and within this article, this term is used interchangeably with “Billing Day”. The Bill Day must be a numerical value between 1 and 28, to account for all 12 months of the year. When Billing runs, all charges are tallied and the invoice is generated.
Invoice Day, meanwhile, refers almost entirely to the Service Period. The Invoice Day set in the Billing Default, between 1 and 28, will be the first day of the Service Period, as noted in the generated Invoice. The purpose of having a separate Billing and Invoice Day is to enable pre-generated invoices for an upcoming billing cycle.
Creating a New Billing Default
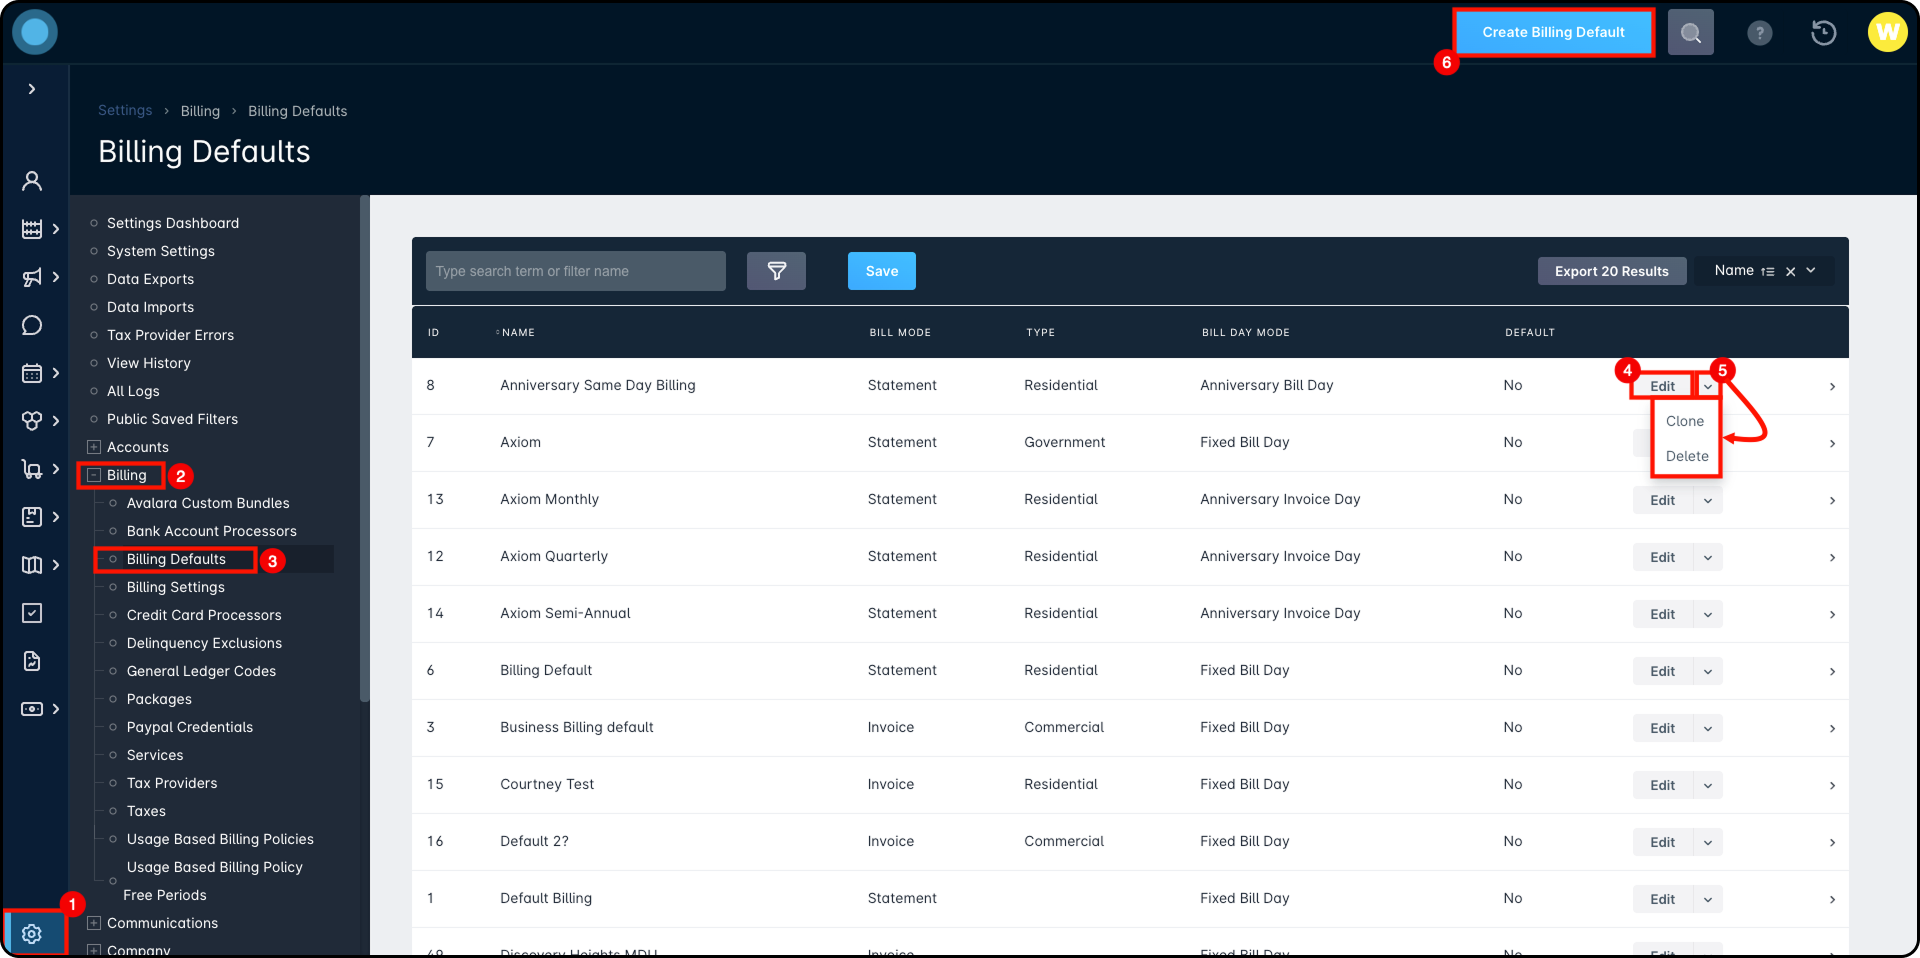
Creating a Billing Default from scratch is one of the most complex billing procedures in Sonar. While custom Billing Defaults are incredibly powerful, making sure you understand how they're set up and how they affect your customer accounts is critical. Access to Billing Defaults can be gained by going to Settings → Billing → Billing Defaults. On this page, you can Edit or Clone existing Billing Defaults, or “Create Billing Default” for an entirely new one.
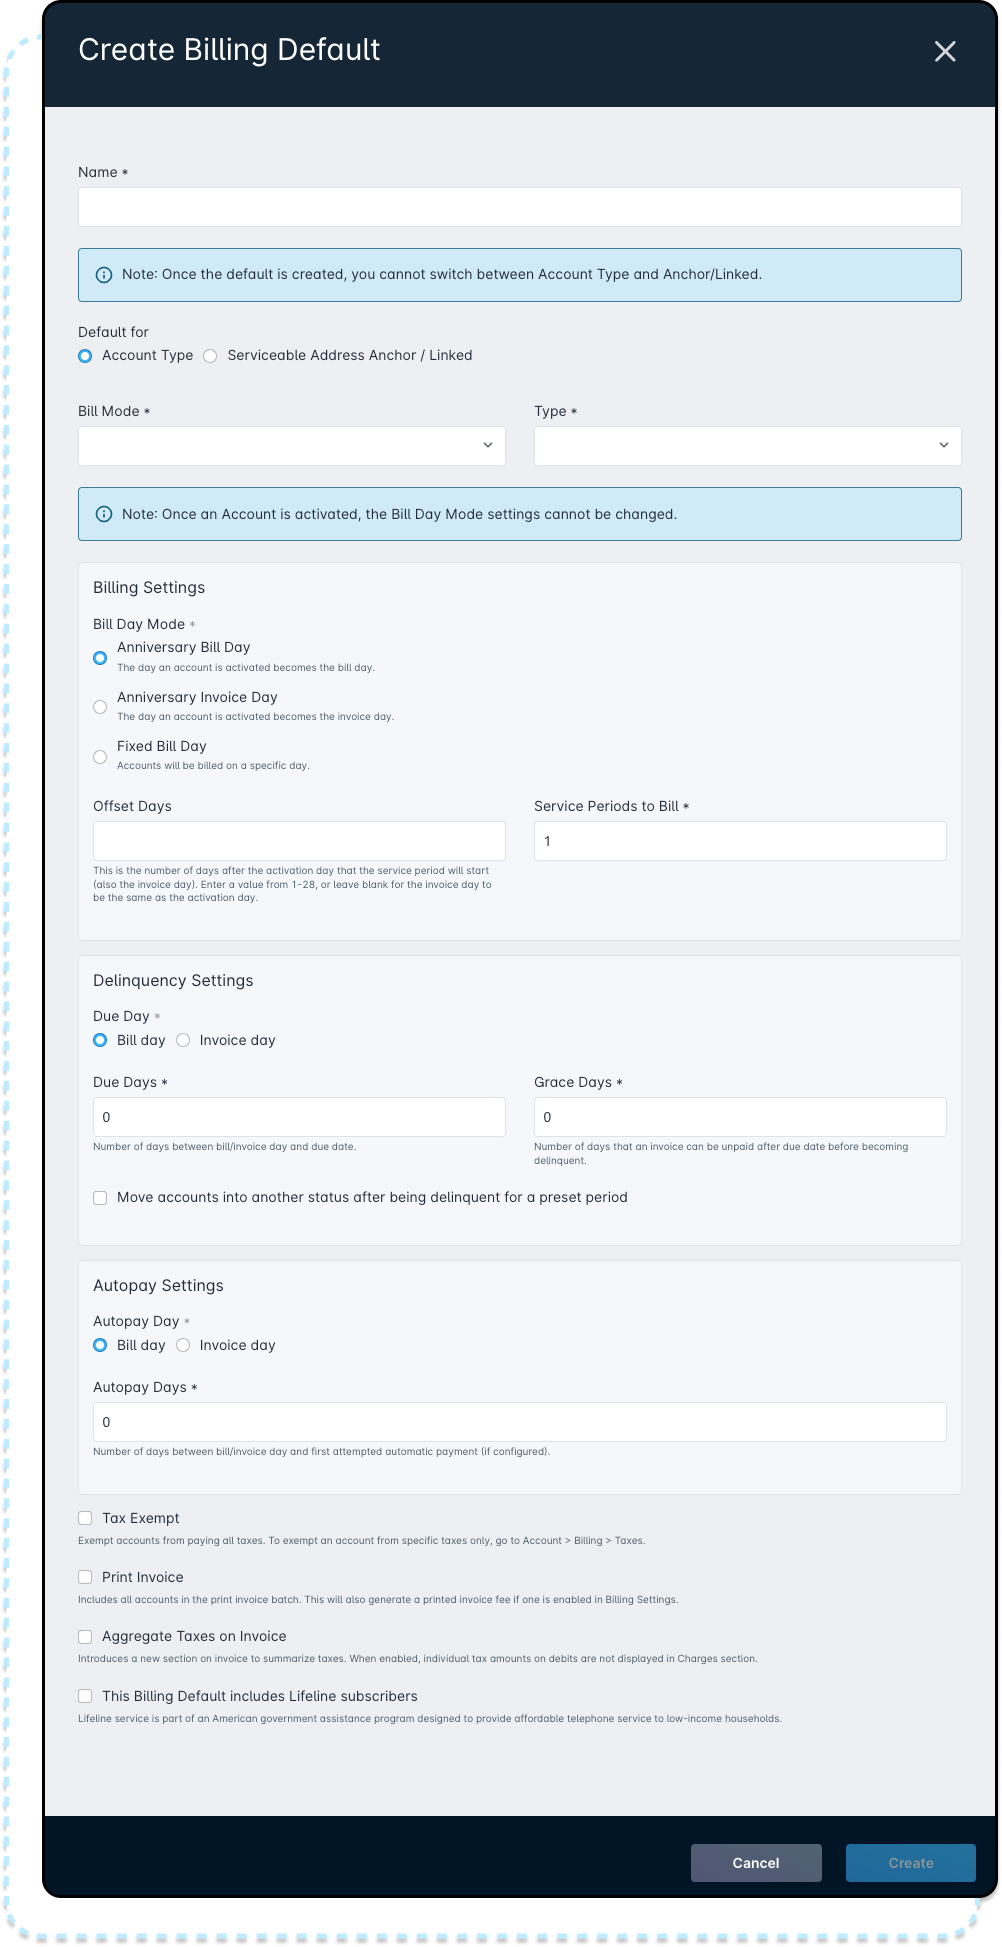
In the modal that appears, you'll be greeted by many billing terms, and a series of radio buttons and check boxes. To better understand the options presented to you, review each section carefully before proceeding with the creation of a new Billing Default. There are also 3 types of Billing Default that can be created.
- Account Type
- Serviceable Address Anchor
- Serviceable Address Linked
While these 3 types do share many commonalities, how they apply and what they apply to can be distinct.
Account Type Billing Default
The Account Type billing default can be applied to any account, based on the Type you select during its configuration. It can be applied to any of the default account types, or to ones created from scratch. This type of billing default is applied to the account’s billing parameters upon creation.
Serviceable Address Anchor Billing Default
The Serviceable Address Anchor Billing default is not truly its own Billing Default. Rather, it represents one half of the whole. Defining a Billing Default for Serviceable Addresses ties in directly with the Anchor & Linked Addresses feature within Sonar, and more information around their general application can be found there. Most parameters for the Billing Default configuration are shared with the Account Type Billing Default. Unlike an account type billing default, this billing default will update the account billing parameters when an account is associated with an anchor serviceable address.

Serviceable Address Linked Billing Default
The Serviceable Address Linked Billing Default is the second half of the previously mentioned whole. As with the Anchor Billing Default, the Linked Billing Default will update the account billing parameters when an account is associated with a linked serviceable address. Many fields from the Linked Address Billing Defaults are common to the other billing defaults. One notable addition to the Linked Address Billing Default is the requirement to specify a list of Available Services or Packages. This will restrict an account associated with this serviceable address to only those allowed services or packages.
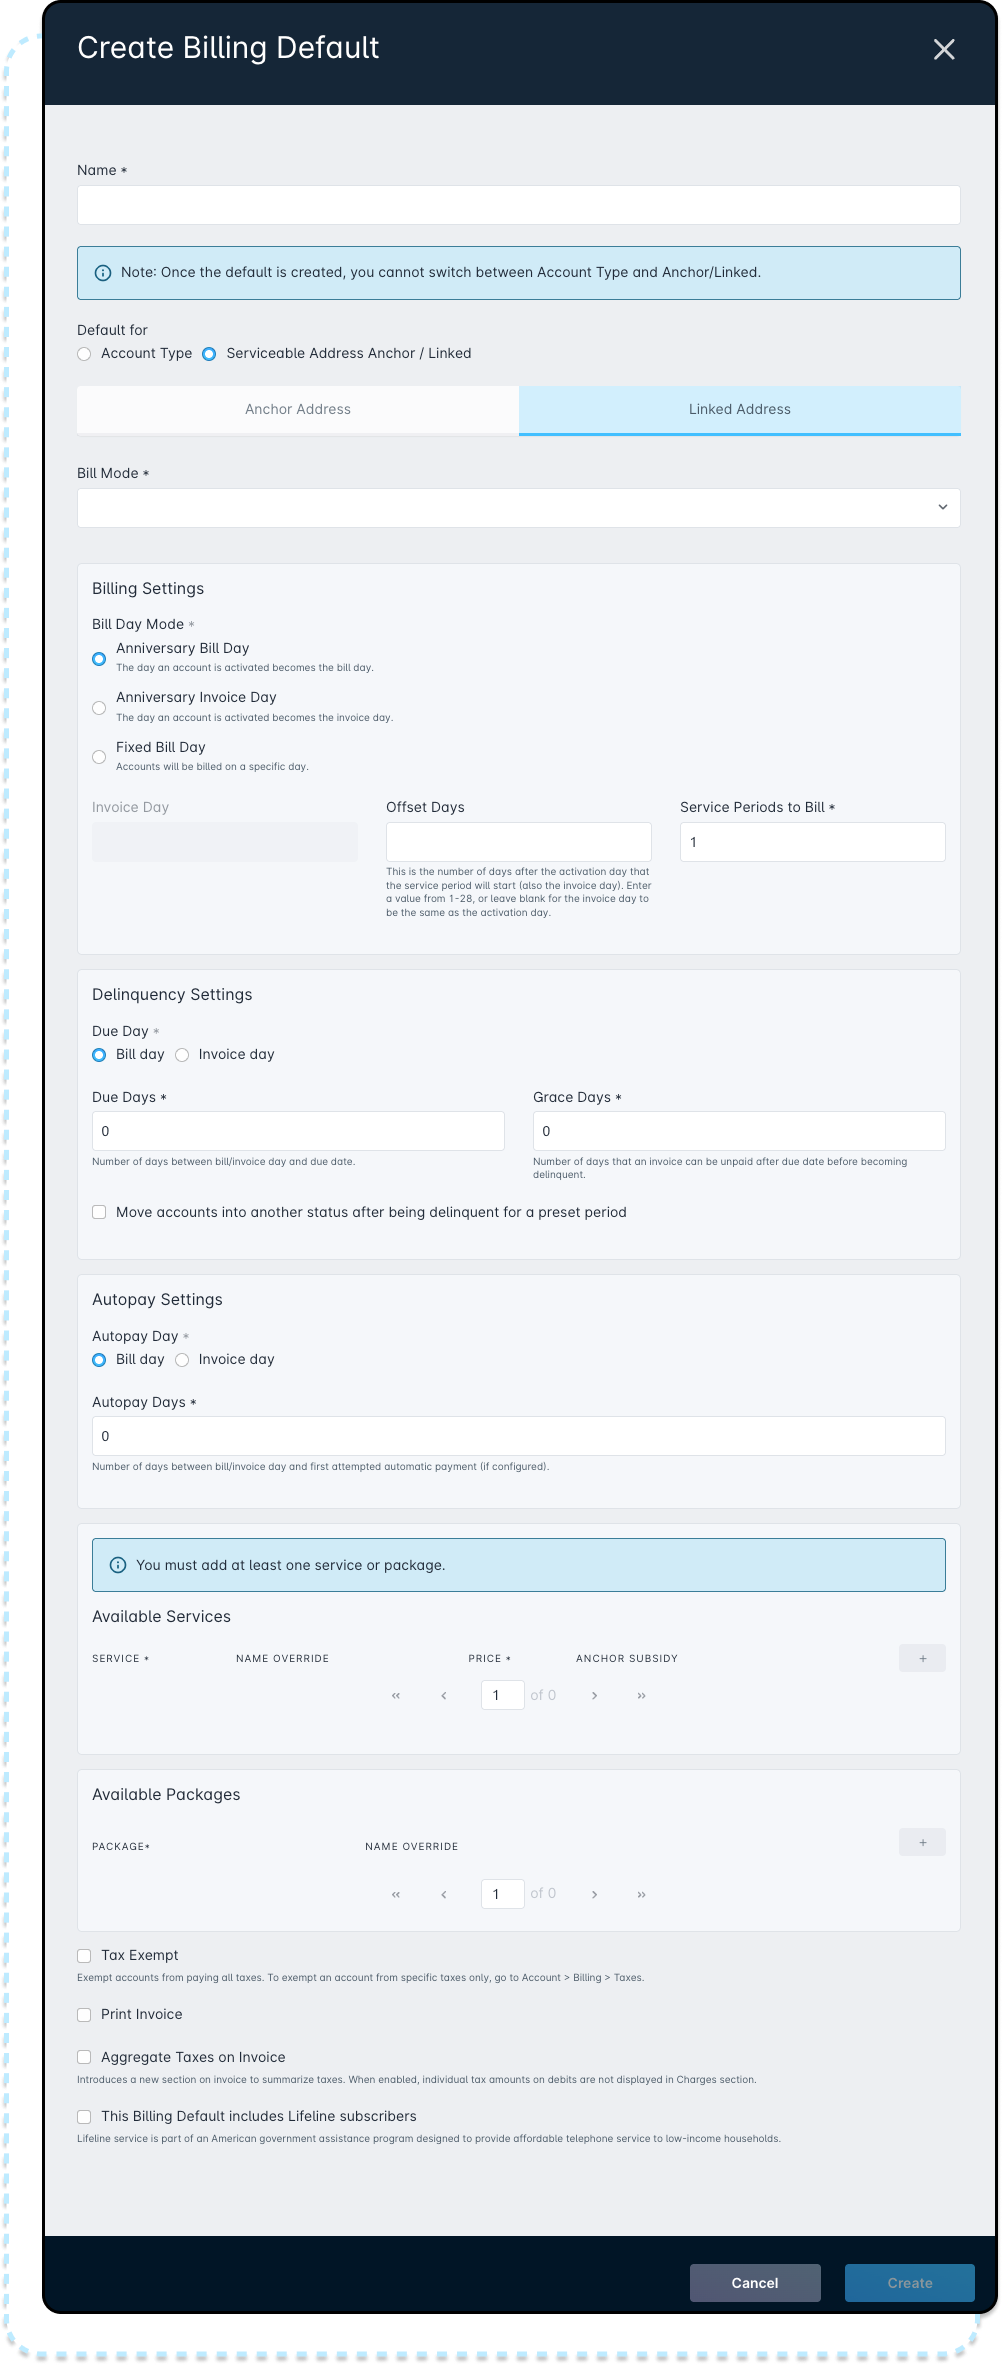
Available Services & Available Packages
The Available services and packages sections are exclusive to Linked Addresses. This section of the Billing Default provides you with a list of all Enabled Services and Packages in your instance. When one is added, you have the option to override the name of the service, set its price, and optionally, add a subsidy for the service or package. If a subsidy is applied to that service, the set amount will be subtracted from the invoiced service cost applied to the linked account, and will, in-turn, be applied to the Anchor account.
All services that could potentially be added to the account need to be included here, including One-Time, Adjustment, Recurring, Expiring, Data, Voice, and Discount services.
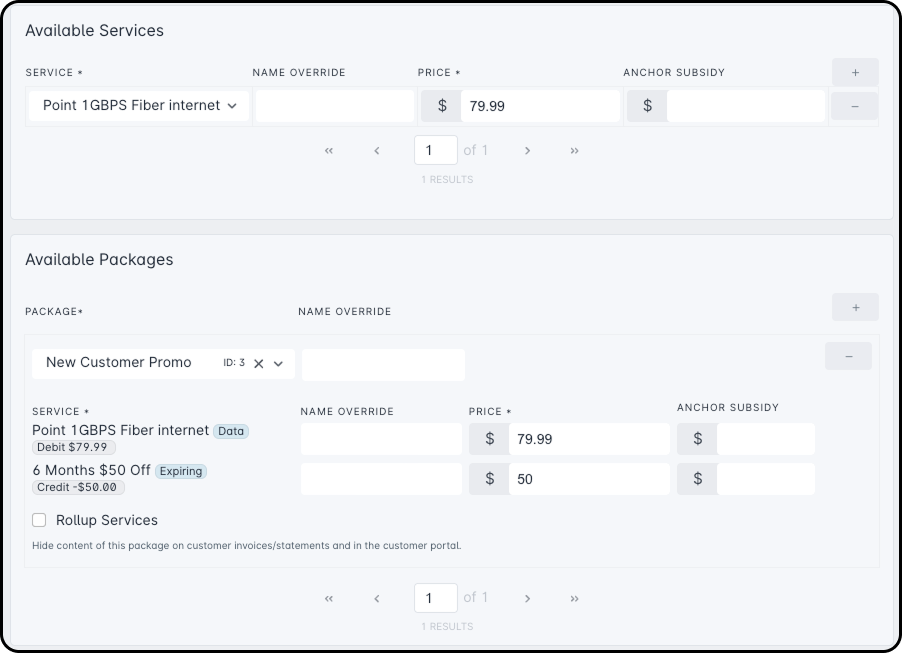
Keep in mind that services or packages applied as an Available Service or Available Package will still be dependent on Company association. If a Service or Package is made available to an account, but the account is assigned to a company that does not have access to said Service or Package, then it will not appear for selection. This can result in no services or packages appearing as available in an account.
Shared Settings
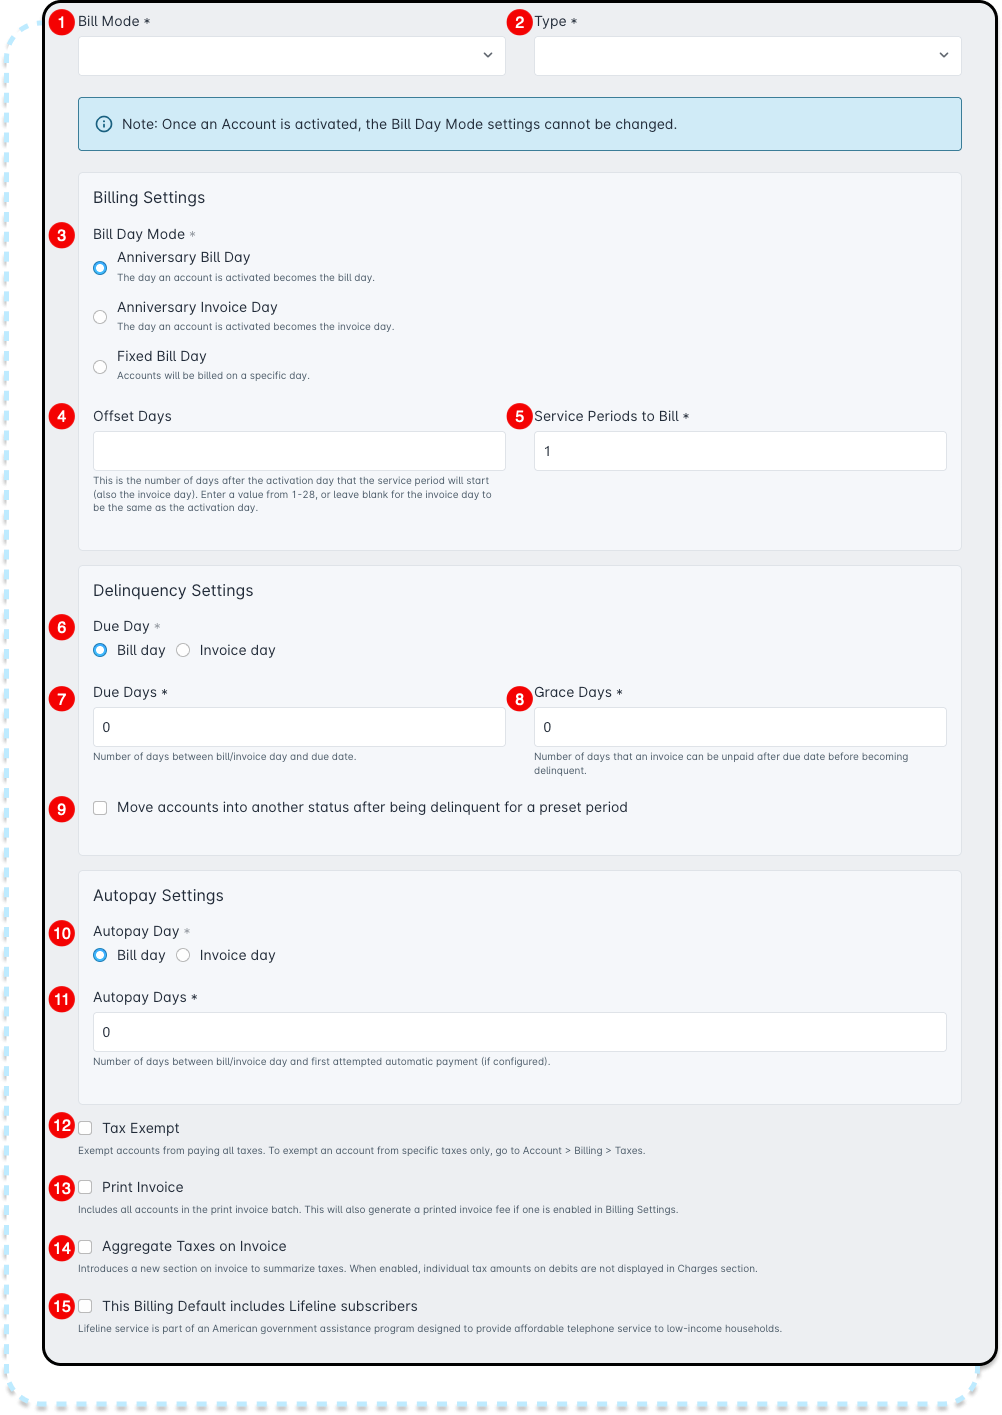
- The Bill Mode drop-down menu can be switched between Invoice and Statement. An invoice in Sonar will display only the current amount due, while a statement will show all line items and any prior unpaid balance.
- The Type drop-down menu will display all the created account types in your instance, allowing you to add one or more account types that will fall under the umbrella of this default Billing Setting.This field is only visible when creating a new billing default; the “default” billing default that was pre-loaded into your instance will not have this option available in its edit modal.
- The Bill Day Mode setting allows accounts to automatically inherit its Bill Day or Invoice Day based on how this setting is configured.Bill Day Mode is a option that only exists before an account is activated to automatically stagger and set its Bill Day and Invoice Day. Once an account is activated, this option disappears. Bill Day and Invoice Day can still be set manually once an account has been activated.
- Anniversary Bill Day can be used if you want the day an account is activated to become the Bill Day for that account, then add X number of days to this value to set the Invoice Day. A newly activated account will create an initial invoice that includes a prorated partial month as well as a complete month of service.
Selecting Anniversary Bill Day will modify the fields on the form, adding a new field titled “Offset Days”.- The Offset Days field controls how many days after activation the invoice day will be. Enter a value from 1–28, or leave it blank to make the invoice day the same as the activation day.
- Anniversary Invoice Day will set the Invoice Day based on when the account is activated, then set the Bill Day X number of days backward from the day the account is activated. A newly activated account will create an initial invoice for one complete month, then create the next invoice.
Selecting Anniversary Invoice Day will modify the fields on the form, adding a new field titled “Offset Days”.- The Offset Days field controls how many days before activation the account will bill. Enter a value from 1–28, or leave it blank to make the bill day the same as the activation day.If this field is set on accounts that are created, but not activated (such as kept in a Lead status), this value will be stored in the Bill Day field for those accounts. If modifications are needed through Sonar's API, they'll need to be made to that field.
- The Offset Days field controls how many days before activation the account will bill. Enter a value from 1–28, or leave it blank to make the bill day the same as the activation day.
- Fixed Bill Day can be used if you want all accounts to bill on a specific day. Manually setting the Bill Day and Invoice Day here will result in newly activated accounts creating an initial invoice that is a prorated partial month.
- Anniversary Bill Day can be used if you want the day an account is activated to become the Bill Day for that account, then add X number of days to this value to set the Invoice Day. A newly activated account will create an initial invoice that includes a prorated partial month as well as a complete month of service.
- The Offset Days field can be used to manually set the number of days after the activation day that the service period will start (also the invoice day). Enter a value from 1-28, or leave blank for the invoice day to be the same as the activation day.If Fixed Bill Day setting is selected, you will not have the Offset Days field available, but instead the following options will be available.
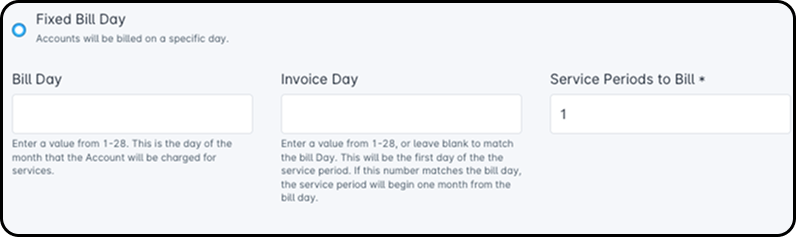
1. The Bill Day field can be used to manually set the day of the month, from 1 to 28, that the account will bill on and generate the invoice. This field will only appear if “Fixed Bill Day” is selected. Otherwise, this field will be unavailable.
2. The Invoice Day field can be used to manually set the day of the month, from 1 to 28, that will represent the first day of the Service Period for the account. This field will only appear if “Fixed Bill Day” is selected. Otherwise, this field will be unavailable. - The Service Periods to Bill field sets the number of months to bill for this billing default. This means is that each time billing runs, it will run for X months and then not run again until the X months have passed.This setting can't be used with recurring services that have a multi-month billing scheme.
- The Due Day setting determines what generation day, between Billing Day and Invoice Day, will be used to influence the generated invoice's payment due date.
- The Due Days field determines how many days it will be before payment for an account is due, adjusted based on the “Due Day [see #10]” field (either Billing or Invoice Day). If the Due Day is set to '
Invoice Day', for example, the invoice will be due that many days after the invoice date. When configuring Due Days, keep in mind that this field additive, moving outwards from the designated day. For more information, see the examples further in the article. - The Grace Days field determines how many days an account will be given between the payment becoming due and the invoice becoming delinquent. Once the Grace Days have elapsed, the invoice will change status, and trigger any delinquency logic based on your instance. Grace Days are only counted if the invoice is unpaid.
- The Move accounts into another status after being delinquent for a preset period setting determines what happens if the customer becomes delinquent on their due amount and does not pay the invoice amount within the Grace Period. This option will switch their status to a delinquent one, set in the drop-downs that appear when this setting is enabled.Account status changes that are determined by billing configurations will occur at 12AM UTC.

- Days of Delinquency For Status Switch: This setting determines the number of days an invoice can remain delinquent on an account until the status of the account changes automatically; a “0” here will cause it to change immediately upon delinquency, whereas a “1” would result in a 1-day delay, “2” in a 2-day delay, and so on.
- Delinquency Account Status: This setting controls what status gets set after the Delinquency days have elapsed. Generally, people will set the account to a non-activated status that suspends billing and shows the account as in arrears.
- Delinquency Removal Account Status: This setting controls what status accounts will enter after having paid their past due balance and leaving delinquency status. Generally, this will be set back to 'Active' if enabled.The rules for Grace Days and Days of Delinquency for Status Switch may not be true every month, as the configuration of your instance's Billing Settings also play a role here.
For example, if Days to check delinquency excludes weekends, and the invoice delinquency date happens to fall on a Saturday, then the delinquency will instead be pushed to Monday. This changes the date of when a delinquent account would switch to a different account status, as this is calculated from when an invoice is first flagged delinquent.
In our example, Peter Parent's invoice should have gone delinquent on Saturday, March 9th, but as the Days to check delinquency excludes weekends, his invoice instead went delinquent on Monday, March 11th. As the Days of Delinquency for Status Switch is set to 10 days, the account status will now switch on Thursday, March 21st.
- The Autopay Day option determines what generation day, between Bill Day and Invoice Day, that Auto Pay will use as the adjusted value.
- The Autopay Days field determines how many days later any payment methods set to automatic will first attempt a payment, adjusted based on the “
Auto Pay Day[see # 9]” field (either Billing or Invoice Day). - The Tax Exempt checkbox will exempt any accounts from paying any taxes. If you would like to exempt a user from specific taxes only, this is done at the account level.
- The Print Invoice checkbox will include any accounts in the print invoice batch. This will also generate a printed invoice fee if one is enabled in the billing settings.
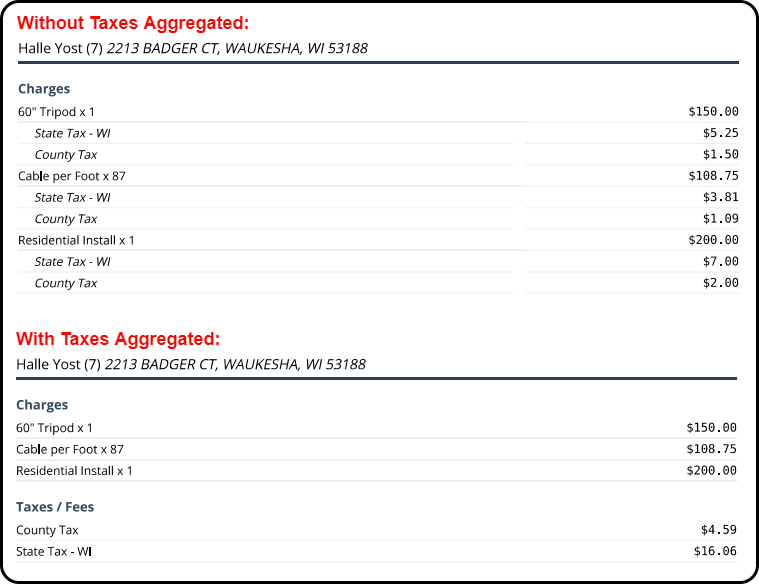
- The Aggregate Taxes on Invoice option determines how taxes will appear on a customer's invoice. With this option disabled, every tax and its amount would be listed under the associated service. With it enabled, any applicable taxes on the invoice would be aggregated and viewable under a header titled Taxes/Fees.
- The “The Billing Default includes Lifeline subscribers” setting is used with Avalara. This option should be checked if you have Lifeline subscribers in your customer pool. Information on configuring Lifeline can be found here.
Billing Default Examples
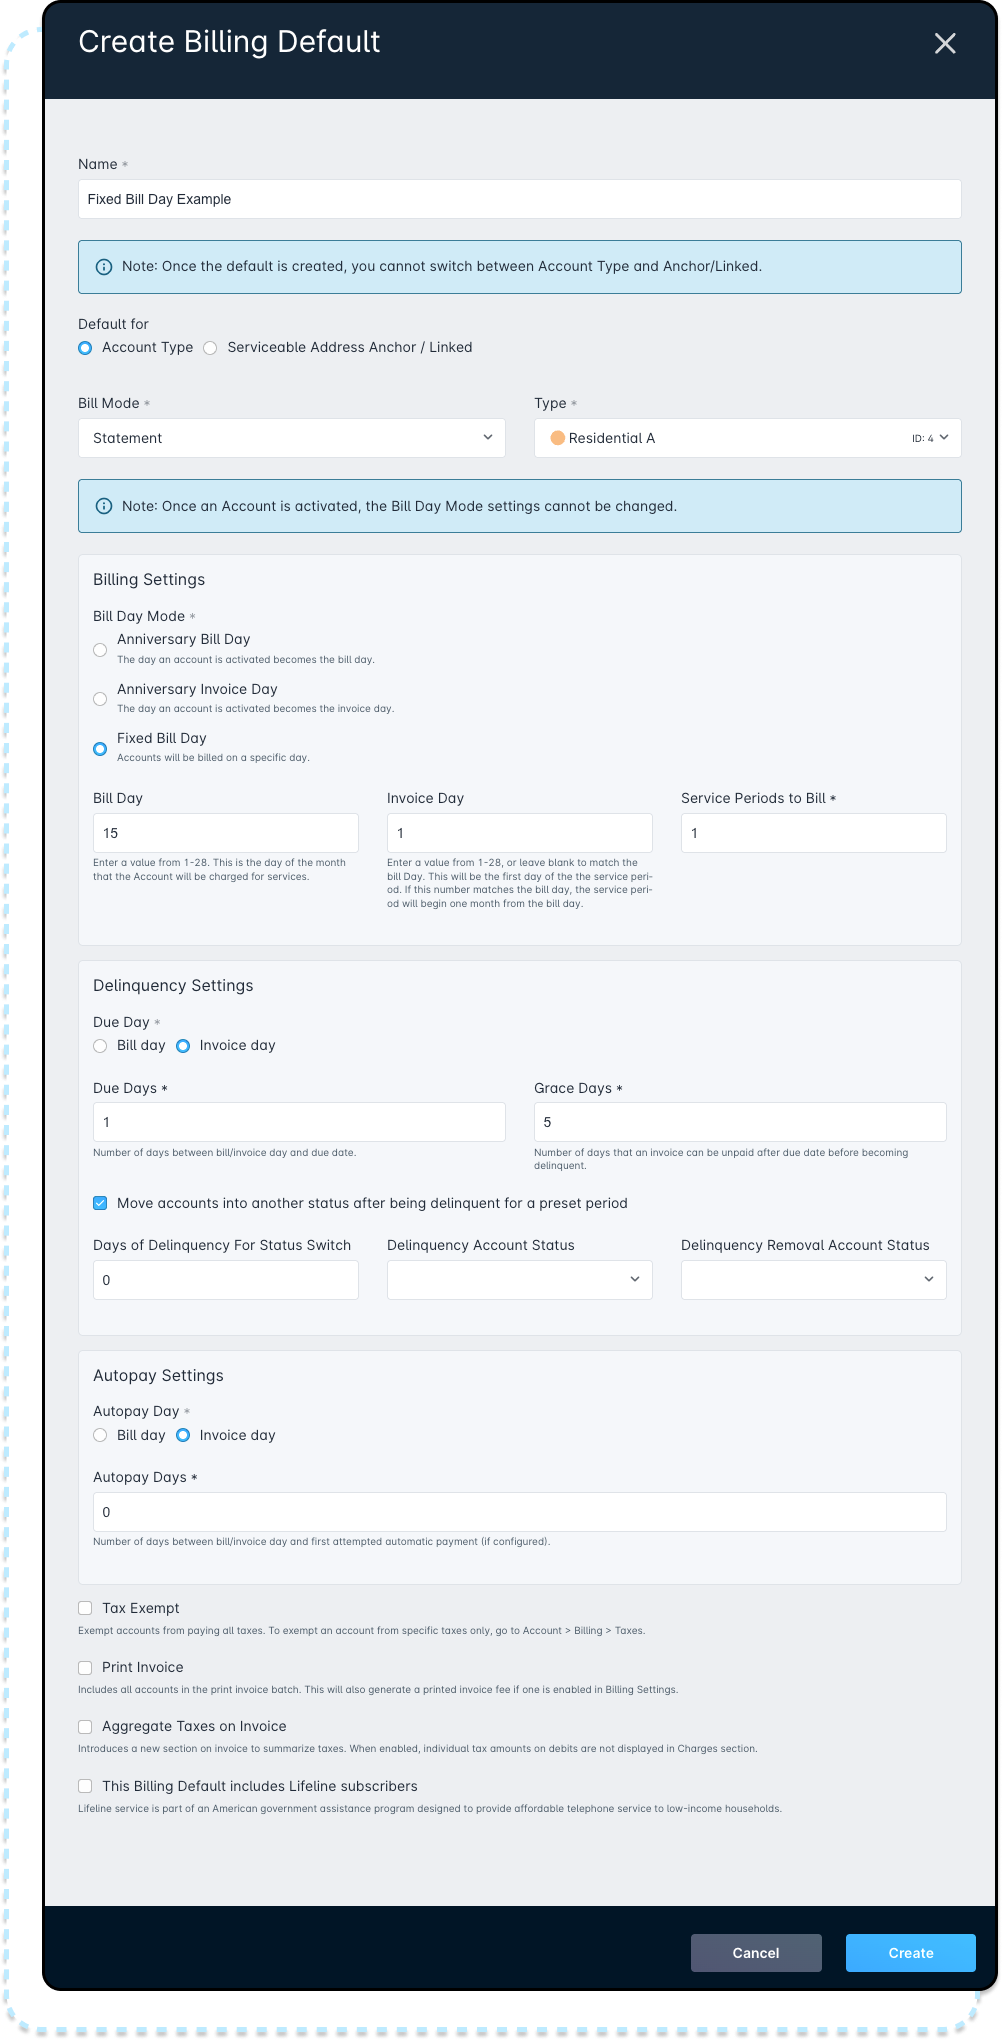
Fixed Billing: 1st of the Month Service Period
With this example, Fixed bill day mode will be used. This lets you manually configure every setting within a Billing Default, setting them to specific days of the month.
- Bill Day Mode will be set to
Fixed bill day - The Bill Day will be set to “
15”, which means that Billing (that tallying of debits, credits, and discounts on the account) will occur on the 15th of every month.- The Bill Day running on the 15th will generate the transactions and the invoice for service being delivered on the 1st of the following month.
- The Invoice Day will be set to “
1”, which means that the service period start date will occur on the first of every month.- A service period is entirely determined by Invoice Day, as the service period will span from one Invoice Day to the next.
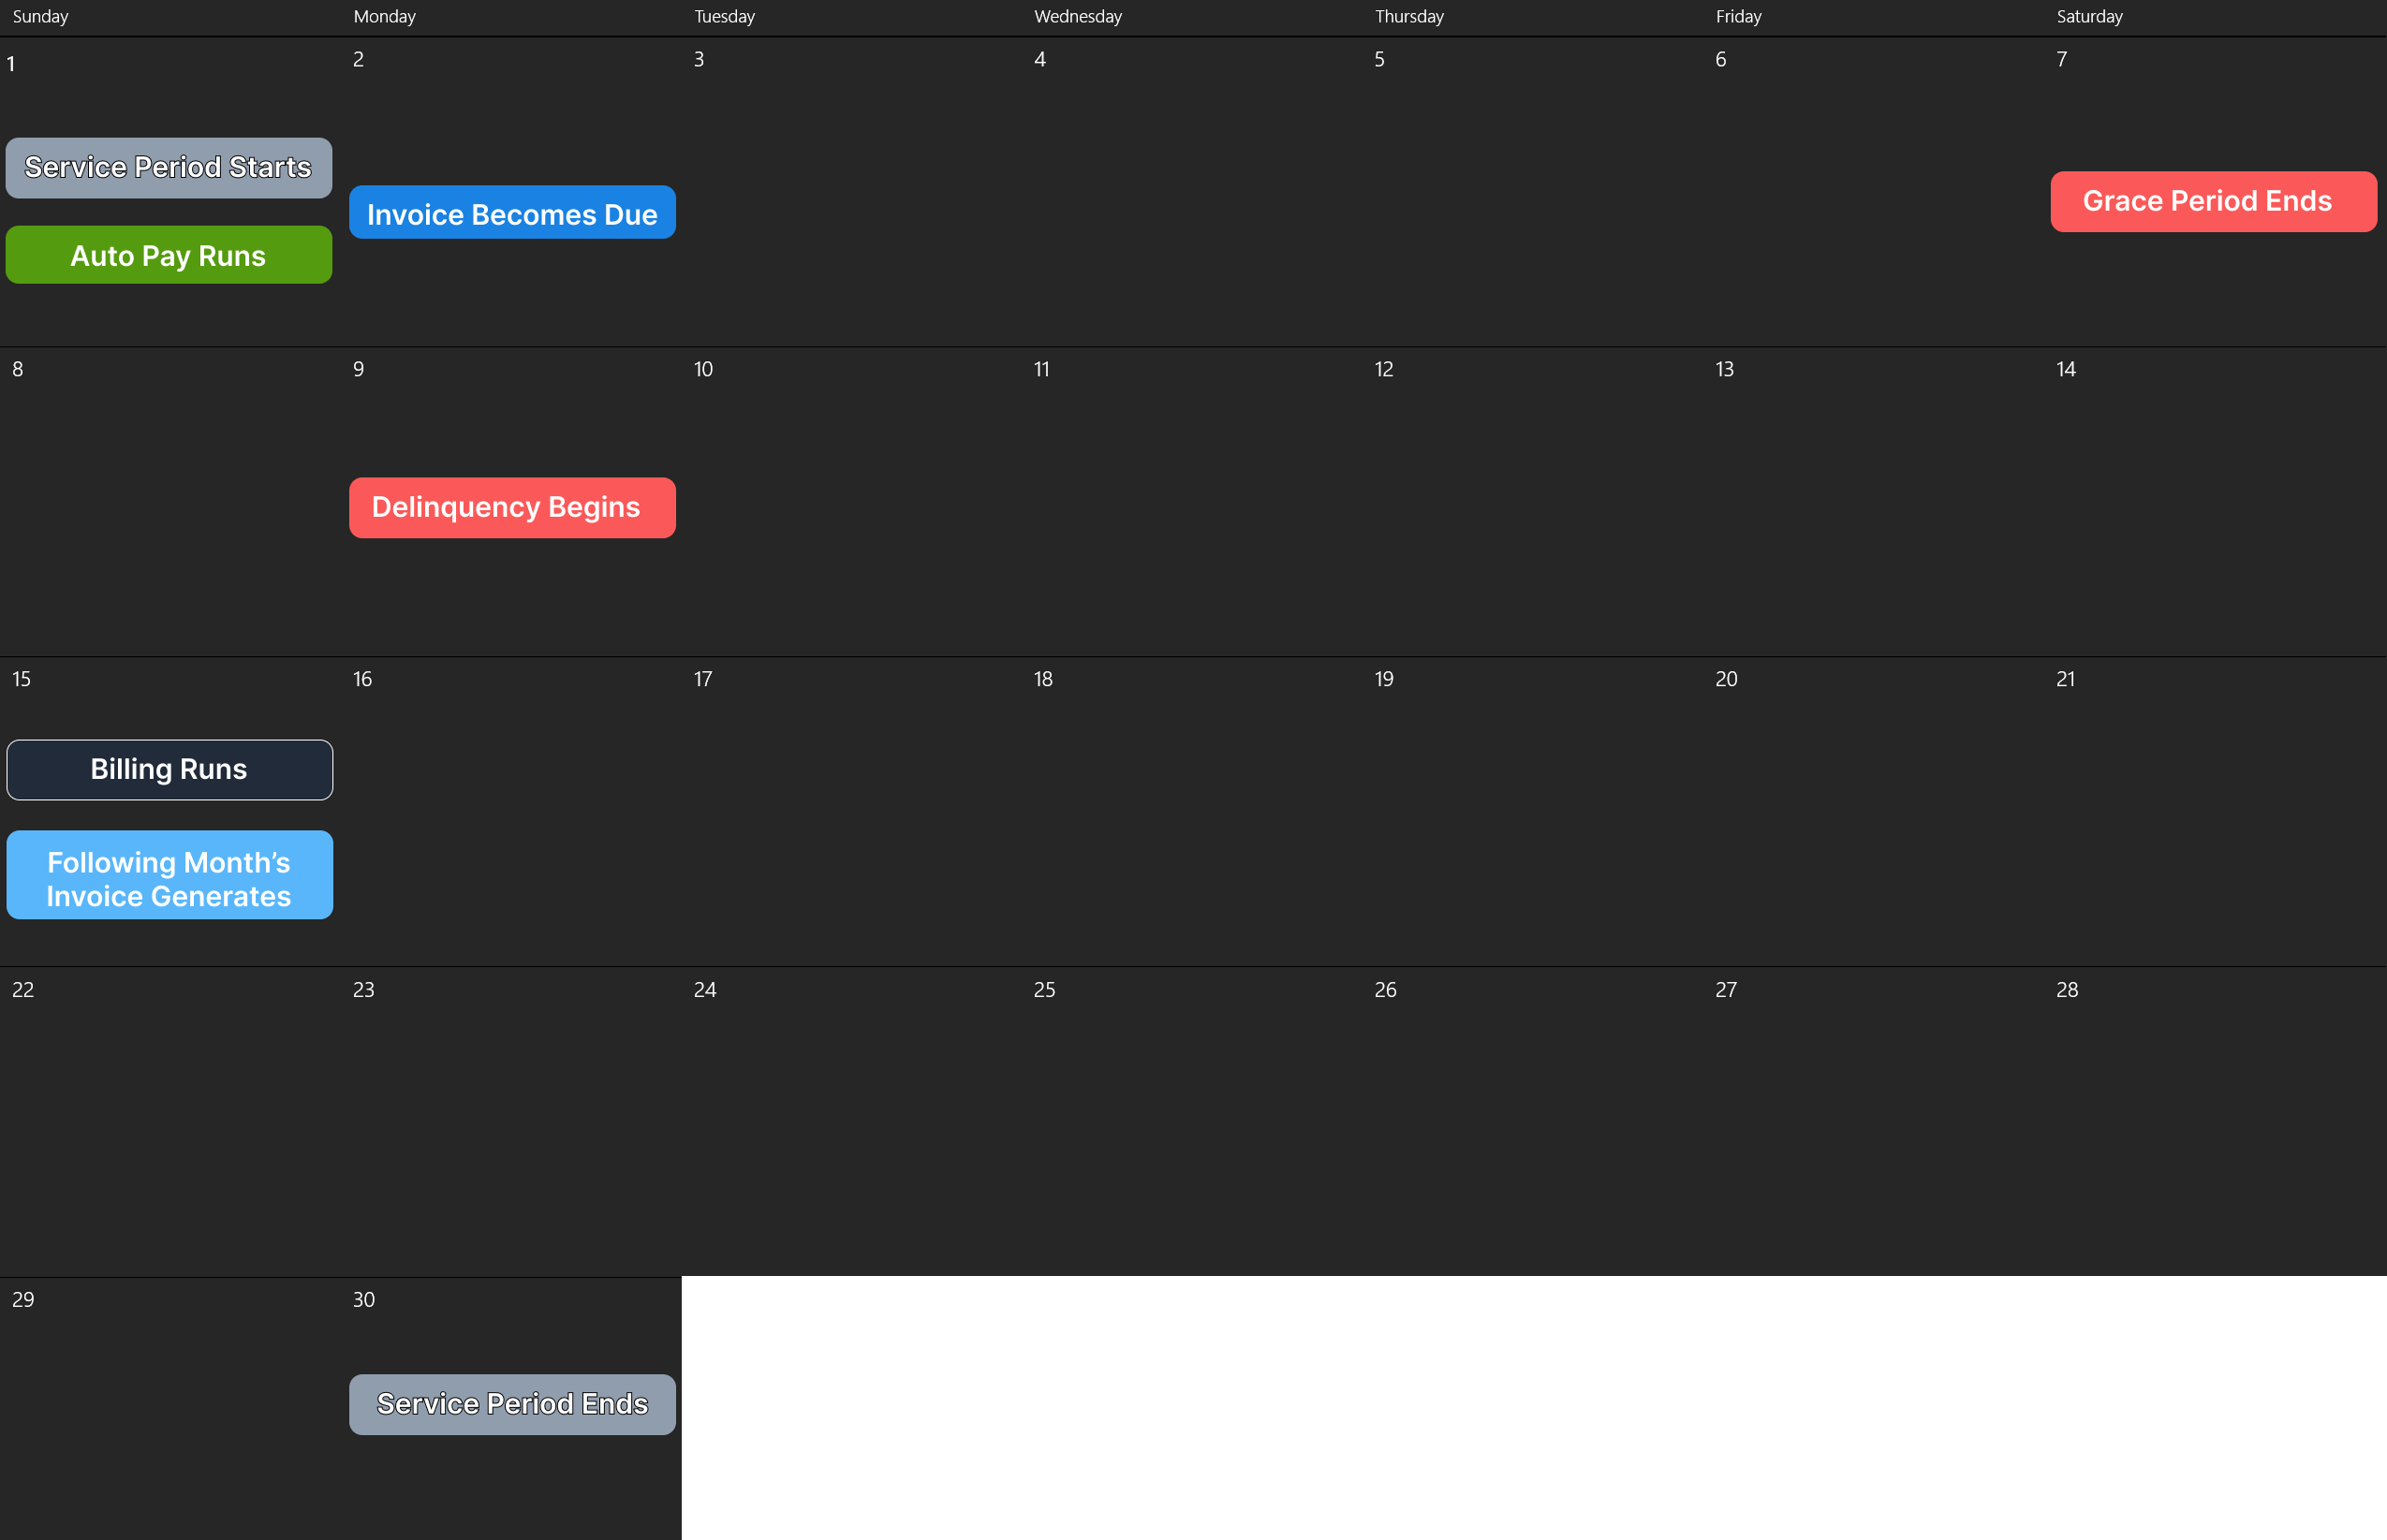
While Due Days, Auto Pay Days, and Grace Days are more free-form, some example numbers will be used for illustrative purposes:
- Due Days will be set to “
1”, and Due Day will be set to “Invoice day”. This means that a generated invoice will become due the day after the Service Period begins. - Auto Pay Days will be set to “
0”, and Auto Pay Day is set to “Invoice day”. This means that as soon as the Service Period begins, a day before the due day, an attempt will be made to run the due balance against the auto-pay method registered on the account. - The Grace Days will be set to “
5”, meaning that if the customer misses payment on the Due Day, they have 5 additional days to pay before the account becomes delinquent.Keep your “Days to check delinquency” setting in mind as you perform the Grace Days calculation. For this example, assume Saturdays and Sundays do not have Delinquency checks performed.
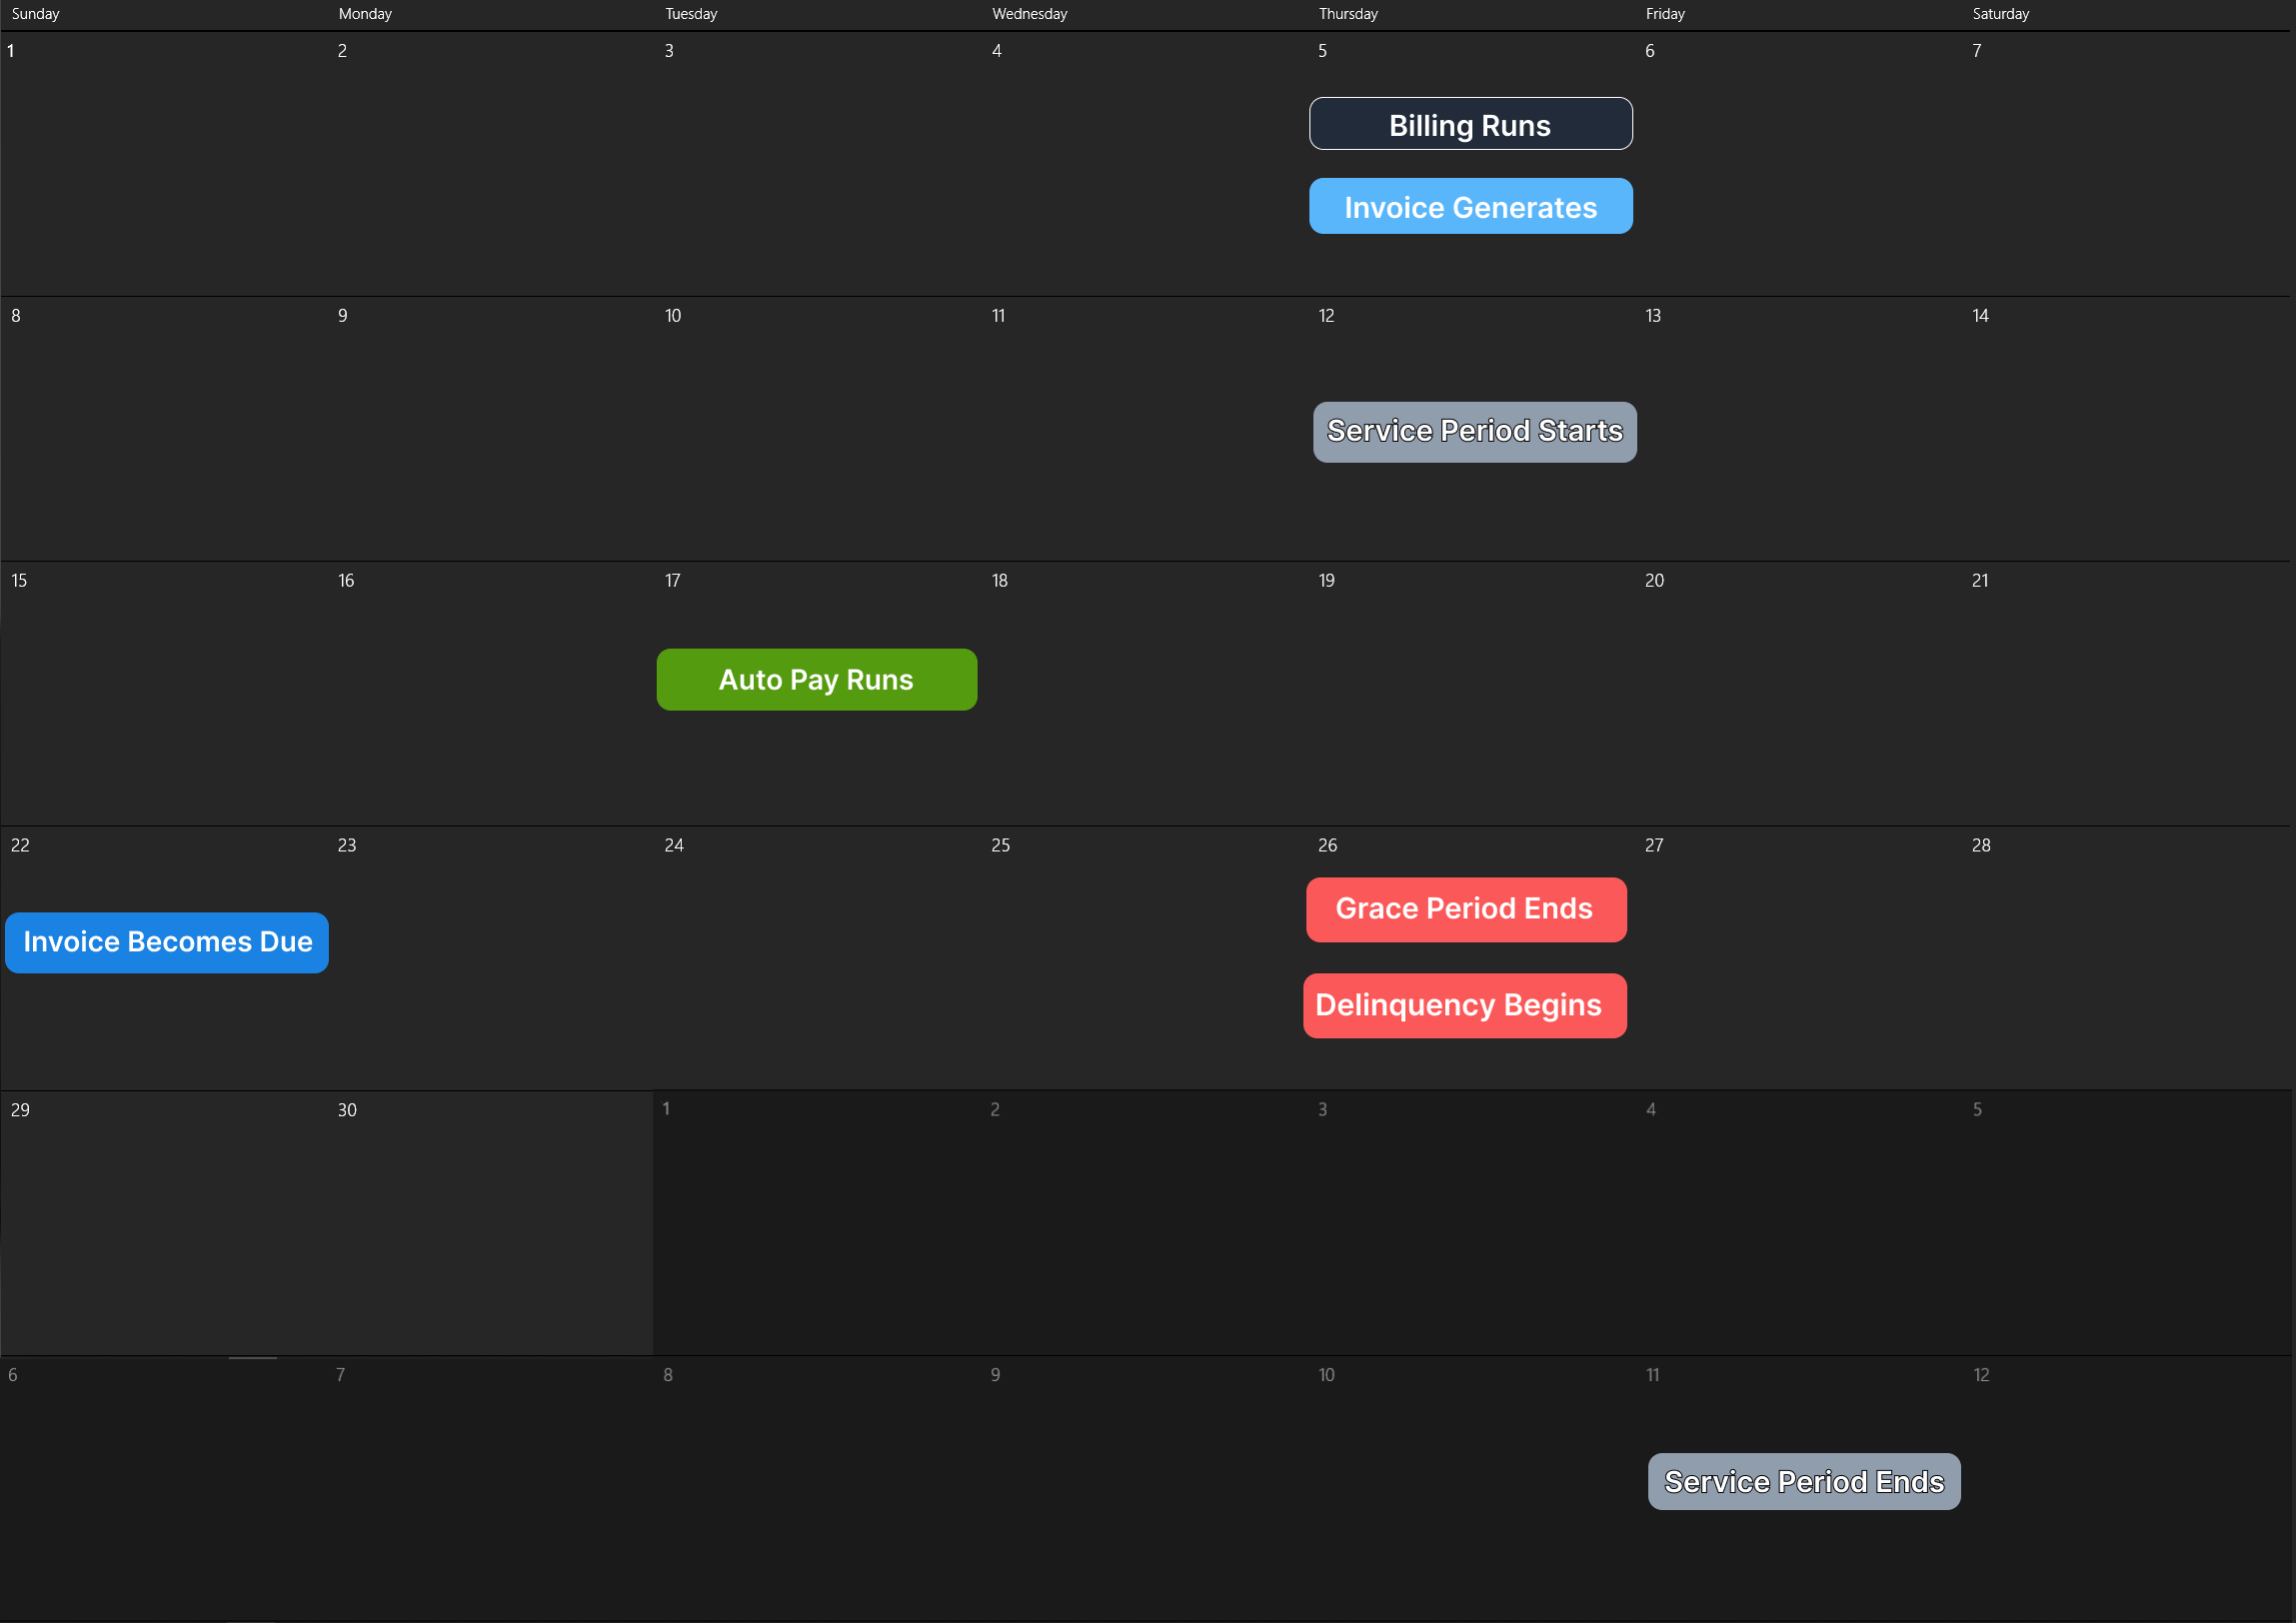
Calendar View
_
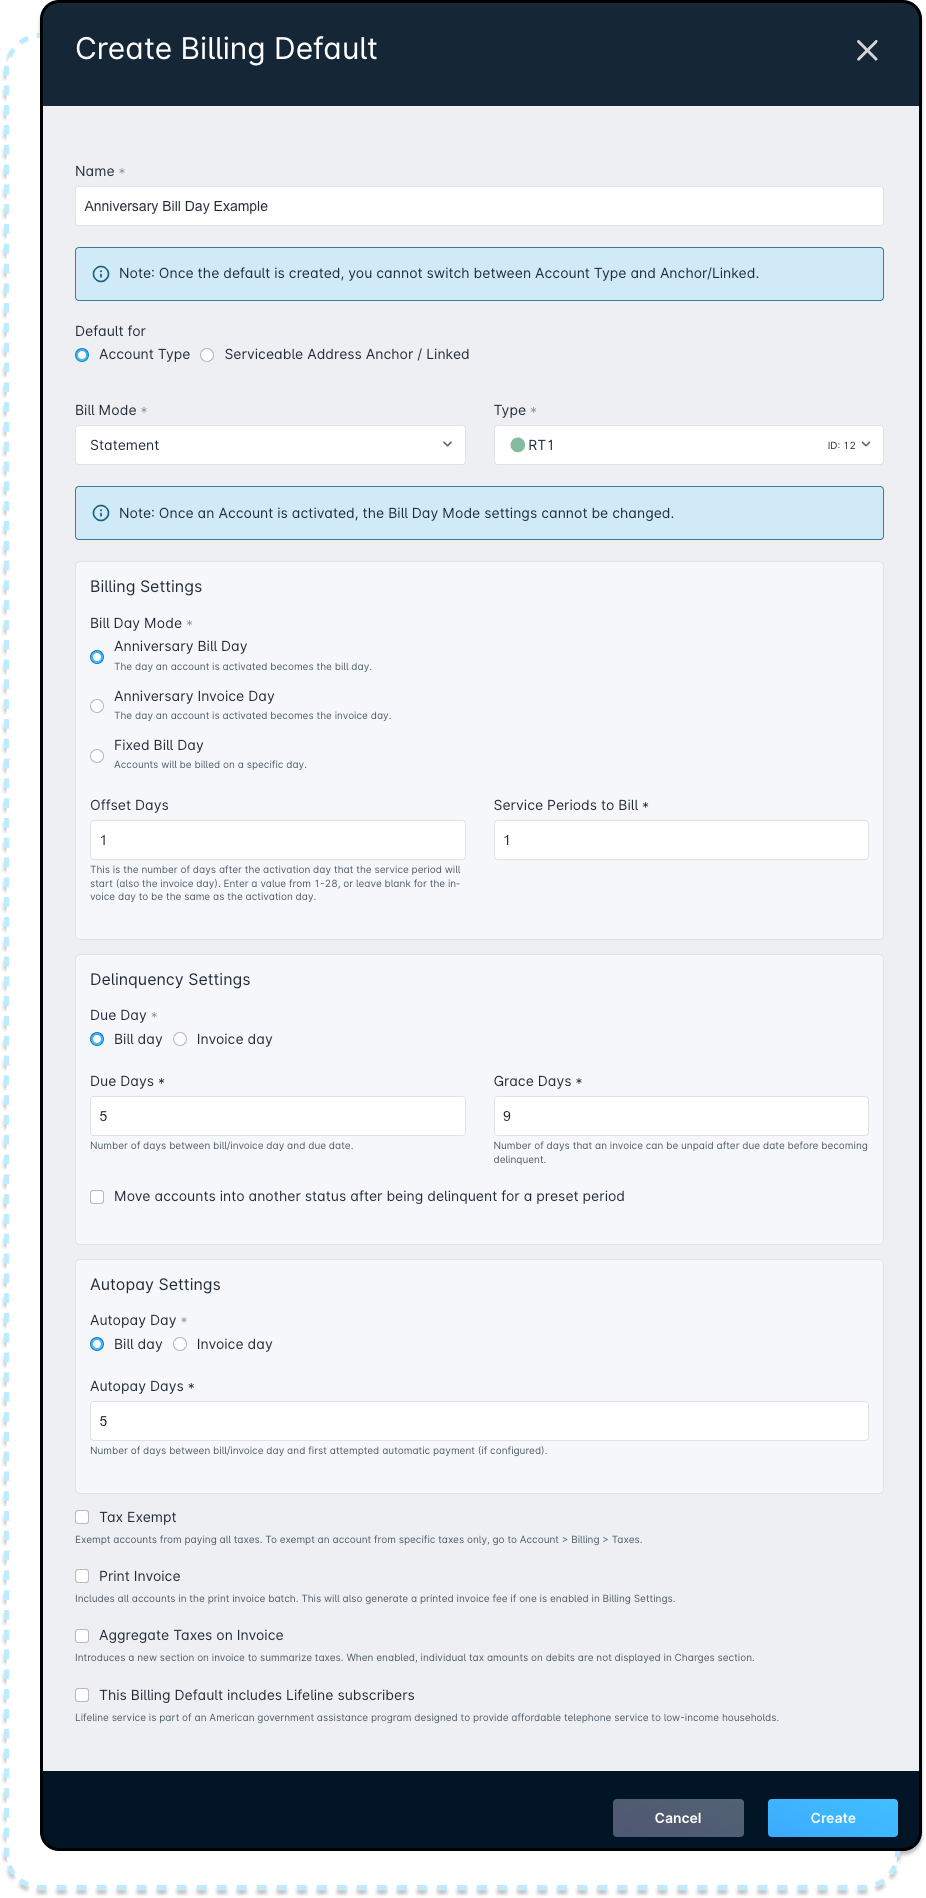
Anniversary Bill Day: Billing Day Same as Invoice Day
With this example, the Anniversary Bill Day will be used to demonstrate how you can deploy a Billing Default with the bill day as a variable value based on a customer's sign-up date.
- Bill Day Mode will be set to
Anniversary Bill Day, which means that the Bill Day is set to the Account's Activation Day - Invoice Day cannot be filled out, as it will be determined by the “Days After Activation Field”.
- The Days After Activation Field will be set to “
0”. This will mean that the Invoice is generated on the same day that Billing runs (which is also the same day the account was created)
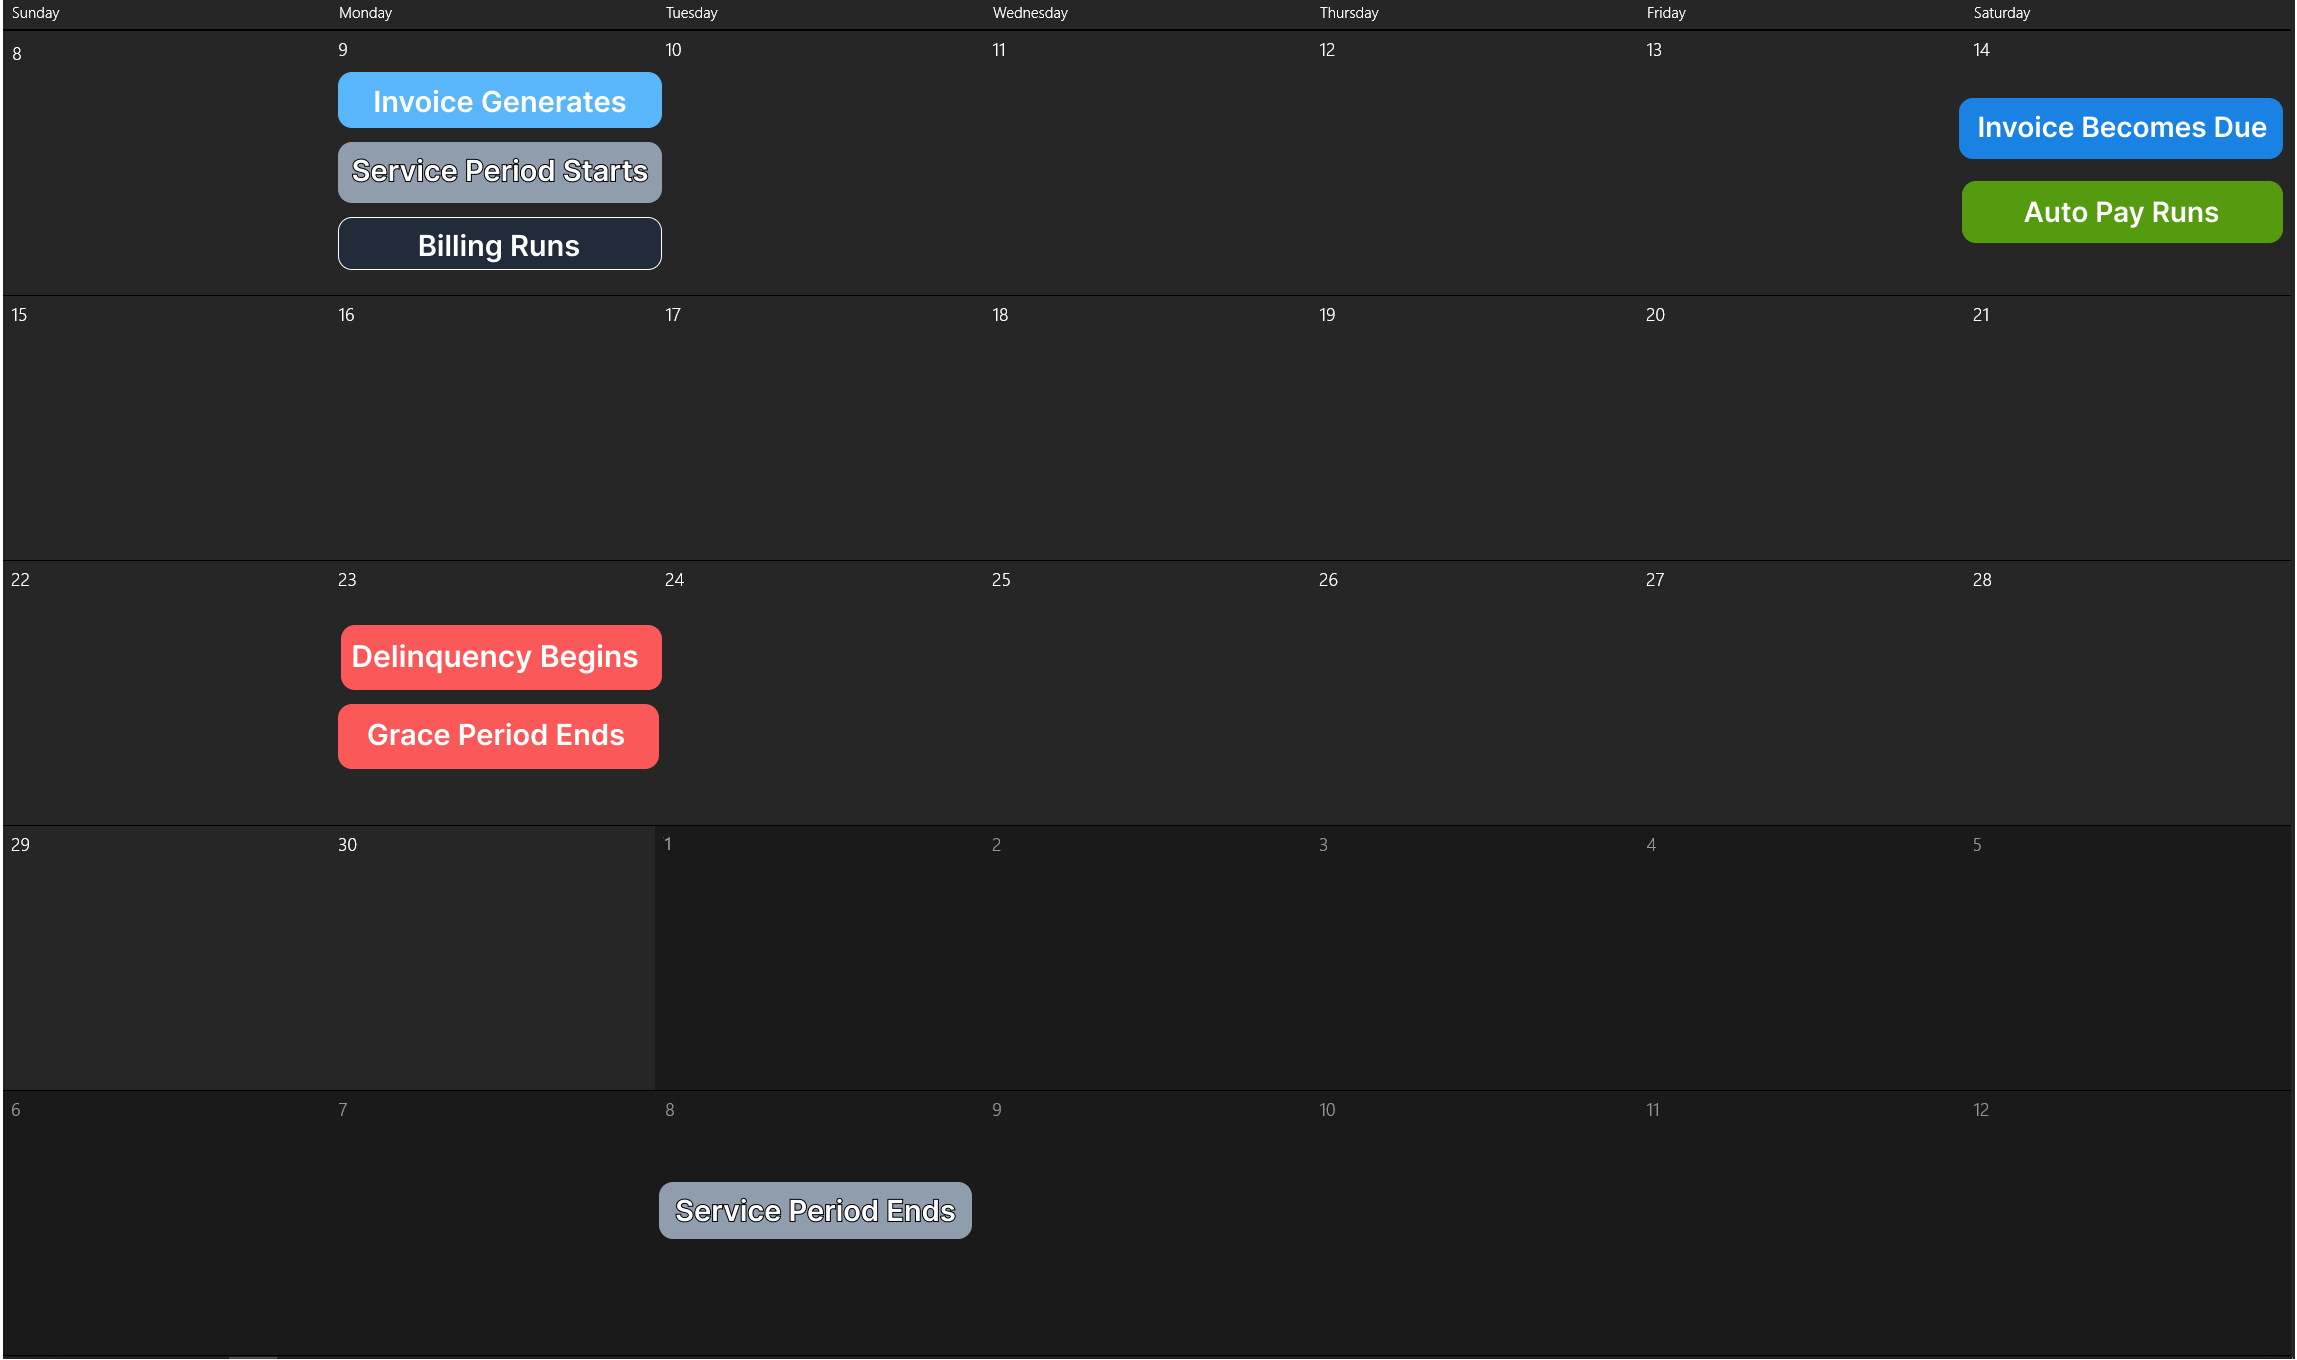
While Due Days, Auto Pay Days, and Grace Days are more free form, some example numbers will be used for illustrative purposes:
- Due Days will be set to “
5”, and Due Day will be set to “Billing Day”. As Invoice Day and Bill Day are the same in this example, the generated invoice will become due five days after it's generated and delivered to the customer. - Auto Pay Days will be set to “
5”, and Auto Pay Day is set to “Billing Day”. This means that as soon as the invoice is generated, the same day as the due day, an attempt will be made to run the due balance against the auto-pay method registered on the account. - The Grace Days will be set to “
9”, meaning that if the customer misses payment on the Due Day, they have 9 additional days to pay before the account becomes delinquent.Keep your “Days to check delinquency” setting in mind as you perform the Grace Days calculation. For this example, assume Saturdays and Sundays do not have Delinquency checks performed.
Calendar View
Anniversary Invoice Day: Bill Day 7 Days Before Invoice
With this example, the Anniversary Invoice Day will be used to demonstrate how you can deploy a Billing Default with the invoice day as a variable value based on a customer's sign-up date.
If the other settings are in place but the “Prorate Account Status Change” field is not enabled, the invoice will not be generated until the next billing period.
- Bill Day Mode will be set to
Anniversary Invoice Day, which means that the account's Invoice Day will be identical to its activation day. - Bill Day cannot be filled out, as it will be determined by the “
Days Before Account Activation Day” field. - The Days Before Account Activation field will be set to 7, making the
Bill Dayoccur 7 days before the account's activation.
While Due Days, Auto Pay Days, and Grace Days are more free form, some example numbers will be used for illustrative purposes:
- Due Days will be set to “
10”, and Due Day will be set to “Invoice Day”. This will make the Invoice generated on the Bill Day become due 10 days after the Service Period starts. - Auto Pay Days will be set to “
5”, and Auto Pay Day is set to “Invoice Day”. This will mean that the amount due will be billed to the customer's Auto Pay method 5 days after the Service Period starts. - The Grace Days will be set to “
4”, meaning that if the customer misses payment on the Due Day, they have 4 additional days to pay before the account becomes delinquent.Keep your “Days to check delinquency” setting in mind as you perform the Grace Days calculation. For this example, assume Saturdays and Sundays do not have Delinquency checks performed.

Calendar View
Anniversary Billing Considerations
There are considerations for anniversary billing due to varying billing behaviors. If an account is activated on the 29th, 30th, or 31st of a month, the customer's initial transaction will be significantly different from that of an account activated between the 1st and the 28th. This is because the 29th, 30th, and 31st are not present in every calendar month. Below, we detail the key differences between a bill date of the 28th and the 29th. If you have any further questions, please contact the Sonar support team at support@sonar.software.
For both examples, we will be using the billing parameters as shown below:
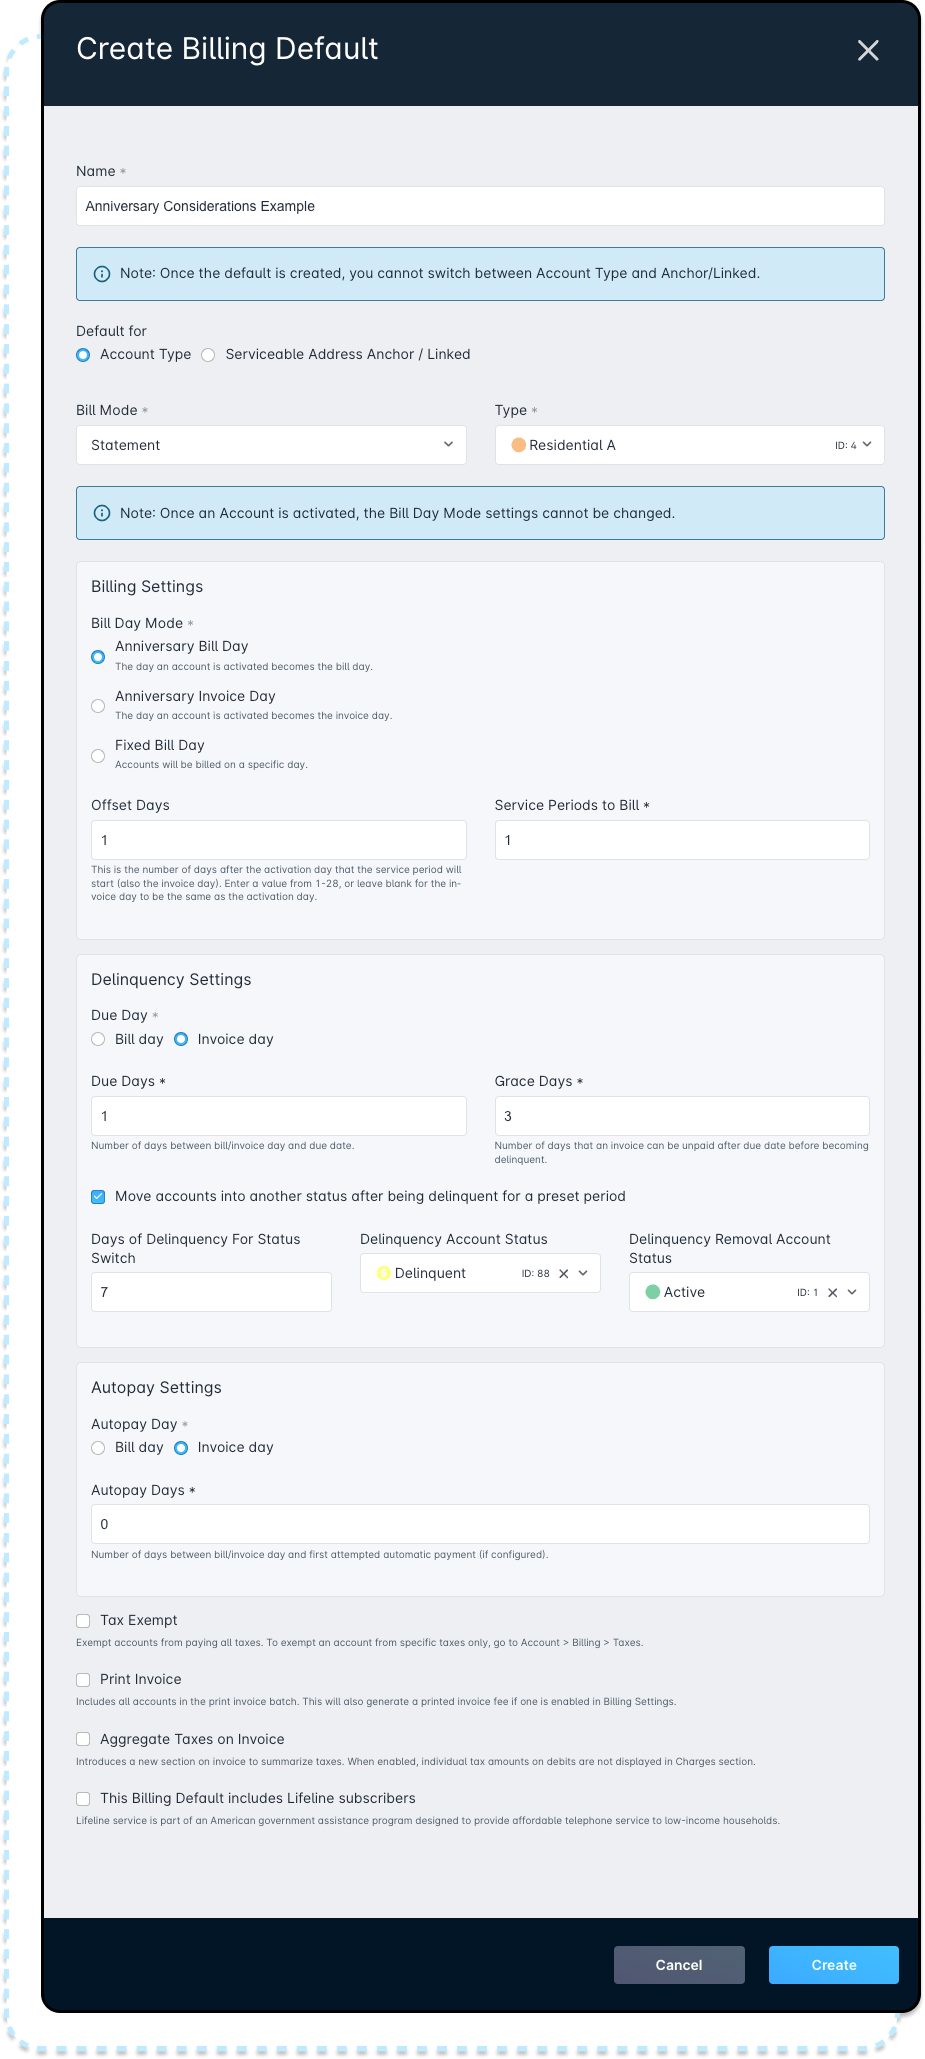
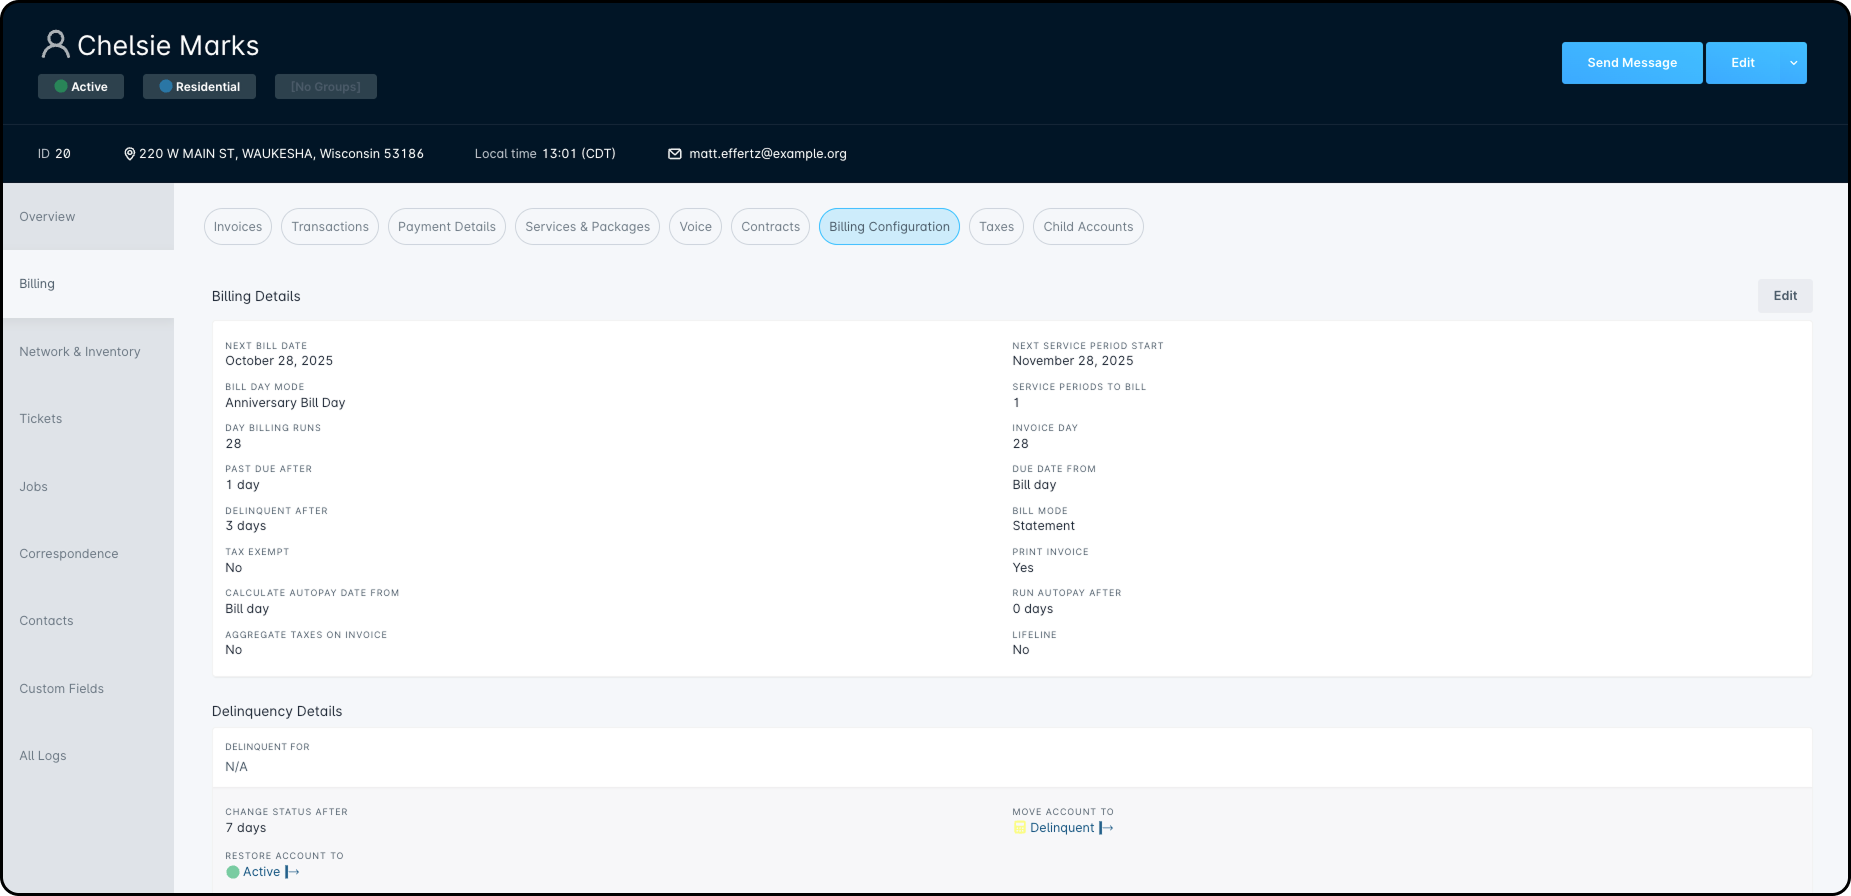
Bill Date of the 28th
Chelsie Marks' Internet service is activated on February 28th, 2024. The Sales representative ensures the “Pro-rate” option is enabled before switching Chelsie's account into an active status. Once activated, the Billing Configuration tab of his account will reflect that his Next Bill Date is set to March 28th, 2024 and his Next Service Period Start will commence on April 28th, 2024. Chelsie's Invoice Day will fall on the 28th of every month moving forward.
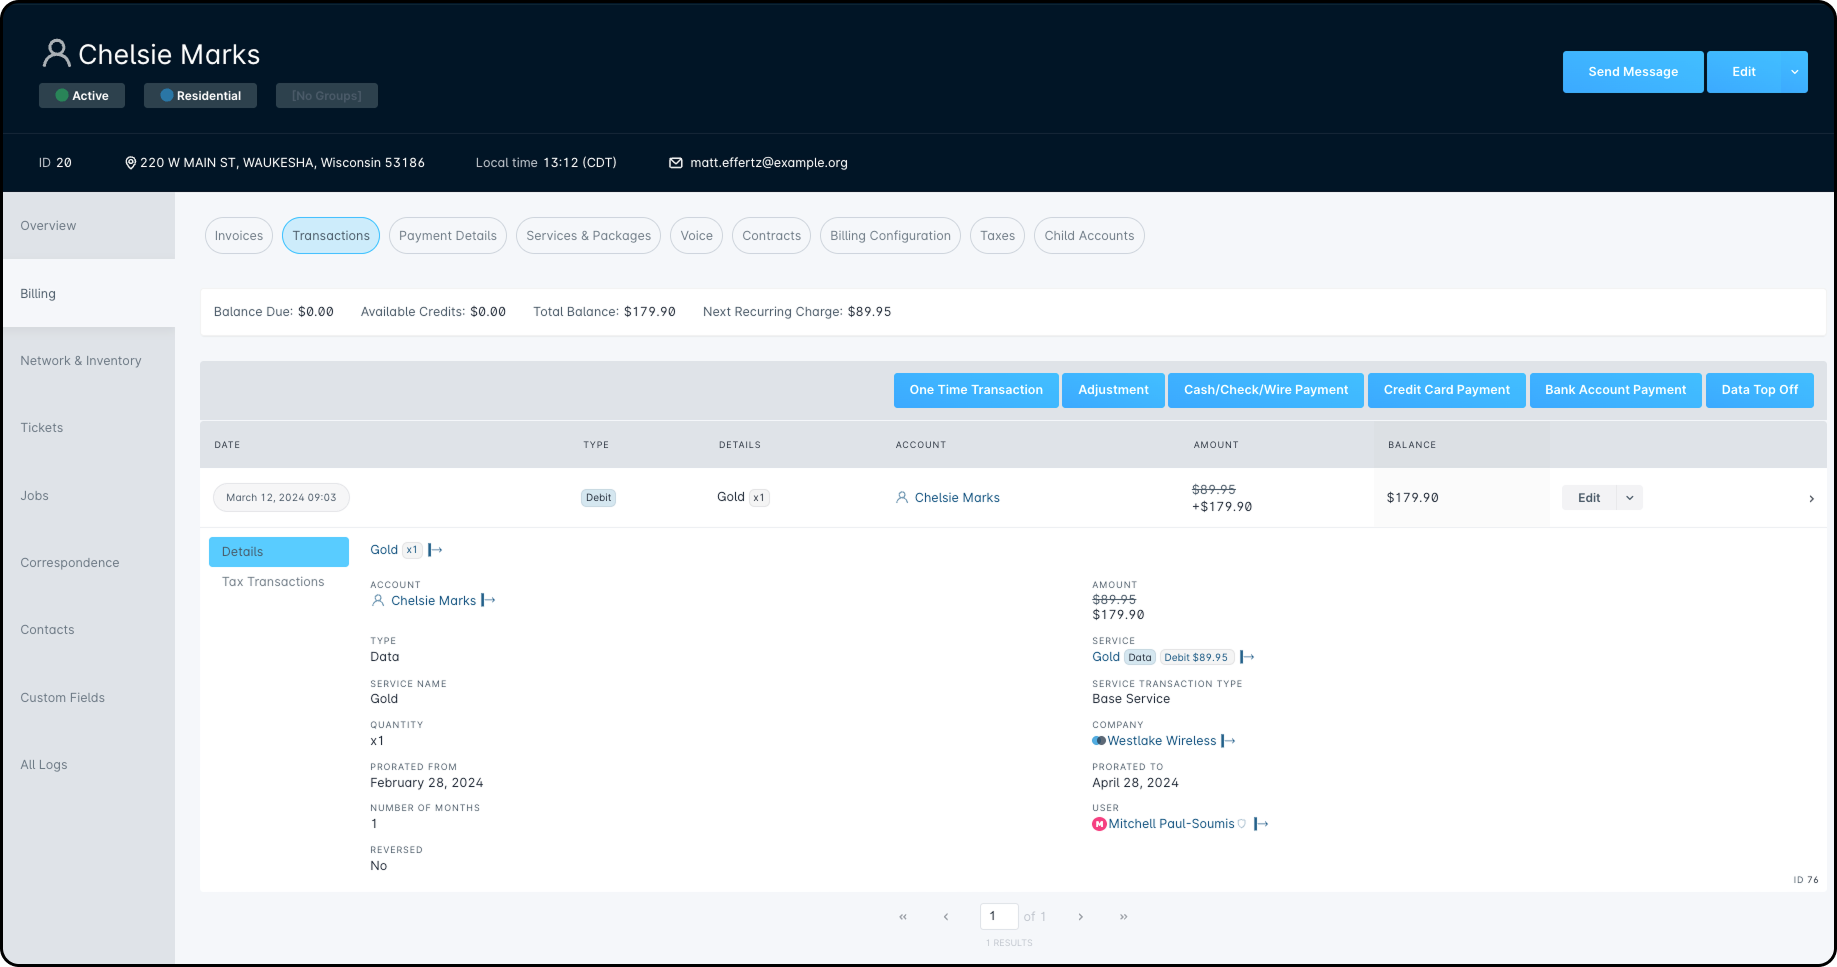
If we move over to the Transactions tab, we can see a debit transaction for Gold 50Mbps Fiber of $179.90. Taking a further look into the details, we can see that the service Chelsie has subscribed to costs $89.95. So, why was Chelsie charged twice this amount? As the account was pro-rated upon activation, they were charged for the period of February 28th, 2024 through to April 28th, 2024, as reflected in the Prorated From and Prorated To subsections.
Bill Date of the 29th
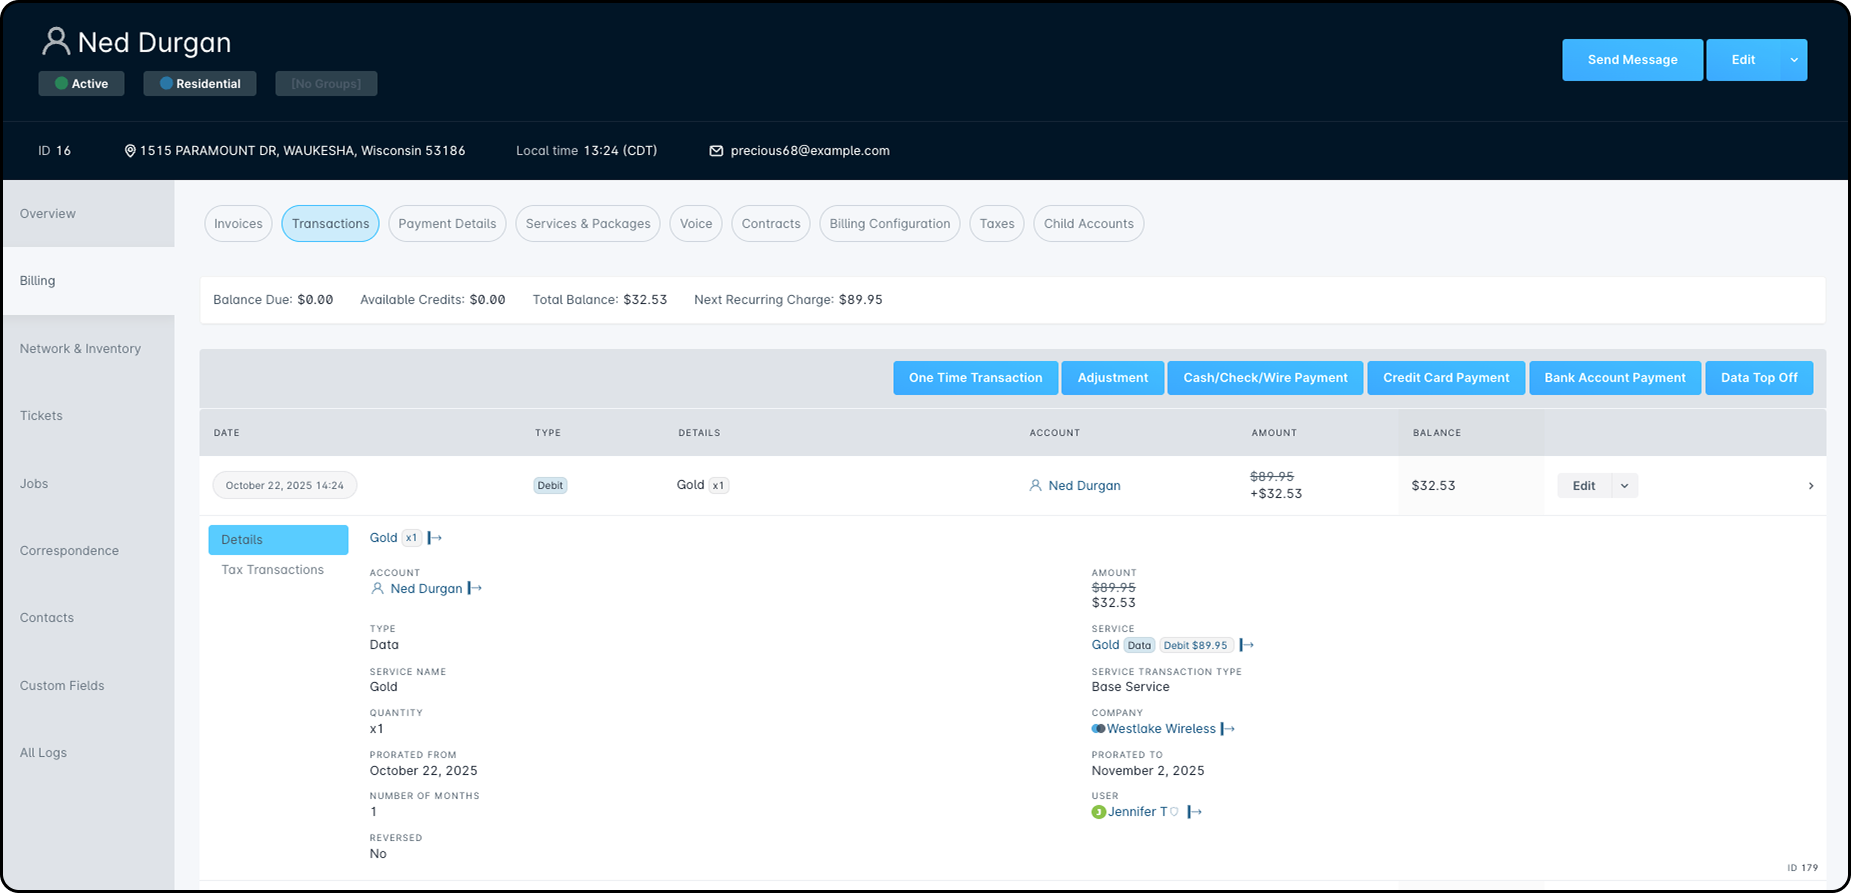
Ned Durgan's Internet service is activated on October 22nd, 2025. Like Chelsie's account, Ned's was pro-rated upon activation; however, because his activation fell on the 22nd, his initial billing will look substantially different. Shown under the Billing Configuration tab of his account, we can see that the Next Bill Date is set to November 1st, 2025 and the Next Service Period Start for November 2nd, 2025. As the 29th is not (usually) included in every month, Ned's Invoice Day will fall on the 2nd moving forward.

Moving over to the Transactions tab, we can see a balance of $32.53. The reason Ned's first transaction is so much smaller than Chelsie's is due to the proration period. Digging into the Details, we can see that this balance was calculated on a Pro-ration period of October 22nd, 2025 through to November 2nd, 2025; this is because Ned's next service period begins on the 2nd.