Our Products & Services
Getting Started
First Time Setup
Getting Started with Inventory
Getting Started With Jobs
Getting Started with Accounts
Getting Started with Ticketing
Setting Sonar up for Billing
Baseline Configuration
How To: Using Sonar's Customer Portal
User Specific Resources
Accounts
Account Groups: Overview & Example Use Cases
Account List View: Overview
Account Management View: Overview
Account Overview Customization
Account Statuses: Overview & Example Use Cases
Account Types: Overview & Example Use Cases
Anchor & Linked Serviceable Addresses: Overview and Best Practices
Archiving an Account: Overview
CPUC Fixed Broadband Deployment by Address
Child Accounts: Best Practices & How Tos
Creating a New Account
Direct Messages: Overview
Disconnecting an Account
Disconnection Reason Management: Overview
Exploring Task Groups
FCC Broadband Data Collection (BDC) Filings: How Sonar Can Help
FCC Data Exports: General Overview and Usage
Future Serviceable Addresses: Overview
Lead Intake Form Processing
Notes: Best Practices & Use Cases
Scheduled Events: Overview & Use Cases
Serviceable Addresses: Overview and Usage
Specify Account ID upon Creation
Tasks & Task Templates: Overview
Using Sonar's FCC Broadband Label Generation Tool
Billing
ACH Batching: Overview
Accounts in Vacation Mode
Avalara: Overview & Setup
Batch Payments & Deposit Slips: Overview
Billing Calculator
Billing Defaults
Billing Settings
Building Packages
Building a Data Service
Canadian ACH tool
Changing Service Pricing in Sonar: Best Practices
Configure Service Eligibility Criteria: Overview
Considerations When Using Avalara with Voice Services
Creating Discounts for Services and Packages
Delinquency Billing Best Practices
Delinquency Exclusions: Overview
Dual Data Services: Overview
Email Invoice Batch: Overview
General Ledger Codes: Overview
General Transactions: Best Practices
How Sonar Prorates Billing
How to Take Bank Account Payments
How to Use SKUs: Overview
How to: Adding a Service to an Account
Invoice Templates: Overview
Leveraging PayPal as a Payment Method in Sonar
Manual Transactions
Multi-Month Billing & Multi-Month Services
Print to Mail
Printed Invoice Batches: Overview
Reversals and Refunds: Overview
Services: Overview
Setting Up Payment Methods and Taking Payments
Setting up Bank Account & Credit Card Processors
Taxes Setup
Usage Based Billing Policies: Overview and Usage
Usage Based Billing Policy Free Periods: Overview and Usage
Using Tax Exemptions - How To
Communication
Communications: Call Logs Overview & Best Practices
Communications: Messages Overview
Email Variables & Conditions
Message Categories: Overview & Use Cases
Phone Number Types: Overview and Use Cases
Saved Messages: Overview
Setting up an Outbound Email Domain
Trigger Explanations
Triggered Messages: Setup
Using Outbound SMS
Using the Mass Message Tool
Companies
How to: Setting Up a Company in Sonar
Managing Multiple Companies in Sonar: Best Practices
Rebranding your Sonar Instance
Field Tech App
Financial
Agreement Templates
Invoice Attachment Use Cases & PDF Examples
Invoice Messages: Overview & Use Cases
Invoices in Sonar: Examples, Creation & Contents
Integrations
Atlas Digital CORE Integration
Calix Cloud Data Field Mappings
Calix SMx Integration: Overview
CrowdFiber Integration
External Marketing Providers
GPS Tracking Providers: Overview
GoCardless Integration: Overview & Setup
Handling Static IPs with the Calix SMx Integration
How to Connect Cambium to your Sonar Instance
How to Connect Preseem to your Sonar System
How to: Using Webhooks in Sonar
Integrating with Calix Cloud
RemoteWinBox - Integration with Sonar
Sonar Retain: AI-Powered Customer Retention & Quality Intelligence
Tower Coverage Integration: Overview
Troubleshooting Calix SMx Operational Issues
VETRO FiberMap V2 Integration: Overview
VETRO FiberMap V3 Integration: Overview
Webhook Events: Overview
Webhooks in Sonar: Basic PHP Example
iCalendar Integration
Inventory
Inventory List View: Overview
Inventory Model Management: General Overview
Network Inventory: How-to & Usage Guide
Segmentable Inventory: How-to & Usage Guide
Setup of Inventory: Manufacturers, Categories, and Assignees
Tracking and Using Consumable Inventory
Jobs
Applying Task Templates to Jobs
Edit Job Options
Example Jobs & Templates
Geofences: Overview
Job Types: Best Practices
Jobs and Scheduling: Overview
Scheduling Dispatcher View: Overview
Scheduling How-to: Creating and Booking a Job
Scheduling Table View: Overview
Scheduling Week View: Overview
Setting Up Schedules General Overview
Mapping
Misc.
Combining Custom Fields & Task Templates for Information Storage
Custom Fields Overview & Use Cases
Custom Links: Overview
Task Templates Overview & Use Cases
Monitoring
Building Alerting Rotations
Building a Monitoring Template
Poller Troubleshooting
Pollers: General Overview, Deployment Strategy, Build Out & Setup
Troubleshooting Poller and Monitoring Issues
Networking
Adtran Mosaic Cloud Platform Integration: Overview
Assigning RADIUS Addresses
Assigning an IP Address Using Sonar's IPAM: How to
Automating IP Assignments, Data Rates, and Network Access in Sonar
Building Address Lists
Building RADIUS Groups
Building a Device Mapper
Cable Modem Provisioning
Controlling Customer Speeds with Sonar: General Overview
DHCP Delivery
Data Usage Available Methods
Finding your OIDs
FreeRADIUS 3: Build-Out & Integration
How Sonar Communicates - Egress IPs Explained
IP Assignments & Sonar
IPAM: Basic Setup
IPAM: Overview
LTE Integration
MikroTik as an Inline Device: Integration With Sonar
MikroTik: Controlling Access
MikroTik: Controlling Speeds
MikroTik: Setting Up a Sonar Controlled DHCP Server
Netflow On-Premise Integration: Setup and Overview
Network Dashboard: Overview
Network Sites: Management View Overview
PacketLogic: Integration With Sonar
Pulse, Polling, and PHP
RADIUS: Build-Out & Integration with Sonar
RADIUS: Building Reply Attributes
Setting Up CoA Proxy
Sonar Flow
Sonar IP Addressing
Troubleshooting DHCP: Why Isn't My Subscriber Getting an Address?
Troubleshooting MikroTik Integration Issues
Using Multiple Network Devices in Sonar
Purchase Orders
Release Notes
Reporting
Common Custom Report Uses
Enhanced Business Intelligence - Tips & Tricks for Advanced Users
How To Enhance Your Reporting With Custom Field Data
How to Unpublish a Report or Dashboard
Managing Scheduled Reports
Report Licenses
Reporting Time Zone Behavior
Sonar's Business Intelligence: Overview
Understanding Sonar Reports
Using Sonar DataConnect to Connect BI Applications with Your Sonar Instance
Security
Application Firewall: General Overview and Best Practices
Auth0: Overview
Multi-Factor Authentication: Overview
Password Policy In Depth
Removing a Terminated Employee In Sonar
Role Creation using GraphiQL
User Role Creation & Best Practices
Users: Overview
Sonar Billing
sonarPay
How to Find Your Processing Rates in the sonarPay Portal
How to: Managing Email Notifications in the sonarPay Portal
Reconciling sonarPay Disbursements with Bank Deposits
What to Expect After sonarPay Enrollment
sonarPay Canada Disbursements: Overview
sonarPay Chargebacks & Disputes: Overview
sonarPay Disbursements: Overview
sonarPay Migration: Approving Your Match & Going Live
sonarPay Migration: The Token Transfer & Matching Process
sonarPay Monthly Statement: Overview
sonarPay Overview
sonarPay Reversals, Voids, & Refunds: Overview
sonarPay: Token Migration Process
System
A Deeper Dive into the New Sonar API
API Calls Using Third Party Applications: Personal Access Tokens
Browser Compatibility and Minimum Hardware Requirements for Sonar
Consuming the Sonar API
Controlling Your Landing Page: Personal Preferences
Customizing Your Customer Portal
Date/Time Picker: Overview
Dynamic Time Zones in Sonar
Filtering: Overview
Frequently Used Terms
Getting Your Data into Sonar
GraphQL Rate Limiting Overview
How To Use GraphiQL to Understand the Sonar API
How Your Data is Backed Up
How to Best Use Global Search
Interacting with Files via the API
Introducing the New Sidebar
Main Menu: Overview
Mutations in the Sonar API
Notification Preferences
REST API Wrappers for V1 Compatibility
SMS Notifications
Sonar Feels Slow: What to Check First
Sonar's Rich Text Editor
System Settings: Overview
The New Sonar API
Troubleshooting the Customer Portal
Upgrading your Ubuntu OS - Customer Portal Upgrades
User Profile: Your Personal User Settings
View History & All Logs: Overview
Ticketing
Advanced Ticketing Features
Canned Replies Examples & Templates
Canned Reply Categories
Exploring Ticket Groups
How Sonar Manages Spam Tickets
How to Integrate Inbound Mailboxes with Slack
Inbound Mailboxes Example Build
Merged Tickets: Overview & Best Practices
Ticket Category Families & Ticket Categories: Overview
Ticket Resolution Reasons: Overview
Ticketing: Overview
Using Parent Tickets
Voice
API Changes for Voice Billing
Best Practices to Remain CPNI Compliant
Billing Voice Services in Sonar
Deploying Voice Services in Sonar
Working With the Sonar Team & Additional Resources
Sonar's Security Practices & Certifications
Security & Compliance
Sonar and General Data Protection Regulation (GDPR)
Technical Security Overview
Best Practices for Fast Tracking a Support Request
Feedback Portal / Suggest a Feature
Learning with Sonar: Tools and Resources
New Client Training Overview
Sonar Casts Table of Contents
Submitting Bugs vs. Feature Requests
The Sonar Community Forum
The Sonar Status Page
Third Party Customer Support Referrals
Where Sonar Stores Your Data
Table of Contents
- All Categories
- Accounts
- Scheduled Events: Overview & Use Cases
Scheduled Events: Overview & Use Cases
 Updated
by Mitchell Ivany
Updated
by Mitchell Ivany
Read Time: 7 mins
Scheduled events are automated actions that you can set up to modify an account on a future date. They are useful when an account change needs to happen outside business hours, and can also be used as an alternative to making a note to complete an account change at a later date. The scheduled events are configured individually per account, and once set up, are viewable from the Overview tab of an account.
By keeping this in mind, you can set expectations appropriately: events will always respect their minimum start time, but slight delays may occur under heavy demand.
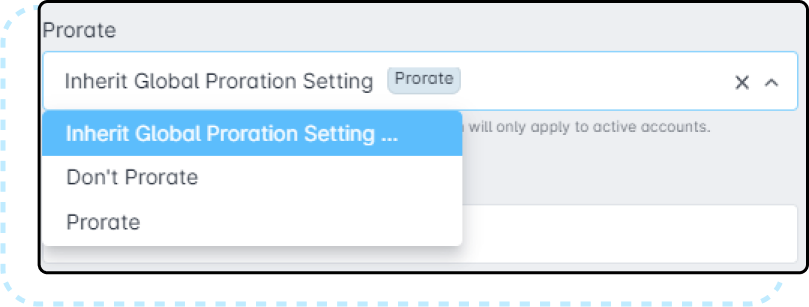
Scheduling service or account status changes can also be prorated, and the dropdown will default to using your instance's default settings. If you'd like to override these settings, expand the dropdown, and select whether to pro-rate the services.
How To Set Up A Scheduled Event
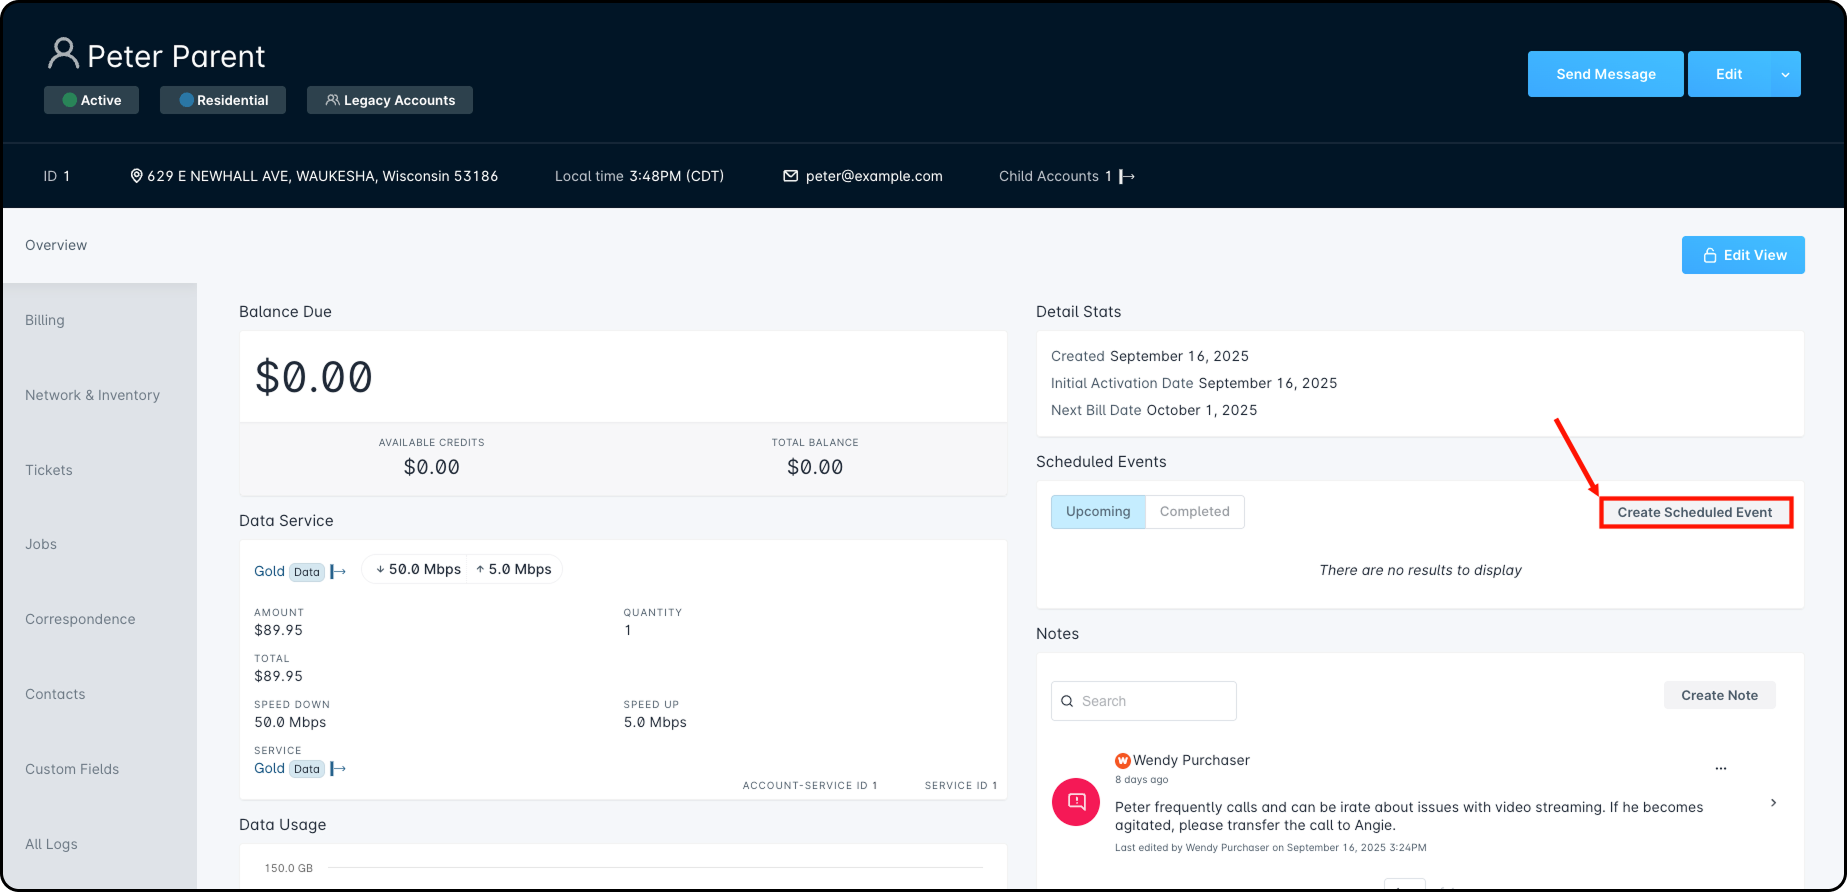
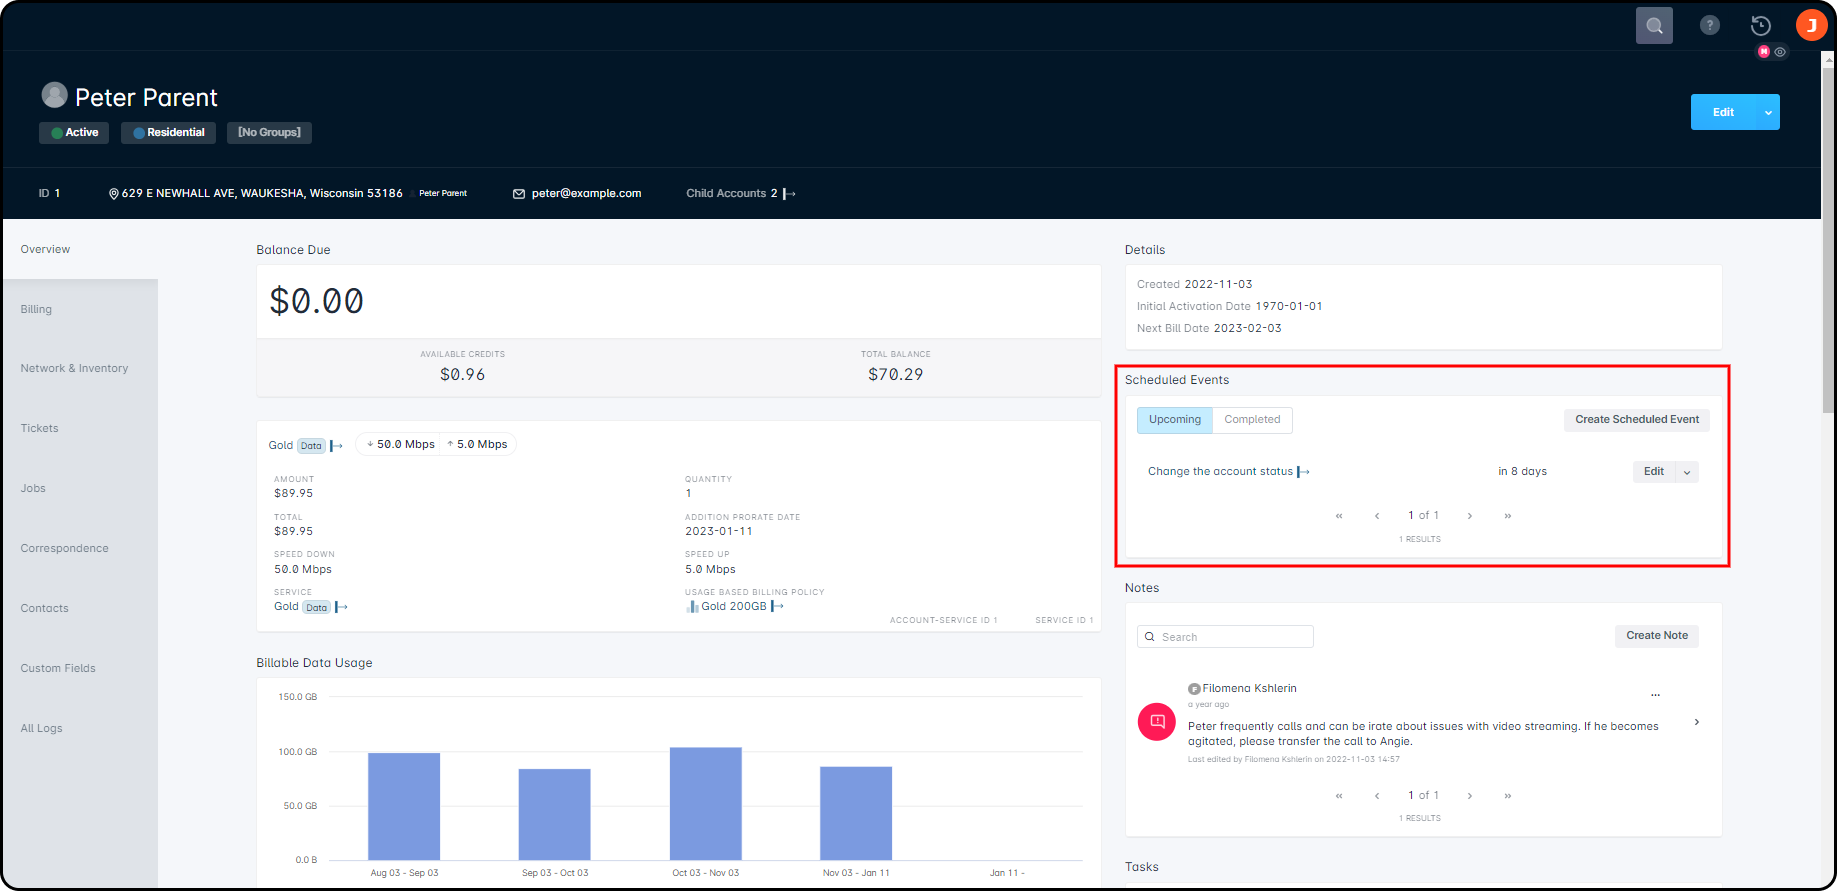
To set up a scheduled event, first, navigate to the account that you wish to set it up for. From the Overview tab of the account screen, you will see a Scheduled Event section on the right-hand side. Any upcoming scheduled events will appear here; otherwise, it will say “no results to display”. In this section, you will also find the Create Scheduled Event button, to set up a new scheduled event.
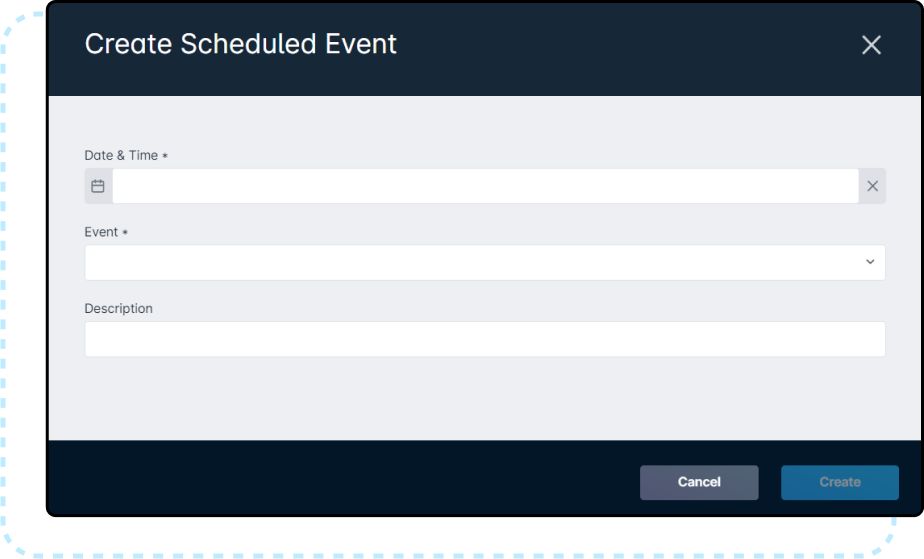
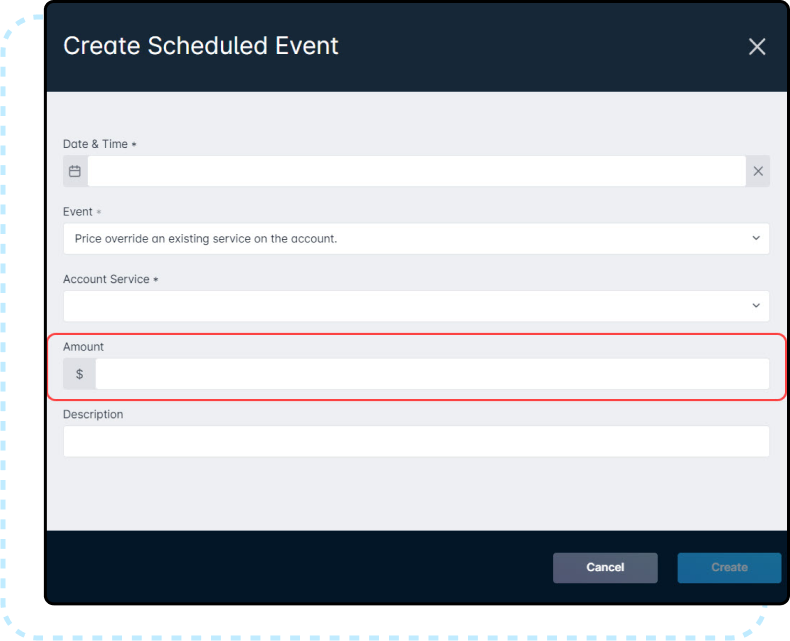
Clicking Create Scheduled Event will cause a pop-up window to appear, where you will define the event. This window will only have 3 fields displayed initially:
- Date & Time: This is where you will select the date and time that you want the scheduled event to occur. You will first select the date, and then the option for the time will appear directly after.For more information on how to use the Date/Time picker, please review this linked article.
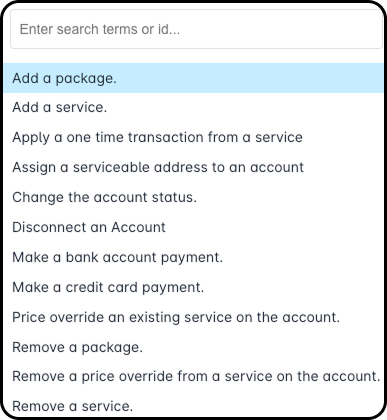
- Event: This is a drop-down list of predefined events, where you will need to select which event you would like to schedule. Depending on the event you choose, additional fields may appear and be required to fill out as well.Available options for the Event field are shown below.
- Description: This field is primarily for providing some information regarding the scheduled event that is set to happen. It can be used to provide details around why the event is happening and if it was requested, by whom, just so that when anyone else is viewing the account they can see any necessary information.
Once a scheduled event is created, it will appear on the right-hand side of the Overview tab in the account view. Clicking the event name opens a sidebar with key details, including the linked account, event type, description, date and time, and the assigned user. The system also shows when the event is scheduled, broken down into years, months, days, hours, and minutes, as well as how long ago past events occurred. For more precision, hovering over the event’s time counter will display the exact date and time of the event.
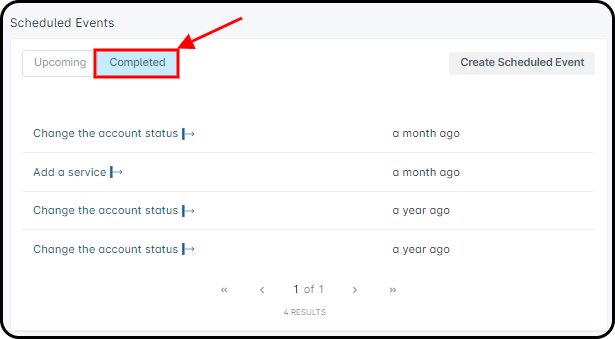
To view Completed Scheduled Events, click on the Completed tab.
Example #1: Adding A Service
Using the “Add a service” Scheduled Event, you can automate placing a new Service on an Account, or, in the case of Data Services, automatically change the Service associated with the Subscriber. In this example, the Subscriber is requesting a service upgrade at the start of their next billing cycle that won't require technician intervention. These straightforward changes highlight the strengths of Scheduled Events.
The Scheduled Event for this subscriber, Anissa Mills, would look like this:
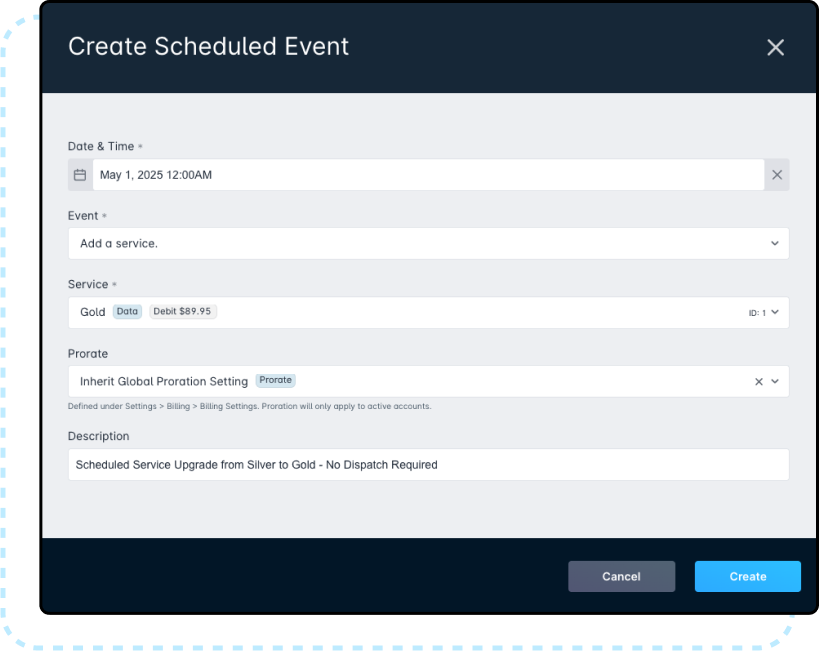
Since billing runs at 5 minutes past midnight within Sonar, scheduling the event for midnight on May 1st will allow it to take effect before billing runs, and before the subscriber's next billing cycle. On the scheduled day, Anissa's account will now have 2 actions take place automatically based on this scheduled event.
- The Silver Internet service will be removed.
- The Gold Internet service will be added.
Now that we have created the event, we will be able to view it, as well as any other scheduled events, from the right-hand side of the Account Overview screen.
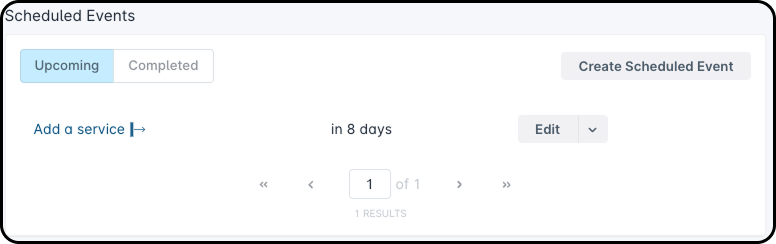
Example #2: Change The Account Status
Victor Moen, a customer, calls in saying that he will be on vacation from March to July, and will therefore not be needing any services during this time. Instead of making a note to set their account to Inactive and also to change the status back to Active once they return, or having them call in again when they are back from their vacation, we can use scheduled events to automatically change Victor's account status.
First, we will need to create an event to change the account status to Inactive on March 1st.
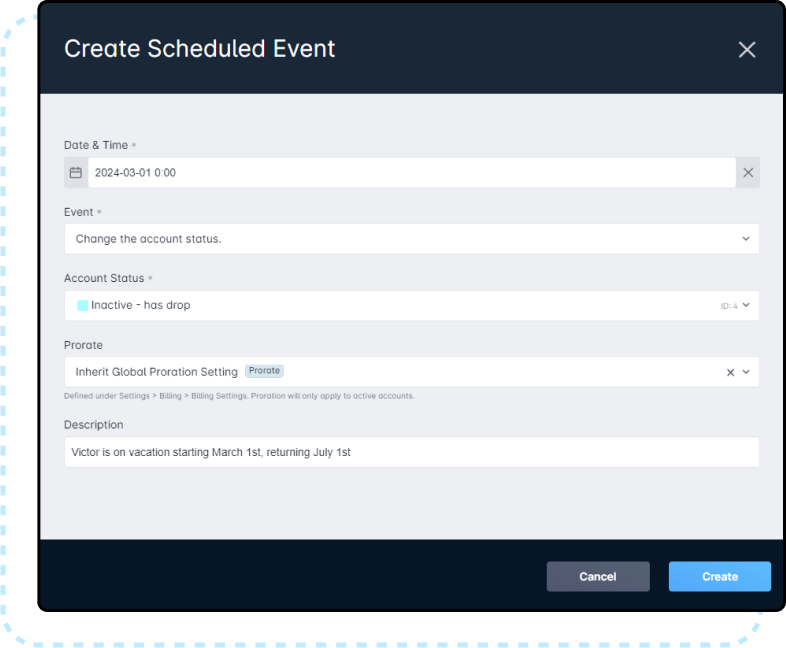
Next, we will need to create an event to change the account status back to Active, for when Victor returns from vacation on July 1st.
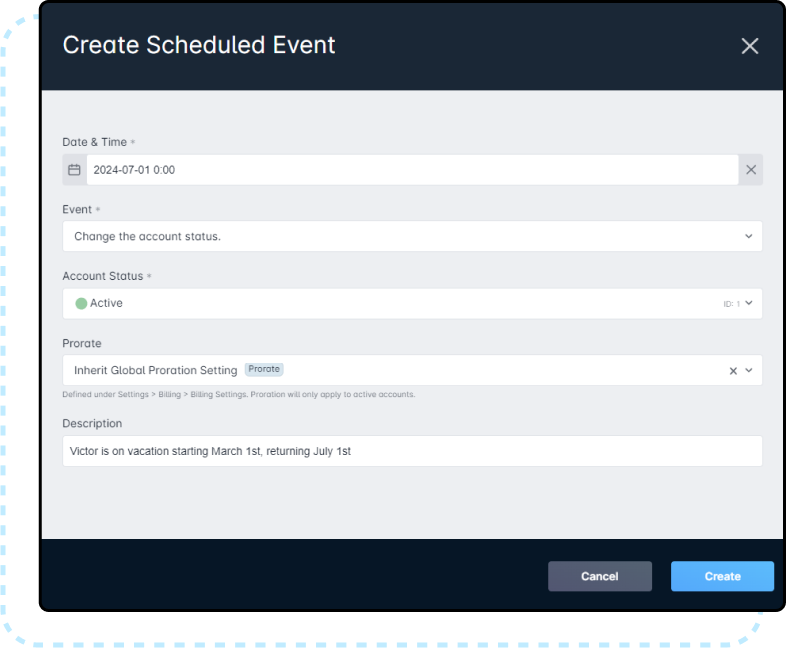
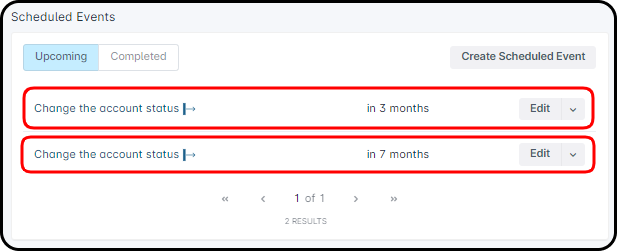
Now, both scheduled events have been set up and Victor's account will change to the appropriate status during her vacation as well as return to Active once they're back.
Considerations when changing the account status
The above example for changing the account status works for most situations where customers are away for periods of time. However, if the account's billing parameters have the Day Billing Runs and Invoice Day as different values, this might cause an unexpected result in the case of prorating when the account is reactivated.
For example: We have an ISP that bills on the 20th of the month, but their invoice date is set for the 1st of the month because they bill in advance. If the customer's account was set to an Inactive status for this entire time, but then became active on the 25th of the month, then when billing runs on the 20th that means that billing didn't run on their account yet – therefore proration did not work as expected.
One solution for this would be to use a combination of a vacation status, scheduled events, and the Next Bill Date billing parameter for the account. Creating a vacation status for these customers and having them moved into that status, instead of just being moved into Inactive, helps to let you know that the customer is indeed returning and is not going to remain inactive. Then, using scheduled events, you would be able to set up 2 events to change the account status from Active to Vacation, and then from Vacation back to Active. Lastly, you would only need to change the Next Bill Date on the account's billing configuration. Doing this would make the disconnect process similar to the process below:
- Create a Vacation account status (if not already created)
- Create a Scheduled Event to change the customer's account status from Active to Vacation
- Create a Scheduled Event to change the customer's account status from Vacation to Active
- Change the Next Bill Date parameter to a future date beyond the date the customer is scheduled to be reactivated