Table of Contents
Netflow On-Premise Integration: Setup and Overview
 Updated
by Mitchell Ivany
Updated
by Mitchell Ivany
Read Time: 7 mins
What is Netflow, and What are Netflow Endpoints?
Netflow is a catch-all term for a process originally developed by Cisco to respond to a need to gather information on a network's traffic flow and volume. This technology was further developed by the Internet Engineering Task Force (IETF) to become “Internet Protocol Flow Information eXport” or “IPFIX”. Netflow works by capturing data from Netflow Endpoints and submitting that data to a Netflow Collector.
Sonar's On-Premise Netflow solution acts as a Netflow Collector on your hardware, and serves to store the data sent to your instance by the Netflow Endpoints. Many network devices support Netflow, or some variant of it (e.g., IPFIX.) While there are a few variants, this documentation will refer to Netflow generally – just be aware that this solution supports Netflow version v1, v5/v7, v9, and IPFIX.
Supporting Netflow with Sonar is simple. All you need to do is prepare your instance, download the GitHub repository, extract and run the setup tool, then configure your delivery agents!
Prerequisites
Minimum Guidelines
OS: Debian-based distro running Ubuntu 24 x64. Please note that the Netflow On-Premises solution will not work with Ubuntu 19, as Docker is unsupported.

CPU Requirements: 4 CPU cores (or 4 vCPUs)

RAM: 16 GB | As the size of the network / unique IP addresses being monitored grows, so should this value. If Netflow collection traffic approaches 1Gbps, 32 GB is recommended.

Storage: 150 GB SSD | This needs to be adjusted if you change the environment variables that relate to retention. More importantly, data is being constantly written and read from the storage. High IOPS will ensure a smooth operation.

Networking: 1Gbps (or above) | A good rule of thumb is that Netflow traffic will be about 1% of your total data traffic. However, there can be spikes, so make sure you have the network capacity to accommodate.
1. Increase hardware on the existing server or spin up a second server and have Netflow traffic split between devices.
2. Adjust the Netflow settings of your network hardware so that each device is capturing unique traffic.
Creating your Netflow On-Premises User and User Role
The Netflow On-Premises solution requires a connection to your Sonar instance, which we recommend you accomplish with a dedicated User. This created User will also require the appropriate permissions to ensure uninterrupted communication with your instance.
Creating the User Role
Before you create a User, the User Role needs to be defined. The purpose of this Role is to allow your On-Premises Netflow Connector to access basic account and IP information, while also letting it add Data Usage. Run the following in GraphiQL (e.g., yourinstance.sonar.software/graphiql):
- Start by adding this mutation to the panel in the top-left:
mutation createRole($netflow_onprem: CreateRoleMutationInput) {
    createRole(input: $netflow_onprem) {
        name
    }
} - Then create the variable (drag the lower-left window upwards to reveal the screen)
{
"netflow_onprem":
  {
    "name": "Netflow On-Premises",
    "applied_permissions": [
        "READ_ACCOUNT",
         "READ_ACCOUNT_STATUS",
         "READ_ACCOUNT_GROUP",
         "READ_ACCOUNT_TYPE",
         "READ_IP_ASSIGNMENT",
         "READ_ADDRESS_LIST",
         "CREATE_DATA_USAGE",
         "READ_NETFLOW_ENDPOINT",
         "CREATE_NETFLOW_ENDPOINT",
         "UPDATE_NETFLOW_ENDPOINT",
         "DELETE_NETFLOW_ENDPOINT"
    ],
    "note": {
      "message": "Netflow On-Premises",
      "priority": "NORMAL"
    }
  }
} - Finally, click the play button to run the mutation.
Considerations When Creating the User
- When you create a new user for the Netflow On-Premise solution, it's important to consider the User's name. While the name doesn't truly matter, providing a distinct name will, in addition to the logging mentioned earlier, facilitate troubleshooting conducted by you or the Sonar Support team.
- Because this User account acts as the bridge between your Sonar Instance and the Netflow On-Premises Connector, you'll need to generate a Personal Access Token from this User. For this reason, it's important to ensure you, or someone on your team, can maintain access to this account.
Generate A Personal Access Token
With the User created, a Personal Access Token is needed to authenticate with the On-Premise Netflow Collector.
- Log in as the Netflow Collector user and click on the avatar icon in the top-right.
- Click on the Personal Access Token Tab.
- Click on Create Personal Access Token.
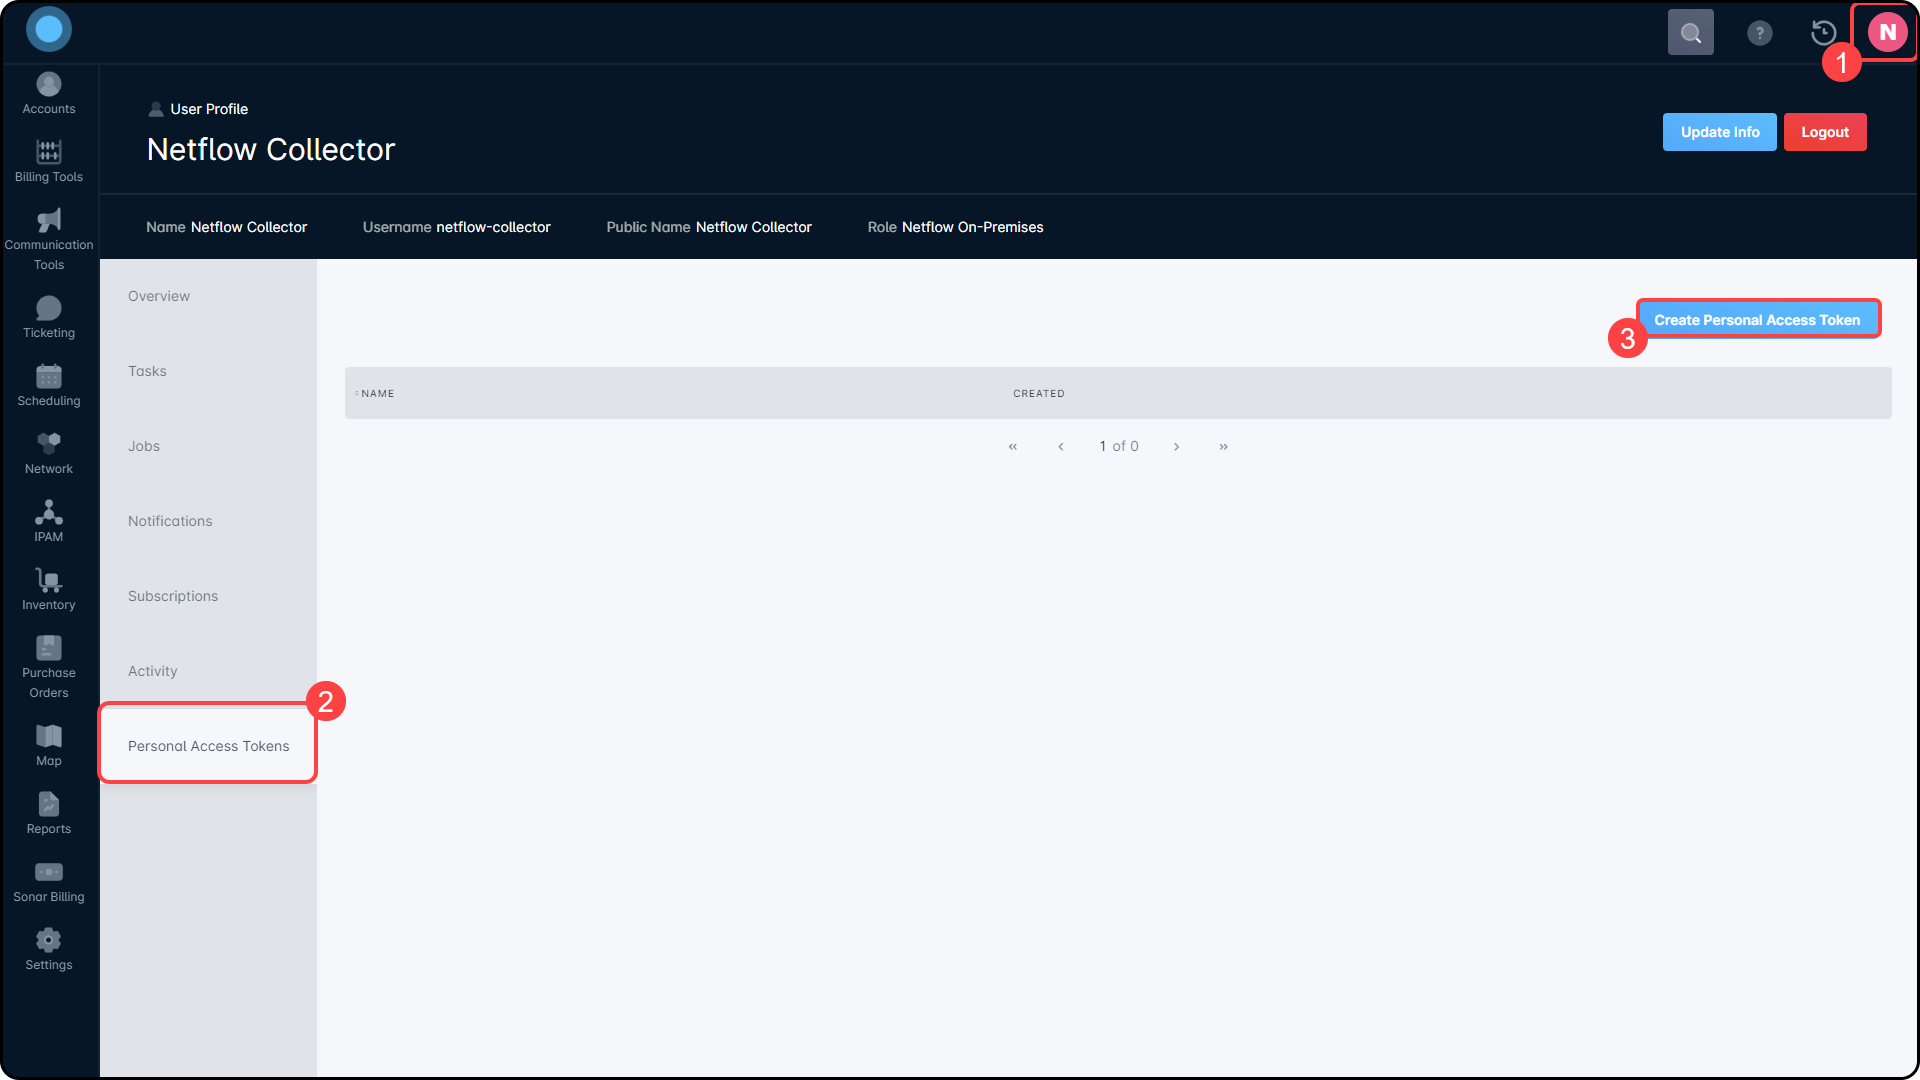
- Add a recognizable name for the Personal Access Token.

- Copy the Personal Access Token and save it somewhere. This will be needed during the setup of your On-Premise Netflow Collector.
Building the On-Premises Netflow Collector
To assist you with configuring your Netflow Collector, Sonar has written a guide hosted in the repository on GitHub. You can find it by following this link, and it will take you through the whole process.
Configuring your Delivery Agent
Each device that can deliver Netflow is configured differently, but please see below for a quick tutorial on a MikroTik router.
First, open the IP menu and click on Traffic Flow.
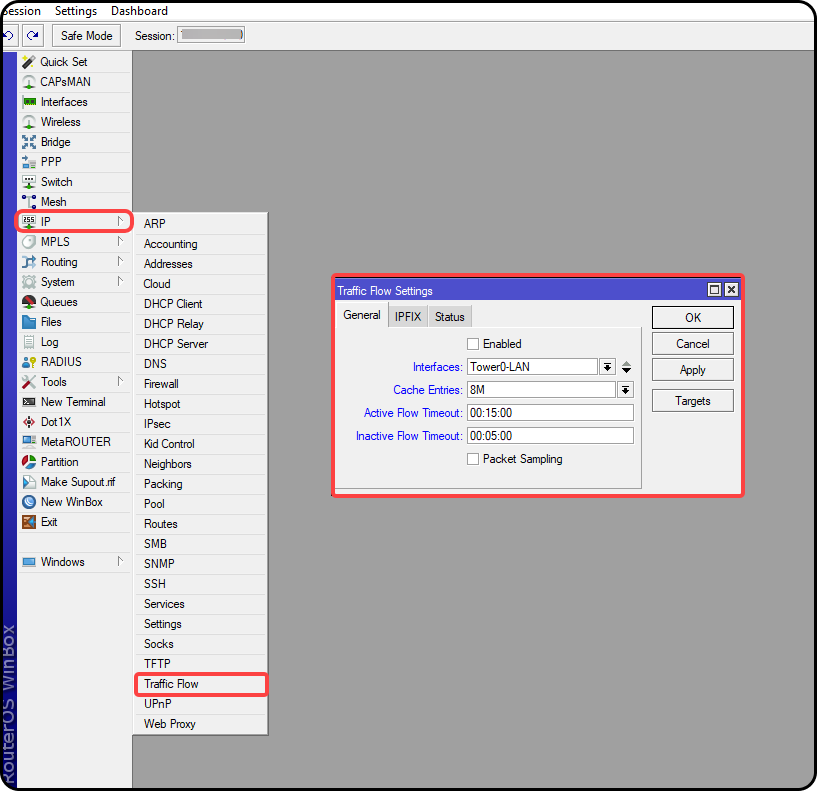
If you only wish to collect data from certain interfaces (for example, if you have a single customer-facing interface), then select the appropriate interfaces in the Interfaces section. If this router handles a lot of traffic, you should limit the reporting interfaces to lessen the load on your router.
The Cache entries option controls the number of flows that can be in the router's memory simultaneously. If you have a high quantity of traffic, you should increase this – just be aware that it will increase memory consumption on your router. The values for Active/Inactive Flow Timeouts reflected in the above screenshot are the recommended settings.
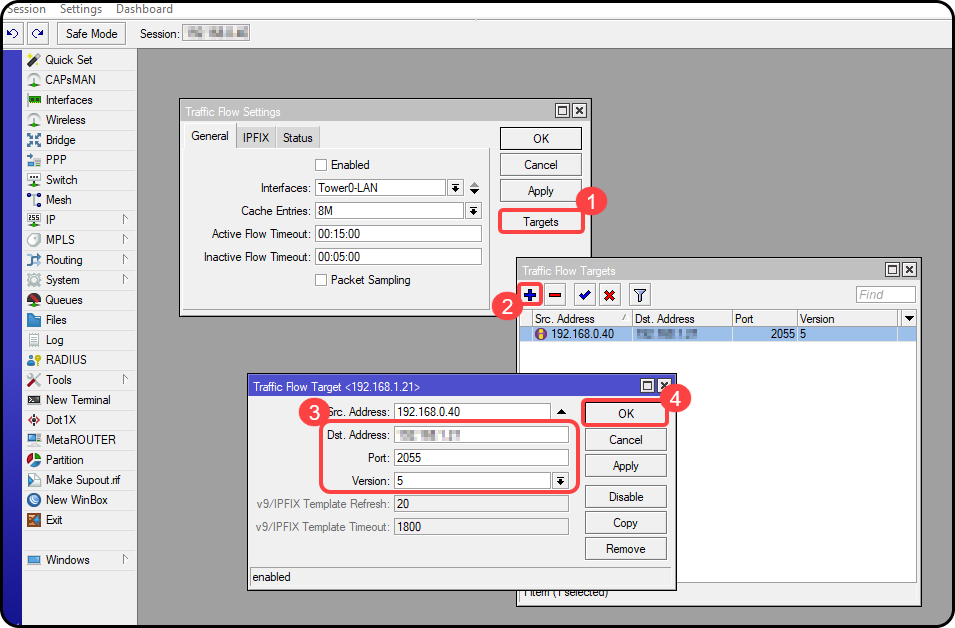
Now click the Targets button and then the + button. You'll need to add this router as the Src. Address, as we want to send all traffic data from this router to the Netflow Collector. Once that's done, enter the address of the Netflow On-Premise Device in the Dst. Address field, and the port you were provided when the Netflow On-Premise setup was performed in the Port field. Set the Version field to 5 and click OK:
After a few minutes, you will see data usage for your customers begin to tabulate on their accounts in Sonar.
Switching From Sonar as a Netflow Collector
Previously, Sonar's Netflow integration relied on your instance acting as the collector. While this works fine for small amounts of data, it falls flat when dealing with anything larger than very small networks. This new solution relies on external, upgradeable hardware, which makes it the ideal solution for most networks. Switching between the two is easy:
- On your network, redirect the Netflow traffic from your routers to the new On-Premise Netflow collector.
- Deactivate the built-in Sonar Netflow collector
Once that's done, Usage Data will be reported by the On-Premises connector, and nothing more is required.