Table of Contents
FreeRADIUS 3: Build-Out & Integration
 Updated
by Jennifer Trower
Updated
by Jennifer Trower
Read Time: 08 mins
This guide is intended for users who wish to set up FreeRADIUS for use with Sonar. It leverages FreeRADIUS Genie, an installer that simplifies the configuration process, and is built for compatibility with Ubuntu 24.04 and FreeRADIUS 3.
Building the RADIUS Server
Getting Started
This installer is intended for use on Ubuntu 24.04 64bit with FreeRADIUS 3, but it should also work on other Ubuntu versions. First, install Ubuntu on the server where you plan to run FreeRADIUS. If you're hosting it online, Digital Ocean is a recommended option.
- Install Ubuntu 24.04 on your server.
- SSH into your server and run the following commands in preparation:
sudo apt-get updatesudo apt-get upgradesudo apt-get install php-cli php-mbstring php-mysql unzip gitIf you're on an older Ubuntu version, use this command instead to install the required PHP 5 packages and unzip:sudo apt-get install php5-cli php5-mbstring php5-mysql unzip git
- After running the initial commands, install MariaDB (a drop-in replacement for MySQL) and the FreeRADIUS server by using the following commands:
sudo apt-get install mariadb-server mariadb-clientsudo apt-get install freeradius freeradius-common freeradius-utils freeradius-mysql
- Download FreeRADIUS Genie:
- Navigate into the FreeRADIUS Genie directory:
cd freeradius_genie-v3
Hosting Considerations
If you're hosting your server online, it likely doesn't have swap memory set up. For servers with low RAM (1–2 GB), or even more, it's a good idea to add swap space to avoid out-of-memory errors. The swap file size should be at least equal to your server’s RAM and at most double the RAM. A simple rule is to match your swap size to your RAM and increase it to 2x only if needed. If you still get memory errors after doubling it, upgrade your server’s RAM instead of increasing swap further. You can also refer to the Ubuntu Swap FAQ for more guidance.
To set up swap, run these commands as root or use sudo:
/usr/bin/fallocate -l 4G /swapfilewhere 4G is equal to the size of the swap file in gigabytes./bin/chmod 600 /swapfile/sbin/mkswap /swapfile/sbin/swapon /swapfileecho "/swapfile none swap sw 0 0" >> /etc/fstab/sbin/sysctl vm.swappiness=10echo "vm.swappiness=10" >> /etc/sysctl.conf/sbin/sysctl vm.vfs_cache_pressure=50echo "vm.vfs_cache_pressure=50" >> /etc/sysctl.conf
Completing Preliminary Installation
With all required software installed, the next step is to secure and configure your SQL database. Run the following command:
sudo /usr/bin/mysql_secure_installation
Then answer the prompts like this:
- Enter current password for root (enter for none): Press Enter
- Set root password? [Y/n]: Type
y - New password: Enter a strong password and save it—you’ll need it soon
- Remove anonymous users? [Y/n]: Type
y - Disallow root login remotely? [Y/n]: Type
y - Remove test database and access to it? [Y/n]: Type
y - Reload privilege tables now? [Y/n]: Type
y
After completing these steps, you’ll have a basic setup with FreeRADIUS and MySQL ready for initial configuration.
Configuration
To let the Sonar Genie tool finish the setup, you need to add your MySQL root password to a config file.
- Copy the example file and open it:
cp .env.example .envnano .env
- Find the line that says
MYSQL_PASSWORD=changeme, deletechangeme, and replace it with the MySQL root password you set earlier. - Press
CTRL+X, then confirm to save and exit.
Be sure to save this password somewhere safe—you’ll need it again later.
Once that’s done, you’re ready to start using Genie!
Genie
Genie is a command‑line tool created to automate the setup and configuration of your FreeRADIUS server. You’ll use it to walk through the initial setup so you don’t need to edit configuration files or work directly in MySQL. Run: php genie

First Steps
Start by setting up the database:
- In the Genie menu, highlight Initial Configuration, press the space bar to select it, then press Enter.
- Select Setup initial database structure, press the space bar, then press Enter again. This will create the database structure.If you see a credentials error, double-check the MySQL root password in your
.envfile in the Configuration section.
Next, configure FreeRADIUS files:
- Select Perform initial FreeRADIUS configuration, press the space bar, then press Enter.
- This sets up FreeRADIUS to use the SQL server as a backend and restarts it.
Managing Your NAS
A NAS (Network Access Server) is the device that connects to your RADIUS server to manage client access—usually something like a PPPoE concentrator in ISP setups.
To add a NAS using Genie:
- Run
php genieto open the tool. - From the main menu, select NAS Configuration, then Add NAS.
- Enter the NAS’s IP address and a short name for it when prompted.
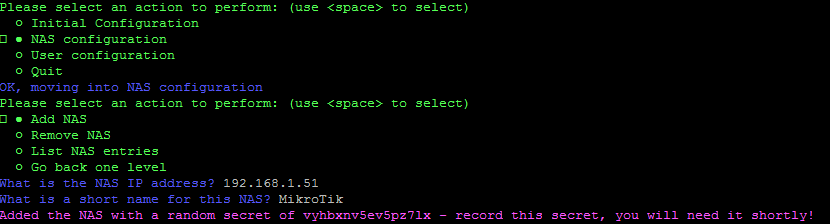
Genie will generate a random secret—make sure to copy it. You’ll need to enter it into your PPPoE concentrator (for example, a MikroTik router).
Connecting MikroTik to Your RADIUS Server
Now that your RADIUS server is set up, you can connect it to your MikroTik router to manage PPPoE sessions. These steps may vary depending on your NAS device, so check the manual if needed.
To configure RADIUS in MikroTik using WinBox:

- Go to RADIUS in the left menu.
- Click the + button to add a new RADIUS server.
- Fill out the form:
- Check the PPP checkbox.
- In Address, enter your RADIUS server’s IP.
- In Secret, enter the random secret Genie gave you.
- In Src. Address, enter the IP address you used when adding the NAS in Genie.
That’s it—your MikroTik is now using RADIUS for PPPoE!
You can view all NAS entries in Genie by selecting List NAS Entries, or remove one using Remove NAS.
Configuring MySQL for Remote Access
To let Sonar connect to your RADIUS server, you need to enable remote access in MySQL.
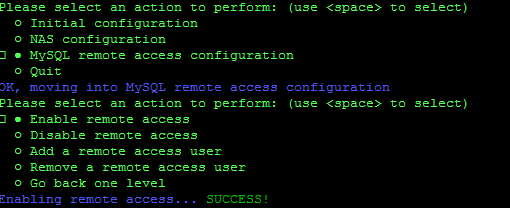
- In Genie, go to the MySQL Remote Access Configuration menu.
- Select Enable remote access — this allows MySQL to accept connections from outside the server, rather than just to
localhost(127.0.0.1).
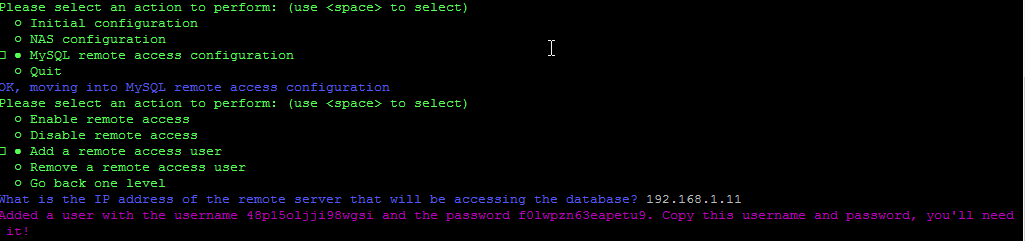
Next, create a remote access user:
- In the same menu, select Add a remote access user.
- Genie will ask for the remote server’s IP. Use the default for Sonar V2.If you're using Sonar V1 and don't know the IP, ping your Sonar instance to find it.

After you add the remote access user, Genie will give you a random username and password—be sure to copy and save them for later.
Linking FreeRADIUS to Sonar
Now that setup is complete, you’ll connect your RADIUS server to Sonar.
- In your Sonar instance, go to Settings.
- Click on Networking, then select RADIUS Servers.
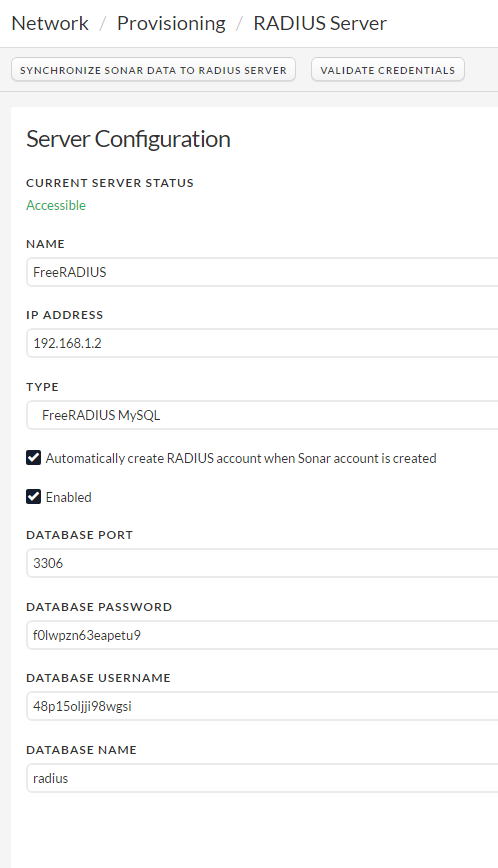
- Fill in the required details:
- Database Name:
radius - Database Port:
3306
- Database Name:
- Click Validate Credentials. If everything is correct, the Current Server Status will show as Accessible.
Basic PPPoE Configuration
Once everything is set up, you can configure a basic PPPoE setup on your MikroTik router.
- Set Up IP Pools
Go to IP > Pool in MikroTik. These pools should match the ones you've set up in Sonar’s IPAM (refer to Sonar docs for help).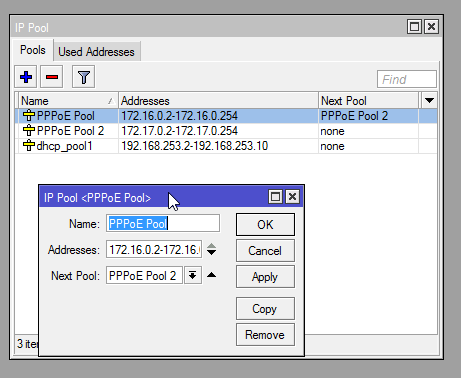
- Define a start IP, end IP, and an optional “next pool” if the first is full.
- You can assign static IPs in Sonar by linking them to a user’s RADIUS account. If not, MikroTik will assign a dynamic IP from the pool, and Sonar will track it as a soft assignment.
- Create a PPP Profile
Go to PPP > Profiles and click+to create a new profile.- Set a name.
- Choose a Local Address (like the first IP in your subnet, but not one inside the pool).
- For Remote Address, pick your first IP pool.
- Add DNS servers to assign to users.
- Under the Limits tab, set a Session Timeout (for example, 24 hours). Leave it blank if you want sessions to stay connected indefinitely.

Enable RADIUS Accounting in MikroTik
After setting up your PPP profile:
- Go to the Secrets tab, then click PPP Authentication & Accounting.
- Check Use Radius and Accounting.
- Set a value for Interim Update (in minutes). This controls how often MikroTik sends usage data to the RADIUS server.For small networks (a few hundred users), 1–5 minutes is fine. For larger networks, start with 15 minutes or more to avoid overloading your server.
Set Up the PPPoE Server in MikroTik
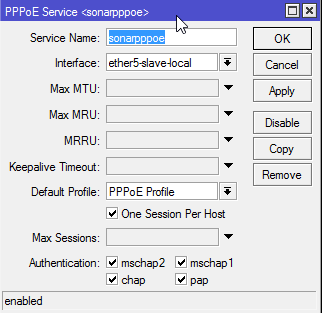
- Go to the PPPoE Servers tab and click
+to create a new server. - Enter a name, choose the interface clients will connect through, and select the PPP profile you set up earlier.
- Check One Session Per Host to limit each device to one PPPoE session.
- Make sure all authentication options at the bottom are checked.
Your basic PPPoE server is now ready.
Testing the Connection
- In Sonar, go to a user account, then Network > RADIUS, and create a new RADIUS account. Note the username and password.
- In MikroTik, go to Active Connections and try connecting with a PPPoE client using the Sonar credentials.
- The client should get an IP from the pool, and the connection will appear in the list.
Assigning a Static IP
To assign a static IP:
- In Sonar, go to the user’s account > Network > IP Assignments.
- Assign an IP to the RADIUS account.
- Disconnect and reconnect the PPPoE client—it will now receive the static IP.
Scaling FreeRADIUS for Large Networks
To handle large networks, FreeRADIUS mainly needs plenty of RAM, CPU power, and fast storage. You’ll also want to adjust a few settings from the scalability guide. If you're managing a network with hundreds of thousands of users and need help, feel free to reach out.