Table of Contents
Scheduling Dispatcher View: Overview
 Updated
by Jennifer Trower
Updated
by Jennifer Trower
Read Time: 7 mins
The Dispatcher View provides a central hub for managing all jobs, technician schedules, and route planning. This tool supports both visual and grid-based scheduling, enabling dispatchers to quickly assess and assign jobs with minimal travel time and schedule conflicts.
Permissions
Before getting started with the feature, your user roles will need to be adjusted to account for the permissions required to use the Dispatcher View feature.
- Job:
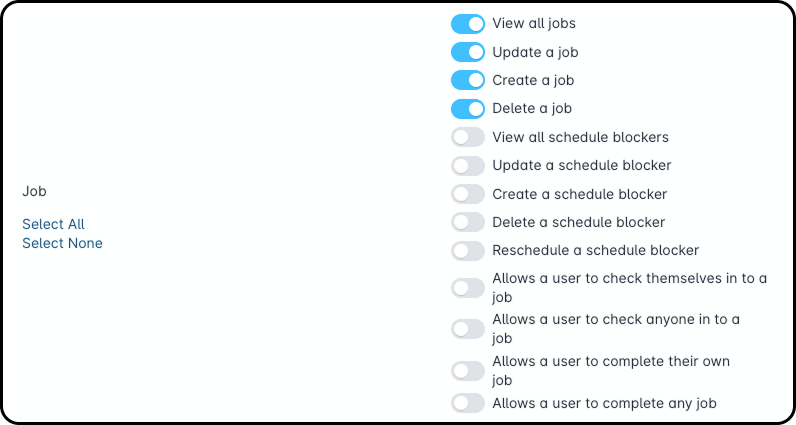
Permission Details
1. View all jobs: allows you to view all jobs.
2. Update a job: allows you to update a job.
3. Create a job: allows you to create a job.
4. Delete a job: allows you to delete a job.
5. View all schedule blockers: allows you to view all scheduled blockers.
6. Update a schedule blocker: allows you to update a scheduled blocker.
7. Create a schedule blocker: allows you to create a scheduled blocker.
8. Delete a schedule blocker: allows you to delete a scheduled blocker.
9. Reschedule a schedule blocker: allows you to reschedule a scheduled blocker.
10. Allows a user to check themselves in to a job: allows you to check into a job.
11. Allows a user to check anyone in to a job: allows you to check anyone into a job.
12. Allows a user to complete their own job: allows you to complete your job.
13. Allows a user to complete any job: allows you to complete any job. - Account:
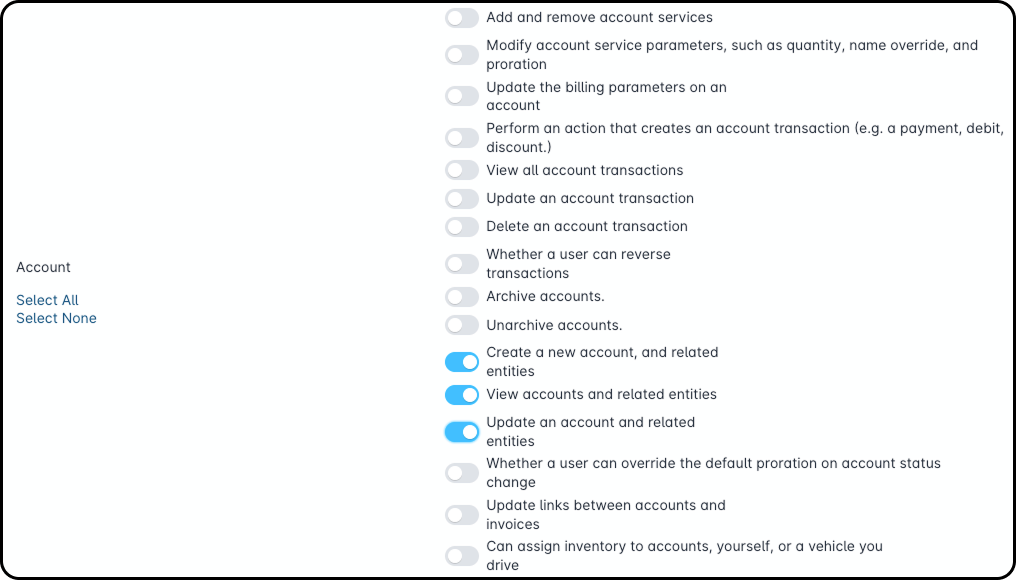
Permission Details
1. Add and remove account services: allows you to add or remove account services.
2. Modify account service parameters, such as quantity, name override, and proration: allows you to modify account service parameters on an account.
3. Update the billing parameters on an account: allows you to update billing parameters on an account.
4. Perform an action that creates an account transaction (e.g. a payment, debit, discount.): allows you to create an account transaction.
5. View all account transactions: allows you to view all account transactions.
6. Update an account transaction: allows you to update an account transaction.
7. Delete an account transaction: allows you to delete an account transaction.
8. Whether a user can reverse transactions: allows you to reverse transactions.
9. Archive accounts: allows you to archive accounts.
10. Unarchive accounts: allows you to unarchive accounts.
11. Create a new account, and related entities: allows you to create a new account and related entities.
12. View accounts and related entities: allows you to view accounts and related entities.
13. Update an account and related entities: allows you to update an account and related entities.
14. Whether a user can override the default proration on account status change: allows you to override the default proration on account status changes.
15. Update links between accounts and invoices: allows you to update links between accounts and invoices.
16. Can assign inventory to accounts, yourself, or a vehicle you drive:allows you to assign inventory to accounts, yourself, or a vehichle you drive. - Address:

Permission Details
1. Create a new serviceable address: allows you to create a serviceable address.
2. View serviceable addresses: allows you to view a serviceable address.
3. Update a serviceable address: allows you to update a serviceable address.
4. Delete a serviceable address: allows you to delete a serviceable address.
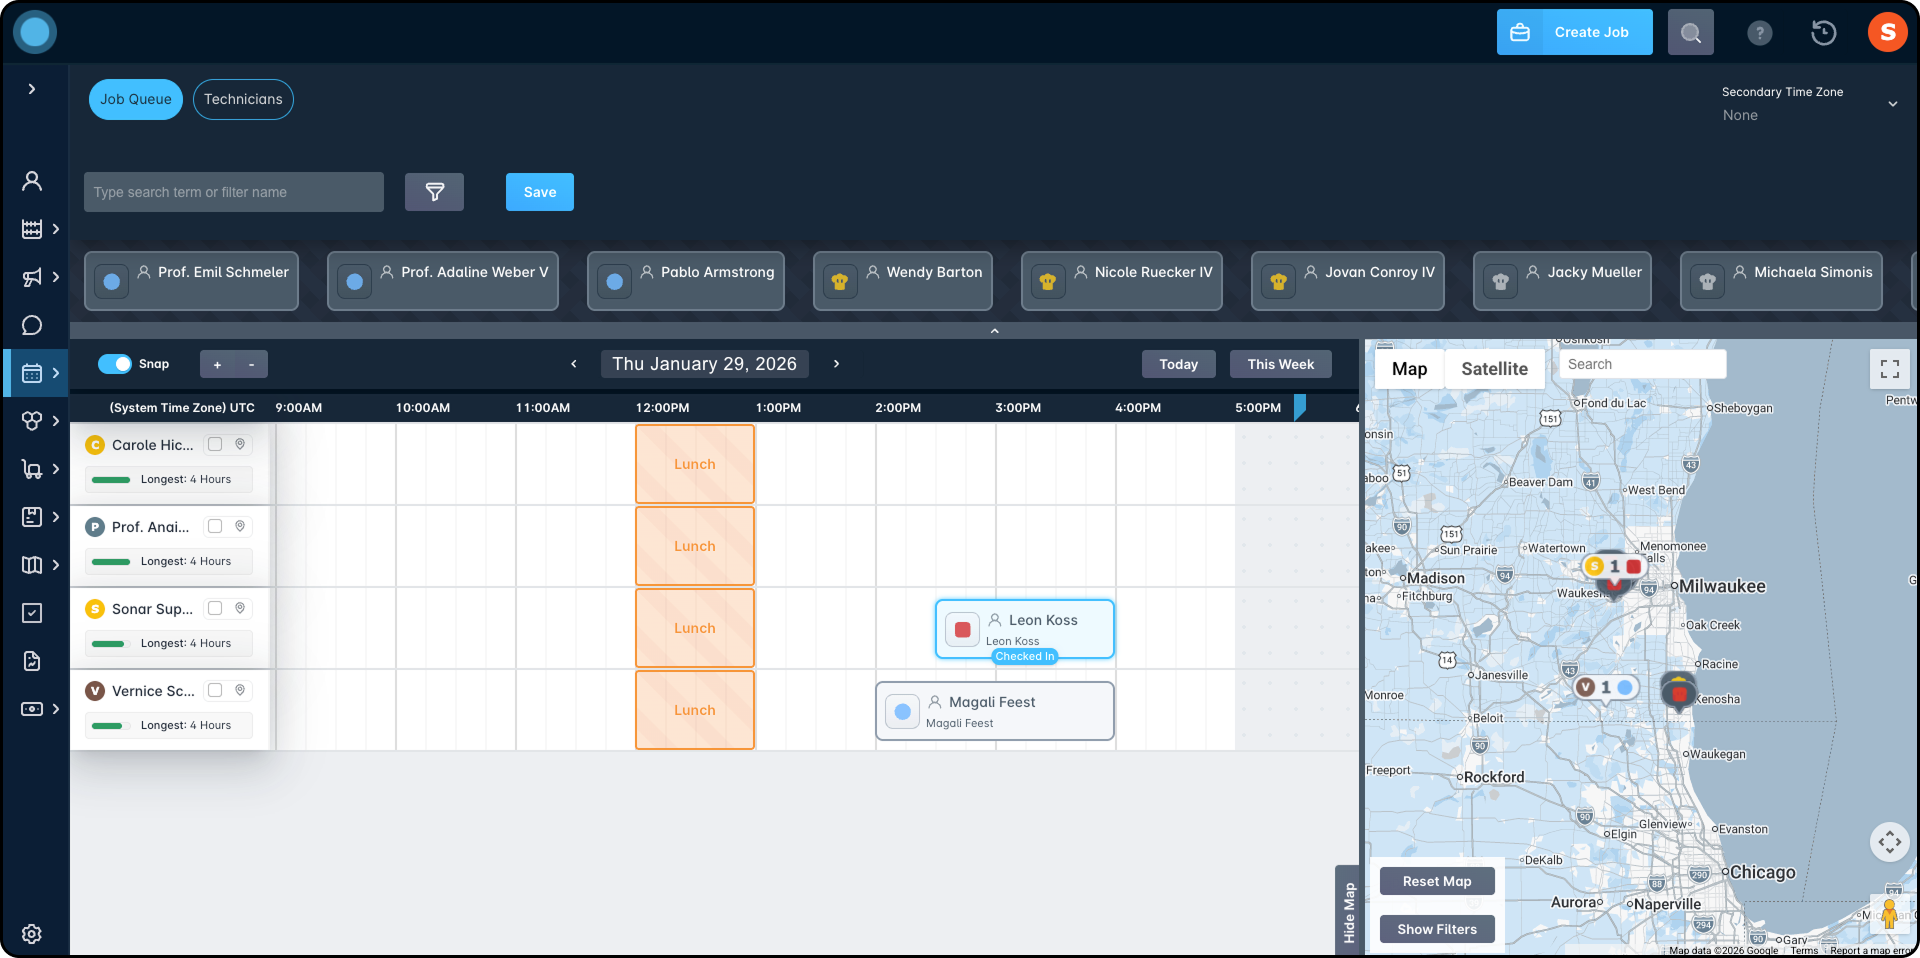
Job Queue and Grid
The job queue and grid section is where you manage unscheduled jobs and assign them to technicians. It provides a clear list of pending jobs and a visual grid of each technician’s schedule for the day. With easy drag-and-drop functionality and helpful filters, you can quickly find, review, and assign jobs based on availability and job requirements.
- Access the job queue to view all unscheduled jobs.

- Use filters and the search bar to refine your job list.

- Hover over any job for a mini pop-up with key details.
- Drag jobs onto the daily job grid to assign to available technicians.Hold
CONTROLwhile dragging to temporarily toggle snap settings.
Job Grid Controls
The job grid controls in the Dispatcher View help you navigate and manage the daily schedule with ease. These tools allow you to zoom in and out, switch between dates, and adjust how jobs snap into place on the grid. With flexible viewing options and intuitive controls, you can quickly organize your technicians’ schedules and make real-time updates with minimal effort.
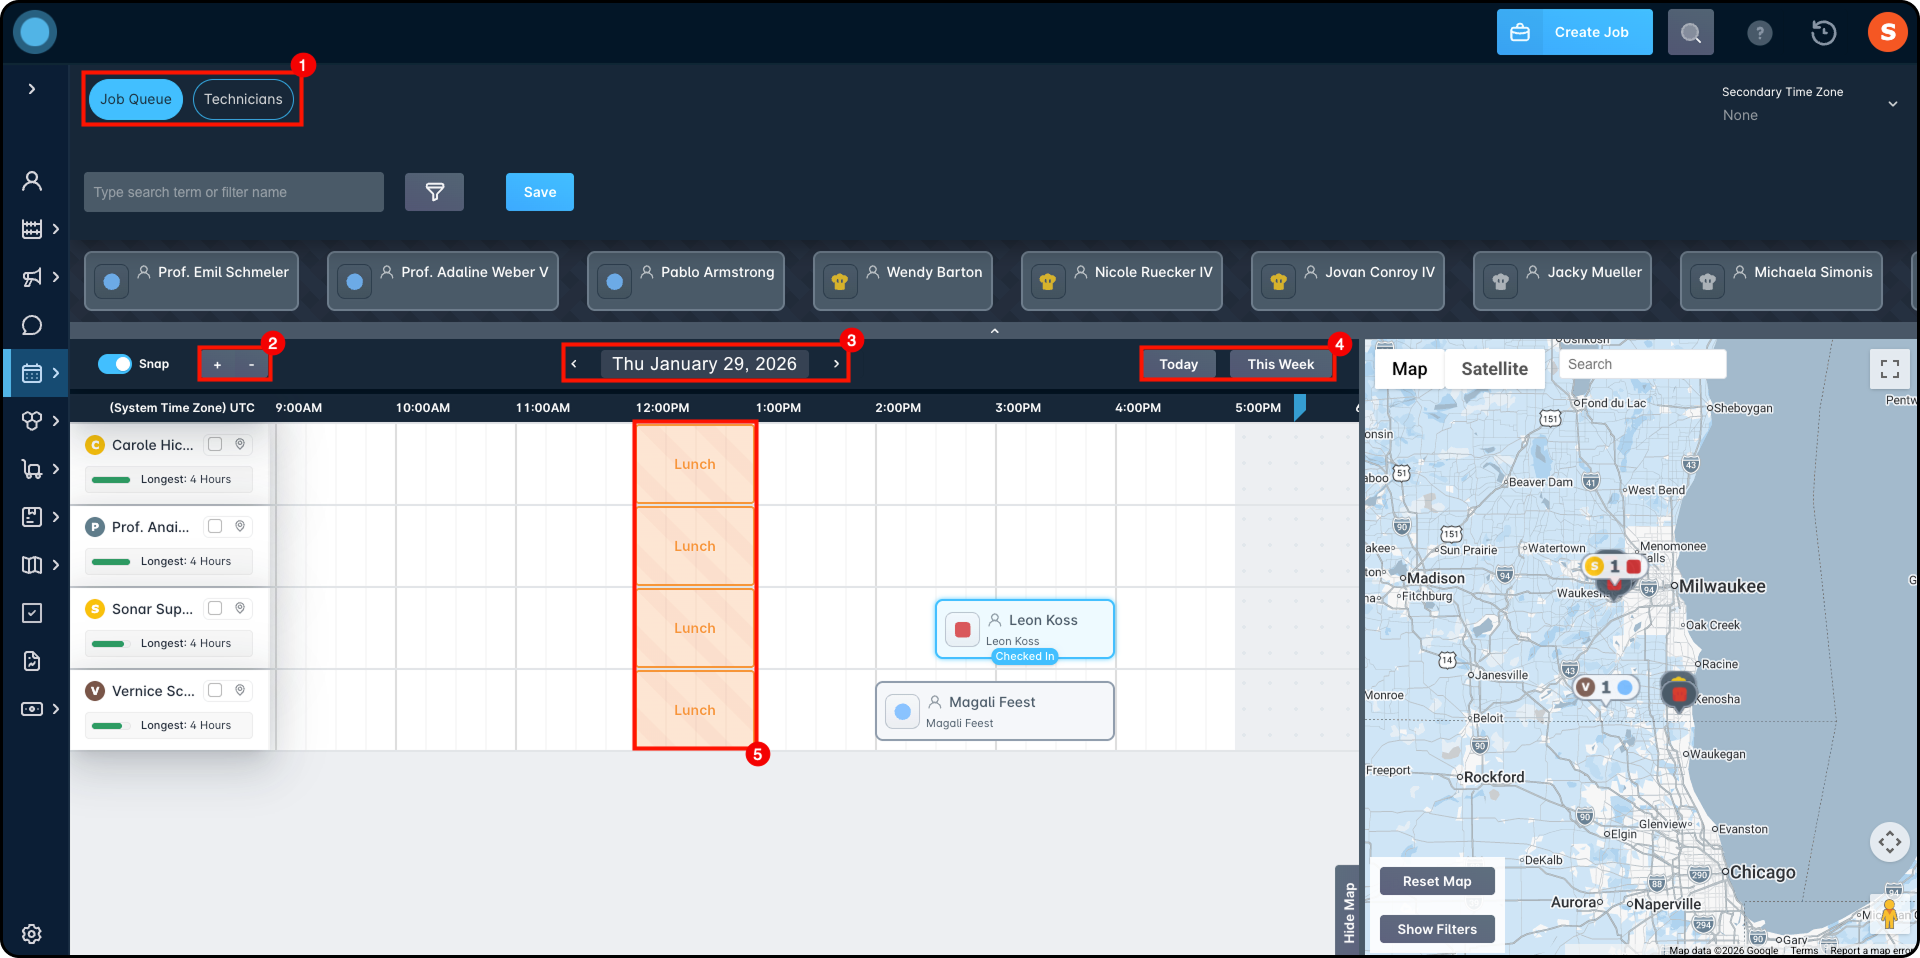
- Toggle between job and technician view.
- Adjust the grid zoom with “+” and “-”.
- Use the
<and>buttons to view other days. - Click “Today” to return to the current day, or “This Week” to see weekly availability.
- View schedule blockers (for example, breaks, lunch) directly in the grid.
Technician Panel
The technician panel gives you a quick overview of all available technicians and their schedules in one place. It highlights availability, longest open time slots, and routing details, making it easier to assign jobs efficiently. With quick access to technician details—and real-time location data when GPS is enabled—you can schedule with confidence while minimizing conflicts and travel time.
- Displays technicians, their availability, and route details.
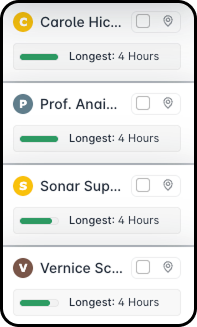
- Click on a technician for more info or hover to see their map location (if GPS is enabled).

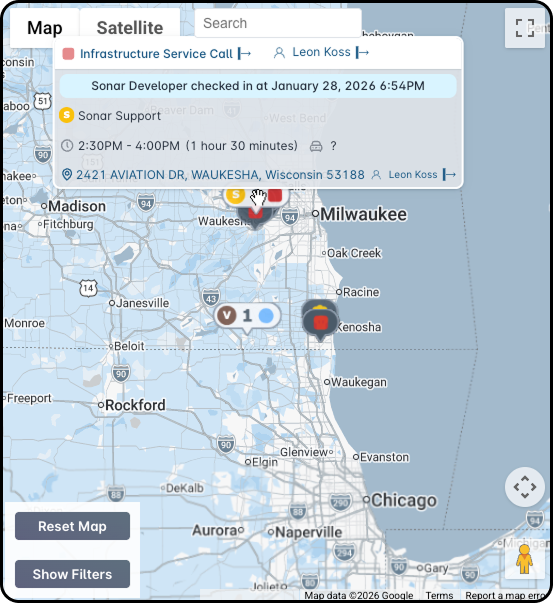
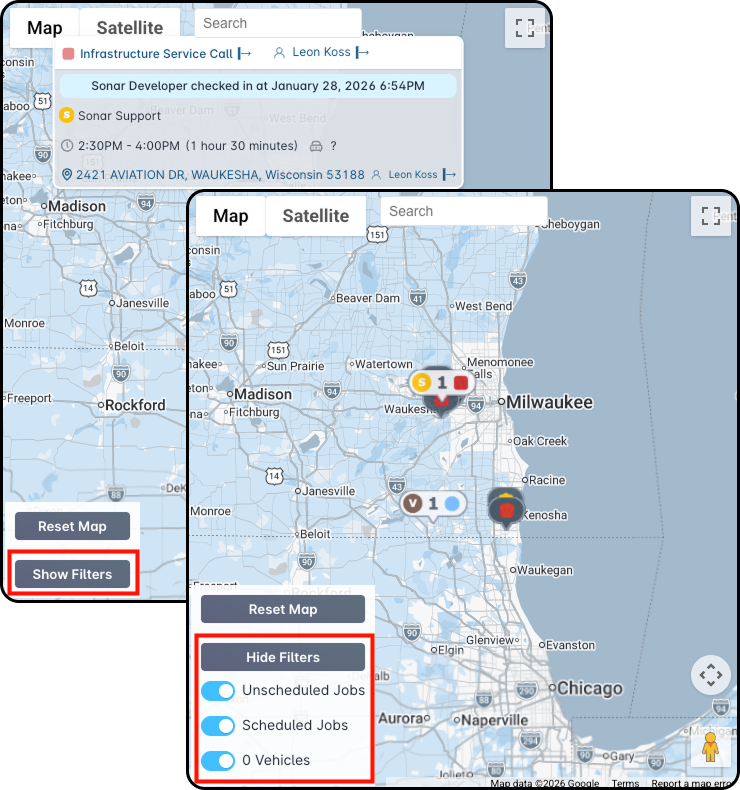
Map View
Using the map in the Dispatcher View provides a clear, visual way to understand where jobs and technicians are located in real time. It helps you plan routes more efficiently, reduce travel time, and make smarter scheduling decisions by seeing both scheduled and unscheduled jobs by address. The map also allows you to quickly assign jobs by dragging them directly into the schedule, making dispatching faster and more intuitive.
- See all jobs plotted on a map by address.
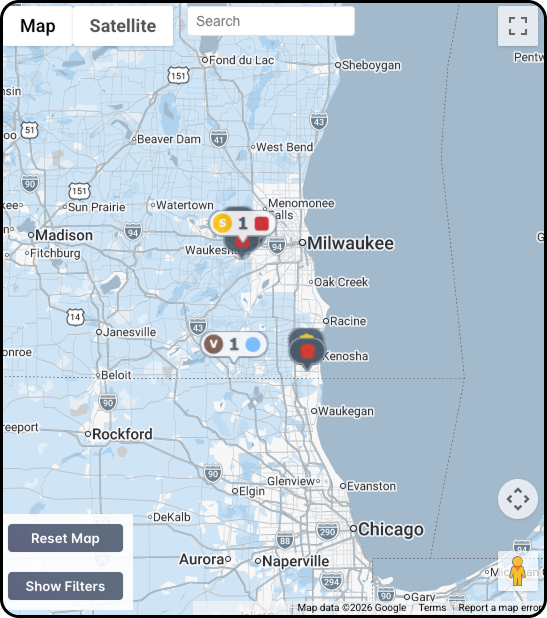
- Hover over map icons for job details.
- Drag unscheduled jobs from the map to the grid (hold
SHIFTwhile dragging to schedule). - Use “Show Filters” on the map to refine displayed jobs.
Drive Time Calculation
The Dispatcher view automatically estimates how long it will take a technician to drive between locations. These times come from Google Maps, so accurate addresses matter.
- Drive time on the left of the first job shows travel time from the technician’s Start Point (their Schedule Address) to that first job. More on Start Points and Schedule Addresses is in Setting Up Schedules: General Overview.

- Drive time on the right of a job shows travel time from that job to the next job on the schedule, based on each job’s service address/location.This is calculated by Google Maps using the Serviceable Address or Location that both jobs are assigned to.
- Even if there’s a gap in the schedule (like a blocker between jobs), Sonar still calculates the travel time between the job locations. It can also calculate travel time from the last job to the technician’s End Point address.

Technician Sorting & Filtering
Using filtering and sorting for technicians helps you quickly find the right person for the job and make better scheduling decisions. By narrowing the list based on qualifications, availability, location, or role, you reduce manual searching and avoid assigning work to unqualified or unavailable technicians. Sorting further improves visibility by highlighting technicians with the most availability or best fit, saving time and helping you build efficient schedules with less effort.
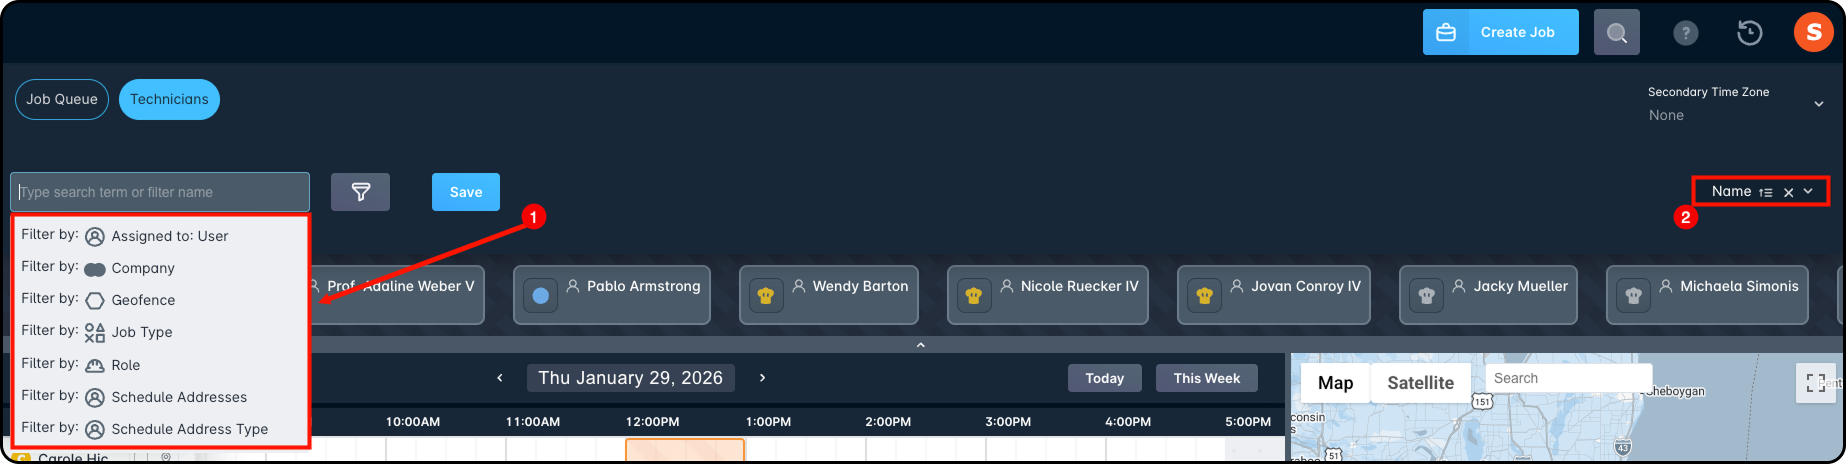
- In the Technician view, filter by:
- Name or ID
- Geofence eligibility
- Qualified job types
- Role, user, company, scheduled addresses, and schedule address types.
- Sort technicians by various criteria using the Sorter below the Secondary Time Zone dropdown.
Change Log
The changelog at the bottom of the screen keeps track of all schedule changes made during your current session. It shows the total number of changes and lets you easily review, undo, or save each change individually—or all at once.

Additional Functions
To add a new job directly from the Dispatcher View, simply click the “Create Job” button. This opens the job creation window, allowing you to enter all necessary details and quickly schedule it without leaving the page. It's a convenient way to keep your workflow moving without interruptions.

GPS Tracking (if integrated)
The GPS tracking feature adds real-time visibility into your technicians’ locations directly within the Dispatcher View. When integrated, it allows you to monitor vehicle positions, view route details, and make more informed scheduling decisions based on where your technicians are in the field.
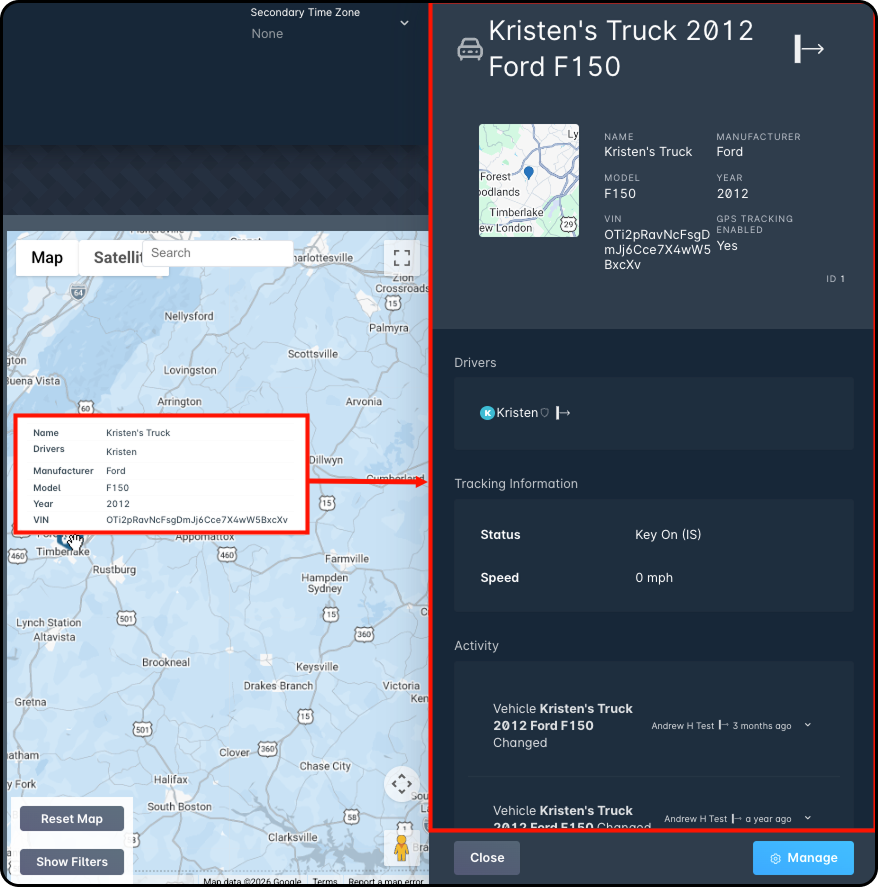
- Hover over technician names or vehicle icons to see real-time GPS data, such as:
- Location
- Vehicle info (VIN, make, speed)
- Click vehicle icons for a detailed sidebar with activity history and inventory links.