Table of Contents
How to: Managing Email Notifications in the sonarPay Portal
 Updated
by Mitchell Ivany
Updated
by Mitchell Ivany
Read Time: 8 mins
In the sonarPay portal, email notifications are sent whenever an event occurs on your merchant account, which covers everything from a failed transaction to an opened chargeback to a completed disbursement. You control who receives them, and this article covers how recipients are structured, how you'll add people to a notification, and which notifications can't be sent to anyone beyond your primary account holder.
These notifications are configured separately from the notification preferences inside your Sonar instance, which means changing one will have no effect on the other. If you're looking to configure ticket, task, or network notifications for your Sonar users, read Notification Preferences instead.
How notification recipients work
Every notification in the sonarPay portal is sent to the main login on your merchant account, and that recipient can't be removed from the distribution. When one person at your company receives every payment notification and nobody else receives any of them, this default is the reason. It's also the reason a single person often ends up forwarding alerts internally to the staff who actually action them.
Everyone else receives notifications through a Team. A Team is a group of portal users who share access and settings, and email alerts are configured against the Team rather than against a person. Enabling an alert from an individual user's profile under Admin will display a toggle that appears active, but the portal doesn't recognize that as a valid configuration, and no email will be sent.
Team membership on its own won't enable anything either. Alerts are enabled one at a time, and each person who needs to receive one has their email address added to that specific alert. This means adding someone to your Team and expecting them to inherit the notifications the rest of the Team receives will leave them with nothing.
Before you start
Teams and Team alerts are yours to manage, and any portal user with a full-access role can create a Team, add members to it, and configure notifications. If the Teams option isn't in your navigation, the user you're signed in as has a restricted role rather than a full-access one. Your Payments Portal administrator controls this through the user's role settings, so you'll either adjust that role or sign in as a user who already has full access.
Anyone you add as a recipient will need a sonarPay portal user account that's linked to your merchant. It's worth noting that a user can exist in the portal and belong to one of your Teams without that link being established, because the way the account was created determines whether the association is made. When the link is missing, Team alerts won't reach that user no matter how the alert is configured, and this is the one part of the process you can't see or correct yourself.
Adding a user to a Team
- Open the Teams page
- Navigate to Users under the Management category in the left navigation panel, click the plus icon next to Users, and then select Teams.
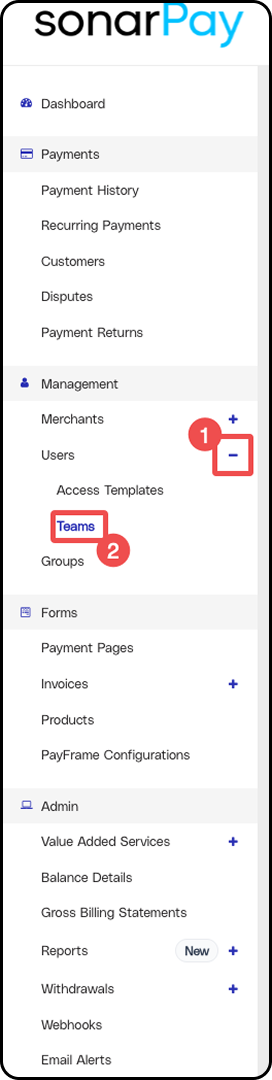
- Navigate to Users under the Management category in the left navigation panel, click the plus icon next to Users, and then select Teams.
- Open the Team profile
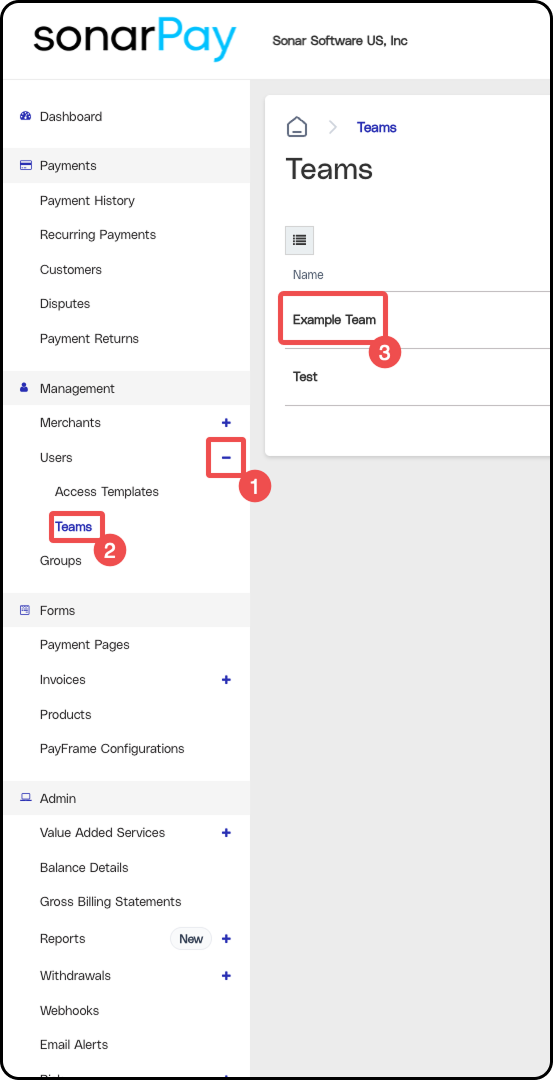
- Find your Team in the table and click any information in that row to open the Team Profile page, where you'll see tabs running down the left side for Profile, Work Flows, Alerts, Email Alerts, and Users.
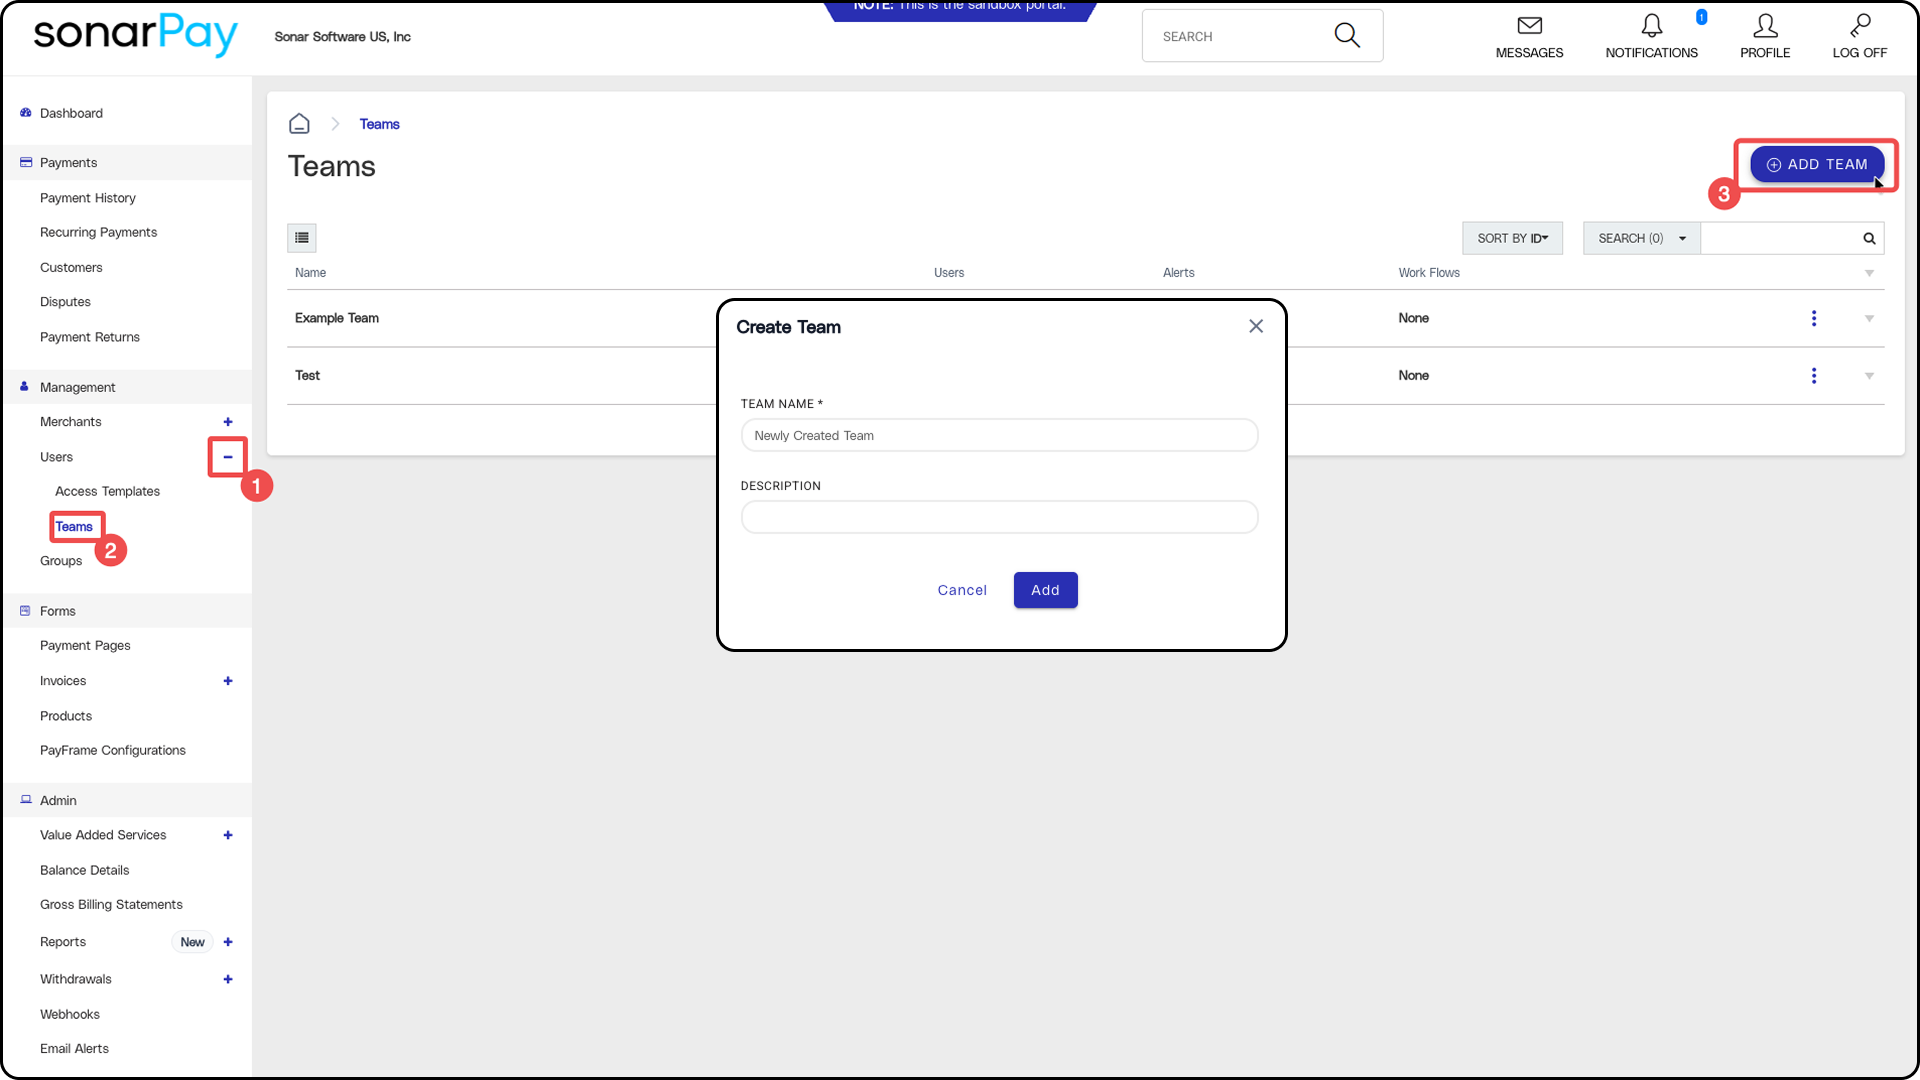
- If you don't have a Team yet, click ADD TEAM in the top right corner, enter a name and an optional description, then click SAVE. Most operators run a single Team covering their billing and finance staff because keeping every recipient in one place is far easier to maintain than splitting alerts across several Teams.
- Find your Team in the table and click any information in that row to open the Team Profile page, where you'll see tabs running down the left side for Profile, Work Flows, Alerts, Email Alerts, and Users.
- Add the user
- Open the Users tab and click ADD USER. Select the user or users you want from the list of available accounts, click the checkmark next to each one, then click ADD USERS to save.
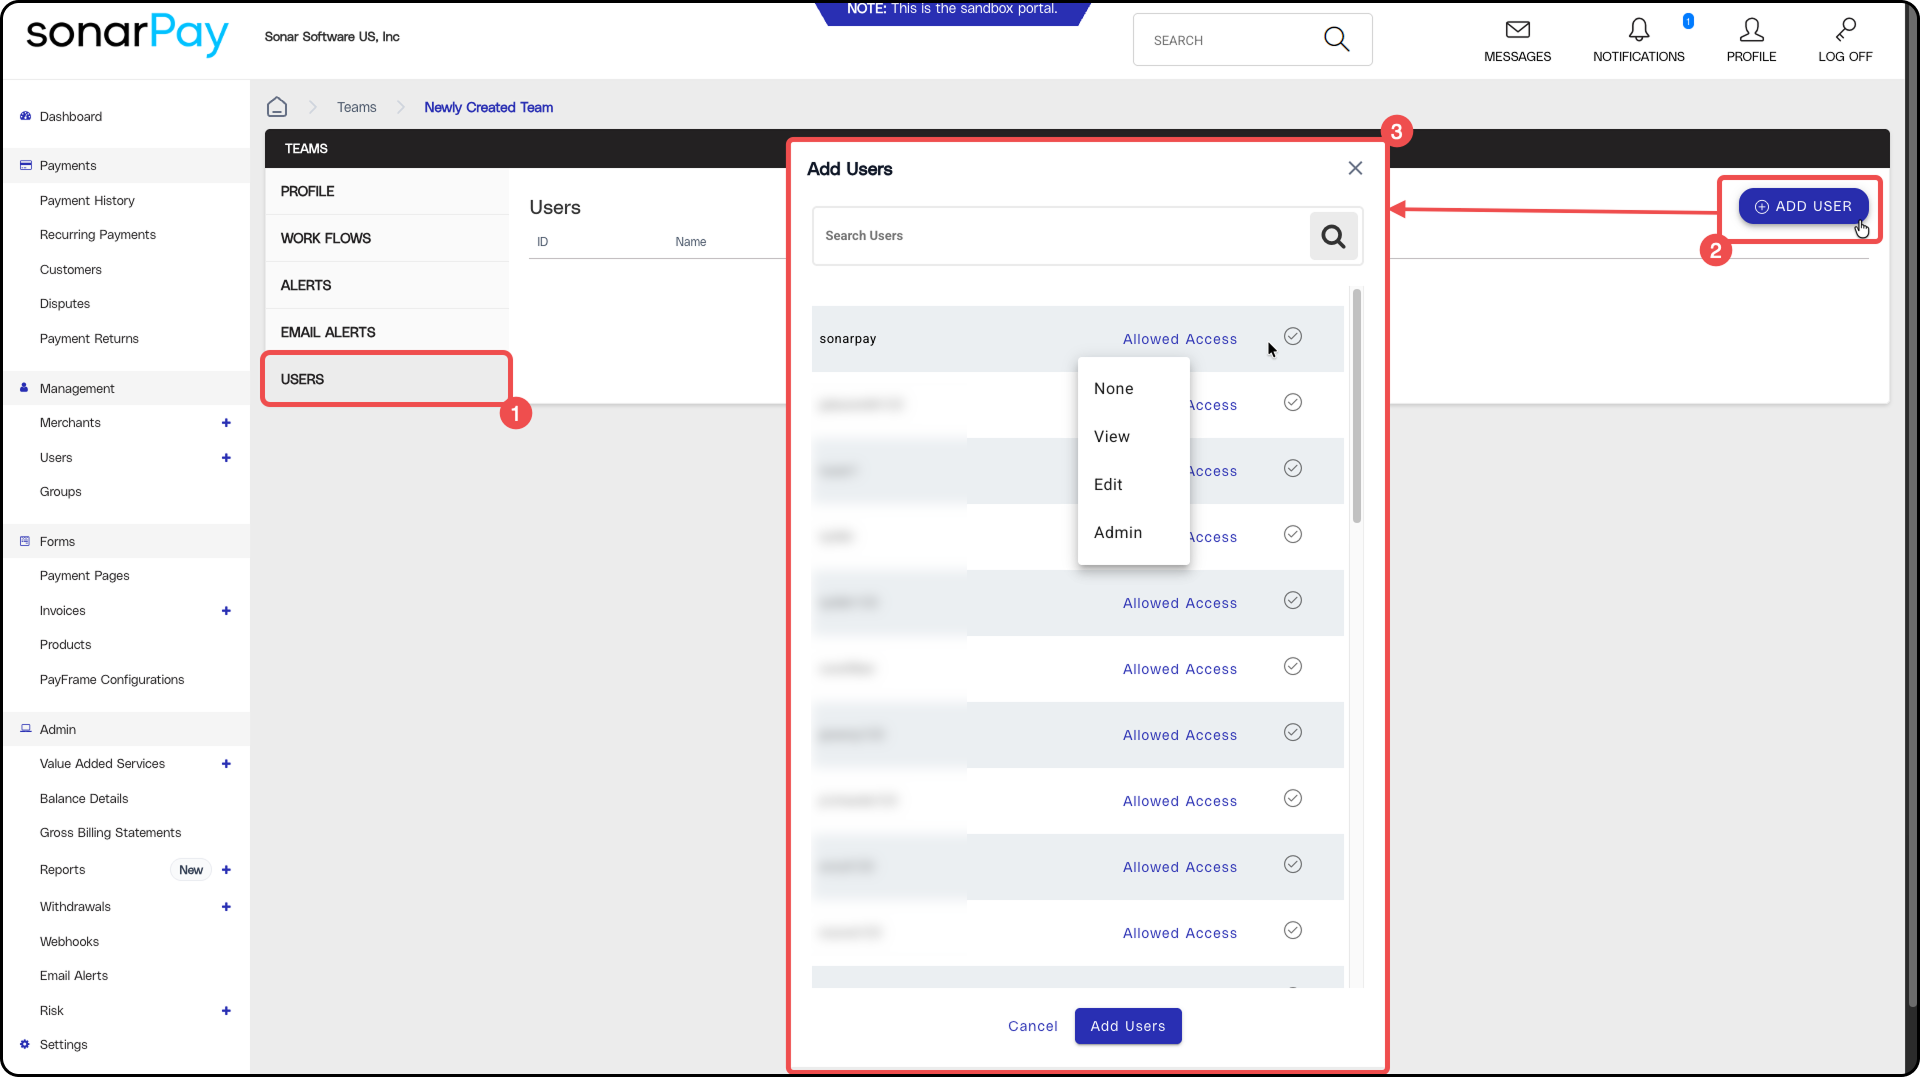 Once the user is a member of the Team, they still won't receive anything until you enable an alert for them, because membership and alert enrollment are separate configurations.
- Open the Users tab and click ADD USER. Select the user or users you want from the list of available accounts, click the checkmark next to each one, then click ADD USERS to save.
Enabling a notification for your Team
Open the Email Alerts tab
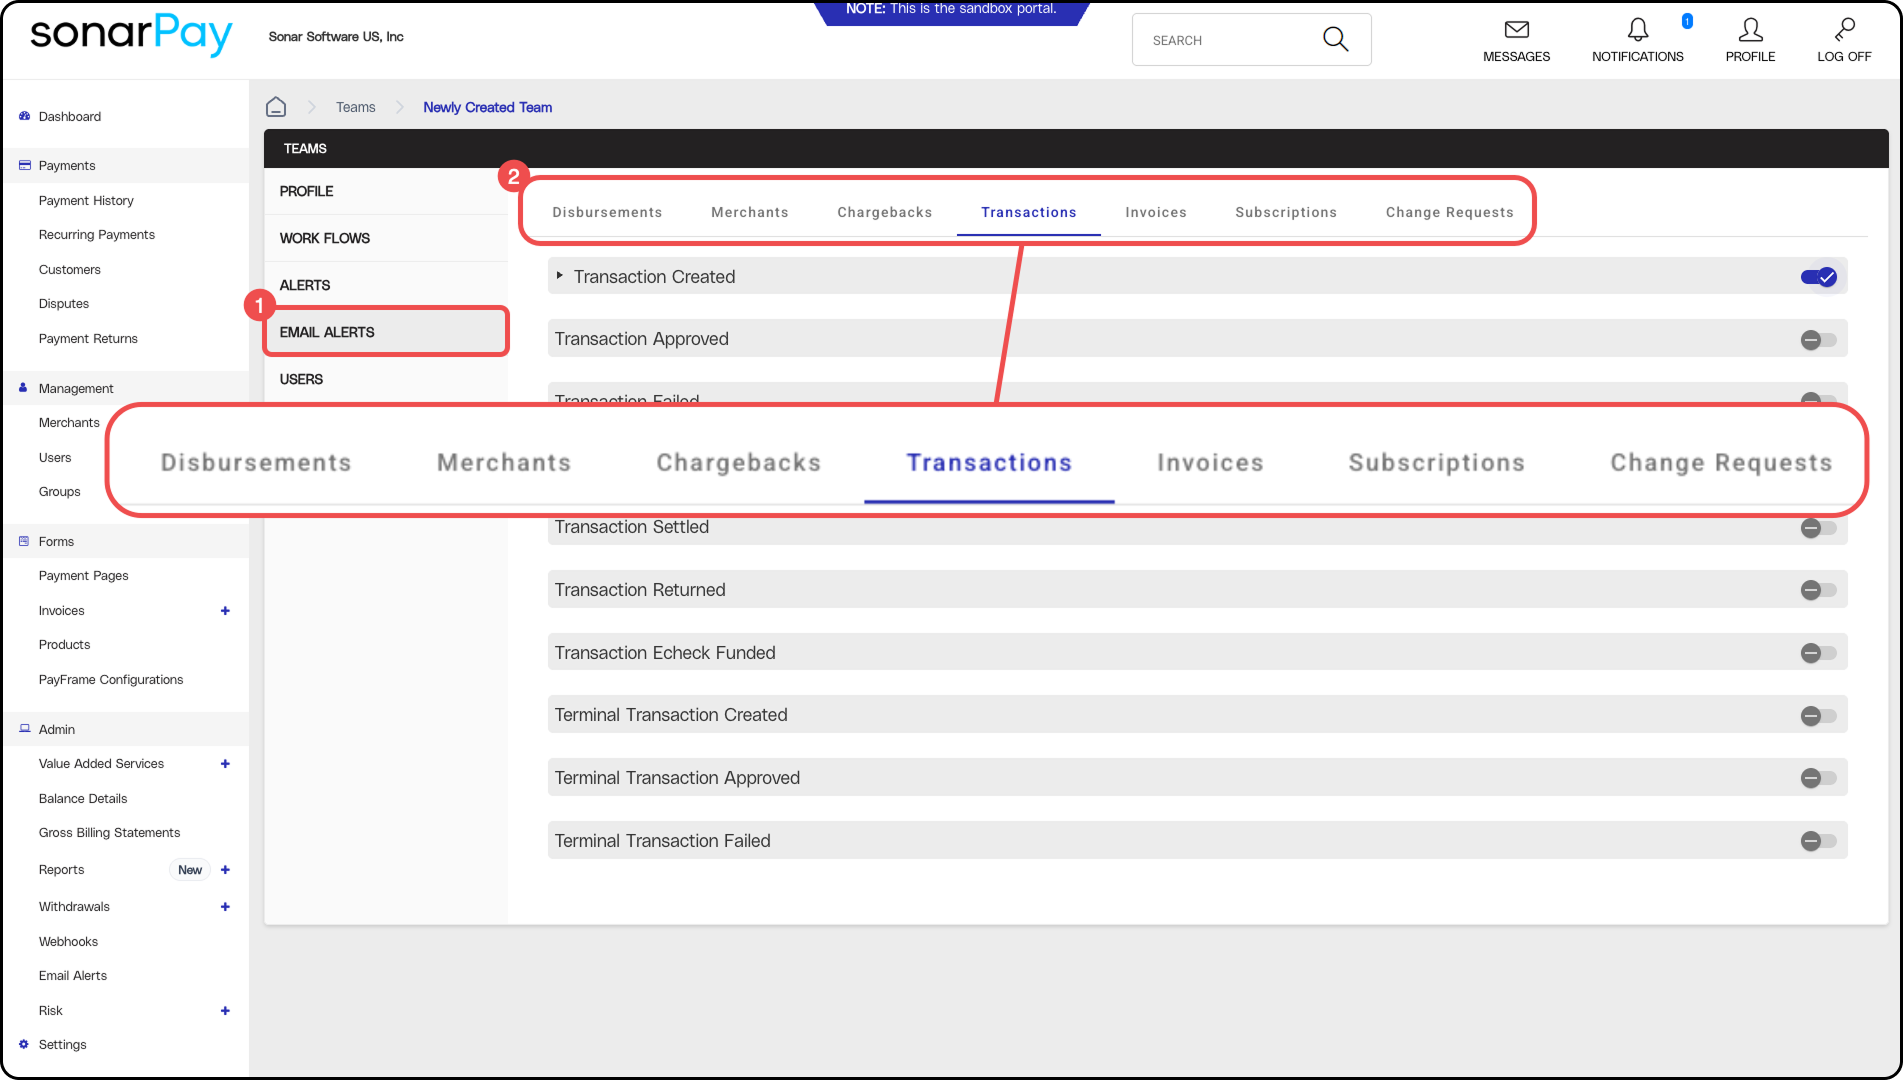
- From the Team Profile page, click EMAIL ALERTS in the tab list on the left. The alerts are grouped into categories across the top of the page, including Disbursements, Chargebacks, Transactions, Invoices, Subscriptions, and Change Requests.
- Find the alert and turn it on
- Select the category that contains the alert you're after, locate the specific alert in the list, then click the toggle switch on the right side of that row to enable it. When an alert is switched off, the toggle will display a minus symbol.
- The alerts most operators start with are Transaction Failed and Transaction Returned under Transactions, Chargeback Created and Chargeback Opened under Chargebacks, and the disbursement alerts confirming that funds have been sent to your bank account.
- Add recipients
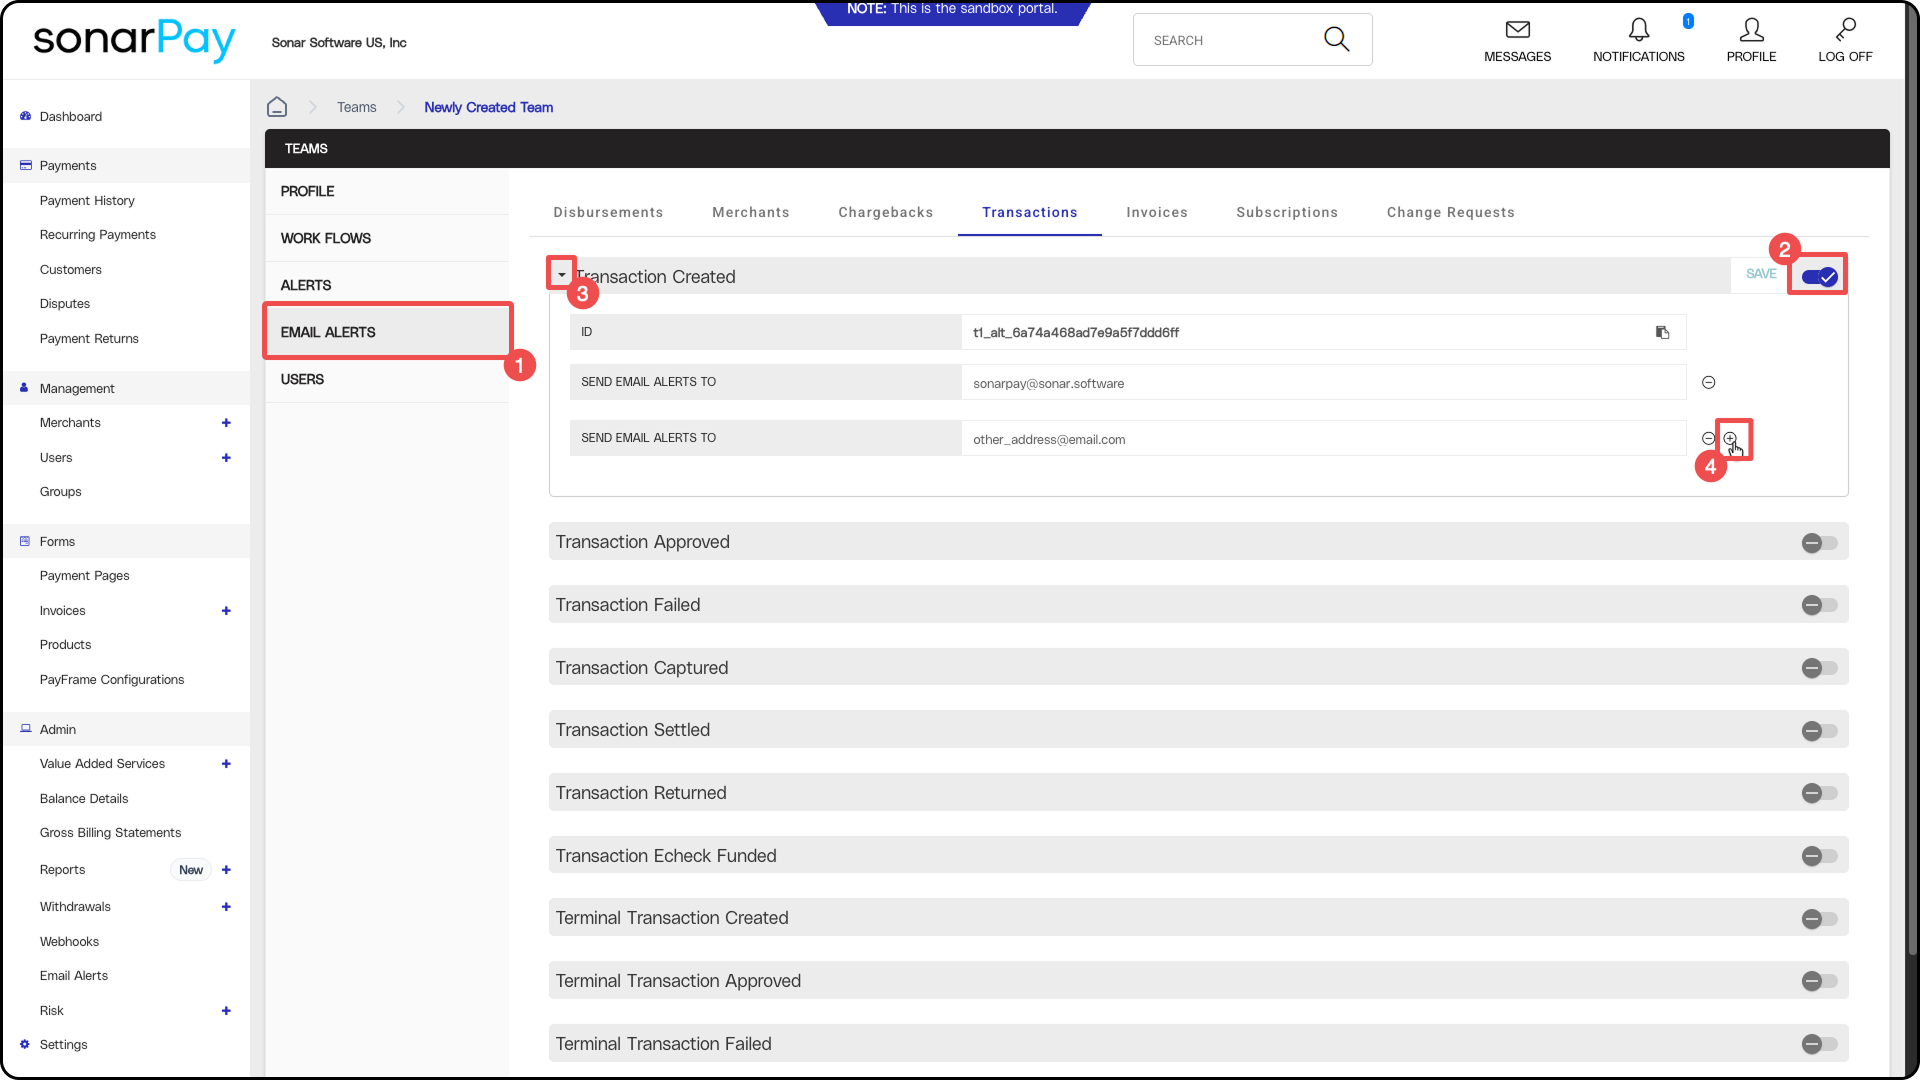
- Click the triangle to the left of the alert name to expand it, and the alert will display an ID field along with one or more SEND EMAIL ALERTS TO fields.
- Enter a recipient's email address into the field. When you need to add another recipient, click the plus icon at the end of the last row and enter the next address, and to remove someone, click the minus icon on their row.
- Repeat for each alert
- Enabling one alert has no effect on any of the others, so you'll work through each notification your team needs and add the relevant recipients to each one individually.
- Verify
- Alerts fire on real events, which means the next transaction, chargeback, or disbursement matching the alert criteria will confirm the configuration for you. If a recipient receives nothing after a matching event has occurred, the most likely cause is a missing link between their user account and your merchant, and Sonar Support can verify and correct that.
team: The referenced resource does not exist, clear your browser cache and sign out before signing back in and trying again, because this error is usually a stale session rather than a configuration problem. If it persists after a fresh sign-in, send Support the Team name and the alert you were configuring.Avoiding duplicate notifications
Your primary account holder already receives every alert through their main login, so adding their email address at the Team level will send them two copies of the same notification.
Leave the primary account holder out of your Team alert configuration entirely. Their coverage is automatic and permanent, and including them changes nothing except the volume arriving in their inbox.
Notifications that can't be shared
Two separate notifications cover failed ACH payments, and only one of them accepts additional recipients.
The “Your ACH Transaction Has Failed” notification is system-generated and is delivered only to the main login on your merchant account, which means it can't be enabled for an individual user or for a Team. This distinction matters because it's the notification that carries the specific bank return reason, so your accounting staff can receive the general returned transaction alert while still missing the reason a payment failed.
Working around it
Your primary account holder will need to route those emails to the people who need them, and a one-time setup will handle it without anyone forwarding messages by hand.
Start by creating a rule in the primary account holder's mailbox that matches the “Your ACH transaction has failed” subject line and forwards those messages to a shared mailbox or distribution list your billing team already monitors. Then add that same shared address as a recipient on the Team-level “Transaction Returned” alert so both notifications arrive in one place and your team gets the return reason alongside the returned transaction record.
Using a shared address rather than individual addresses will also save you from reconfiguring alerts every time someone changes roles or leaves.
When to contact Support
When a recipient is configured correctly but receives nothing, the cause is usually a missing link between their user account and your merchant, which isn't visible or editable from the portal. Contact Sonar Support at support@sonar.software with the user's full name and email address, the Team they belong to, and the alerts they should be receiving.